Zoom! Boom! Bully Cake

Those of you who don’t happen to be immersed in the magical world of three- to five-year-old children are probably not familiar with John Scieszka’s Trucktown. So I recommend that you follow the link so you know what the heck I’m talking about.
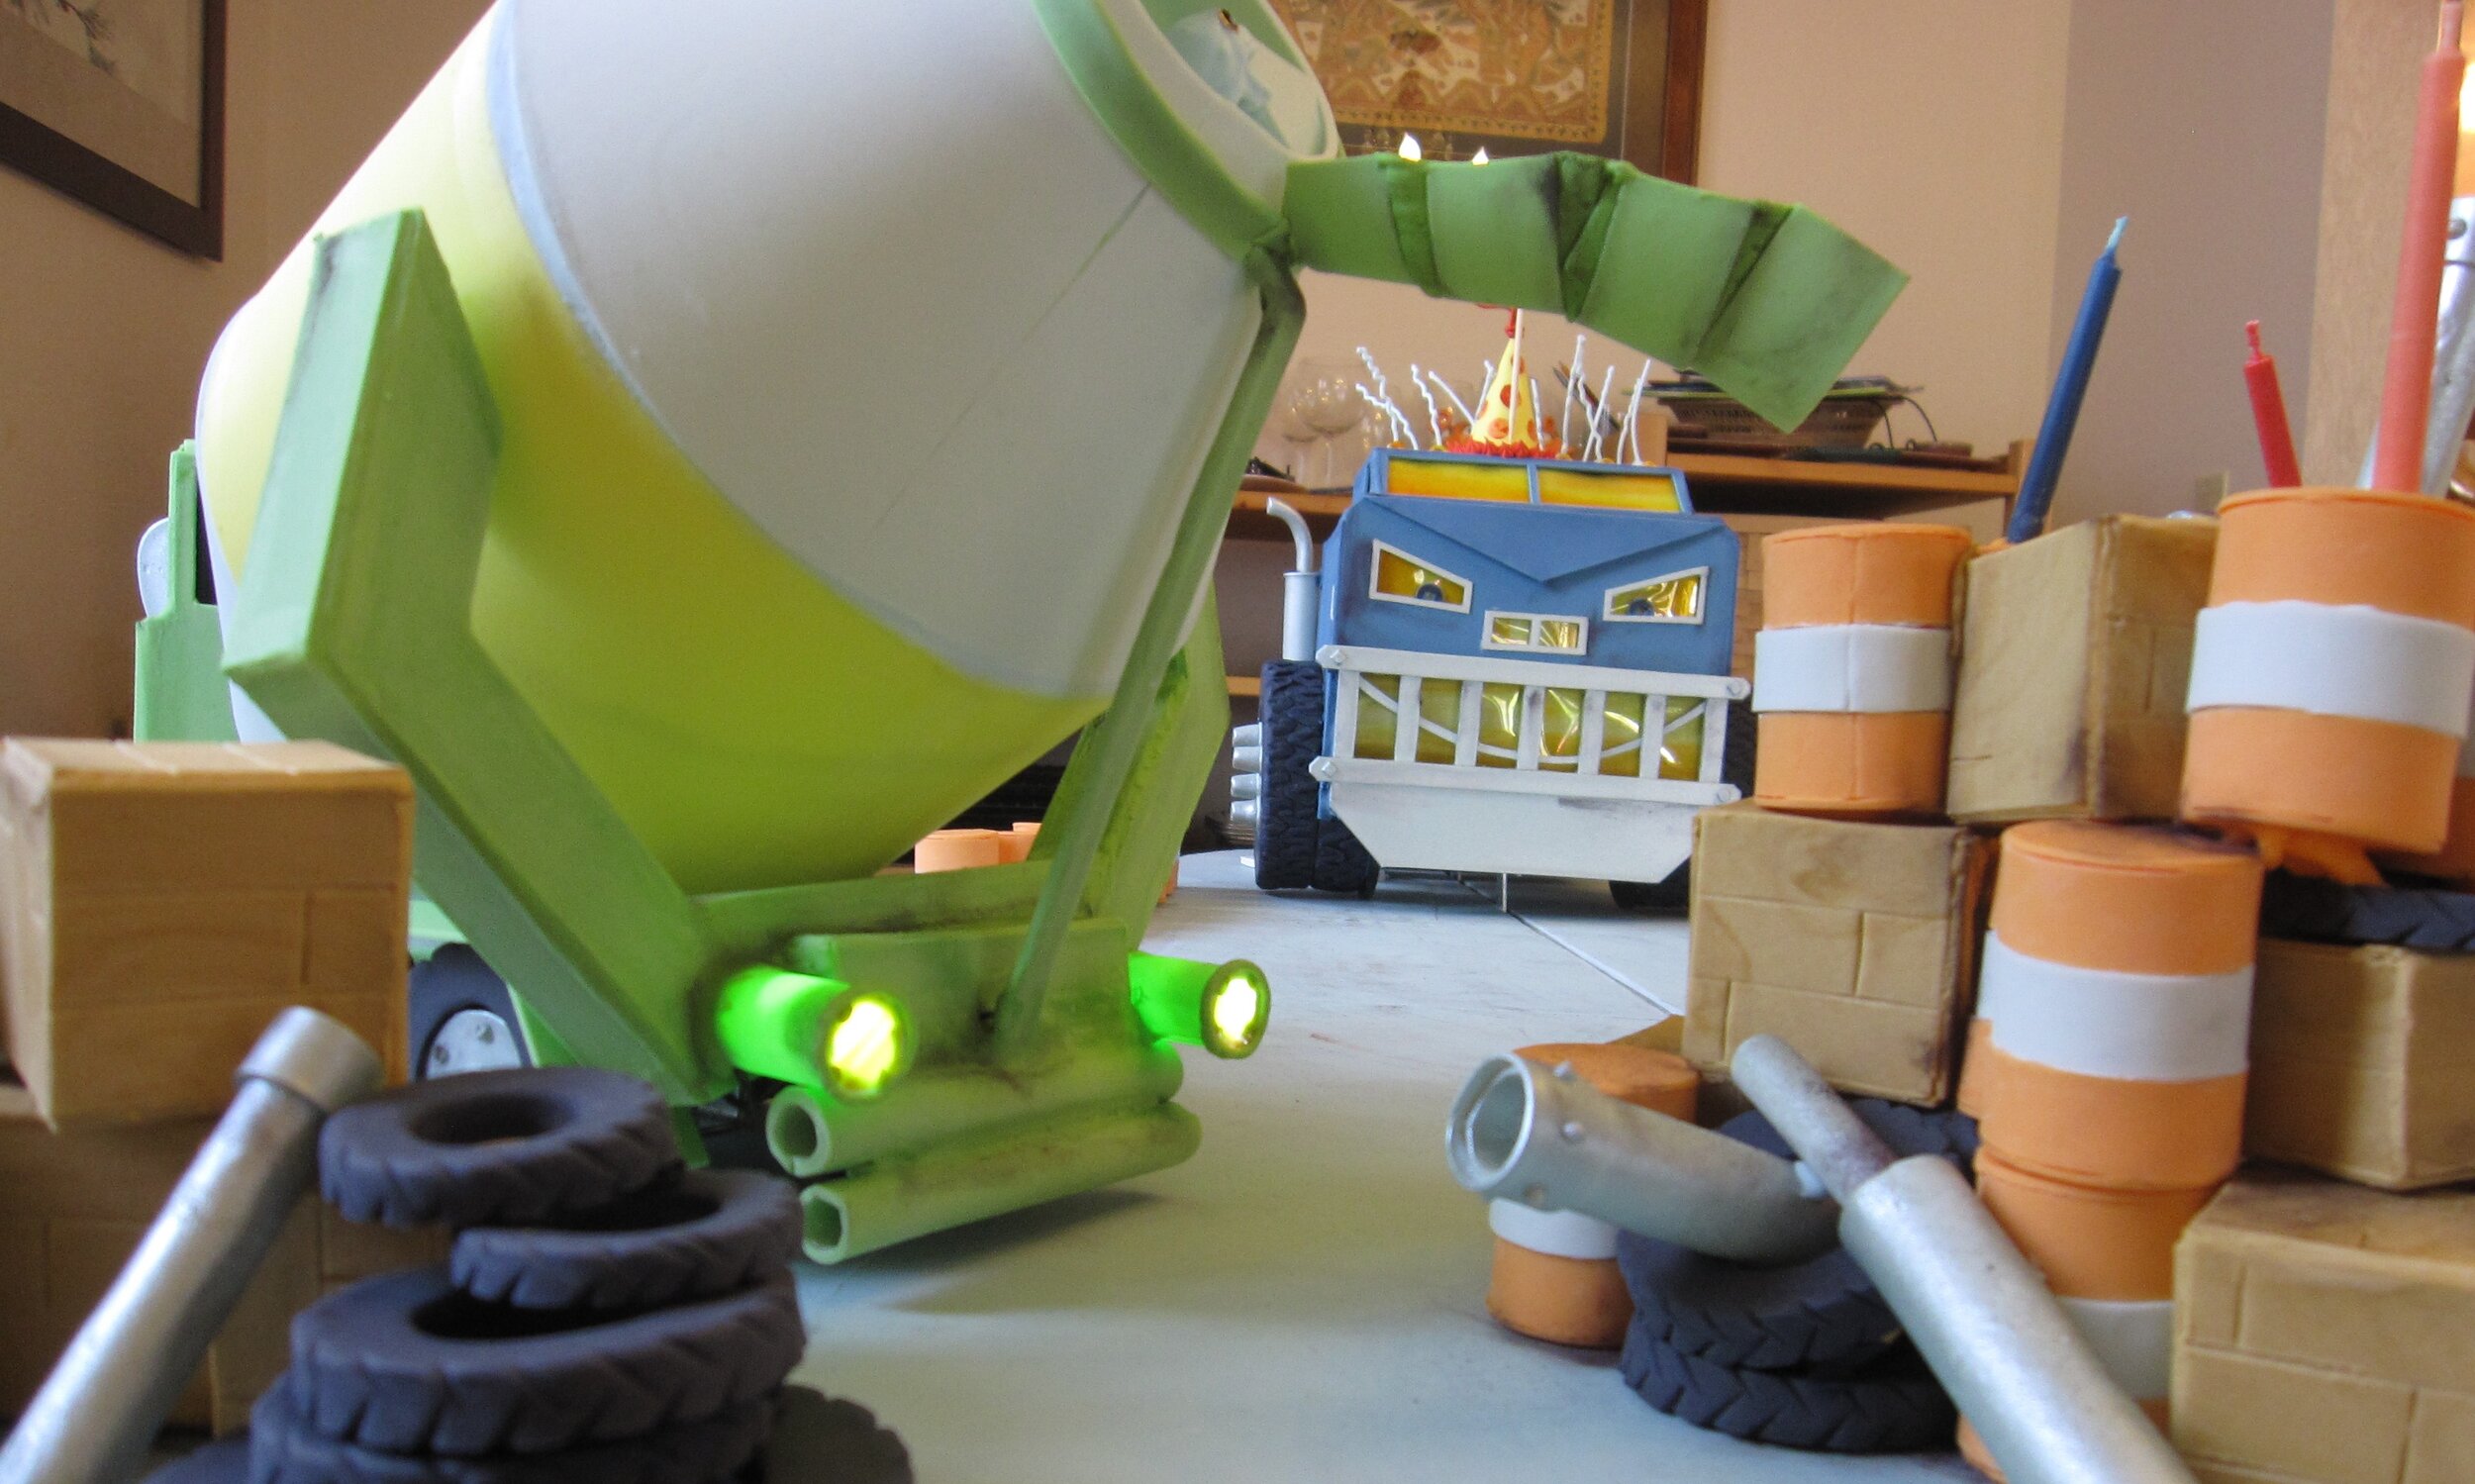
My personal favorite book in the Trucktown series is actually Smash! Crash!, but since the occasion for this cake was my niece Alex’s fourth birthday, Zoom! Boom! Bully was a more appropriate reference. The basic plot is that various denizens of Trucktown stack up crate, barrels, and tires in the middle of the street, but are periodically disrupted by the aptly named Big Rig smashing into them (Zoom! Boom!). The other trucks then exclaim about what a bully Big Rig is. The big surprise in the end is that it’s Big Rig’s birthday and the other trucks are making him a birthday cake out of the crates, barrels, and tires, which Melvin the cement mixer then pours cement “icing” on. Big Rig, very touched by the other trucks’ thoughtful gesture, picks up the “cake”, takes it back to his garage, and proceeds to gleefully smash it while wearing a festive yellow party hat.
I decided to recreate the penultimate moment of the book in cake form, consisting of three components:

1) The “cake” made of tires, crate, and barrels.

2) Melvin the cement mixer, with a rotating drum in the process of dumping cement onto the “cake”.

3) Big Rig, who would smash face first into the “cake”.
When I explained this concept to Alex she was very enthusiastic, if a bit disappointed that Jack Truck and Dump Truck Dan wouldn’t be on the cake.
The first thing I had to do was figure out how the heck I was going to make any of this happen. The easiest way to describe the process is probably to take each piece separately, though of course these projects were running concurrently.
Melvin the Cement Mixer
I learned a lot about cement mixer drums. The first thing I learned was that it’s very difficult to find detailed schematics of them on the internet. Eventually I resorted to studying Alex’s toy cement mixer. As far as I’ve been able to determine from these authoritative sources, cement mixer drum interiors consist of a series of semicircles, angled and staggered such that when the drum turns one way the cement is propelled towards the bottom of the drum and when it turns the other way the cement is pushed up and out the chute.
I made a whole series of Bristol board mockups with various sizes and densities of semicircles, trying them out using little pieces of paper as a cement substitute. None of them even came close to working. So I branched out and tried some other variations on the internal structure. Finally I settled on a helical arrangement of triangular wedges spiraling up towards the top of the drum. This seemed to at least sort of work.
With the basic structure settled, it was time to remake the drum in gum paste. The exterior of the drum was made in three pieces around Bristol board forms. Once these and the myriad little triangular wedges were dry, I assembled them with royal icing around a brass tube for the center support. Assembly was a lengthy process, as I had to wait for the icing on each wedge to dry before attaching the next one.

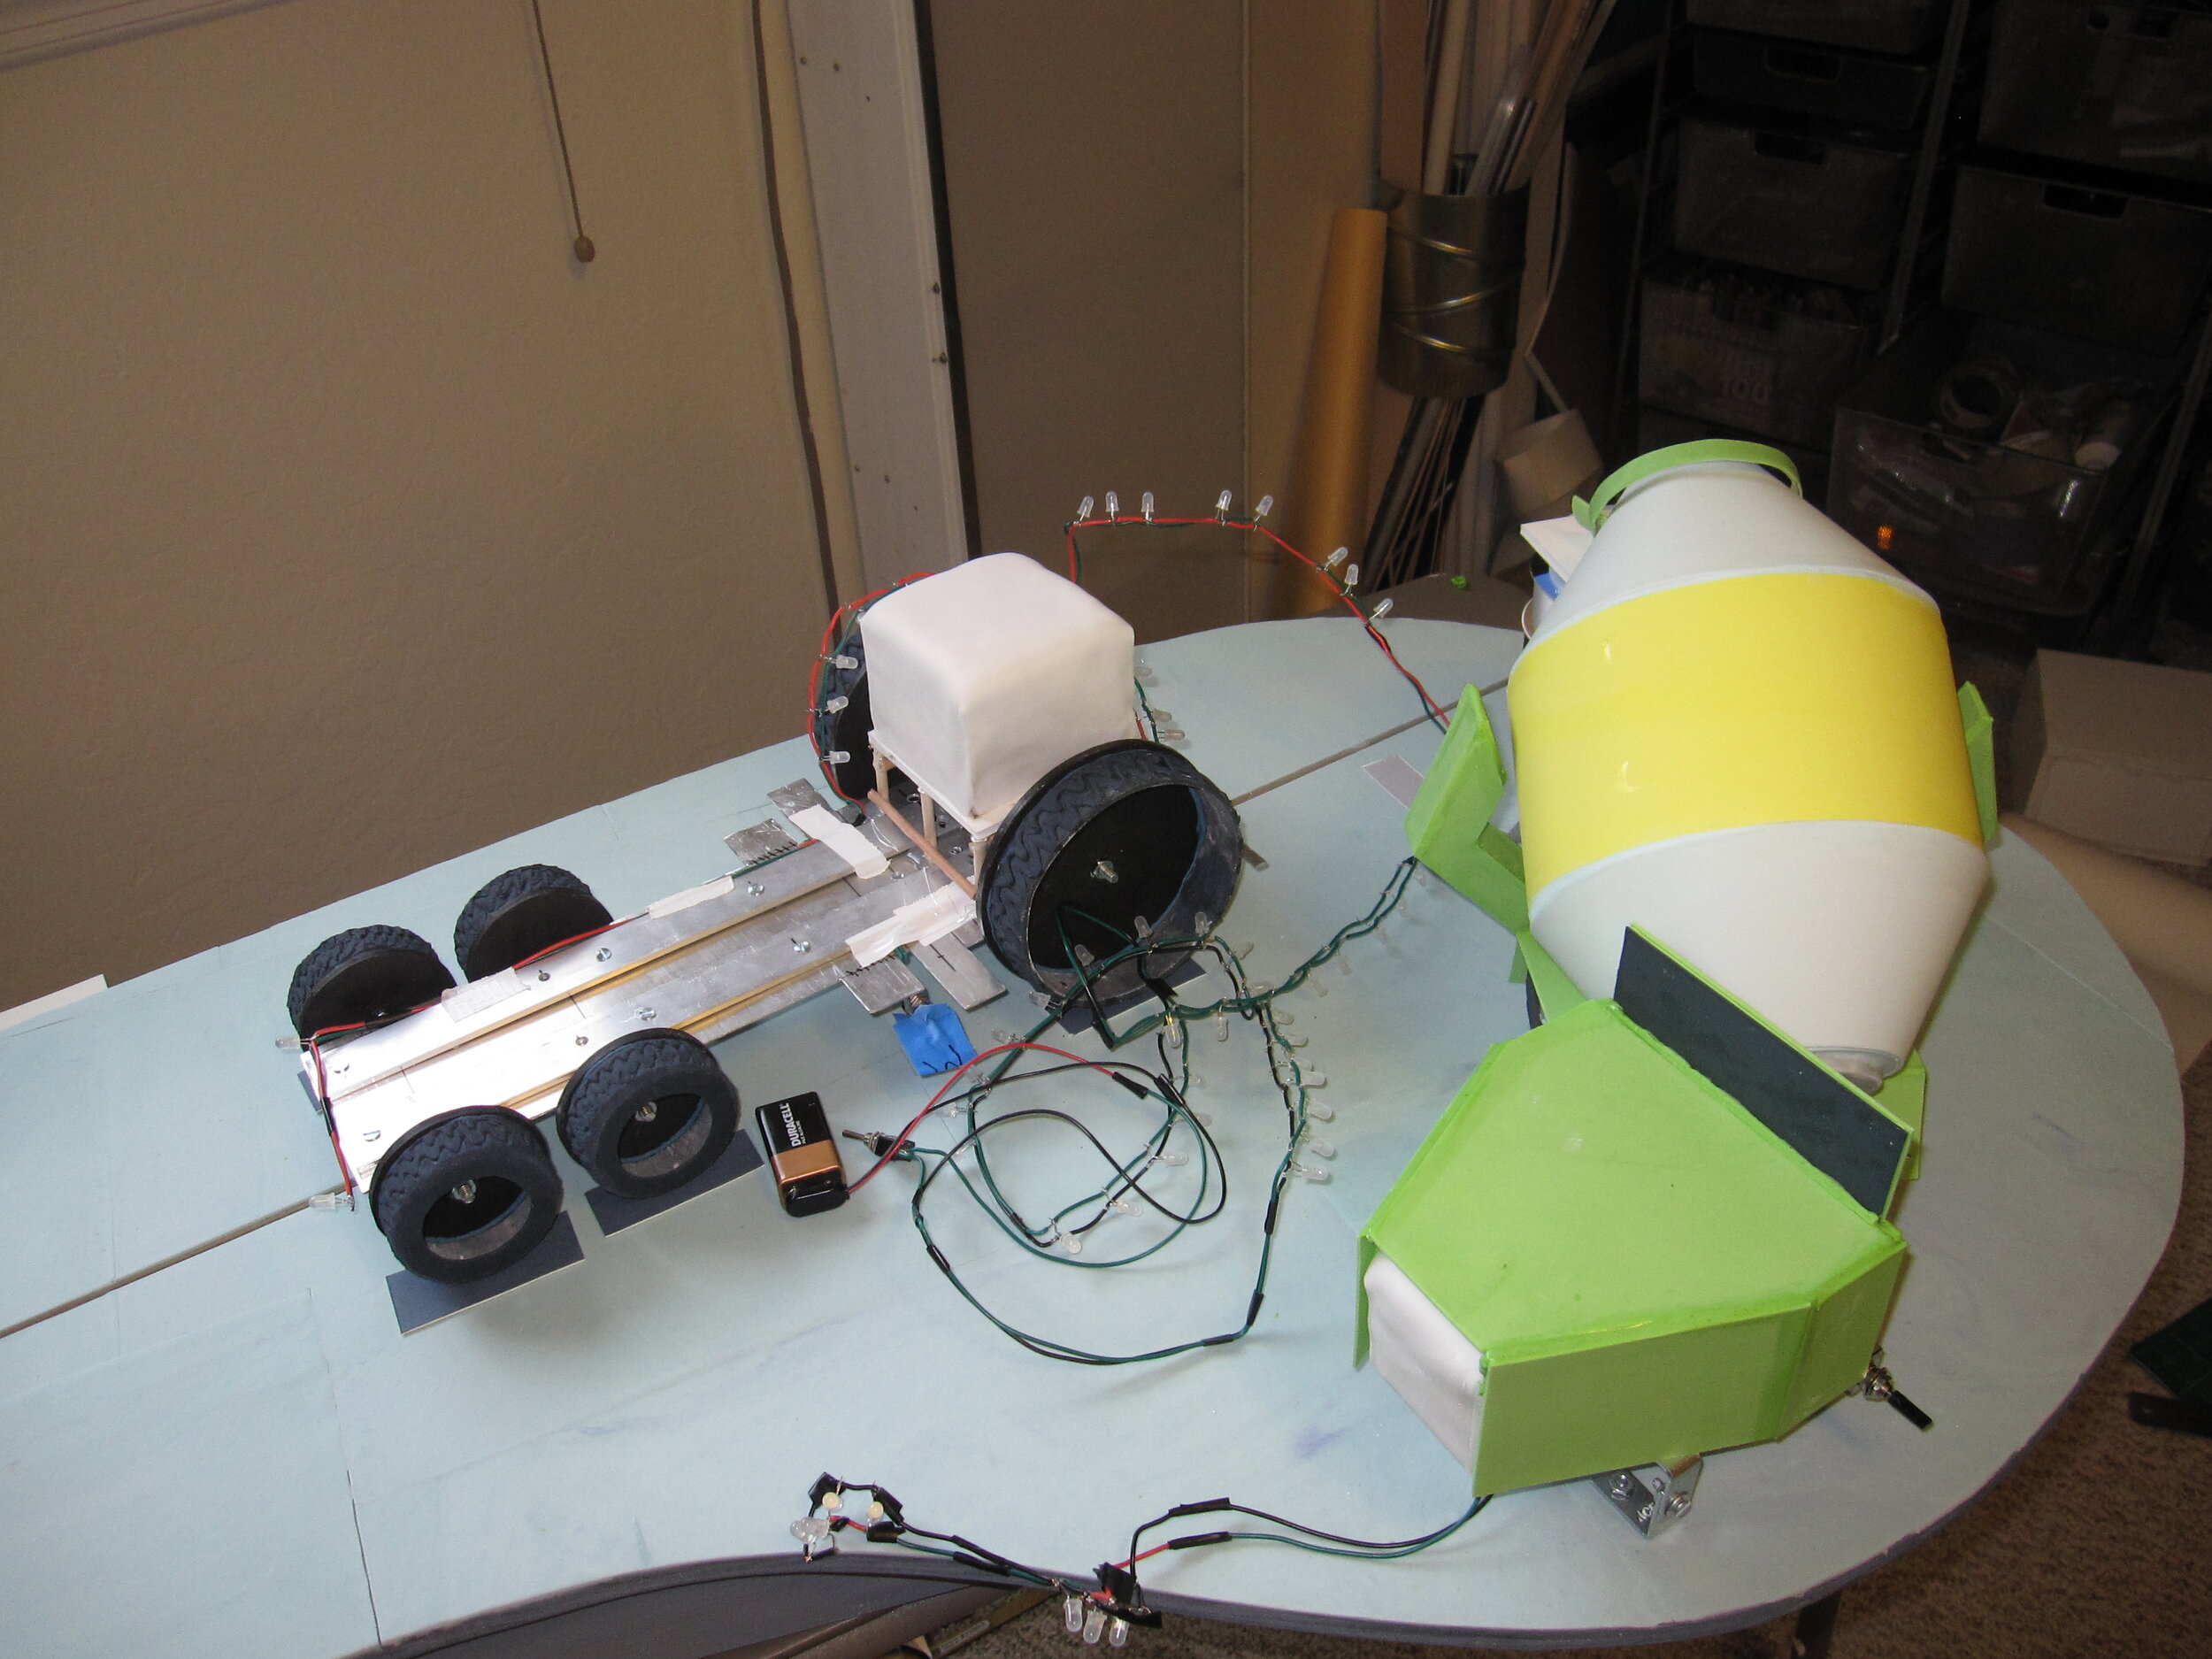
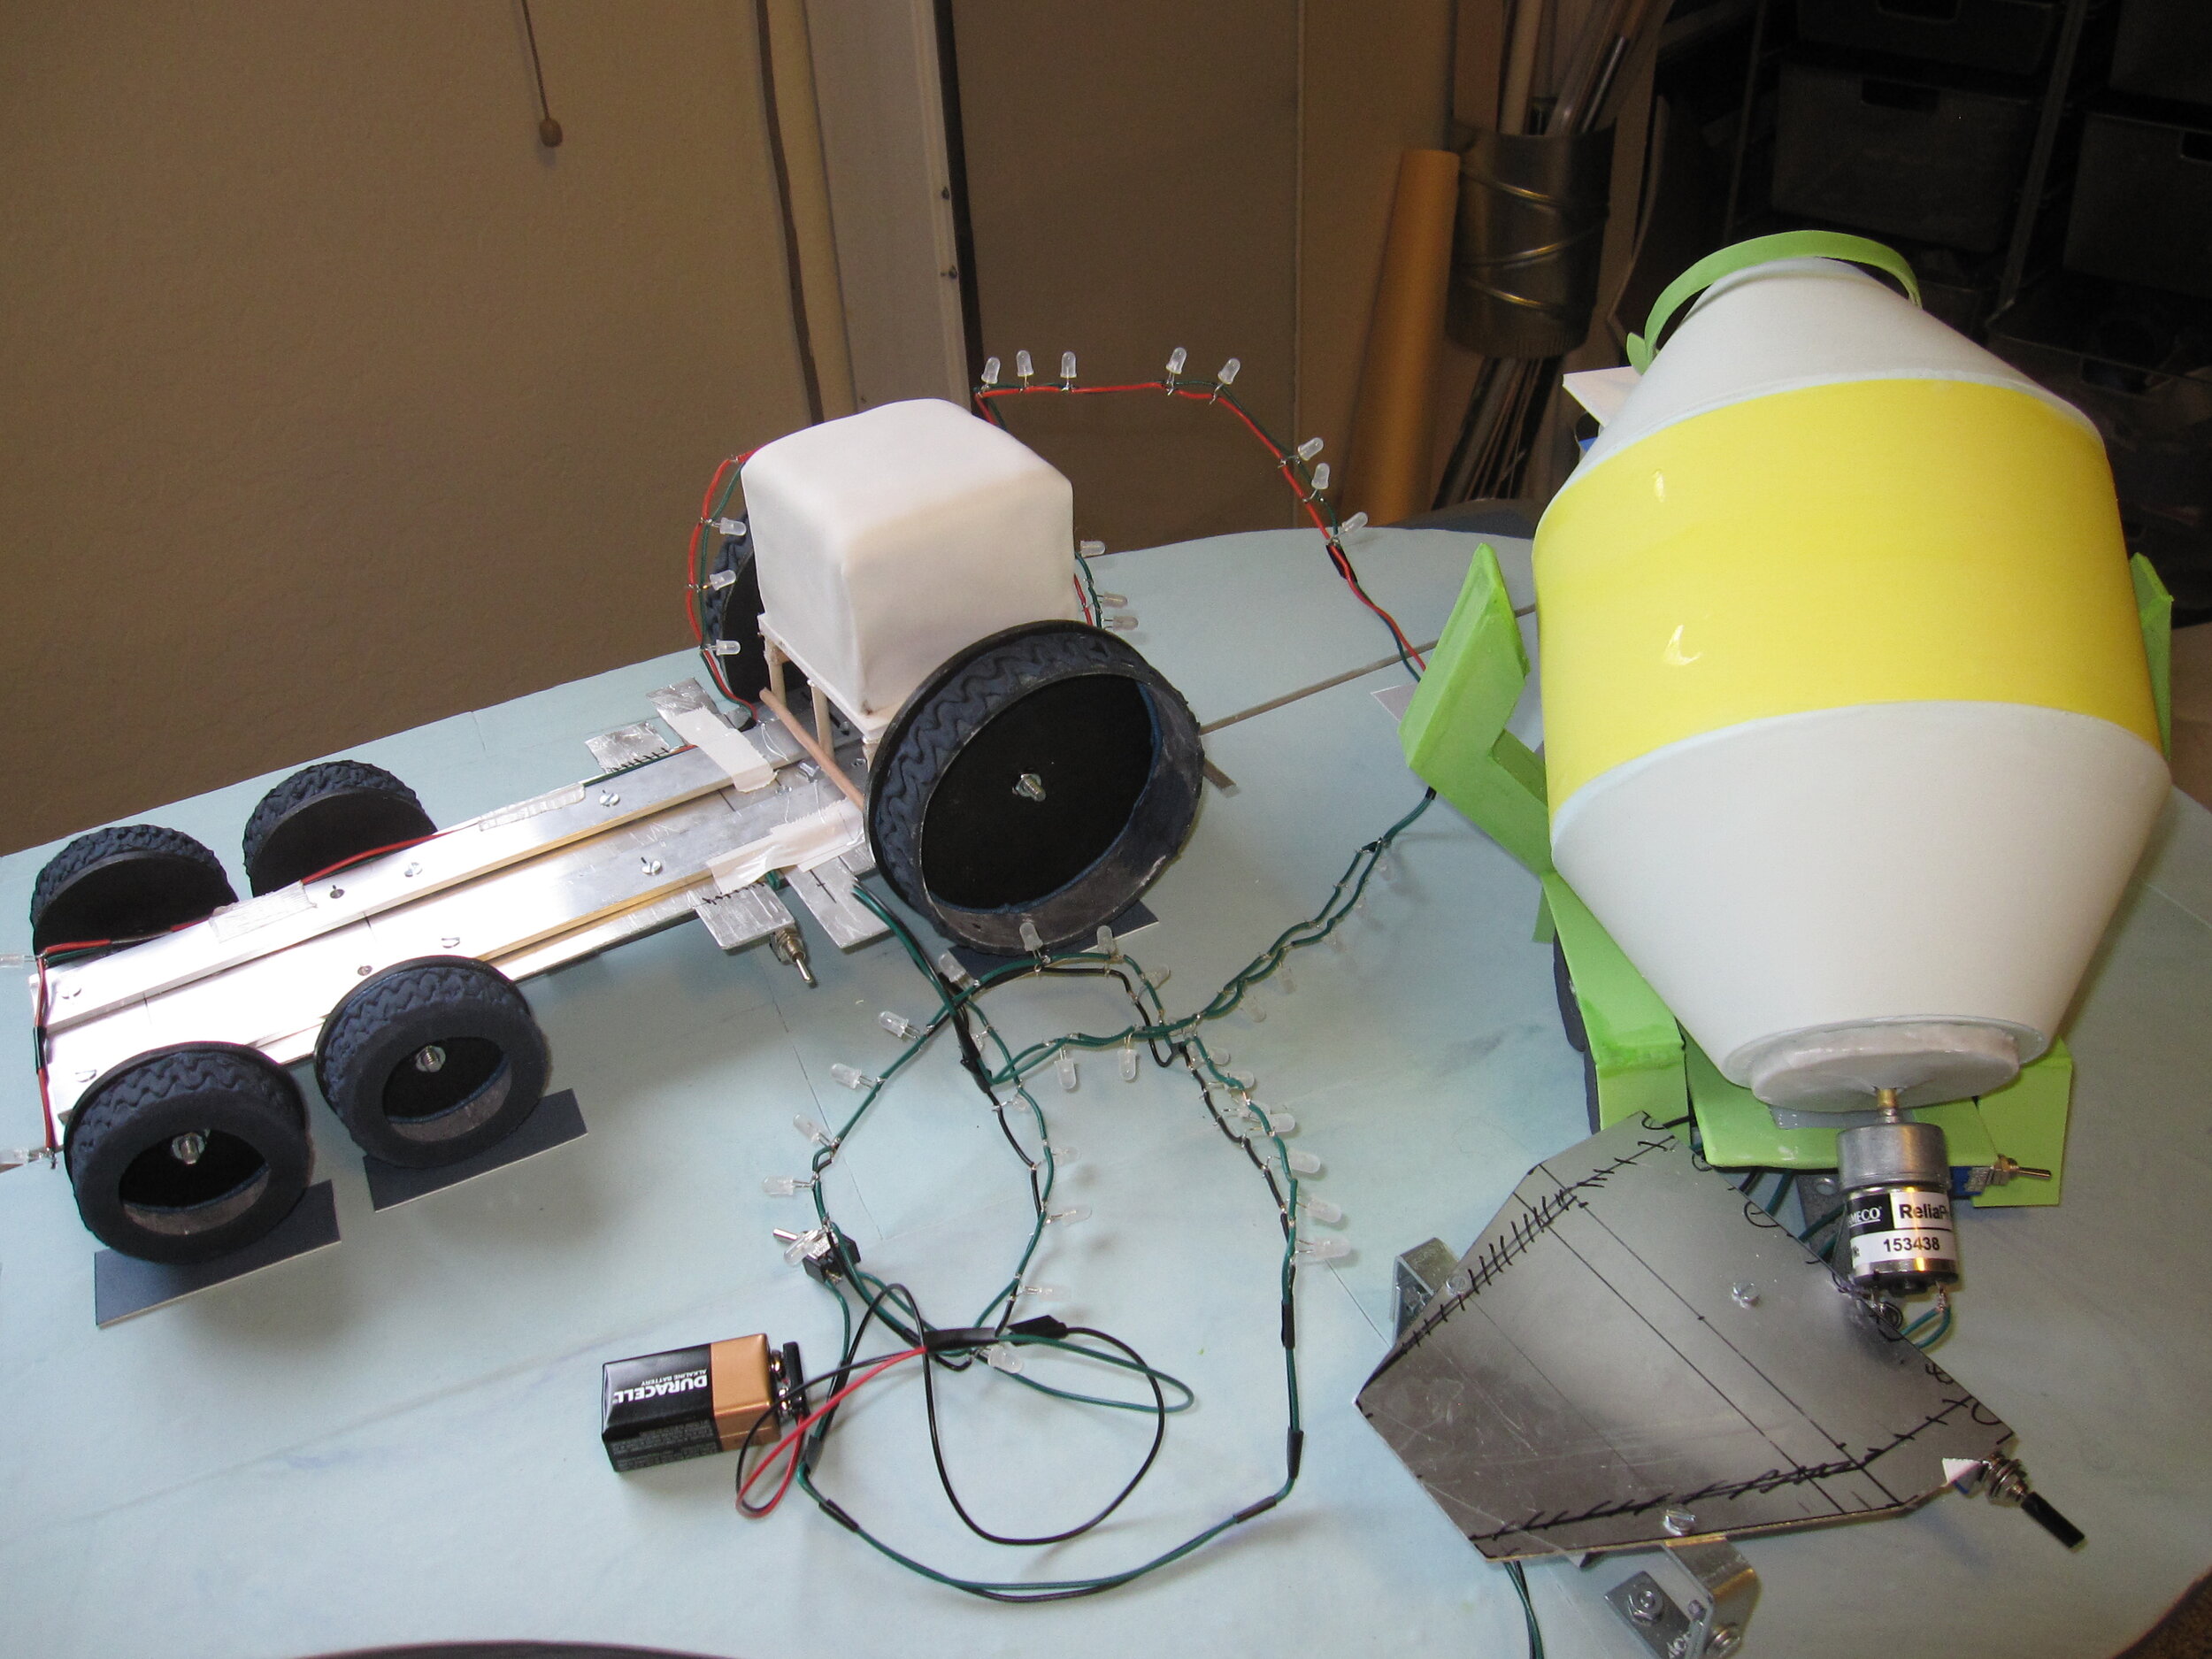
With the drum assembled around the central tube, I superglued the tube to the shaft of a reversible gear head motor (once I had figured out how to wire up the motor to make it reversible.) Mounting the drum and motor assembly to the base was a real challenge. I had made a pretty simple base for Melvin out of a cut-up aluminum baking sheet, covered with gum paste, and elevated off the wooden base for the entire cake with L-brackets, so the body of the truck would ultimately appear to be resting on its tires. In Zoom! Boom! Bully, Melvin’s drum appears to be supported from beneath in the middle by two angled beams, but there doesn’t seem to be a support for the back of the drum. This, of course, also raises the question of what Melvin’s rear chute is attached to.
My plan was to build the side support beams out of gum paste around pieces of brass, bolted to the aluminum base. Because, unlike the people illustrating the book, I physically needed something on the back to support both the drum and the chute, I decided on a brass ring mounted on a strip of brass and wrapped in gum paste, also bolted to the aluminum base.

The first time that I put this all together with the motor and the gum paste drum, I set it up so that the lowest point on the drum was resting on the aluminum base, on which I had put some UHMW tape to keep friction to a minimum. I thought that this would help to support the weight of the drum and keep stress off the motor. This turned out to be a very bad plan, as I had failed to account for the fact that, in spite of my best efforts, I had failed to center the drum perfectly on the central brass tube. This meant that when I turned the motor on, as soon as the part of the drum that was slightly further from the axis of rotation got around to the bottom, it jammed against the base. I turned the motor off as soon as I realized what has happened, but not soon enough. As the central brass tube was still trying to rotate while the drum itself was jammed against the base, the royal icing connected the gum paste drum pieces to the brass tube cracked. D’oh!
A few tense hours and one major royal icing repair later, the drum was reattached to the tube. In order to prevent this from happening again, I made a new, slightly higher brass ring to support the back of the drum and raised the motor, and therefore the front of the drum, about a half an inch as well. That way, the drum never touched the actual aluminum base and was supported only by the motor on one end and the brass ring on the other end. It worked!
Once the drum turning mechanism was in place, finishing the back of the truck was relatively simple. I covered the motor in green gum paste and assembled the gum paste pieces of the side support beams. Having previously made tires out of black fondant and hubcaps out of gum paste, sprayed silver, it was easy to attach these, as well as the gum paste wheel wells.
I had also wired up some white LEDs to use for Melvin’s taillights and headlights, so I put the LEDs for the taillights in place and then ran the wires underneath the aluminum base so they’d be in place for the headlights once I got his head assembled. The taillights themselves I made out of gum paste cylinders, capped with rice paper (to diffuse the light) and yellow gelatin (to give the light the correct hue.) In the past, when I’ve needed sheet gelatin (see the Tardis Cake and the Flying Saucer Cake) I’ve used the pre-made kind, but since that has a strange diamond pattern on it, this time I tried making my own flat sheet gelatin, using these instructions that I found on the internet. After a few abortive efforts, it worked pretty well.
Assembling the chute took a little time, because it was made of six separate pieces, which had to be attached one at a time, with sufficient time for the connective royal icing to dry before attaching the next one.

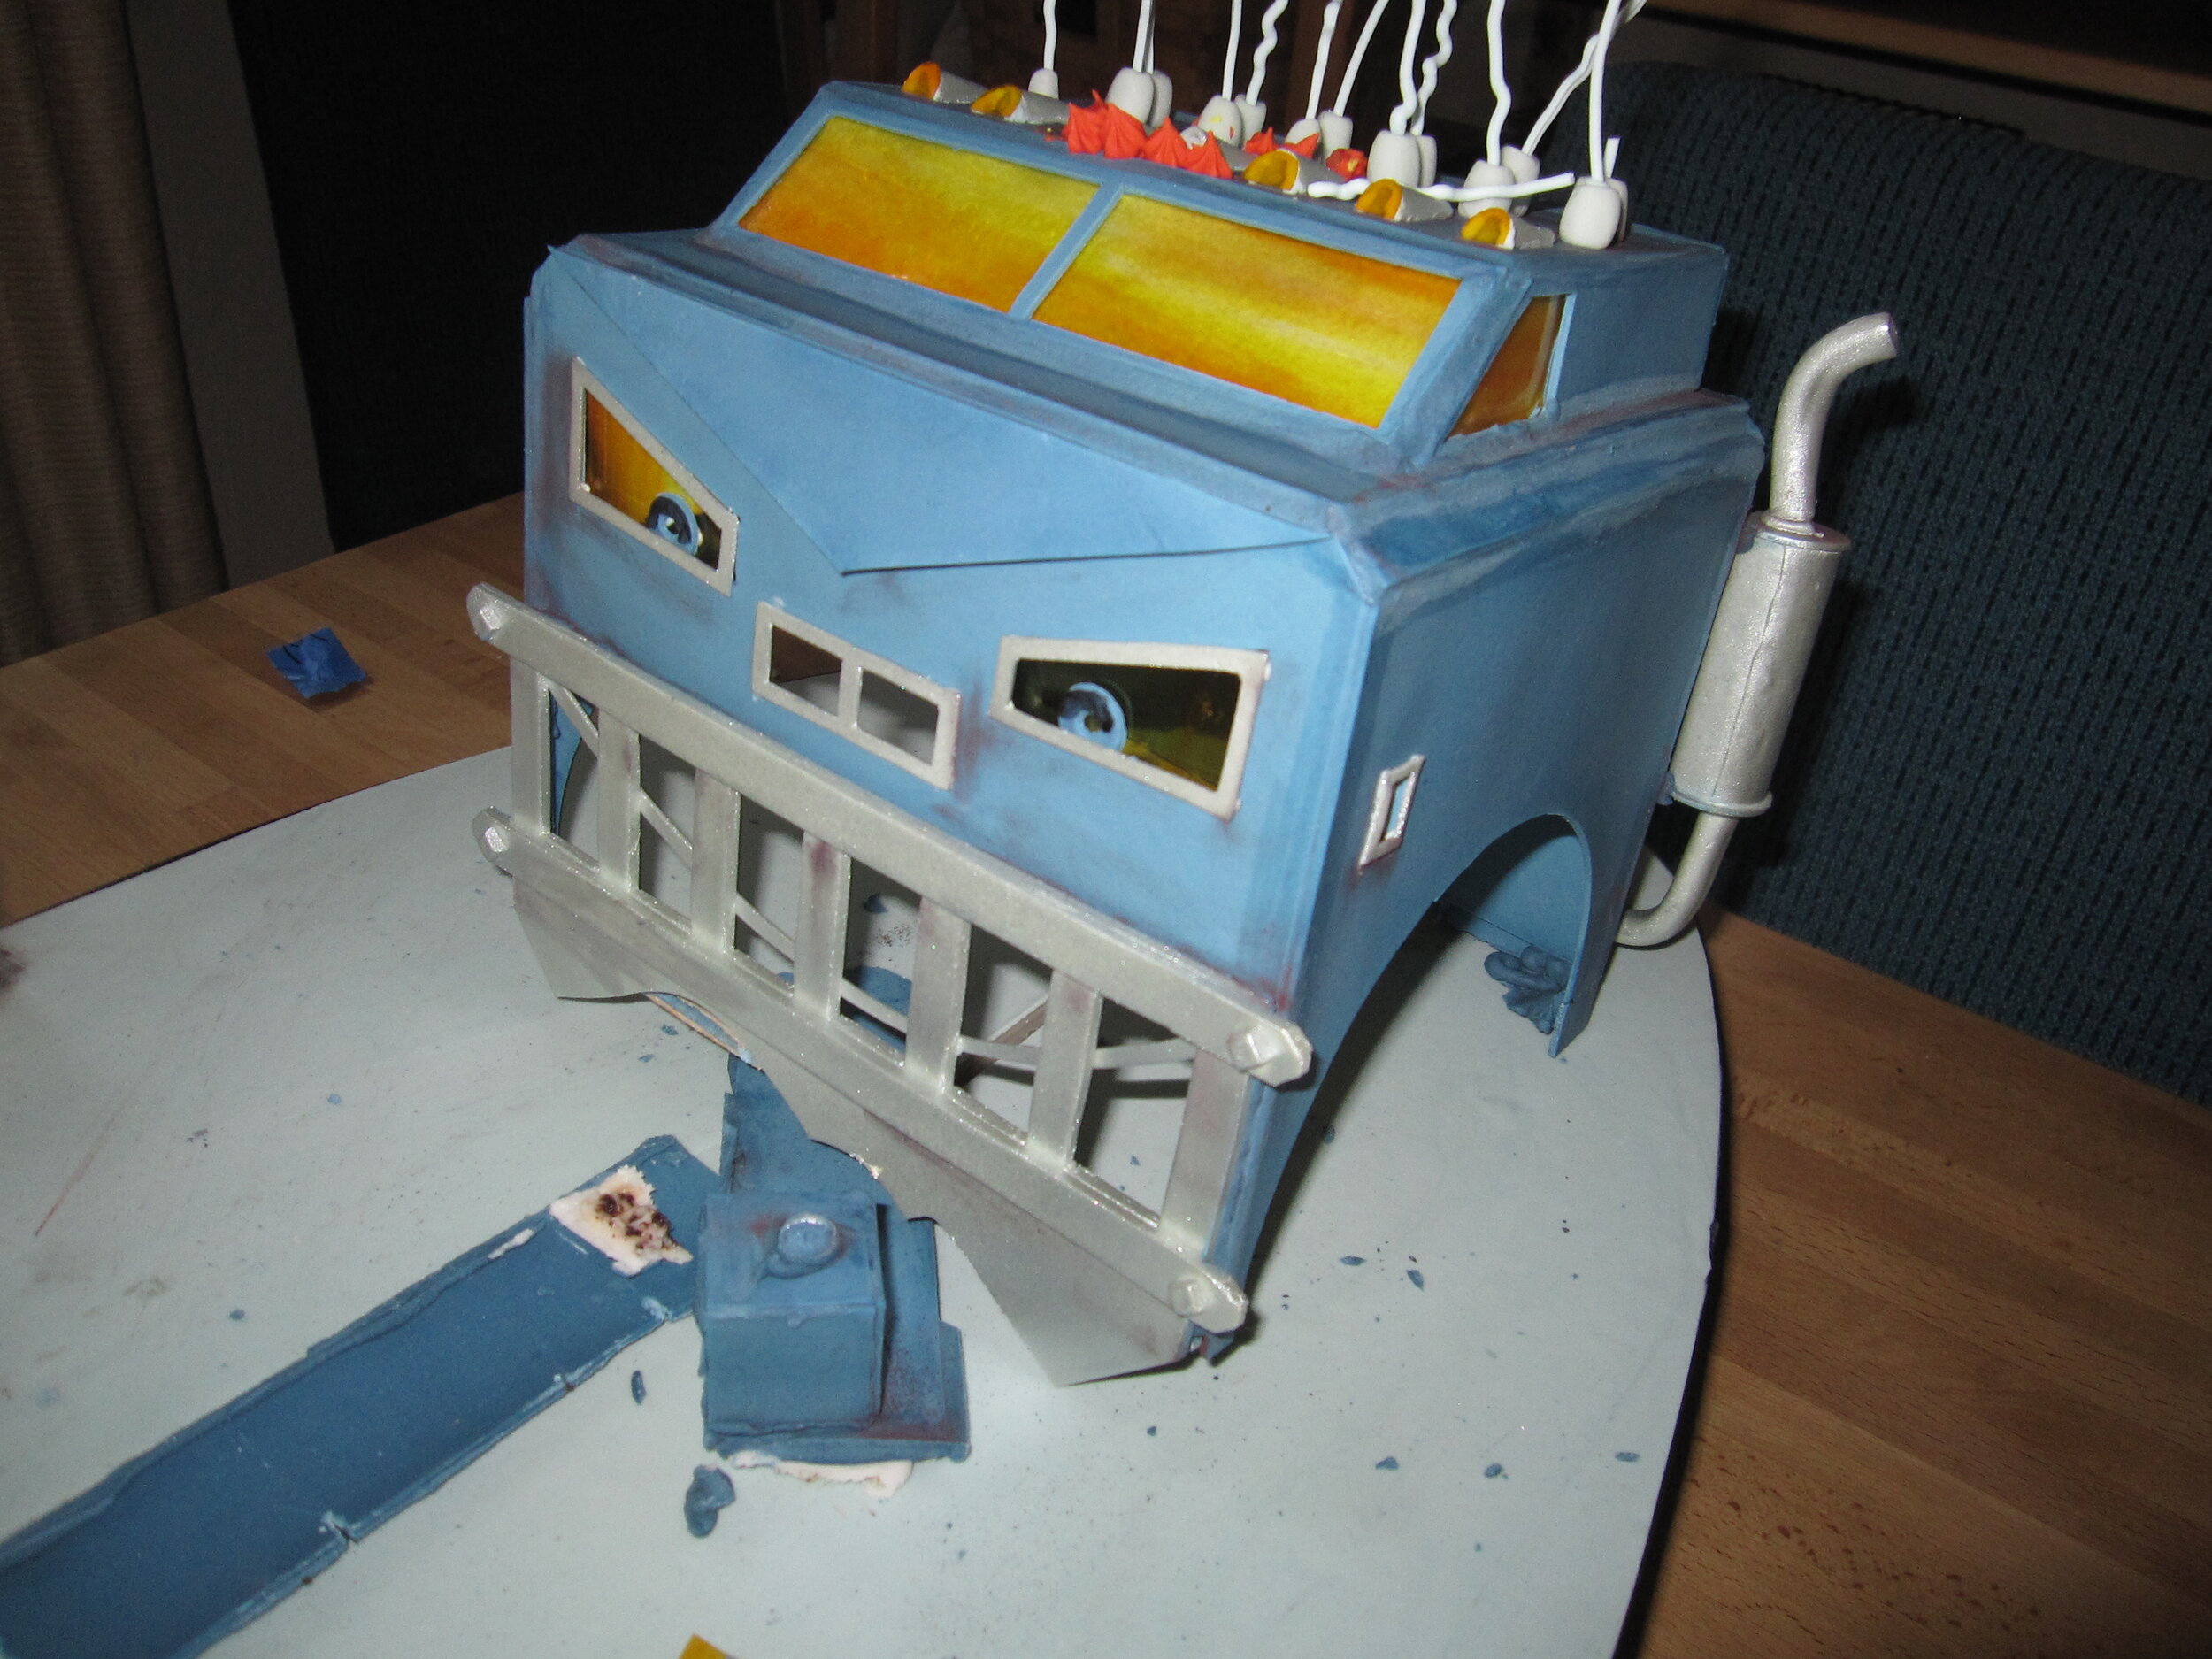
With the back of Melvin thus complete, I had to make his head, the only part of Melvin that contained actual cake. This went very smoothly. Having made all the exterior gum paste pieces in advance, it was simply a matter of carving the cake into the appropriate shape, covering it with fondant, and then setting it in place on the aluminum base. Then I could assemble the gum paste exterior with royal icing, including more tires and wheel wells, the ears / side view mirrors, and eyeglasses / headlights (which were assembled around the rest of the strand of LEDs.) To fill gaps and hide seams, I used royal icing, smoothed with a damp paintbrush.
For cement, I made some white chocolate ganache, tinted grey with black powdered food coloring. Mind you, at this point I still didn’t know whether the drum was properly configured to actually push the cement out and down the tube, and I wouldn’t find out until the party.
Big Rig
My biggest challenge of this cake was figuring out how to make Big Rig roll. It was also pretty high pressure because, let’s face it, if Big Rig didn’t smash into the “cake” the whole project would pretty much be a blatant failure. With almost all of my cakes, I accept that there is a fairly high probability that it might not work as I intend. My philosophy is that if you always know that what you’re doing will work, you’re not trying hard enough. Which is fine when the only people who are going to be disappointed with a failure are me, or my adult friends, or the guests at my friends’ wedding. But I really didn’t want to disappoint Alex. So in this particular case, I really couldn’t let failure be an option.
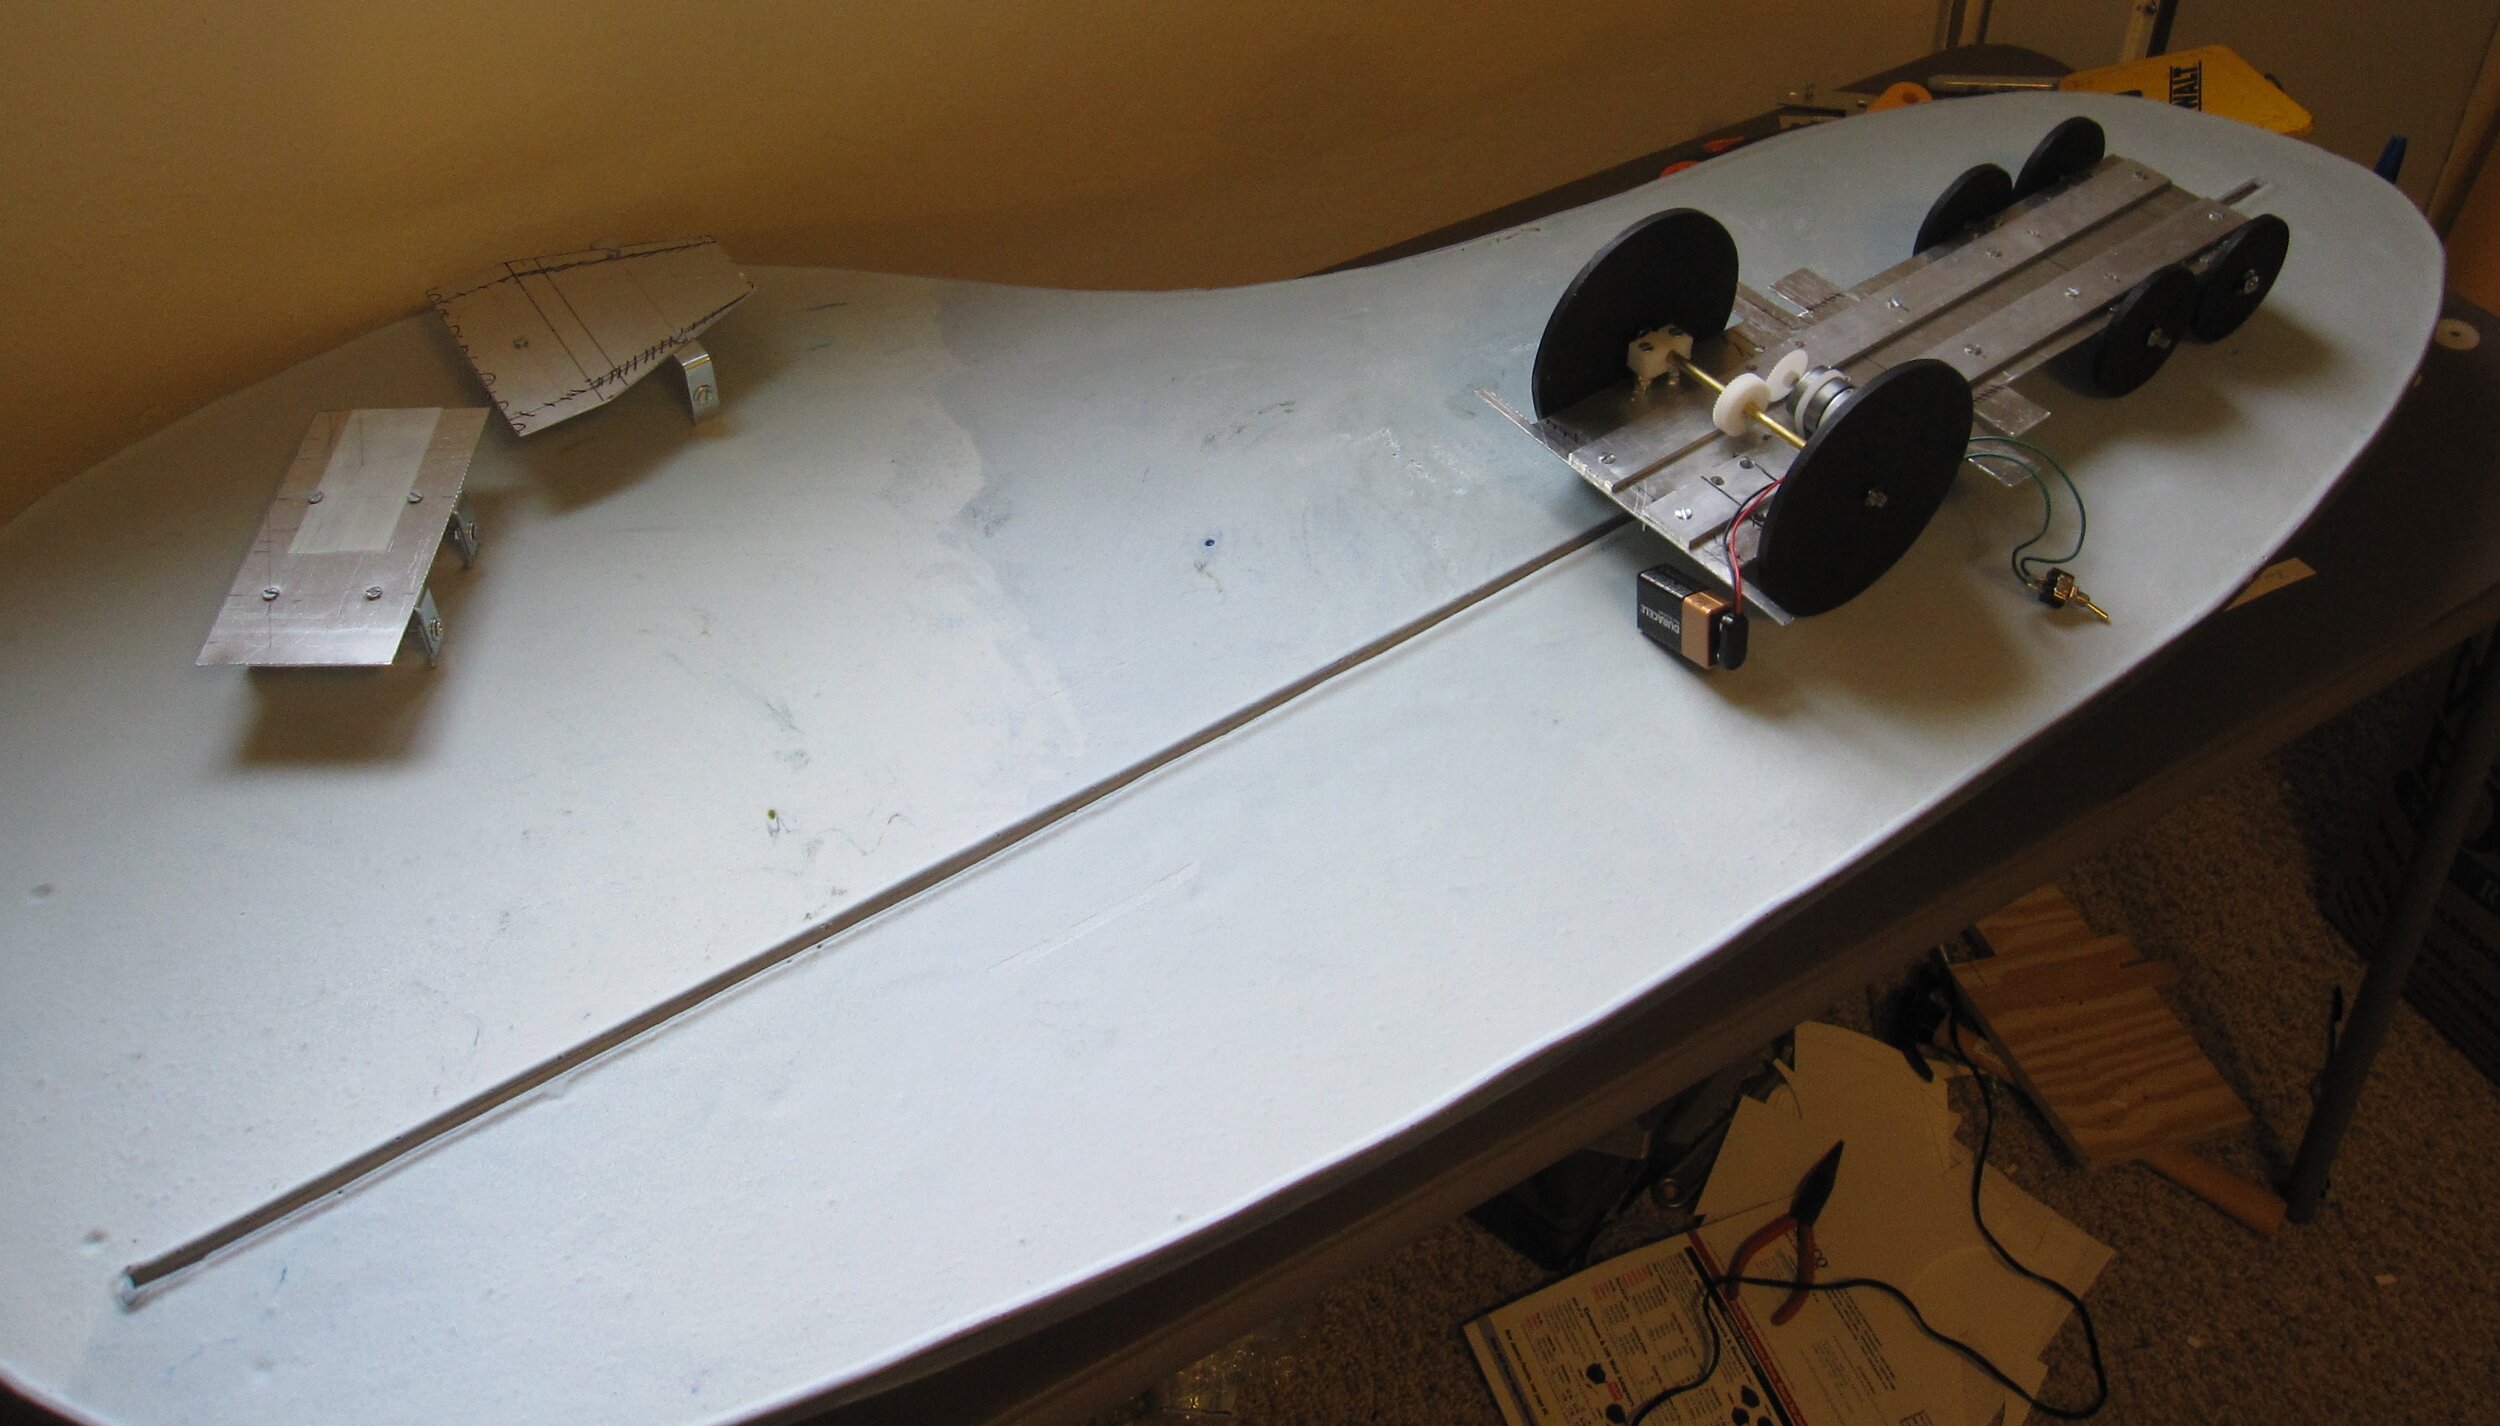
Keeping Big Rig on the right trajectory was the easy part. I attached two L-brackets to the bottom of Big Rig’s aluminum base, a material which I had selected to keep his weight as low as possible. Then I cut a track in the plywood base for the entire cake, running from the far end where Big Rig would start, leading to the end of the base where the “cake” would sit. That way, the L-brackets, slotted into the plywood track, which I had lined with UHMW tape to reduce friction, would keep Big Rig on target to the “cake.” All I had to do was get him to move.
My first attempt at a drive mechanism was to connect a hobby motor directly to the shaft of one of the front wheels (made out of plywood, to be covered later with gum paste tires), so it would basically be a one-wheel drive car. This failed for at least two reasons. First, because the two front wheels weren’t connected to each other via a complete axle, both had a tendency to bind up in their bushings, so that moving even the light aluminum base without any cake on it took all the motor’s power. Second, because only one wheel was driving the truck, it had a tendency to try to pull the truck off course so that the L-bracket bound up in the track.
So I scrapped that and tried something else. This time, I connected the two front wheels with a brass and threaded rod axle. My plan was to transfer the power from the motor to the axle with a heavy-duty rubber band under tension. This plan failed even before I connected it to the wheels, as the minute that I started experimenting with putting tension on a rubber band around the shaft of any of the hobby motors I had in hand it became clear that none of my motors had nearly enough torque to get the job done.
I went online and located a promising-looking high-torque motor. While I was waiting for that to arrive, I started playing around with the possibility of a motor-less drive mechanism. My first thought was a tension spring. Unfortunately, a few major problems with this idea soon became clear. First, the length difference between the relaxed spring and the spring under tension wasn’t nearly enough. I couldn’t pull the truck all the way back to the end of the track, and even with the spring fully relaxed I was afraid that the truck wouldn’t even reach the “cake” to smash it. Second, I was very scared that, if I had to keep Big Rig under that kind of tension for any length of time there was a significant risk of premature smashing, which would be a real tragedy. Third, I really wanted Big Rig’s tires to spin on their own, so I could start the wheels spinning, and then release the truck for the final smash. There’s a great illustration in Zoom! Boom! Bully where Big Rig’s tires are spinning into a whirl of smoke just as Jack shouts, “Stop!” and the other trucks reveal that the “cake” is for Big Rig’s birthday. I really wanted to recreate this moment in cake before the smash, and that required motor power directly to Big Rig’s wheels.
I managed to solve the first of these problems by substituting a jumbo-sized rubber band for the spring. The rubber band had a much higher stretch-to-length ratio than the spring, and the flexibility of the rubber band meant that even after its tension was exhausted, it at least wouldn’t arrest the momentum of the truck. The rubber band also seemed to have sufficient power to move the truck fairly quickly, even with the projected added weight of the cake and gum paste. But the rubber band still left my other two concerns unaddressed. It still required the truck to be under tension for a longer period of time than I was comfortable with, unless I could come up with a release mechanism that I could set after the cake was completed and moved into place. And in order to achieve the effect I wanted with the tires spinning prior to release, I really needed tires that were legitimately motor-powered.
Fortunately, when my high-torque motor arrived, early signs were encouraging. Unlike the motors I was trying before, it was clearly powerful enough to withstand the tension on the rubber band. So I mounted the motor to the cake base and ran the rubber band to connect the motor shaft to the axle. Initially, I was delighted with the result. With no weight on the aluminum base, the truck drove great. However, as soon as I put some weight on it, to mimic the weight of the cake and gum paste I was planning to put onto Big Rig, it stopped working altogether, as the added weight was sufficient to counteract the tension on the rubber band and cause it just to slip uselessly around the axle. I tried to mitigate this problem by putting something sticky on the axle, but this just made the rubber band stick to itself and get wound up around the axle.
Next, I tried using gears to transfer the power from the motor to the axle, which required a complete redo of the front bushings to leave space between the axle and the aluminum base for the gear. Like the rubber band drive, this worked great until I put any weight on the base. Unlike with the rubber band, the truck did at least move with additional weight on it. It just moved very slowly. I did have hopes, though, that if I kept the cake as light as I possibly could, it might work.
To give it an extra boost of power, I decided to combine this partially successful motor solution with my partially successful rubber band solution. I designed a release mechanism consisting of a piece of U-shaped channel that ran across the track, underneath the base, attached to a dowel handle leading out the side of the base. That way, with the rubber band connected to one of the L-brackets under the truck base on one end and an eye bolt at the “cake” end of the track at the other end, I could finish decorating Big Rig with the rubber band relaxed, and then pull him back and set the L-bracket into the U-channel. This would hold him in place, and hold the front wheels a fraction of an inch off the base, so I could turn the motor on, let the wheels spin freely for a second, and then pull the dowel to release him. The rubber band would pull Big Rig forward while the wheel simultaneously pushed him forward. I could only hope that would provide enough force to make him powerfully smash into the “cake.”
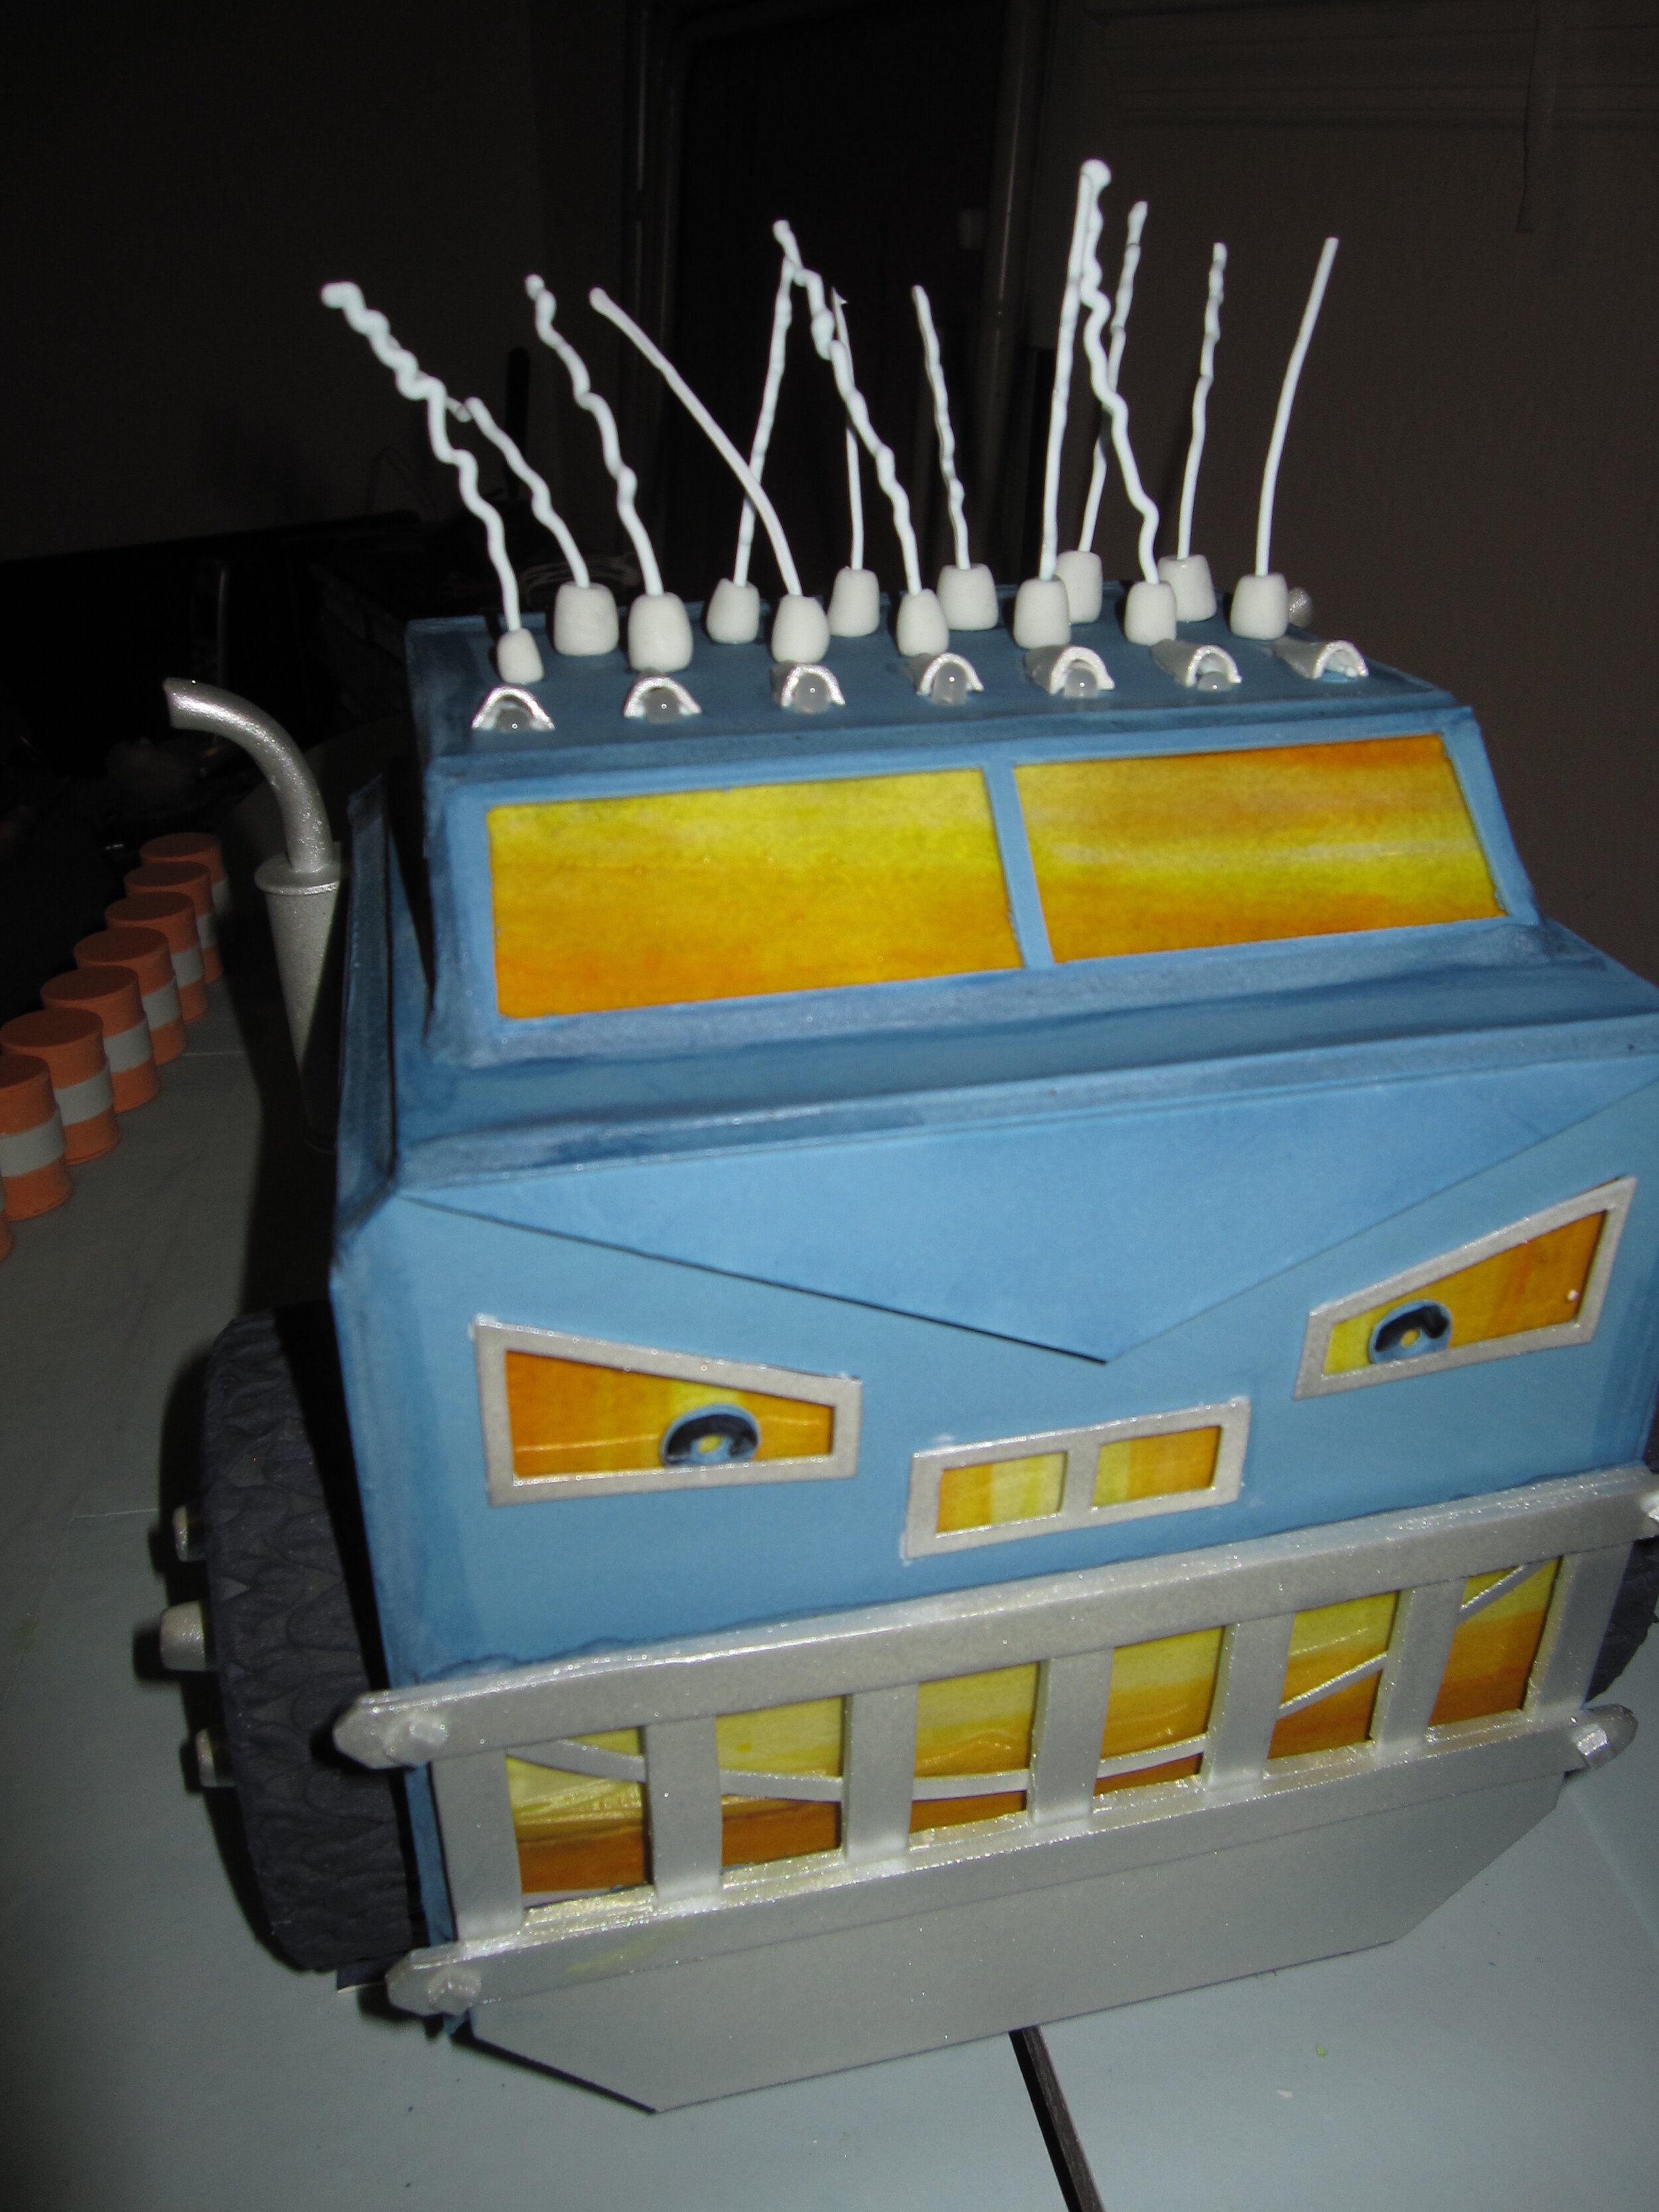
And thus ends the saga of making Big Rig go, but I still had to actually make Big Rig. Because Big Rig has a kind of maniacally glowing face, as well as taillights and a menacing glow inside his wheel wells, he needed a lot of LEDs. Fortunately, by this point I’ve done so many LED-intensive cakes that I could basically just chop and splice segments together as needed, so the wiring went pretty quickly.
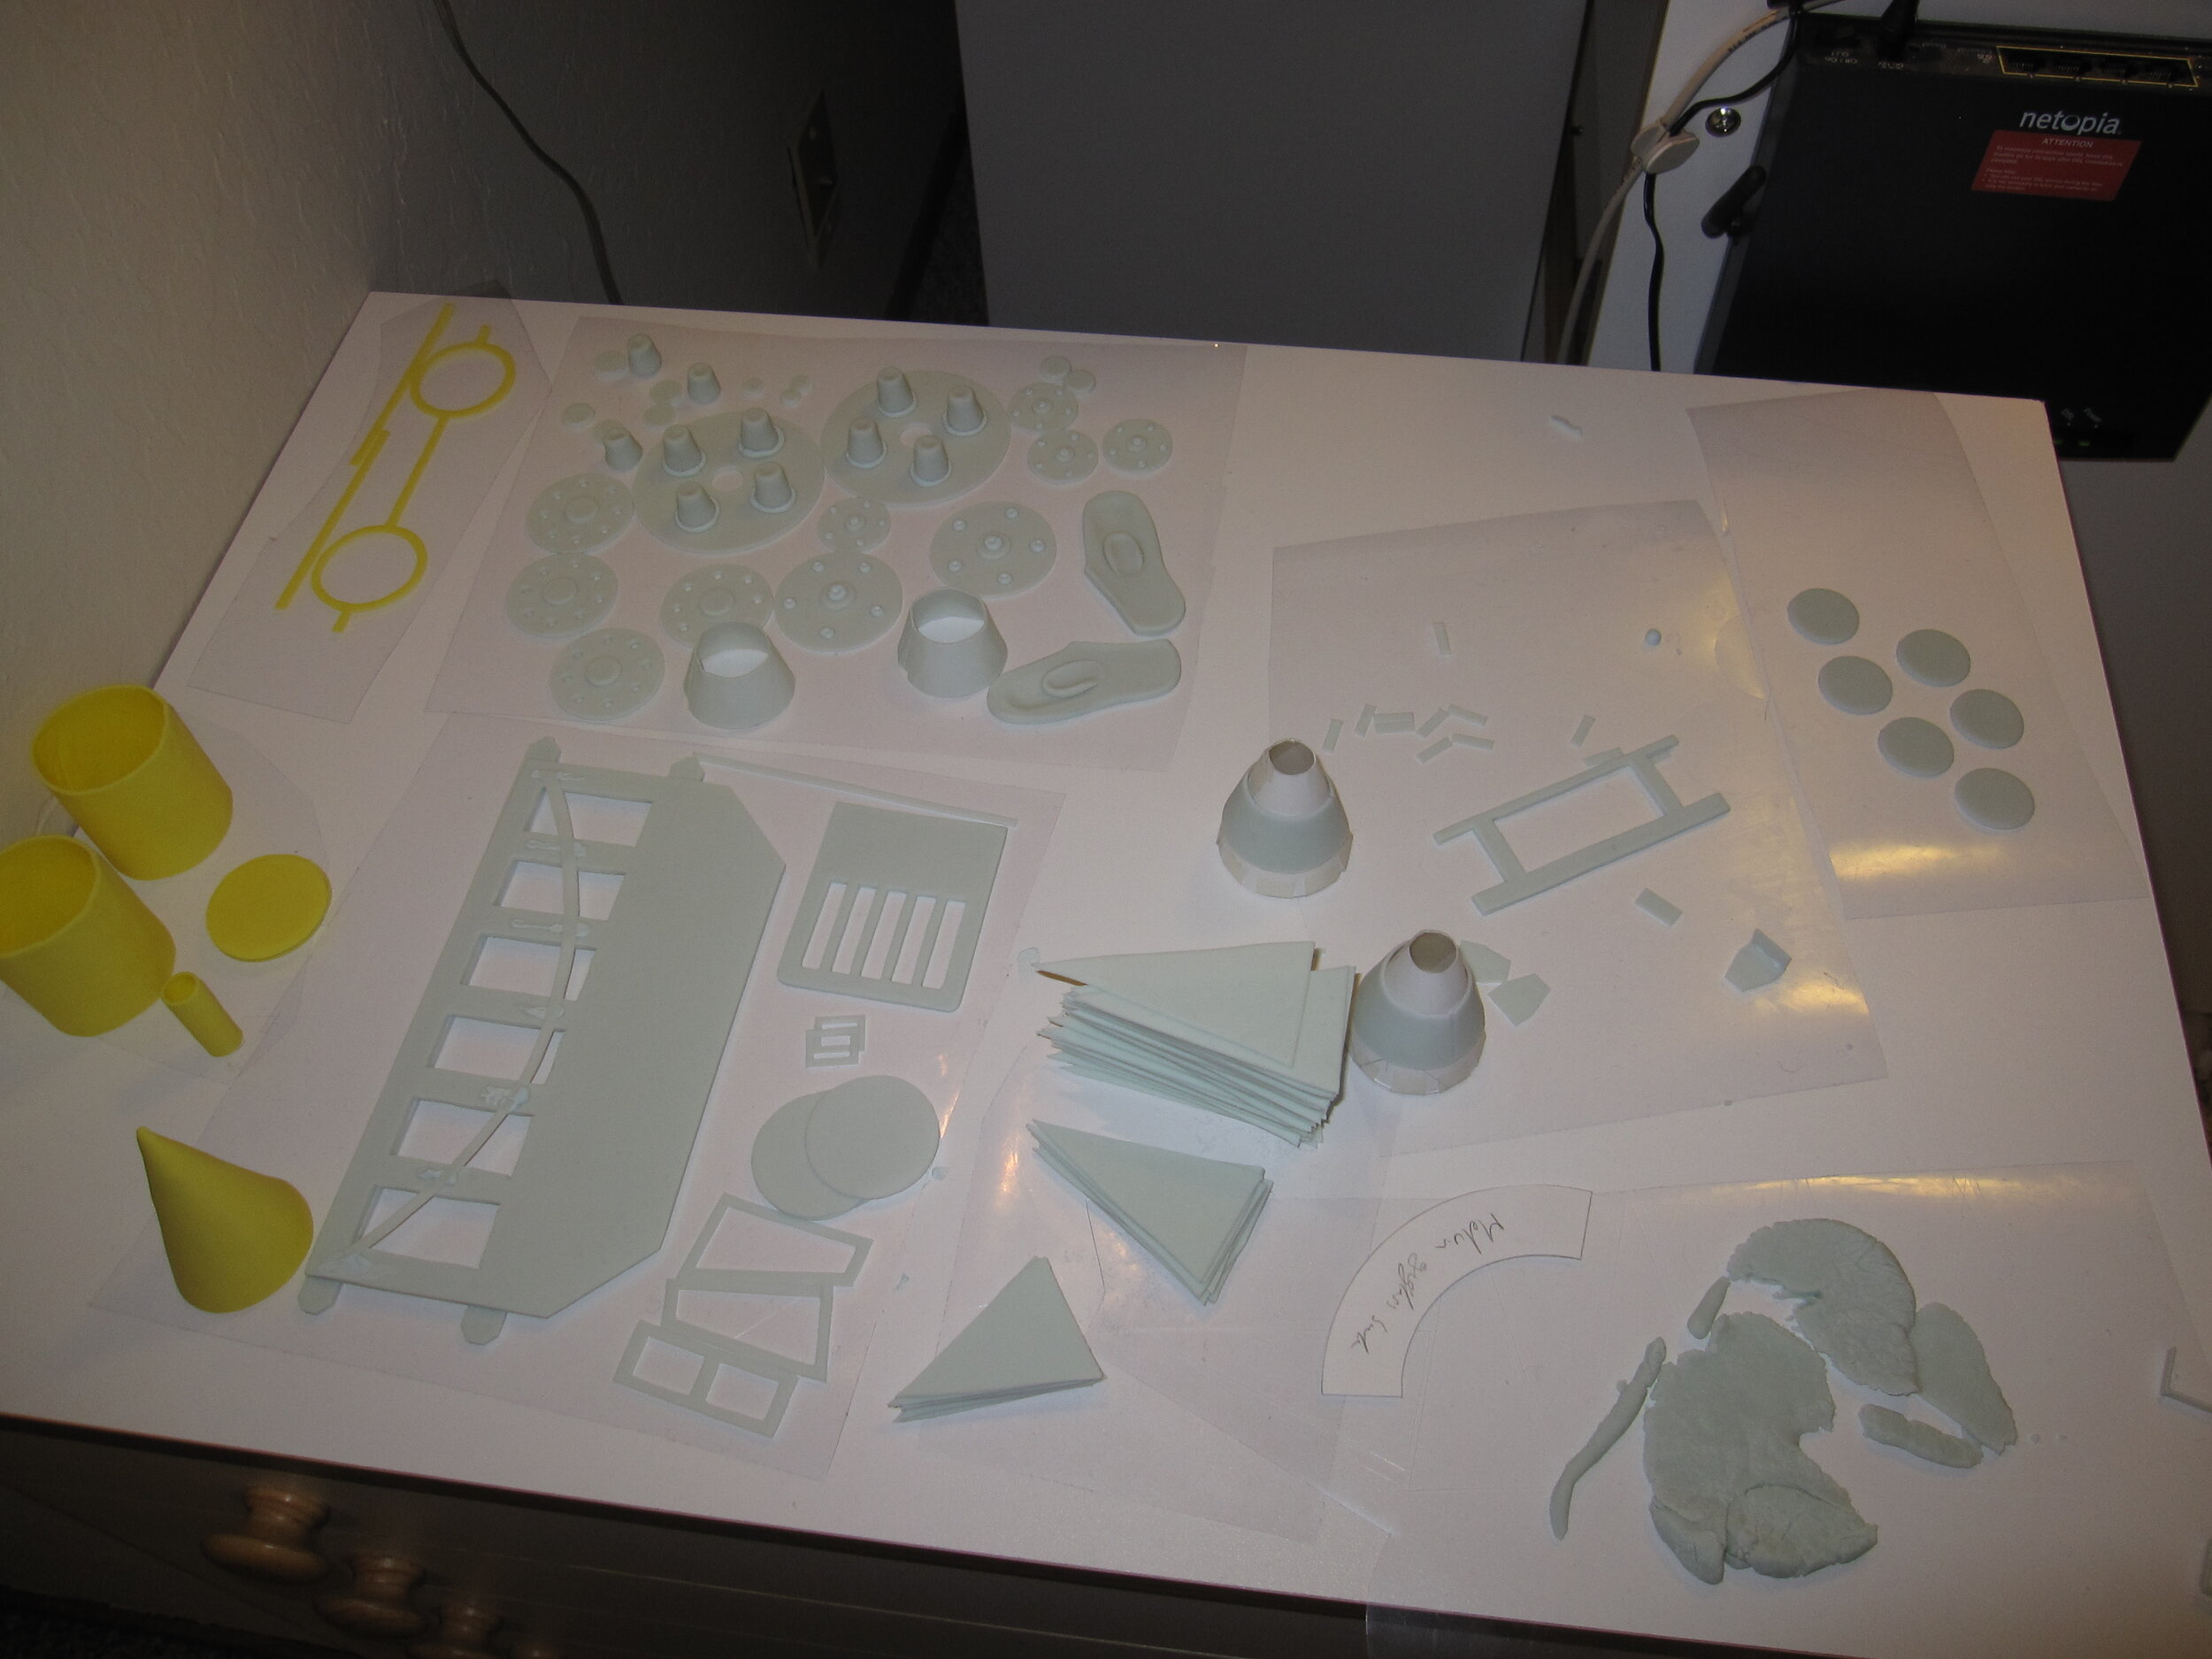
All the gum paste pieces, including tires, hubcaps, fuel tanks, bumpers, walls, trim, and yellow party hat, were made and dried in advance. To get the requisite orange and yellow glow out of Big Rig’s eyes, mouth, etc. I made sheets of gelatin with fades from yellow to orange, backed with rice paper to diffuse the light form the LEDs.

The cake itself was limited to the back of Big Rig and a very small square of cake inside his cab. At the party, someone pointed out that it was like a little cake engine block. I couldn’t put a bigger cake inside his head, because I needed to leave space around it for the LEDs. I kept the fondant layer on the cakes (necessary to prevent the gum paste from touching the buttercream icing, which softens dried gum paste) as thin as possible to keep the weight down. Fortunately, since I was covering the entire thing with pre-made gum paste pieces, the fondant didn’t have to look particularly nice.
With the cakes in place, attaching the gum paste exterior and all the trim pieces was really quite simple. The only problem I had was that when I redid the front axle bushings to accommodate the gears, I had failed to make the corresponding changes to the templates for Big Rig’s cab, so the sides, front, and back of the cab were all about half an inch too short. Fortunately, I had some extra dry blue gum paste pieces that I was able to cut down to patch the gaps. With some liberal royal icing spackle, it turned out just fine. The finishing touches were the royal icing antennae on the top. I have no idea why Big Rig needs so many antennae (which is what I told Alex when she asked me that question) but he has them in the book, so he had them in the cake.
“Cake”
Although the “cake” was the easiest component in that it didn’t have to do anything but sit there and be smashed, it also required more individual gum paste pieces than (I think) Melvin and Big Rig put together. Each barrel was made of five separate gum paste pieces and each crate required six. At the early planning stages of this project, I had envisioned putting tiny individual pieces of cake inside each crate and each barrel. Considering that the crates were only an inch and a half on each side, and the barrels were even smaller, I’m very glad that I came to my senses before I tried to do this. It’s not like there wasn’t already more cake than our guests would possibly eat anyway. Instead, I just put a little square of cake inside the “cake”, surrounded by the hollow crates and barrels and fondant tires. This probably made for a better smash in the long run anyway.

In addition to the crates and barrels, the cake also included a selection of fondant tires and gum paste pipes. Since I had made way more of all these things than were actually required, I used the extras to create bonus piles of stuff around the perimeter of the plywood cake base.
Finishing touches
With everything assembled, I actually went to bed at a relatively reasonable hour the night before the party. The next morning, as I was putting on the finishing touches – mostly adding a little dirt and grime with black powdered food coloring – Alex came in to inspect my work. She walked around it, studying it very carefully and commenting favorably on specific elements, like Big Rig’s tires and Melvin’s articulation. She then pointed out that I needed to put eyes on the chicken hood ornament on Melvin’s nose, which was already on my list of details to finish up before the party.

Alex then noted that I hadn’t made a hitch for the back of Big Rig. I had considered making a hitch for Big Rig, but decided against it because it doesn’t play any role in this scenario and because in some of the images in the source book, he doesn’t appear to have a hitch. Alex listened patiently to this explanation and then countered by pointing out that, in Truckery Rhymes, Big Rig is shown towing a trailer, which he couldn’t do if he didn’t have a hitch. I was forced to bow to her superior logic and quickly made a gum paste hitch. Actually, it even looked better from an aesthetic point of view, as the silver hitch made the solid blue rear section of Big Rig much more interesting. What I especially love about Alex’s argument is that it draws not just upon the specific source book for this project – Zoom Boom Bully – but upon the rest of the Trucktown canon as well. I also enjoy that it is a functional argument. Her point was not merely that Big Rig should have a hitch because he is shown with a hitch in the illustrations, but that Big Rig needs a hitch or he would be unable to fulfill his function as a big rig.

With the hitch completed, I got Alex’s dad to help me move the cake out to the dining room. Then came the stressful moment when I had to pull Big Rig back into his release mechanism. I was terrified that I was either going to lose my grip and send him crashing into the “cake” or crack Big Rig’s head to pieces in the effort of pulling back the rubber band. Fortunately I avoided either catastrophe and got Big Rig primed for release with only the loss of one fuel tank that was easily reattached.

Alex then consulted the source material for one final check on the accuracy of my work. She pointed out that, in the book, the “cake” is shown on a wooden palette, and I had failed to put my cake version of the “cake” onto a palette. I explained that I had noticed that and had considered putting the “cake” on a palette but had decided against it as I was afraid that the palette would arrest Big Rig’s movement so that he wouldn’t smash into the “cake” as effectively. Alex considered this carefully and then decided that perhaps Big Rig had taken the “cake” home on the palette and then removed it from the palette in order to smash it. I agreed that was an excellent explanation.
The party
With only one exception, the cake worked very well. Melvin’s drum turned flawlessly, but sadly, he did not actually pour cement. Either the drum and/or the wedges inside weren’t angle correctly or I had made the ganache too thick. Also, I didn’t really know which way the drum was supposed to be turning to make the cement come out. Cement mixers are complicated. Oh well, at least the drum turned.

Most importantly, Big Rig worked! Zoom! Boom! One of the barrels even flew off the table. Big Rig’s front bumper cracked beautifully so that he wound up with an excellent jagged evil grin.

Alex had a great time eating various gum paste bits (and a little bit of actual cake.) I particularly enjoyed it when she ate one of Melvin’s eyes, revealing the LEDs and leaving Melvin looking like a mangled cyborg.

The next day, as Alex was helping me to disassemble the remains of the cake and salvage the electronic components, she told Melvin (who was by this point essentially just a severed head) that he was her favorite cake ever. I call that a big success. Alex was a very tough audience with an incredible eye for detail. She was tremendously critical, but with such sincerity and such admiration. She has absolute confidence in my ability to execute a perfect cake version of Big Rig, so of course she wants to point out my errors so that I can correct them. It’s such a charming combination of exactitude and blind faith. She’s the perfect manager.