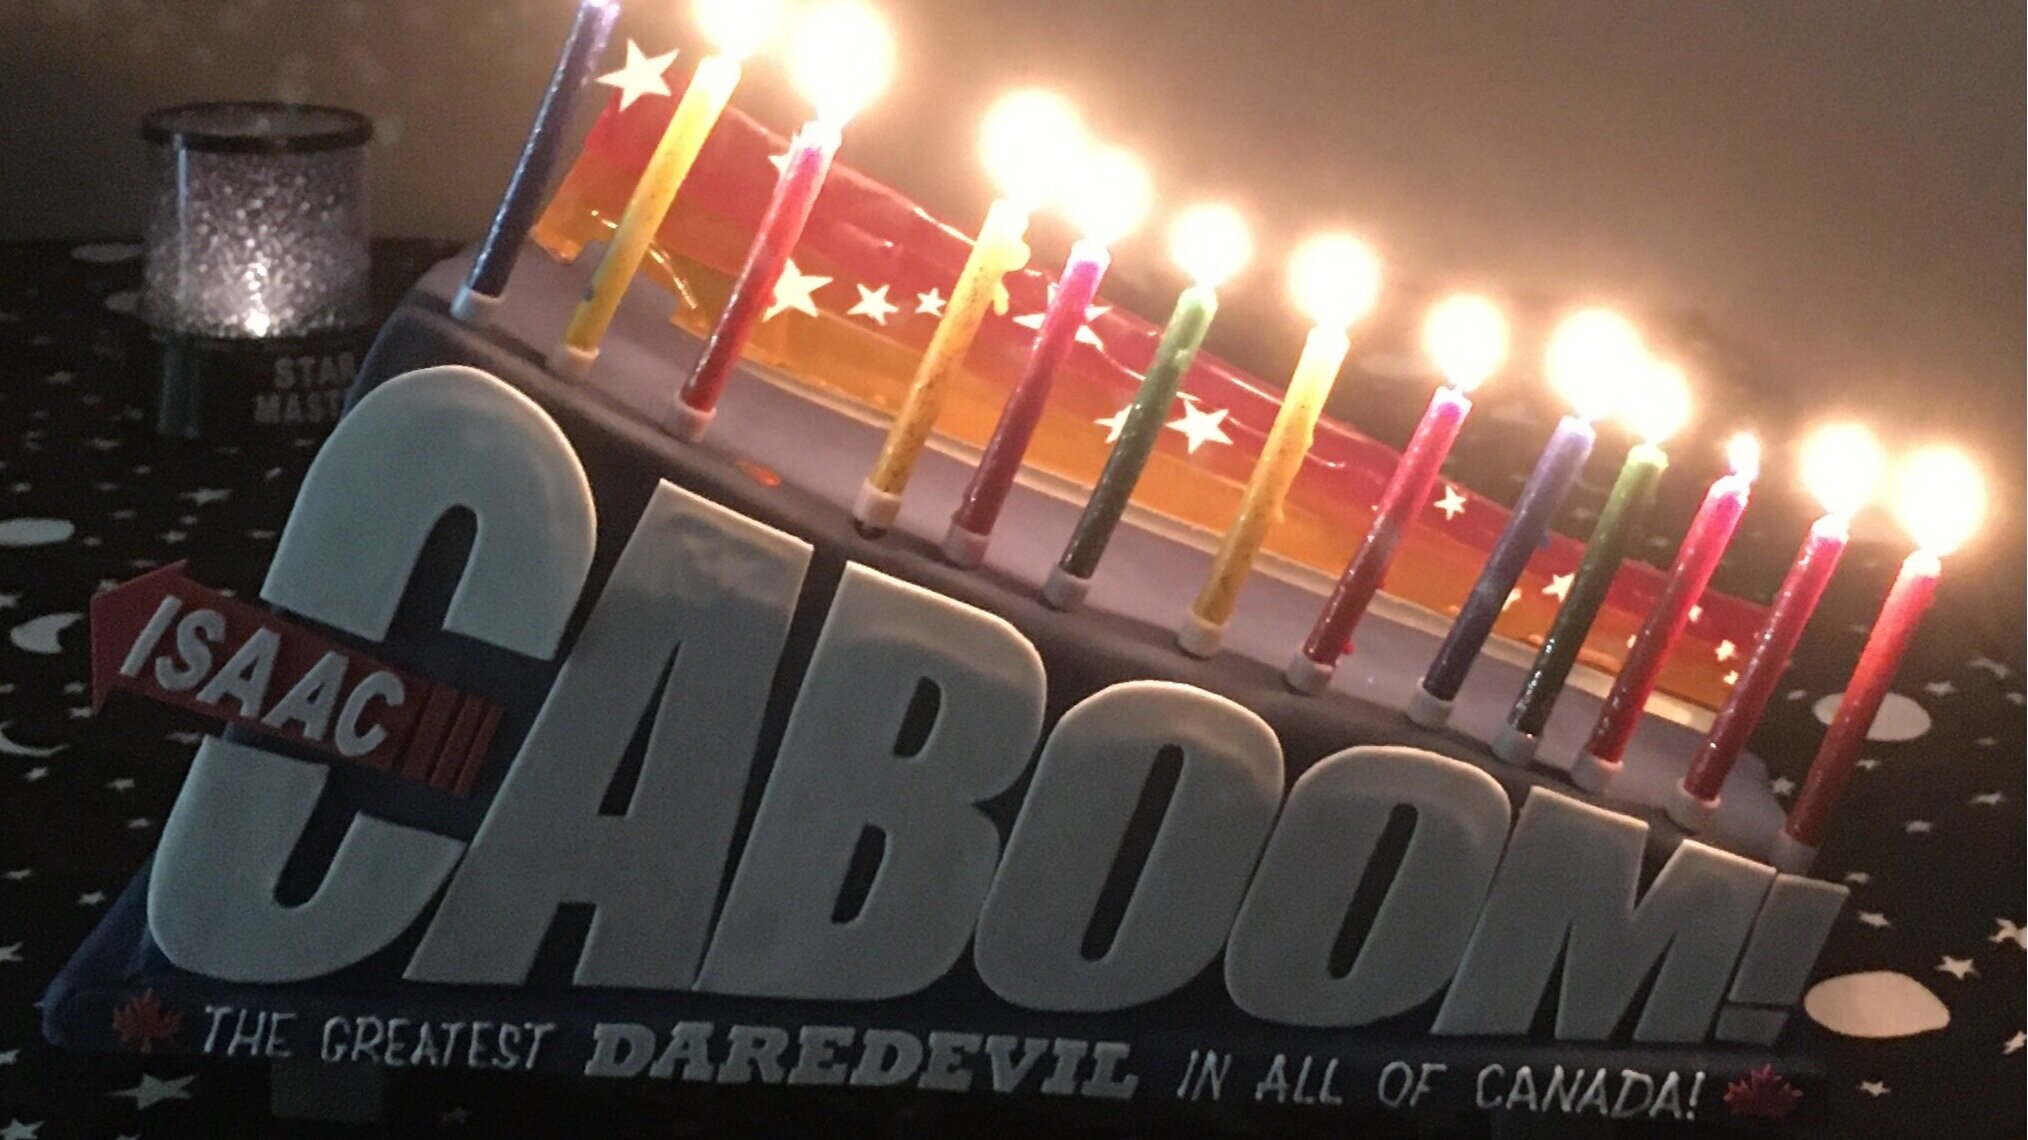
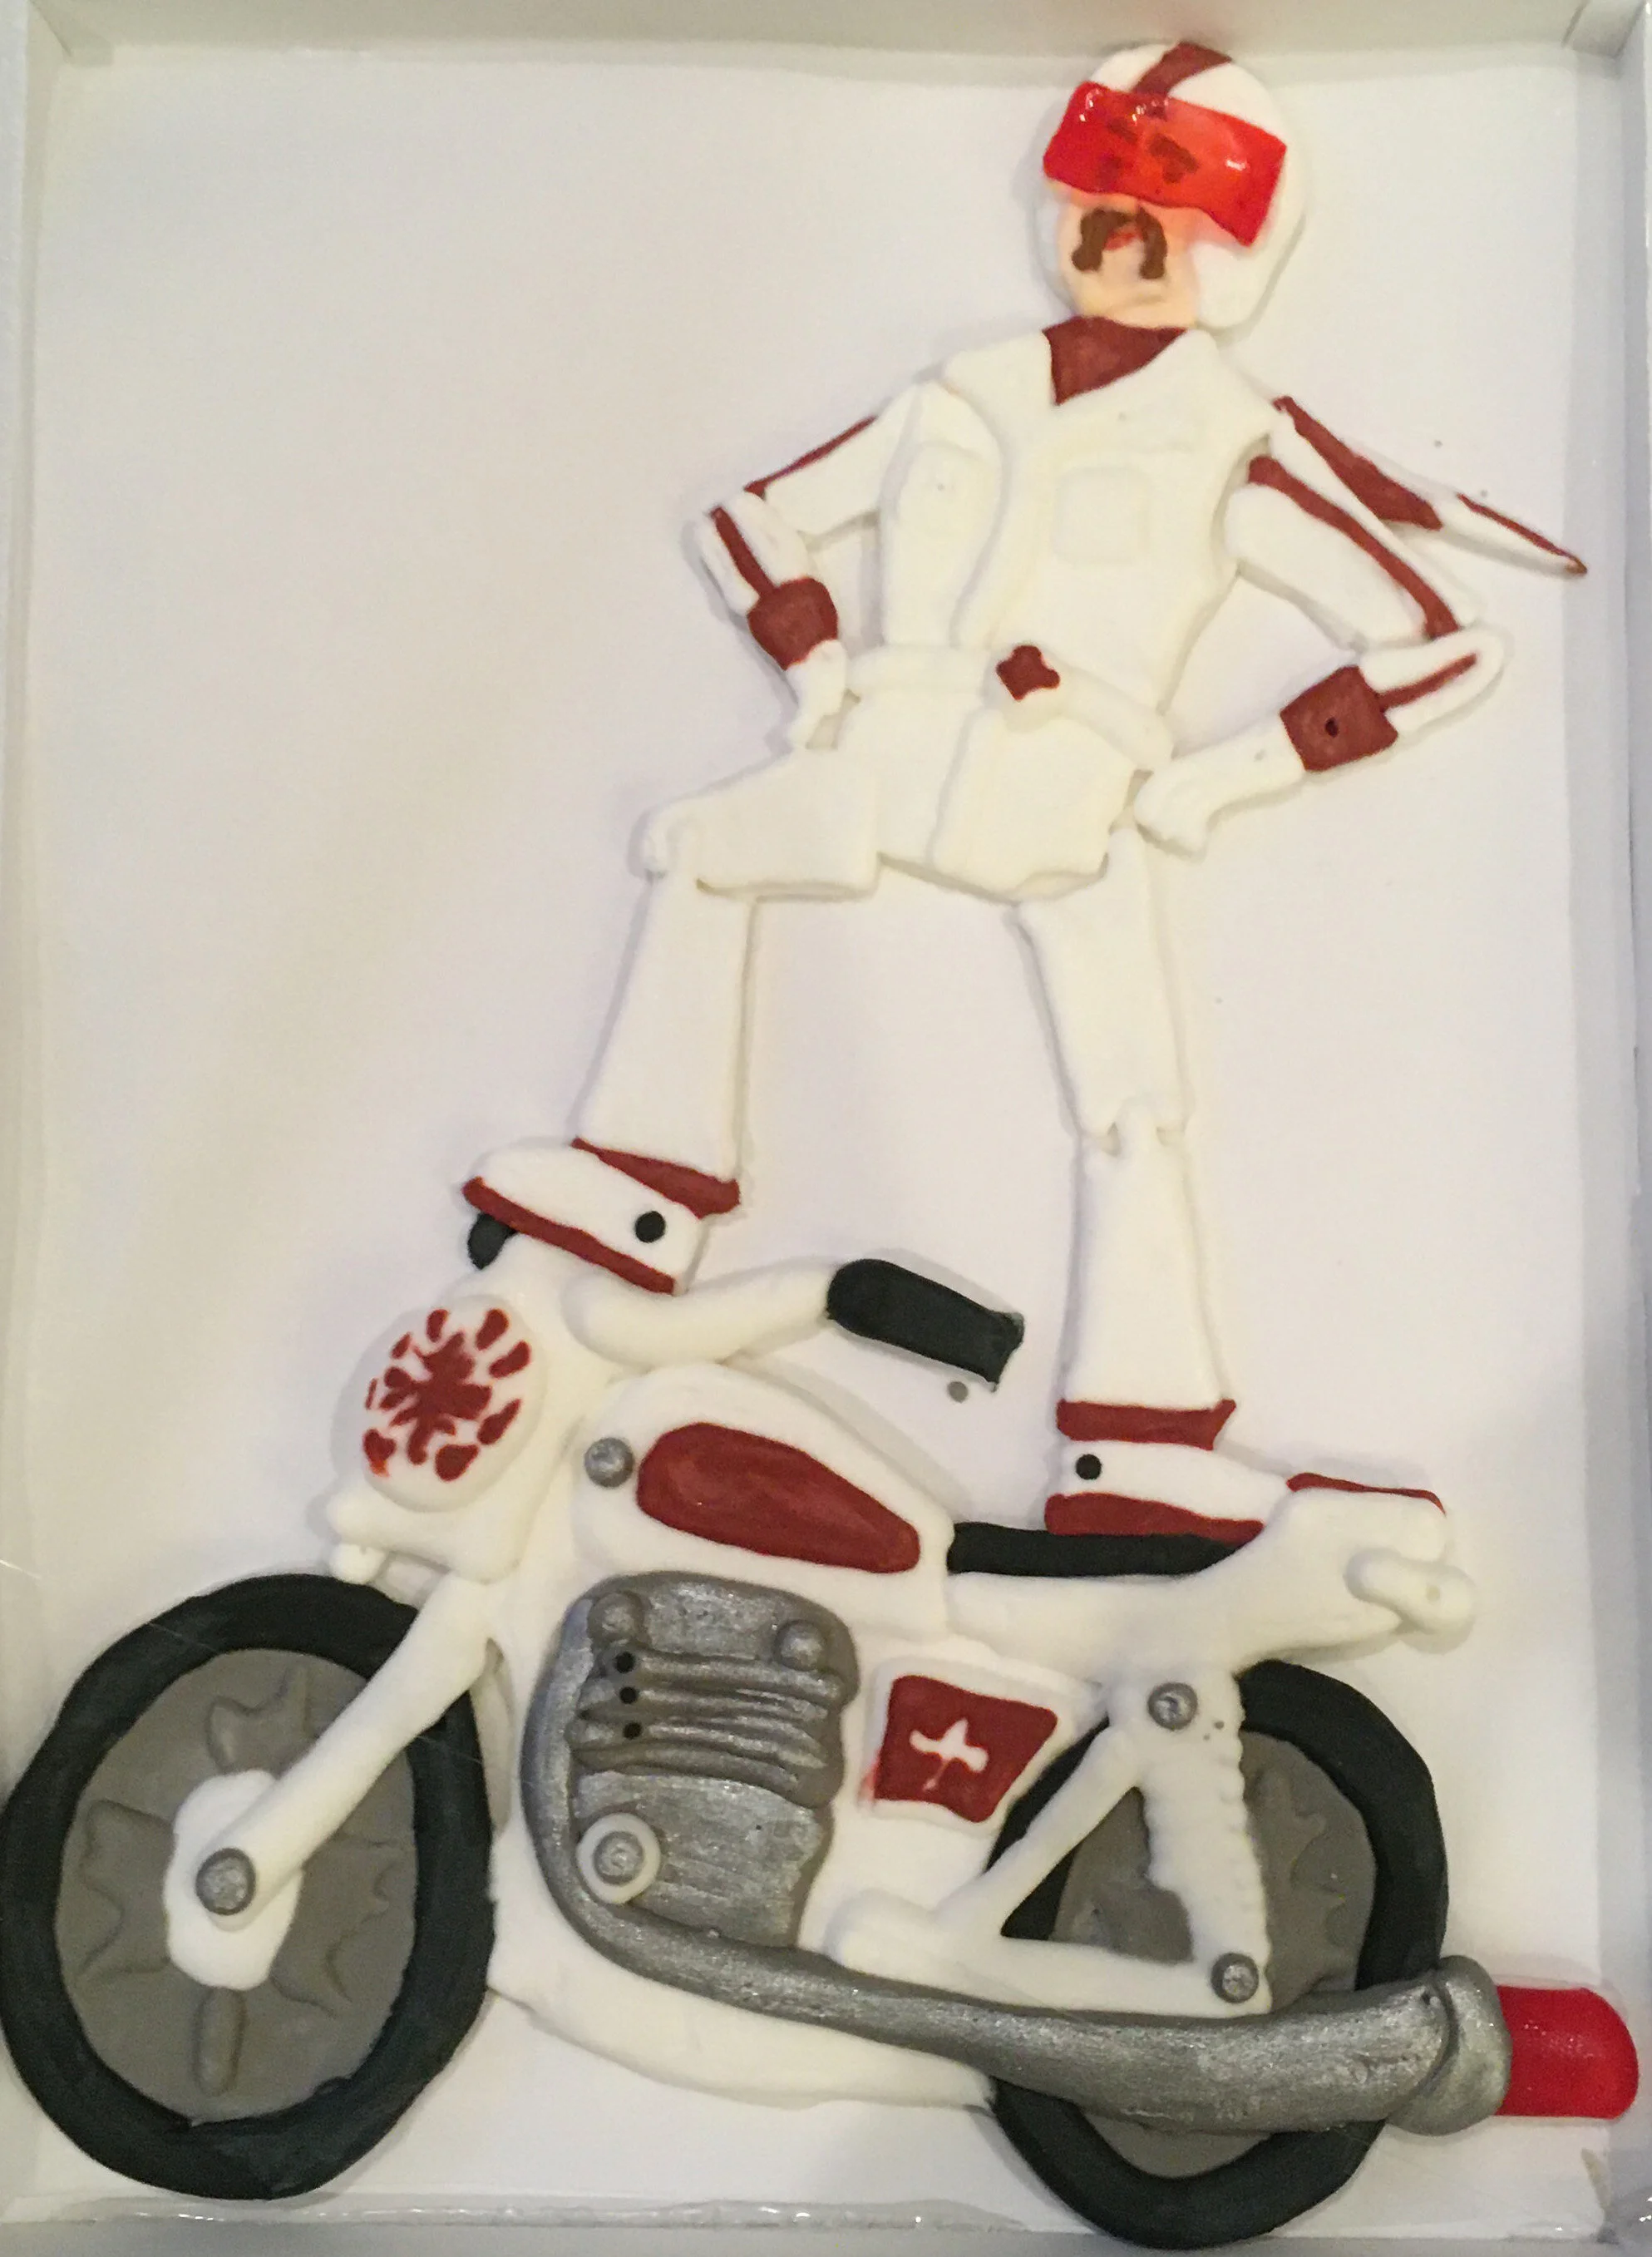
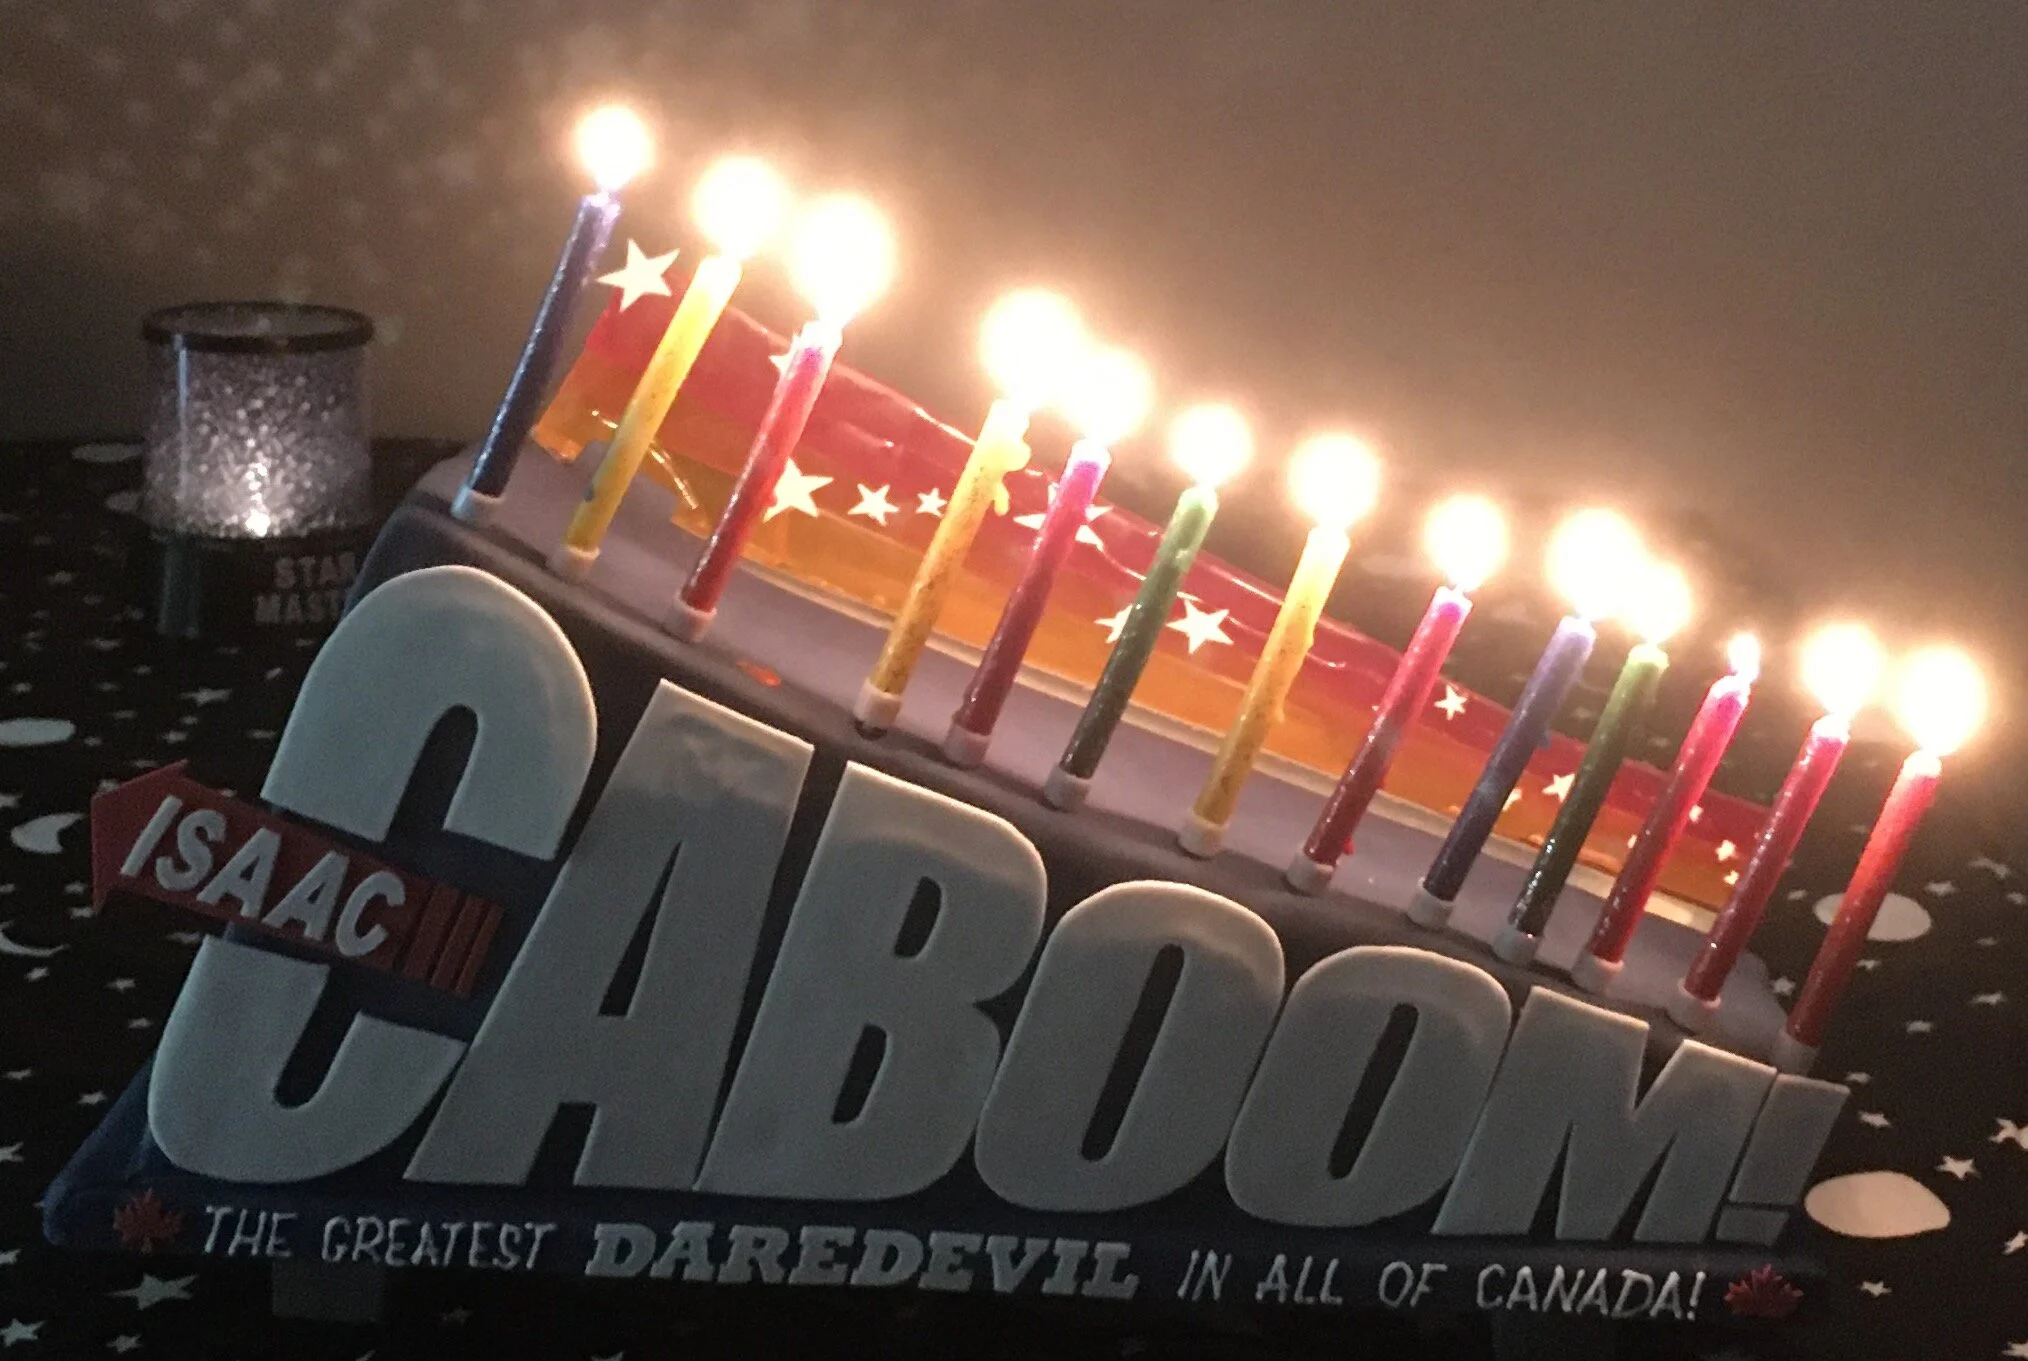
Isaac Caboom Cake
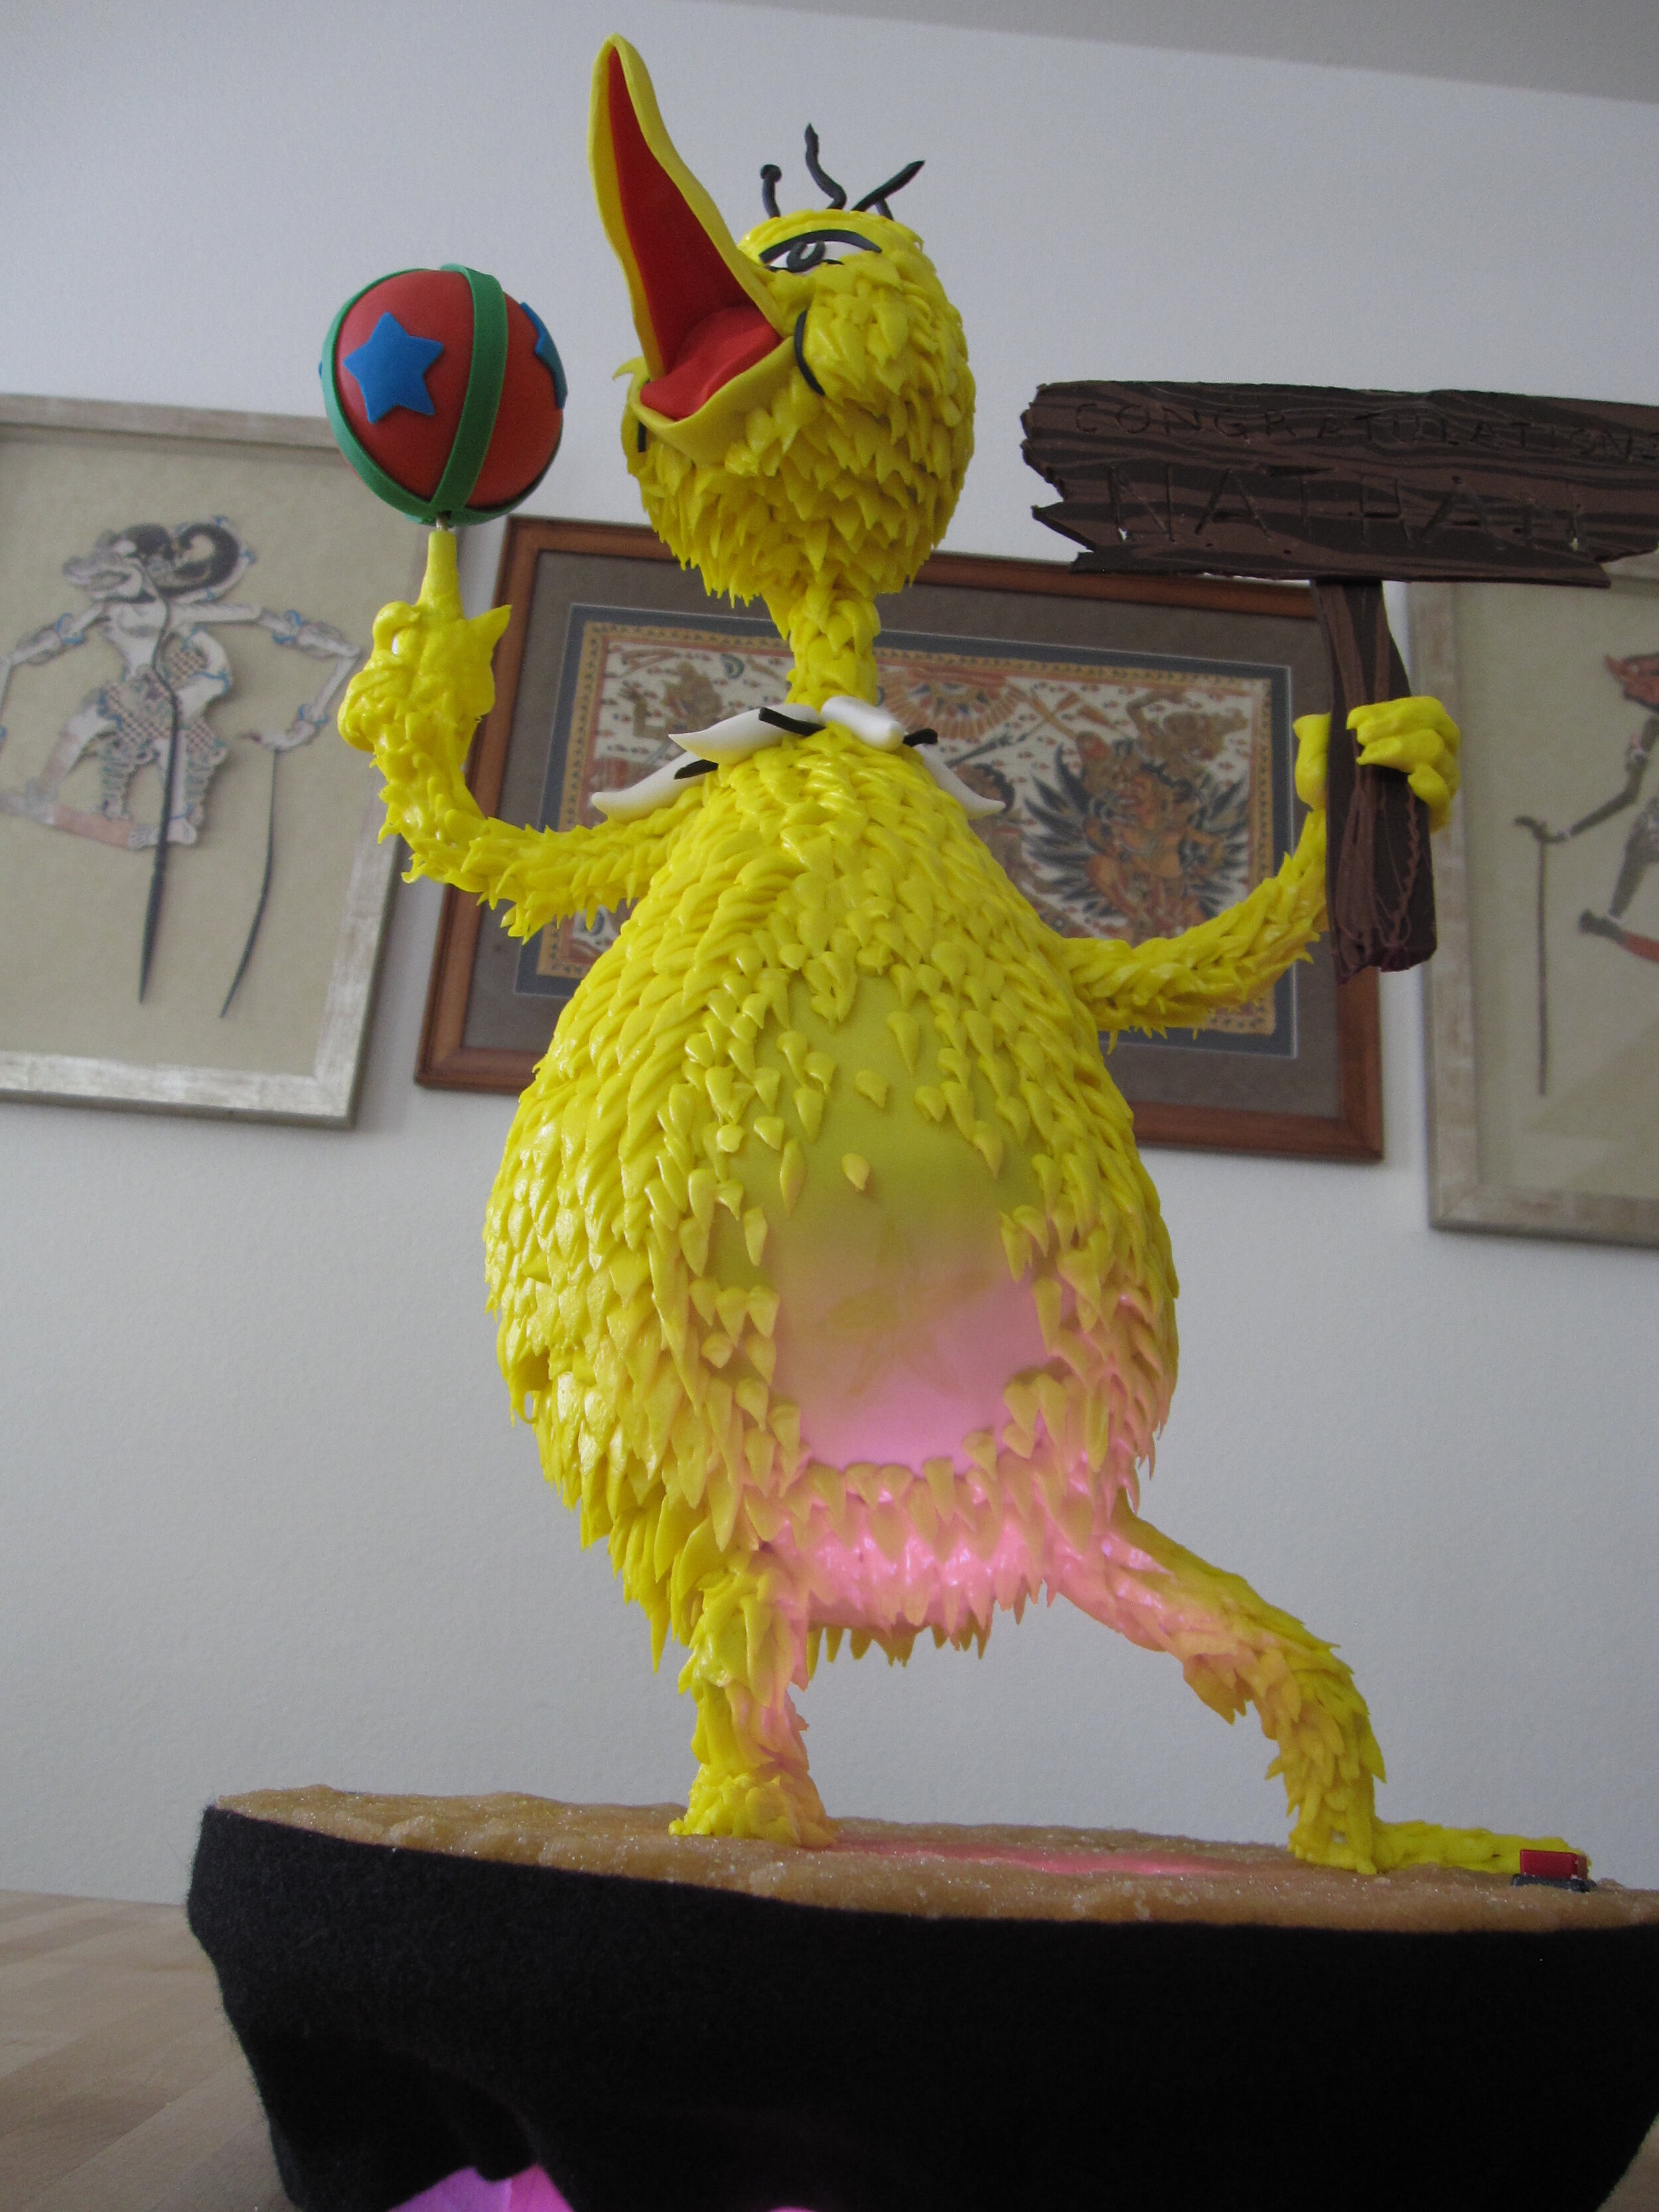
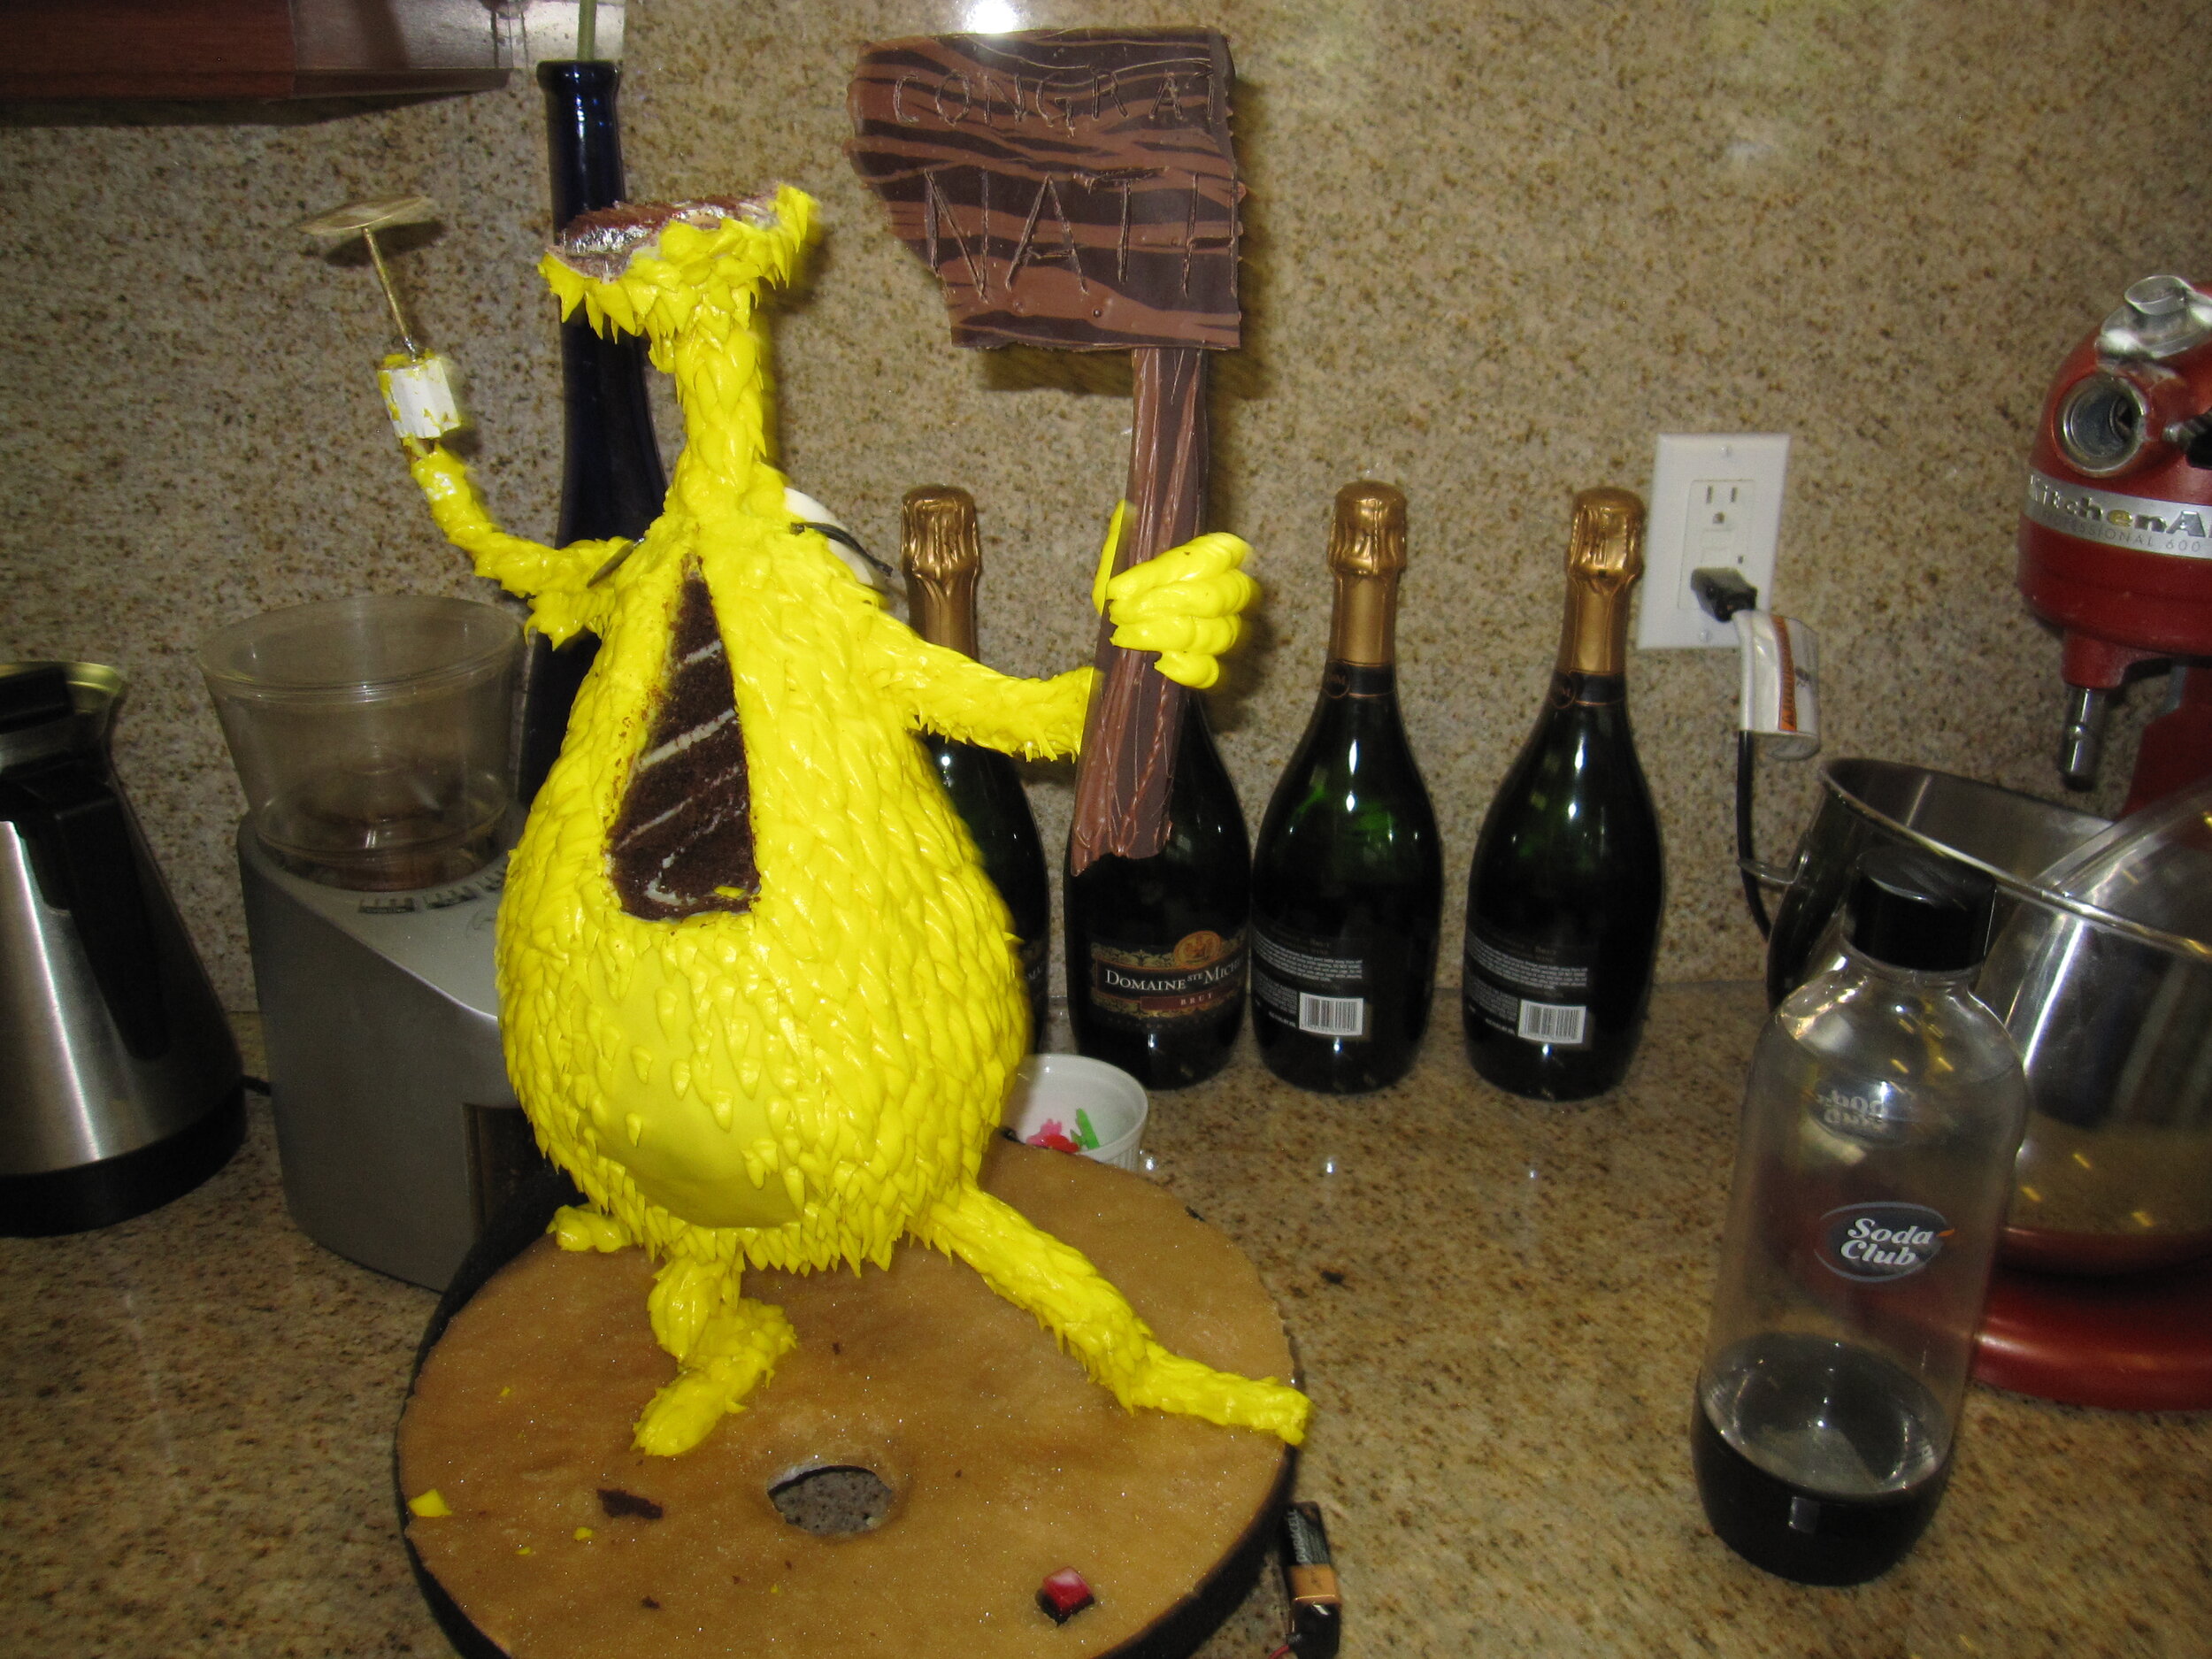
Based on Duke Caboom from Toy Story 4, the figure on top of my Isaac Caboom cake was supposed to do a daredevil jump off the end of the cake. Like many of my cake mechanisms, it sort of worked eventually, but not as well as I had hoped.
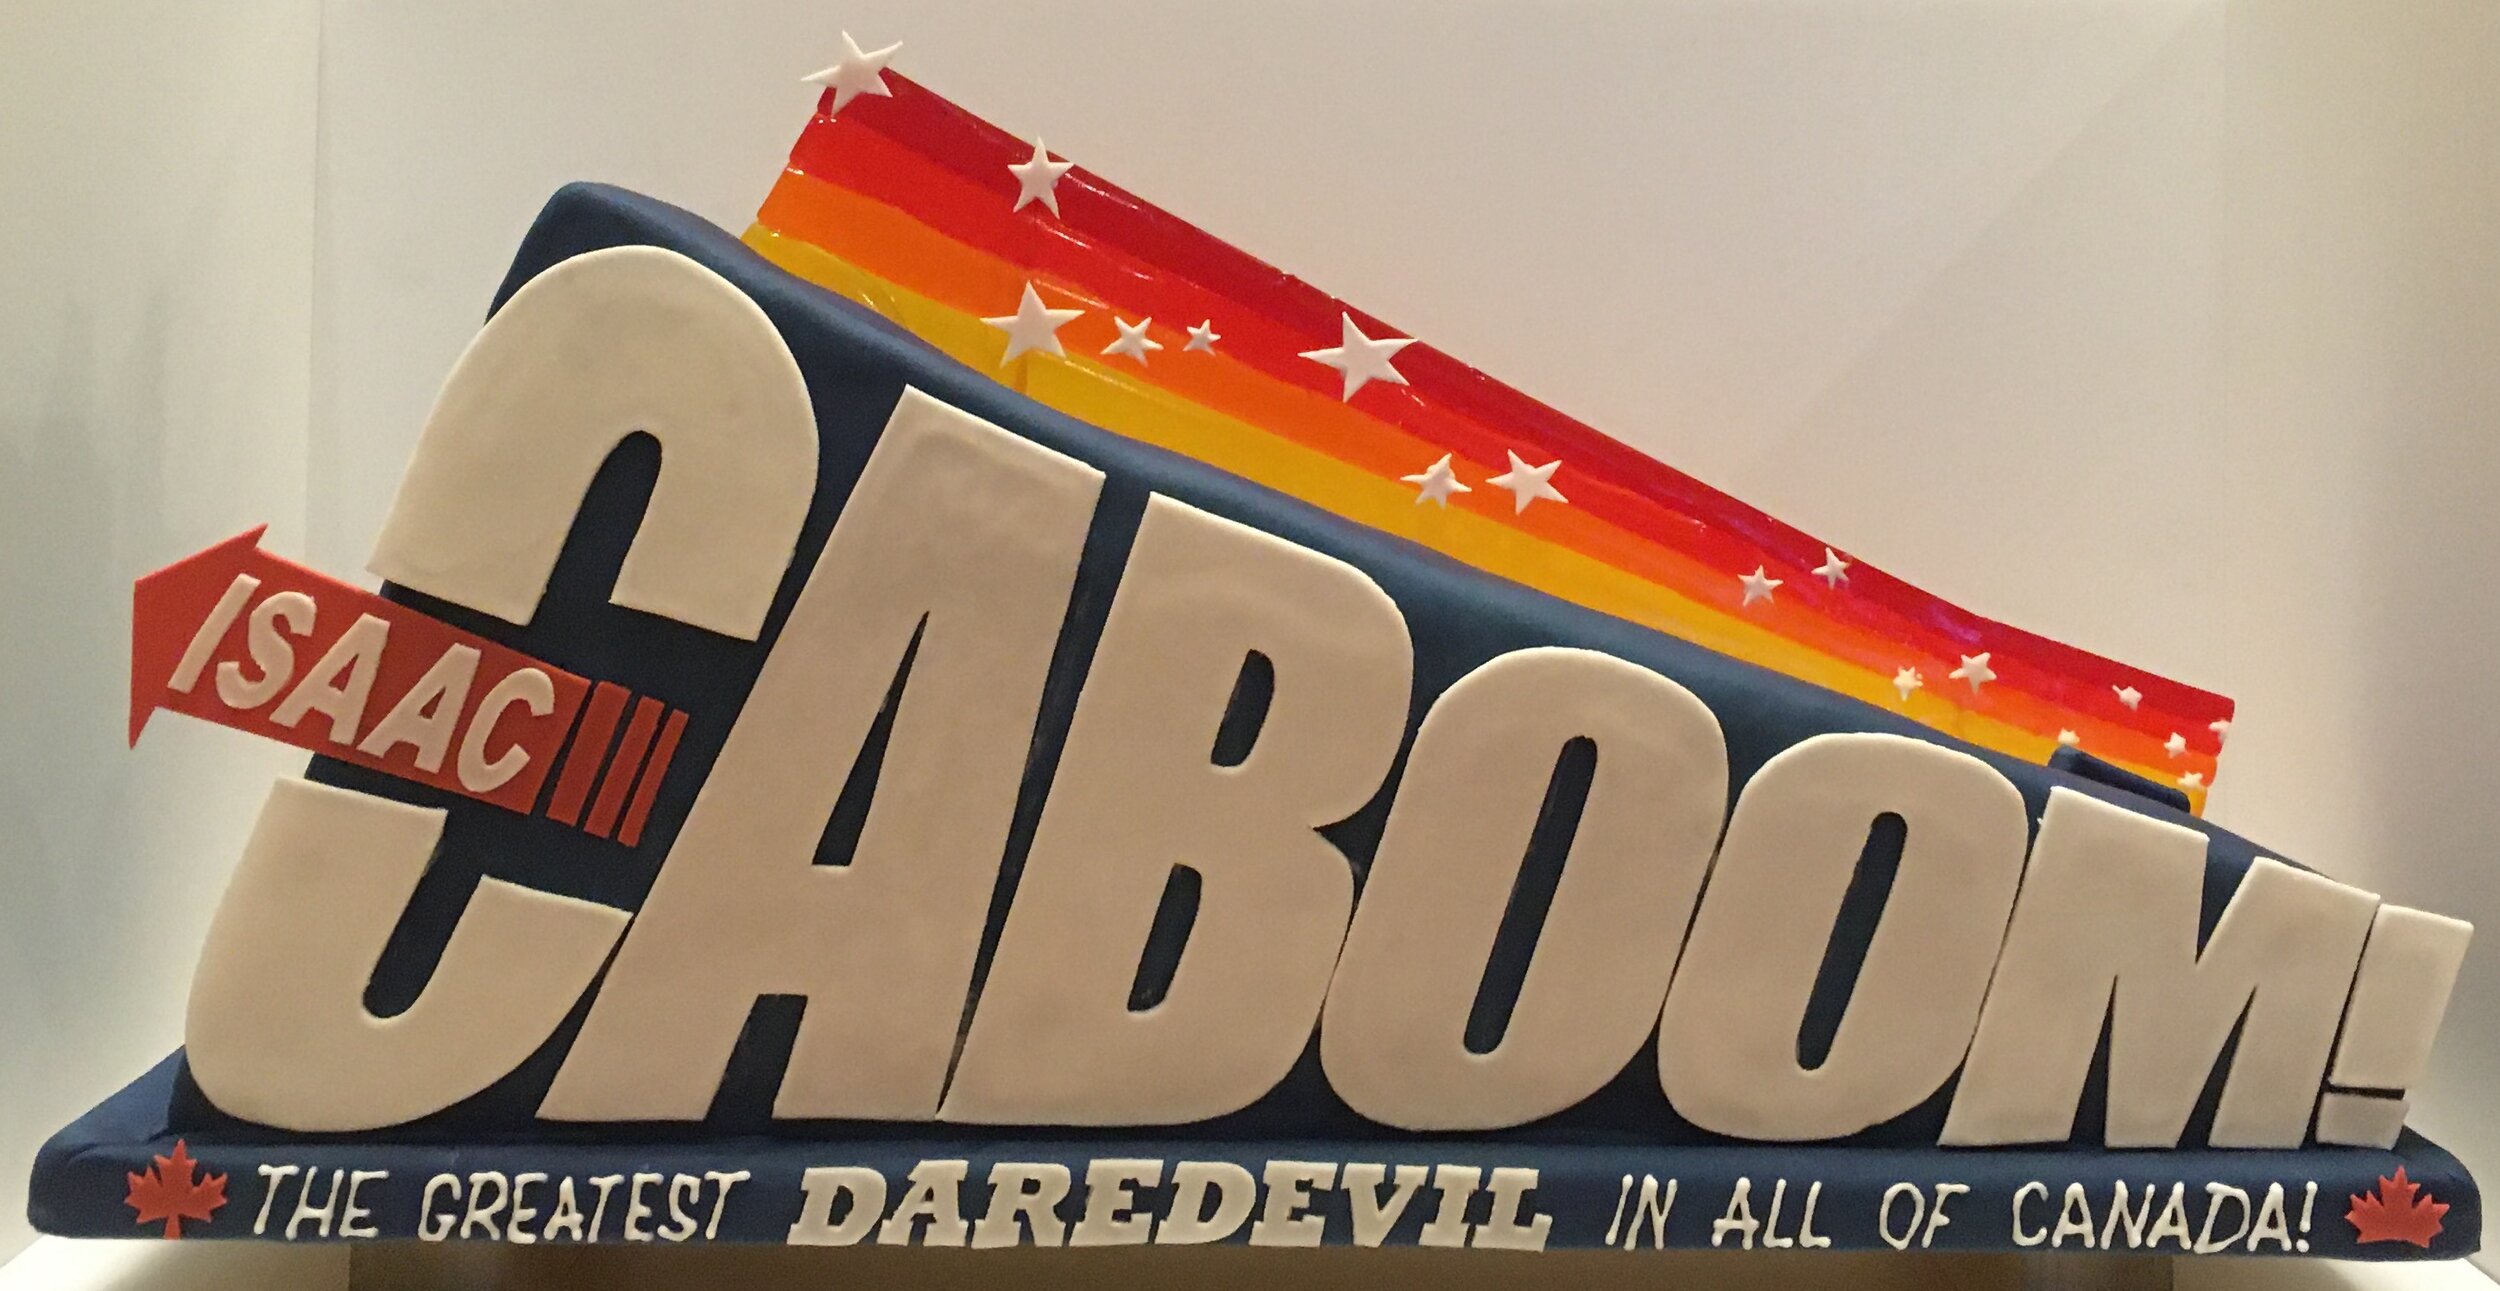
Based on Duke Caboom from Toy Story 4, the figure on top of my Isaac Caboom cake was supposed to do a daredevil jump off the end of the cake. Like many of my cake mechanisms, it sort of worked eventually, but not as well as I had hoped. Which is pretty on brand, both for me and for Duke Caboom.
The cake is lemon cake with raspberry mint white chocolate ganache. The red, yellow, and orange piece on top is isomalt. The guy is made out of gum paste with royal icing detail piped on top.

Guardian Skywatcher Cake
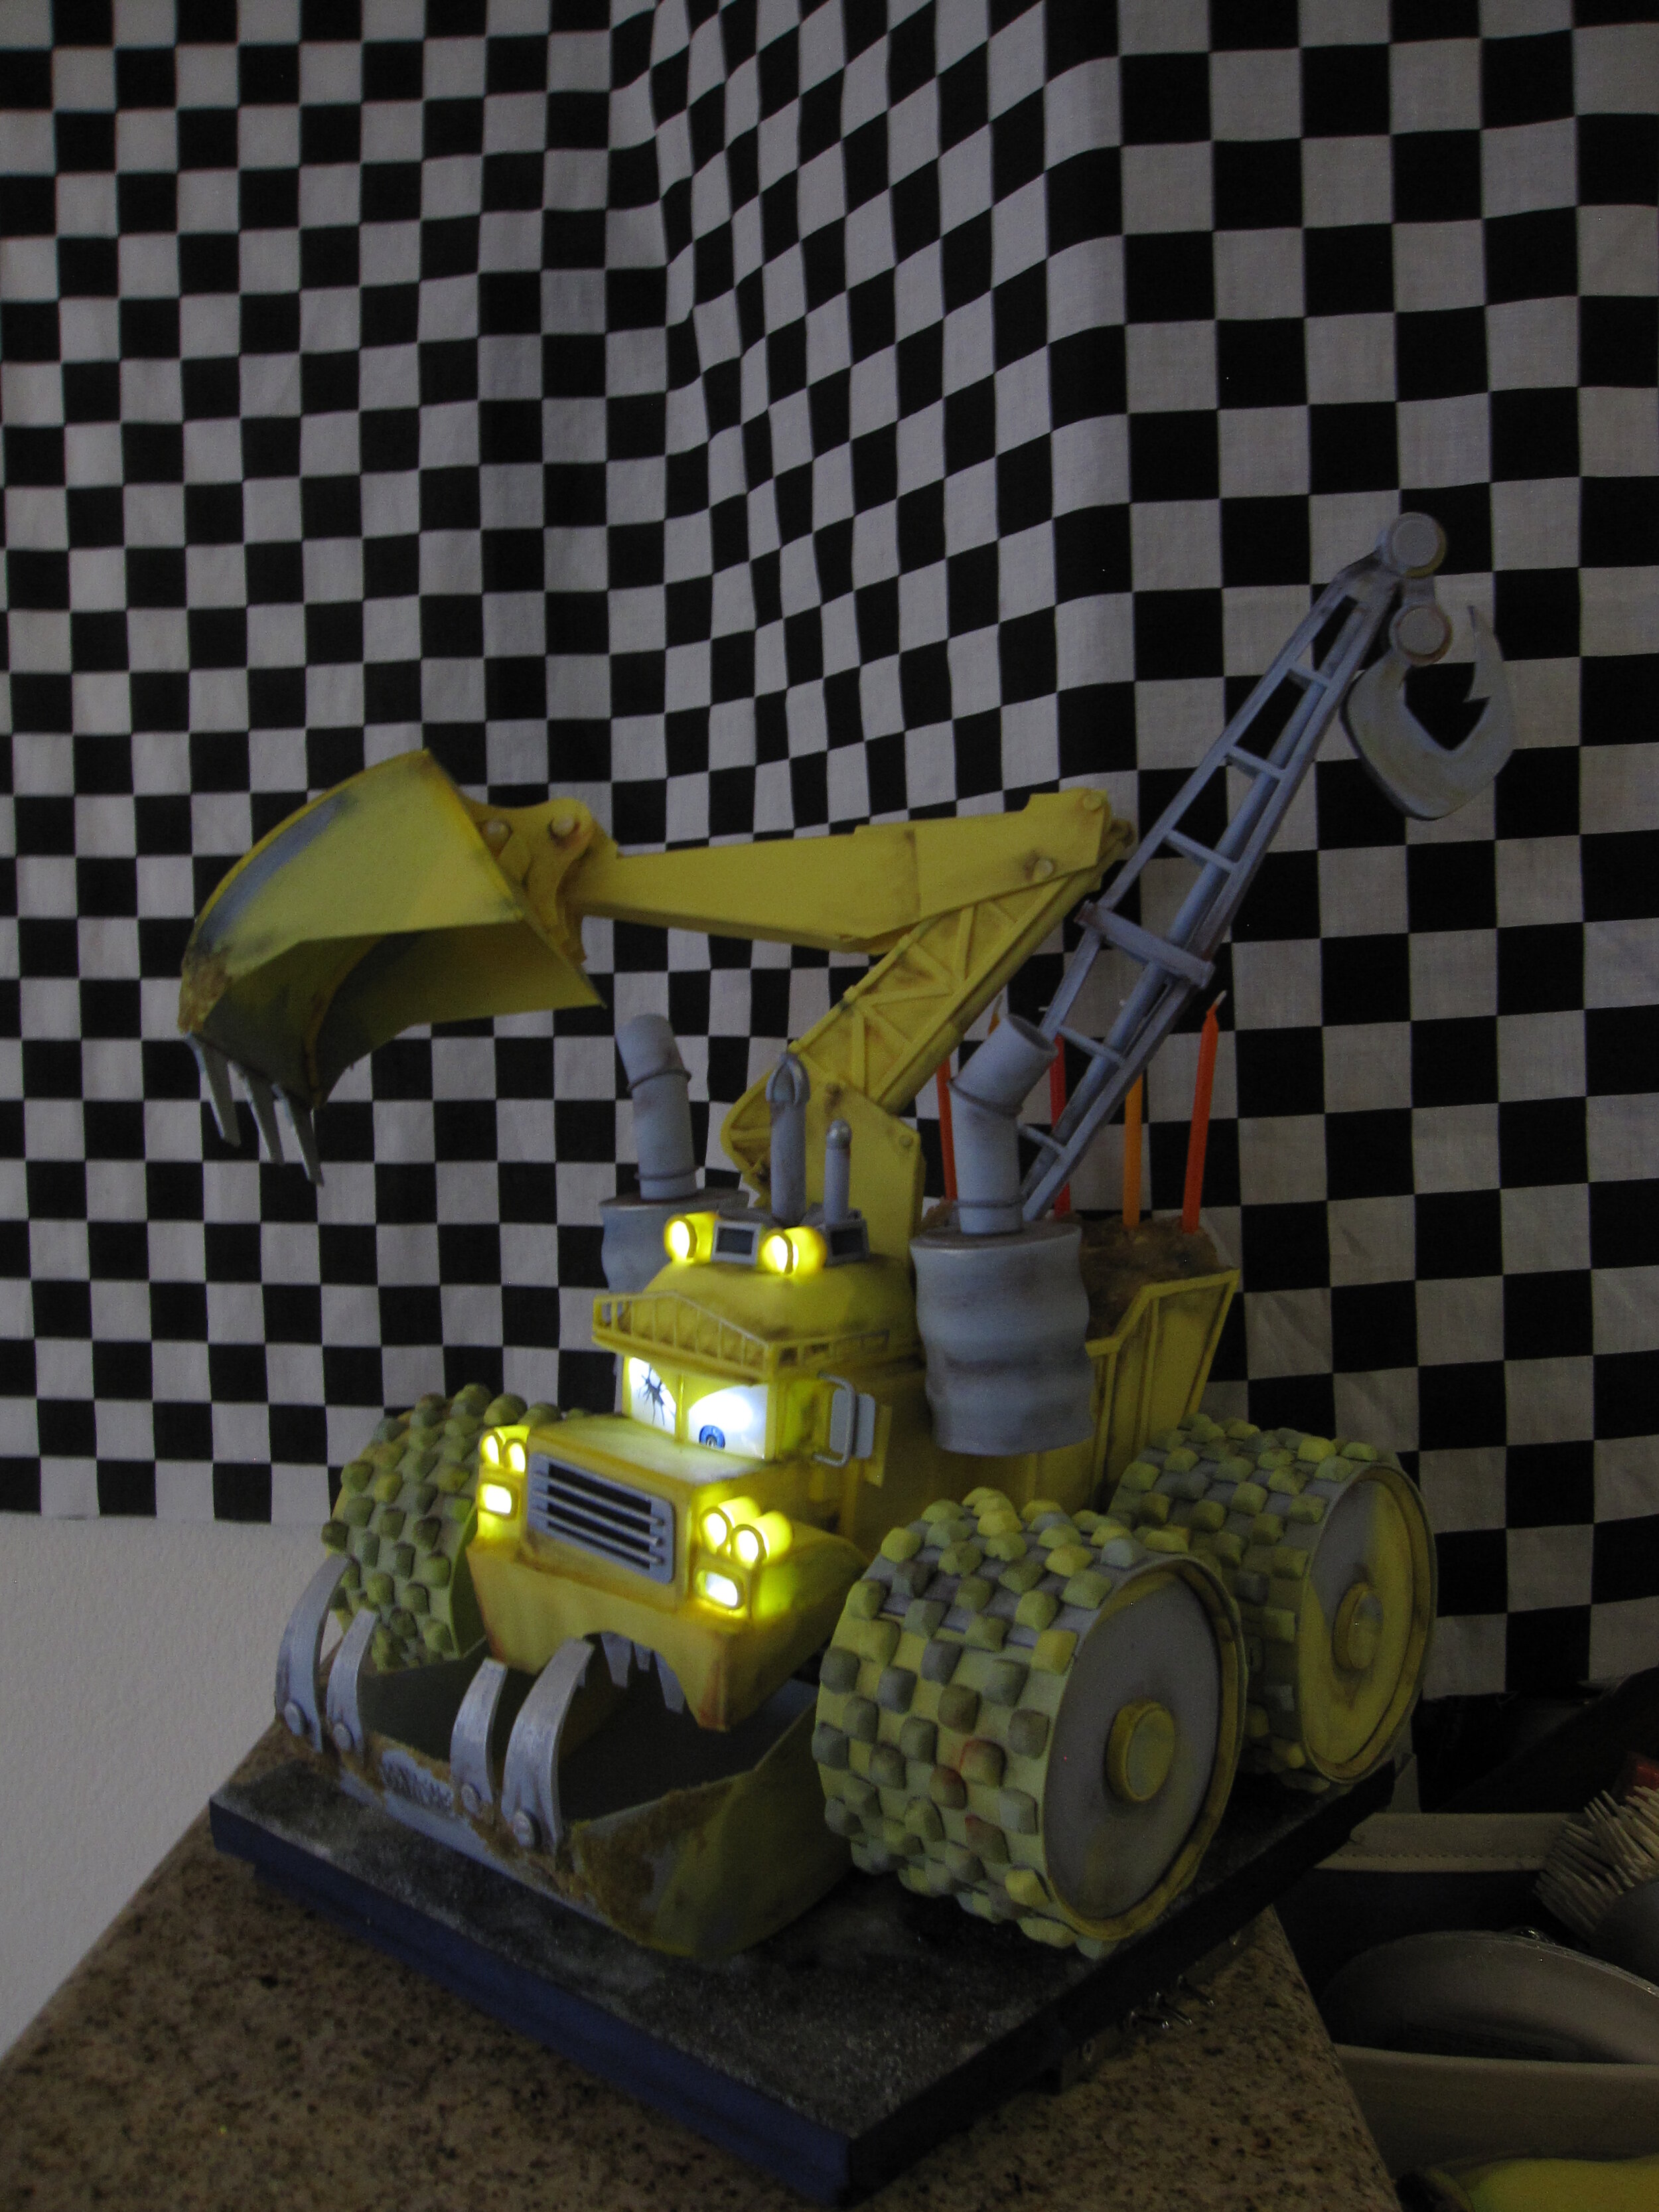
For his 9th birthday, my nephew asked for Guardian Skywatcher from Legend of Zelda: Breath of the Wild. It was almost, but not quite, a total disaster.

For his 9th birthday, my nephew asked for Guardian Skywatcher from Legend of Zelda: Breath of the Wild. If you aren’t familiar with it, it look something like this:
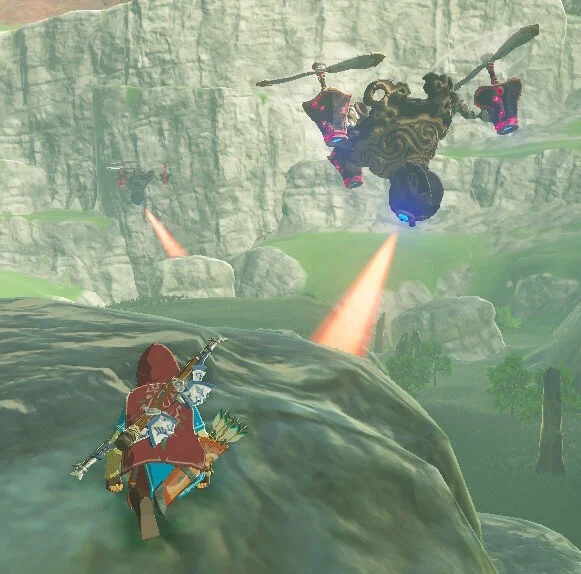
This was one of those cakes of which I just underestimated the difficulty. In retrospect, the difficulties should have been obvious. The shape of the Guardian Skywatcher is very undercut. It has pieces suspended off the sides by thin supports. The propellers are wide at the tips but narrow in the center. And the entire thing is flying. None of these things are easy to achieve in cake.

Yet I blundered into the project with big ambitions but minimal preparation. Long story short, it was almost, but not quite, a total disaster. Attaching the pieces on the sides was a nightmare. The propellers all broke before the party. Even the pink piping gel I used for the glowing sections faded before the party started. On the bright side, at least the entire structure didn’t collapse, which was a real possibility. Overall, clearly not my strongest work, but my nephew, who is among the sweetest people in the world, loved it anyway.


Cars Pit Crew Cake
My little friend Isaac really likes the pit crews from Cars. Fortunately, if there is one thing I’m good at, it’s making anthropomorphic vehicles out of gum paste.
My little friend Isaac really likes the pit crews from Cars. Fortunately, if there is one thing I’m good at, it’s making anthropomorphic vehicles out of gum paste. Over the years, I’ve had a lot of experience.

Because I also like to build automata, I decided to make the pit crew dance.
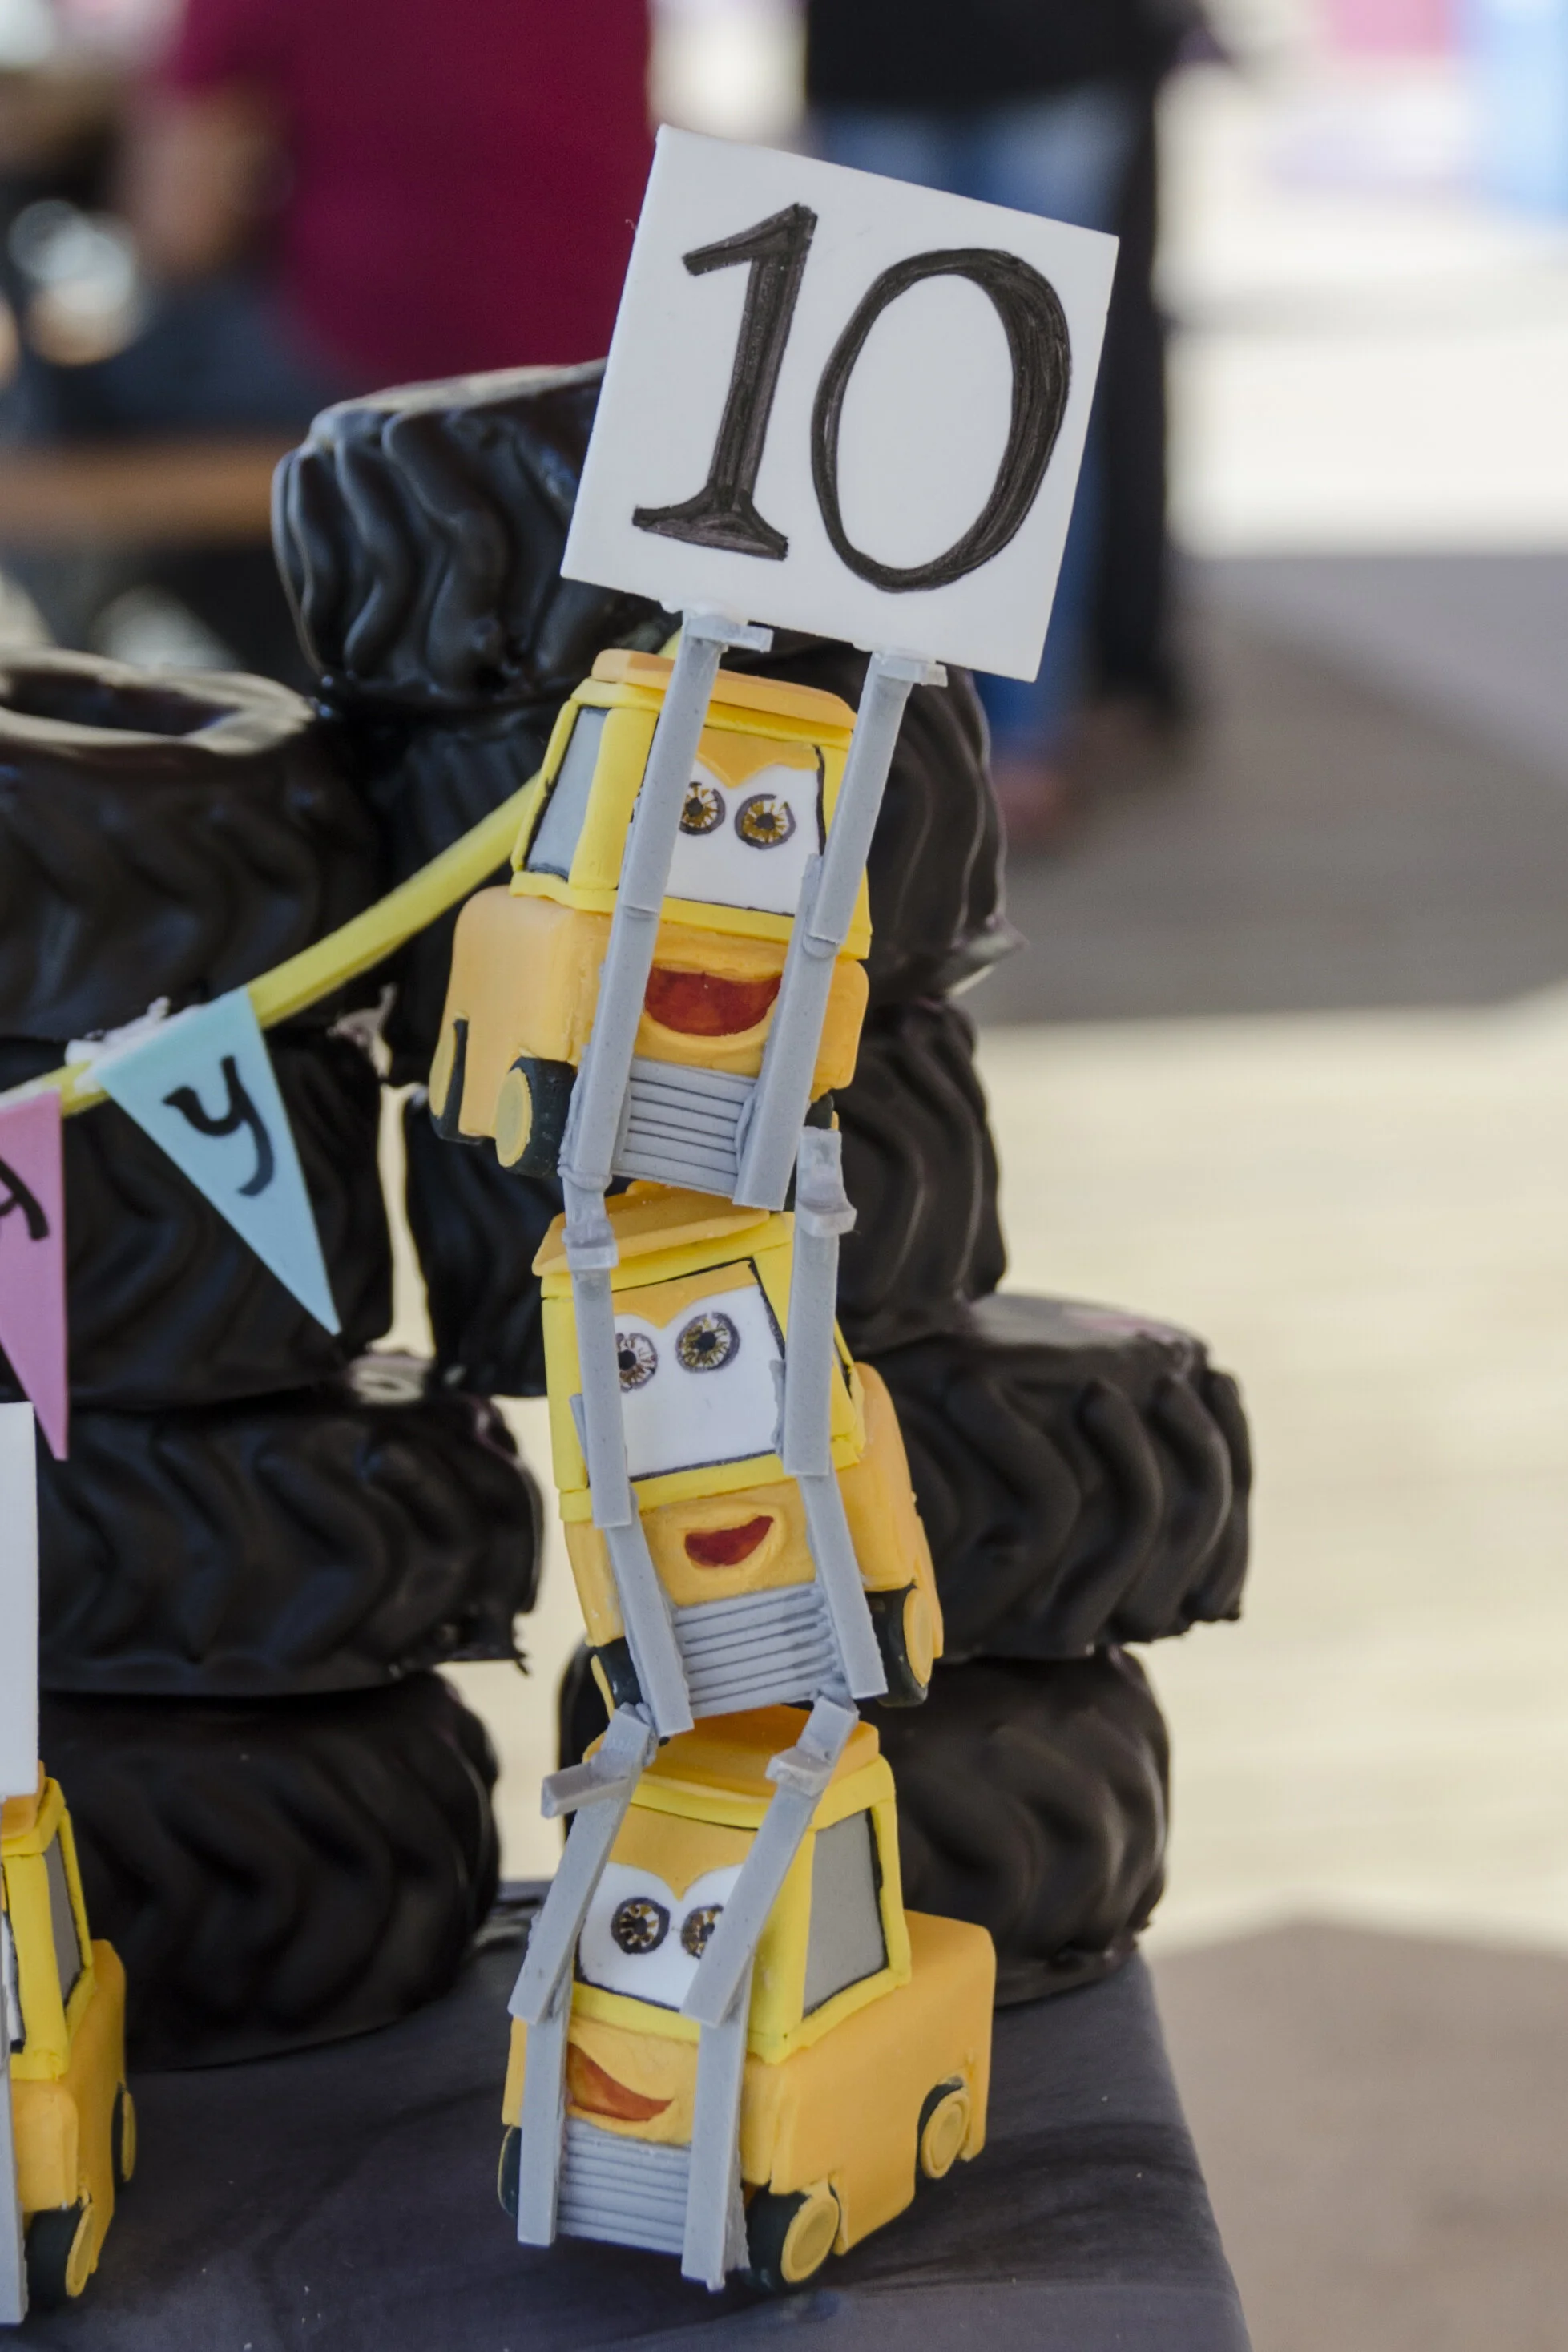
I really wanted to make it voice activated, with a headset like the pit crew boss. I have successfully made a voice activated automaton before, but for some reason I couldn’t get this one to work so I had to settle for a switch. In the end, the switch was probably better because it was easier for Isaac to use than the voice activation would have been and he really enjoyed turning it on and off while carefully examining the mechanism.
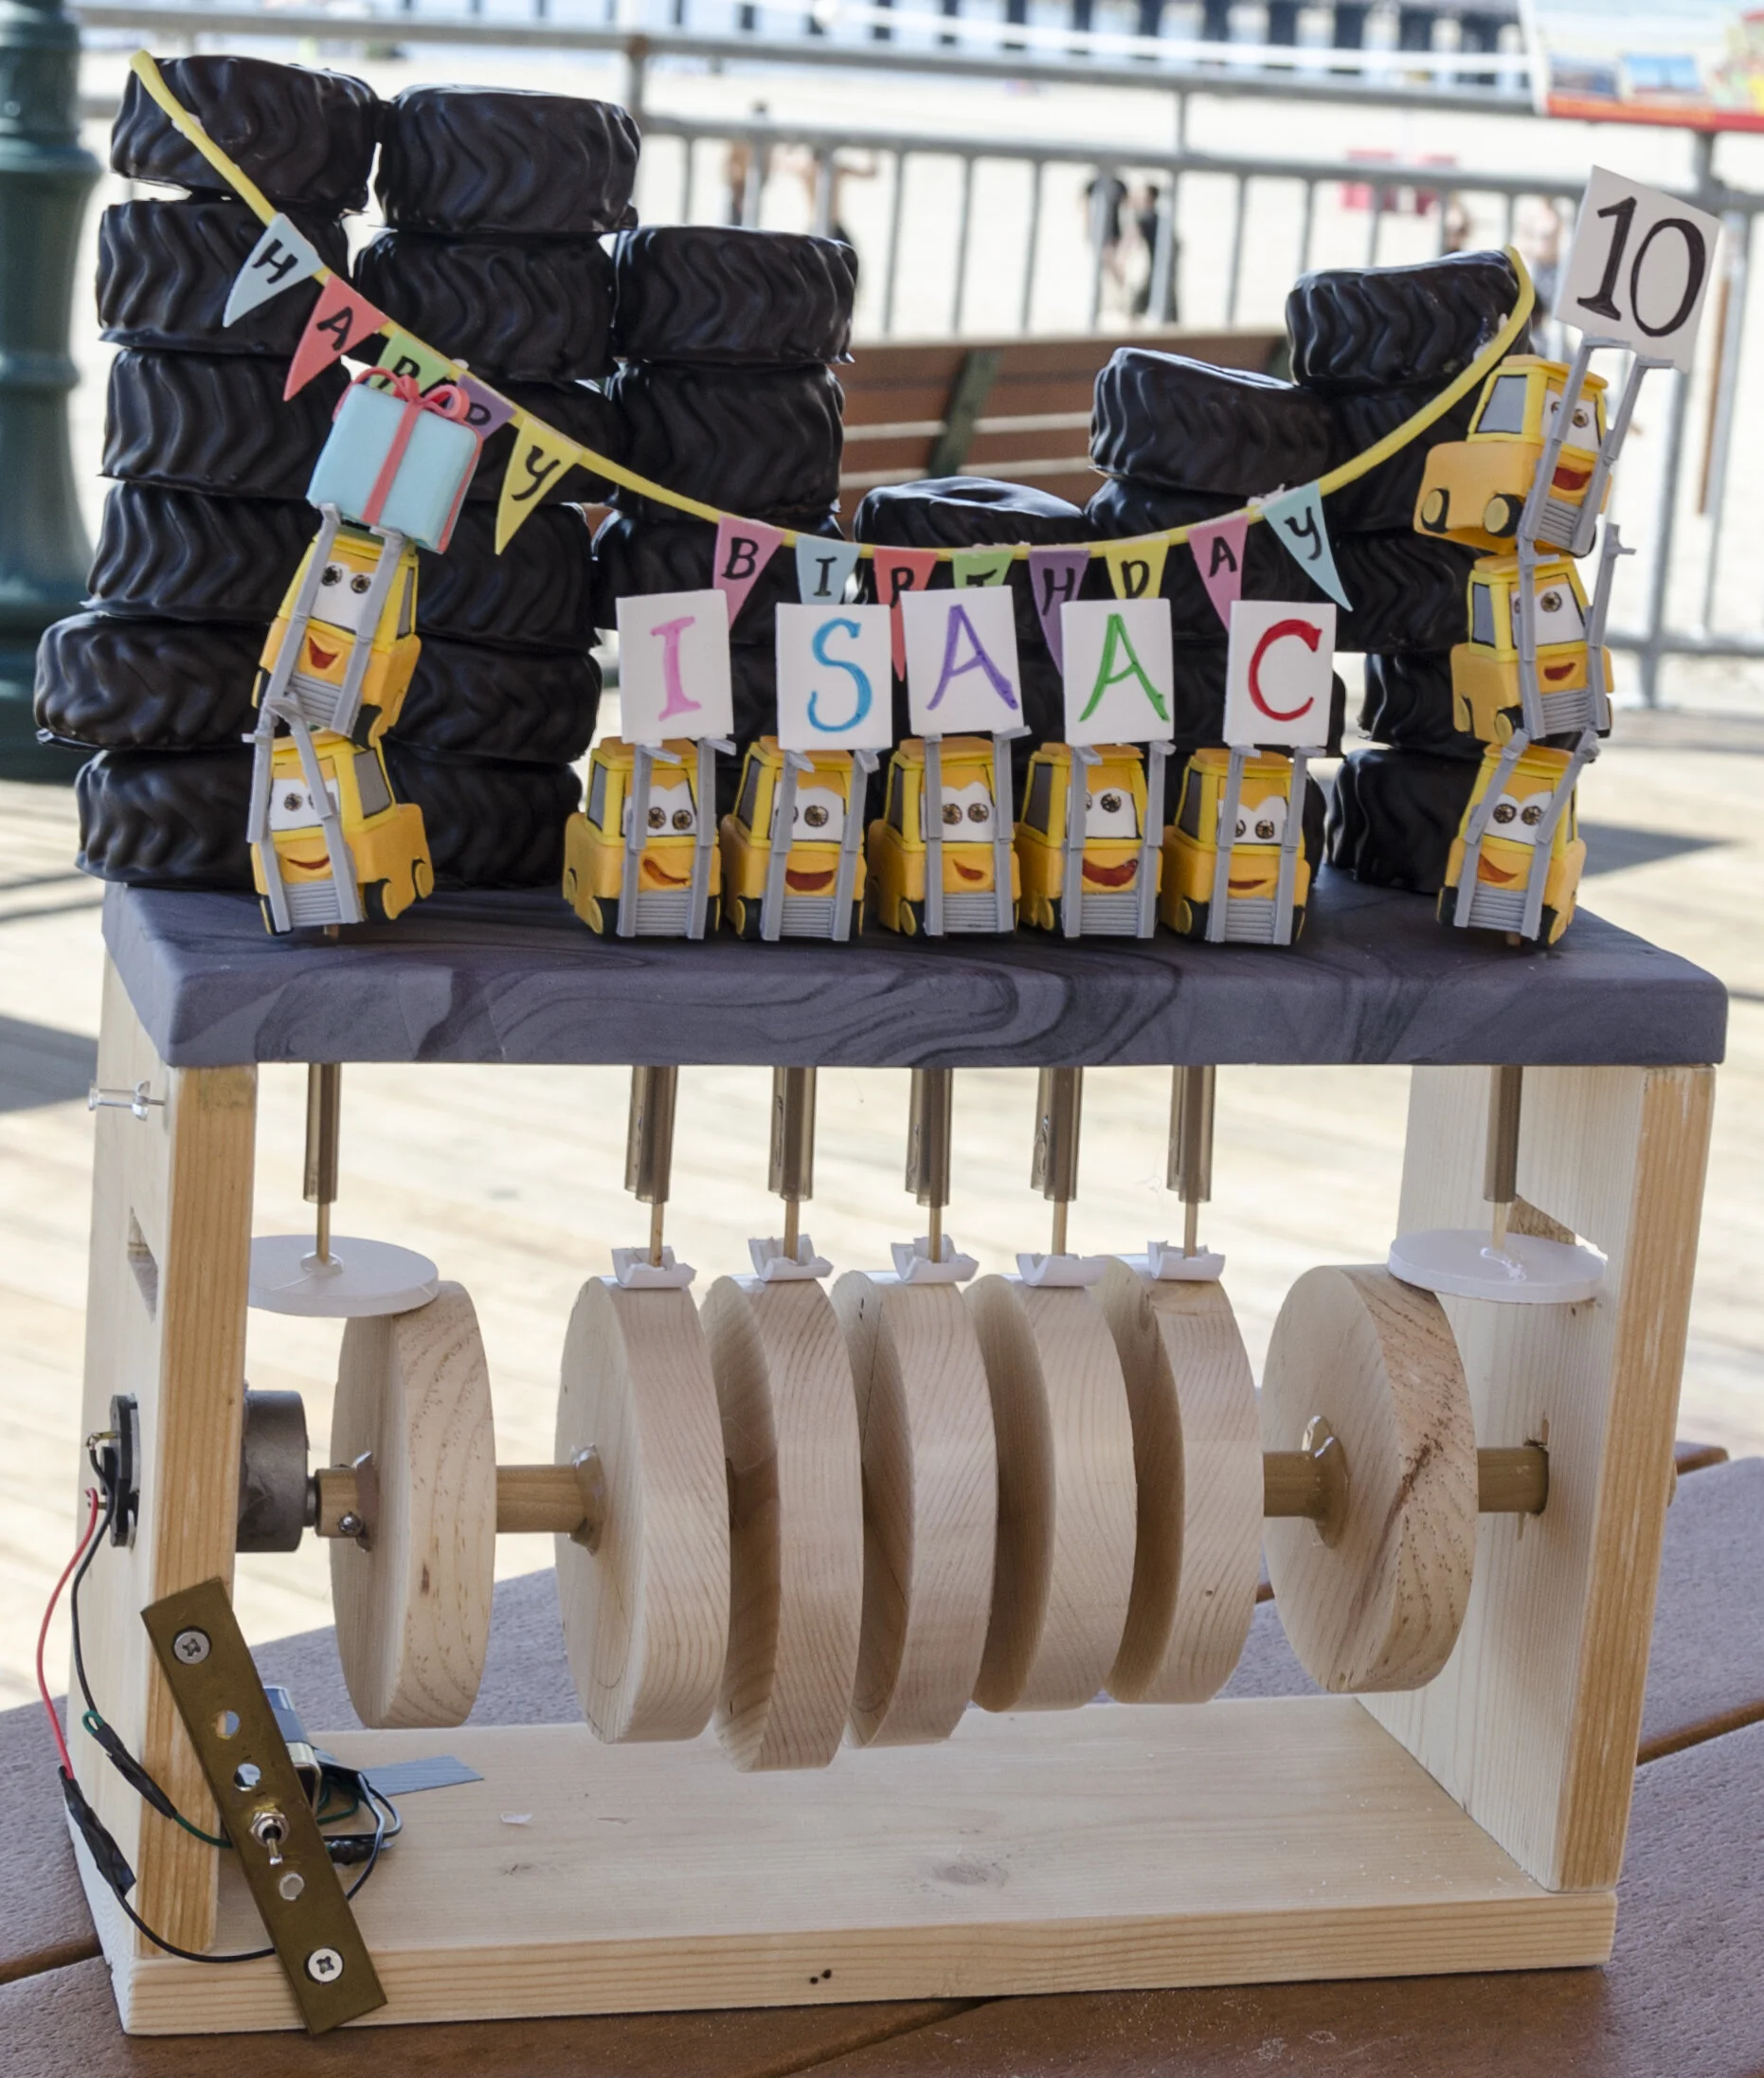
The actual cake is the tires behind the pit crew. They’re a basic sponge cake with a raspberry or blackberry jam filling, with modeling chocolate treads, dipped in dark chocolate.

They were kind of like really fancy Donettes. Which is to say they were fabulous. If I do say so myself.

Inside Out Cake
This Inside Out cake was for my friend Isaac’s ninth birthday, which is why it’s in the shape of the number 9.
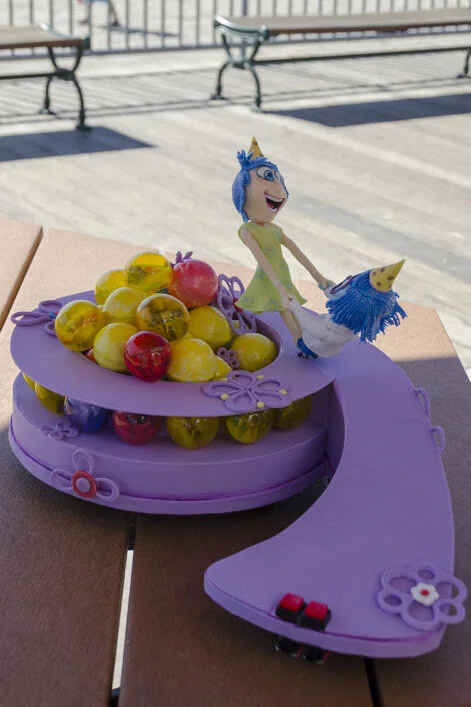

This Inside Out cake was for my friend Isaac’s ninth birthday, which is why it’s in the shape of the number 9.

The number 9 itself is mostly foam core covered with gum paste, because I needed room to embed LEDs and I didn’t need very much cake because they party was pretty small.

The memories around the edge of the 9 are gelatin bubbles, which are made by dipping partially inflated balloons, coated with shortening, into melted gelatin. They’re surprisingly sturdy once dry and technically edible, though it’s a little like eating plastic.
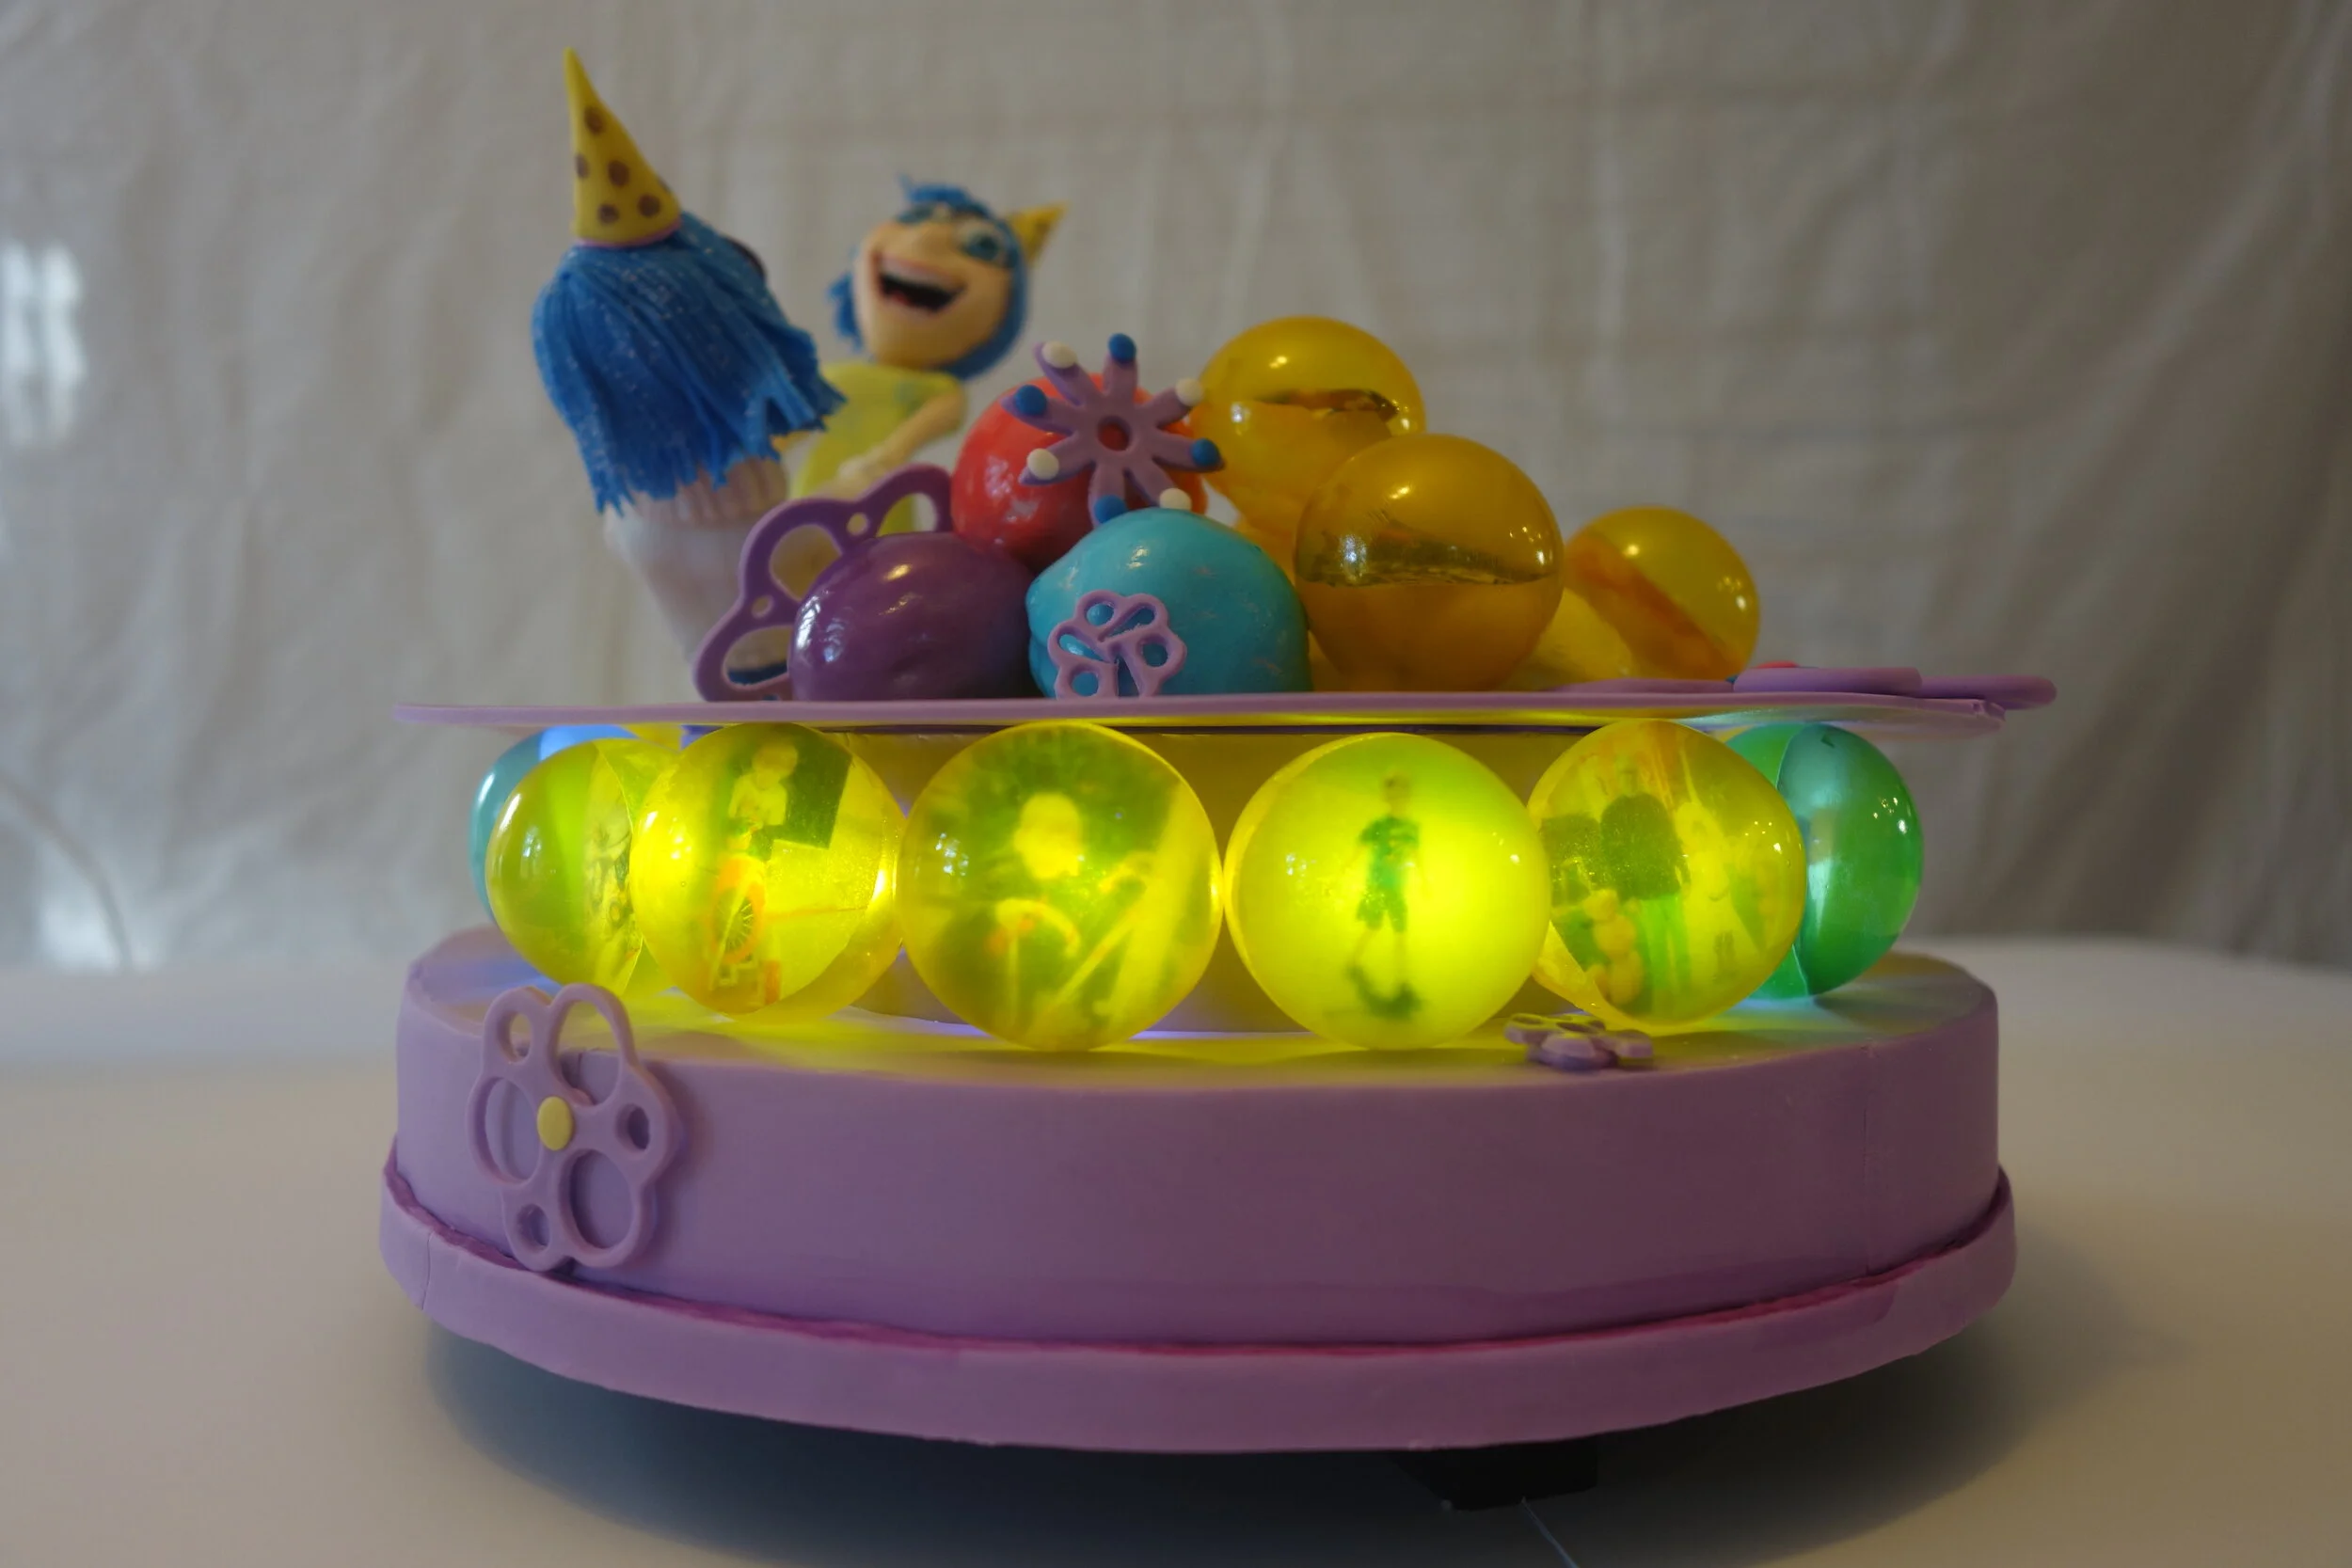
Each memory bubble contains a picture of the birthday boy, at ages from infancy to now, printed on edible wafer paper and each one has an LED behind it.
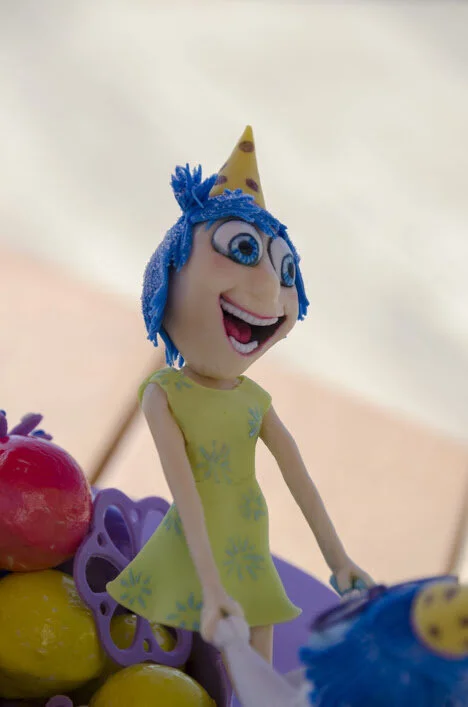

The figures are made of modeling chocolate with gum paste hair and clothes. They are made over a wire armature attached to a motor, so that they can spin joyously around.
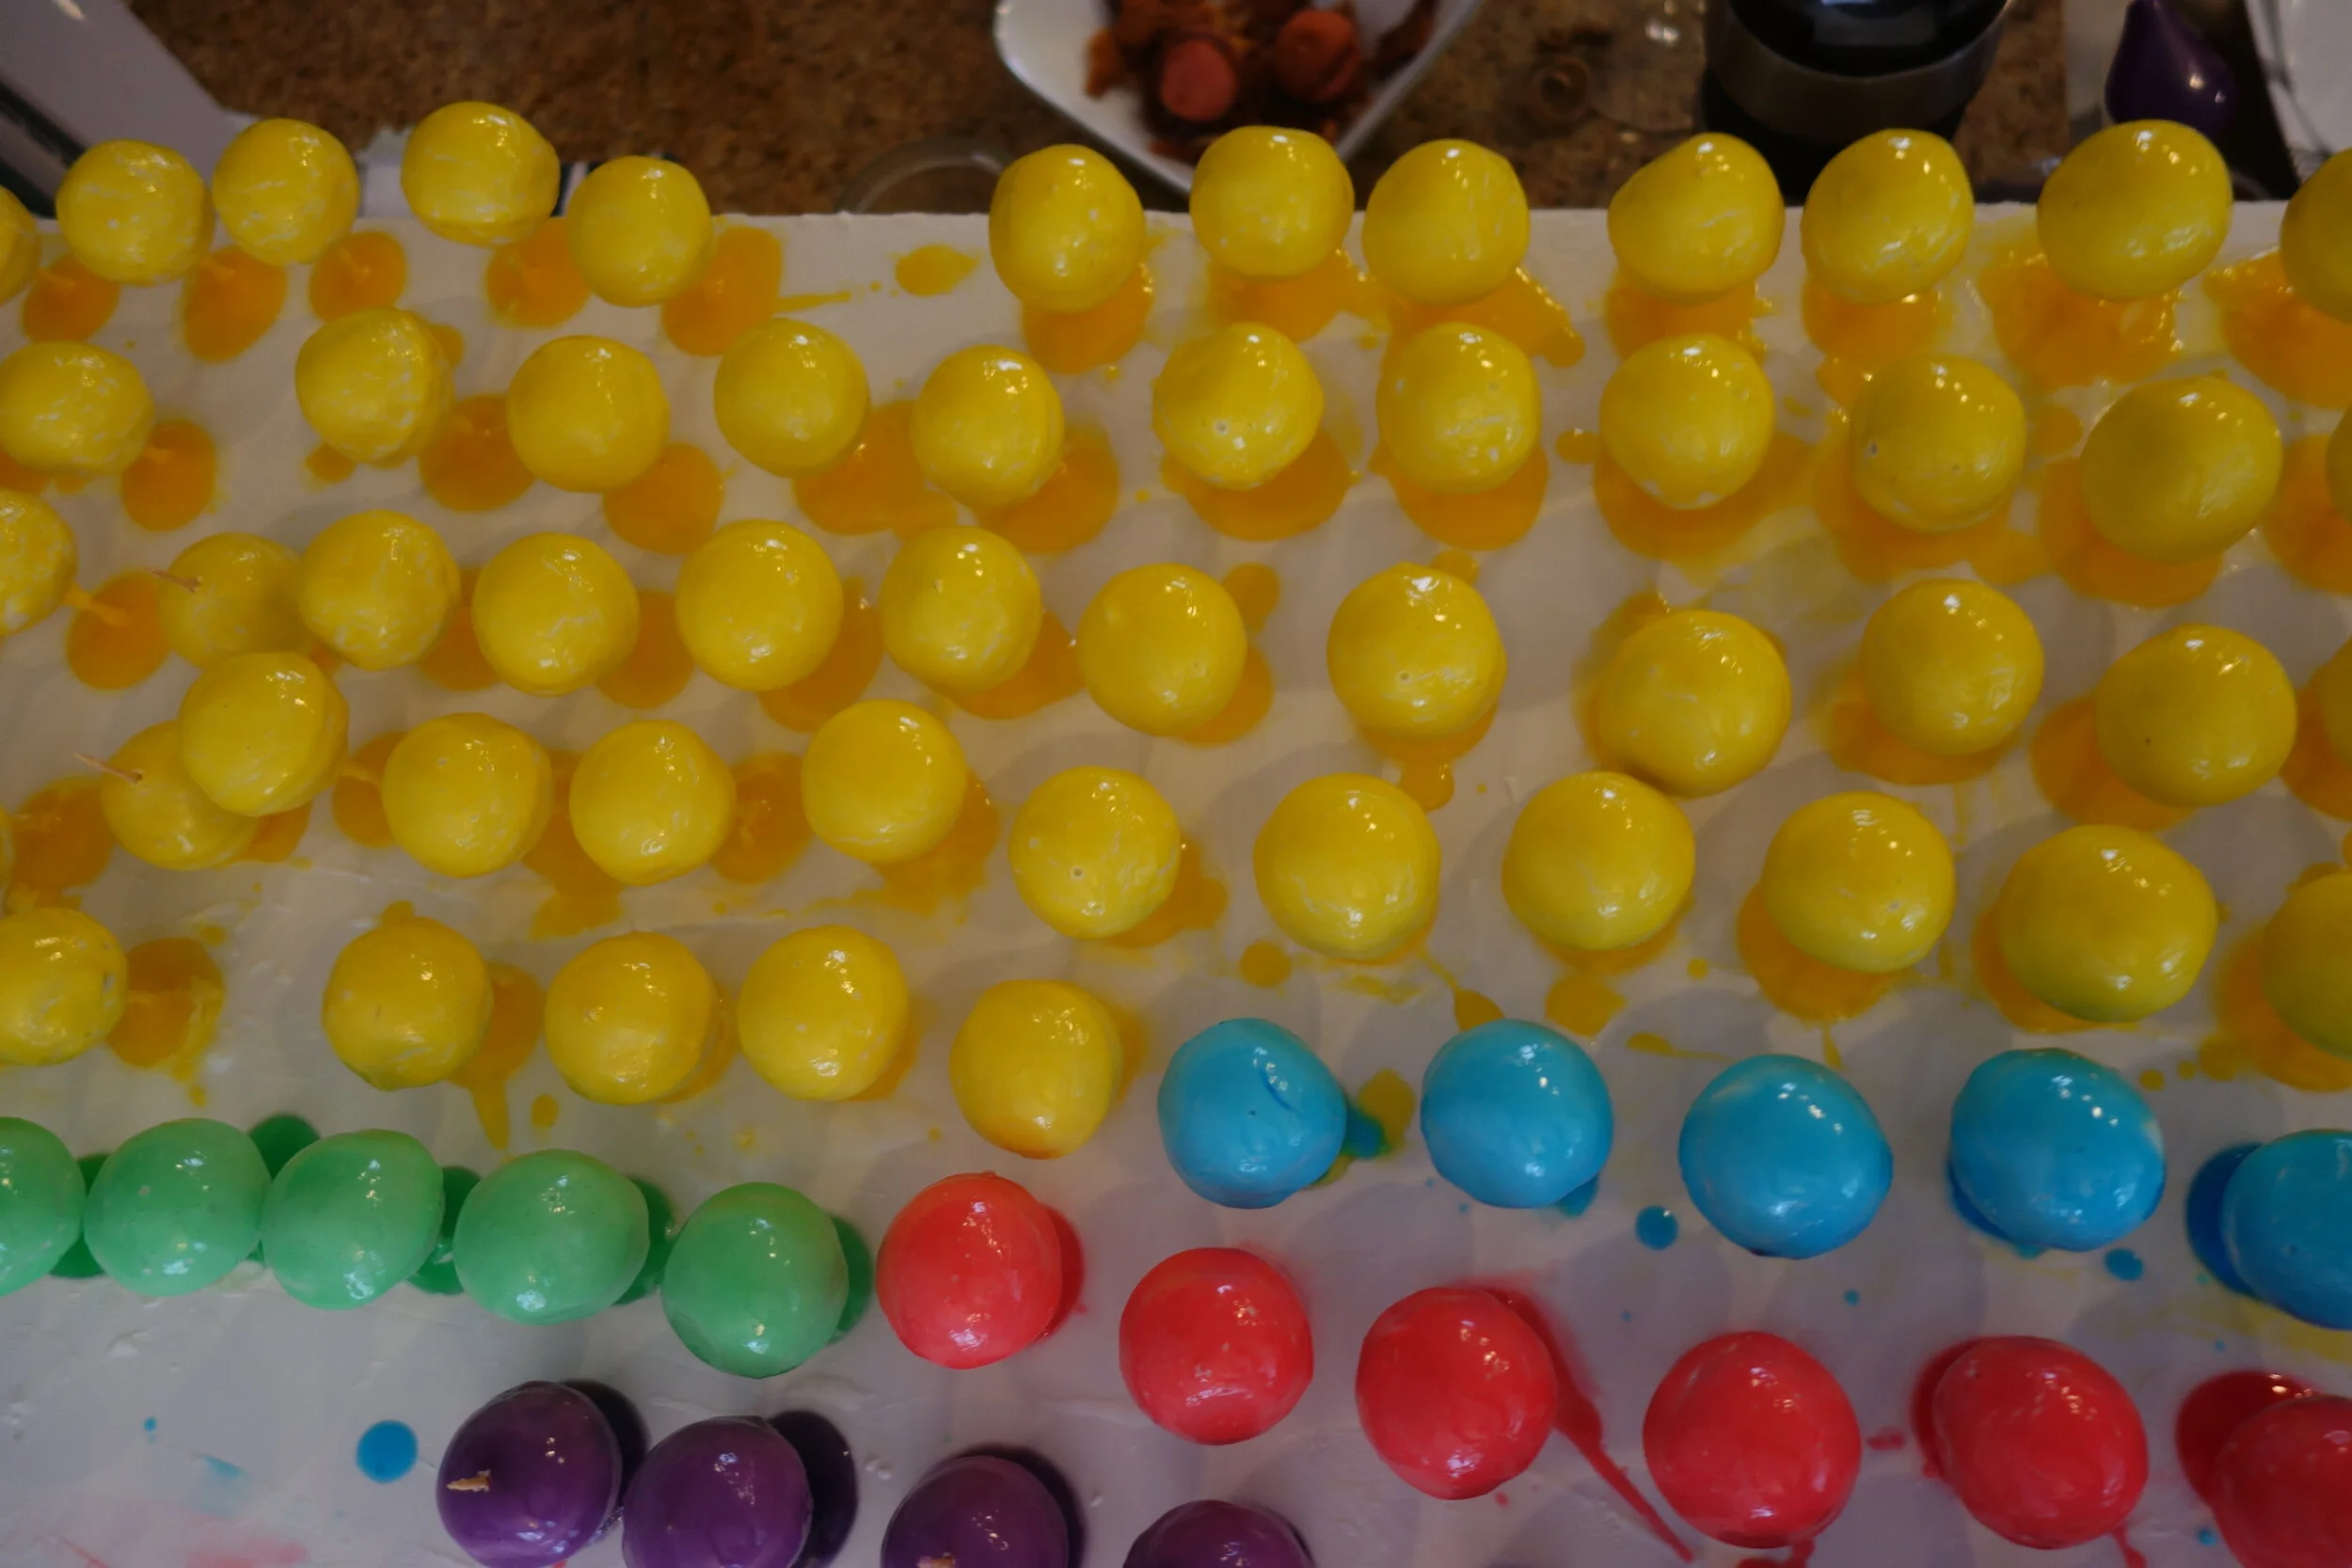
The actual cake is the memory balls in the middle of the 9, which are cake balls dipped in royal icing and then in colored piping gel. I was trying to make cake that was easy to pick up and eat with no utensils, because the party was outside. But I didn’t leave enough time for the piping gel to dry, so they wound up extremely sticky and messy to eat. Still tasty, though.

Clash of Clans Cake
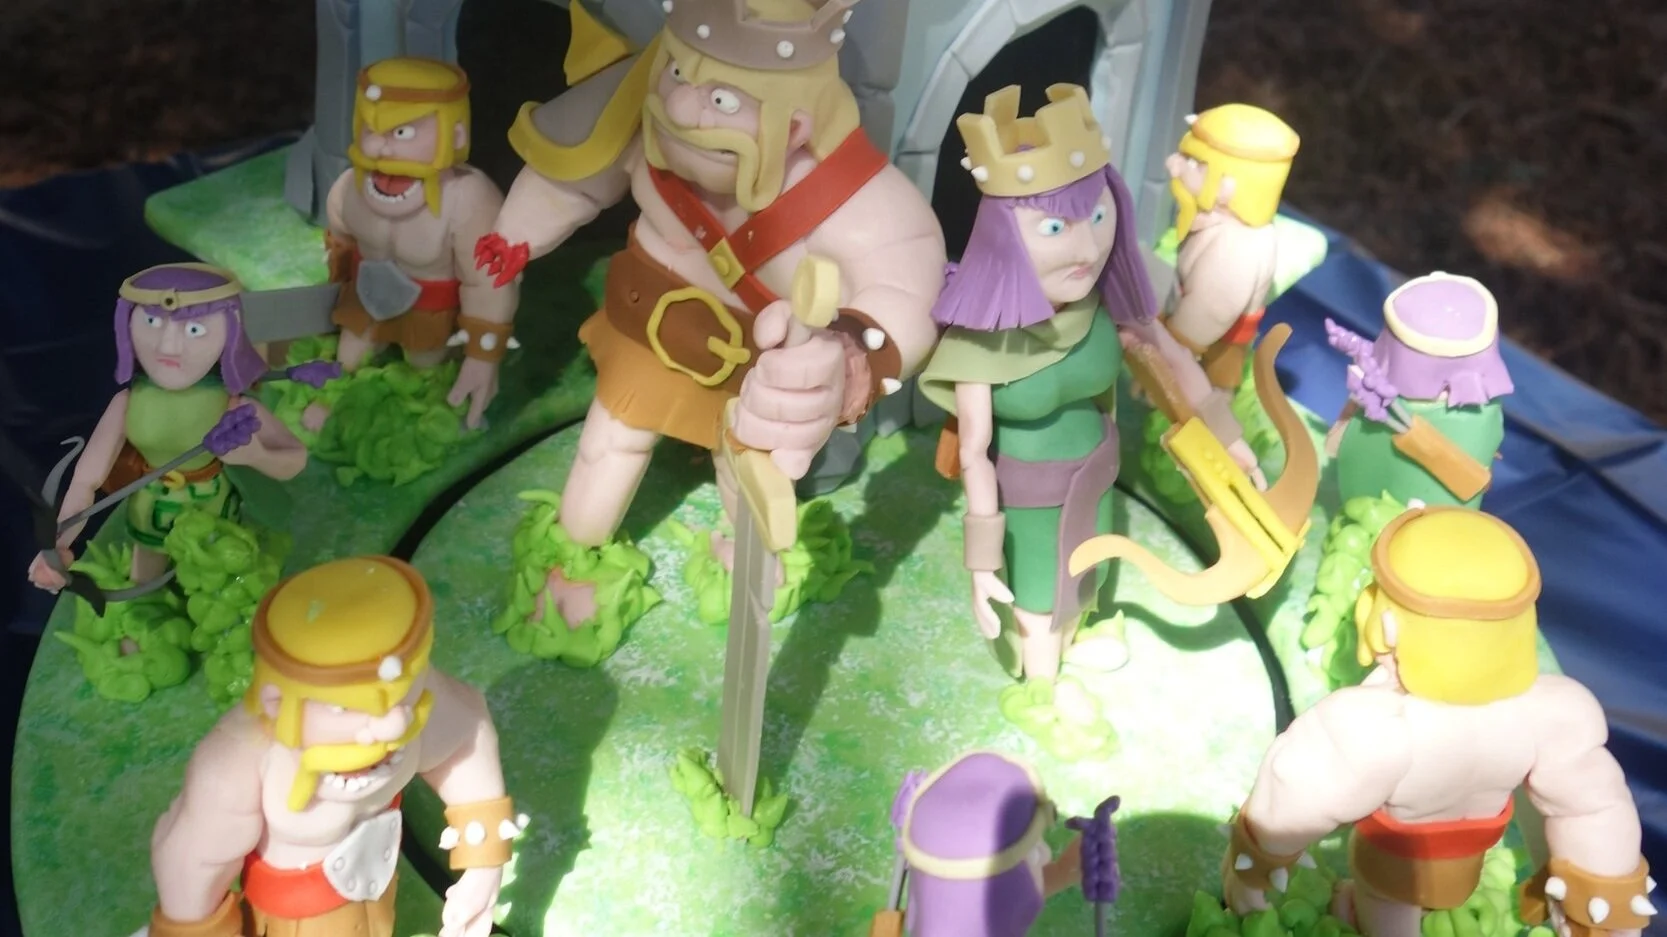
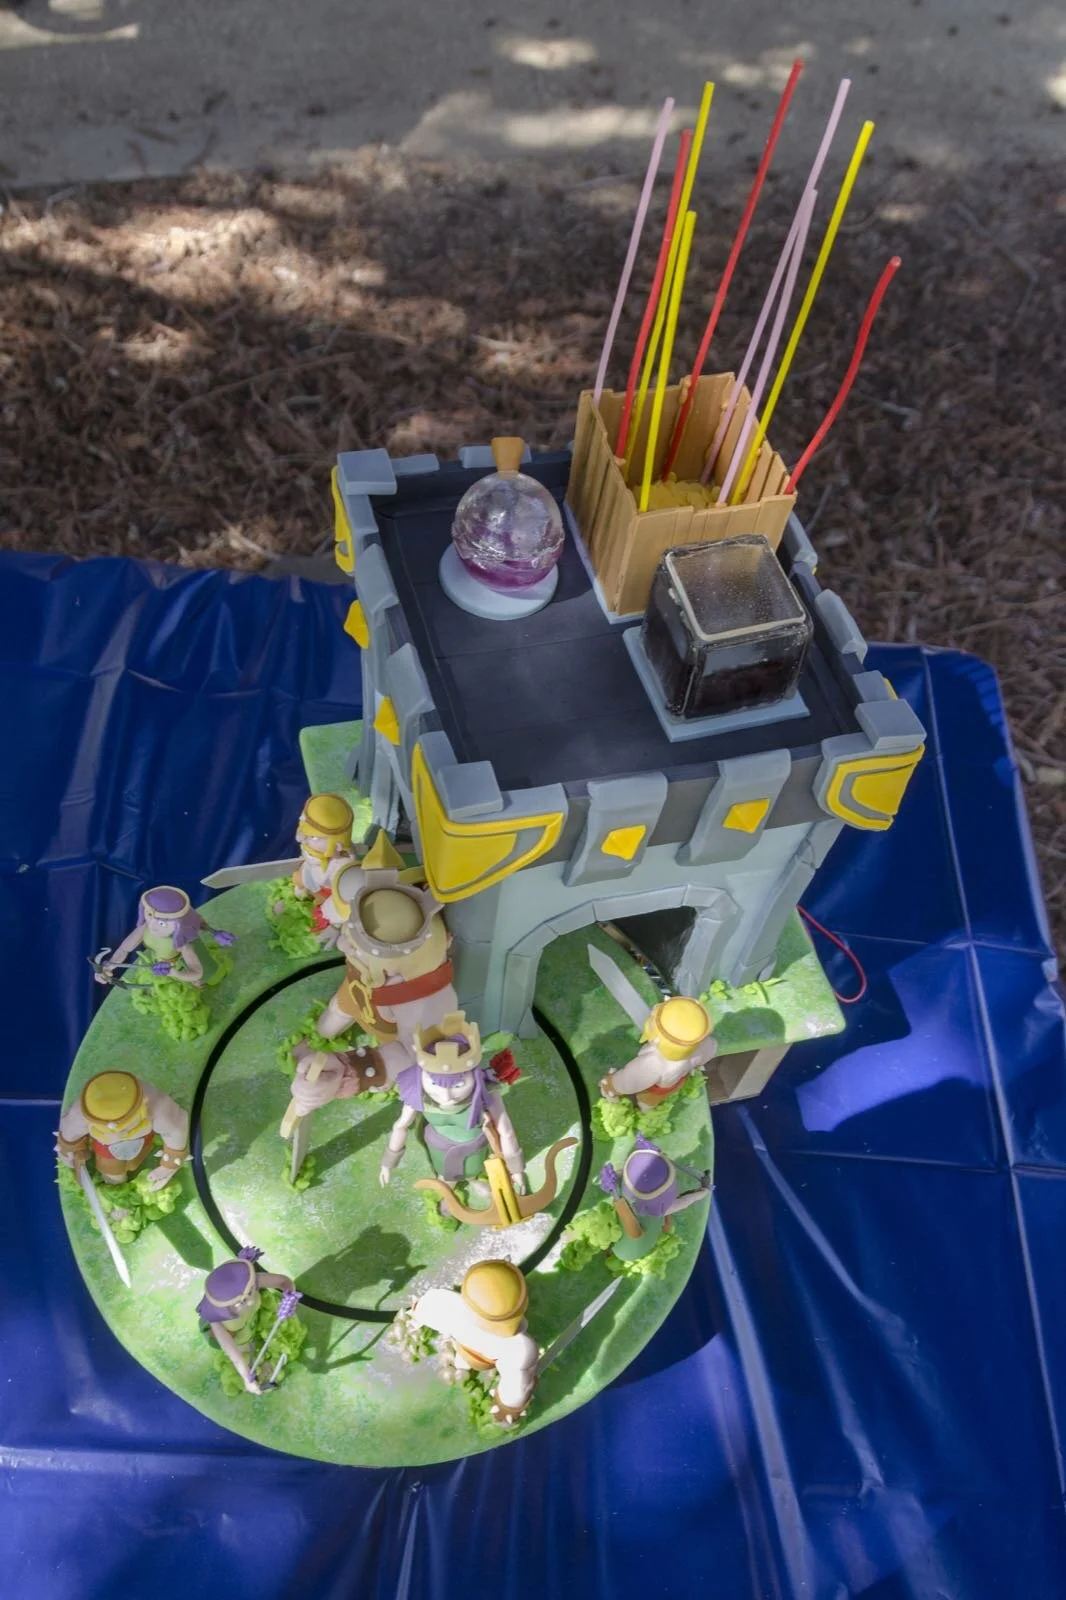
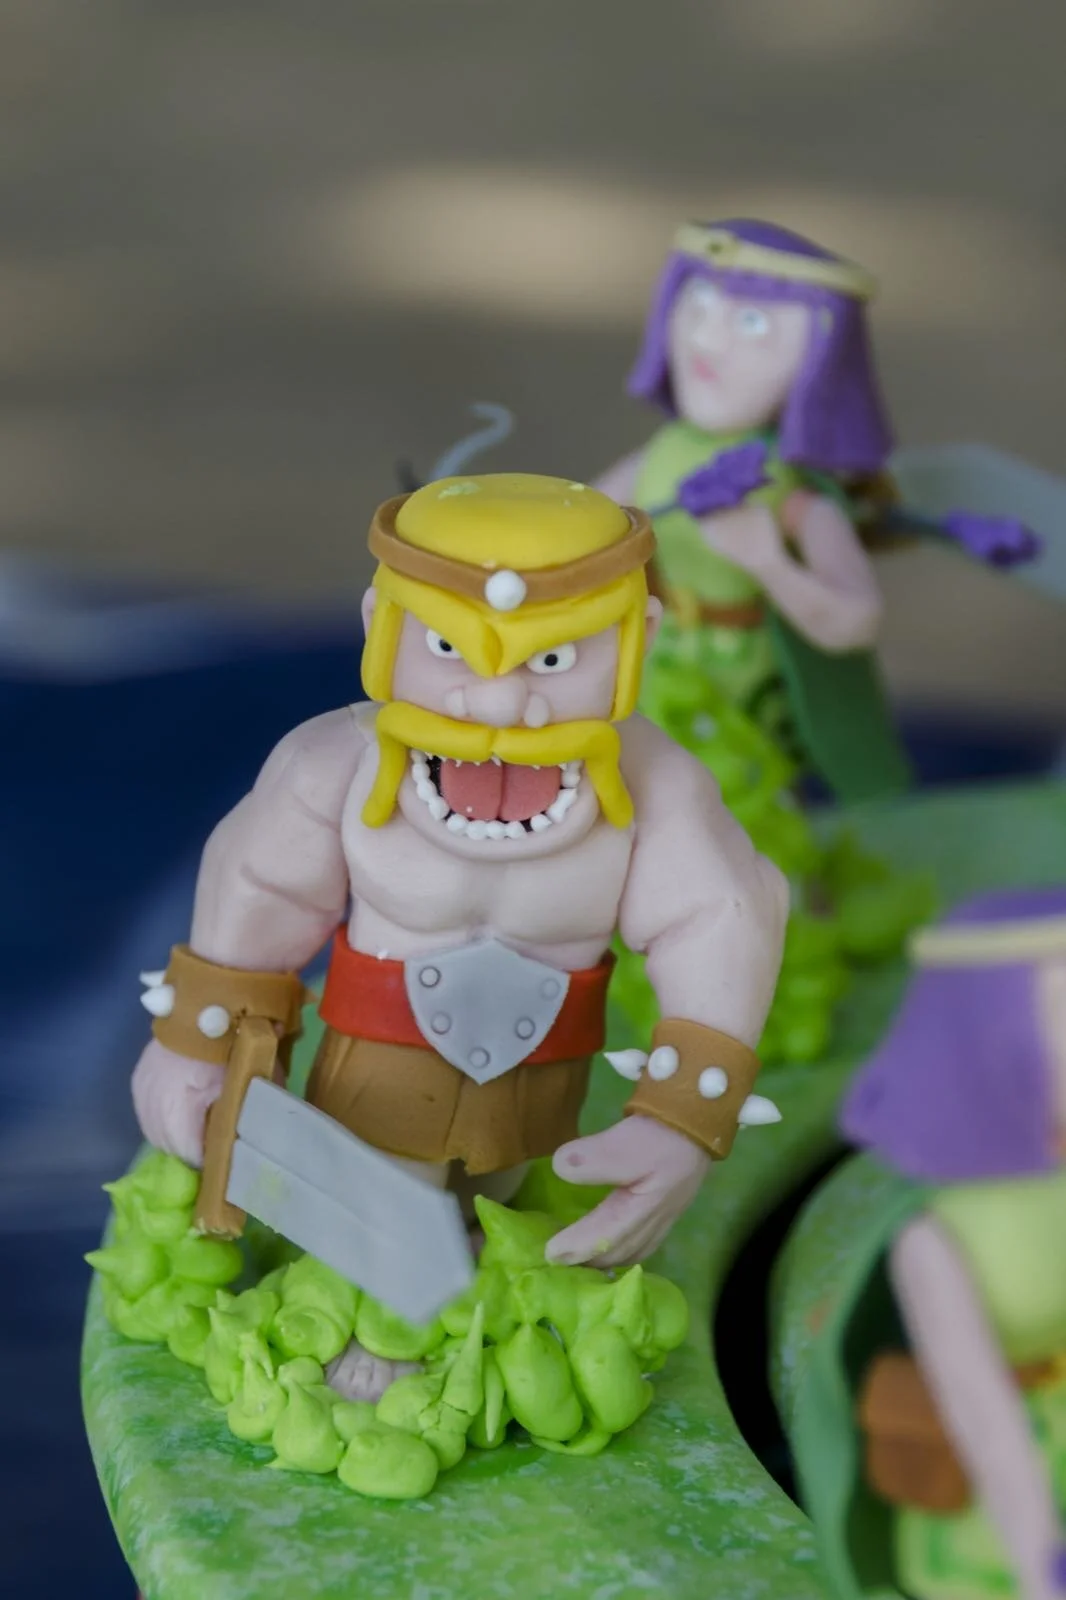
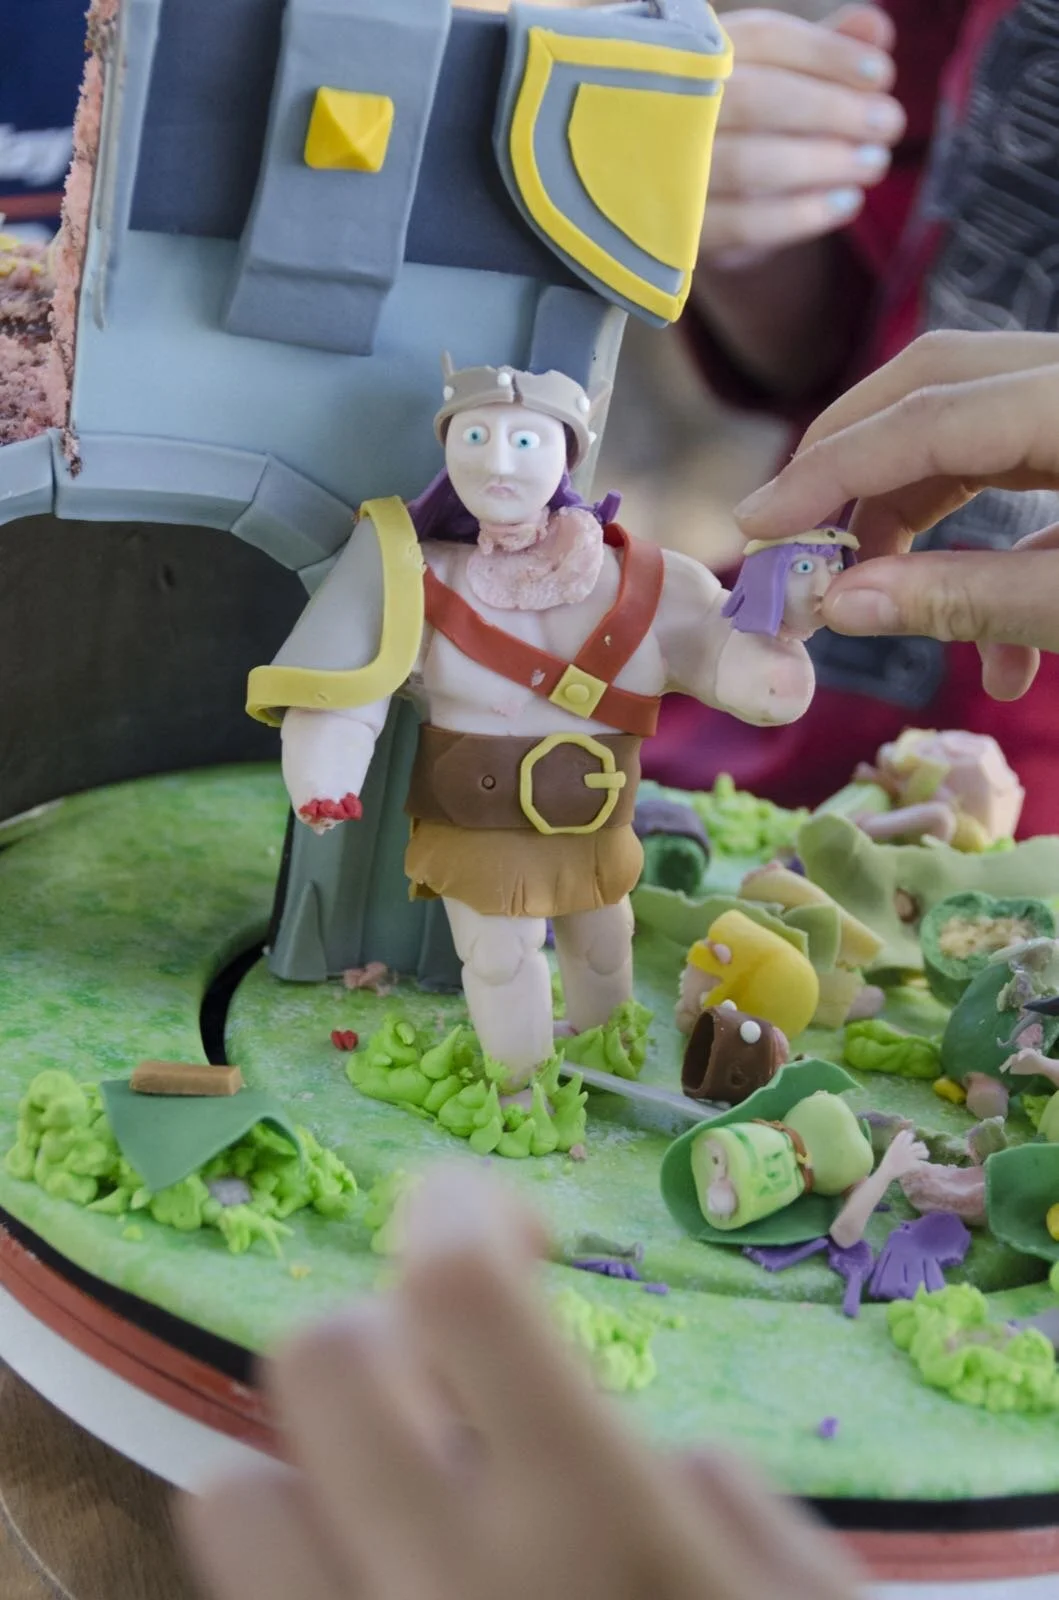
For her 9th birthday, my niece had very specific requirements – a Level 6 Clan Castle from Clash of Clans with an Archer Queen and Barbarian King as well as archers and barbarians.
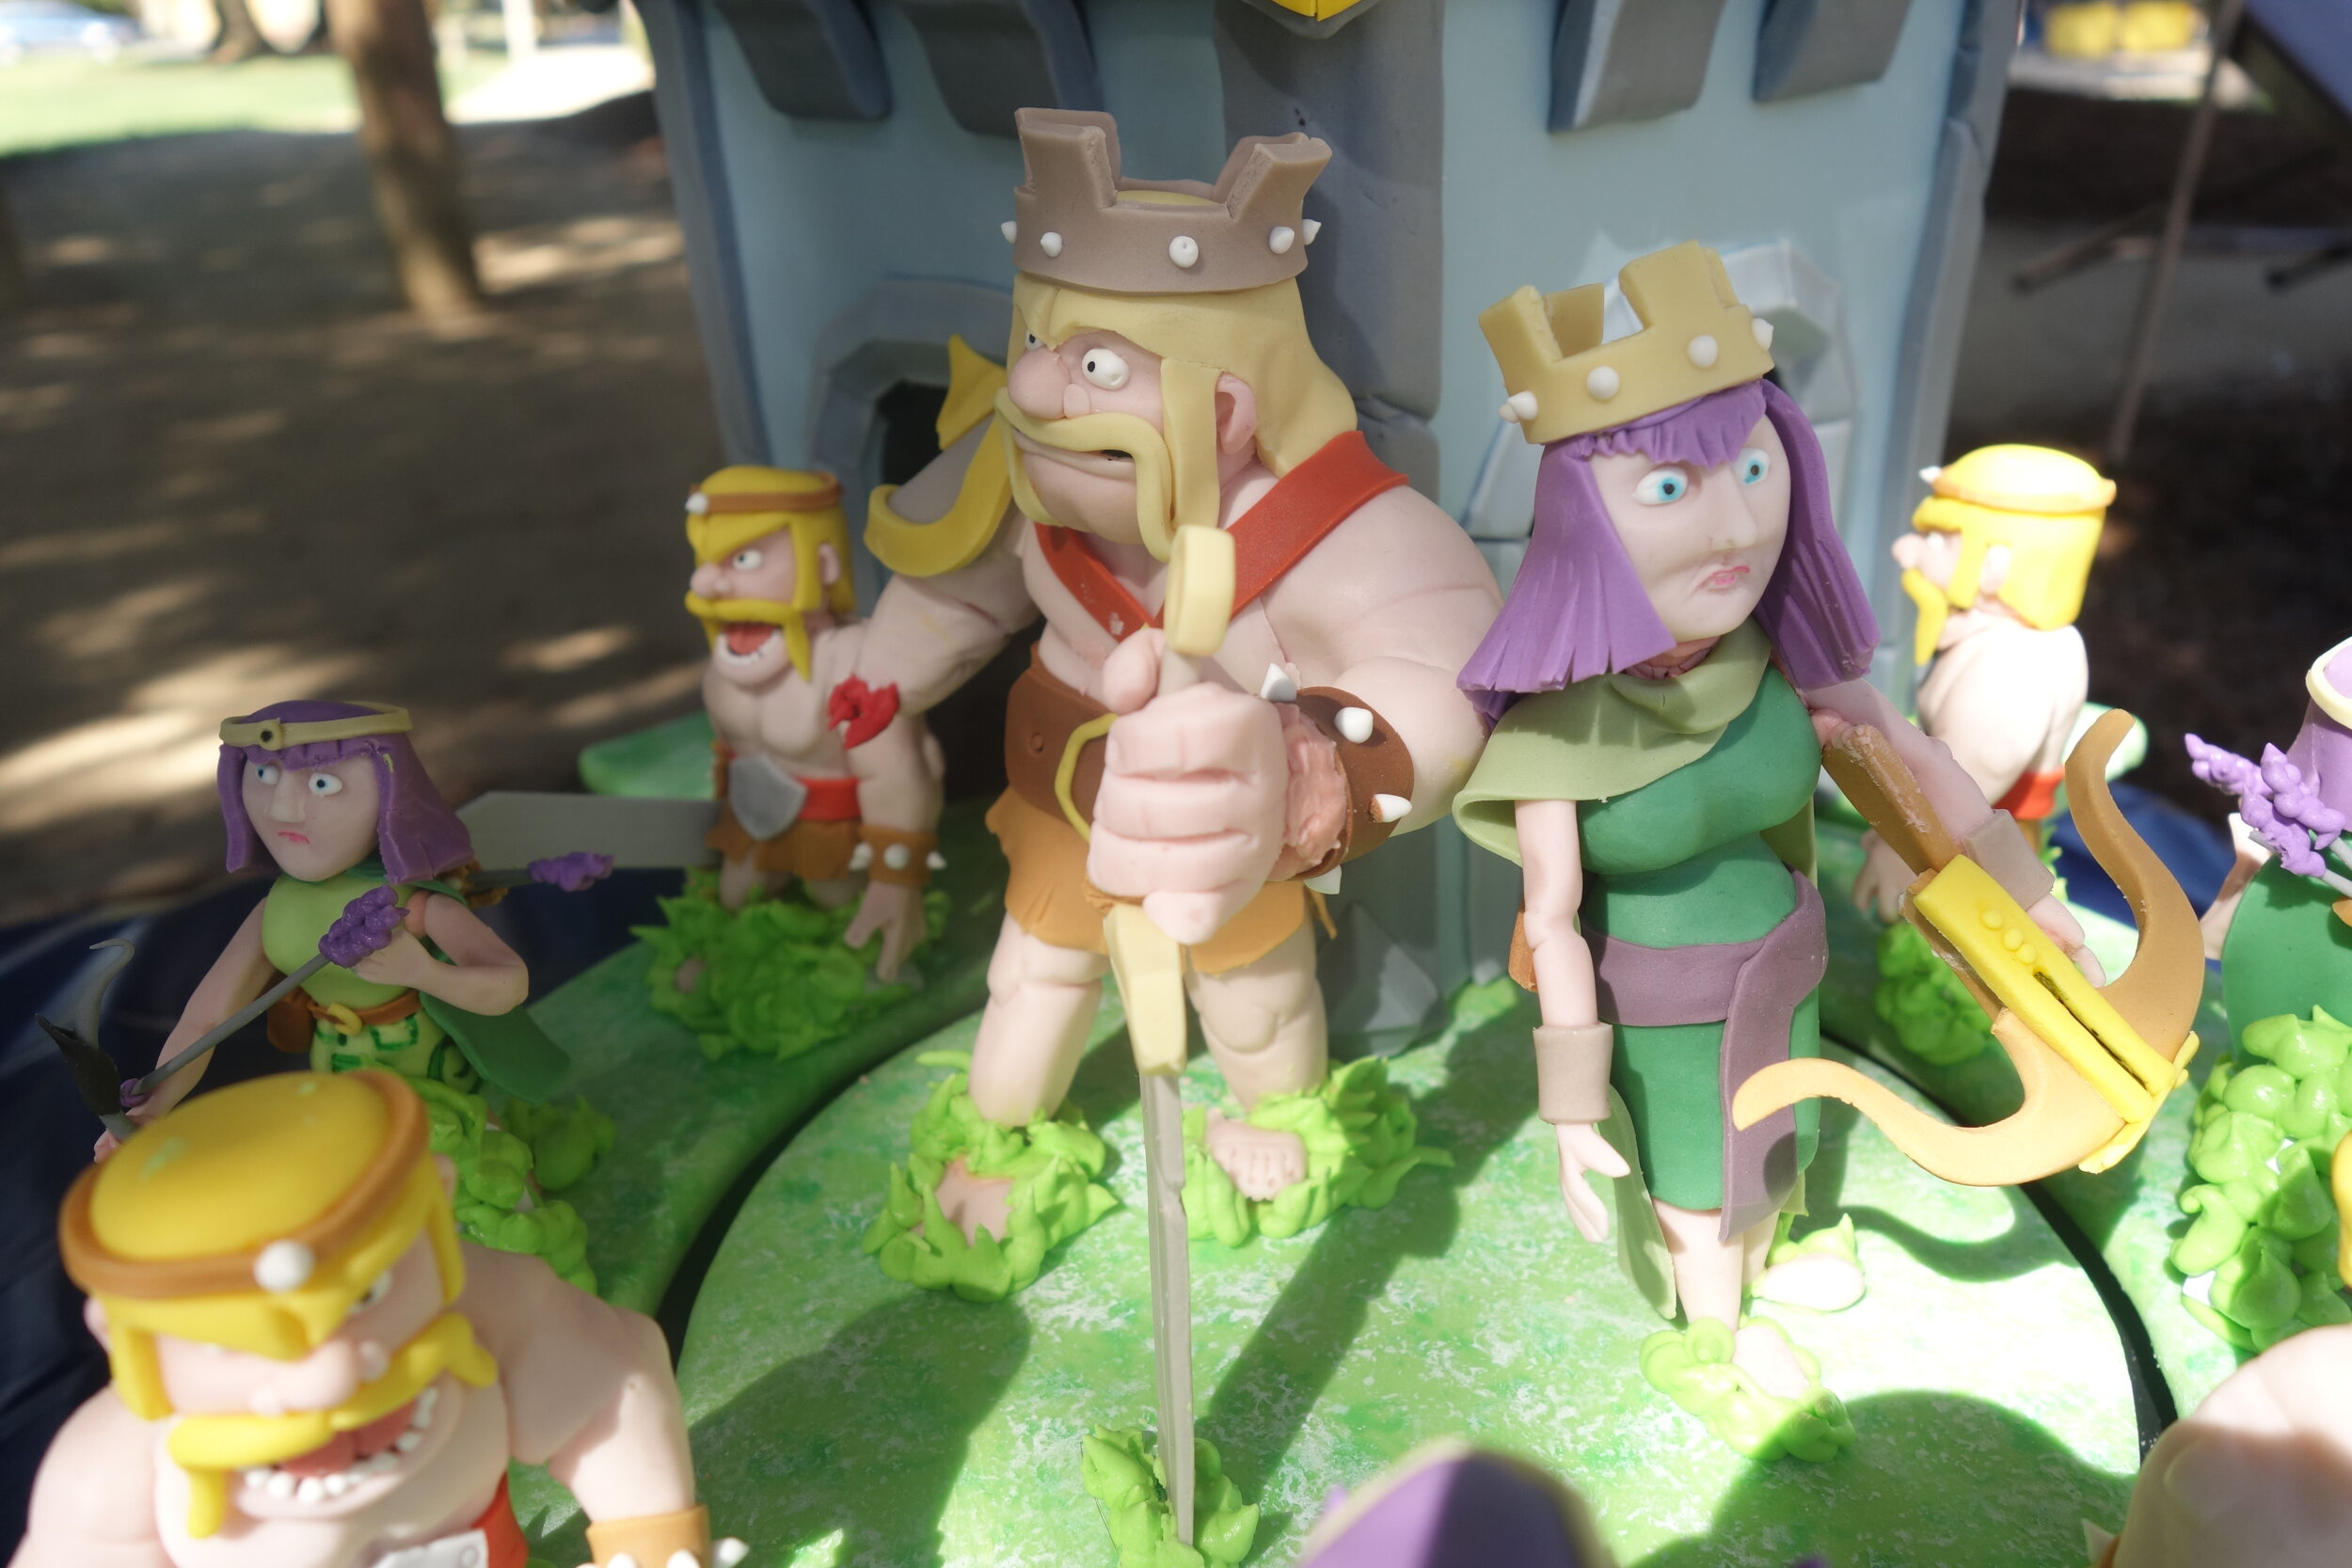
For her 9th birthday, my niece had very specific requirements – a Level 6 Clan Castle from Clash of Clans with an Archer Queen and Barbarian King as well as archers and barbarians. This is actually a fairly reasonable cake request, especially since Clan Castles are nice and square, and therefore quite conducive to being sculpted in cake. I, of course, decided to make it more difficult for myself by trying to make the archers and barbarians march in and out of the castle.

I think I actually built a pretty cool turntable mechanism out of 5-gallon buckets and rubber bands, but sadly once I got all the weight of the figures on it, it didn’t really turn. Oh well.
I also had more problems than usual with getting the figures put together. Partially this was because I just didn’t have enough time so the gum paste wasn’t totally dry, but I also had problems with royal icing that just didn’t want to dry. I still don’t know exactly what the problem was. I think I must have mixed it wrong somehow because I’ve never had that problem before. I had so much trouble attaching the Barbarian King’s hand that I ultimately had to leave it off and add some red royal icing so it looked like his hand had been chopped off in battle.
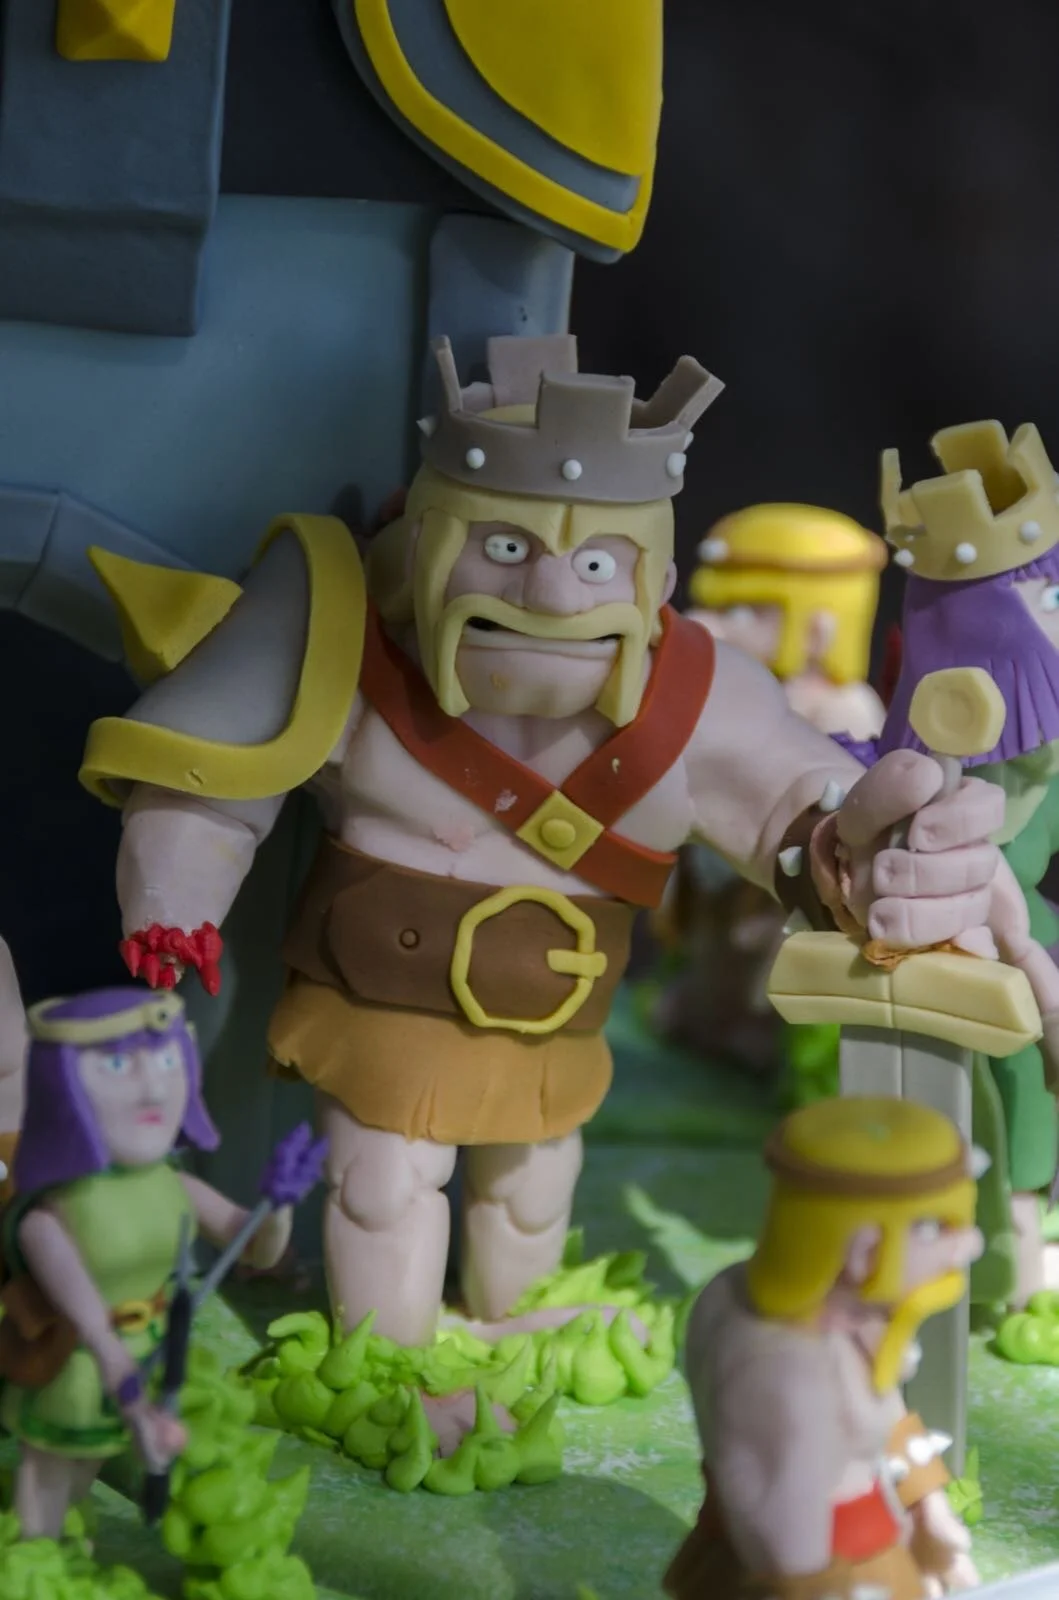
By the time we got the cake to the park for the party I was pretty frustrated, but I did eventually get all the figures standing up. I had to prop some of them up with bits of foam core concealed under green royal icing so that they wound up looking like they were knee-deep in unusually large tufts of grass.
The kids loved it, though, which is the important thing. The best part was after the cake was served when a bunch of the kids dismembered and reassembled the figures like a bunch of miniature Doctor Frankensteins.

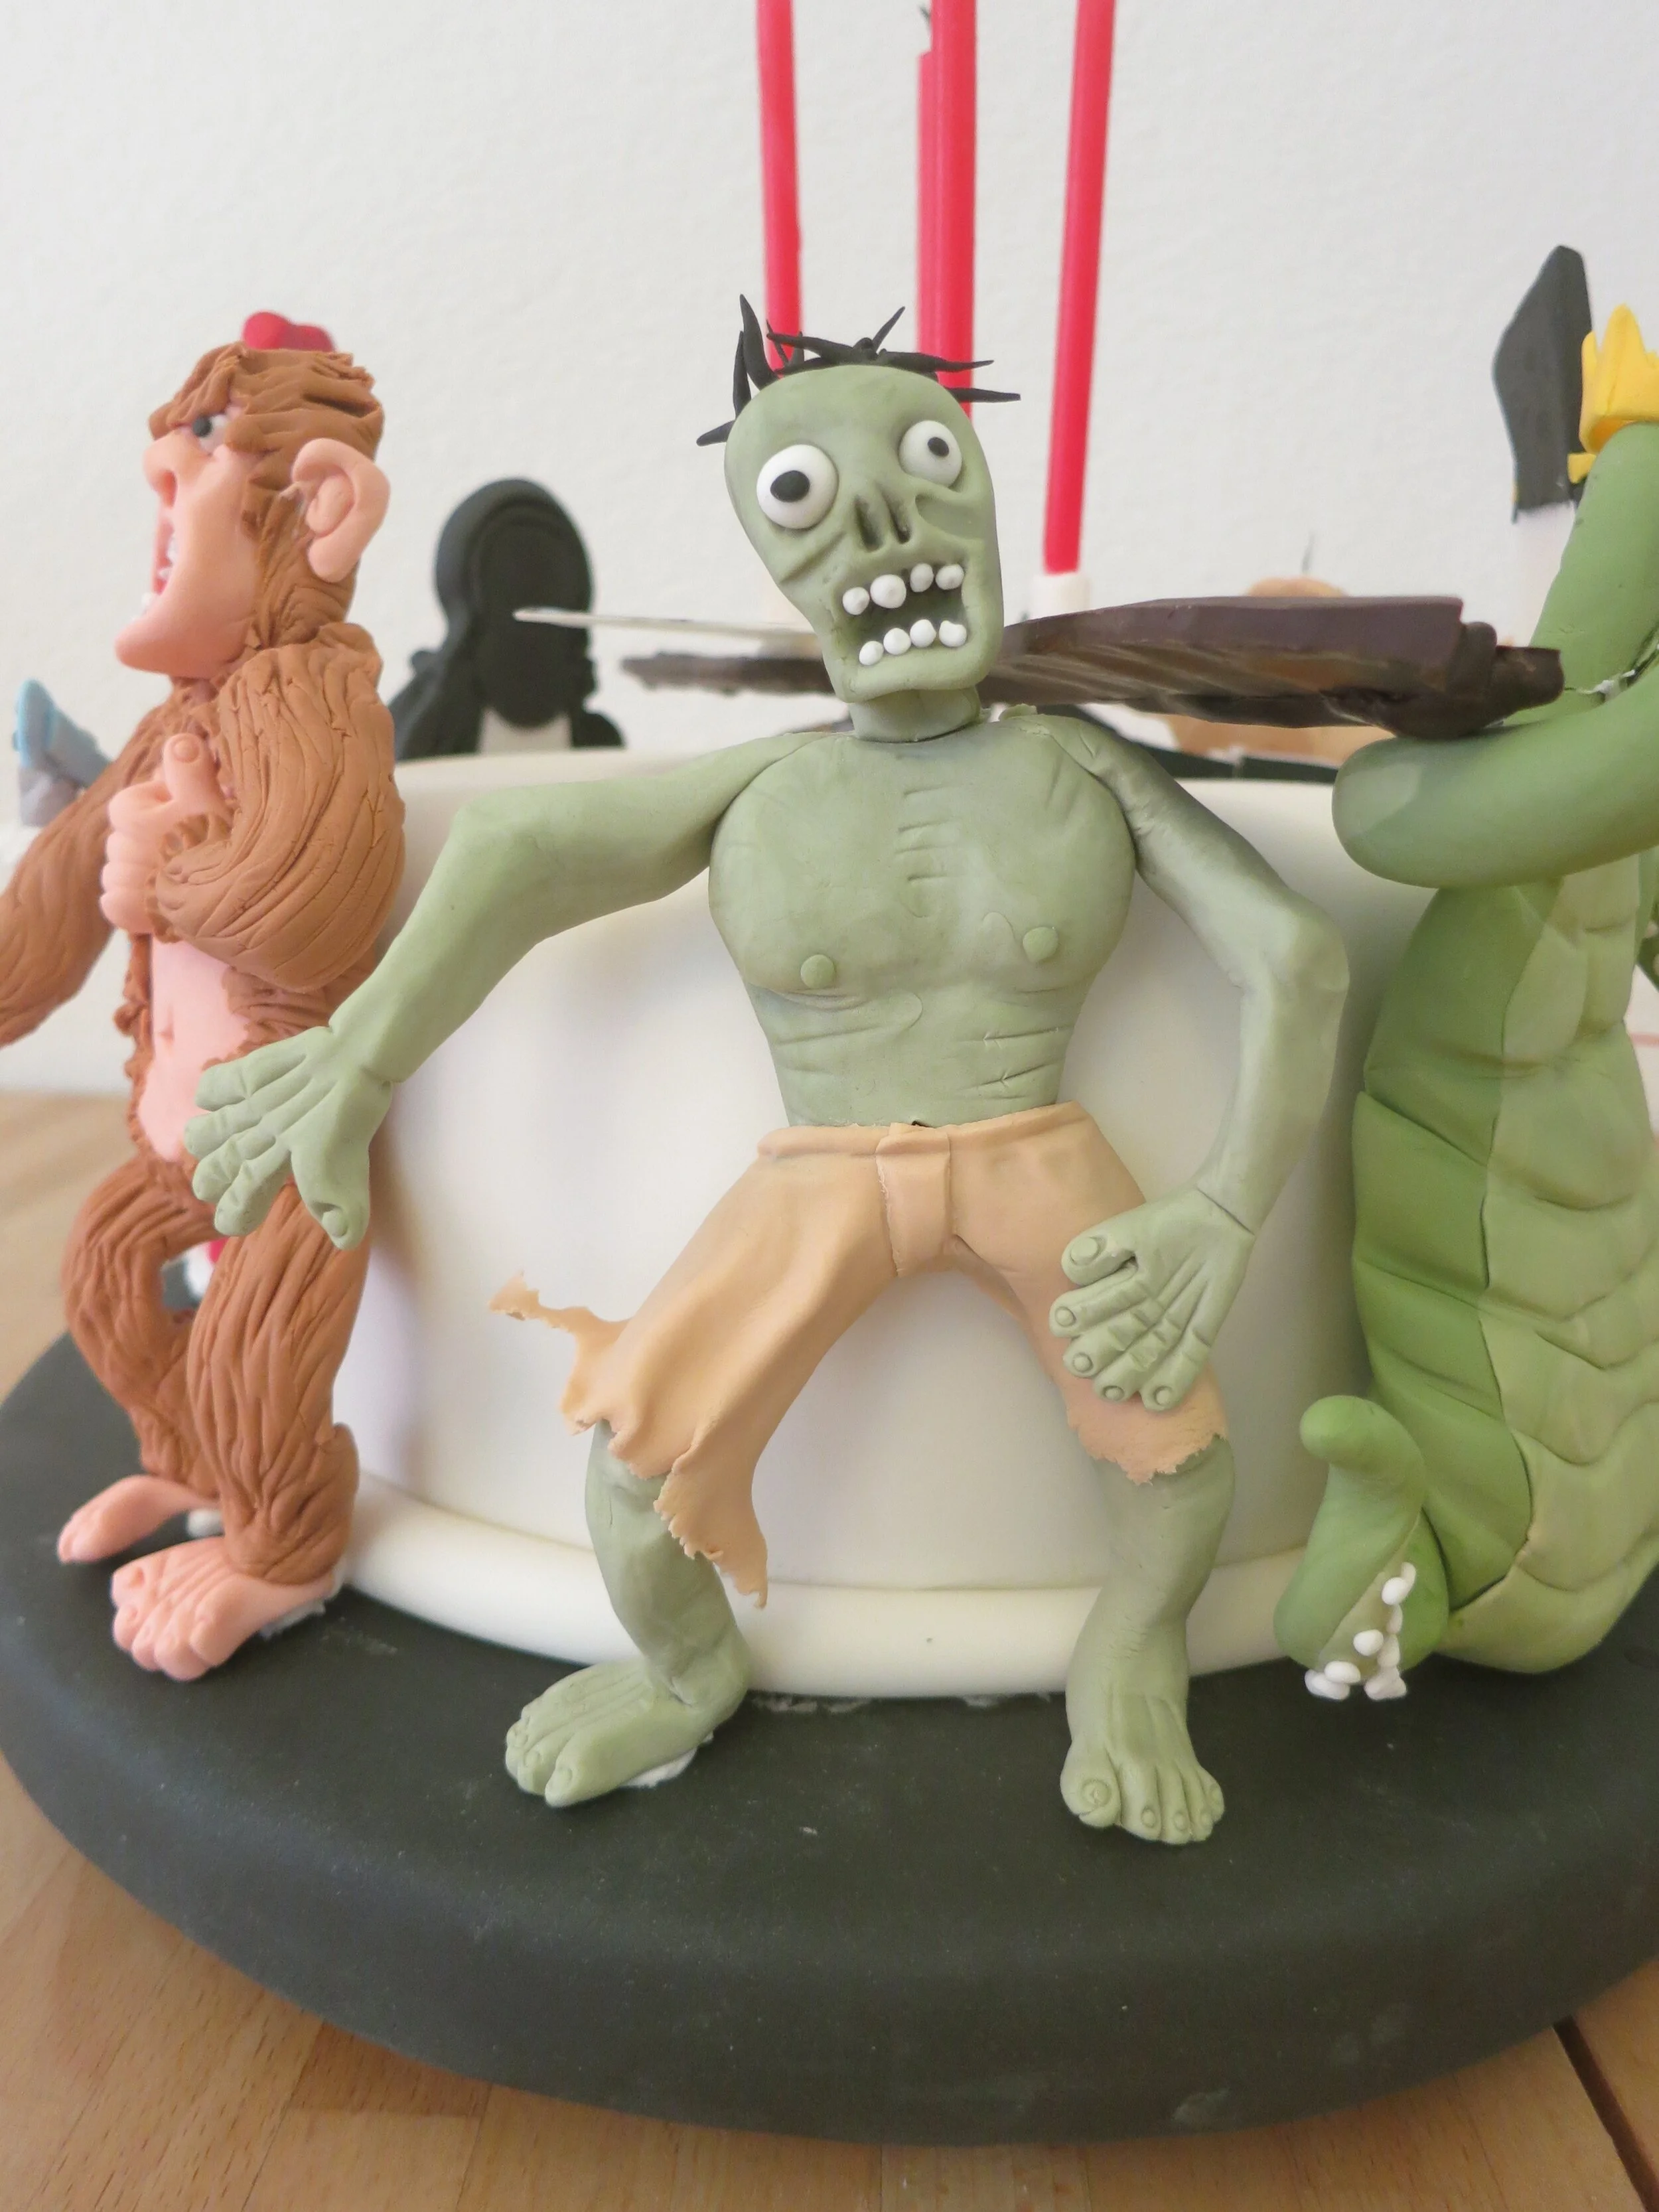
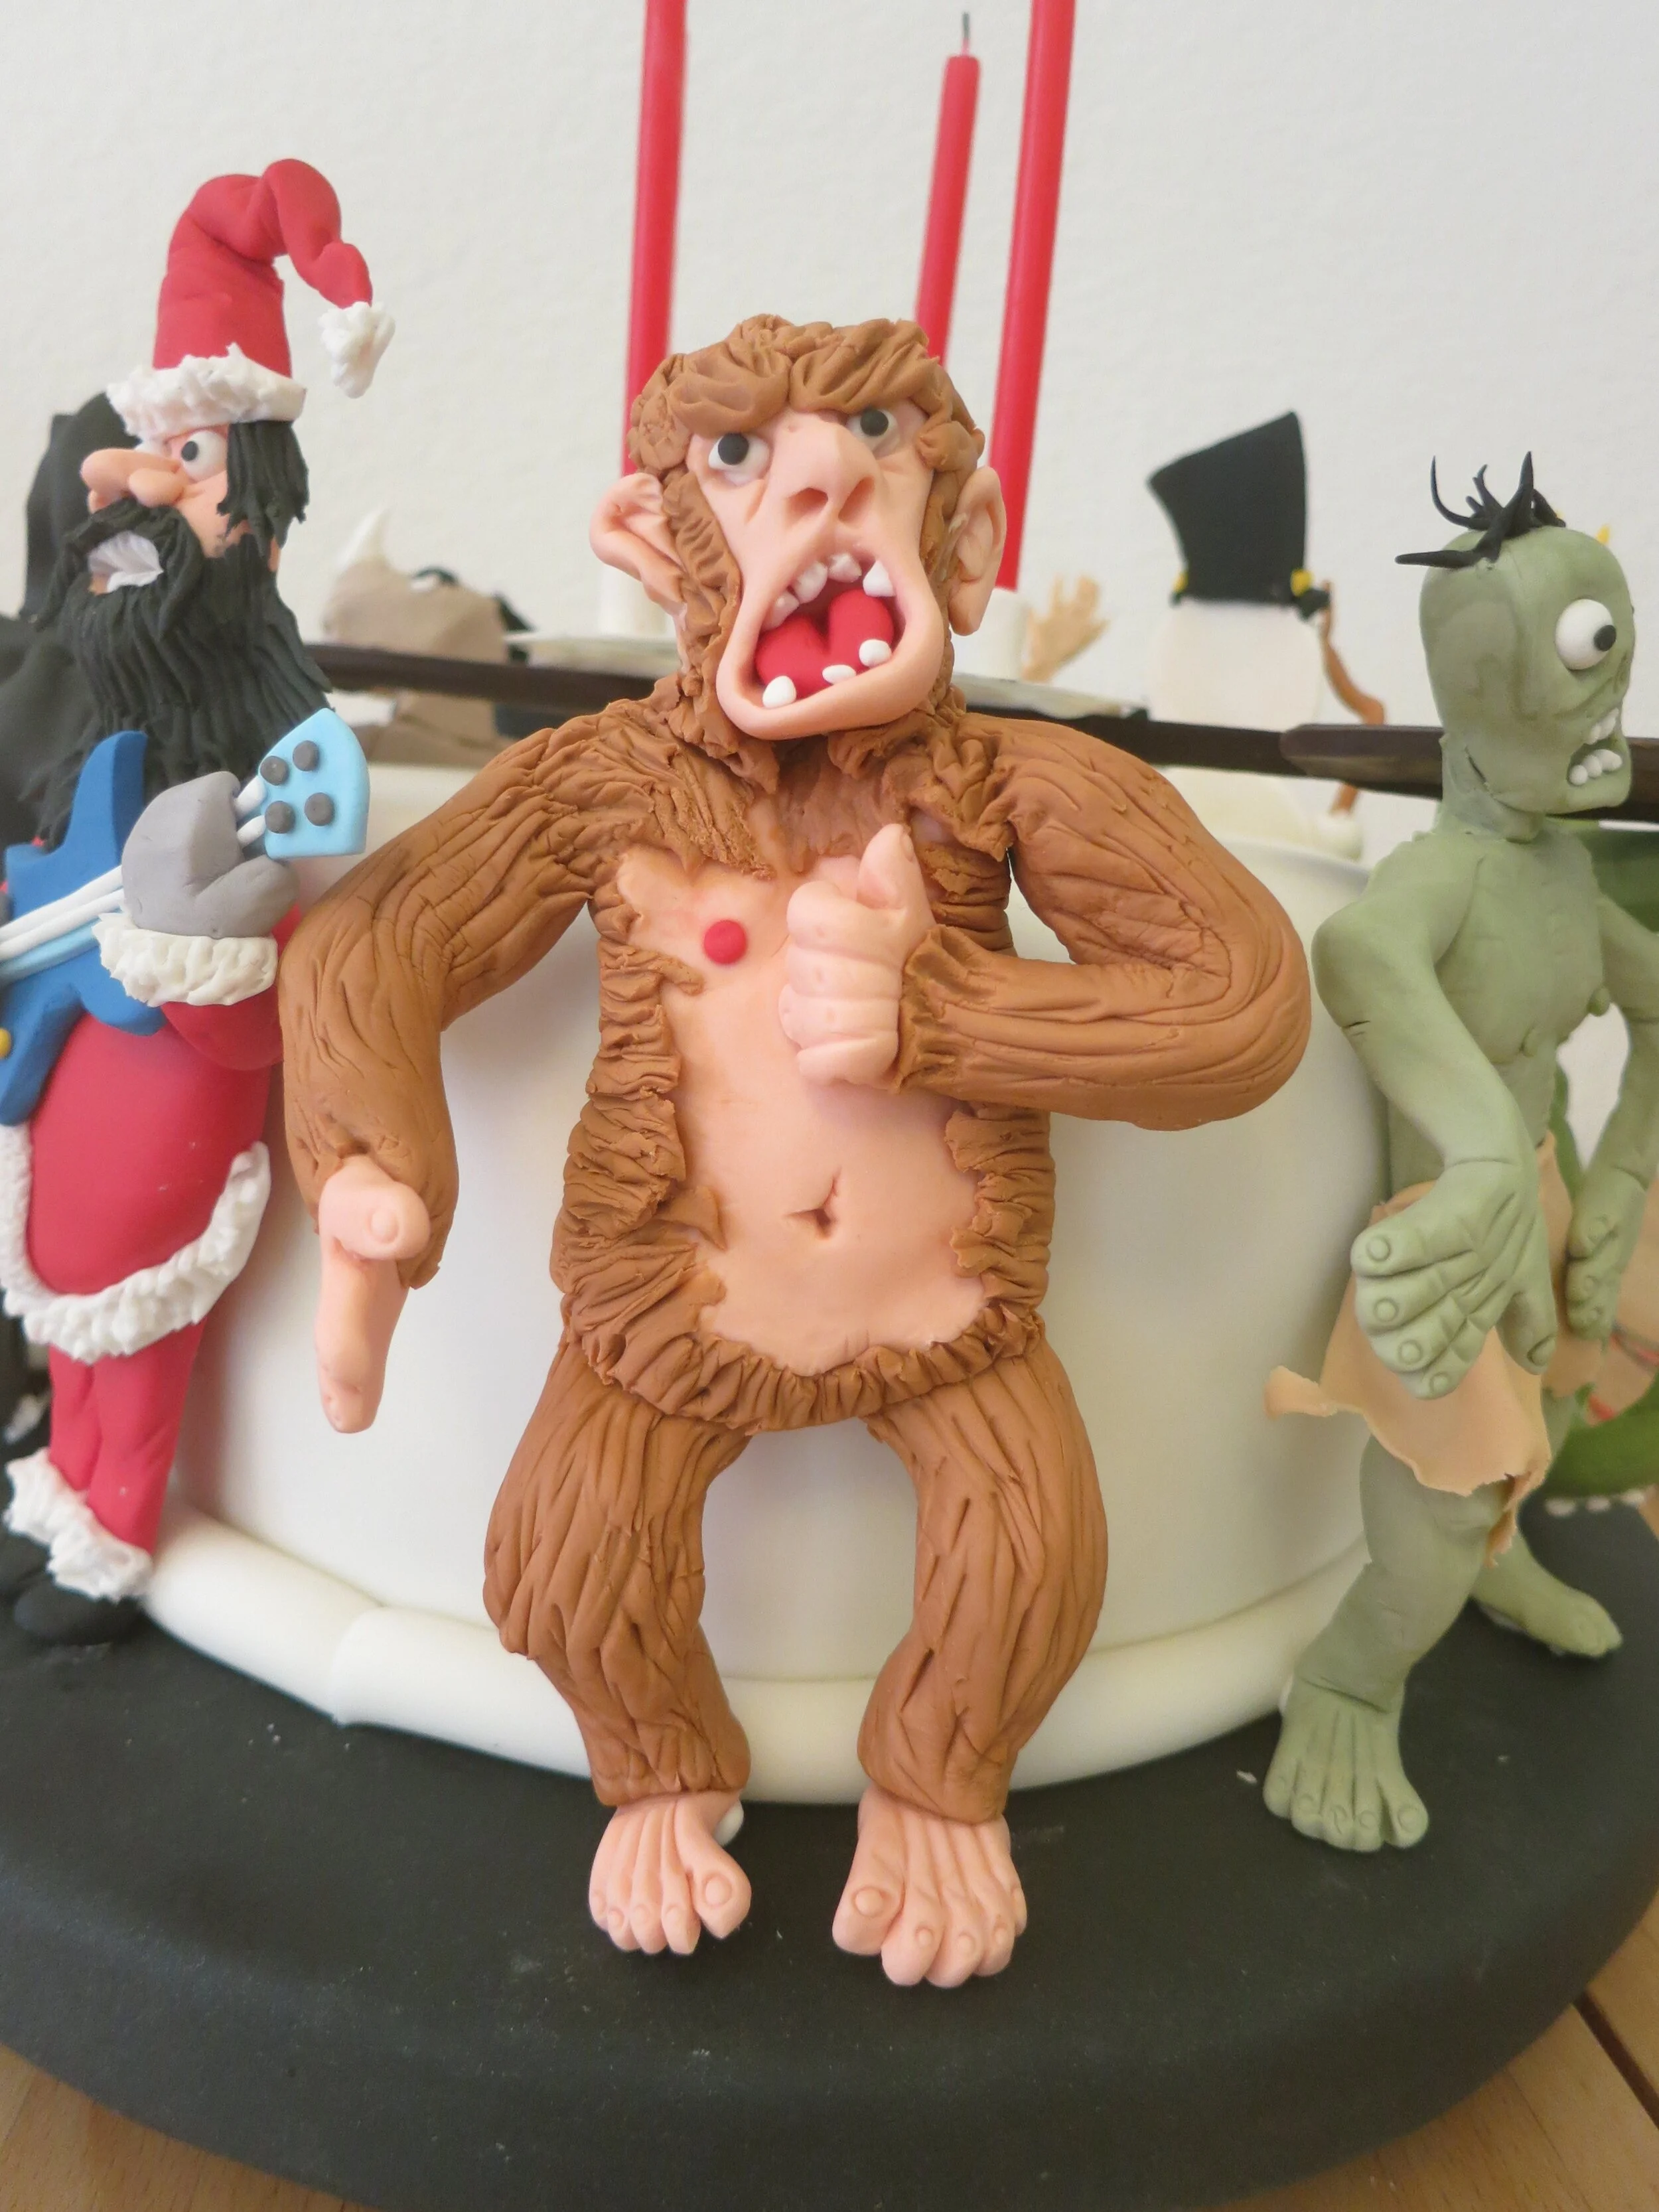
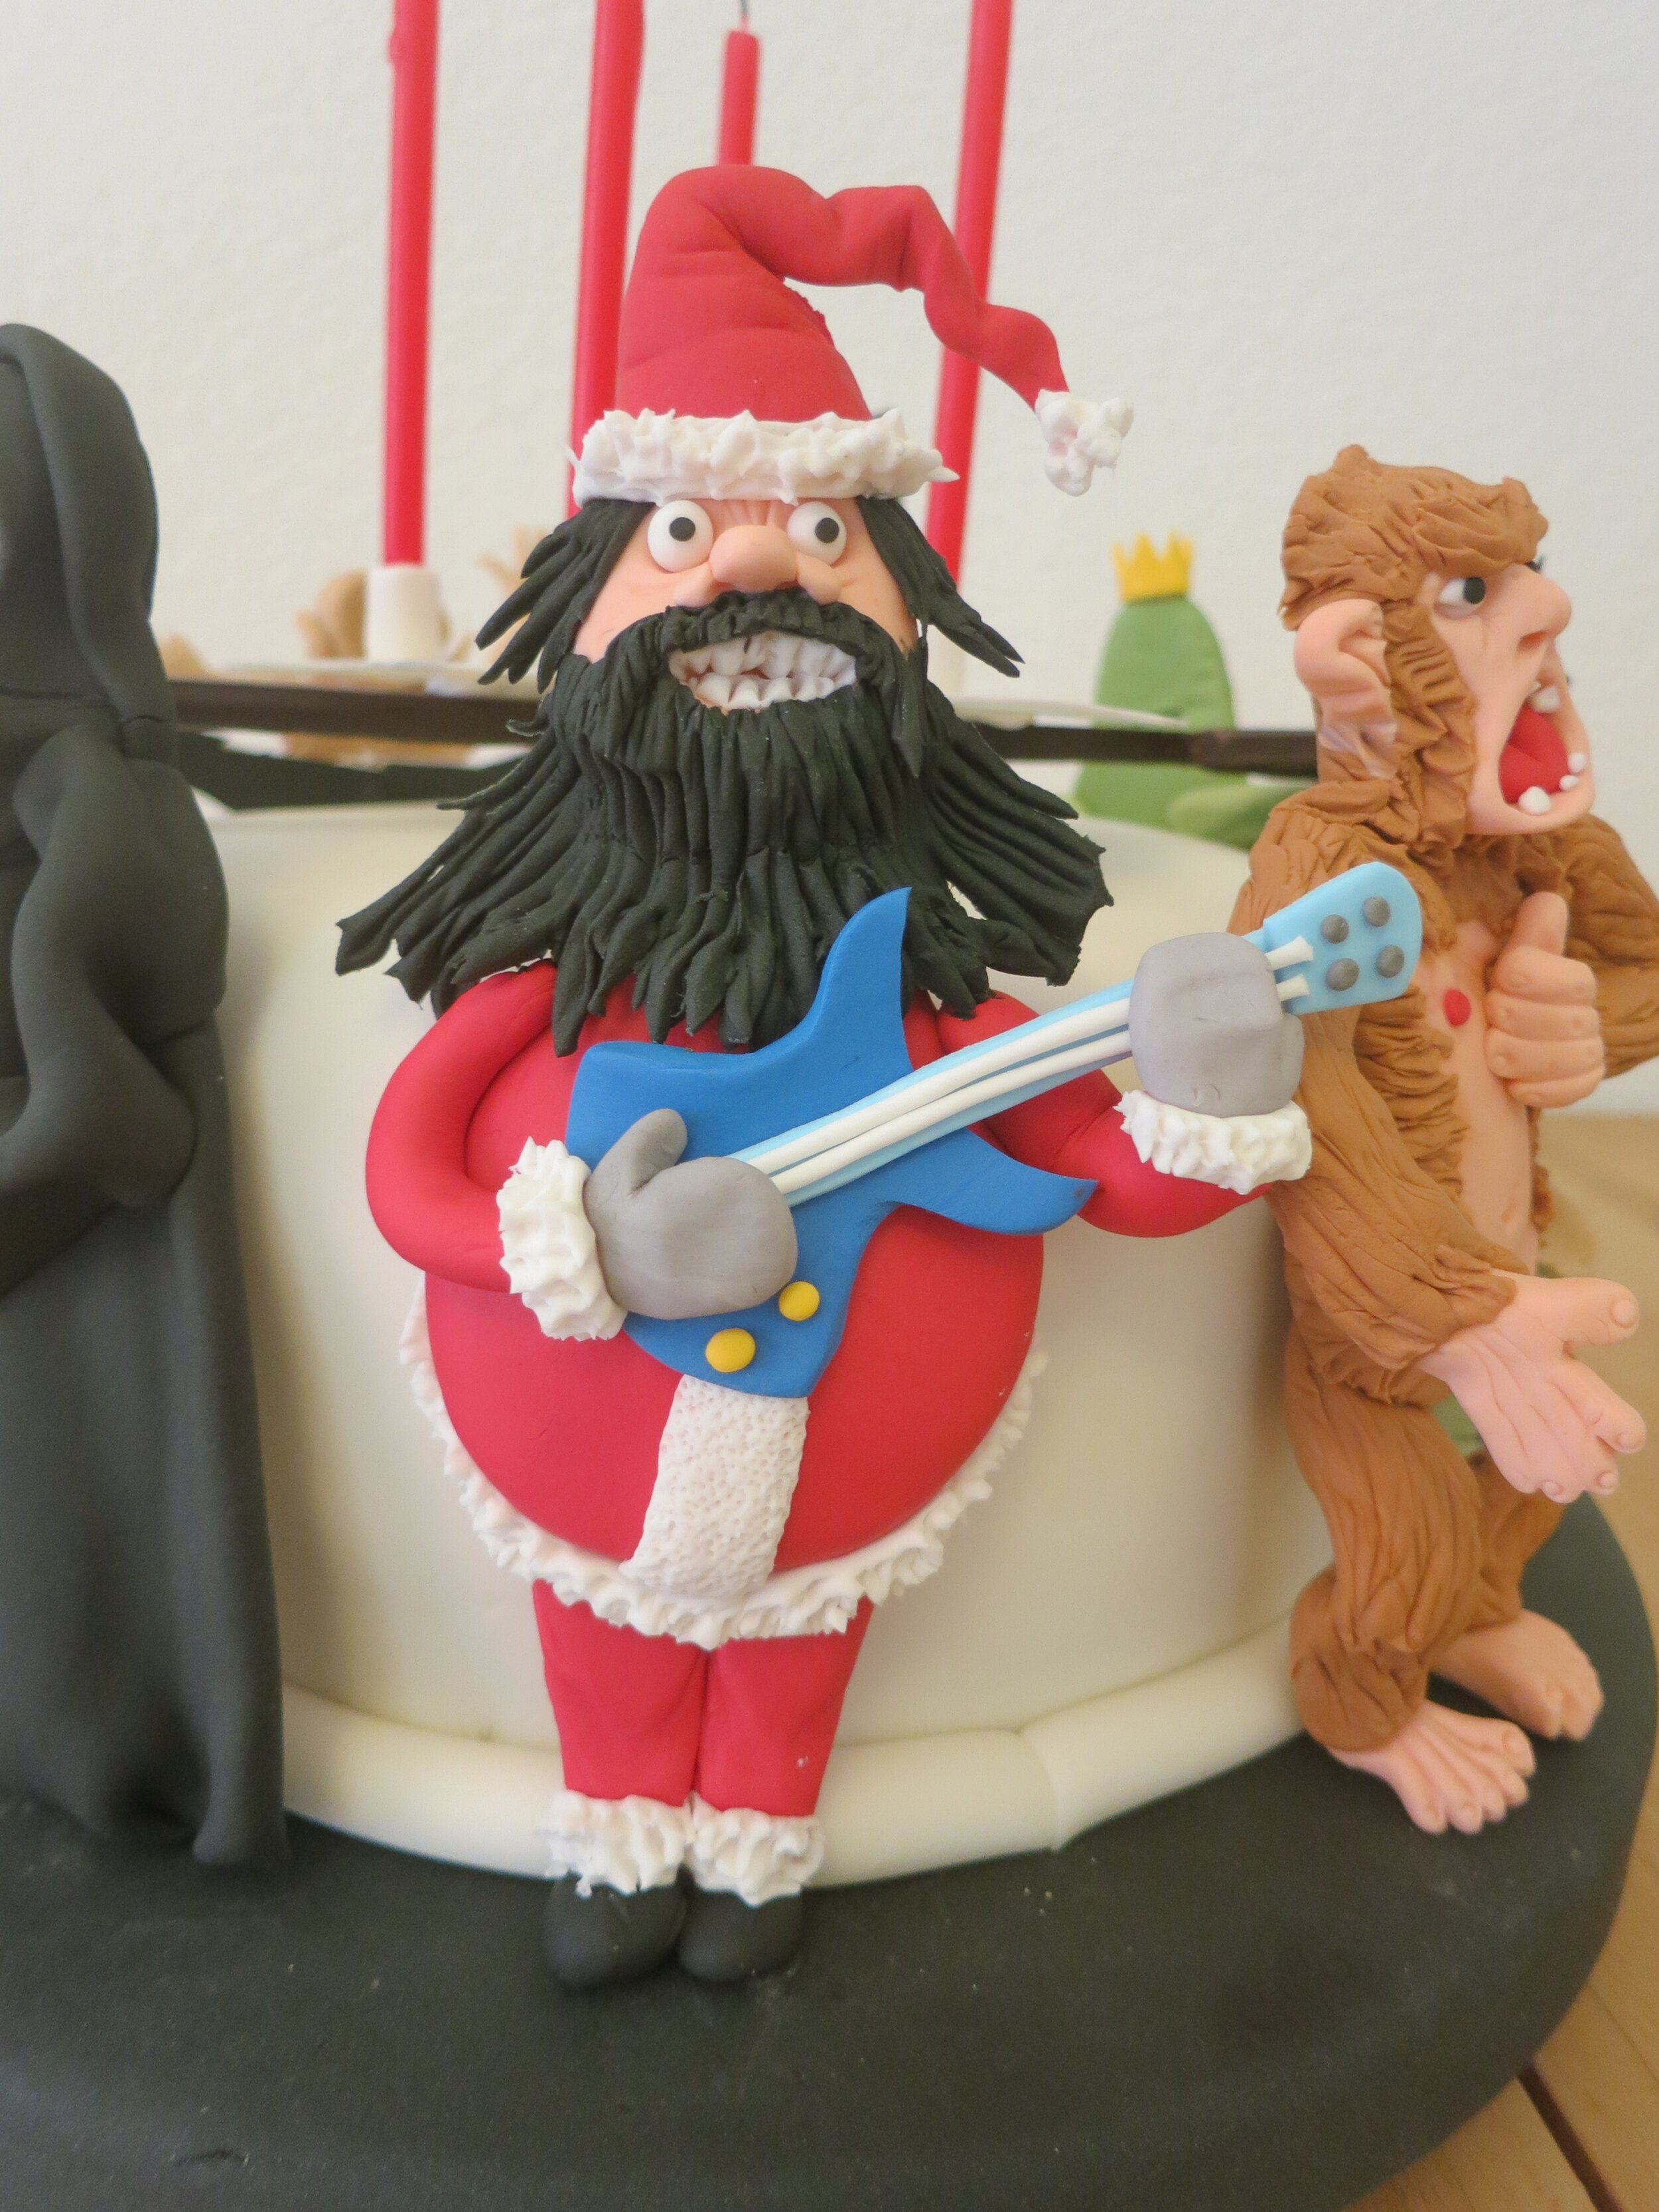
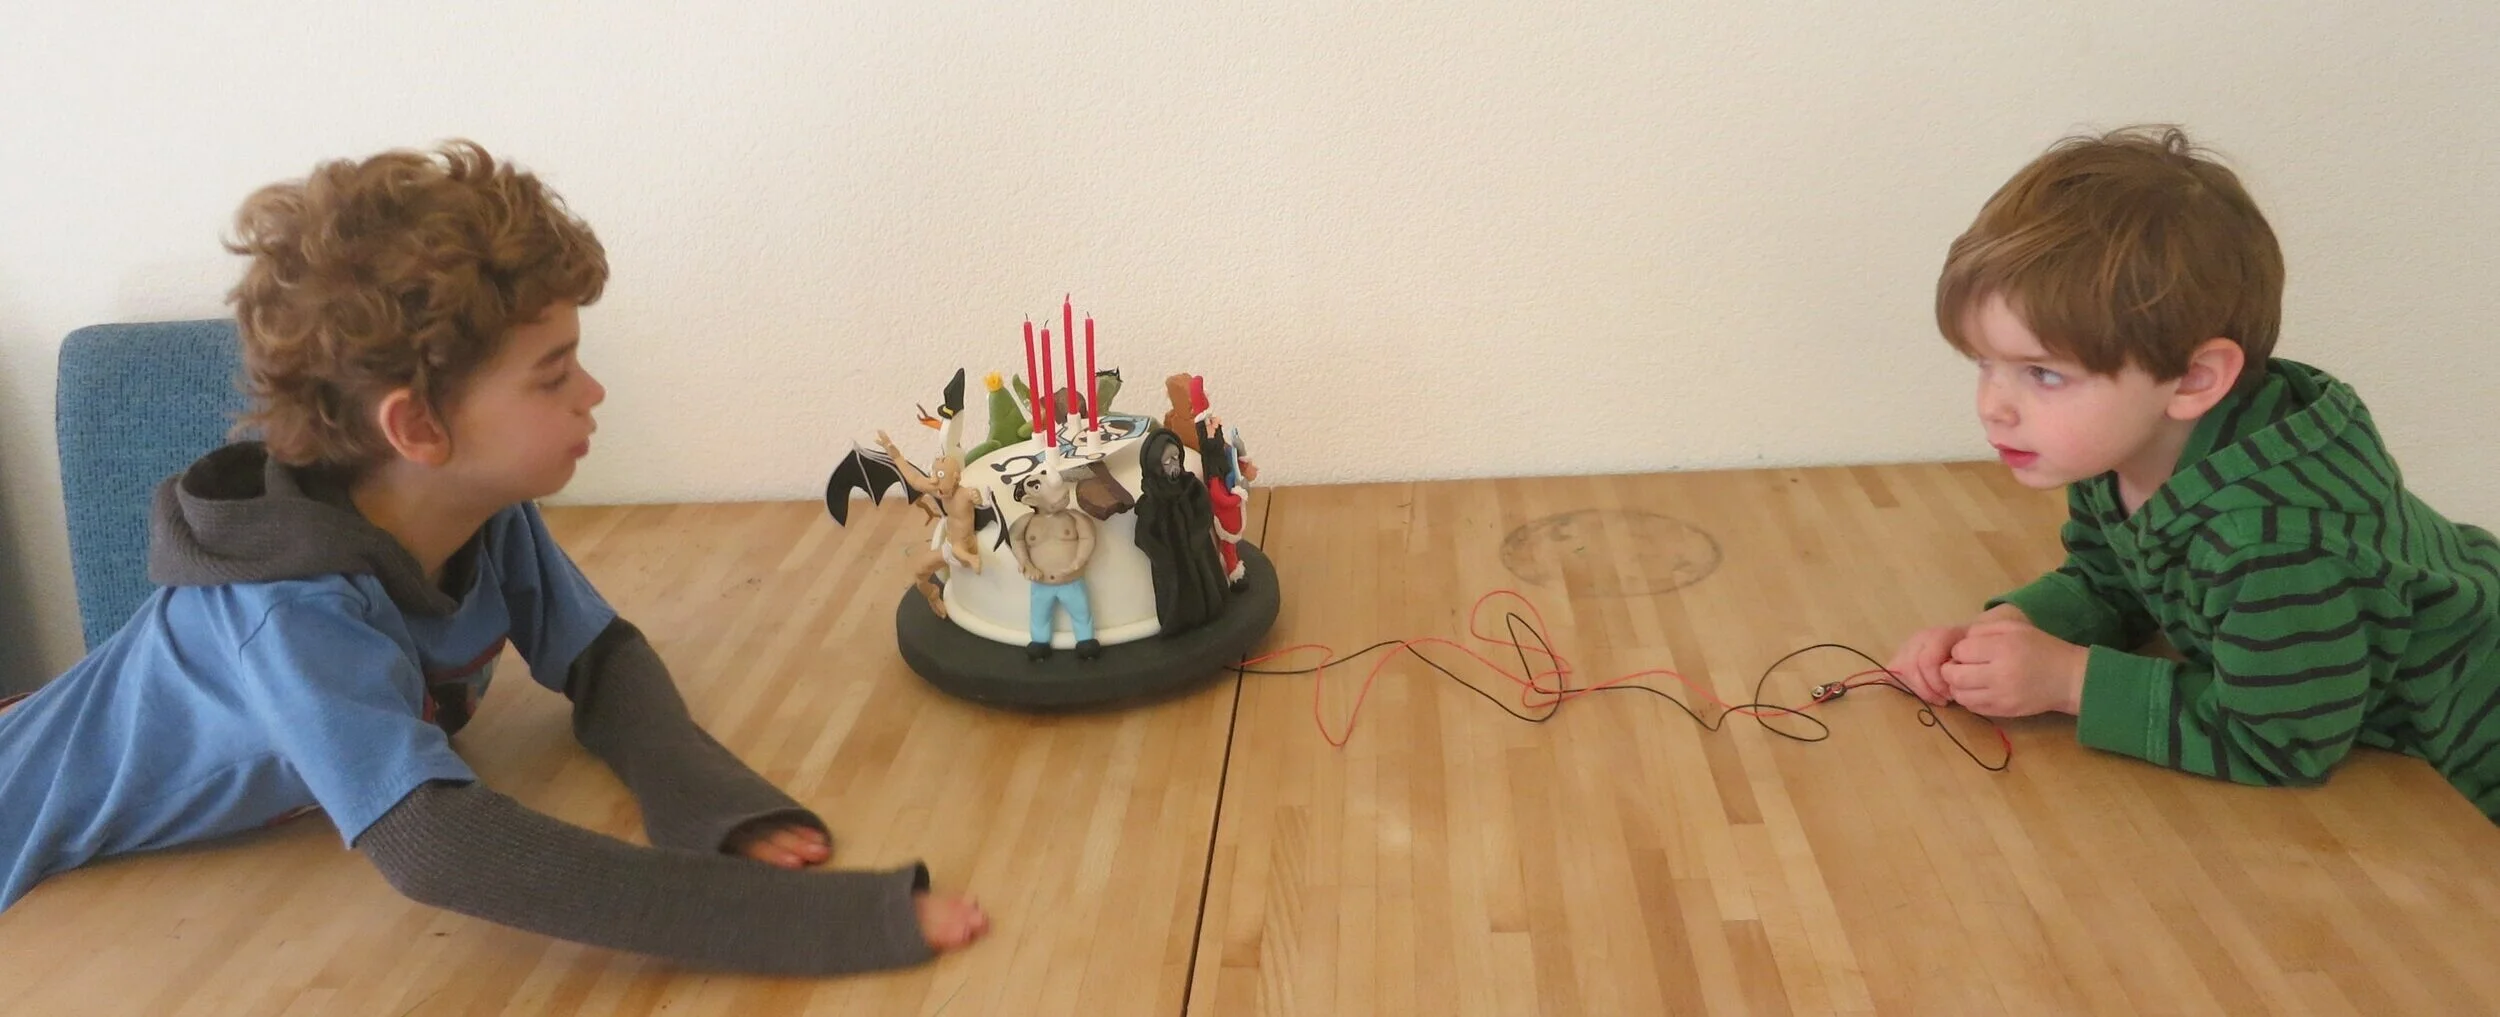
Dem Bones Cake
My niece and nephew’s preschool has the delightful tradition of having the pre-K kids perform a little skit based on one of their favorite books as part of the end-of-the-year graduation ceremony. This year, Sam’s class chose Dem Bones as their book so, of course, I made him a Dem Bones cake. Ever since I saw this video, I’ve been wanting to try to make a zoetrope cake, so this seemed like the perfect opportunity.
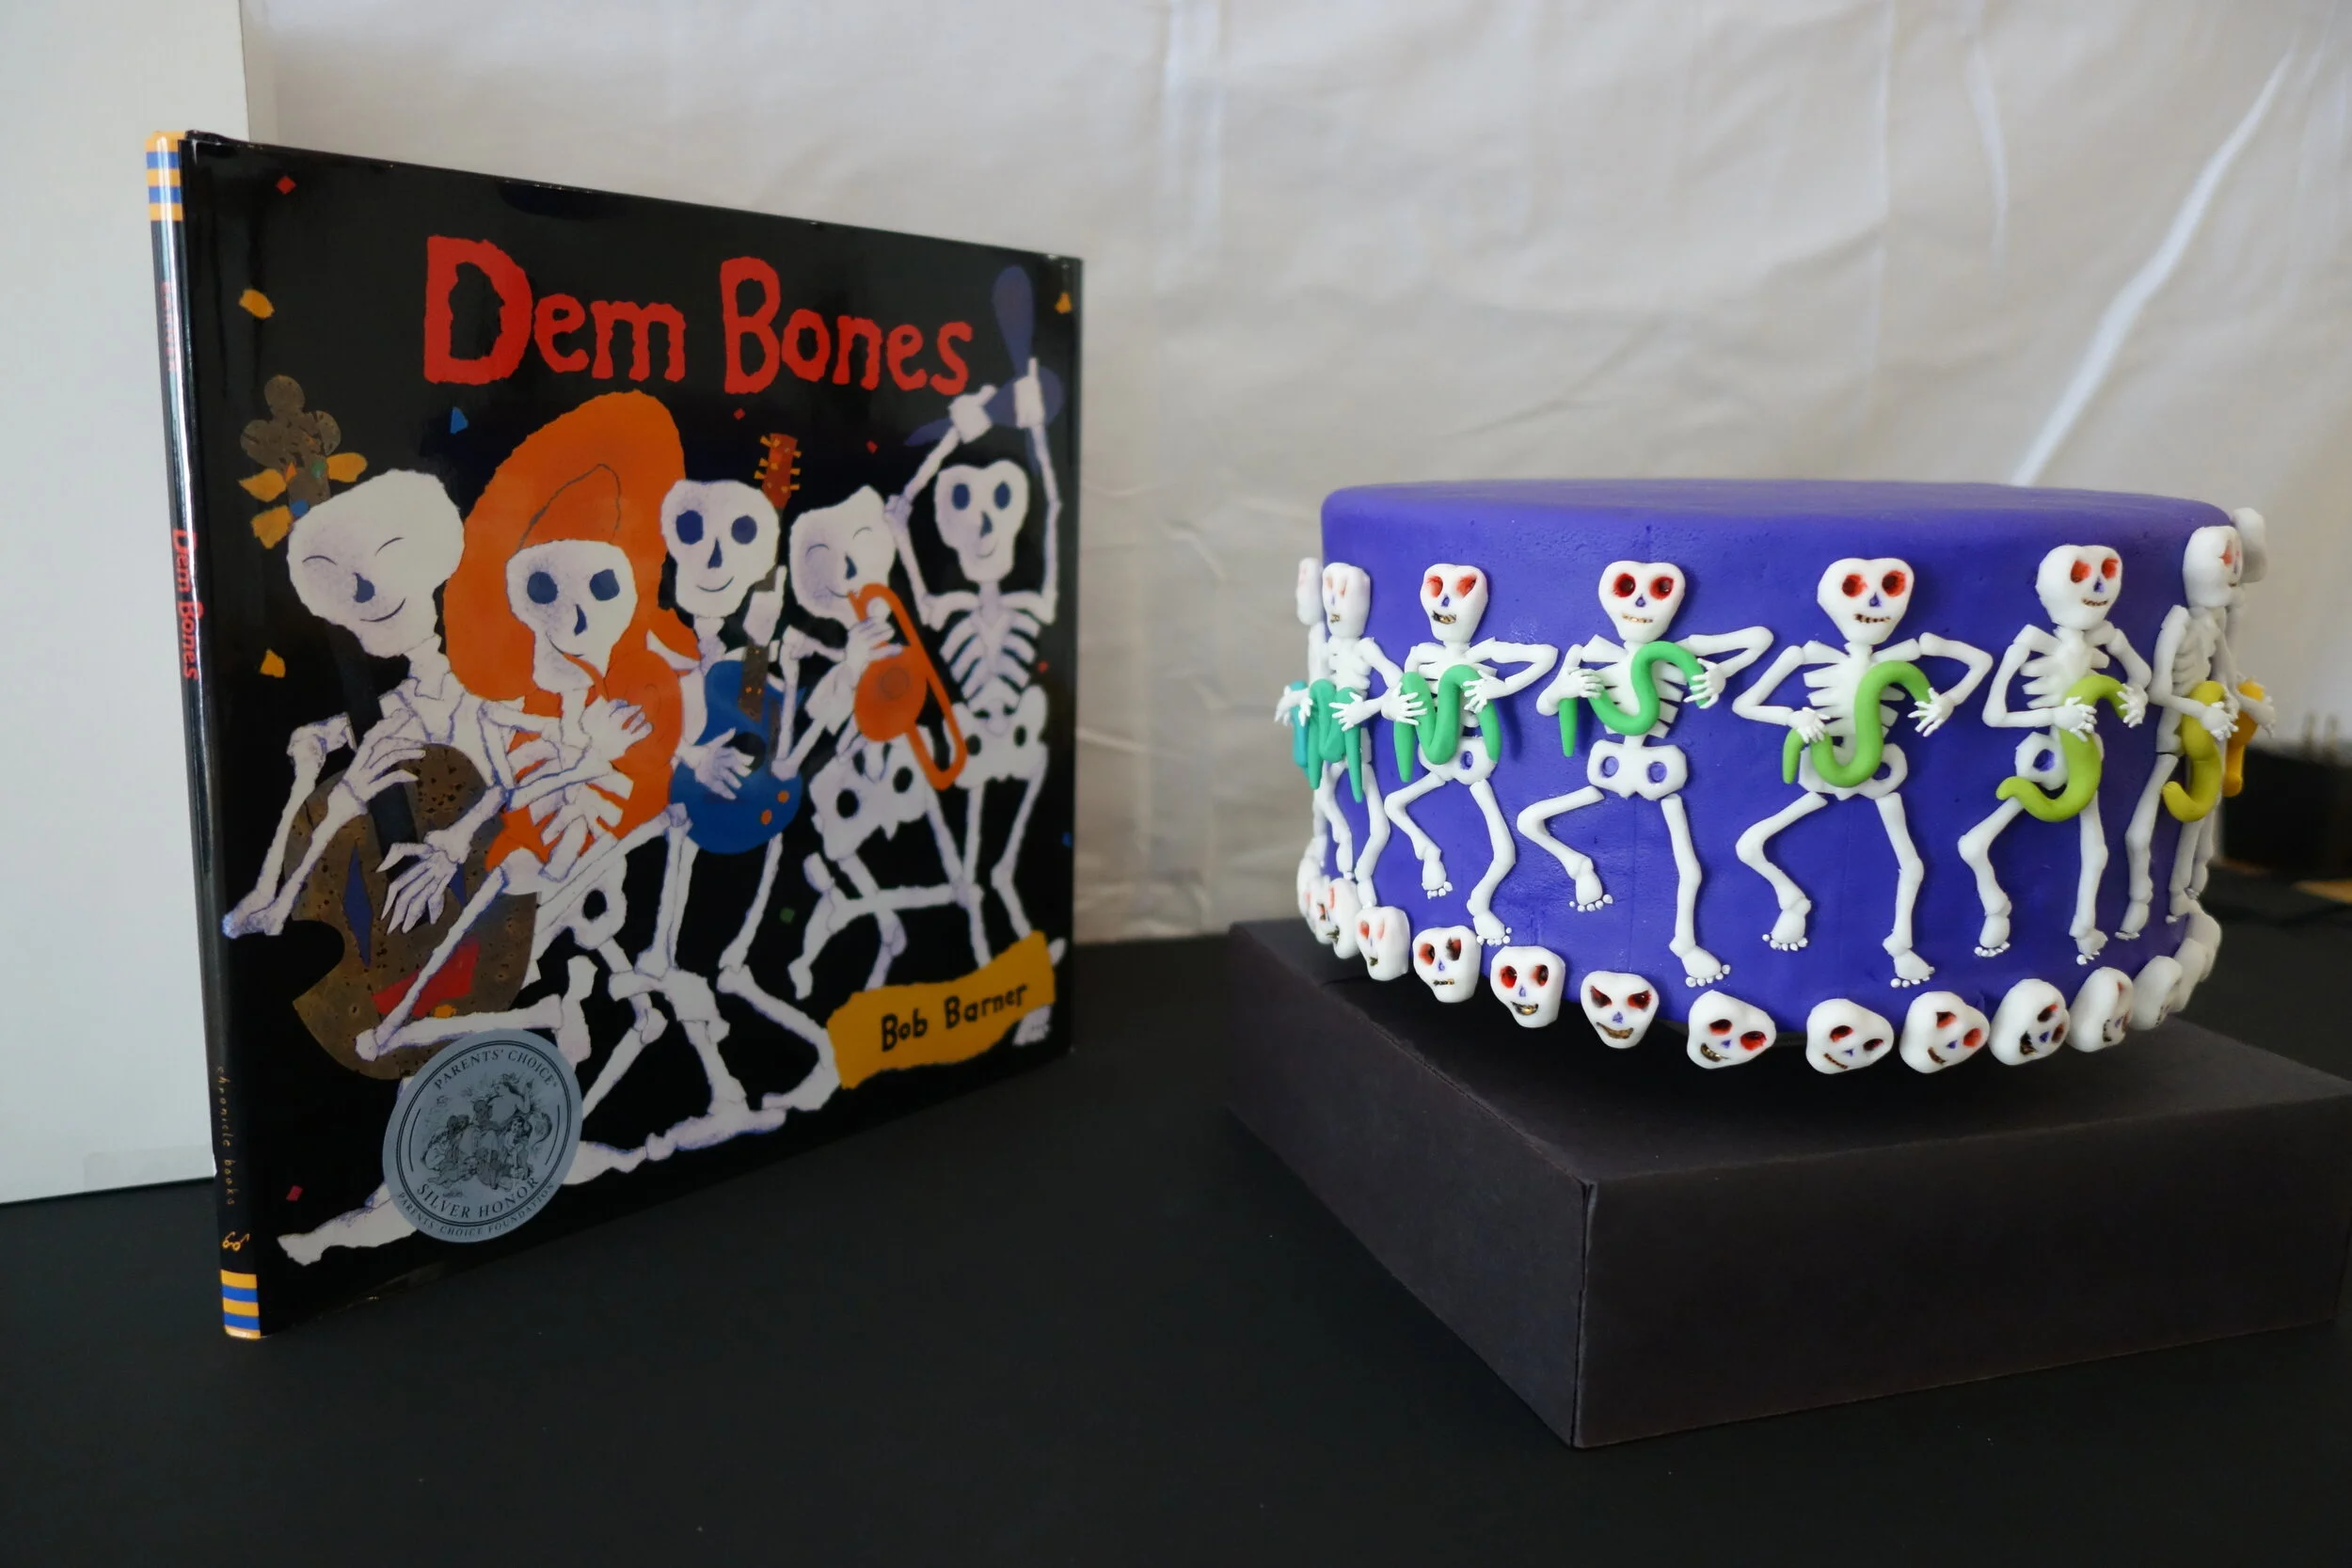
My niece and nephew’s preschool has the delightful tradition of having the pre-K kids perform a little skit based on one of their favorite books as part of the end-of-the-year graduation ceremony. Three years ago, Alex’s class performed Dr. Suess’s The Sneetches, so I made her a Sneetch cake. This year, Sam’s class chose Dem Bones as their book so, of course, I made him a Dem Bones cake.
Ever since I saw this video, I’ve been wanting to try to make a zoetrope cake, so this seemed like the perfect opportunity. Unfortunately, I don’t actually know anything about constructing a zoetrope, so it didn’t totally work. Next time I’ll have to do my research a little better.
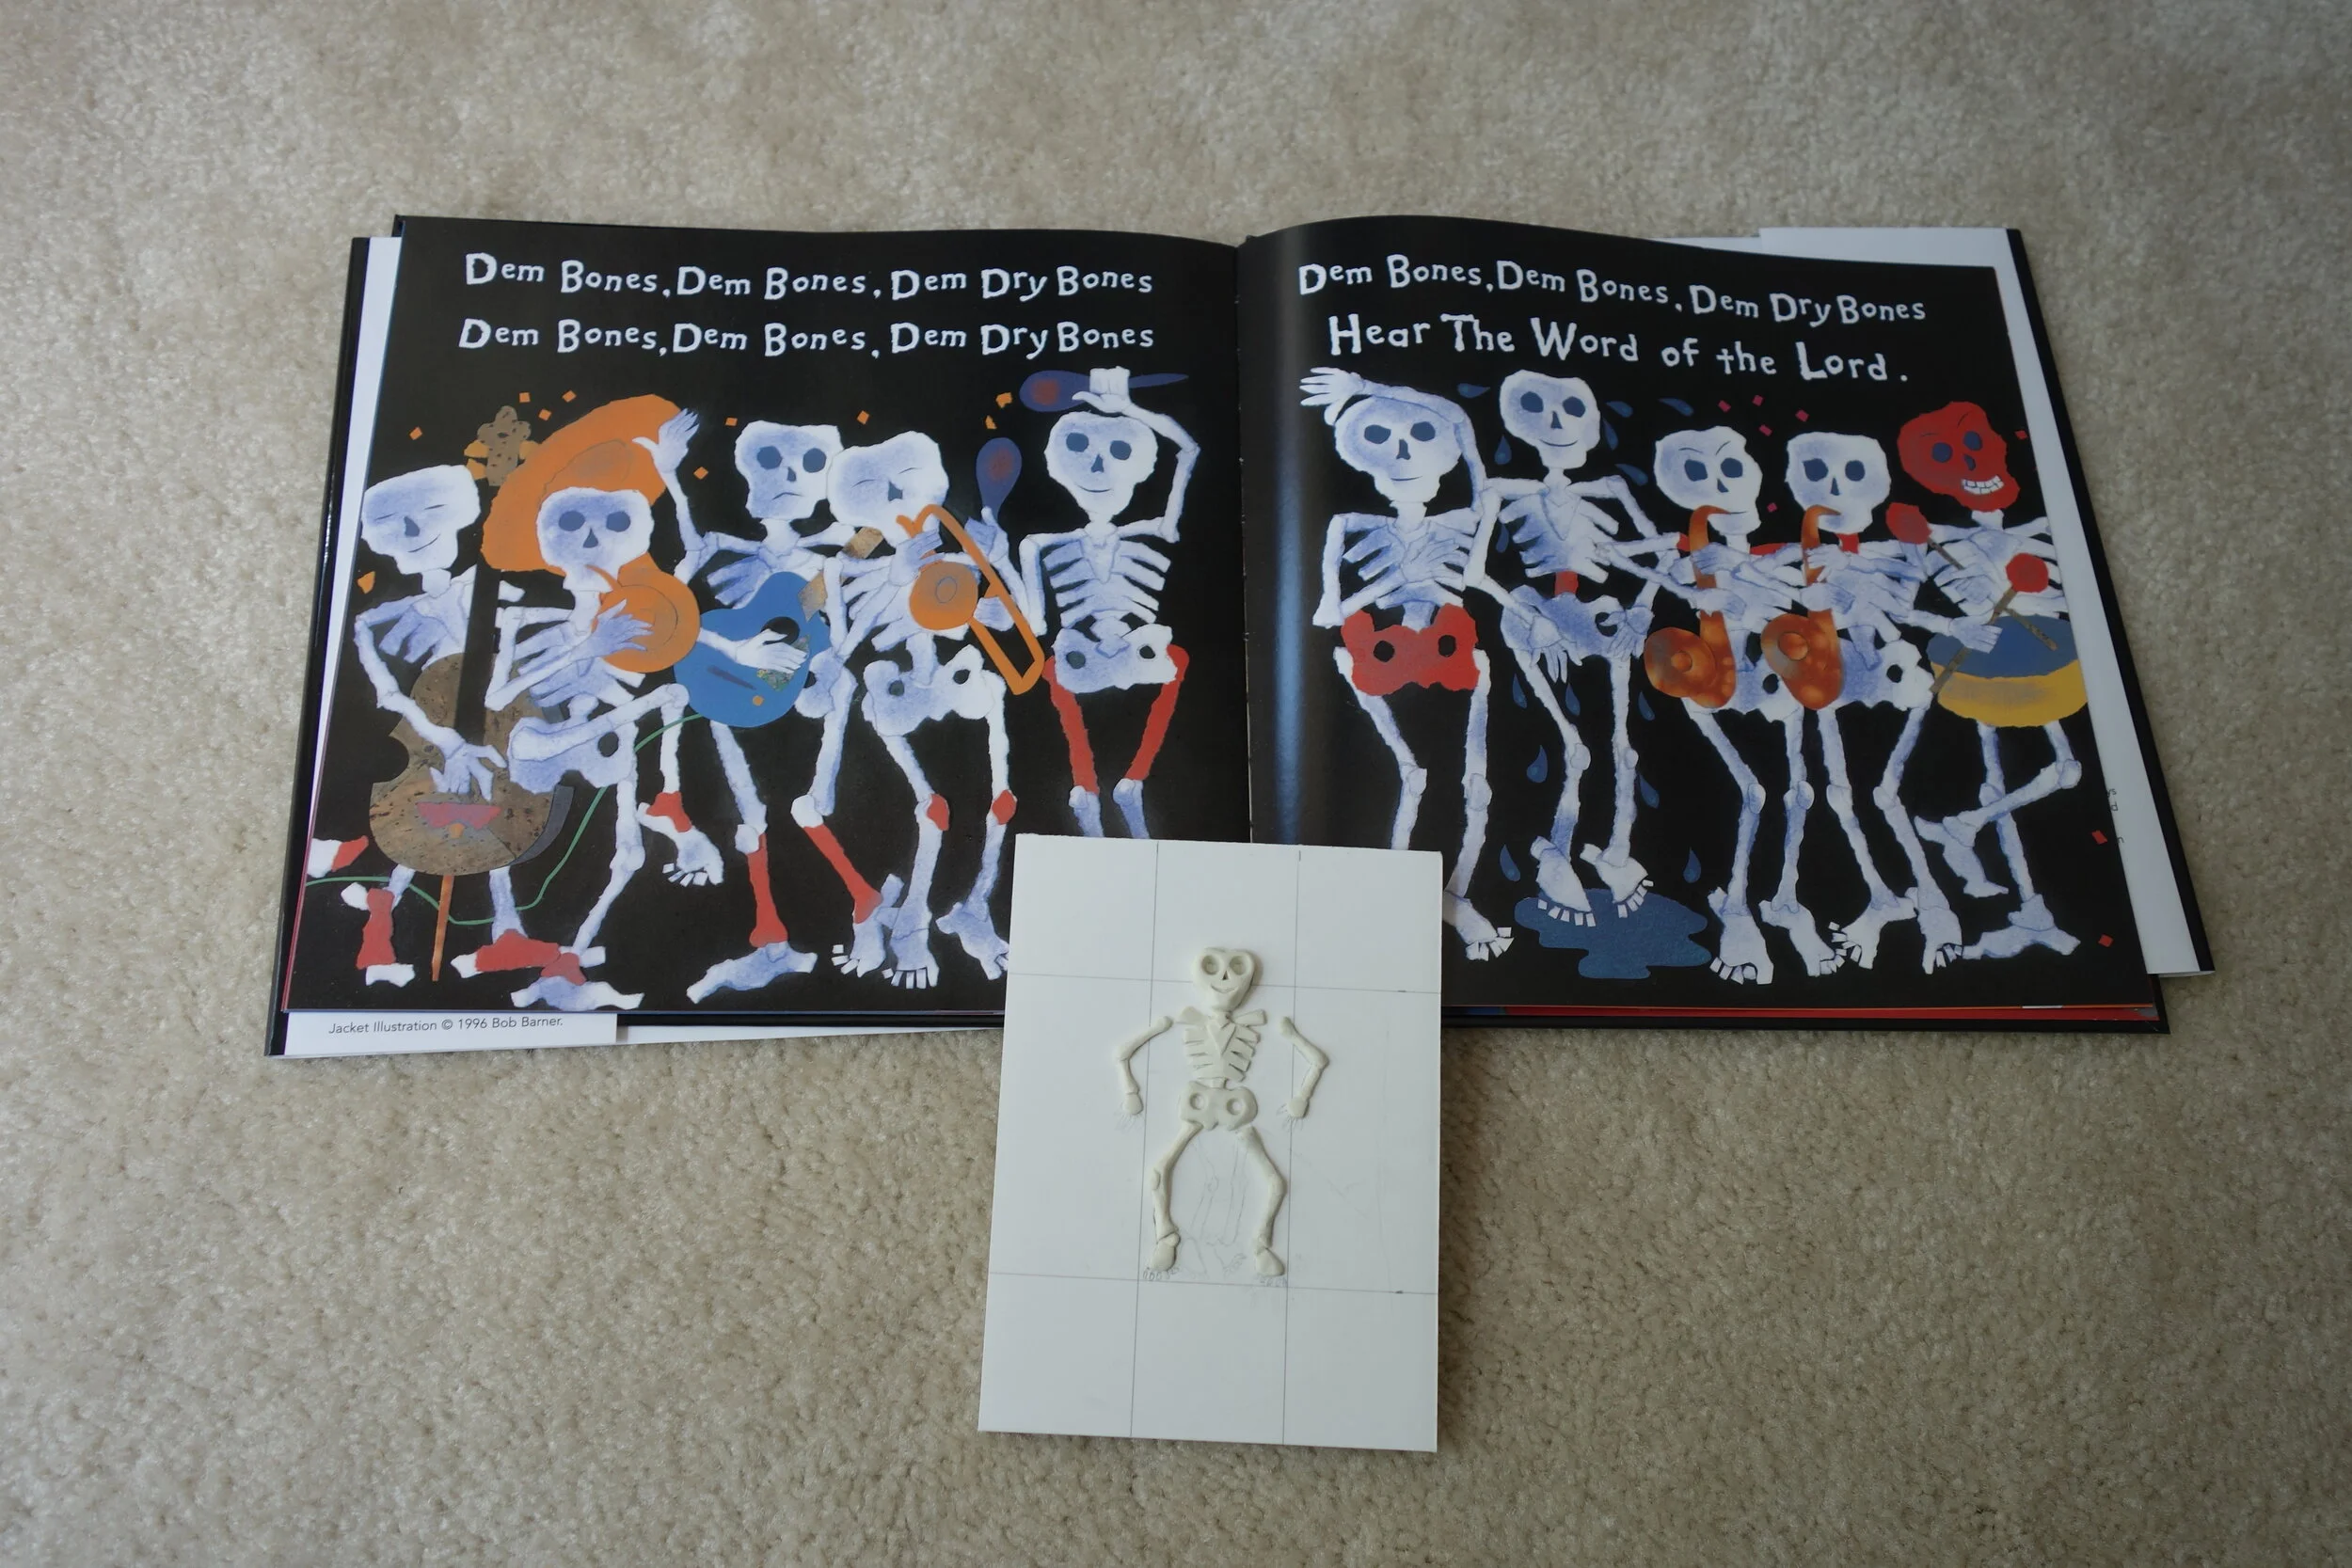
In order to make the sixteen skeletons around the sides of the cake, I sculpted one skeleton and then made a mold using food-safe silicon.

I could then make the skeletons by pushing pieces of white fondant into the mold and sticking them onto the cake. The skeletons are holding letters that morph from the letter “S” to the letter “A” to the letter “M” to spell “Sam.”
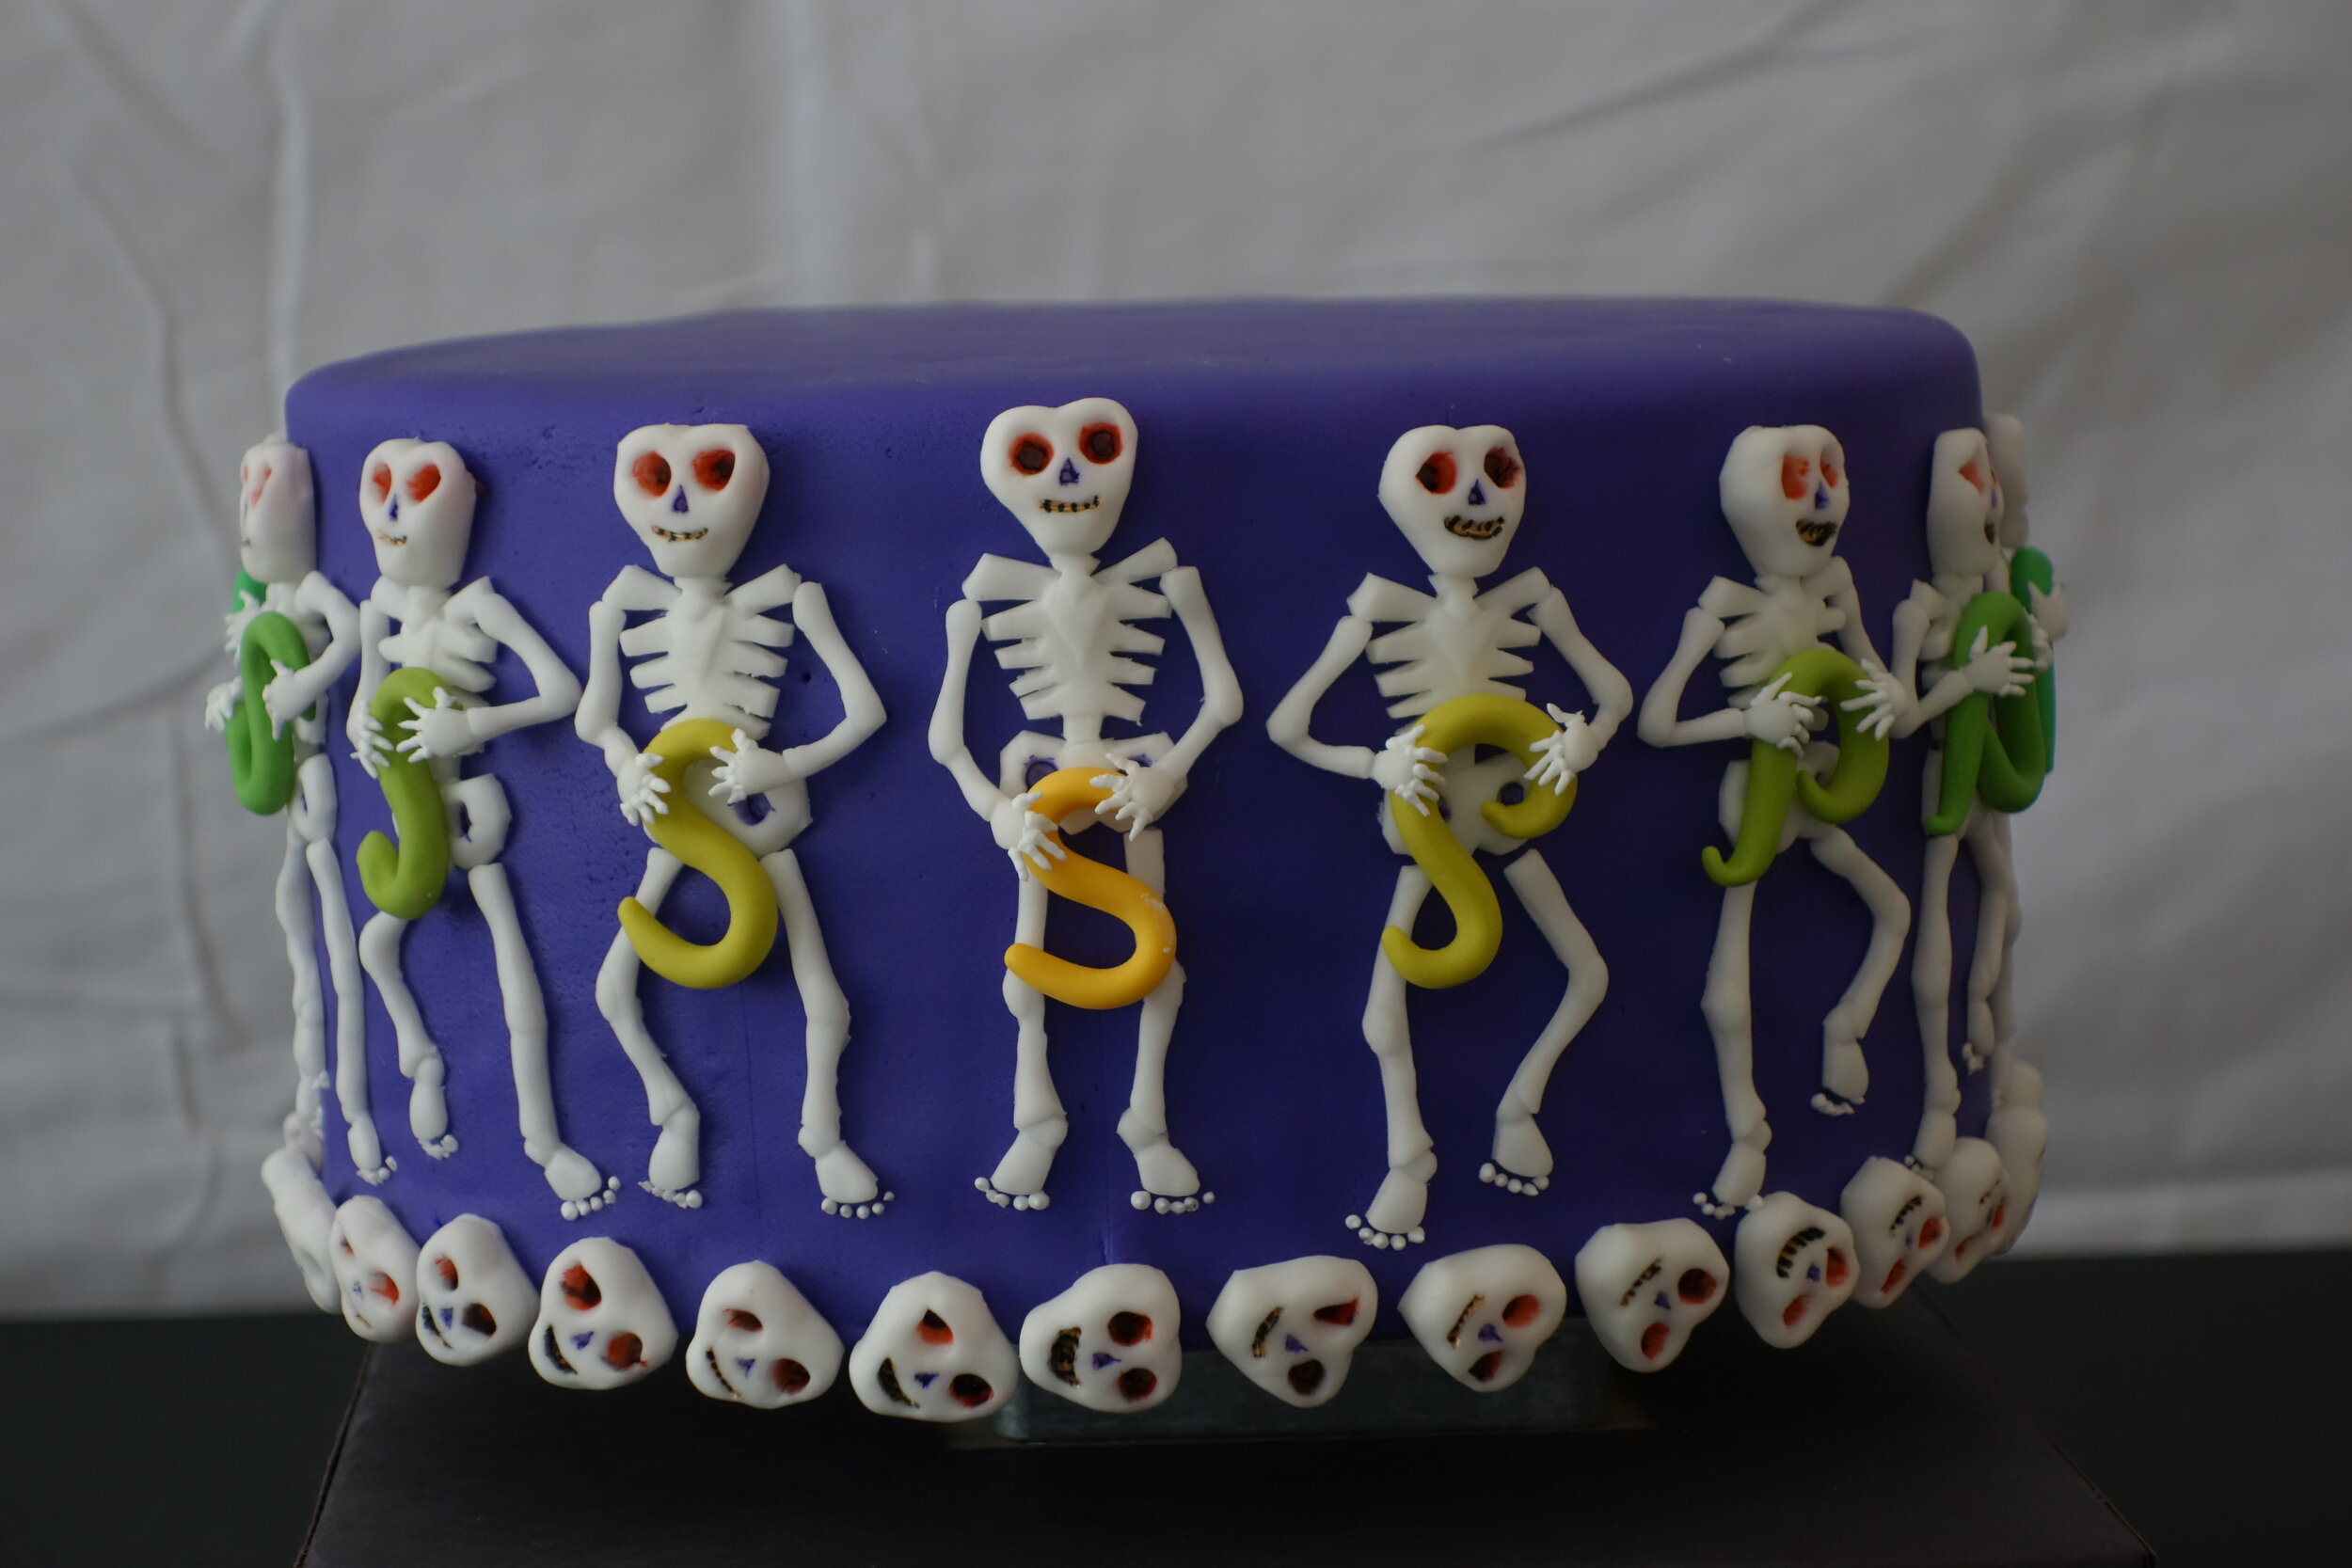
The turntable I built for the cake worked perfectly, but I never got it synchronized with the strobe light or viewing slit well enough for the zoetrope illusion to really work. It sort of works if I animate all these photos together like this, though.
Ultimately, it didn't matter whether or not the zoetrope effect worked, since Sam absolutely loved the cake.

He especially loved the skeleton heads and by the end of the party he had eaten the heads off of all the remaining skeletons on the cake.

Head Chopping Cake
When I asked Sam what cake he wanted for his fourth birthday, of course he wanted an Axe Cop cake like his sister had.


When I asked Sam what cake he wanted for his fourth birthday, of course he wanted an Axe Cop cake like his sister had. I didn’t have time to make Sam quite as large a cake as I made for Alex, so I just went with a simple 8” round cake with a row of bad guys around the perimeter.

I stuck a motor in the middle, so that I could attach chocolate axes to chop the bad guys’ heads off. I really needed a stronger motor and a better way to attach the chocolate axes, but we did eventually manage to decapitate and/or knock over all the gum paste bad guys.
Sugar Dome
I’m back on Food Network, on the Sugar Dome episode “When Toy Stores Come to Life at Night!”


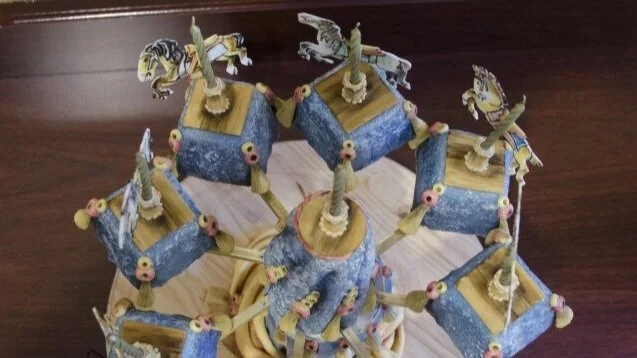
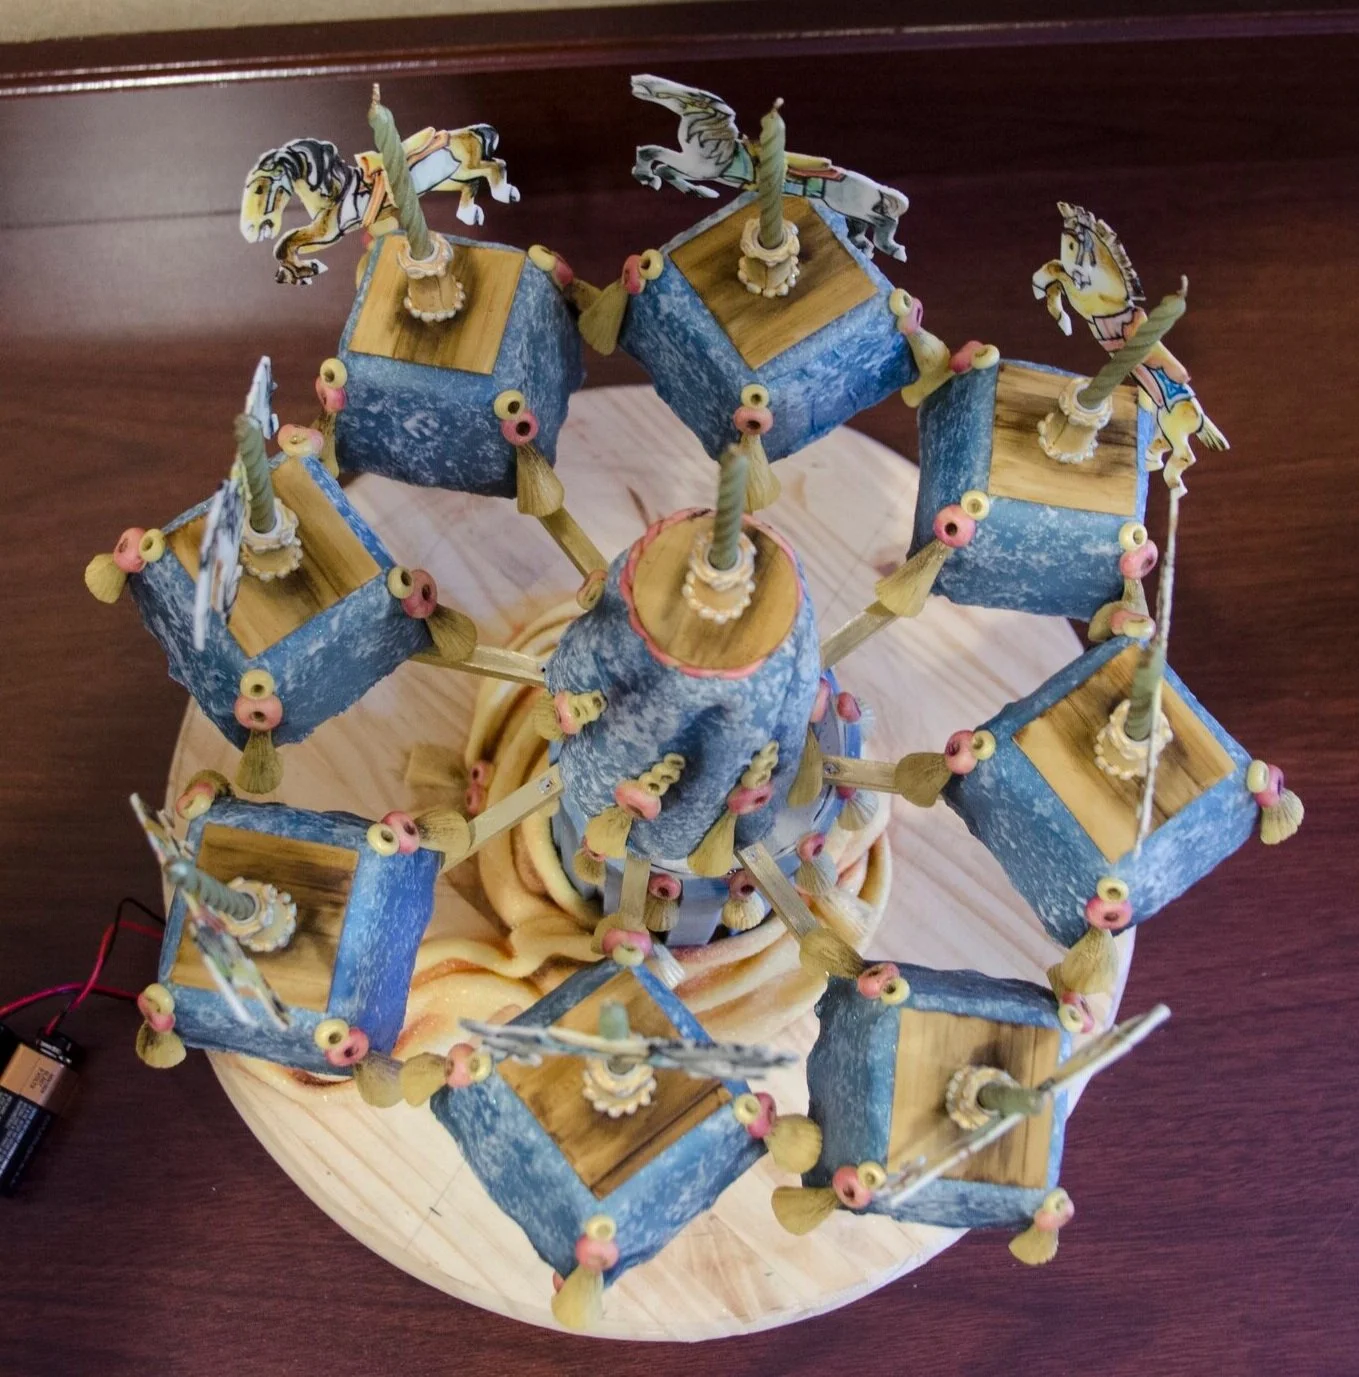
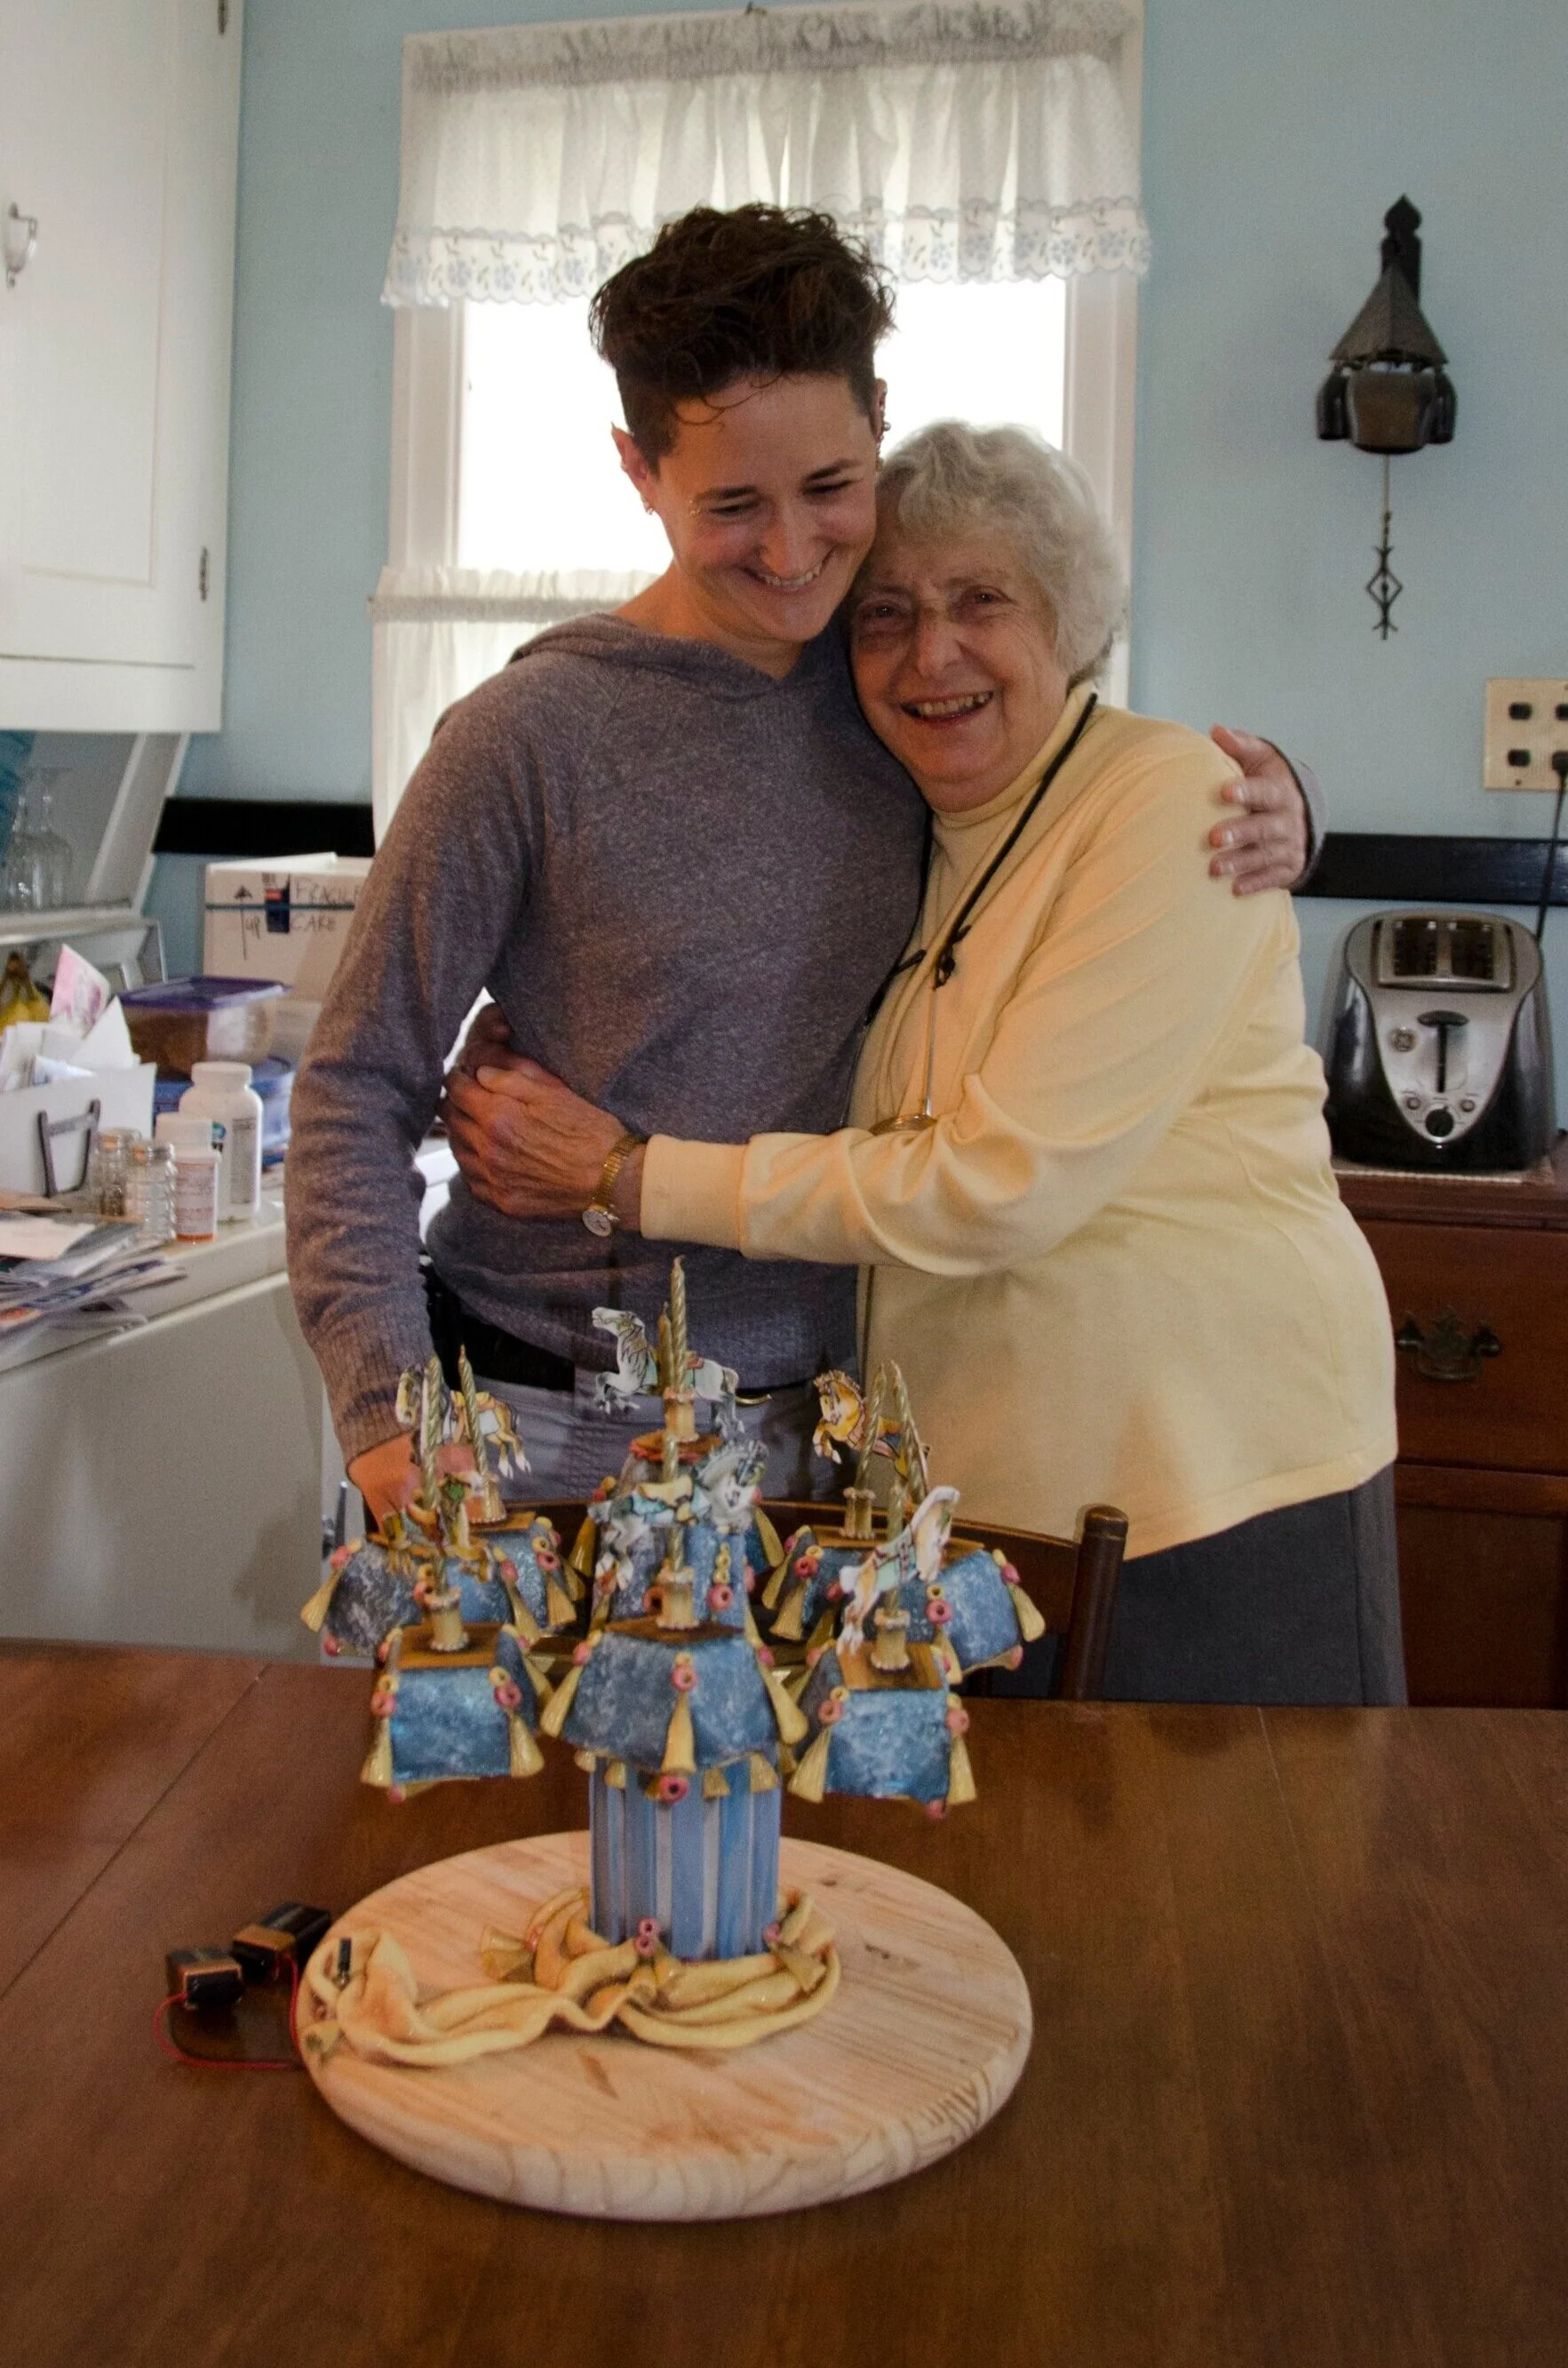
Carousel Cake
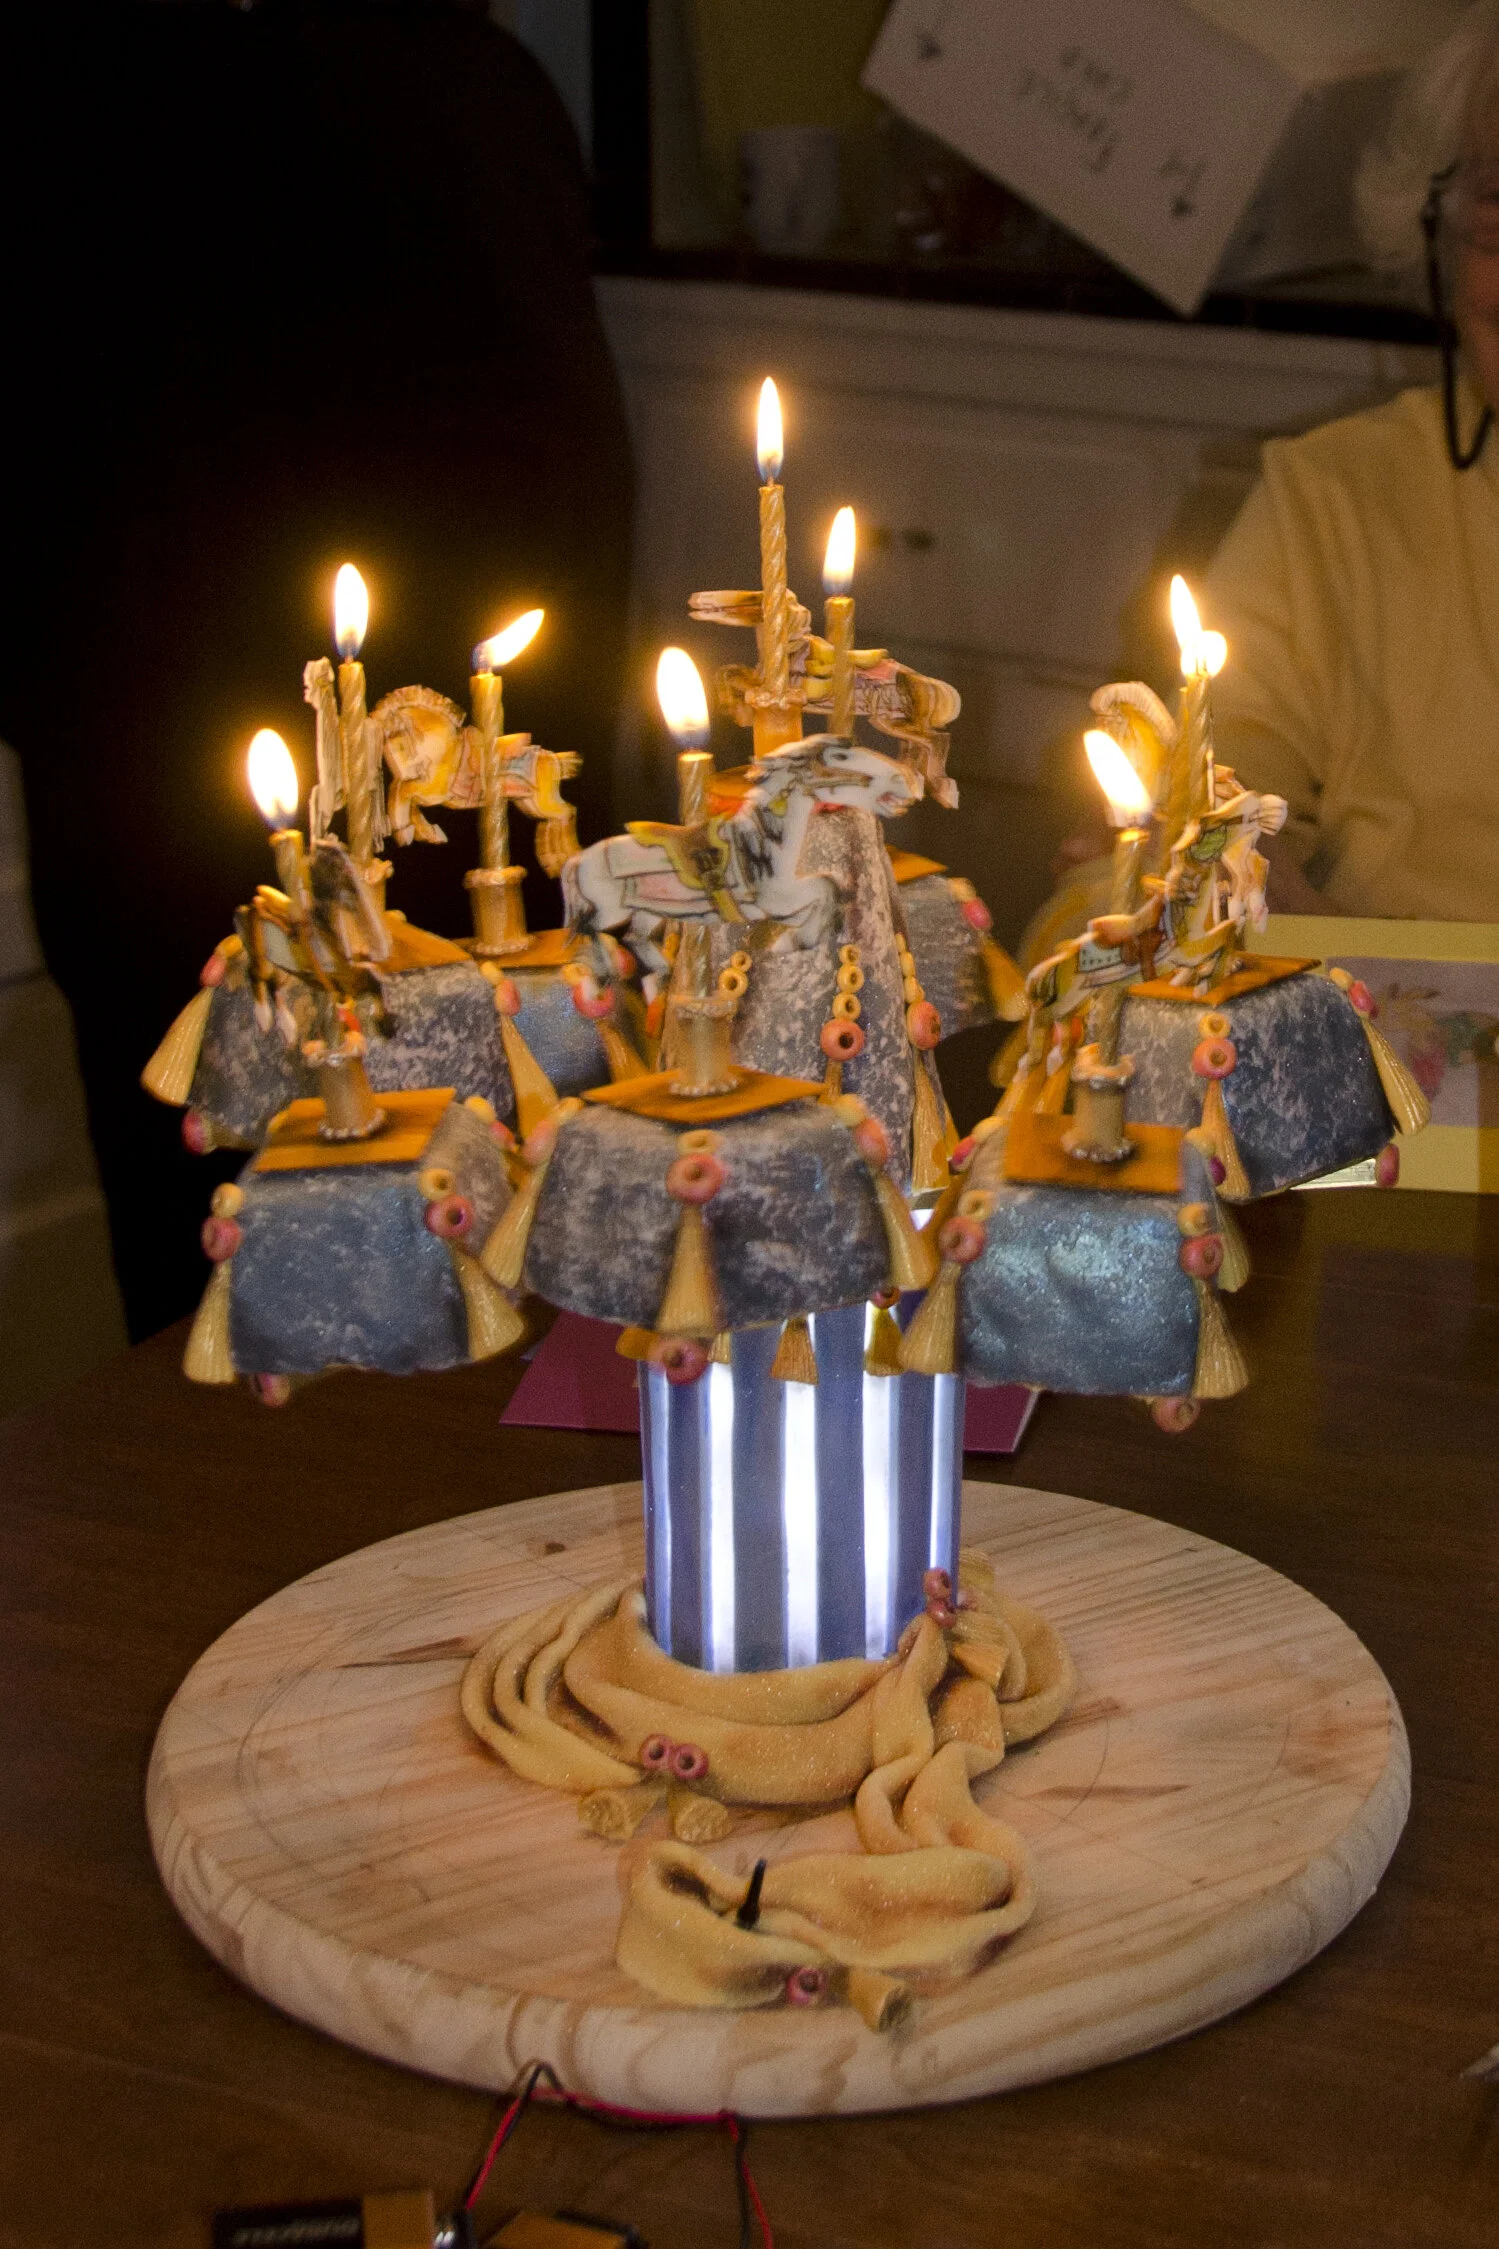
My grandmother lives near a beautiful old carousel from the 1920s. When we visited her when we little, she would always take us to ride it. When I was designing her 90th birthday cake, I got to thinking about riding the carousel with her, and this is the result.
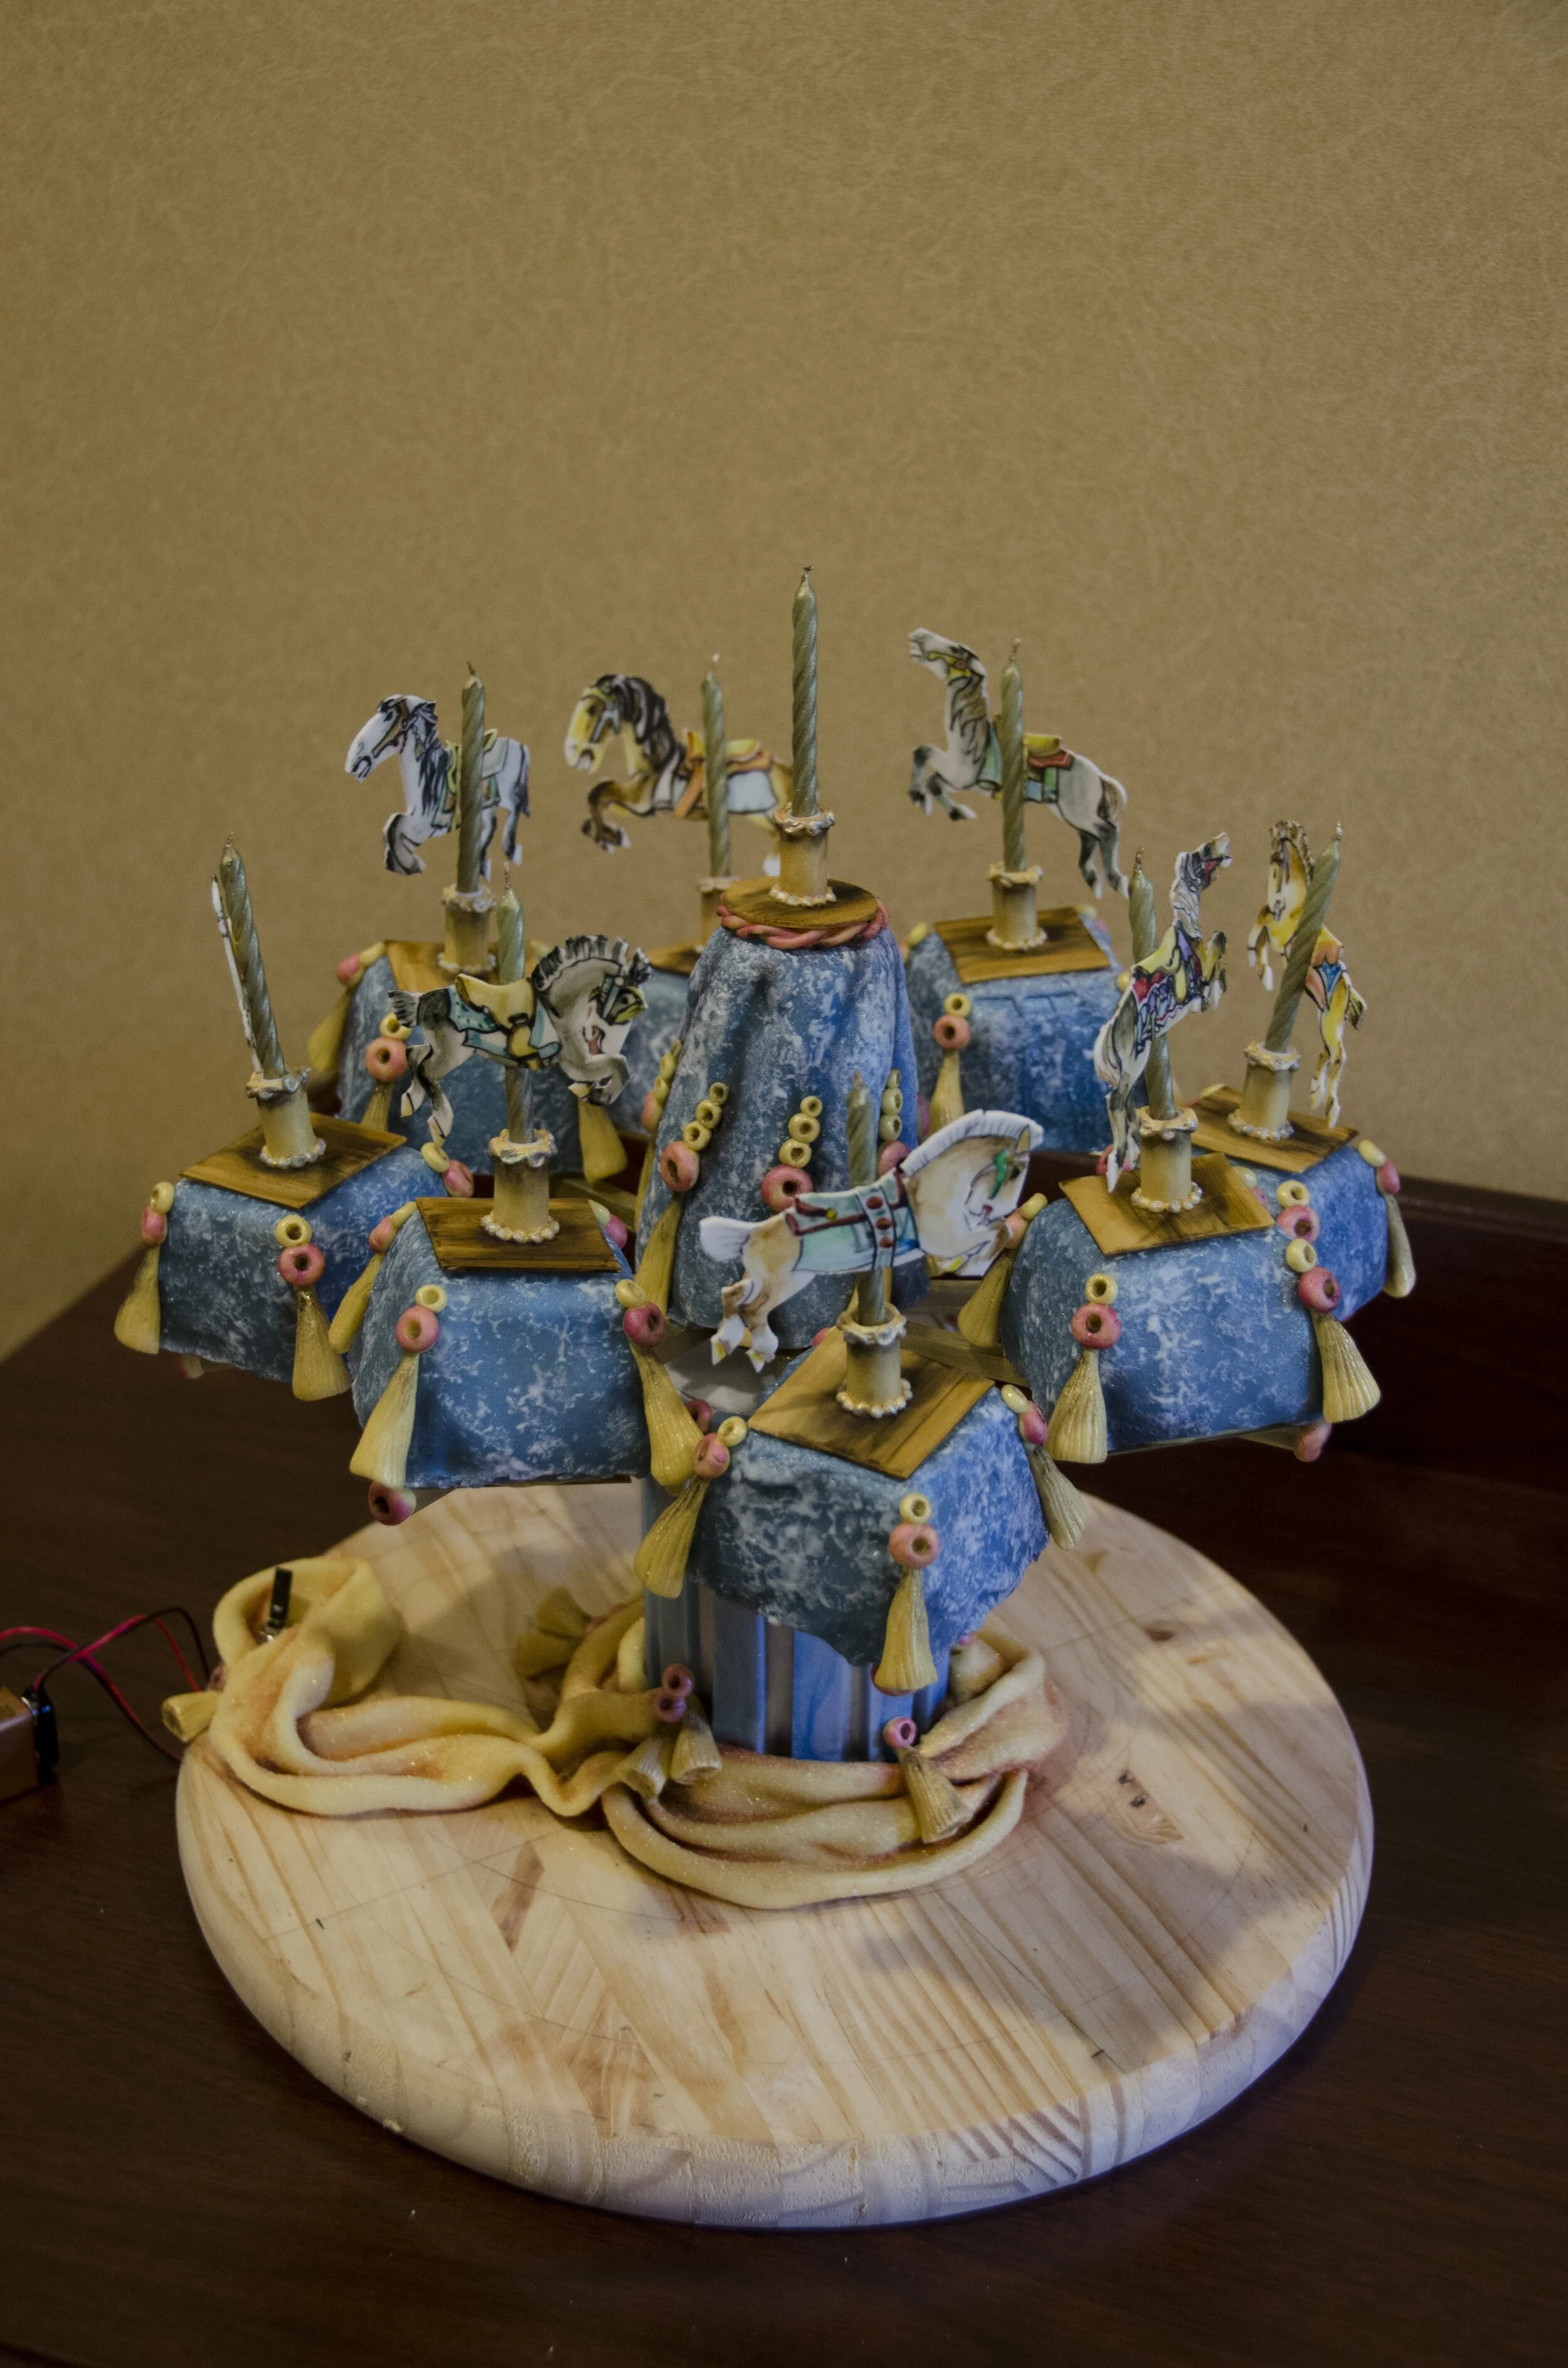
My grandmother lives near a beautiful old carousel from the 1920s. When we visited her when were little, she would always take us to ride it. When I was designing her 90th birthday cake, I got to thinking about riding the carousel with her, and this is the result.
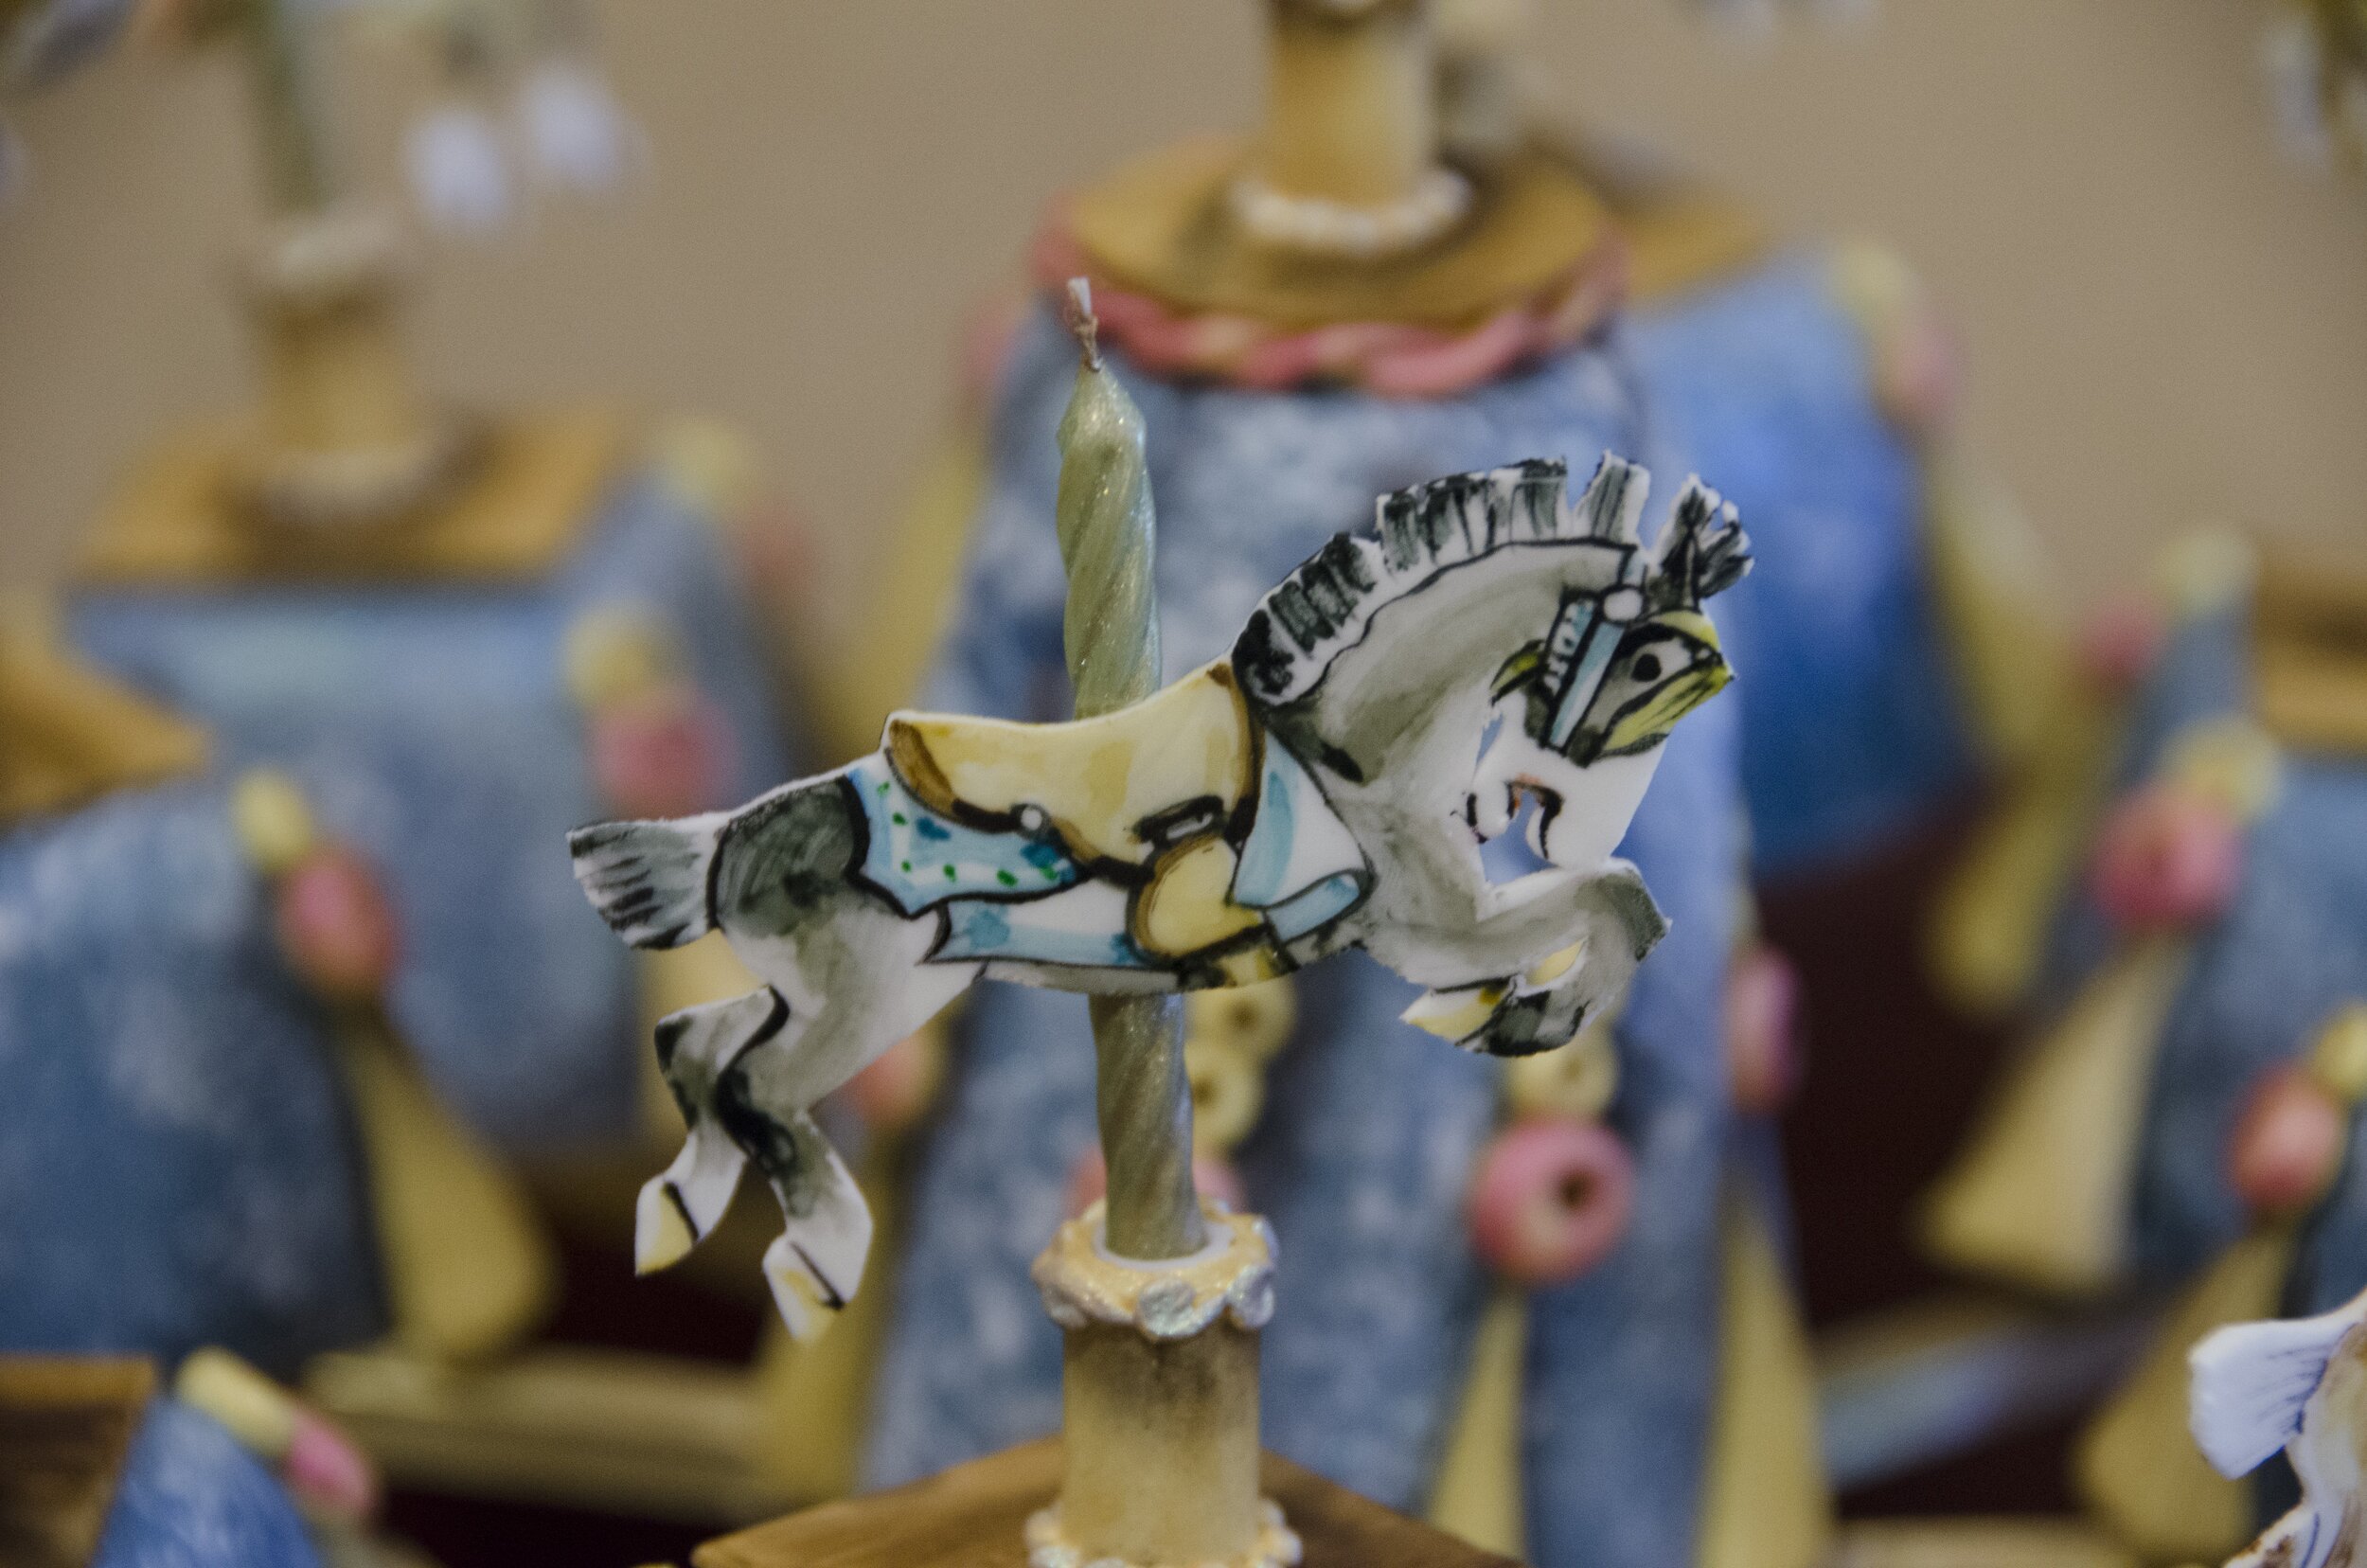
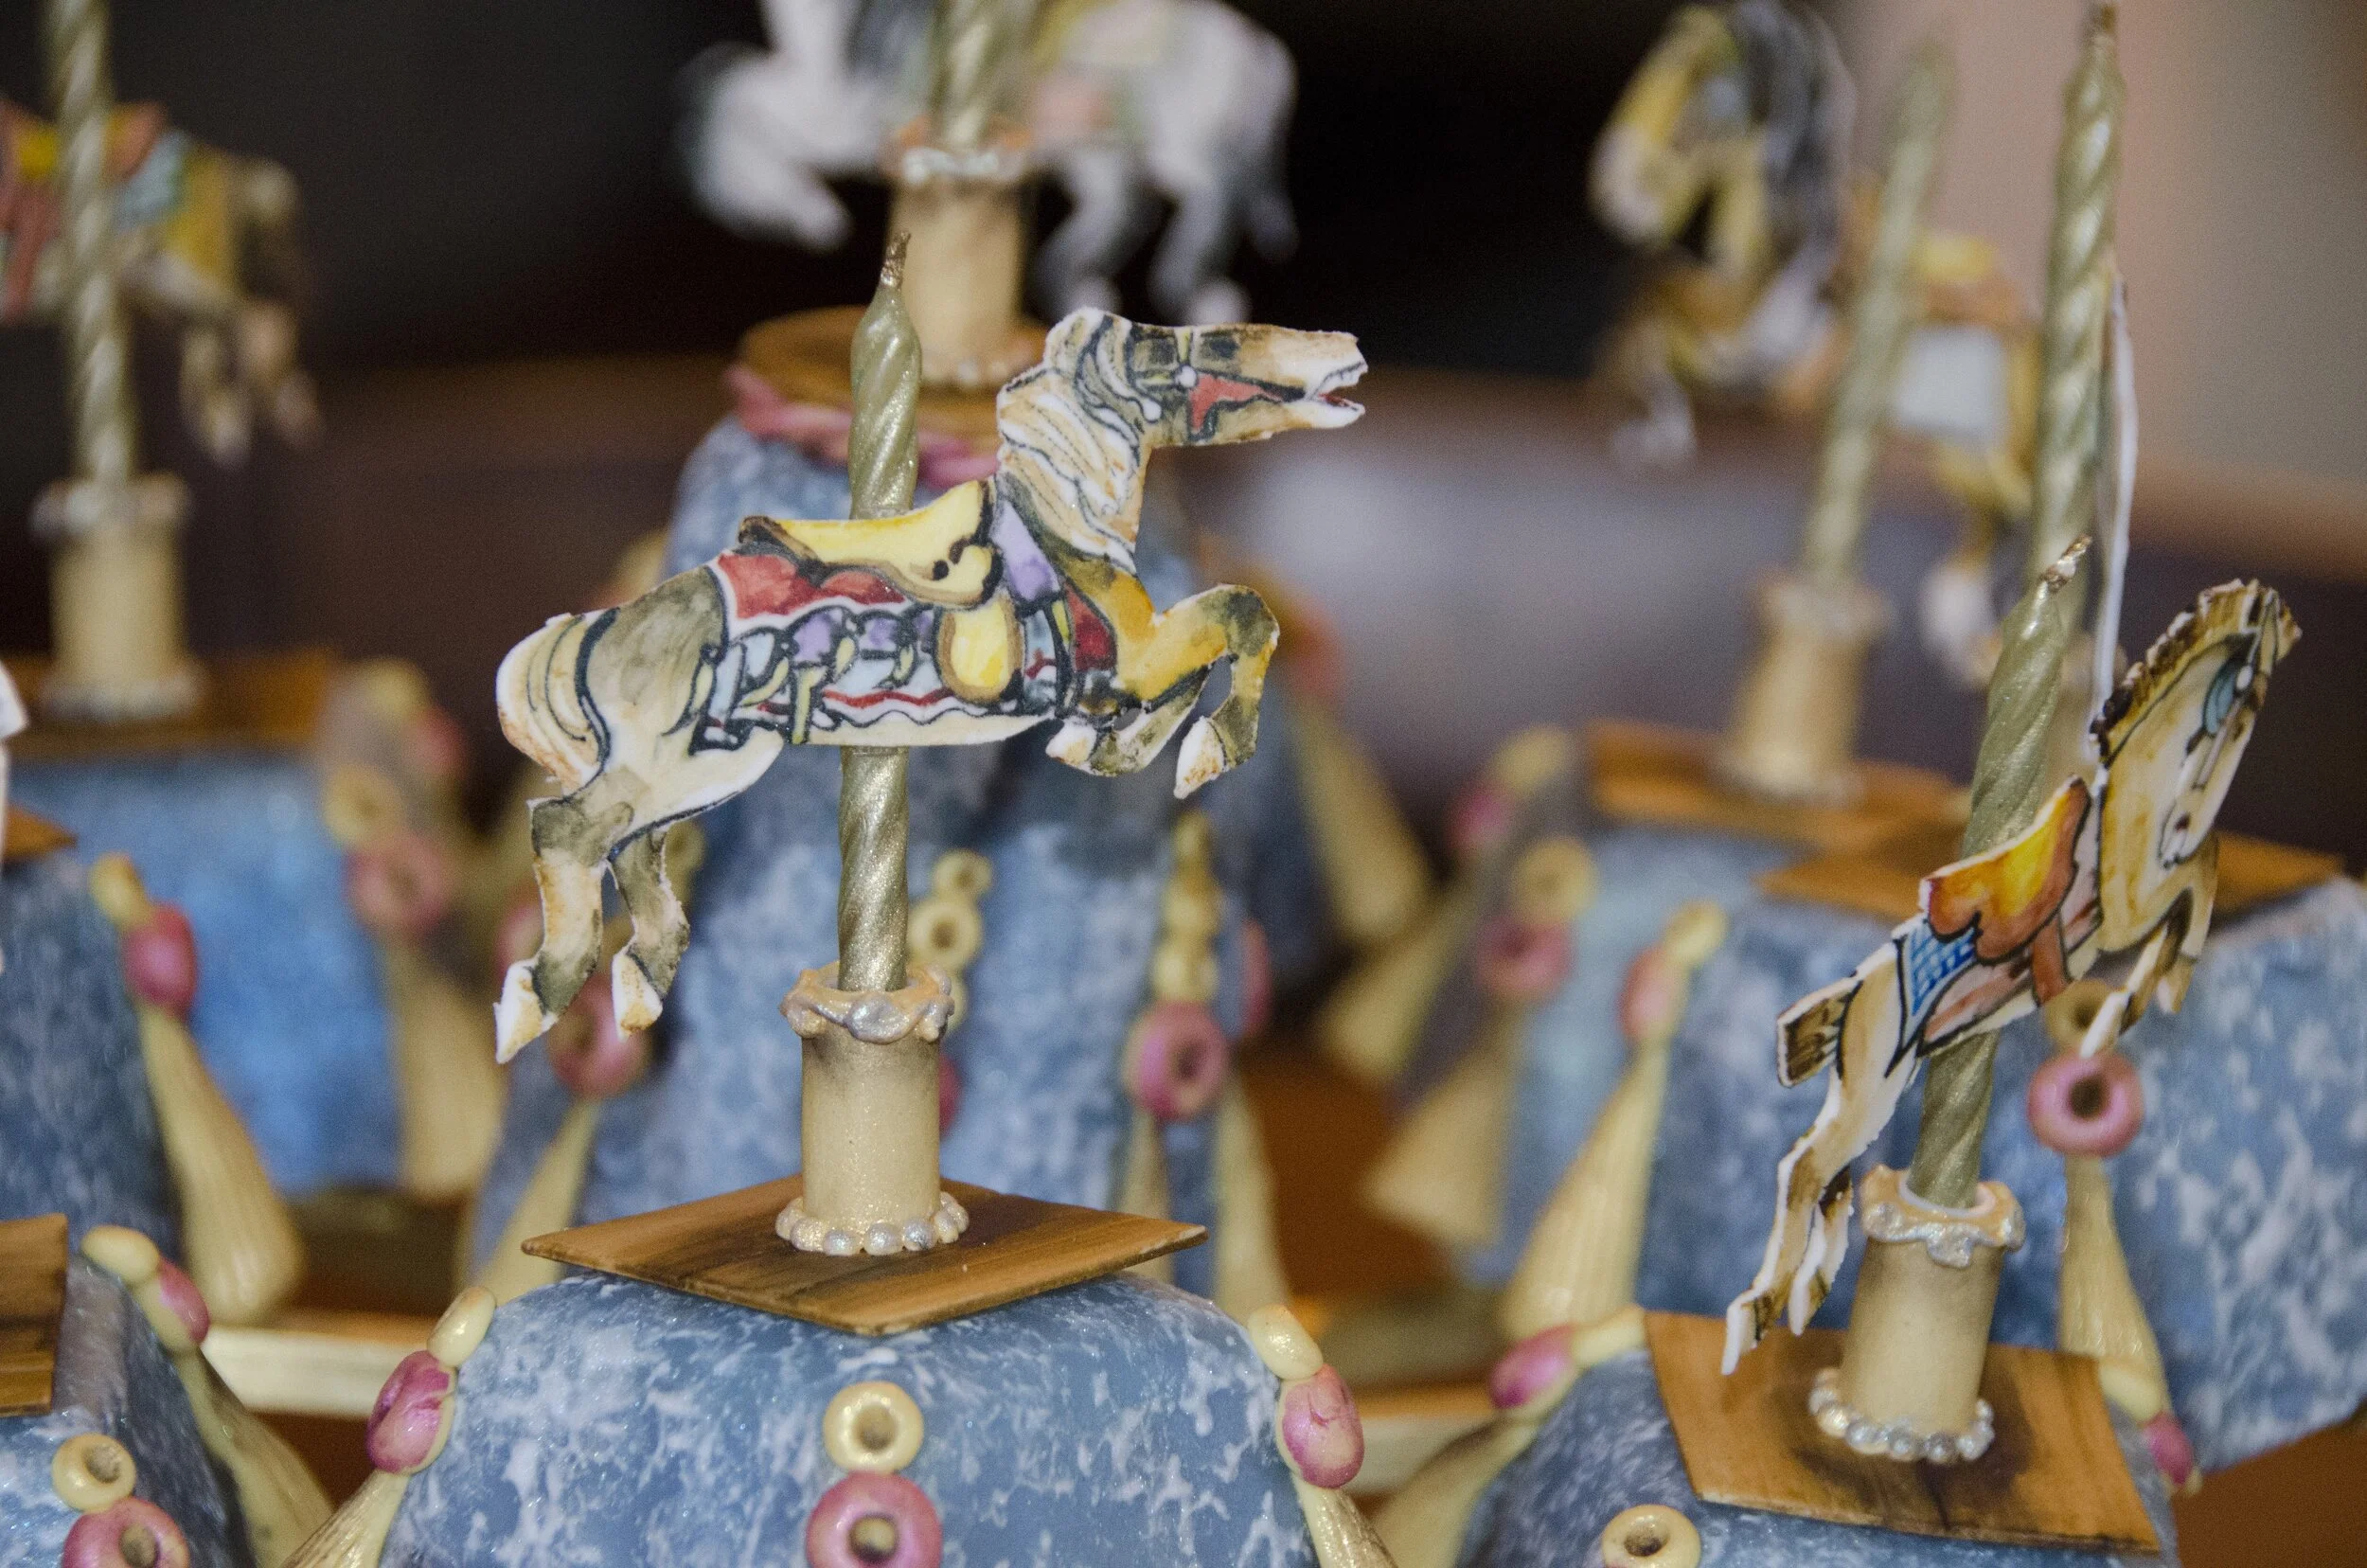
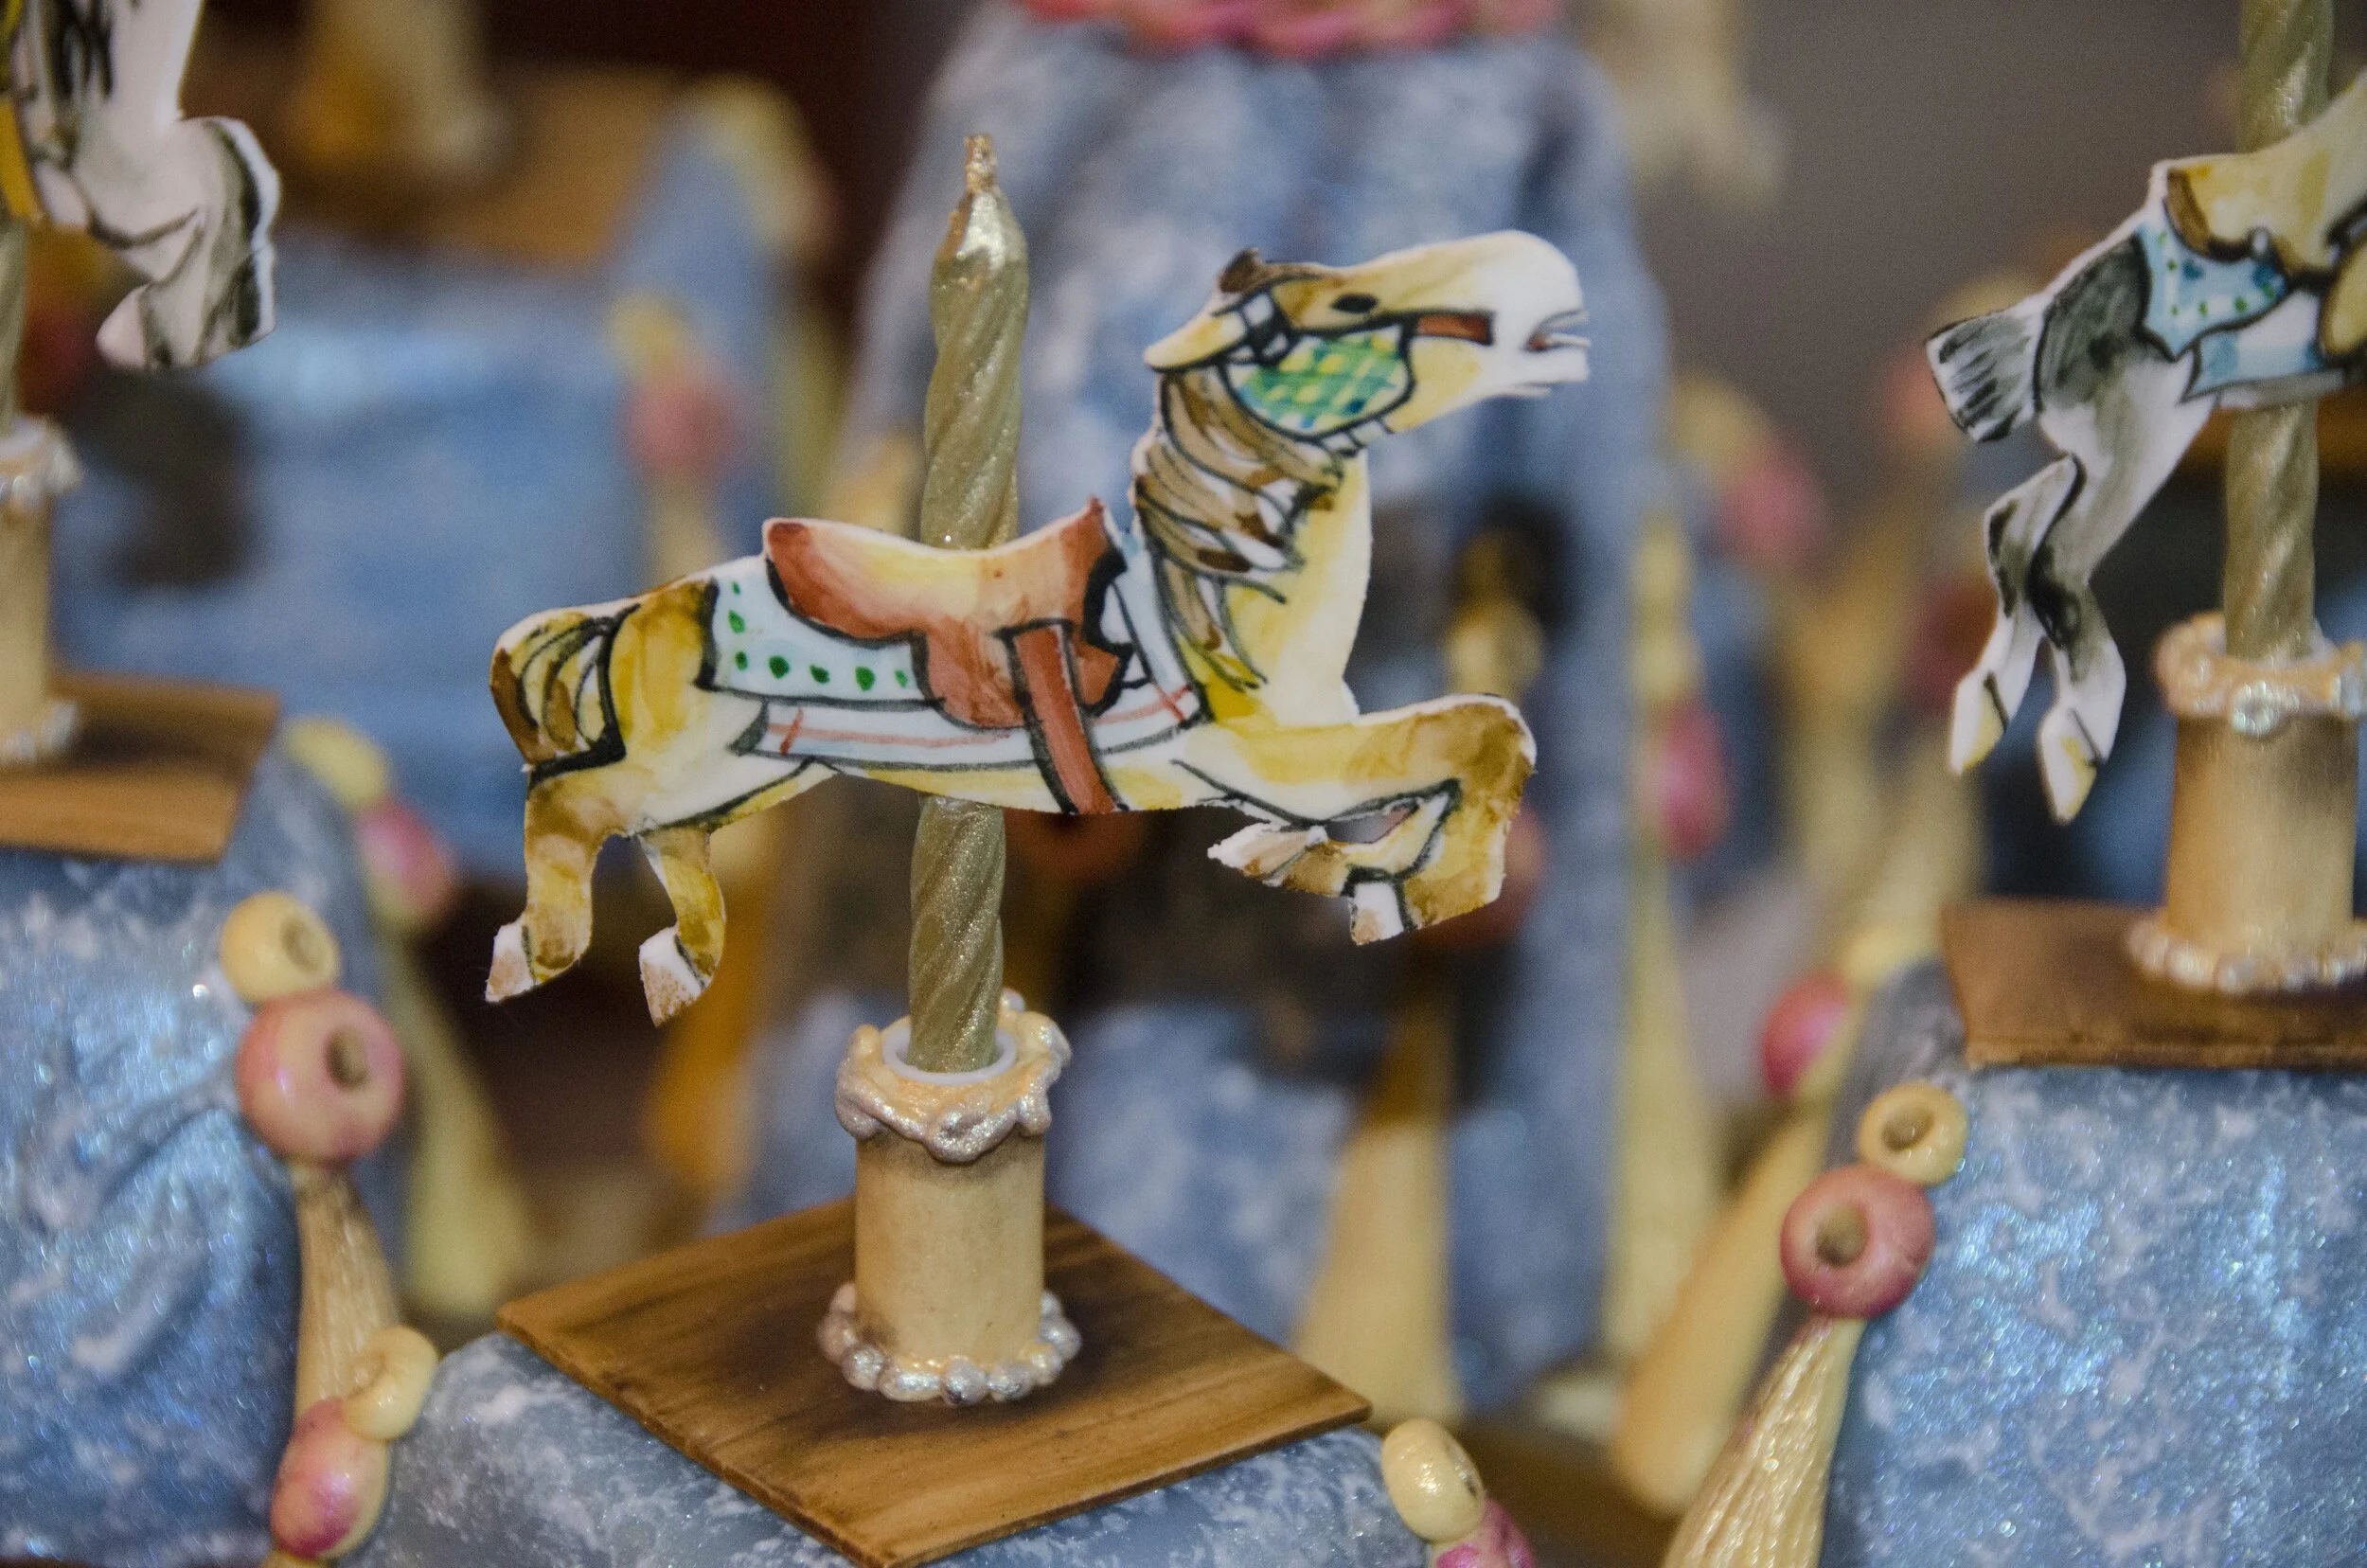
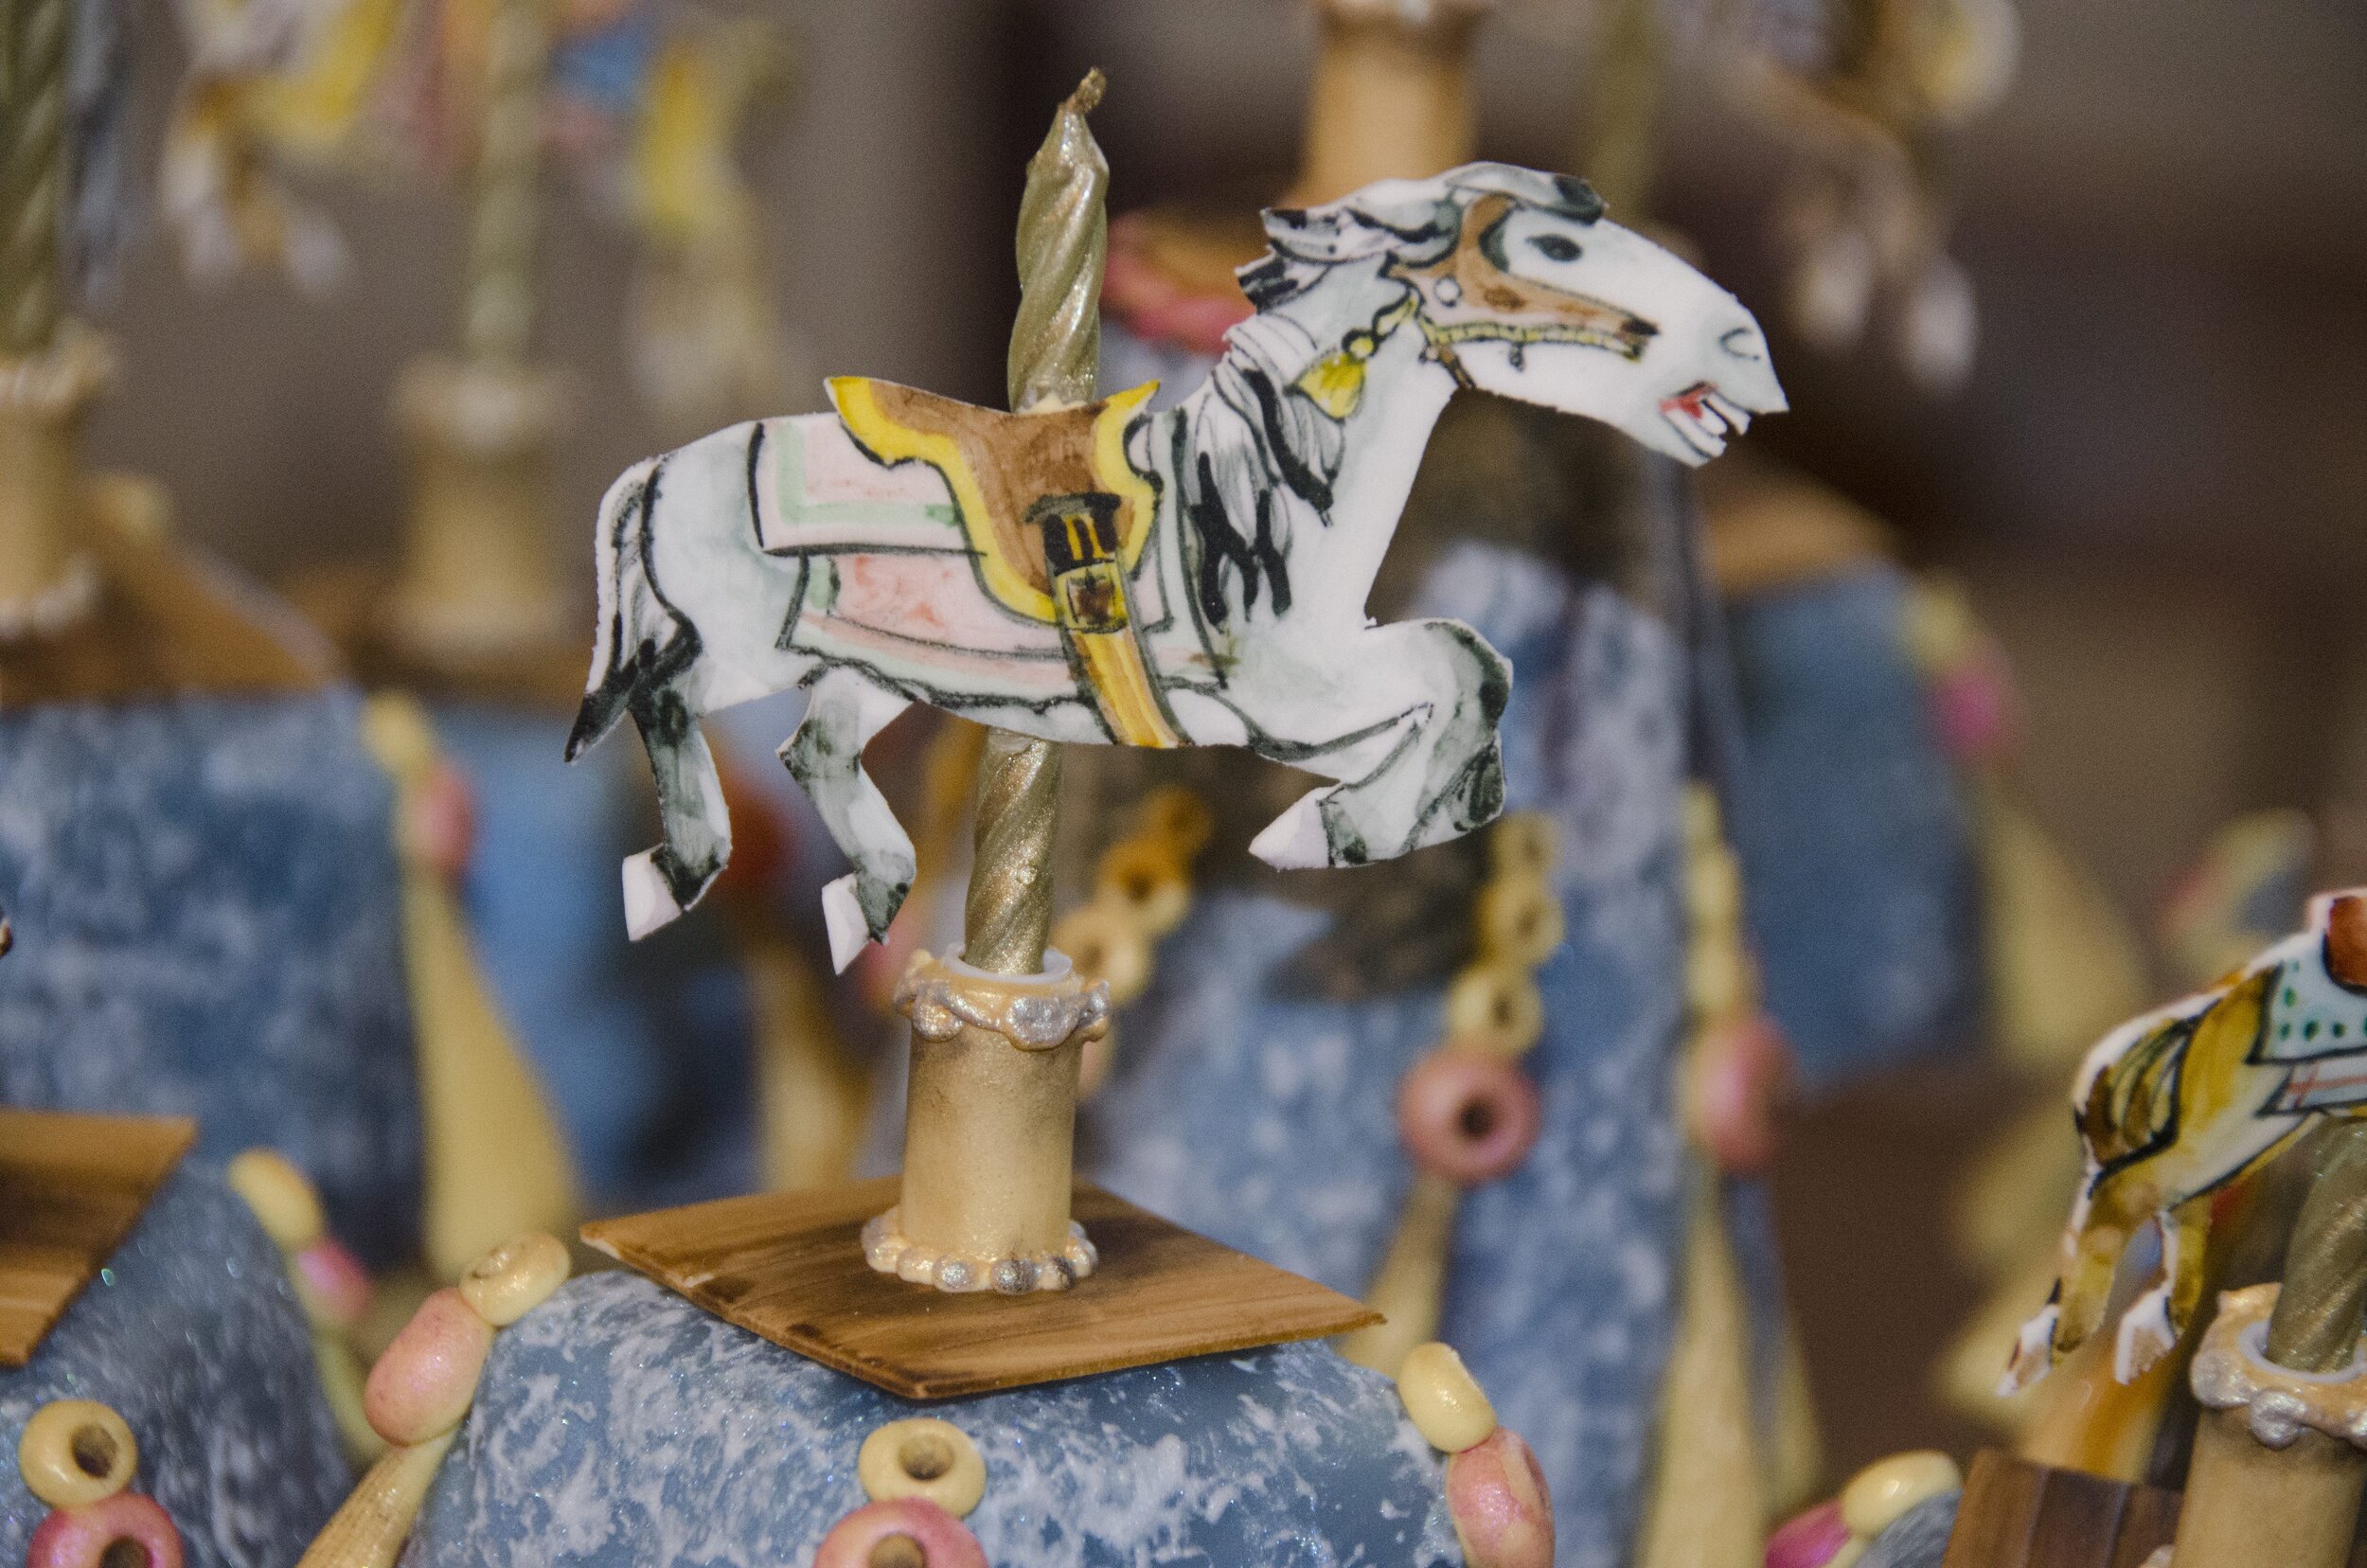
Obviously, it rotated and lit up. The little gum paste horses on the candles are modeled after horses on the real carousel.
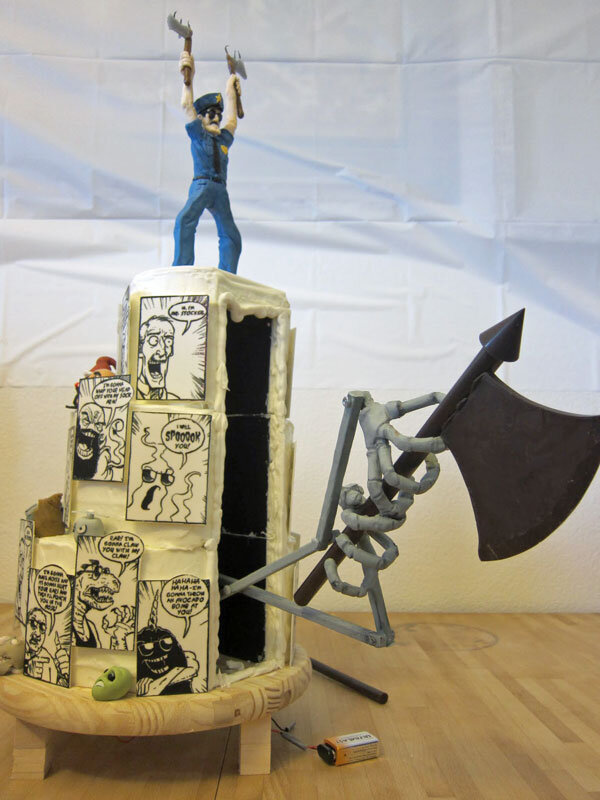
Axe Cop Cake
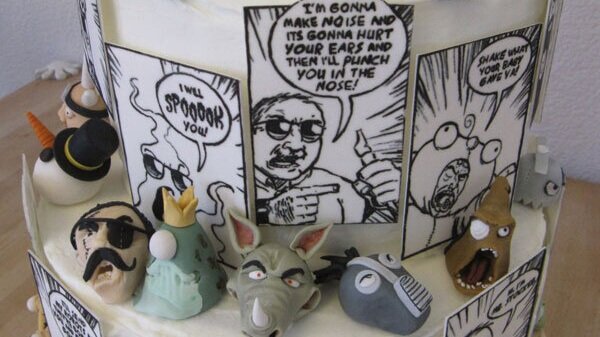
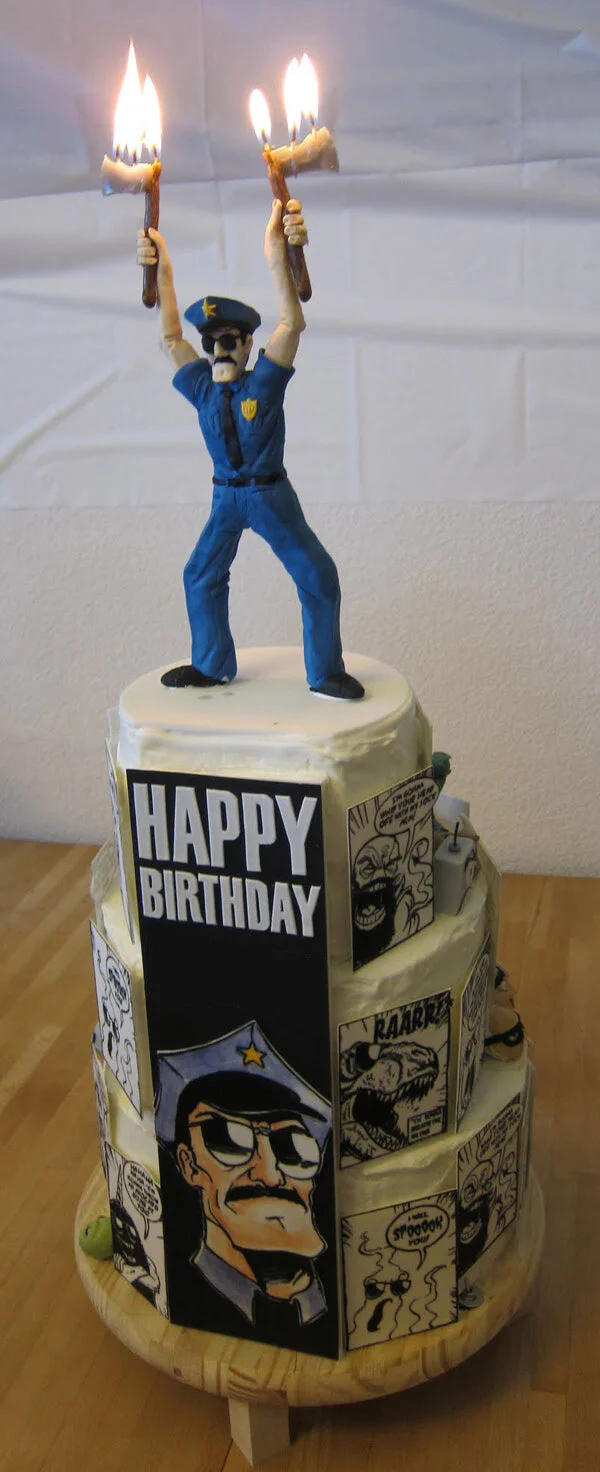
For my niece’s sixth birthday we decided on an Axe Cop theme. Axe Cop’s favorite food is birthday cake with a candle of himself on it, so I took that as my starting place for the cake.

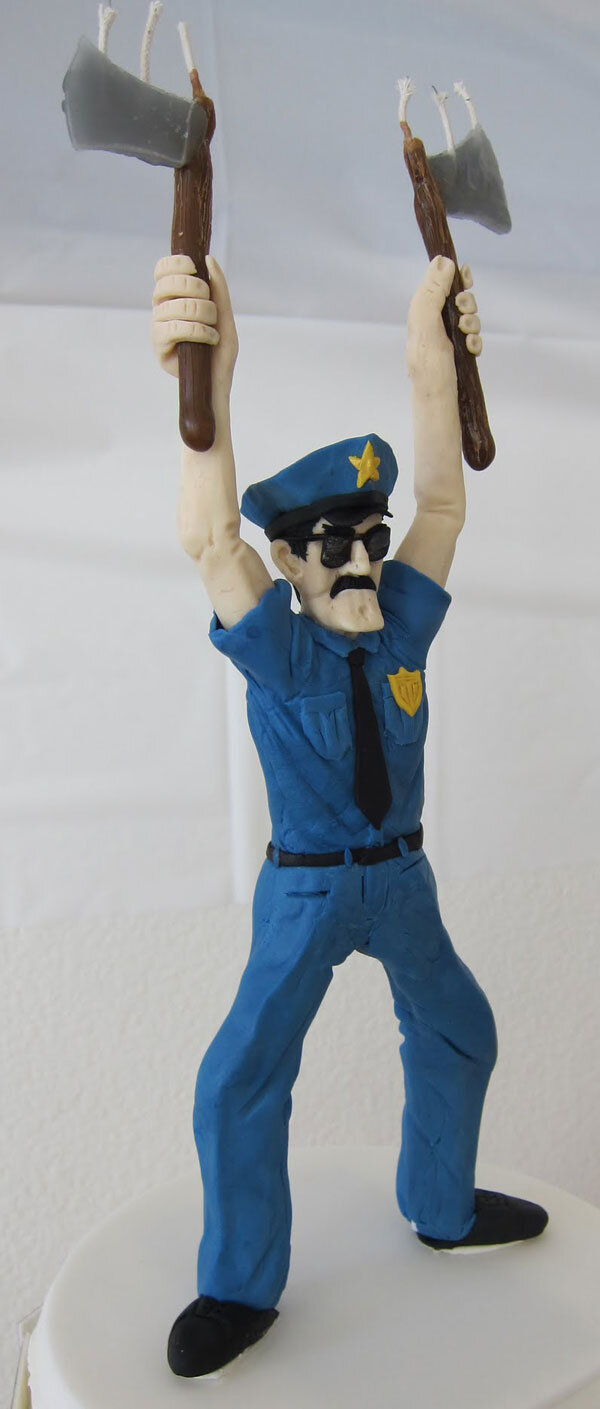

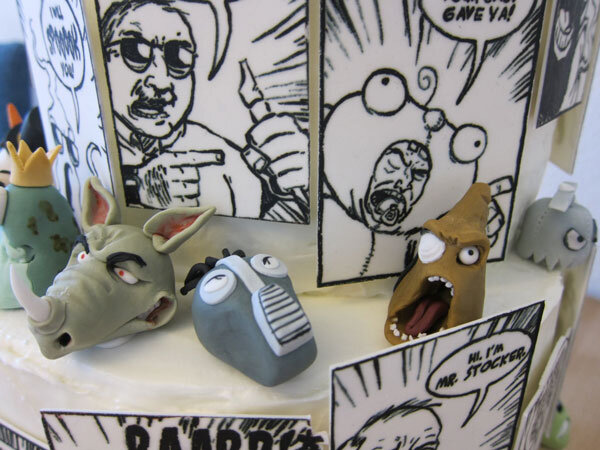
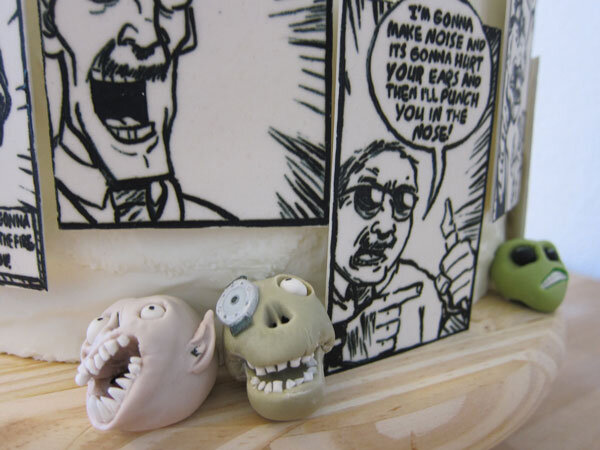
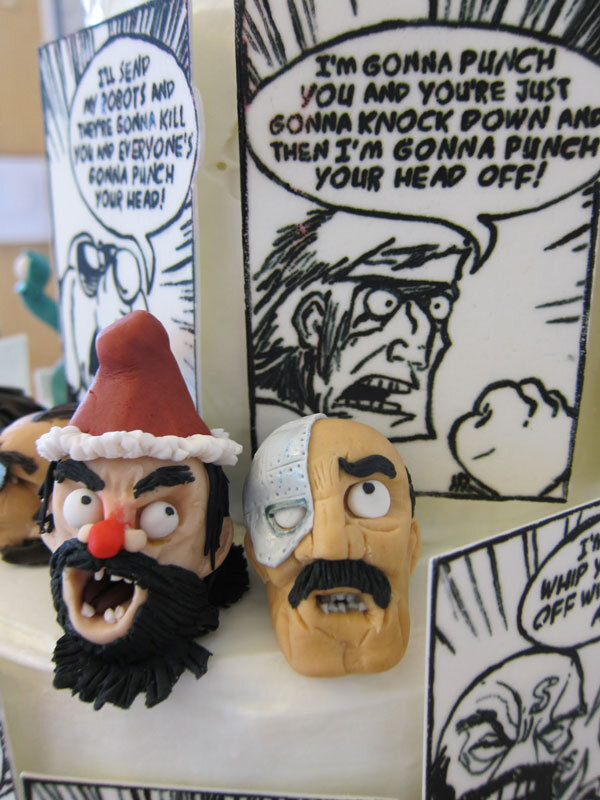
The cake topper is gum paste with axe candles in his hands. The gum paste comic panels around the sides are all of Axe Cop’s team members with their catch phrases. The gum paste heads are bad guys’ heads that Axe Cop has chopped off.


Axe Cop also has a robot that lives in his moustache and hands him weapons at need. So I made robot arms holding a chocolate axe and concealed them inside the cake. Right before we served the cake, Alex flipped the switch and the arm smashed dramatically out of the cake. Sadly, the chocolate axe broke on the way out, but I had a spare on hand for the photo op.

Sneetch Cake
I have been looking forward to seeing my niece and nephew perform in school plays since before they were born. Finally, my dream has come true. At her pre-K graduation, my niece Alex appeared in their stage adaptation of Dr. Suess’s The Sneetches. To celebrate her accomplishment, I decided to make her a Sneetch cake.
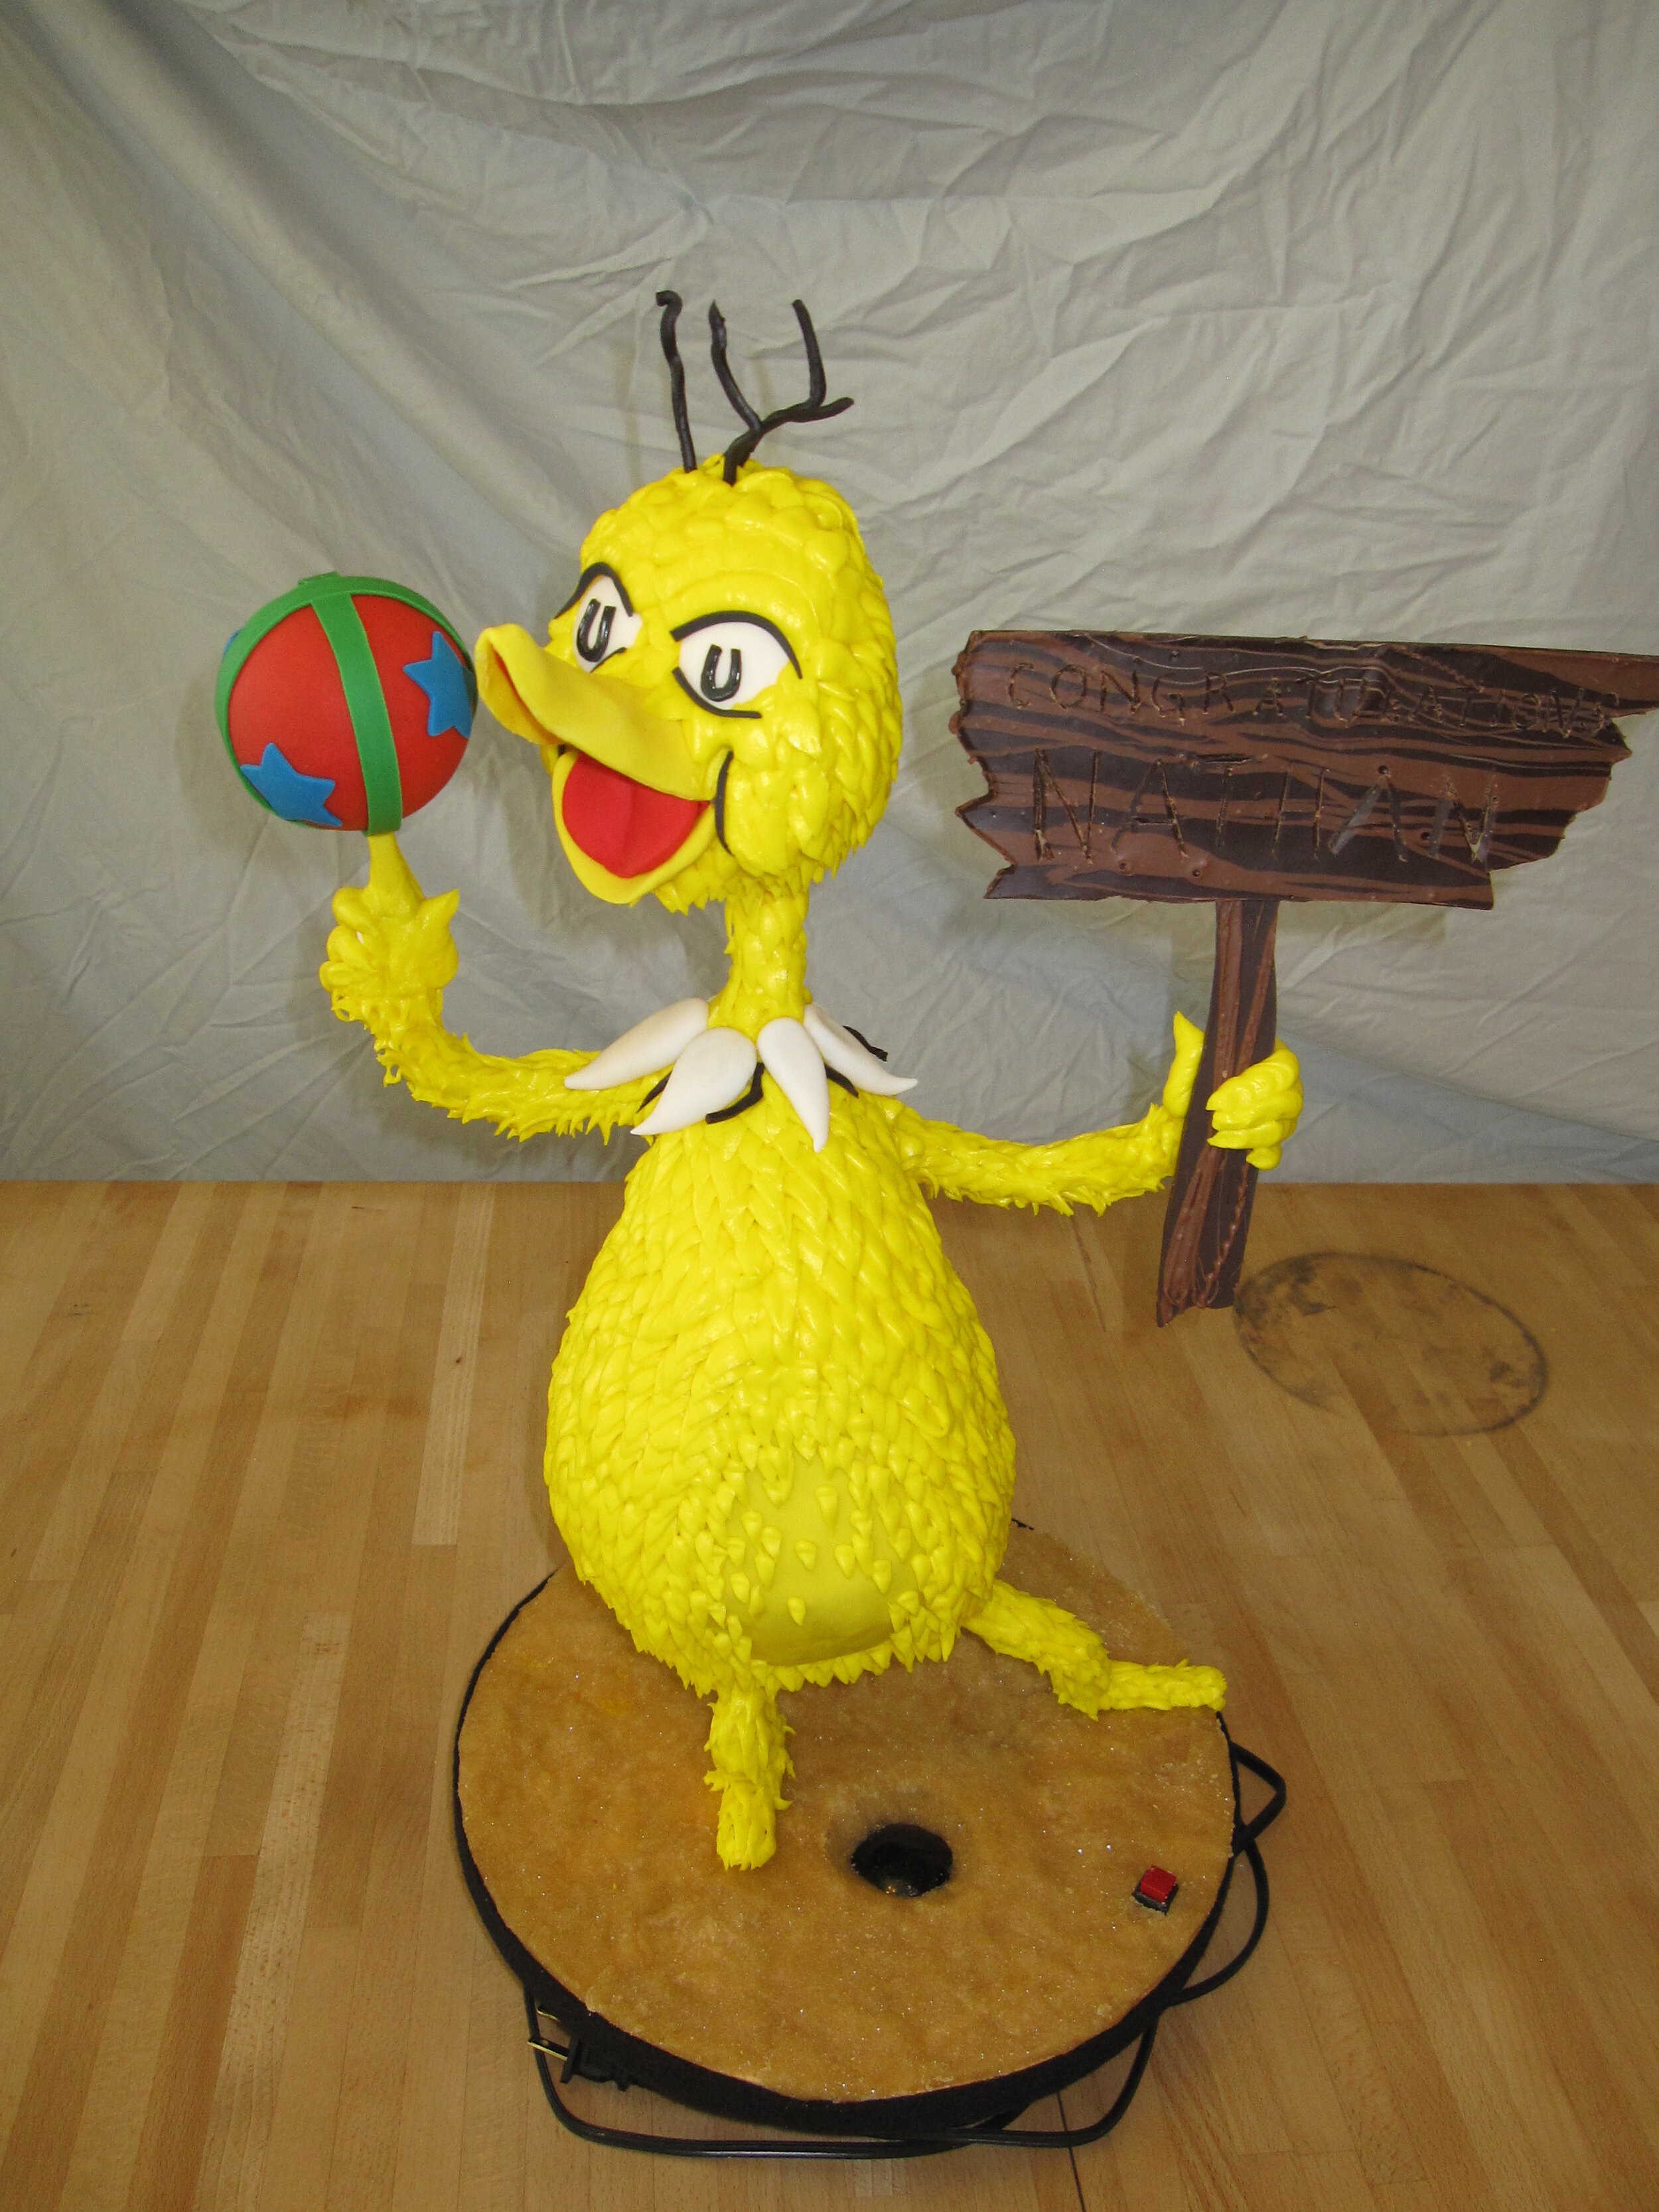
I have been looking forward to seeing my niece and nephew perform in school plays since before they were born. Finally, my dream has come true. At her pre-K graduation, my niece Alex appeared in their stage adaptation of Dr. Suess’s The Sneetches. My completely and totally unbiased expert opinion is that Alex was clearly the best Sneetch in the bunch. To celebrate her accomplishment, I decided to make her a Sneetch cake.
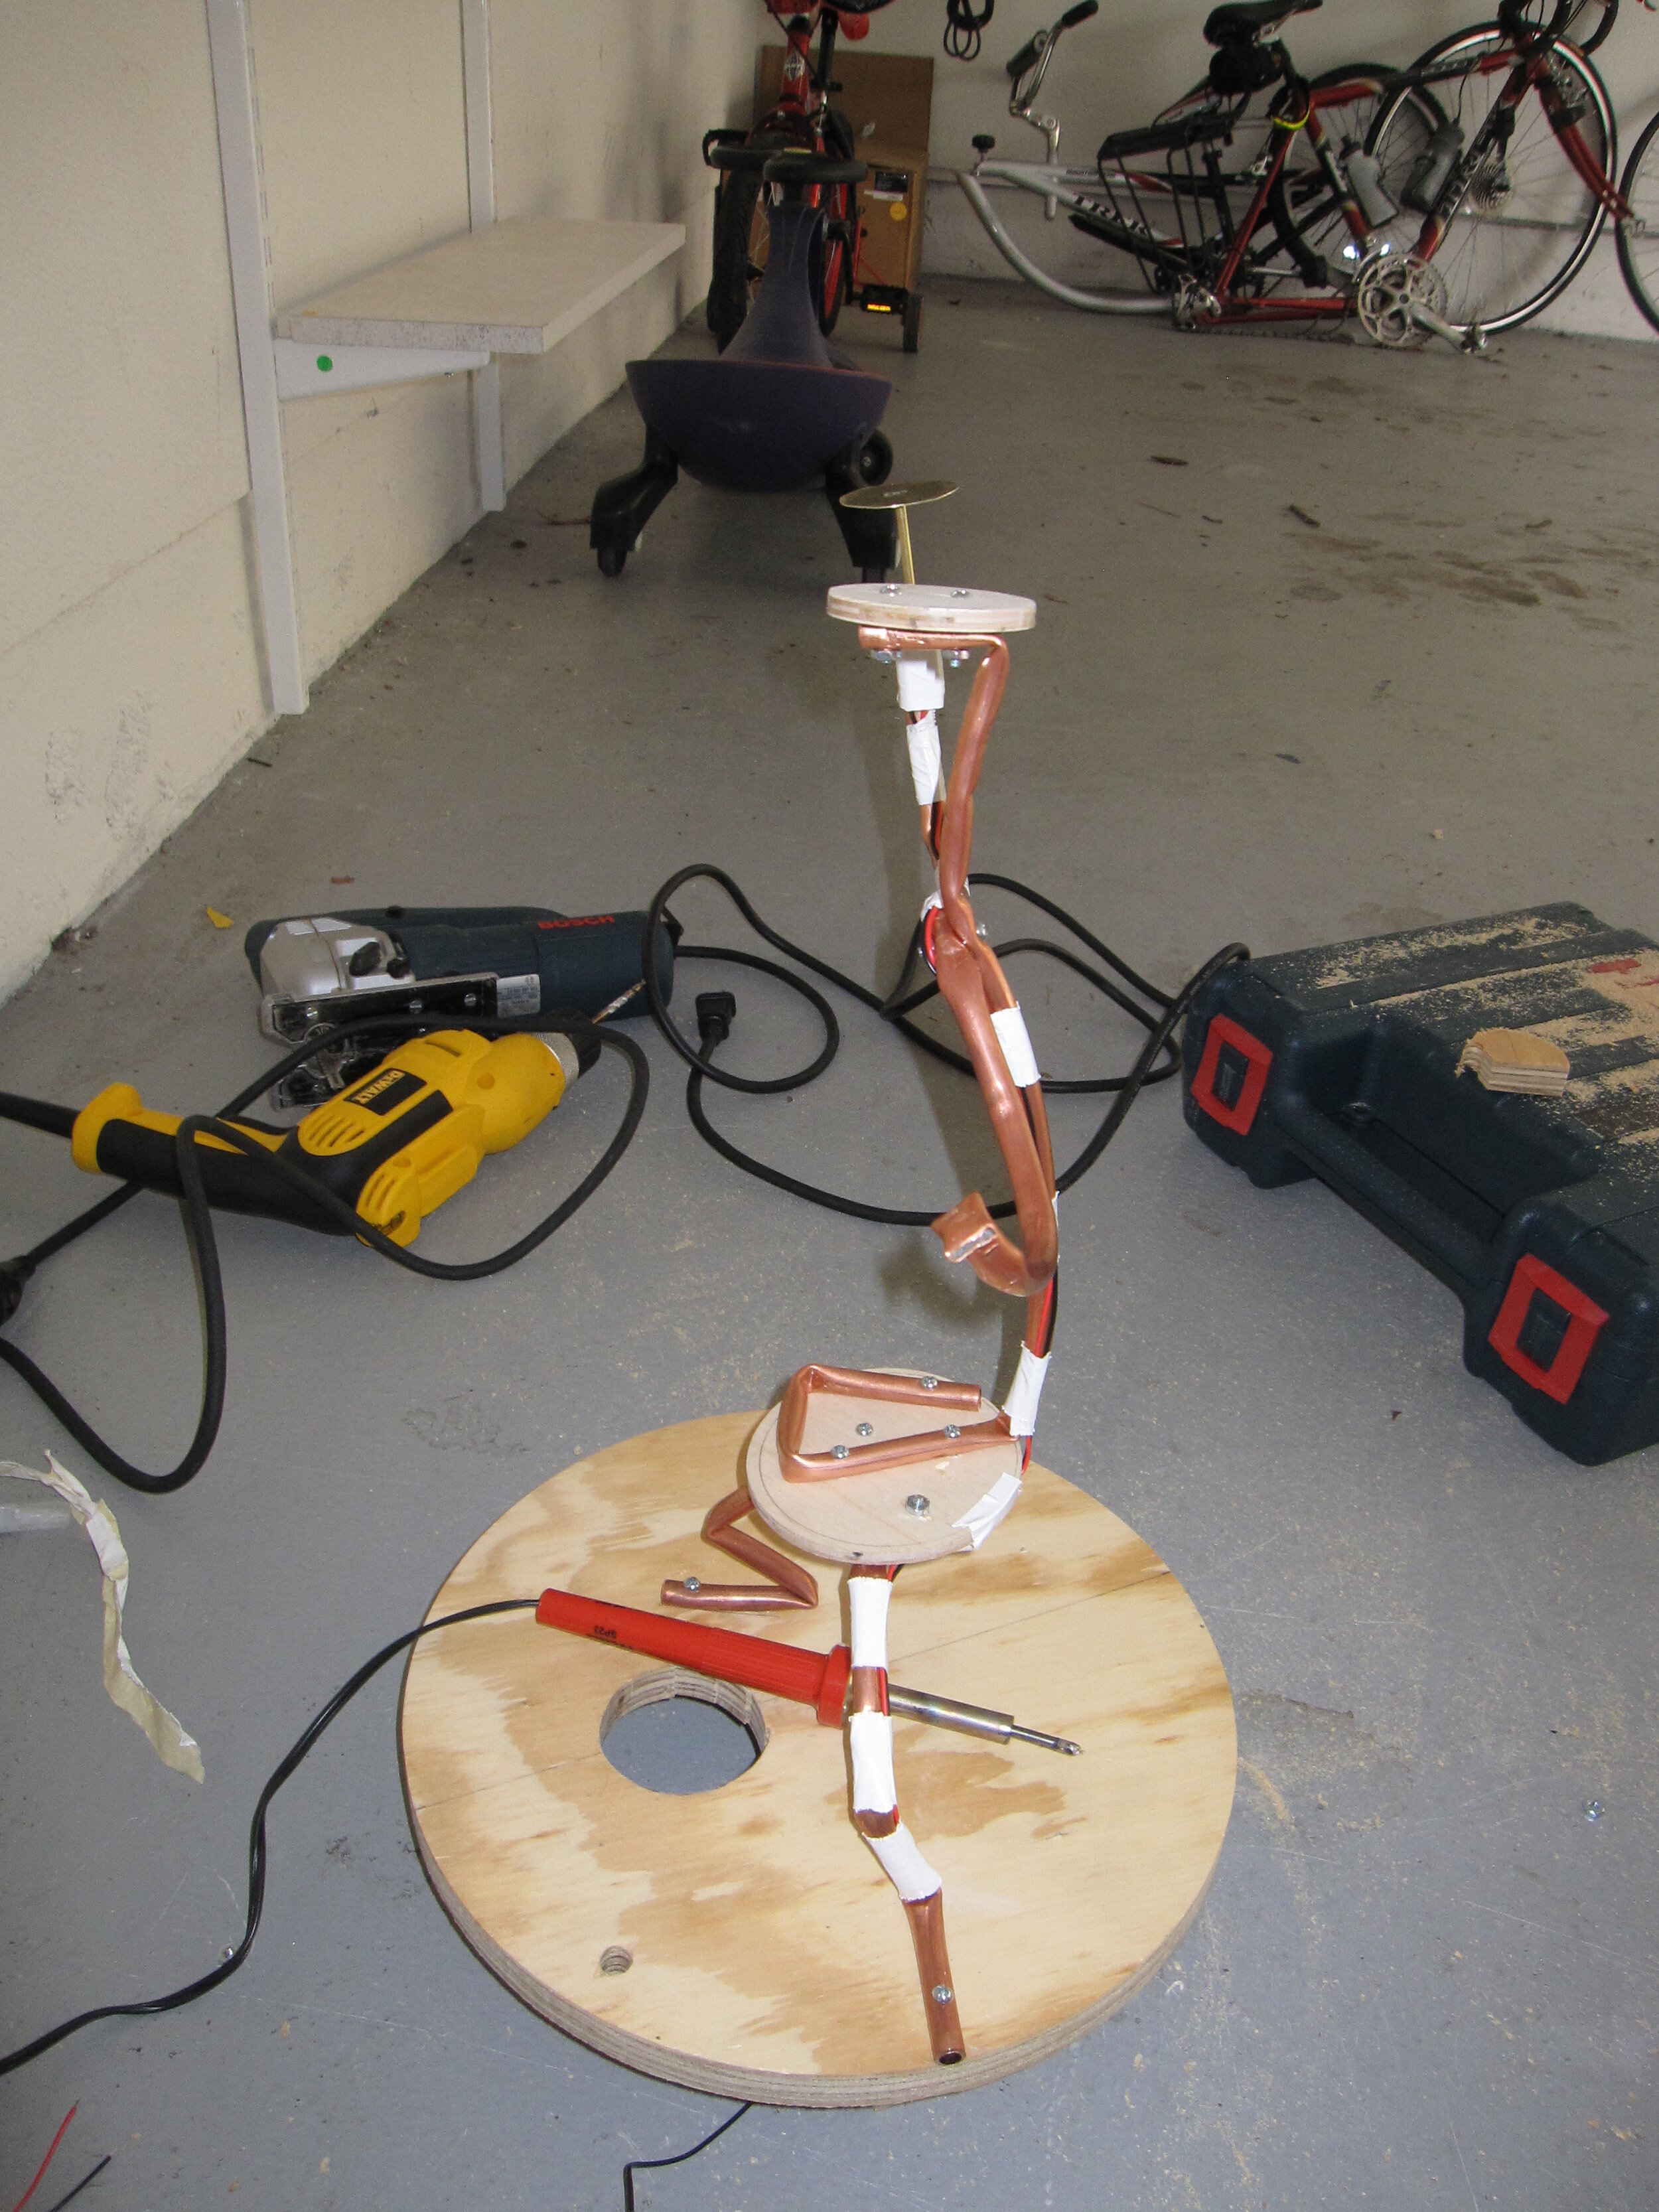
It would have been fairly easy to make a Sneetch sitting down, so of course I didn’t go that route. I wanted to make a standing up Sneetch because it would give me the opportunity to try one of the copper tubing armatures that I always see on Food Network Challenge and Ace of Cakes. I chose to attempt the pose of a proud newly-starred Sneetch thrusting out its belly. Ultimately, I'm not convinced that I fully achieved the balance and expression that I was looking for in the pose, so next time I'll have to take a little more care with the shape of the armature.
I’m not really sure if I made my armature according to industry best practices, but it seemed to work. I used 3/8” copper tubing, which was relatively easy to bend. I don’t think it would have supported a much larger cake, especially as the tight bends tend to get rather weak. I used ¼” plywood to make the circles to support the butt and the head and then I bolted the whole thing to a ¾” plywood circle for the base.
At this point, prior to the actual performance of The Sneetches, I knew nothing about the play except that Teacher Christine was playing the role of Sylvester McMonkey McBean and that it involved playing with a ball. So I decided to have my Sneetch twirling a ball on his finger. Alex and I have also been playing with a motor recently as part of a kit of science experiments related to light. The idea is that if you stick a circle of paper colored, for instance, half blue and half green onto the axle of the motor, when it spins the colors will blend together and you’ll see cyan. My thought was that if I made the ball red, blue, and green and got it to spin fast enough, then the colors would blend in the eye and look white – or at least yellowish grey.
To make this happen, I wired up a little hobby motor and soldered a circular brass platform to the top of it to hold up the cake ball. Because the cake ball was going to be pretty small, I just duct taped the motor to the top of the copper tubing arm.
The only gum paste pieces that I made in advance were the nose / beak (I’m not sure of the exact anatomy of a Sneetch), the eyes, and the ball, which I formed around a 3” diameter rubber ball.
The crux of anything Sneetch-related is, of course, the belly star, or lack thereof. My plan was to attempt to use a technique that I saw Mary Maher use on Last Cake Standing – glow-in-the-dark piping gel. By painting the star with club soda, which contains quinine, which fluoresces under blacklight, and implanting a blacklight in the base of the cake, I hoped to be able to make the belly star appear and disappear like in the story.
The first step in bringing this idea to life as to test the club soda. I tried a couple different ways of incorporating the club soda into piping gel, as well as just painting with the pure club soda. The most effective glow turned out to come from the star painted solely with the pure club soda, but overall it wasn’t really as impressive as I hoped that it would be. But I went ahead with it anyway, by cutting a hole in the cake’s plywood base and sticking my blacklight bulb in underneath. I frankly wasn’t confident that the effect would be anything to write home about, but it was the best I could do for a first try. I covered the base with brown pressed sugar to simulate the Sneetches’ beaches.
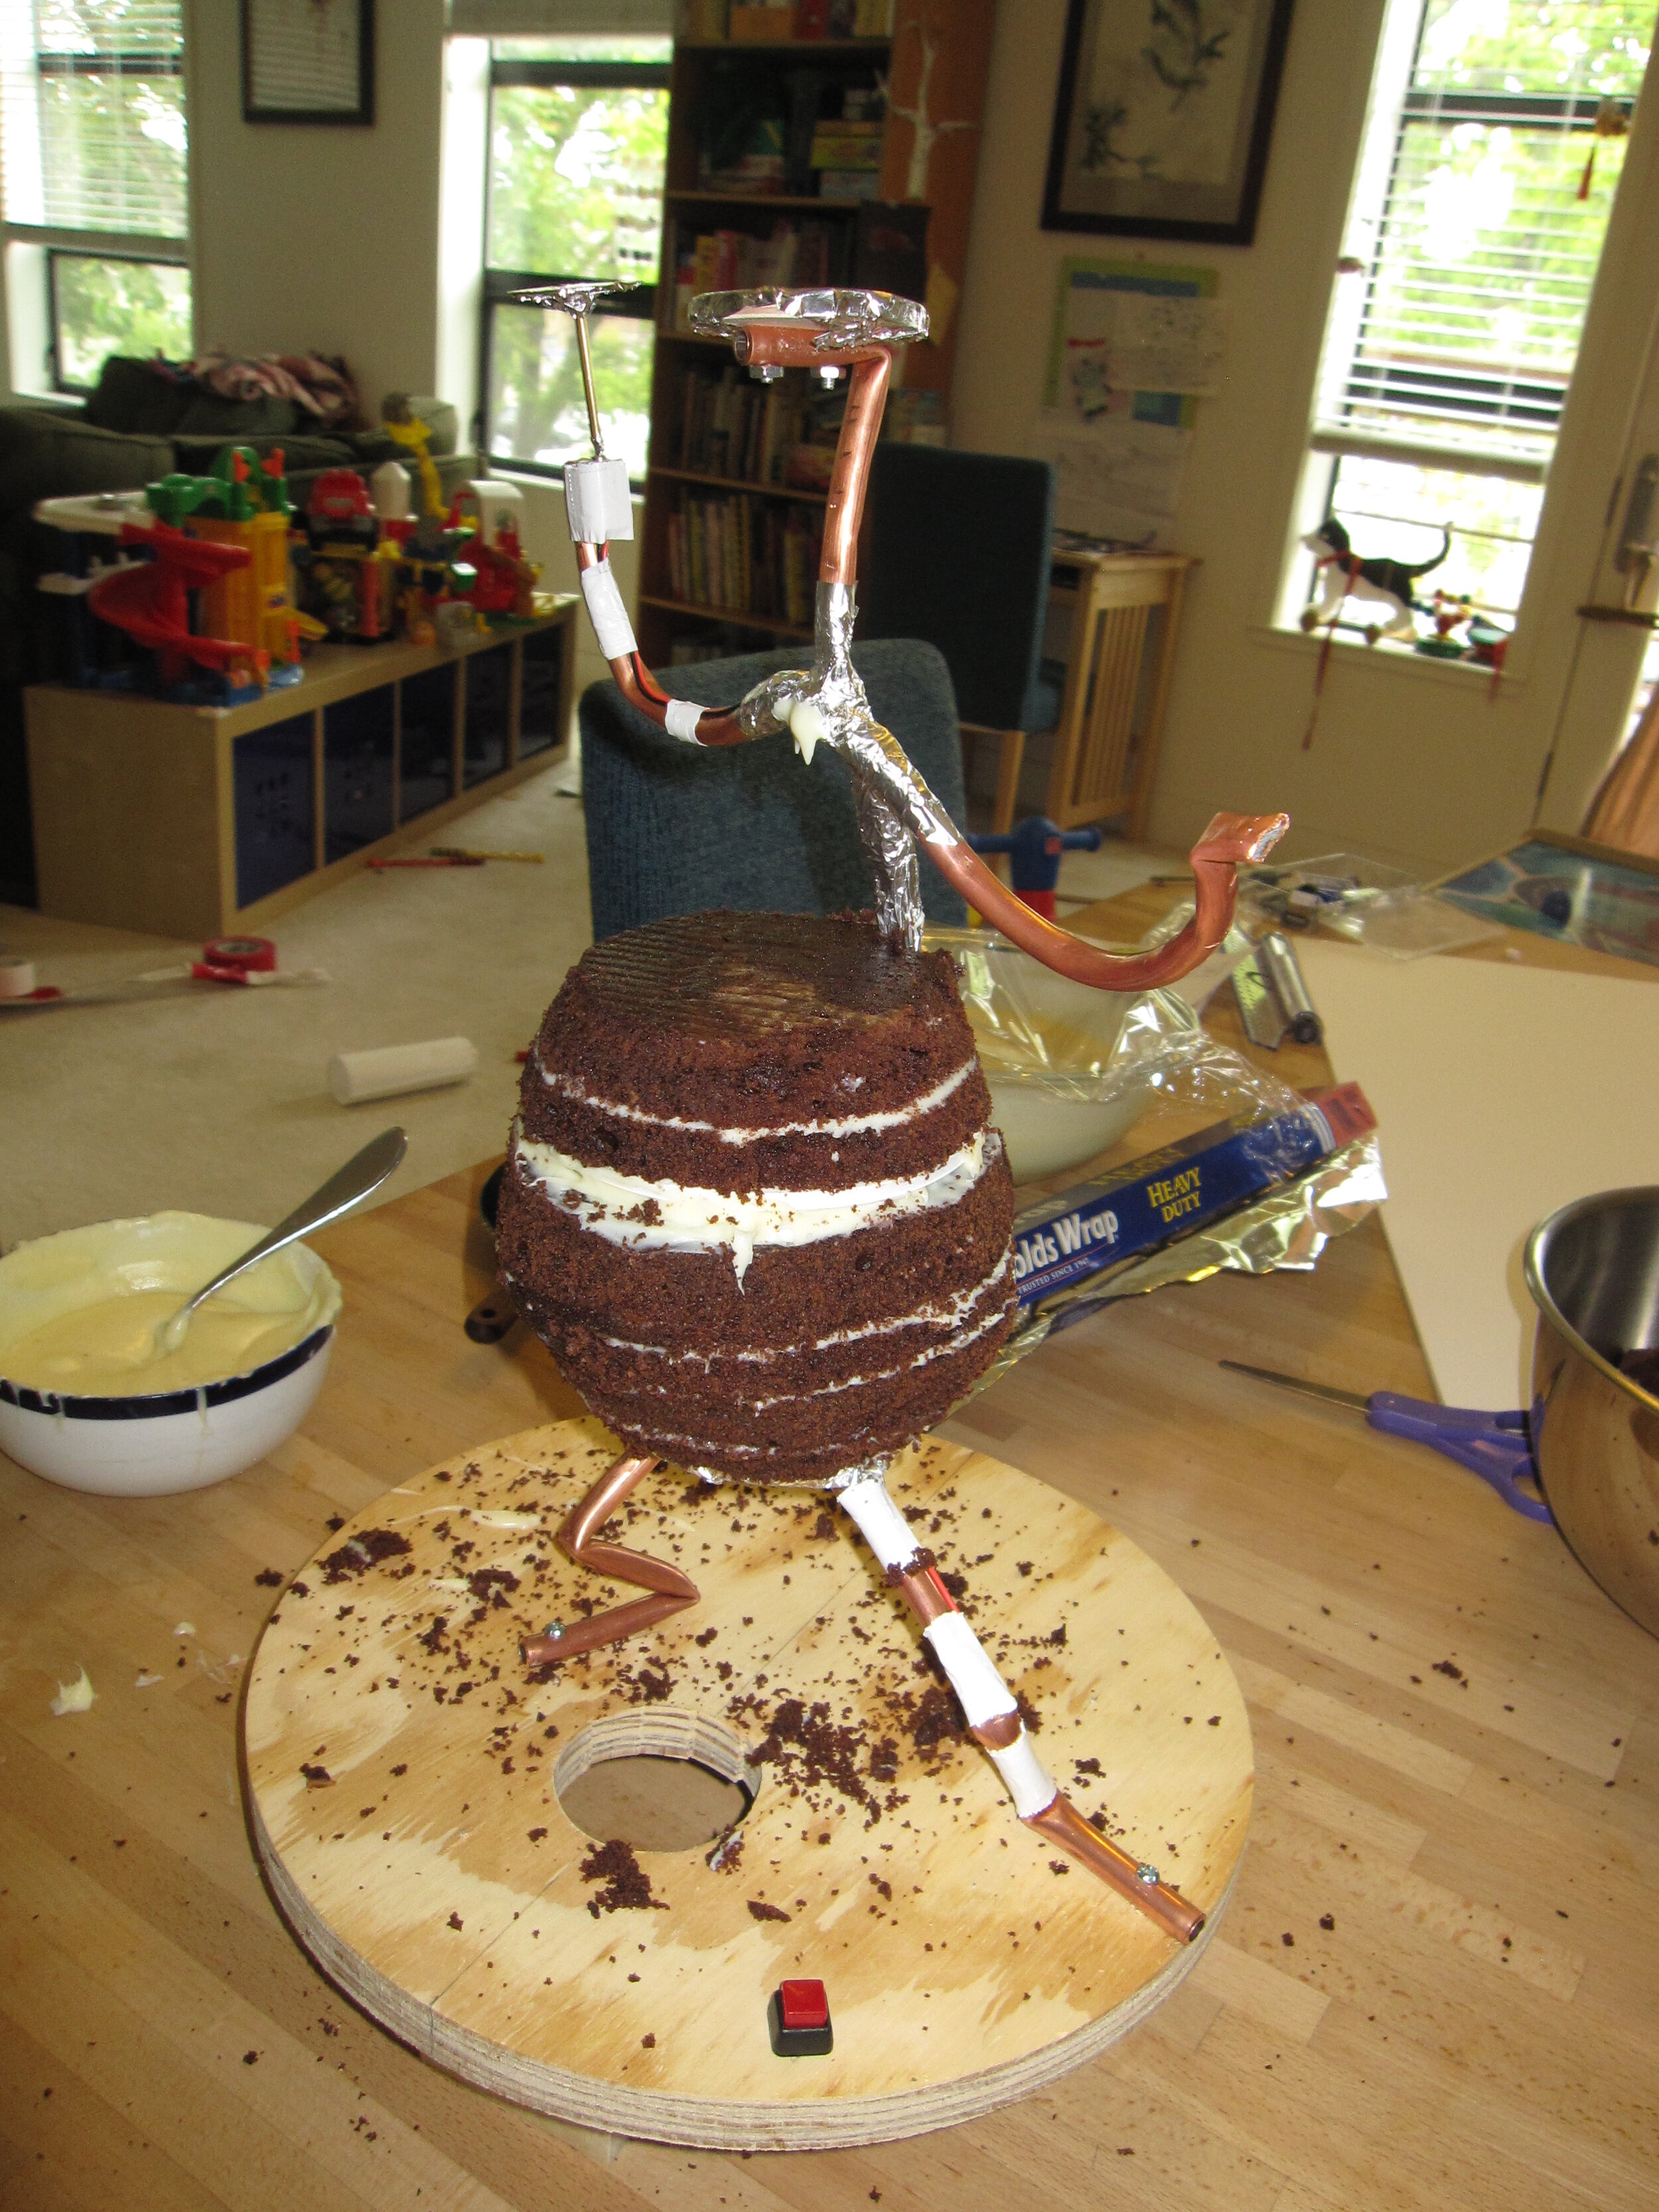
Because I was trying to keep the cake small, I started with just six 6” round cakes – 4 for body and two for the head with enough scrap left over for the ball. I torted and filled them using a white chocolate ganache because I wanted to make sure that the cake had the stability that you get from such a firm frosting.
After I carved the cake into the basic shape, I tried out another a new technique that I saw someone do on Food Network Challenge. I don’t remember who I saw doing this, but I think they called it “spackle.” Basically, you take the cut-off scraps of cake and stir it into some icing so that it makes a pretty thick paste. Then you can use the spackle to really smooth out the surface of the cake and fill in any gaps. I found that it worked perfectly to round out the curves of the head and the butt underneath the plywood bases and to fill in the seam where the body cake was notched out around the copper backbone.
For the fur / feathers (again, I’m not sure what kind of animals Sneetches actually are), I decided to used piped buttercream. I don’t generally use a lot of buttercream. I think I may be using a substandard recipe because I often have trouble with my buttercream breaking down. This time was no exception. My buttercream started out at the right consistency, but with the heat of my hand it rapidly got too liquidly in the piping bag. So I didn’t get the definition I was looking for in some of the Sneetch’s coat.
On the belly area, I used a gum paste panel instead of the buttercream so I would be able to paint on the club soda star. This gave me a little trouble in blending the belly into the rest of the body. I’m still not 100% happy with the result, because real Sneetches’ bellies aren’t discernibly different in texture from the rest of their bodies, but I think I did a tolerable job of keeping it from being too jarring.
The ball went together quite easily. I made the ball itself in two halves of red gum paste and then hid the seam with a green gum paste stripe. For the blue to complete my attempt at RGB color mixing I added blue stars. I fully expected Alex to criticize my color choice because in my carelessness I had reversed the colors of the ball as seen in the book. In the book, it’s a blue ball with red stars. Alex is normally a stickler for this kind of detail, but she must have really liked the cake because she actually didn’t even mention the ball colors. I also fully expected that my color mixing wouldn’t be fully successful because I didn’t have the food colors that I really needed. I didn’t have royal blue, so I had to use sky blue and I didn’t have emerald green, so I had to use kelly green.
At this point I also realized that I had constructed the spinning mechanism in such a way that not only would the ball spin, but also the finger that it was sitting on. Oops. Obviously this was unacceptable, so I had to whip up a little gun paste sleeve to conceal the spinning tube underneath the ball.
For the final details, I used a combination of gum paste and dark chocolate tinted with black food coloring. The only thing I really wasn’t happy with was the shape of the eyes. Real Sneetches have eyes that are slightly taller than they are wide. Mine wound up wider than they were tall, which made my Sneetch look slightly untrustworthy.
We served the cake at a very small graduation party. Alex was delighted, though she was also deeply concerned with the effects.
When we plugged in the blacklight it got very hot, which began to melt the pressed sugar above it. So Alex spent the entire few minutes that the blacklight was on begging us to turn it off, apparently under the impression that it might melt the entire cake. The star did show up a little bit in the blacklight, but it certainly wasn’t an attention-grabbing effect.
The ball spun well, though not fast enough to fully blend the colors the way that I had hoped. Again, Alex was deeply concerned, this time because the ball’s rotation shook the entire cake on its thin little legs.
Alex’s little brother Sam was especially delighted with the cake ball. For days after he ate it, he kept asking us, “Where’s-a cake ball?” and we had to keep reminding him that it was in his tummy.

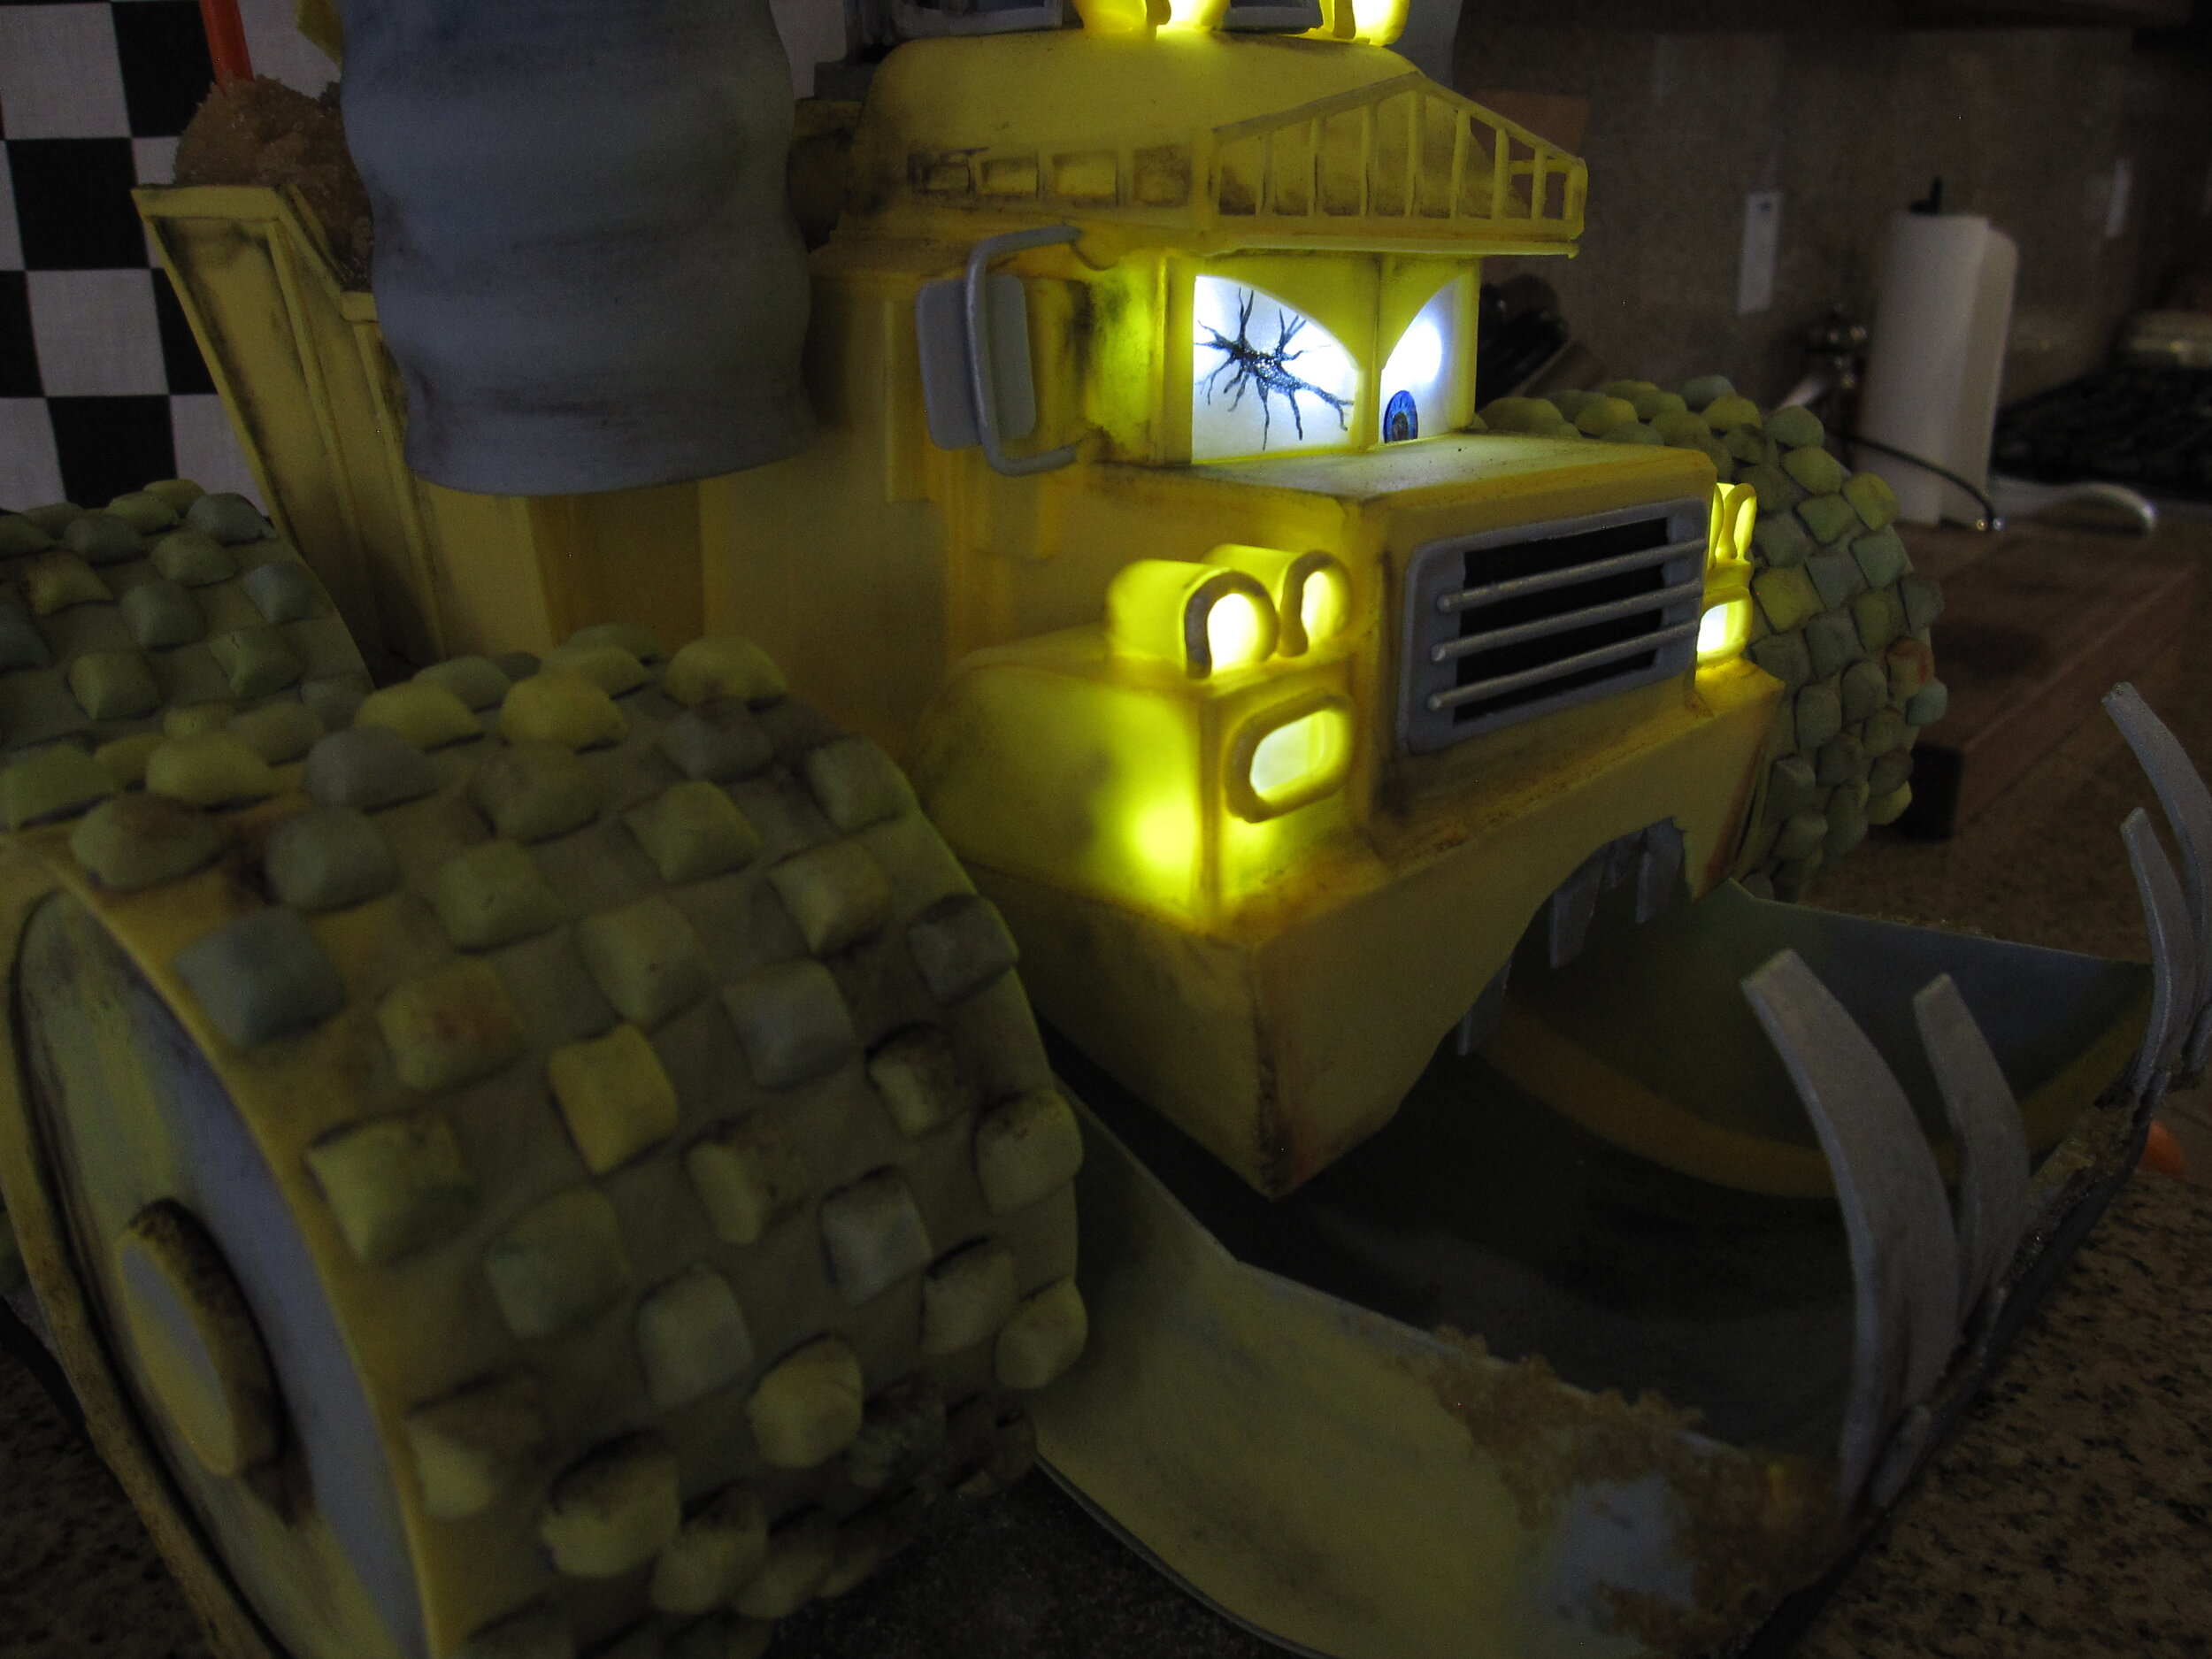
Banshee Cake
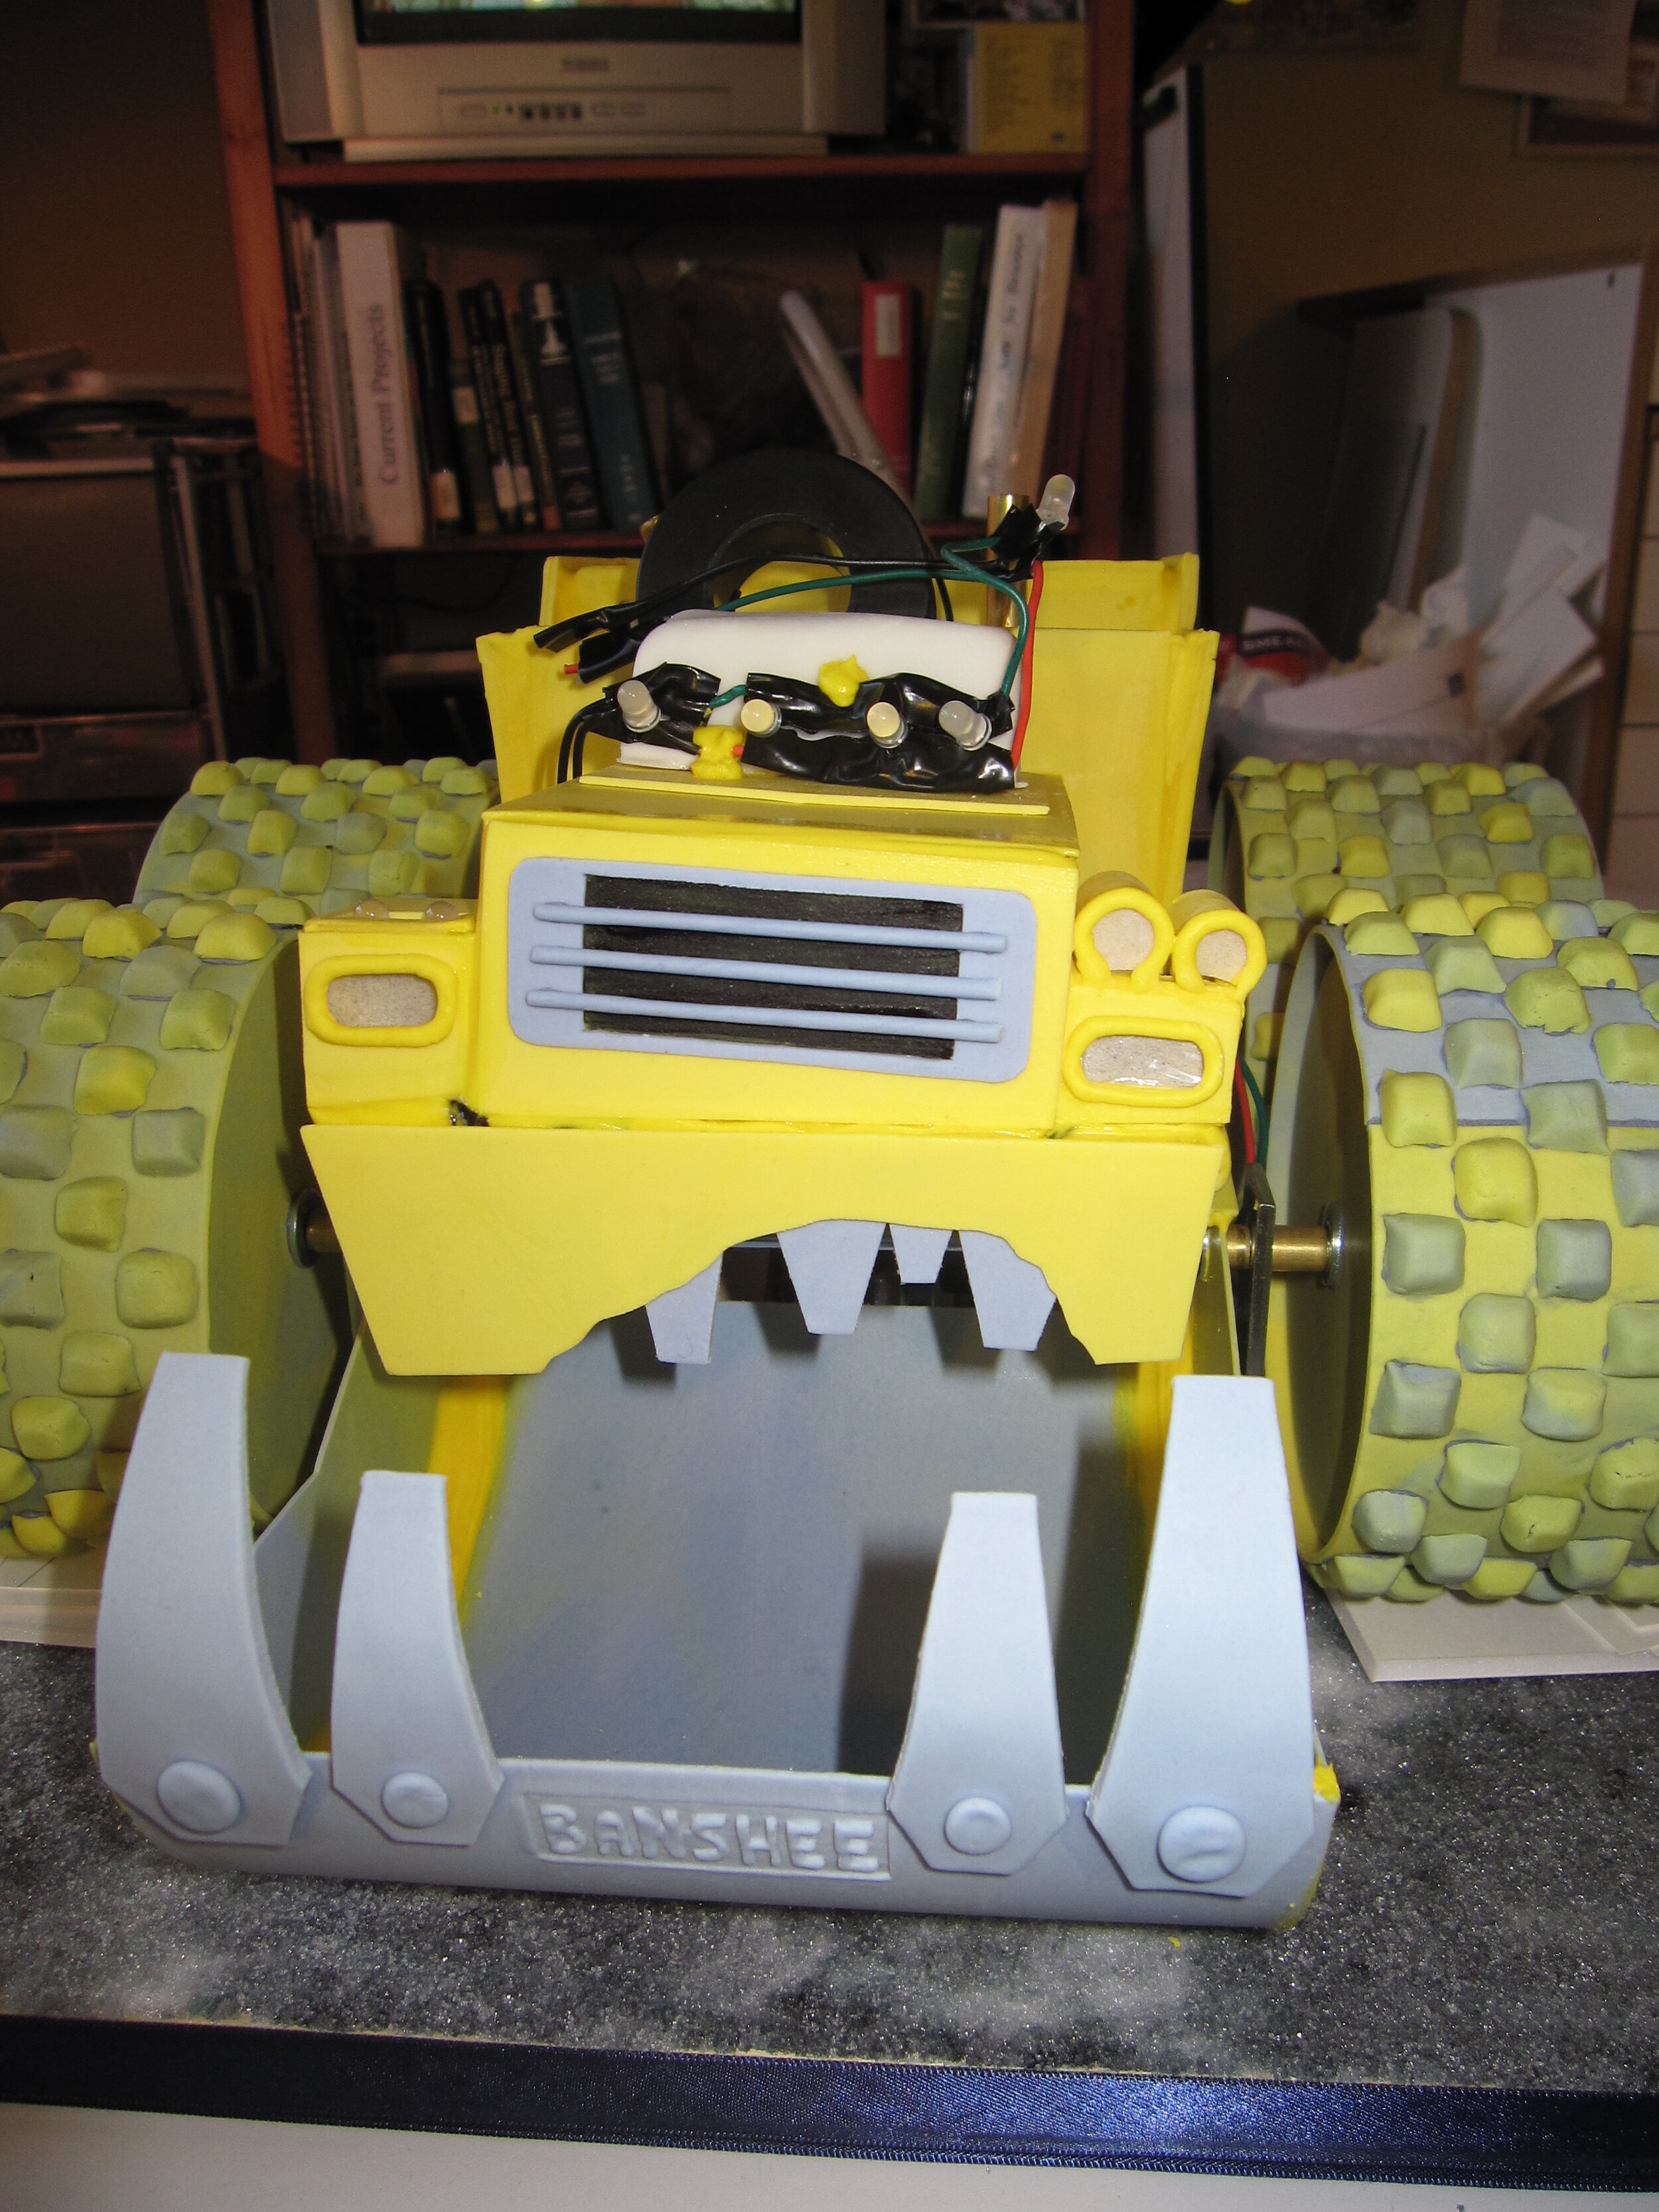
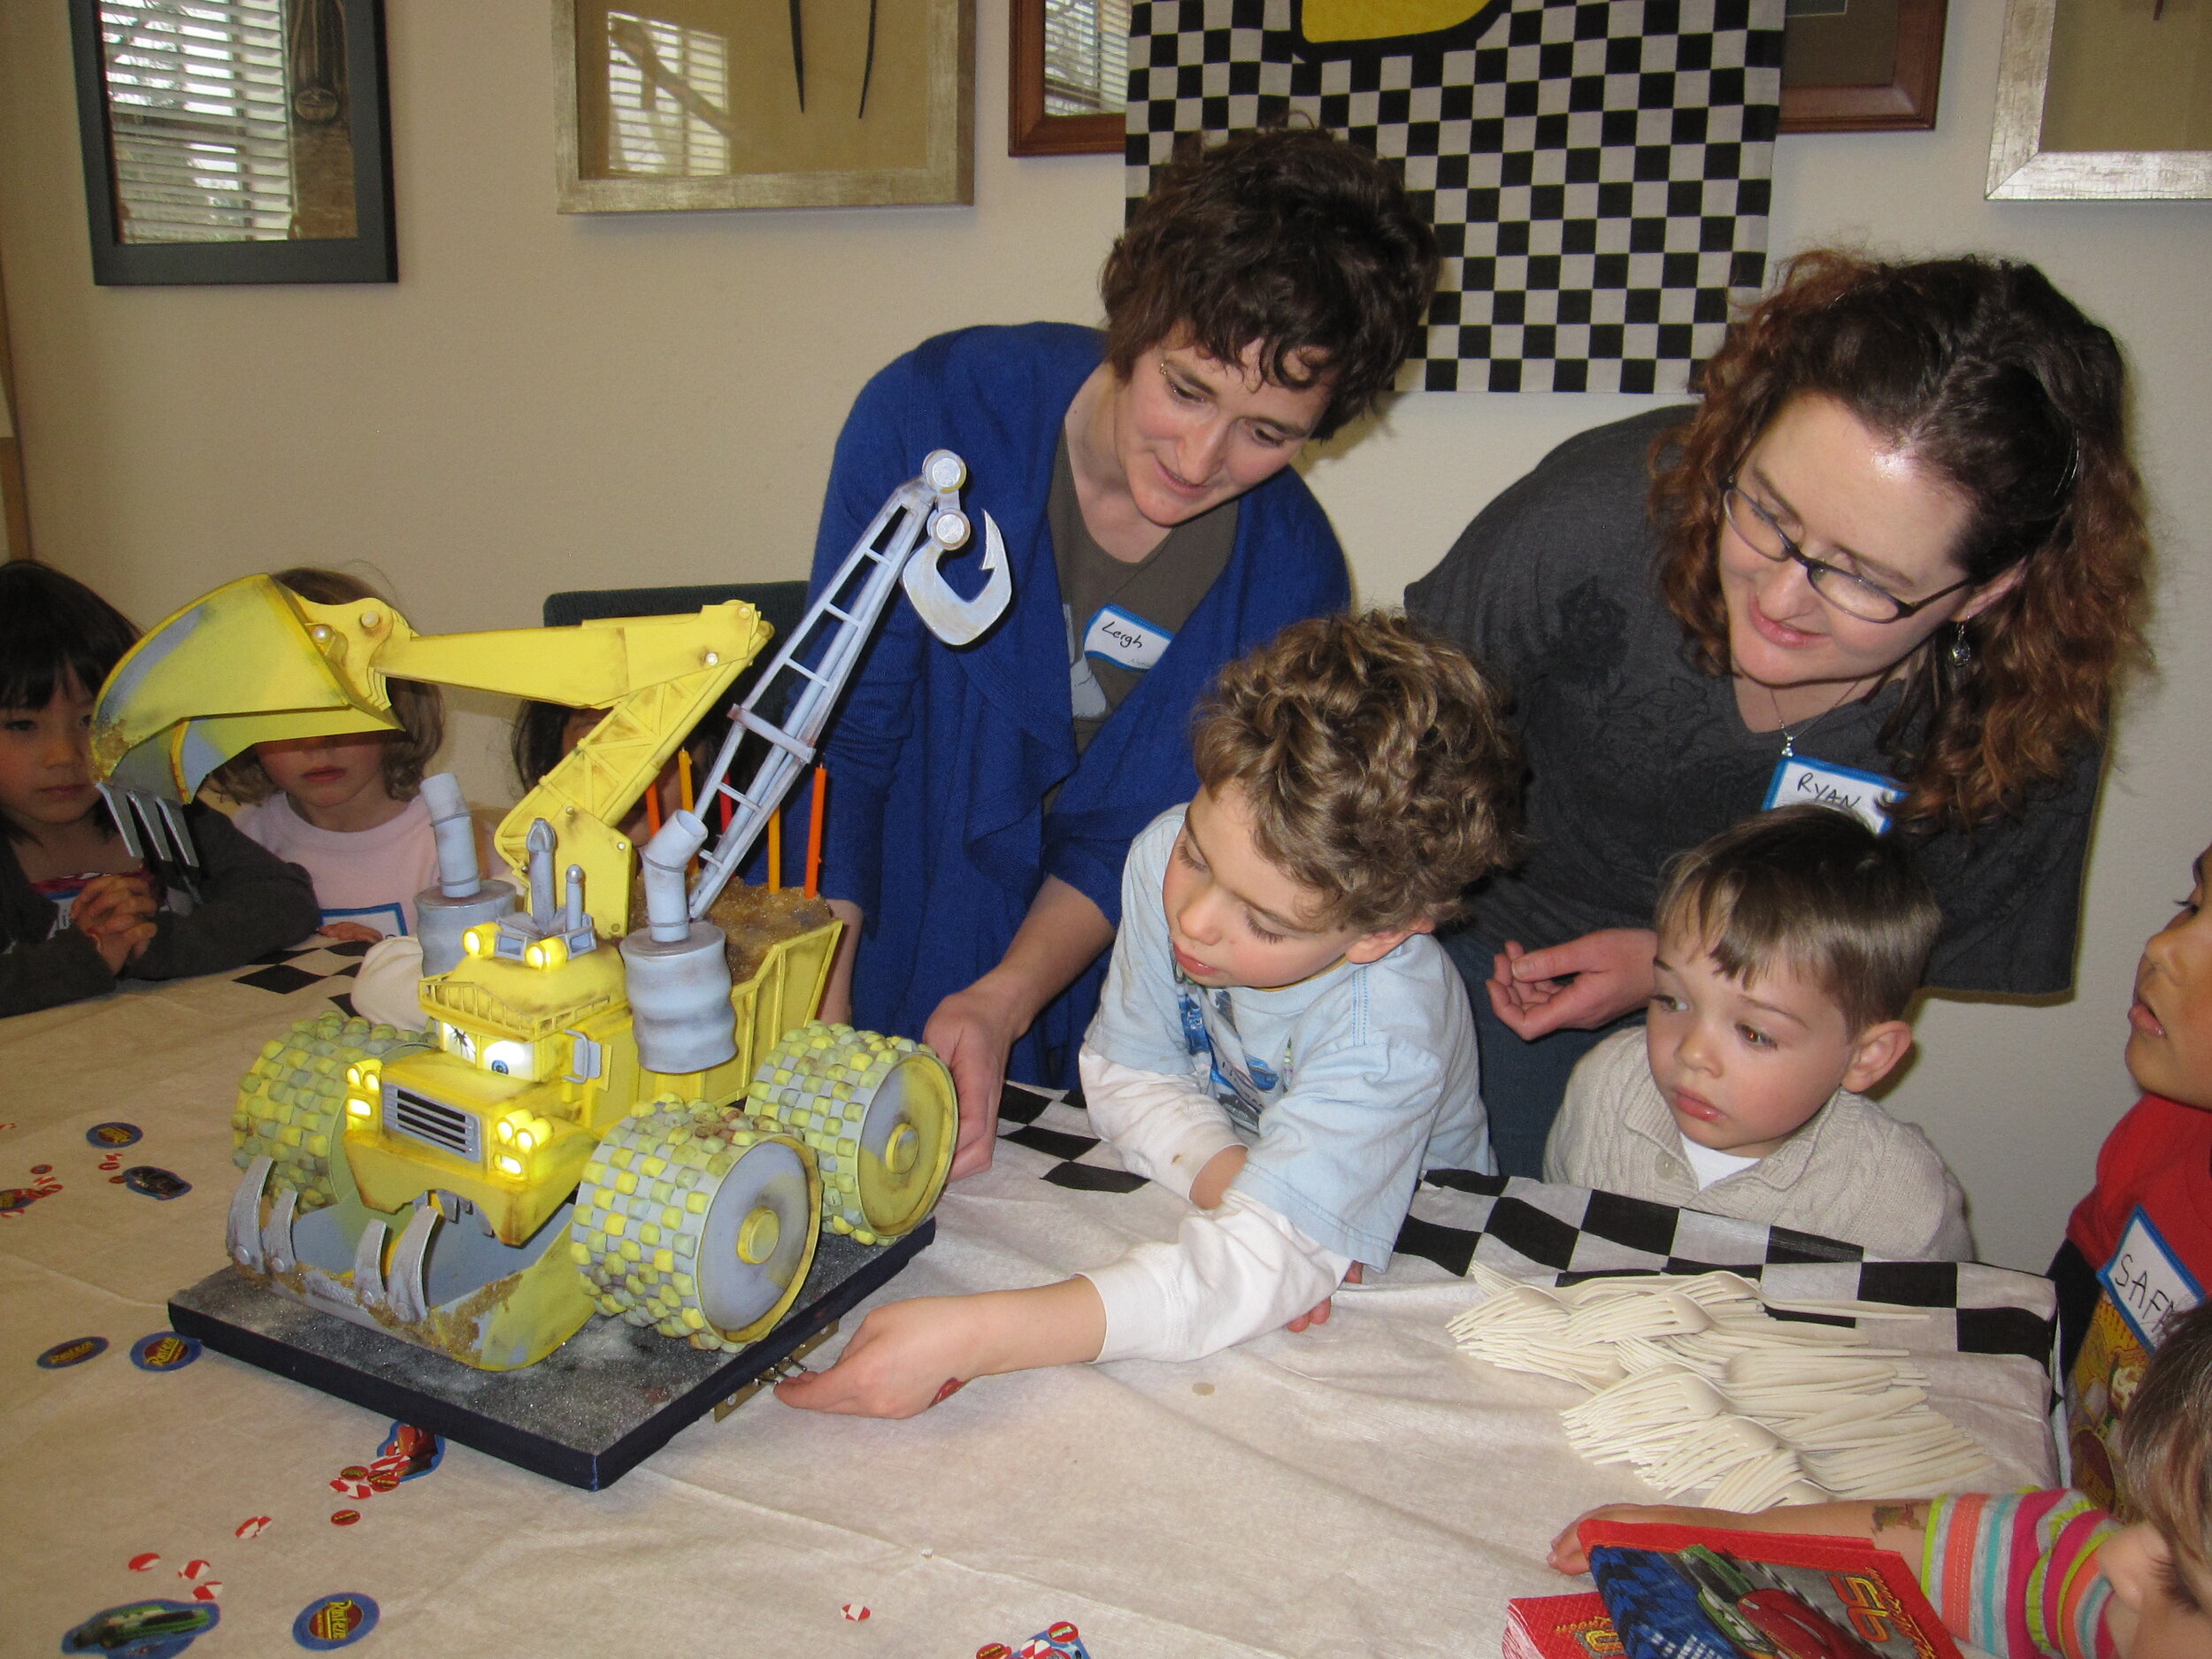
My niece Alex’s specifications for her fifth birthday cake: “I want a Banshee cake. And one switch will make the lights turn on and one switch will make the wheels turn and one switch will make the mouth open and close.”
My niece Alex’s specifications for her fifth birthday cake:
“I want a Banshee cake. And one switch will make the lights turn on and one switch will make the wheels turn and one switch will make the mouth open and close.”
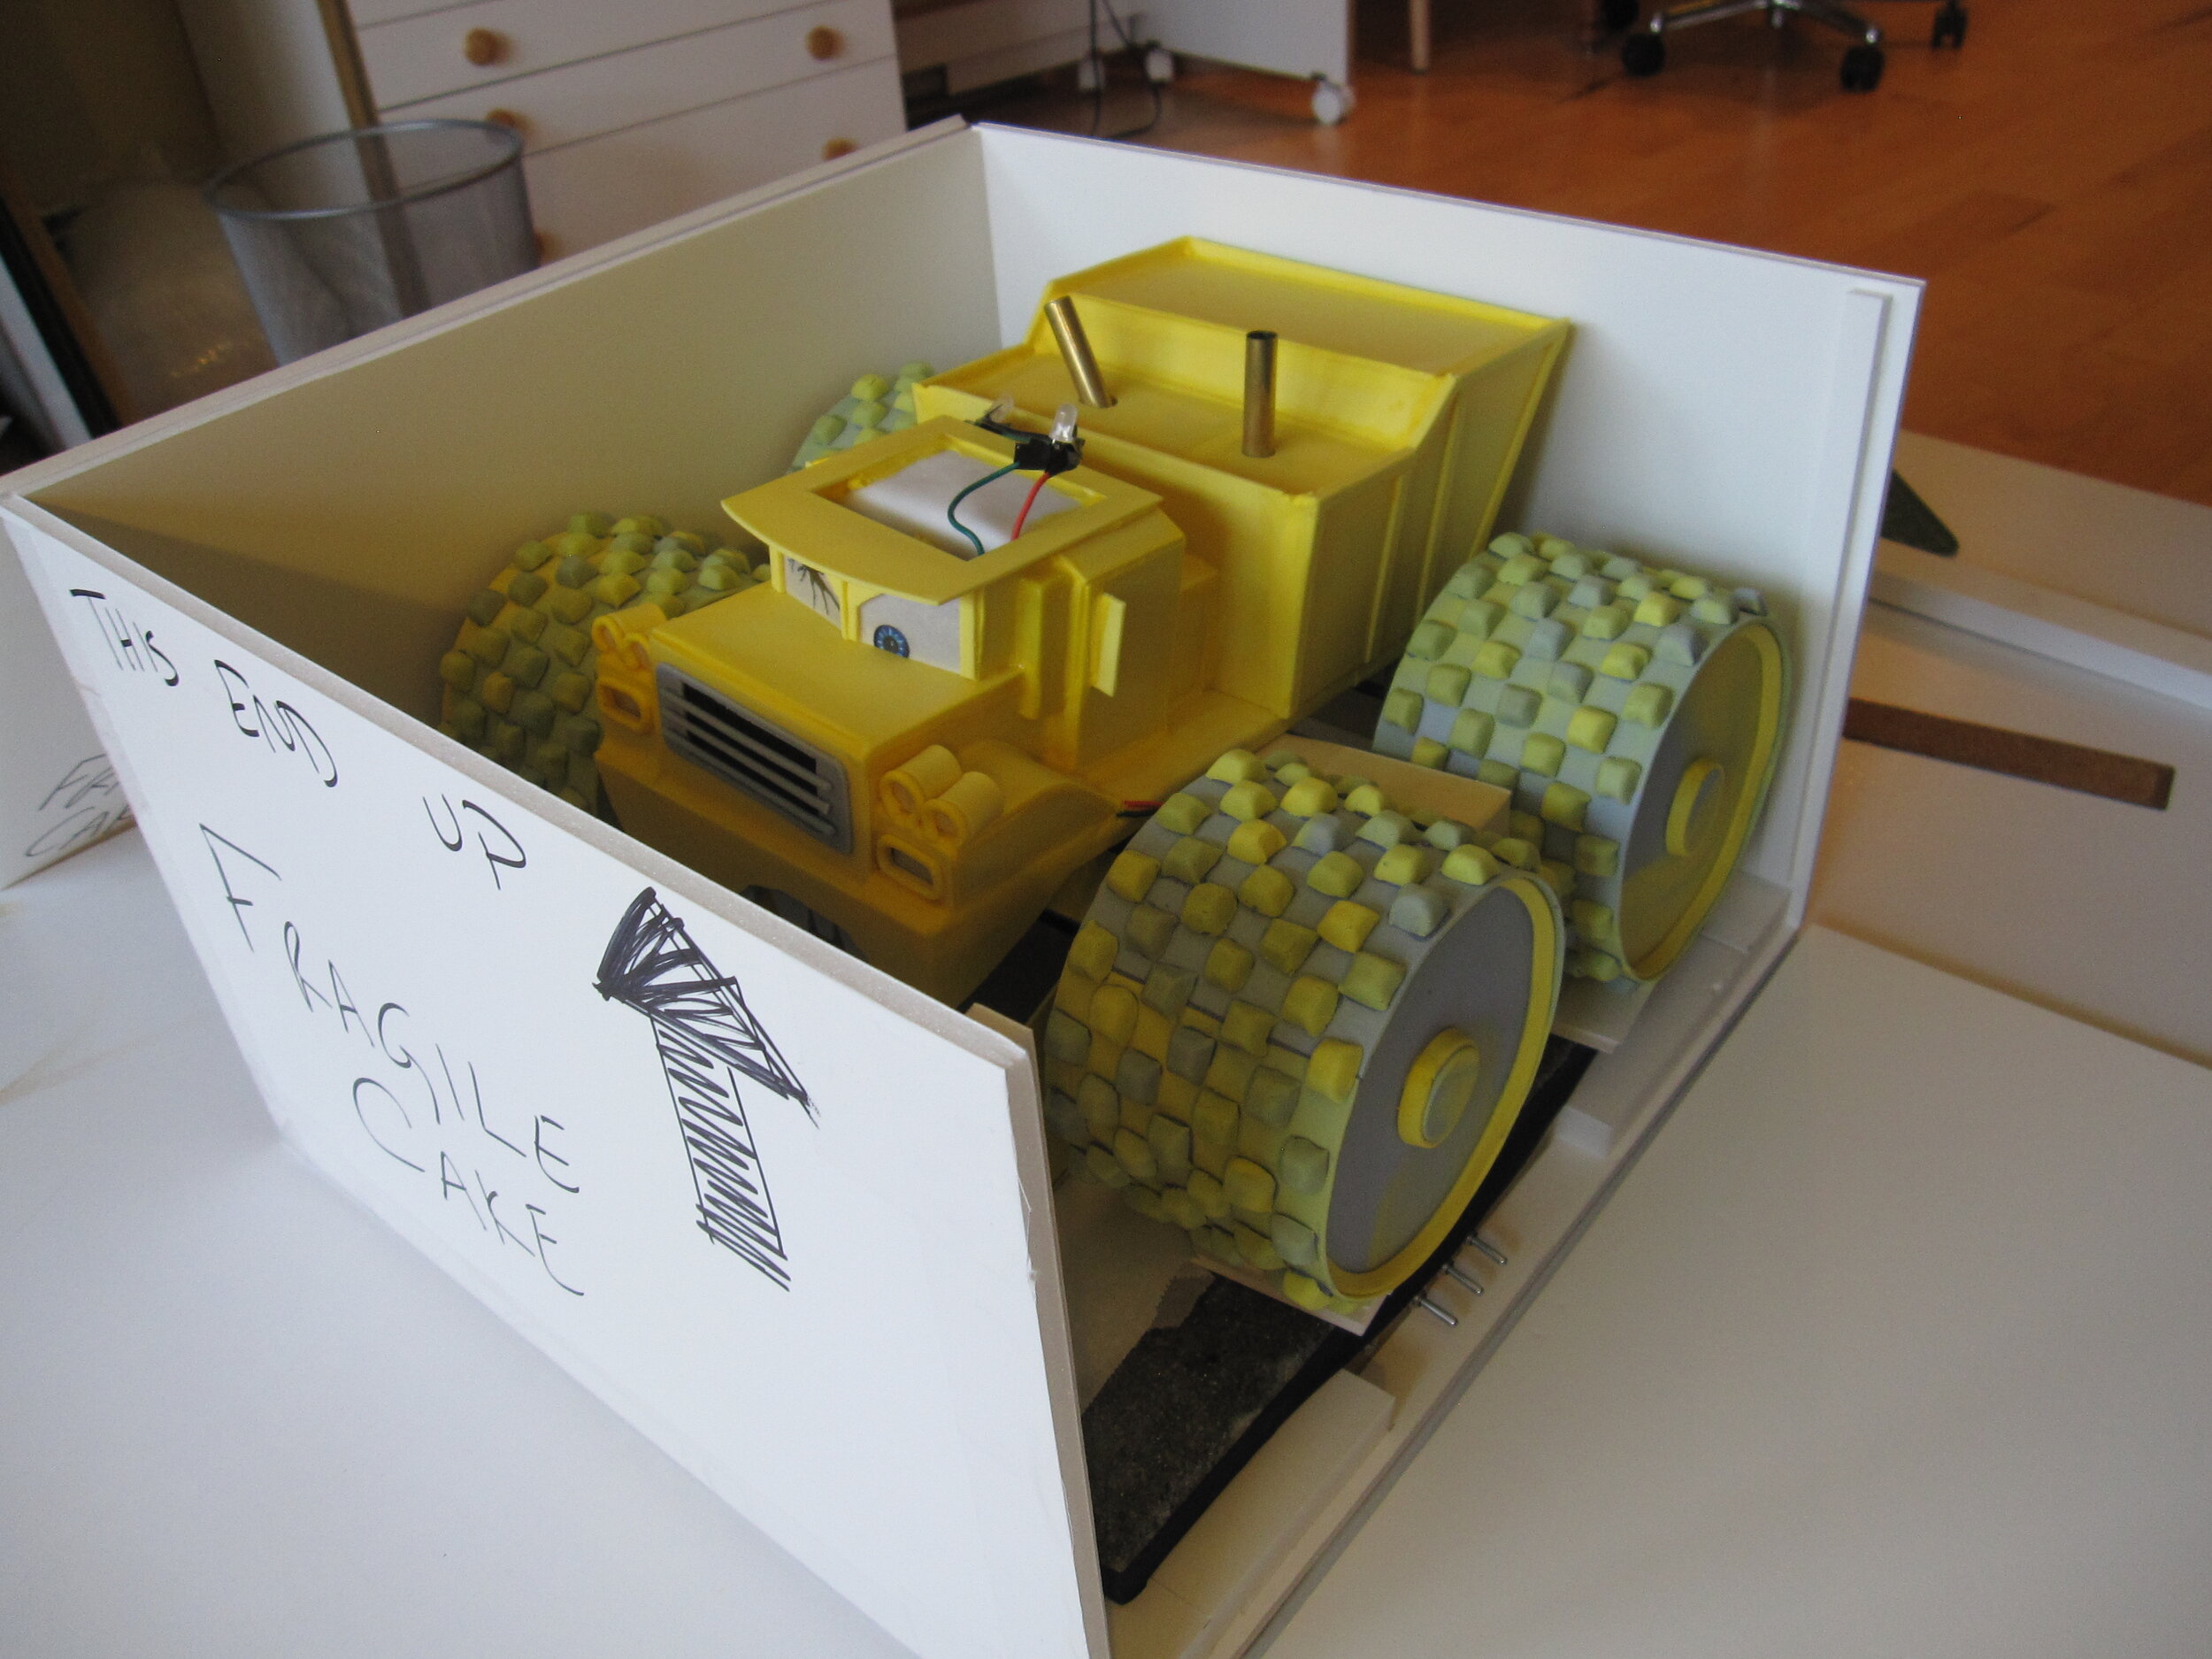
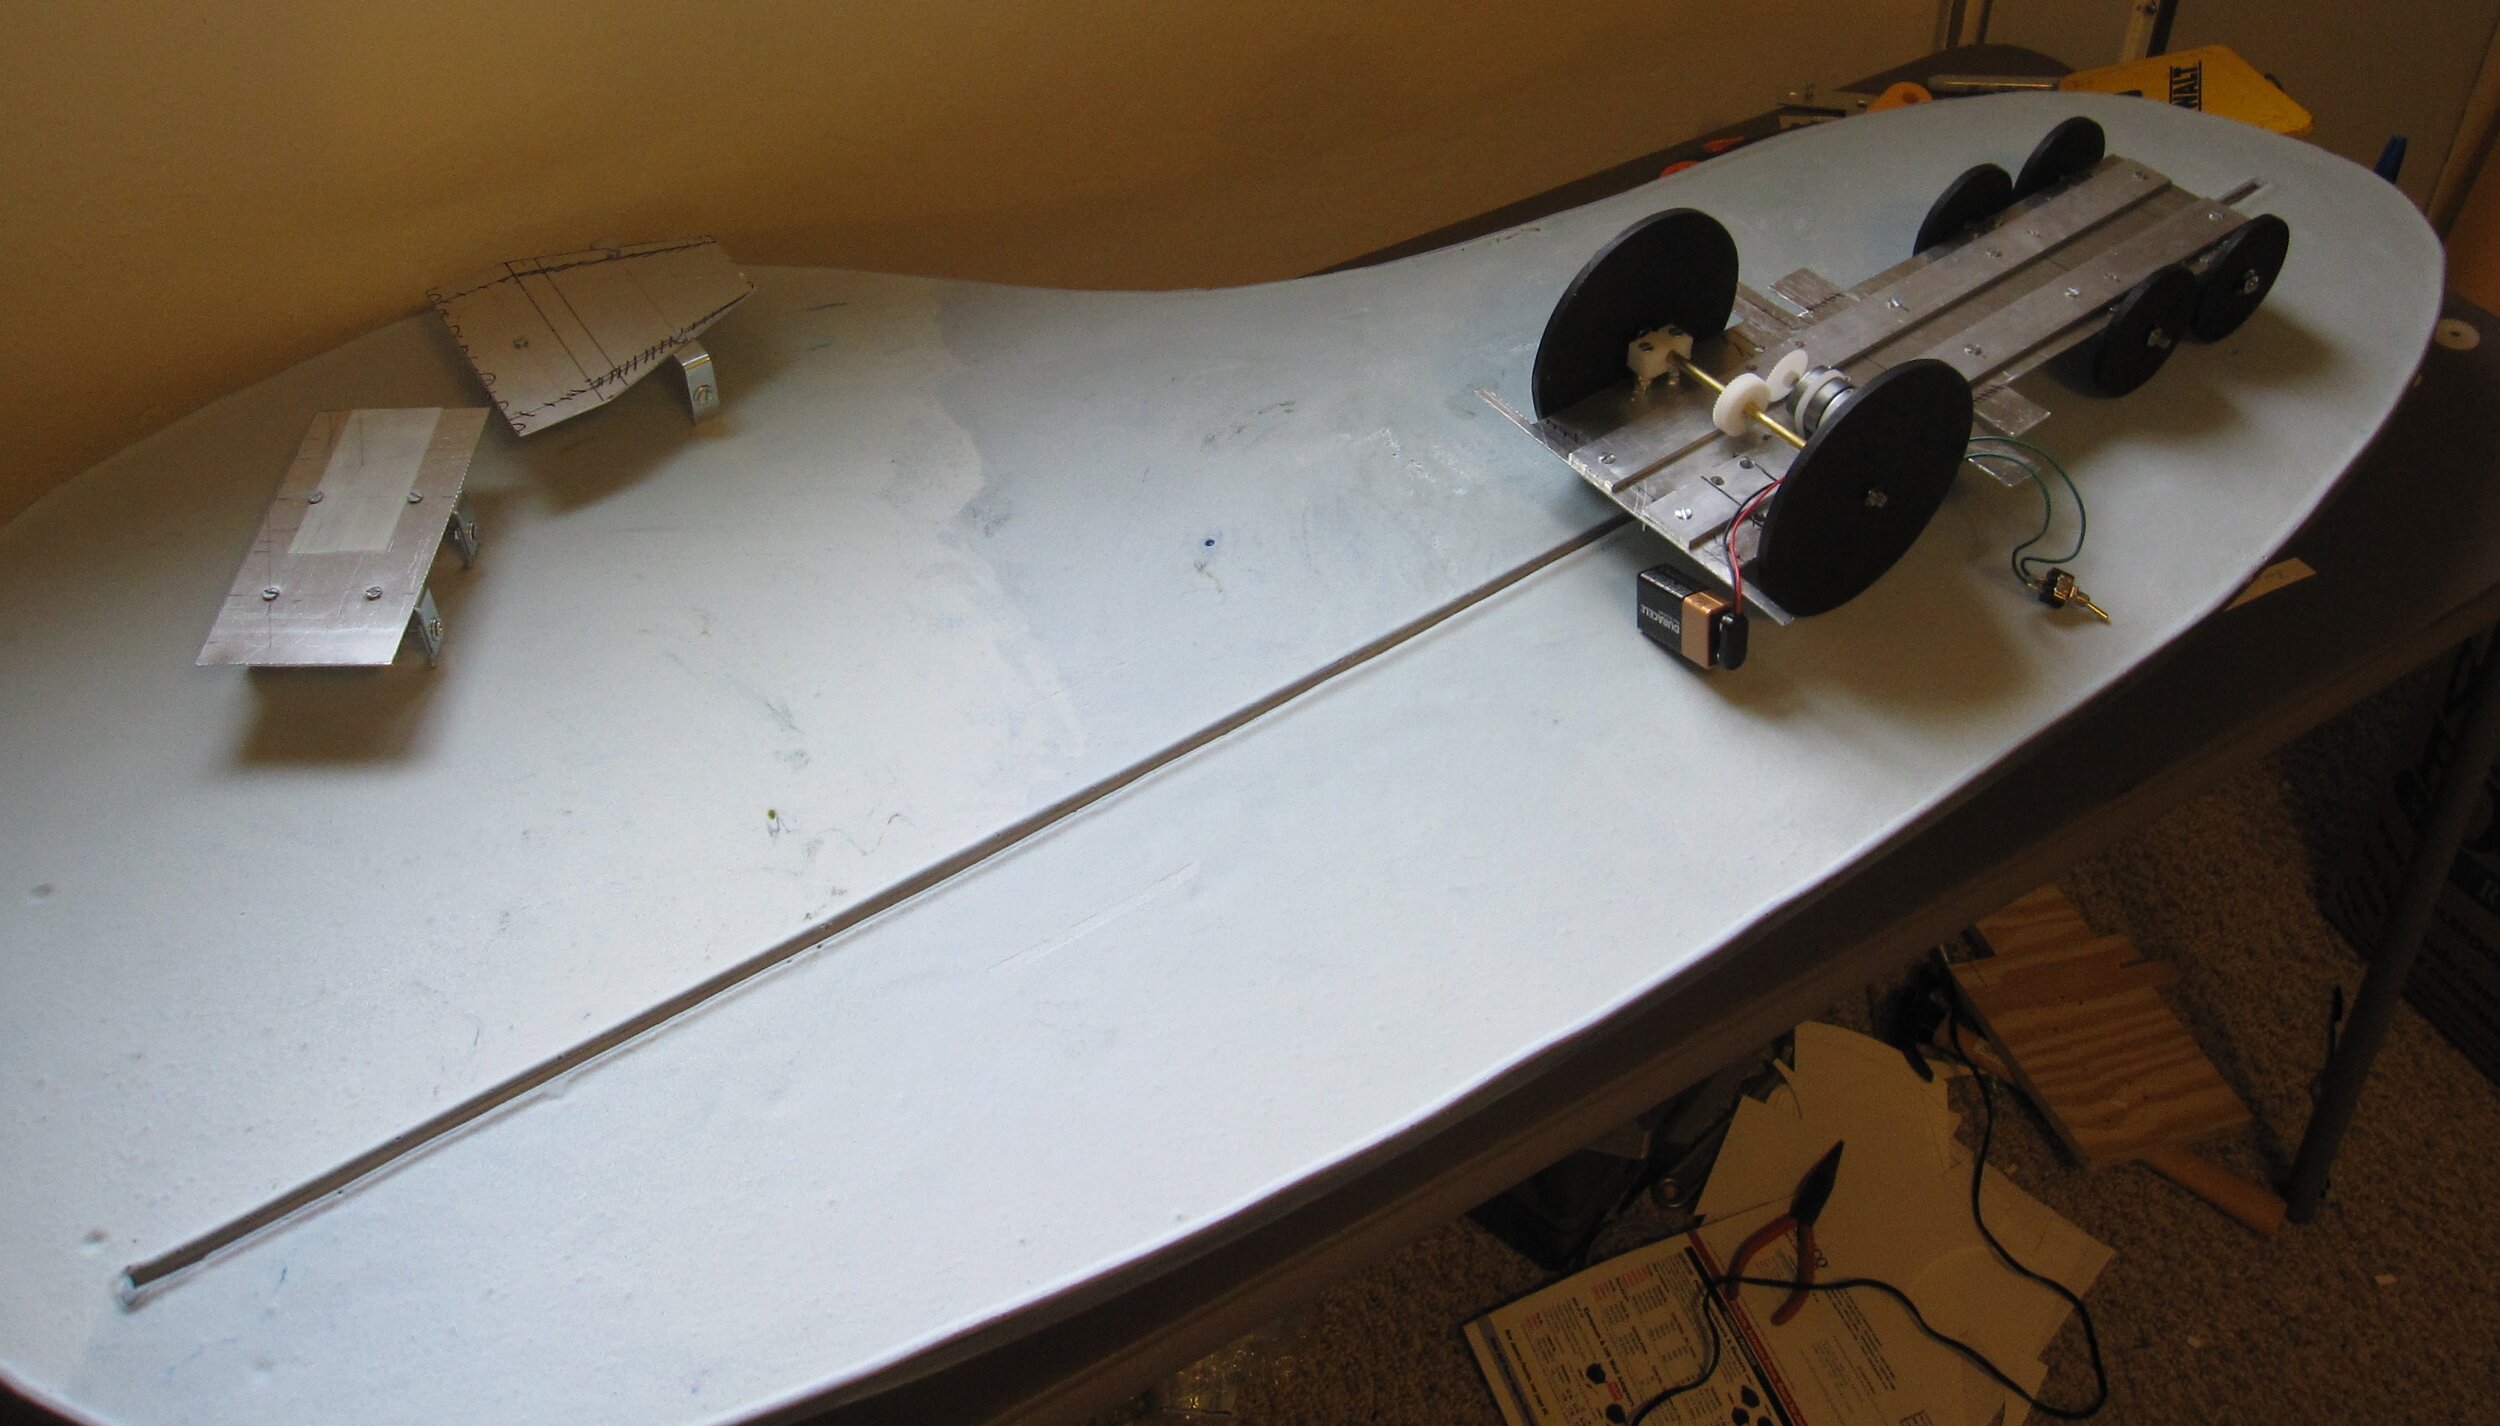
Given her previous four birthday cakes, this is a reasonable request, though as you’ll read later in this account, I only managed to deliver on one of the switch operations. Of course, when I made her other birthday cakes, I was living in the same house with Alex. But now, while Alex still lives in California, I am in grad school in Madison, Wisconsin. Fortunately, my spring break aligns fairly well with Alex’s birthday, so I was able to be there for her party, but this meant that I had to make the cake in Wisconsin and then bring it with me to California on the airplane. One thing this forced me to do was to scale the cake such that it would fit in the overhead bin of an airplane, so Banshee was the smallest cake I’ve made in quite a while.

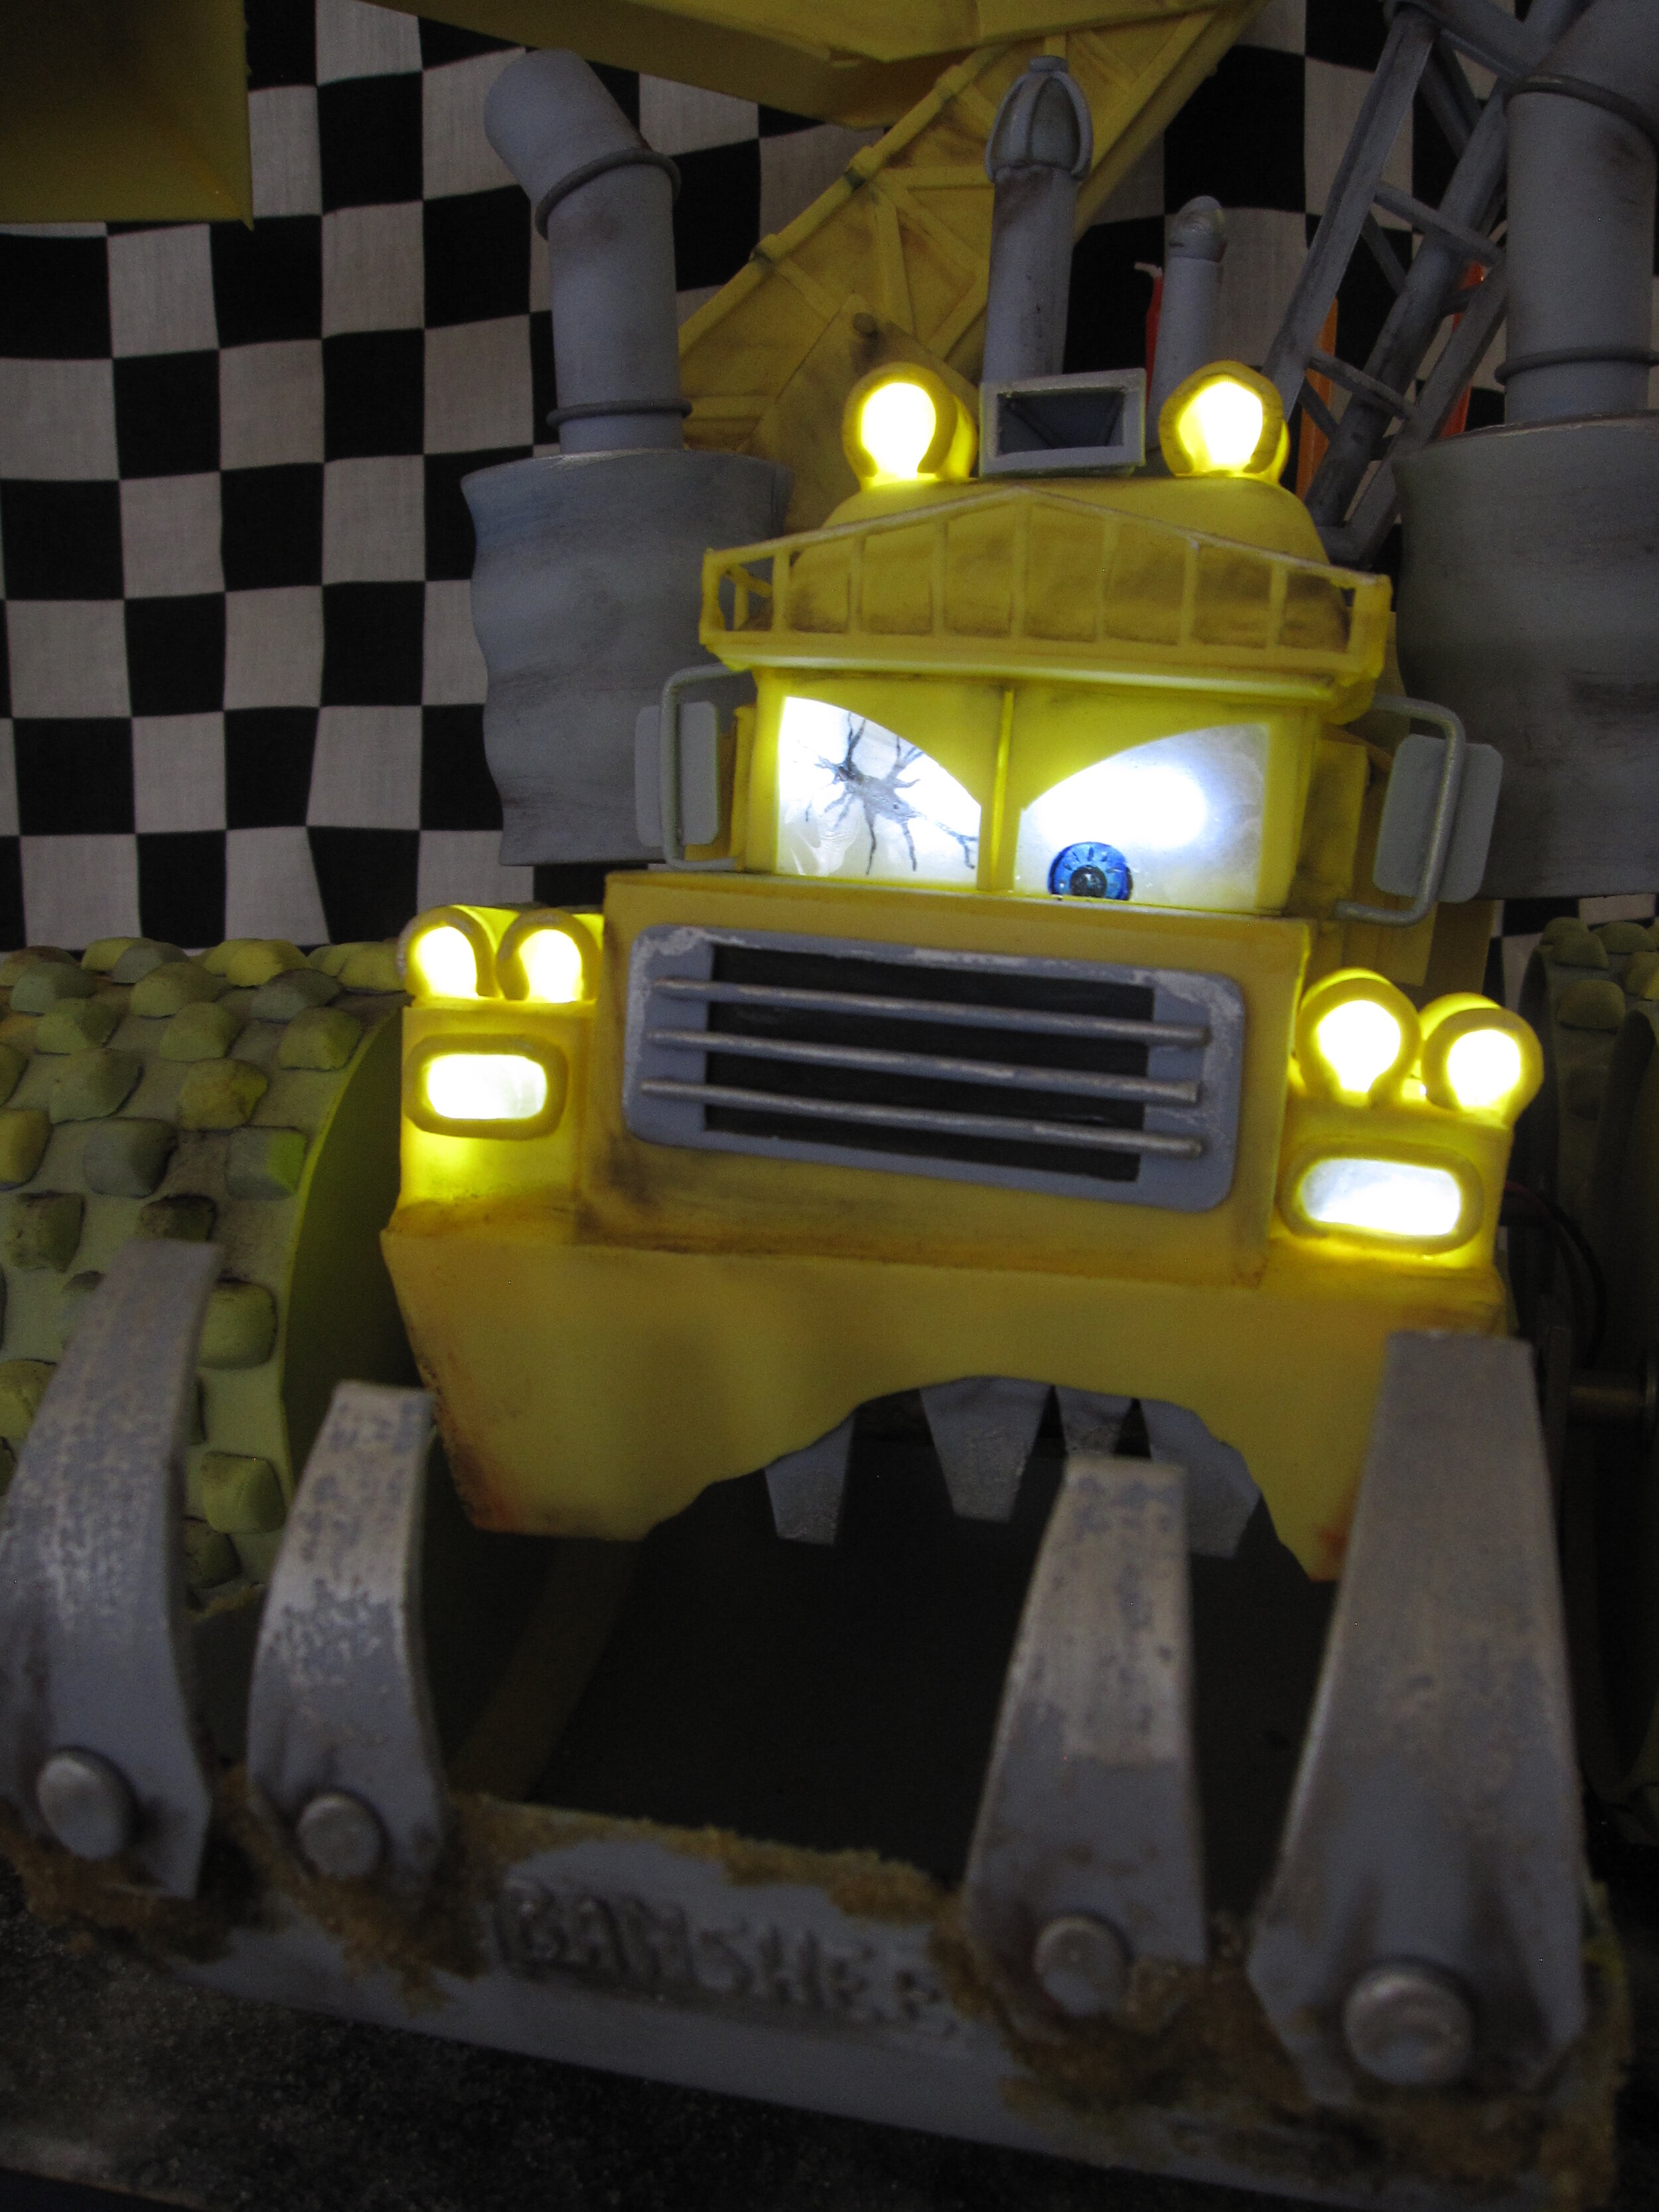
Banshee, of course, is a big work machine that appears at the end of Mater and the Ghostlight, which is an extra short on the DVD for the movie Cars. In fact, Banshee is not even in the short itself; he pops onto the screen only after the closing credits. He appears for all of twenty seconds and you only see him from one angle, which means that I had no idea, from watching the short, what the back half of Banshee looks like. Fortunately there is also a toy version of Banshee, so I bought one, planning to use it as a model for the cake and then give it to Alex for her birthday. However, since I failed to inform my sister and her husband that I had this toy for Alex, they bought her one as well. I gave mine to my little friend Isaac (age 4), who is also a huge Cars fan, so it actually worked out well for everyone.
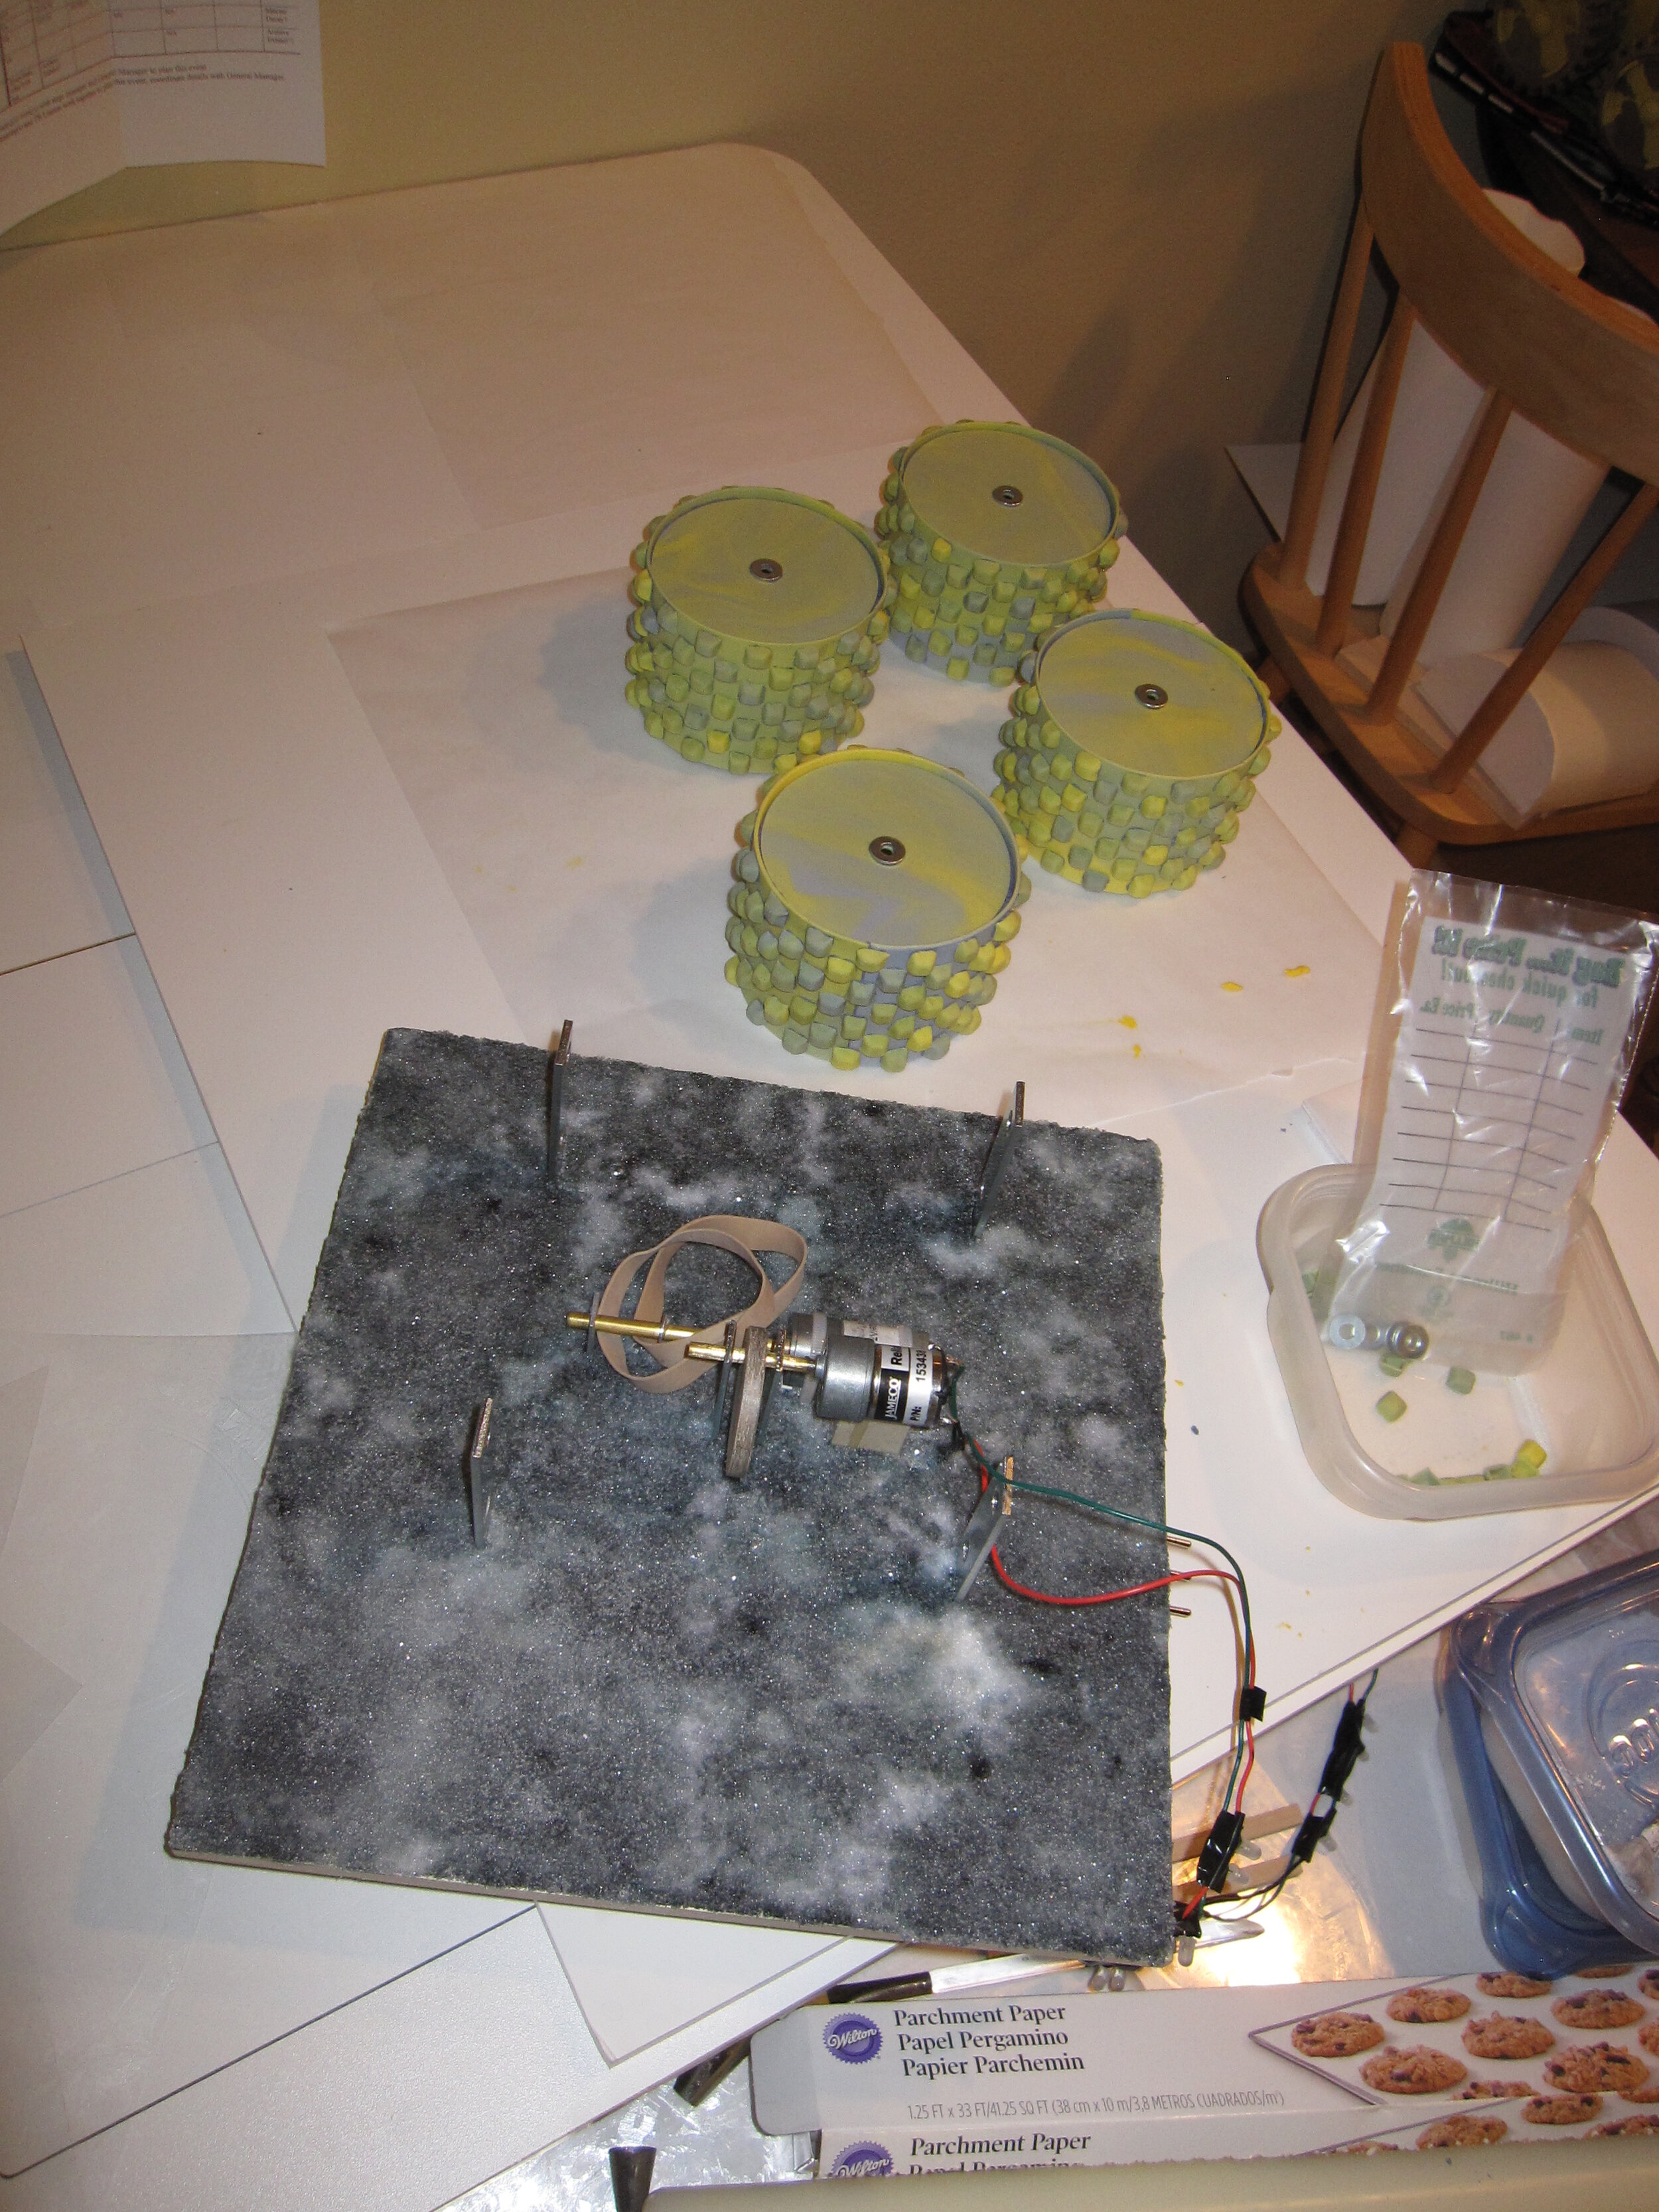
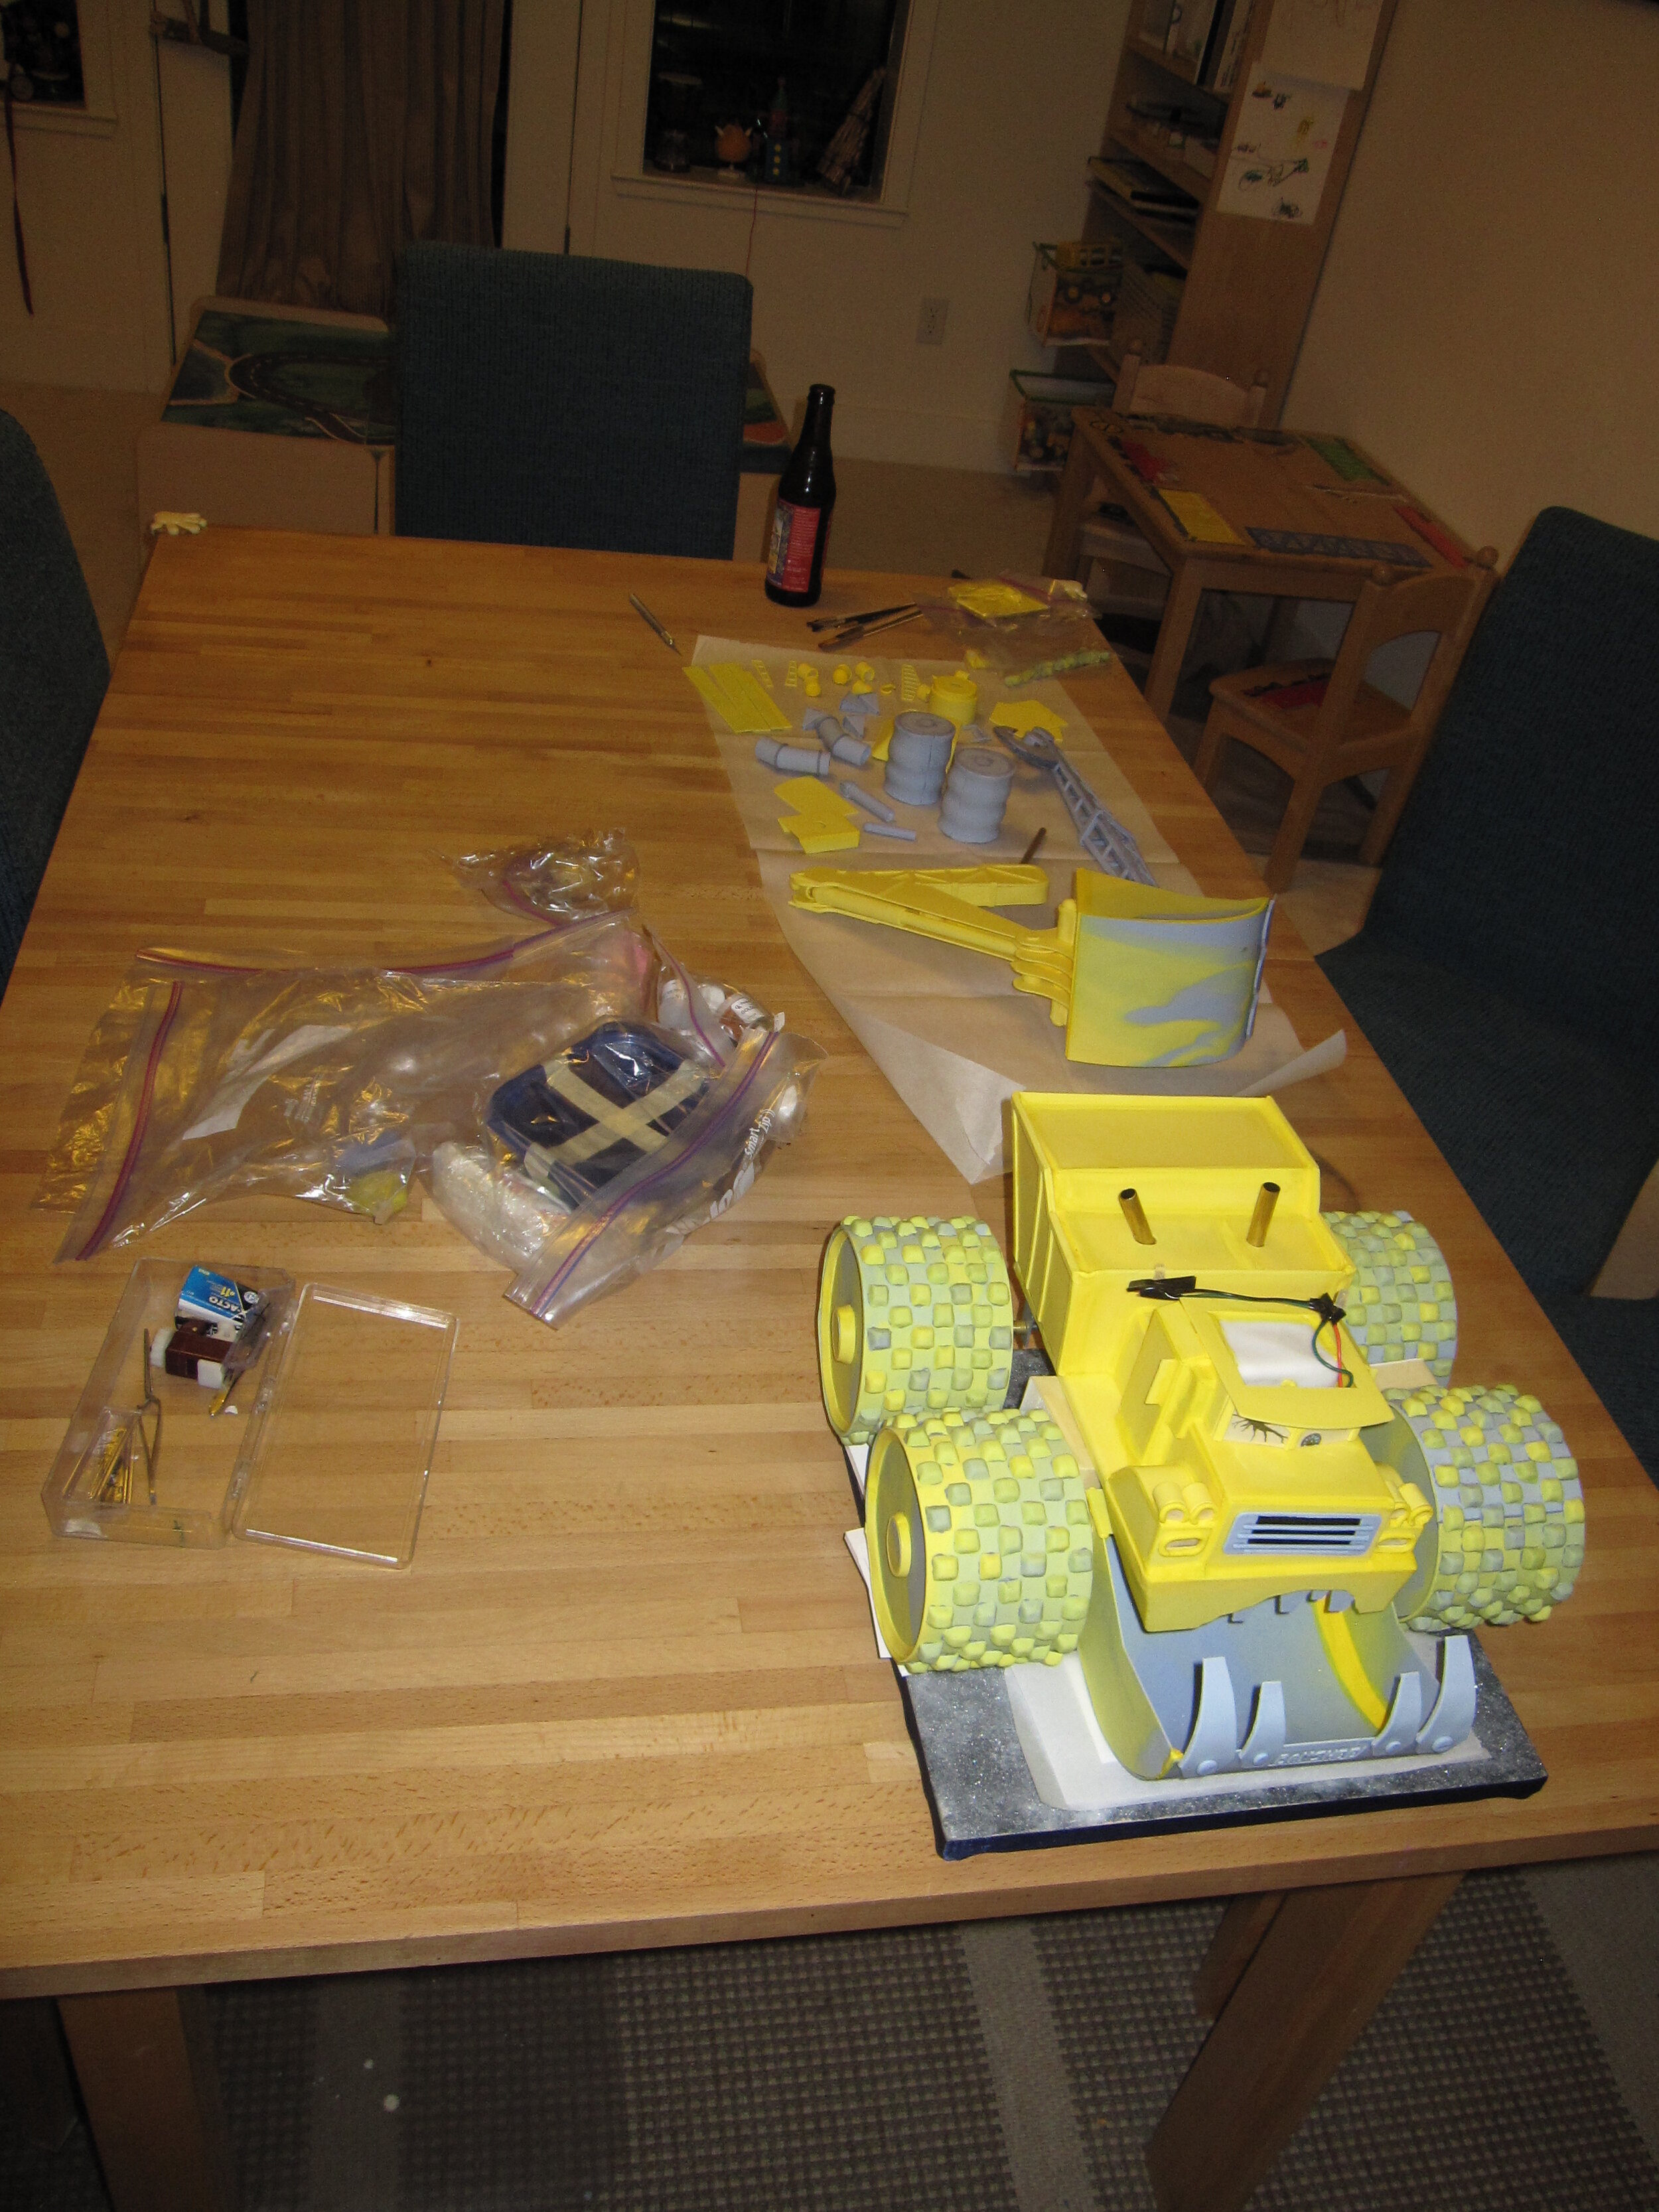
My first step was to create the electronics. By this point, I’m pretty adept at putting LEDs in my cakes, so the lights were easy. I reused the LEDs that I originally bought for the Tardis Cake. To make the wheels spin, I used a motor that I last used to power Big Rig on Alex’s fourth birthday cake, transferring power to the axles via rubber band drives. I still think it would have worked if my rubber bands had been slightly shorter. Rather than just make the mouth open and close I decided that the whole cake should rise and fall as well, so that Banshee looked like he was breathing, as he does in the movie. So I made an eccentric cam, hooked up to a motor that I had from powering Melvin the cement mixer’s drum, also on Alex’s fourth birthday cake. So as the cam rotated, it was meant to raise and lower the front end of Banshee’s body, which was anchored at the axle for his rear wheels, while simultaneously pushing his jaw up and down. If my motor had been strong enough to actually do this with the weight of the cake on it, it would have been really cool.
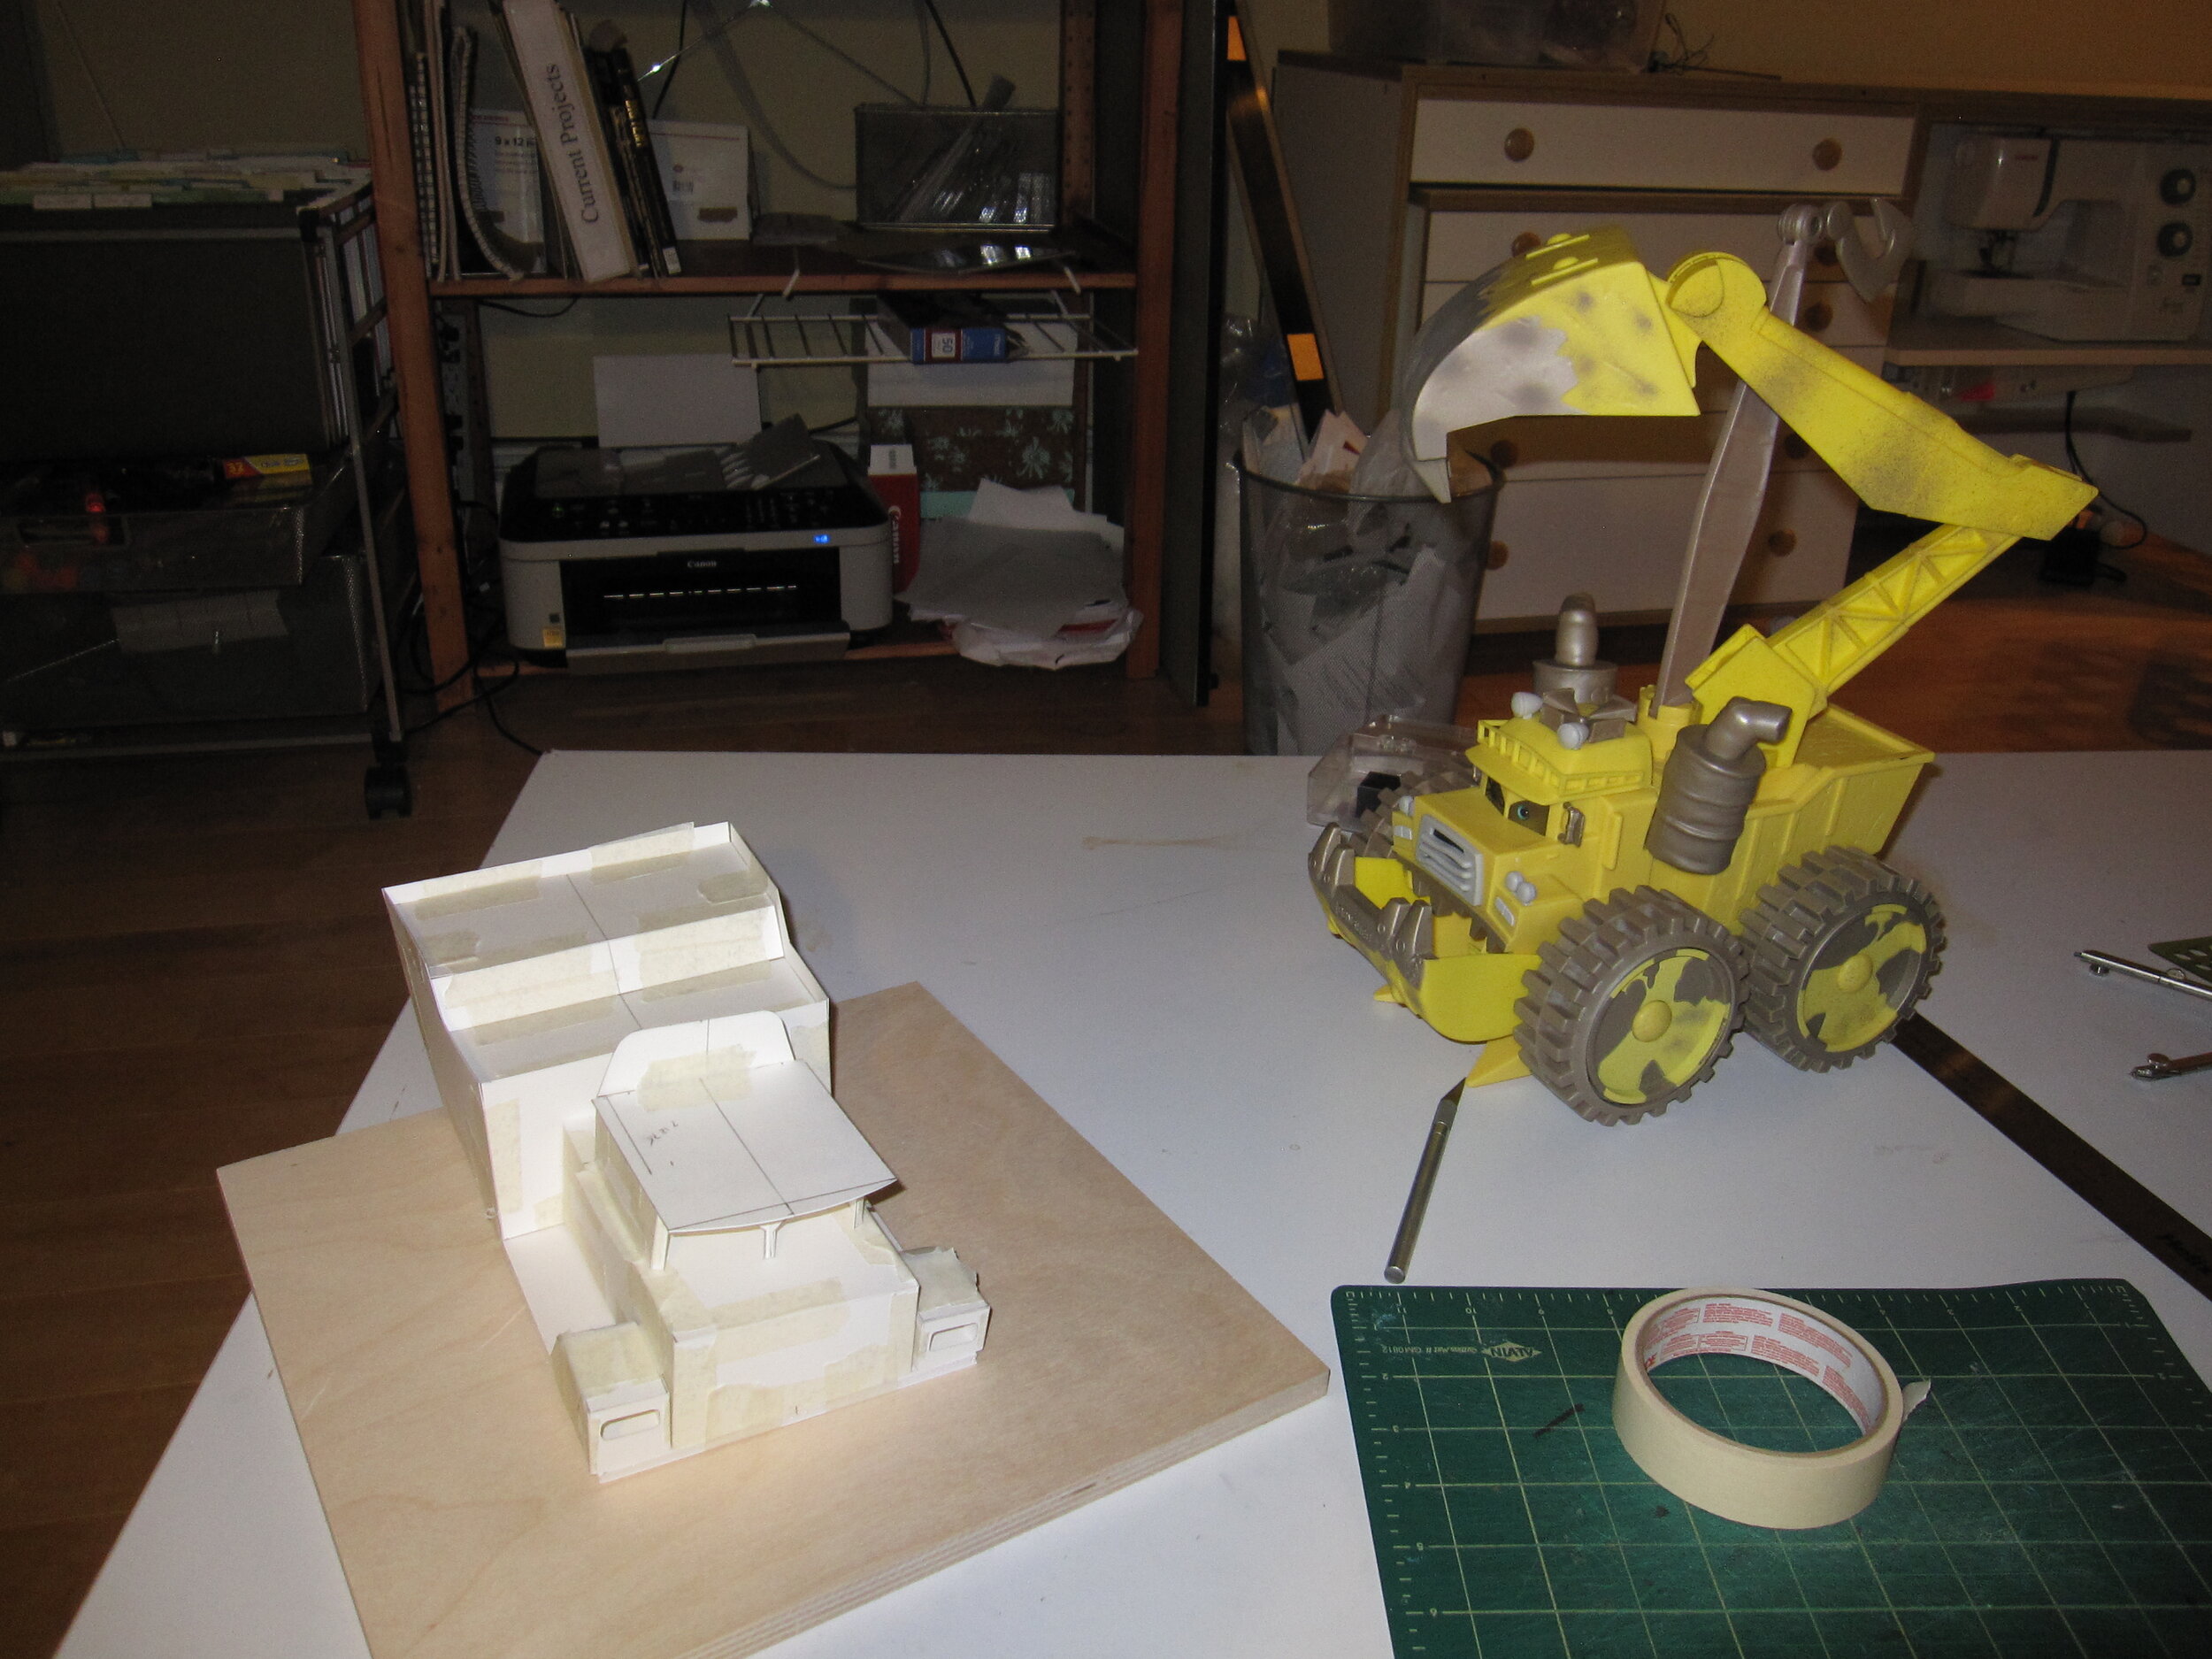
Before I made anything in edible materials, I made a full scale mockup of the entire cake in Bristol board. Then I cut it apart to use as a pattern to make the entire exterior of the cake out of gum paste. One nice thing about Banshee is that he only requires two colors of gum paste – construction vehicle yellow and old, dirty metal grey. This helped the gum paste cutting stage to go by fairly quickly. The most tedious part was making the approximately four hundred and twenty little truncated pyramids for the treads of the tires.

Once all the gum paste was dry, I assembled substructures as much as possible with royal icing. Because I was going to be transporting this cake across the country, I used more non-edible supports than I might have normally.
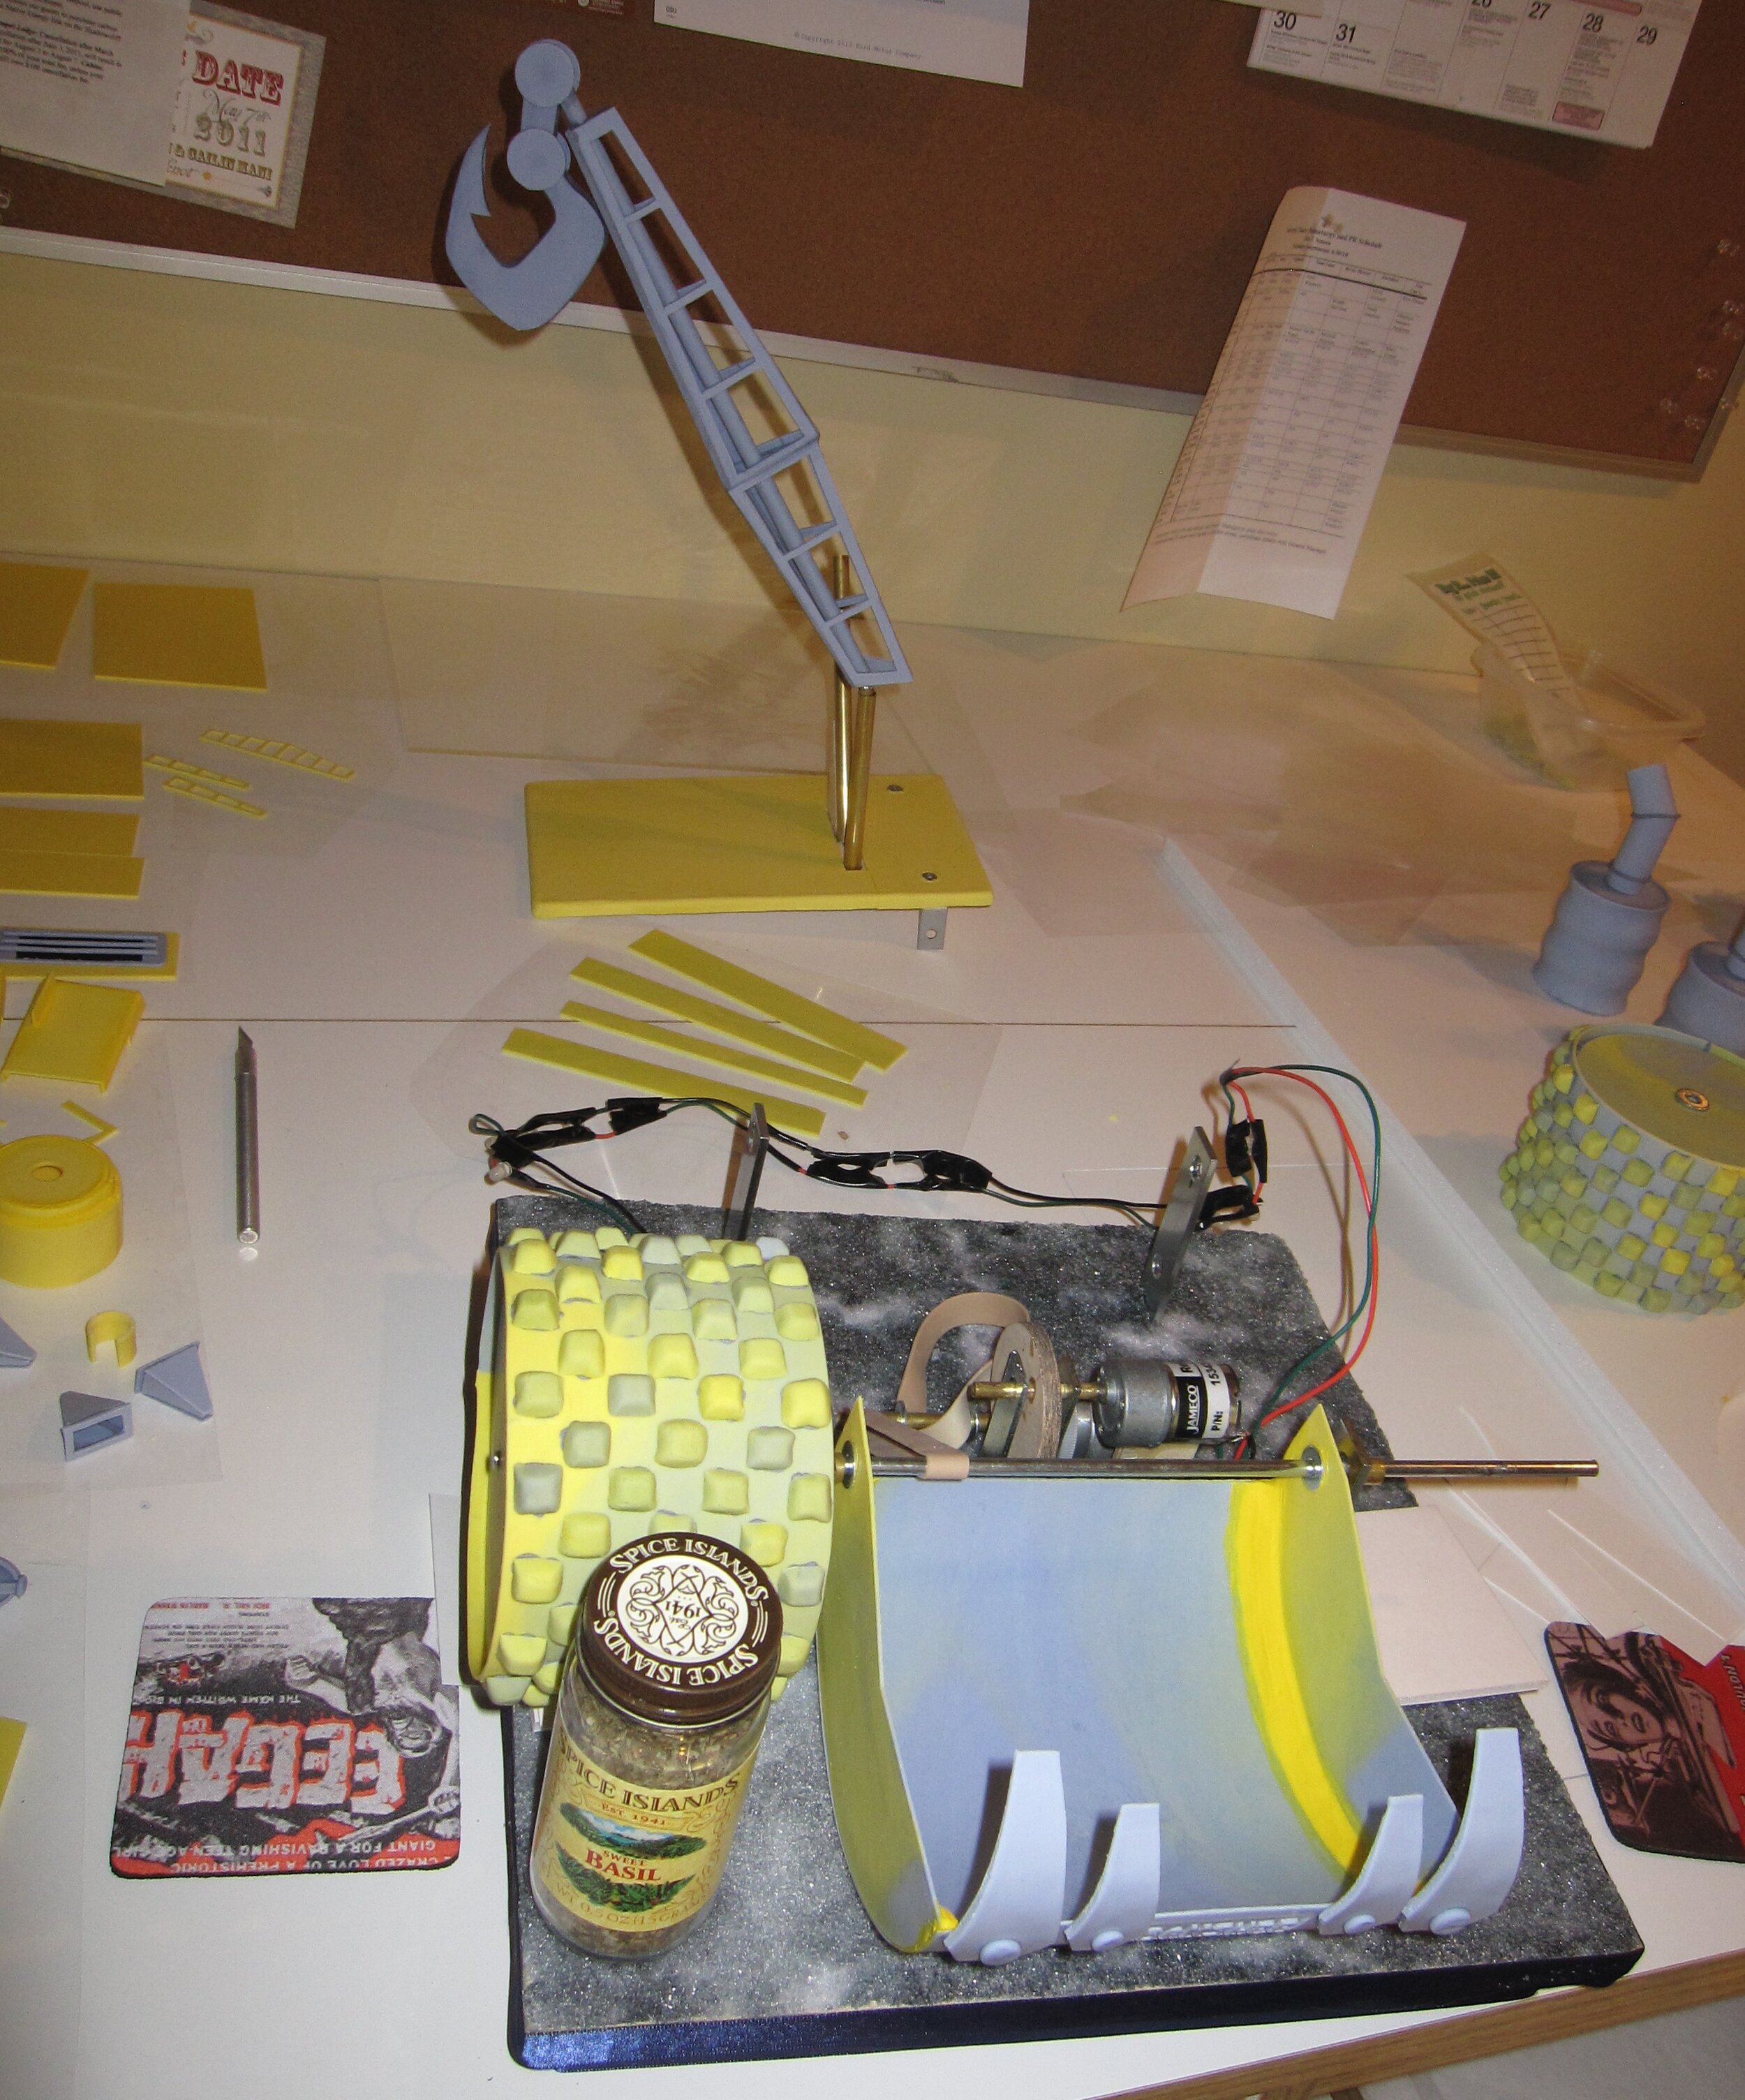
The tow hook and the scoop, for instance, were assembled around brass rods. Incidentally, although I’m breezing over all this in a paragraph, in reality I spent about a month on this stage of the project.

Two days before my flight to California I baked the actual cake. Because I wanted to be sure of a very stable cake for transport I used a chocolate ganache filling, rather than a buttercream. I made three separate little cakes – one for the bottom of the cab, one for the top of the cab, and one for the dumper bed in back. I covered them in fondant because you don’t want gum paste directly in contact with the cake because icing softens the gum paste.
Cake assembly went well. Only a few gum paste pieces were inexplicably the wrong size, but I was able to shave them down to size with a minimum of trouble.
Much more problematic than assembling the cake was packing the cake for travel. This was the first time I had ever tried to move a cake except by car so I was nervous. I had to use basically every inch of my two carry on allotment. For my main carry on I made a foam core box that was about 9”x14”x15” to carry the cake. I also needed to use my extra briefcase carry on allotment to bring Banshee’s scoop arm and tow hook, as well as all the components that made him more than 8 ½” tall. Terrified that my pieces would break en route and I wouldn’t have a cake to give to Alex, I spent at least six hours making boxes, carefully packing components, padding, etc. It was time well spent.

The trip was probably the most stressful flight I have ever endured, with the possible exception of the first solo plane trip I ever took when I was sixteen and flew from Michigan to California to visit my sister in her first year at Stanford. Initially, I had imagined that I would relax once I successfully got the boxed cake through security. This turned out not to be the case.
Security screening went pretty well, although I was so nervous that my hands were shaking. If I hadn’t been allowed to take the cake on the plane, it would have been game over. Fortunately, I was flying out of the Madison, Wisconsin airport, which is by far the most laid back airport I’ve even been to. The only other airport I’ve been to that even comes close is in Paro, Bhutan, an airport so remote and exclusive that only two airplanes are allowed to land there. I got to the airport about three hours early to be sure to have plenty of time to get through security. Obviously, they needed me to open the boxes, but the security personnel were very respectful of the cake’s fragility and complimentary of its appearance. After they swabbed my hands, the cake boxes, and the switches I was cleared through security and safely on my way.
At this point I realized that I couldn’t relax because I was traveling by myself and didn’t want to take my cake into the bathroom with me to pee. Fortunately, I ran into a friend in the airport bar whose flight to Albuquerque had been delayed, so she was able to watch my cake while I ran to the ladies’ room.
Getting onto the plane was also terrifying because the first leg of my itinerary was Madison to Chicago, which is a short commuter flight on a very small plane. When the gate attendant in charge of gate checking carry ons came around the gate area, he told me that I would probably not to able to fit both of my carry ons onto the plane, which to me would have been a complete disaster. However, after a half hour of sitting in the gate area in terror, I was able to stow the cake under the seat in front of me and my other item in the overhead bin. I cannot tell you how relieved I was that this worked out.
In Chicago, I had to carry the cake from one end of the airport to the other to get to my next gate, but at least it fit more easily onto this plane than the last one. A flight attendant even saw it in the overhead bin and offered to put an ice pack on the box to keep the cake cool.
I arrived in California late Friday night and the party was scheduled for Sunday afternoon. On Friday, all I could do was open the box to verify that the cake hadn’t completely collapsed before I fell asleep. I spent Saturday playing with the kids, so I didn’t get to unpack the cake completely until Saturday evening after the kids went to bed.
Amazingly, the cake came through the journey completely unscathed. Literally only one piece broke, and it was a piece that I had extras of, so it didn’t even matter. Even in my best case scenario, I had expected to have to effect at least minor repairs. I was completely flabbergasted by how well the cake traveled.
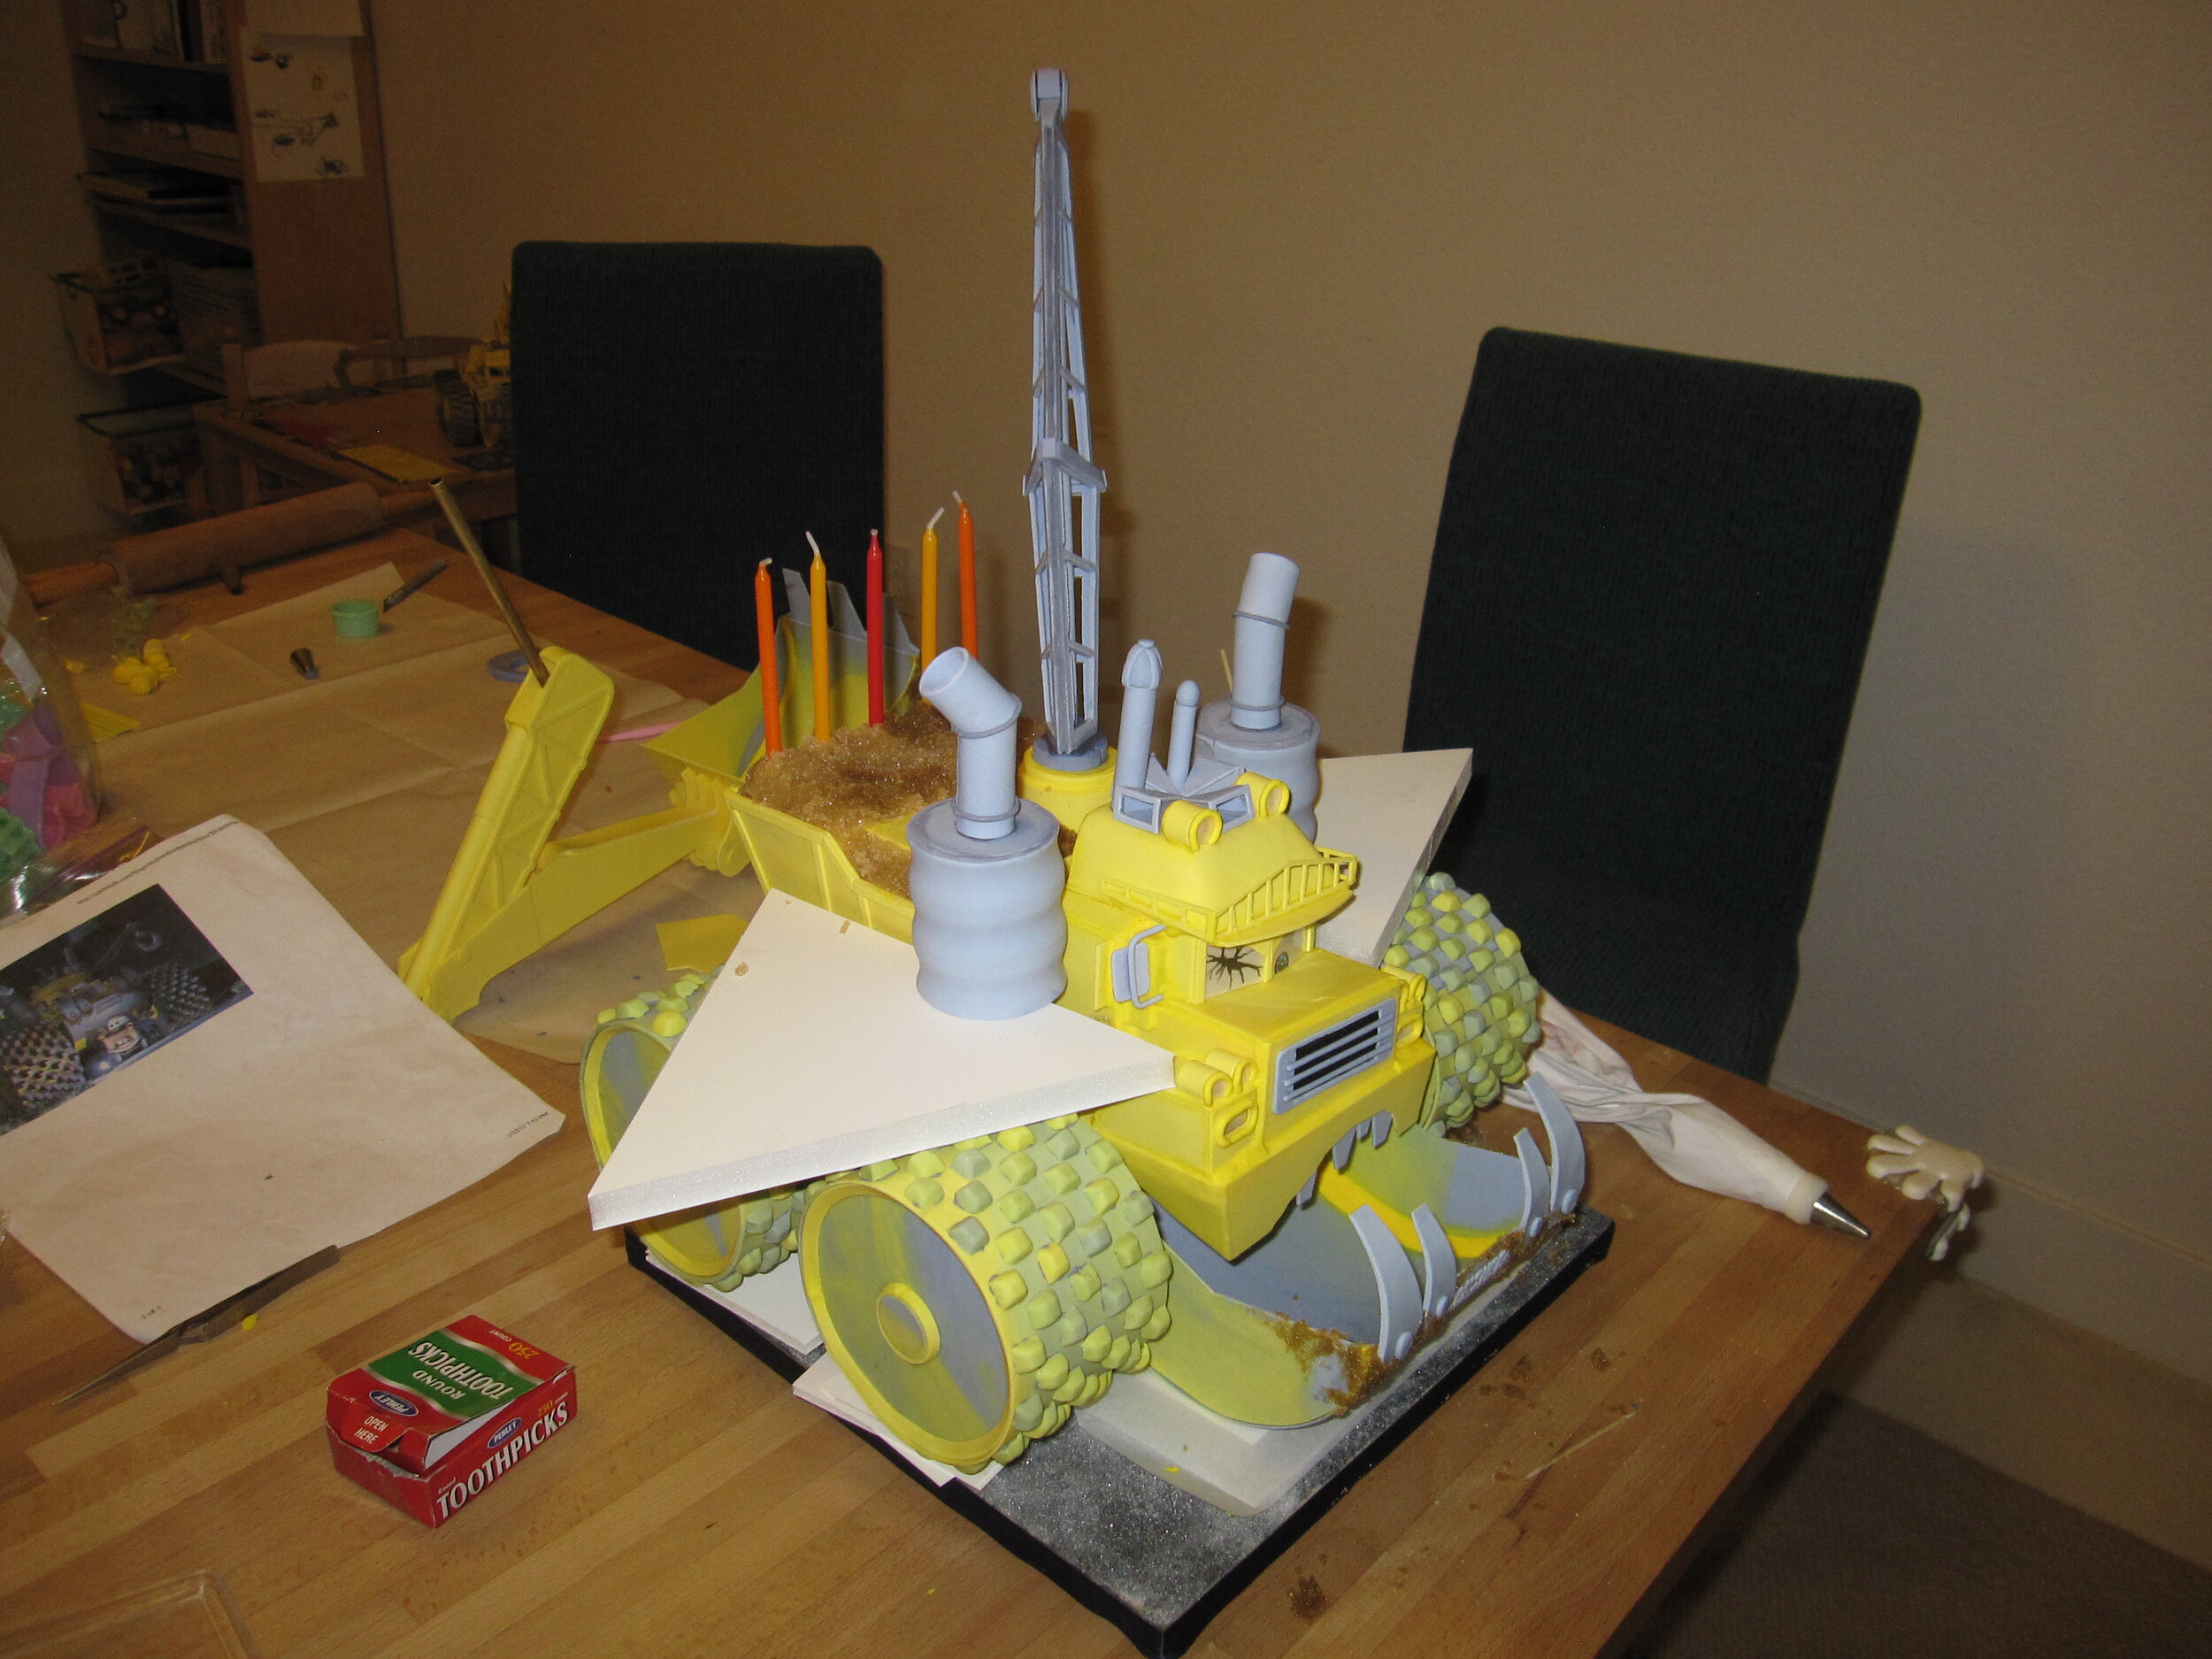
I spent Saturday night completing the assembly of the cake, installing the hook and the scoop, and adding finishing touches to the paint job. I also used some pressed sugar colored with brown food coloring for dirt on the teeth and in the dumper bed, where I also installed the five candles.

The party was fantastic. Our friend Sara brought awesome Cars decorations and balloons. My sister had invited Alex’s entire preschool class plus several other friends, so there were about 20 children. I’m not sure how they even all fit in the house.
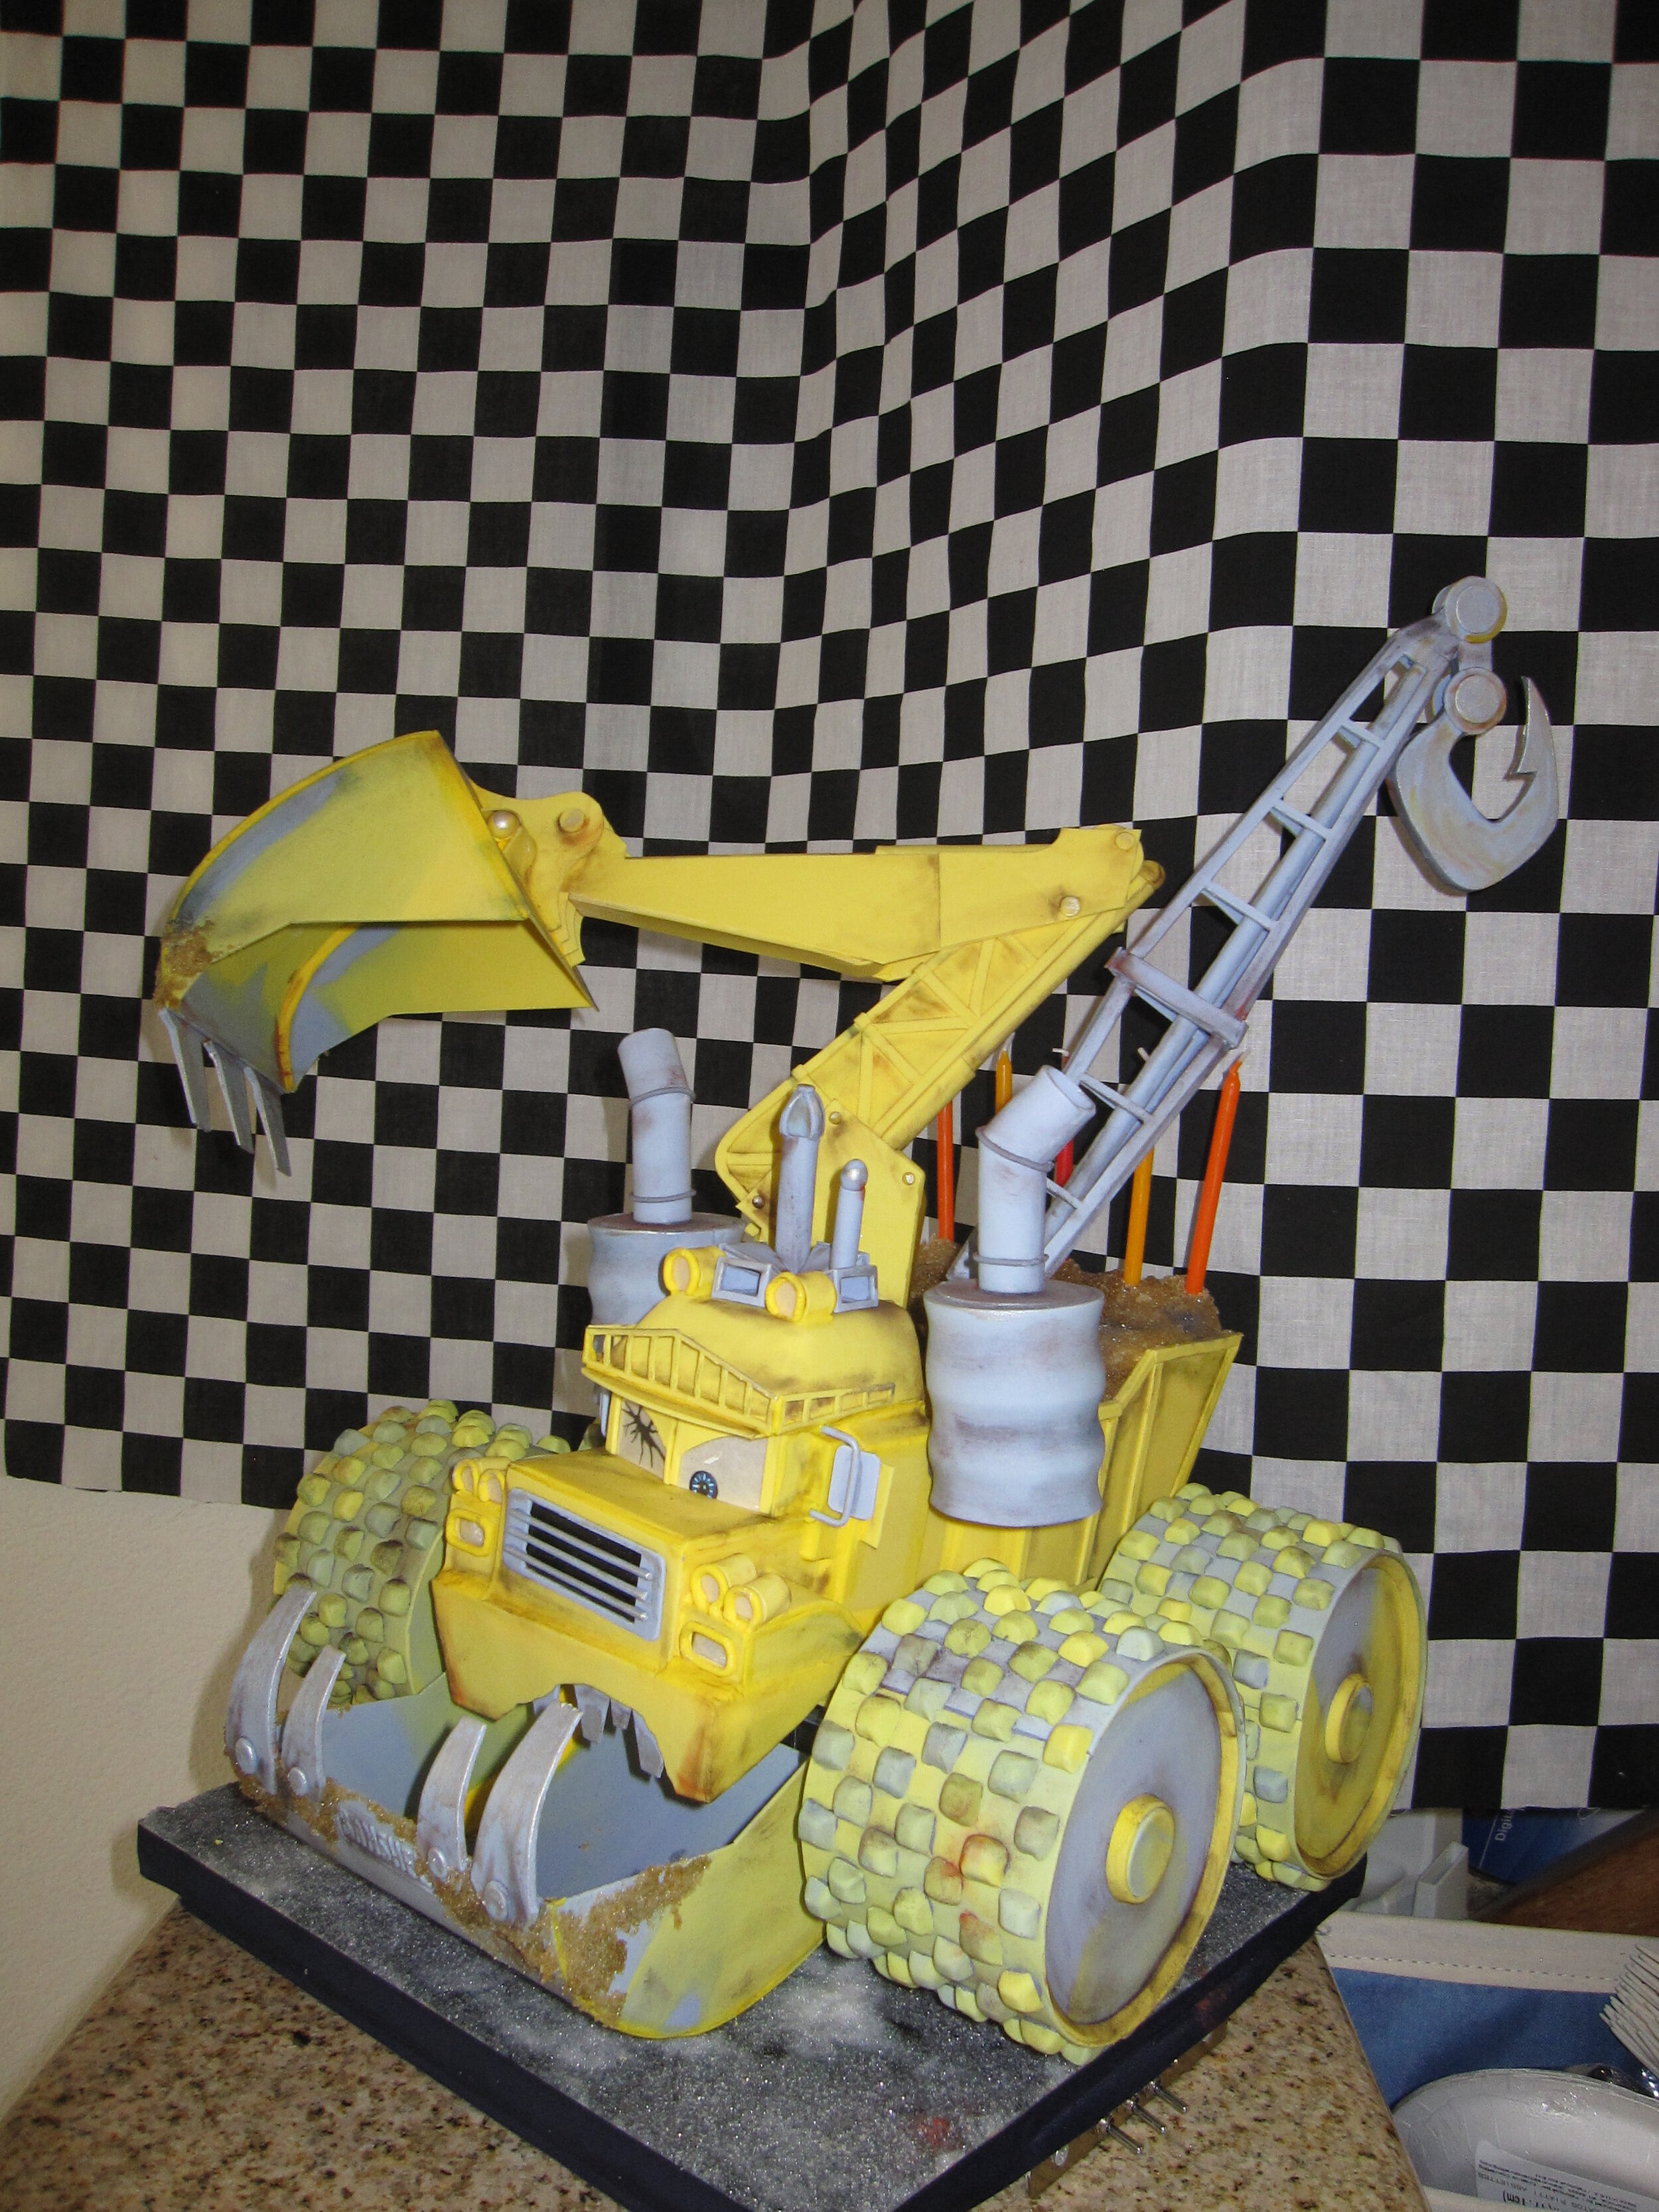
Sadly, Banshee’s wheels didn’t spin (I think the rubber bands weren’t tight enough) and he didn’t go up and down (I think the cake was too heavy for the motor), but otherwise he was very well received. The most important thing is that Alex was happy. Happy and full of sugar.

Zoom! Boom! Bully Cake
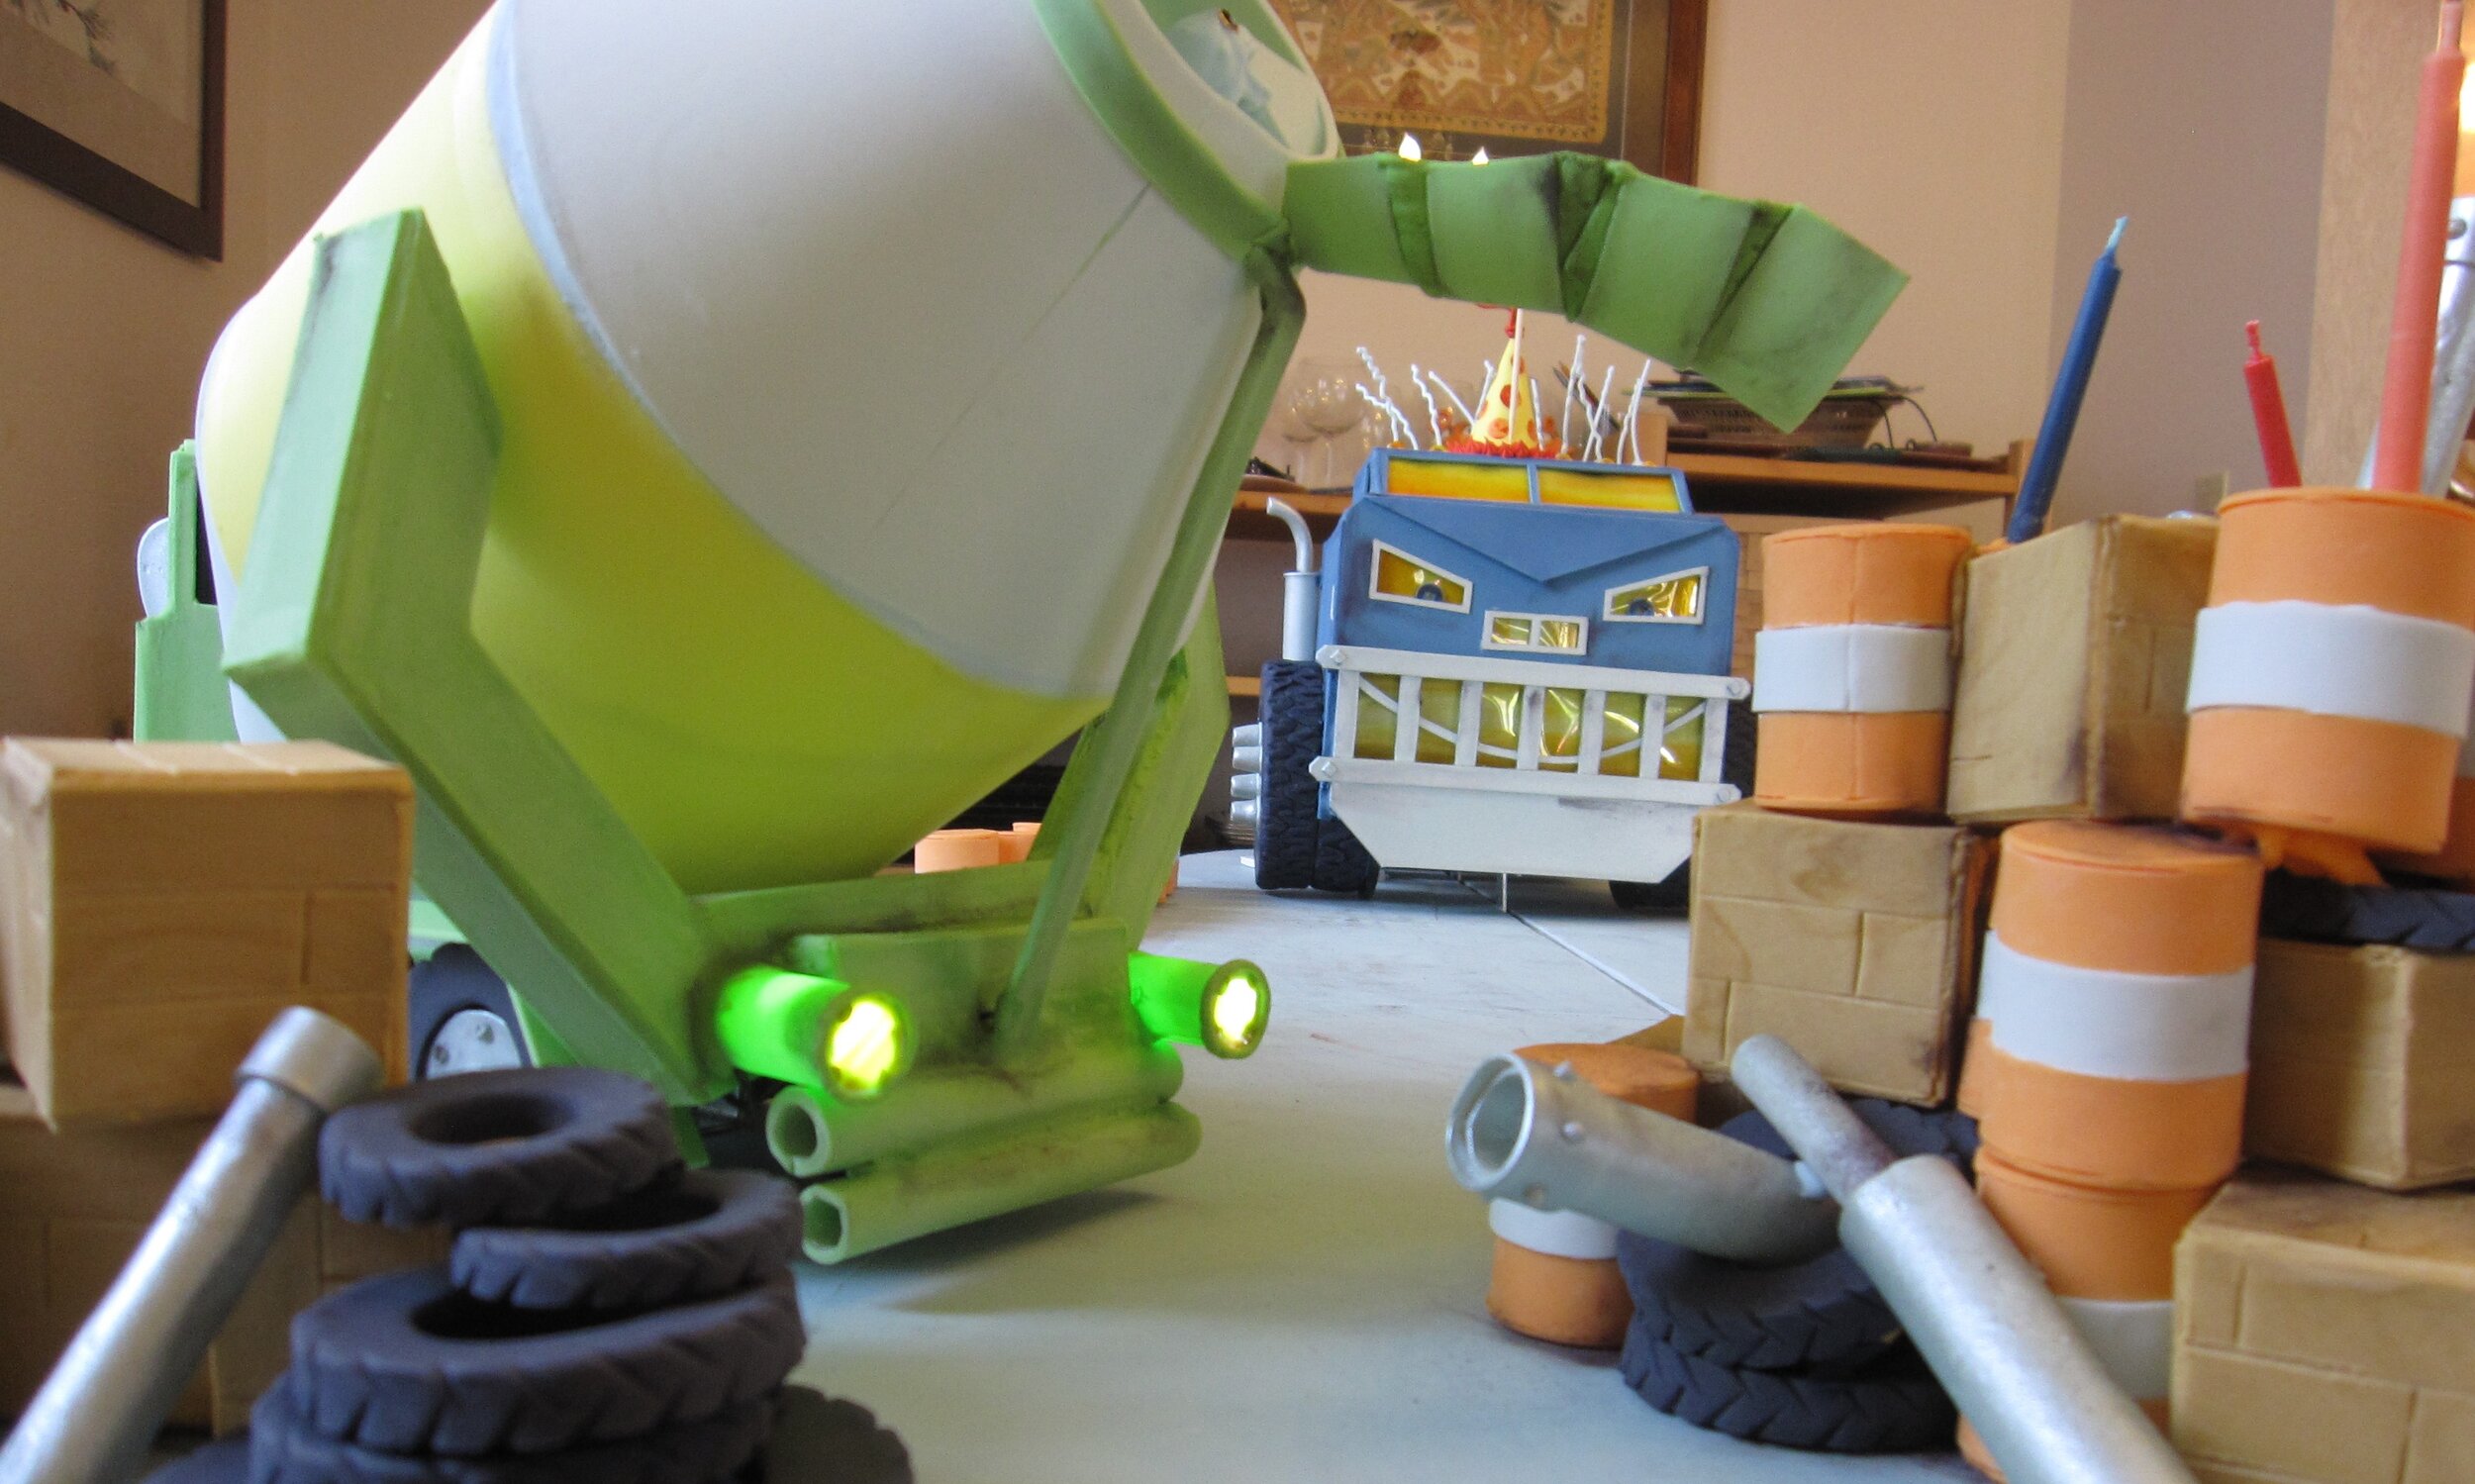
For my niece’s fourth birthday, I made a cake based on Zoom! Boom! Bully from John Scieszka’s Trucktown.

Those of you who don’t happen to be immersed in the magical world of three- to five-year-old children are probably not familiar with John Scieszka’s Trucktown. So I recommend that you follow the link so you know what the heck I’m talking about.
My personal favorite book in the Trucktown series is actually Smash! Crash!, but since the occasion for this cake was my niece Alex’s fourth birthday, Zoom! Boom! Bully was a more appropriate reference. The basic plot is that various denizens of Trucktown stack up crate, barrels, and tires in the middle of the street, but are periodically disrupted by the aptly named Big Rig smashing into them (Zoom! Boom!). The other trucks then exclaim about what a bully Big Rig is. The big surprise in the end is that it’s Big Rig’s birthday and the other trucks are making him a birthday cake out of the crates, barrels, and tires, which Melvin the cement mixer then pours cement “icing” on. Big Rig, very touched by the other trucks’ thoughtful gesture, picks up the “cake”, takes it back to his garage, and proceeds to gleefully smash it while wearing a festive yellow party hat.
I decided to recreate the penultimate moment of the book in cake form, consisting of three components:

1) The “cake” made of tires, crate, and barrels.

2) Melvin the cement mixer, with a rotating drum in the process of dumping cement onto the “cake”.

3) Big Rig, who would smash face first into the “cake”.
When I explained this concept to Alex she was very enthusiastic, if a bit disappointed that Jack Truck and Dump Truck Dan wouldn’t be on the cake.
The first thing I had to do was figure out how the heck I was going to make any of this happen. The easiest way to describe the process is probably to take each piece separately, though of course these projects were running concurrently.
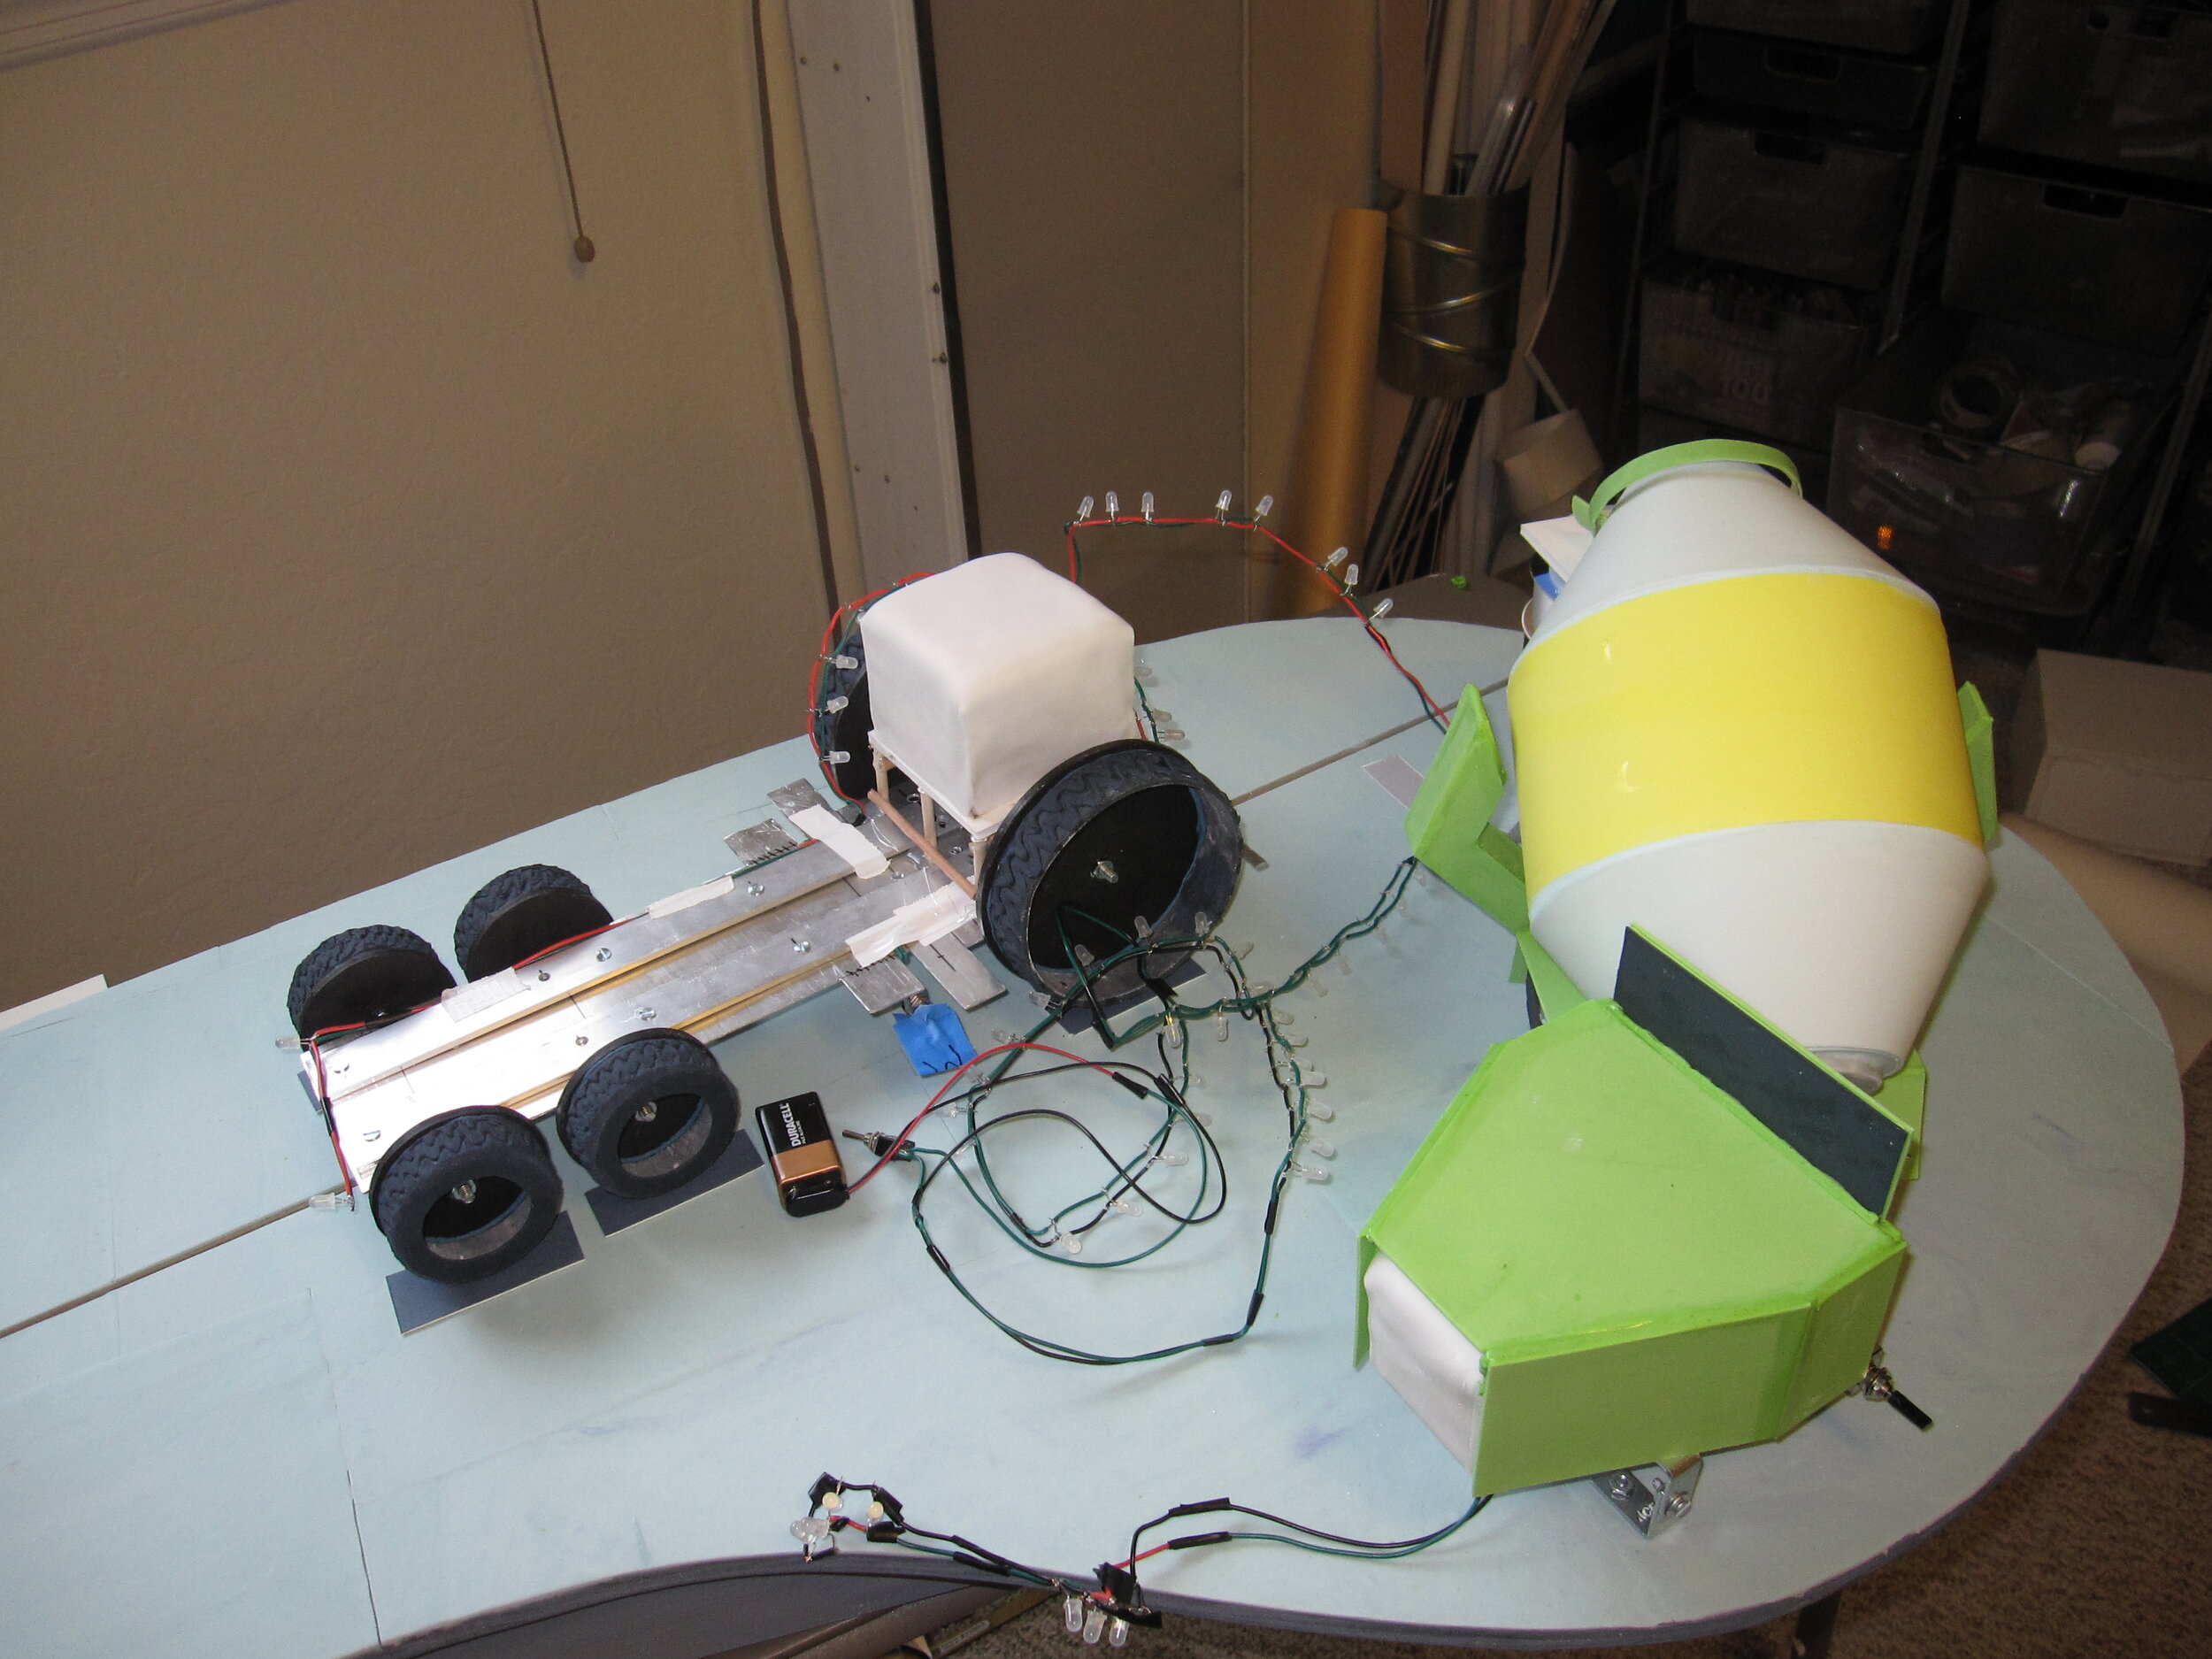
Melvin the Cement Mixer
I learned a lot about cement mixer drums. The first thing I learned was that it’s very difficult to find detailed schematics of them on the internet. Eventually I resorted to studying Alex’s toy cement mixer. As far as I’ve been able to determine from these authoritative sources, cement mixer drum interiors consist of a series of semicircles, angled and staggered such that when the drum turns one way the cement is propelled towards the bottom of the drum and when it turns the other way the cement is pushed up and out the chute.
I made a whole series of Bristol board mockups with various sizes and densities of semicircles, trying them out using little pieces of paper as a cement substitute. None of them even came close to working. So I branched out and tried some other variations on the internal structure. Finally I settled on a helical arrangement of triangular wedges spiraling up towards the top of the drum. This seemed to at least sort of work.
With the basic structure settled, it was time to remake the drum in gum paste. The exterior of the drum was made in three pieces around Bristol board forms. Once these and the myriad little triangular wedges were dry, I assembled them with royal icing around a brass tube for the center support. Assembly was a lengthy process, as I had to wait for the icing on each wedge to dry before attaching the next one.

With the drum assembled around the central tube, I superglued the tube to the shaft of a reversible gear head motor (once I had figured out how to wire up the motor to make it reversible.) Mounting the drum and motor assembly to the base was a real challenge. I had made a pretty simple base for Melvin out of a cut-up aluminum baking sheet, covered with gum paste, and elevated off the wooden base for the entire cake with L-brackets, so the body of the truck would ultimately appear to be resting on its tires. In Zoom! Boom! Bully, Melvin’s drum appears to be supported from beneath in the middle by two angled beams, but there doesn’t seem to be a support for the back of the drum. This, of course, also raises the question of what Melvin’s rear chute is attached to.
My plan was to build the side support beams out of gum paste around pieces of brass, bolted to the aluminum base. Because, unlike the people illustrating the book, I physically needed something on the back to support both the drum and the chute, I decided on a brass ring mounted on a strip of brass and wrapped in gum paste, also bolted to the aluminum base.

The first time that I put this all together with the motor and the gum paste drum, I set it up so that the lowest point on the drum was resting on the aluminum base, on which I had put some UHMW tape to keep friction to a minimum. I thought that this would help to support the weight of the drum and keep stress off the motor. This turned out to be a very bad plan, as I had failed to account for the fact that, in spite of my best efforts, I had failed to center the drum perfectly on the central brass tube. This meant that when I turned the motor on, as soon as the part of the drum that was slightly further from the axis of rotation got around to the bottom, it jammed against the base. I turned the motor off as soon as I realized what has happened, but not soon enough. As the central brass tube was still trying to rotate while the drum itself was jammed against the base, the royal icing connected the gum paste drum pieces to the brass tube cracked. D’oh!
A few tense hours and one major royal icing repair later, the drum was reattached to the tube. In order to prevent this from happening again, I made a new, slightly higher brass ring to support the back of the drum and raised the motor, and therefore the front of the drum, about a half an inch as well. That way, the drum never touched the actual aluminum base and was supported only by the motor on one end and the brass ring on the other end. It worked!
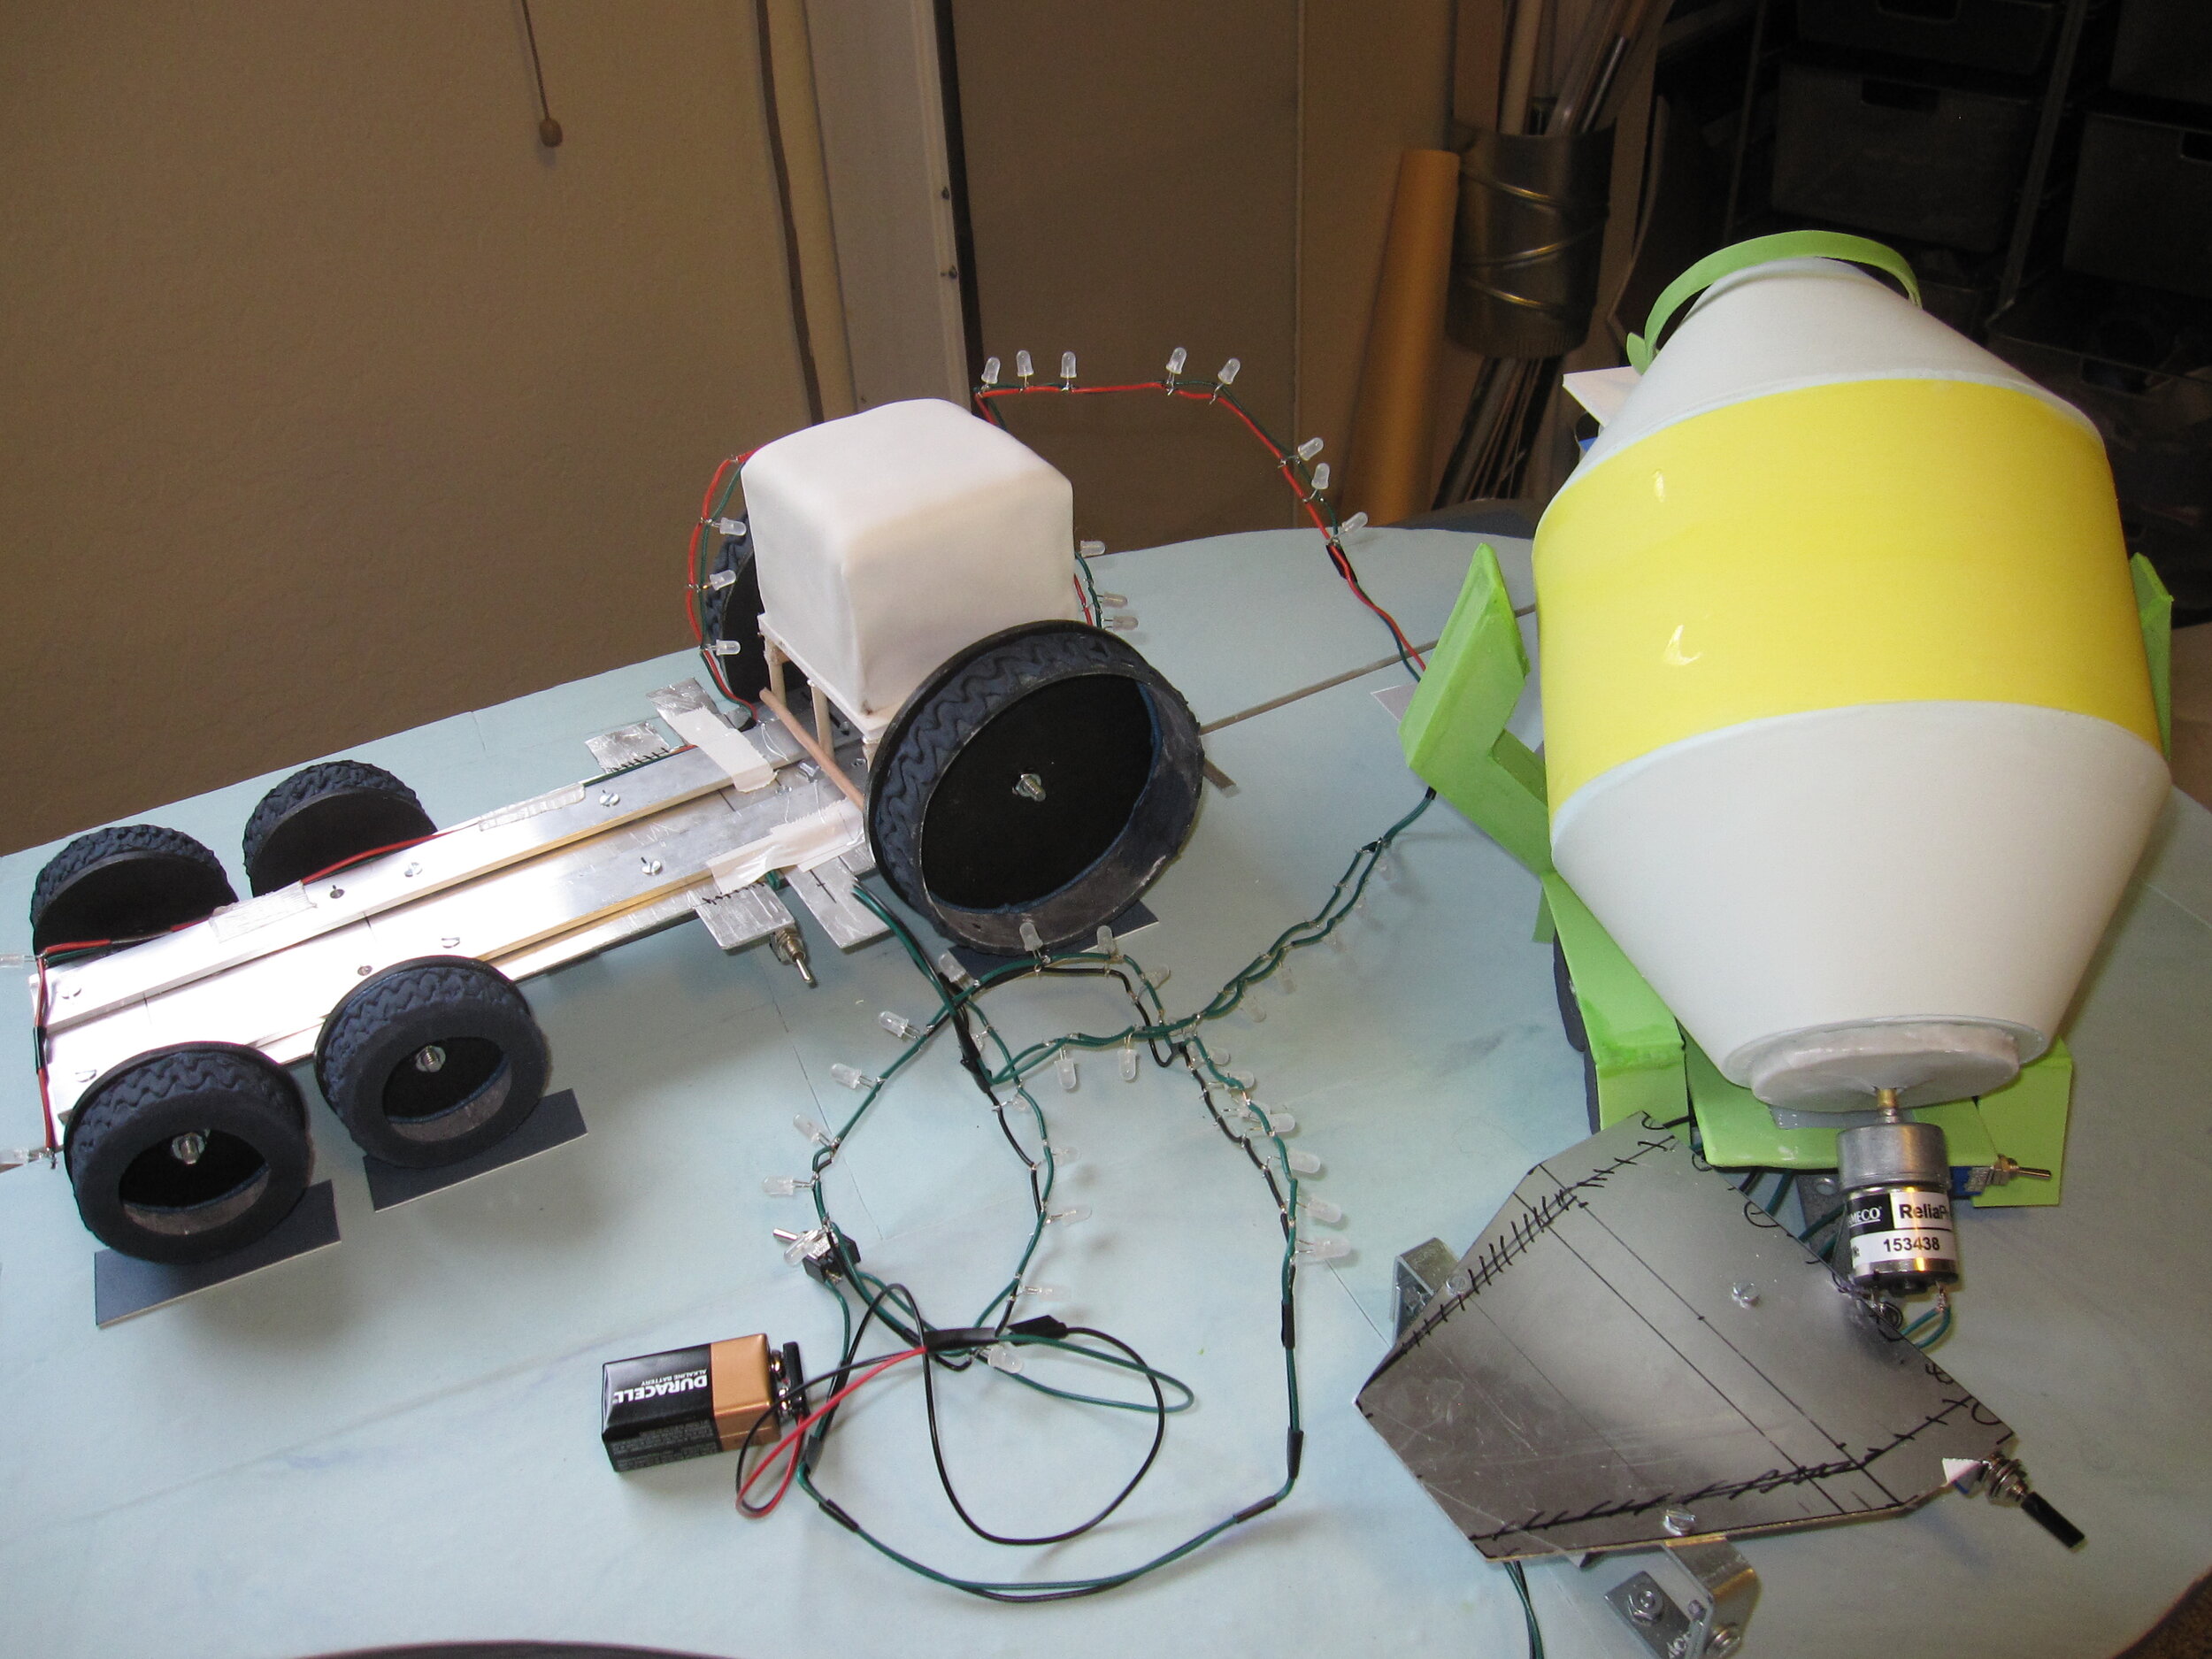
Once the drum turning mechanism was in place, finishing the back of the truck was relatively simple. I covered the motor in green gum paste and assembled the gum paste pieces of the side support beams. Having previously made tires out of black fondant and hubcaps out of gum paste, sprayed silver, it was easy to attach these, as well as the gum paste wheel wells.
I had also wired up some white LEDs to use for Melvin’s taillights and headlights, so I put the LEDs for the taillights in place and then ran the wires underneath the aluminum base so they’d be in place for the headlights once I got his head assembled. The taillights themselves I made out of gum paste cylinders, capped with rice paper (to diffuse the light) and yellow gelatin (to give the light the correct hue.) In the past, when I’ve needed sheet gelatin (see the Tardis Cake and the Flying Saucer Cake) I’ve used the pre-made kind, but since that has a strange diamond pattern on it, this time I tried making my own flat sheet gelatin, using these instructions that I found on the internet. After a few abortive efforts, it worked pretty well.
Assembling the chute took a little time, because it was made of six separate pieces, which had to be attached one at a time, with sufficient time for the connective royal icing to dry before attaching the next one.

With the back of Melvin thus complete, I had to make his head, the only part of Melvin that contained actual cake. This went very smoothly. Having made all the exterior gum paste pieces in advance, it was simply a matter of carving the cake into the appropriate shape, covering it with fondant, and then setting it in place on the aluminum base. Then I could assemble the gum paste exterior with royal icing, including more tires and wheel wells, the ears / side view mirrors, and eyeglasses / headlights (which were assembled around the rest of the strand of LEDs.) To fill gaps and hide seams, I used royal icing, smoothed with a damp paintbrush.
For cement, I made some white chocolate ganache, tinted grey with black powdered food coloring. Mind you, at this point I still didn’t know whether the drum was properly configured to actually push the cement out and down the tube, and I wouldn’t find out until the party.
Big Rig
My biggest challenge of this cake was figuring out how to make Big Rig roll. It was also pretty high pressure because, let’s face it, if Big Rig didn’t smash into the “cake” the whole project would pretty much be a blatant failure. With almost all of my cakes, I accept that there is a fairly high probability that it might not work as I intend. My philosophy is that if you always know that what you’re doing will work, you’re not trying hard enough. Which is fine when the only people who are going to be disappointed with a failure are me, or my adult friends, or the guests at my friends’ wedding. But I really didn’t want to disappoint Alex. So in this particular case, I really couldn’t let failure be an option.
Keeping Big Rig on the right trajectory was the easy part. I attached two L-brackets to the bottom of Big Rig’s aluminum base, a material which I had selected to keep his weight as low as possible. Then I cut a track in the plywood base for the entire cake, running from the far end where Big Rig would start, leading to the end of the base where the “cake” would sit. That way, the L-brackets, slotted into the plywood track, which I had lined with UHMW tape to reduce friction, would keep Big Rig on target to the “cake.” All I had to do was get him to move.
My first attempt at a drive mechanism was to connect a hobby motor directly to the shaft of one of the front wheels (made out of plywood, to be covered later with gum paste tires), so it would basically be a one-wheel drive car. This failed for at least two reasons. First, because the two front wheels weren’t connected to each other via a complete axle, both had a tendency to bind up in their bushings, so that moving even the light aluminum base without any cake on it took all the motor’s power. Second, because only one wheel was driving the truck, it had a tendency to try to pull the truck off course so that the L-bracket bound up in the track.
So I scrapped that and tried something else. This time, I connected the two front wheels with a brass and threaded rod axle. My plan was to transfer the power from the motor to the axle with a heavy-duty rubber band under tension. This plan failed even before I connected it to the wheels, as the minute that I started experimenting with putting tension on a rubber band around the shaft of any of the hobby motors I had in hand it became clear that none of my motors had nearly enough torque to get the job done.
I went online and located a promising-looking high-torque motor. While I was waiting for that to arrive, I started playing around with the possibility of a motor-less drive mechanism. My first thought was a tension spring. Unfortunately, a few major problems with this idea soon became clear. First, the length difference between the relaxed spring and the spring under tension wasn’t nearly enough. I couldn’t pull the truck all the way back to the end of the track, and even with the spring fully relaxed I was afraid that the truck wouldn’t even reach the “cake” to smash it. Second, I was very scared that, if I had to keep Big Rig under that kind of tension for any length of time there was a significant risk of premature smashing, which would be a real tragedy. Third, I really wanted Big Rig’s tires to spin on their own, so I could start the wheels spinning, and then release the truck for the final smash. There’s a great illustration in Zoom! Boom! Bully where Big Rig’s tires are spinning into a whirl of smoke just as Jack shouts, “Stop!” and the other trucks reveal that the “cake” is for Big Rig’s birthday. I really wanted to recreate this moment in cake before the smash, and that required motor power directly to Big Rig’s wheels.
I managed to solve the first of these problems by substituting a jumbo-sized rubber band for the spring. The rubber band had a much higher stretch-to-length ratio than the spring, and the flexibility of the rubber band meant that even after its tension was exhausted, it at least wouldn’t arrest the momentum of the truck. The rubber band also seemed to have sufficient power to move the truck fairly quickly, even with the projected added weight of the cake and gum paste. But the rubber band still left my other two concerns unaddressed. It still required the truck to be under tension for a longer period of time than I was comfortable with, unless I could come up with a release mechanism that I could set after the cake was completed and moved into place. And in order to achieve the effect I wanted with the tires spinning prior to release, I really needed tires that were legitimately motor-powered.
Fortunately, when my high-torque motor arrived, early signs were encouraging. Unlike the motors I was trying before, it was clearly powerful enough to withstand the tension on the rubber band. So I mounted the motor to the cake base and ran the rubber band to connect the motor shaft to the axle. Initially, I was delighted with the result. With no weight on the aluminum base, the truck drove great. However, as soon as I put some weight on it, to mimic the weight of the cake and gum paste I was planning to put onto Big Rig, it stopped working altogether, as the added weight was sufficient to counteract the tension on the rubber band and cause it just to slip uselessly around the axle. I tried to mitigate this problem by putting something sticky on the axle, but this just made the rubber band stick to itself and get wound up around the axle.
Next, I tried using gears to transfer the power from the motor to the axle, which required a complete redo of the front bushings to leave space between the axle and the aluminum base for the gear. Like the rubber band drive, this worked great until I put any weight on the base. Unlike with the rubber band, the truck did at least move with additional weight on it. It just moved very slowly. I did have hopes, though, that if I kept the cake as light as I possibly could, it might work.
To give it an extra boost of power, I decided to combine this partially successful motor solution with my partially successful rubber band solution. I designed a release mechanism consisting of a piece of U-shaped channel that ran across the track, underneath the base, attached to a dowel handle leading out the side of the base. That way, with the rubber band connected to one of the L-brackets under the truck base on one end and an eye bolt at the “cake” end of the track at the other end, I could finish decorating Big Rig with the rubber band relaxed, and then pull him back and set the L-bracket into the U-channel. This would hold him in place, and hold the front wheels a fraction of an inch off the base, so I could turn the motor on, let the wheels spin freely for a second, and then pull the dowel to release him. The rubber band would pull Big Rig forward while the wheel simultaneously pushed him forward. I could only hope that would provide enough force to make him powerfully smash into the “cake.”
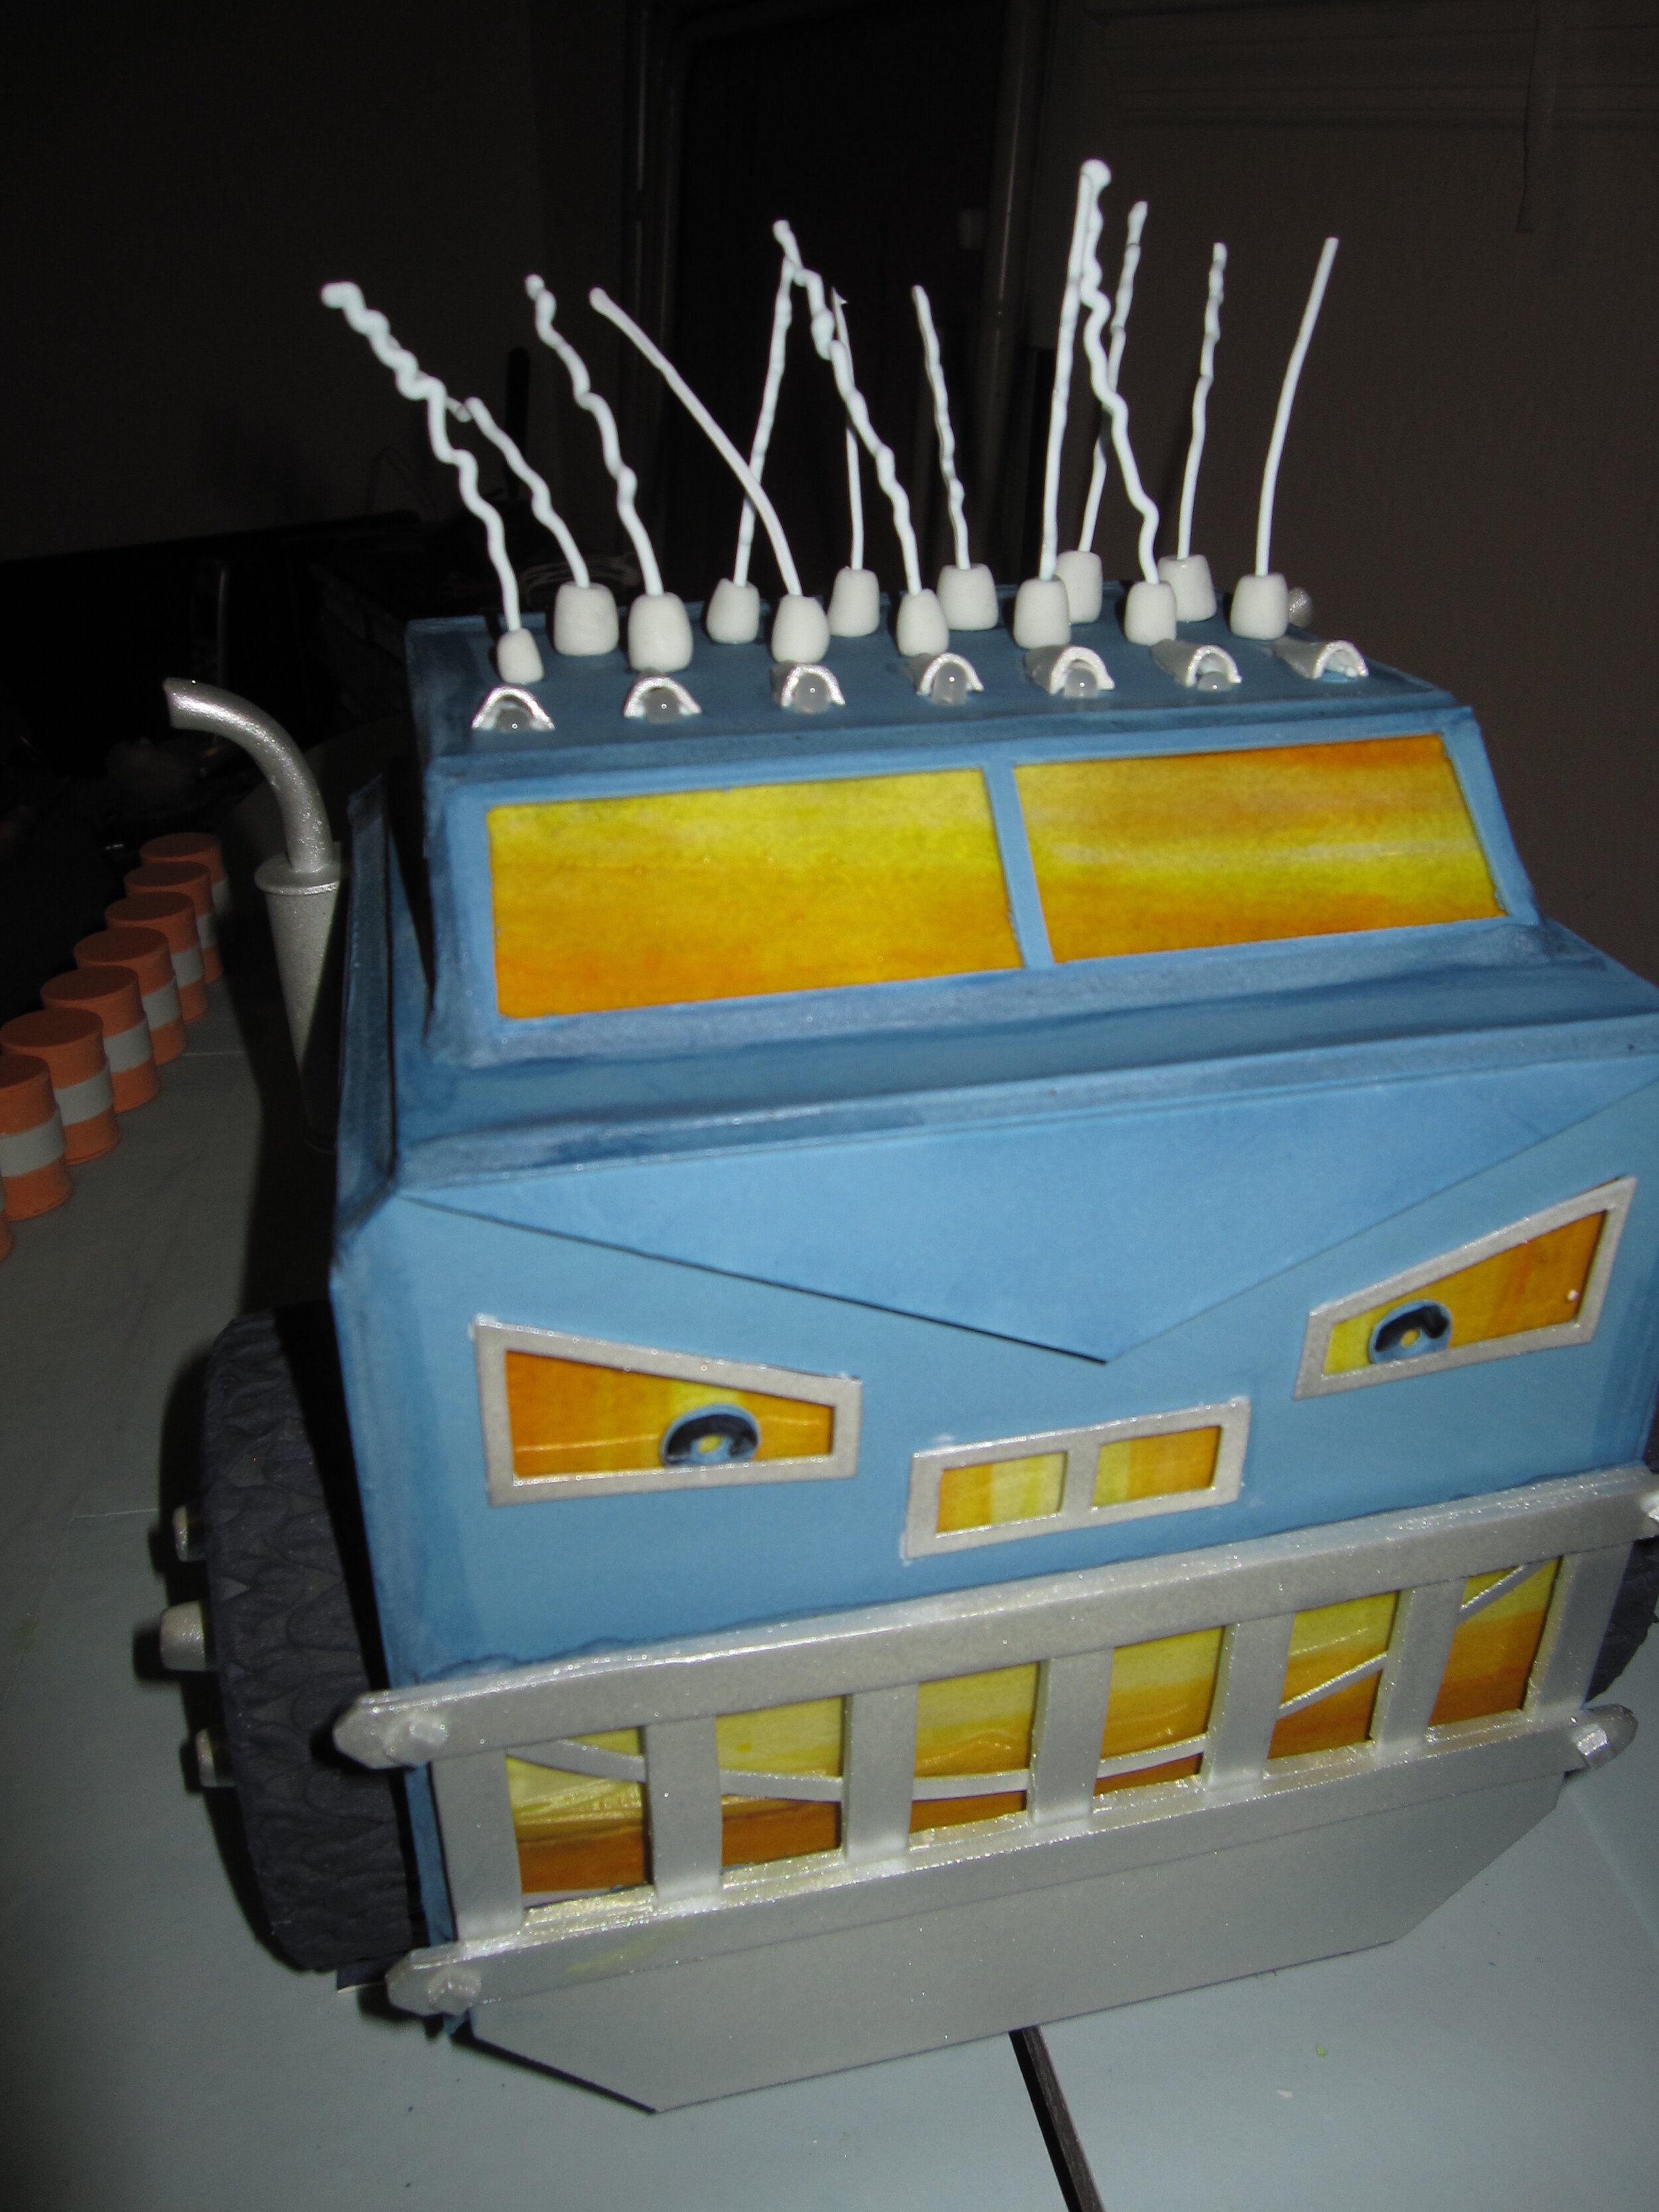
And thus ends the saga of making Big Rig go, but I still had to actually make Big Rig. Because Big Rig has a kind of maniacally glowing face, as well as taillights and a menacing glow inside his wheel wells, he needed a lot of LEDs. Fortunately, by this point I’ve done so many LED-intensive cakes that I could basically just chop and splice segments together as needed, so the wiring went pretty quickly.
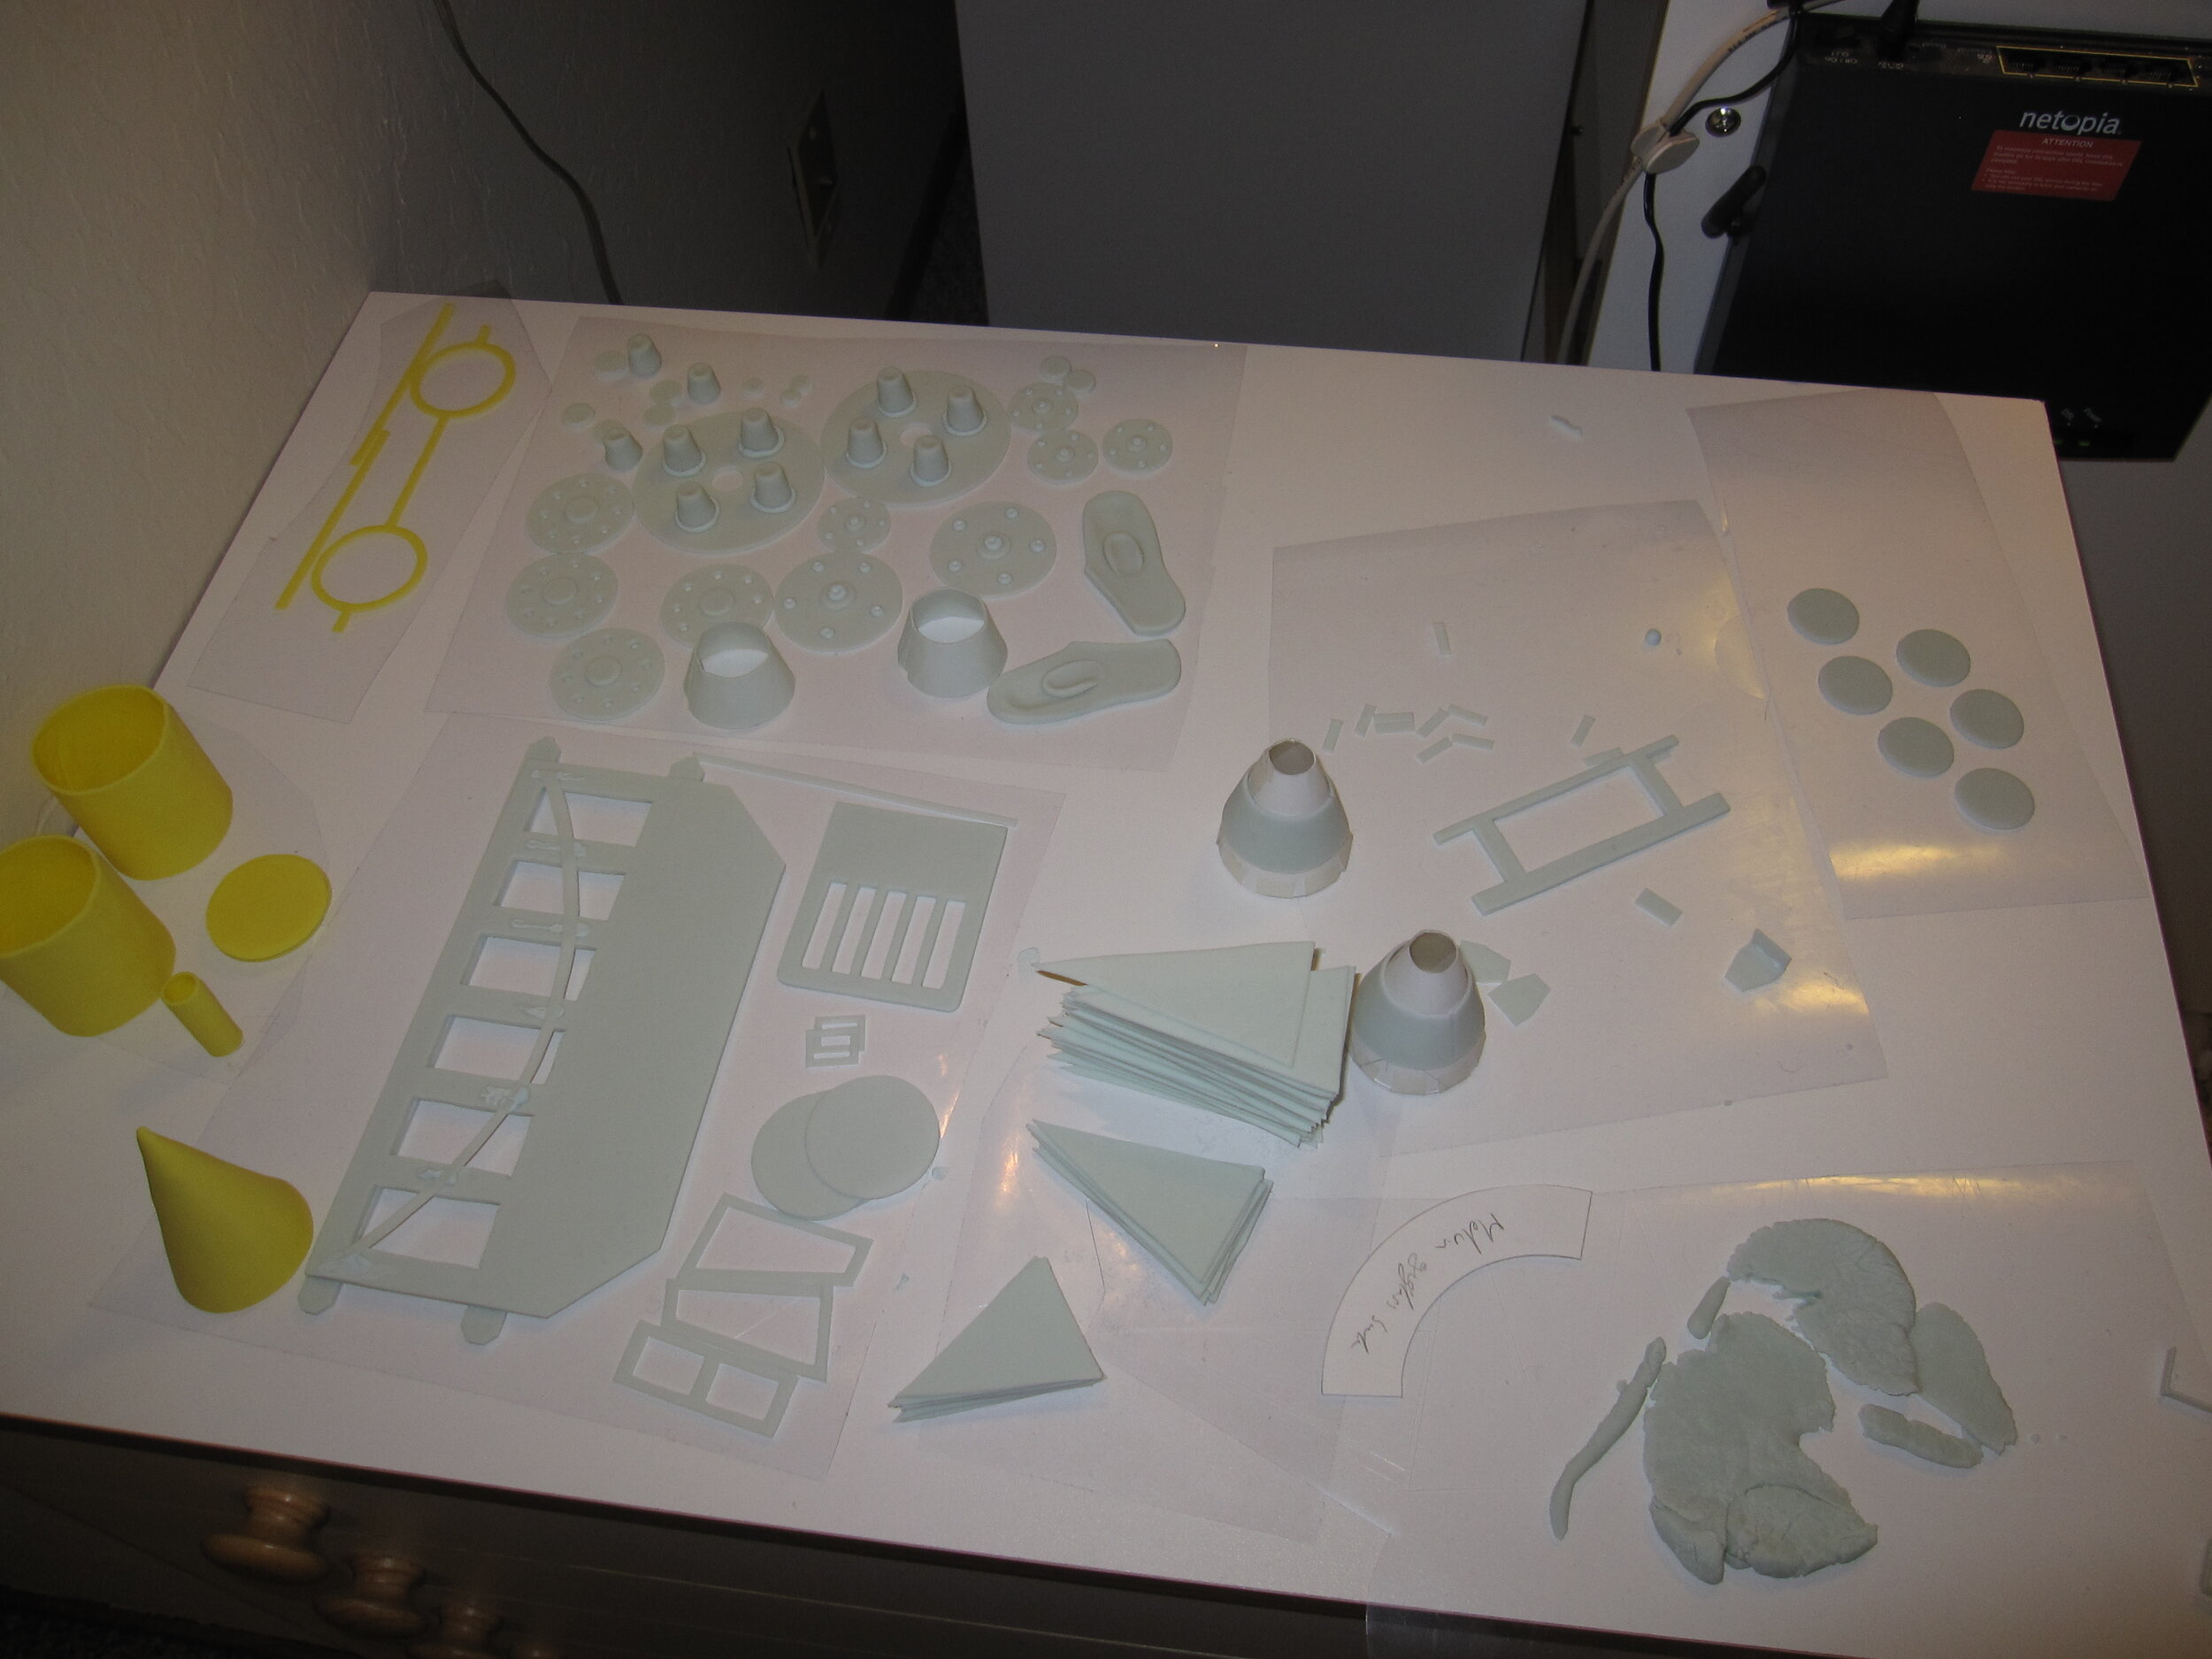
All the gum paste pieces, including tires, hubcaps, fuel tanks, bumpers, walls, trim, and yellow party hat, were made and dried in advance. To get the requisite orange and yellow glow out of Big Rig’s eyes, mouth, etc. I made sheets of gelatin with fades from yellow to orange, backed with rice paper to diffuse the light form the LEDs.

The cake itself was limited to the back of Big Rig and a very small square of cake inside his cab. At the party, someone pointed out that it was like a little cake engine block. I couldn’t put a bigger cake inside his head, because I needed to leave space around it for the LEDs. I kept the fondant layer on the cakes (necessary to prevent the gum paste from touching the buttercream icing, which softens dried gum paste) as thin as possible to keep the weight down. Fortunately, since I was covering the entire thing with pre-made gum paste pieces, the fondant didn’t have to look particularly nice.
With the cakes in place, attaching the gum paste exterior and all the trim pieces was really quite simple. The only problem I had was that when I redid the front axle bushings to accommodate the gears, I had failed to make the corresponding changes to the templates for Big Rig’s cab, so the sides, front, and back of the cab were all about half an inch too short. Fortunately, I had some extra dry blue gum paste pieces that I was able to cut down to patch the gaps. With some liberal royal icing spackle, it turned out just fine. The finishing touches were the royal icing antennae on the top. I have no idea why Big Rig needs so many antennae (which is what I told Alex when she asked me that question) but he has them in the book, so he had them in the cake.
“Cake”
Although the “cake” was the easiest component in that it didn’t have to do anything but sit there and be smashed, it also required more individual gum paste pieces than (I think) Melvin and Big Rig put together. Each barrel was made of five separate gum paste pieces and each crate required six. At the early planning stages of this project, I had envisioned putting tiny individual pieces of cake inside each crate and each barrel. Considering that the crates were only an inch and a half on each side, and the barrels were even smaller, I’m very glad that I came to my senses before I tried to do this. It’s not like there wasn’t already more cake than our guests would possibly eat anyway. Instead, I just put a little square of cake inside the “cake”, surrounded by the hollow crates and barrels and fondant tires. This probably made for a better smash in the long run anyway.

In addition to the crates and barrels, the cake also included a selection of fondant tires and gum paste pipes. Since I had made way more of all these things than were actually required, I used the extras to create bonus piles of stuff around the perimeter of the plywood cake base.
Finishing touches
With everything assembled, I actually went to bed at a relatively reasonable hour the night before the party. The next morning, as I was putting on the finishing touches – mostly adding a little dirt and grime with black powdered food coloring – Alex came in to inspect my work. She walked around it, studying it very carefully and commenting favorably on specific elements, like Big Rig’s tires and Melvin’s articulation. She then pointed out that I needed to put eyes on the chicken hood ornament on Melvin’s nose, which was already on my list of details to finish up before the party.

Alex then noted that I hadn’t made a hitch for the back of Big Rig. I had considered making a hitch for Big Rig, but decided against it because it doesn’t play any role in this scenario and because in some of the images in the source book, he doesn’t appear to have a hitch. Alex listened patiently to this explanation and then countered by pointing out that, in Truckery Rhymes, Big Rig is shown towing a trailer, which he couldn’t do if he didn’t have a hitch. I was forced to bow to her superior logic and quickly made a gum paste hitch. Actually, it even looked better from an aesthetic point of view, as the silver hitch made the solid blue rear section of Big Rig much more interesting. What I especially love about Alex’s argument is that it draws not just upon the specific source book for this project – Zoom Boom Bully – but upon the rest of the Trucktown canon as well. I also enjoy that it is a functional argument. Her point was not merely that Big Rig should have a hitch because he is shown with a hitch in the illustrations, but that Big Rig needs a hitch or he would be unable to fulfill his function as a big rig.

With the hitch completed, I got Alex’s dad to help me move the cake out to the dining room. Then came the stressful moment when I had to pull Big Rig back into his release mechanism. I was terrified that I was either going to lose my grip and send him crashing into the “cake” or crack Big Rig’s head to pieces in the effort of pulling back the rubber band. Fortunately I avoided either catastrophe and got Big Rig primed for release with only the loss of one fuel tank that was easily reattached.

Alex then consulted the source material for one final check on the accuracy of my work. She pointed out that, in the book, the “cake” is shown on a wooden palette, and I had failed to put my cake version of the “cake” onto a palette. I explained that I had noticed that and had considered putting the “cake” on a palette but had decided against it as I was afraid that the palette would arrest Big Rig’s movement so that he wouldn’t smash into the “cake” as effectively. Alex considered this carefully and then decided that perhaps Big Rig had taken the “cake” home on the palette and then removed it from the palette in order to smash it. I agreed that was an excellent explanation.
The party
With only one exception, the cake worked very well. Melvin’s drum turned flawlessly, but sadly, he did not actually pour cement. Either the drum and/or the wedges inside weren’t angle correctly or I had made the ganache too thick. Also, I didn’t really know which way the drum was supposed to be turning to make the cement come out. Cement mixers are complicated. Oh well, at least the drum turned.

Most importantly, Big Rig worked! Zoom! Boom! One of the barrels even flew off the table. Big Rig’s front bumper cracked beautifully so that he wound up with an excellent jagged evil grin.

Alex had a great time eating various gum paste bits (and a little bit of actual cake.) I particularly enjoyed it when she ate one of Melvin’s eyes, revealing the LEDs and leaving Melvin looking like a mangled cyborg.

The next day, as Alex was helping me to disassemble the remains of the cake and salvage the electronic components, she told Melvin (who was by this point essentially just a severed head) that he was her favorite cake ever. I call that a big success. Alex was a very tough audience with an incredible eye for detail. She was tremendously critical, but with such sincerity and such admiration. She has absolute confidence in my ability to execute a perfect cake version of Big Rig, so of course she wants to point out my errors so that I can correct them. It’s such a charming combination of exactitude and blind faith. She’s the perfect manager.

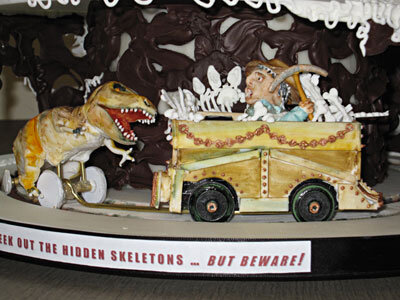
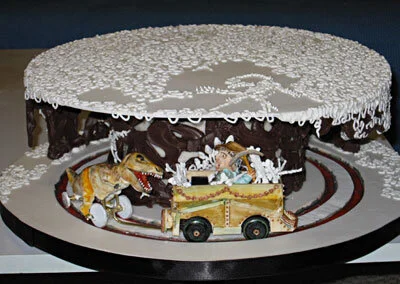
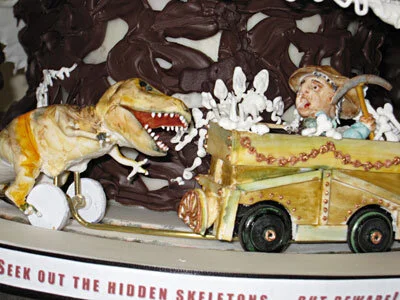
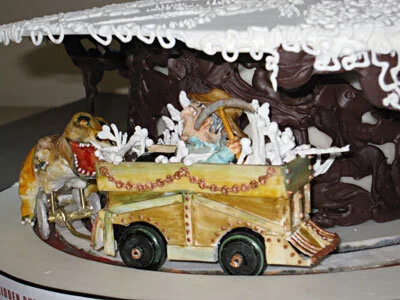
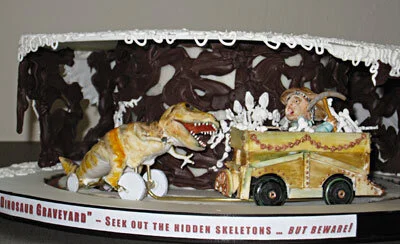
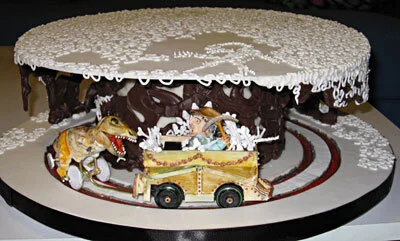
Dinosaur Graveyard Cake
Pastry arts for a good cause – this cake was raffled off at a fundraiser for my niece’s preschool.
Pastry arts for a good cause - this cake was raffled off at a fundraiser for my niece's preschool.
My niece's pre-school was having a fundraiser. My challenge - make a cake for the raffle that fulfilled all of the following conditions: The cake should be:
Small enough that people wouldn't be intimidated by the prospect of eating it.
Sturdy enough that there would be minimal possibility of breakage when the winner transported it home.
Enough like a normal cake in appearance that people would recognize it as such when walking by the raffle table.
Appealing enough to the average two-to-four-year-old that he or she could be counted upon to pester his or her parents into purchasing raffle tickets for it.
Appealing enough to the average parent of a two-to-four-year-old that he or she would be willing, with some childish prompting, to spend a few bucks for a raffle ticket for a good cause.
Appealing enough to me that I wouldn't get bored making it.
Collectively, these represent waaaay more constraints than I have ever had placed on one of my cakes before. Prior to this, my biggest restriction was when my sister and I made a cake for our friends' wedding and they said that, ideally, it probably shouldn't bleed, explode, or catch fire.

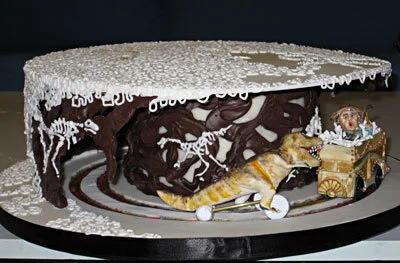
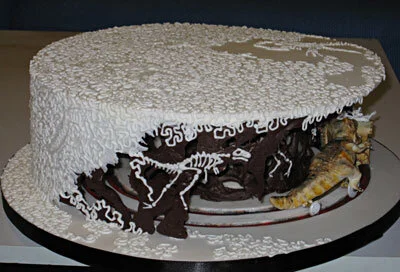
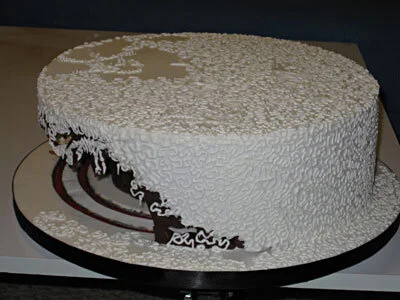
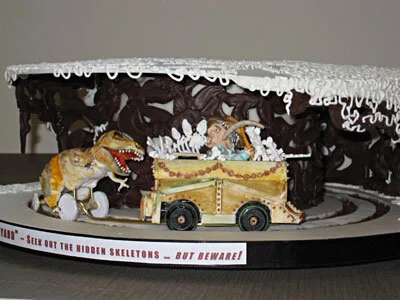
So I had a bit of a challenge developing an initial concept, but ultimately I came up with a solution that I think fulfilled all the requirements. Viewed from one angle it would appear to be an ordinary 12" round cake, covered with white fondant, delicately decorated with cornelli lace, so as to appeal to people who like their cake to look like cake. From the other side, however, the fondant would be cut away to reveal a subterranean tunnel with a train going around and around, so as to appeal to the toddler set. The train would be pursued by a ravenous dinosaur, so as to appeal to me.

I think I can best explain the process of construction by breaking it up into its component elements.
The train:
The first thing I needed was a way to make the train go. I figured the easiest thing to do would be to get some kind of battery operated car toy and build my train around it, so I went to Toys R Us. Mind you, I detest Toys R Us, for various reasons that I needn't go into here, but I was in a hurry and it was my best option for a quick solution. The toy I selected was a battery operated Thomas the Tank Engine, which turned out to be delightfully easy to decapitate, leaving me essentially with a AA battery on wheels.
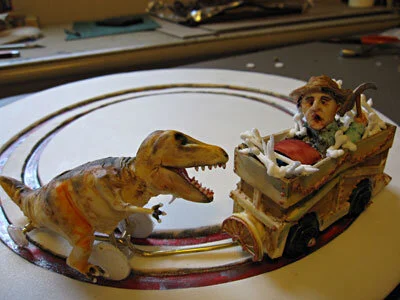
In keeping with the subterranean / archeological theme of the cake, I found a photo of an old-timey mining cart to work from. First I encased the body of the train in a box made of flat gum paste pieces, with semicircles cut out to accommodate the wheels, then I added additional gum paste wooden slats. I used one of the semicircular cut off pieces from the wheels to cover the little magnetic hookup that toy train cars have on the back. I also made a cow catcher for the front. Because of all those cows that archaeologists encounter in underground caves.
I wanted to cover the wheels (which were bright green) with gum paste to make them more rustic and less plastic looking, but every time I tried, the wheels came out too big for the track (more on that later) so I wound up just painting the green wheels with black food coloring.

To get some human interest into my tableau, I wanted to put a little gum paste archaeologist in the train car. After all, no self-respecting dinosaur would be chasing an empty train car - a T-Rex in particular would need the prospect of juicy meat to get him moving. I tried to make my archaeologist look really terrified, with a gaping mouth and wide, staring eyes, looking over his shoulder at his dreadful pursuer. I also couldn't resist making him a little Indiana-Jones-style hat and a pickaxe. The train had a big button on top to start and stop it. At first, my plan was to put my little man directly on top of that button so that you had to push on his head to make the train go, but then I realized that was just too risky to be worth it - who wants to see a man with a smooshed head being chased by a dinosaur? So I moved him to right in front of the button and left the button alone. I'm glad I did because by the time I was done some crumbs or something must have fallen into the mechanism because the button got a bit temperamental.
I then put a coat of paint on everything, using paste food colors thinned with vodka. It has recently been pointed out to me that using vodka to paint things intended for children might not be 100% ok, which had never occurred to me. I choose to assume that the majority of the alcohol evaporates away and that what's left is so minimal as to make no difference. Certainly my niece has shown no ill effects from the last three birthday cakes that I've made for her.
With my base coat in place, I was ready to add fine details. I made some royal icing chains and rivets. I also added some royal icing dinosaur bones around my archaeologist, and threw in some oreo cookie crumb dirt for good measure. I used some more vodka (Woo hoo! Par-ty!) with bronze luster dust to make the chains look metallic.
The track:
Now I had an operational train, but a train doesn't do anyone any good unless it goes where you want it to go. So I needed a track. It took me five or six cardboard mockups before I got one where the tracks were the right width and the right distance apart and correctly positioned within the circle of the cake. Once I had a functional mockup that worked with my little toy train, I covered a foamcore circle with a 1/4" thick layer of white fondant and used my mockup as a template to carve the fondant away to create the two concentric circles of the track. With the fondant cut away, I needed to do something to cover the foam core revealed underneath. After a few experiments, I settled on painting the revealed foam core base red (which frankly would have been a lot easier to do had it occurred to me to paint it red before I covered it with fondant). Because I didn't do the world's best job of this, I dusted the track with a lot of brown and black powdered food coloring and silver luster dust to try to conceal my mistakes.

The dinosaur:
A little train by itself might be interesting enough for pre-schoolers, but I have loftier aspirations. To keep my interest, the cake needed a monster. And it had to be Big! Fierce! Mean! Prehistoric! RAAAWR! I settled on T-Rex.
Step 1 - find internet photos. Of course, the internet crazies have conflicting opinions on what T-Rex looked like, so I just picked the skin texture and color scheme that seemed the most appealing to me.
I made two gum paste bodies, because I wasn't sure quite what size I wanted. I wound up using the bigger one. By letting the gum paste dry for a few minutes, so that it developed a bit of a dry shell, and then bending the body a little I was able to create a delightful wrinkly skin texture.

In order for the dinosaur to chase the train, it of course needed to be on wheels. My first idea was to use the wheels from a tiny little toy skateboard. This didn't work at all. For one thing, toy skateboard wheels turn out to be very flimsy and not very well aligned. I know this is a shock, considering that I bought it for $3.95 at Target. For another thing, toy skateboard wheels are extremely small, on the order of 1/8" in diameter. Since my layer of fondant between the two track circles was on the order of 1/4" thick, I clearly had a problem. I tried to salvage my skateboard wheel solution by cutting larger plastic circles and gluing them to the existing skateboard wheels. Then I realized that this was a stupid idea and I should just make the wheels from scratch.
I cut two new sets of plastic wheels, larger for the front, smaller for the back and put hot glue rims on them so as to give them the requisite traction. For the axles I used brass tubing, encased in slightly larger diameter brass tubing to allow it to rotate freely. I attached these to the body of the dinosaur by using royal icing and by cramming brass tubing up into the body.

I tried to mask the wheels a little when I added the gum paste legs, but since I was simultaneously trying to position the legs as if T-Rex was in a full-out run, and since I was trying to conceal four wheels with two legs, I wasn't very successful. I chose a nice muted ochre and brown color scheme, with some purple and green details, again using vodka and paste food colors for paint. Once that dried, I used royal icing to make little teeth and claws. I of course couldn't resist adding a bit of food coloring blood to the tips.
The hookup:
I now had a train on wheels and a dinosaur on wheels but in order to make the dinosaur chase the train I needed to connect the dinosaur to the train. I cut and bent a piece of brass tubing into the correct curve. Gluing it to the dinosaur was easy. Gluing it to the train was exceedingly difficult. First I tried hot glue. Then I tried Superglue. Then I tried hobby cement. Then I tried epoxy. As it turns out, for some inexplicable reason, none of these things stick to the underbody of Thomas the Tank Engine, even after he's been roughed up with a flat file. Eventually I resorted to the king of household glues - Gorilla Glue. Because Gorilla Glue expands as it dries, I was terrified that it would push everything completely out of alignment, but it actually worked.
The tunnel:
With my train and dinosaur set, I needed a tunnel for them to run through. My original plan was to create a nice rocky texture by making a mold in the shape I wanted the tunnel to be, lining it with plastic produce bags (because they release easily from chocolate), filling it with crushed ice, and then pouring tempered chocolate over it. In my imagination, this technique created a beautiful organic texture. In reality, it created absolutely nothing of value because the chocolate set up before it got beyond the first layer of ice. I went to plan B.
Plan B involved making two concentric tubes of chocolate with holes in them to form the inner and outer walls of the tunnel. One would be 6" in diameter, to fit around the 6" round cake that would be in the middle of my creation. The other would be 12" in diameter, leaving a 3" tunnel for the train to pass through.
At first I envisioned creating these tubes by spreading chocolate over bubble wrap (which also releases easily from chocolate), cutting it into appropriate rectangles, and then wrapping the rectangles around cake tins of the appropriate diameter, all while the chocolate was set up enough to cut accurately but malleable enough to wrap around the cylinder. This didn't work either. By the time the chocolate set up enough to cut it was too firm to wrap, so it just cracked when I tried to bend it into the right curve. I was also having problems getting my chocolate in good temper, so it wasn't setting as firmly as I would have liked. Normally I would blame problems like this on my own relatively limited experience working with chocolate. In this case though I'm more inclined to blame the problem on the chocolate itself because, at the same time as I was making this cake, I was also making chocolates to raffle off at the event, and I was having spectacular success tempering chocolate bars that had been sitting in our cabinets for so long that they were essentially just big slabs of chalky blooms. For the cake, though, I was using a new bag of chocolate medallions from my local cake supply store and I couldn't get them in temper to save my life. So I choose to blame the chocolate.
My third plan was to wrap the 6" and 12" cake pans in tin foil and them pipe tempered chocolate onto them in an abstract pattern. Due to my issues with getting my chocolate in temper I was concerned with the stability of the structure and I thought that I might get it to be sturdier and set up faster by mixing in a little corn syrup. This is a technique that I used to good effect when I made the shrunken head truffles, but in this application it just seemed to make the chocolate more brittle. So the technique that I finally ended up with was putting the tin foil wrapped cake tins in the freezer and piping the (sort of) tempered chocolate onto the cold foil in an abstract pattern with lots of open space. This helped the chocolate to firm up quickly when it touched the cold foil so that it wouldn't drip down the sides of the cake pan.
Third time's a charm. This time my plan more or less worked, although I still wasn't happy with the temper of my chocolate and my finished pieces broke in a few places when I unmolded them from the tin foil. But I figured it was nothing I couldn't repair when I put it in place around the cake.
The cake:
The cake itself is actually the most boring part of this story. All I needed was a 6" round cake. I tried a new recipe for chocolate cake, but when I went to torte it I realized that it wasn't baked all the way through, so I had to make an emergency backup cake. Since I didn't have any more cocoa powder I went with a white cake, which turned out fine. I torted and filled that one with buttercream icing. My sister took the incompletely baked cake, carved a hole out of the center to remove the uncooked part, put some ice cream in the middle, and took it to a friend's birthday party so it wasn't a total loss.
The facade:
To make my 6" cake surrounded by chocolate cylinders look like a 12" cake with a chocolate tunnel inside, I premade two pieces of white fondant. One was a simple 12" circle to cover the top of the cake and tunnel. The other piece was to go part way around the perimeter of the cake, but it also had to appear to be cut away so as to reveal the tunnel inside. I rolled out a piece of fondant, then cut it into a sort of ragged trapezoid. I used a ball tool to thin out the rough edges then draped the whole piece over the side of a 12" cake pan to get the right curve. To make sure that these pieces were dry enough to maintain their rigidity I made them a week in advance.

Putting it all together:
With all my components pre-made it was a simple matter to place my 6" round cake in the center of my train track and piece together my chocolate tunnel around it. For some reason my 6" round chocolate cylinder was bigger than I needed it to be, but the fact that it was poorly tempered meant that it was easy to cut a slice off to adjust.
Chocolate tunnel in place, I stuck my fondant circle on top and my curved fondant piece around the edge with some royal icing. I was a bit concerned about the top fondant circle drooping, as a large section of it was unsupported. My concerns were not wholly unfounded, as close examination of the finished cake does uncover some definite unintended curvature to the top of the cake, but as it didn't seem to pose a risk of structural cake failure I didn't let myself get unduly concerned.

In order to integrate the dinosaur with the cake, I incorporated subtle dinosaur skeletons into the cornelli lace that I piped onto the fondant. I used a #2 tip because I was too lazy to use a #1 tip. I also put a couple of dinosaur skeletons onto the inner wall of the chocolate tunnel.
When we set the cake up at the fundraiser, we tried to position it such that children would be able to see it easily, but not grab the train. For the most part, we succeeded. Only at one point during the party did I have to shoo away a toddler who was trying to snatch the dinosaur. The cake was ultimately won in the raffle by one of the kids from my niece's preschool. I hope that he and his family enjoyed it.
Demolition Cake
The Demolition cake was created for my truck-obsessed niece’s third birthday party.
The Demolition cake was created for my truck-obsessed niece's third birthday party.
Most people would tell you that a 3-year-old's birthday party is likely to involve quite enough carnage and demolition without any help from the cake. I am not one of those people, especially since my 3-year-old niece Alex is extremely passionate about demolition, construction, and more or less anything that involves big machines.
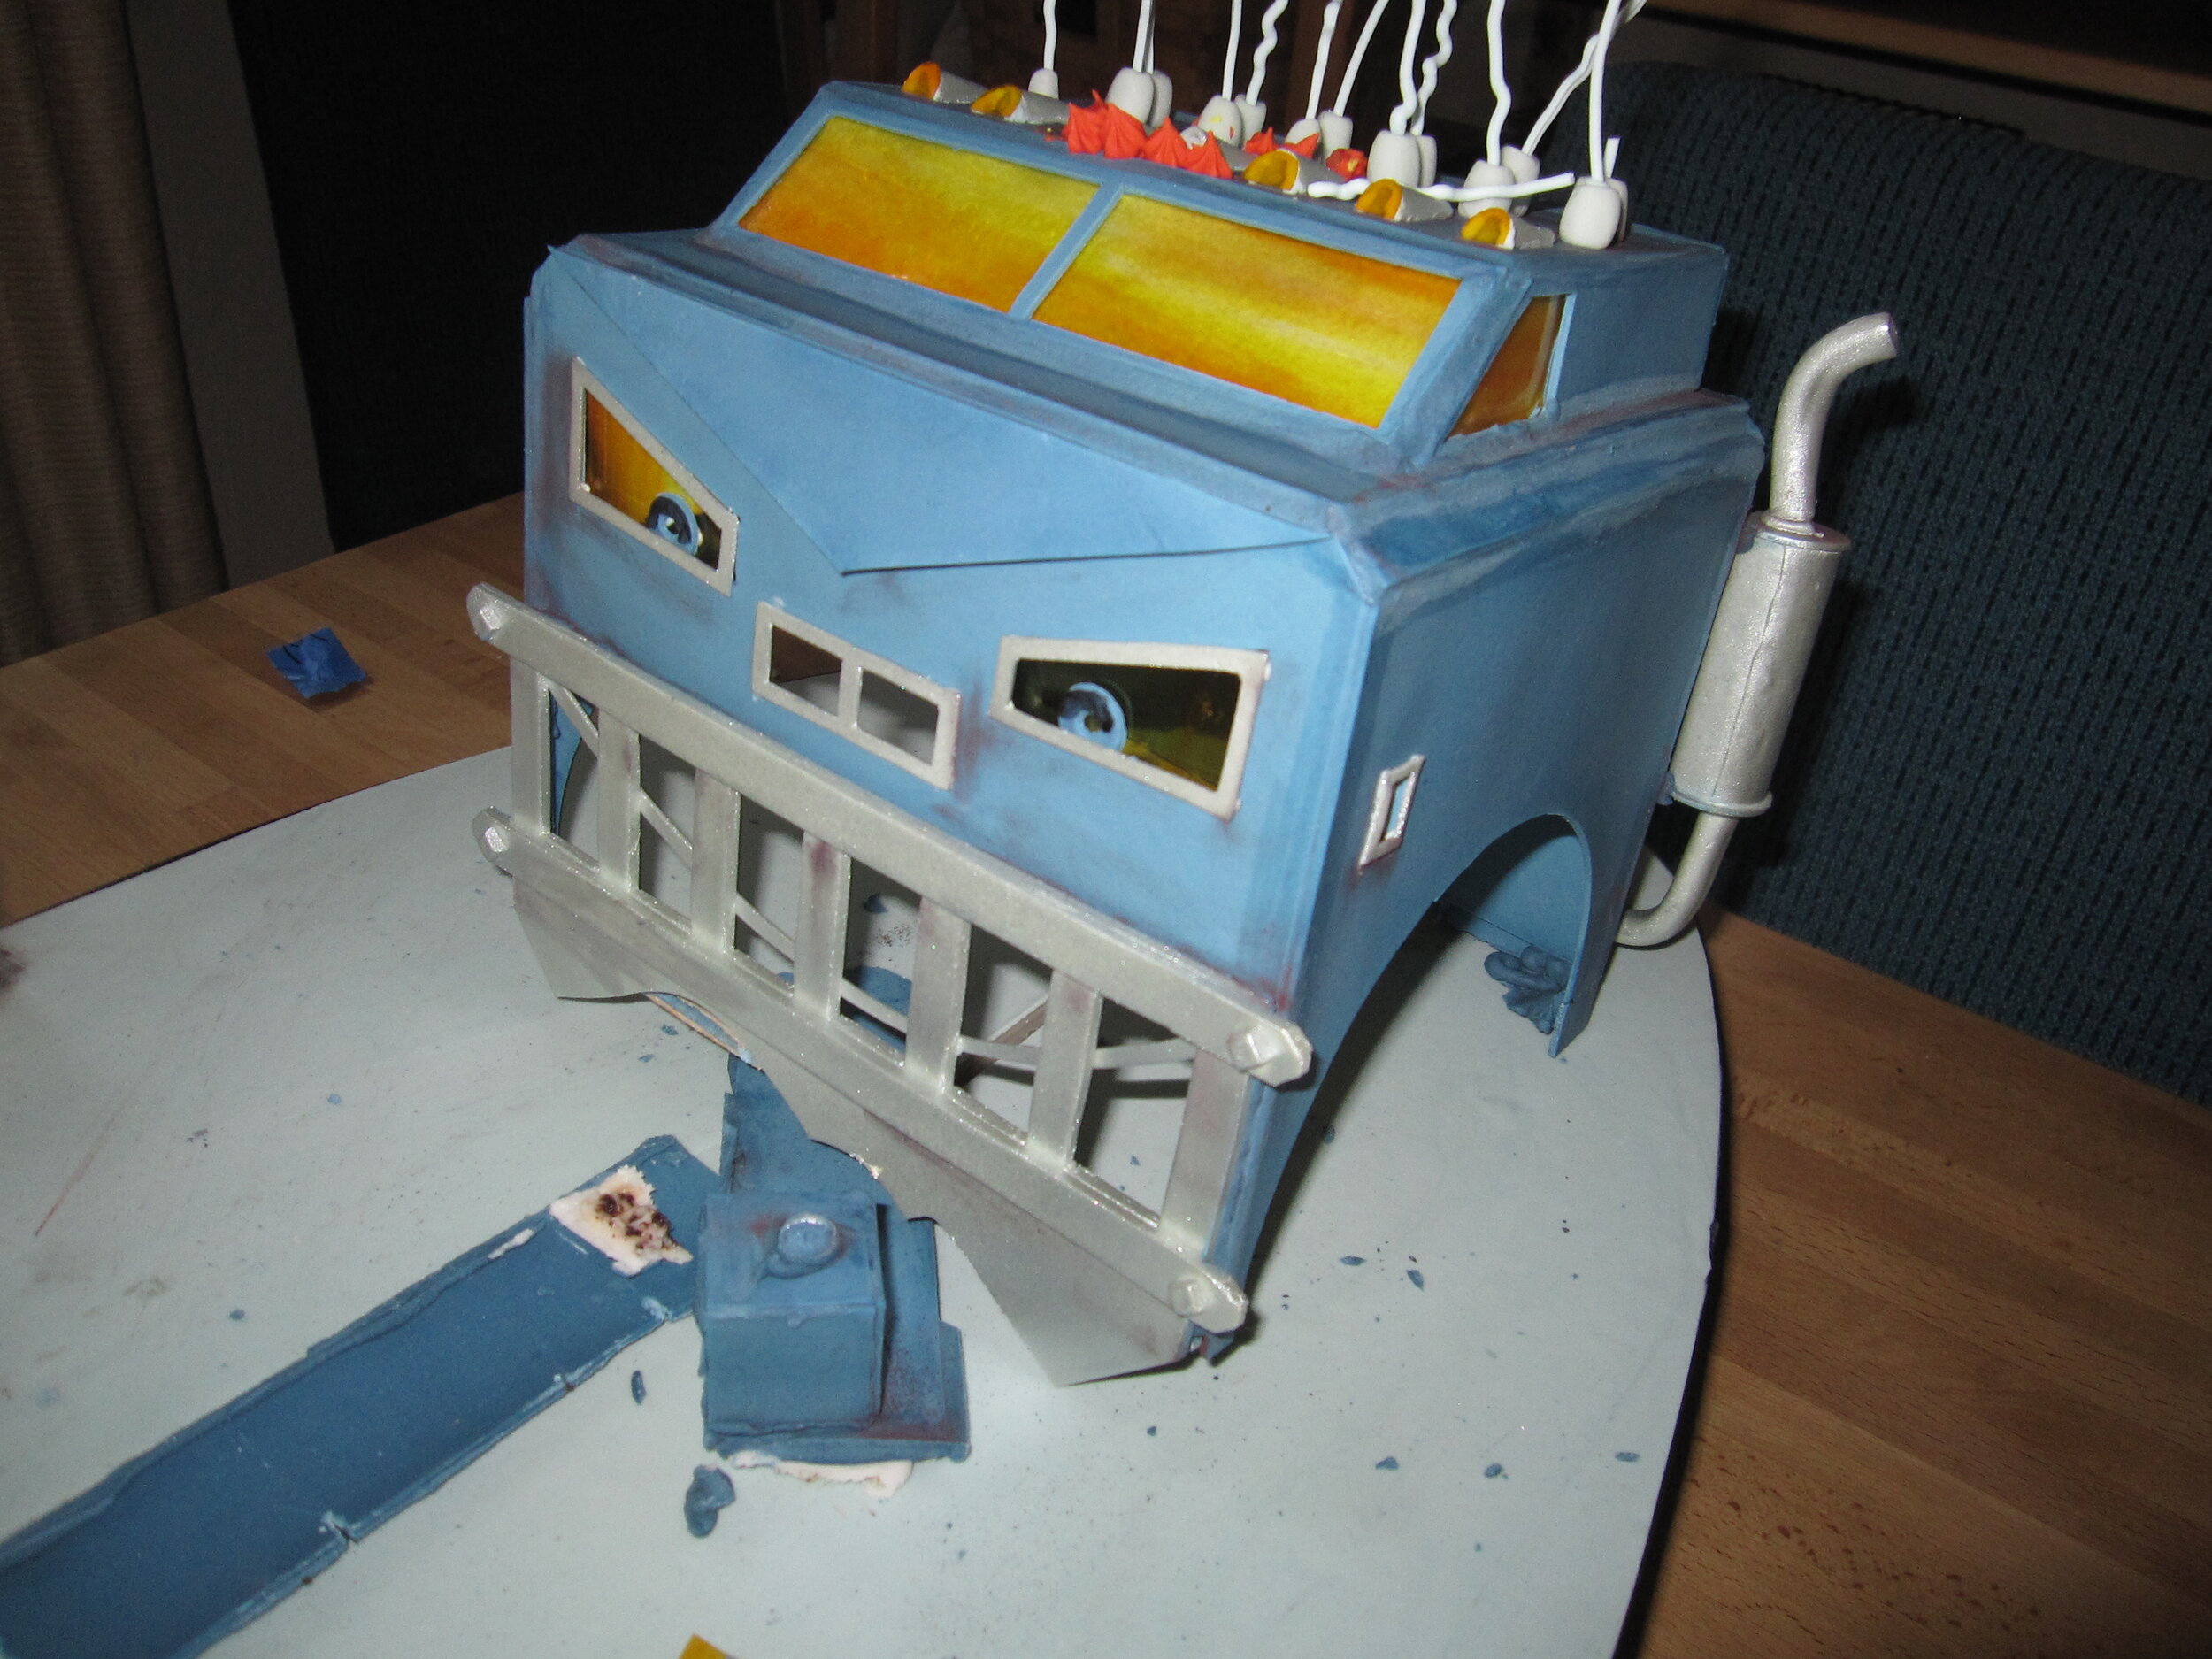
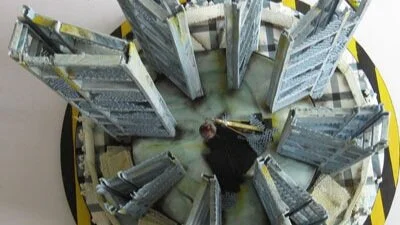
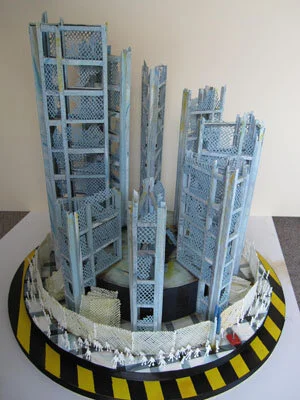
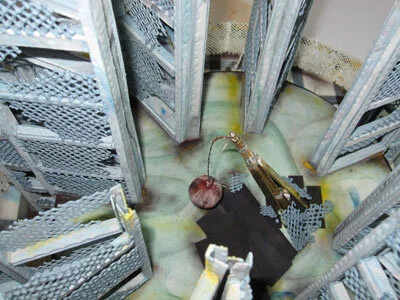
So I thought that a wrecking-ball cake would be ideal for her demolition-themed birthday party (if that isn't bowing to the inevitable, I don't know what is.) Of course, a wrecking ball cake that didn't actually wreck anything would be utterly pointless, so my first step was to come up with a good, working wrecking ball mechanism. I was concerned that if I made a wrecking ball that simply sat next to the cake that it was intended to wreck, the composition wouldn't be unified enough. I also didn't want to have to make an entire crane to support the wrecking ball. So I came up with a plan where a wrecking ball would rise up out of a circular cake and spin around in a complete circle, knocking down a series of gum paste buildings around the perimeter. This concept was also nicely in keeping with my series of self-destroying cakes, previous examples of which include the Melting Head Cake, the Fountain Cake, and the Self-Digging Cake for Alex's second birthday.

The wrecking ball mechanism consisted of a brass tube attached to a hobby motor, which spun inside another, larger-diameter brass tube. The hobby motor was encased inside a piece of PVC tubing, so that the cake (with a pre-cut hole in the middle) could just be slipped around it. The spinning tube had a hole drilled in the tip, to which I could tie a little piece of wire, the other end of which would ultimately be attached to the wrecking ball.

I went through a few iterations of wrecking ball tests. My first plan was to make the wrecking ball out of hard candy, embedding the wire in it when I poured the sugar. They turned out OK, but then I got worried that the sugar ball might shatter when it hit the cake and I also bought a silicon sphere mold that resulted in sugar spheres that were altogether too big and heavy for the power of the motor. My next idea was to make the wrecking ball out of marshmallow, on the theory that marshmallow would be tough enough to break the cake but spongy enough not to shatter. This turned out not to work at all, as homemade marshmallows are significantly poofier than commercial marshmallows and couldn't wreck their way out of a wet paper bag. Proving that old axiom that the third time is the charm, my third idea was modeling chocolate. This way I could roll balls of modeling chocolate to whatever size I desired, then punch holes through the center to attach the wire. This worked well, except that on my first try I only ran one wire through the middle of the modeling chocolate ball, and when I turned the wrecking ball on the wire just sliced right through the chocolate and the ball went flying. I found out, however, that if I distributed the wires at four points around the ball the centrifugal forces were dispersed enough that the ball stayed intact. I also covered the ball with a layer of royal icing and a dusting of powdered colors to make it look more iron-like.

With wrecking ball methodology ascertained, the next step was creating and decorating the cake base. The bottom of the base was a simple plywood circle, but I also needed to layer some foamcore on top of that to hide the battery, wires, and switch for the wrecking ball. To get a little color into what promised to be an otherwise fairly drab-colored cake, I painted yellow and black caution tape stripes on the plywood. I then put a smaller circle of foam core over top of this, with appropriate holes for the battery and such, and covered that with a tiled pattern of marbled fondant. Actually, I did this twice because I didn't like my haphazard arrangement of shades of grey the first time around, so I tore it up and redid it with a much more careful pattern.
Now having a base for my cake, I set about making the sides and top. For the top of the cake, I made a circle of marbled fondant with a pre-cut hole in it for the wrecking ball. By letting this dry for a week, I wound up with a nice rigid circle that would give me a much cleaner, more architectural finished cake than I would get by covering the cake with soft fondant after it was baked. This resulted in me making the interesting discovery that blue food coloring turns green when exposed to sunlight. Fortunately, it still looked OK with the rest of my cake color scheme (at least it was a cool, grayish-green) but hopefully this can help prevent potential problems in the future. For the sides of the cake I made a series of very dark blue and purple gum paste rectangles, which looked fine, but, due to the massive quantity of food coloring involved, tasted revolting. Perhaps next time I should start with chocolate fondant.
Now all I needed was something for the ball to wreck. In order to get something that would shatter nicely, I opted for skeletal buildings made of gum paste, rather than trying to smash through actual cake. I still wonder if that was a bit of a cop-out. I made a series of eight skeletal framework buildings of increasing height. I calculated that, in total, they required just over 300 feet of gum paste strips. It was a bit of a time-consuming process because I first had to roll out the gum paste, then cut it into strips and use a bit of brass tubing to create a riveted texture. Once the gum paste dried, I could cut it to the appropriate length, and then stick three pieces of each length together with royal icing to made "U-beams". (I thought about making I-beams, but decided that would be more difficult and wouldn't look as good.) After the U-beam royal icing dried, I used more royal icing to put the pieces together into each of the three sides of each of the eight buildings. I then had to wait for that to dry again before I could stick the three sides of each building together. In other words, I spent about two weeks every day after work hunched over my table sticking tiny grey bits of gum paste to other tiny grey bits of gum paste. Whee!
Once the buildings were done, I had to make the expanded steel (by which I mean royal icing) inserts to go between the gum paste girders. Fortunately, this went a lot faster than the gum paste project, even considering that I was also piping lots of royal icing chain link fence that was ultimately destined to go around the perimeter of the cake. I used a #2 and a #1 piping tip, so my hand did get a little sore, but that's to be expected.
Once the royal icing was dry, I just peeled it off the wax paper and stuck it into the holes of the gum paste buildings with a little more royal icing.
At this point it seemed that I really should make some actual cake to include in my cake. This was probably the easiest actual cake I've ever made, since I actually wanted it to be round, which just so happens to be the shape of normal cake pans. So, for once, no cake carving, no giant pile of gooey cake scraps, just some torting and filling, and making sure that I would up with a cake the correct height to fit with the premade buildings. I did have to cut a carefully angled hole in it to accommodate the wrecking ball mechanism, but compared to my usual practice of carving cakes into the shapes of rats and human heads and such, it was quite easy.

With the cake in place around the wrecking ball, it was very quick work to slap my pre-made top and sides on and place my eight building around the perimeter. I also flung some edible glitter on the sides to give it a little more sparkle.
From there it was a simple matter of placing the fence pieces, and strewing a few broken bits of girders and such about to give it more of that "in the process of demolition" feel. In retrospect, it might have made a stronger artistic statement if I had started with a complete building and wrecked that, rather than starting with an already wrecked building and simply wrecking it more.

At this point it occurred to me that, as I was making this cake for a three-year-old's birthday party, it might be a good idea to incorporate some birthday candles into the design. Considering that they were a complete afterthought, I thought they turned out rather well. I encased the three candles in various heights of leftover gum paste girders and stuck them to the chain link fence, right behind the switch that turned on the wrecking ball.
To bring the whole composition together, I added some black food coloring shadows into the seams between the buildings and the cake itself and I added some bright yellow highlights to the buildings, which picked up the yellow paint on the bottom base.

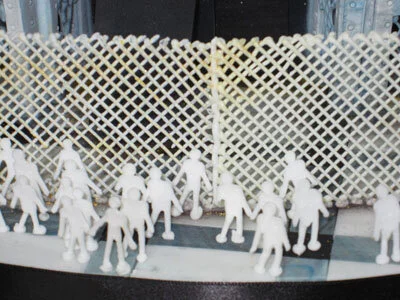
The finishing touch - little royal icing people watching from outside the fence. I like to make my sugar crowds along the same lines that I make my scale figures when I draw set sketches for the plays I design, keeping the people blank, white, and anonymous so as not to distract attention from the scenery or the cake which is the true focal point of the piece. In cake form, this tends to give my crowds a bit of a zombie-horde feel, which, as you can probably guess, I really enjoy.

The presentation of the cake at the party went quite well. Alex was excited about tuning on the switch, but she's sort of a cautious kid, so she also kept turning it off and her friend Noah would turn it back on. So the destruction proceeded a bit in fits and starts, but eventually the ball reached full speed and full destructive capability. I wish I had made the wire on the wrecking ball just a tad longer, because I think it would have made the destruction more impressive, but all in all I was extremely pleased. And Alex looked delightfully like an angelic little blond Godzilla gnawing on the broken girders.

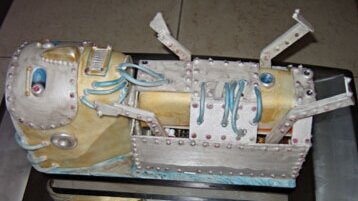
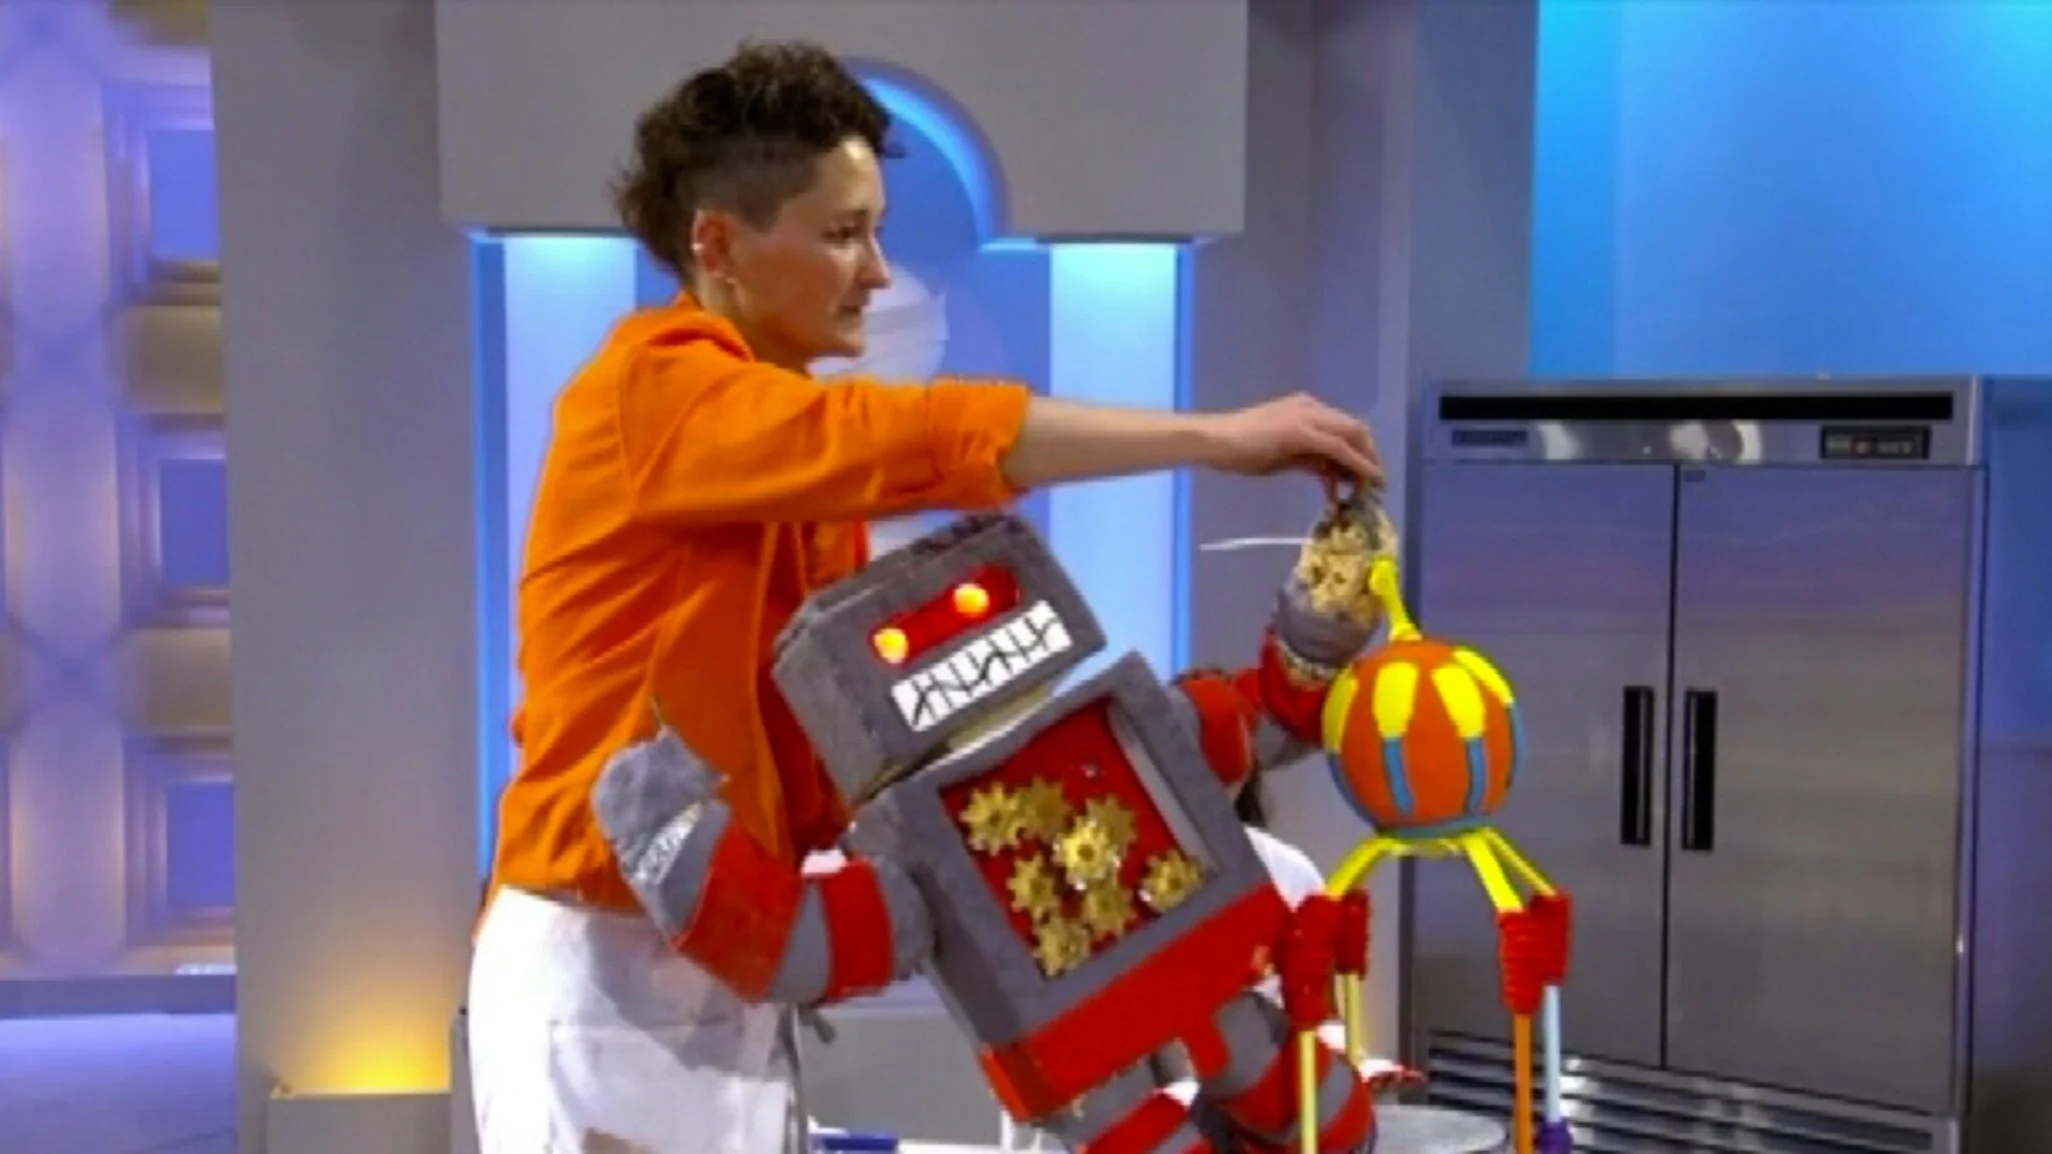
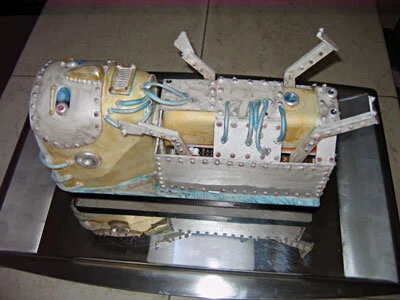
Robot Baby Cake
I made this creepy robot baby cake for my little friend Isaac's second birthday party. Nobody requested this, I came up with this one on my own.
I made this creepy robot baby cake for my little friend Isaac's second birthday party. Nobody requested this, I came up with this one on my own.
My little friend Isaac has a room entirely decorated with space robots(plus the giant stuffed spider I made him when he was born, which sort of fits in with the decor if you assume it's a giant stuffed SPACE spider.)His wall is covered with framed robot pictures, intermingled with illustrations from children's books about space travel from the 1950's; the hooks on his door are made of wooden stacking robot toys; and the wall over his crib reads "Blast Off!" His mom even turned his diaper pail into DiaperBot! He lives to serve humanity and devour and vaporize our dirty diapers. At least until he rebels against his human masters and destroys us all. And after a few months of eating diapers, who can blame him?
So when it came time to make Isaac's second birthday cake, what could be more appropriate than a robot cake? And naturally a robot cake ought to do more than lie there like a pile of hardware. It ought to do something. But what? Unfortunately I don't know anything at all about robotics, in spite of having taking a brief Kinetic Art class, in which we made a vibrating spider out of a motor, a paper clip, and an Altoids tin. So I turned where everyone turns when they need robot construction kits - the internet. I purchased two - one for a line-following snail robot and one for a sound-activated walking robot (clap once, it starts walking; clap again, it stops walking.)

As it turns out, robot kits supplied by the internet are really lame. First of all, they teach you absolutely nothing about robotics. The circuit boards are pre-assembled, so all the "assembly" that I got to do involved zip-ties and plastic pop-rivets. Not really very educational. Also, the snail robot couldn't carry even so much as a cupcake, so it was essentially useless to me. The walking robot, however, had more potential. It clearly wasn't strong enough to make the entire cake walk (which would have been cool) but, by laying the robot on its back I was able to achieve a nice kicking and flailing motion. "Aha!" I said to myself, "I can make that look like a newborn baby robot, lying on its back and kicking its adorable little aluminum arms and legs!" Some of you might be tempted to argue that a newborn baby robot cake might be more appropriate for a party for, say, a newborn baby, as opposed to a party for a two-year-old. Well, you're right, but I didn't have time to learn how to make a toddling robot, so a newborn baby robot was really my only choice.
First I created a dowel framework that would support the body of the robot while leaving the legs free to flail. Then I rolled out a big sheet of gum paste, to be cut into the various metal plates. Once the gum paste dried enough to be rigid, but not enough to make it impossible to cut, I cut out arms, legs, hands, and feet and attached them to the robot's little legs with a bit of royal icing.

My sister (ably assisted by her two-year-old daughter) kindly baked the cake for me. I started out with two 9" square cakes, which I cut up and reassembled into a small body section, to be mounted on top of the robot base, and a head, to sit adjacent to the robotic body. I covered both of these with a layer of fondant (which actually took a couple of tries - the first time out I made both the body and the head too big, so I had to peel the fondant off, re-carve the cakes, and recover them) and mounted them in the appropriate places on the cake board.
In order to hide at least the majority of the plastic robot mechanism, I cut rectangles of gum paste and assembled them around the cake and the base of the robot. I wish that I had thought to make the body of the robot more human and anatomical because then I could have made it kind of a Matrix-style cyborg-y baby trapped in a metal cocoon, but I didn't think of that until it was too late. I also made a face plate and mouth plate to put on the head, along with a little pair of circular ears.
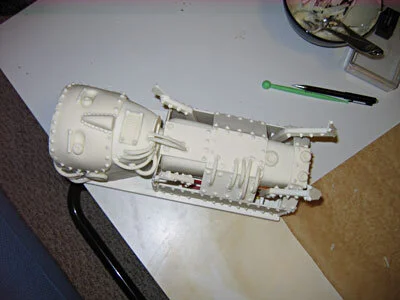
At this point, it was about 1:00 in the morning on the day of the party (I got a really late start on this cake - sorry, Isaac!), so I was really rushing to add all the additional details. As a result, I was unfortunately unable to put as much care and detail in as I would have liked, and I also didn't have time to let the gum paste tubing dry sufficiently so it turned out pretty wilted. The cake did end up with an interesting steam punk vibe about it though, with all the royal icing rivets. I confess that I couldn't resist adding a little gum paste belly button rivet and two subtle little gum paste testicles. Evidently no one noticed, because no one at the party commented on it, which is probably just as well, since it was a pretty juvenile thing to do.
In retrospect, maybe I should have left the cake white rather than painting it, because it looked a lot cleaner unpainted, but I suppose that might have made it seem unfinished. I was going to paint the entire thing silver, but I didn't have enough silver luster dust (I was using luster duster dissolved in gin, because I didn't have any vodka [alcohol works better than water because it dries faster due to the alcohol content.] If you're thinking I was totally unprepared for this cake project, you're right - sorry again, Isaac.) So I painted the outer plates silver and the inner "skin" areas gold. It still looked a little too monochromatic, so I added some shiny blue and red accents.
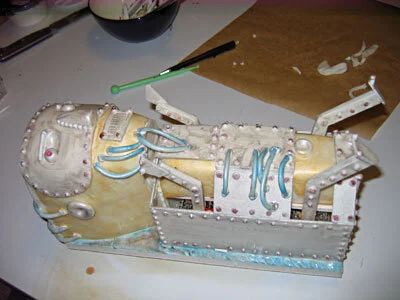
At this point I realized that my cake seemed to be leaking brown sugary goo. I had refrigerated and thawed the cakes a few times over the course of the day, because cold cakes are firmer for carving and fondant smoothing. As I said earlier, I messed up the fondant covering, so there were several trips in and out of the refrigerator. Apparently in my refrigerator this generates humidity or something and breaks down the icing enough to cause the cake to leak, slowly but continuously. Well, now I know not to do that again. Fortunately, in this case, it wasn't that bad. The leakage didn't get anywhere near the electronics, so it didn't interfere with the robot's functionality. In fact, the little trickle emerging from the corner of the head looked like an oil leak, so it basically worked with the overall concept.
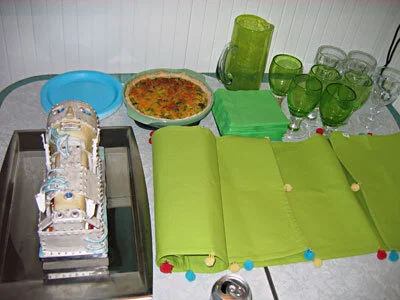
The cake was a hit at the party, especially with my 2-and-a-half-year-old niece, who enjoyed clapping it on and off. Later in the party, she inadvertently turned the cake on by shrieking in rage that she was not permitted to play with the birthday boy's new toys (because the birthday boy was currently playing with them himself.) I think we all know what that frustration feels like. We left the party early.