
Cars Pit Crew Cake
My little friend Isaac really likes the pit crews from Cars. Fortunately, if there is one thing I’m good at, it’s making anthropomorphic vehicles out of gum paste.
My little friend Isaac really likes the pit crews from Cars. Fortunately, if there is one thing I’m good at, it’s making anthropomorphic vehicles out of gum paste. Over the years, I’ve had a lot of experience.

Because I also like to build automata, I decided to make the pit crew dance.
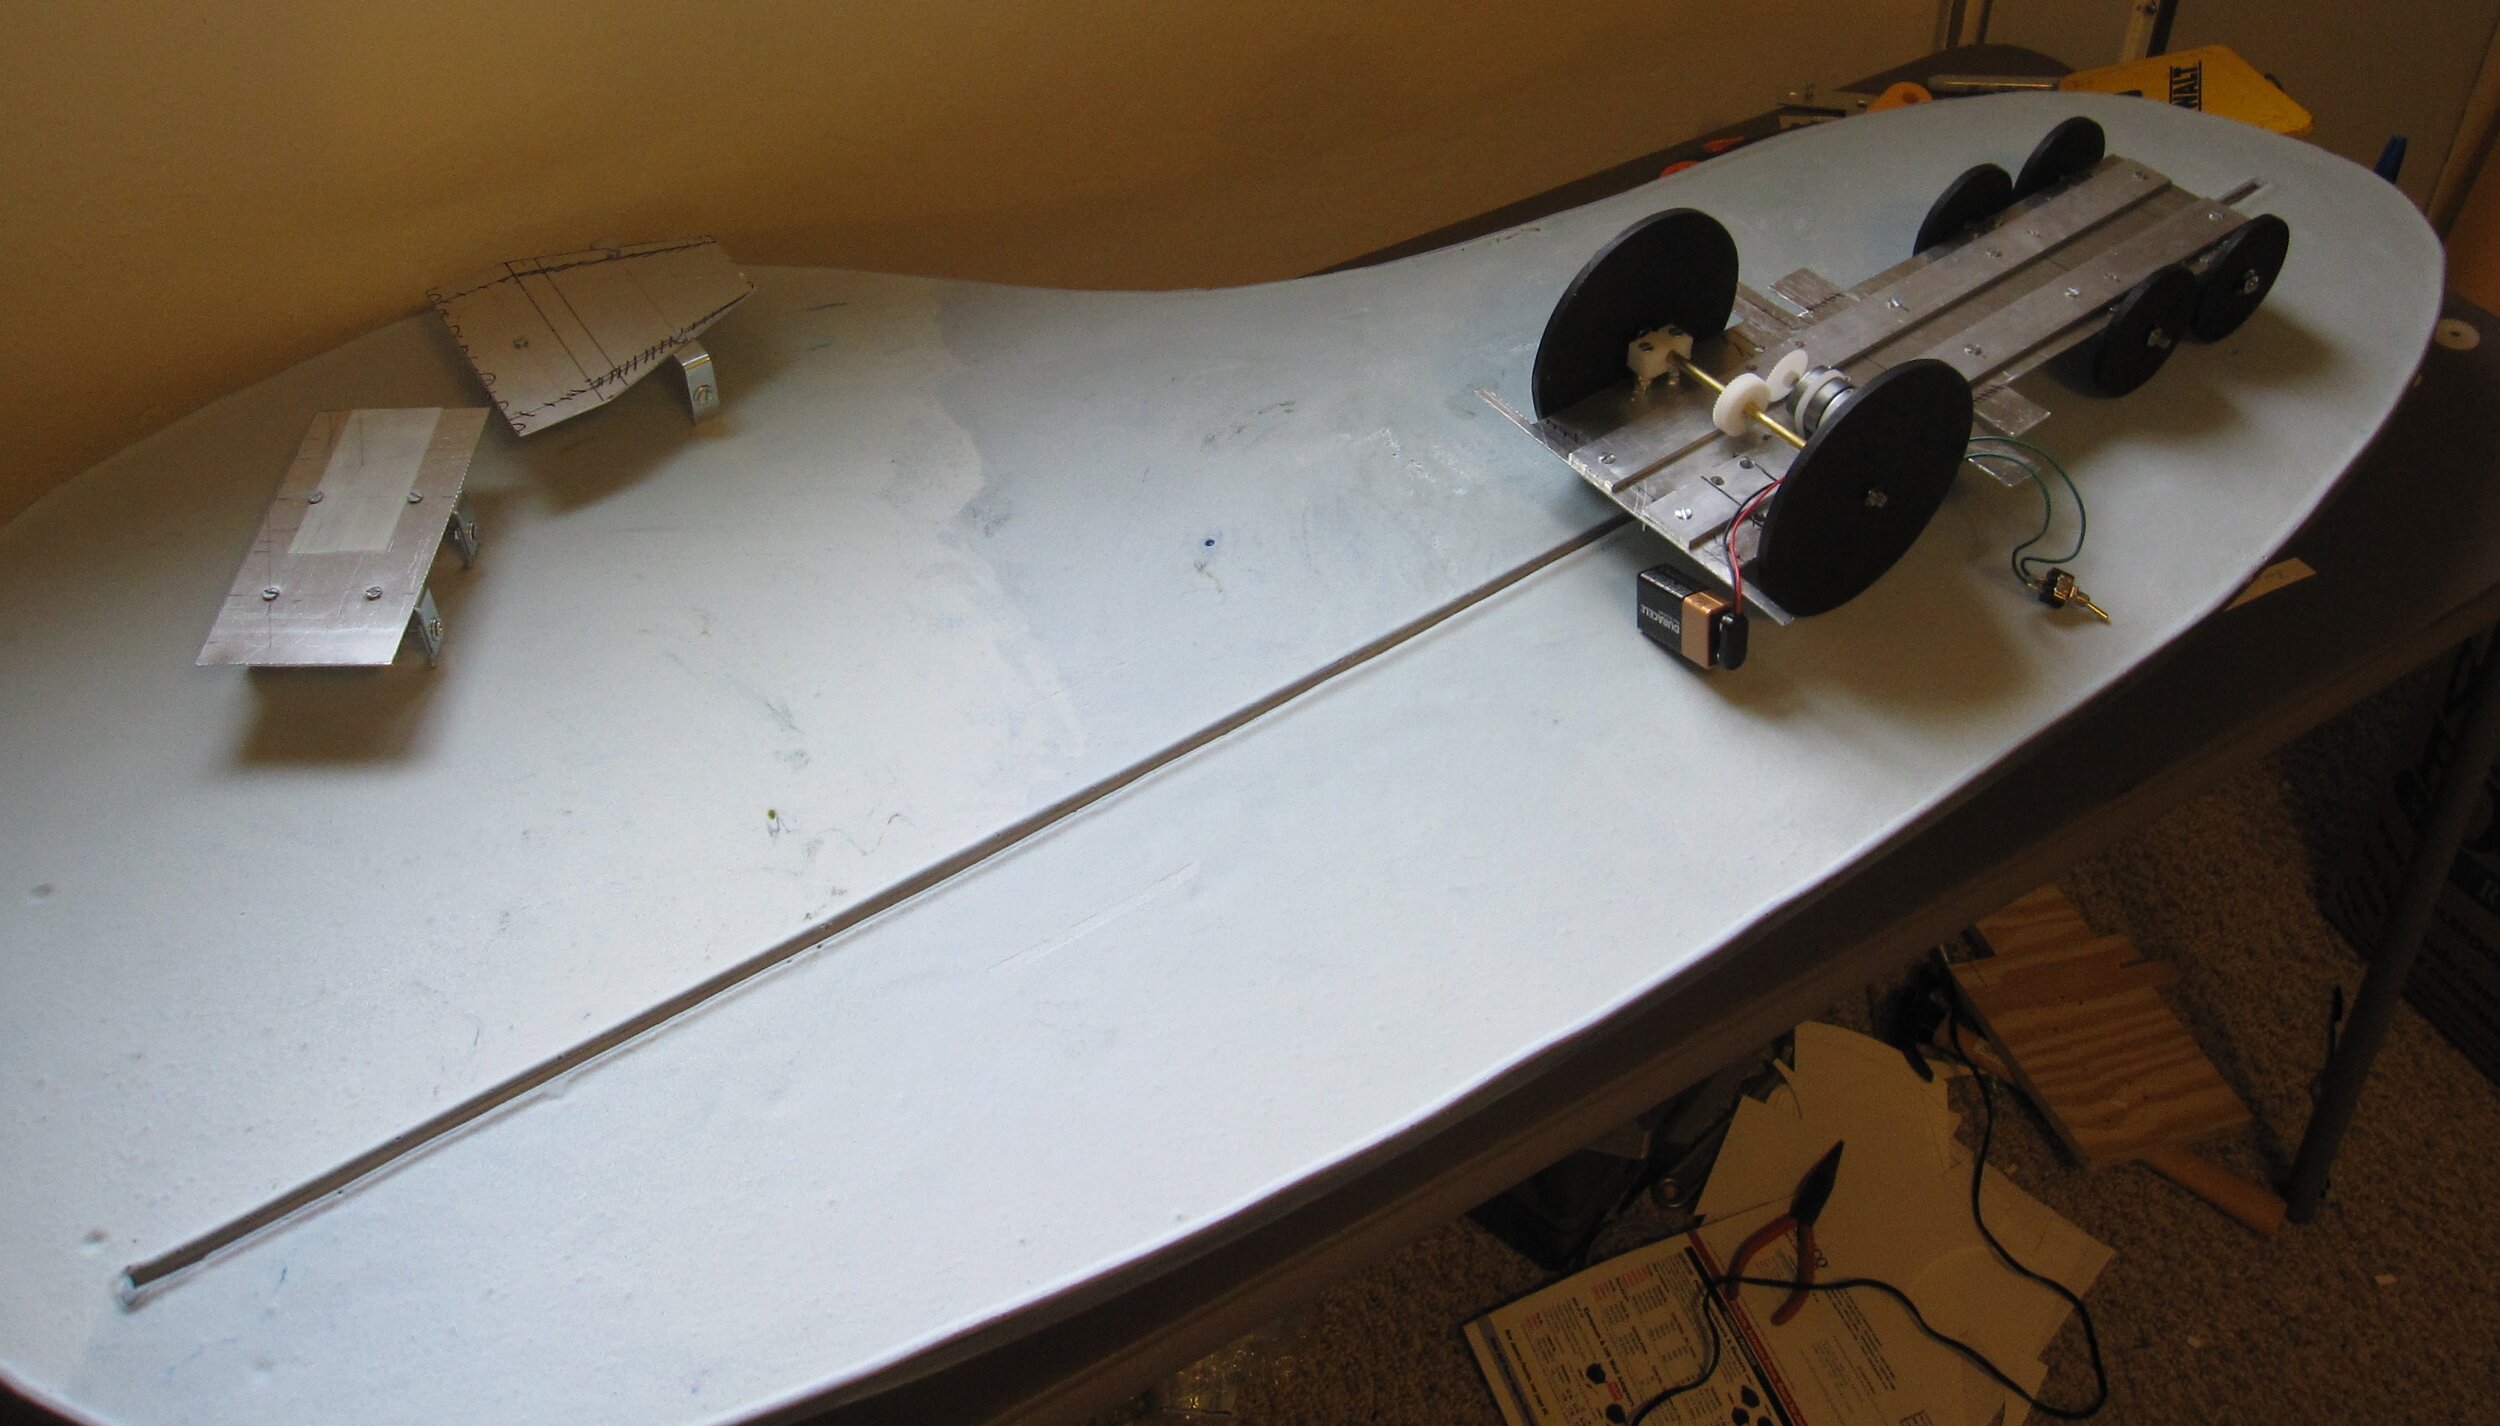
I really wanted to make it voice activated, with a headset like the pit crew boss. I have successfully made a voice activated automaton before, but for some reason I couldn’t get this one to work so I had to settle for a switch. In the end, the switch was probably better because it was easier for Isaac to use than the voice activation would have been and he really enjoyed turning it on and off while carefully examining the mechanism.
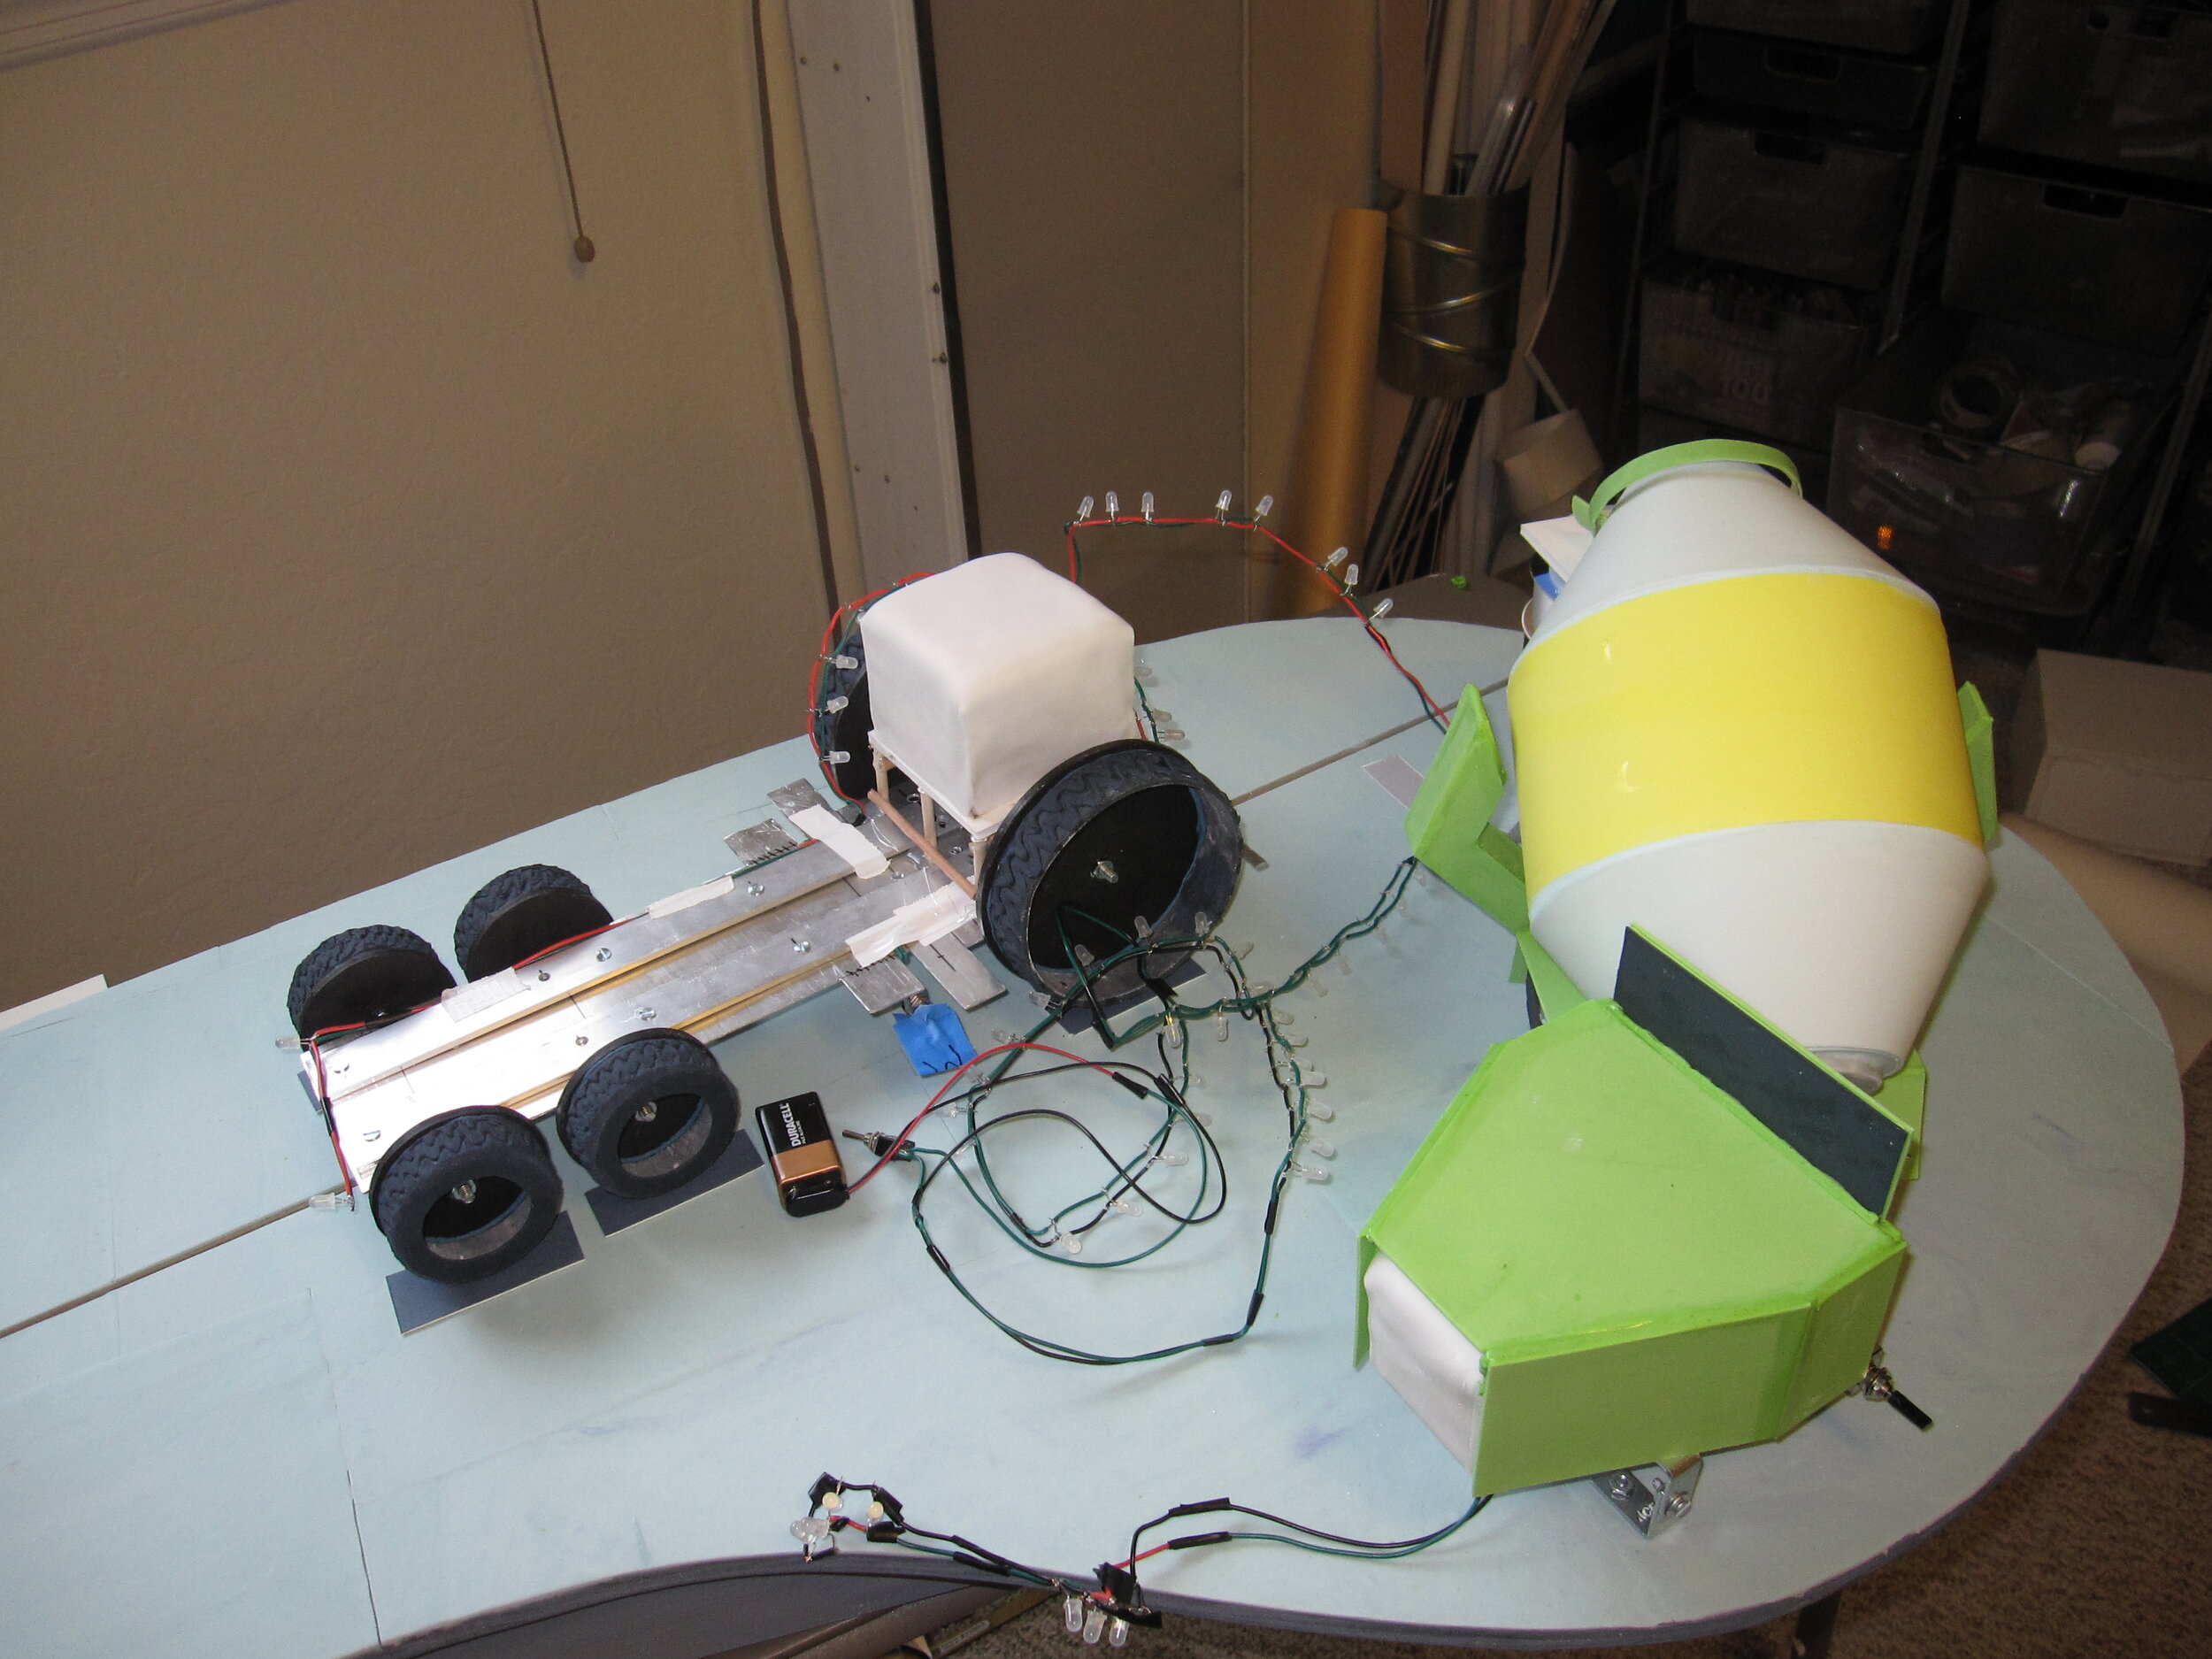
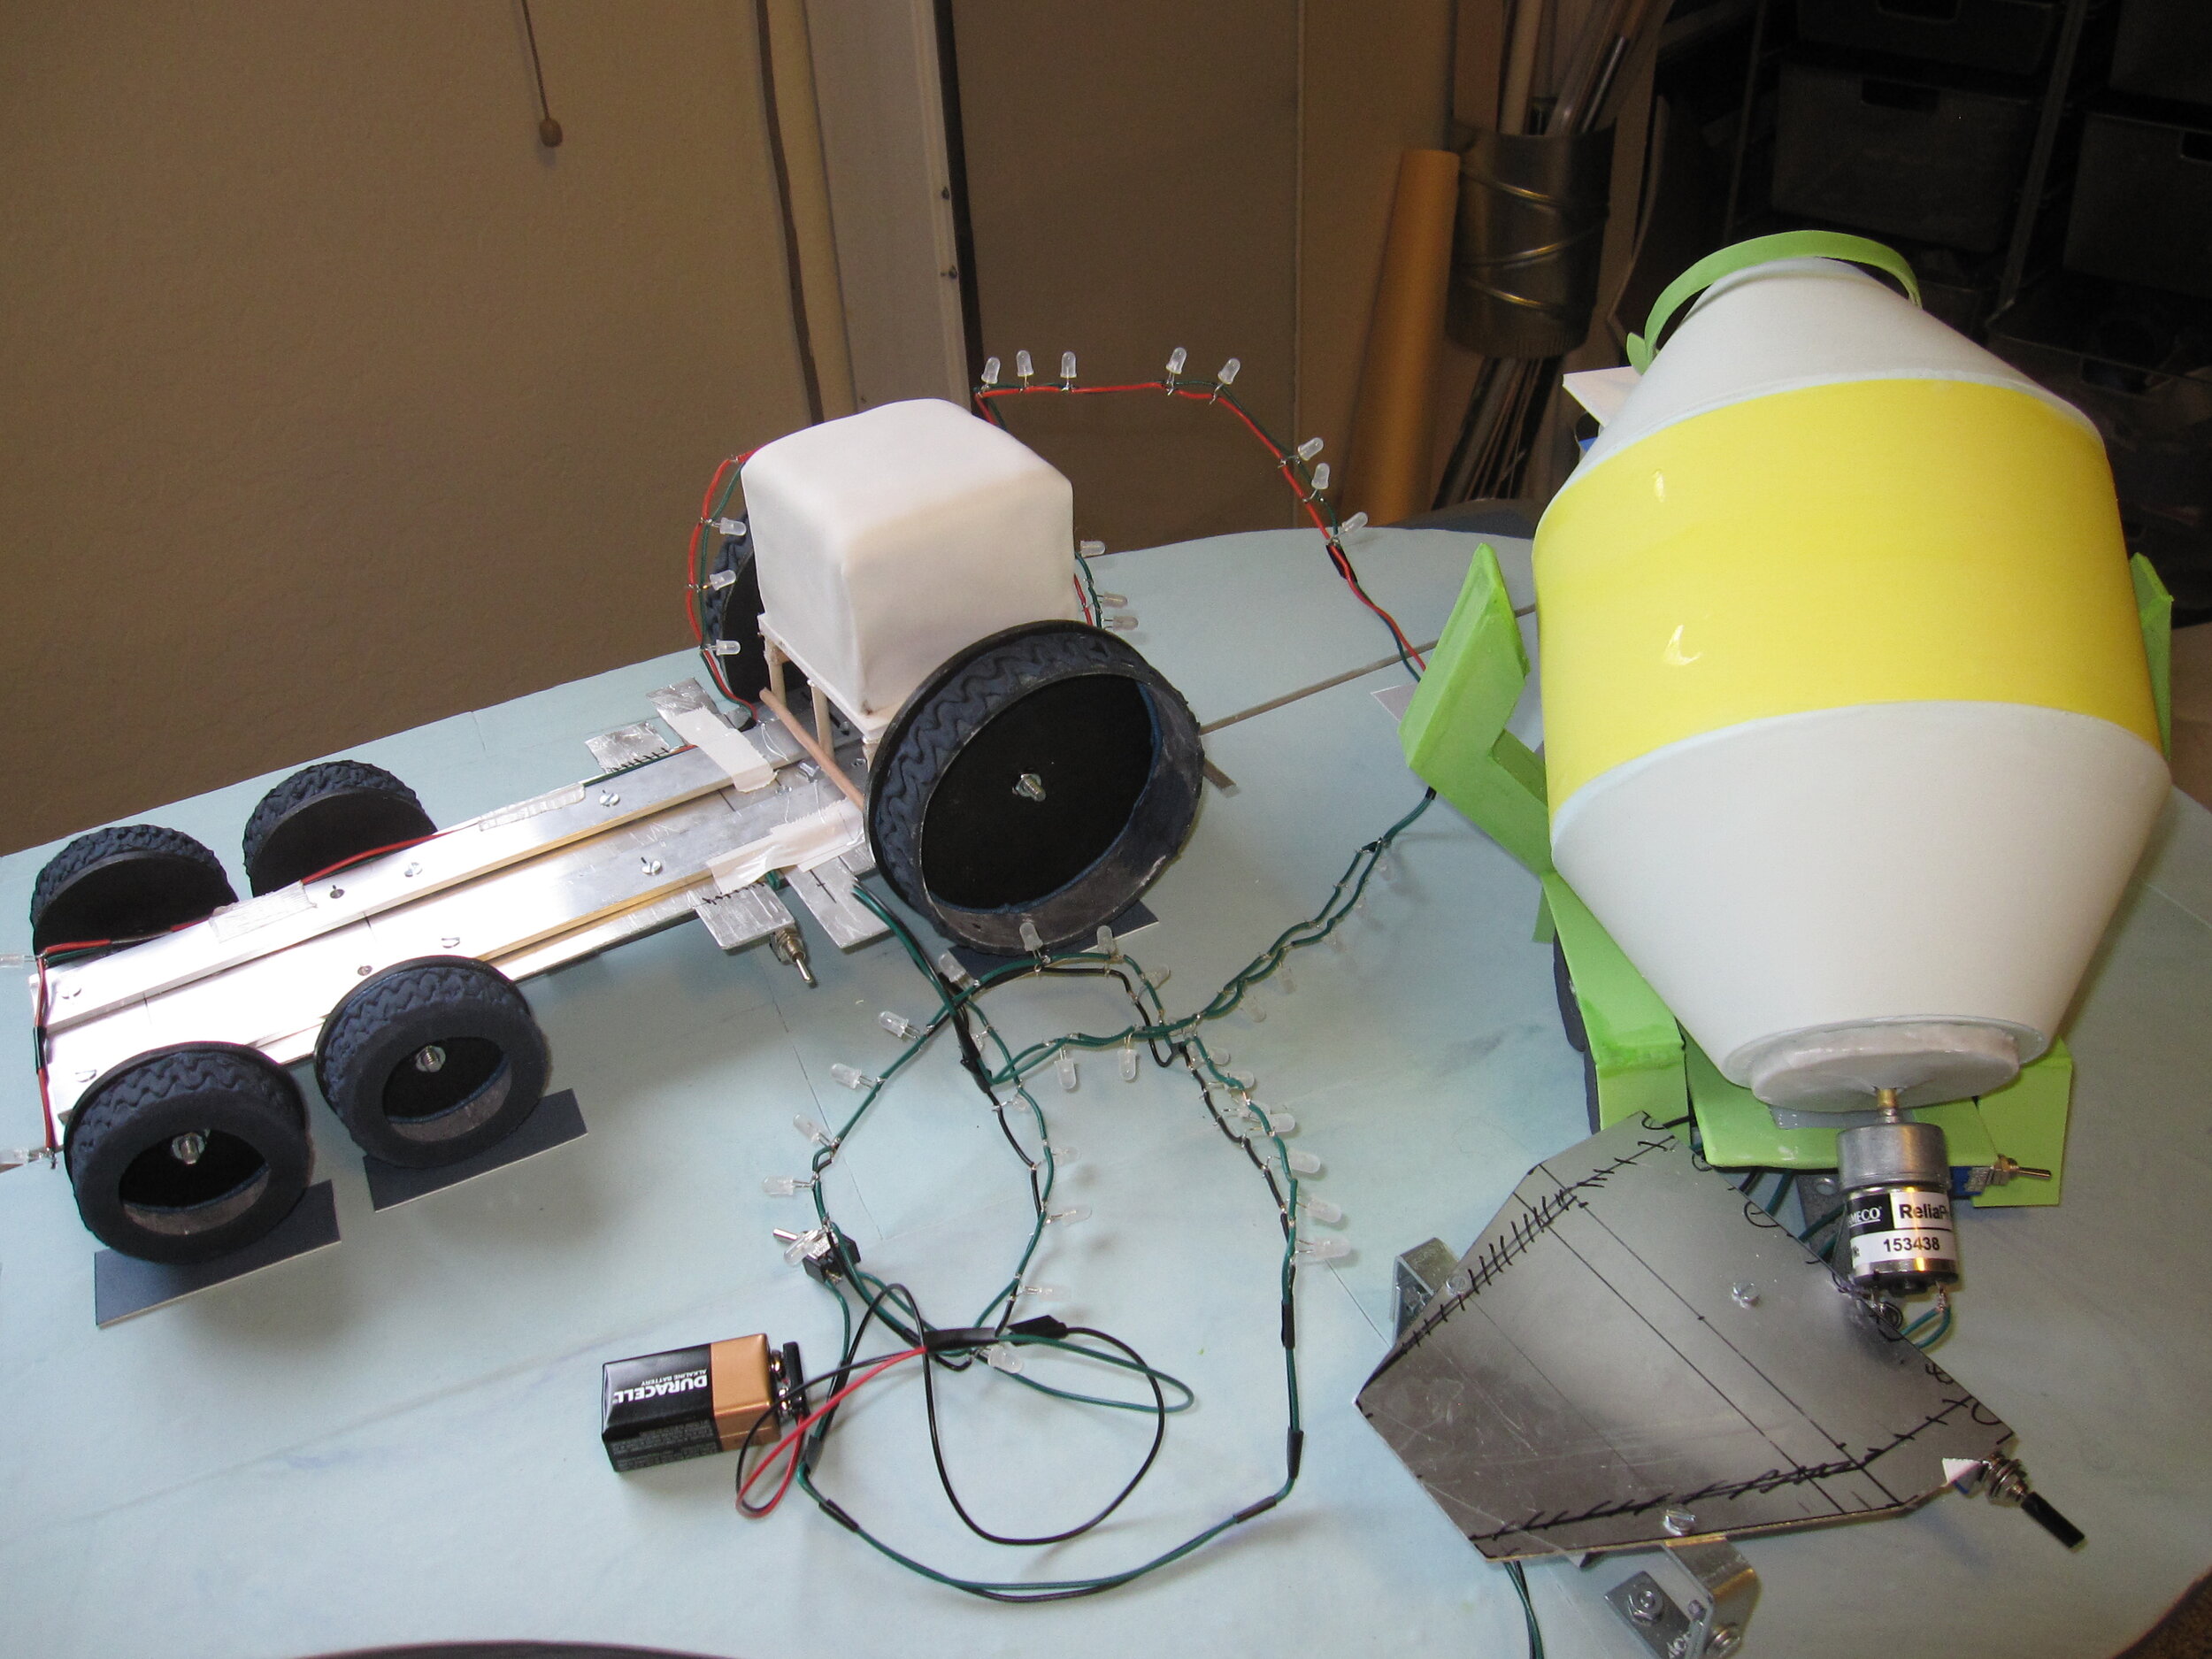
The actual cake is the tires behind the pit crew. They’re a basic sponge cake with a raspberry or blackberry jam filling, with modeling chocolate treads, dipped in dark chocolate.

They were kind of like really fancy Donettes. Which is to say they were fabulous. If I do say so myself.
Love Makes the World Go Round Cake
My friend’s granddaughter’s birthday party theme was Love Makes the World Go Round. So I came up with this cake, which is meant to suggest the earth traveling around the sun on an outer space cake board.
My friend’s granddaughter’s birthday party theme was Love Makes the World Go Round. So I came up with this cake, which is meant to suggest the earth traveling around the sun on an outer space cake board.
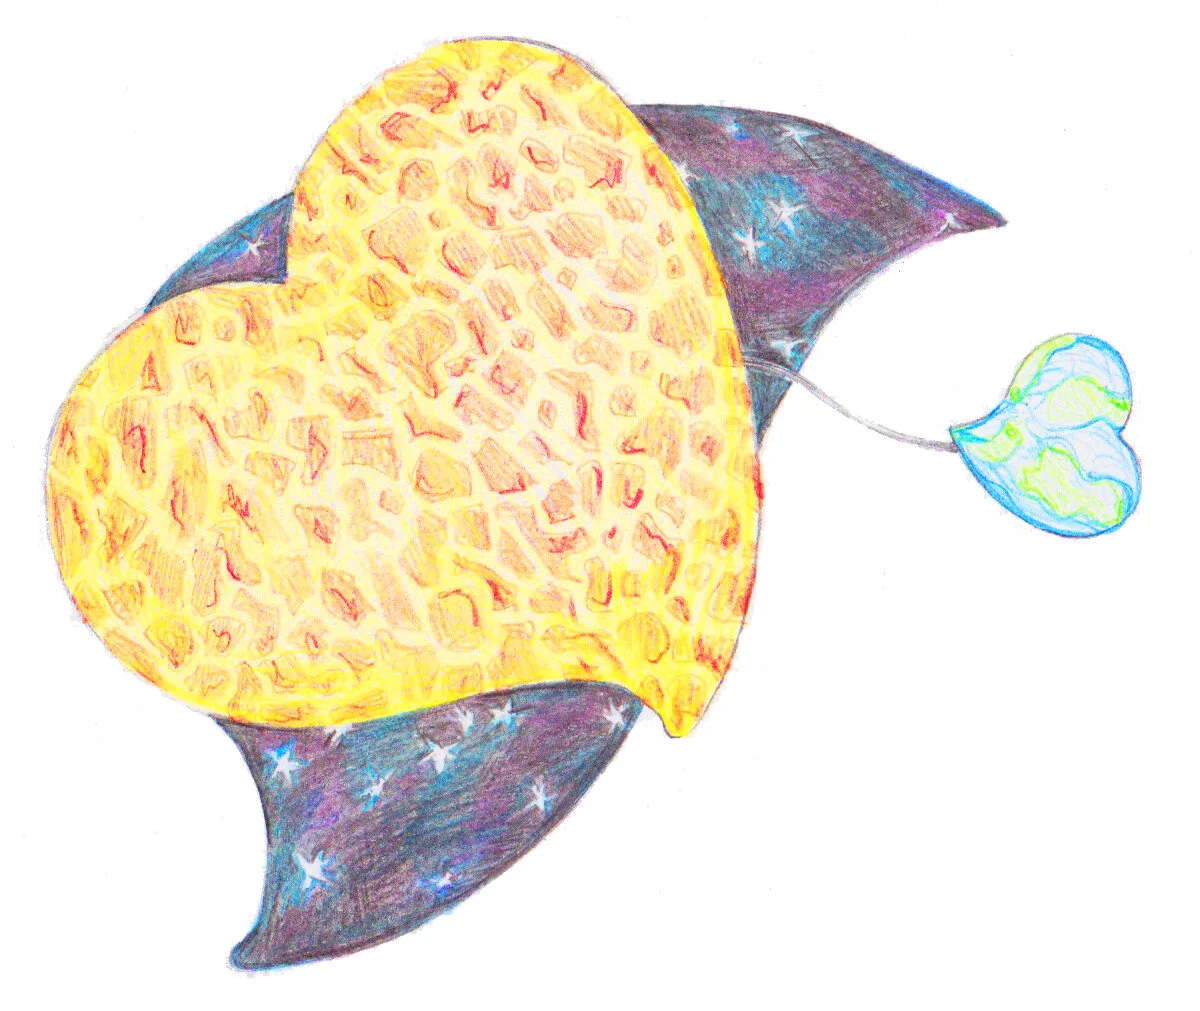
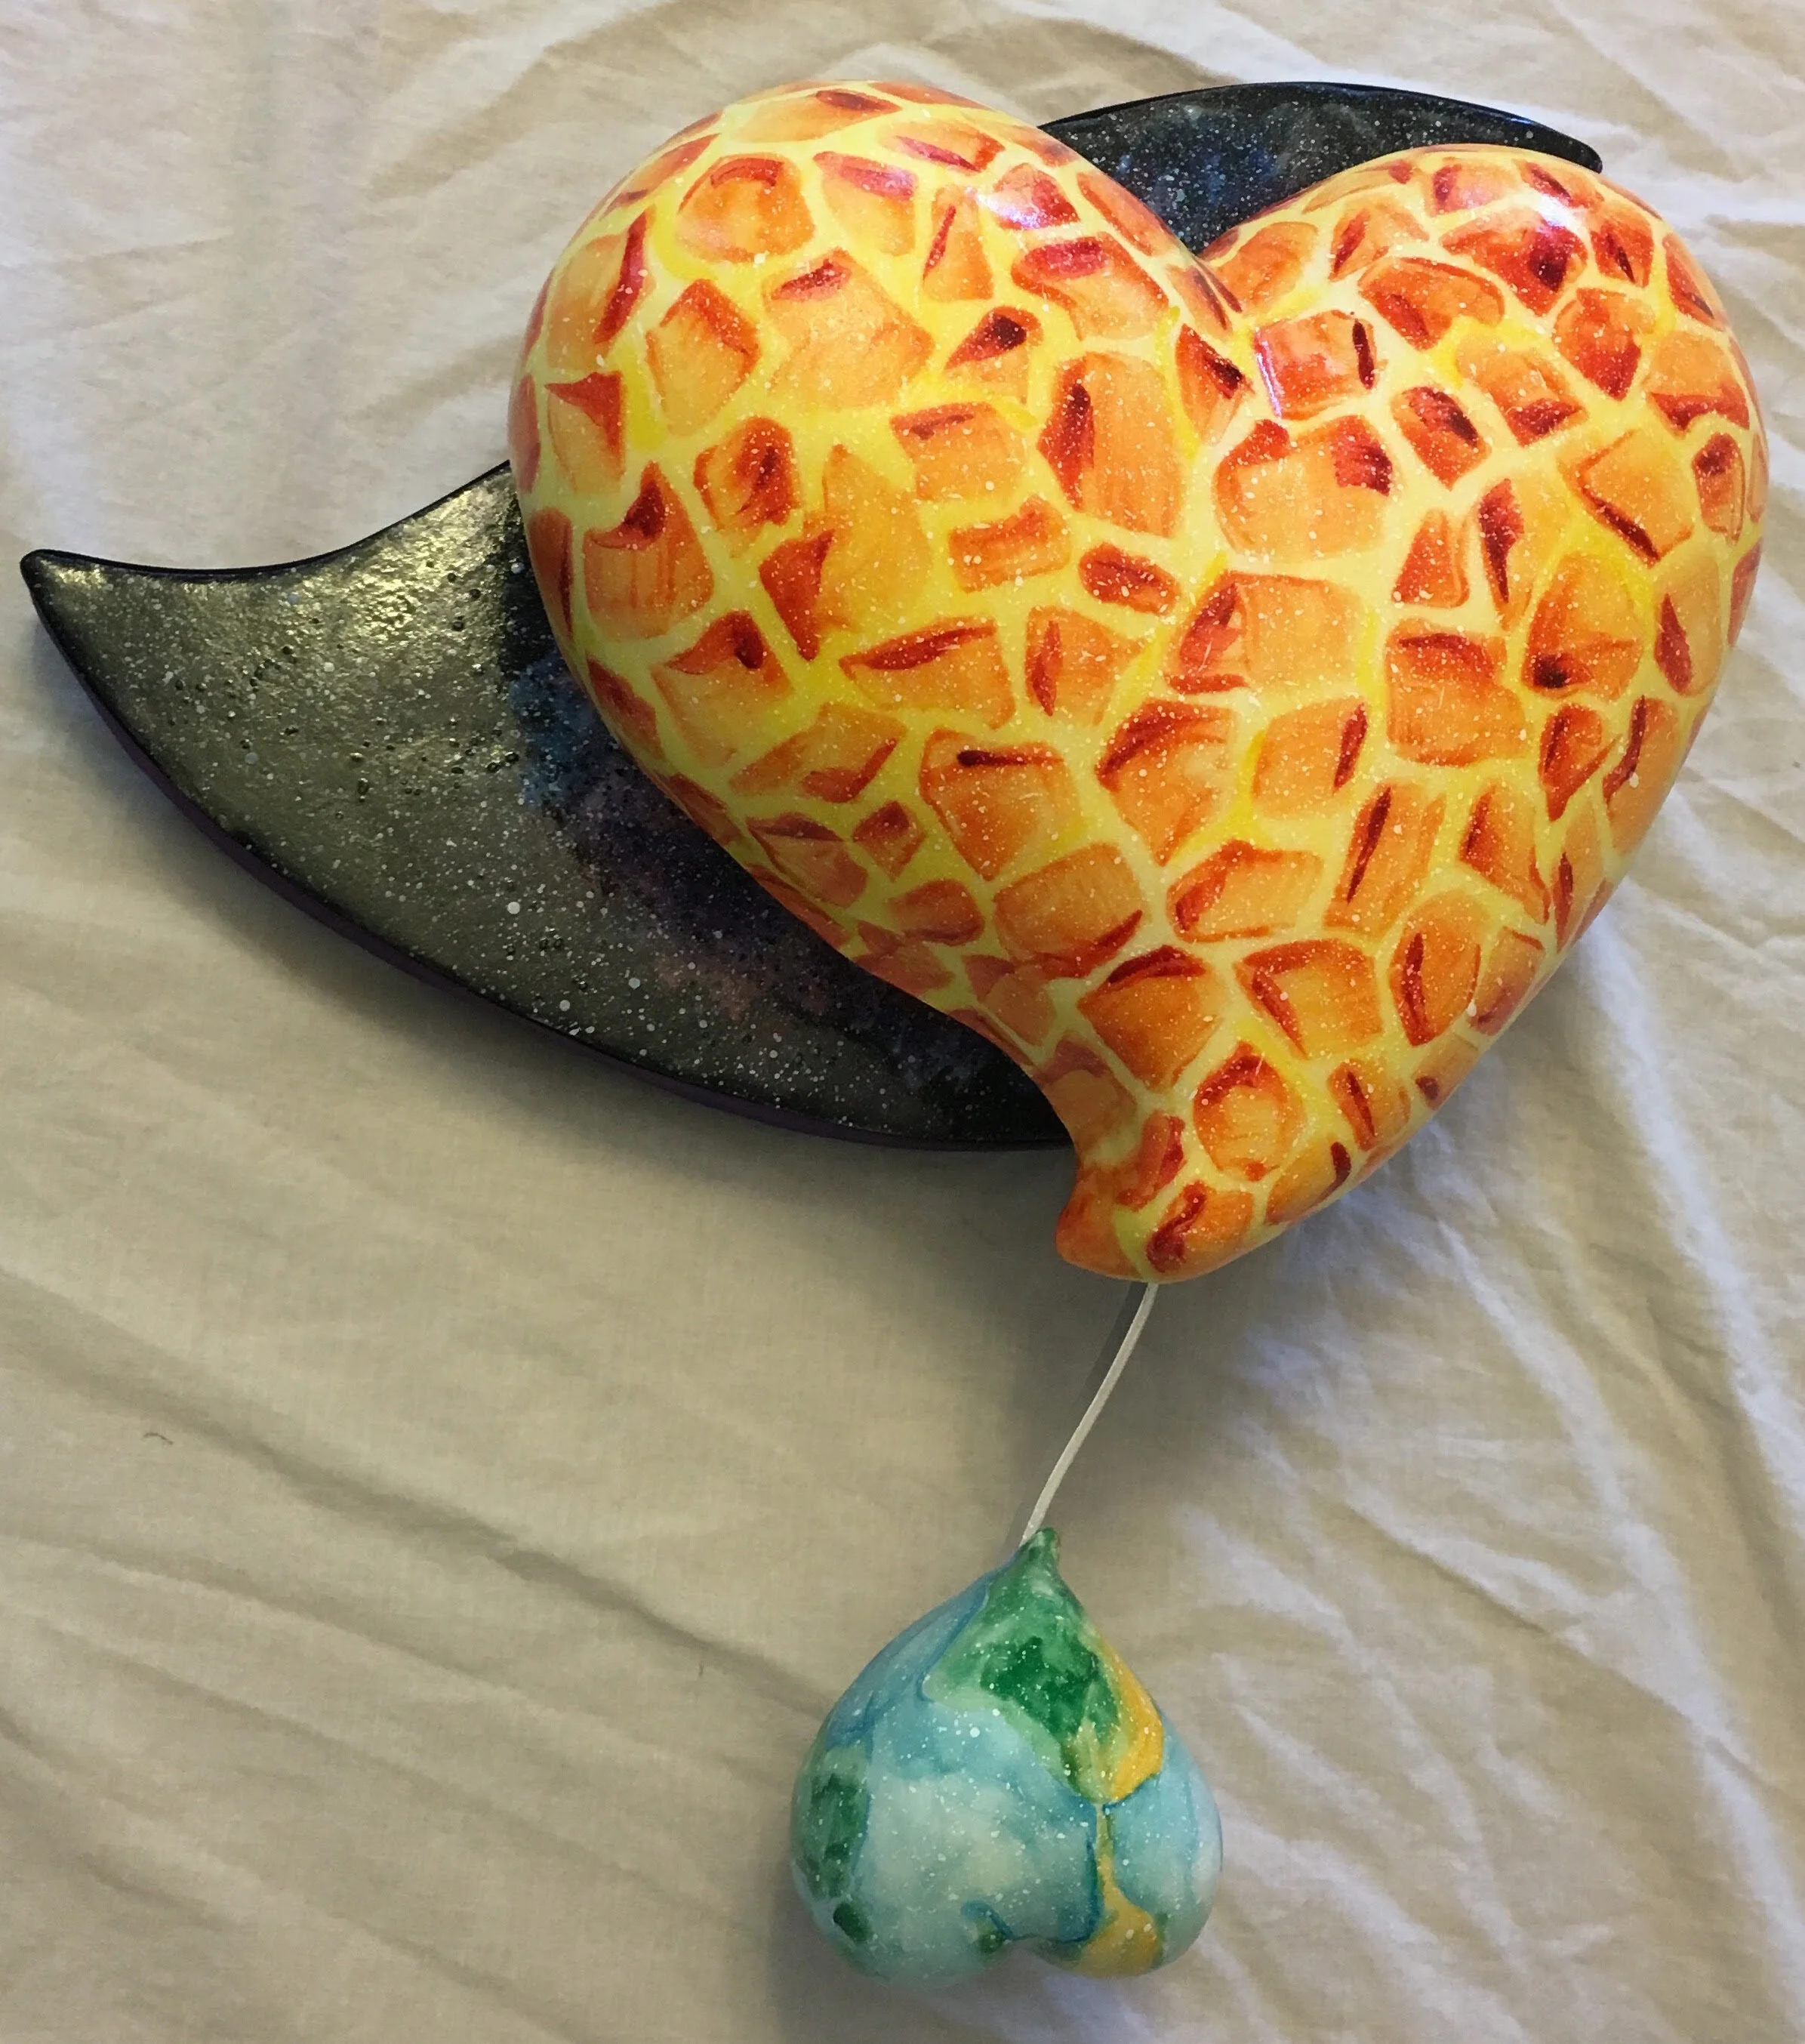
The color is all hand painted. The sun came out looking maybe a little more like a giraffe than a sun, but at least the overall effect is fun and colorful.
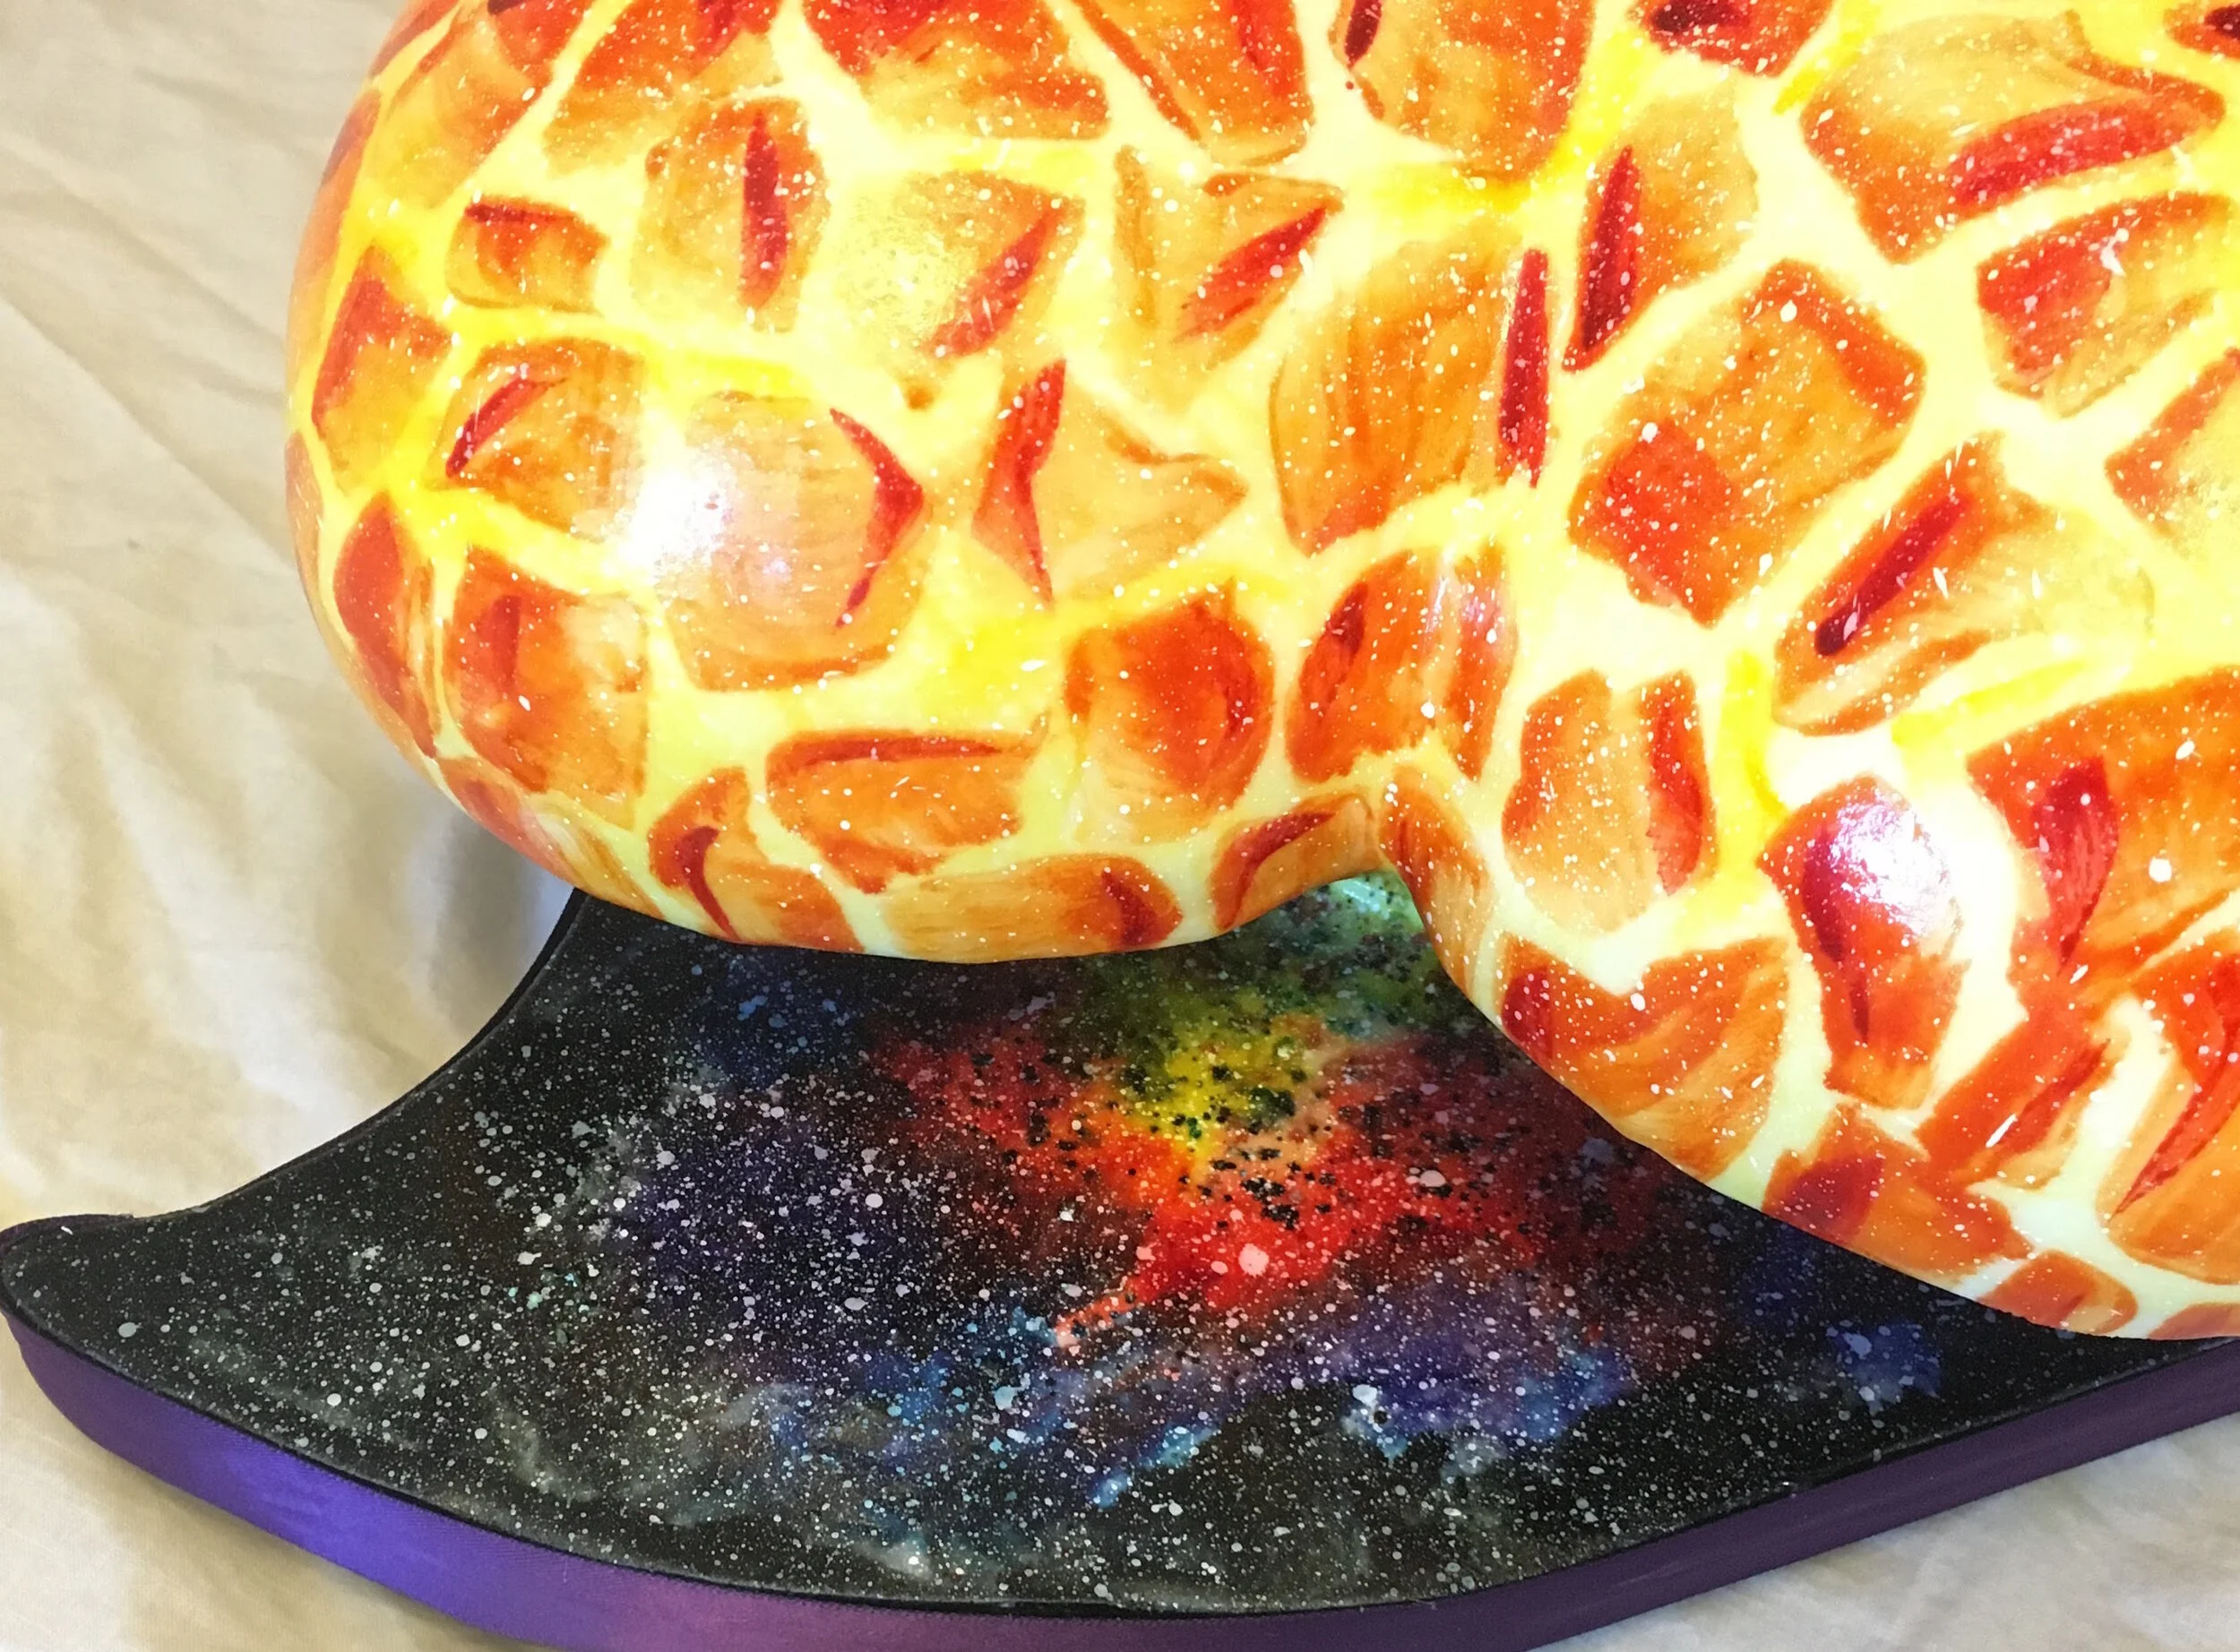
The earth is mounted on an aluminum strip that rotated freely around the post supporting the sun, so you can make the earth orbit around the sun.
Terraria Celestial Event Cake
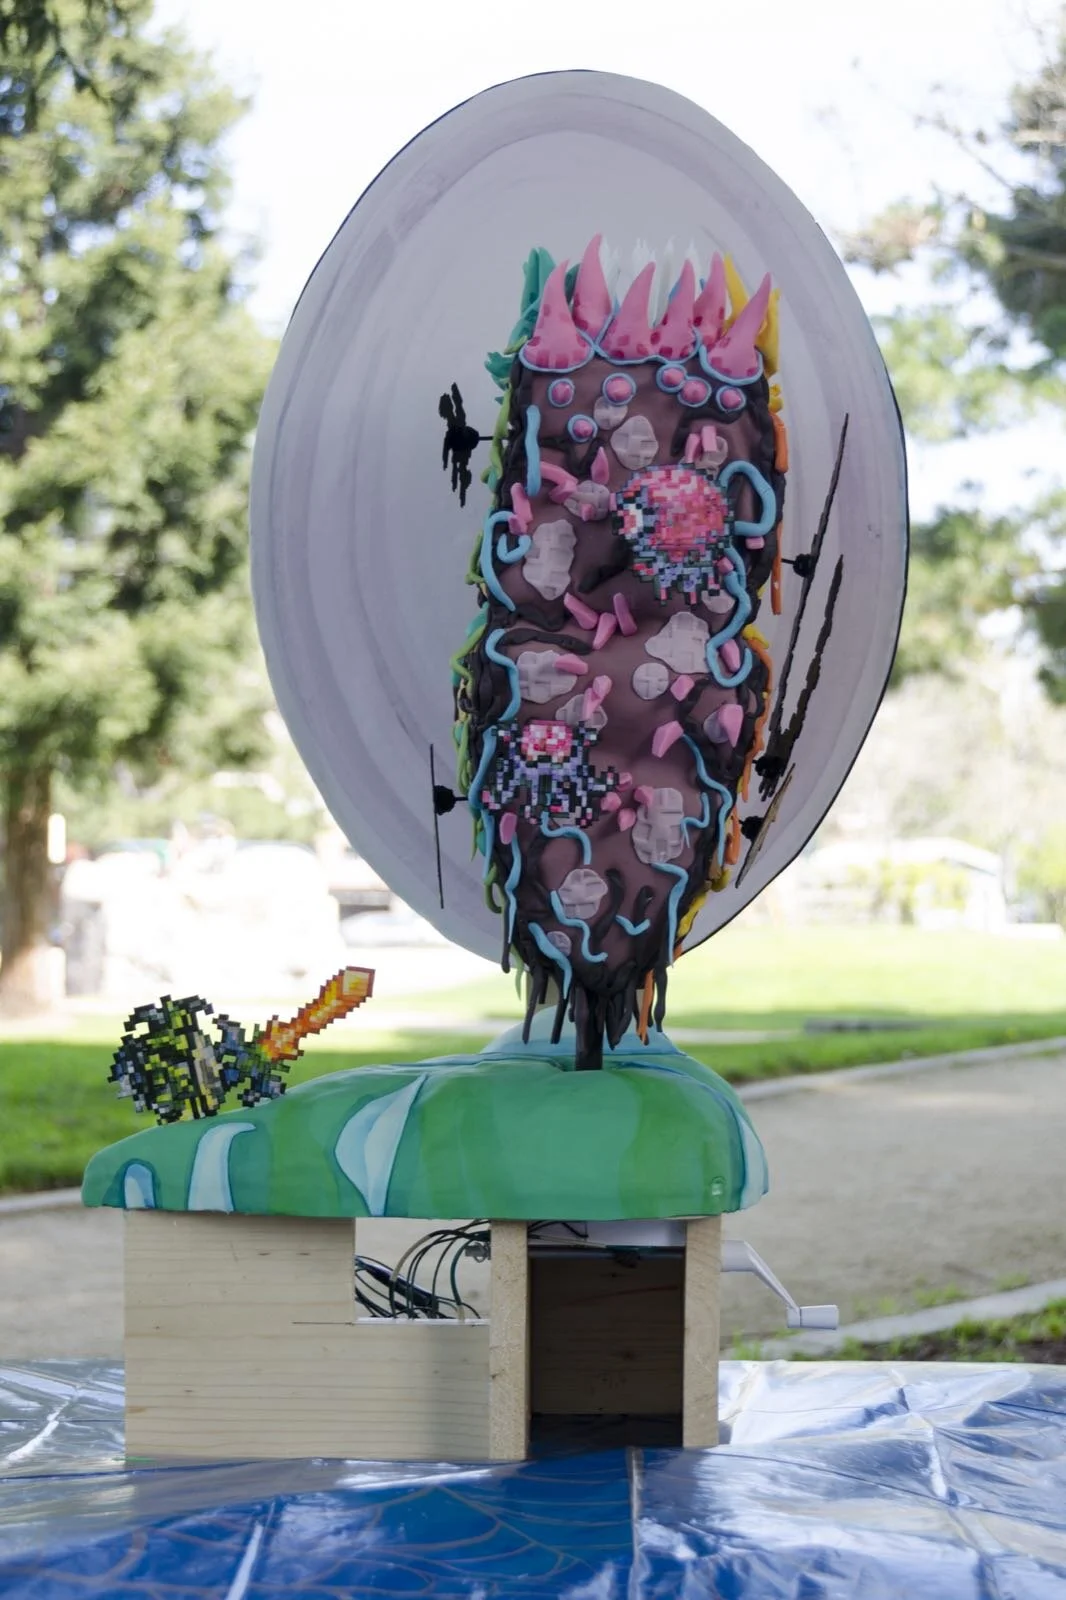
Alex, for her 10th birthday, requested a Terraria celestial event cake, with a four-sided pillar, each side of which corresponds to a phase of the celestial event – Nebula, Stardust, Vortex, and Solar – and includes the appropriate monsters.

Alex, for her 10th birthday, requested a Terraria celestial event cake, with a four-sided pillar, each side of which corresponds to a phase of the celestial event – Nebula, Stardust, Vortex, and Solar – and includes the appropriate monsters.
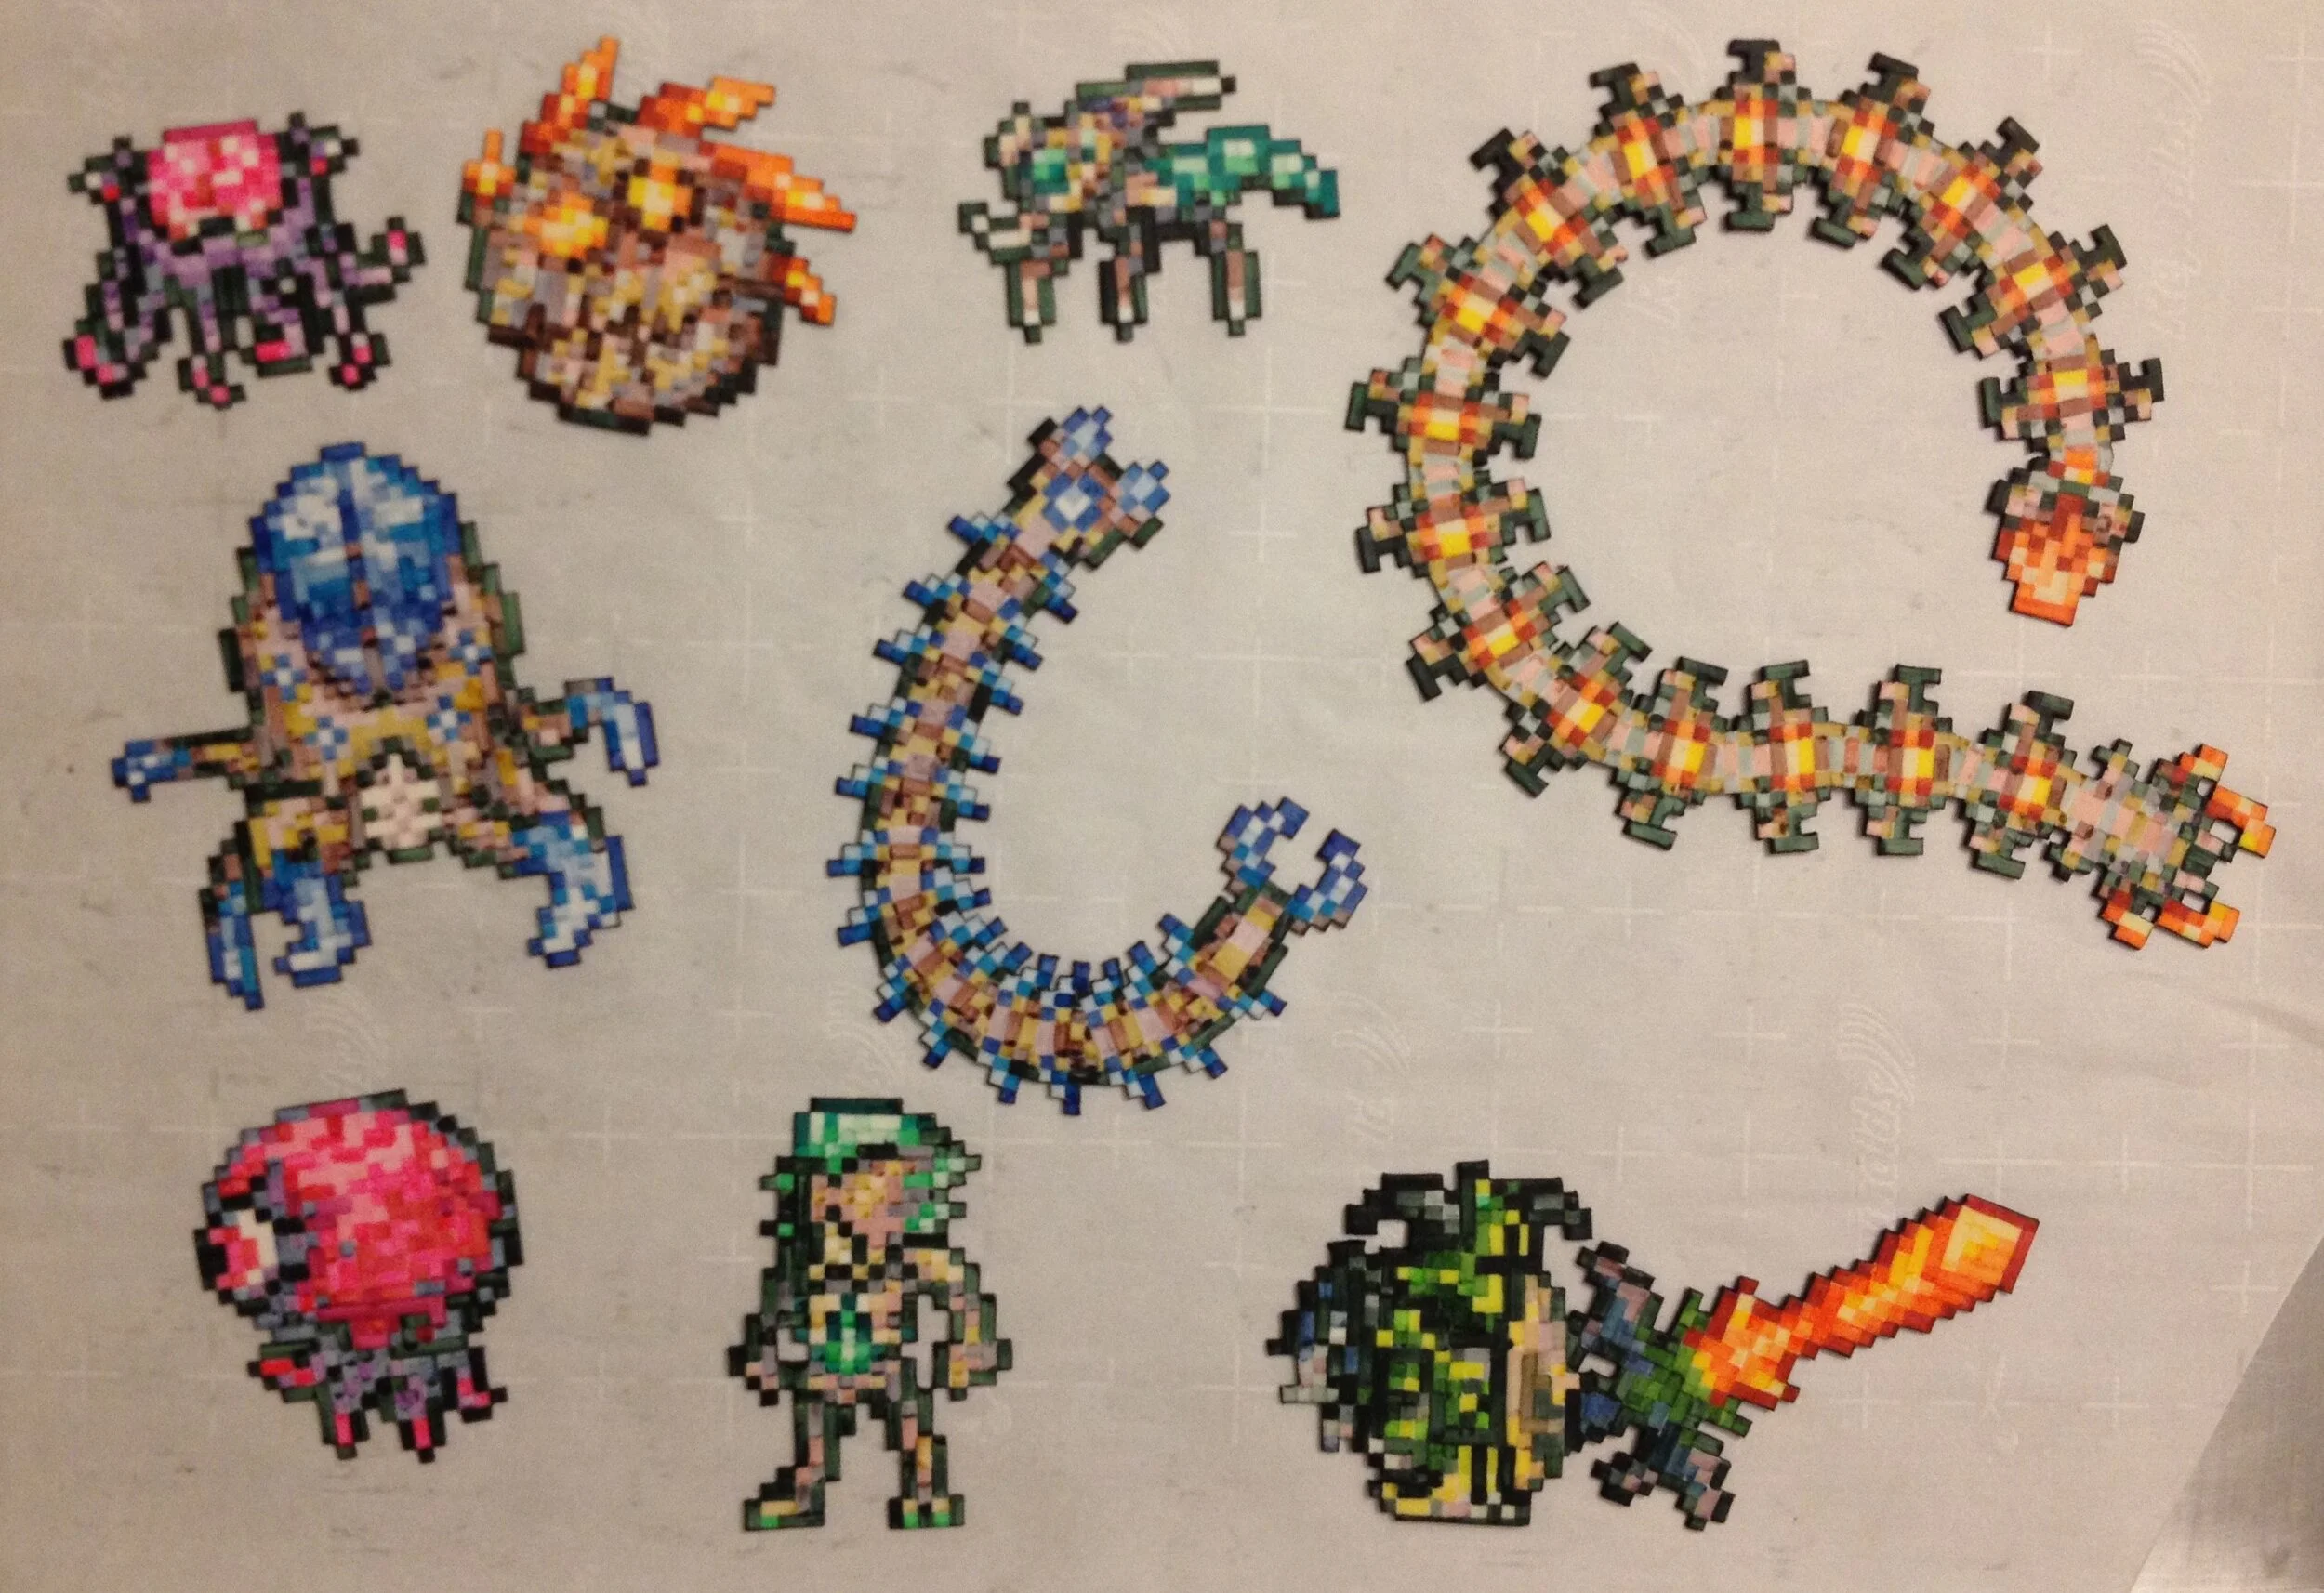
Fortunately, after Sam’s last Terraria cake, I am expert at painting pixel-y gum paste Terraria characters. The guy on the side is Alex’s avatar, with a Horseman’s Blade, which she specifically requested.

The tower is cake, mounted on a pipe connected to a bevel gear, so that the cake can be turned with a crank.
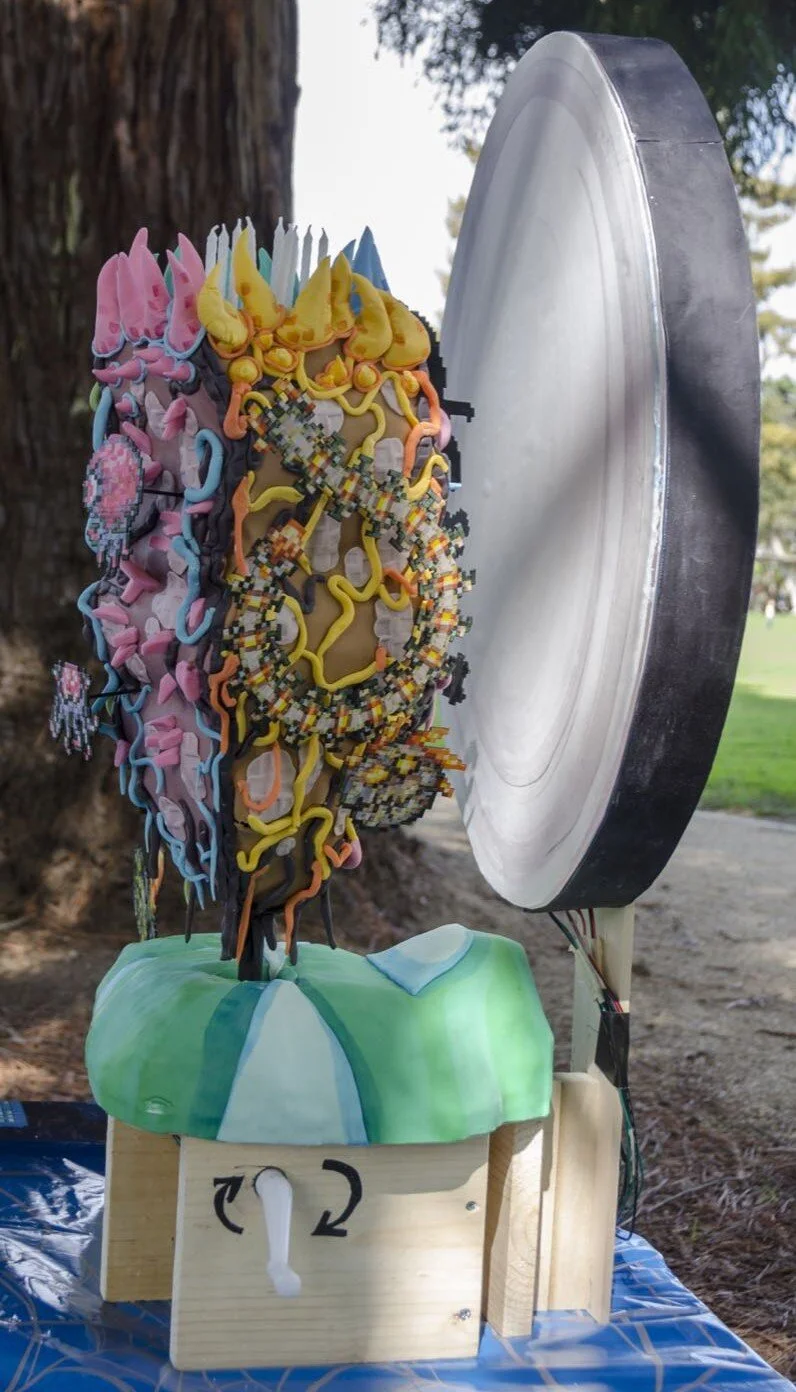
I wanted to make the backdrop change color to correspond with the celestial event phase, so I made a light box like the one I made for the Terraria Blood Moon Cake. Inside are strips of LED tape in pink, yellow, blue, and green. When the cake turned, a strip of copper tape on the gear created electrical connections that lit the appropriate color LEDs as each side of the pillar came to the fore. It quite well at home, but the party was outside on a sunny day, so with that much ambient light the color change was virtually imperceptible.

As usual, I made about four times as much cake as the party required.
Terraria Blood Moon Cake
For Sam’s 7th birthday, he wanted a Terraria blood moon cake. Apparently, when there is a blood moon, a lot more zombies come out and there are some kinds of zombies that only appear in the blood moon. So we settled on a design where the moon changed from blue (regular moon) to red (blood moon) and a bunch more zombies rose up out of the ground.
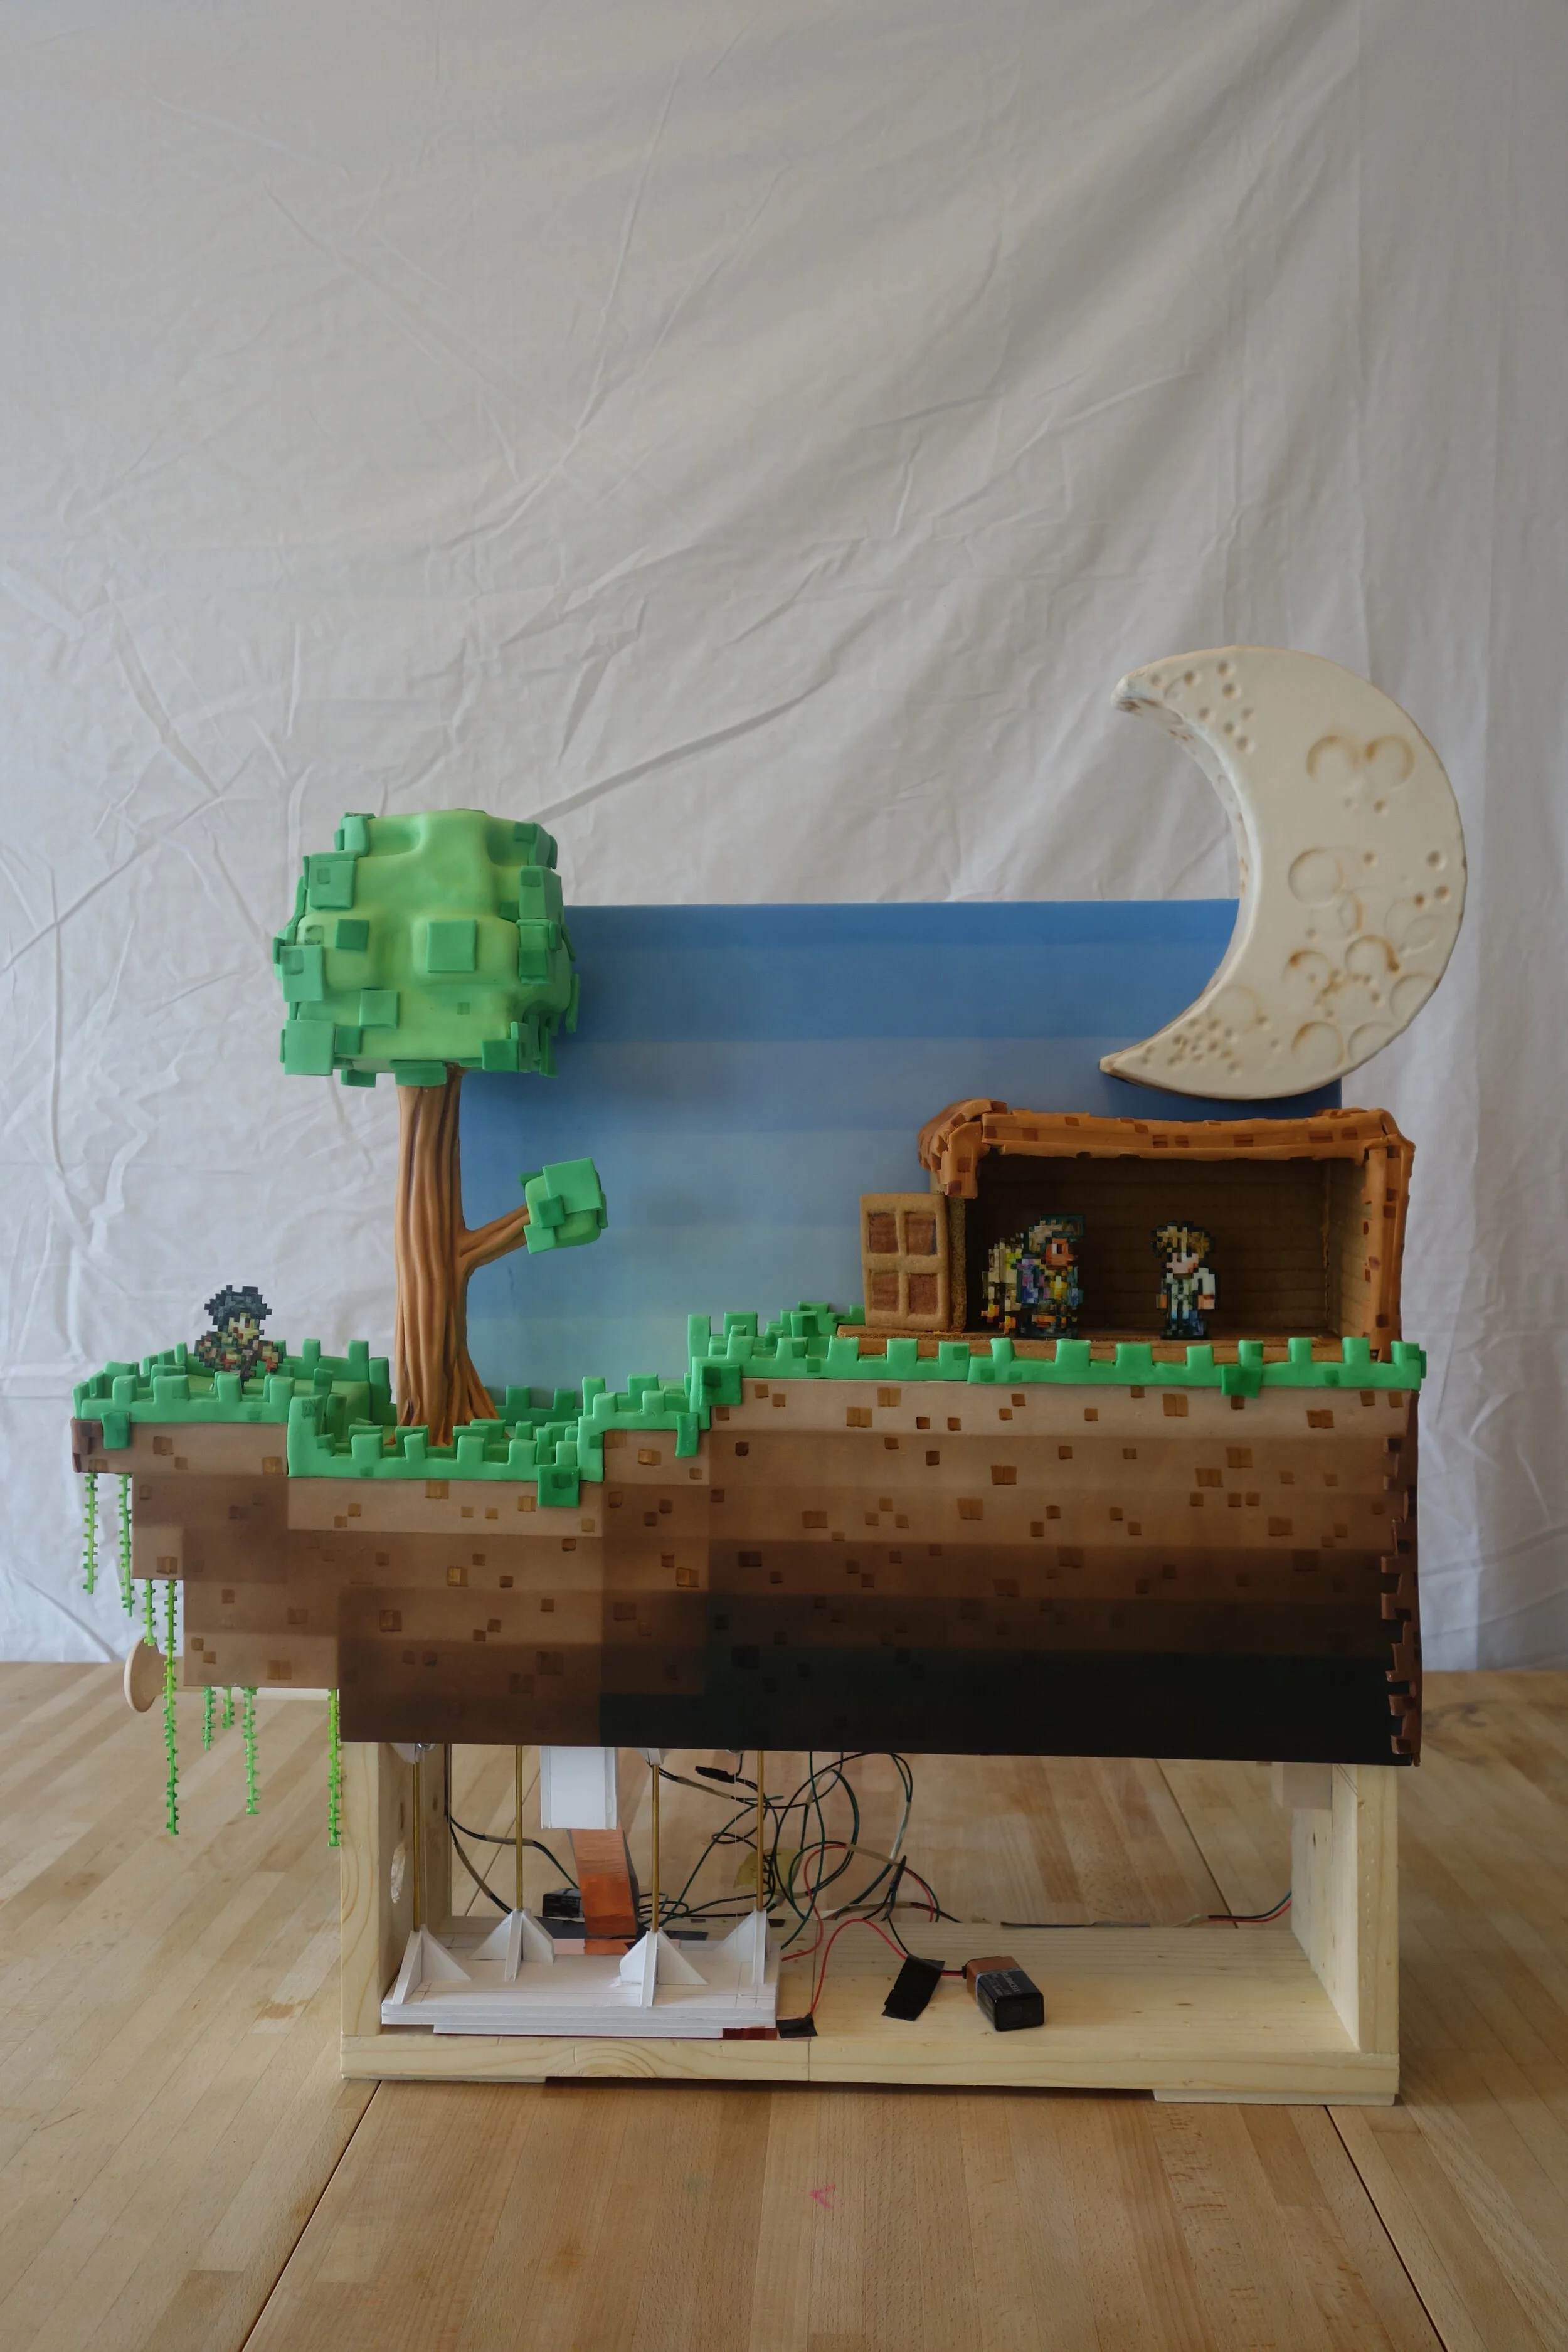
For Sam’s 7th birthday, he wanted a Terraria blood moon cake. Apparently, when there is a blood moon, a lot more zombies come out and there are some kinds of zombies that only appear in the blood moon. So we settled on a design where the moon changed from blue (regular moon) to red (blood moon) and a bunch more zombies rose up out of the ground.

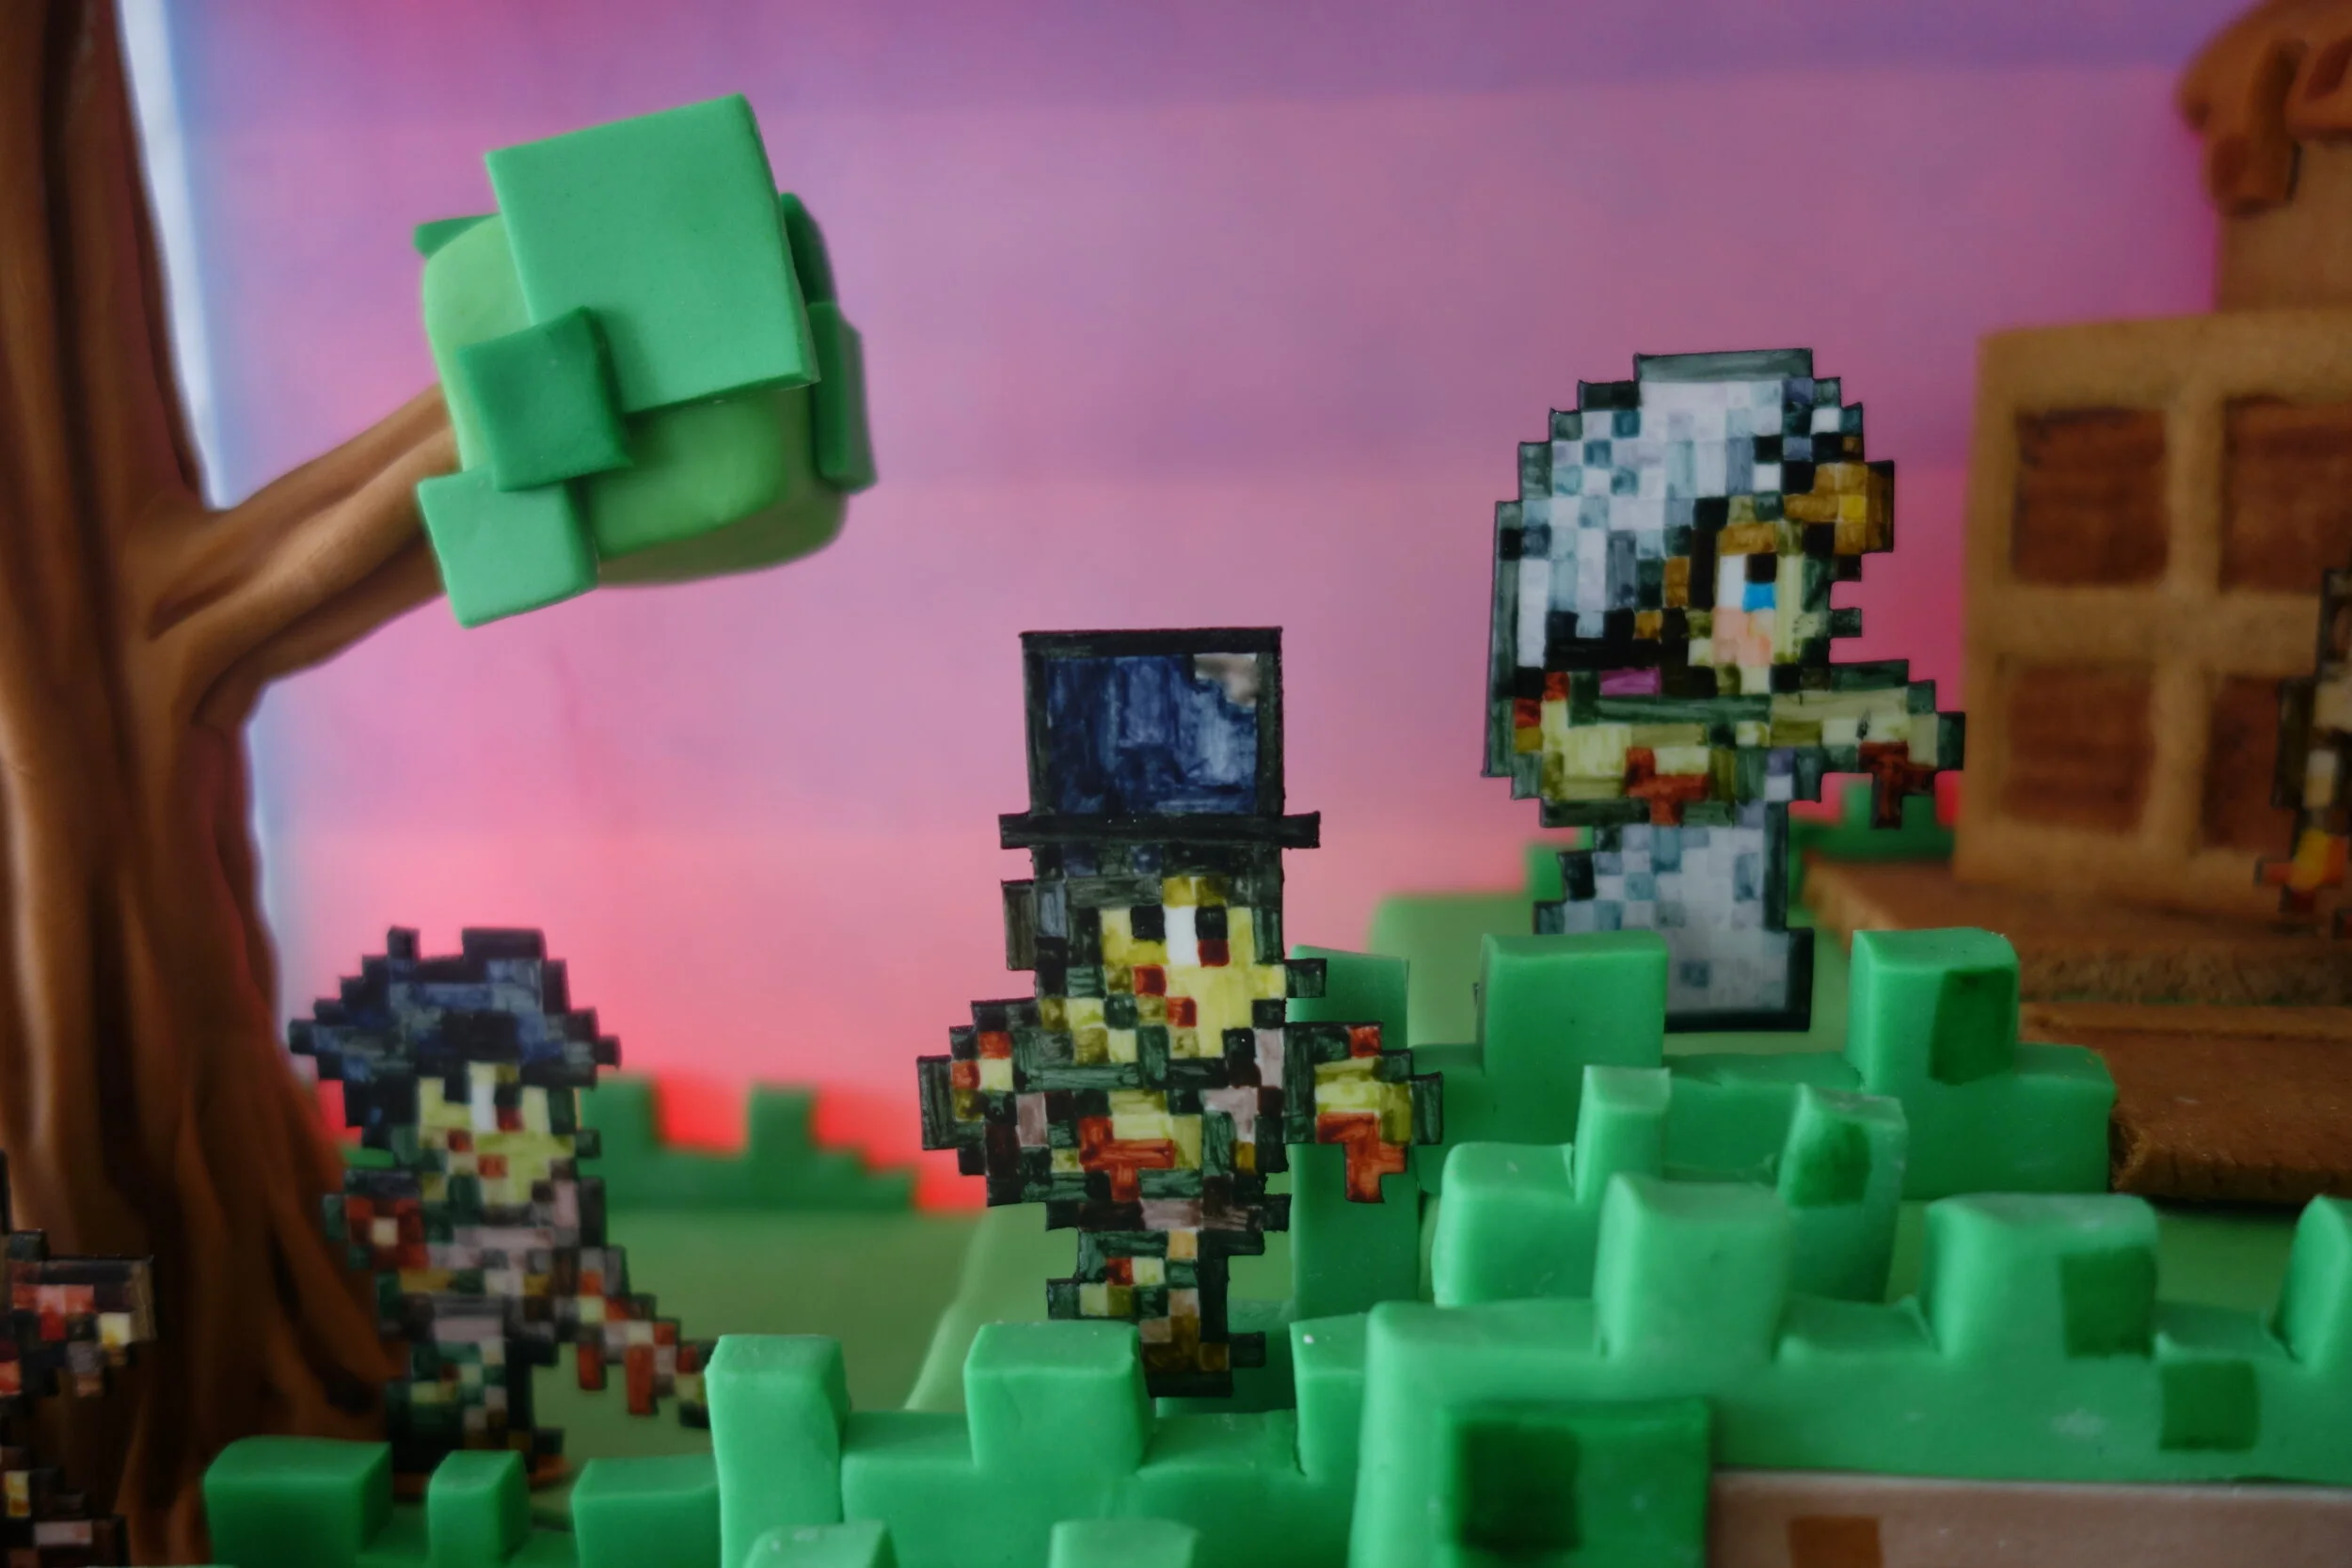
The characters are hand painted gum paste. The blood moon zombies are all mounted on metal tubes that are attached to a little platform. The platform is lifted by fishing line attached to a wooden dowel, so that when the dowel is pulled out, the zombies rise up for the blood moon and when the dowel is pushed in, the zombies sink into the ground for the regular moon.

Sam also wanted his Terraria avatar and the guide NPC, so I included a little house made of gingerbread where they can hide from the zombies and mounted them on a track so they can walk back and forth.

The backdrop and the moon are light boxes with lids of plexiglass covered with fondant. Inside, are rows of red LEDs and rows of blue LEDs. The LEDs are wired through the platform that raises and lowers the zombies, so that the blue LEDs light when the platform is down (regular moon) and the red LEDs light when the platform is up (blood moon).


Emperor Palpatine Whoopie Cushion Cake
My niece and nephew and I play a game called “Emperor Palpatine Whoopie Cushion.” Essentially, the kids put imaginary whoopee cushions on a chair and then I, as Emperor Palpatine, sit on the chair, make a farting noise, and chase them around the room shouting about how I’m going to destroy them. So, for his fifth birthday, Sam requested an Emperor Palpatine whoopie cushion cake. Here is what I came up with.

My niece and nephew and I play a game called “Emperor Palpatine Whoopie Cushion.” I don’t remember the genesis of the game. Essentially, the kids put imaginary whoopee cushions on a chair and then I, as Emperor Palpatine, sit on the chair, make a farting noise, and chase them around the room shouting about how I’m going to destroy them.

So, for his fifth birthday, Sam requested an Emperor Palpatine whoopie cushion cake. Here is what I came up with. The steps, the chair, and the lower portion of Palpatine’s body are cake. The upper half of Palpatine is rice krispie treats. I used a little recording module from Radio Shack to record the sound, triggered by a button under the seat that was depressed when Palpatine sat down.
This may be the silliest cake I’ve ever made (which is a pretty high bar), but it was also perhaps the most entertaining.
Zebra Cupcakes
When I asked my nephew Sam what he wanted for his third birthday cake, he immediately responded, “Zebra cupcake!" I have no idea where he got this idea, or what exactly he thinks a zebra cupcake looks like.

When I asked my nephew Sam what he wanted for his third birthday cake, he immediately responded, “Zebra cupcake!” I have no idea where he got this idea, or what exactly he thinks a zebra cupcake looks like. To my knowledge, he has never seen anything that could reasonably be called a zebra cupcake. I tried to encourage him to elaborate on the idea of a zebra cupcake, but he wasn’t very forthcoming. So I was left to interpret his request as best I could.
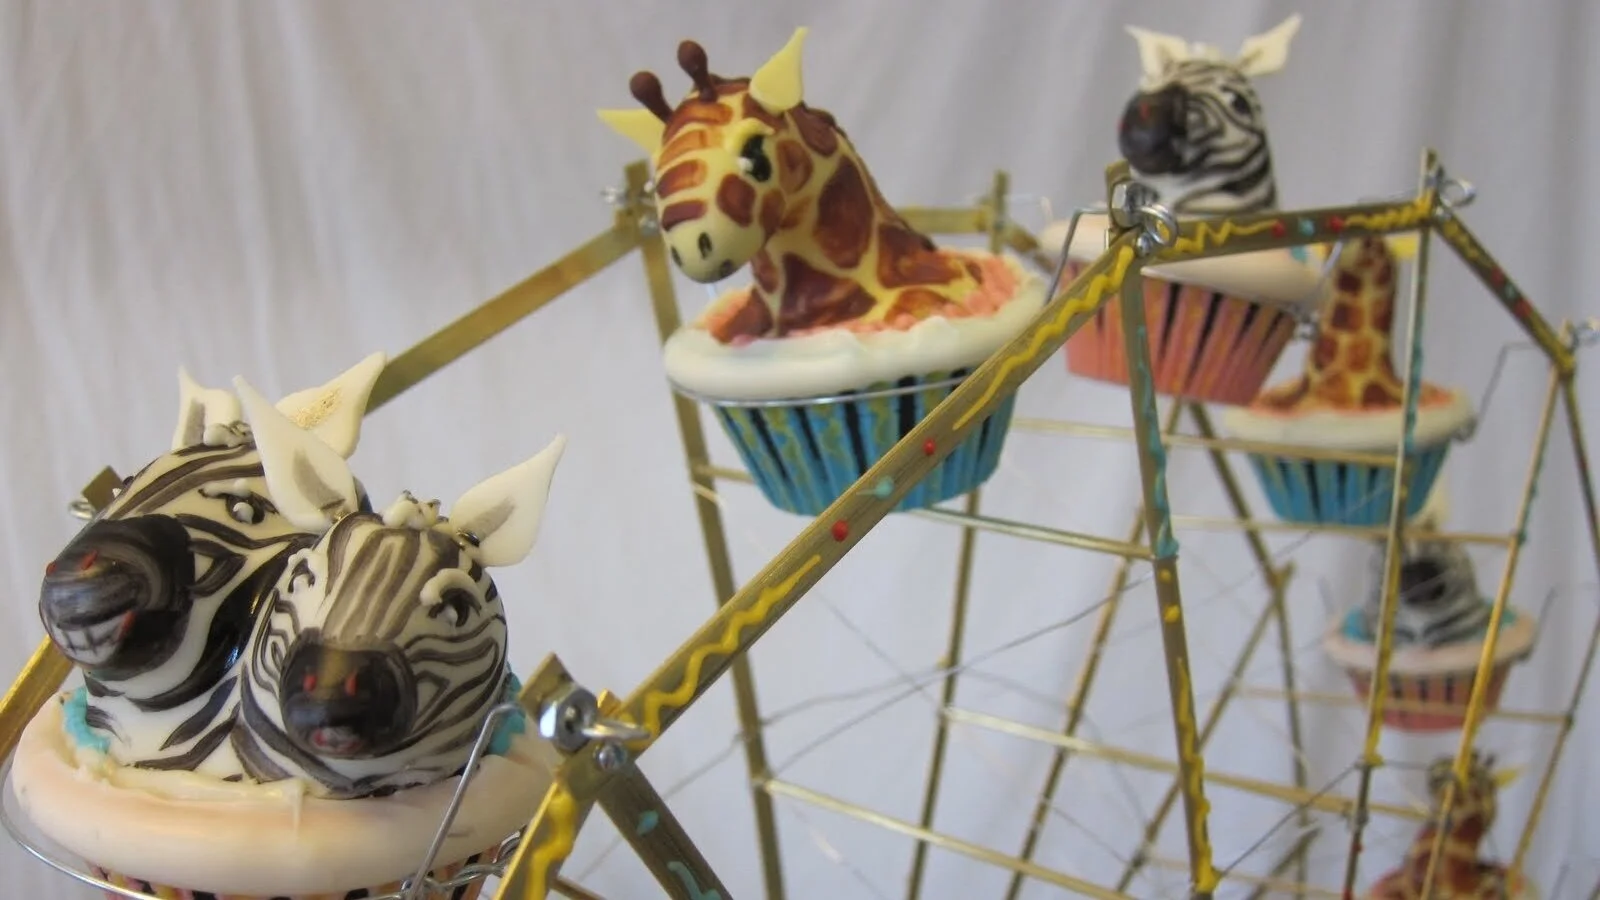
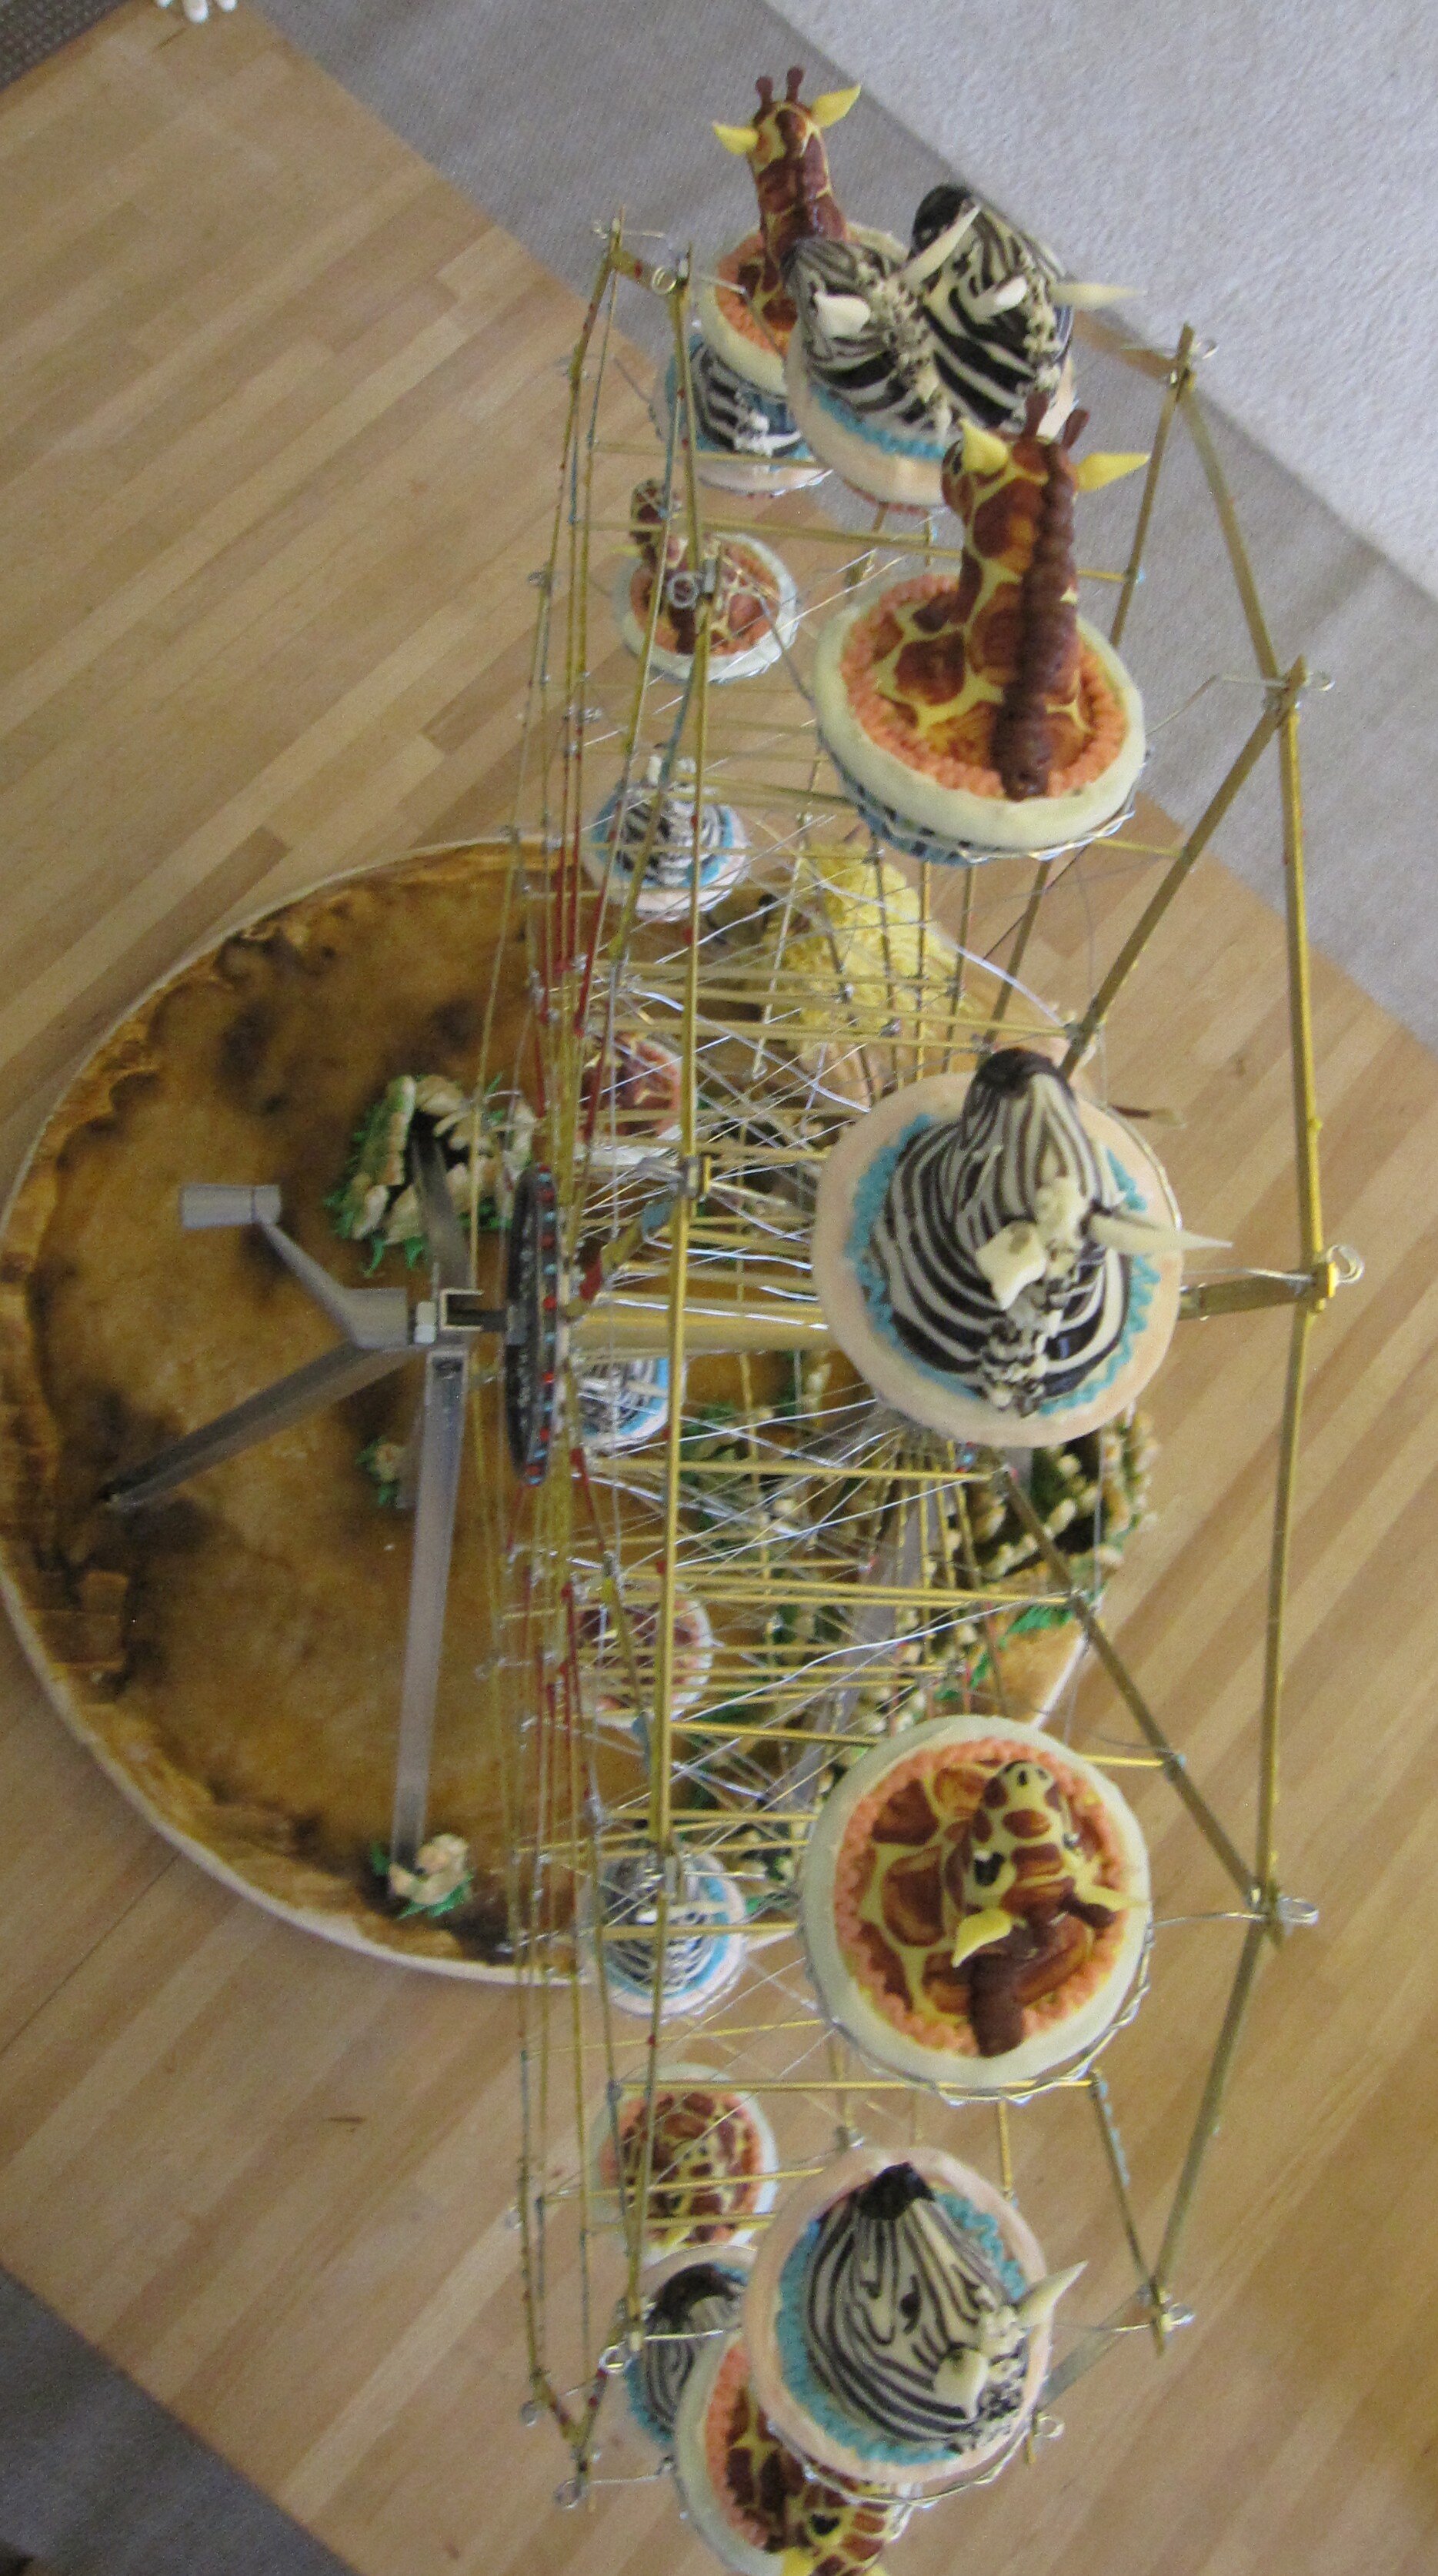
I don’t quite recall my thought process, but I ultimately decided to make zebras riding a big ferris wheel with a lion jumping up to try to get them. Mostly, I probably just wanted to see if I could make a ferris wheel. Initially, I had considered making the ferris wheel motorized, but after consulting Sam’s mom and his big sister, Alex, I decided that Sam would like it more if he could operate the ferris wheel himself with a hand crank. Based on the usual size of cupcakes, I calculated that, in order to accommodate the sixteen cupcake cars that I planned to make, the ferris wheel would need to be about two feet in diameter.

I was at a little bit of a disadvantage in building the ferris wheel because I was visiting my sister and didn’t have my jigsaw with me, so I had to come up with a way to build a ferris wheel with a minimal number of cuts. I began by making each of the sixteen spokes out of brass strips joined by brass tube and steel wire, scratching the heck out of my fingertips in the process. I joined all of these together, using lots of tiny bolts and quart paint can lids as the hubs. On the perimeter of the wheel, I connected the spokes with more brass strips and more teeny tiny bolts. Unfortunately, I didn’t get the two halves of the hub aligned exactly perfectly, so the spokes wound up a tiny bit torqued. It didn’t ultimately impact the functionality of the wheel, but I’ll know to pay more attention to that next time. You know, the next time I make a zebra cupcake ferris wheel. Though the lesson would probably be applicable to other African animal cupcake ferris wheels as well.

For the frame to hold up the ferris wheel, I used half-inch aluminum channel, bolted together and embedded in the wooden base. To my surprise, the wheel turned perfectly as soon as I mounted it in the frame and attached the crank handle. The next challenge, though, was to make the cars work.
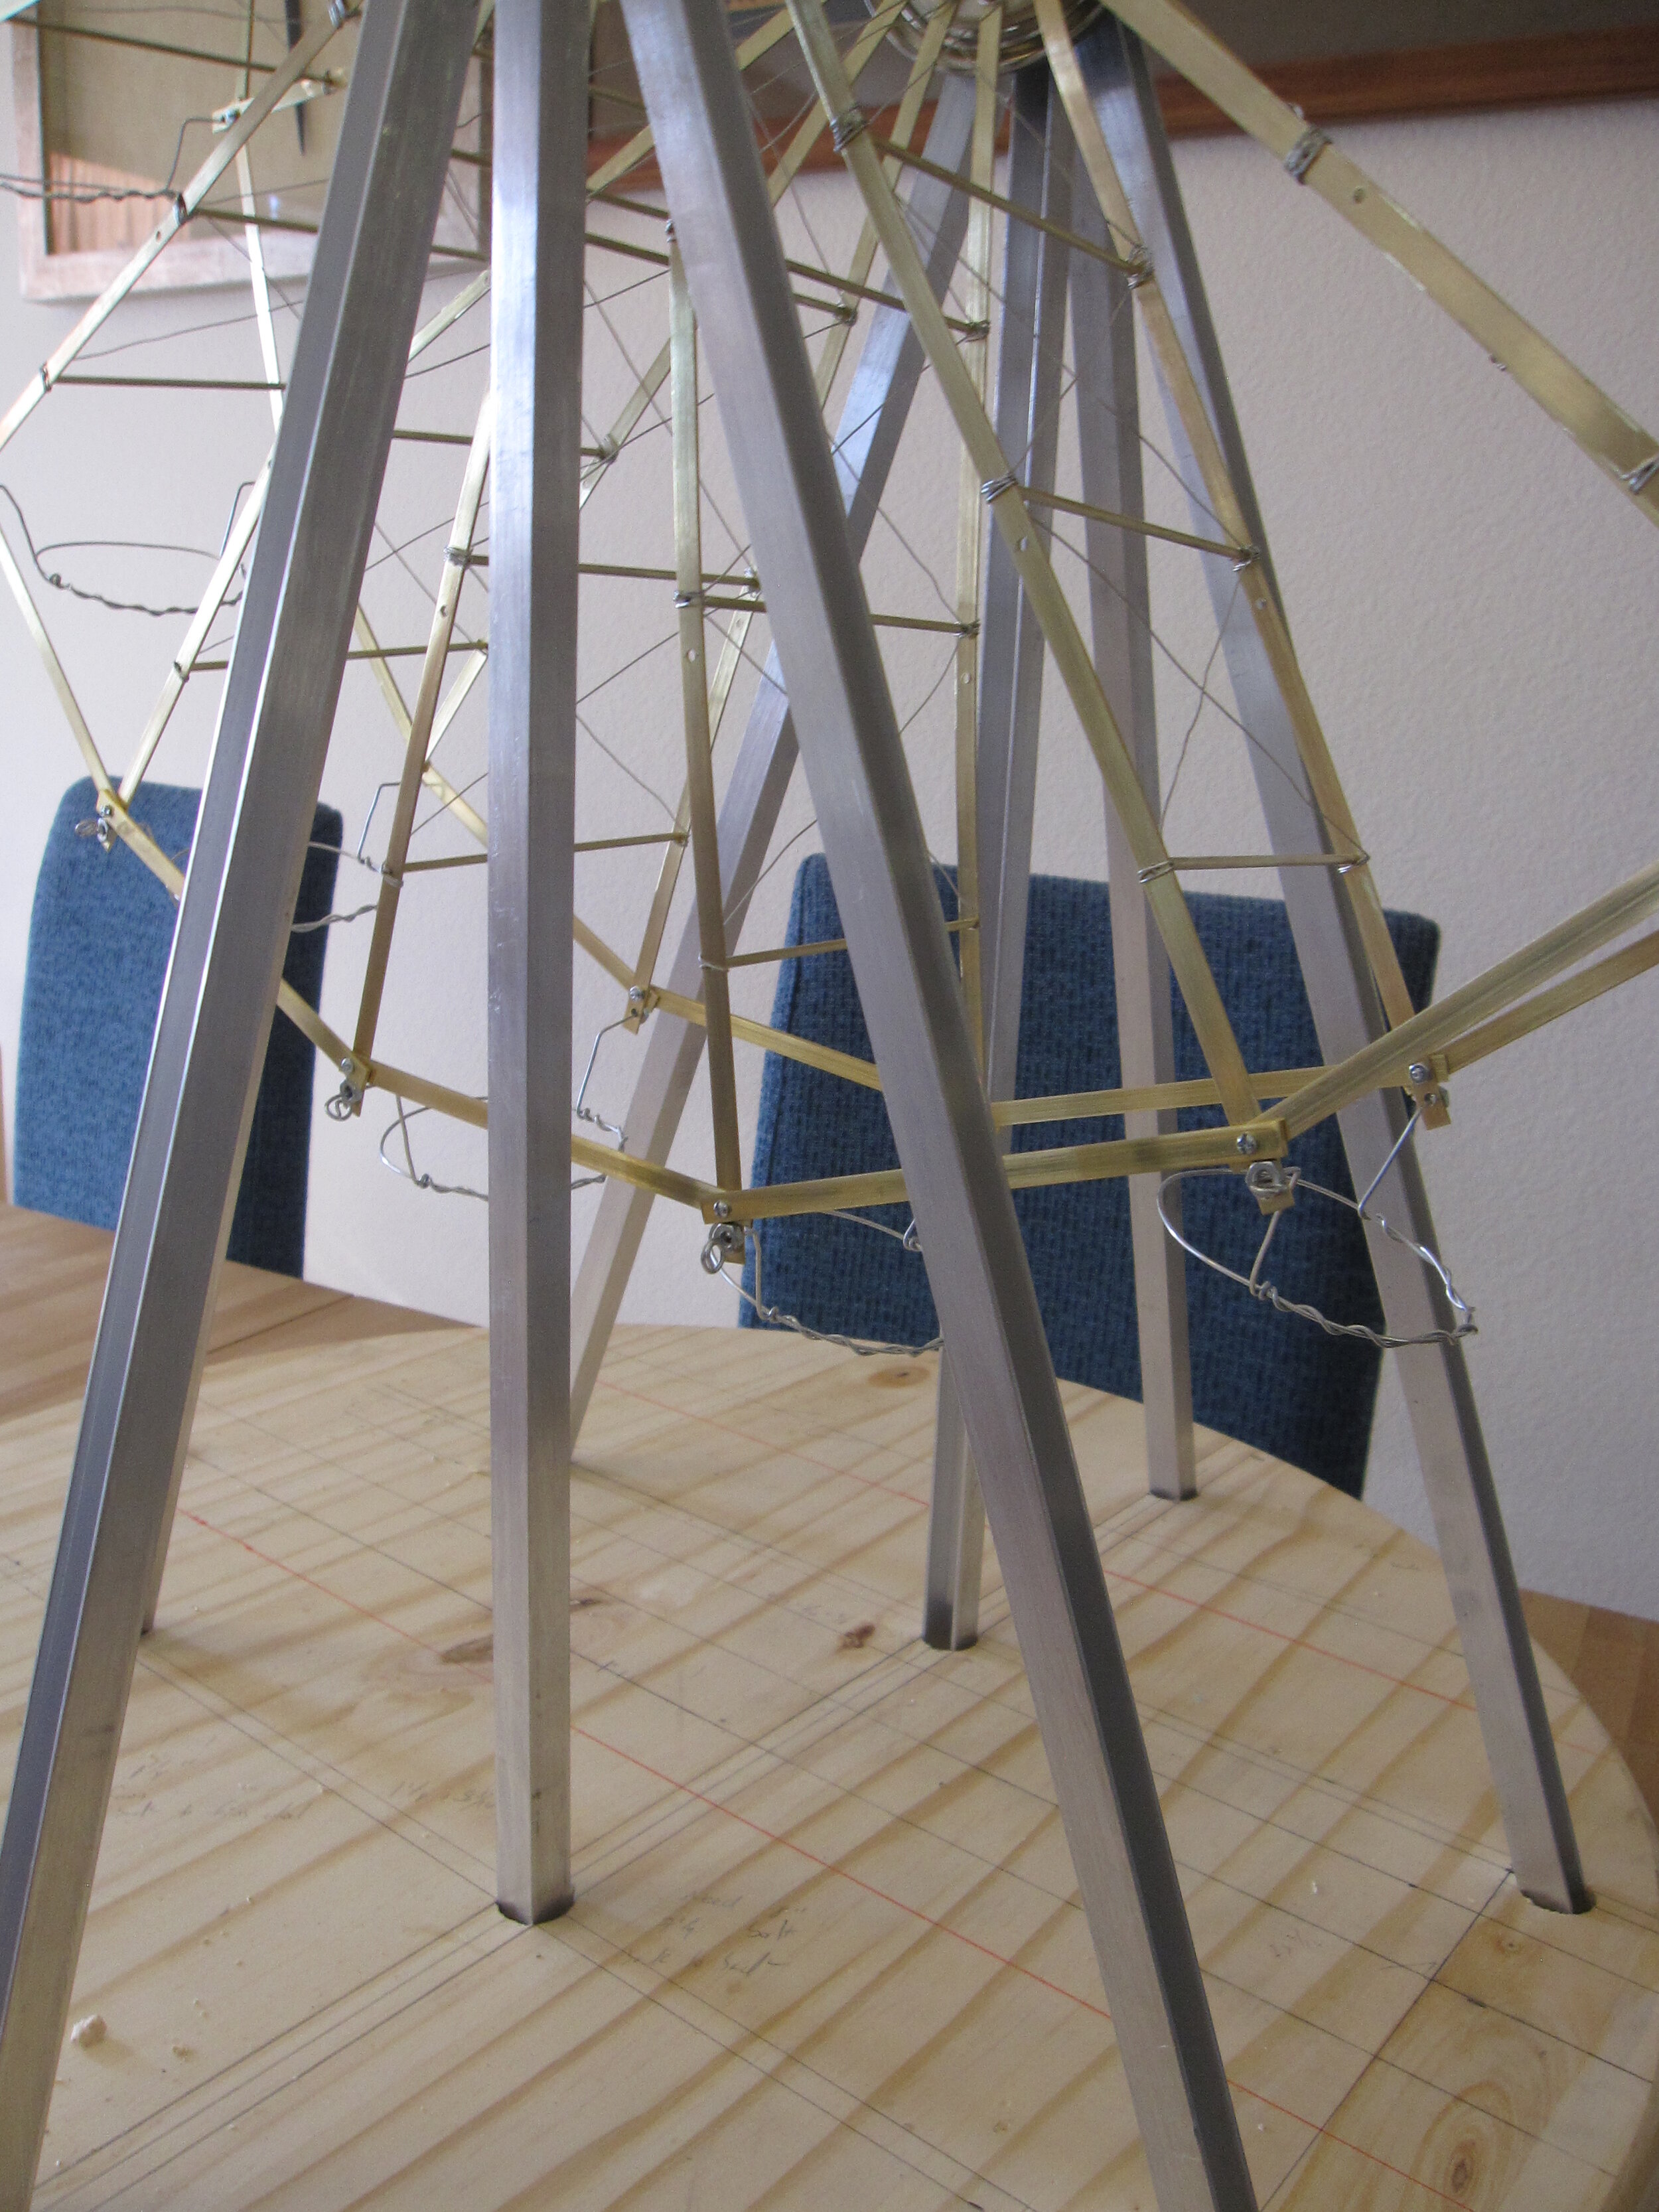
I really wanted people to be able to pick up the entire cupcake car and eat the entire thing. So I made basically little wire rings to set the cupcakes in. Obviously, these had to spin freely so that the cupcakes stayed upright all the way around the wheel (this being the essence of a ferris wheel). This would have been very easy if I had kept the strips connecting the spokes back from the end of the spokes about an additional half an inch. As it was, I had a bit of a struggle to keep the rings from catching on the brass strips, but in the end I managed it. One more thing I’ll know to do differently the next time I make a cupcake ferris wheel.
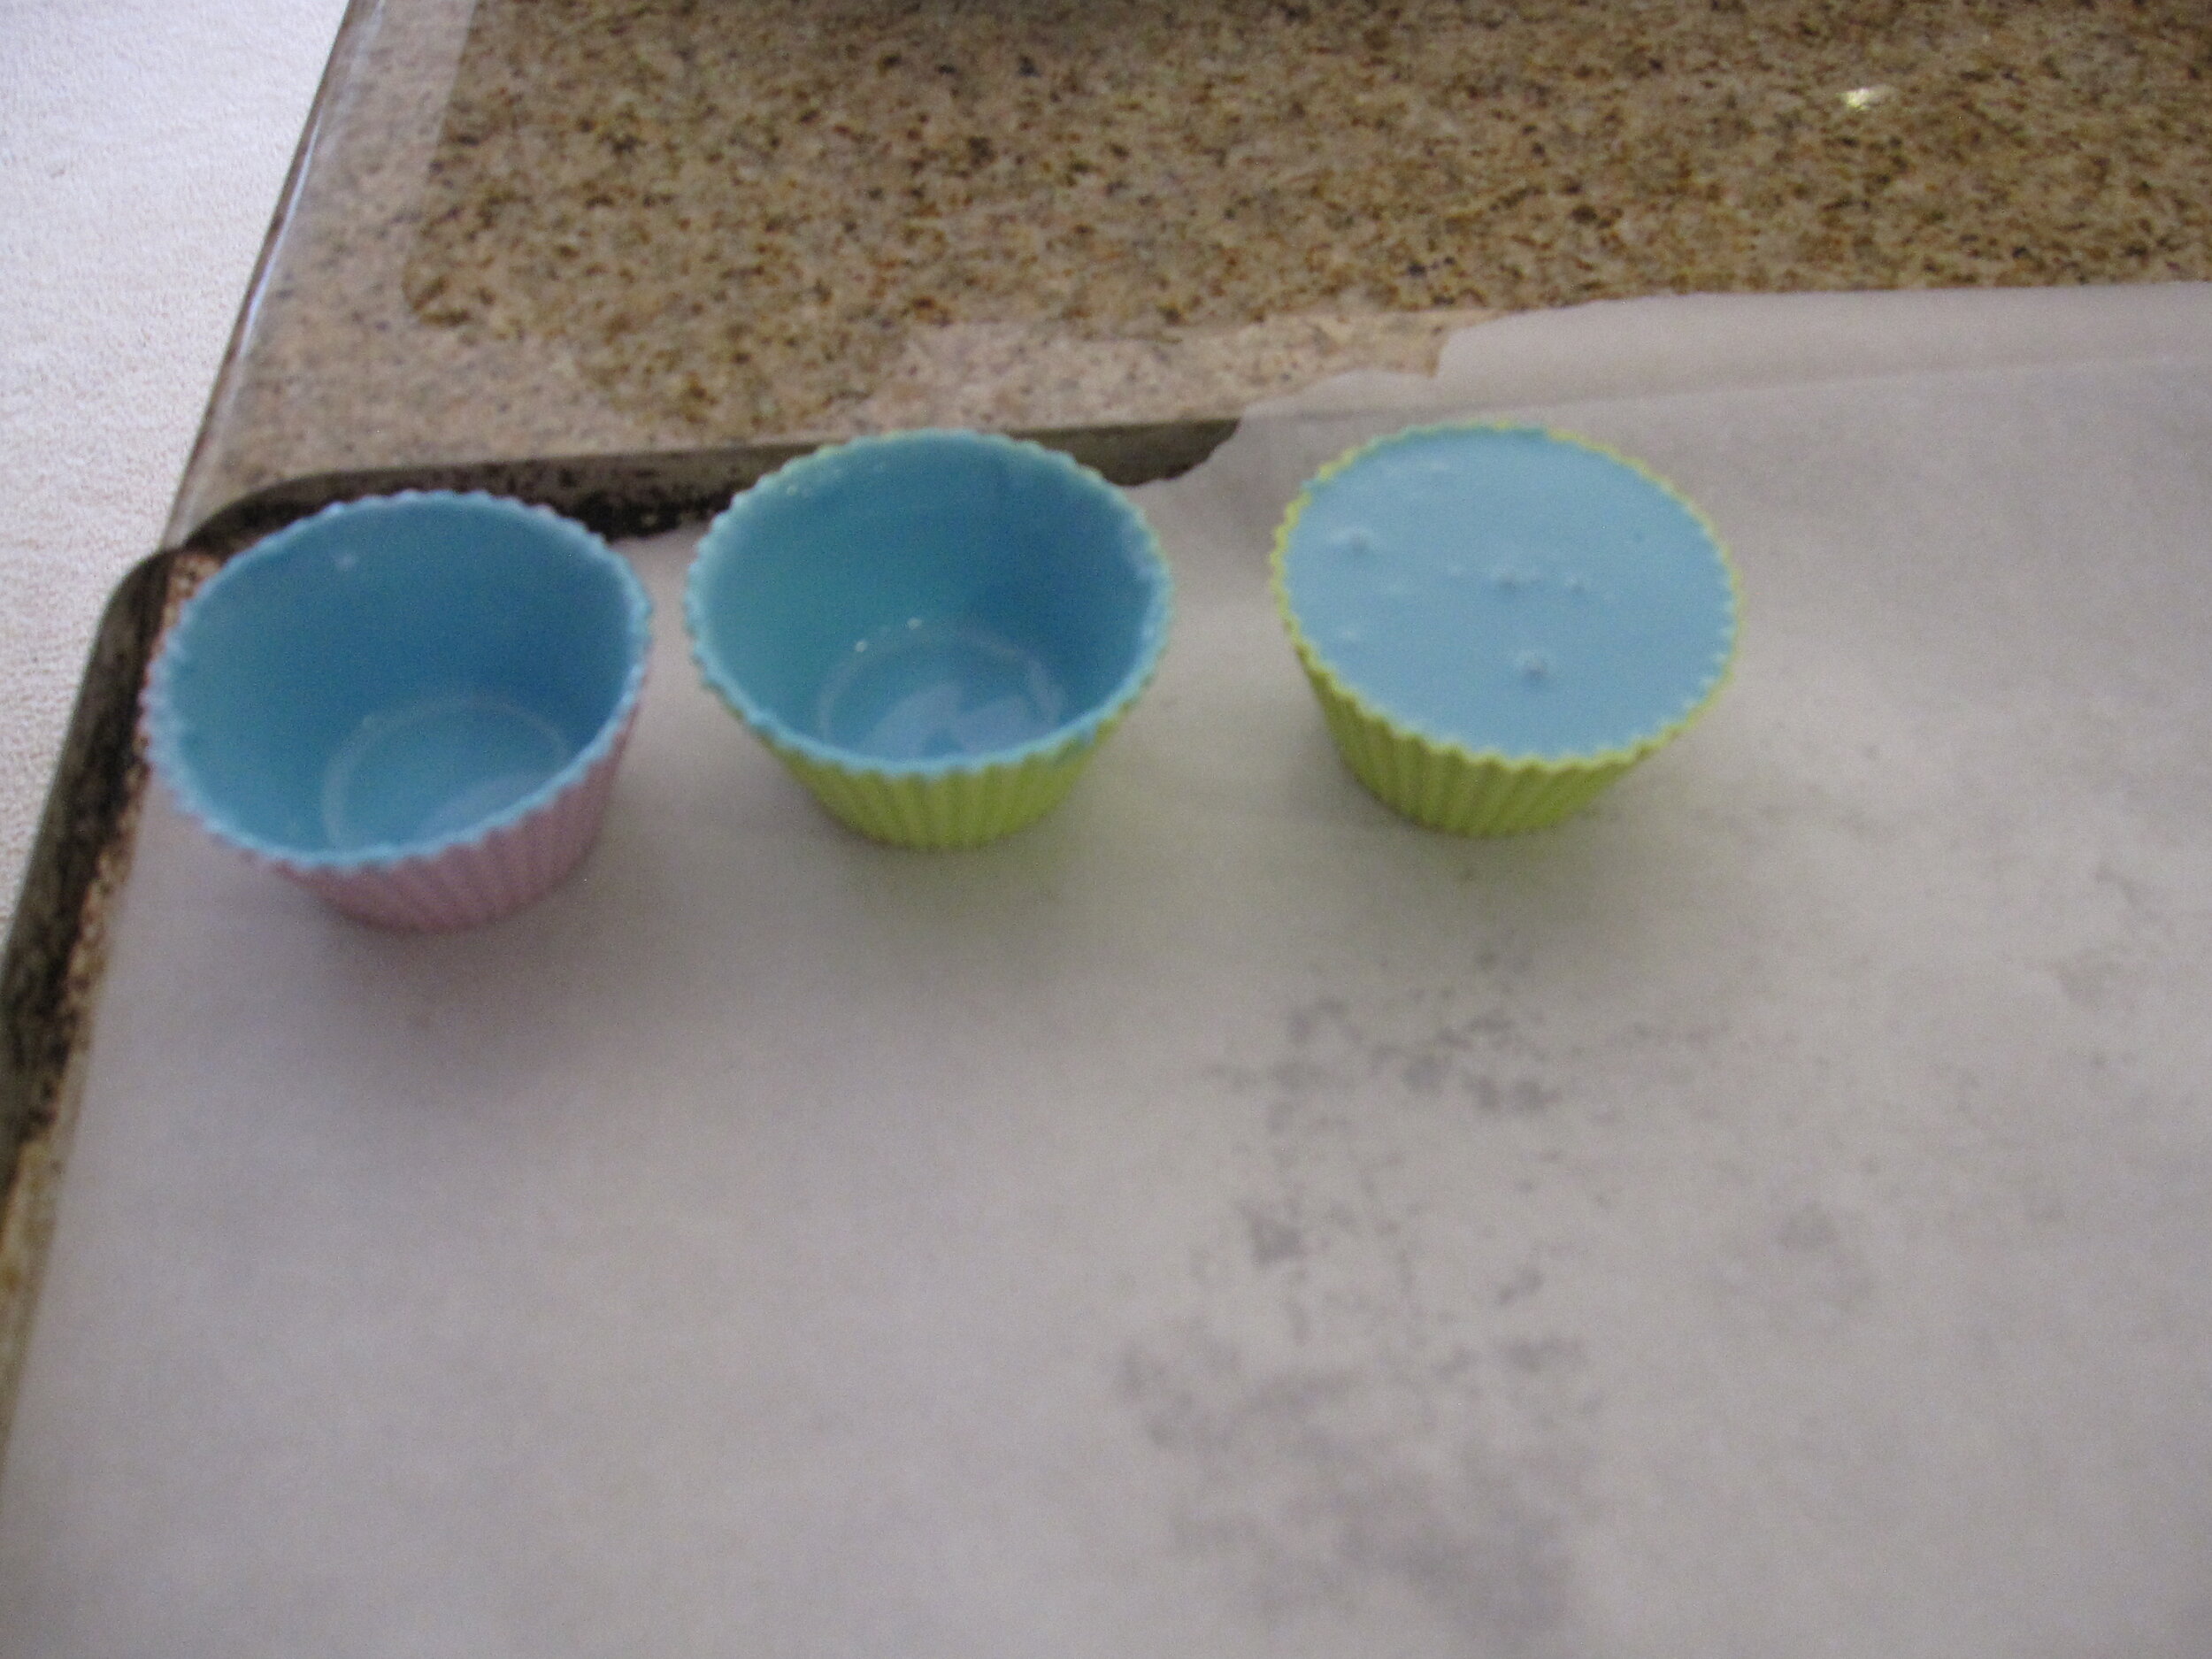
In order to make the cups themselves edible, I poured candy melts into silicone cupcake cups. For many years, I have been vehemently opposed to candy melts because I think they taste disgusting and the colors they come in are generally not in tune with my aesthetic, but my sister gave me that trendy little cake pop kit for Christmas, and I wanted to try out some of the techniques. I have been confirmed in my belief that they taste disgusting, but I suppose that they do have their uses. After all, I use fondant, too, and that doesn’t taste very good either.
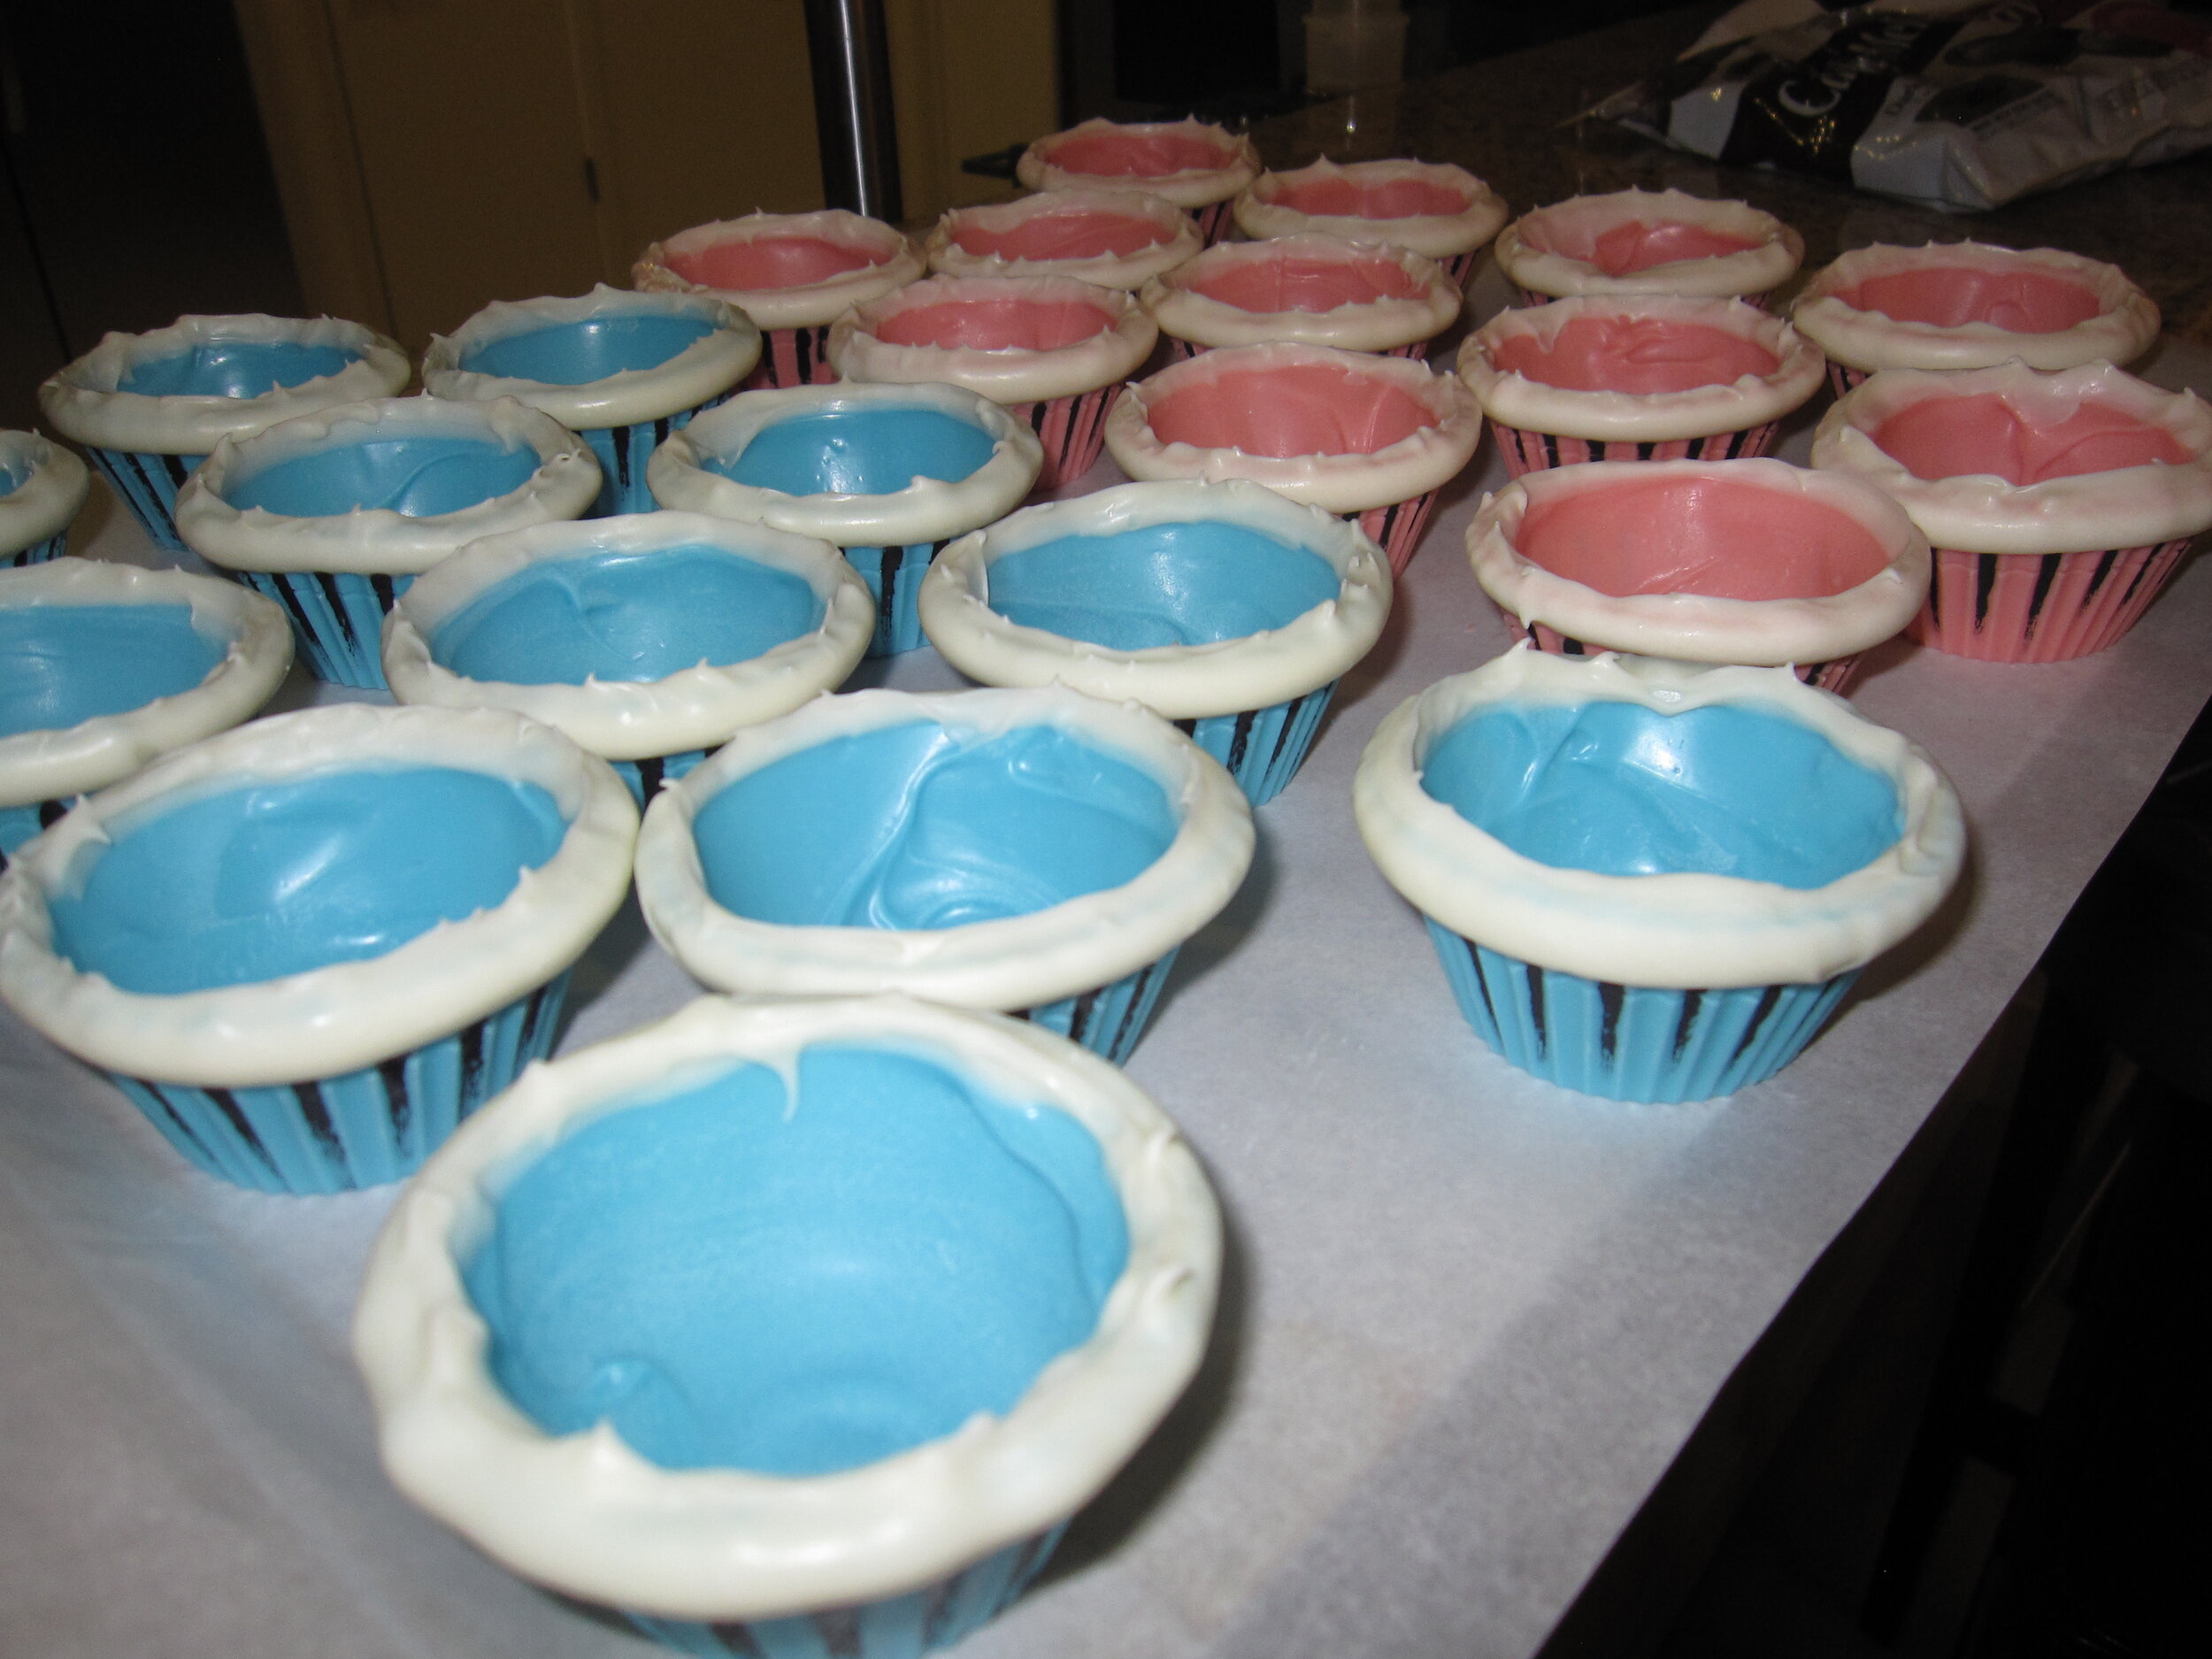
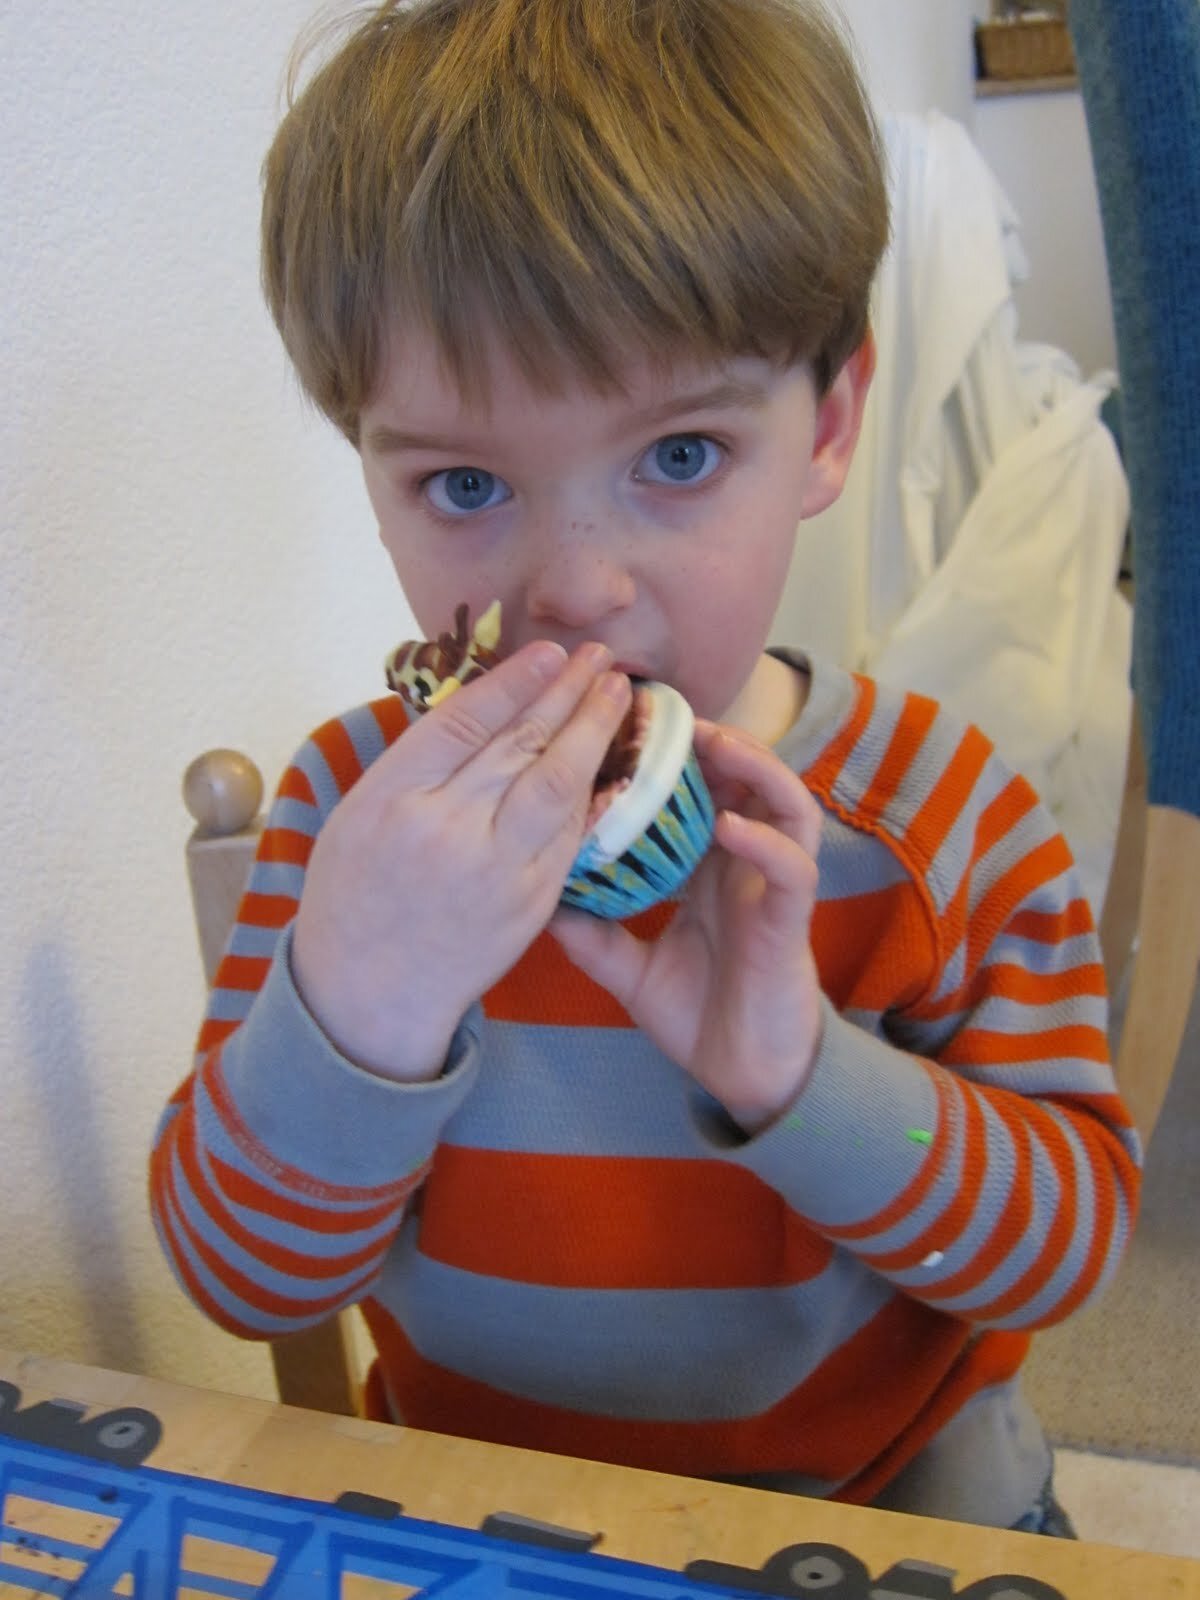
I let Sam pick out the colors of candy melts that he wanted for the cups and he chose pink and baby blue. Much like candy melts in general, this is basically the exact opposite of my aesthetic (and, as my sister pointed out, made it look a bit like a baby shower cake) but, hey, it’s his birthday. Who am I to argue? I gave the cups a second coat of candy melt on the inside to give them added structural stability and to make sure that the weight of the cupcake was concentrated in the bottom so they wouldn’t flip upside down. I dipped the top edge in white candy melt to give them a decorative rim that would also serve to hold them in the wire rings more effectively. I then attempted to ameliorate the pastel-ness of the cups by giving them distressed black streaks in some of the flutes of the cupcake cups. I told myself I was striving for a vaguely Victorian steam-punk aesthetic. I’m not sure that I entirely got there.
A few days before the party, I made a very important discovery. Sam’s grandparents gave him an awesome set of Little People animals for his birthday, which he absolutely loved. He even refused to eat dinner because he was too busy playing with them, which, coming from Sam, is a huge complement. He pulled the giraffe out of the bag and proudly exclaimed, “Zebra!” Uh oh. I remembered that Sam does not always differentiate between zebras and giraffes. So I pulled out the zebra and the giraffe and asked him which one was a zebra cupcake. First he pointed to the giraffe. Then he pointed to the zebra. So I decided to hedge my bets and make both zebra and giraffe cupcakes.
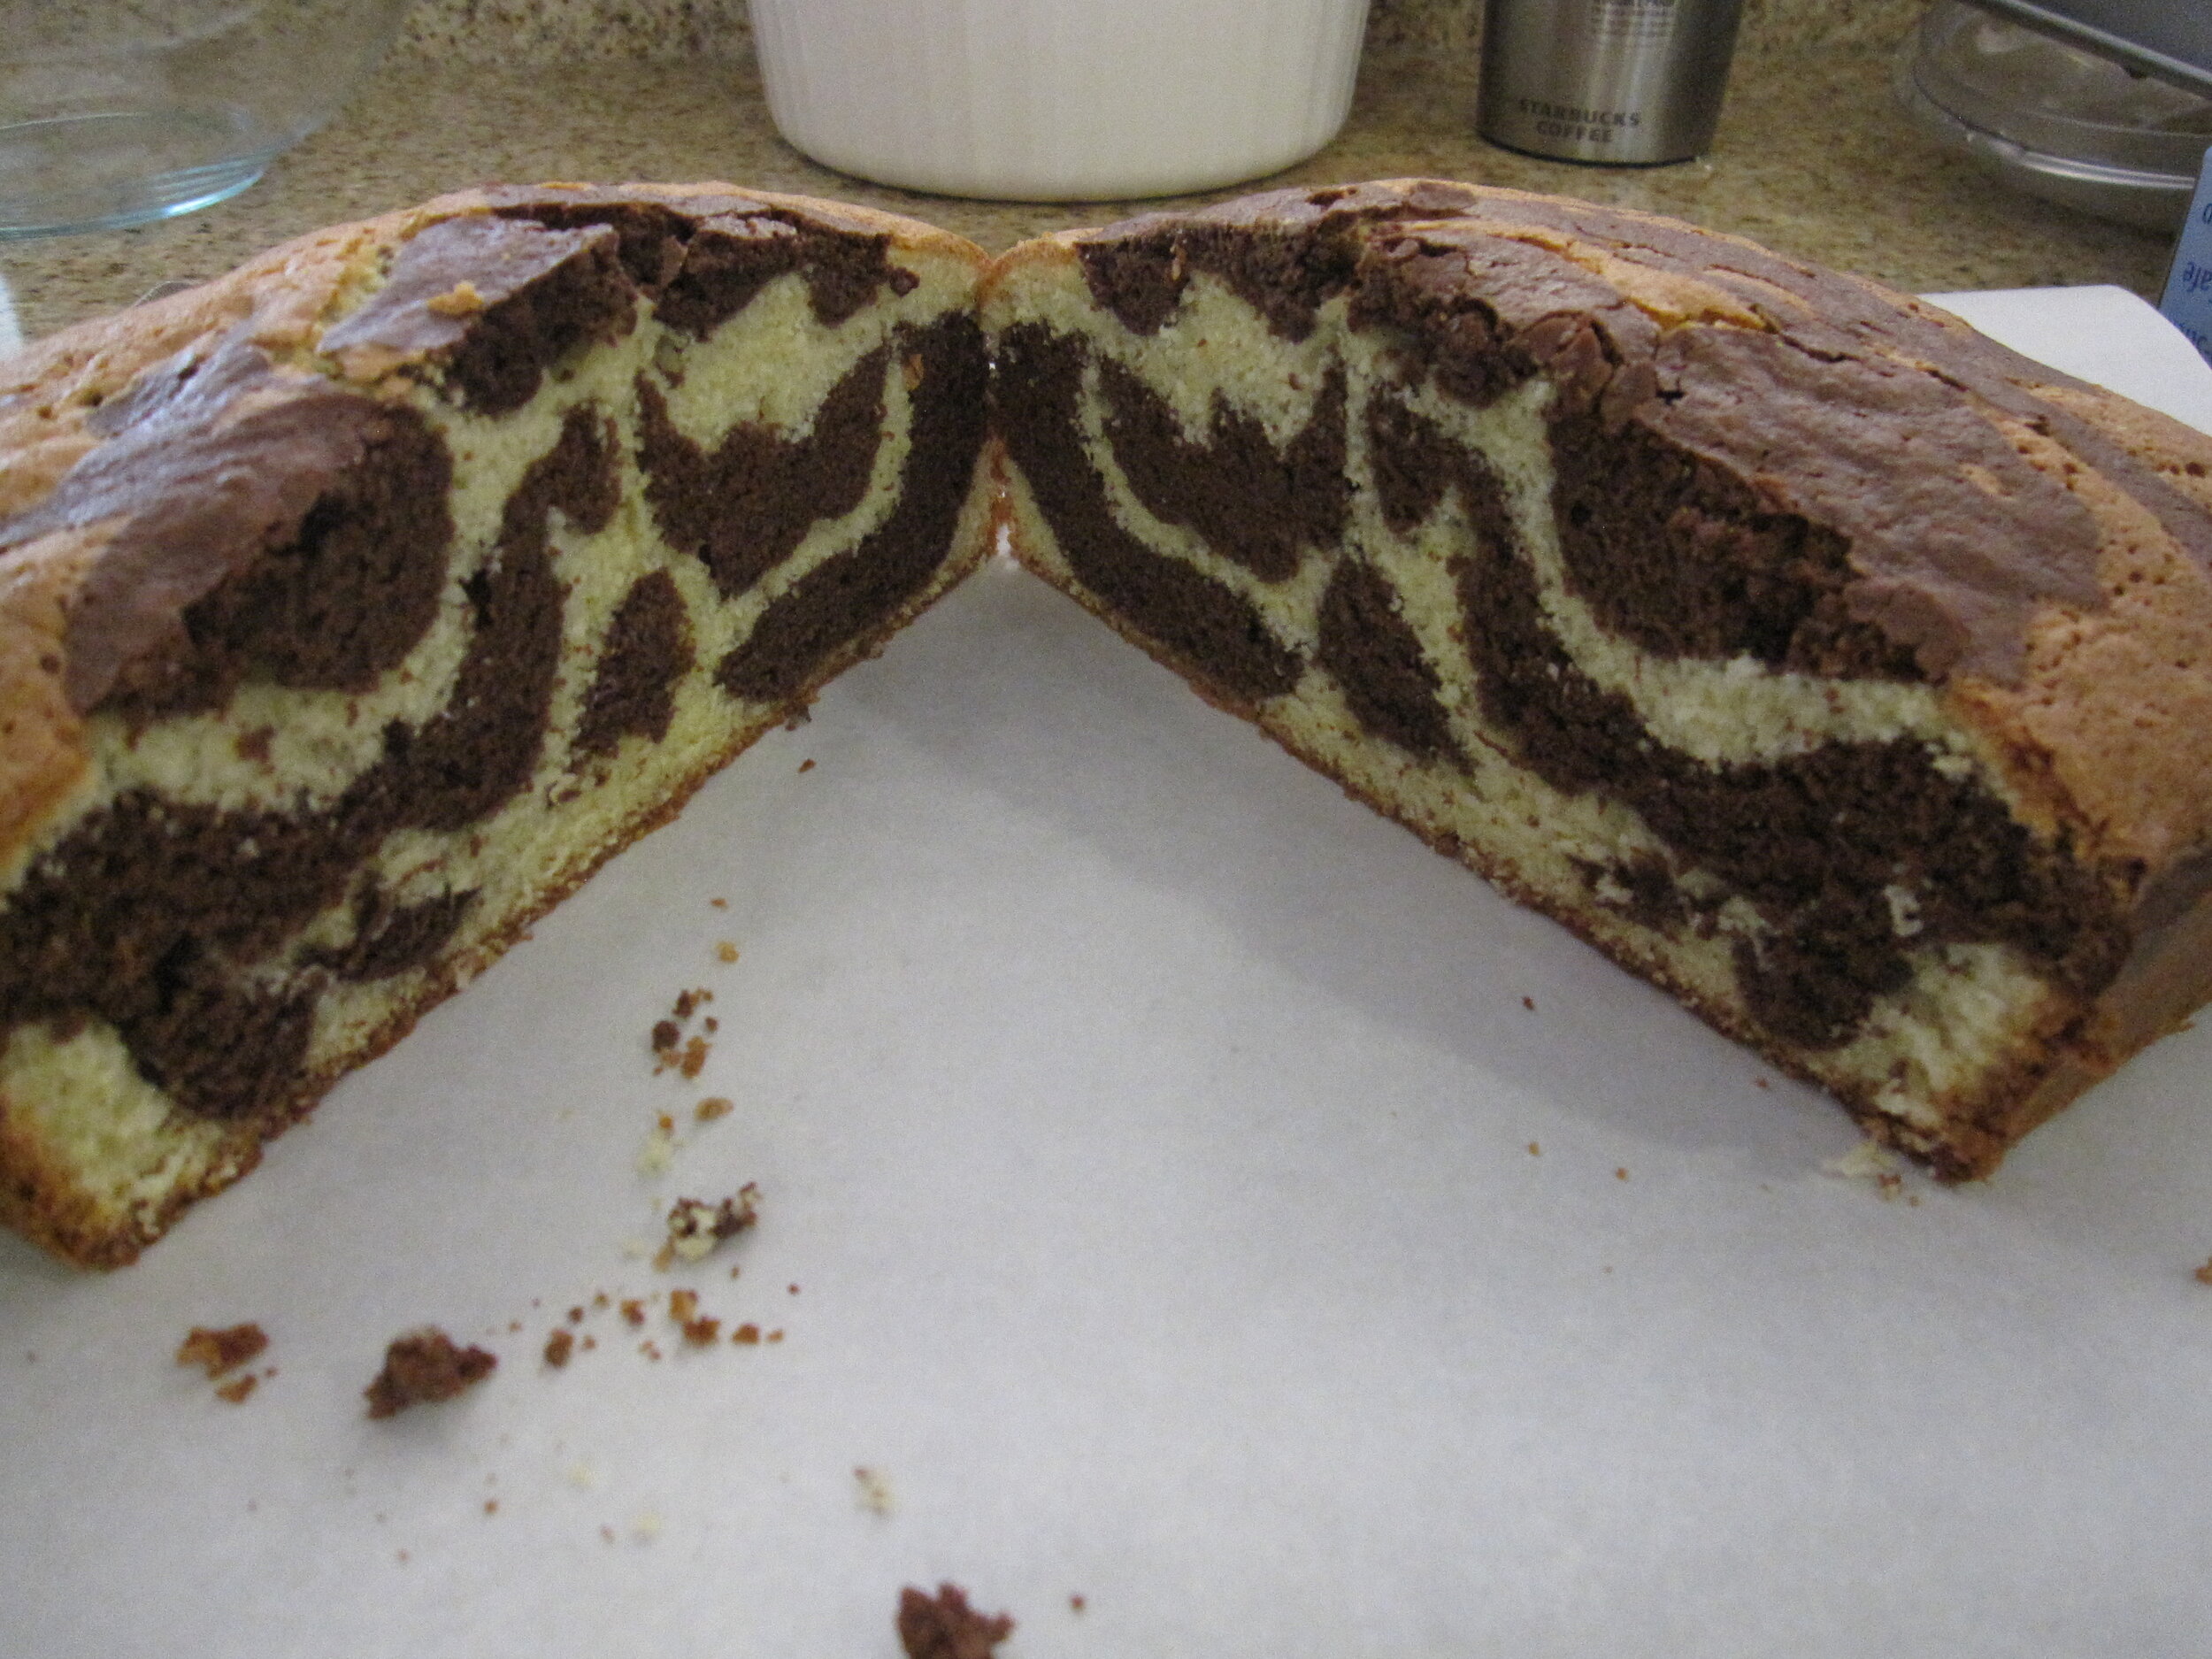
For the cake recipe, I used a new marbled olive oil cake recipe. I had initially chosen this recipe because the marbling resembled zebra stripes. It actually turned out to be perfect because the marbling, both in color and in pattern, is about halfway between a zebra and a giraffe. It also turned out to be quite delicious. Generally, when I’m making a cake, the last thing I want to do is eat cake, but I snacked on this cake the entire time.
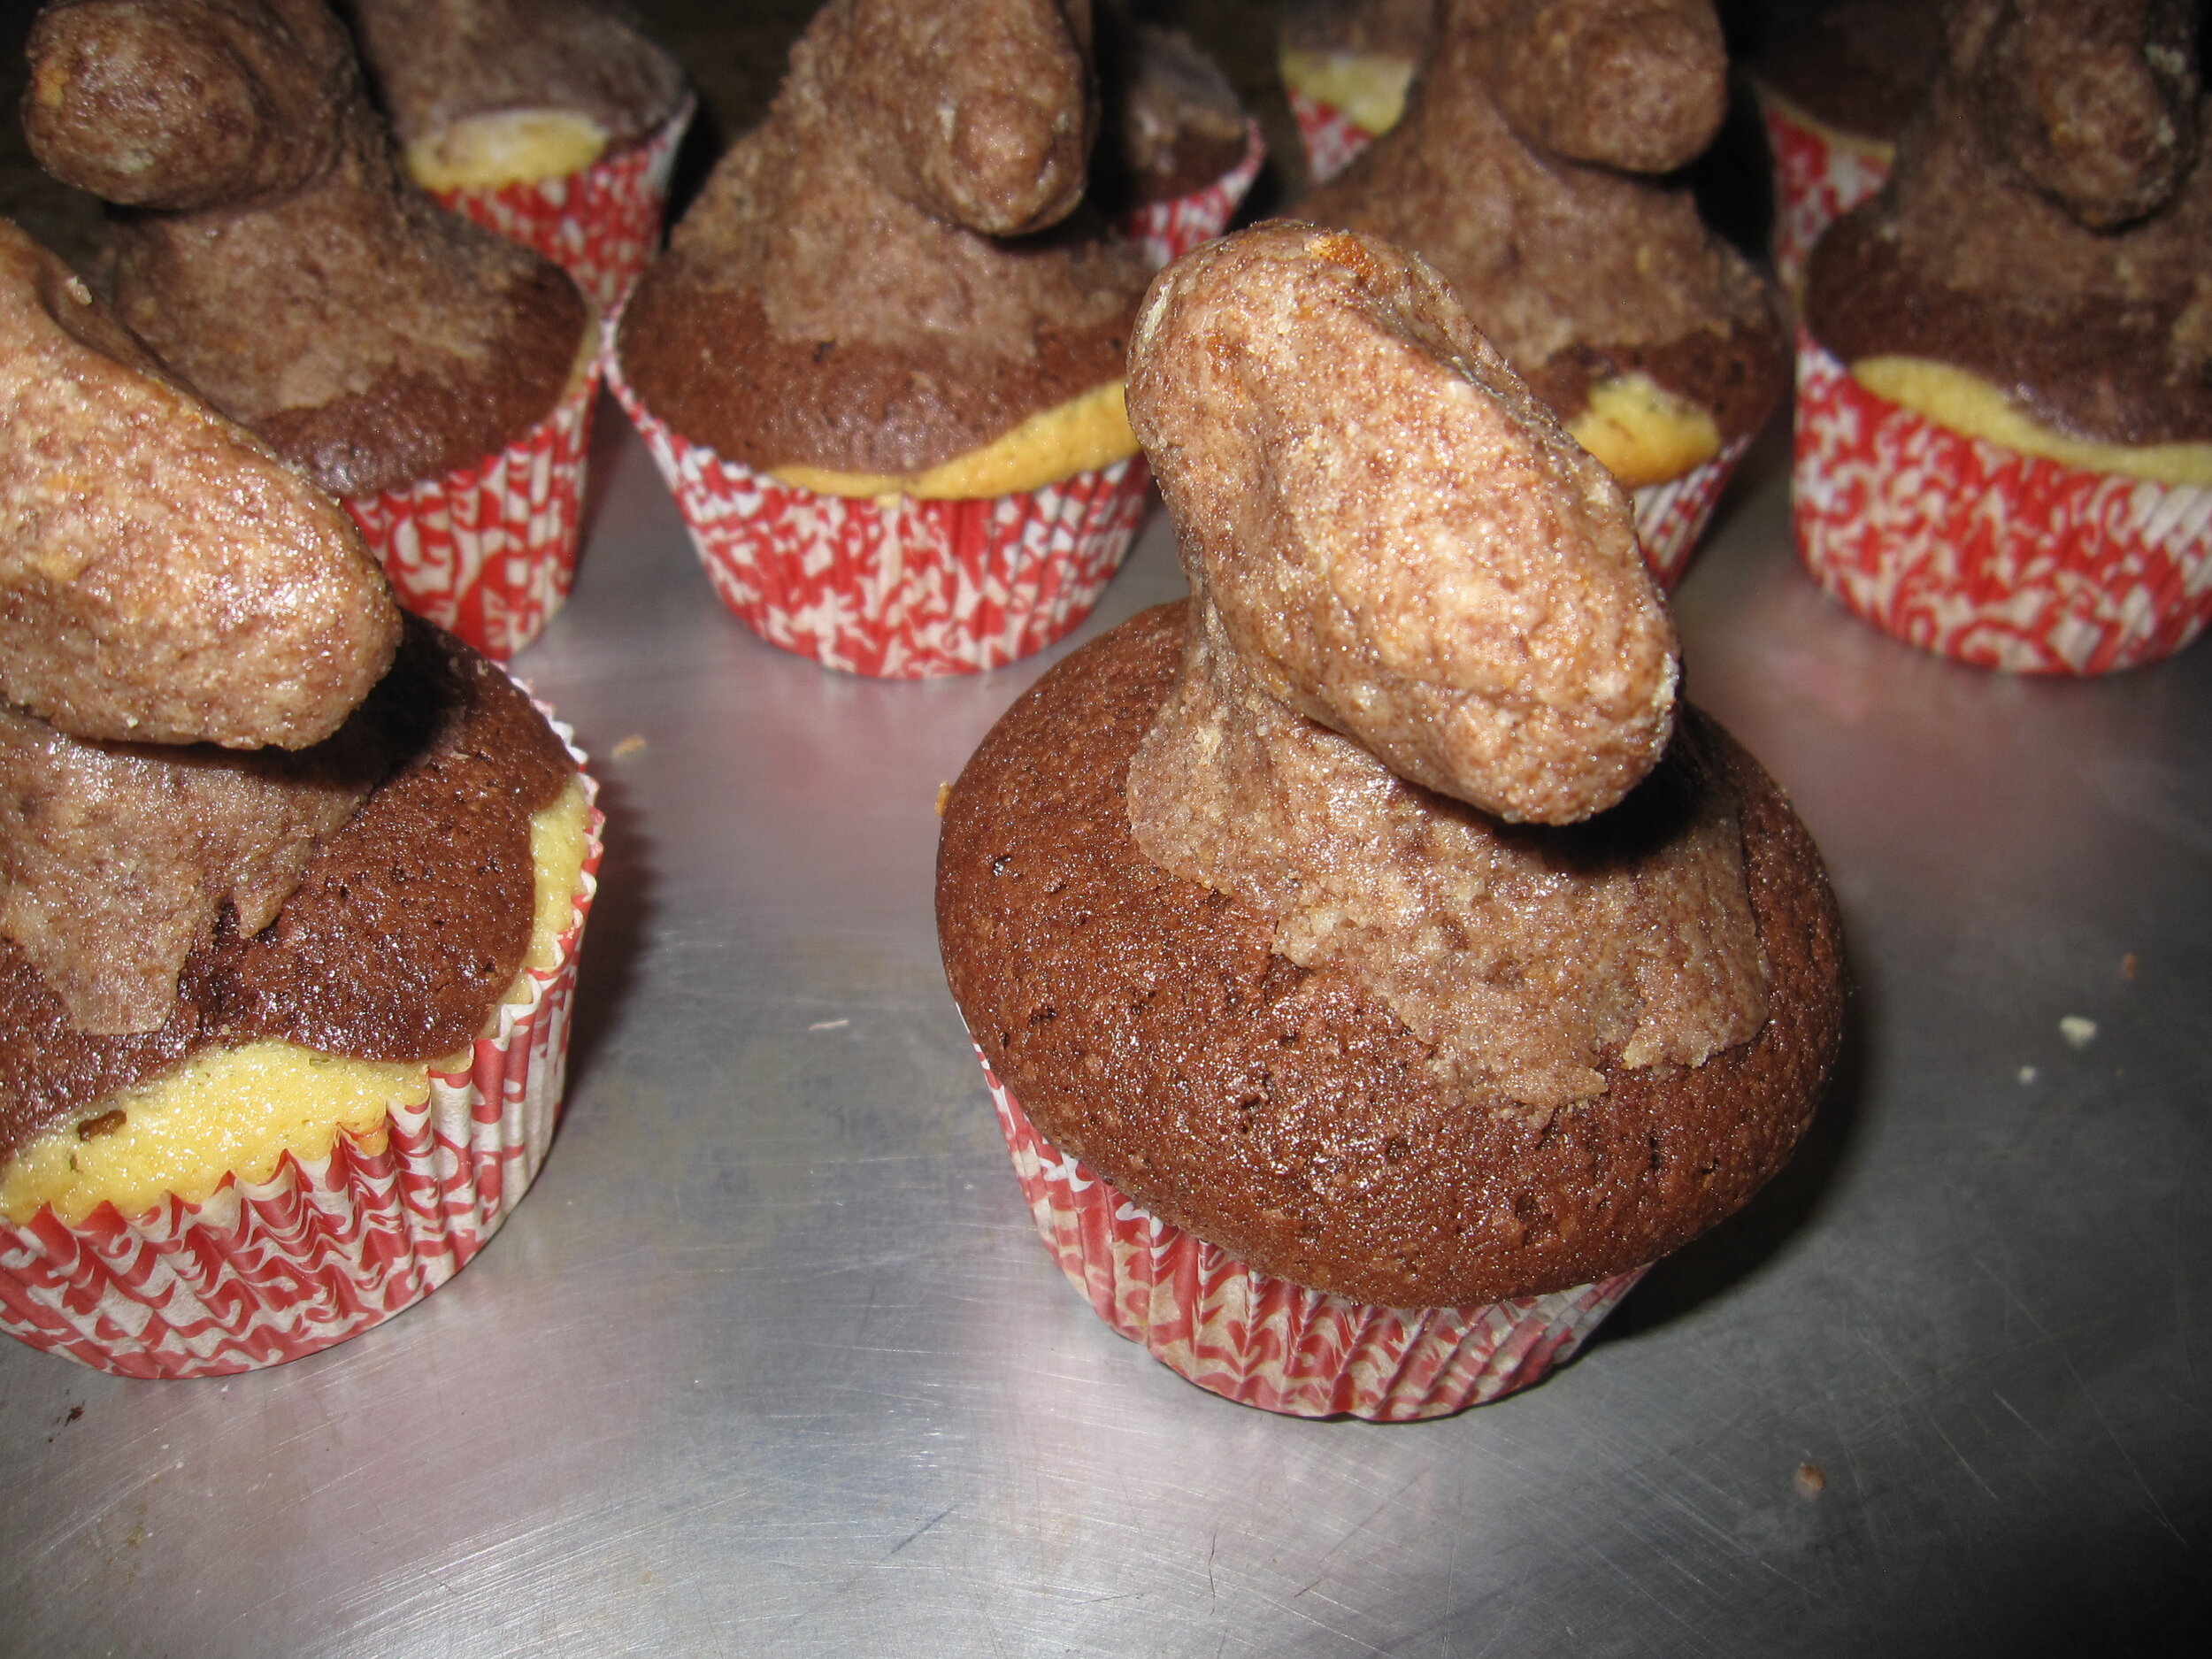
Once the cupcakes were baked, I used essentially the cake pop technique to add zebra and giraffe heads to them. This involves crumbling up cake and mixing it with frosting to make a thick paste and then shaping it as desired. To make the zebra heads, I did this directly on top of the cupcakes. Because the giraffes needed long, thin necks, I made them separately then popped them in the refrigerator to harden up enough that I could then embed them in the cupcakes.
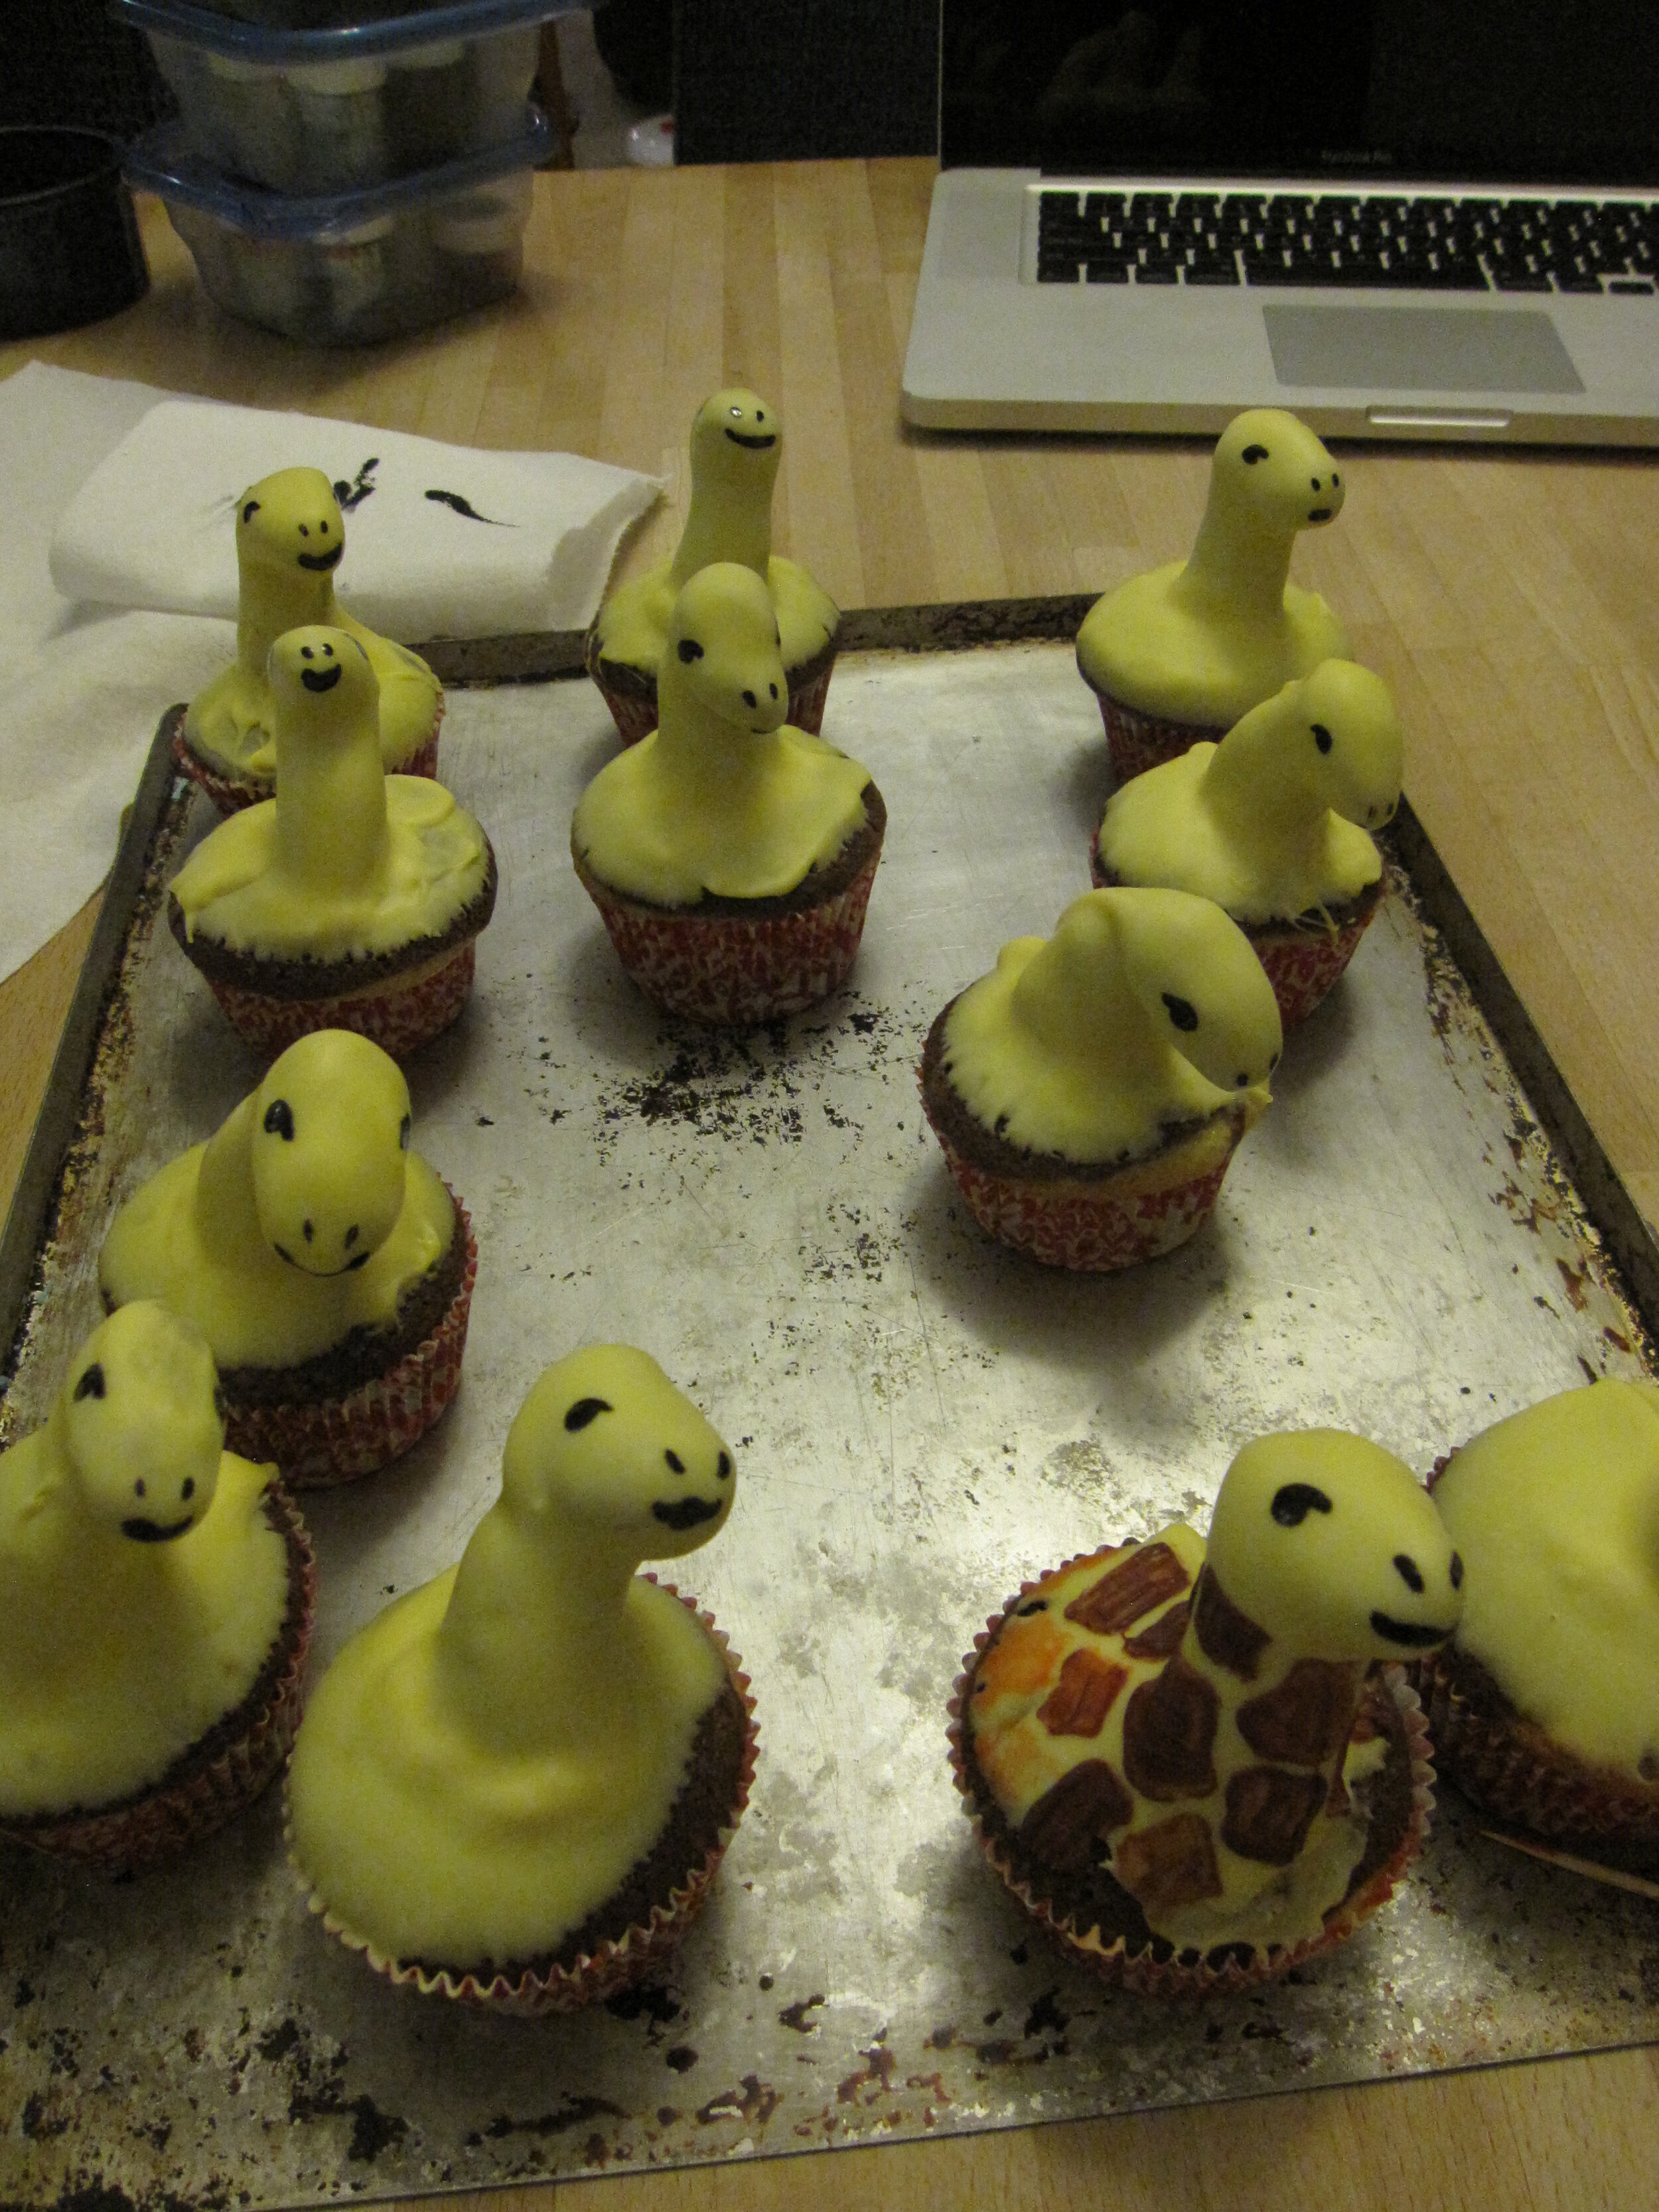
I dipped the zebras in white candy melts and the giraffes in yellowish candy melts. Once this hardened, I peeled the paper off the cupcakes and set the cupcakes in the candy melt cups. Then I used food coloring and candy melts to paint on the patterns, mouths, and eyes. I tried to make them look smug about the fact that the lion couldn’t reach them. I think that next time I should make the eyes more prominent by using something three-dimensional like a candy sprinkle. I also added candy melt ears, manes, and (in the case of the giraffes) horns.
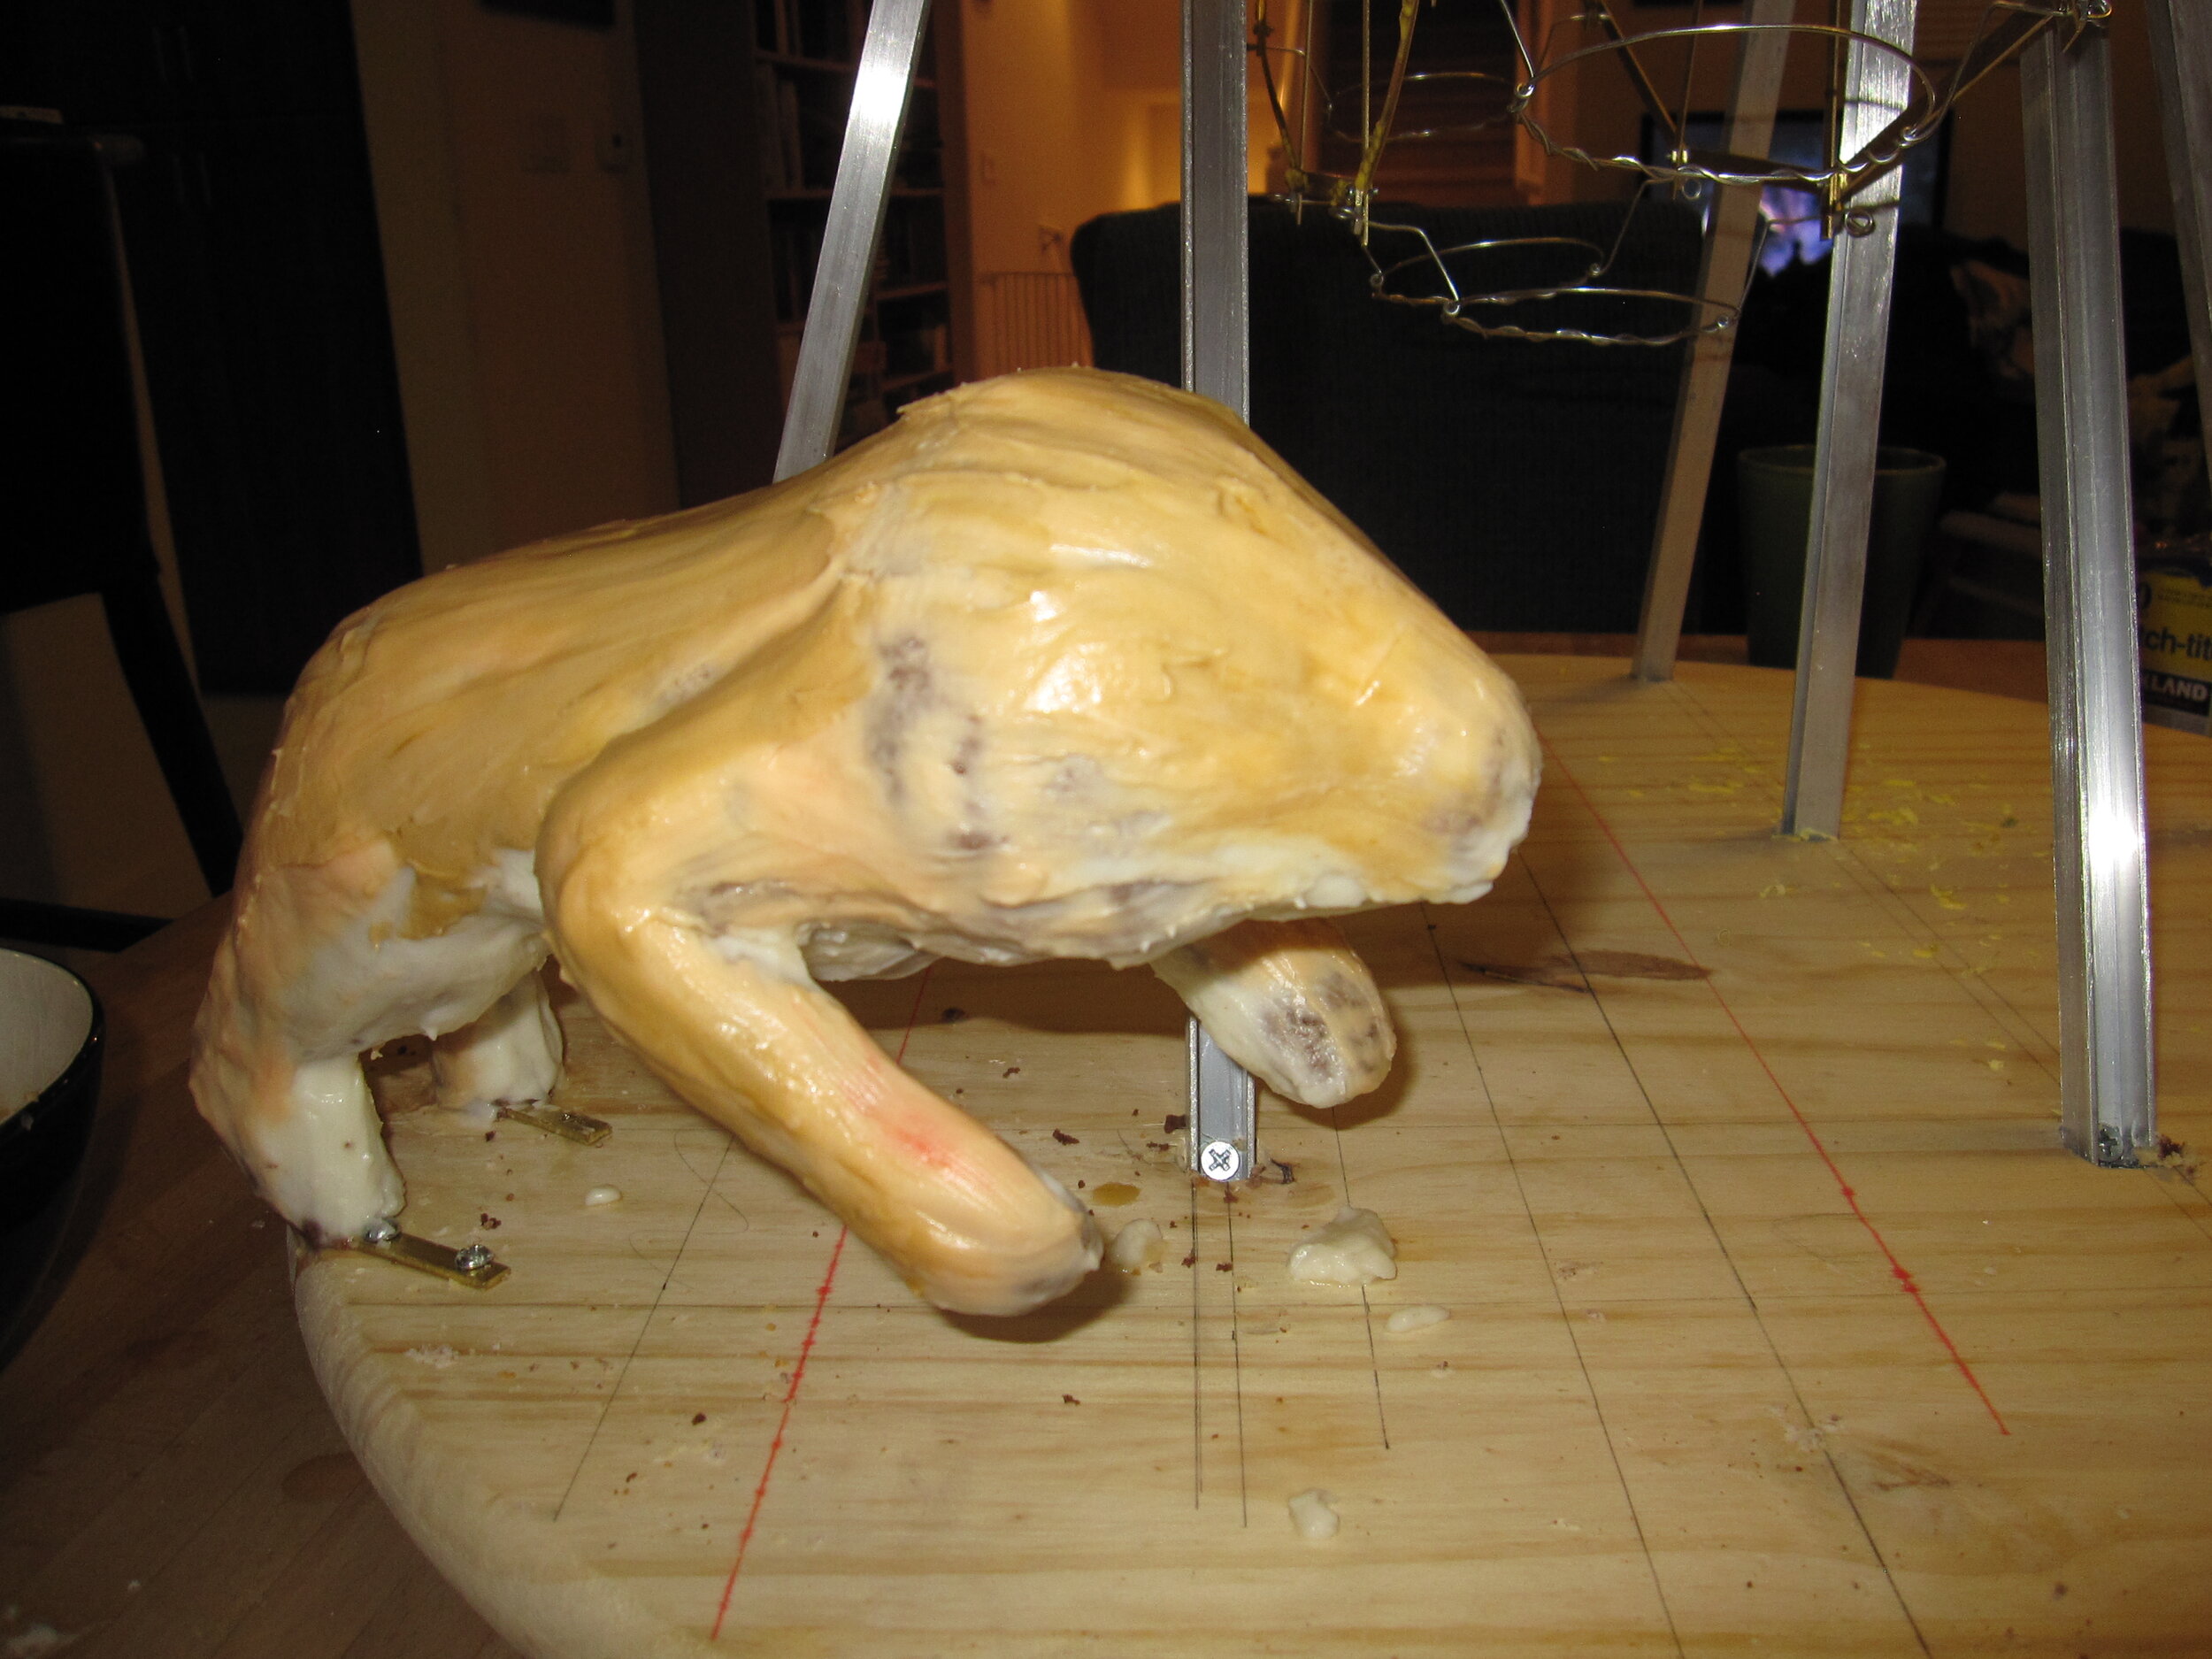
To make the lion look like it was in mid-lunge, I made a base for it using brass strips and foam core so that only the back two feet would be touching the ground. I bolted this to the cake base and built the lion on top of it. I wish that the base had been a little bigger, because I couldn’t really place the lion in the way I would have liked. He wound leaping more alongside the ferris wheel than at the ferris wheel. I also wish I had waited until the cake cooled completely before I put it on the base, because then I would have had less trouble with the cake melting the icing and sliding on the base. After I carved the cake and added a little mass with some of the cake pop goo, I used buttercream icing for the fur and candy melt for the ears and tail. In the end, I wasn’t particularly happy with the way the lion turned out. It was more awkward than scary, but not cartoony enough to be fun. Just as I was feeling most disappointed in how the lion turned out, Sam woke up and saw it. He gave a squeal of unmitigated delight and yelled “A lion!” So apparently, my lion wasn’t such a failure after all. For days after the party, Sam wandered around saying, “I ate the tail!”
At an early point in the process, I had planned to dip the entire ferris wheel in candy melt. Fortunately, I gave this idea up before I tried it, as the results would doubtless have been disastrous. However, I also couldn’t leave it entirely unadorned. For one thing, it clashed with the baby shower pink and blue cupcake cups. For another, Alex pointed out to me that ferris wheels are colorful. So I decorated it with red, blue, and yellow candy melt squiggles and dots. I was reasonably pleased with this effect and Alex also gave it her stamp of approval.

The final touches were to decorate the base. By this time it was the morning of the party and I had been up all night working on the cake. So the base sort of got short changed. I threw down a layer of pressed sugar dirt and then brushed on some different shades of brown food coloring. I didn’t have my airbrush with me, so the results weren’t as subtle as I would have liked. I also tried something new to make the savannah grasses. I used puff pastry, brushed with green food coloring, and cut into grass shapes. In the end, it looked more like french fries than grass, but it was still a fun experiment.
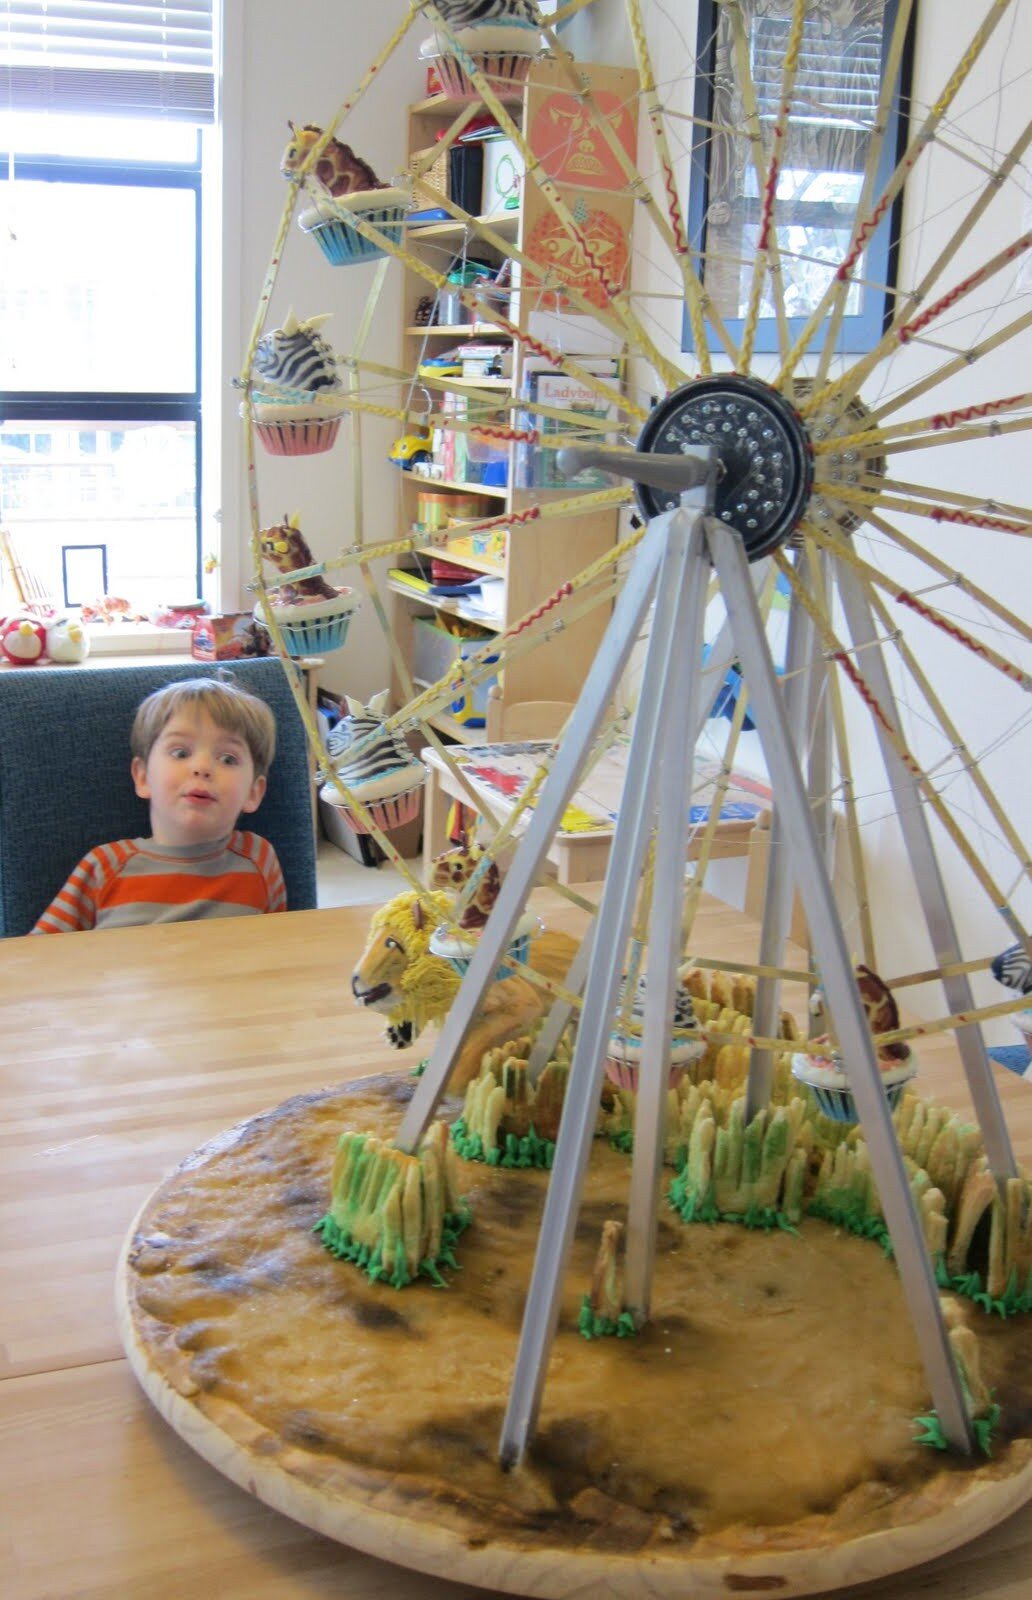
Right before the party, I set all the animals in the ferris wheel. I had to make a few tweaks to get them all to rotate freely, but all in all it really worked remarkably well. Only one zebra fell out in the process, but I had extras, so it wasn’t a problem.The party was great. All the kids took a turn spinning the ferris wheel and they were all very serious about not spinning it too fast. I served the lion to the adults, because it didn’t have candy melt all over it. The kids, of course, loved the candy melts. In fact, Alex ate only the candy melt portion and ignored the actual cake. Of course, I still have no idea what Sam actually imagined that zebra cupcakes are, but he seemed pleased with what I came up with, which is really all that matters. And now he has a two-foot diameter metal ferris wheel to treasure forever.


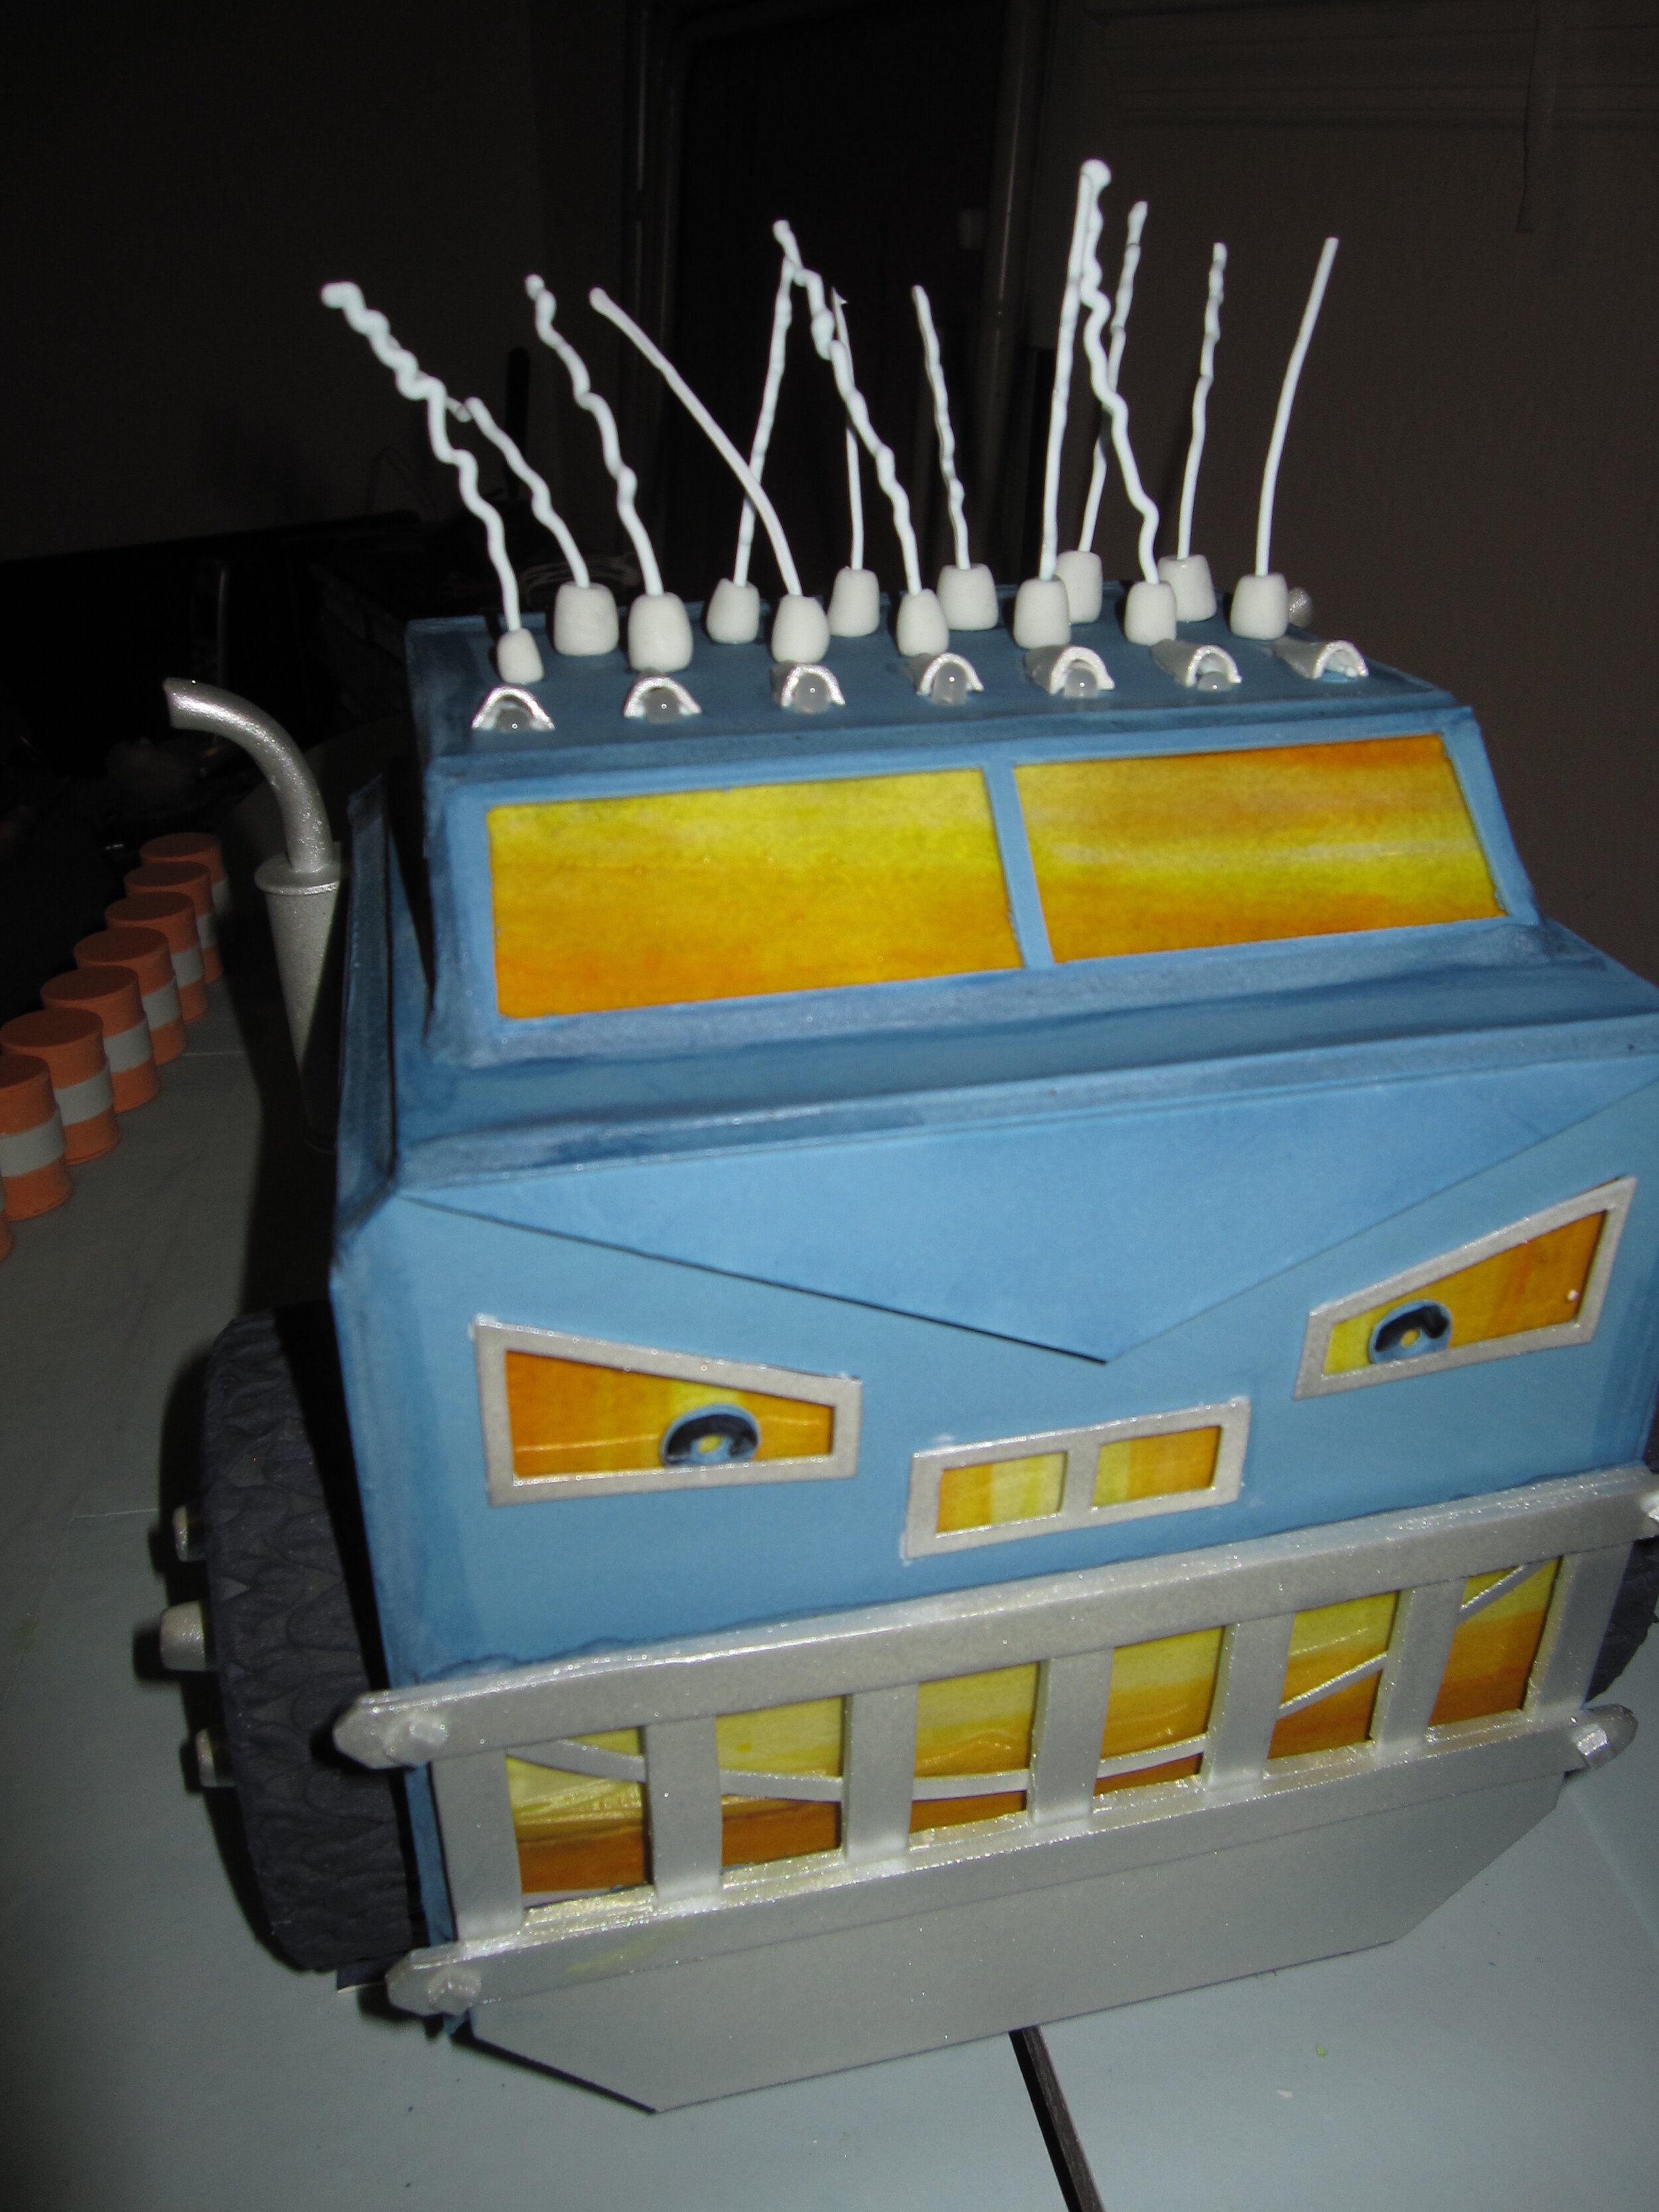
Zoom! Boom! Bully Cake
For my niece’s fourth birthday, I made a cake based on Zoom! Boom! Bully from John Scieszka’s Trucktown.

Those of you who don’t happen to be immersed in the magical world of three- to five-year-old children are probably not familiar with John Scieszka’s Trucktown. So I recommend that you follow the link so you know what the heck I’m talking about.
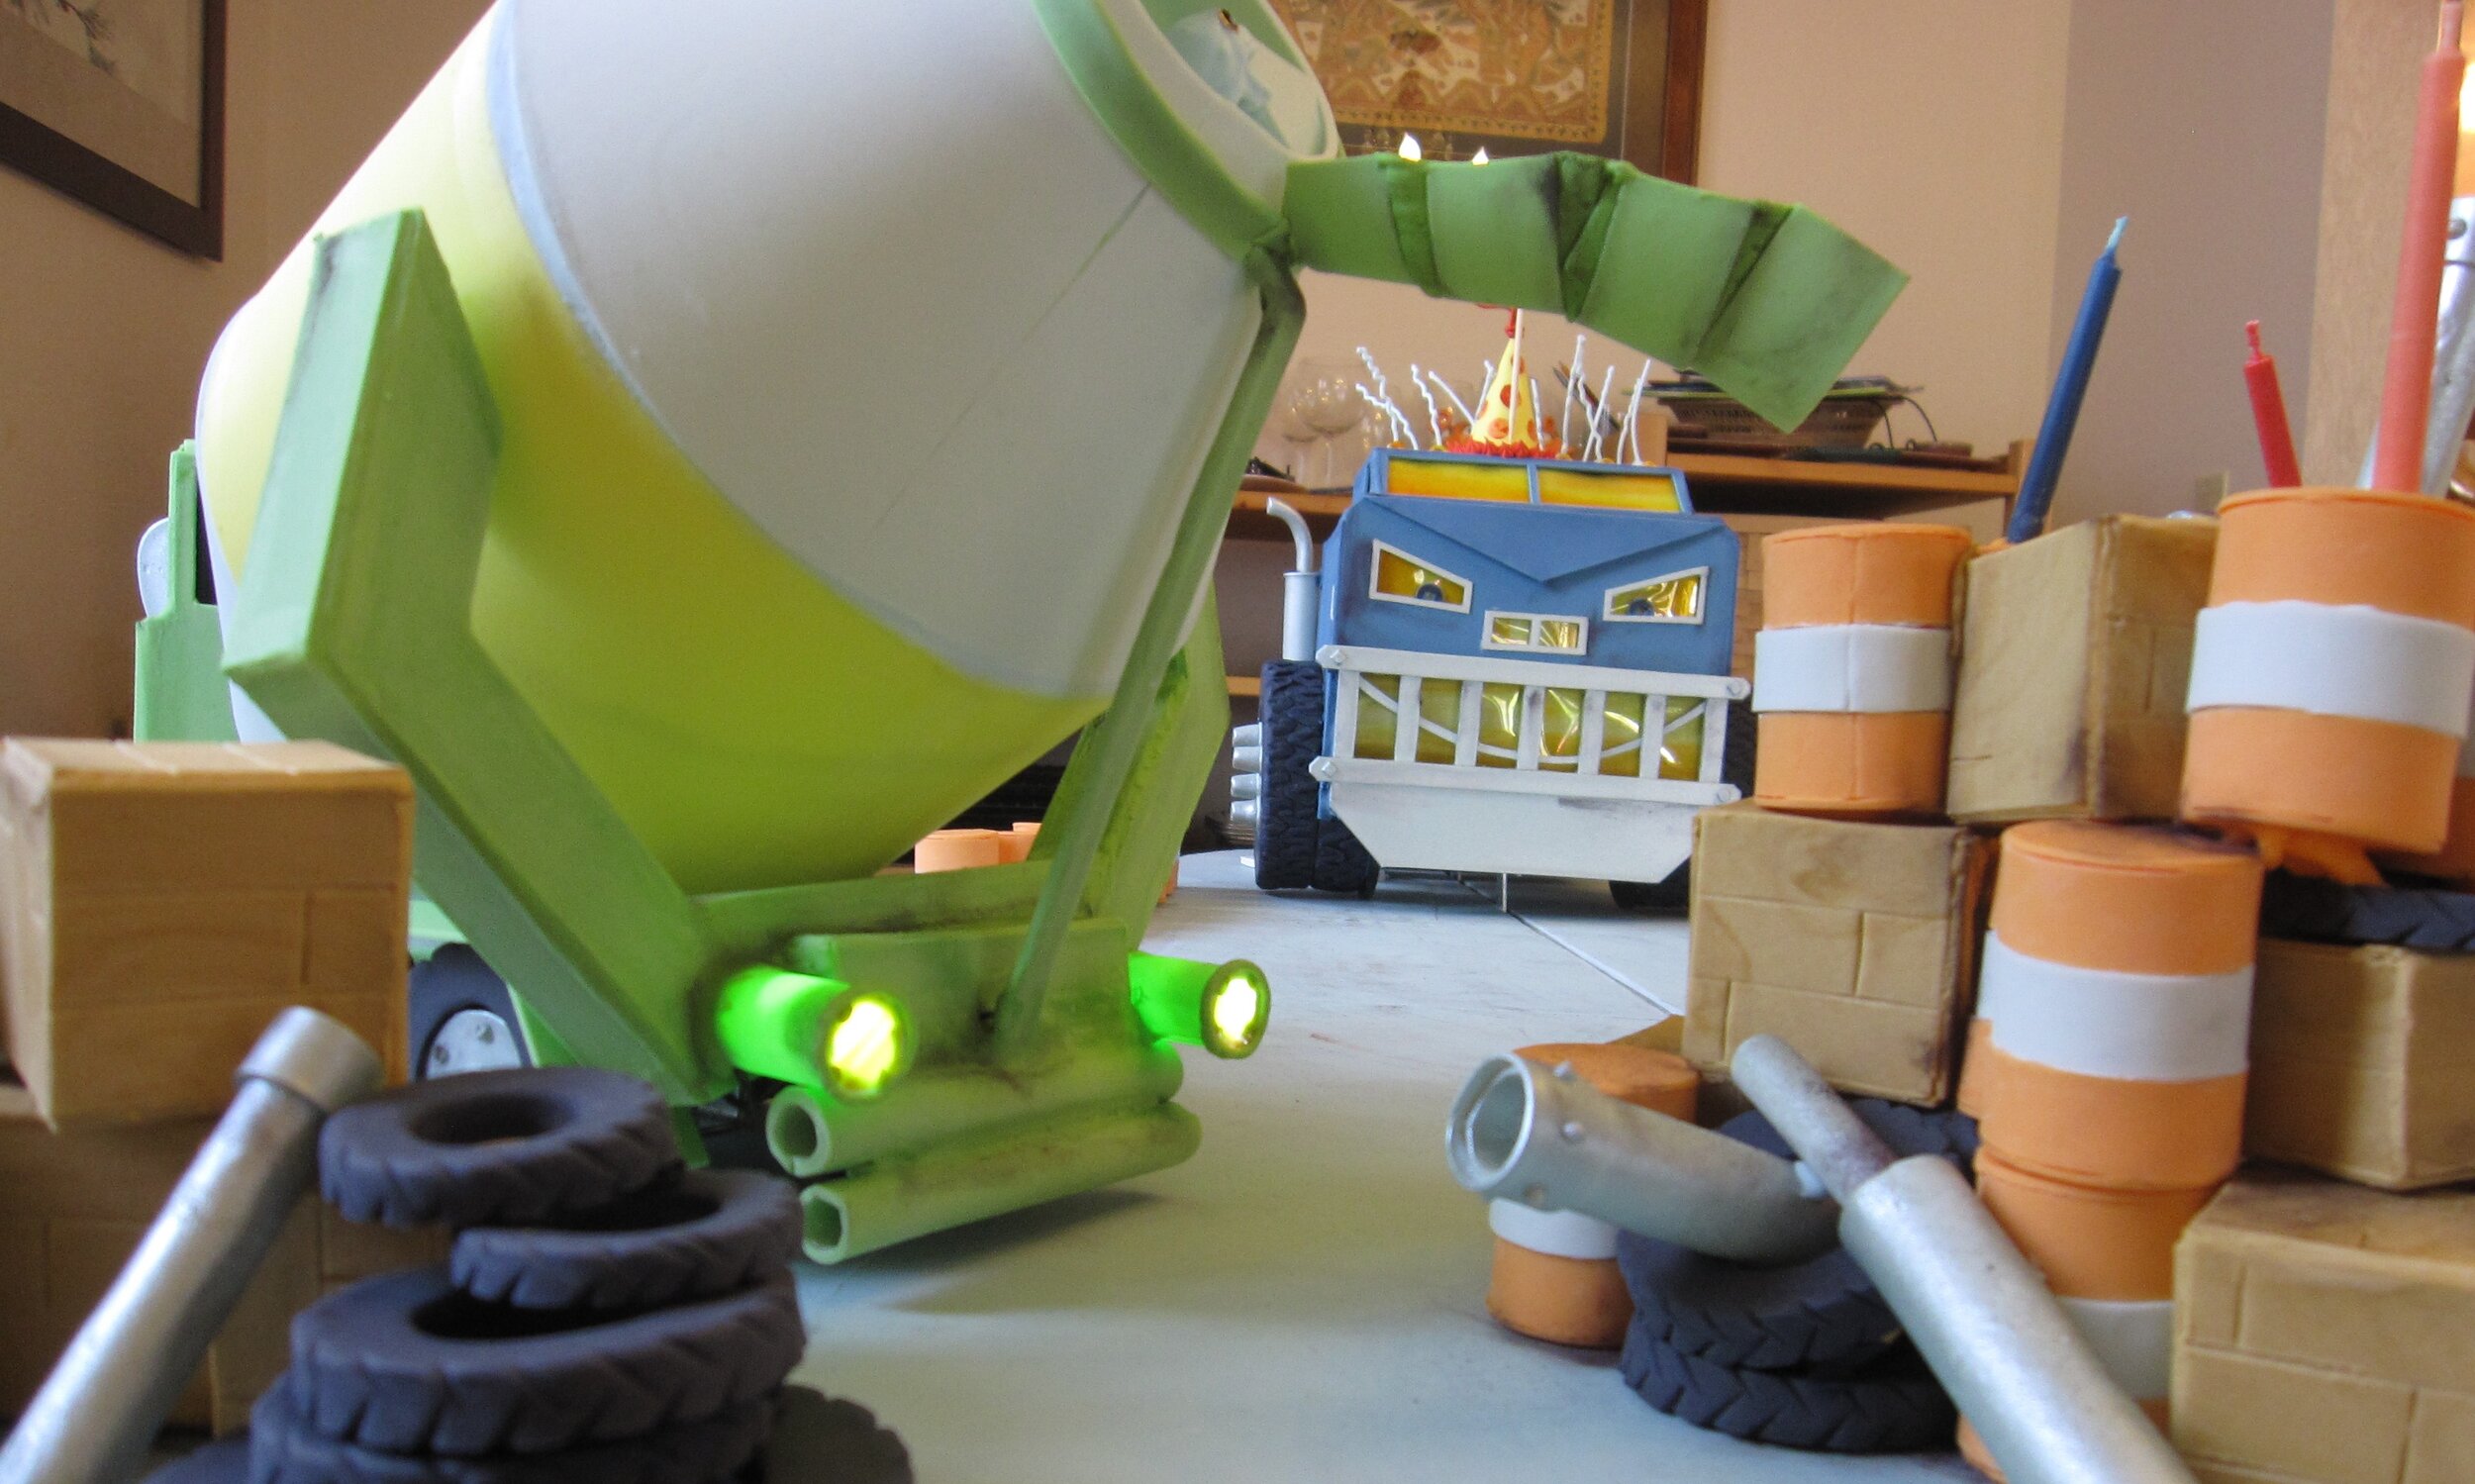
My personal favorite book in the Trucktown series is actually Smash! Crash!, but since the occasion for this cake was my niece Alex’s fourth birthday, Zoom! Boom! Bully was a more appropriate reference. The basic plot is that various denizens of Trucktown stack up crate, barrels, and tires in the middle of the street, but are periodically disrupted by the aptly named Big Rig smashing into them (Zoom! Boom!). The other trucks then exclaim about what a bully Big Rig is. The big surprise in the end is that it’s Big Rig’s birthday and the other trucks are making him a birthday cake out of the crates, barrels, and tires, which Melvin the cement mixer then pours cement “icing” on. Big Rig, very touched by the other trucks’ thoughtful gesture, picks up the “cake”, takes it back to his garage, and proceeds to gleefully smash it while wearing a festive yellow party hat.
I decided to recreate the penultimate moment of the book in cake form, consisting of three components:

1) The “cake” made of tires, crate, and barrels.

2) Melvin the cement mixer, with a rotating drum in the process of dumping cement onto the “cake”.

3) Big Rig, who would smash face first into the “cake”.
When I explained this concept to Alex she was very enthusiastic, if a bit disappointed that Jack Truck and Dump Truck Dan wouldn’t be on the cake.
The first thing I had to do was figure out how the heck I was going to make any of this happen. The easiest way to describe the process is probably to take each piece separately, though of course these projects were running concurrently.
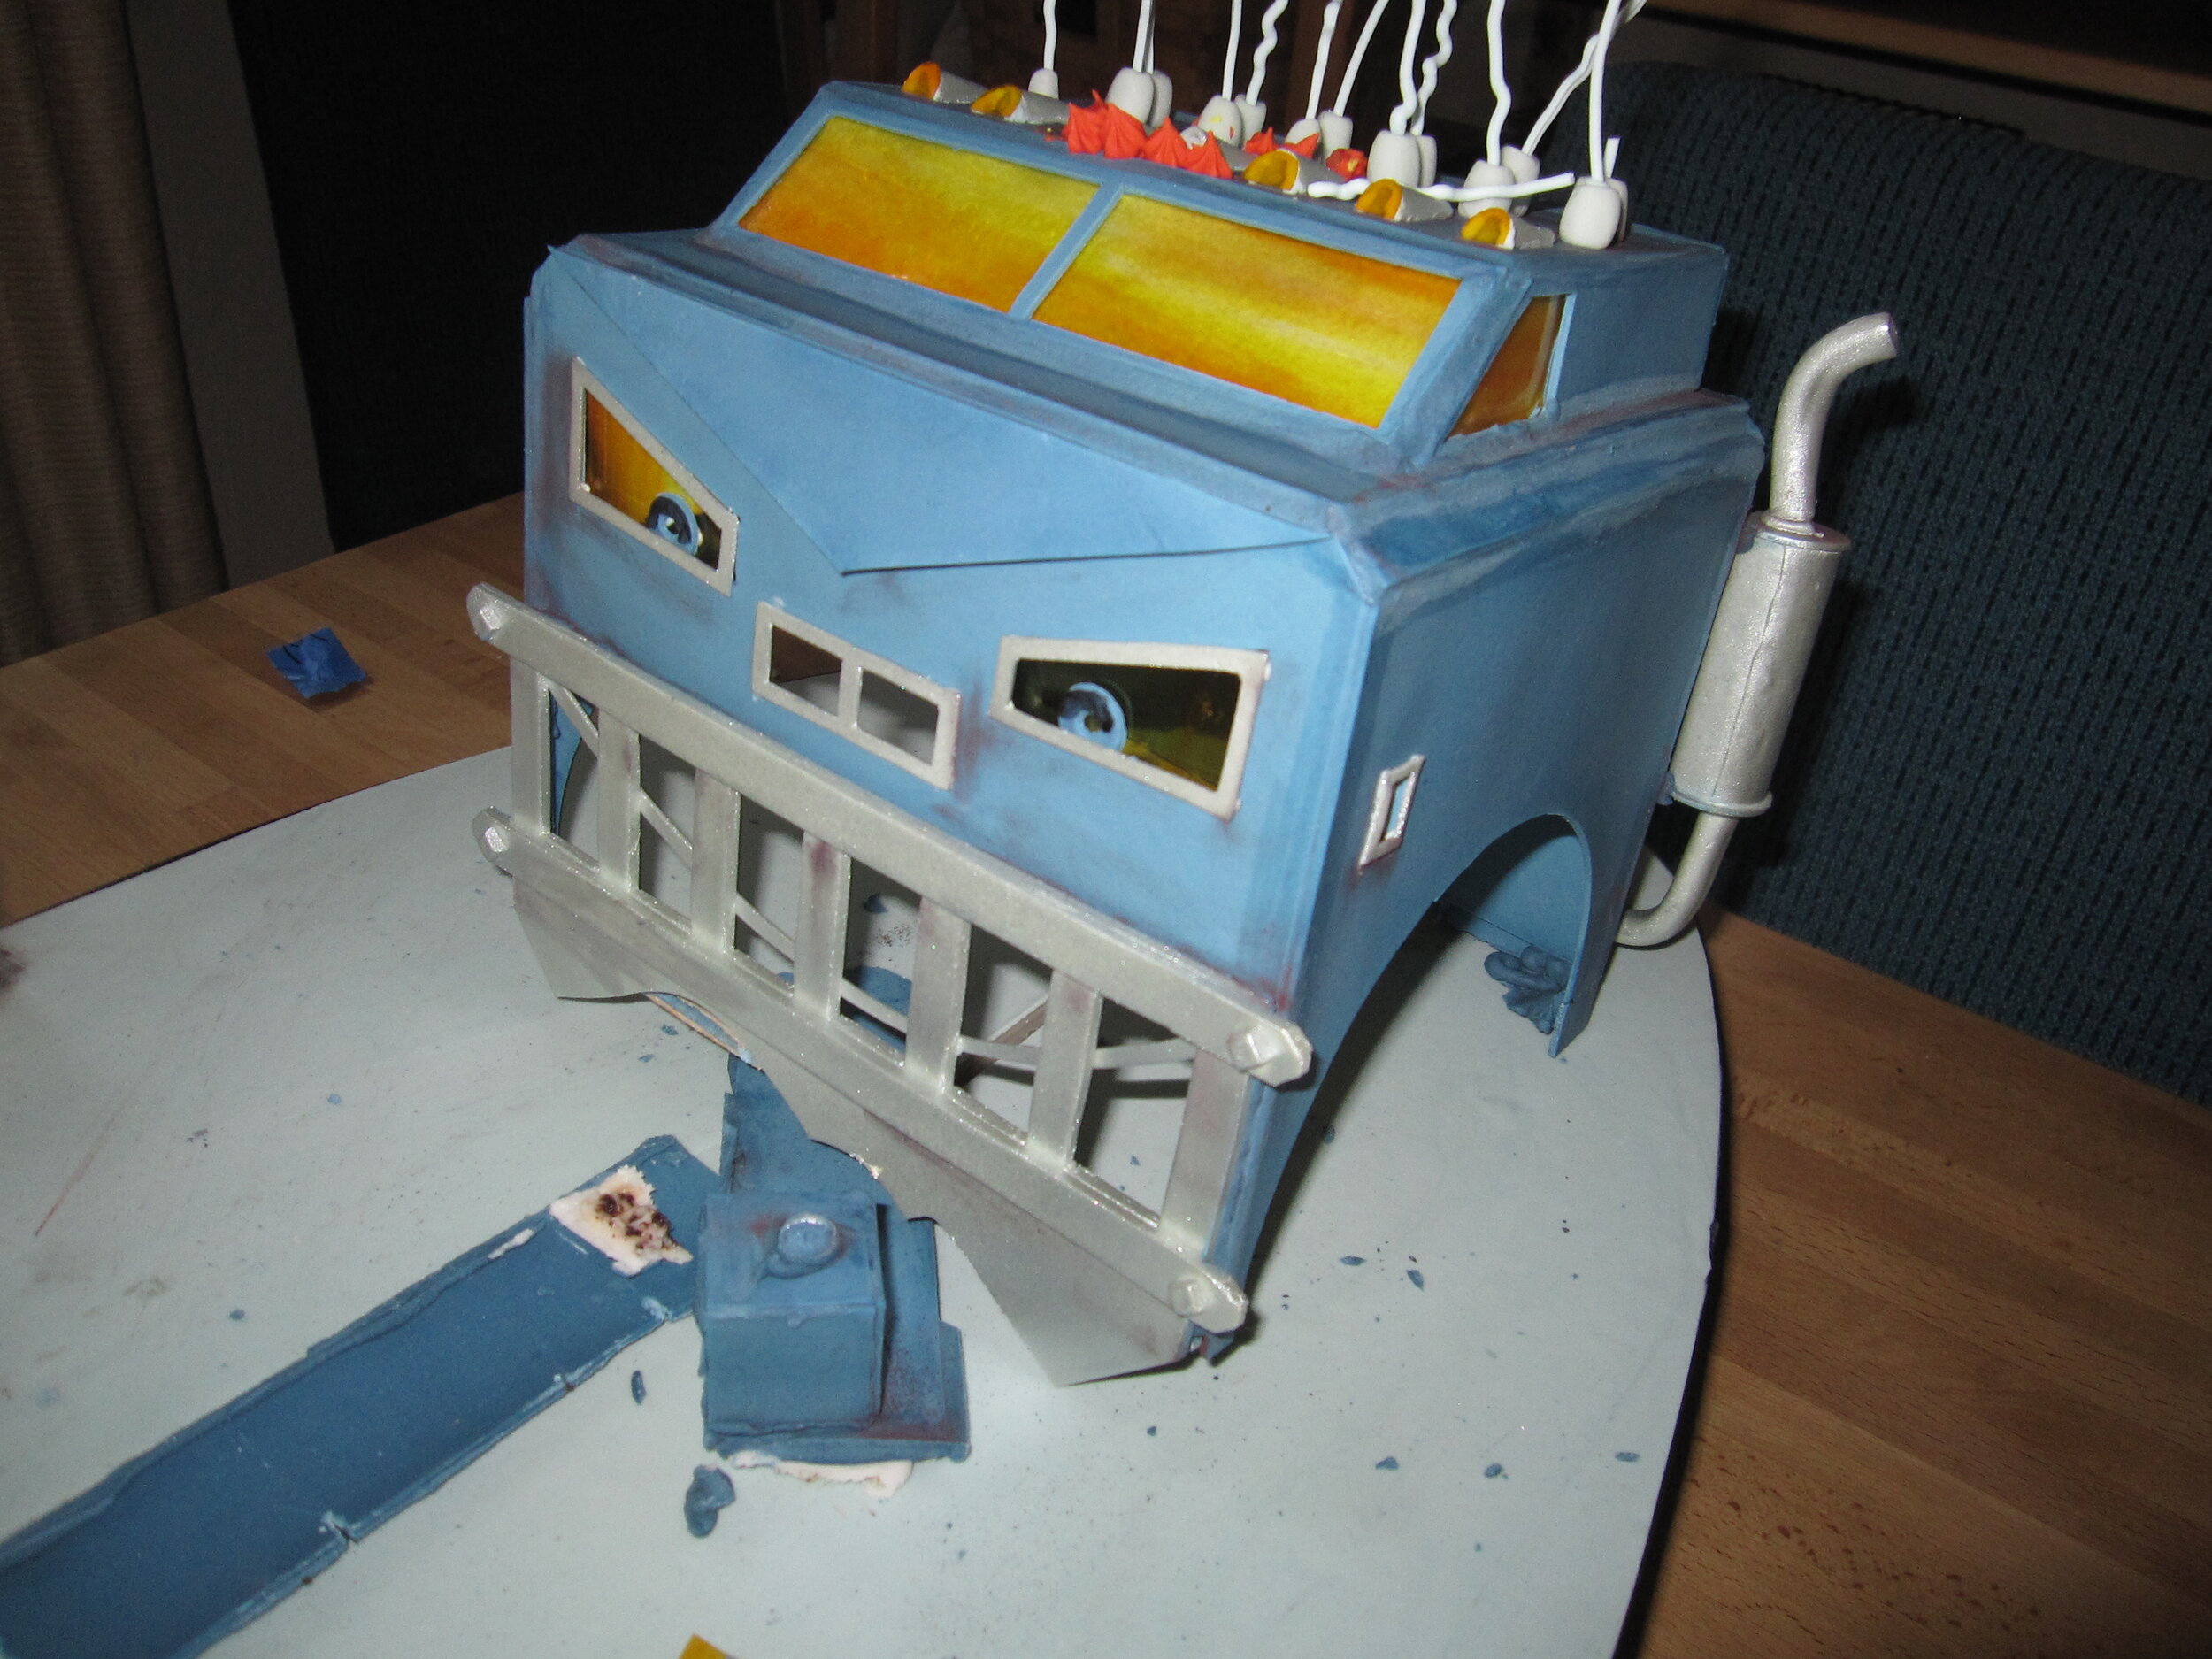
Melvin the Cement Mixer
I learned a lot about cement mixer drums. The first thing I learned was that it’s very difficult to find detailed schematics of them on the internet. Eventually I resorted to studying Alex’s toy cement mixer. As far as I’ve been able to determine from these authoritative sources, cement mixer drum interiors consist of a series of semicircles, angled and staggered such that when the drum turns one way the cement is propelled towards the bottom of the drum and when it turns the other way the cement is pushed up and out the chute.
I made a whole series of Bristol board mockups with various sizes and densities of semicircles, trying them out using little pieces of paper as a cement substitute. None of them even came close to working. So I branched out and tried some other variations on the internal structure. Finally I settled on a helical arrangement of triangular wedges spiraling up towards the top of the drum. This seemed to at least sort of work.
With the basic structure settled, it was time to remake the drum in gum paste. The exterior of the drum was made in three pieces around Bristol board forms. Once these and the myriad little triangular wedges were dry, I assembled them with royal icing around a brass tube for the center support. Assembly was a lengthy process, as I had to wait for the icing on each wedge to dry before attaching the next one.

With the drum assembled around the central tube, I superglued the tube to the shaft of a reversible gear head motor (once I had figured out how to wire up the motor to make it reversible.) Mounting the drum and motor assembly to the base was a real challenge. I had made a pretty simple base for Melvin out of a cut-up aluminum baking sheet, covered with gum paste, and elevated off the wooden base for the entire cake with L-brackets, so the body of the truck would ultimately appear to be resting on its tires. In Zoom! Boom! Bully, Melvin’s drum appears to be supported from beneath in the middle by two angled beams, but there doesn’t seem to be a support for the back of the drum. This, of course, also raises the question of what Melvin’s rear chute is attached to.
My plan was to build the side support beams out of gum paste around pieces of brass, bolted to the aluminum base. Because, unlike the people illustrating the book, I physically needed something on the back to support both the drum and the chute, I decided on a brass ring mounted on a strip of brass and wrapped in gum paste, also bolted to the aluminum base.

The first time that I put this all together with the motor and the gum paste drum, I set it up so that the lowest point on the drum was resting on the aluminum base, on which I had put some UHMW tape to keep friction to a minimum. I thought that this would help to support the weight of the drum and keep stress off the motor. This turned out to be a very bad plan, as I had failed to account for the fact that, in spite of my best efforts, I had failed to center the drum perfectly on the central brass tube. This meant that when I turned the motor on, as soon as the part of the drum that was slightly further from the axis of rotation got around to the bottom, it jammed against the base. I turned the motor off as soon as I realized what has happened, but not soon enough. As the central brass tube was still trying to rotate while the drum itself was jammed against the base, the royal icing connected the gum paste drum pieces to the brass tube cracked. D’oh!
A few tense hours and one major royal icing repair later, the drum was reattached to the tube. In order to prevent this from happening again, I made a new, slightly higher brass ring to support the back of the drum and raised the motor, and therefore the front of the drum, about a half an inch as well. That way, the drum never touched the actual aluminum base and was supported only by the motor on one end and the brass ring on the other end. It worked!
Once the drum turning mechanism was in place, finishing the back of the truck was relatively simple. I covered the motor in green gum paste and assembled the gum paste pieces of the side support beams. Having previously made tires out of black fondant and hubcaps out of gum paste, sprayed silver, it was easy to attach these, as well as the gum paste wheel wells.
I had also wired up some white LEDs to use for Melvin’s taillights and headlights, so I put the LEDs for the taillights in place and then ran the wires underneath the aluminum base so they’d be in place for the headlights once I got his head assembled. The taillights themselves I made out of gum paste cylinders, capped with rice paper (to diffuse the light) and yellow gelatin (to give the light the correct hue.) In the past, when I’ve needed sheet gelatin (see the Tardis Cake and the Flying Saucer Cake) I’ve used the pre-made kind, but since that has a strange diamond pattern on it, this time I tried making my own flat sheet gelatin, using these instructions that I found on the internet. After a few abortive efforts, it worked pretty well.
Assembling the chute took a little time, because it was made of six separate pieces, which had to be attached one at a time, with sufficient time for the connective royal icing to dry before attaching the next one.

With the back of Melvin thus complete, I had to make his head, the only part of Melvin that contained actual cake. This went very smoothly. Having made all the exterior gum paste pieces in advance, it was simply a matter of carving the cake into the appropriate shape, covering it with fondant, and then setting it in place on the aluminum base. Then I could assemble the gum paste exterior with royal icing, including more tires and wheel wells, the ears / side view mirrors, and eyeglasses / headlights (which were assembled around the rest of the strand of LEDs.) To fill gaps and hide seams, I used royal icing, smoothed with a damp paintbrush.
For cement, I made some white chocolate ganache, tinted grey with black powdered food coloring. Mind you, at this point I still didn’t know whether the drum was properly configured to actually push the cement out and down the tube, and I wouldn’t find out until the party.
Big Rig
My biggest challenge of this cake was figuring out how to make Big Rig roll. It was also pretty high pressure because, let’s face it, if Big Rig didn’t smash into the “cake” the whole project would pretty much be a blatant failure. With almost all of my cakes, I accept that there is a fairly high probability that it might not work as I intend. My philosophy is that if you always know that what you’re doing will work, you’re not trying hard enough. Which is fine when the only people who are going to be disappointed with a failure are me, or my adult friends, or the guests at my friends’ wedding. But I really didn’t want to disappoint Alex. So in this particular case, I really couldn’t let failure be an option.
Keeping Big Rig on the right trajectory was the easy part. I attached two L-brackets to the bottom of Big Rig’s aluminum base, a material which I had selected to keep his weight as low as possible. Then I cut a track in the plywood base for the entire cake, running from the far end where Big Rig would start, leading to the end of the base where the “cake” would sit. That way, the L-brackets, slotted into the plywood track, which I had lined with UHMW tape to reduce friction, would keep Big Rig on target to the “cake.” All I had to do was get him to move.
My first attempt at a drive mechanism was to connect a hobby motor directly to the shaft of one of the front wheels (made out of plywood, to be covered later with gum paste tires), so it would basically be a one-wheel drive car. This failed for at least two reasons. First, because the two front wheels weren’t connected to each other via a complete axle, both had a tendency to bind up in their bushings, so that moving even the light aluminum base without any cake on it took all the motor’s power. Second, because only one wheel was driving the truck, it had a tendency to try to pull the truck off course so that the L-bracket bound up in the track.
So I scrapped that and tried something else. This time, I connected the two front wheels with a brass and threaded rod axle. My plan was to transfer the power from the motor to the axle with a heavy-duty rubber band under tension. This plan failed even before I connected it to the wheels, as the minute that I started experimenting with putting tension on a rubber band around the shaft of any of the hobby motors I had in hand it became clear that none of my motors had nearly enough torque to get the job done.
I went online and located a promising-looking high-torque motor. While I was waiting for that to arrive, I started playing around with the possibility of a motor-less drive mechanism. My first thought was a tension spring. Unfortunately, a few major problems with this idea soon became clear. First, the length difference between the relaxed spring and the spring under tension wasn’t nearly enough. I couldn’t pull the truck all the way back to the end of the track, and even with the spring fully relaxed I was afraid that the truck wouldn’t even reach the “cake” to smash it. Second, I was very scared that, if I had to keep Big Rig under that kind of tension for any length of time there was a significant risk of premature smashing, which would be a real tragedy. Third, I really wanted Big Rig’s tires to spin on their own, so I could start the wheels spinning, and then release the truck for the final smash. There’s a great illustration in Zoom! Boom! Bully where Big Rig’s tires are spinning into a whirl of smoke just as Jack shouts, “Stop!” and the other trucks reveal that the “cake” is for Big Rig’s birthday. I really wanted to recreate this moment in cake before the smash, and that required motor power directly to Big Rig’s wheels.
I managed to solve the first of these problems by substituting a jumbo-sized rubber band for the spring. The rubber band had a much higher stretch-to-length ratio than the spring, and the flexibility of the rubber band meant that even after its tension was exhausted, it at least wouldn’t arrest the momentum of the truck. The rubber band also seemed to have sufficient power to move the truck fairly quickly, even with the projected added weight of the cake and gum paste. But the rubber band still left my other two concerns unaddressed. It still required the truck to be under tension for a longer period of time than I was comfortable with, unless I could come up with a release mechanism that I could set after the cake was completed and moved into place. And in order to achieve the effect I wanted with the tires spinning prior to release, I really needed tires that were legitimately motor-powered.
Fortunately, when my high-torque motor arrived, early signs were encouraging. Unlike the motors I was trying before, it was clearly powerful enough to withstand the tension on the rubber band. So I mounted the motor to the cake base and ran the rubber band to connect the motor shaft to the axle. Initially, I was delighted with the result. With no weight on the aluminum base, the truck drove great. However, as soon as I put some weight on it, to mimic the weight of the cake and gum paste I was planning to put onto Big Rig, it stopped working altogether, as the added weight was sufficient to counteract the tension on the rubber band and cause it just to slip uselessly around the axle. I tried to mitigate this problem by putting something sticky on the axle, but this just made the rubber band stick to itself and get wound up around the axle.
Next, I tried using gears to transfer the power from the motor to the axle, which required a complete redo of the front bushings to leave space between the axle and the aluminum base for the gear. Like the rubber band drive, this worked great until I put any weight on the base. Unlike with the rubber band, the truck did at least move with additional weight on it. It just moved very slowly. I did have hopes, though, that if I kept the cake as light as I possibly could, it might work.
To give it an extra boost of power, I decided to combine this partially successful motor solution with my partially successful rubber band solution. I designed a release mechanism consisting of a piece of U-shaped channel that ran across the track, underneath the base, attached to a dowel handle leading out the side of the base. That way, with the rubber band connected to one of the L-brackets under the truck base on one end and an eye bolt at the “cake” end of the track at the other end, I could finish decorating Big Rig with the rubber band relaxed, and then pull him back and set the L-bracket into the U-channel. This would hold him in place, and hold the front wheels a fraction of an inch off the base, so I could turn the motor on, let the wheels spin freely for a second, and then pull the dowel to release him. The rubber band would pull Big Rig forward while the wheel simultaneously pushed him forward. I could only hope that would provide enough force to make him powerfully smash into the “cake.”
And thus ends the saga of making Big Rig go, but I still had to actually make Big Rig. Because Big Rig has a kind of maniacally glowing face, as well as taillights and a menacing glow inside his wheel wells, he needed a lot of LEDs. Fortunately, by this point I’ve done so many LED-intensive cakes that I could basically just chop and splice segments together as needed, so the wiring went pretty quickly.
All the gum paste pieces, including tires, hubcaps, fuel tanks, bumpers, walls, trim, and yellow party hat, were made and dried in advance. To get the requisite orange and yellow glow out of Big Rig’s eyes, mouth, etc. I made sheets of gelatin with fades from yellow to orange, backed with rice paper to diffuse the light form the LEDs.

The cake itself was limited to the back of Big Rig and a very small square of cake inside his cab. At the party, someone pointed out that it was like a little cake engine block. I couldn’t put a bigger cake inside his head, because I needed to leave space around it for the LEDs. I kept the fondant layer on the cakes (necessary to prevent the gum paste from touching the buttercream icing, which softens dried gum paste) as thin as possible to keep the weight down. Fortunately, since I was covering the entire thing with pre-made gum paste pieces, the fondant didn’t have to look particularly nice.
With the cakes in place, attaching the gum paste exterior and all the trim pieces was really quite simple. The only problem I had was that when I redid the front axle bushings to accommodate the gears, I had failed to make the corresponding changes to the templates for Big Rig’s cab, so the sides, front, and back of the cab were all about half an inch too short. Fortunately, I had some extra dry blue gum paste pieces that I was able to cut down to patch the gaps. With some liberal royal icing spackle, it turned out just fine. The finishing touches were the royal icing antennae on the top. I have no idea why Big Rig needs so many antennae (which is what I told Alex when she asked me that question) but he has them in the book, so he had them in the cake.
“Cake”
Although the “cake” was the easiest component in that it didn’t have to do anything but sit there and be smashed, it also required more individual gum paste pieces than (I think) Melvin and Big Rig put together. Each barrel was made of five separate gum paste pieces and each crate required six. At the early planning stages of this project, I had envisioned putting tiny individual pieces of cake inside each crate and each barrel. Considering that the crates were only an inch and a half on each side, and the barrels were even smaller, I’m very glad that I came to my senses before I tried to do this. It’s not like there wasn’t already more cake than our guests would possibly eat anyway. Instead, I just put a little square of cake inside the “cake”, surrounded by the hollow crates and barrels and fondant tires. This probably made for a better smash in the long run anyway.

In addition to the crates and barrels, the cake also included a selection of fondant tires and gum paste pipes. Since I had made way more of all these things than were actually required, I used the extras to create bonus piles of stuff around the perimeter of the plywood cake base.
Finishing touches
With everything assembled, I actually went to bed at a relatively reasonable hour the night before the party. The next morning, as I was putting on the finishing touches – mostly adding a little dirt and grime with black powdered food coloring – Alex came in to inspect my work. She walked around it, studying it very carefully and commenting favorably on specific elements, like Big Rig’s tires and Melvin’s articulation. She then pointed out that I needed to put eyes on the chicken hood ornament on Melvin’s nose, which was already on my list of details to finish up before the party.

Alex then noted that I hadn’t made a hitch for the back of Big Rig. I had considered making a hitch for Big Rig, but decided against it because it doesn’t play any role in this scenario and because in some of the images in the source book, he doesn’t appear to have a hitch. Alex listened patiently to this explanation and then countered by pointing out that, in Truckery Rhymes, Big Rig is shown towing a trailer, which he couldn’t do if he didn’t have a hitch. I was forced to bow to her superior logic and quickly made a gum paste hitch. Actually, it even looked better from an aesthetic point of view, as the silver hitch made the solid blue rear section of Big Rig much more interesting. What I especially love about Alex’s argument is that it draws not just upon the specific source book for this project – Zoom Boom Bully – but upon the rest of the Trucktown canon as well. I also enjoy that it is a functional argument. Her point was not merely that Big Rig should have a hitch because he is shown with a hitch in the illustrations, but that Big Rig needs a hitch or he would be unable to fulfill his function as a big rig.

With the hitch completed, I got Alex’s dad to help me move the cake out to the dining room. Then came the stressful moment when I had to pull Big Rig back into his release mechanism. I was terrified that I was either going to lose my grip and send him crashing into the “cake” or crack Big Rig’s head to pieces in the effort of pulling back the rubber band. Fortunately I avoided either catastrophe and got Big Rig primed for release with only the loss of one fuel tank that was easily reattached.

Alex then consulted the source material for one final check on the accuracy of my work. She pointed out that, in the book, the “cake” is shown on a wooden palette, and I had failed to put my cake version of the “cake” onto a palette. I explained that I had noticed that and had considered putting the “cake” on a palette but had decided against it as I was afraid that the palette would arrest Big Rig’s movement so that he wouldn’t smash into the “cake” as effectively. Alex considered this carefully and then decided that perhaps Big Rig had taken the “cake” home on the palette and then removed it from the palette in order to smash it. I agreed that was an excellent explanation.
The party
With only one exception, the cake worked very well. Melvin’s drum turned flawlessly, but sadly, he did not actually pour cement. Either the drum and/or the wedges inside weren’t angle correctly or I had made the ganache too thick. Also, I didn’t really know which way the drum was supposed to be turning to make the cement come out. Cement mixers are complicated. Oh well, at least the drum turned.

Most importantly, Big Rig worked! Zoom! Boom! One of the barrels even flew off the table. Big Rig’s front bumper cracked beautifully so that he wound up with an excellent jagged evil grin.

Alex had a great time eating various gum paste bits (and a little bit of actual cake.) I particularly enjoyed it when she ate one of Melvin’s eyes, revealing the LEDs and leaving Melvin looking like a mangled cyborg.

The next day, as Alex was helping me to disassemble the remains of the cake and salvage the electronic components, she told Melvin (who was by this point essentially just a severed head) that he was her favorite cake ever. I call that a big success. Alex was a very tough audience with an incredible eye for detail. She was tremendously critical, but with such sincerity and such admiration. She has absolute confidence in my ability to execute a perfect cake version of Big Rig, so of course she wants to point out my errors so that I can correct them. It’s such a charming combination of exactitude and blind faith. She’s the perfect manager.
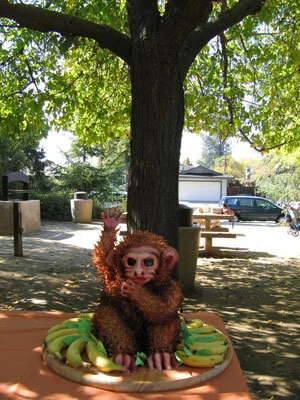
Poo-Flinging Monkey Cake
I made this creepy poo-flinging monkey cake for our little friend Isaac's first birthday party. This was a special request by Isaac's mother, who was also the recipient of the dancing yeti wedding cake.

I made this creepy poo-flinging monkey cake for our little friend Isaac's first birthday party. This was a special request by Isaac's mother, who was also the recipient of the dancing yeti wedding cake.
What does every little boy want for his first birthday? That's right - a cake shaped like a creepy-looking monkey! And what's even better than a creepy-looking monkey cake? That's right - a creepy-looking monkey cake that flings poo, just like a real monkey.
OK, maybe that's not exactly what my little friend Isaac would have requested for his first birthday cake, but he can't talk, and that is exactly what his mom requested.

The first step, of course, was to figure out exactly how the poo mechanism should work. My first thought was to make it a sort of catapult, but thenI realized that it would be more fun if it could fling poo repeatedly without a complicated reset of the mechanism. So I decided to go with a spring-loaded hinge. I made an armature for the arm and hand out of wood and brass tubing - I felt that it was necessary to have a metal structure within each individual finger so they wouldn't break off when I pulled the arm back to release the poo. The arm was connected via the spring hinge to a post, which was in turn secured to the heavy wooden base of the cake.

Before I made the cake, I sculpted the arm out of gum paste and fondant around the wooden armature, which meant that I had a sort of ghostly white monkey arm on a stick. I did load it up with some raisinettes (aka cake monkey poo), which it flung quite effectively, so I was ready to move onto the cake.
My sister was kind enough to actually bake the cakes for me. Fortunately she baked more than I asked her to, because the amount that I asked her to make would not have been enough. I had to cut notches in each tier and slide them into place around the arm support post. When I was done, I had what appeared to be a squat, one-armed robot, at least until I carved it into a more monkey-like shape.

This cake marked my first experiment with using rice krispie treats to sculpt additively onto my cakes. It's a technique that I learned, like so many others, from reading Colette Peters' books. My plan was to sculpt the tail, haunches, and second arm out of rice krispie treats. Not having ever made rice krispie treats myself, for some reason I thought they solidified really quickly. "I'll have to work fast," I thought, "but once I get them into shape they'll hold really well." Yeah, it didn't work out that way atall.

I'm not sure whether it was because it was really wet out or just because that's the way rice krispie treats are, but they didn't behave at all the way I expected them to. As I started sculpting them, they were just gooey and collapsing everywhere. I hollered for my sister to bring me skewers! Hurry! Hurry! Yikes! I stuck in skewers, here, there, everywhere! Anything to hold those rice krispie treats together and to hold them in place. Pretty soon I had a proto-monkey which appeared to be undergoing a truly ghastly acupuncture session. But at least it had arms and legs. I added some detail to the hand and feet with fondant.
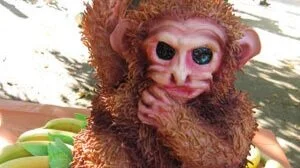
I made the facial features by piping buttercream and sculpting it with a paintbrush. It was kind of hard to make it look like a monkey rather than like a sort of withered old man, but I think I did OK. I was using one of my baby niece’s animal picture books as a reference. It was very nice of her to share it with me.
The ears I had made a few days in advance out of gum paste with skewers embedded in them so I could just stab them into place in the cake.
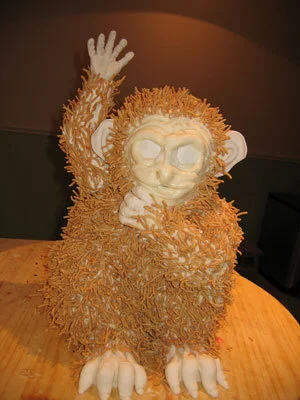
What's the point of a poo-flinging monkey without gross, matted fur? It would have been easy to make the fur out of frosting, but that tends to be too cartoonish for my taste. So I came up with a different plan - those little crunchy chow mein noodles. I know, I know it sounds a little weird. But potato chips and chocolate can be good. Those little shoestring potato snacks and chocolate can be good. I though it was workable. And they looked GREAT! It took me quite a while to cover the entire monkey and I seriously underestimated the amount of noodles it would take. Fortunately, there was some confusion as to who was buying how many packages of noodles, and we wound up buying approximately twice as many as I thought I would need. Which turned out to be just barely enough.

The noodles were already a pretty good base monkey color, so I just airbrushed in some mottling and some shadows. I painted the eyes with black food coloring and then went over that with clear piping gel to get the necessary depth and sheen. With that, the monkey itself was done. Left to my own devices I probably would have left it at that, but fortunately my sister gave me the kick in the ass that I needed to make it a better presentation. She came up with the idea of surrounding the monkey with bananas. So we bought about sixteen bananas and I made some gum paste leaves to fill in the gaps. It looked quite regal really, like he was a monkey king sitting on his banana throne.
The party was in an outdoor park, which was a great setting. We arranged the monkey on a picnic table underneath a big tree, with a convenient bowl of raisinettes to use as poo. The green leaves of the tree complimented the green leaves on the cake perfectly and I got to bask in the compliments of the guests at the party in the next picnic area as well as those of the guests at our party. I actually went to the party thinking that the cake was entirely innocuous and mainstream, at least compared to all my other cakes. But the unanimous verdict was that it was actually quite creepy, primarily due to the huge, hypnotic, glassy eyes.

The weight of all the gum paste and frosting and chow mein noodles on the arm made the poo flinging a little more sluggish than it was in my initial tests, so the monkey only threw his poo about two feet in front of him. Oh well, next time maybe I can get a better angle of release.
Cutting the cake was very funny because I had to cut it away around the arm mechanism. We ended up with a monkey arm hovering above a field of cake and banana carnage. The verdict on the chow mein noodles with the cake was mixed. Some people thought it worked quite well - a bit of crunch, a bit of salt - while others just found it weird and incongruous and ate around it. The birthday boy himself didn't weigh in on that particular issue, as he doesn't have enough teeth to get any of the chow mein noodles, but he certainly seemed to enjoy the cake. No one's quite sure how he got some on the back of his head, though.

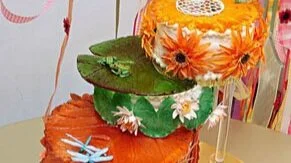
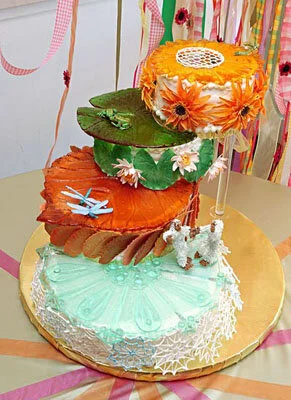
Seasons of Love Cake
Two of our dearest friends were getting married and we got to make the cake! Being the incredibly brave and trusting souls that they are, they gave us a free hand. They didn't have any idea what the cake was going to look like until they showed up for the wedding! If that's not trust, I don't know what is!
This is by far the most complicated cake we've made. My sister and I spent the entire day before the wedding working on it (about 18 hours, each) but during the week before, I spent about 50 hours and my sister (due to her day job) spent about 30 hours working on it. That all adds up to about 120 woman-hours and an incredibly fun project.
We didn't keep close track of the cost, but we estimate we spent about $500 on supplies, including all the ingredients, gum paste, cake pan and leveler, and the silicone mold compound for the sugar plates (which was the biggest single expense).
Introduction
Two of our dearest friends were getting married and we got to make the cake! Being the incredibly brave and trusting souls that they are, they gave us a free hand. They didn't have any idea what the cake was going to look like until they showed up for the wedding! If that's not trust, I don't know what is!
Naturally, being who we are, we came up with an incredibly complicated and time-consuming concept. We called it the Seasons of Love cake, because our idea involved each tier representing a different season of the year and of the couple's life together. We also tried to flavor each tier to match the season it represented. All four tiers were made with the same chocolate cake recipe, but my sister came up with the great idea to add different flavorings to the batter for each season. We also used a different filling for each layer, as follows.
Winter - Chocolate cake with chocolate chips added to the batter with a mint chocolate ganache filling
Autumn - Chocolate cake with hazelnuts added to the batter with a chocolate hazelnut spread filling
Summer - Chocolate cake with orange zest added to the batter with a cherry jam filling
Spring - Chocolate cake with orange zest added to the batter with an orange marmalade filling
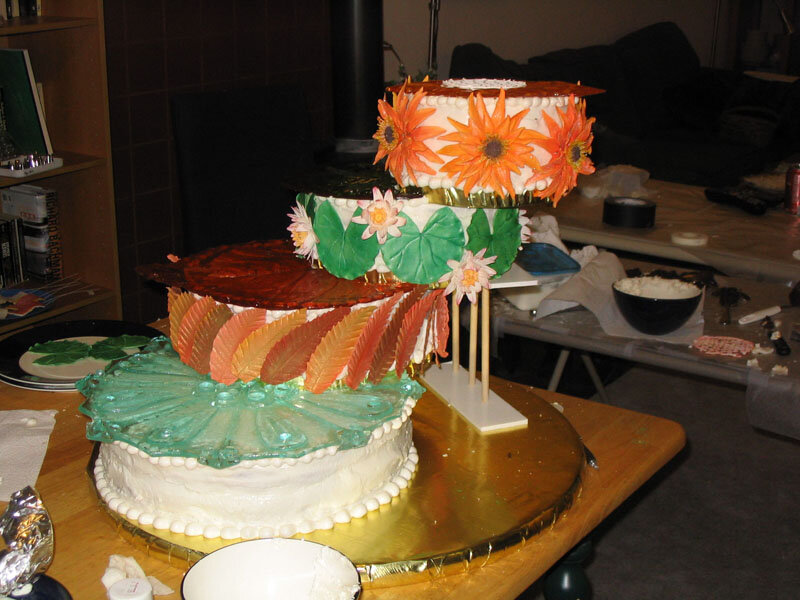
Each tier of the cake was to be topped with a sculpted sugar plate appropriate to the season, then the sides wrapped with seasonally appropriate leaves, flowers, etc. as follows.
Winter - Blue snowflake sugar plate with royal icing snowflakes around the sides
Autumn - Red leaf sugar plate with gum paste autumn leaves around the sides
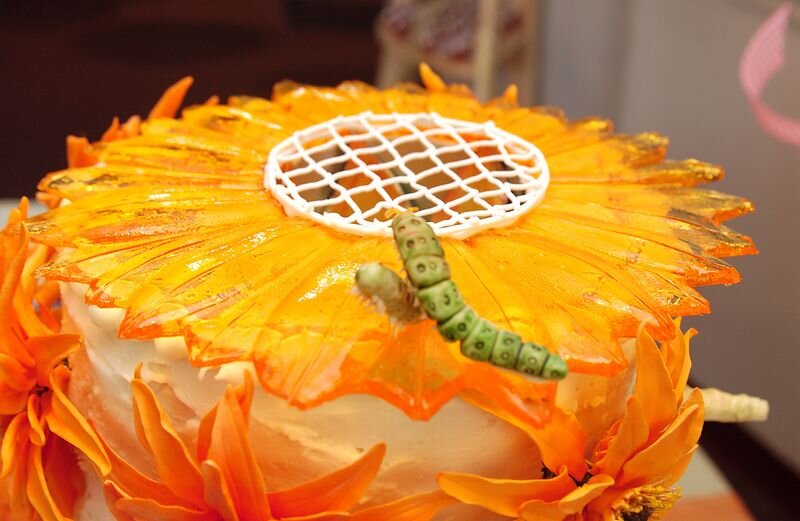
Summer - Green lily pad sugar plate with gum paste lily pads and lilies around the sides
Spring - Yellow flower sugar plate with gum paste gerbera daisies around the sides
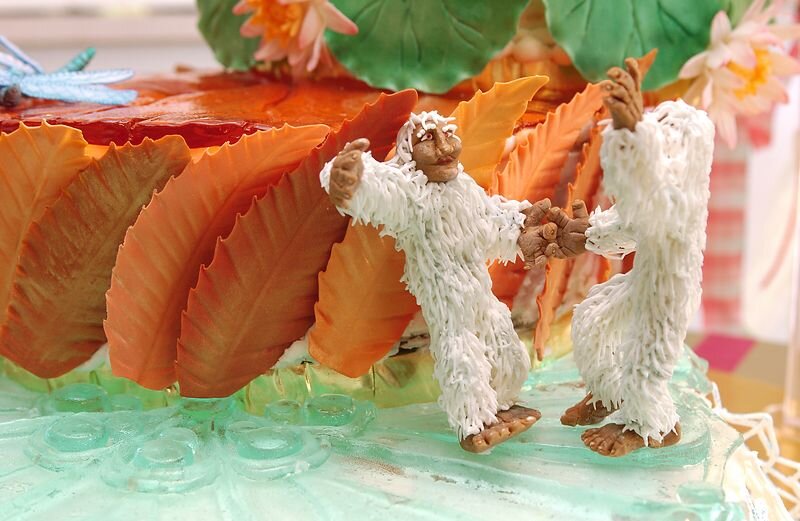
Each tier also got a symbolic bride and groom in the form of a pair of life-size little animals sitting on the sugar plate.
Winter - Pygmy yeti
Autumn - Dragonflies
Summer - Frogs
Spring - Caterpillars
The final touch was to involve a giant gum paste flower blooming out of the top of the cake.
In case all of that doesn't sound like enough, I also came up with a structural design for the cake wherein each layer was cantilevered out from the layer underneath so that it appeared to defy gravity.
I think trying to give you a straight, chronological report of our cake-creating activities would be more confusing than anything else, so I've divided my narrative into sections each describing one aspect of the project. I'll warn you now; it's a pretty long narrative. Enter at your own risk!
Baking, Torting, and Filling
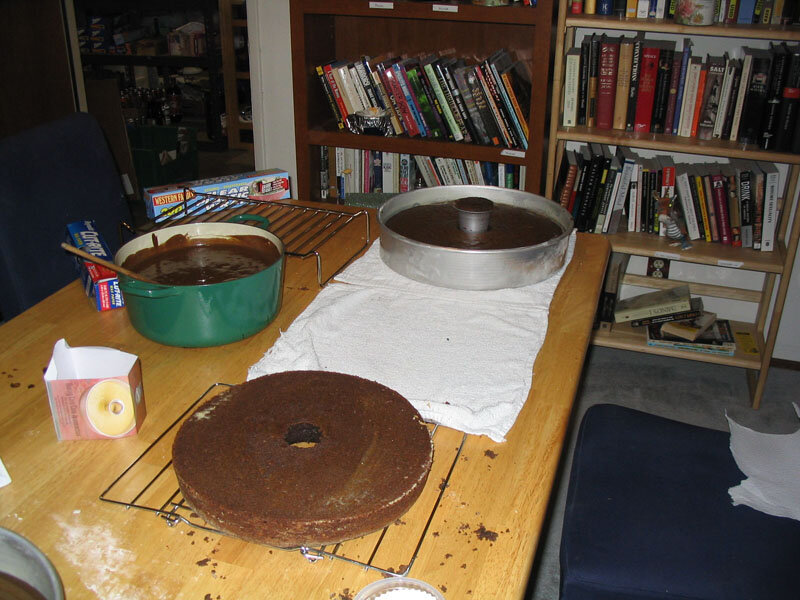
Baking all the cake was pretty much an all-day project (and that's not even counting the enormous shopping trip the day before. Who would have imagined anyone could ever need so much butter?) The smallest tier, the spring tier, was 6"in diameter, summer was 8", autumn 10", and winter 12", so I had to bake two 2" high cakes in each of those sizes for a total of eight cakes, which adds up to a whole lot of cake batter!
Fortunately for me we had decided to make all four layers using the same basic cake recipe so I was able to mix a lot of batter at one time and I never had to wash out the mixer between batches. This meant that I had to add the extra ingredients (chocolate chips, hazelnuts, or orange zest) to the batter by hand
.It all went remarkably smoothly (especially for such a huge project involving me and a kitchen) and eight hours later I had a fridge full of carefully wrapped cakes and a mountain of chocolate-covered dishes.
Torting, filling, and frosting the cakes, however, turned out to be more time-consuming than we could ever have imagined. Fortunately for me, my sister handled that part of it.
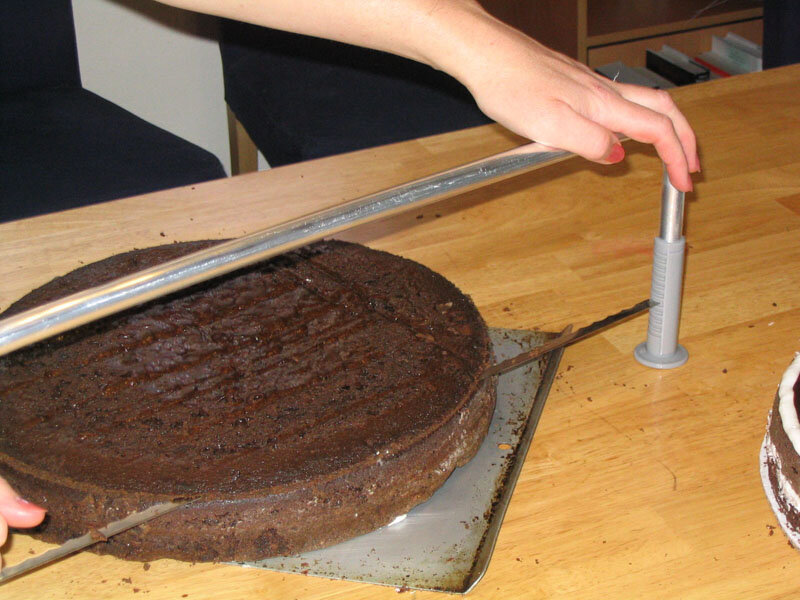
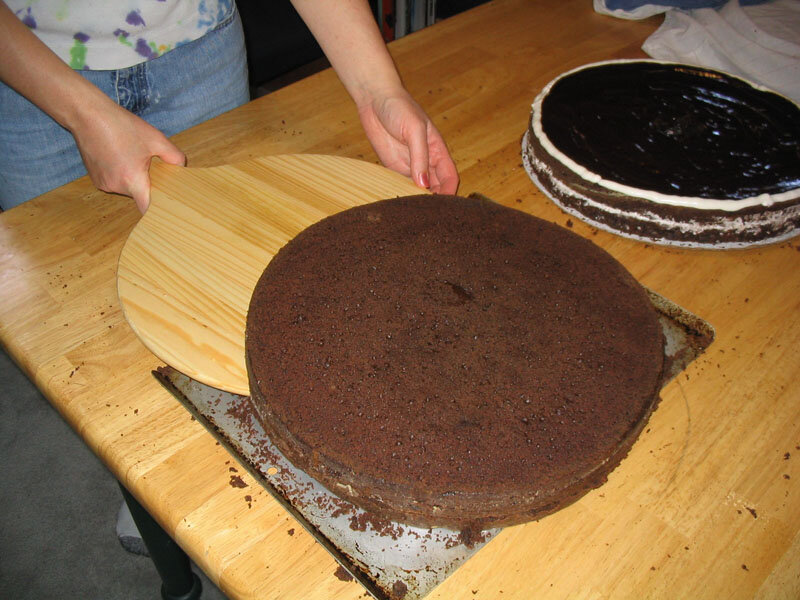
The first step is to level off the top of each cake, for which purpose we bought a special cake-leveling tool, which is like a fine saw turned sideways with feet on it. We thought this would be easier to do when the cakes were cold because then they don't crumble as much but this turned out not to be the case at all. Apparently our cakes were too cold, because our saw wouldn't go through the cake at all the first time we tried it straight out of the freezer. So we let the cakes thaw and tried again with much greater success. We still had to be careful on the larger tiers not to let the cake distort the blade of our tool, which happened if we tried to work too quickly. We found it worked best if my sister held the saw while I held and rotated the cake. After each piece was level on top we had to go through the same process again to split each cake in half, giving us four thin layers of cake per tier between which we could spread our fillings.

The first step in assembling those four separate pieces into an entire tier is to stick the bottom layer onto the cardboard base with a little bit of buttercream icing. Then my sister piped a thick dam of buttercream icing around the edge of that layer to hold in the filling. The filling can then be spread on the cake without fear of it leaking over the sides. The next layer of cake is placed on top of this and pressed down firmly, then the process is repeated until all four layers are in place.
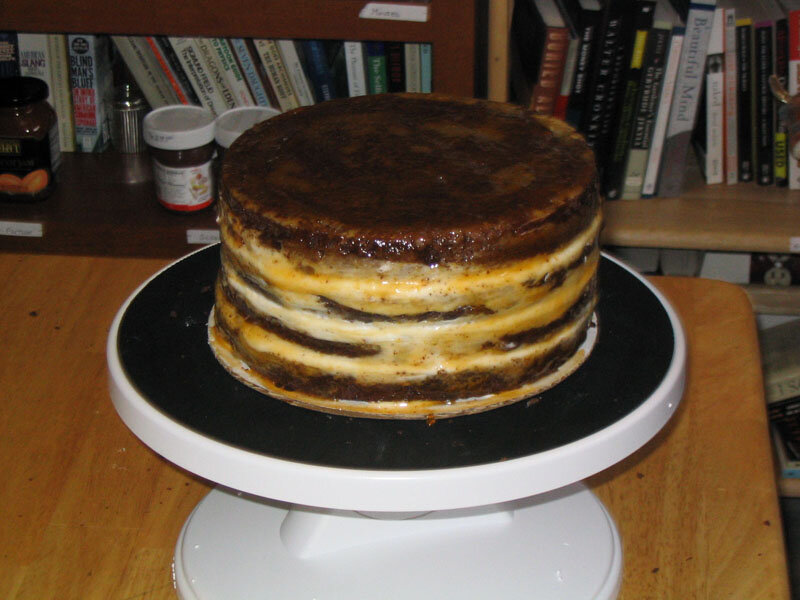
Her next step was to put a crumb coat on each tier. This is a preliminary undercoat of icing to keep the crumbs from the cake from getting into the final icing coat. She decided to use a glaze of apricot jam for this, which she made by heating the jam and then pressing it through a sieve to remove the stringy bits. Applied with a pastry brush in a thin layer, it picks up the stray crumbs and keeps then in place when it dries. In retrospect, it would have been a better idea to use thinned buttercream icing for this, since we had some trouble with the dark cake showing through the icing.
While I'm on the subject of buttercream icing, I should add a sidebar here about my sister’s experiments with buttercream icing. One flaw that buttercream icing has is that, because it is made with butter, it isn't truly white. Buttercream icing can be made with Crisco instead, which does make it white, but it doesn't taste as good. To decide the best way to make the buttercream icing for this cake, she made several batches with slight variations such as using a very light colored butter, or using Crisco but with artificial clear butter flavoring, or adding a bit of white food coloring to icing made with regular butter. We decided that the loss of taste wasn't worth the loss of color and decided against using the Crisco. There was only a very slight color difference anyway.
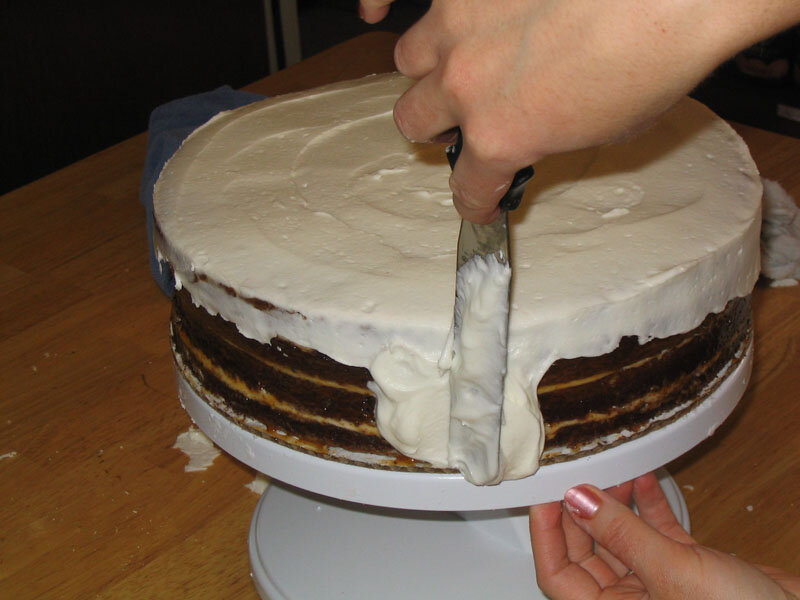
Once the crumb coat dried, she went back to each tier with a layer of buttercream icing. Unfortunately, you could still see the cake through the first layer of icing, and she had some trouble with the second layer sagging and dripping. But she cleaned it all up and the resulting cake tiers were by far the neatest cake tiers we've ever frosted, though I will say that my sister didn't make it look quite as easy as Sandy, our instructor at our Wilton master class in cake decorating. I'll bet she will next time, though.
Gravity-defying Structure
I was determined to make this a cake that defied, or appeared to defy, gravity. I'd like to be able to claim that it was some kind of metaphor for the happy couple's love defying the pressures of life that weigh us all down or some such sentimental hoo-hah, but really, I think it was just because I was convinced I could do it and thought that would be really cool.
The result - my plan for a cake on which each tier sat only halfway on the tier beneath, the other half cantilevered out in an attractive spiral. I hope to one day adapt this design to allow me to render a strand of DNA in cake. For a while I contemplated having each layer actually next to the previous layer, and slightly elevated, not sitting on top of it at all. While I still believe this to be theoretically possible, I'm glad I didn't try it this time because this way was hard enough.
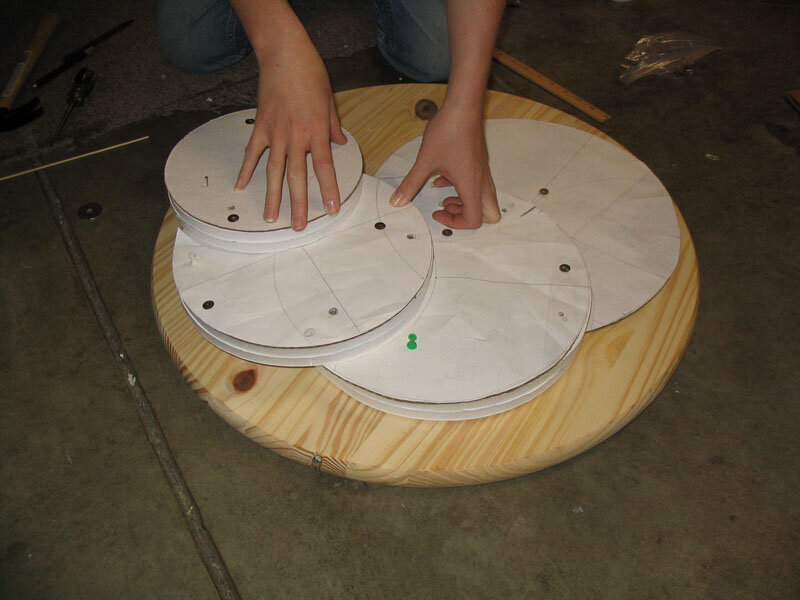
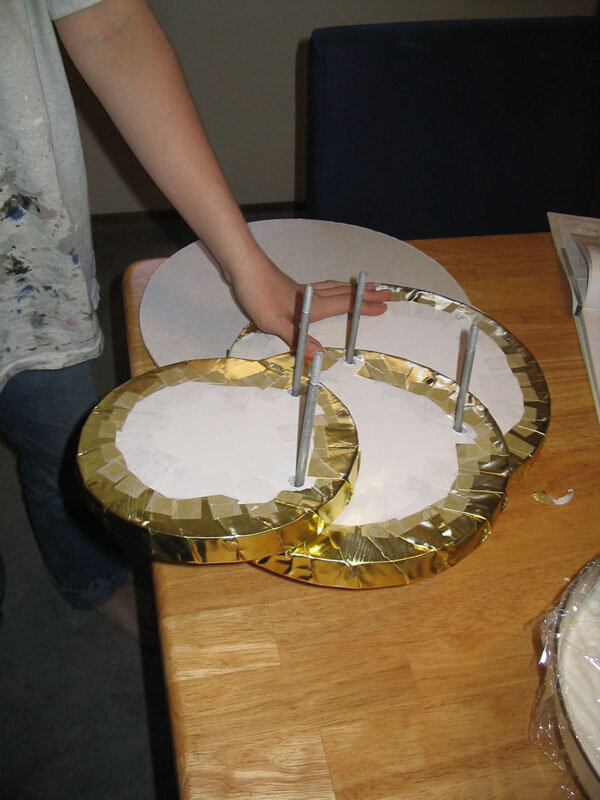
Each tier was to be supported by a circle of 1/2" foamcore, on top of which would rest the cardboard base of each tier, on top of which rested the actual cake. To hold them in place, each tier had to be bolted to the foamcore base of the tier beneath. This necessitated some complicated and mystical-looking hole cutting in each piece of foamcore to allow both for the bolts themselves and for various bolt heads and bolt ends from the layers above and below. I felt like a sorcerer, which is always a good thing to feel like.
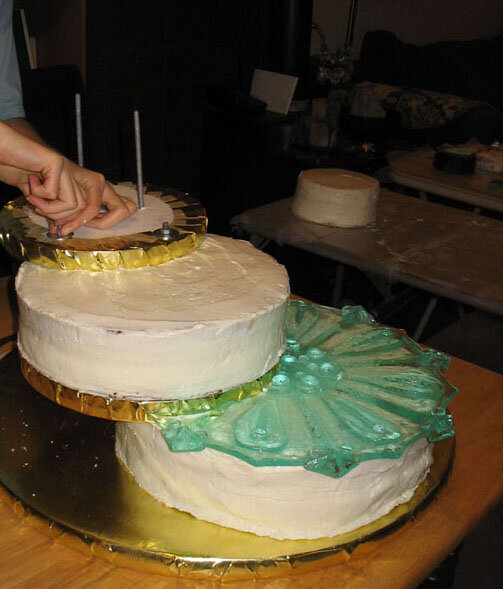
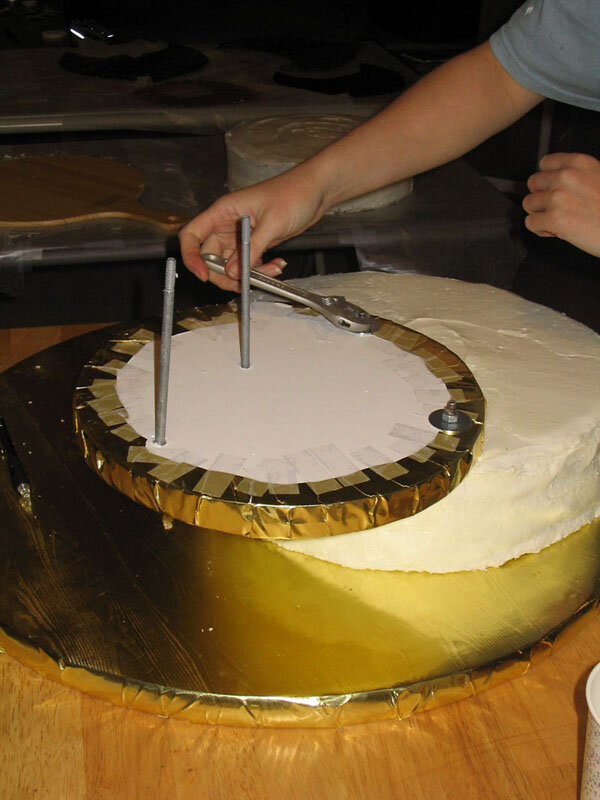
The assembly of the cake was an arduous and nerve-wracking process. Each tier was individually torted and frosted by my sister in advance. Then we started with the large, wooden, circular base, which already had holes drilled for the two bolts to hold the second tier. The heads were also countersunk to allow the base to sit flat on the table. The bolts were inserted first, then the largest tier of the cake, with holes precut in its cardboard base, was lowered into place over the bolts, which, for sanitary reasons, we wrapped in plastic wrap, though we also washed them well first. Next we positioned the foamcore base for the second tier and marked on the first tier where it would sit because we had to insert some 1/4" wooden dowels into the first tier of the cake to support the weight of the tier above. Otherwise, each tier would crush the tier beneath and the entire cake would collapse. I put nine or ten dowels into the fist tier of the cake, arrayed evenly about an inch back from the edge of the area where the next tier would sit. That done, we were ready to bolt the foamcore for the second tier into place. By the way, a cake that requires a crescent wrench to assemble is very funny.
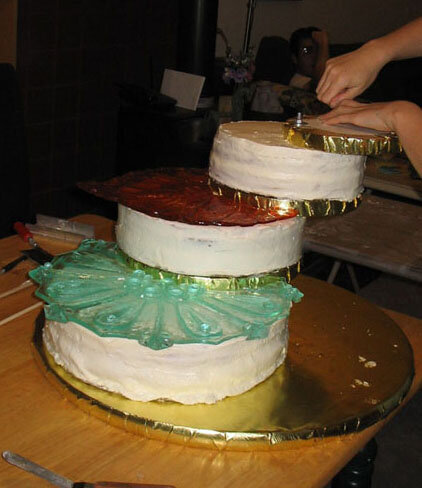
The foamcore base of the second tier already had the bolts to go through to the next tier in it at this point. In fact some of the bolts had to be glued in place in advance because the layers of foamcore were covered with gold foil and the bolts had to be in place before that in order for the heads to be hidden. Therefore, we were all set to lower the second tier onto those bolts and repeat the process described above for the third and fourth tiers. Bear in mind that this entire time, despite my professed confidence in my design, I was pretty much expecting the cake to collapse at any moment.
Miraculously, it all went together and appeared to be stable! We propped it up with temporary dowel supports to make sure and later we went out to get some attractive clear plastic supports from TAP Plastics, which we used for transport and actually had to put back in as a precautionary measure halfway through the reception. The layers did begin to settle and tip a bit, which I suspect indicates that the dowels were being tipped over inside the layers. I'm sure I could solve this problem next time by using an internal support with a wider base, like a plastic ring or oval. All in all, I'd say my first foray into the world of gravity-defying pastry was a roaring success!
Sugar Plates
Each layer of the cake is topped with a seasonally appropriate giant sugar plate - a blue snowflake for winter, a red leaf for fall, a green lily pad for summer, a yellow flower for spring. Modern technology being the marvelous thing that it is, ordinary people like you and I are now able to make our very own rubber, food-safe hard candy molds in the comfort of our own homes! Amazing, isn't it? We purchased five pounds of a two-part, food-safe rubber mold compound from a site called chefrubber.com, which, by the way, has all kinds of products that look super fun.
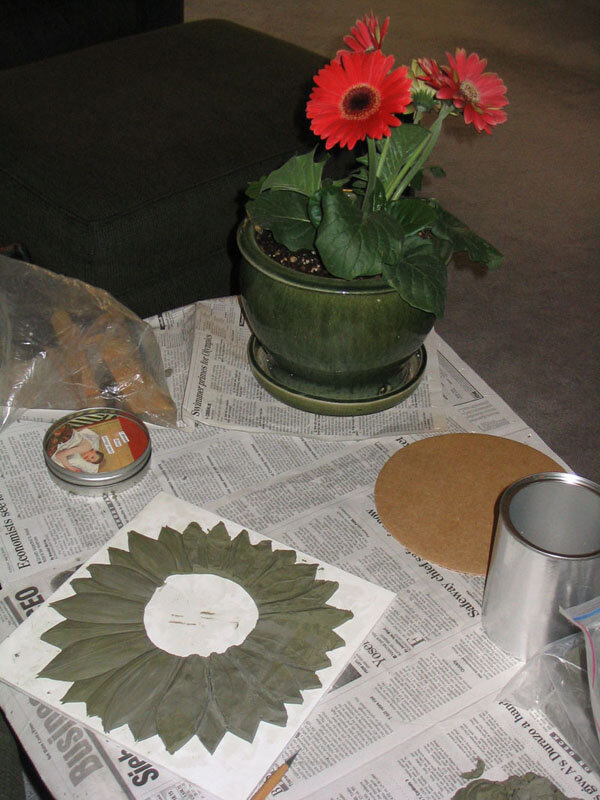
Our first step was to try out our new toy. I made a little leaf out of non-toxic clay and put it in the bottom of a paper cup. We tried out the rubber, carefully mixing the correct proportion using my sister-in-law's kitchen scale and it worked great! First we painted a thin layer of rubber onto the clay positive with a soft brush to make sure it got into all the little crevices, then we poured more rubber on top of that. The pouring process was a bit difficult, as in order to avoid getting bubbles in the mold, we had to pour the rubber in a very thin stream out a tiny hole in the mixing cup. The mold dried sturdy and detailed, and it pulled away easily from both the cup and the clay. We make some hard candy and poured it into the mold once again with great success! The candy took all the fine detail of the mold and then peeled away easily once it cooled.
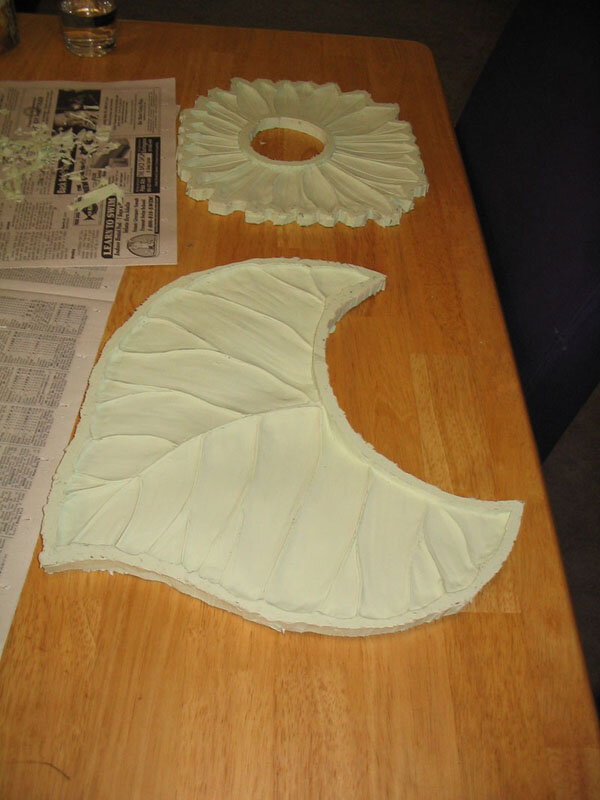
Emboldened by our success, I sat down to sculpt each of the large plates for the cake, again out of non-toxic clay, on sheets of foamcore. Once they were complete, I built up foamcore walls around each to contain the poured rubber, filling in some large spaces with excess clay, to minimize the amount of rubber needed to fill the mold box.
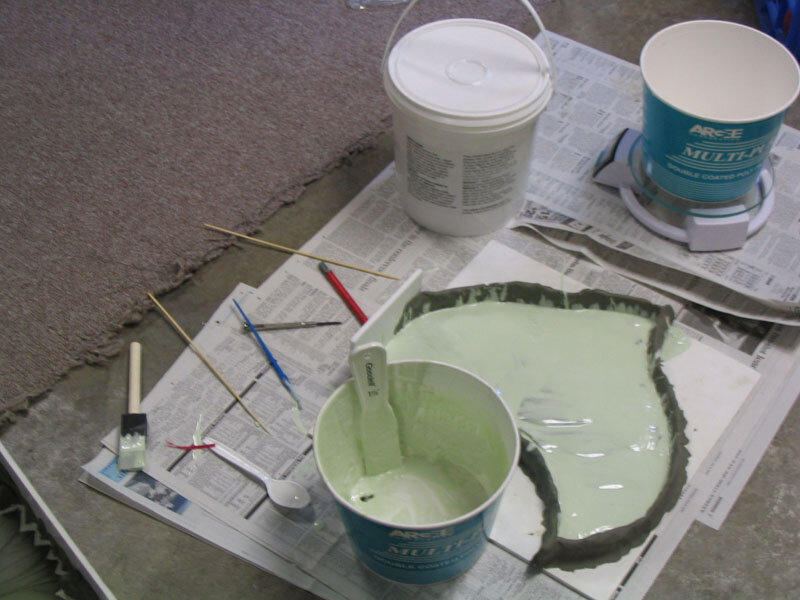
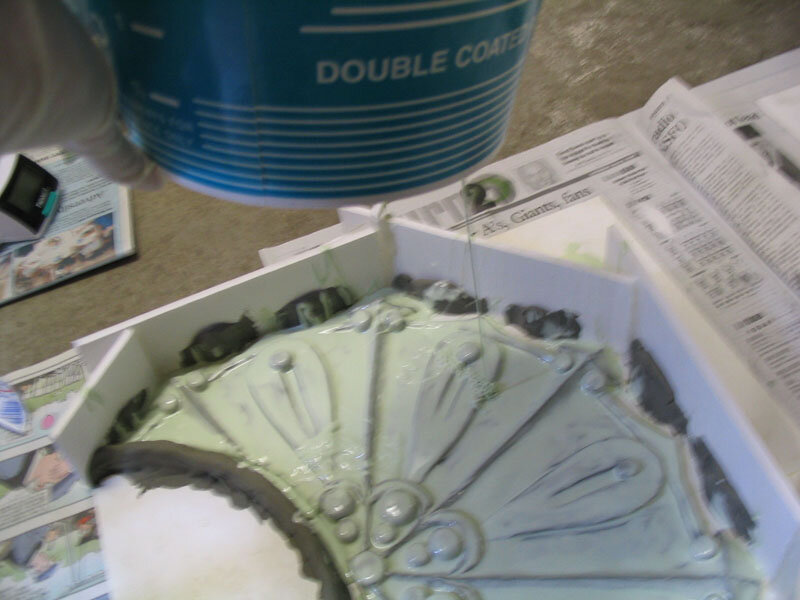
My sister was at work the day I had chosen as my mold-pouring extravaganza so I was left on my own with a fairly nerve-wracking procedure to perform, but I bravely rose to the challenge. My first mistake was trying to mix too much of the compound at once. Although it doesn't completely cure for 24 hours, it starts to set up after only about half an hour. If that seems like plenty of time to pour out a paper cup of rubber, bear in mind that I was pouring it through a pinhole. It's pretty time consuming. Also that I had to paint on a coat of the rubber before I could start pouring. So my first batch started to set before I was done pouring, resulting in me desperately ripping larger and larger holes in the side of my paper bucket until finally I gave up and just poured it over the side. (If you're wondering why I didn't just scrap that batch of rubber and start over, it was because I wasn't sure I would have enough to do all four molds and so I couldn't afford to waste any. It's not something I could just run out to the grocery store and buy more of.) This did, indeed result in quite a few bubbles. I popped the larger ones with a pin and, as always, hoped for the best.
The rest of the pouring went better, as I worked in smaller batches, though I was also worried by one batch that I didn't quite mix as well as I should have, but it seemed to set up with no adverse effects. By the end I was such a pro that I was pouring rubber into one mold box with one hand while painting rubber onto another clay positive with the other hand. I even took pictures with my right hand of my left hand pouring the rubber into the mold box.
An anxious day followed until I could safely pull the molds off of the clay positives, but it was worth the wait. The molds looked great! We washed them with soap and water, as per the instructions and we were ready to the pour the sugar plates.
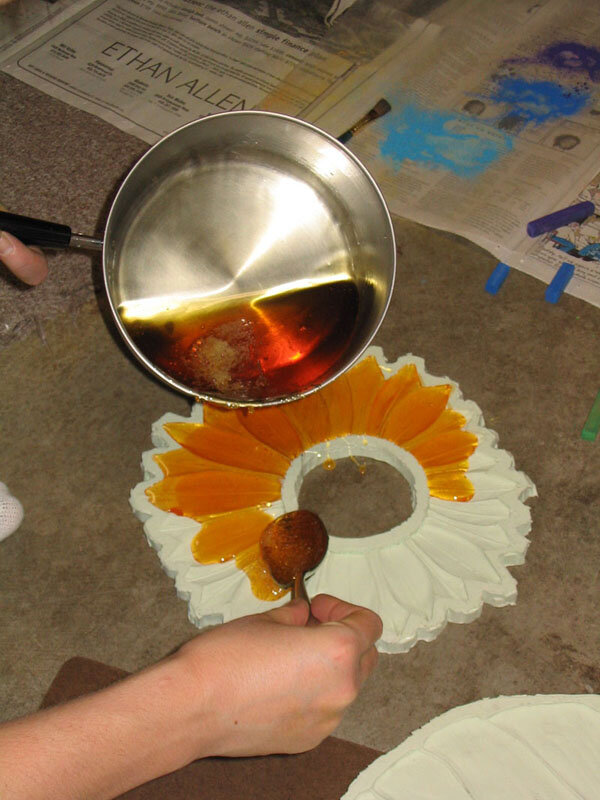
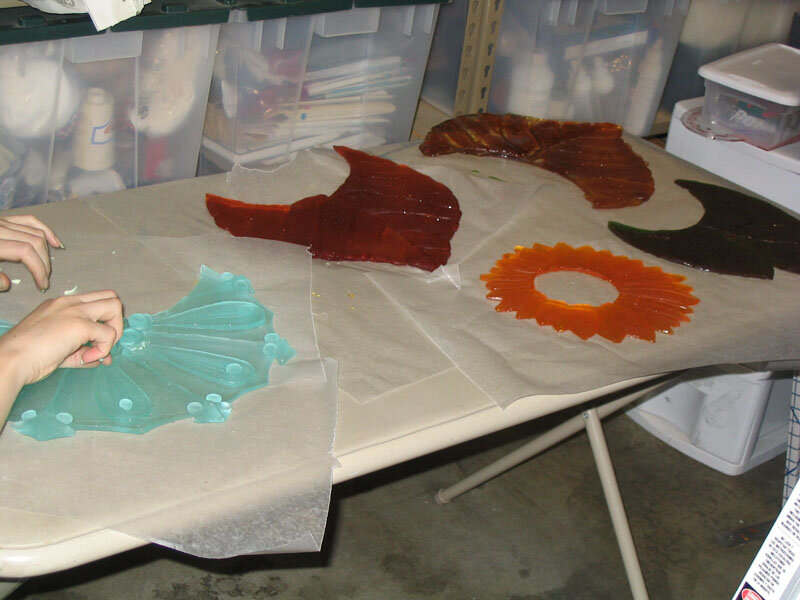
My original plan had been to pour each plate in two different colors so, for instance, the autumn leaves would be a light gold in the veins and darker amber in the areas in between. I expected that the second color of sugar, poured over the first, would melt the first color and the two would blend smoothly together. Boy, was I wrong. I tried this experiment first on the autumn leaf and it didn't work at all. Not only did the two colors not blend together at all, but the second color didn't flow all the way in next to the first color, so I had big ugly grooves on my sugar plate. I decided to try it with just one color.
Not only did this produce a nice, clean leaf, but it was also much faster, easier, less wasteful of sugar and it even produced some of the bi-tonal effect I was looking for all on its own. Because sugar is translucent and the molds were of various thicknesses, the deep areas looked much darker than the shallow areas. I was really pleased with the result.
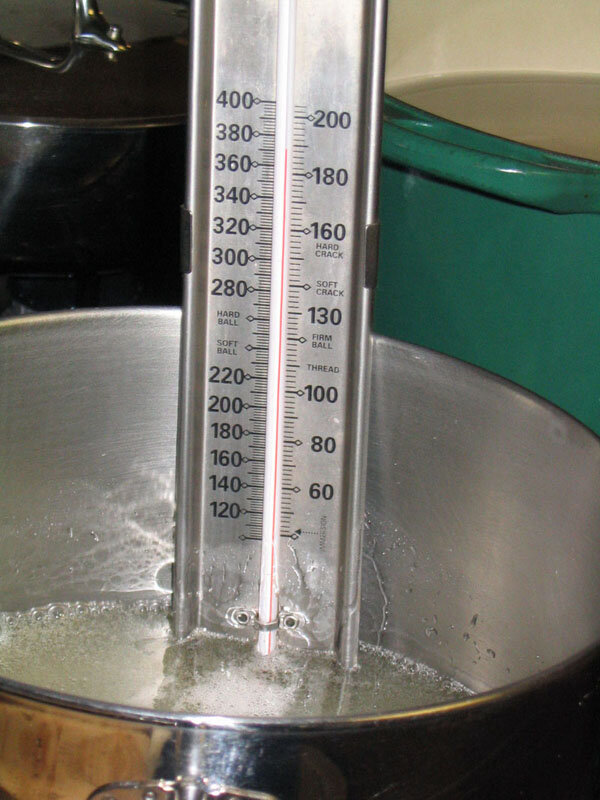
I proceeded to pour the yellow flower and the green lily pad this way, which brought me finally to the largest sugar plate, the snowflake. Now, we wanted the snowflake to be a very pale blue, just a hint of color, really. To accomplish this with sugar would be very difficult because cooked sugar always has a bit of an amber tint. We decided to try using a clear sugar substitute called isomalt, which we learned about at a Pulled Sugar class we took recently. Isomalt is pretty amazing stuff. It comes in the form of opaque white crystals, larger than sugar crystals and you don't need to add water or anything or even stir it while it melts. It won't burn the way sugar will and, unlike sugar, it's perfectly clear. You also have to heat it to a much higher temperature than sugar, which was a little scary, especially since I was stupid enough to do this barefoot, instead of wearing my steel-toed boots, which should have been the obvious thing to do, considering that this process involved me carrying a pot of 400 degree liquid from the kitchen to the garage. Fortunately, the whole thing went without mishap, although I was shocked by how quickly the isomalt heated up. It didn't behave the way sugar does at all, which I suppose is to be expected. I tinted the melted isomalt with just a smidge of blue food coloring and poured the snowflake, which turned out beautifully.

For the finishing touch I rubbed each sugar plate once over with a damp cloth to give it a glossy finish. They had a sort of frosted glass look when they first came out of the molds, which was also nice, but the advantage of the glossy finish is that then if you later drop icing or something onto the sugar plate (which my sister and I considered to be more or less inevitable), you can wipe it off without damaging the finish of the plate.
Side Decorations
Winter
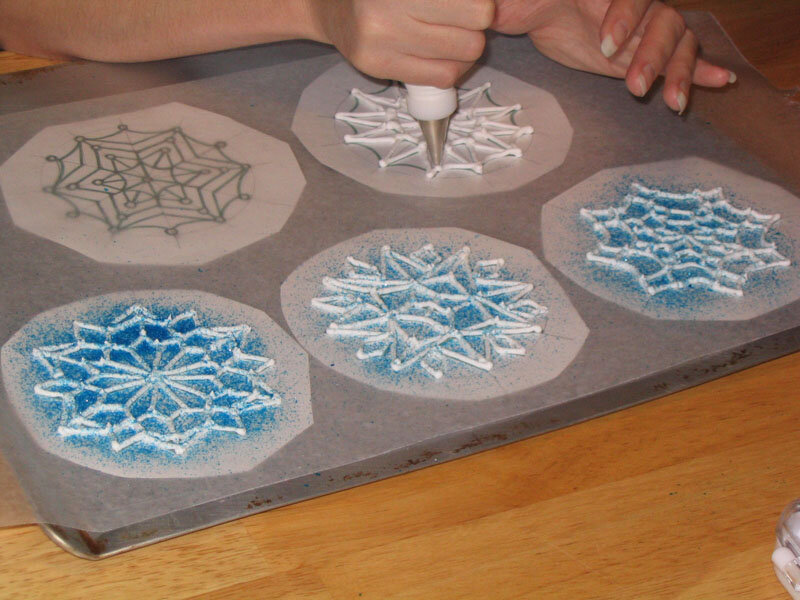
The sides of the winter layer called for royal icing snowflakes. The first step, as always, was to find suitable research photos, so I went online until I had more pictures of snowflakes than anyone should be able to use in a lifetime. Using these as a reference, I drew up six different snowflake patterns. These I taped to a cookie sheet then covered with wax paper. Using a #3 decorating tip, I piped royal icing over each pattern, then sprinkled it with edible glitter (clear, silver, or blue) before the frosting had a chance to dry.
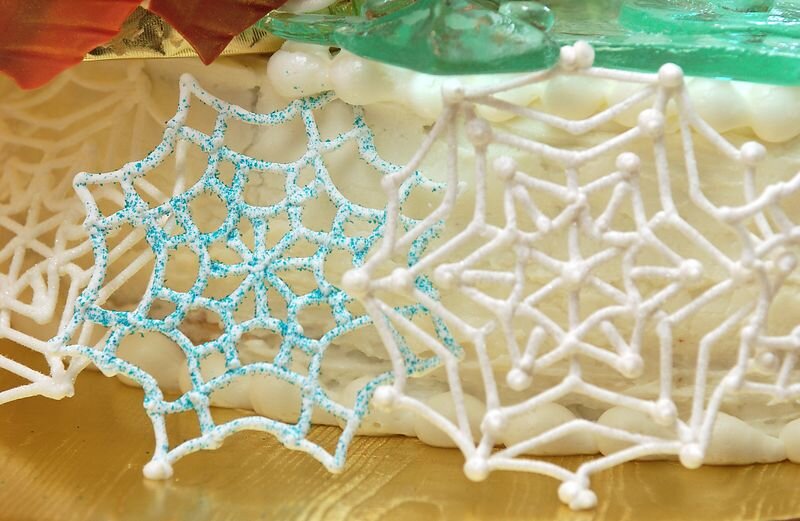
These proved to be extremely popular with the children at the wedding, who kept coming back to the kitchen asking for "snowflake candy." Fortunately, I made about twice as many as I actually needed for the cake, because I was afraid of breakages, so there were plenty to go round. There was one extremely sad incident involving the four-year-old daughter of a good friend of ours, whose piece of snowflake candy fell on the ground and broke. To make up for it I made snowflake candy again (in a slightly sturdier form) to serve at a dinner party that they were coming to a few days later, but unfortunately at the last minute they couldn't make it, so we put the snowflakes in bowls of ice cream and served them to the other guests, which also proved to be quite popular, even among the adults.
Autumn
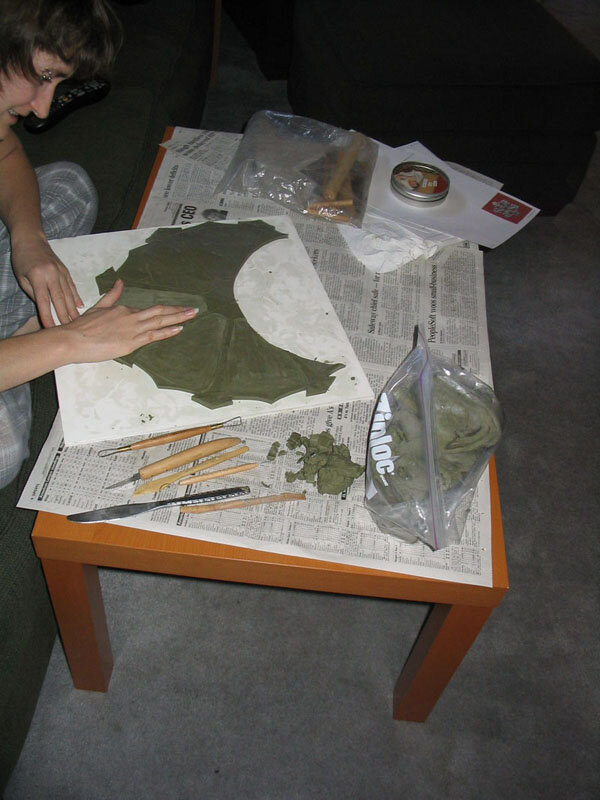
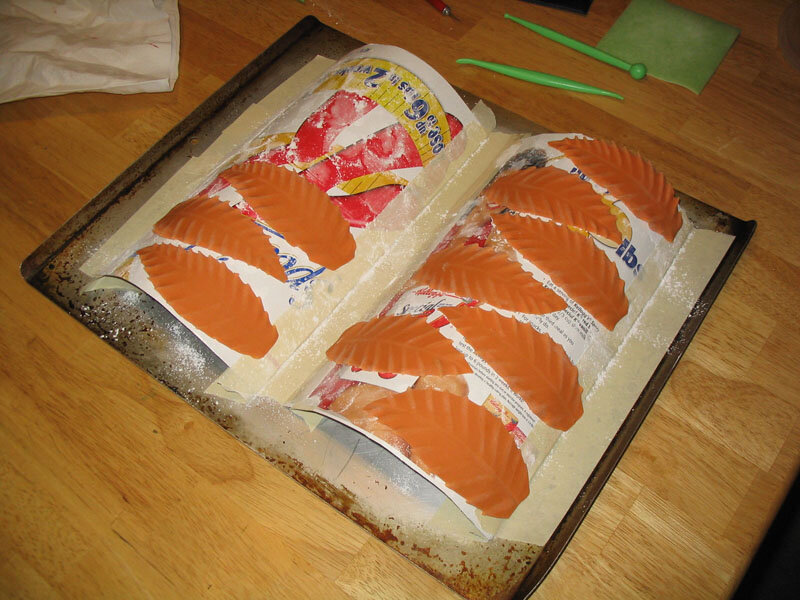
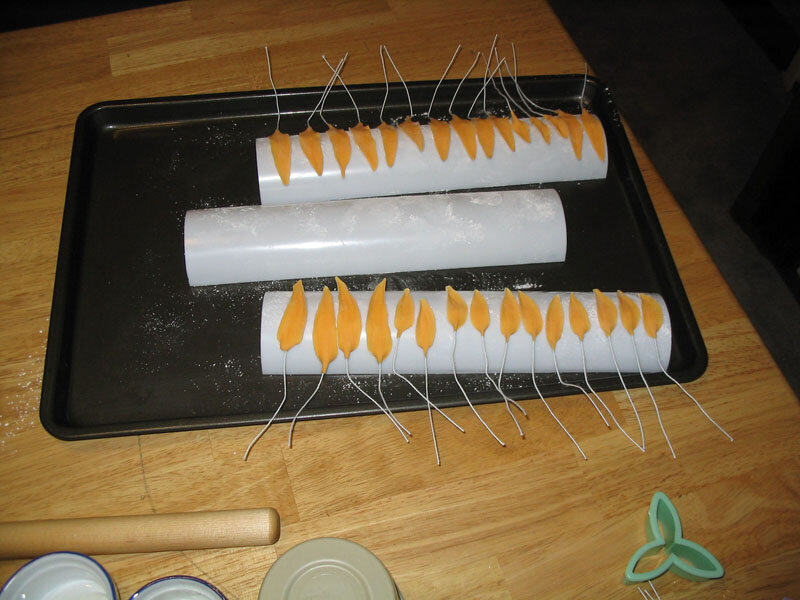
For the sides of the autumn layer I made large gum paste leaves. Actually, they were a little larger than would really have been optimal, but oh well. I didn't have any gum paste cutters big enough to do the job, so I drew myself a paper pattern and cut each leaf out by hand, then drew in veins with a knife tool. All of my flower formers were also too small for these leaves, so I made my own out of the sides of a cereal box taped to a cookie sheet to get the curve I wanted. Once they were generously dusted with cornstarch to prevent sticking the leaves were draped over these to dry.
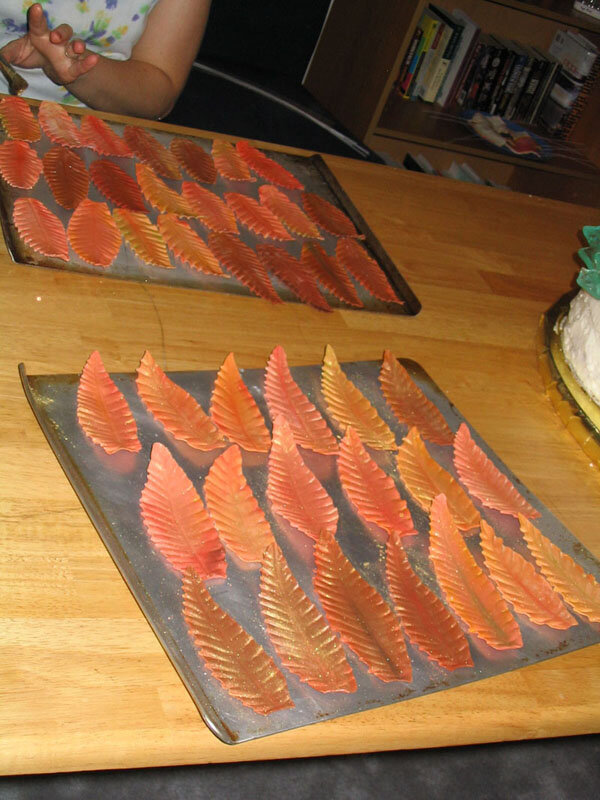
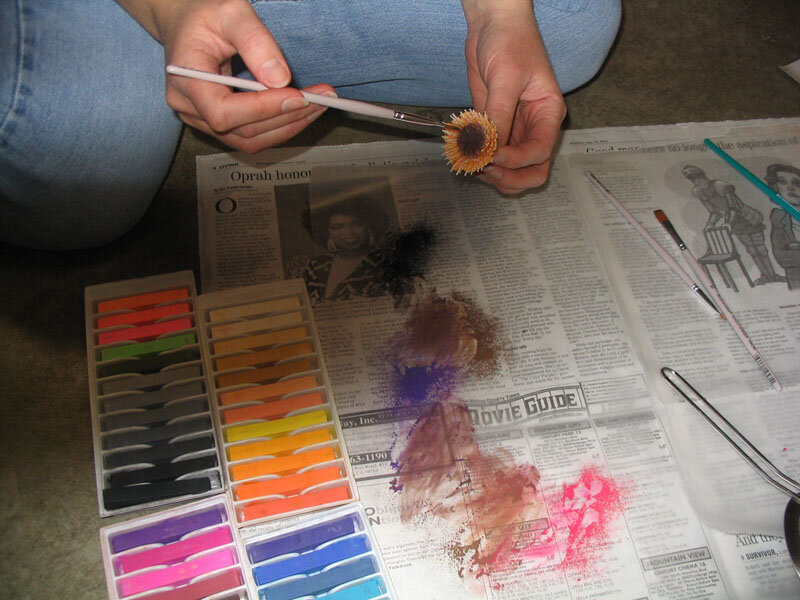
I started with three different colors of gum paste - orange, red, and brown. Once the leaves were dry I went in and added more color variations with chalk pastels - various reds, yellows, browns, oranges, and greens until each leaf was different. I steamed them to set the colors (a neat trick, by the way. You just set a kettle or pot of water boiling and wave the leaf for a few seconds in front of the steam. It keeps the colors from rubbing off and gives it a nice sheen.) For the finishing touch, my sister dusted them with gold luster dust.
Summer
For the summer layer, my sister made gum paste lily pads and I made a few gum paste lilies to go with them.

The lily pads are made of green gum paste, rolled thin, then cut into a circle with a little wedge cut out. My sister then drew in veins and softened the edges with a ball tool. Once the lily pads were dry, we painted them with some thinned green piping gel so they would have the shiny, wet look of a real lily pad.
For the lilies my sister first made yellow centers around green floral wire. (We were following instructions in our gum paste flower book, but they were a little unclear sometimes, so she actually made them far too large the first time and had to do it over.) Once those were dry, she then cut daisy shapes out of yellow gum paste, softened the edges and added veins on the inside, and then built up the interior yellow petals from the inside out on top of the round center. These were left to dry upside down for a day or so.
Once these were dry I got some white gum paste to make the outer petals and some coffee cups covered with tin foil with a hole punched in the middle to assemble the flowers on. The white outer petals of the lilies are assembled from the outside in, so I made the largest petals first, cutting out the gum paste with one of my cutters, and adding veins with a knife tool. The first row of petals lies on the tin foil, arranged around the center hole, making sure to leave the hole exposed. The next layer of petals goes on top of that, glued with meringue powder, staggered and supported by cotton balls so as to give the petals the necessary lift and curve. This goes on until the flower is pretty much filled up, then the center is dropped into place with the wire going through the hole in the tin foil. The hardest part was not gluing the cotton balls to the flower. I didn't entirely succeed in all cases.
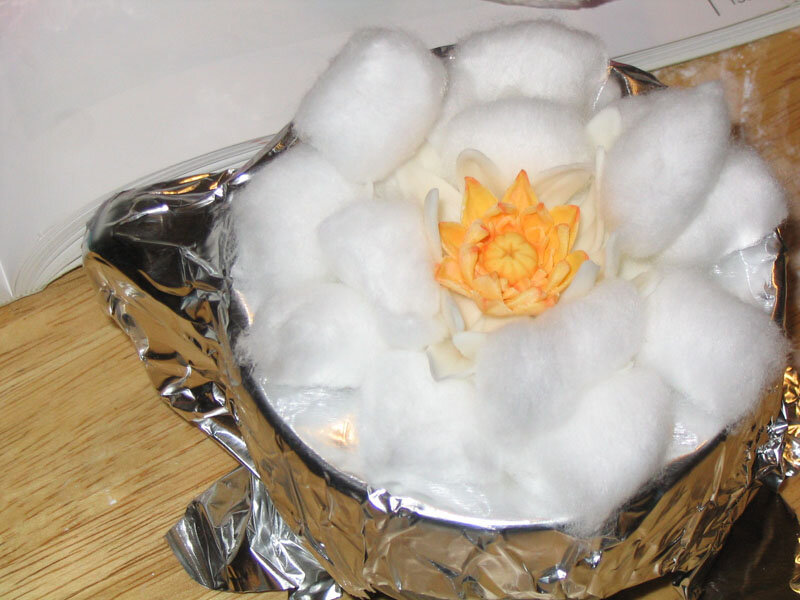
Once these dried, I pried all the cotton balls out, then added a little pink chalk pastel to the tips of each flower petal and the lilies were ready to go. The nice thing about the wire is that they can easily be stuck straight into the side of the cake.
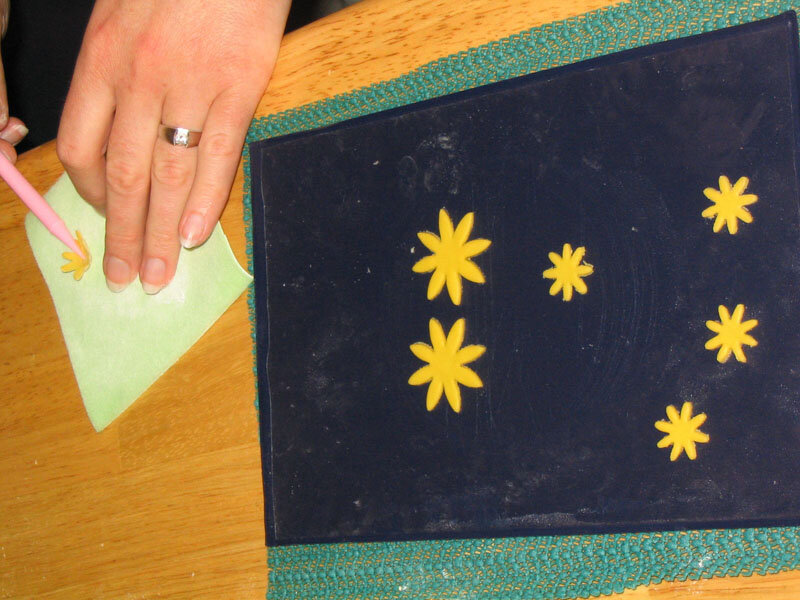
Spring
We chose what might well be the most time-consuming flower in the universe for the spring layer of the cake - the gerbera daisy. Somehow, my sister got stuck with all the tedious, boring jobs, like making millions of tiny daisy petals and I got to have all the exciting jobs like pouring boiling sugar into rubber molds and sculpting yeti out of gum paste. I didn't plan that deliberately, by the way, but I'm also not complaining.
Like the water lilies, she started with forming a center on top of some stiff floral wire, since it needed to be strong enough to support the weight of all the petals. After the center dried, she wrapped it several times with orange gum paste rolled very thin with the edge scored and tiny pieces of very thin floral wire pressed gently into gum paste. This created little stamens around the center. Once that dried, she colored it with non-toxic chalk pastel powder (created by grating the pastels through a sieve).

Along the way, she worked on making the roughly 75 large and 75 small petals required for the 5 daisies. Each one was cut from orange gum paste using a large daisy cutter. She thinned the edges and elongated them to make a more natural shape, then pressed veins down the center. Using meringue powder and water, she attached the petal to short length of very thin floral wire and let it dry on flower former to create a nice curve. The instructions actually called for inserting the wire inside the petal, but when we tried that it seemed very awkward and required rolling thicker petals than we wanted. Once the petals were dry, she brushed them with several shades of orange chalk pastel, and then set the color by briefly holding them over boiling water. The steam also gave them a nice sheen.
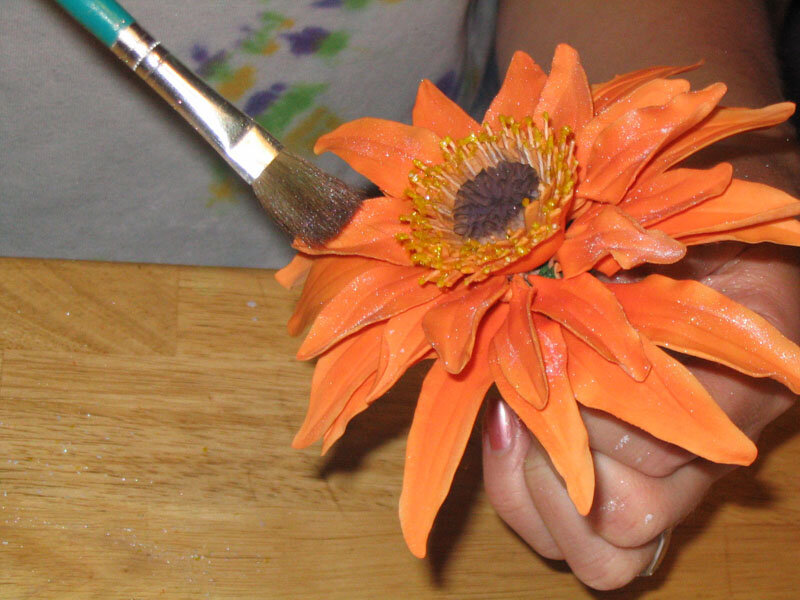
Finally, she was ready to assemble the flowers! First, she dipped the tips of the stamens in meringue powder and water and then dipped them into gold edible glitter. Then she attached the petals to the center stem with the small ones closer to the center. As a final touch, she brushed the petals with gold lustre dust.
Bride & Groom Figures
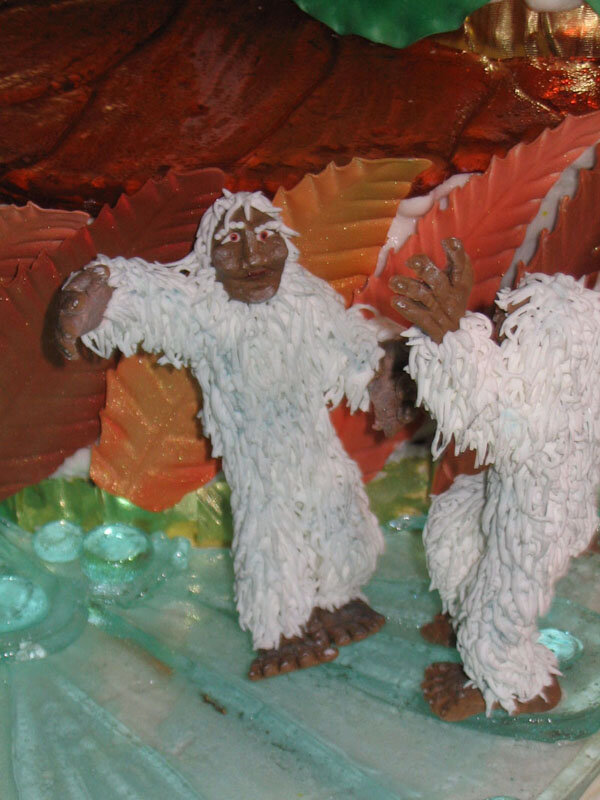
Rather than content ourselves with just one happy couple on the top of the cake, we decided to put a "bride and groom" on each tier of the cake. In keeping with our nature and seasons themes, we set about to select an animal appropriate to each season. Once we had come up with caterpillars for the spring layer, frogs for the summer layer, and dragonflies for the autumn layer we ran into a problem - each of the aforementioned animals can be sculpted and put on a cake full scale, which for some reason I thought was really important and my sister at least humored me, but we were unable to think of a winter animal which would fit on the cake in full scale. Penguins and polar bear were right out, of course, and though we may have been able to come up with some sort of winter mouse, we still weren't satisfied. Then it hit us - pygmy yeti! What could be more perfect? Due to its small size, the pygmy yeti is even more elusive than its larger, more famous cousins such as the migo, the sasquatsch, Bigfoot, and, of course, the standard yeti. In fact, it has yet to be proved that the curious little critter exists outside of this cake and our imaginations, but, if it does, rest assured that it is the same size as the ones I sculpted for this cake. Many of the wedding guests erroneously assumed that I had created small-scale versions of regular yeti, but that just goes to show you the abysmal state of yeti education in this country. That's education about yeti, not education directed at yeti, by the way, though I imagine that a lot of progress could probably be made in that area as well.
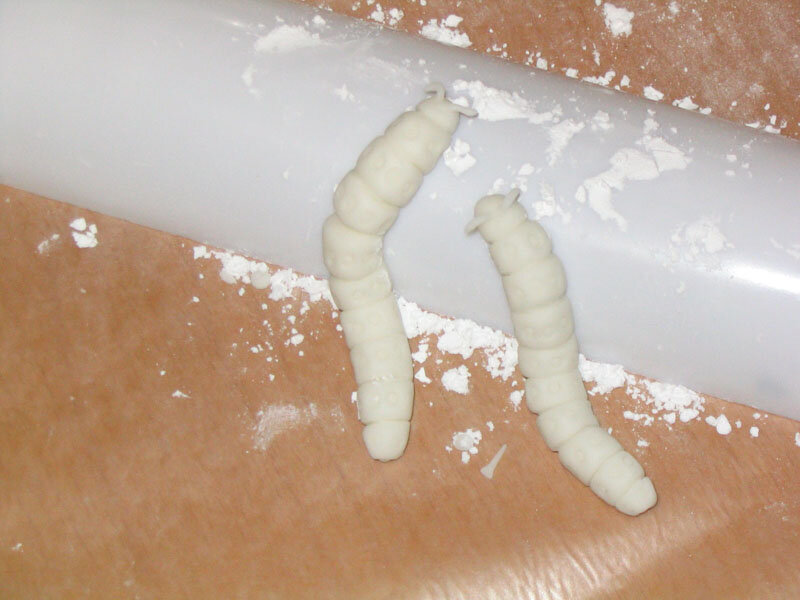
Spring - Caterpillars
We decided on these little green caterpillars because they would stand out nicely on the yellow sugar flower. I always like to have a research photo to work from, so I found a good one with a google image search. These were by far the easiest critters to create. I simply rolled a cylinder of gum paste, and then created the segments with a plastic knife tool from my rolled fondant set. The little spots are made by gently pushing a round decorating tip into the gum paste. I believe I used a #3. A little rolled string of gum paste stuck to the head created the antennae and then the caterpillars were set (arranged in what I hope was a graceful curve) on a large flower former, generously dusted with cornstarch to prevent sticking, to dry. The flower former lifted the front half of the caterpillars off the ground, so when they were set on the cake, they were rearing up the air and twined together. A few dabs of royal icing with a #1 tip created the tiny feet.
Once everything was dry, I painted them with paste food colors, thinned with water. The only tricky part is not to work one area over too much because it dissolves the gum paste. Just paint one quick coat, then set them aside to dry. I also did a little light dusting of chalk pastel once the food coloring dried to give them a more natural look and to make the two caterpillars look slightly different in color and in shade from each other, which I thought would be more realistic.
Summer - Frogs
I made the frog bodies and the legs separately, then glued them together with meringue powder once they had dried. One of the gum paste books we were using for reference actually had a picture of a gum paste frog, though it didn't have directions on how to make it. It did, however, provide me with the tip that bulging eyes could be made by pressing a decorating tip into the gum paste, which worked great! I believe I used a #8 for the eyes and a #5 for what I think are ears, directly behind the eyes. I also used a #16 star tip to make the rough skin texture on the frogs' backs. The mouth and the little lines on the back were done with the knife tool. I had to do all this pretty quickly because gum paste has a very short working time before it dries out and starts to crack.

That pretty much did it for the bodies, so I set to work on the legs. The back legs didn't need any reinforcement, but I had to put little #32 wires into the front legs, so they would be strong enough to hold the frog bodies up off the ground a bit.
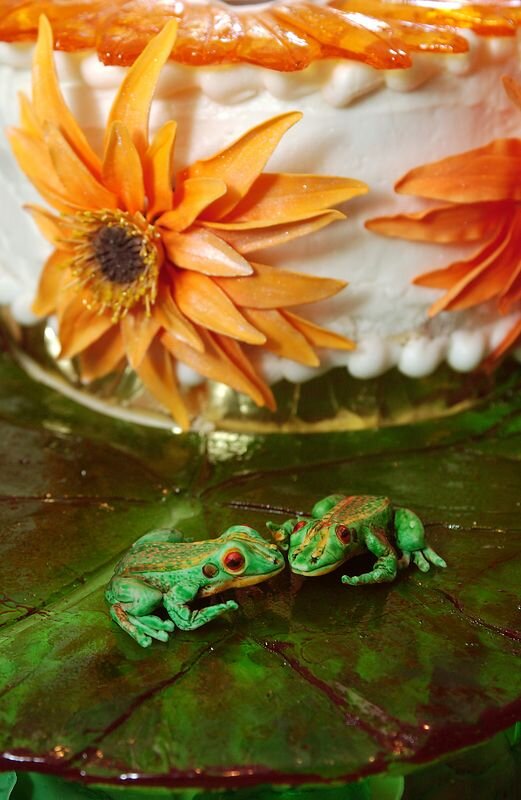
Once the frogs were dry and the pieces glued together, I painted them with paste food colors. I thought about making them red, so they'd contrast with their green sugar lily pad, but we decided against that because we though red frogs might look poisonous and went with standard green instead. First I painted the undersides a yellow ochre (again, working from research I found online) and let that dry before painting the tops green. I used a slightly different shade of green for each frog, so they wouldn't look identical. The eyeballs I painted red, then added a black iris once the red was dry. As with the caterpillars, I added a dusting of chalk pastel to soften the bright green of the food coloring and add a bit of shadow and highlight.
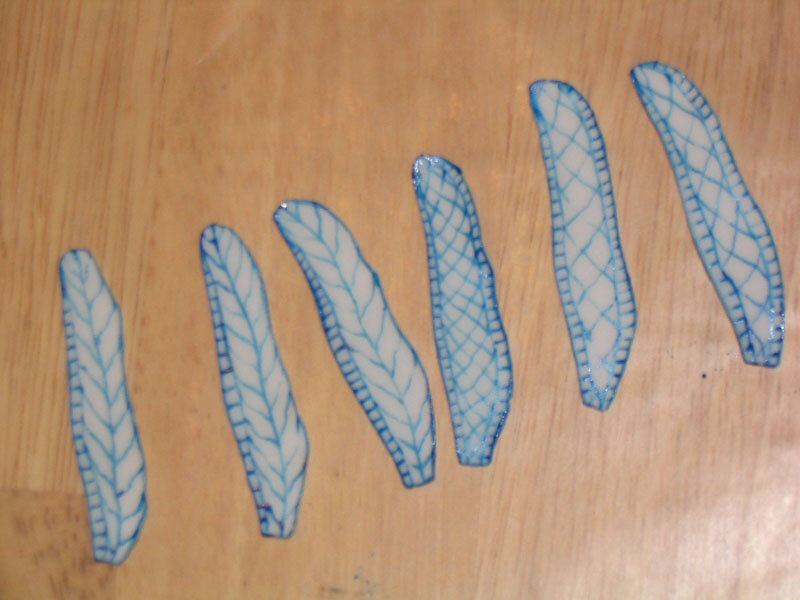
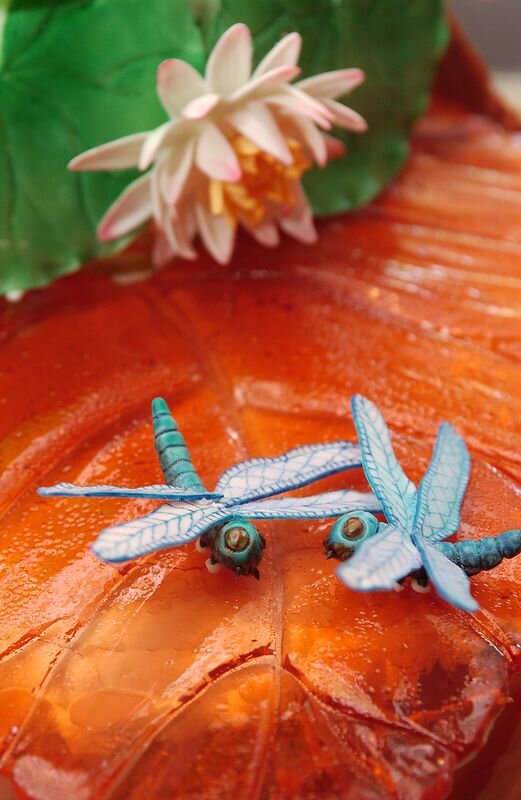
Autumn - Dragonflies
Our gum paste book actually did have directions for making a dragonfly, so I just followed those and used their picture as a reference. The bodies were made much the same way as the caterpillars - a cylinder of gum paste segmented with a plastic knife tool. The shape of the body is slightly different from that of the caterpillars, being rounder and fuller at the head and more tapered at the tail, but the idea is the same. The eyes, like the frogs' eyes, were made with a round decorating tip. The first time I made the wings, following the book's instructions, I wasn't happy with them. Their shape wasn't delicate and specific enough because I had flattened them with the rolling pin again after cutting them out. Also, the wire inside the wings made it impossible to get them as flat as I wanted them to be. I trashed the first set of wings and started again. This time I didn't put wires inside and it worked a lot better. I also rolled the gum paste thinner, cut out a specific shape using a pattern I made out of paper, then carefully thinned only the lower edge with a ball tool. Finally happy with the wings, I set everything aside to dry.
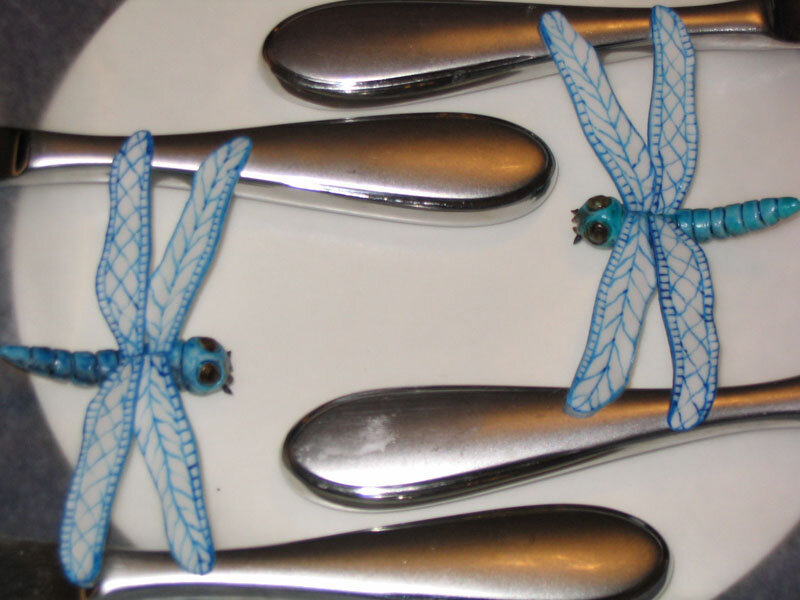
Next, I painted delicate veins on both sides of the wings with blue food coloring. I also painted the bodies with blue food coloring, a slightly different shade for each dragonfly, and added darker shading between each segment with black food coloring. Tiny feelers were added with royal icing and a #1 decorating tip, and the eyes were painted with black piping gel to make them glossy.
The wings were glued to the bodies with meringue powder. One fell off when I was positioning them on the cake, but I glued it back on. A light dusting of blue luster dust on the wings gave them that little extra shine. Amazingly, the dragonflies were even sturdy enough for one guest to take one home to keep.
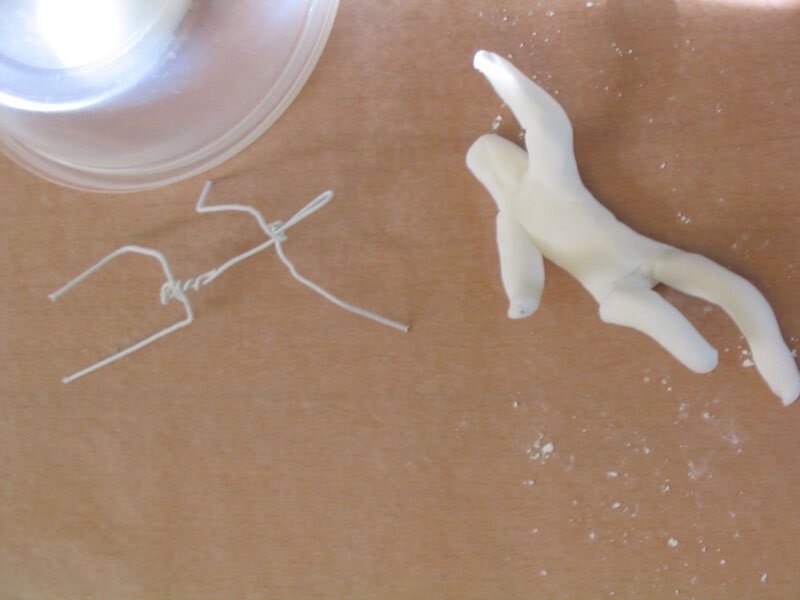
Winter – Pygmy Yeti
The pygmy yeti were by far the most time consuming creatures to make, plus I didn't have any reference to work from, so I had to make it up as I went along. In order to make them stand upright without collapsing under their own weight, I gave the yeti internal wire frameworks, made from #20 white floral wire. I covered this with fondant in the basic shape of a yeti body. I chose fondant instead of gum paste because it has a much longer working time before it dries out than gum paste and I didn't want to have to rush.

The face, hands, and feet are gum paste, colored a nice, rich, yeti-skin brown. I could only do one extremity at a time, then I had to wait for that one to dry before making the next one, so it was quite a drawn out process. At first I had a lot of trouble with the gum paste drying out too quickly (I didn't have the option of using fondant here, because fondant doesn't take fine detail as well as gum paste.), but I discovered that it I kept dipping my plastic sculpting tool in Crisco, it kept the gum paste moist and workable for a longer period of time. I used my own feet as a model (I have surprisingly large feet for someone my size, so they actually made pretty good models for yeti feet.) and I made the toenails and fingernails with #2 and #4 round decorating tips. (Can you tell I really like this new technique I learned?) The feet in particular turned out really well, which is important for such a close relative of Bigfoot, and surprised the heck out of me because I can't draw feet to save my life.
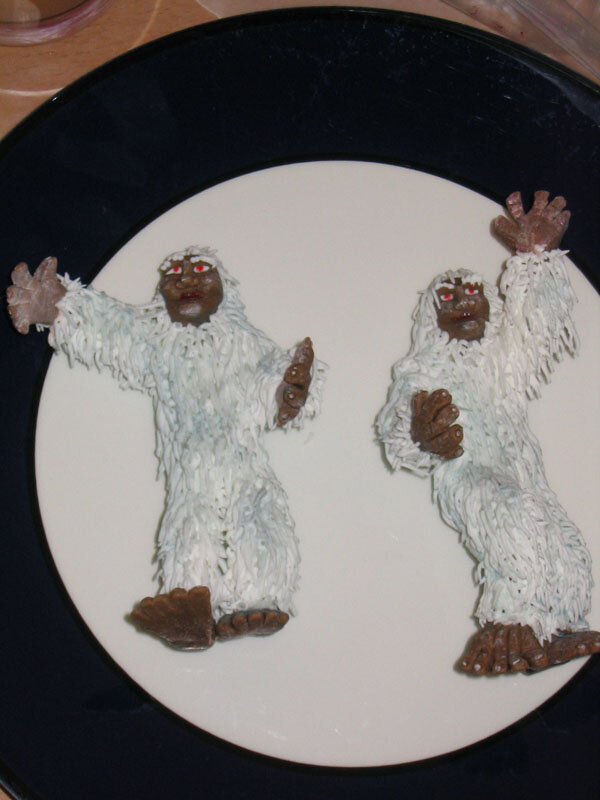
The next step was to give the yeti hair. I toyed with the idea of making the hair out of gum paste, but decided to use royal icing instead. I think I made the right choice. It was another very time-consuming process, but the results were worth it. I drew in each hair individually with a #1 tip and it had to be done in two stages, so that the yeti always had a dry side to lay them down on. I also gave them little royal icing eyebrows and eyeballs.
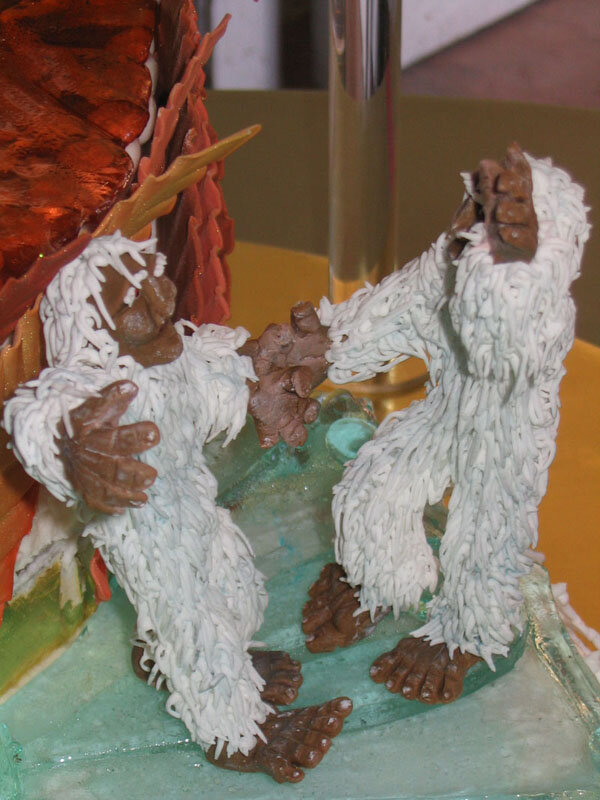
A dusting of a few grey and blue shades of chalk pastel gave the fur that slightly-dingy-wild-animal look and some pink and ivory chalk pastels on the face, hands, and feet, added highlights and emphasized the toenails and fingernails. I'm not sure how I came to the conclusion that pygmy yeti have red irises, but apparently they do. Those are painted with food coloring.
Originally, I had planned for the yeti to be skipping hand-in-hand, but when I put them together they looked like they were jitterbugging, so I went with that instead. We kept the yeti after the cake cutting to give to the bride and groom when they returned from their honeymoon.
Blooming Flower Mechanism
Apparently, just making a cake isn't enough for us. No, our cakes have to do something, even if we don't have time to make it work right. Oh well. We went through about four hundred different concepts and in the end we didn't settle on one so much as we went with the one we happened to be working on when the day of the wedding rolled around.
It all started with the concept of a big flower blooming out of the center of the cake. Nice metaphor for the commencement of the happy couple's new life together, right? Right. But it also raises a very important question - what should be inside the flower? Clearly the center of the flower suddenly becomes the most important spot on the cake, so it has to contain something meaningful, right? We were tossing around a lot of different ideas, including Homer and Marge cake toppers and tiny sugar words saying "love" or "joy" or something along those lines, when my sister suddenly hit on the solution we were looking for - a butterfly! This naturally brought up the idea that the butterfly should actually fly out of the flower, which led to the question - how do me make an edible butterfly light enough that it would be lifted by a tiny fan sitting inside the cake? The solution we came up with was to make the butterflies wings out of petals of edible flowers, but I don't actually know if that would have worked or not because fan difficulties prevented us from ever getting as far as actually making the butterfly.
The first fan I tried was one of the little ones you can buy at Radio Shack to cool computers, which was just the right size to fir inside the cake, but, as it turned out, wasn't even powerful enough to launch edible glitter into the air, let alone flower petals or an edible butterfly. So I set out to look for another fan, but with little success. Fans powerful enough were too big and had to be plugged in, fans small enough and battery-powered were too weak. On the day of the wedding I went to a nail salon to get a manicure and pedicure and at every manicure station was a tiny fan, just the right size, for drying nails in front of, but by the then it was too late. Live and learn. I'll remember it for next time.
At this point I came up with another plan. Instead of using a fan, I'd make the center of the flower out of a piece of balloon, which would be stretched as the flower raised up, then released, thereby launching the flower petals and edible glitter inside into the air. We had to give up on the butterfly at this point because this launch mechanism would have resulted in an apparently dead butterfly catapulting into the air, and then smashing into one of the lower tiers of the cake, possibly taking out a frog or a dragonfly in the process.
Finally having a plan in hand that I had good reason to believe would work, I set about making the petals of the large flower, which was to bloom out of the cake. I made six, to be safe, though I only planned to use five. They needed wires inside to hold them to the center and to strengthen them, so I made two sides of each petal, and then glued them together with wires sandwiched in between. Each petal was made by rolling out the gum paste, cutting it out using a paper pattern I had drawn, then softening the edges with a ball tool and drawing in subtle ridges with a dogbone tool. I then set them on a flower former dusted with cornstarch to dry.
Once the petals were completed, I made the discovery that they were way, way too big to fit in the tube we were using and they had altogether the wrong curve to them, which wasn't as upsetting as it might have been because I had, for some inexplicable reason, painted all these petals with hideous bright pinks and yellows. I don't pretend to know what I was thinking when I did that. I'd like to be able to claim that I was under some sort of evil outside influence, but no, it was all my fault. In any event, it's just as well that I couldn't use those petals.
While I'm hovering near the subject of the cardboard tube, I've got a funny story about that, too. My sister and I were trying to figure out where we were going to find a tube the right size to use in our mechanism. We had some mailing tubes, but they were a little too small. Suddenly, in a blinding flash, inspiration smacked me upside the head. "Oatmeal!" I yelled, and rushed to the kitchen, my sister hot on my heels, where I triumphantly extracted from the cabinet a cylindrical container of oatmeal, which turned out to be much too big for our purposes. This did, however, put us onto the track of food containers, and my sister soon returned from the grocery store with a container of cashews, which was just the right size. Several hours later, after we had eaten half the cashews, my sister realized that the cashew container was exactly the same size as the container in which the gum paste mix is packaged. We had three of these in the house the entire time. Obviously we aren't the most observant people in the history of the universe, or maybe we just need to learn to think things through for a few minutes before rushing off in pursuit of something that was right in front of our noses the whole time.
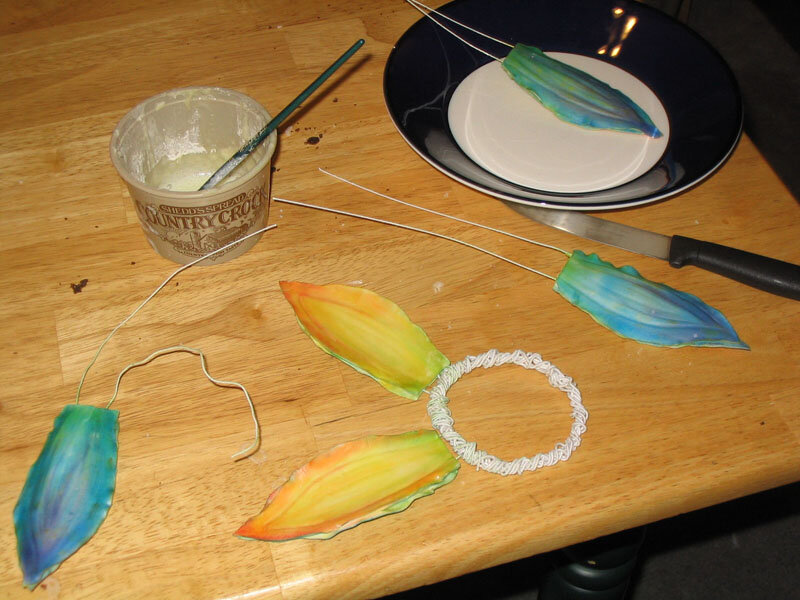
Returning to the topic of the petals, I started over with a new, much smaller petal pattern and this time I curved them the correct way to make them actually fit inside the tube. Once they were dry and their support wires were safely sandwiched in between the two layers of the petals, I set about coloring them. Mindful of past mistakes, I decided to color them with chalk pastels instead of food coloring, allowing for much more natural colors and smoother color blends. I went with a blue and purple color scheme on the bottom of the petals and a yellow and orange scheme on the tops. Remember, it's an idealized fantasy flower. I can make it any color I want. So there. I also added some greens at the bottom of each petal for a more natural stem to petal transition. Then I steamed all the petals to set the colors and make them a little shiny (a trick we learned at our Wilton master class in cake decorating we took last spring.)

With the petals complete, I had only to create the launch mechanism. I first made a ring of several layers of thick floral wire. To this, I taped a cut section of balloon, in which to place the glitter. At this point, we reached the hilarious realization that my launch mechanism looked like a giant condom, but I didn't let that deter me. I attached a wooden dowel handle to the giant condom, then wrapped the wires inside the flower petals into the wires around the perimeter of the condom and the flower was ready to be installed in the cake.
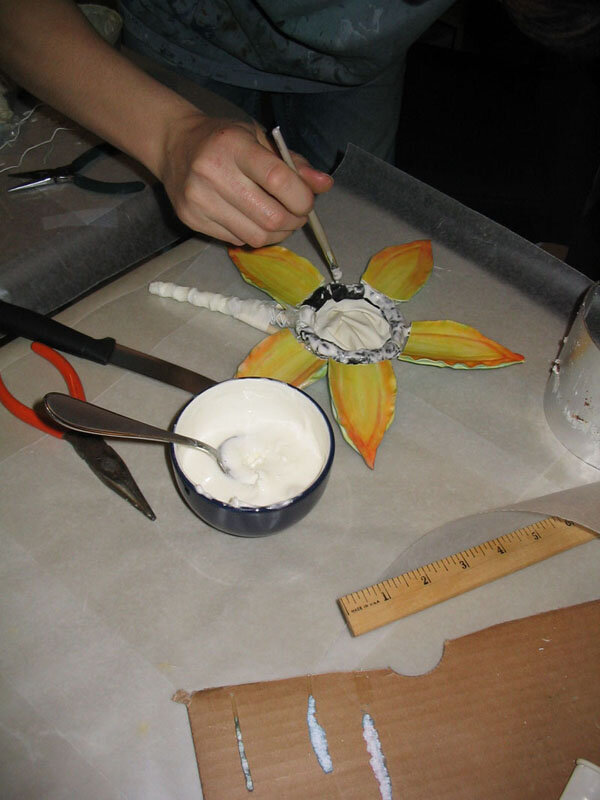
In order for that to happen I had to carve out a large circle in the center of the top tier of the cake. Well, not in the center, actually. It was more off to one side because I convinced my sister that would look more in keeping with the cantilevered, spiral design of the cake. In retrospect, I don't think I was right about that, but oh well. Even I can't be right all the time. Once I had hollowed out the large circle in the center of the top tier, I inserted the cardboard tube from the cashews (cut down to the right height) into the cake, then carved a groove for the handle of the flower to travel in. At about this point, I realized that the tier was slightly shorter than I had figured on and my petals were too long to fit inside the cake, so I had to take them off the condom, remove the wires, carefully cut off the bottom of each petal, reinsert the wires, and rewire them to the condom. After a surprisingly smooth execution of this procedure, I was ready to insert the flower in the cake.
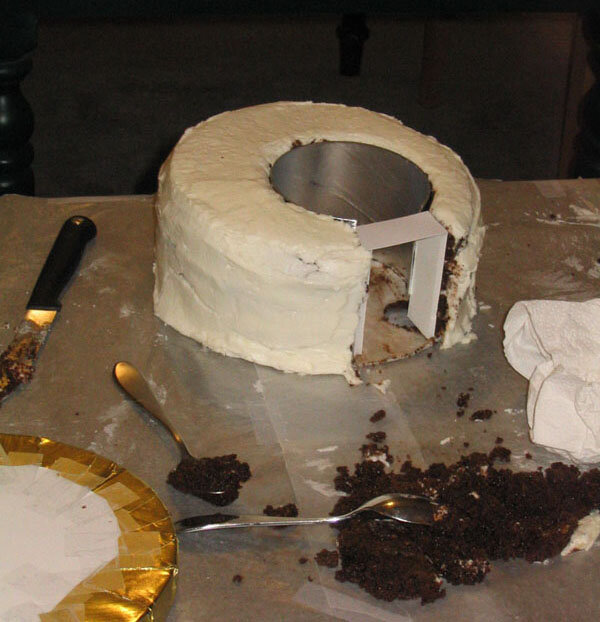
In order for the glitter to be launched into the air, the balloon had to be pulled tight, then released when the flower was lifted up and out of the cake. After experimenting with all manner of clamps and dismembering a little model-making clamp assembly I own, I hit on the solution of putting a tack down through the center of the balloon into the foamcore beneath the cake. This would hold the balloon for a little while until it stretched enough that the hole in the balloon would pass over the head of the tack, releasing the balloon. That done, I poured gold edible glitter into the center of the flower, covered the opening in the sugar flower with a sort of royal icing grid, and prayed for the best.
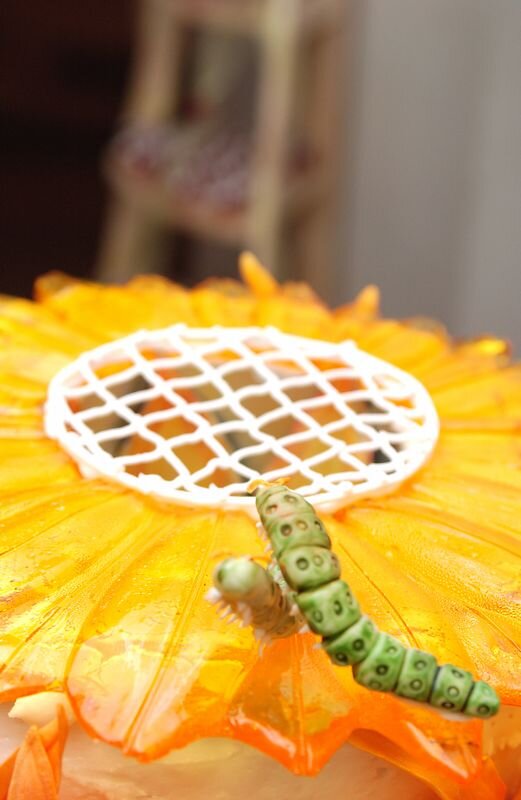
Assembly
Once the structure of the entire cake was together, it remained only to arrange and attach all of our pre-made decoration. For some reason I expected this to be much easier than it was.
The sugar plates actually were easy - they just plopped right down in place. We wet the icing on top of each tier first to make sure they stuck, but that may not have even been necessary. Incidentally, it would have been quite a neat, elegant looking cake with just the sugar plates and no other decorations.

I then piped bead borders around the top and bottom of each tier to hide various and sundry imperfections, then set about attaching the decorations.
We had decided not to attach the figures or the snowflakes until we arrived at the reception site because we didn't want them to break en route, so I had nothing to do on the winter layer for the moment. Which was fine with me because the autumn layer gave me more than enough trouble for two. It took me while to figure out the best way to arrange the autumn leaves around the side of the autumn tier because they were too tall to really fit under the sugar plate and not curved enough to go to the outside of the sugar plate, which extended in some places several inches beyond the cake. After a few abortive attempts, I settled on angling all the leaves so they would fit under the sugar plate and eventually managed to get them all stuck on with royal icing. (Quite a few of them fell off in the car on the drive to the church, but we just stuck them back on once we arrived.)
The summer layer was much easier, because the lily pads were just the right size, possibly because my sister made those, since everything I made for this cake for some reason came out too big. They stuck on easily and the lilies were laughably easy to stick in between.
Spring was also a breeze (again, my sister made these flowers). The gerbera daisies had big wire bases, which I stuck right into the sides of the cake. I placed a delicate royal icing mesh over the hole in the center of spring's sugar plate out of which the flower was to bloom and spring was finished.
That was it for the home assembly - the rest would have to wait until we arrived at the church, which, by the way, is a saga all by itself. There may be no more stressful car ride in the world than a car ride with a cantilevered cake in the back seat. Fortunately for me, My sister drives a station wagon, while I drive a truck, so she was the logical choice for cake chauffer. Because our plans on the day of the wedding called for her to drive to get the bride while I drove to get plastic supports for the cake we needed to take two separate cars, so I couldn't even be in the car with her to offer to moral support. The best I could do was to give her the occasional thumbs-up when she glanced in the rear view mirror.
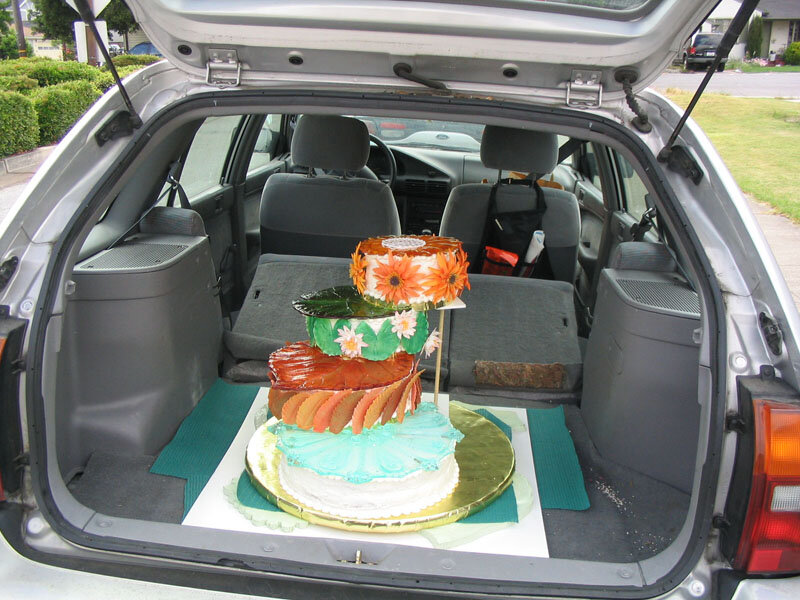
Even just moving the cake from our table to the car was scary. It was pretty darn heavy for a cake, let me tell you, and the round board it was sitting on was only a few inches smaller than our door. We got it safely ensconced in my sister's station wagon, on top of some non-slip material to keep it from shifting. To protect it against dust and such we built a box of foamcore around it and, making sure that our temporary dowel rod supports were firmly in place, we were ready to go!
I can't even imagine how nervous my sister must have been, listing to every creak or snap from the back of the car and cringing at every pothole. It was bad enough just following her. We only pulled over once on the forty minute drive to the church when my sister heard a noise which turned out to only be a few of the autumn leaves falling off.
We made it to the church unscathed and it remained only to get it in the building and onto its table, a process that was greatly assisted by the presence in the church kitchen of a rolling cart.
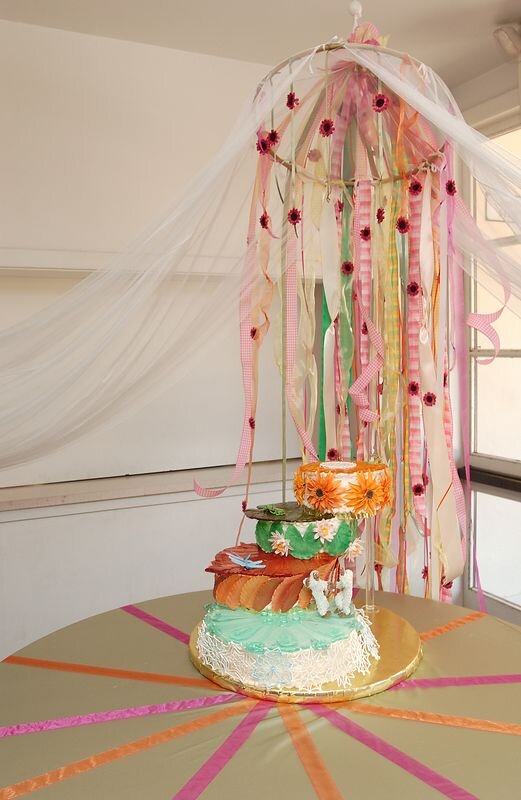
Once the cake was safely in place on the designated cake table (around which the bride and her helpers had erected a lovely ribbon canopy). My sister set about repairing the fallen autumn leaves while I rushed off to the local TAP plastics to get thick plastic rods to use as temporary supports for the cake (much more attractive than the temporary supports we had been using which I made out of dowel rod and foamcore.) I returned to find that the leaves were mended and that my plastic supports were, indeed, quite attractive.
At this point I took over the project of putting the finishing touches on the cake so that my sister (who was also the matron of honor) could scamper off to help the bride prepare. The snowflakes were simple to attach with a little royal icing, as were the various animal couples. I was very careful to position the caterpillars on the top tier so that they wouldn't be crushed by the giant flower when it bloomed out of the cake. That done, I headed out for a well-deserved manicure and pedicure.
Presentation
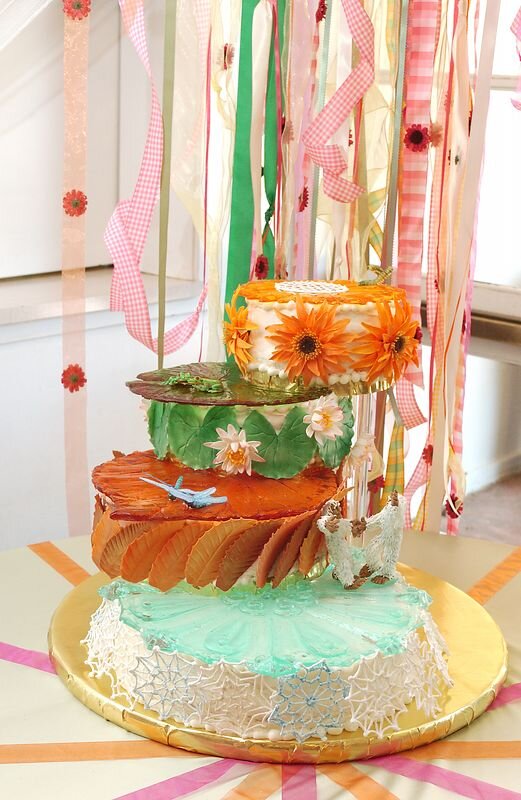
We kept the plastic supports in place until the ceremony was over (I cried; my sister cried; the bride cried; it was a great success.) and the reception began. Then we took them out and hoped for the best. Everything seemed fine, so we went to enjoy the sangria with little plastic monkeys on the glasses. After about forty-five minutes we checked the cake and decided to put the supports back in as a safety precaution because it had tipped a little bit, but it probably would have been fine without them as it wasn't long after that that we were called upon to serve the cake.
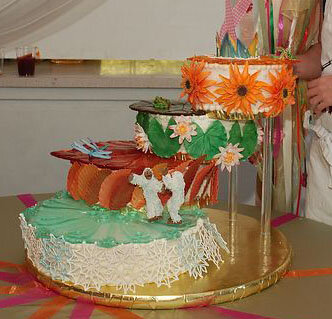
Of course, before the cake was served, the flower had to bloom. Or fail miserably. I couldn't be certain which. We gathered all the guests around the cake where my sister and I described our concept then I warned everyone that, while I hoped the cake was about to do something dramatic, it was possible that it was going to be a complete flop. Then I took hold of the handle and raised the flower. At first, nothing happened. The balloon was too firmly attached to the bottom of the cake and wasn't letting go. A great sigh ran through the assembled celebrants. I gave one last desperate tug and the balloon broke free! Gold glitter spewed into the air and was greeted by cheers! The flower didn't quite make it all the way out, so it only opened part way, but it was a heck of a lot better than nothing.
We pulled the sugar plate off of the top tier so the bride and groom could cut their first piece, then we moved the whole shebang into the kitchen to cut it into servings. We've never cut a cake this big before, but we had a diagram of how it's usually done and I think we did pretty well. I unbolted and disassembled the cake and removed the dowels while my sister and another woman from the church cut the pieces. I also answered questions about gum paste and sugar and isomalt from a few astute young boys who were fascinated by the whole thing and hung around the kitchen the entire time we were serving the cake then took various gum paste flowers and lily pads and such home with them to keep. It's nice to be appreciated.

Our work finally done, we kicked back on a bench in the courtyard to revel in our success, drink sangria, and watch some nearby children make long, beautiful, unintentionally pornographic chains out of the plastic drink monkeys.

For the moment we chose not think about the absolutely giant mess we had waiting for us in the dining room, kitchen, and garage at home.
Resources
We also learned many of our techniques (and had a fabulous time) at the Wilton School in Darien, Illinois. We took the The Master Course, Introduction to Gum Paste, Introduction to Rolled Fondant, and Introduction to Pulled Sugar. Sandy, our Master Course instructor, was one of the best teachers either of us had in any subject.
Our source for the food-safe mold making material (we used the Perfect Soft Silicone). They also have a helpful guide to mold making.