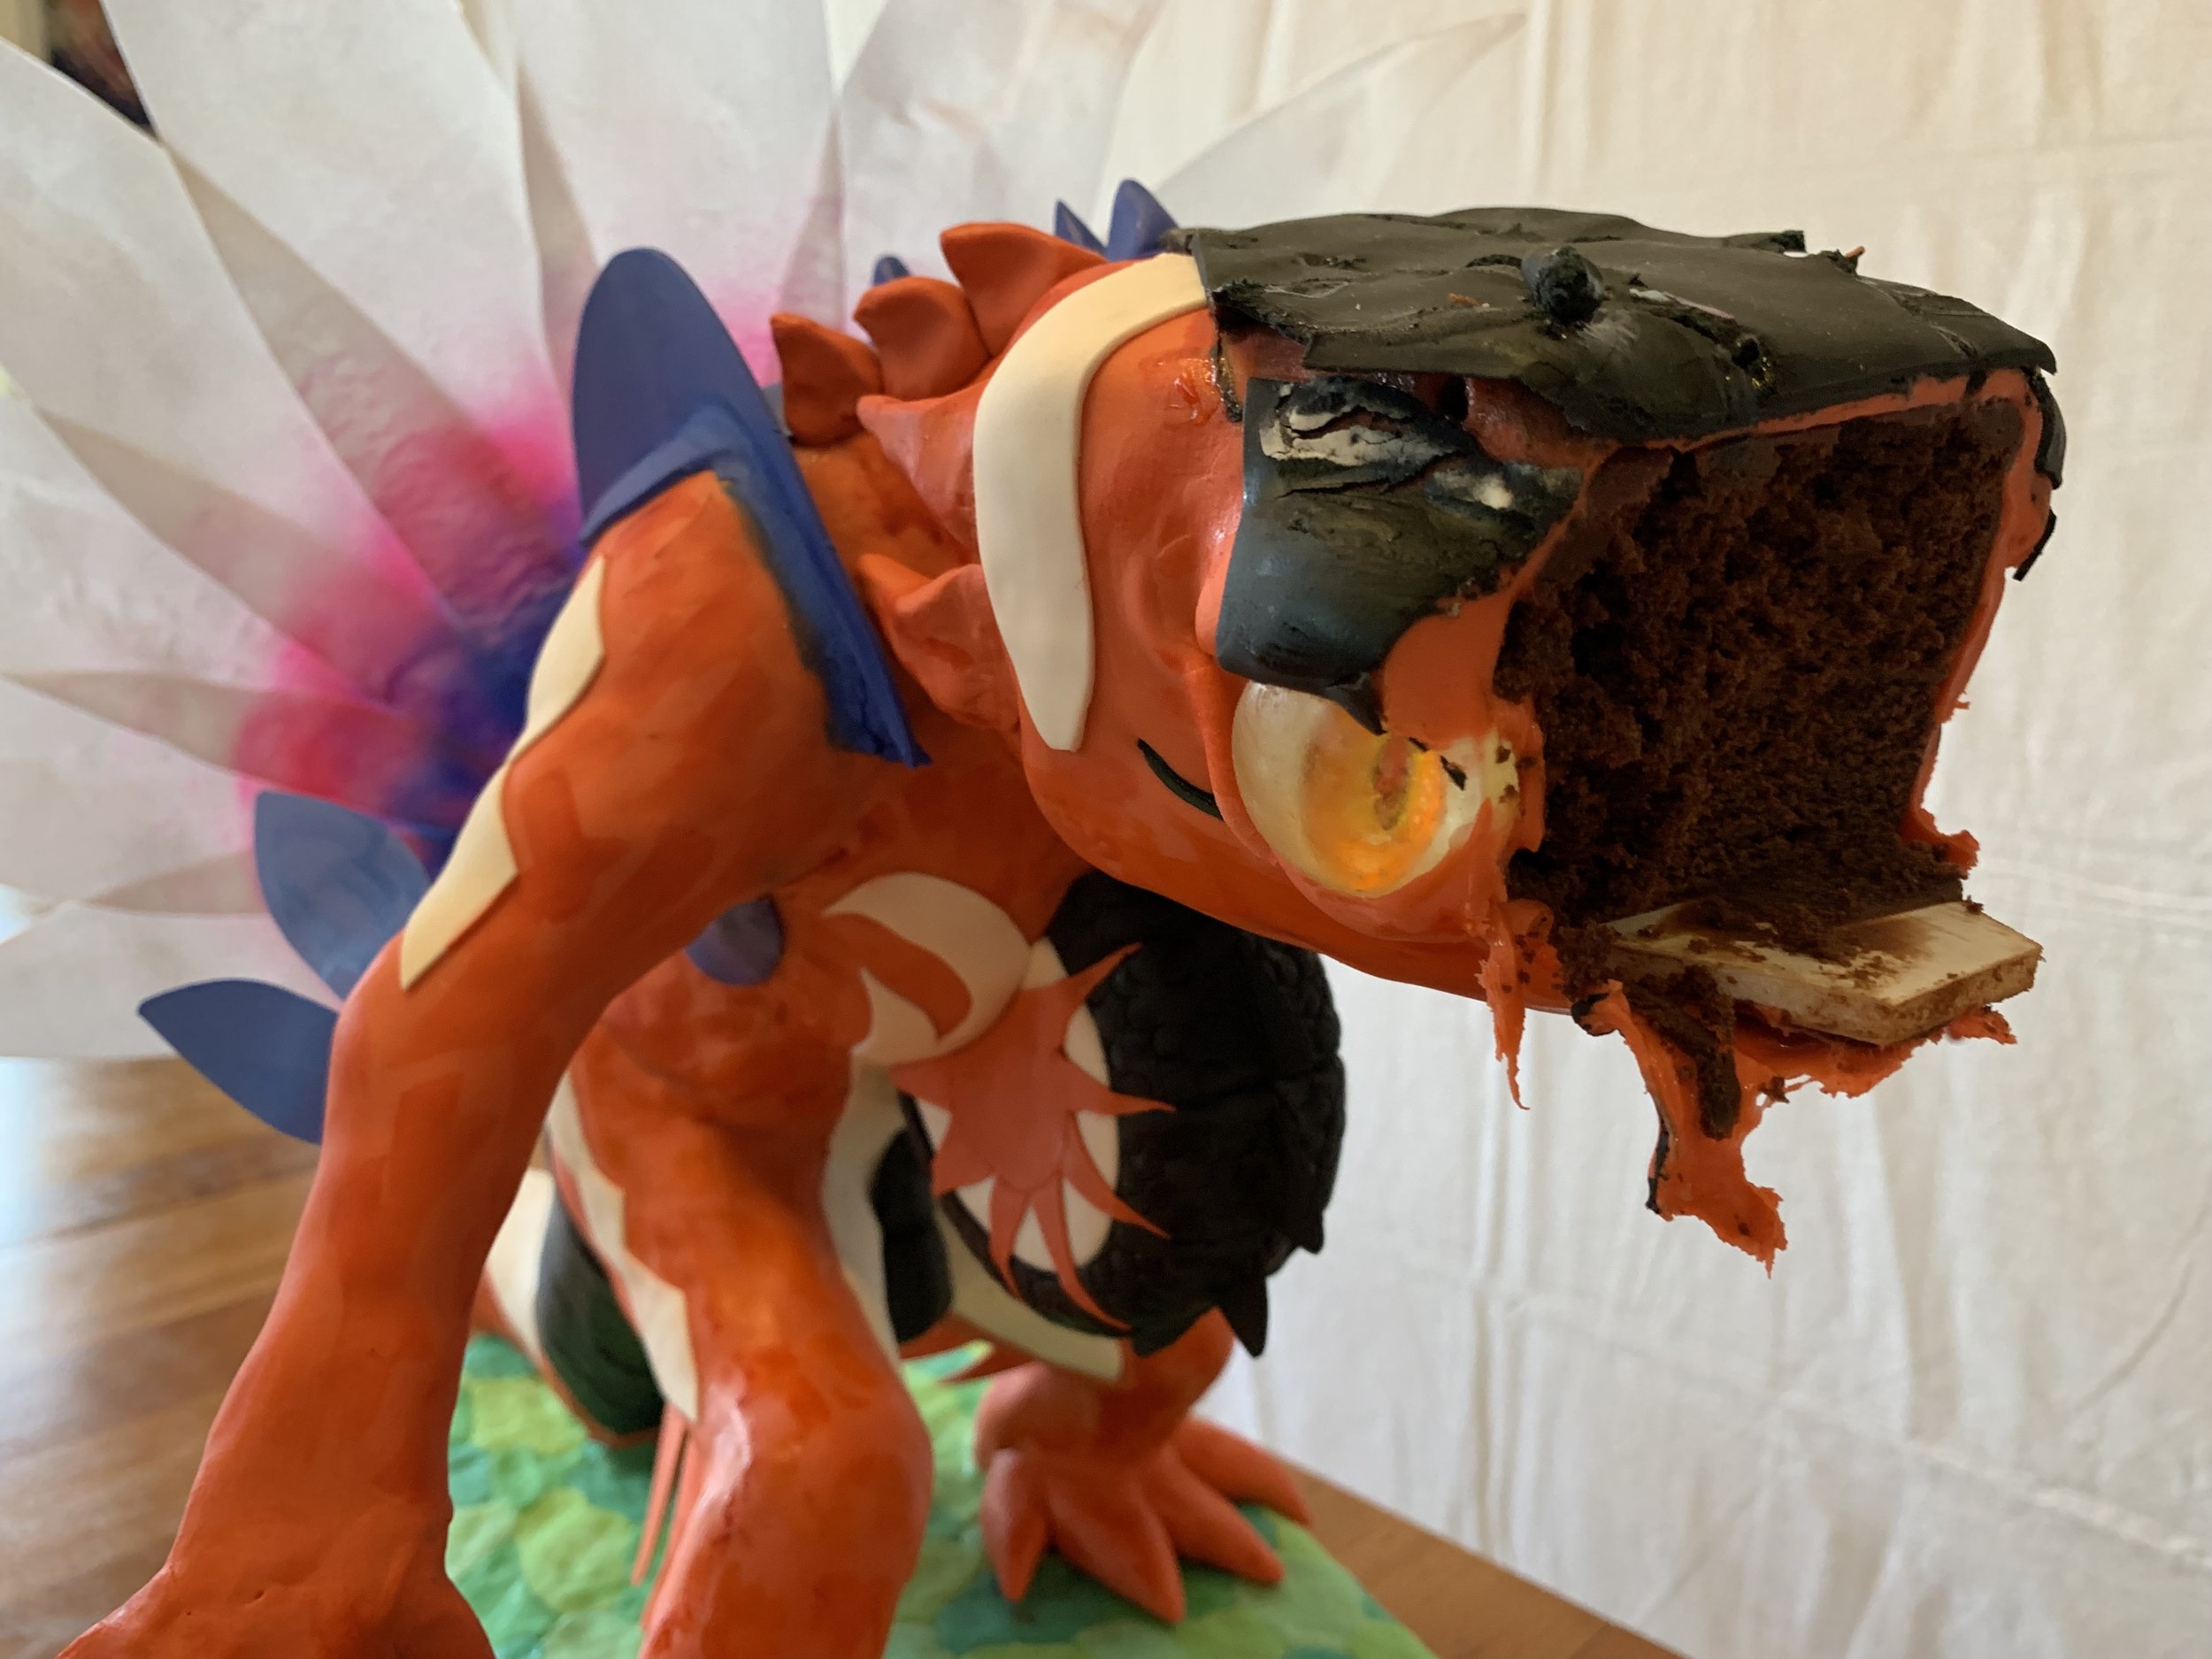
Koraidon Cake
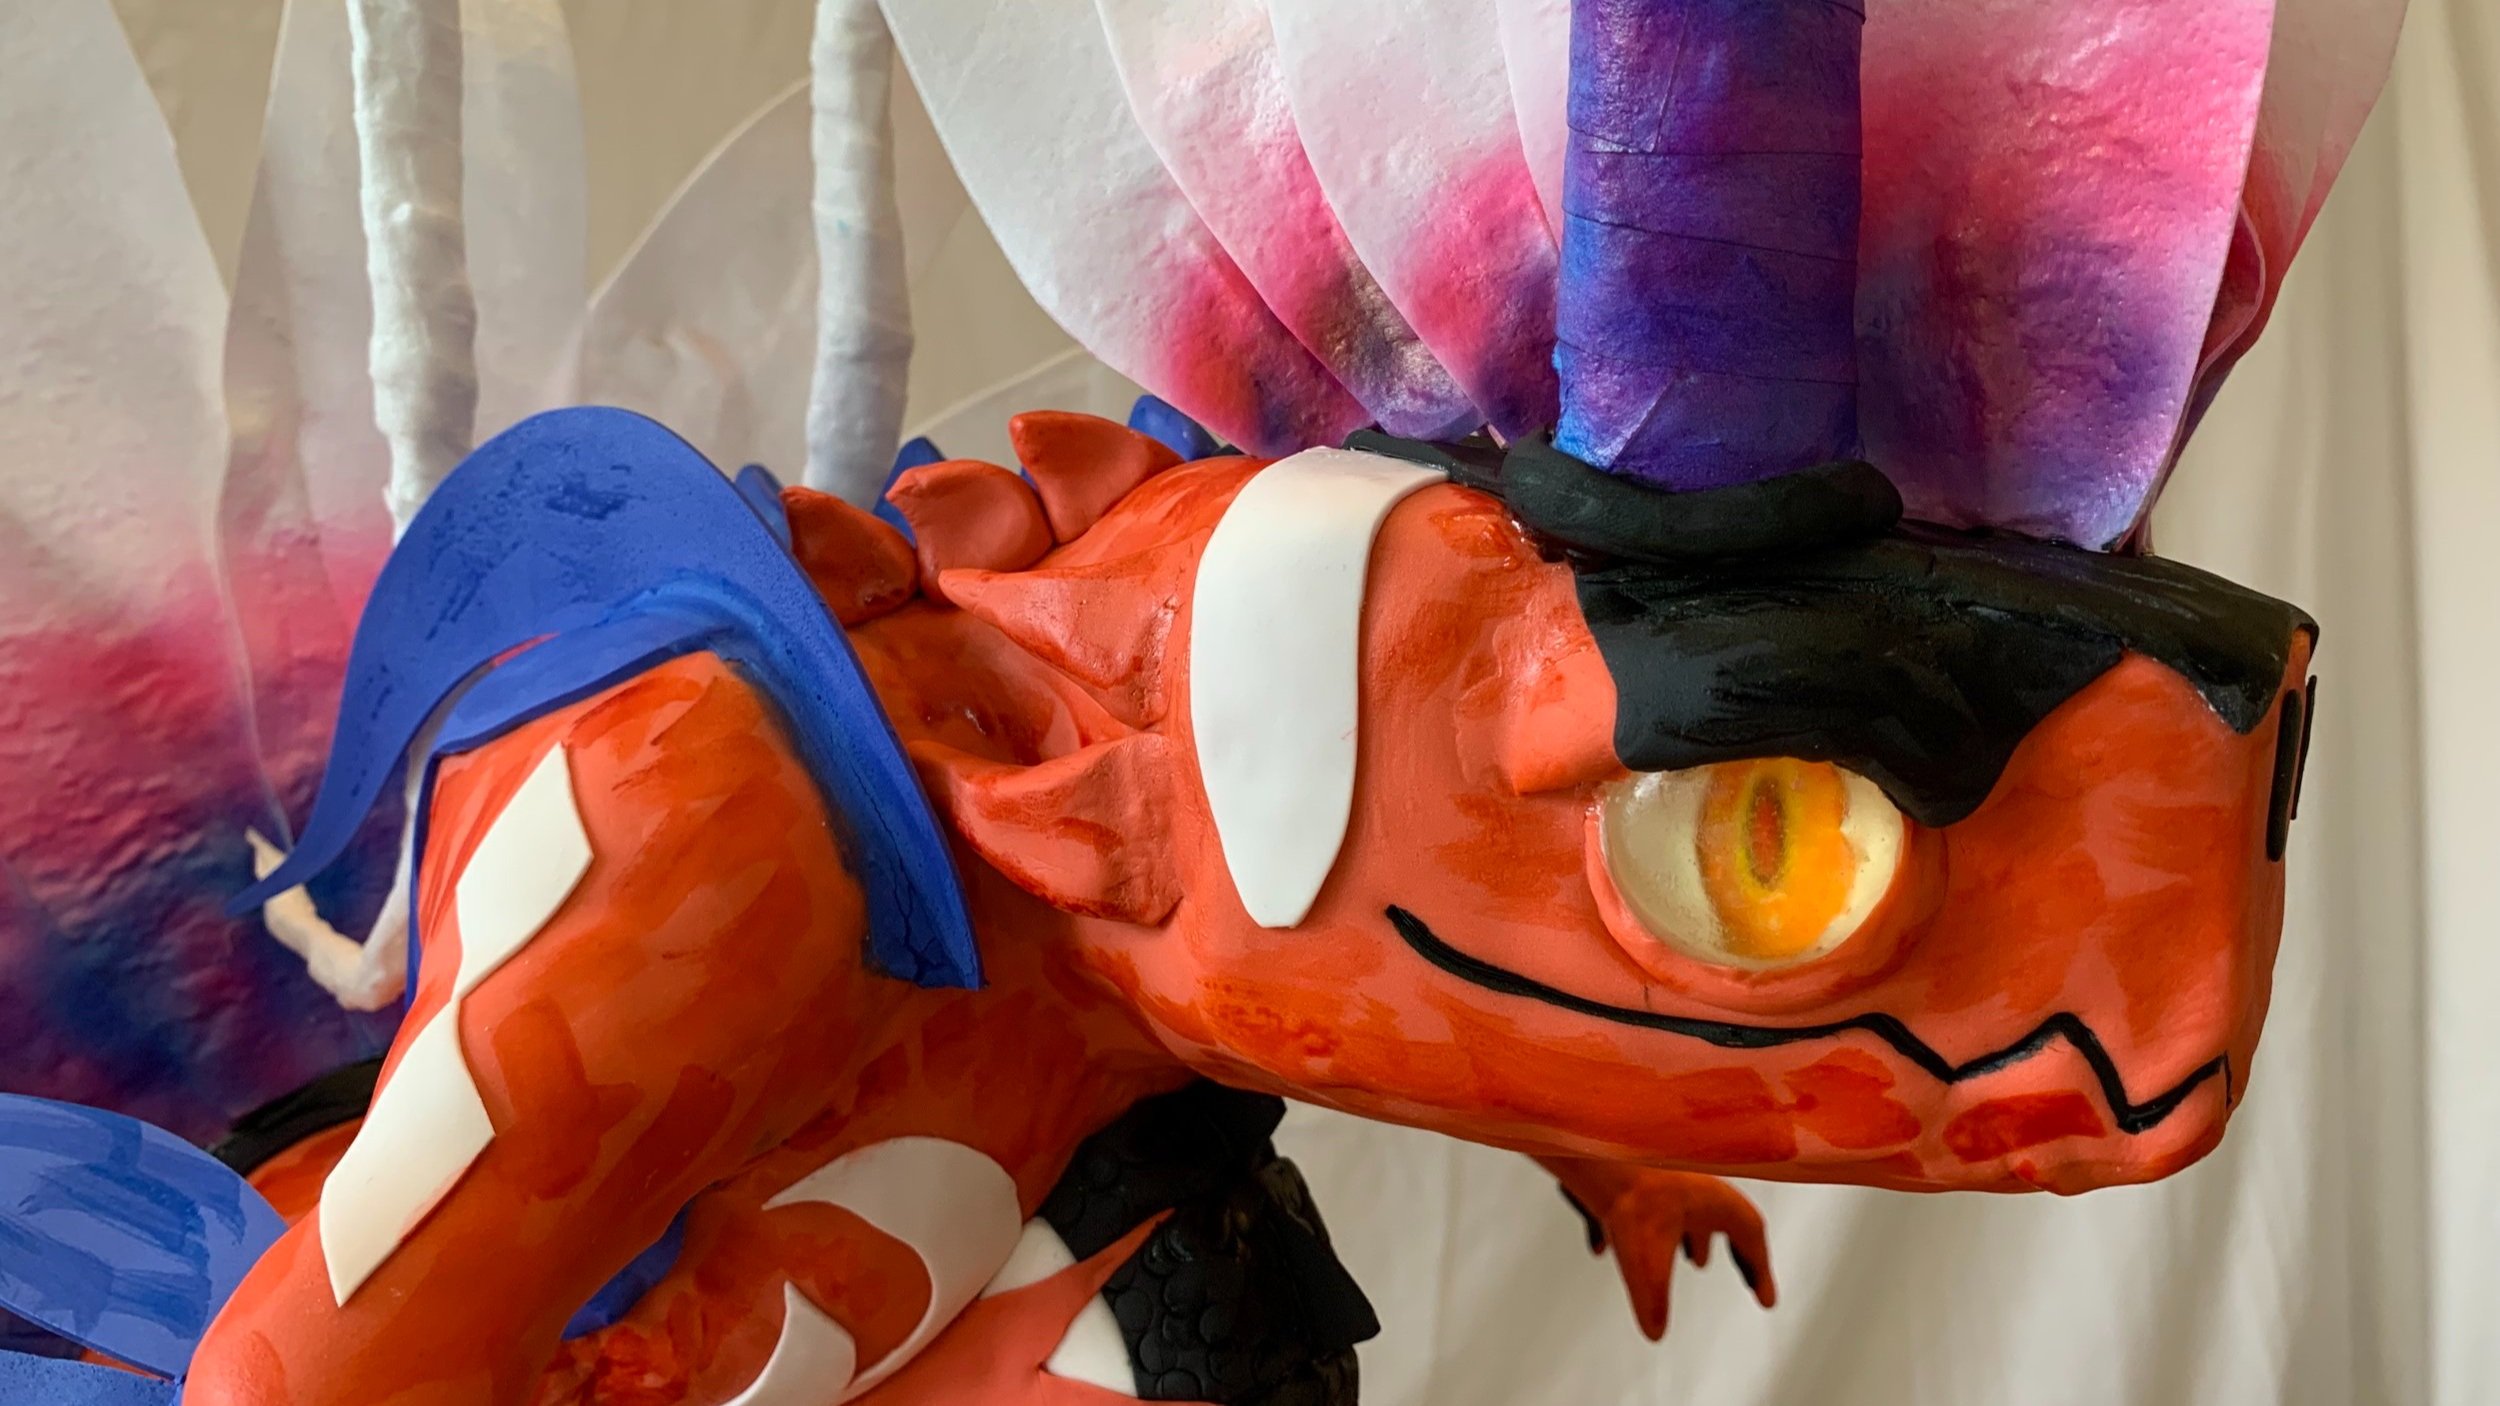
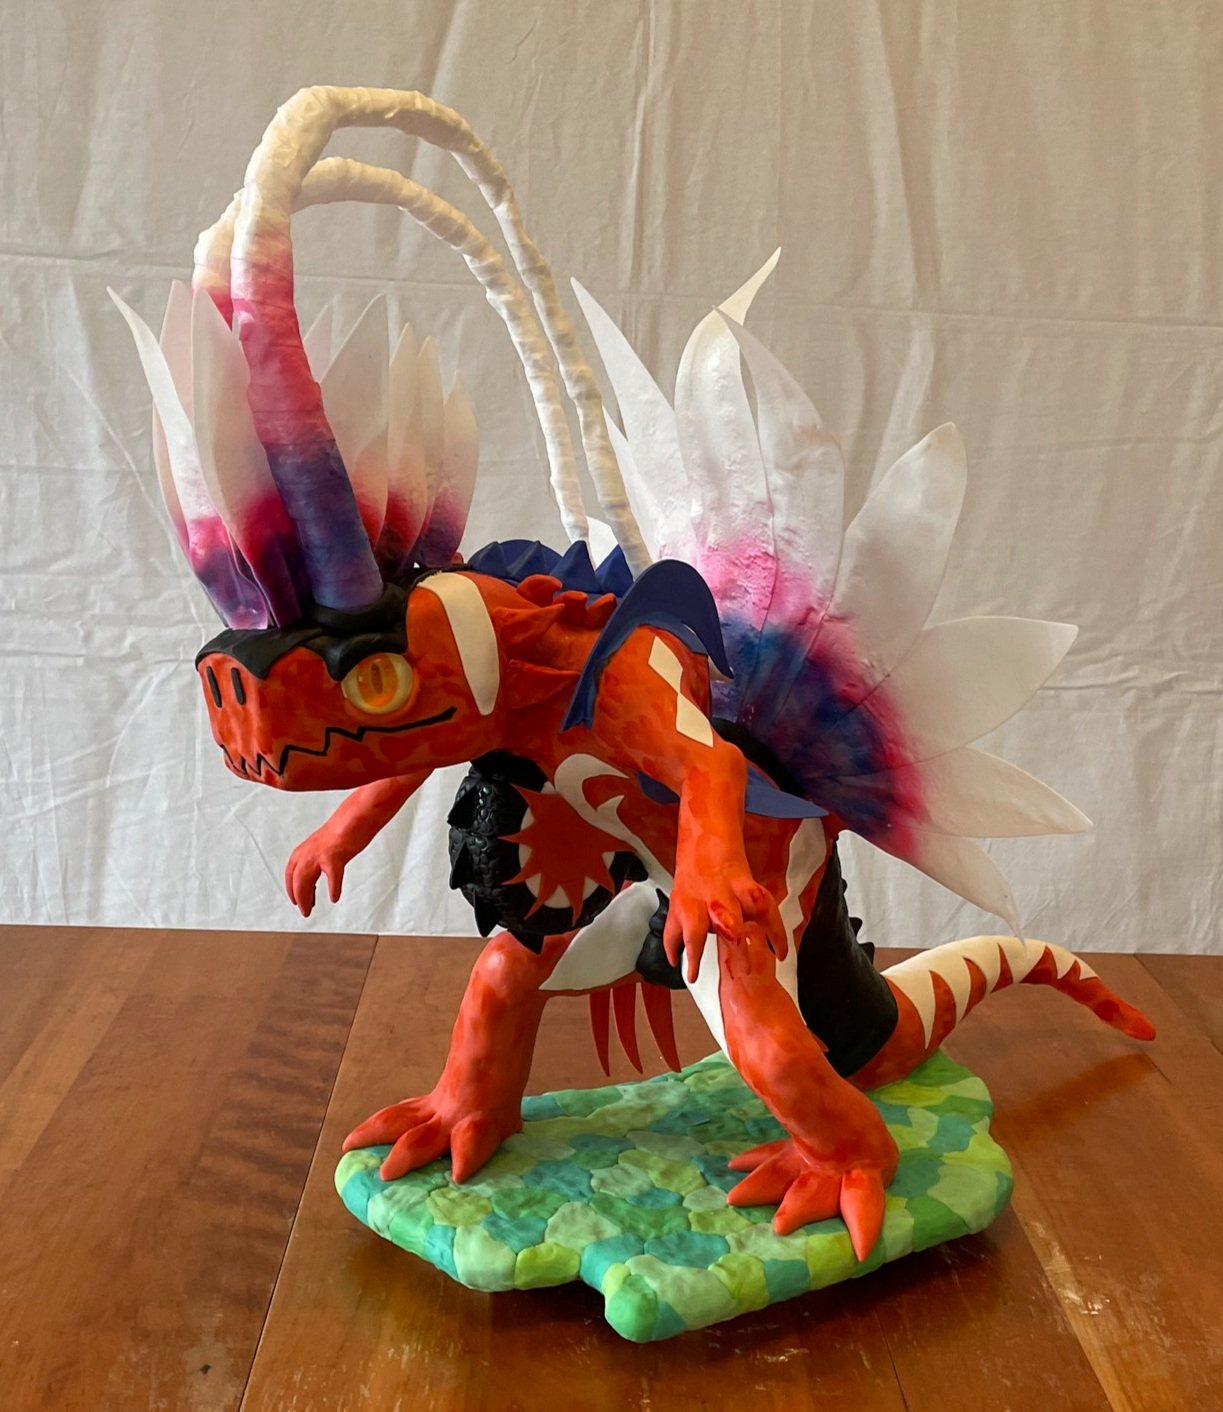
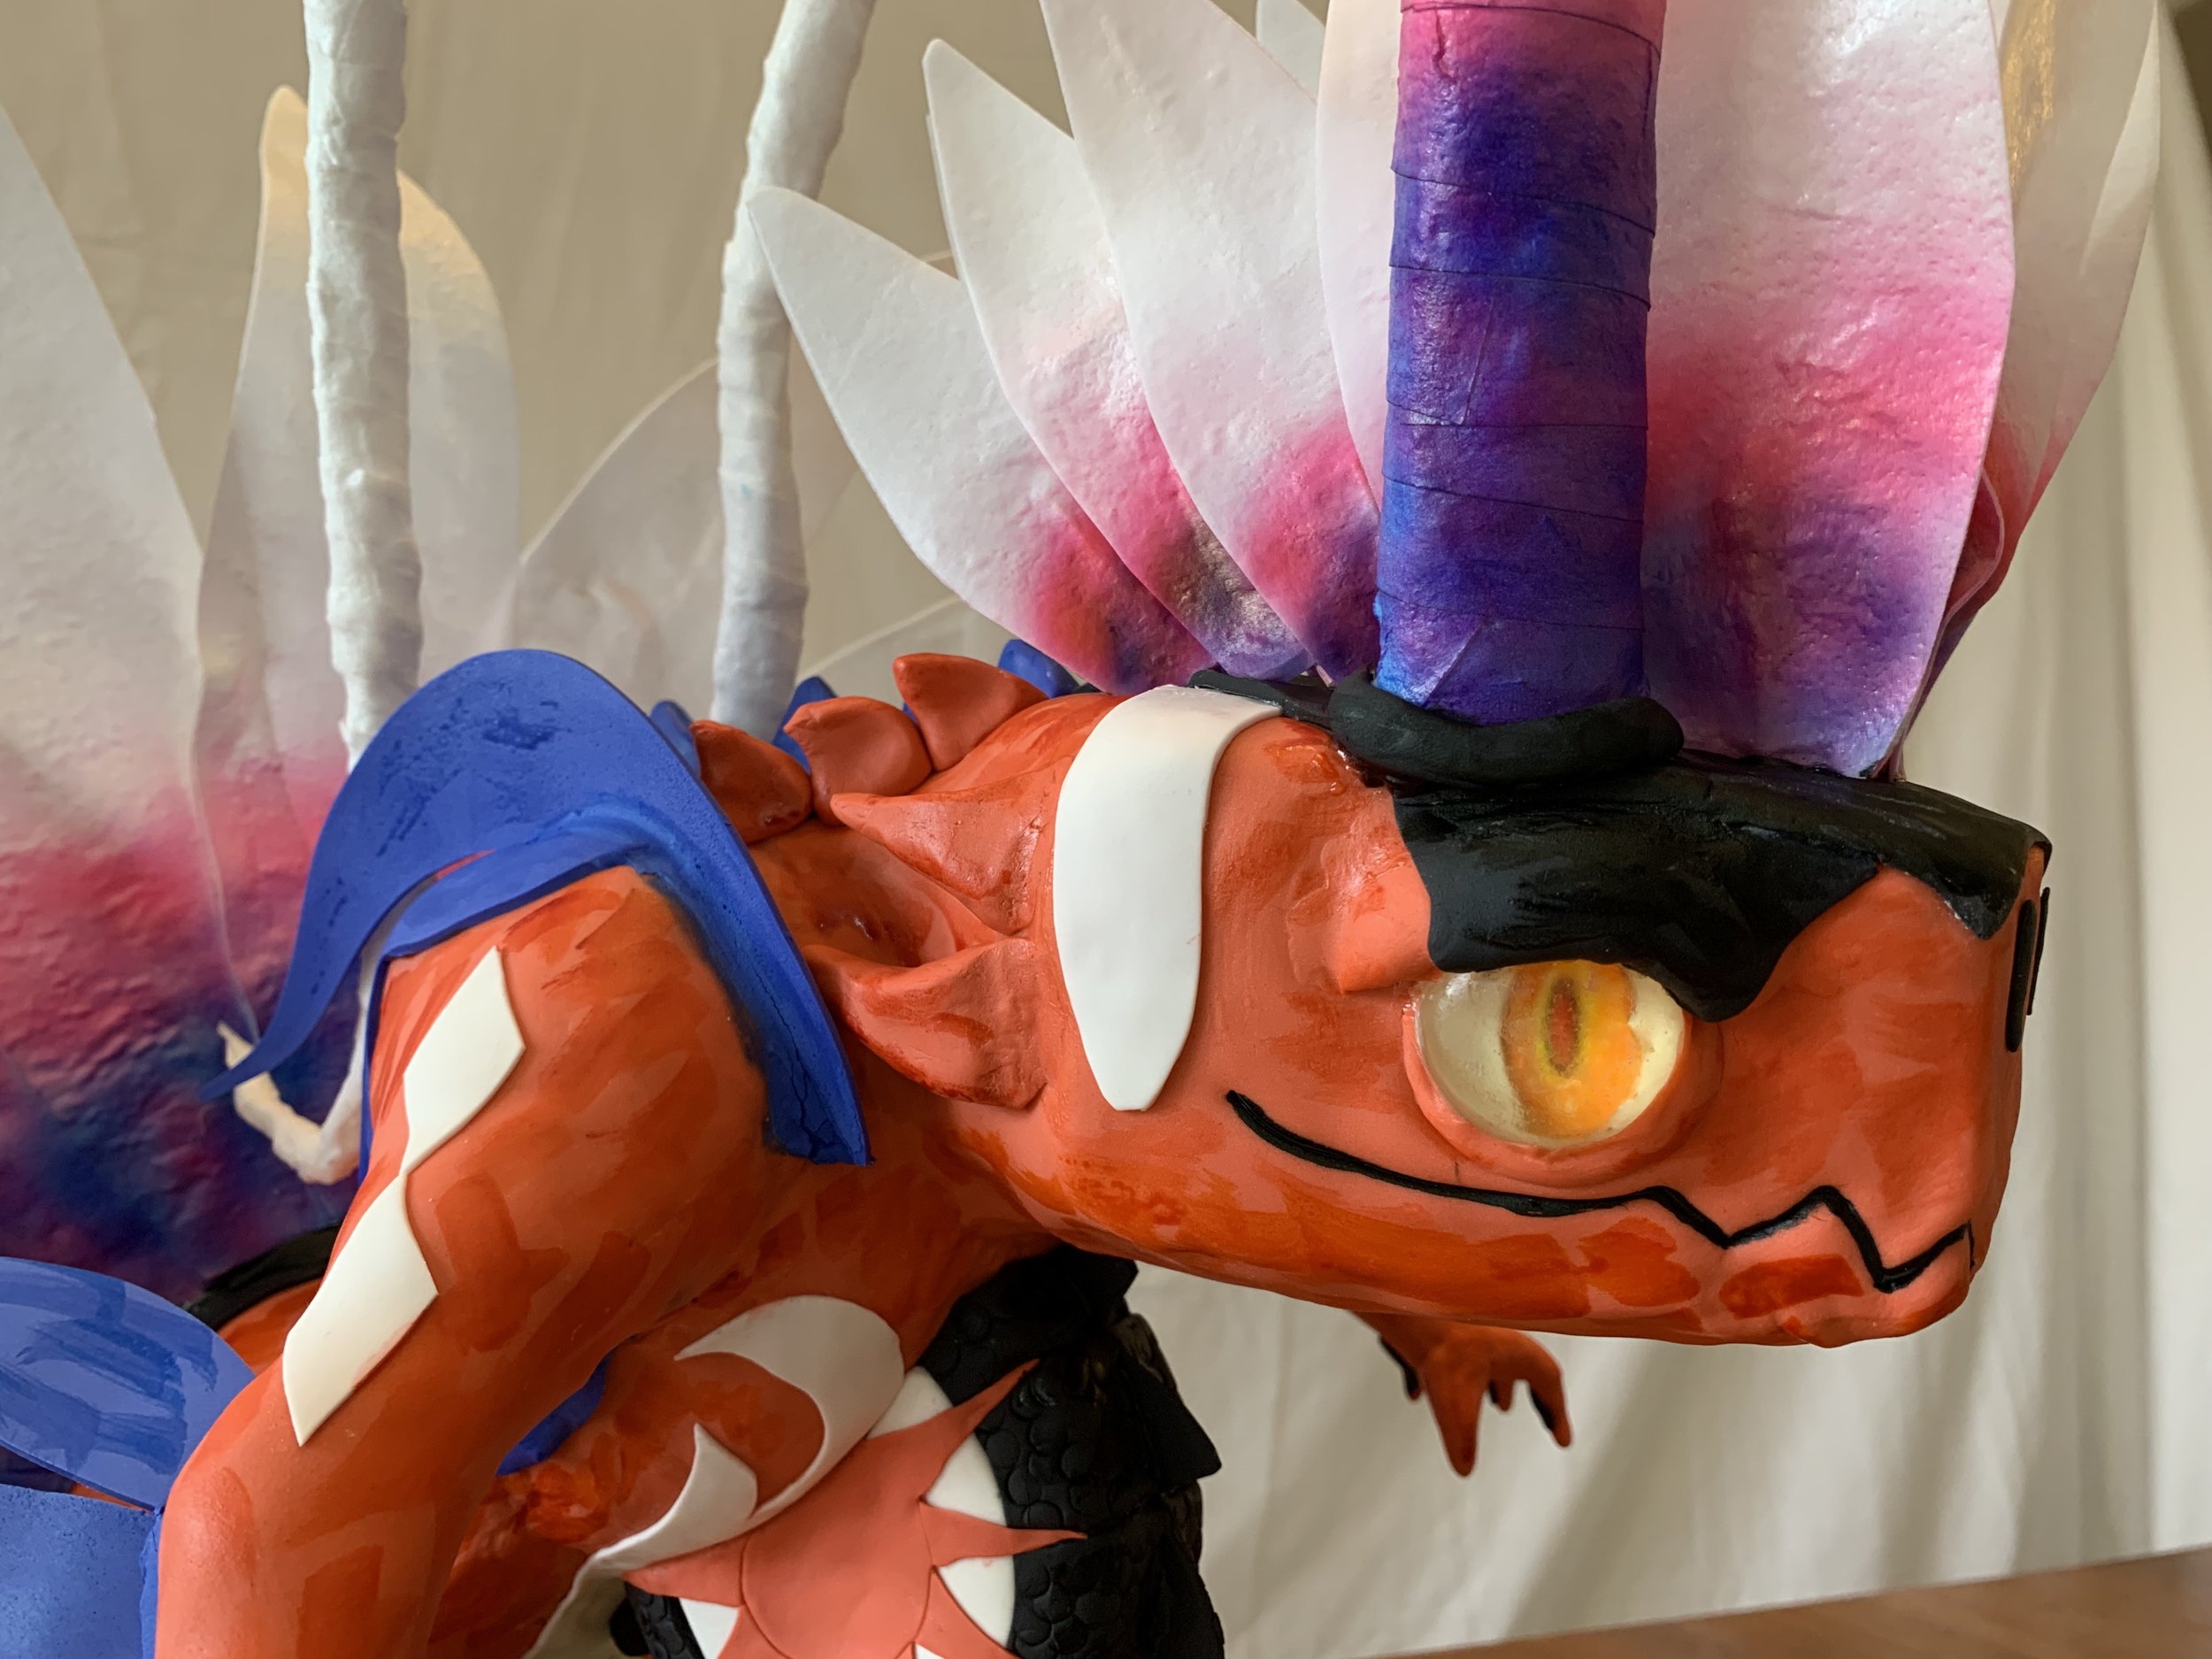
Koraidon is a Pokémon from the new Pokémon Scarlet game. My nephew wanted him in his battle form for his birthday cake.
Koraidon is a Pokémon from the new Pokémon Scarlet game. My nephew wanted him in his battle form for his birthday cake.
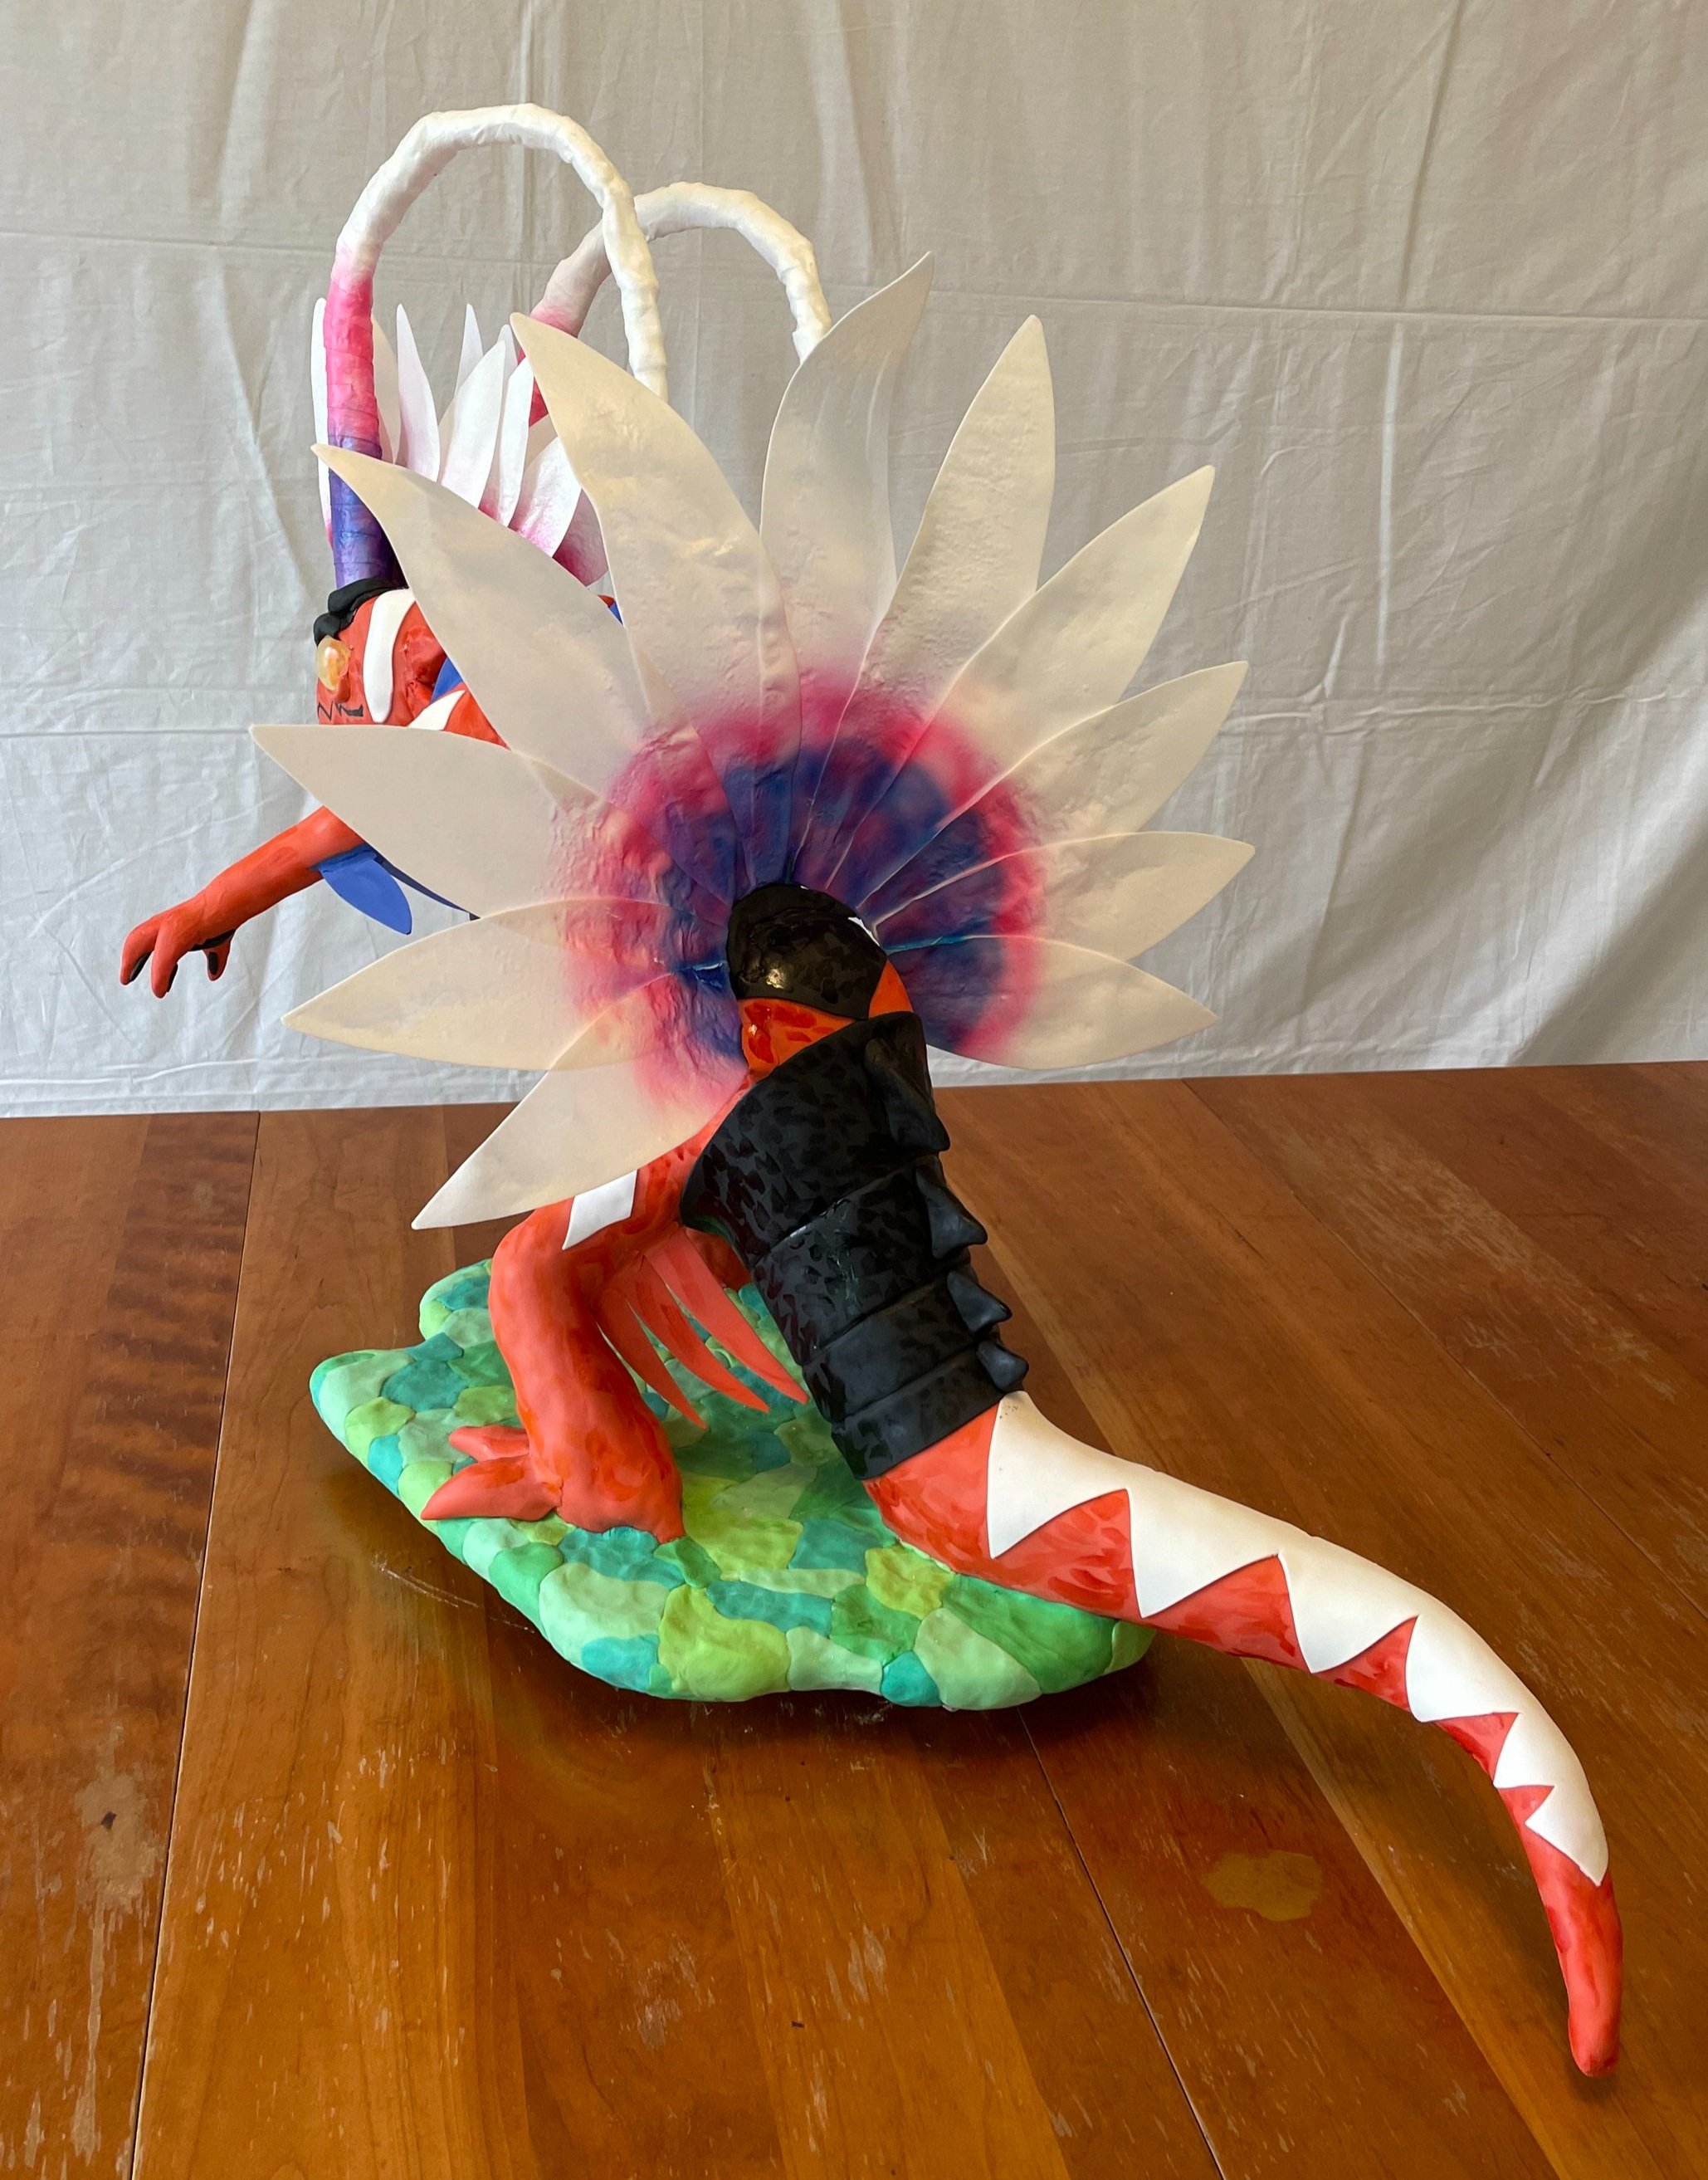
The cake is chocolate with chocolate ganache. The tire in his chest is chocolate cast in a donut mold, covered with gum paste. The feathers and horns are wafer paper. The eyes are isomalt with wafer paper pupils.
As usual, I made about four times as much cake as the occasion required, so we only got through the head at the party.
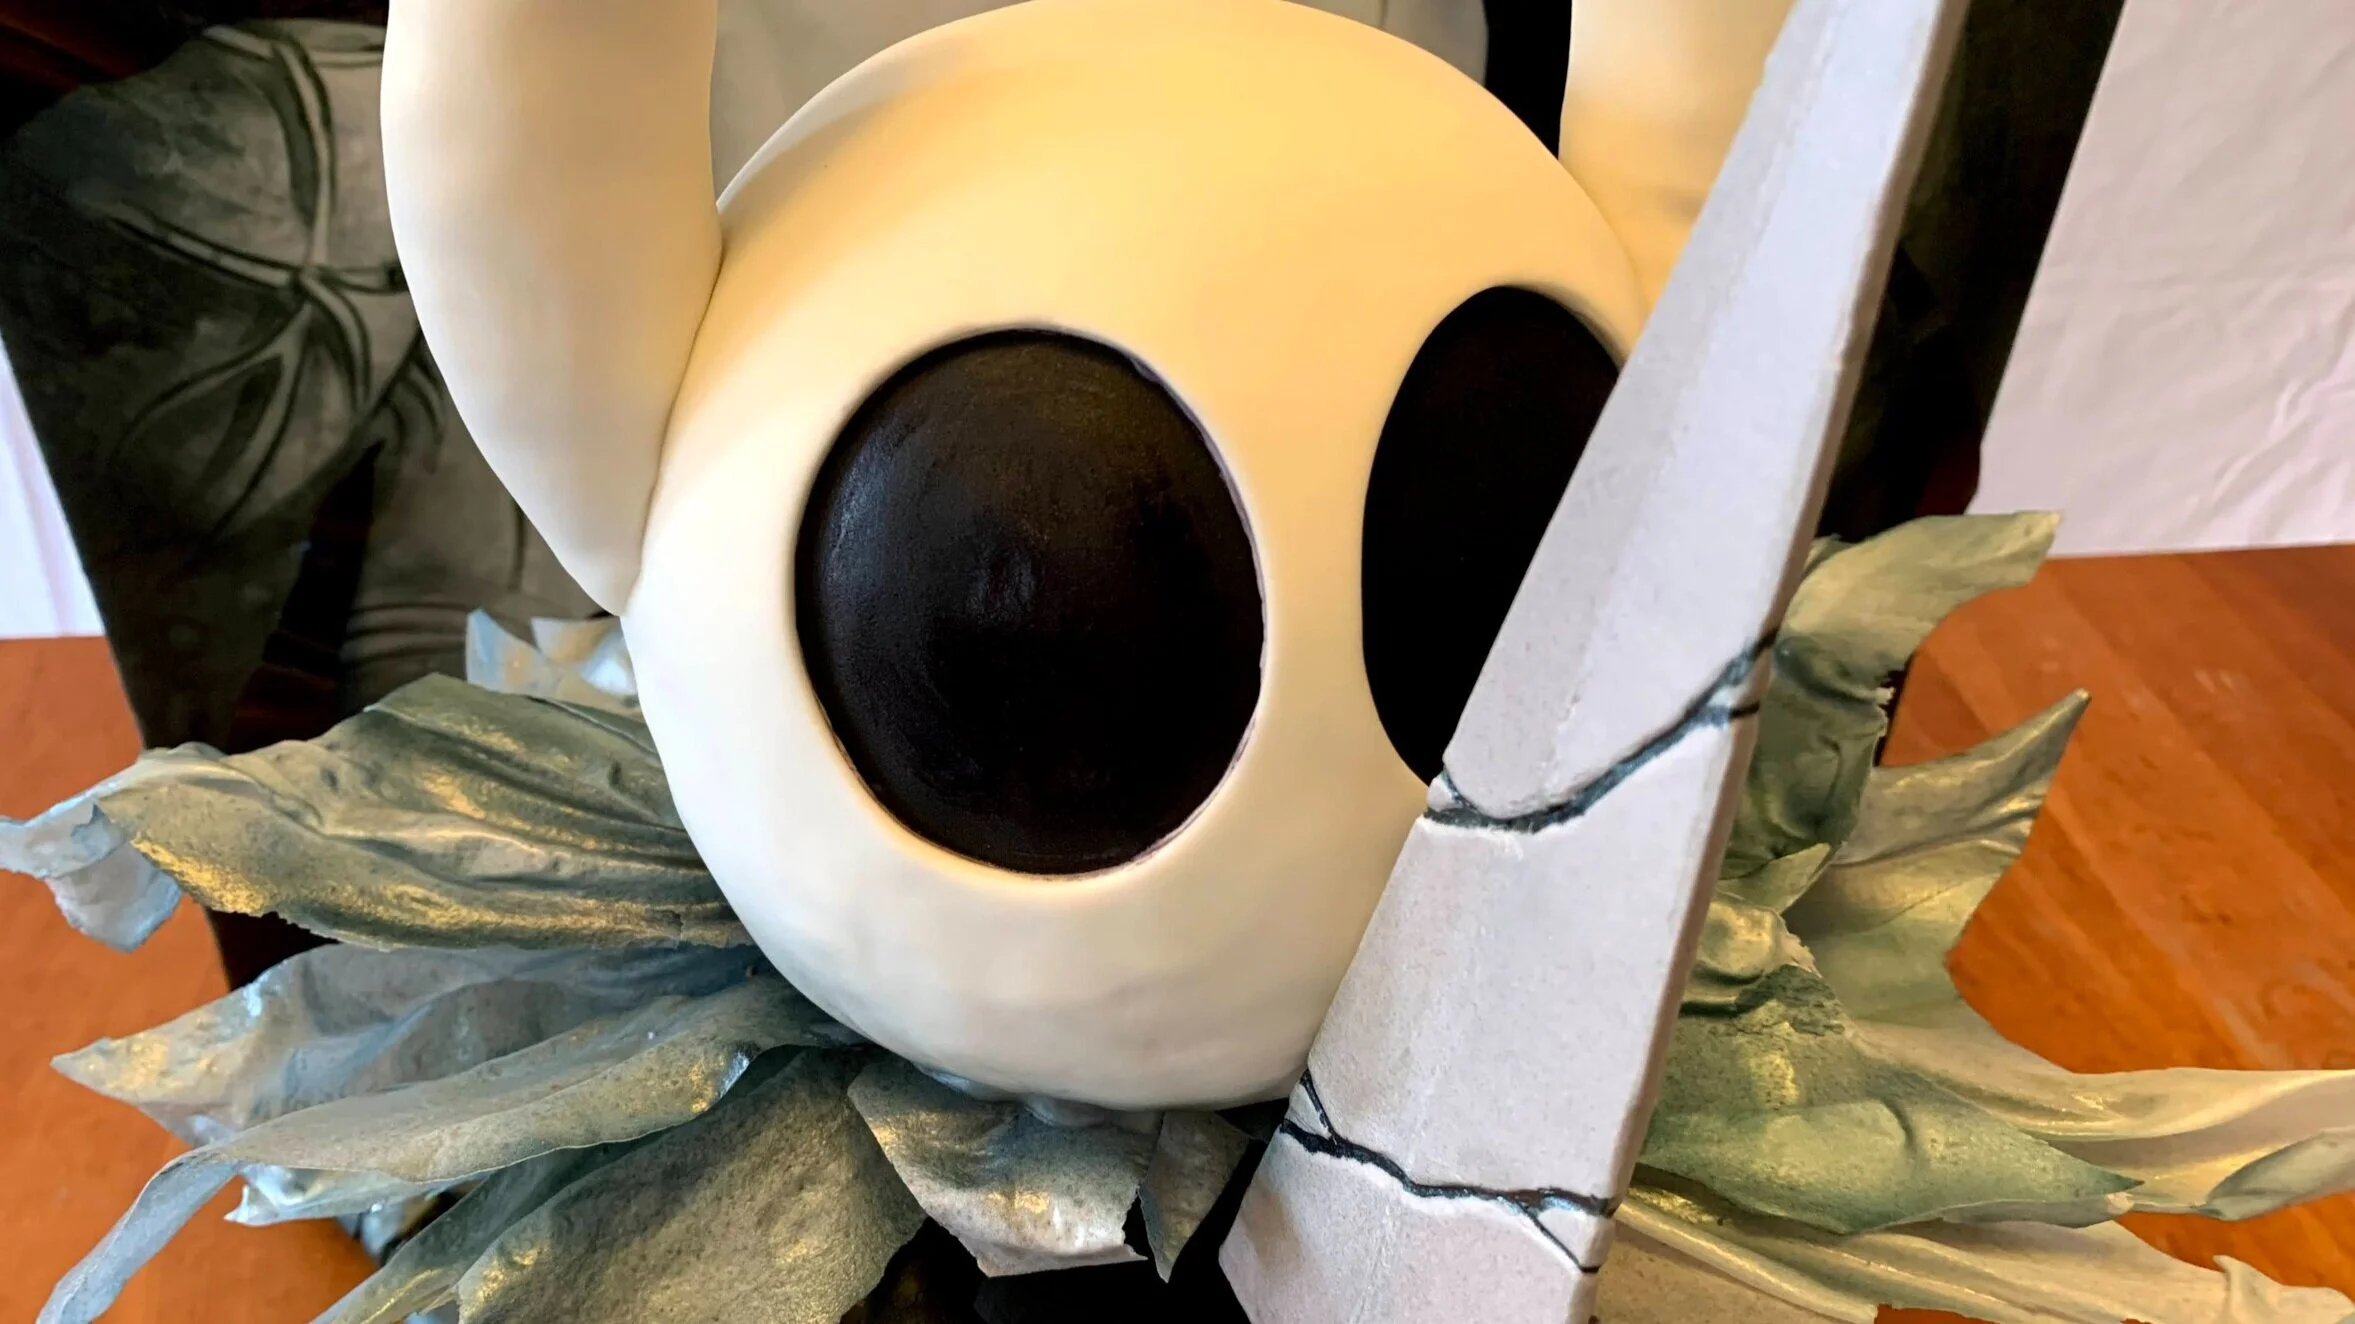
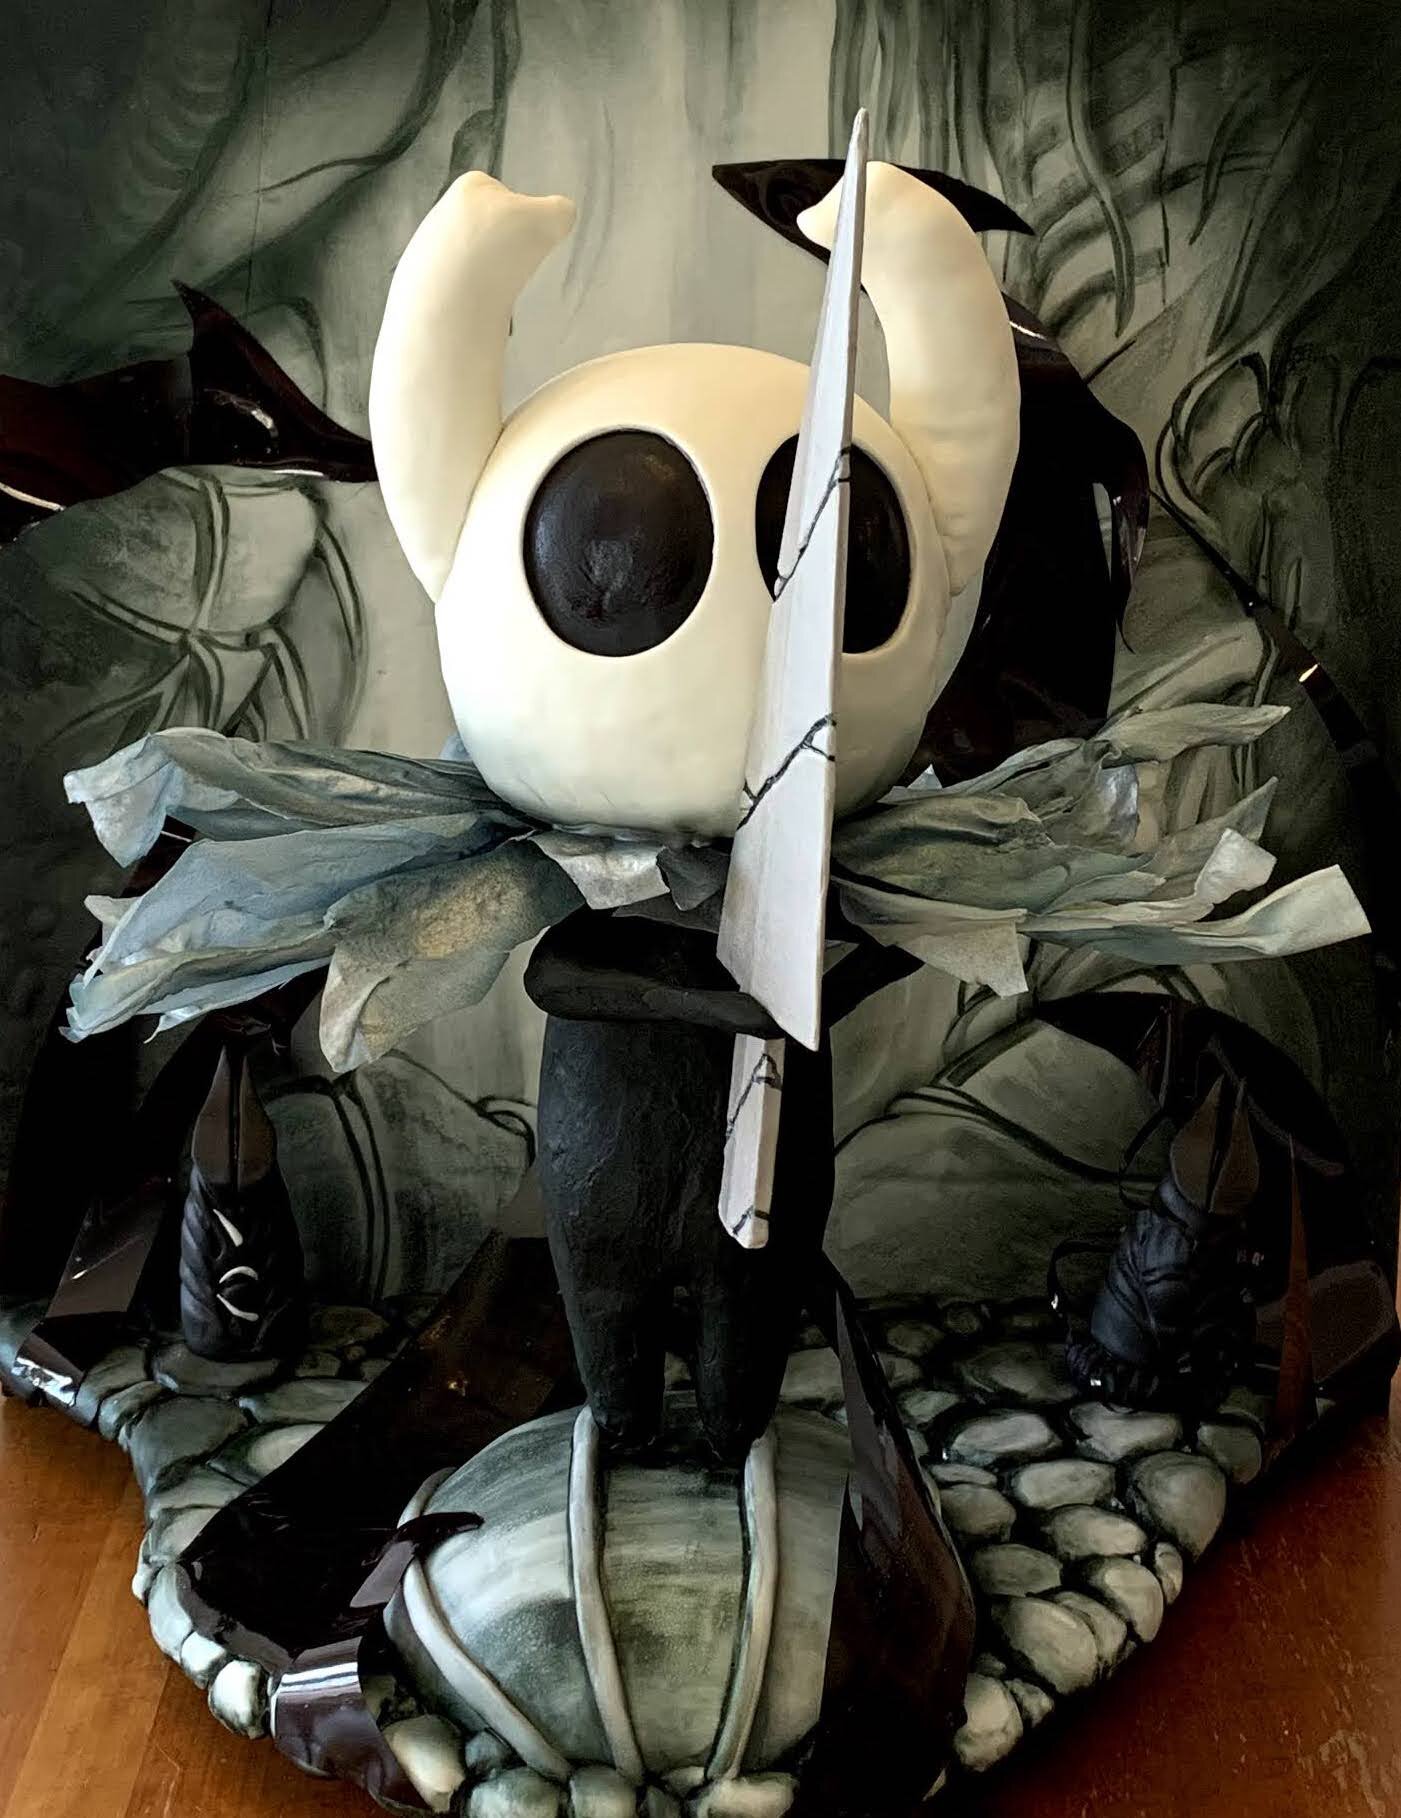
Hollow Knight Cake
In keeping with our Hollow Knight Halloween costumes, Sam wanted a Hollow Knight cake for his birthday this year.
In keeping with our Hollow Knight Halloween costumes, Sam wanted a Hollow Knight cake for his birthday this year.
For reference, this is the image, from Hollow Knight: Voidheart Edition, on which the cake is based

The back is fondant over foam core, painted with food coloring. The rocks on the base are fondant as well, which is good because Sam loves eating fondant and enjoyed eating the rocks as much he enjoyed the actual cake. The cape is wafer paper, coated with gelatin, and the sword is gum paste.

The body, the horns, and the soul totems in the background are made of rice cereal treats covered in fondant.
The soul totems were not in the image the cake is based on, but Sam seemed to think they were important. The one on the left is full of soul energy, hence the little white bits.

The one on the right has been corrupted, hence the Void tendrils. All the Void tendrils are made of gelatin.

The Knight’s head and the thing he’s standing on are made of cake, which is much more cake than we needed for the five people living in this house.

We did Zoom the grandparents in to the party, but unfortunately, they couldn’t help us eat the cake.

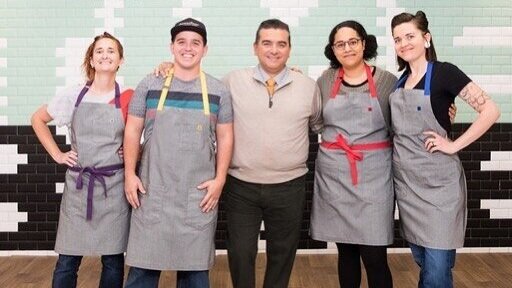
Big Time Bake
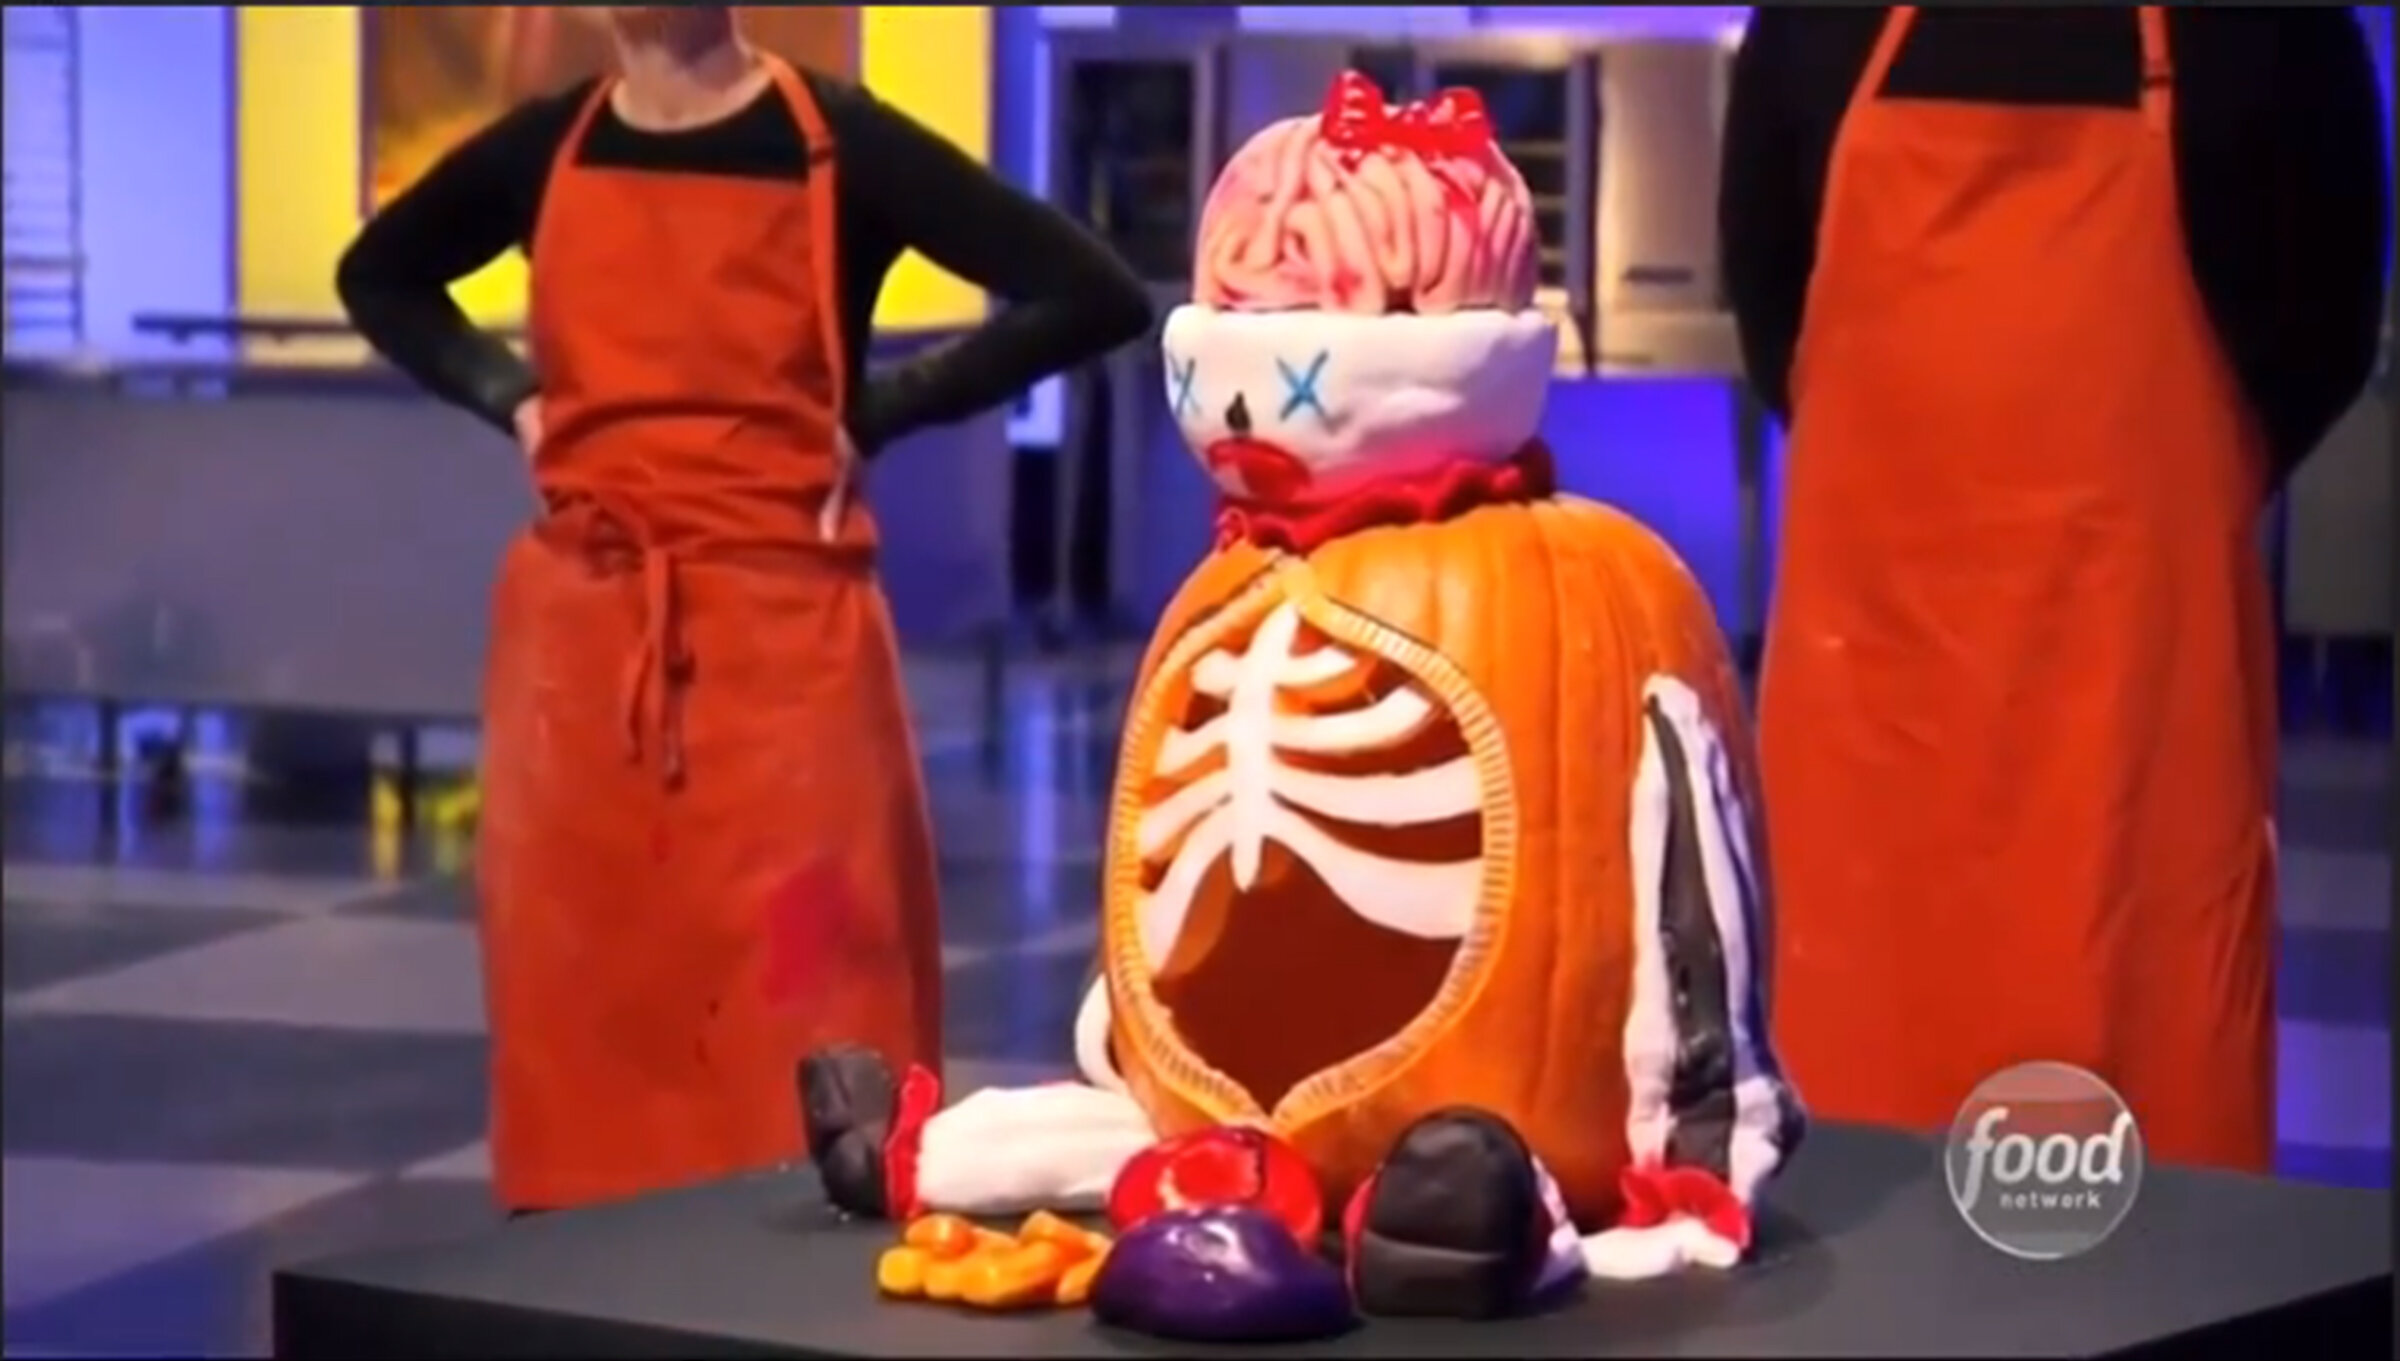
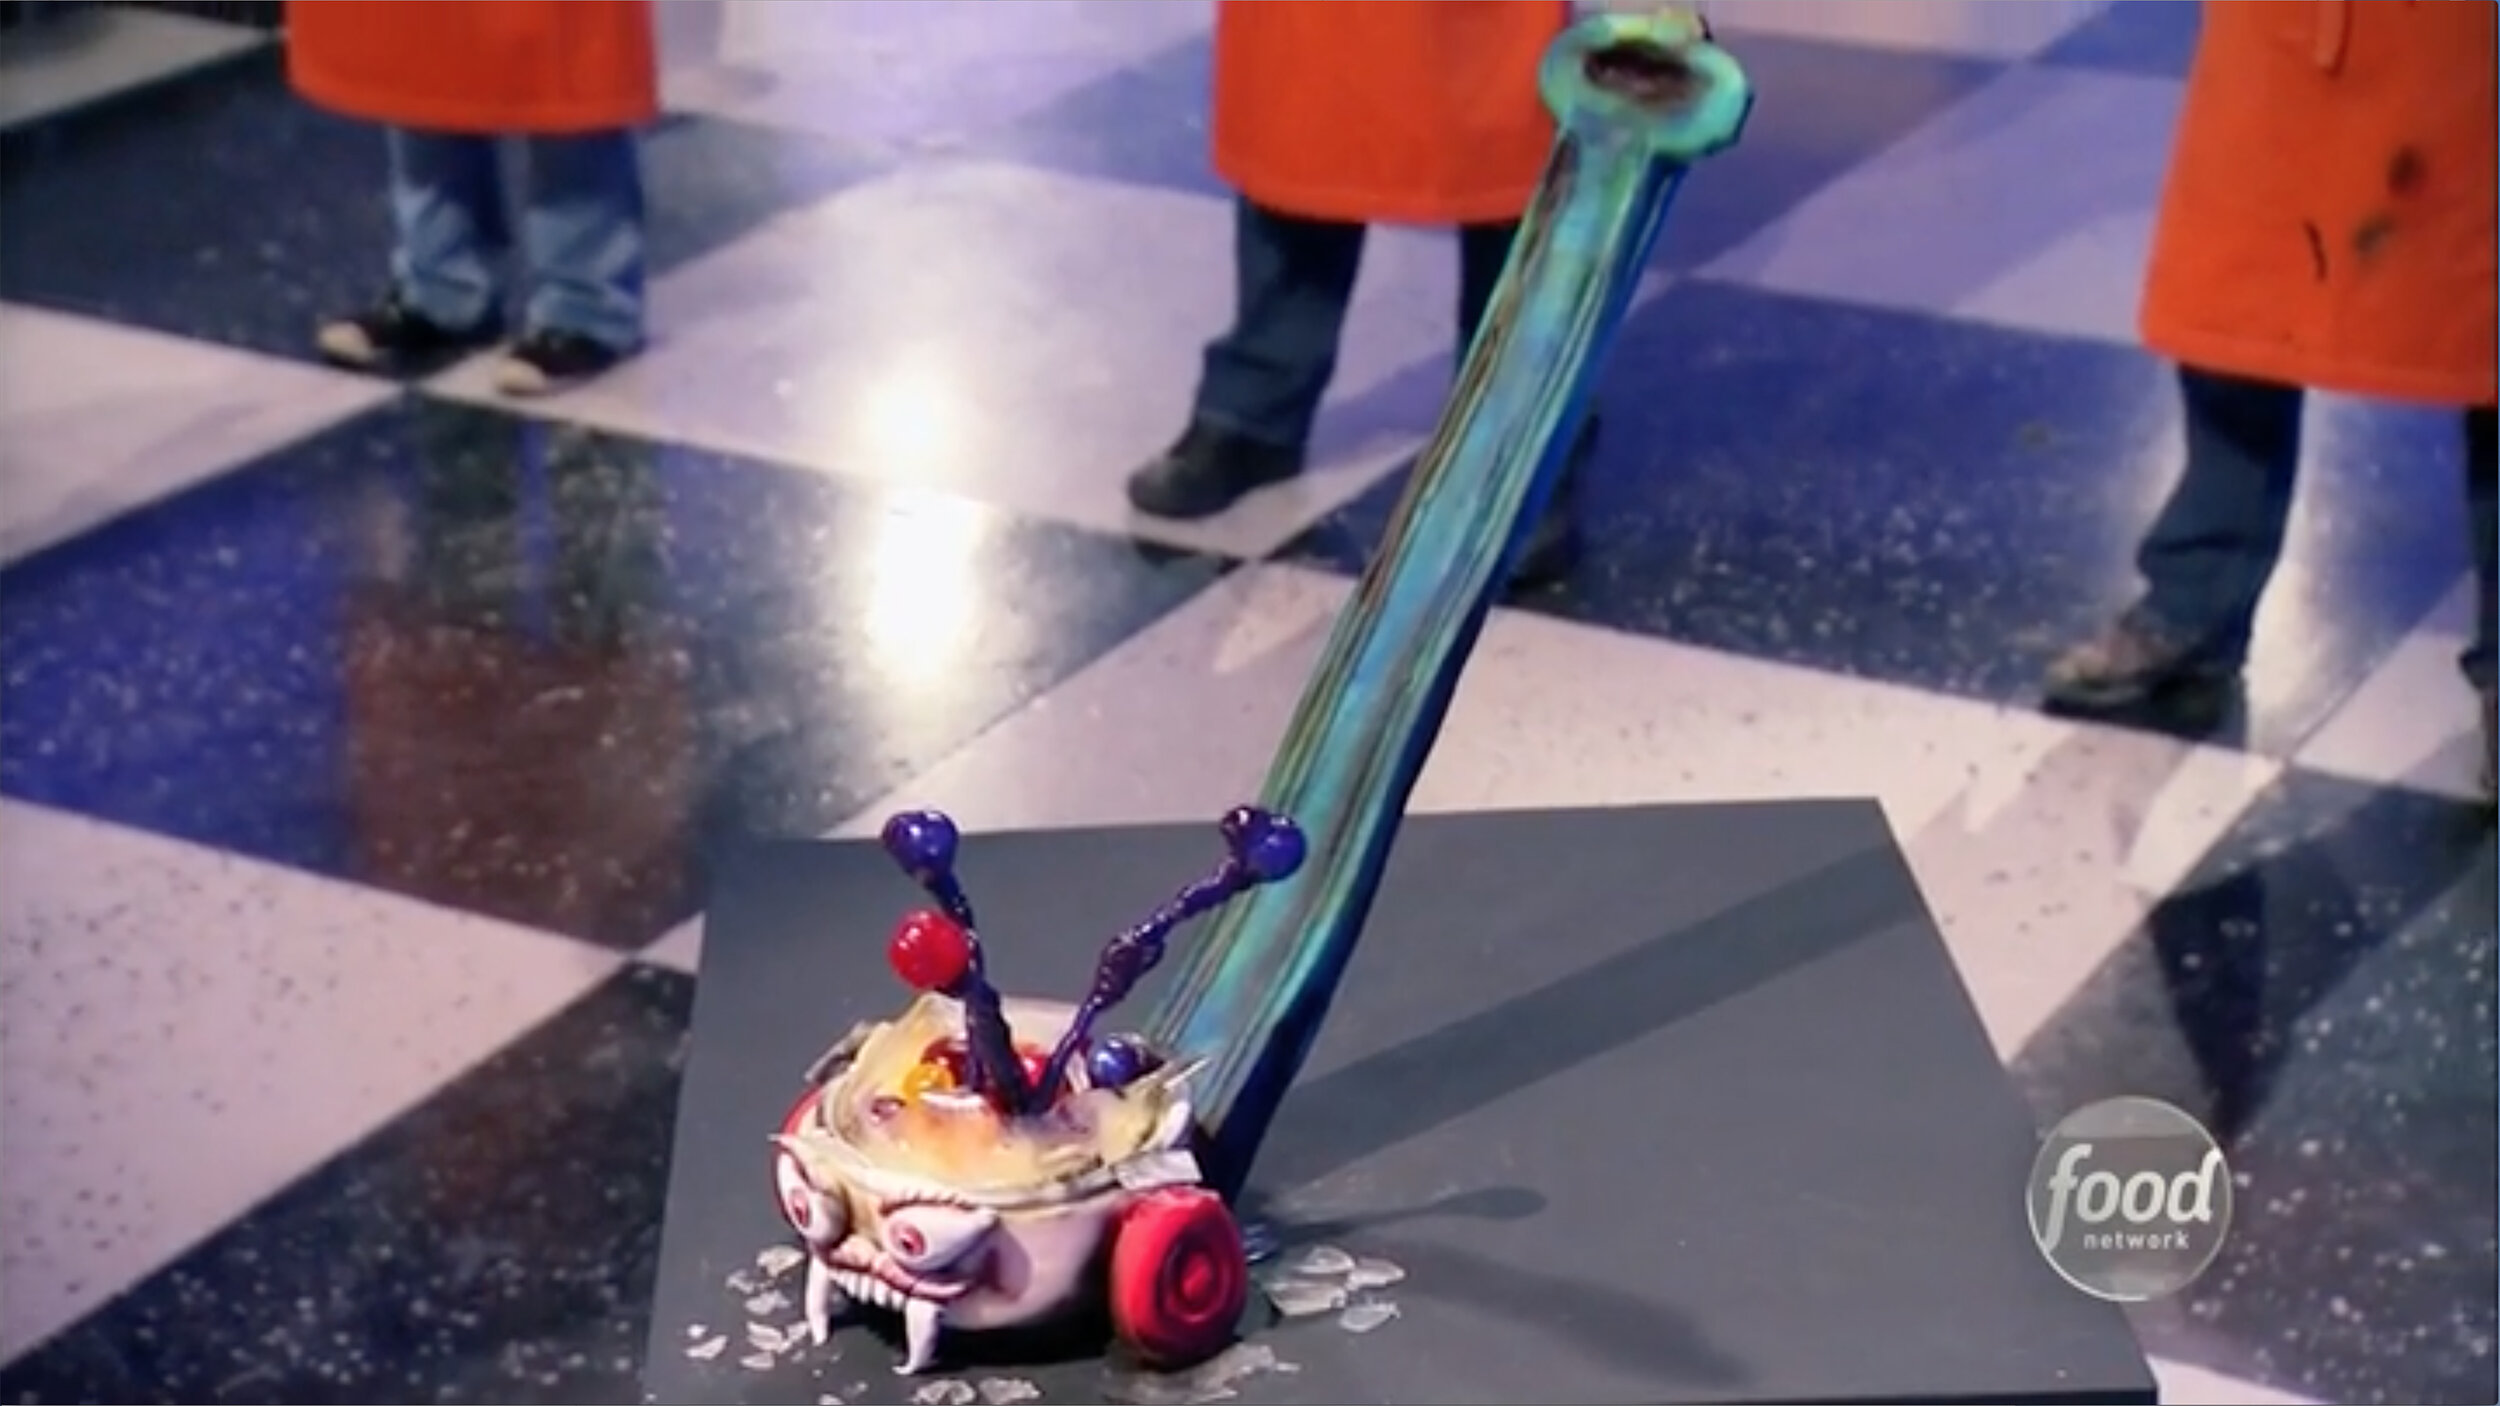
I’m back on the Food Network! You can watch me in the “Fantasy” episode of Big Time Bake.

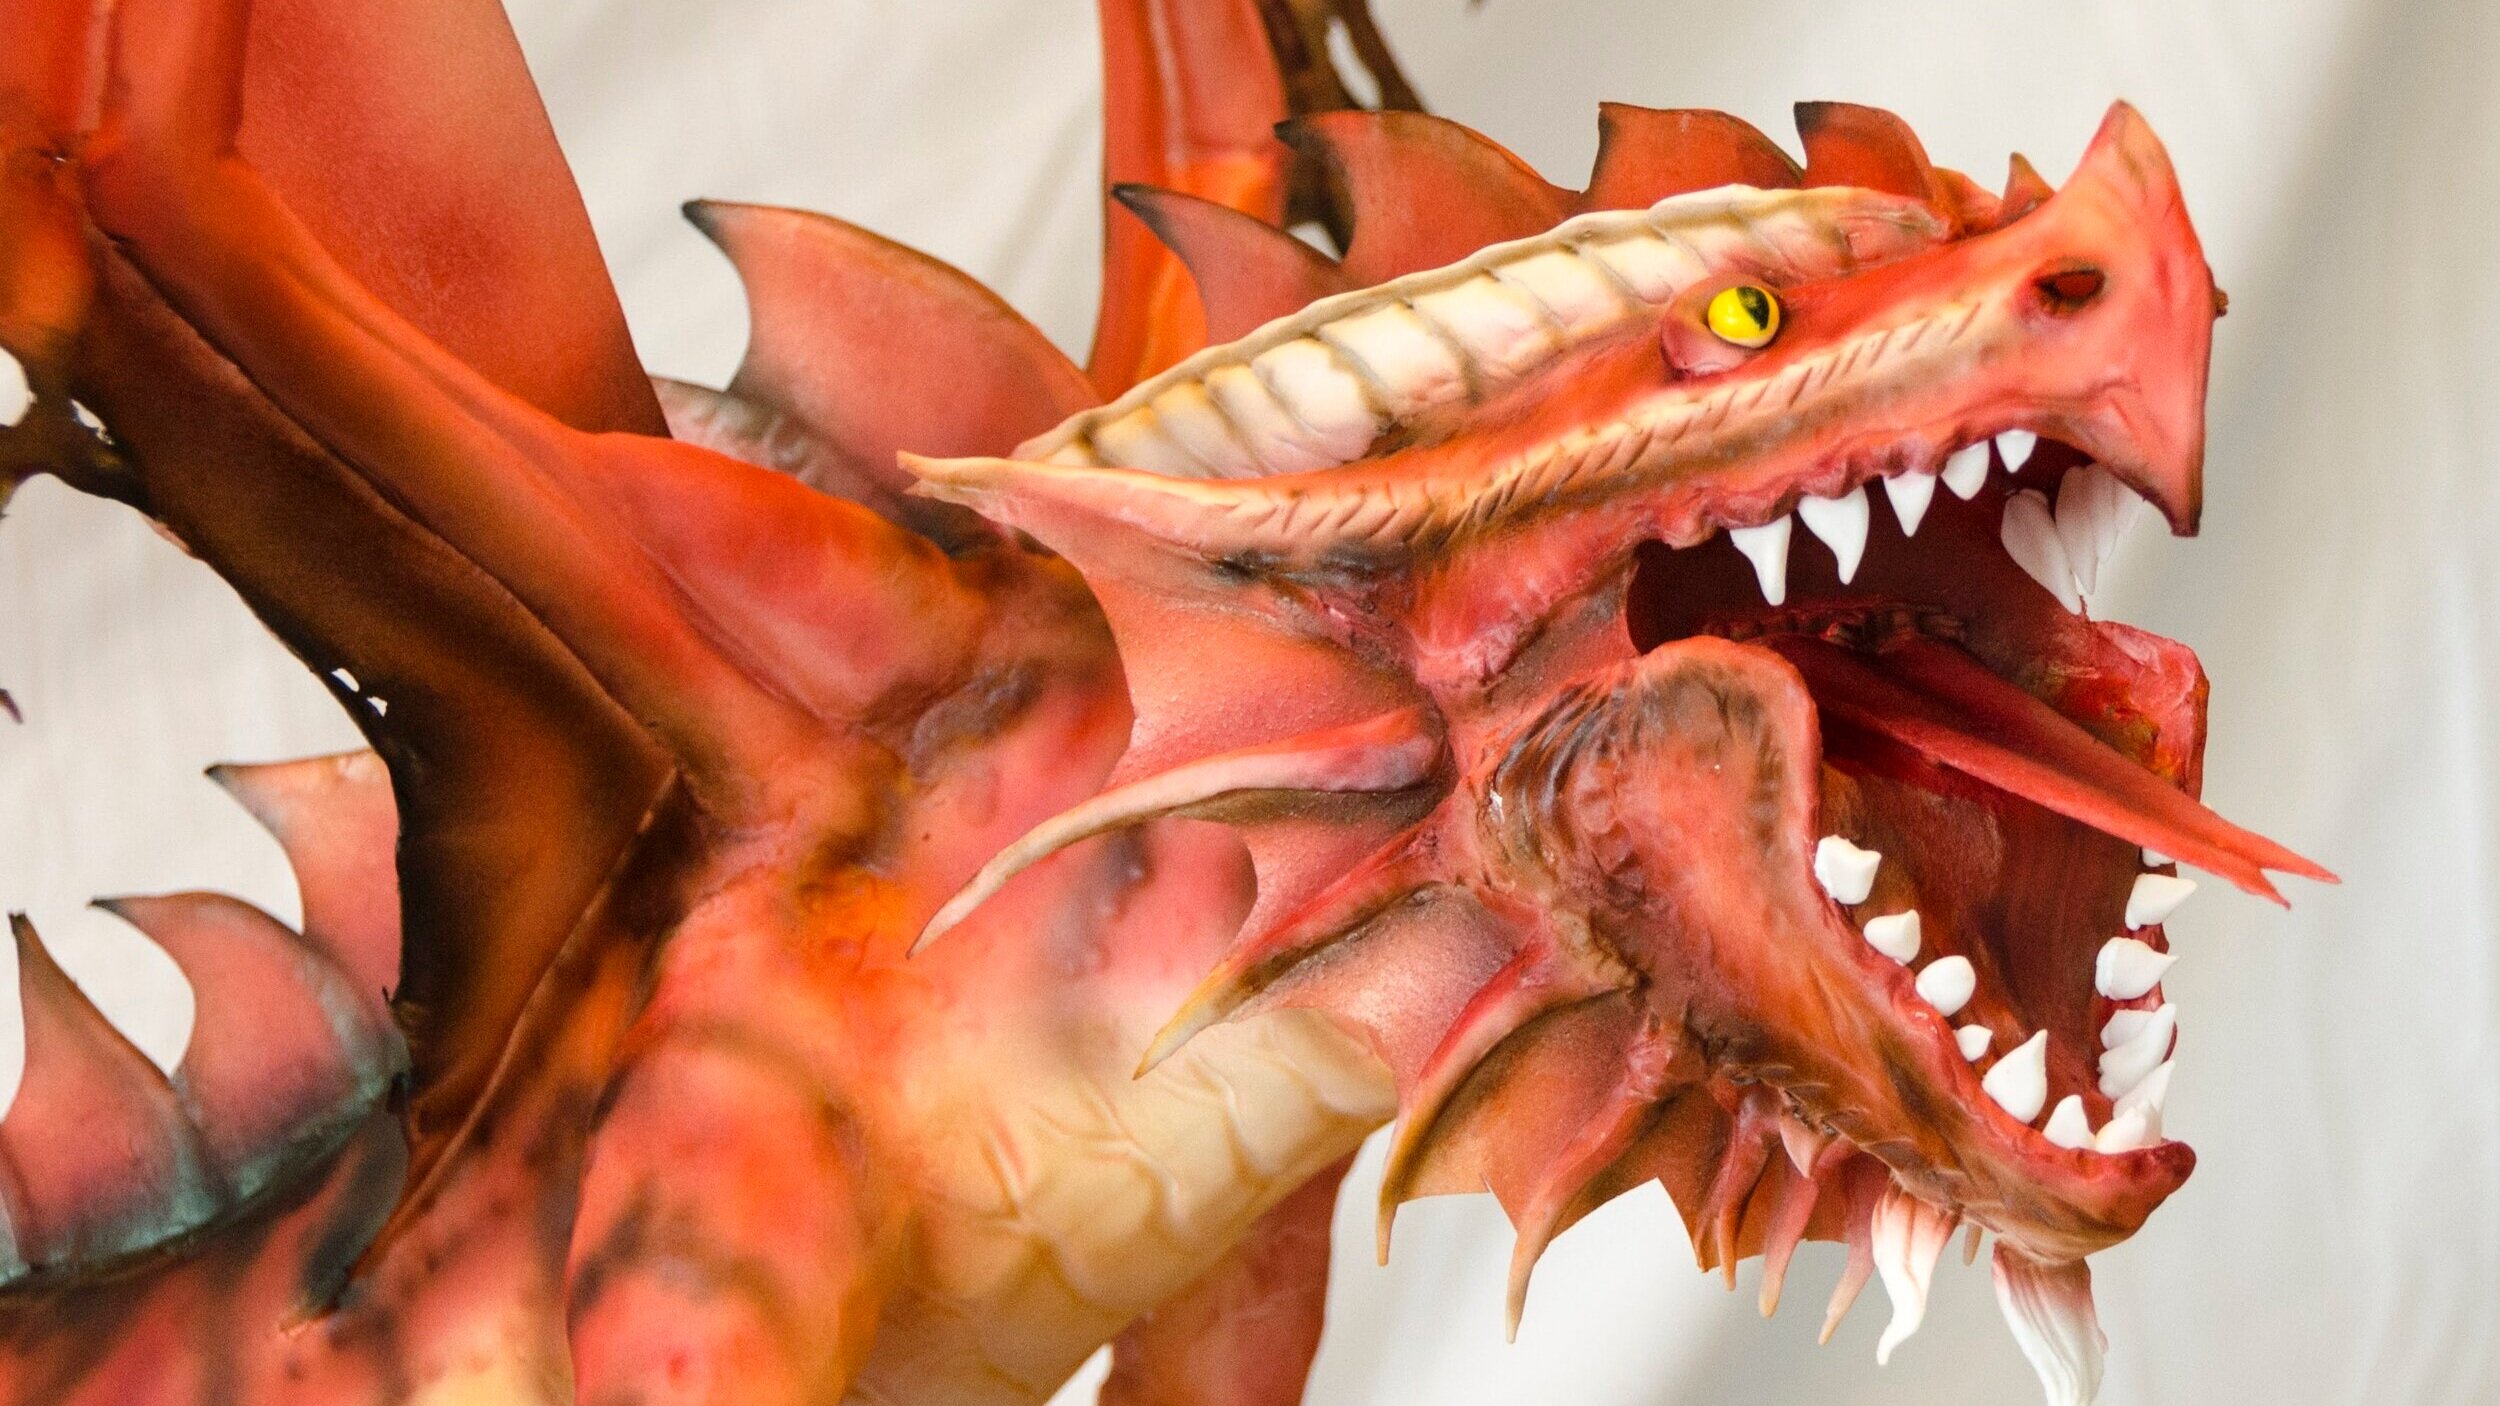
Ancient Red Dragon Cake
Our love of Dungeons and Dragons continues! For her birthday this year, my niece requested an Ancient Red Dragon, guarding a d20, sitting on rocks that spell out “Roll for initiative.” At this point, I’m becoming something of a dragon specialist (see my Frost Dragon Cake and my Norbert(a) Cake), so this seemed well within my skill set.

Our love of Dungeons and Dragons continues! For her birthday this year, my niece requested an Ancient Red Dragon, guarding a d20, sitting on rocks that spell out “Roll for initiative.” At this point, I’m becoming something of a dragon specialist (see my Frost Dragon Cake and my Norbert(a) Cake), so this seemed well within my skill set.
The chunks of rock themselves are sea foam candy, carved into the shape of the letters, with strips of red and orange LEDs behind them, hooked up to a basic flicker effects controller.
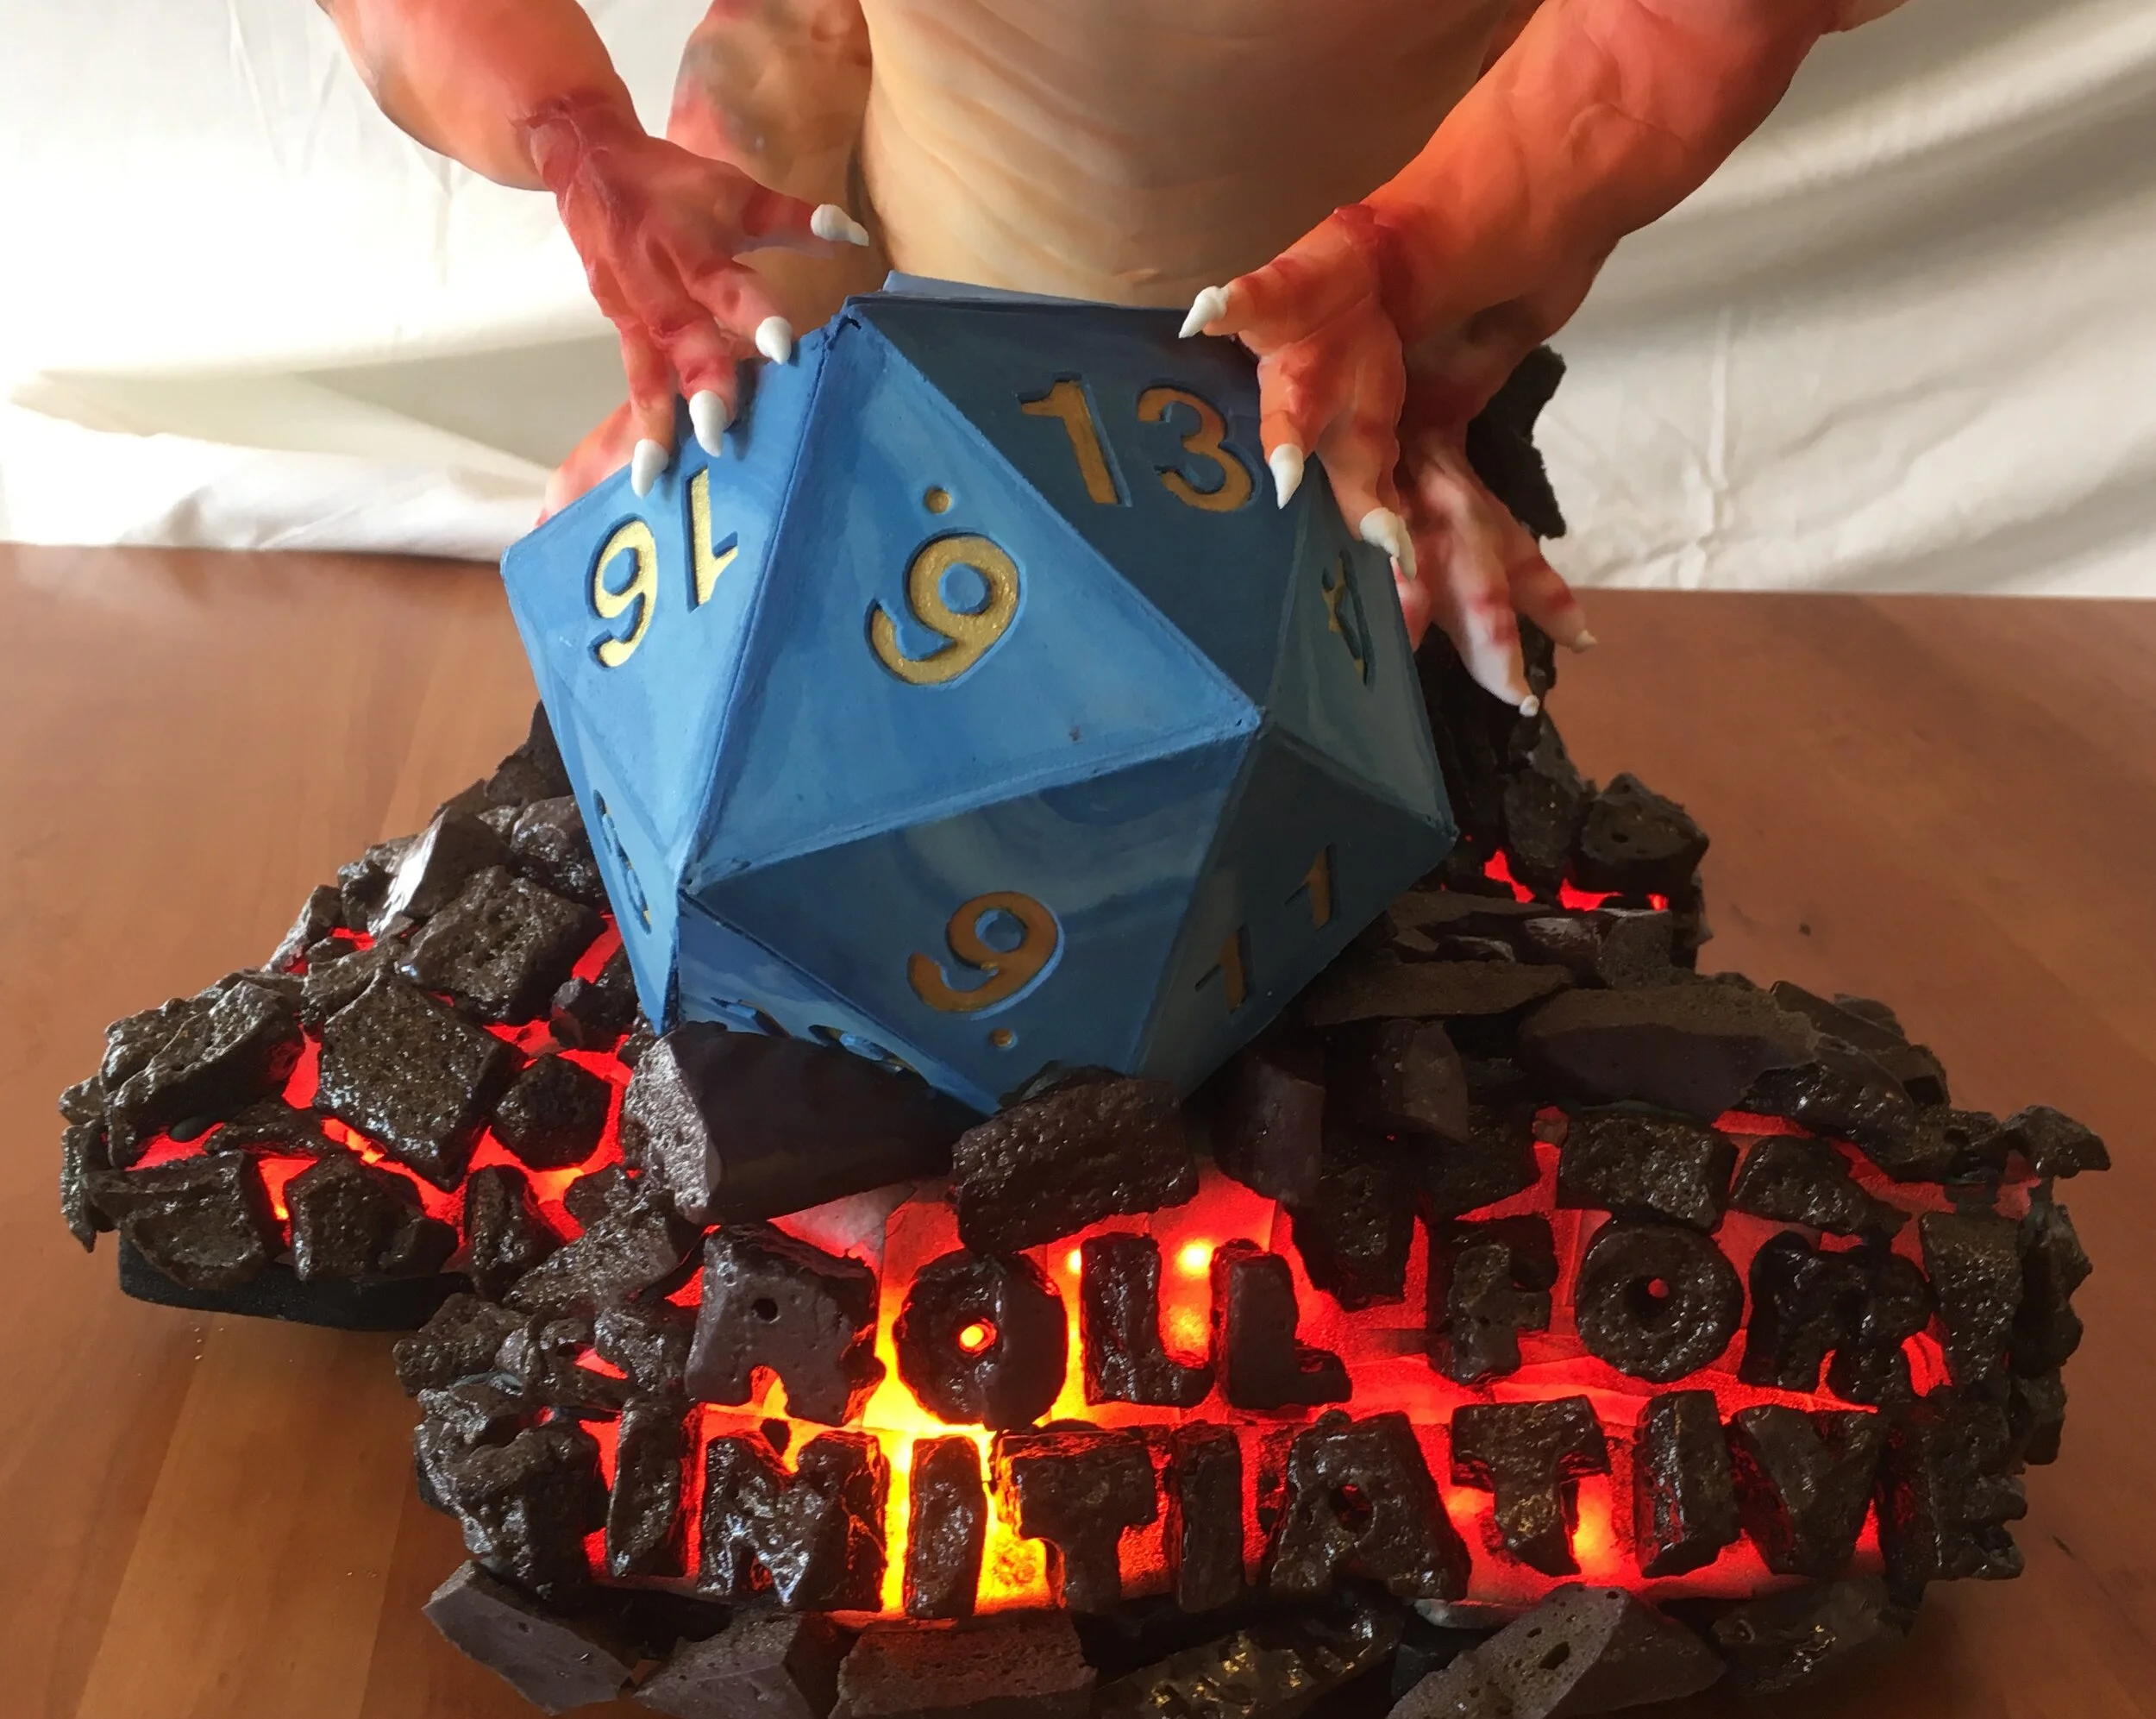
The sides of the d20 are made of gum paste, precut into triangles and assembled around the cake in the center. It turns out that an icosahedron is a very difficult shape to assemble accurately, so I had to do a little shaving and filling to make everything fit, but I was able to mostly hide the imperfections on the back and underside of the die.

I premade the head out of gum paste, so it would be totally dry when I went to assemble the cake. The wings, the spines on its back, and the little fins around the mouth are made of wafer paper (of course with some wire support inside the wings.)
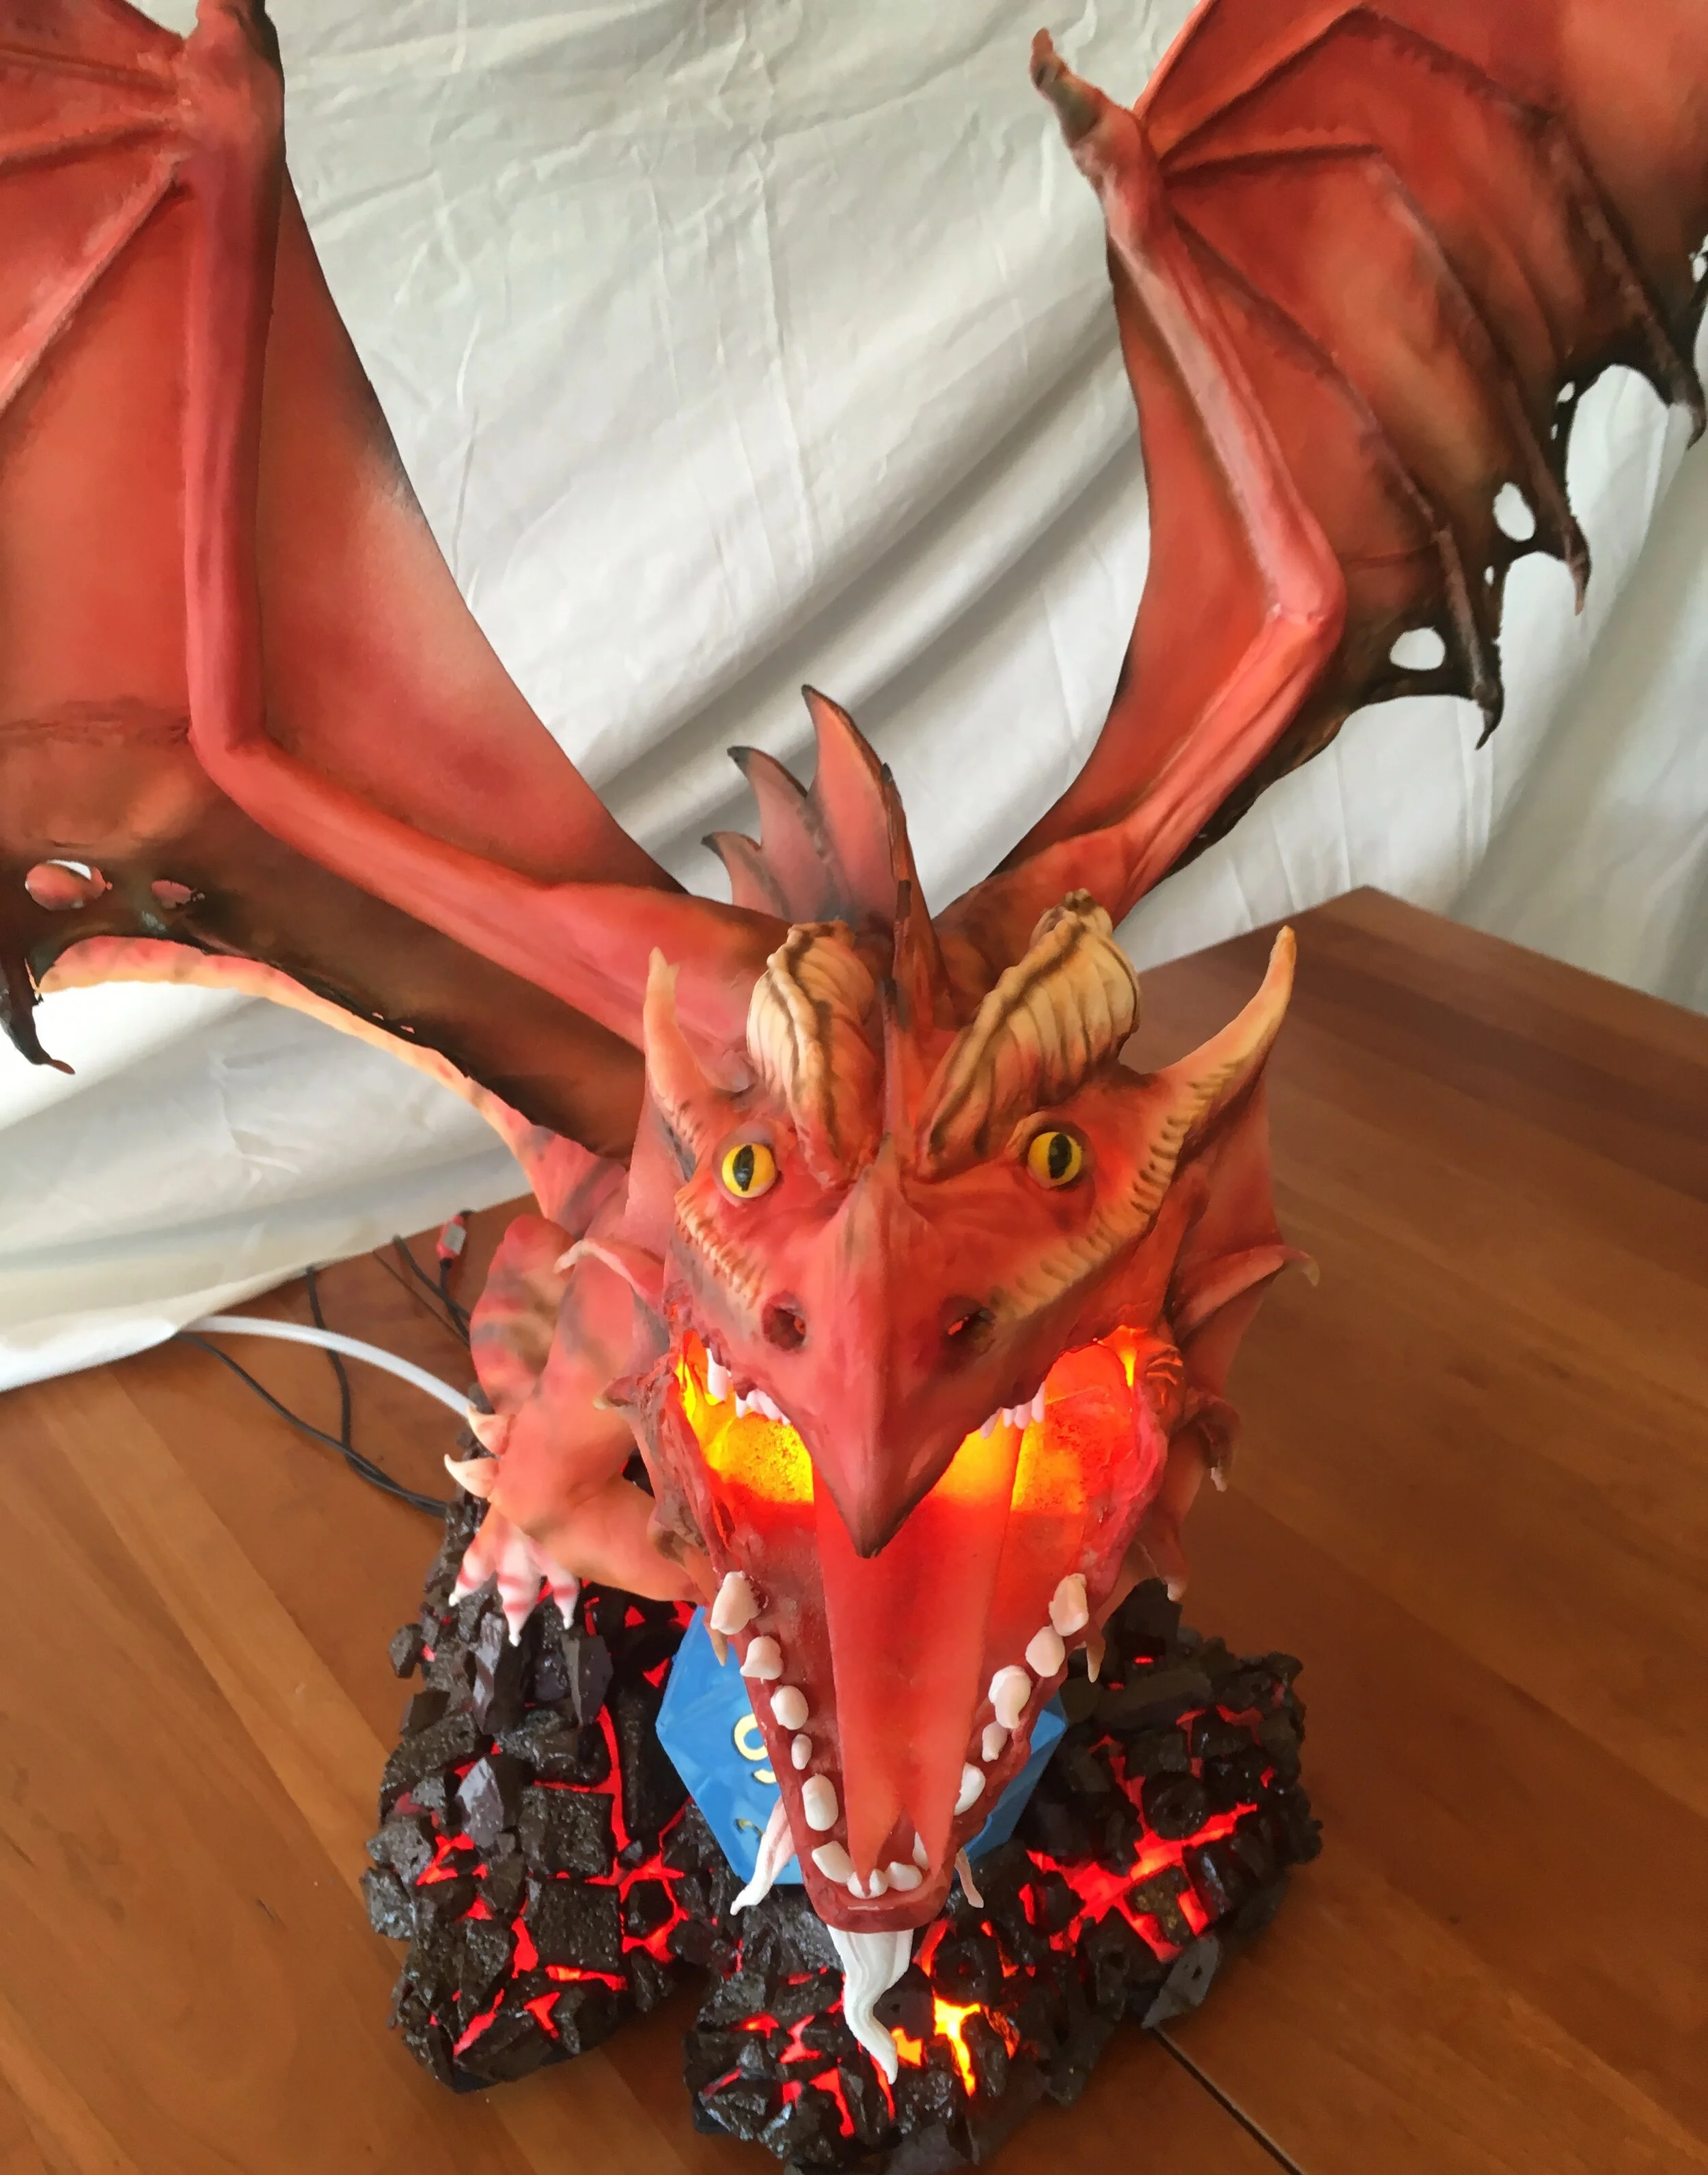
To make the mouth glow, I ran wires down the underside of the belly to a flame simulation LED under the tongue (which is also made of wafer paper). I really wanted smoke to come out of the mouth, too, so I ran a tube up the underbelly and into the mouth as well and hooked it up to the same dry ice fogger I made for the Frost Dragon Cake. The fog didn’t really come out of the mouth, I think because the tube I used was too narrow, so I unhooked it and just made a dramatic atmospheric cloud of fog around the whole scene.

History of Life Wedding Cake
This is the third wedding cake that I have ever made. Which means that, amazingly, there are three couples in the world with that level of trust in me. The bride is in law school and the groom is a paleontologist. The wedding was on September 3, which is the anniversary of the signing of the Treaty of Paris.
This is the third wedding cake that I have ever made. Which means that, amazingly, there are three couples in the world with that level of trust in me
The bride is in law school and the groom is a paleontologist. The wedding was on September 3, which is the anniversary of the signing of the Treaty of Paris, which, as everyone knows, is the treaty that ended the American Revolutionary War and in which Britain recognized the United States as an independent nation. Just kidding, I had no idea what the Treaty of Paris was; I had to google it.
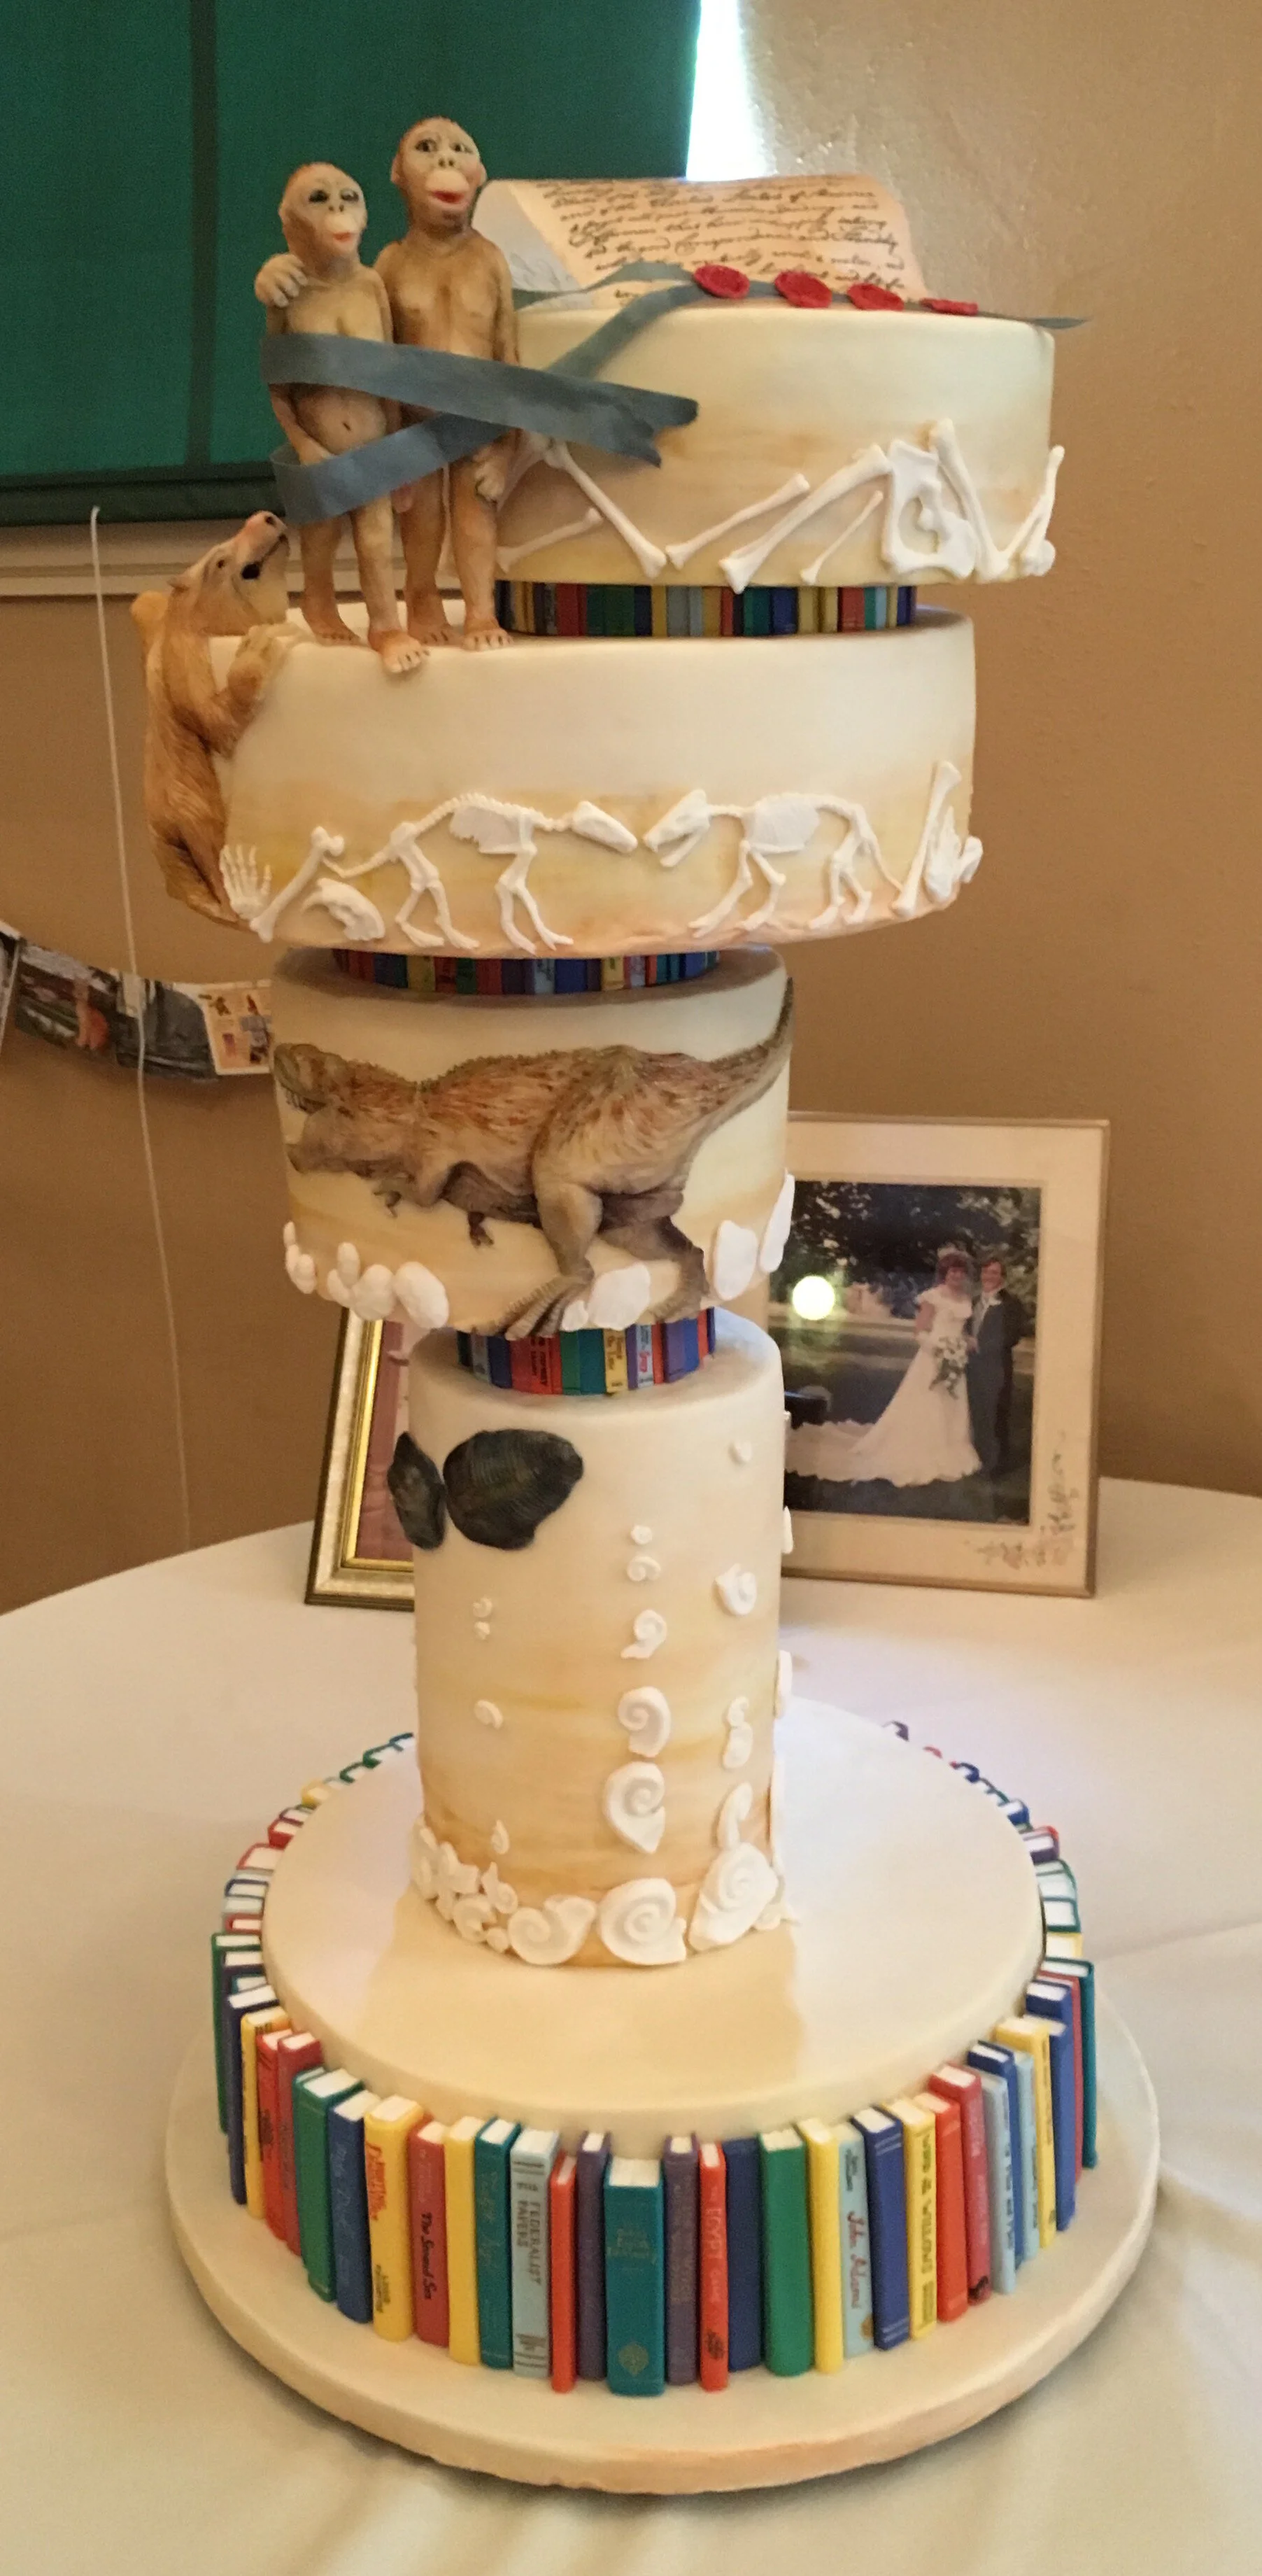
This is the design we came up with.

Each tier represents an era of the evolution of life on Earth – Paleozoic, Mesozoic, and Cenozoic. The tiers get progressively shorter as you move up the cake, to suggest the shorter duration of each era. The overall shape is meant to evoke this kind of spiral shape that is often used in images describing the history of life.
Each tier has a “couple” on it, as well as other iconic forms of life from that era. The Paleozoic tier has a couple of trilobites.

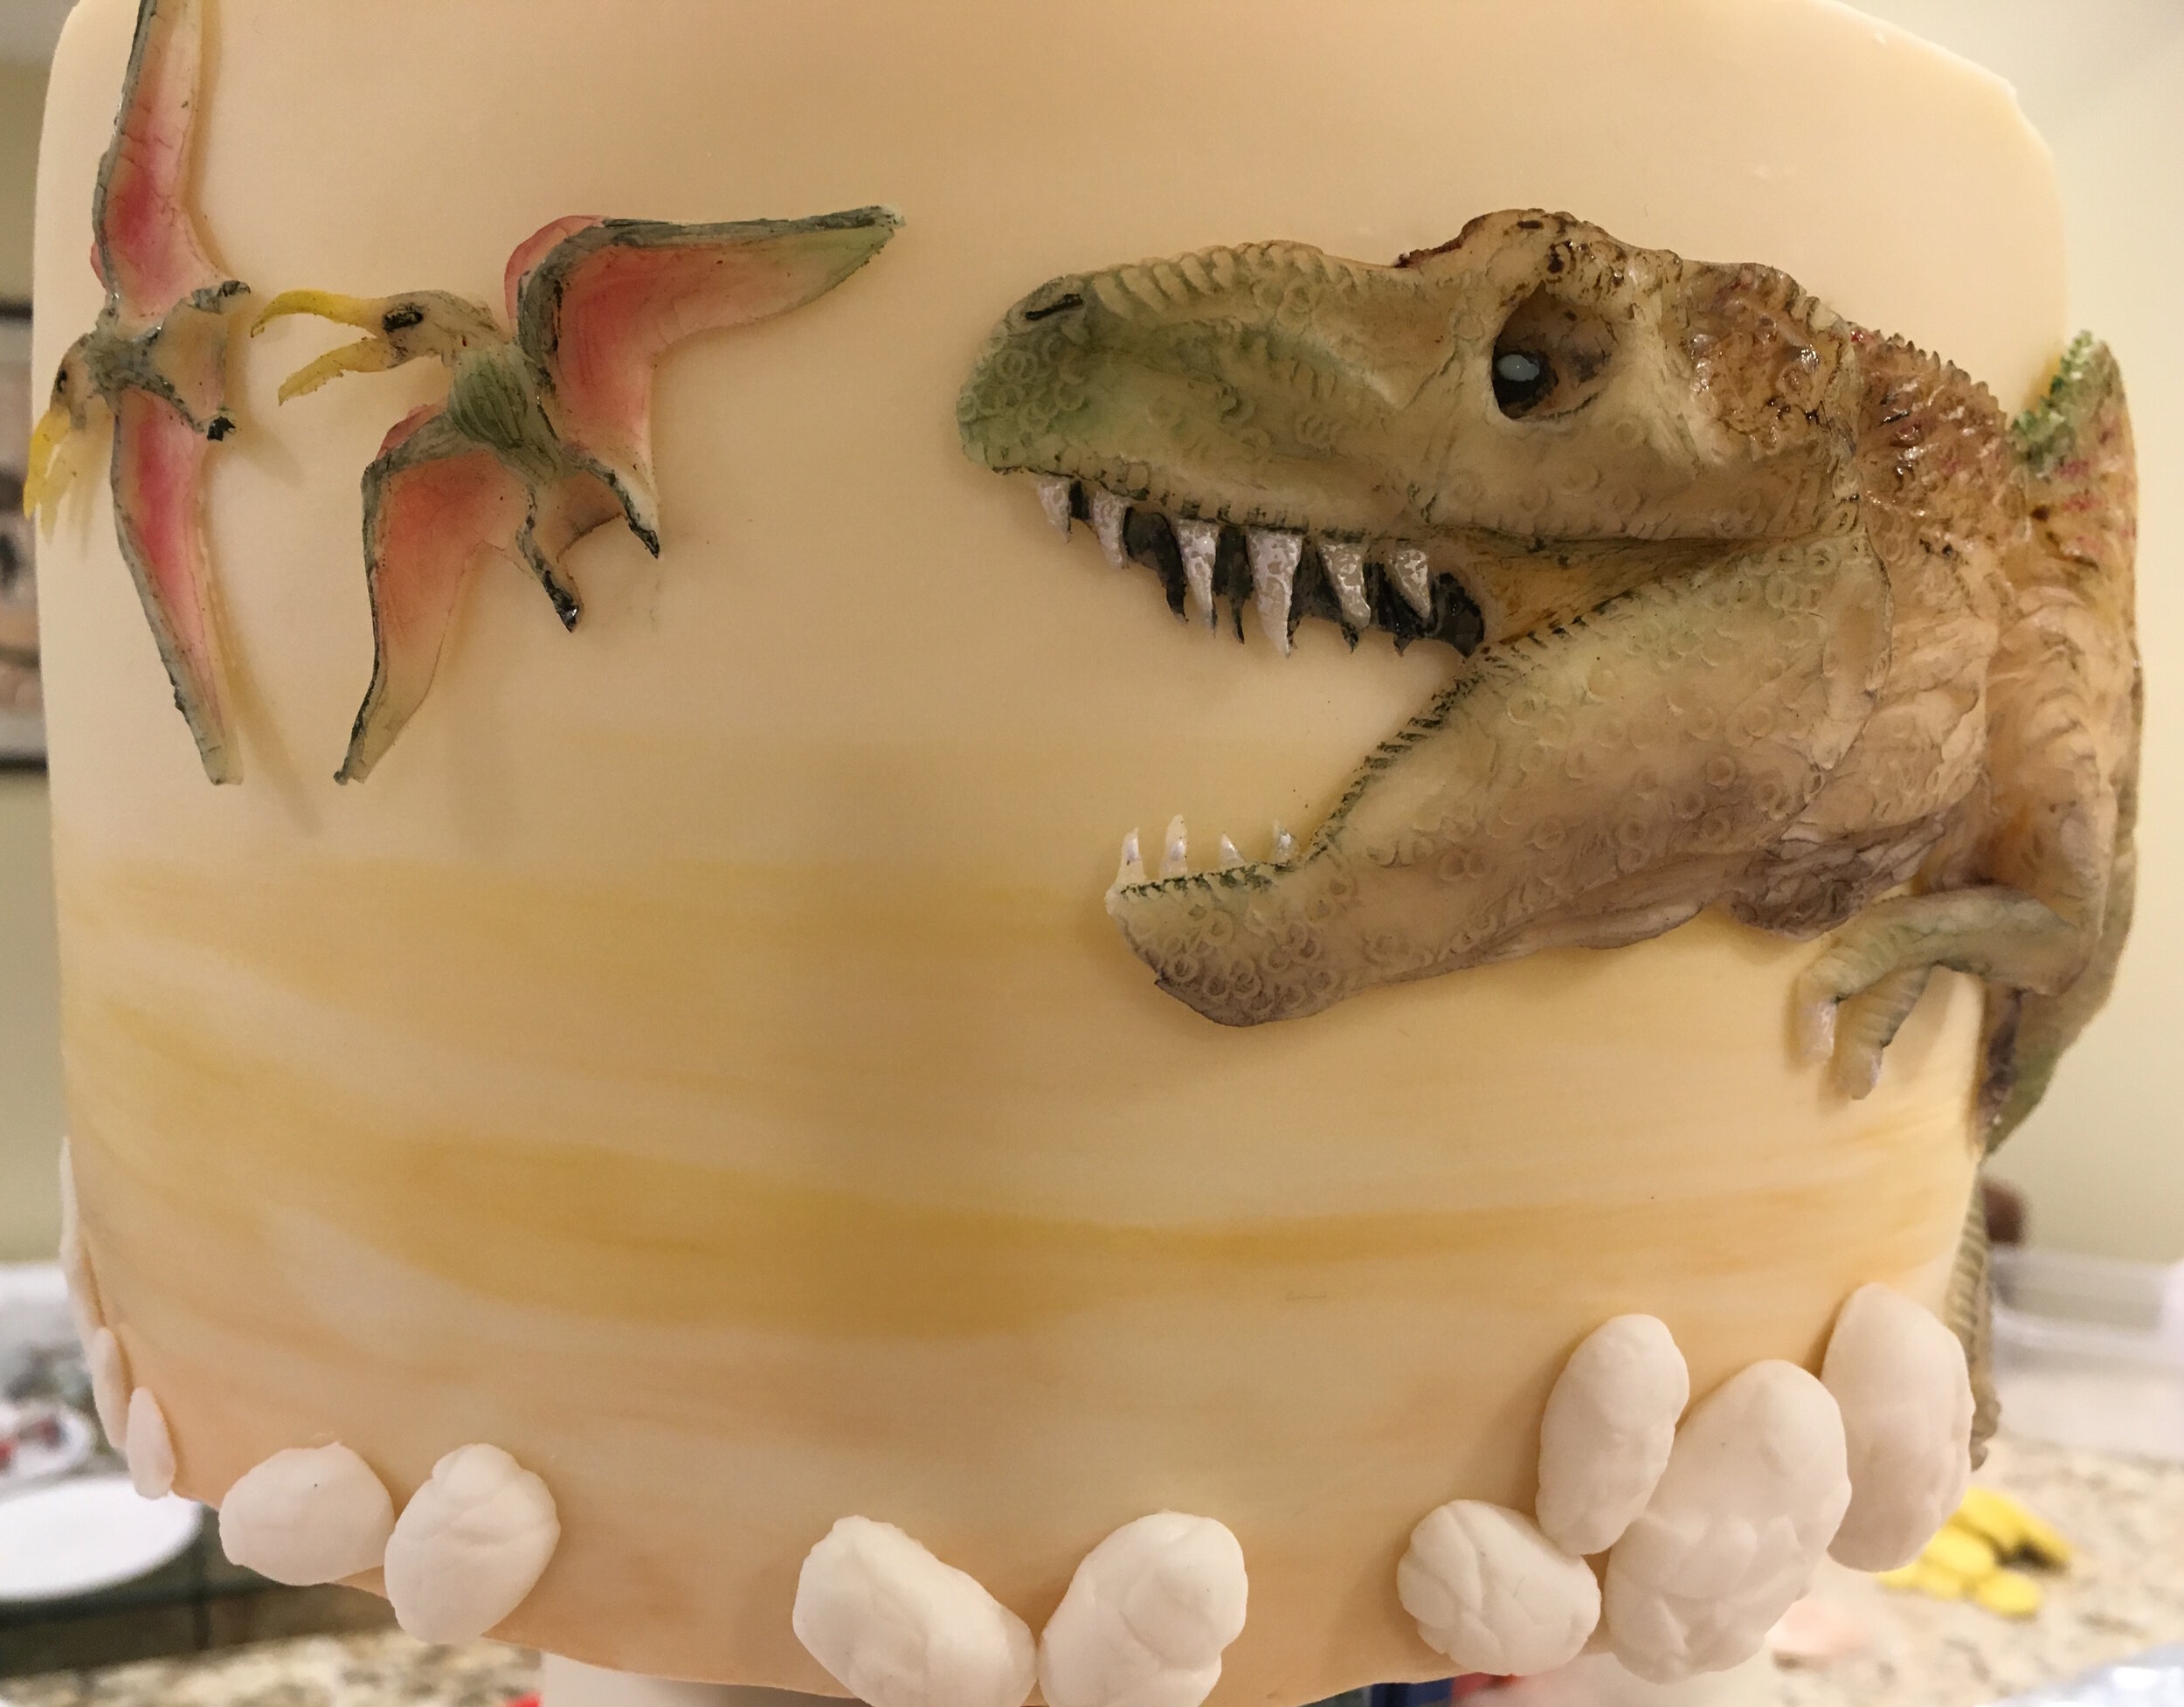
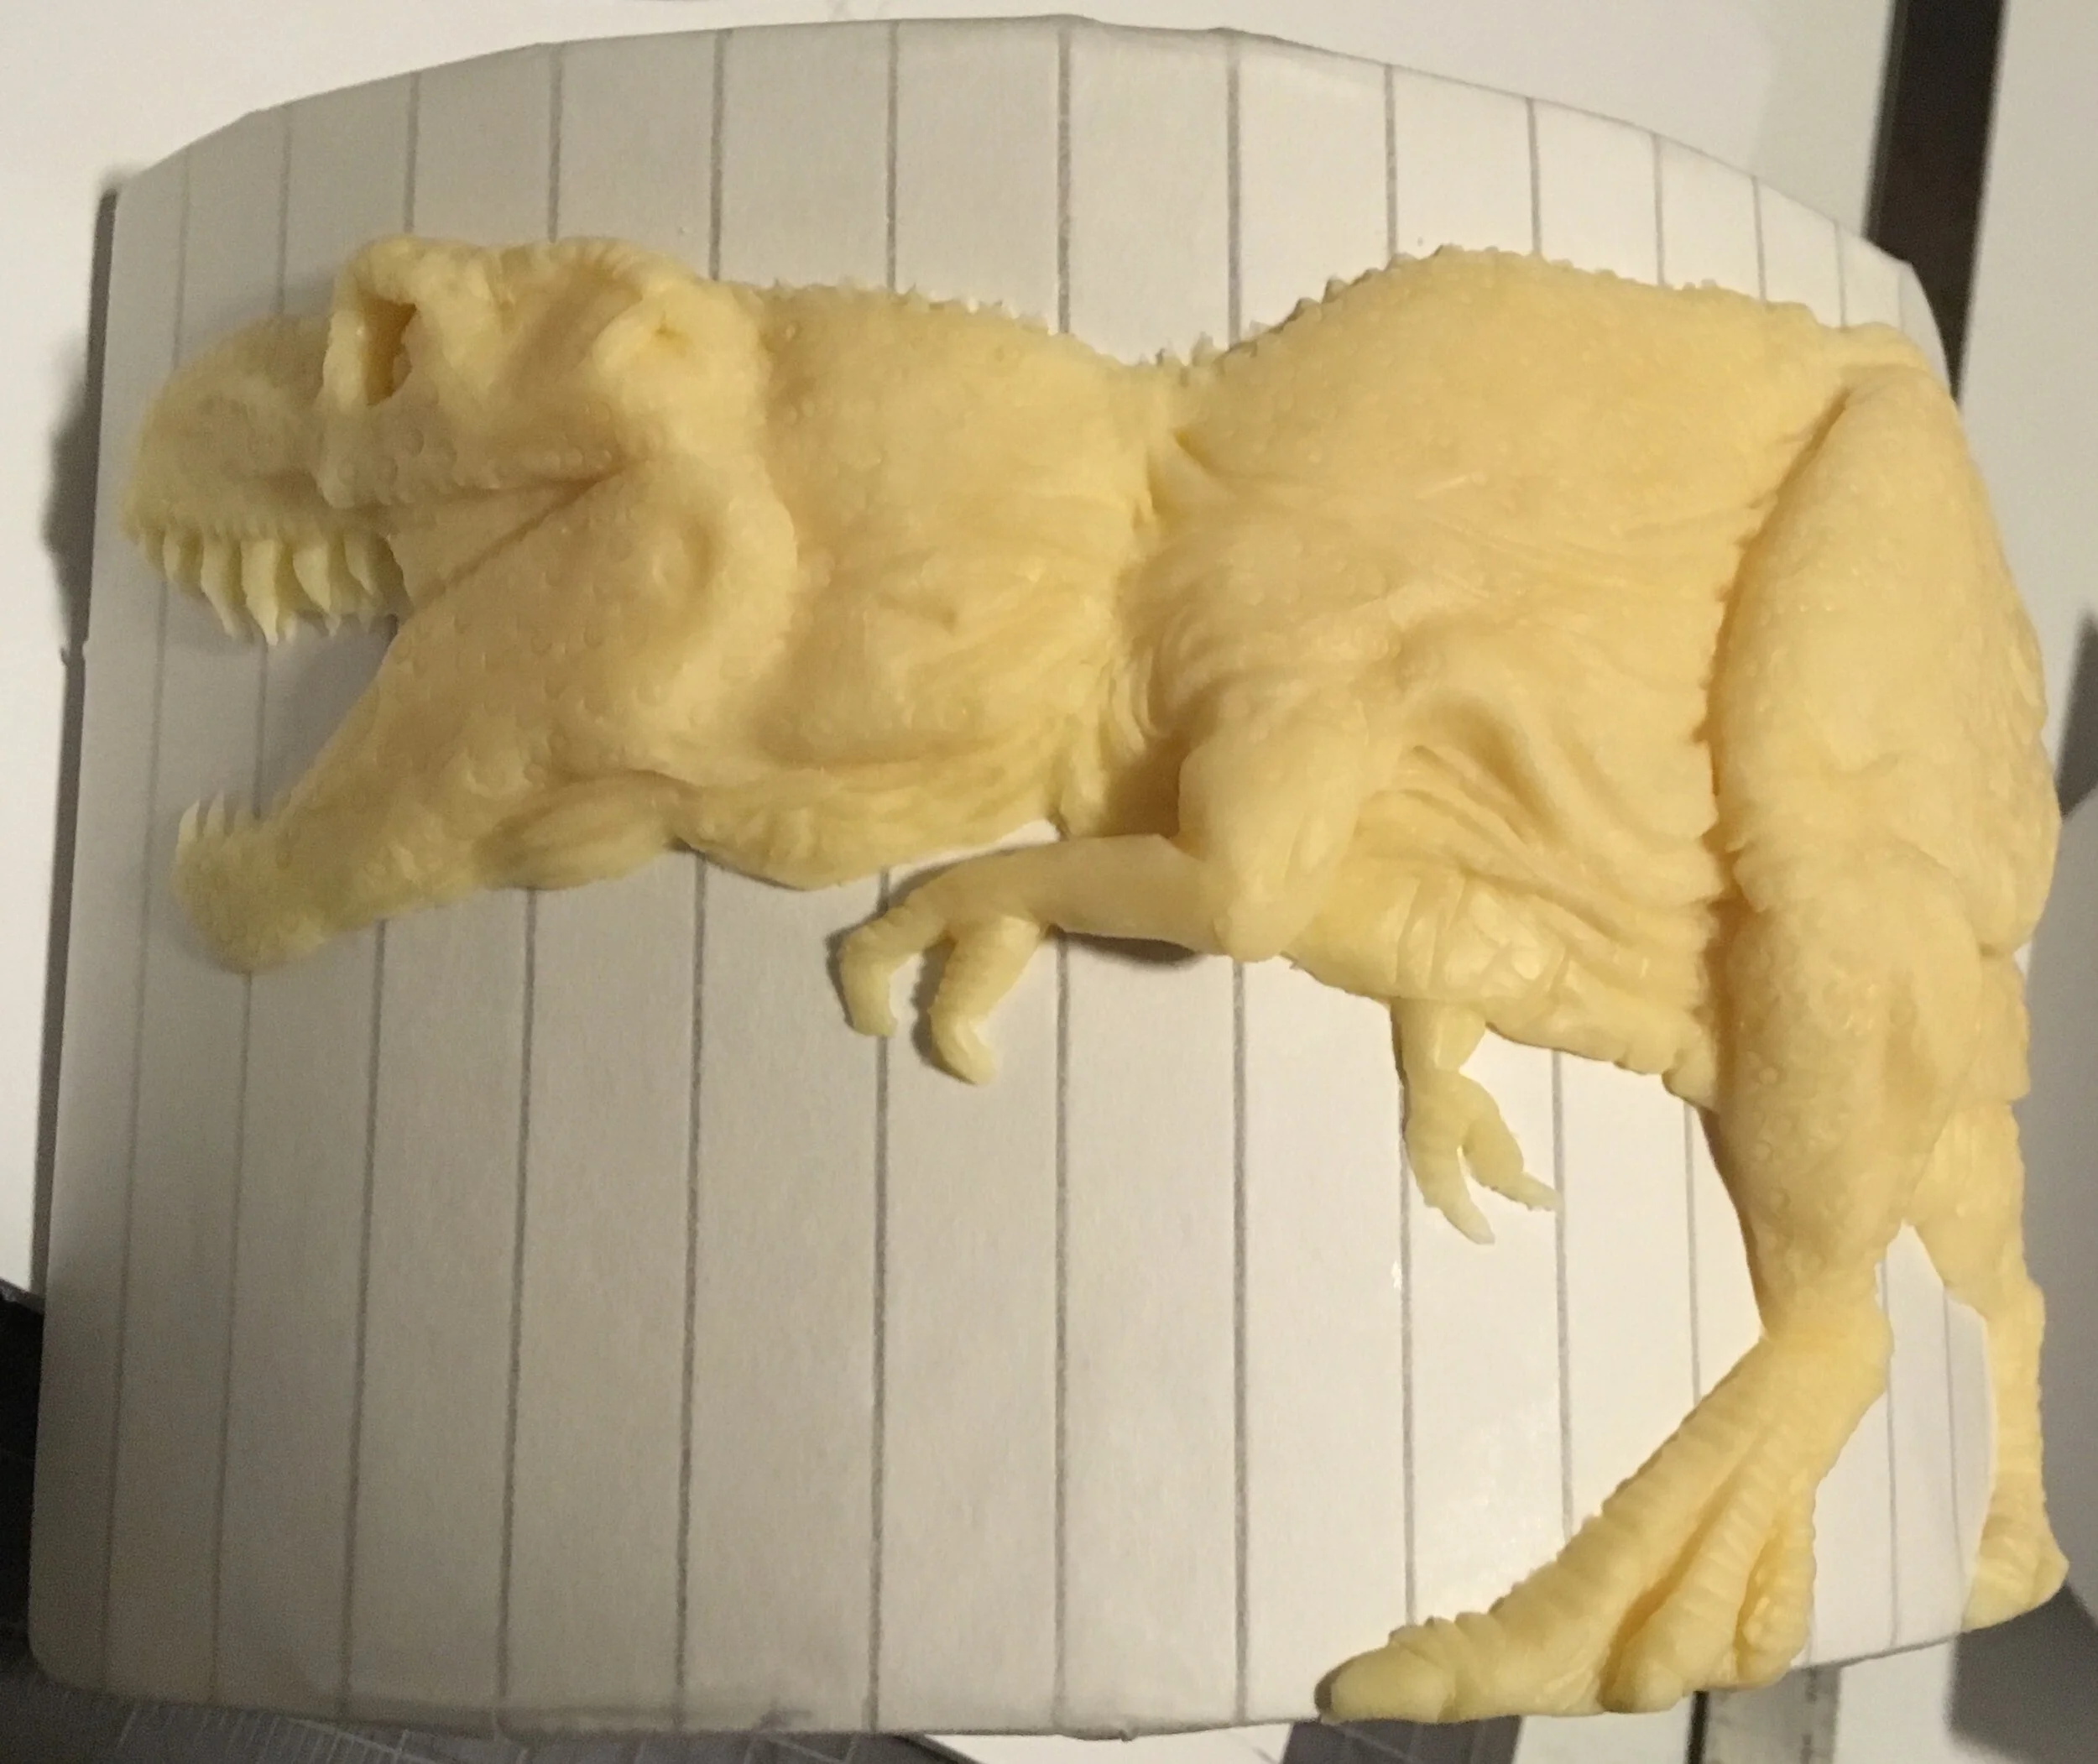
The Mesozoic era features a Tyrannosaurus Rex chasing a fleeing pair of pterosaurs. Note the T-Rex's feathers.
And the Cenozoic era tier has a megatherium (which is kind of giant prehistoric ground sloth) and a couple of hyaenodont skeletons (the groom’s PhD dissertation centered on hyaenodonts).
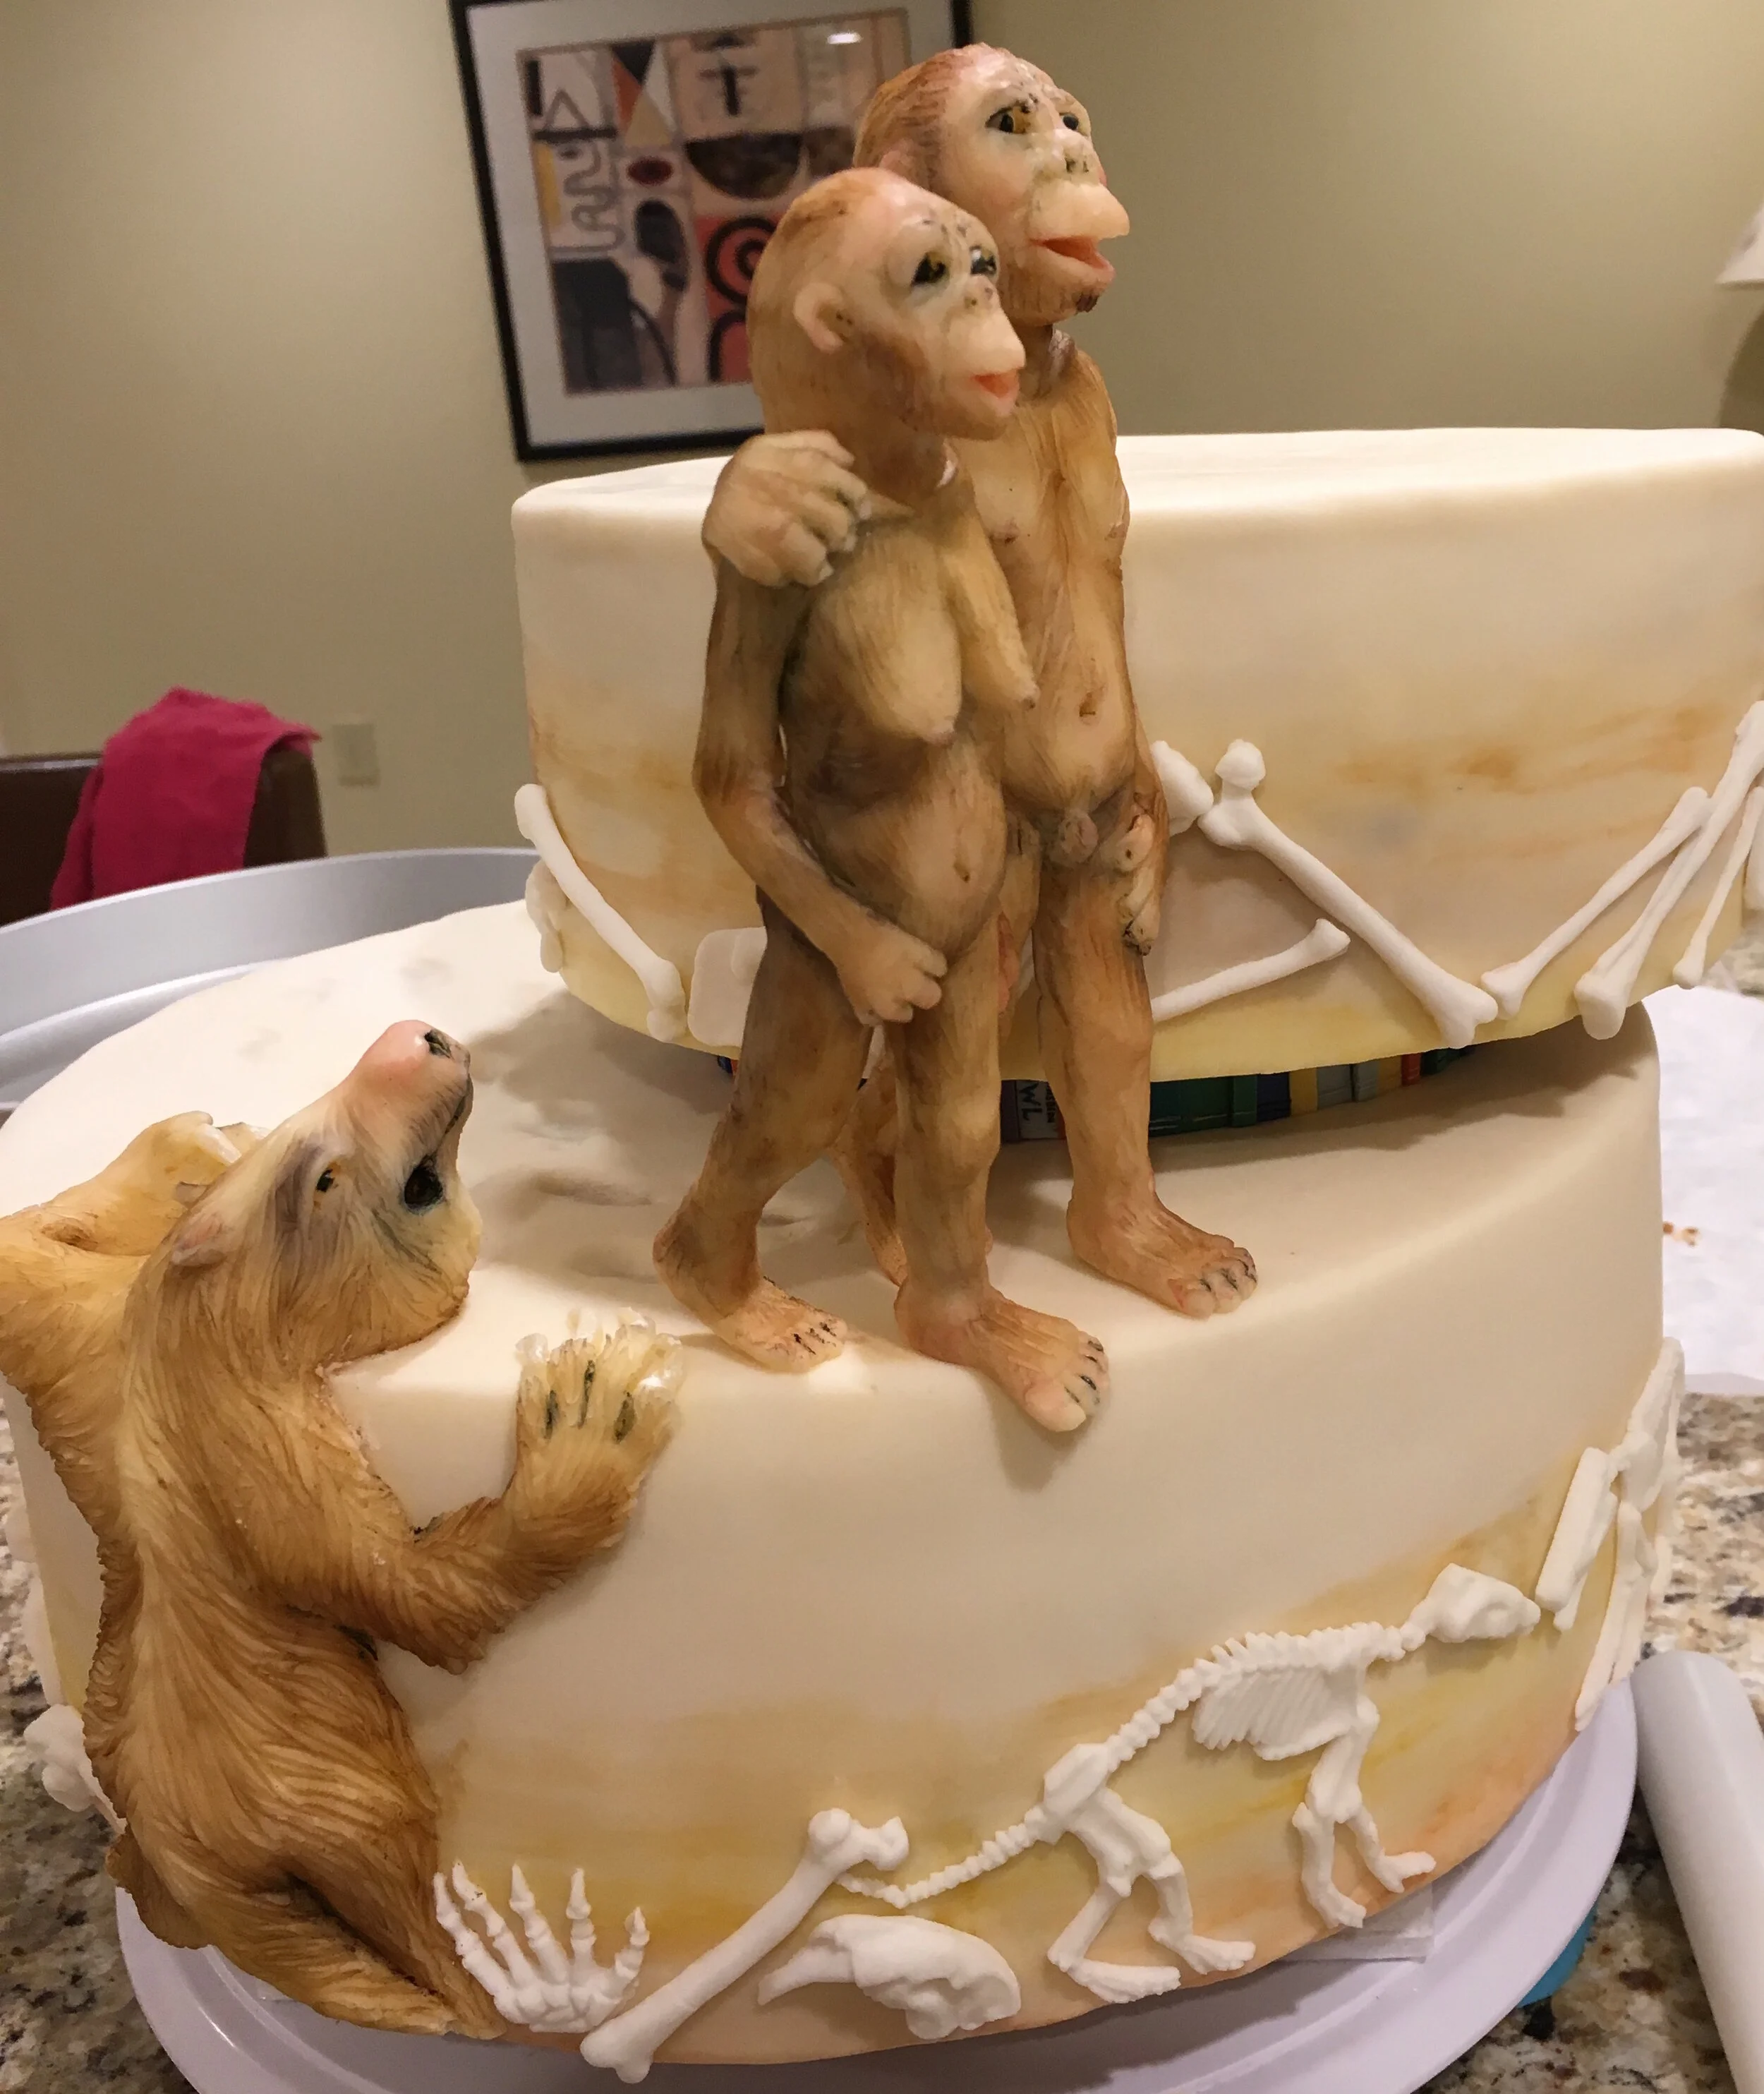
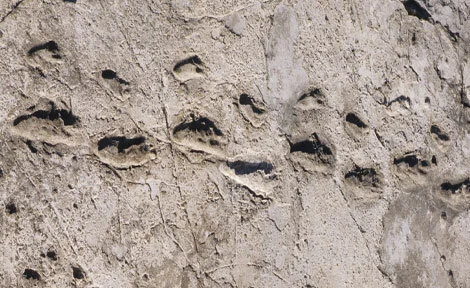
On top of that tier walks a couple of Australopithecus, which I’m told is something that the groom has been imagining on his wedding cake since he was a little boy. It’s inspired by these fossilized footprints that suggest that an Australopithecus couple might have walked next to each other, hand in hand.
The cake is covered with a mix of fondant and modeling chocolate and all of the figures are sculpted out of modeling chocolate colored with powdered food coloring. I made all the large figures in advance, over forms made to mimic the curvature of the cake tiers. That way I could make them well in advance and bring them in my carryon, since I had to fly cross-country for the wedding. (I didn’t fly with the whole cake. I arrived three days early and rented an Air BNB with a full kitchen to do the actual baking and assembly.
For the smaller fossils and bones at the base of each tier, I made molds out of food-safe silicon, so that when I assembled the cake I could just push some fondant into the mold and stick it on the cake.
Of course, Australopithecus would have been nude and the couple understandably didn’t want exposed genitalia on their wedding cake. They also wanted to incorporate the Treaty of Paris, so I was delighted to discover that the Treaty of Paris has a nice blue ribbon at the bottom, running underneath the signatories’ seals. So I made a replica of the Treaty of Paris for the top of the cake with a long ribbon on the bottom to wrap around the couple’s inappropriate bits. Although if you look closely at the above photo before I put the ribbon in place, you’ll see that I couldn’t resist making the Australopithecus couple anatomically correct.
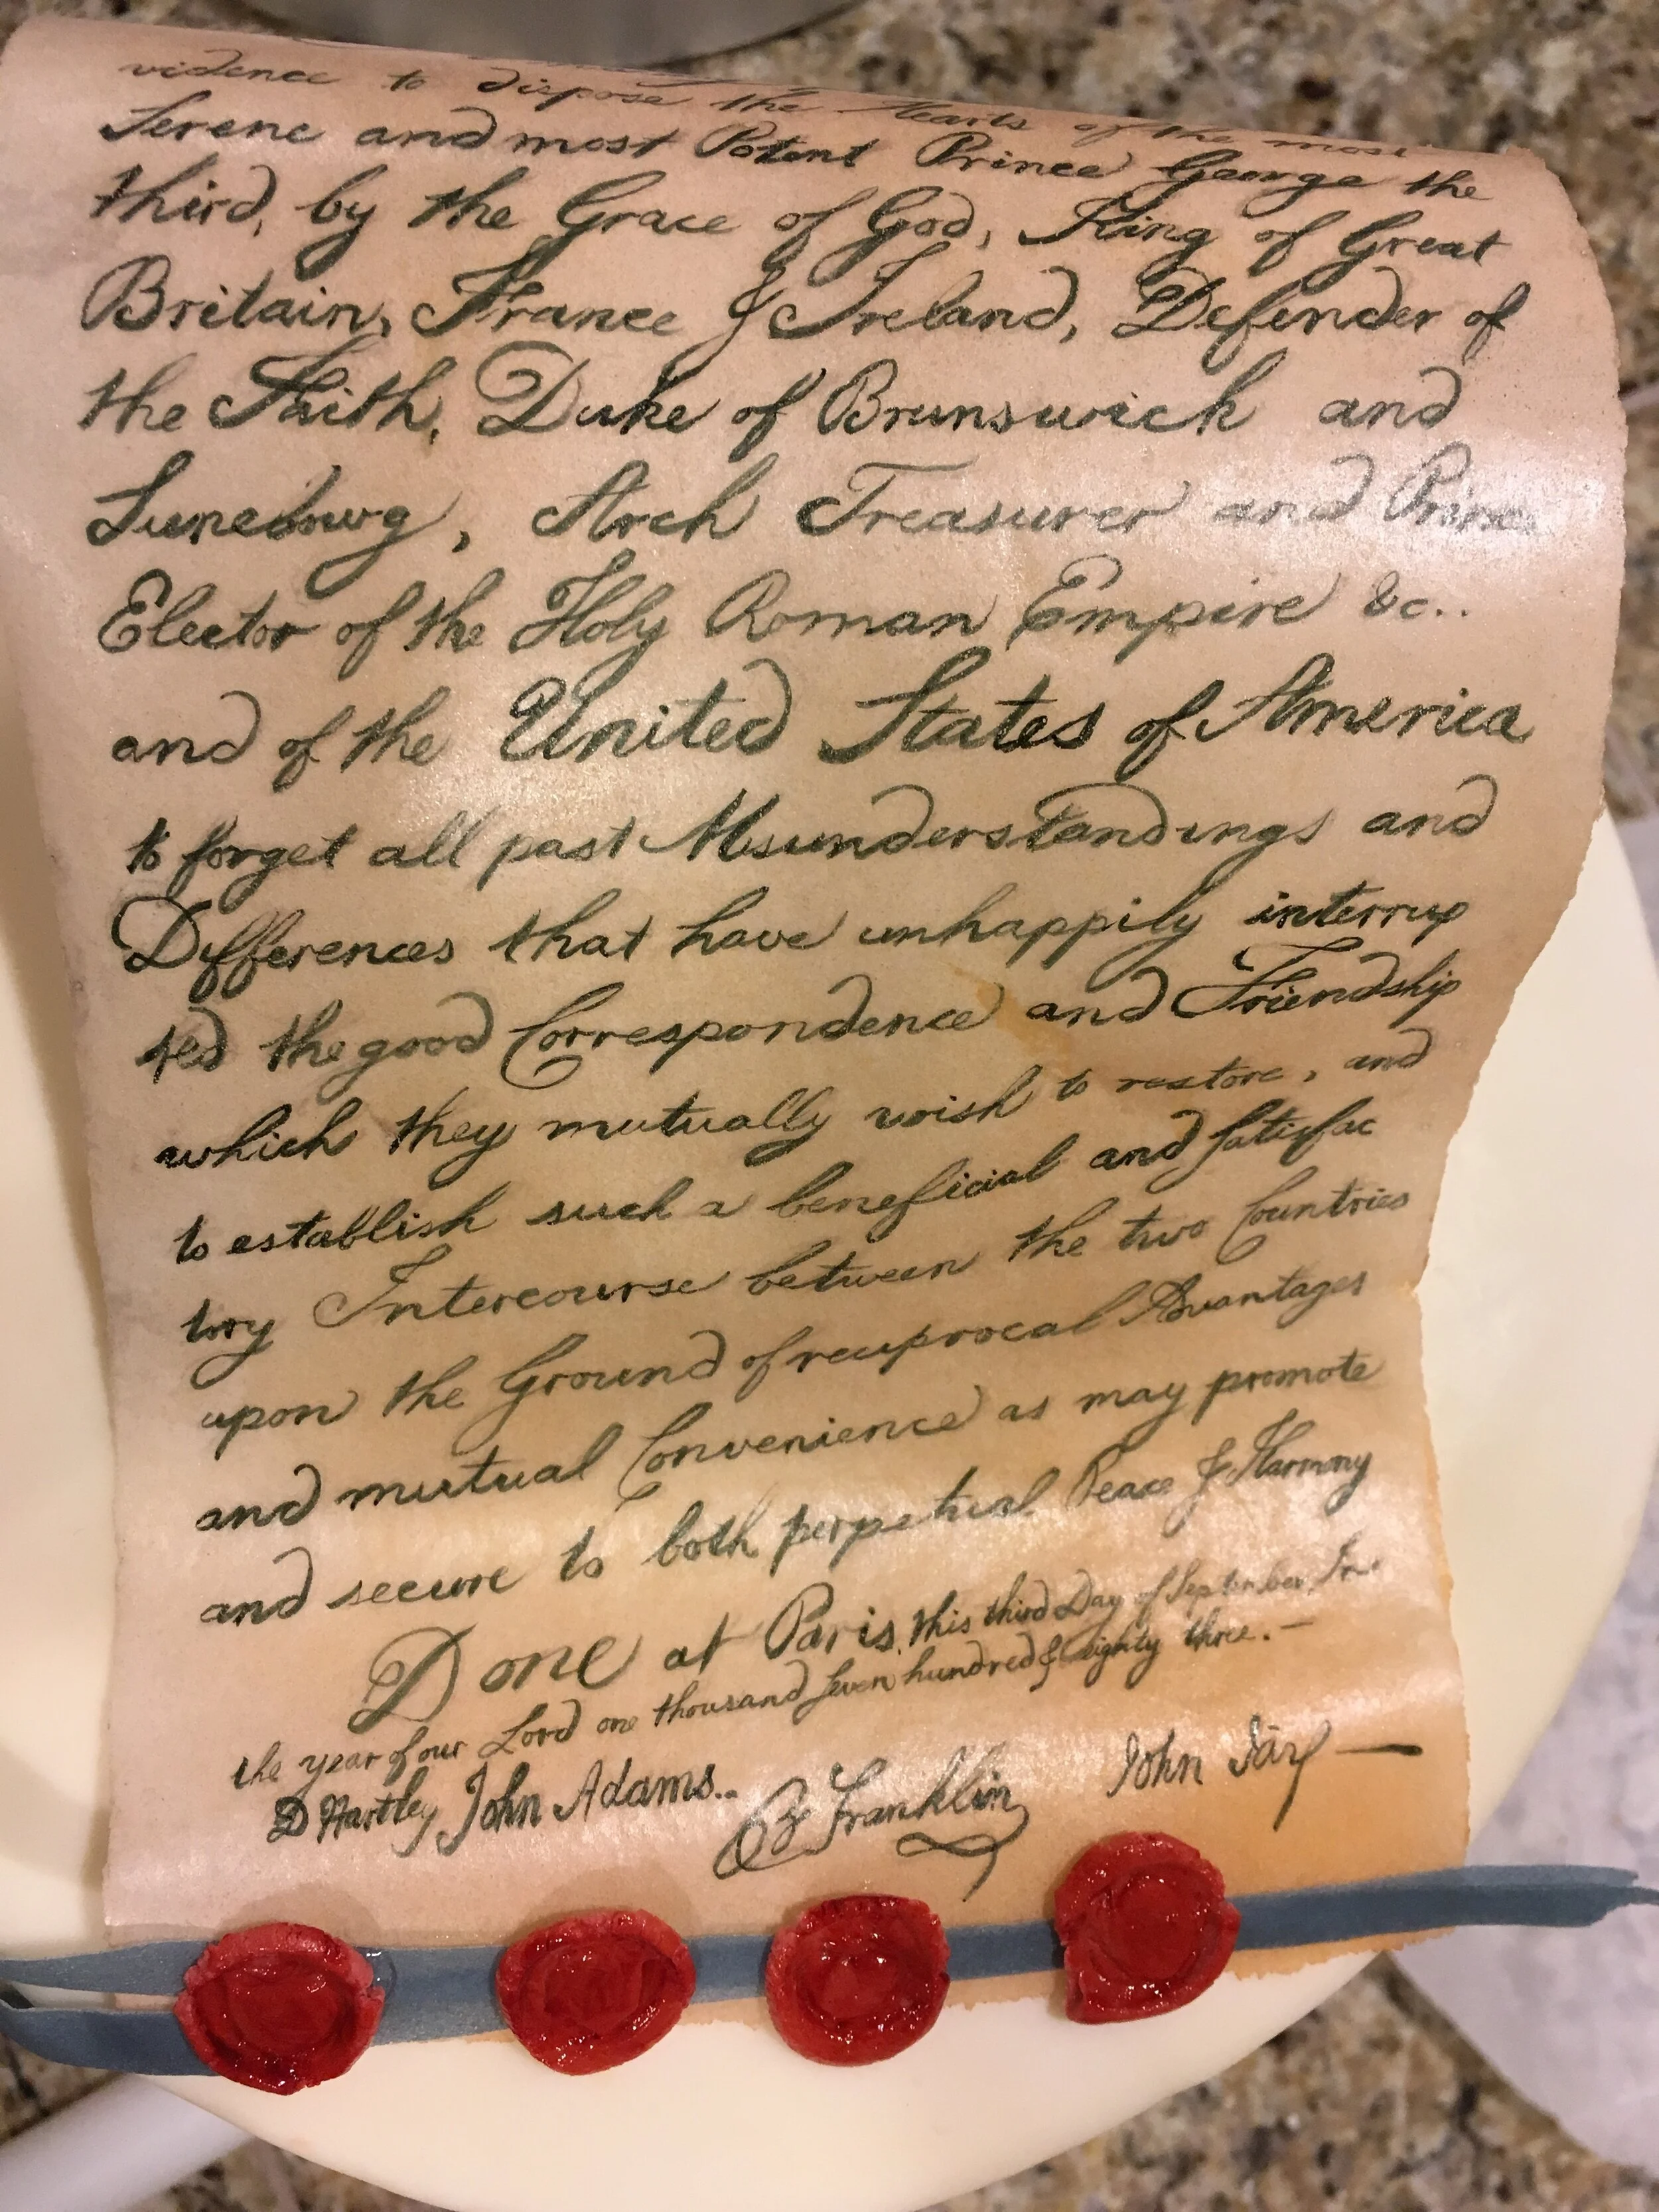
It's made of edible wafer paper with the actual text of the Treaty of Paris hand painted with food coloring. Of course it’s not the entire text, as the treaty is far too long for that. Using images I downloaded of the actual document, I photoshopped the signatures onto the bottom of the first paragraph. Then I printed it out at the actual size I needed for the cake. I turned this into basically edible transfer paper by coating the back of the paper with powdered food coloring. I put this on top of the wafer paper and transferred the text onto the wafer paper by tracing the printed image with a toothpick. Then I went back over the traced text with paste color and a detail brush. To get the graceful curve, I lightly sprayed the back of the wafer paper with water and then set it over and under a couple of rolling pins to dry.

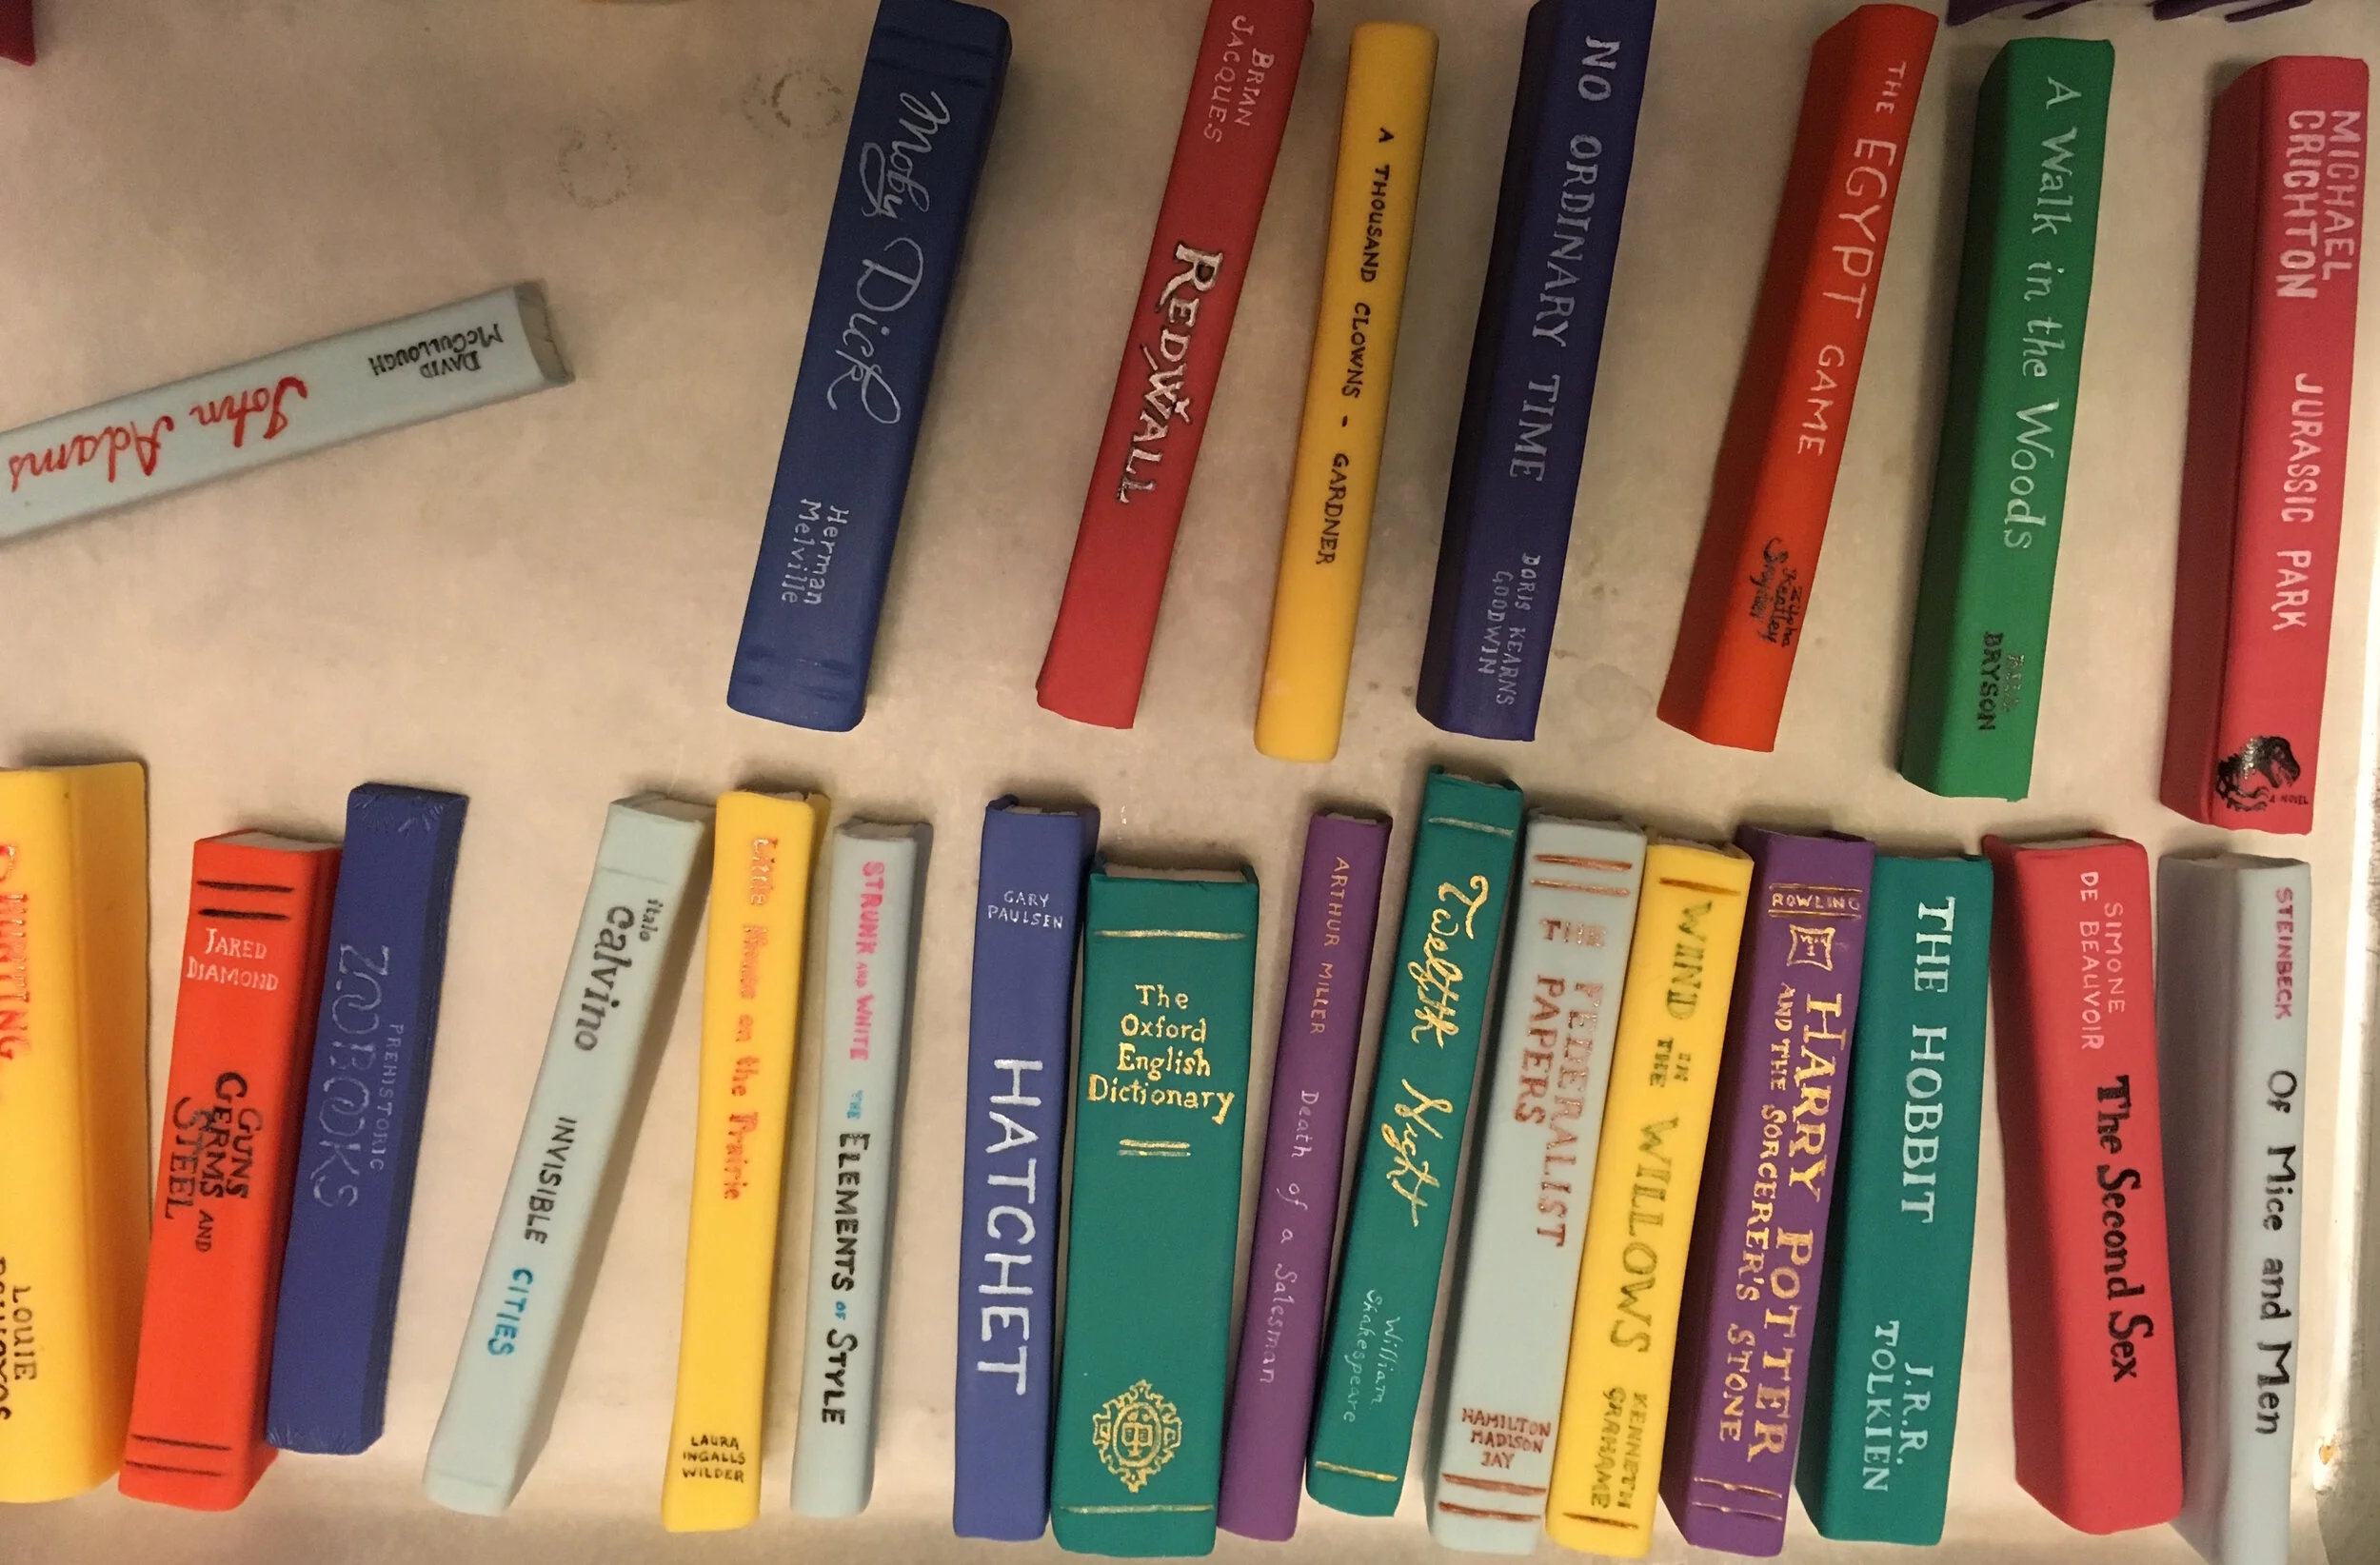
The lowest tier and the dividers between the evolutionary era tiers are encircled with books, which are meant to bring in the bride’s studiousness. They also offered a great opportunity for personalization as the bride and groom sent me a list of all their most influential books. The dividers between the tiers are quite small and made so that they can be popped into place to conceal the cake’s internal support. Those books are just gum paste with the titles painted on.

The books on the bottom tier are much larger and can be seen from the top as well as the sides, so they required more detail to be convincing. So I made pages out of wafer paper and stuck them together with piping gel. Once that was dry, I wrapped each book in a gum paste cover and then painted the title onto the spine. In most cases, I was able to find real cover art from the book to base it on.
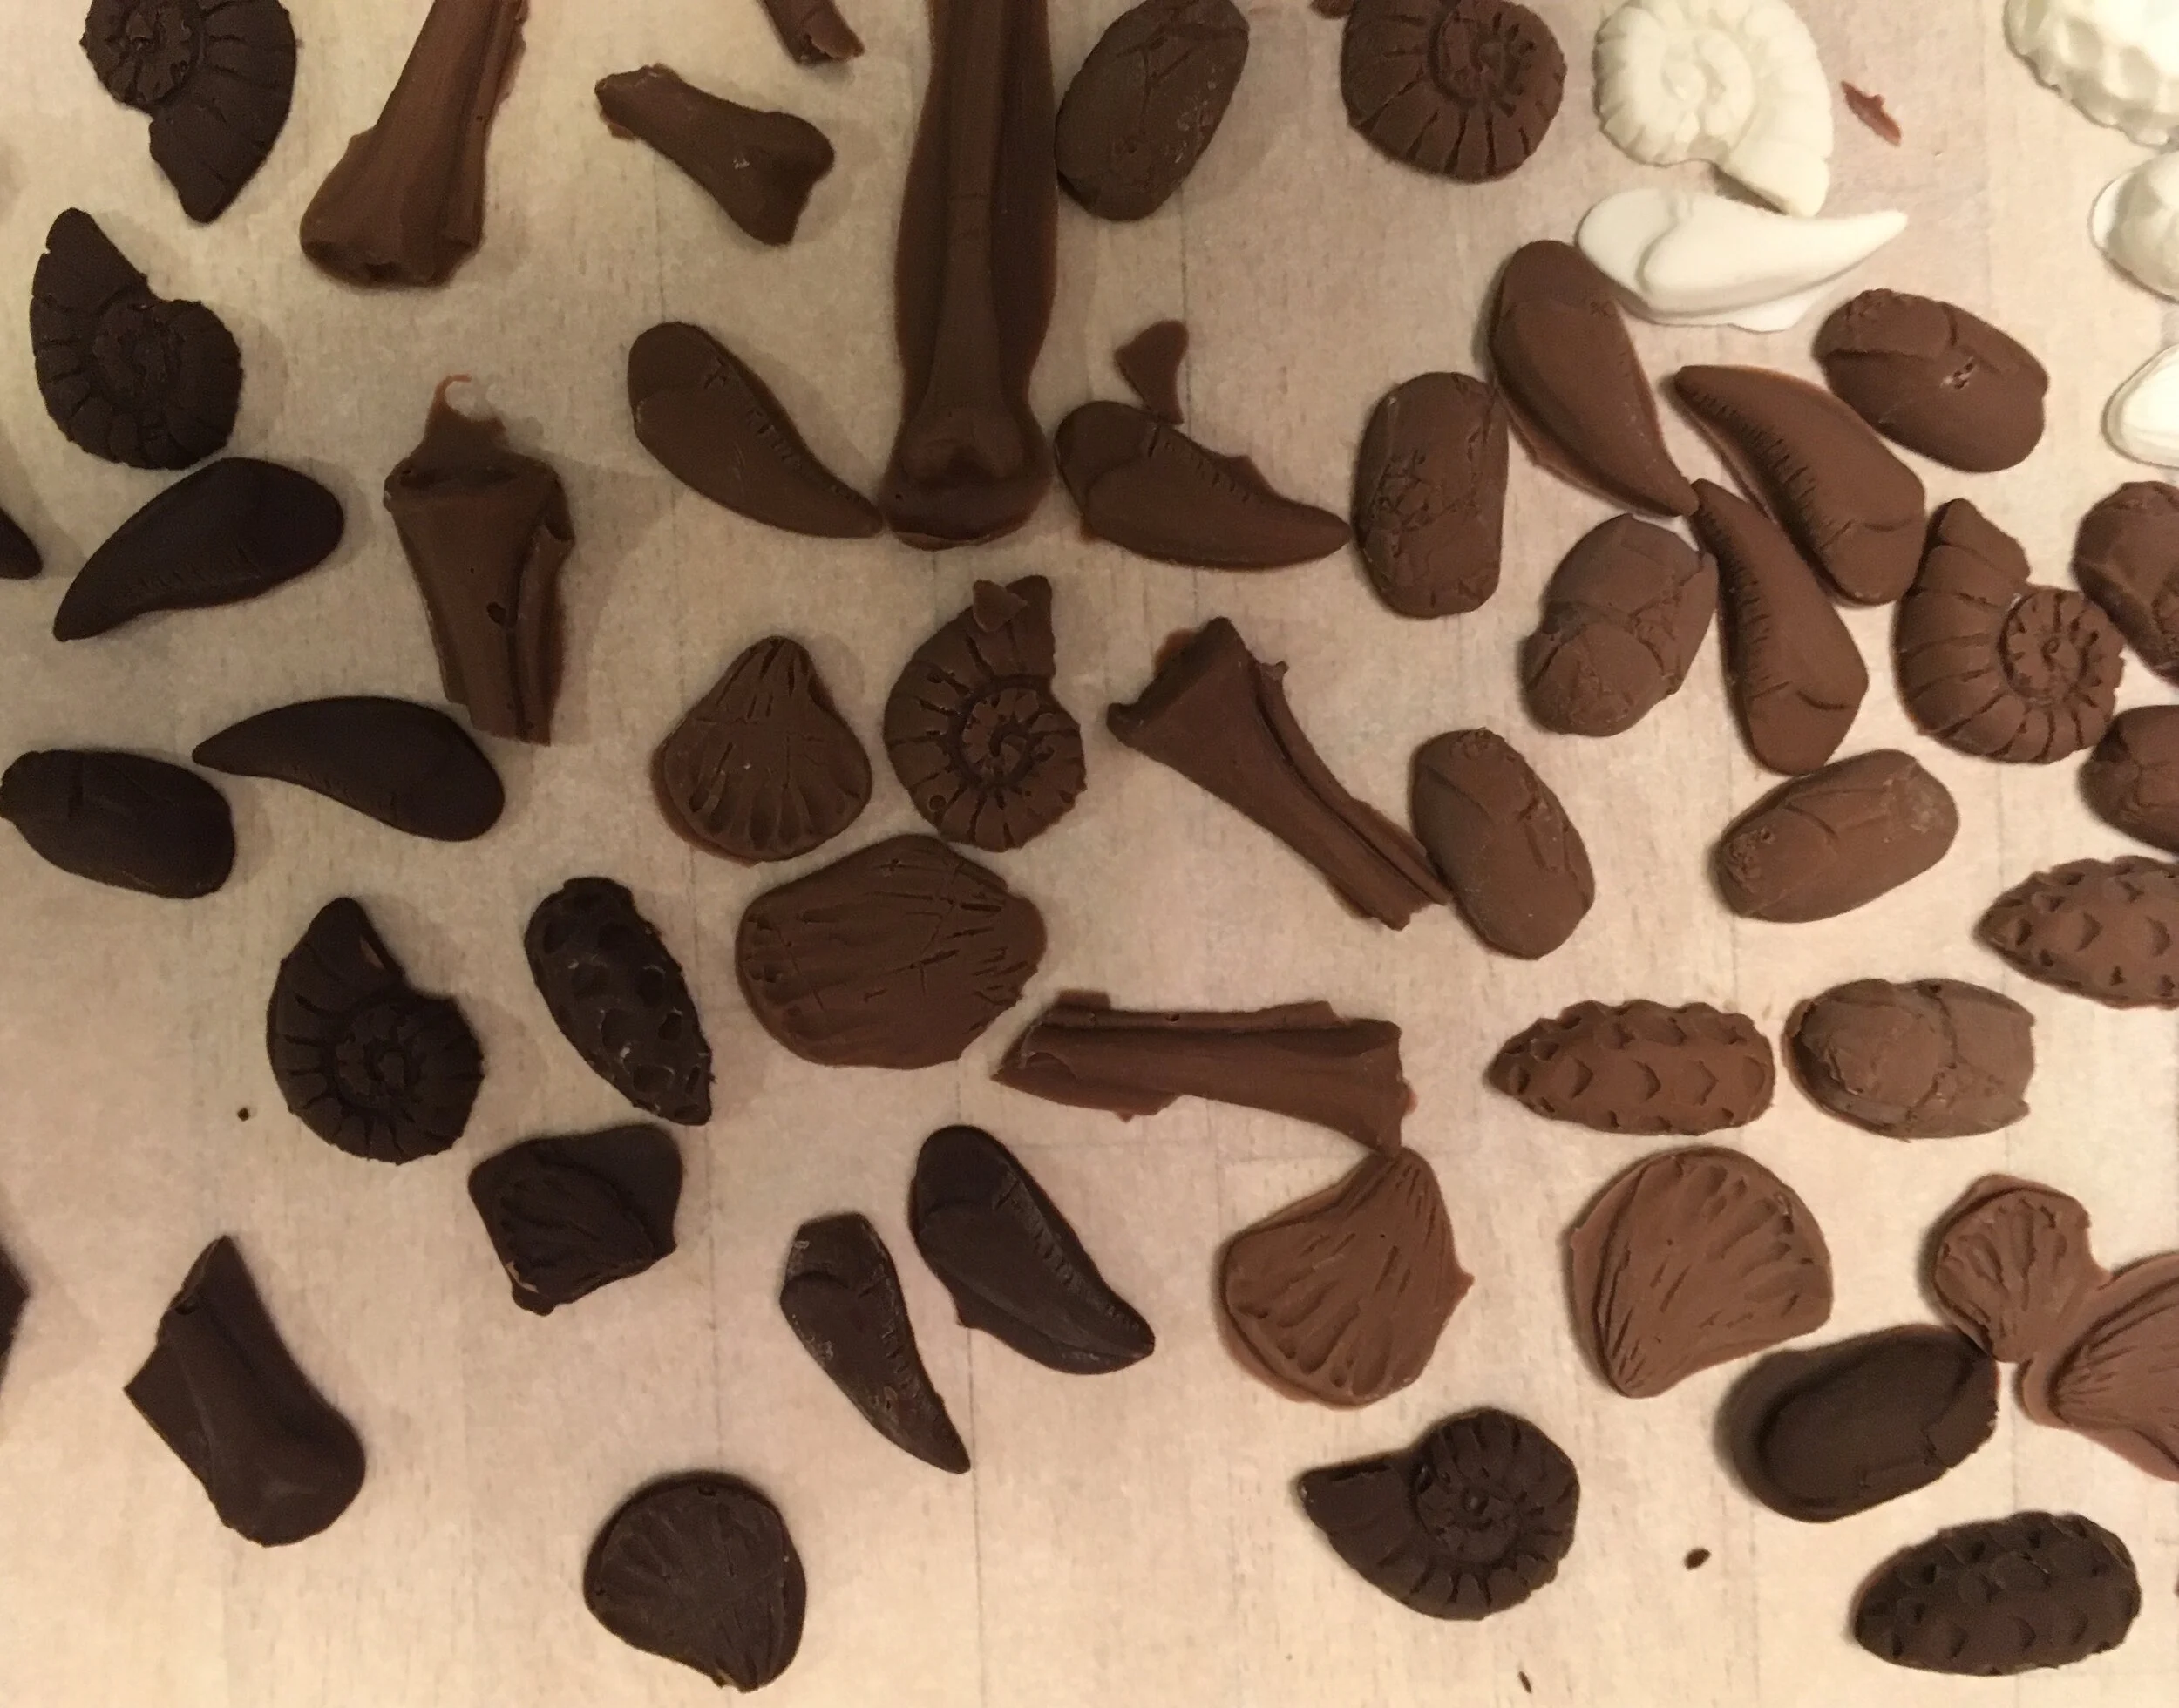
Inside, the cake flavors are vanilla, orange, ginger, and chocolate in alternating layers to suggest different strata of dirt. We wanted people to be able to have an archeological experience while eating the cake, so I buried chocolate fossils inside each layer. I made custom molds for the fossils, based on sculptures that I did representing various fossils that would have been common in each of the cake’s eras. With these molds, I cast the fossils in white, milk, and dark chocolate and then embedded them in the cake layers as I was stacking this cake. Then as the guests ate the cake, they got to excavate their chocolate fossils.
The drive from the Air BNB was about half an hour and not over the greatest roads. I enlisted the bride’s brother to help me deliver the cake, since he has an SUV with enough space. He is a former Army Ranger, yet apparently still found the pressure of the drive terrifying. I don’t blame him. I hate driving with cakes. We arrived at the venue without incident, though.
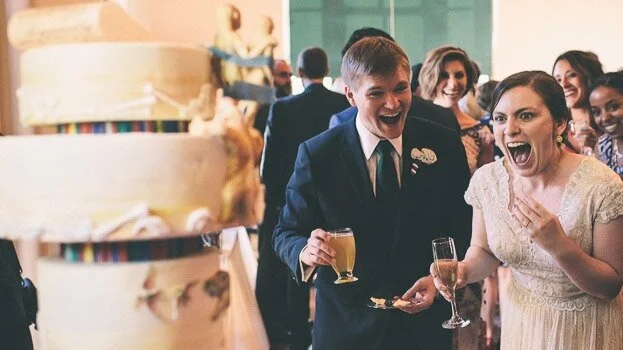
One of the groom’s paleontology friends created a museum card to accompany the cake, explaining all the different fossils, inside and out. He even gave a little introductory speech before they cut the cake. And apparently some of the groom’s paleontology colleagues even said my T-Rex was one of the best reconstructions they have ever seen in any medium. But, really, this photo is the best part.


Banshee Cake
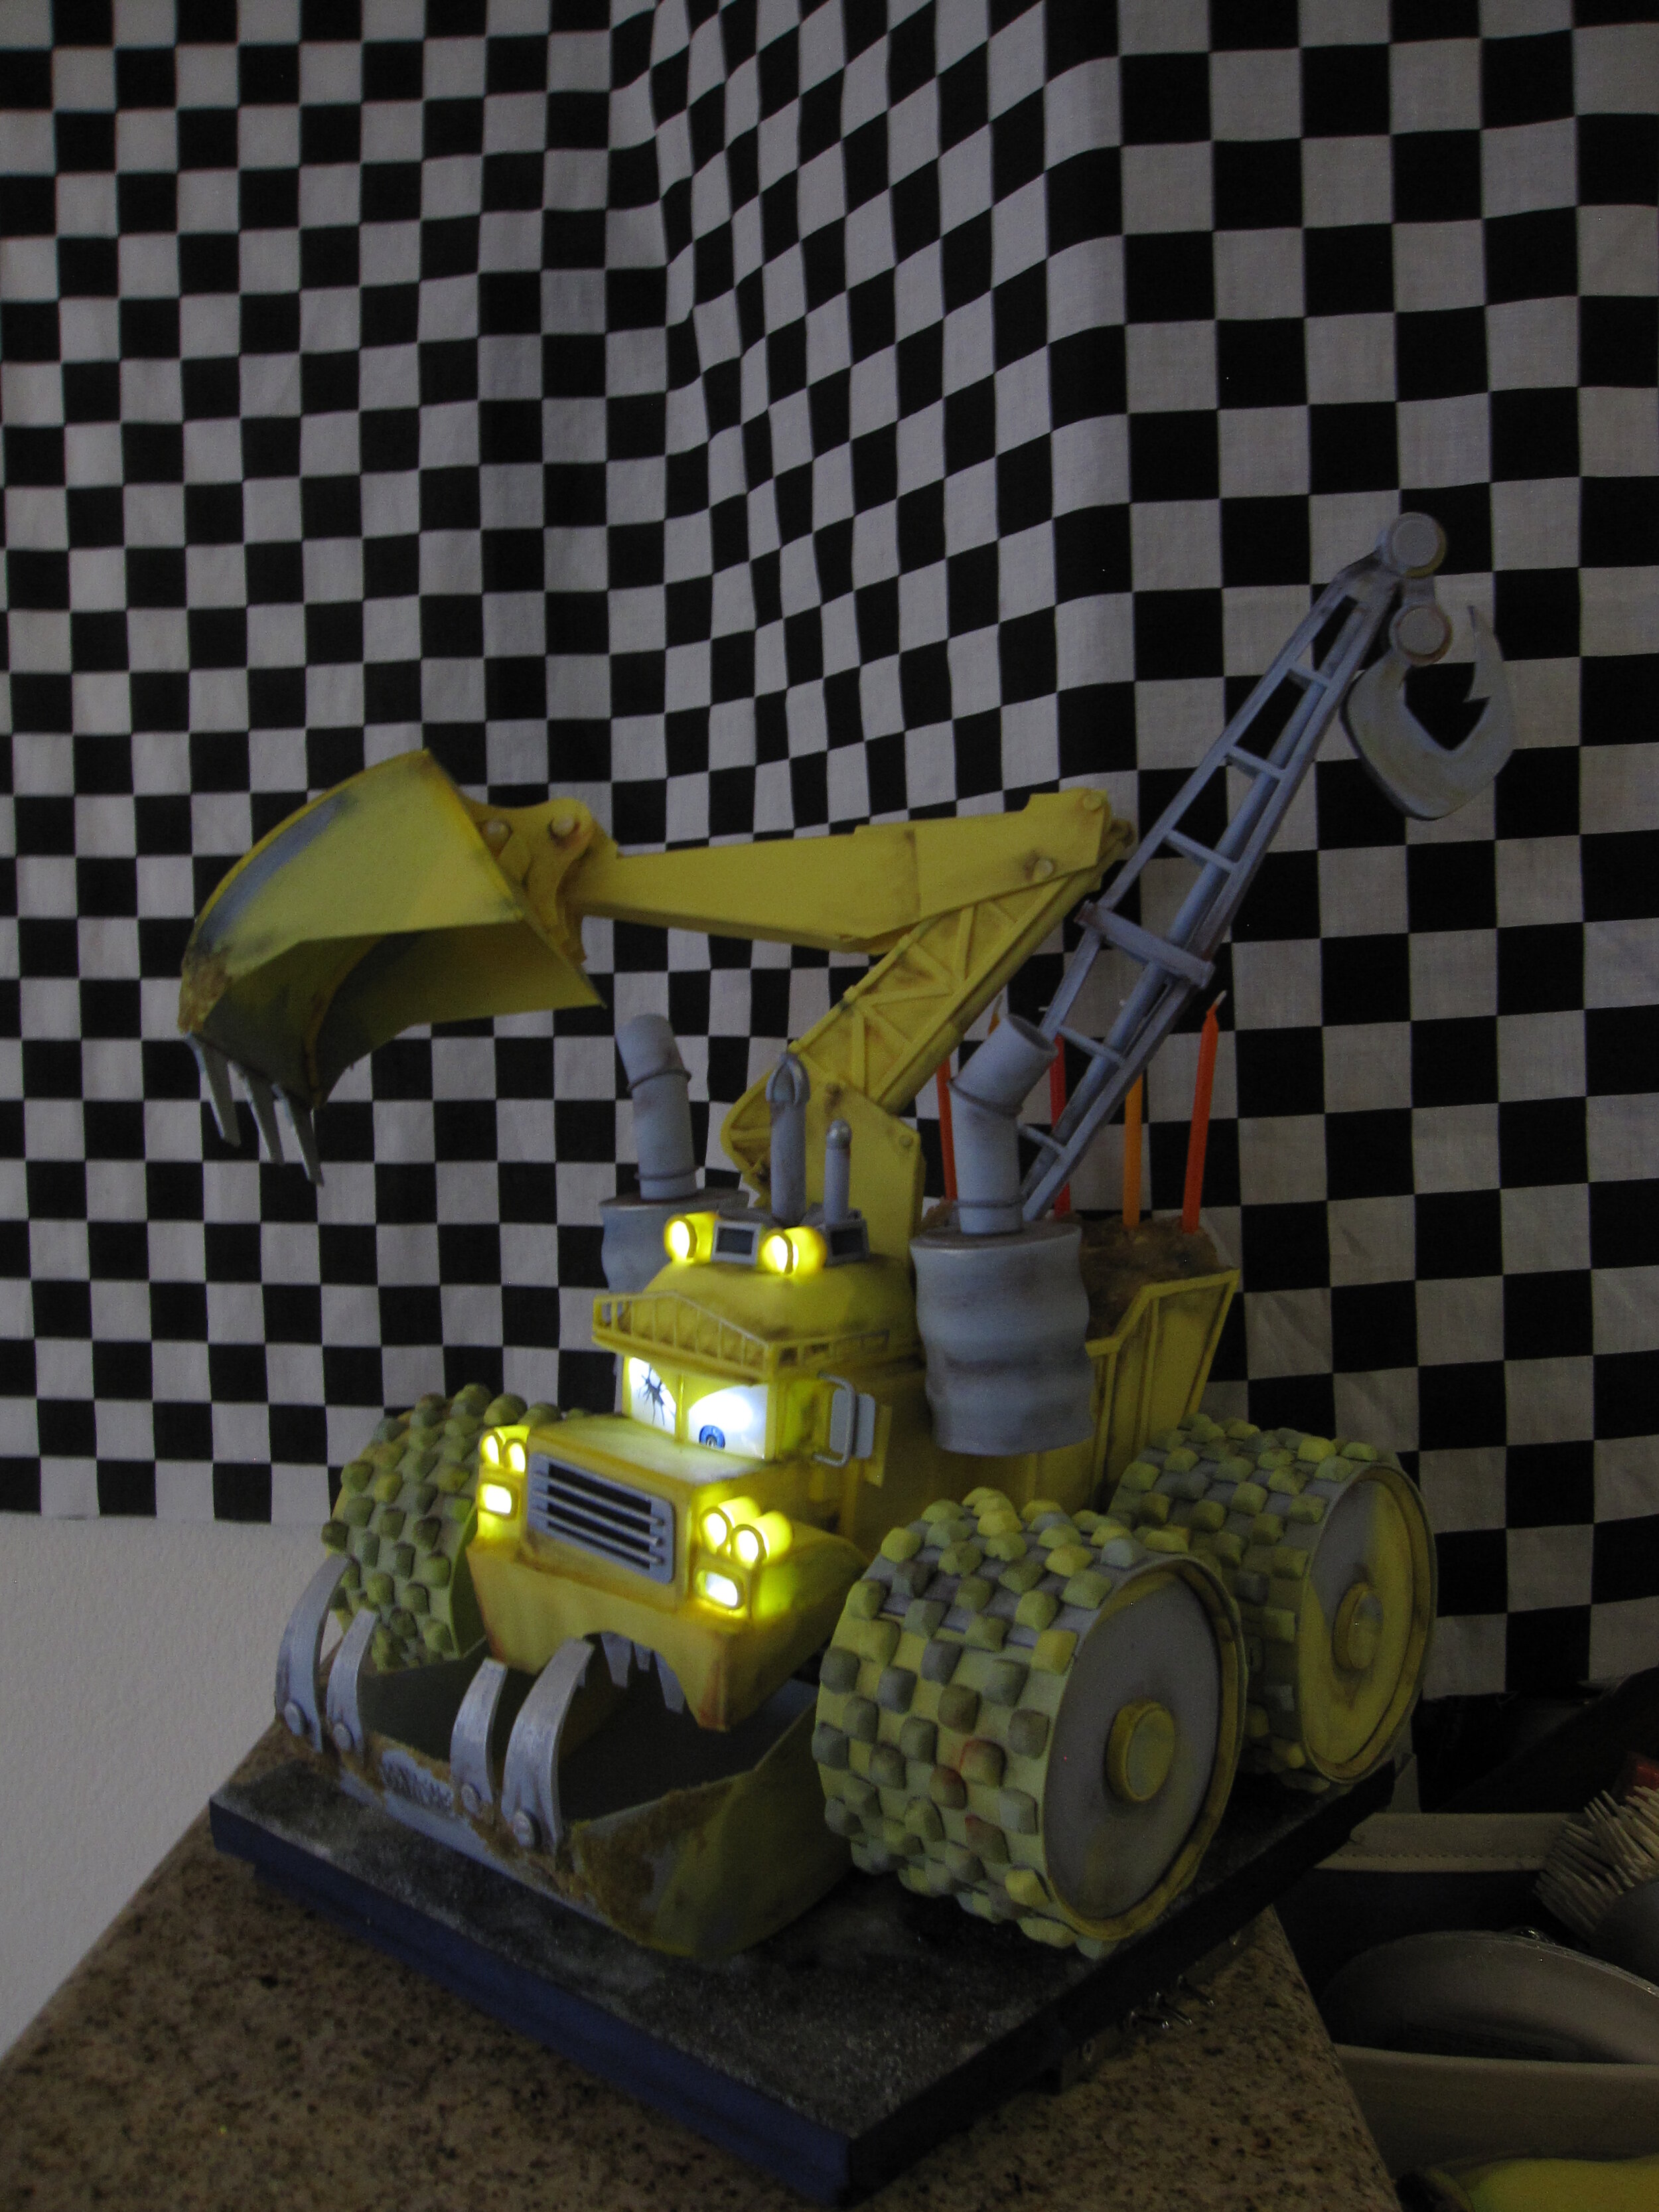
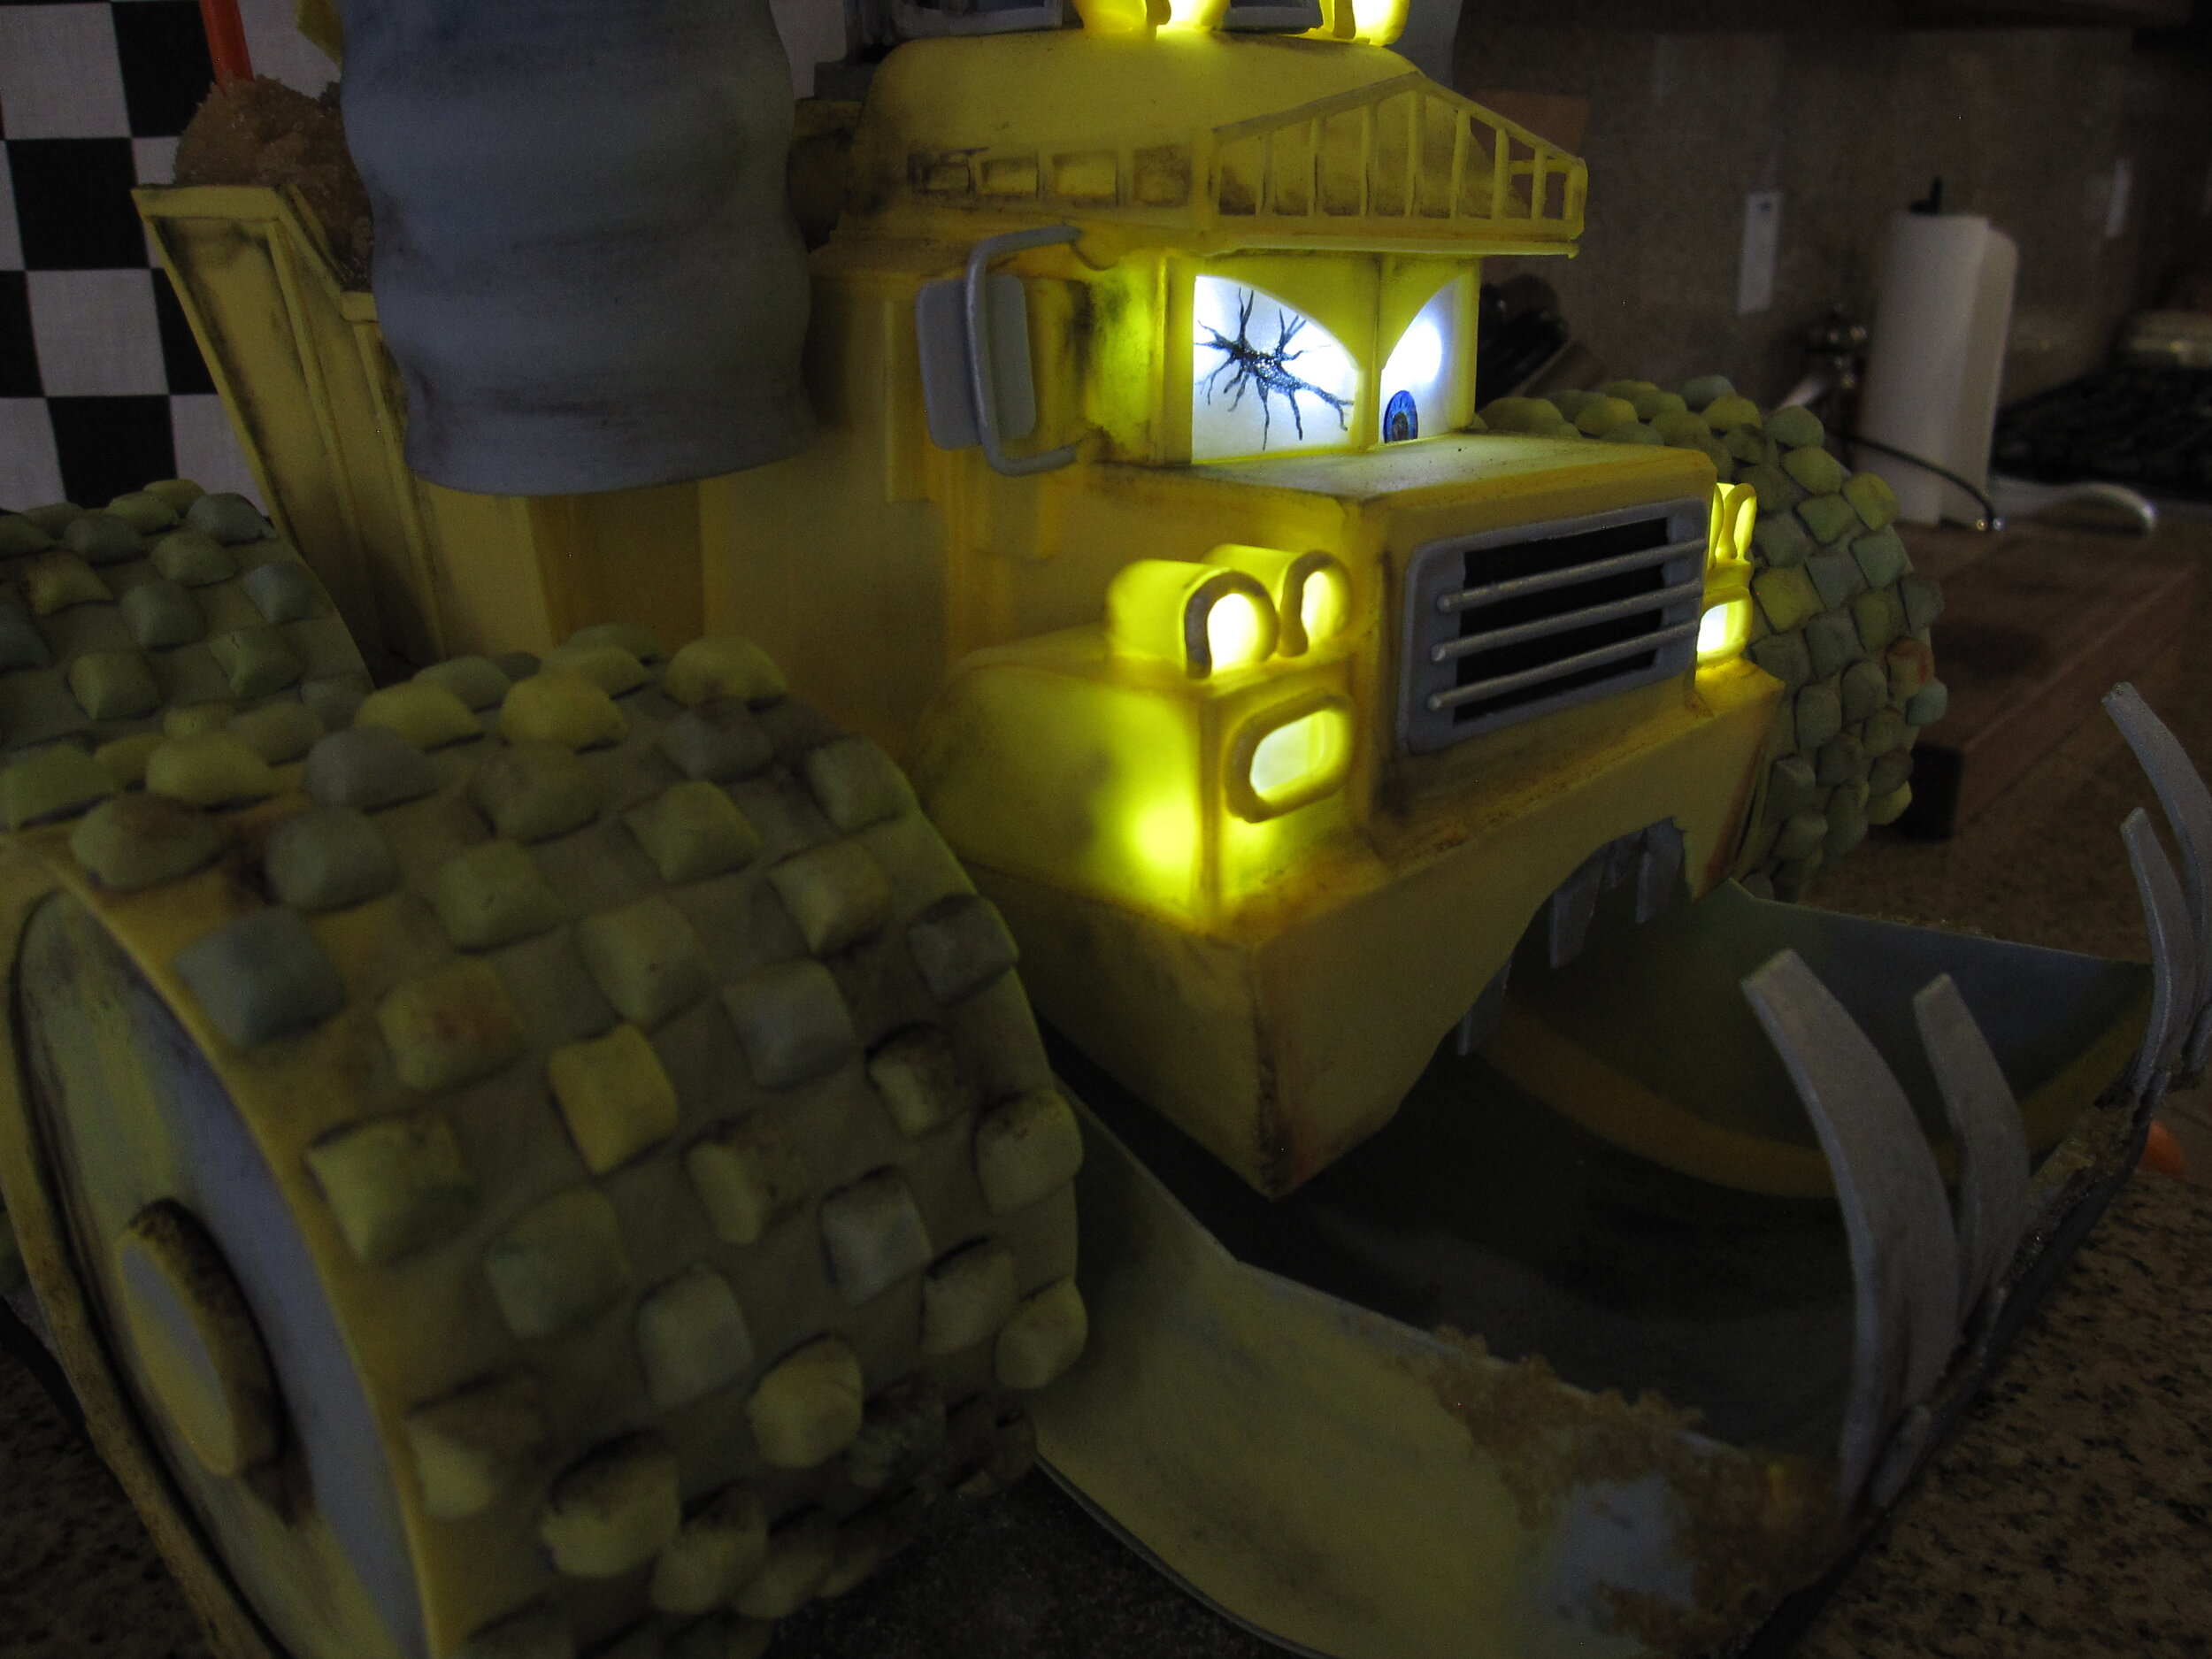
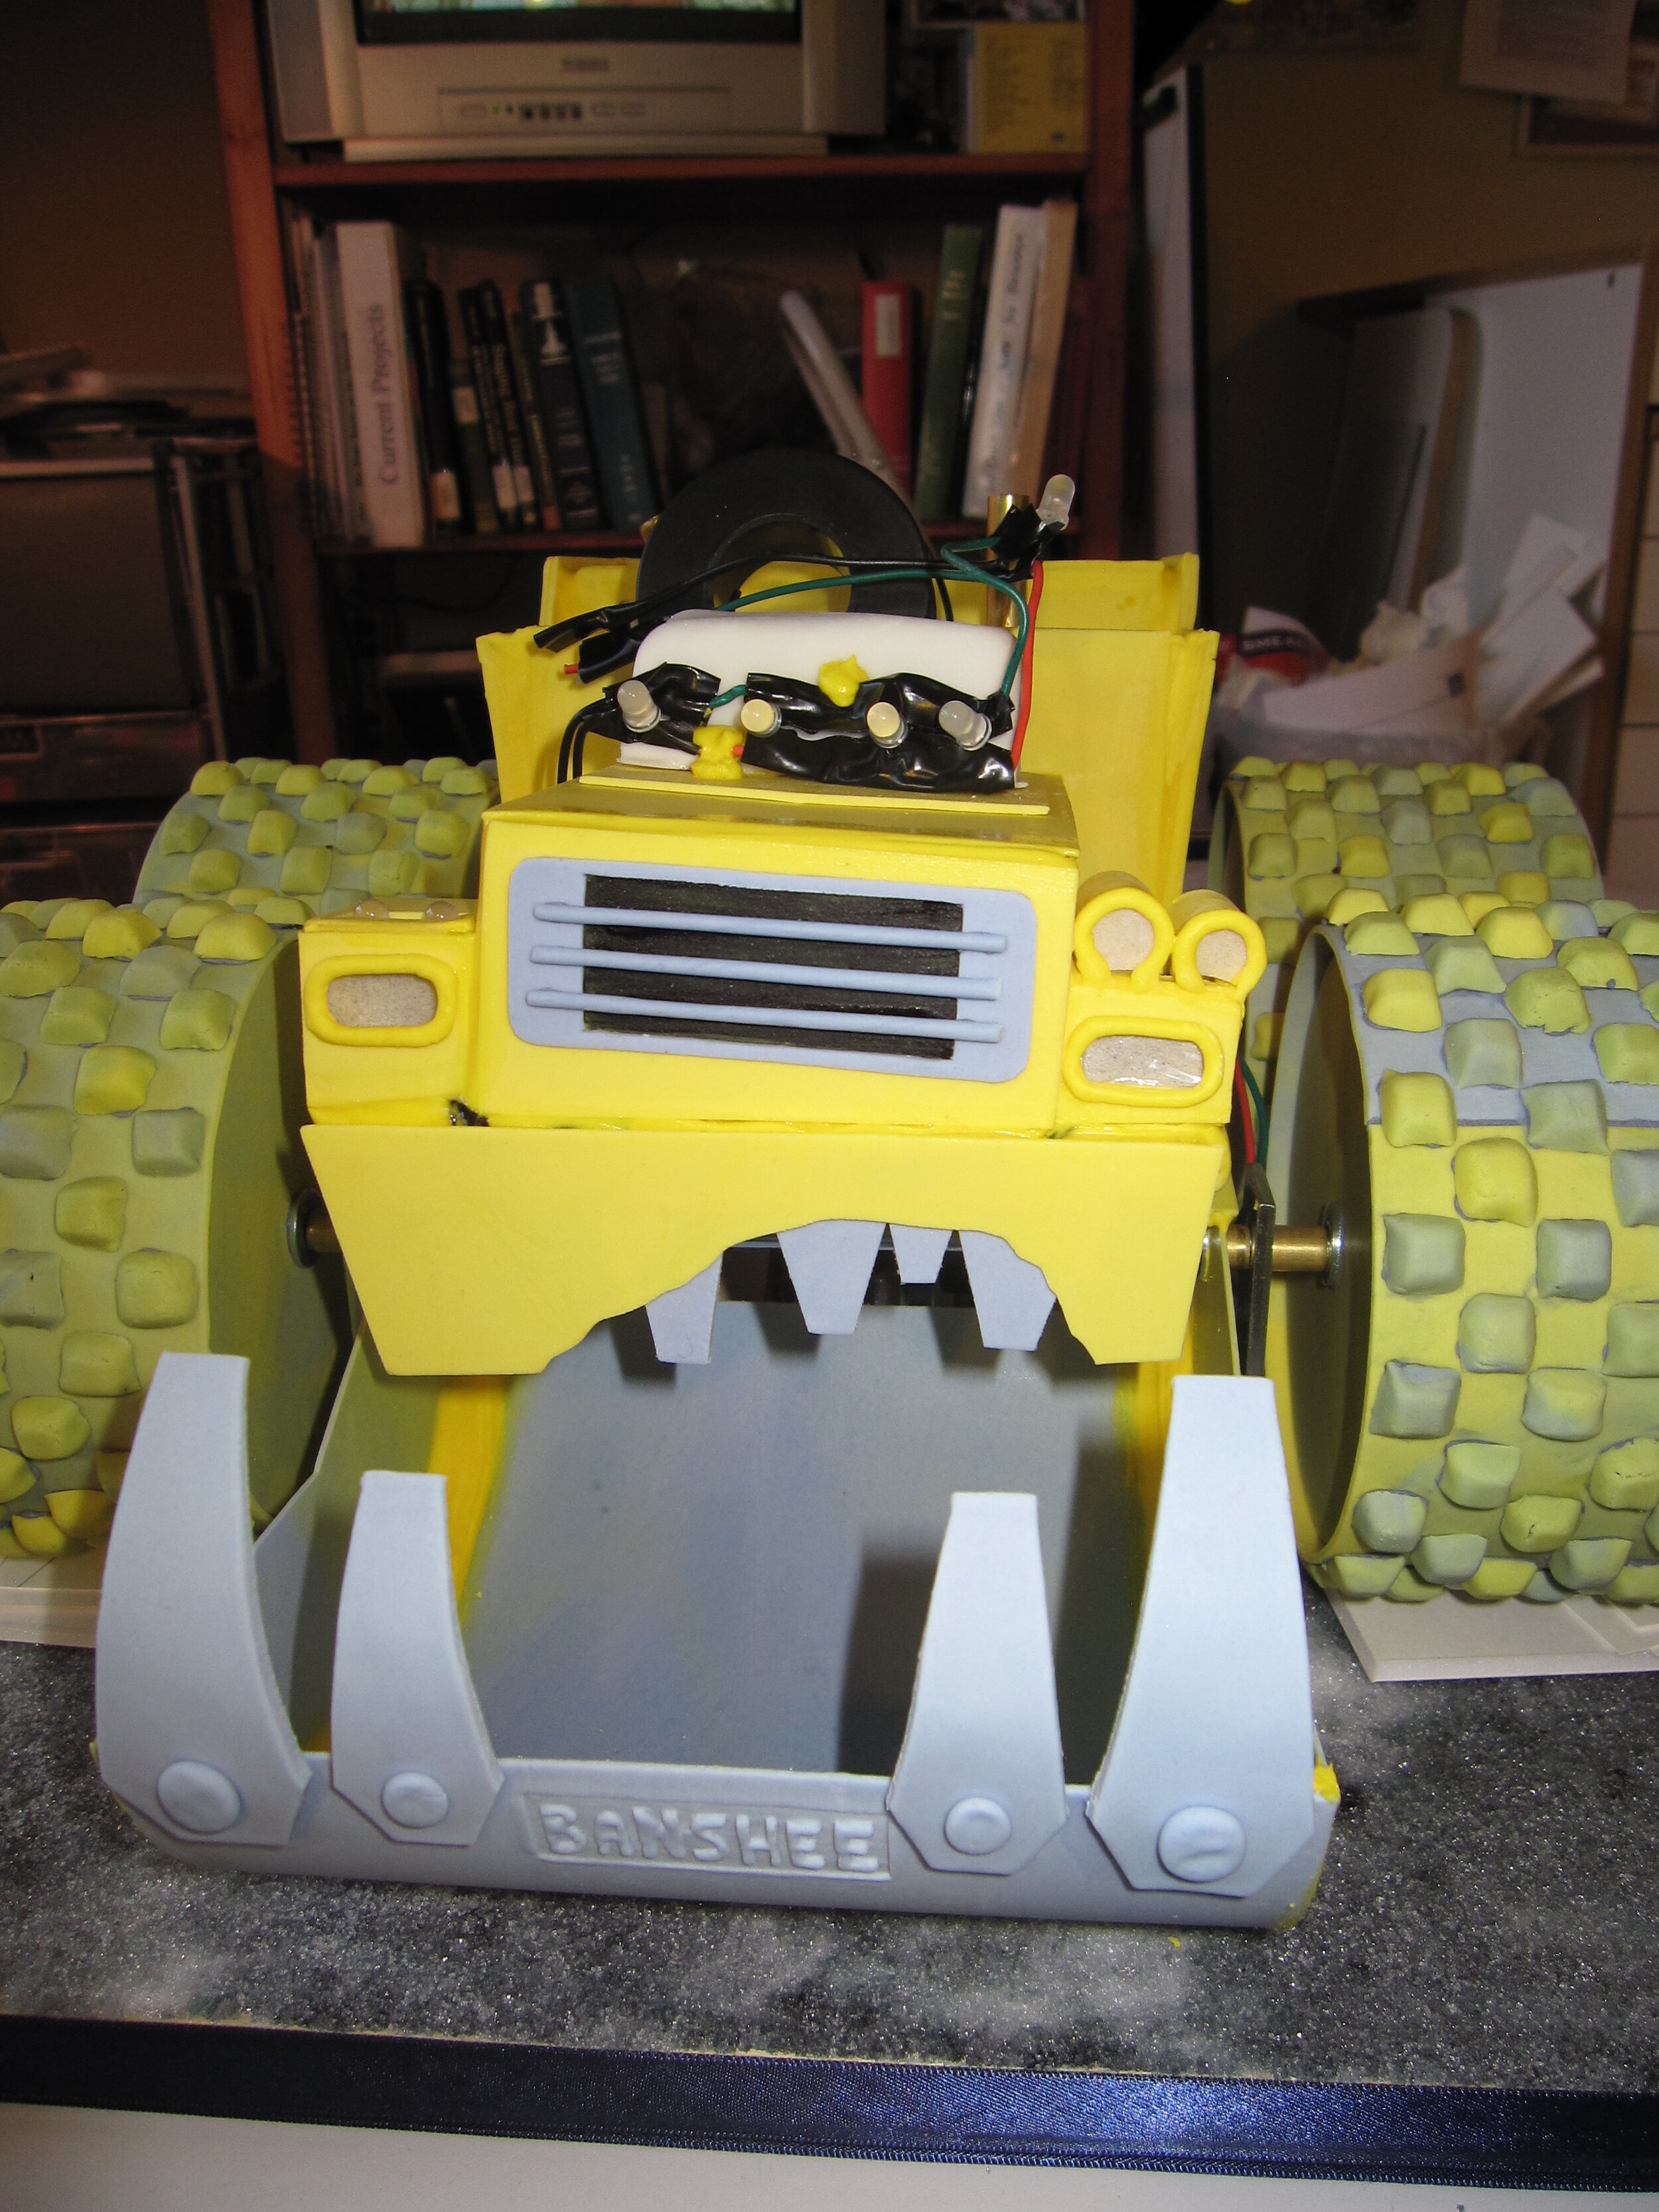
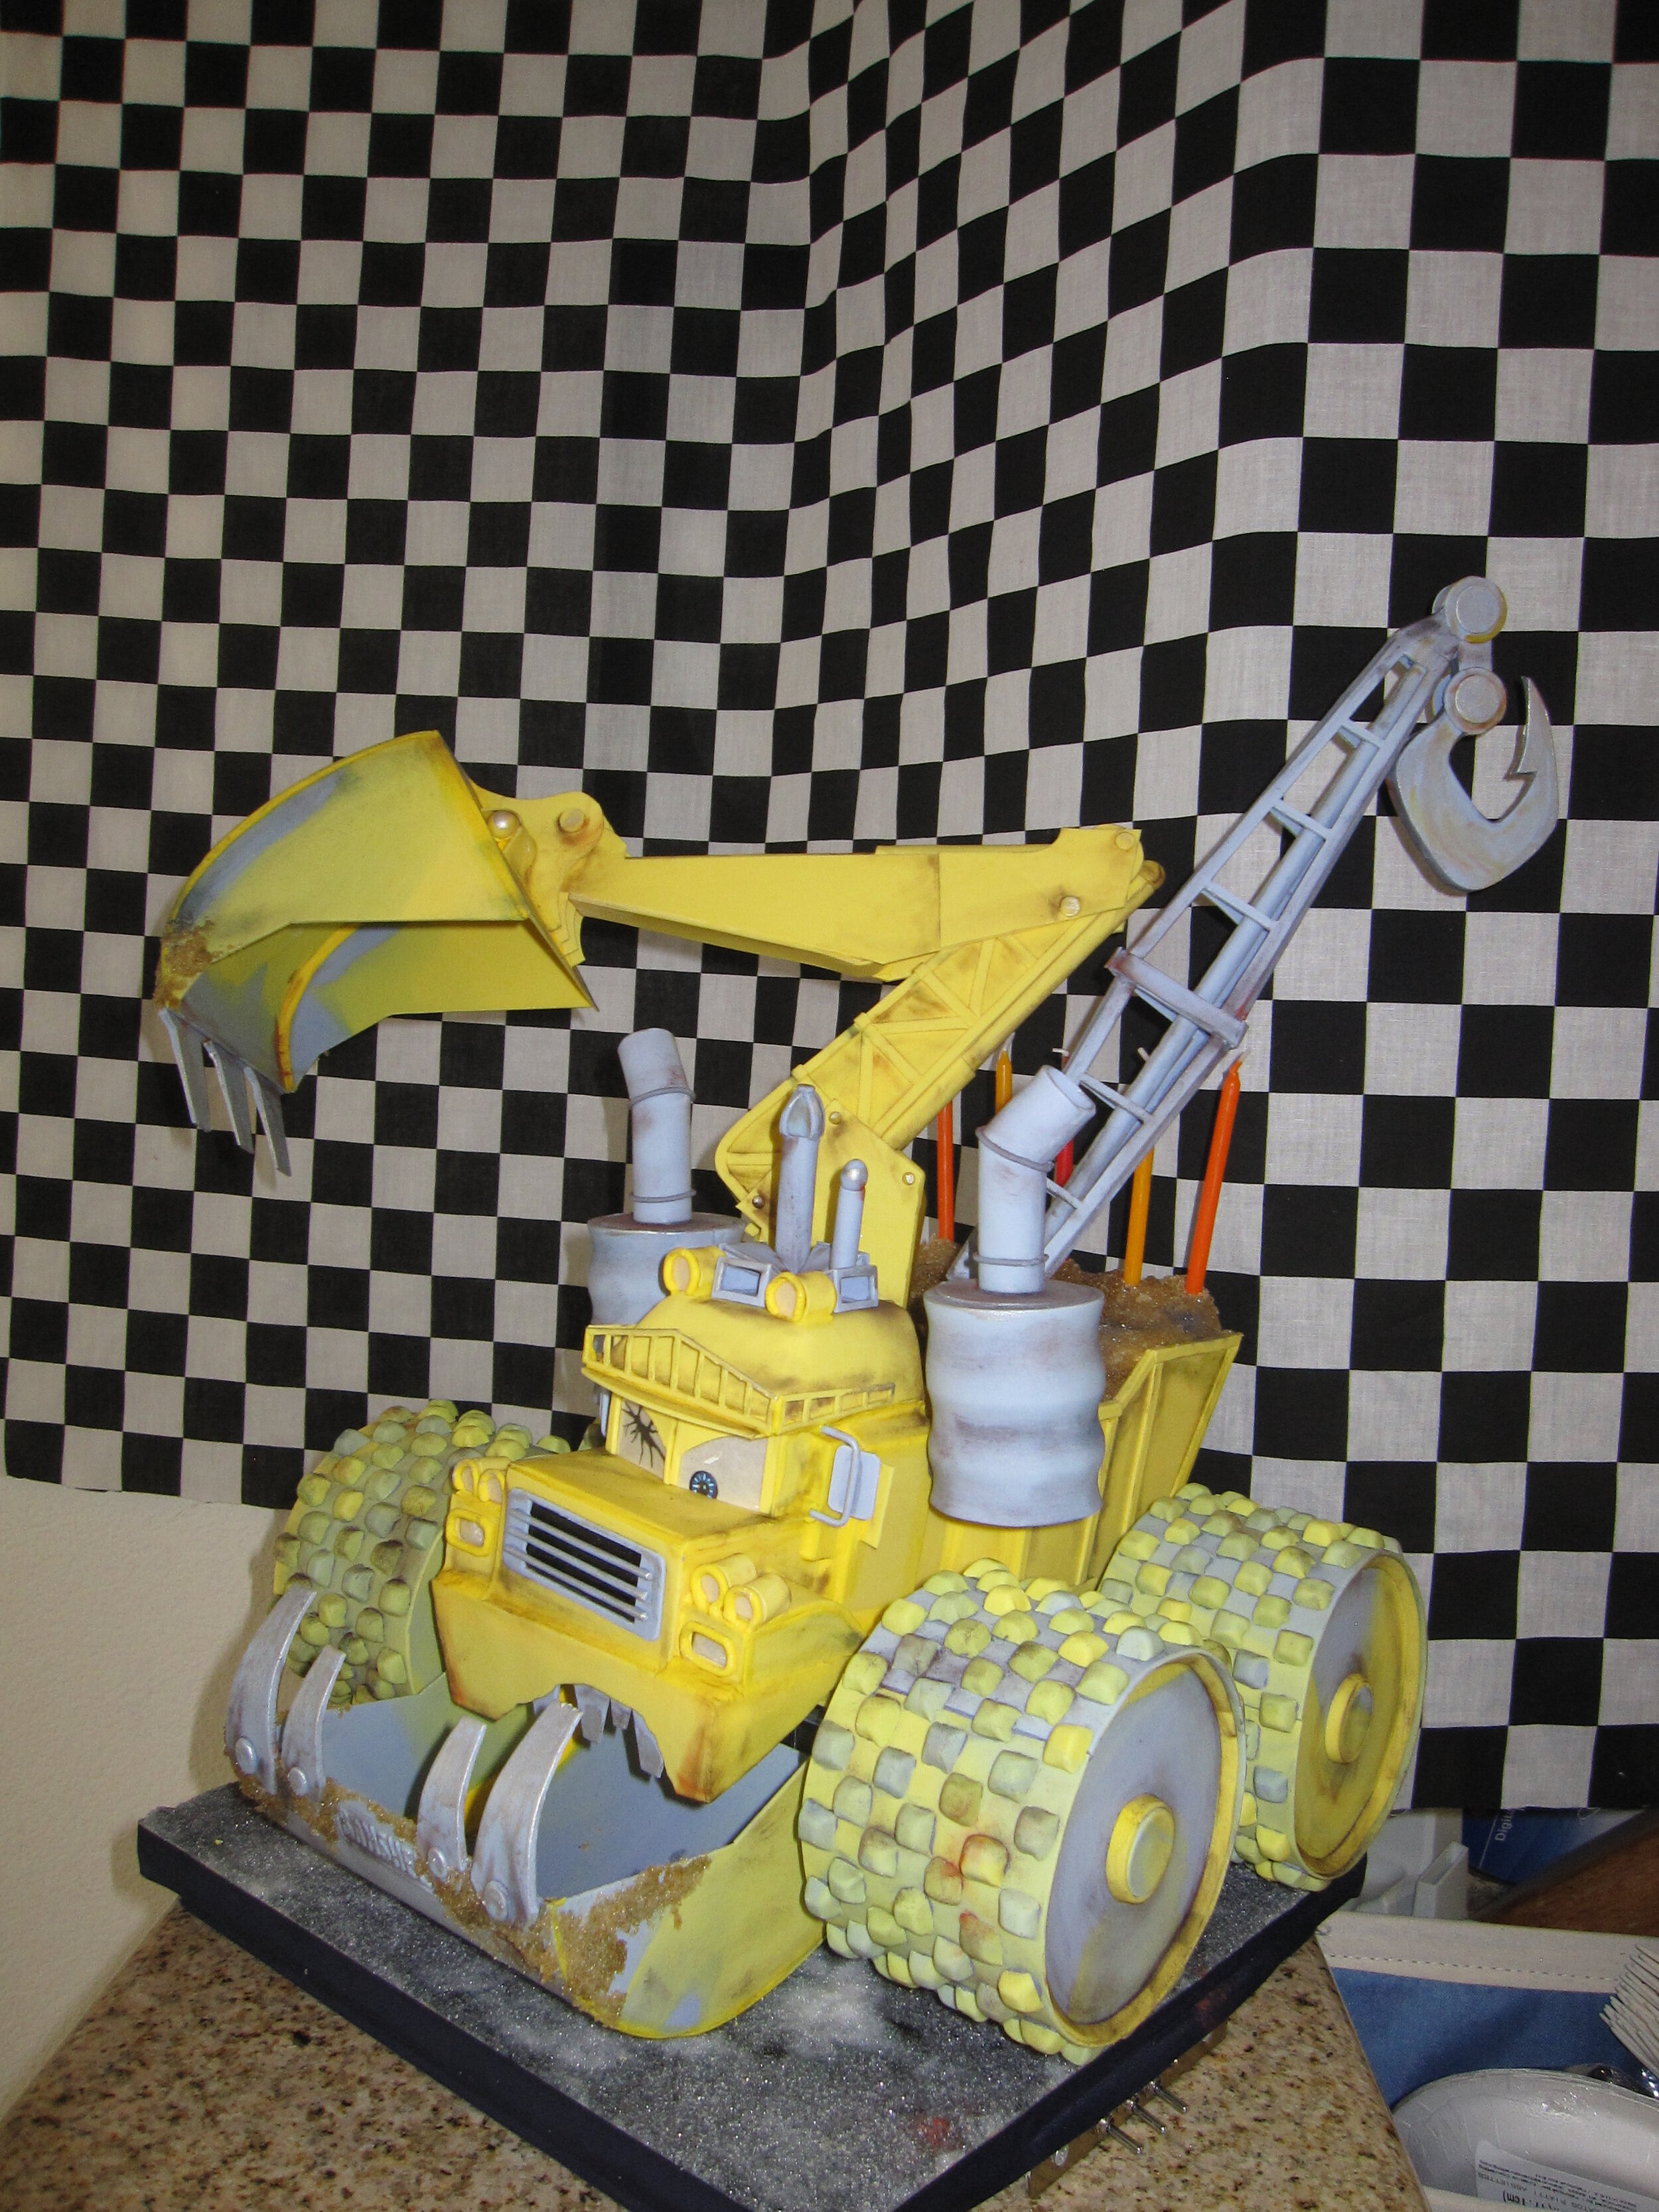
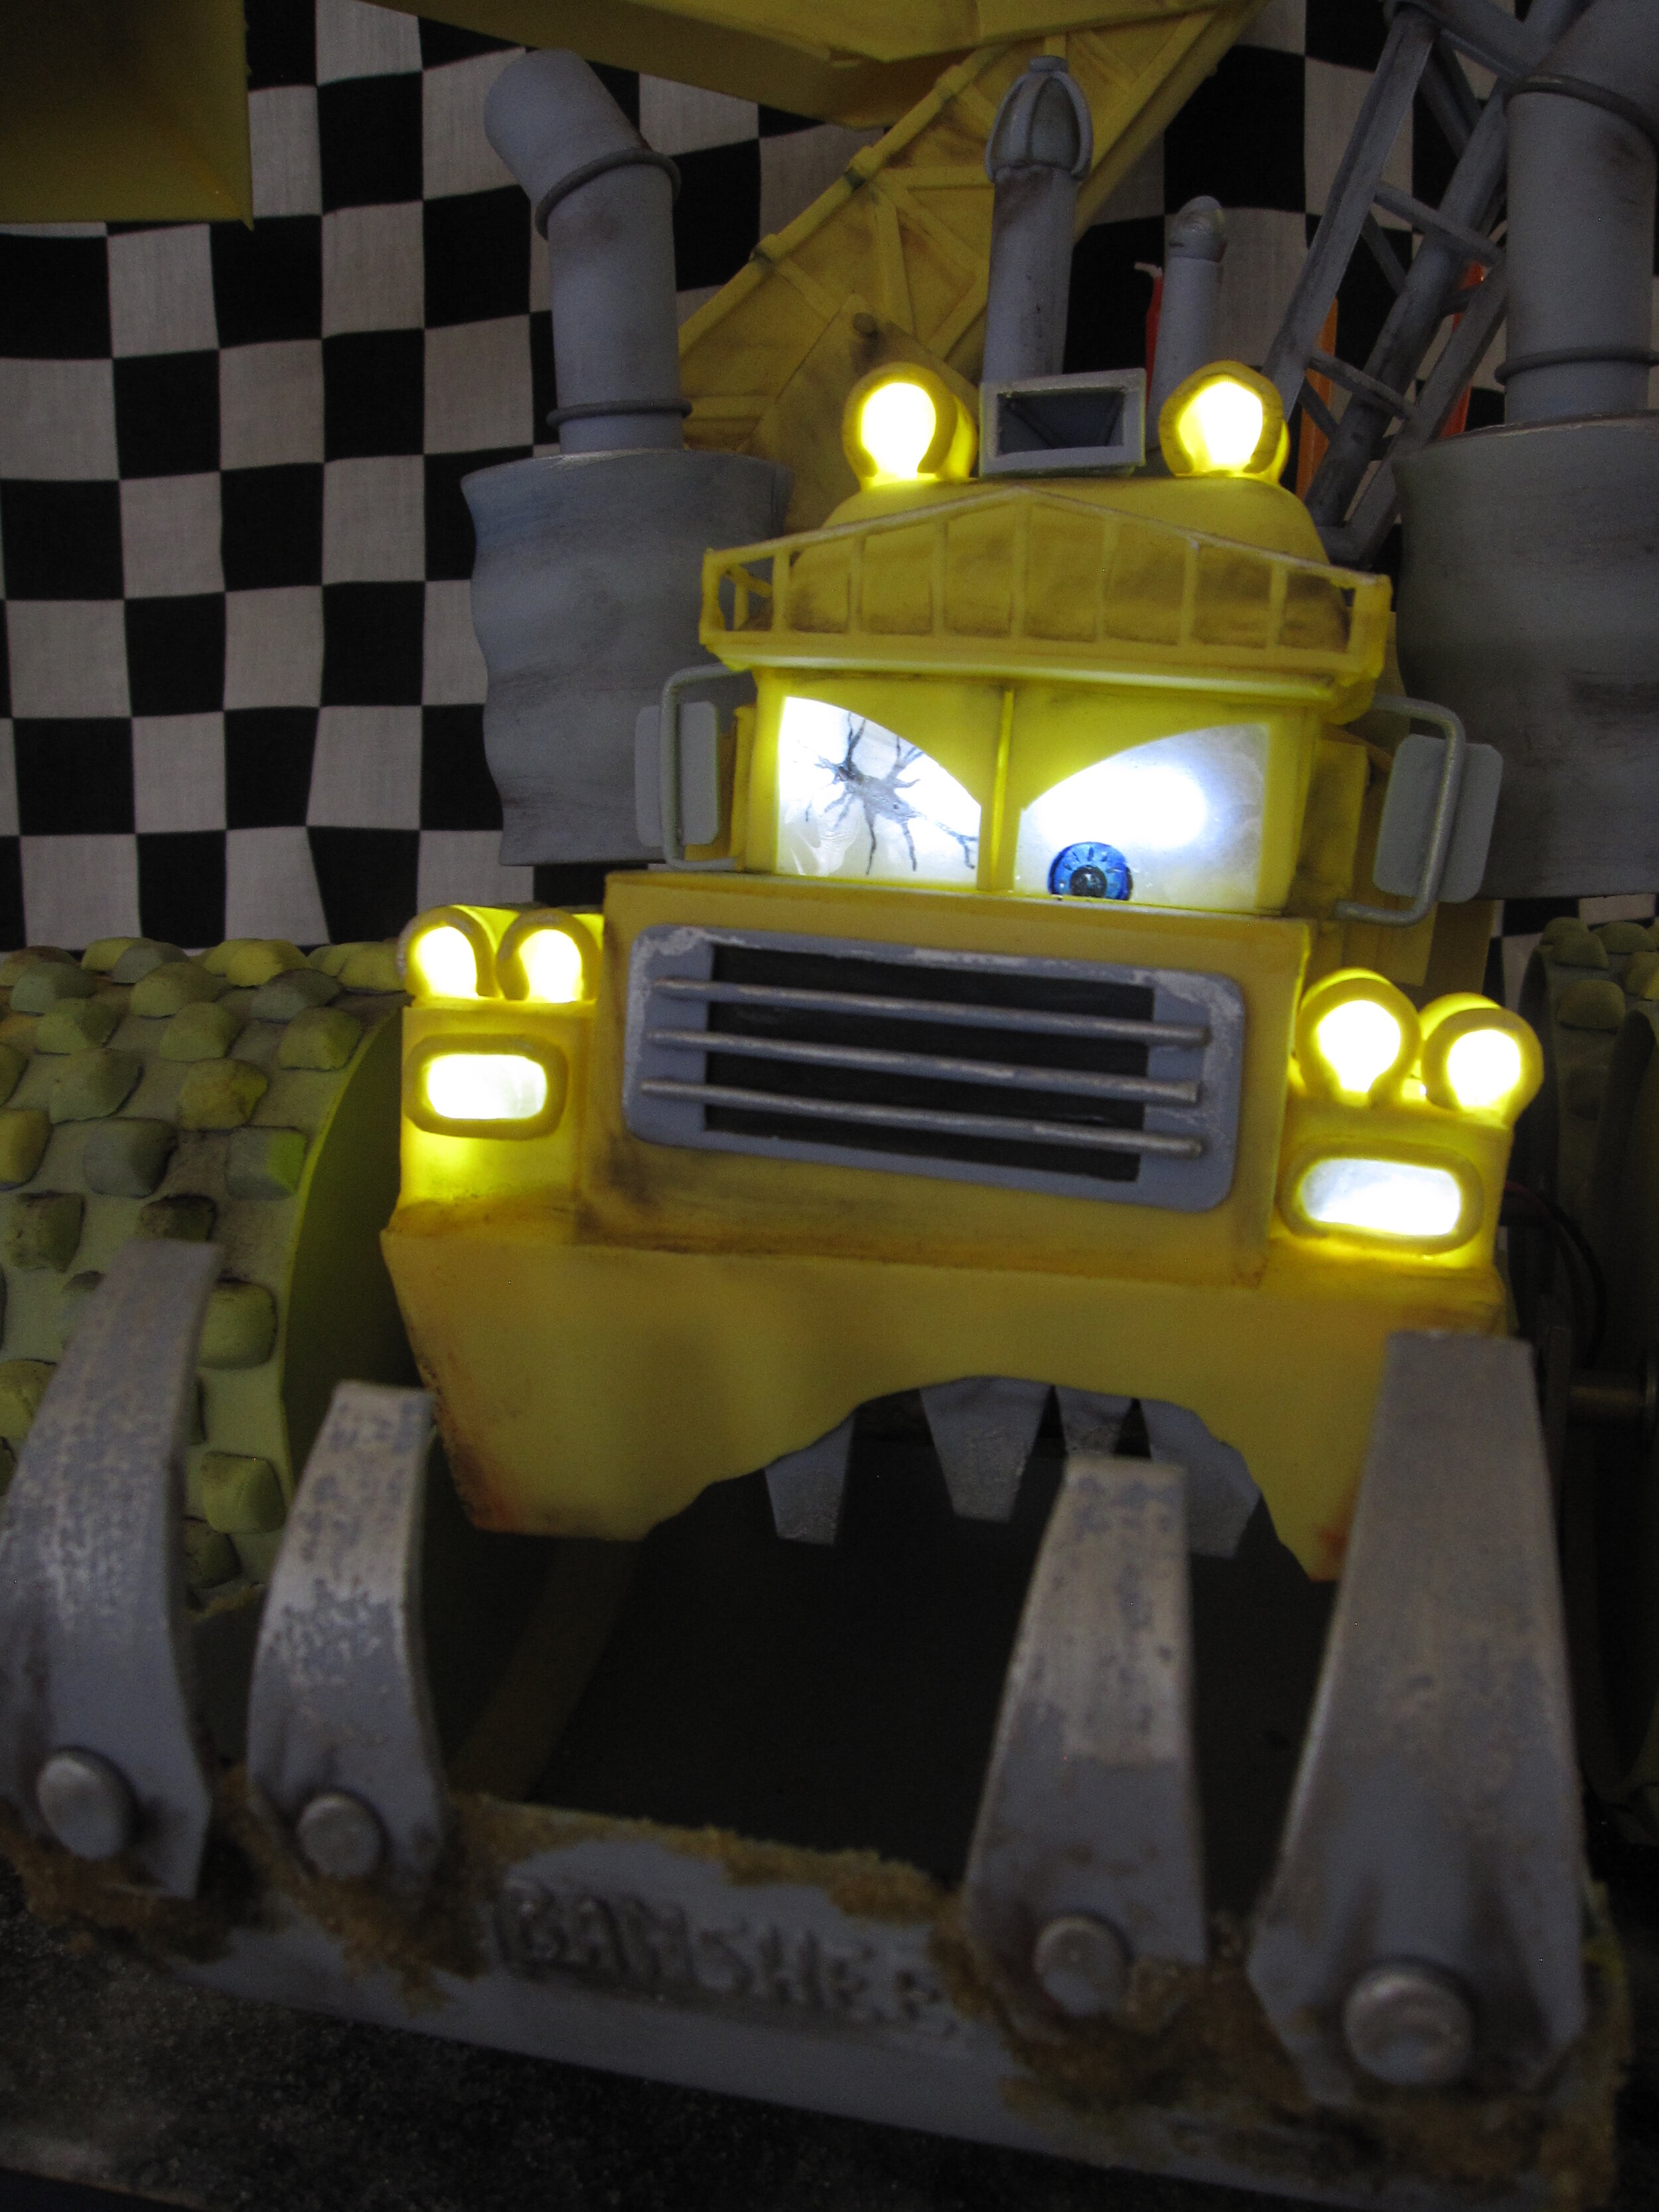
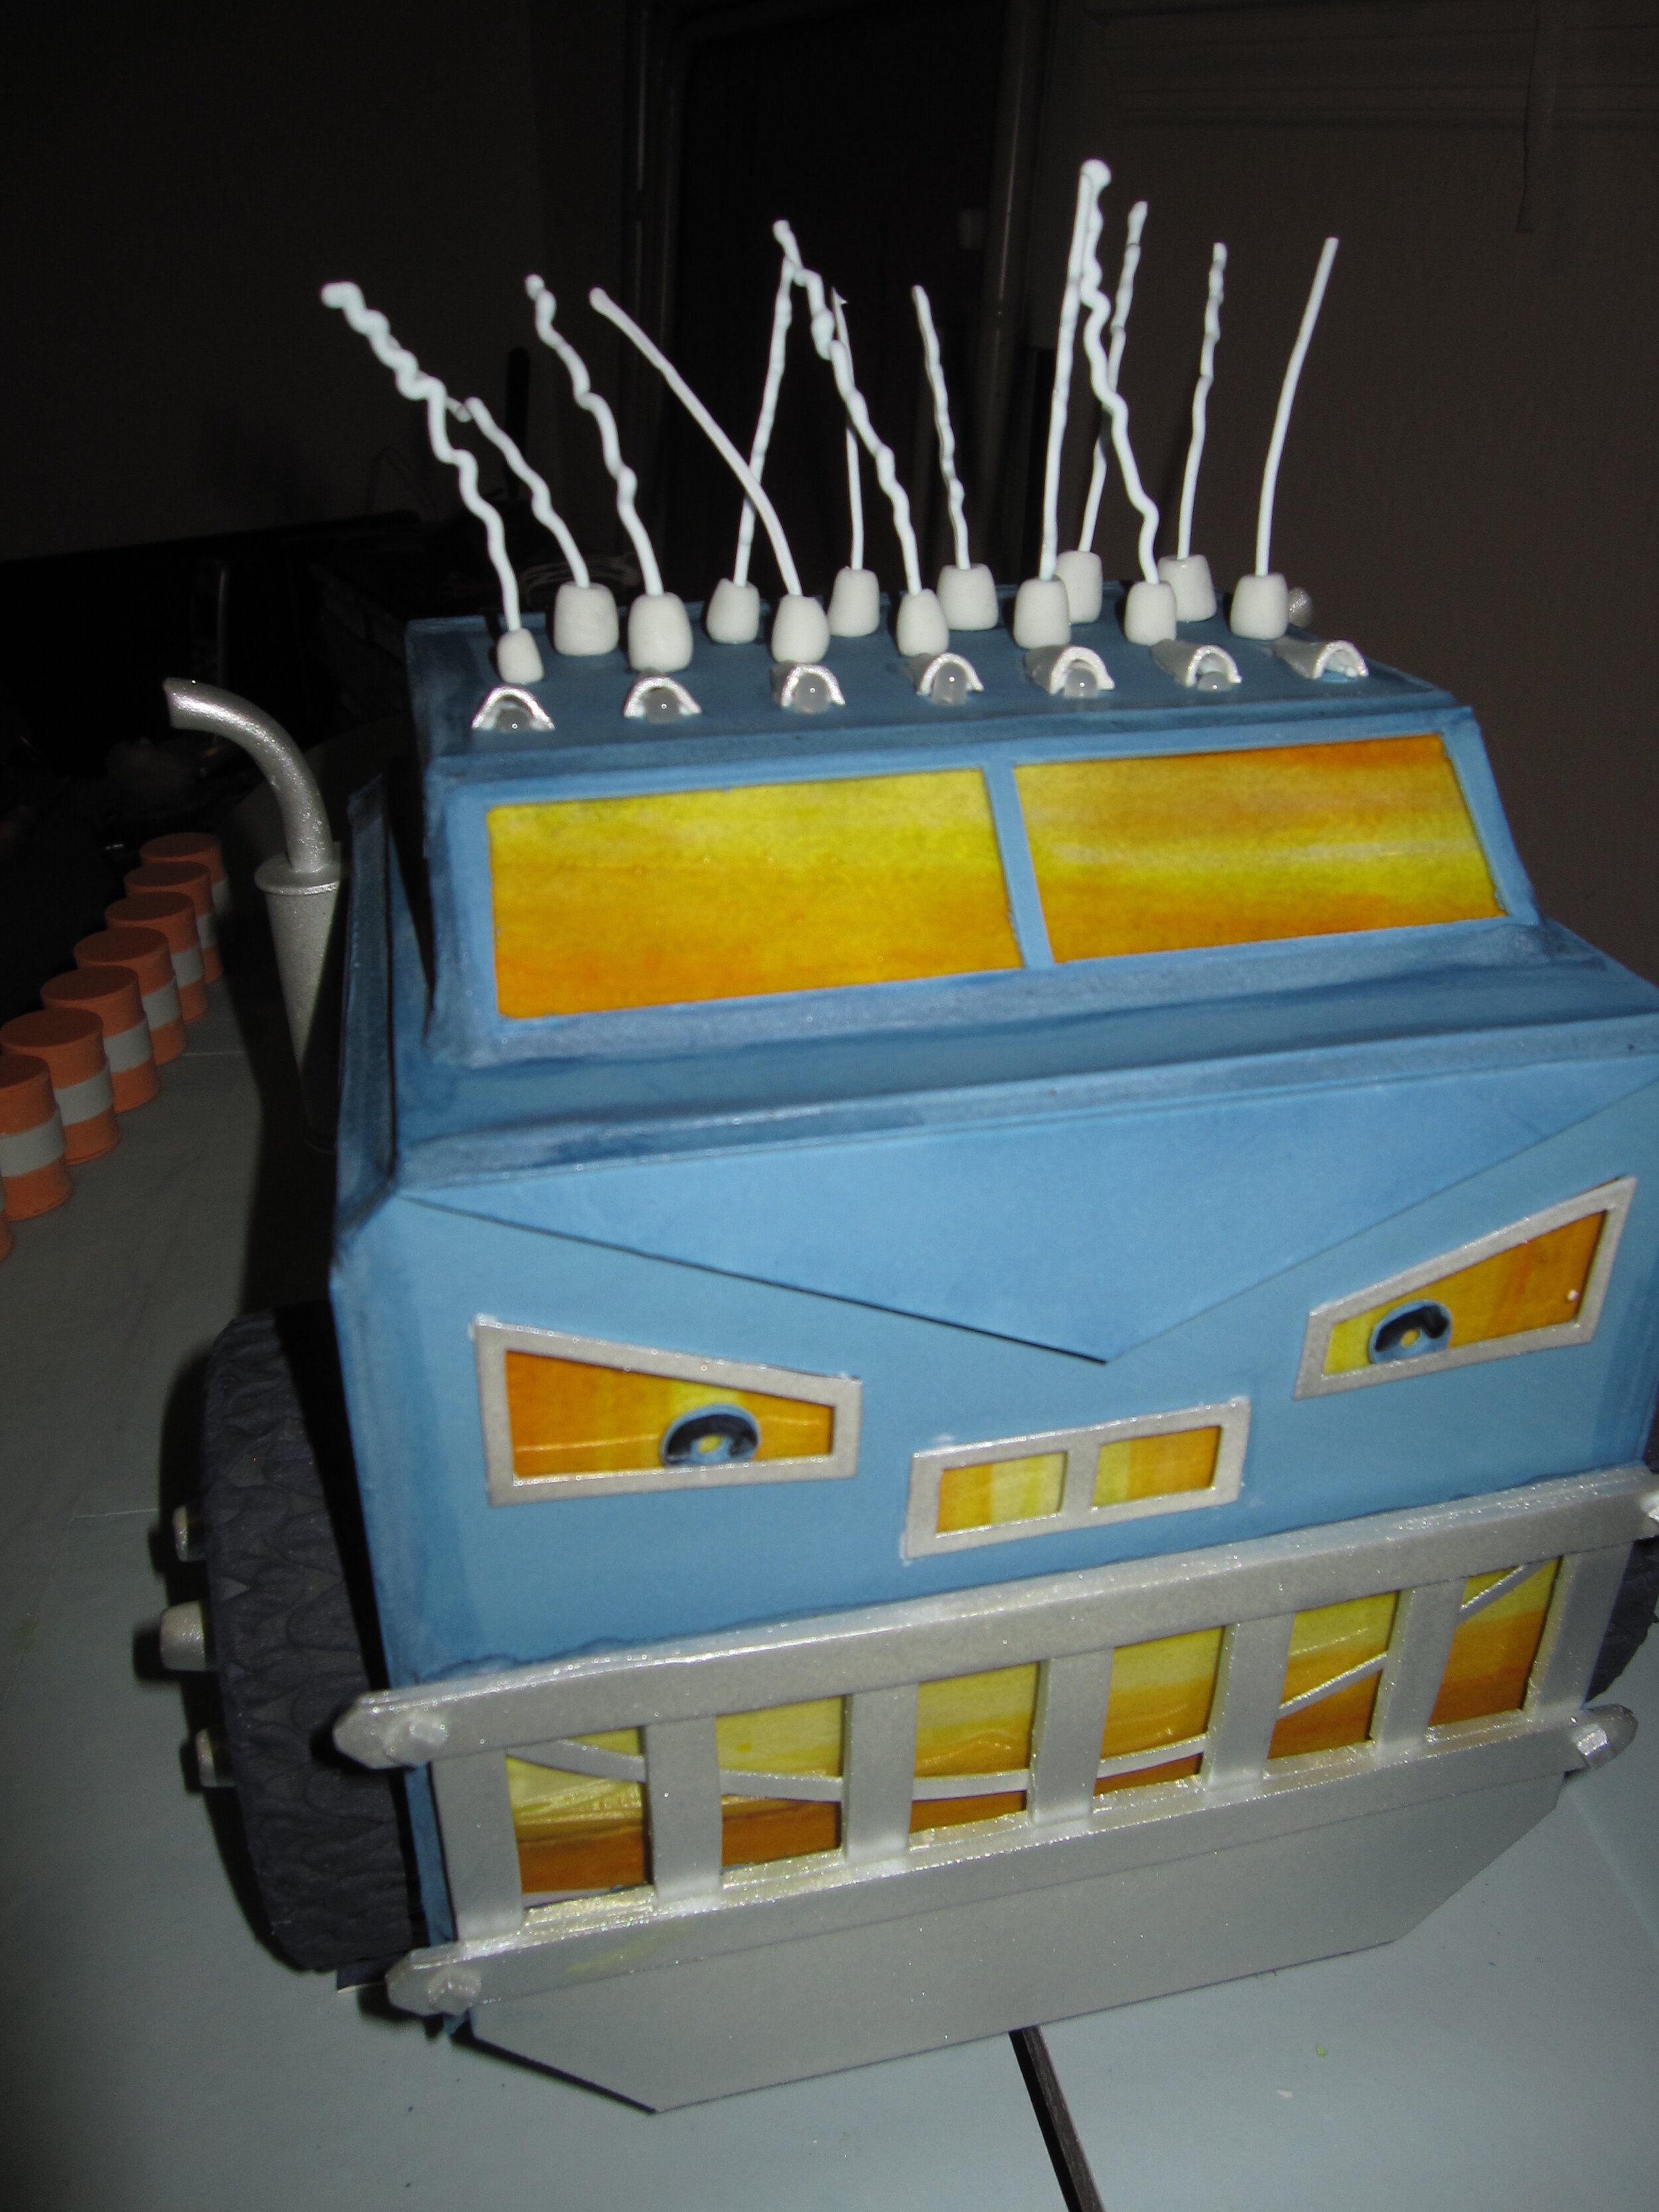
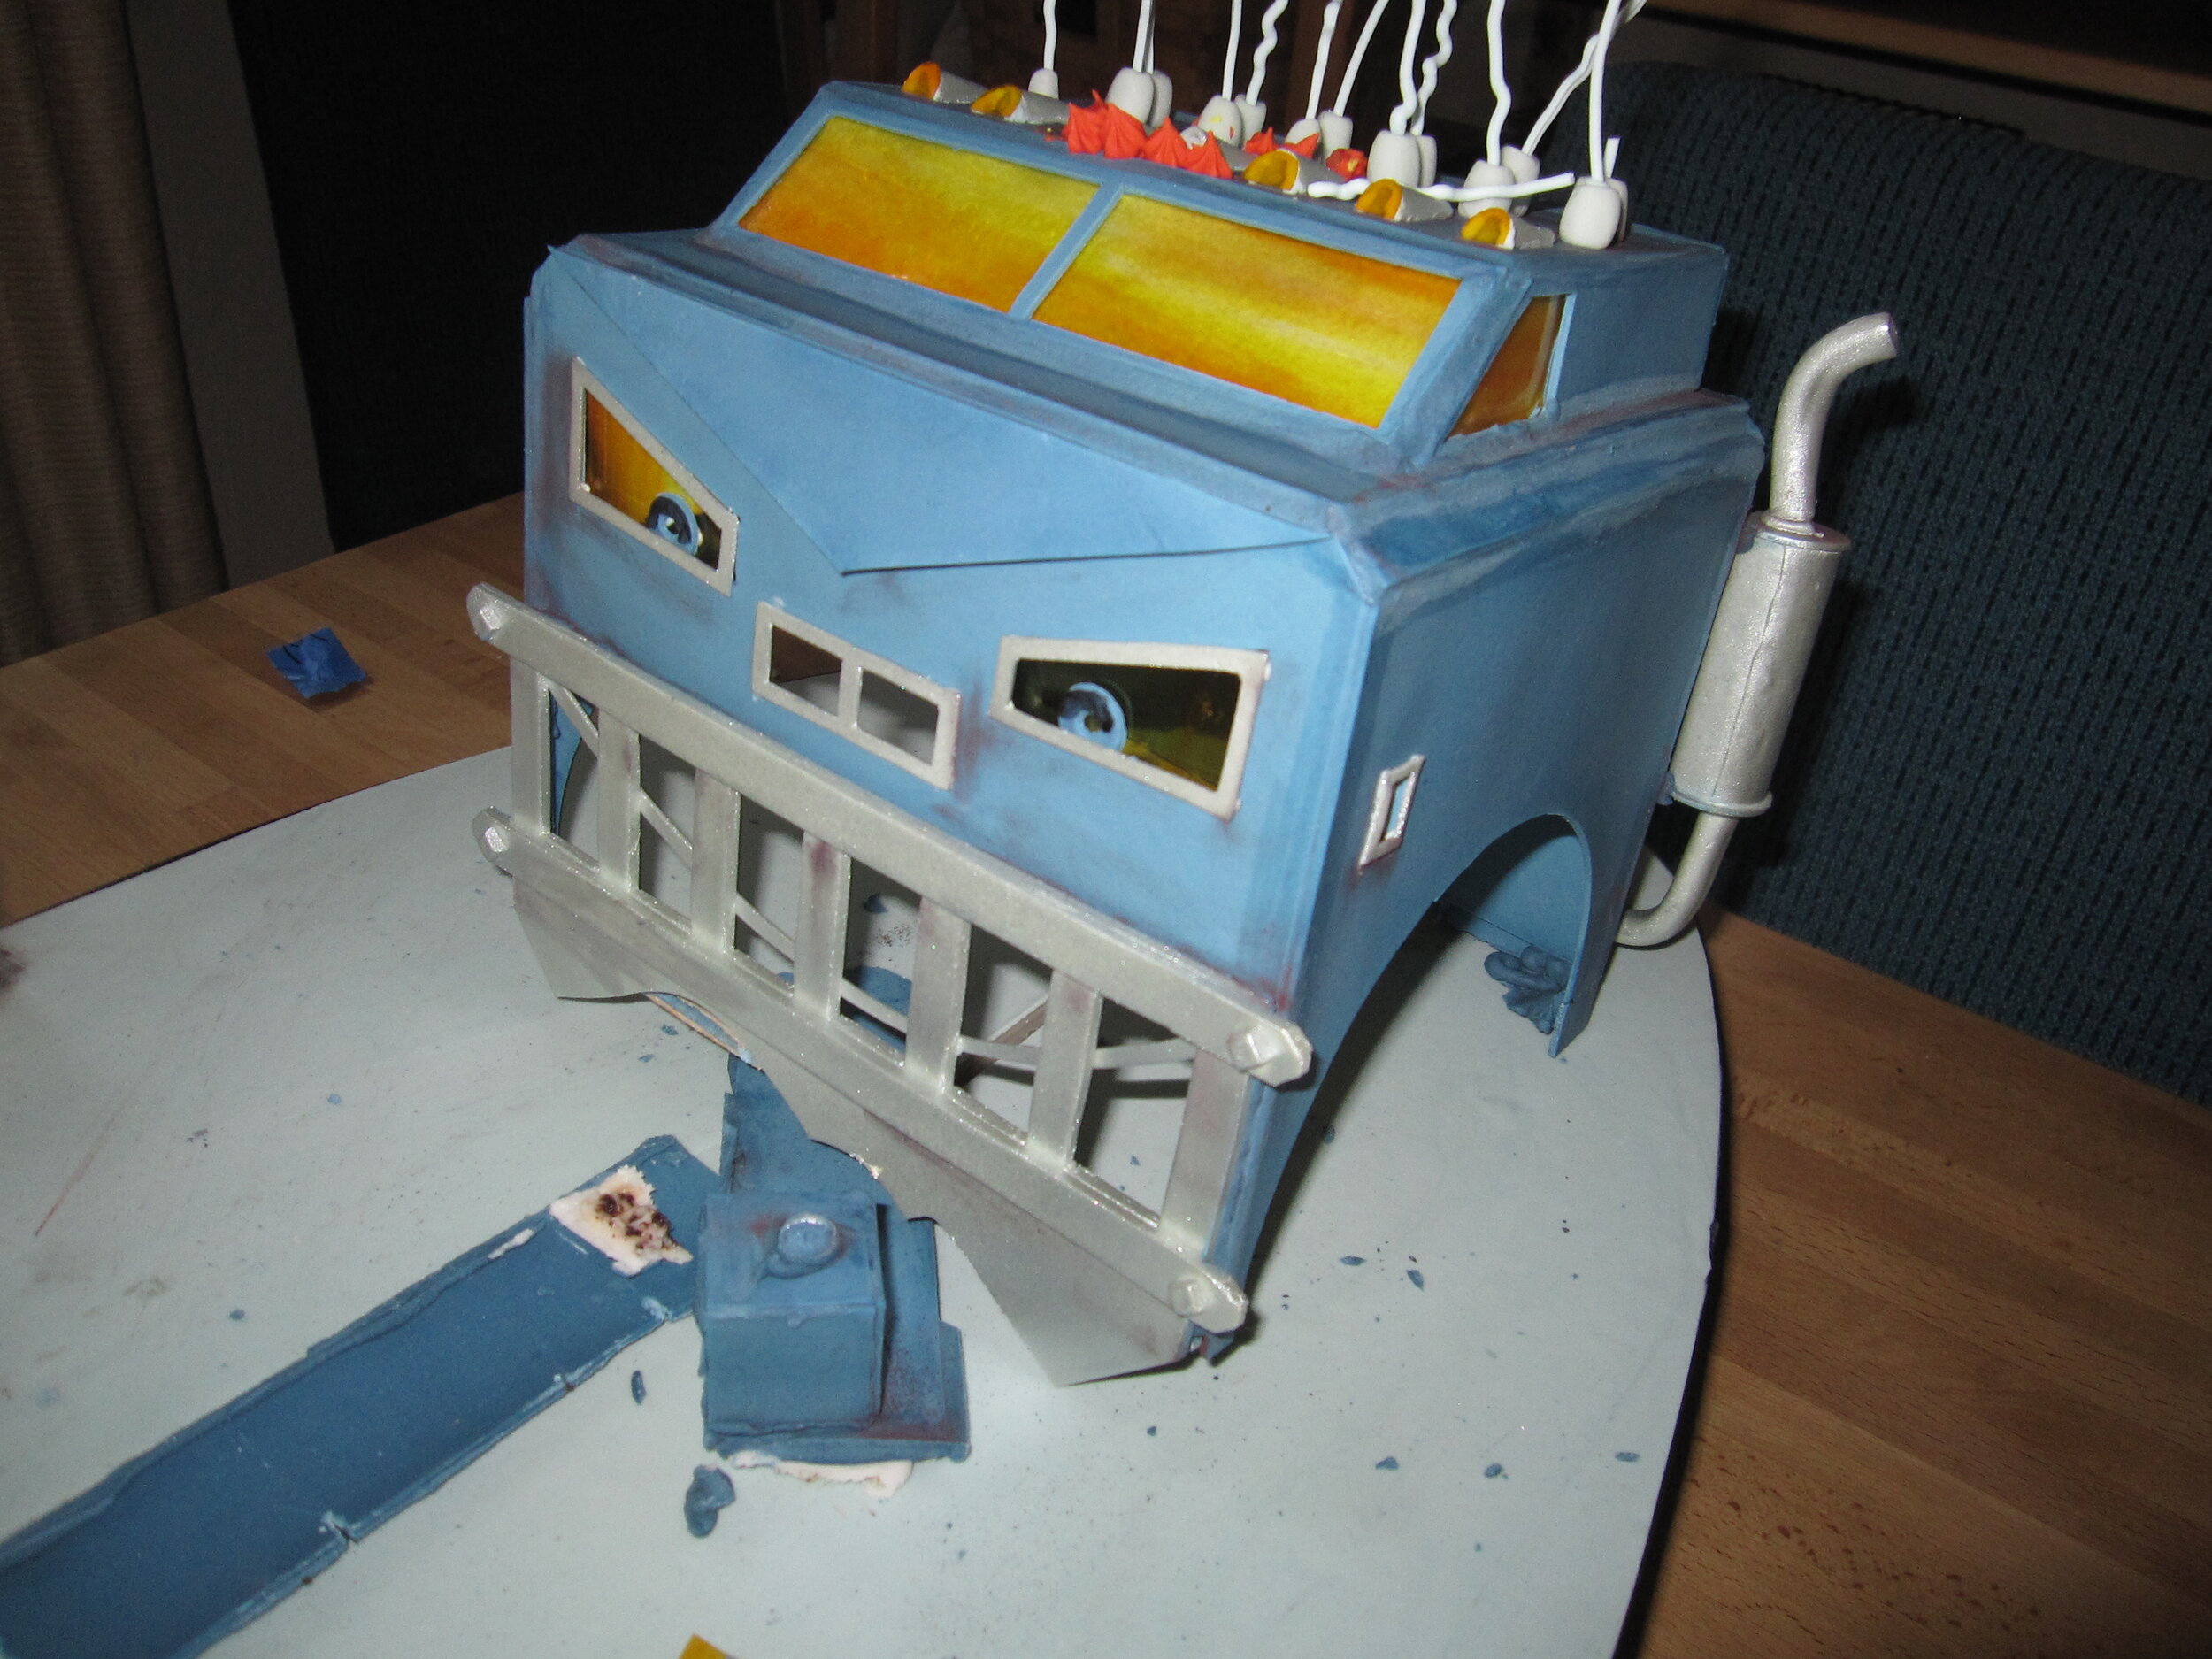
My niece Alex’s specifications for her fifth birthday cake: “I want a Banshee cake. And one switch will make the lights turn on and one switch will make the wheels turn and one switch will make the mouth open and close.”
My niece Alex’s specifications for her fifth birthday cake:
“I want a Banshee cake. And one switch will make the lights turn on and one switch will make the wheels turn and one switch will make the mouth open and close.”
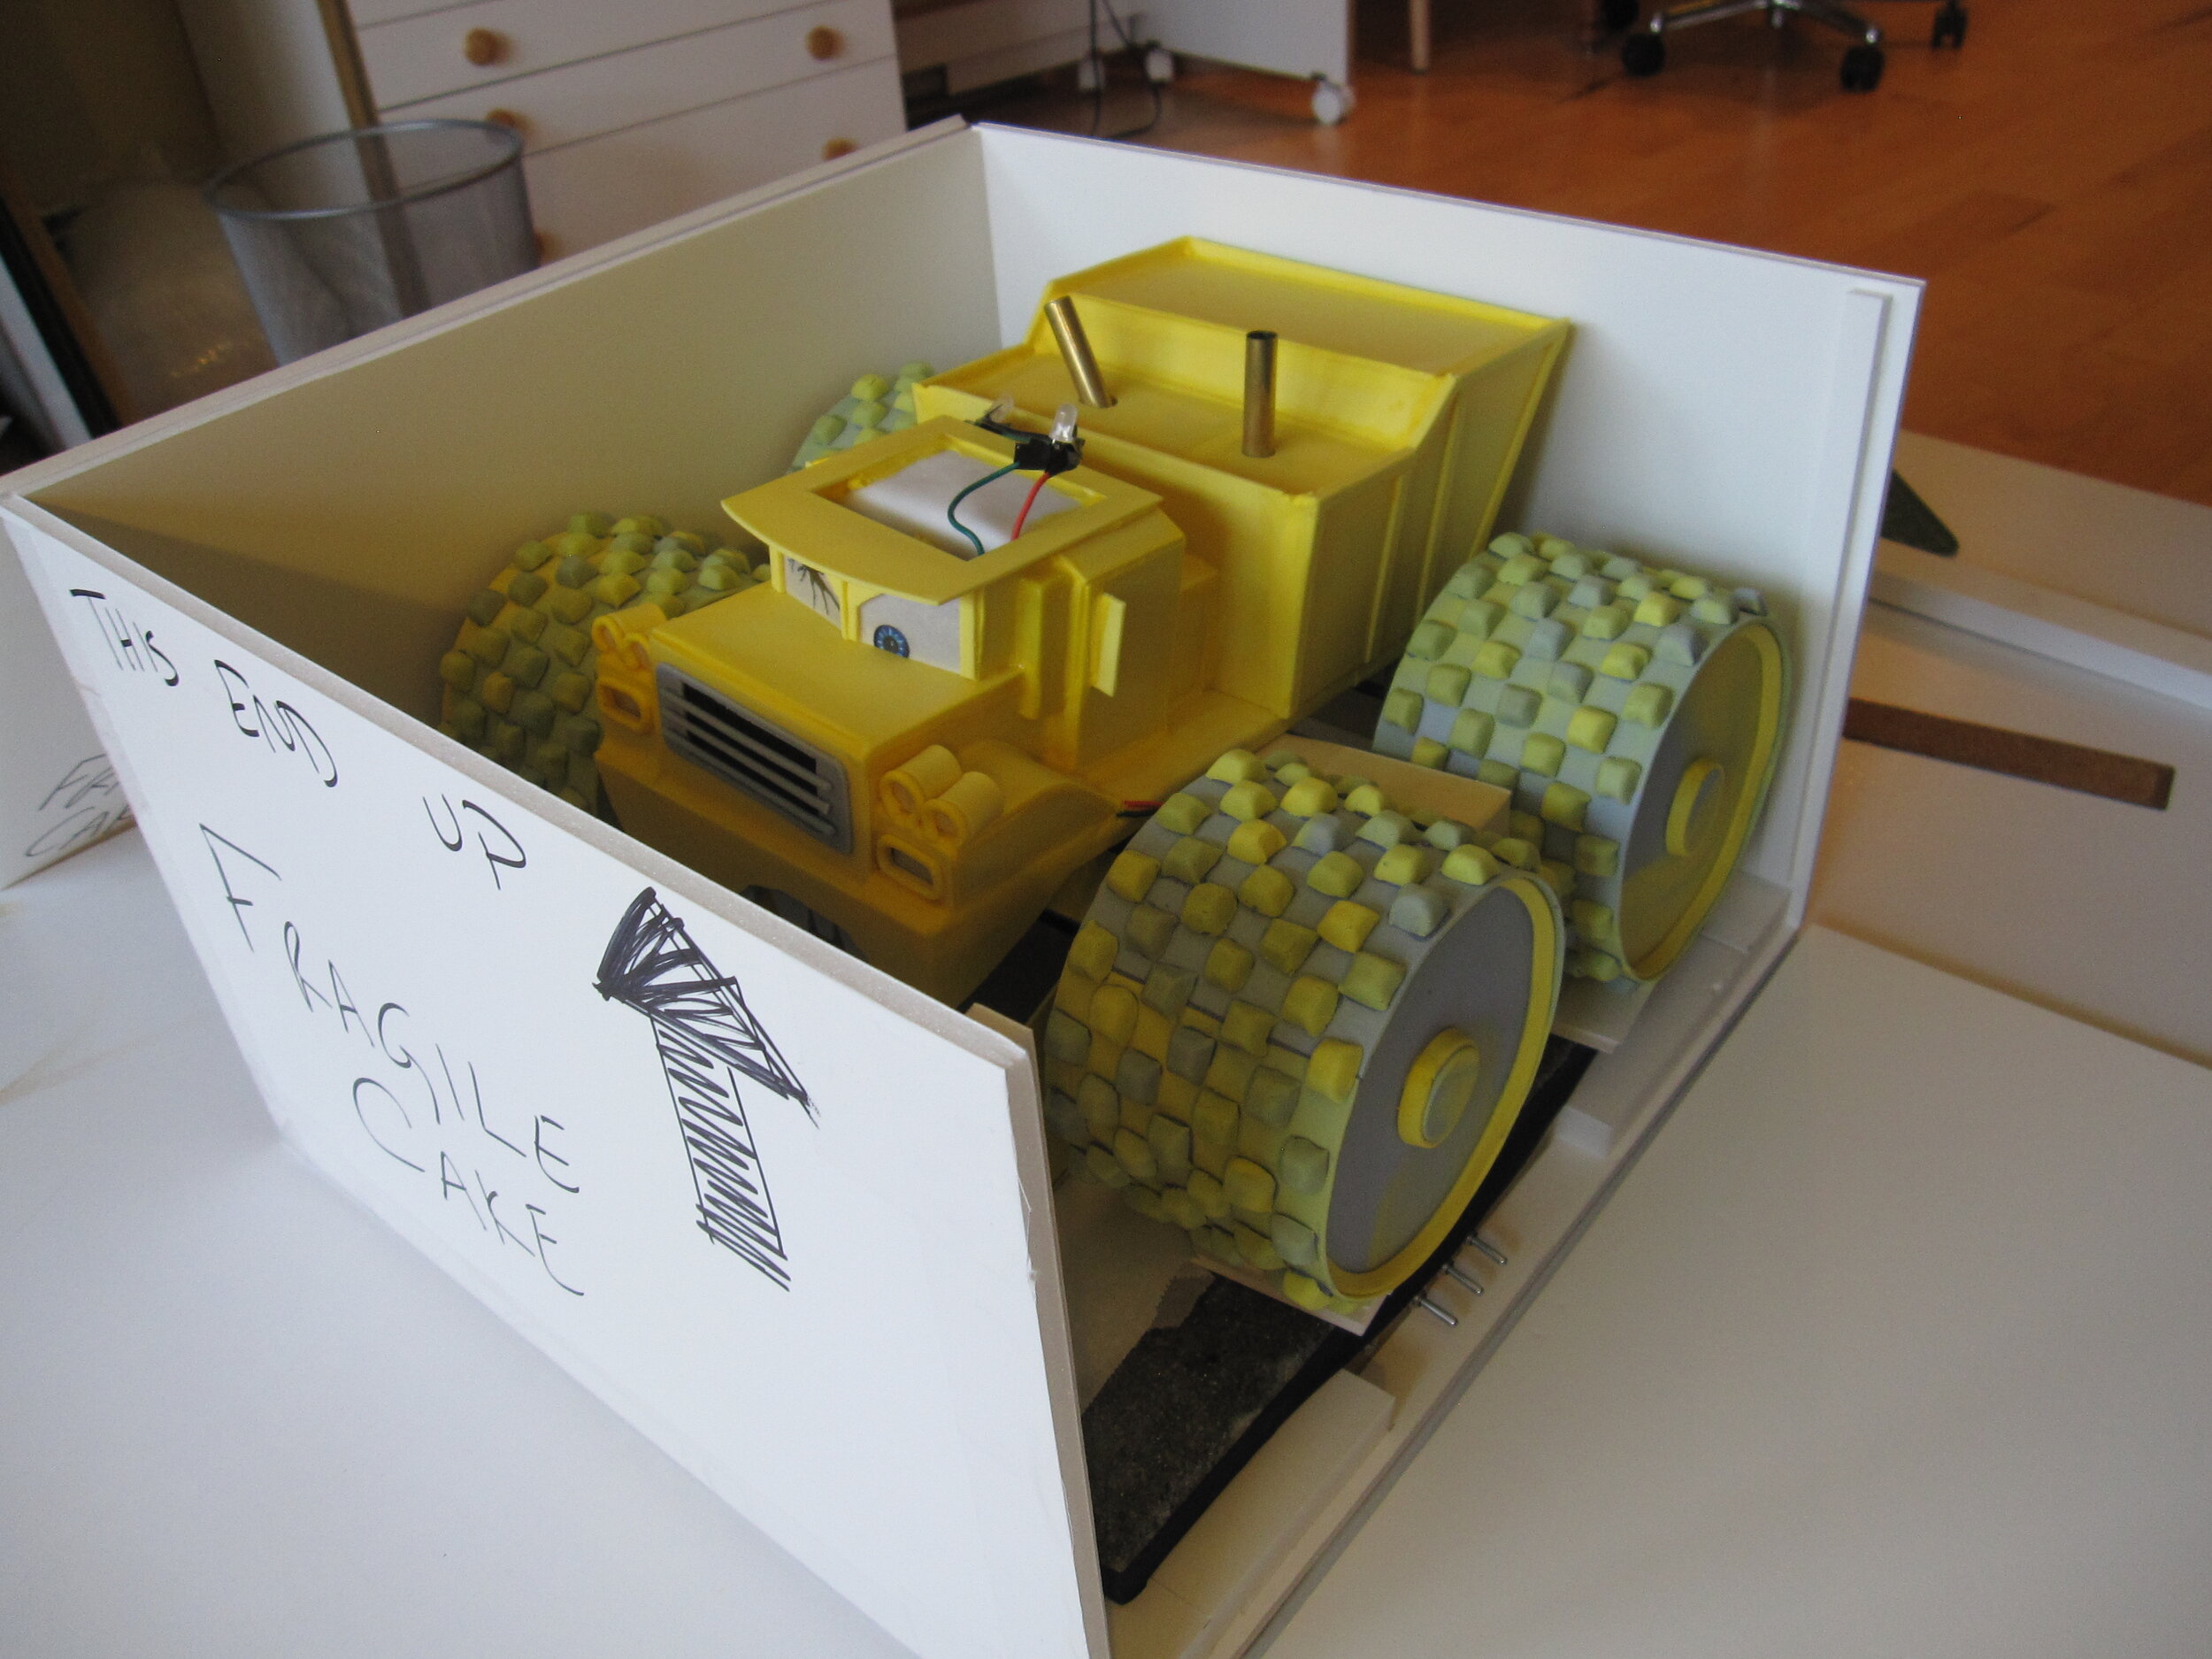
Given her previous four birthday cakes, this is a reasonable request, though as you’ll read later in this account, I only managed to deliver on one of the switch operations. Of course, when I made her other birthday cakes, I was living in the same house with Alex. But now, while Alex still lives in California, I am in grad school in Madison, Wisconsin. Fortunately, my spring break aligns fairly well with Alex’s birthday, so I was able to be there for her party, but this meant that I had to make the cake in Wisconsin and then bring it with me to California on the airplane. One thing this forced me to do was to scale the cake such that it would fit in the overhead bin of an airplane, so Banshee was the smallest cake I’ve made in quite a while.

Banshee, of course, is a big work machine that appears at the end of Mater and the Ghostlight, which is an extra short on the DVD for the movie Cars. In fact, Banshee is not even in the short itself; he pops onto the screen only after the closing credits. He appears for all of twenty seconds and you only see him from one angle, which means that I had no idea, from watching the short, what the back half of Banshee looks like. Fortunately there is also a toy version of Banshee, so I bought one, planning to use it as a model for the cake and then give it to Alex for her birthday. However, since I failed to inform my sister and her husband that I had this toy for Alex, they bought her one as well. I gave mine to my little friend Isaac (age 4), who is also a huge Cars fan, so it actually worked out well for everyone.
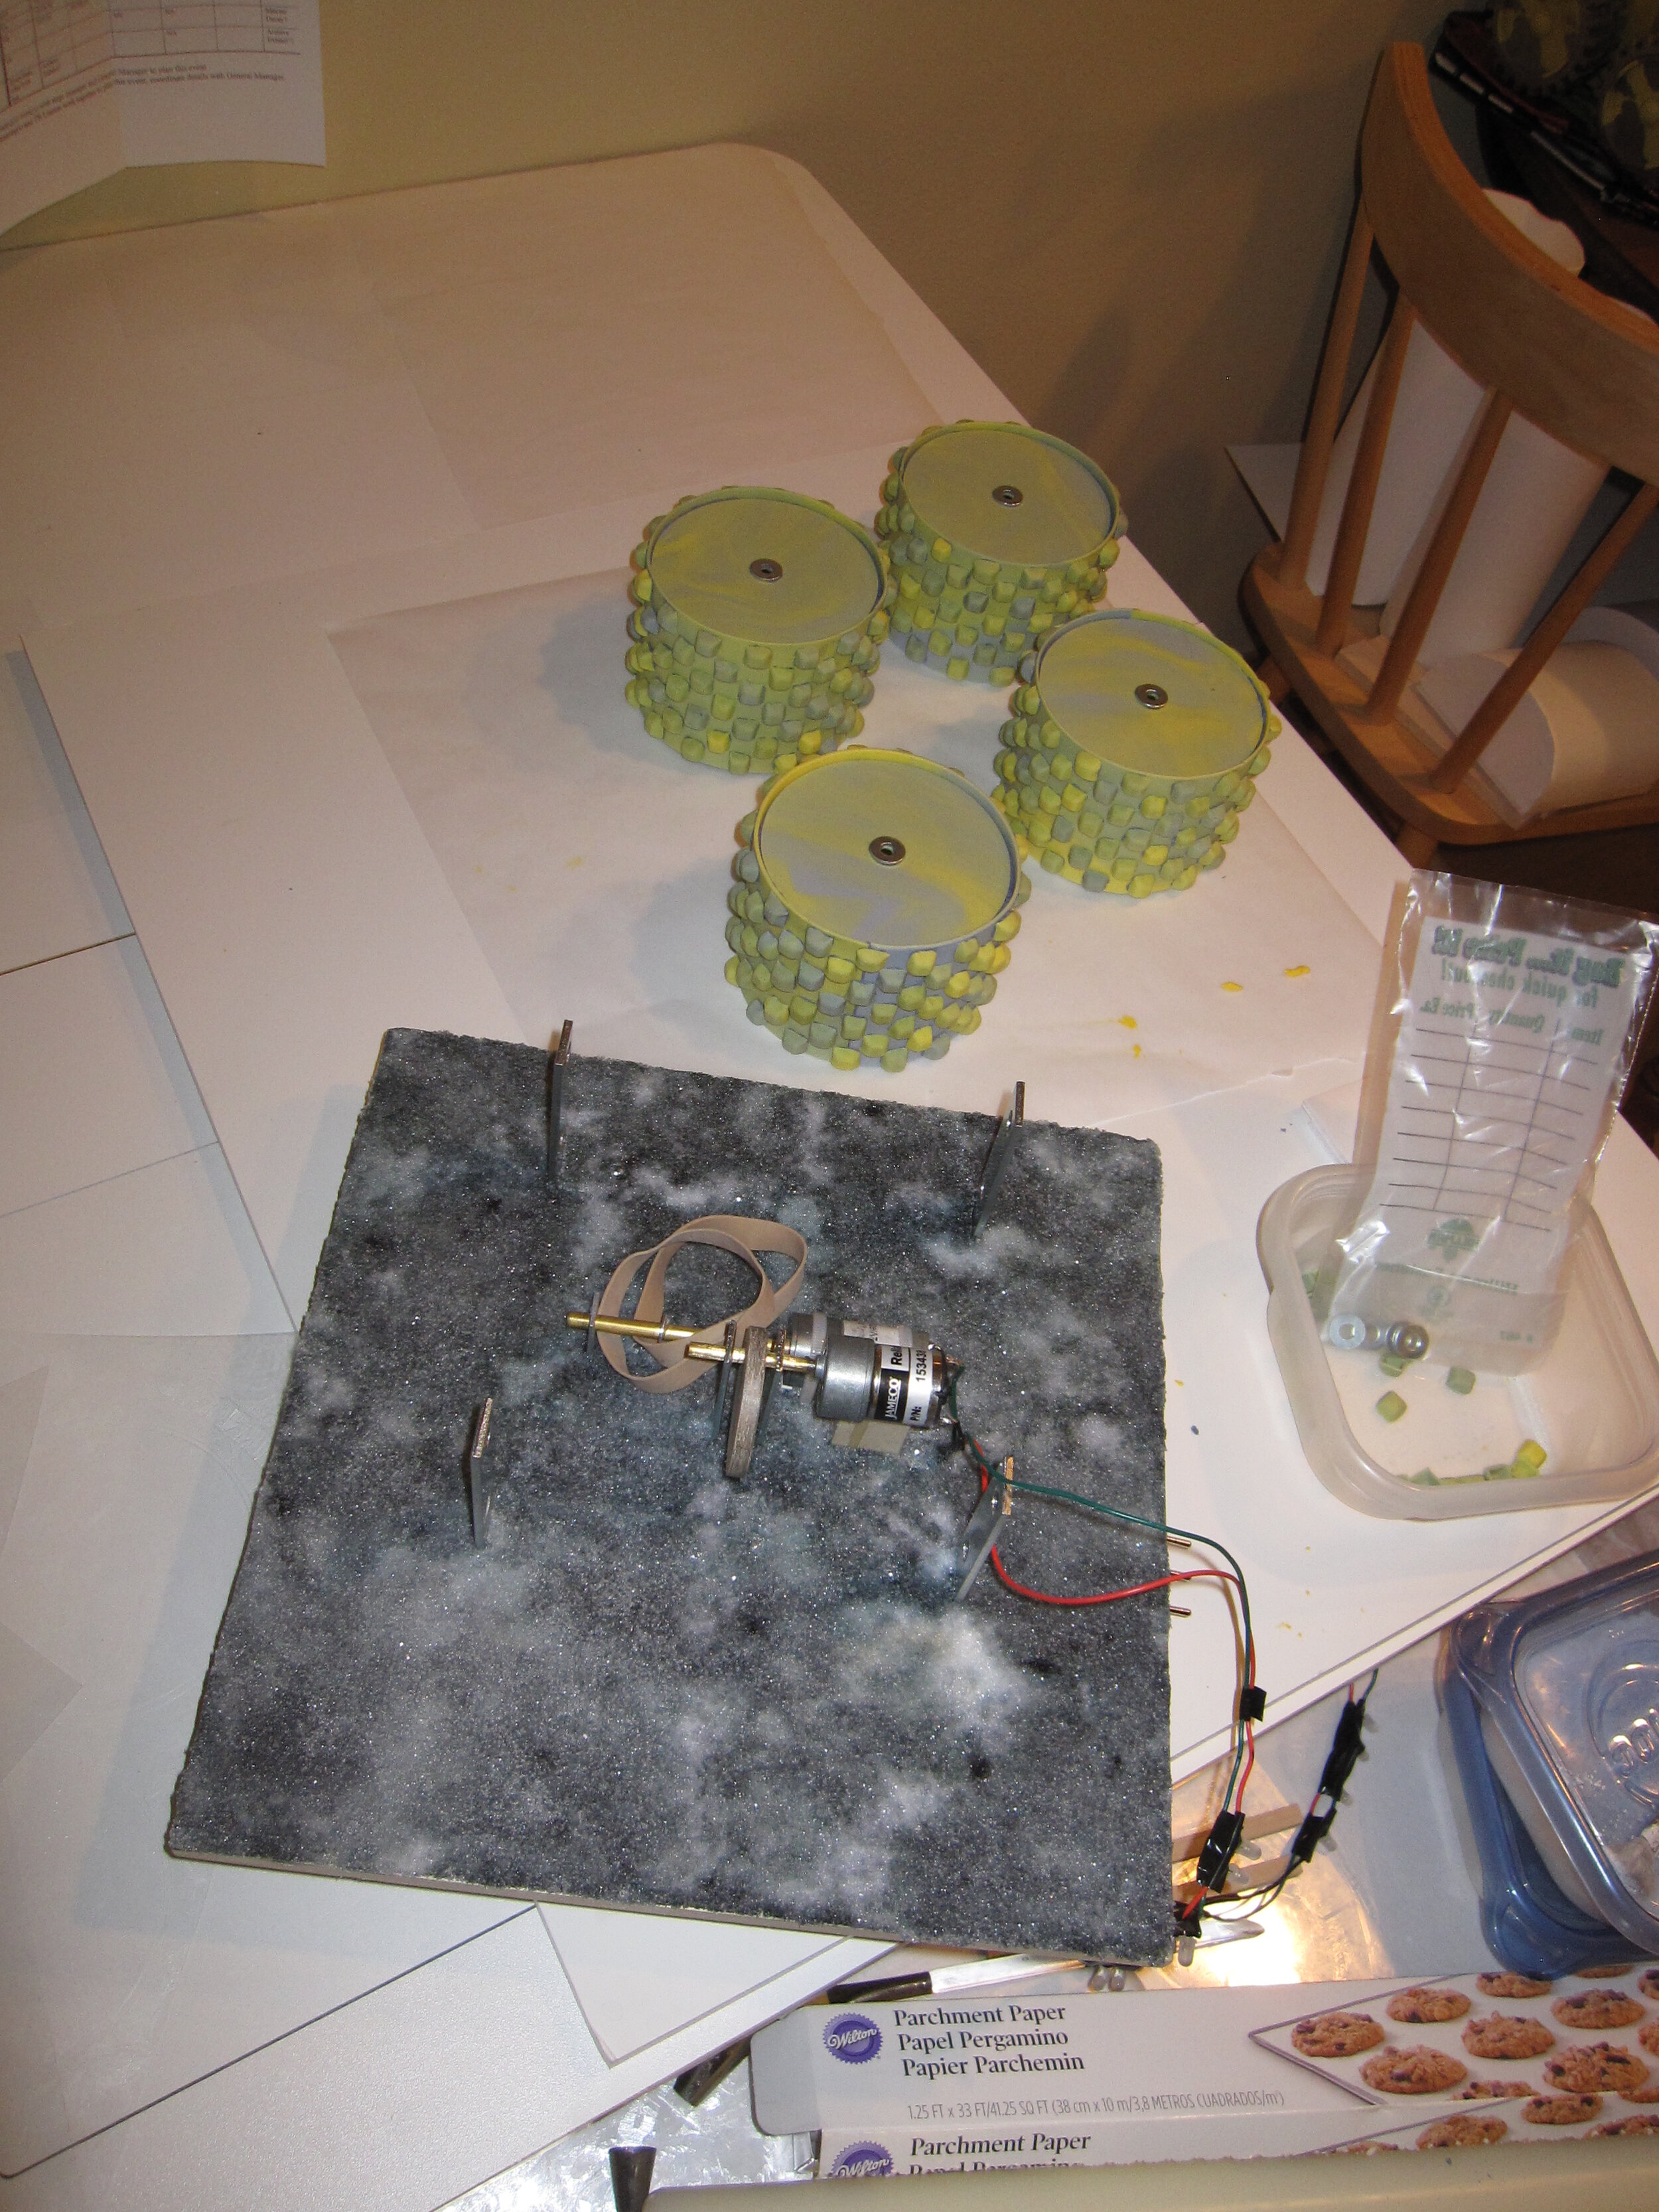
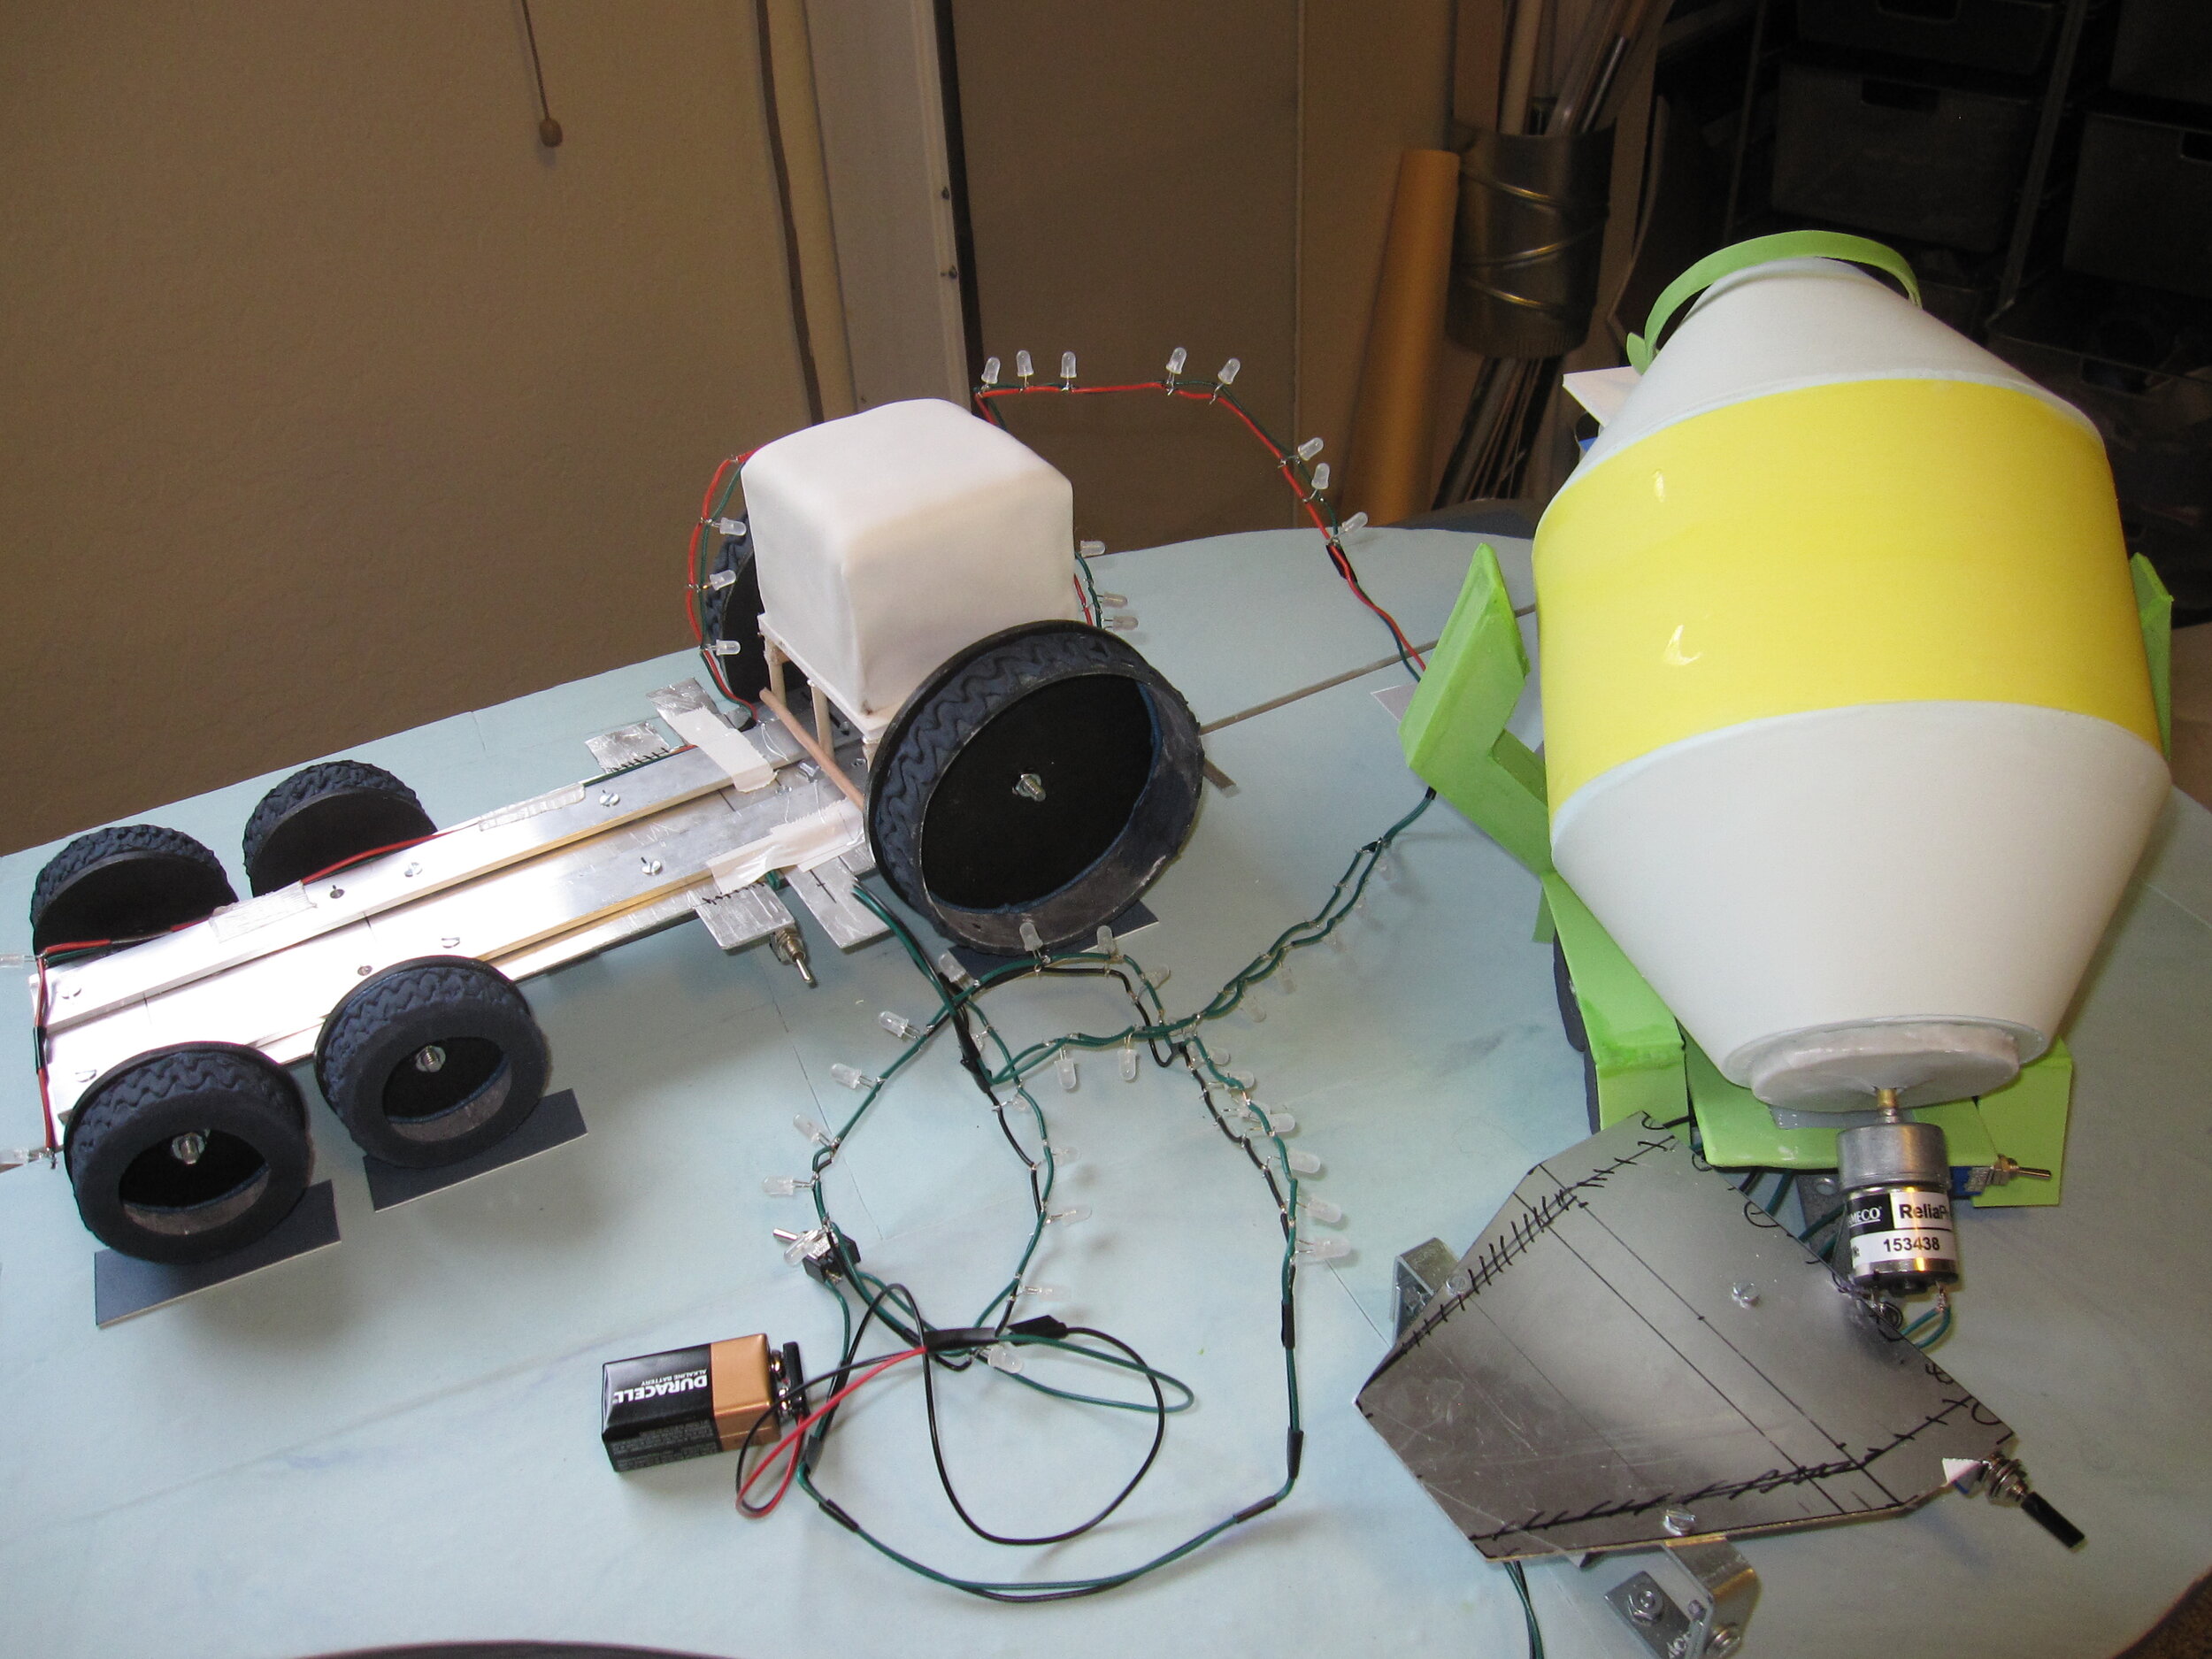
My first step was to create the electronics. By this point, I’m pretty adept at putting LEDs in my cakes, so the lights were easy. I reused the LEDs that I originally bought for the Tardis Cake. To make the wheels spin, I used a motor that I last used to power Big Rig on Alex’s fourth birthday cake, transferring power to the axles via rubber band drives. I still think it would have worked if my rubber bands had been slightly shorter. Rather than just make the mouth open and close I decided that the whole cake should rise and fall as well, so that Banshee looked like he was breathing, as he does in the movie. So I made an eccentric cam, hooked up to a motor that I had from powering Melvin the cement mixer’s drum, also on Alex’s fourth birthday cake. So as the cam rotated, it was meant to raise and lower the front end of Banshee’s body, which was anchored at the axle for his rear wheels, while simultaneously pushing his jaw up and down. If my motor had been strong enough to actually do this with the weight of the cake on it, it would have been really cool.
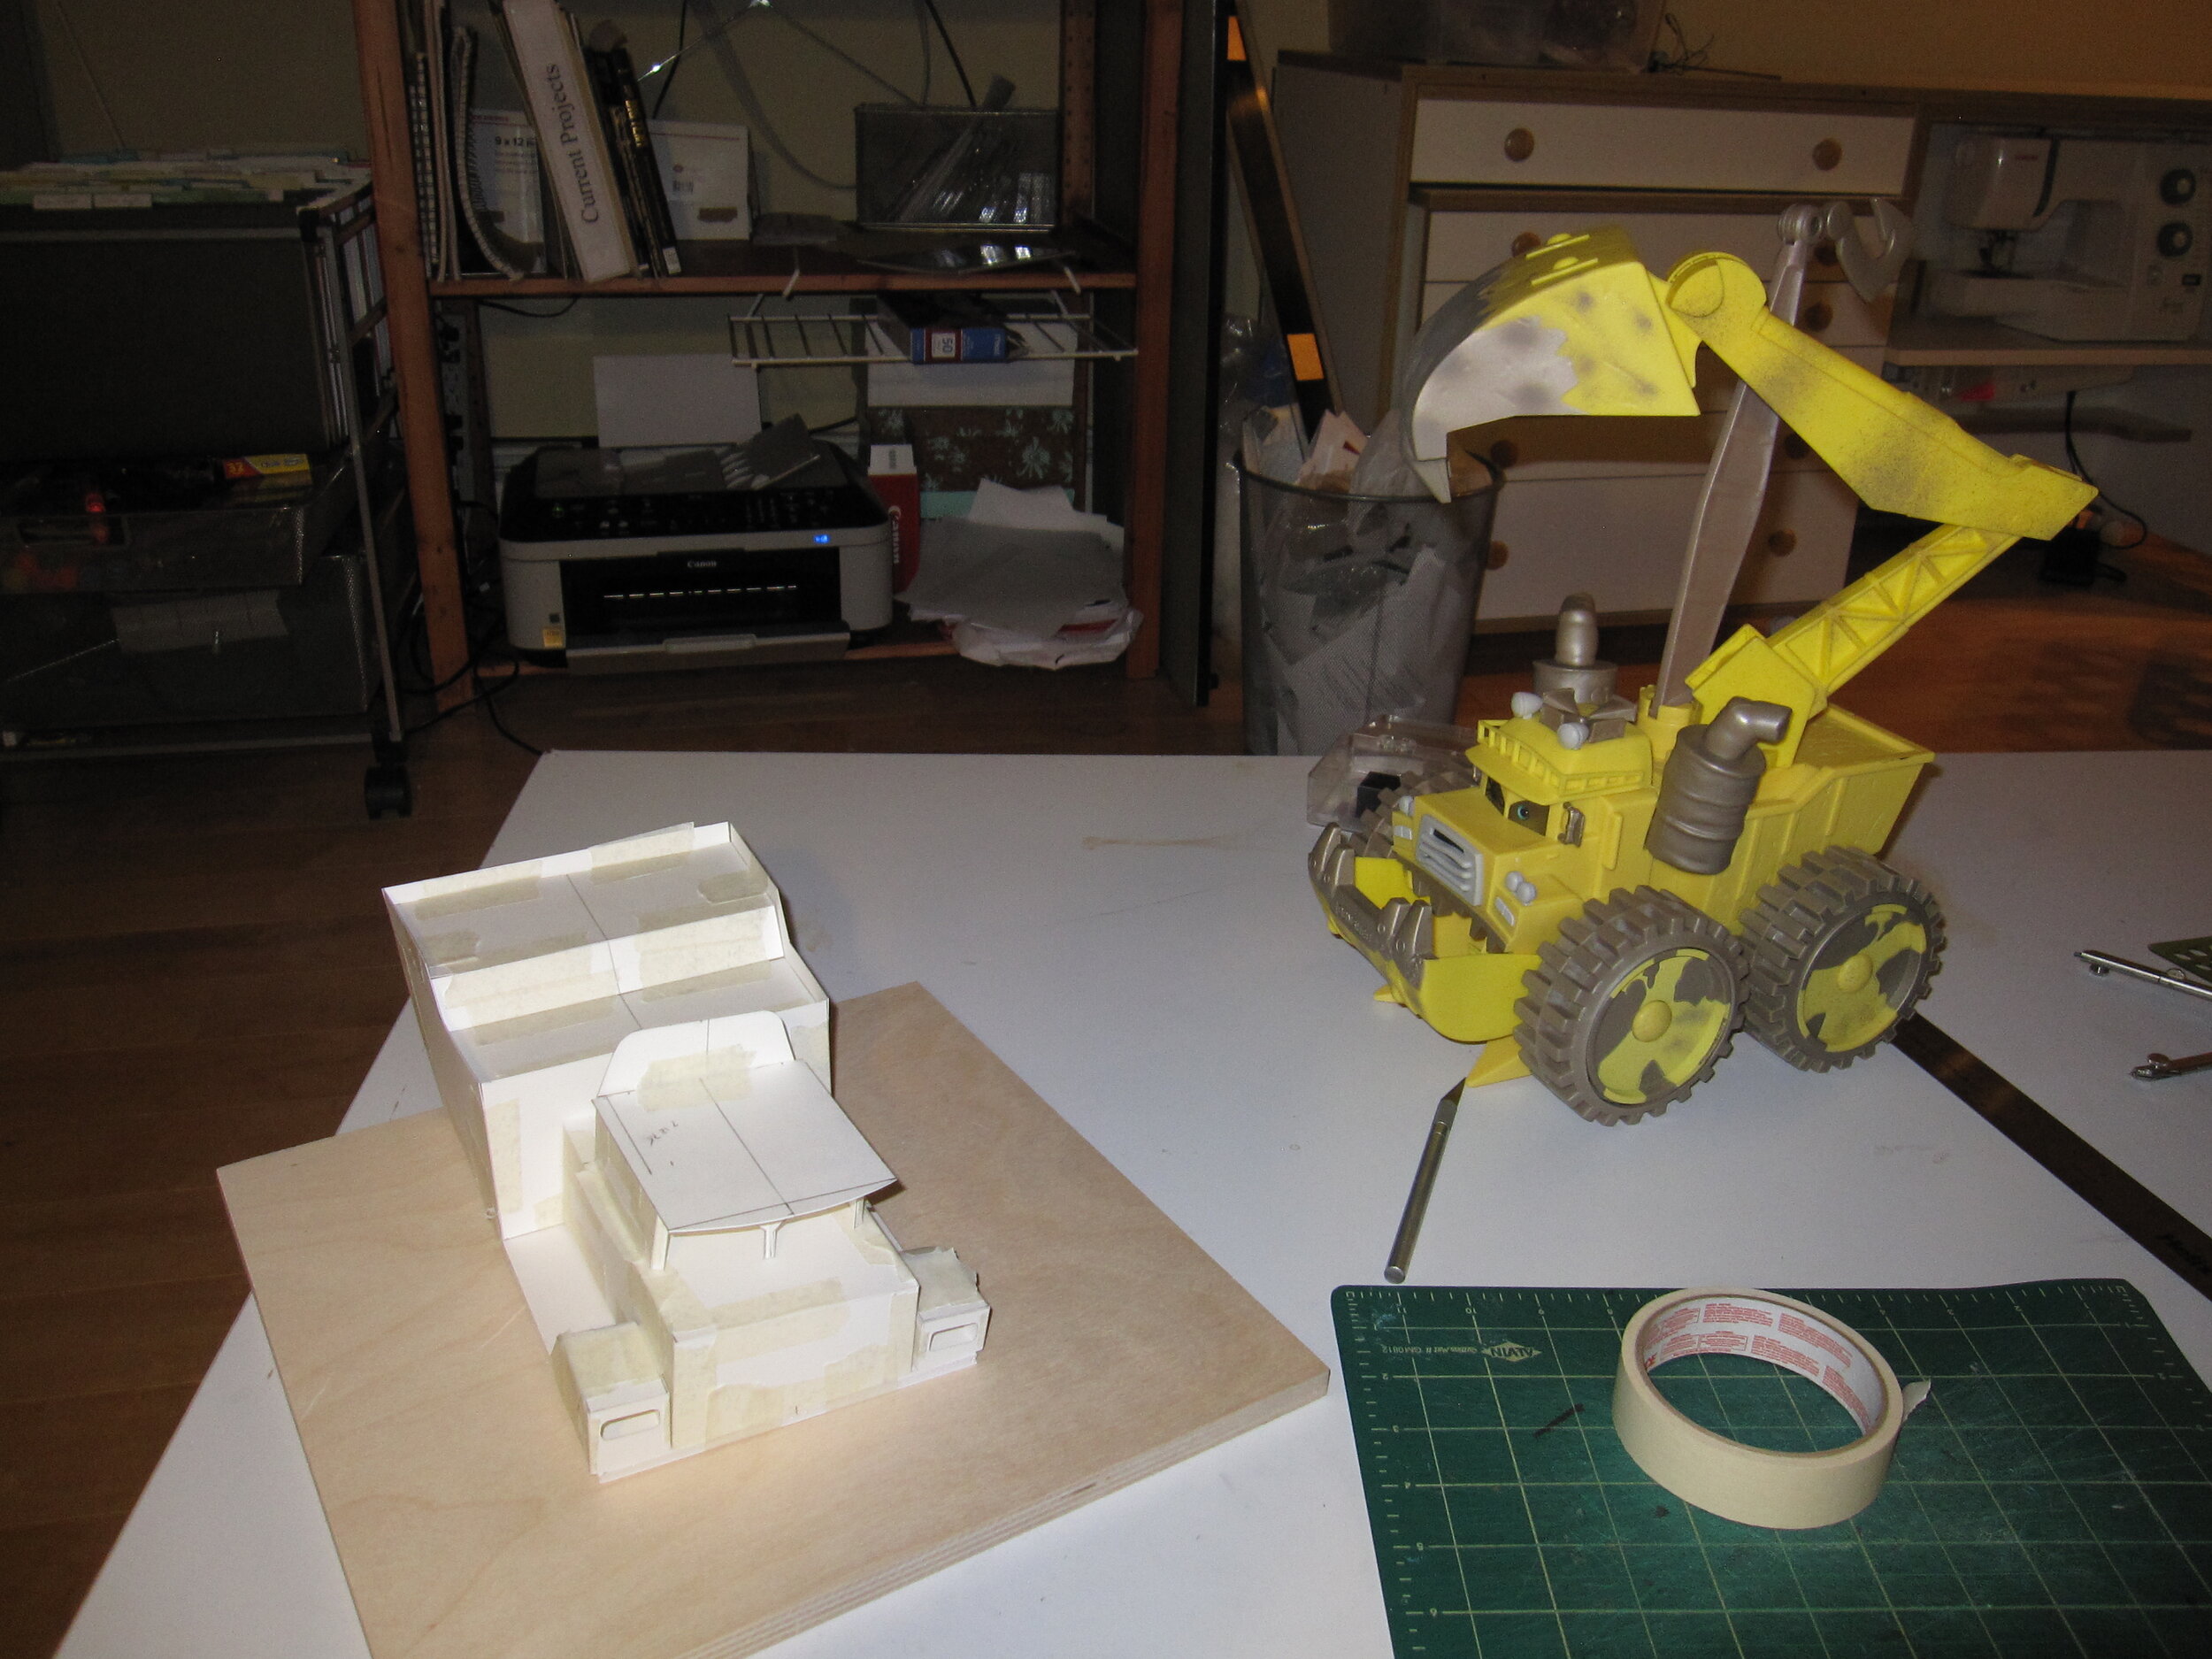
Before I made anything in edible materials, I made a full scale mockup of the entire cake in Bristol board. Then I cut it apart to use as a pattern to make the entire exterior of the cake out of gum paste. One nice thing about Banshee is that he only requires two colors of gum paste – construction vehicle yellow and old, dirty metal grey. This helped the gum paste cutting stage to go by fairly quickly. The most tedious part was making the approximately four hundred and twenty little truncated pyramids for the treads of the tires.

Once all the gum paste was dry, I assembled substructures as much as possible with royal icing. Because I was going to be transporting this cake across the country, I used more non-edible supports than I might have normally.
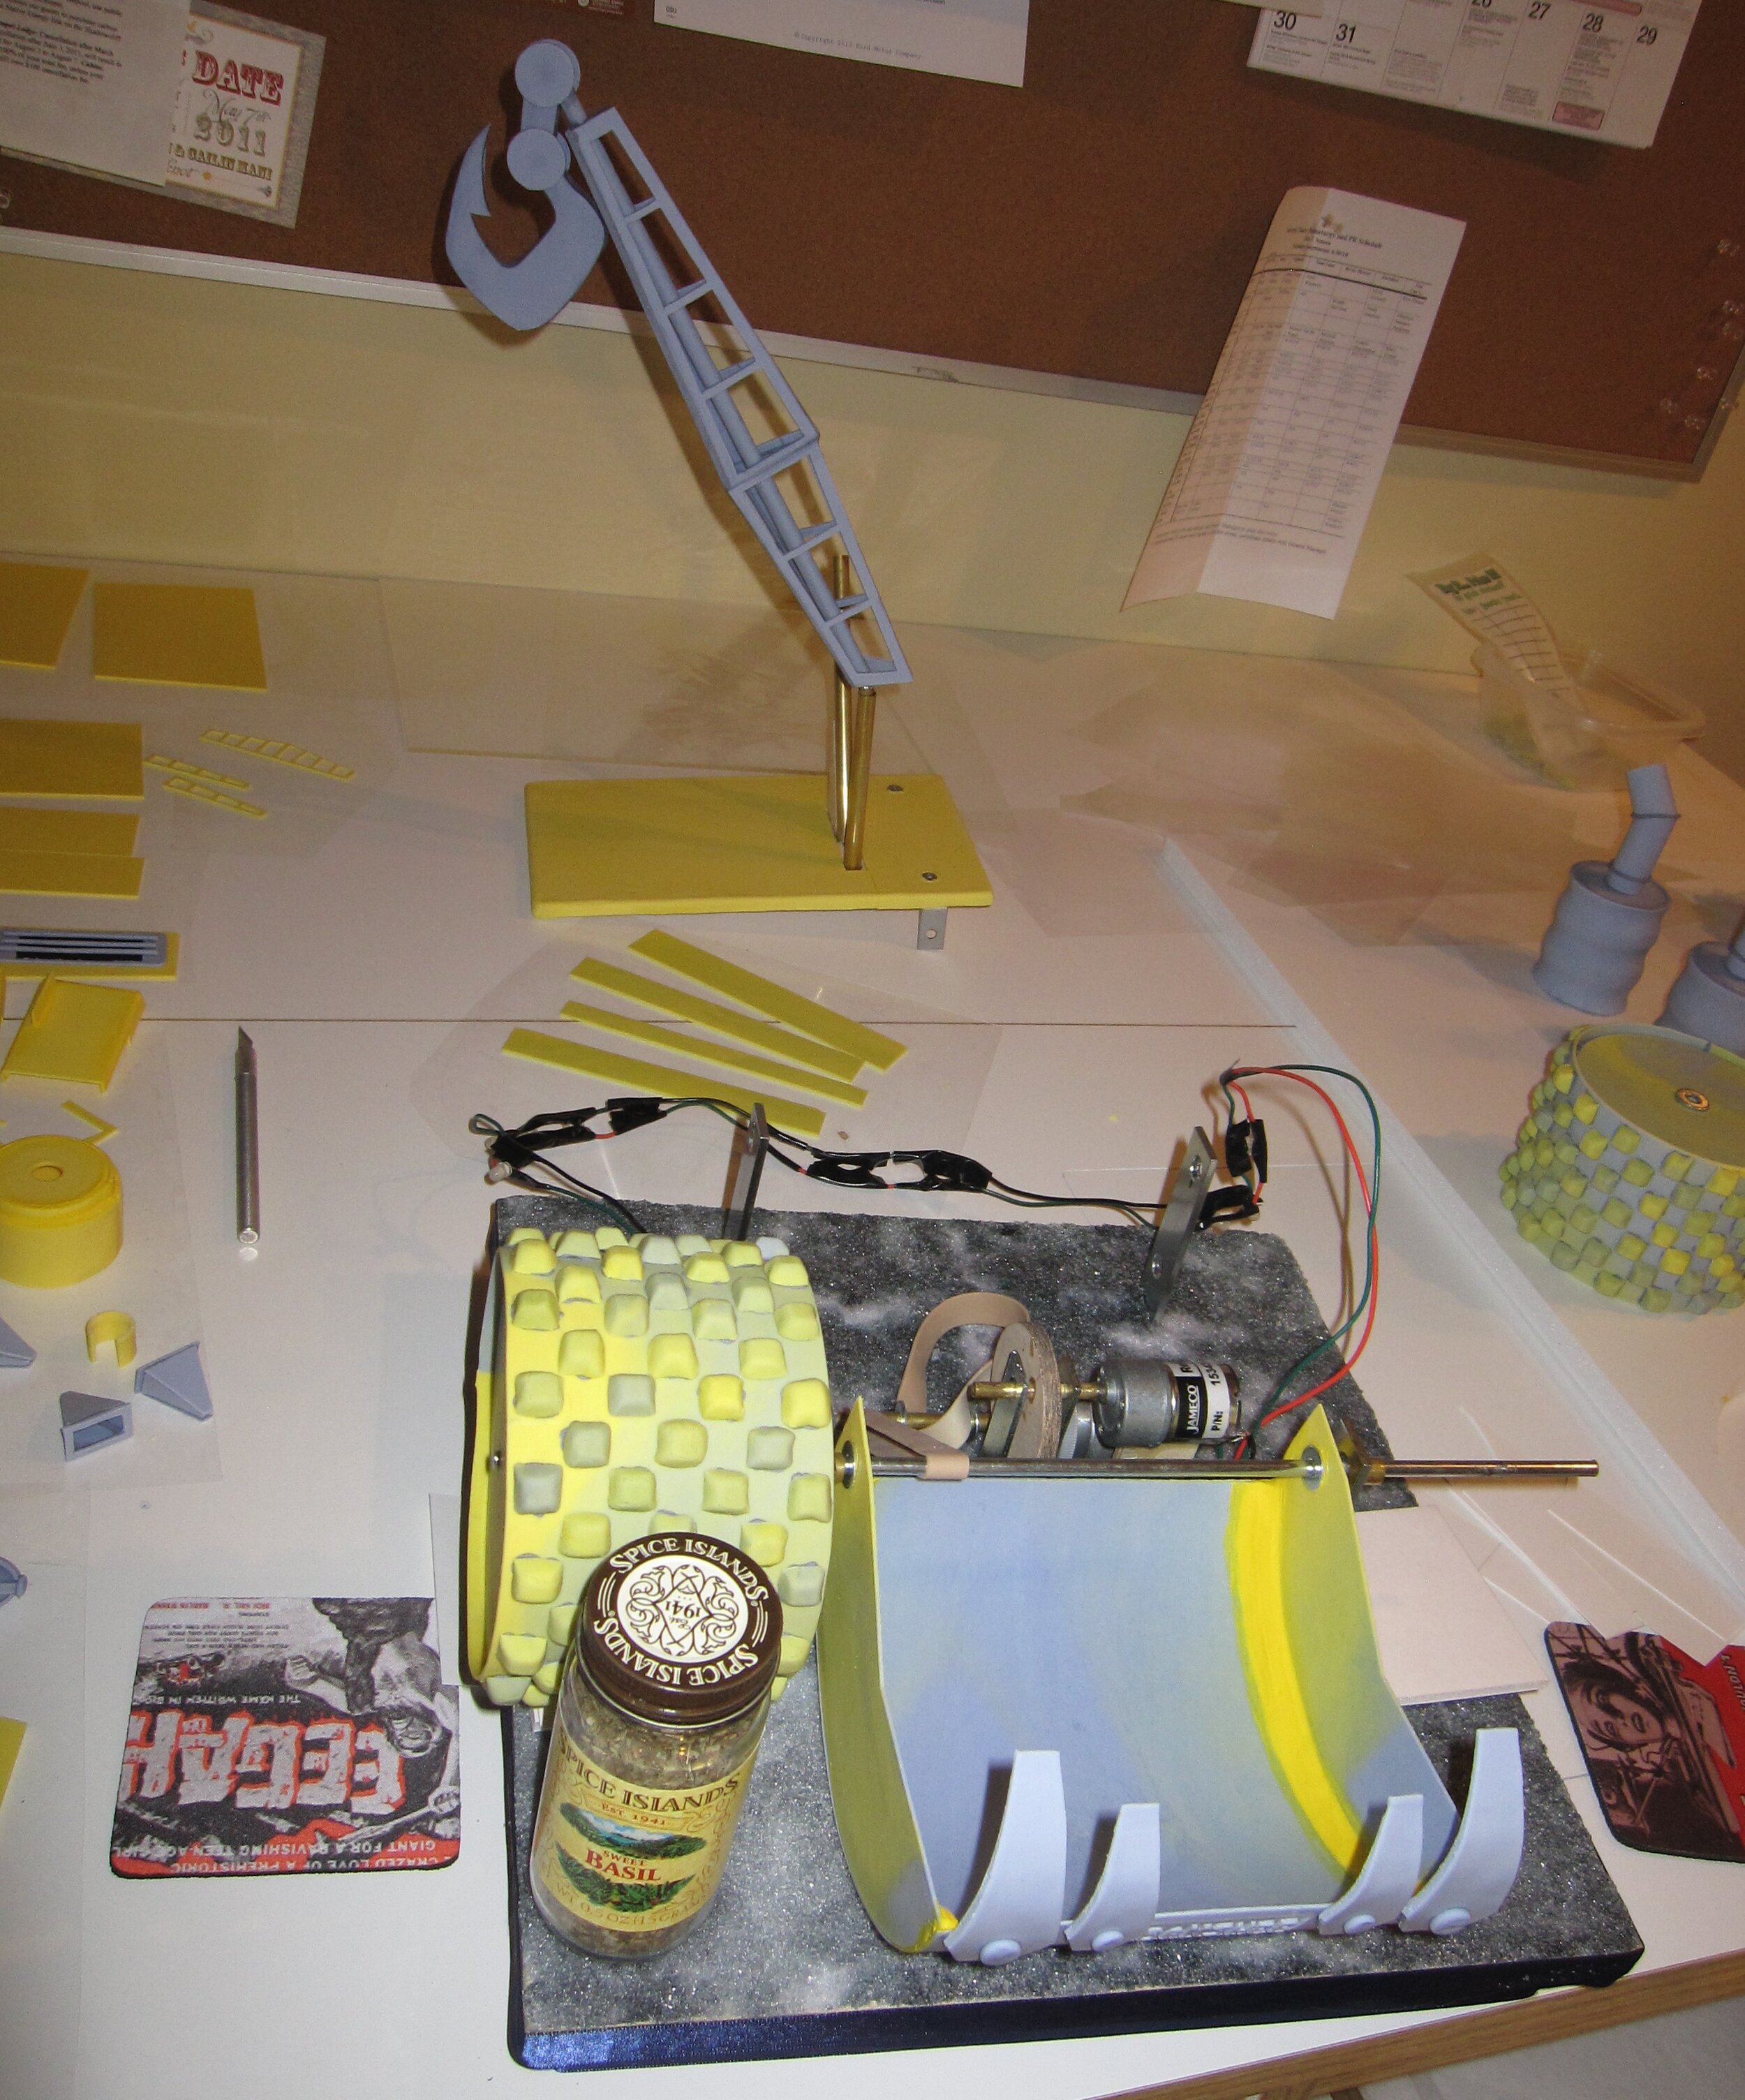
The tow hook and the scoop, for instance, were assembled around brass rods. Incidentally, although I’m breezing over all this in a paragraph, in reality I spent about a month on this stage of the project.

Two days before my flight to California I baked the actual cake. Because I wanted to be sure of a very stable cake for transport I used a chocolate ganache filling, rather than a buttercream. I made three separate little cakes – one for the bottom of the cab, one for the top of the cab, and one for the dumper bed in back. I covered them in fondant because you don’t want gum paste directly in contact with the cake because icing softens the gum paste.
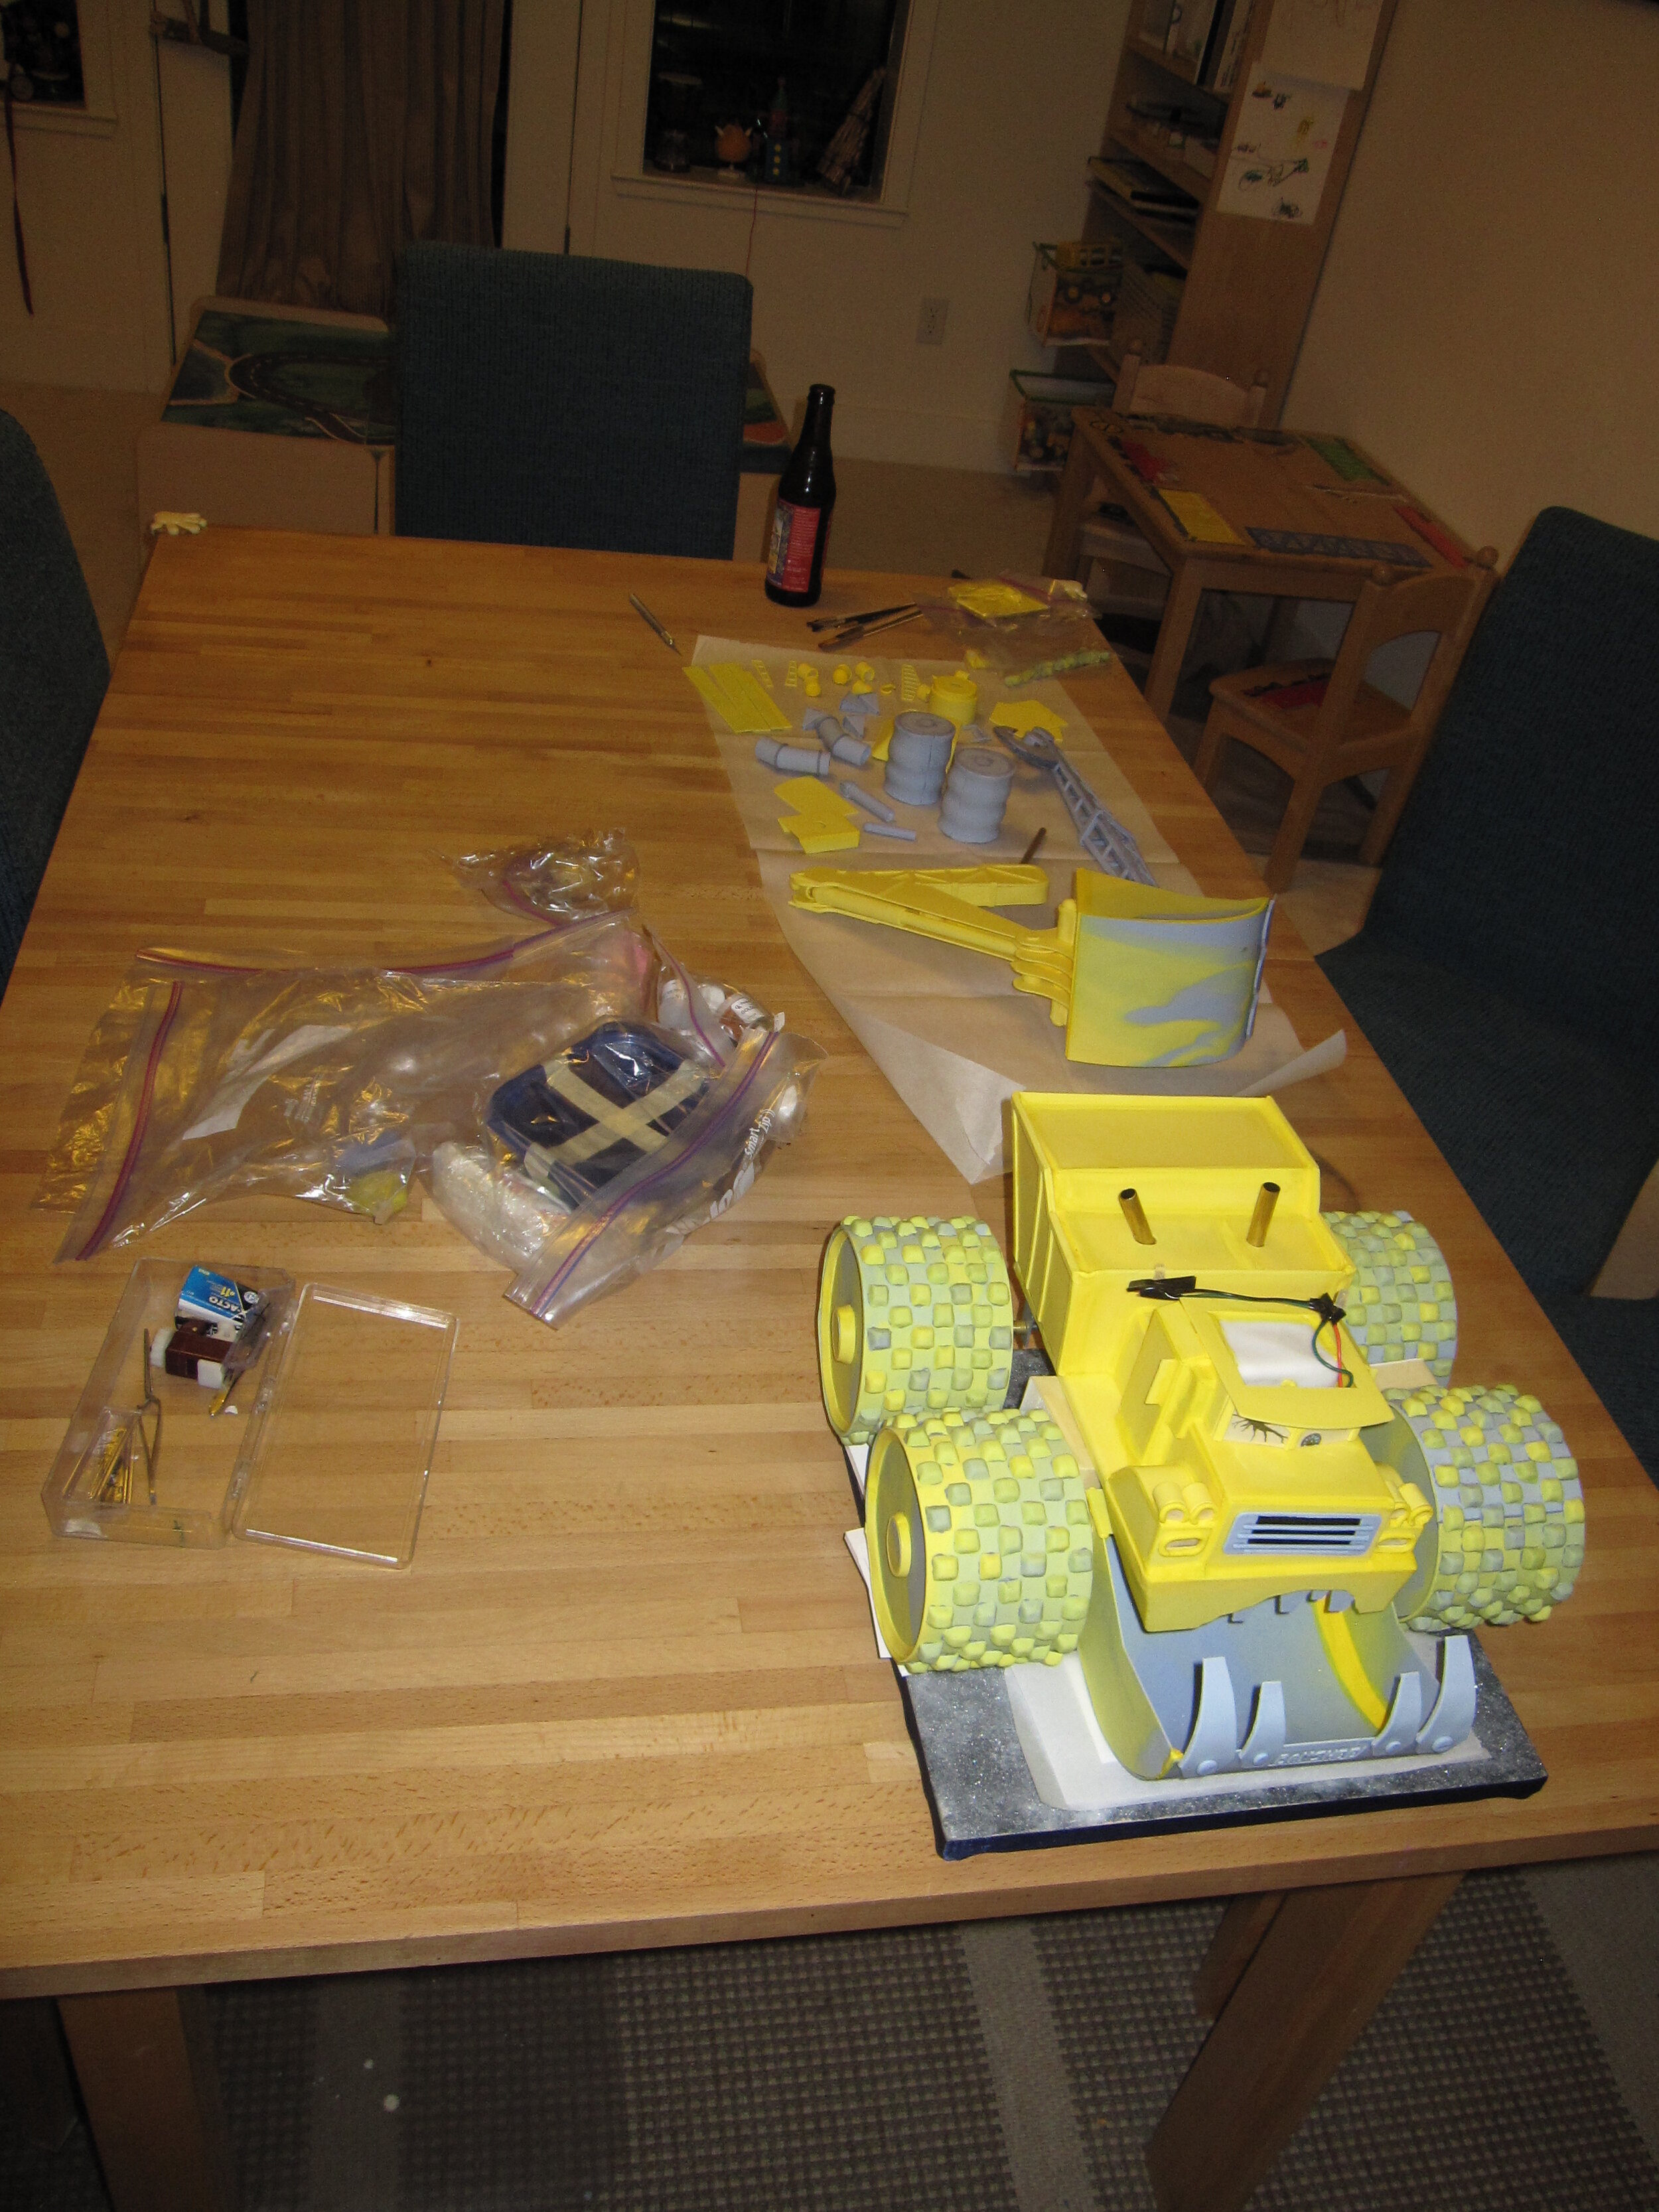
Cake assembly went well. Only a few gum paste pieces were inexplicably the wrong size, but I was able to shave them down to size with a minimum of trouble.
Much more problematic than assembling the cake was packing the cake for travel. This was the first time I had ever tried to move a cake except by car so I was nervous. I had to use basically every inch of my two carry on allotment. For my main carry on I made a foam core box that was about 9”x14”x15” to carry the cake. I also needed to use my extra briefcase carry on allotment to bring Banshee’s scoop arm and tow hook, as well as all the components that made him more than 8 ½” tall. Terrified that my pieces would break en route and I wouldn’t have a cake to give to Alex, I spent at least six hours making boxes, carefully packing components, padding, etc. It was time well spent.

The trip was probably the most stressful flight I have ever endured, with the possible exception of the first solo plane trip I ever took when I was sixteen and flew from Michigan to California to visit my sister in her first year at Stanford. Initially, I had imagined that I would relax once I successfully got the boxed cake through security. This turned out not to be the case.
Security screening went pretty well, although I was so nervous that my hands were shaking. If I hadn’t been allowed to take the cake on the plane, it would have been game over. Fortunately, I was flying out of the Madison, Wisconsin airport, which is by far the most laid back airport I’ve even been to. The only other airport I’ve been to that even comes close is in Paro, Bhutan, an airport so remote and exclusive that only two airplanes are allowed to land there. I got to the airport about three hours early to be sure to have plenty of time to get through security. Obviously, they needed me to open the boxes, but the security personnel were very respectful of the cake’s fragility and complimentary of its appearance. After they swabbed my hands, the cake boxes, and the switches I was cleared through security and safely on my way.
At this point I realized that I couldn’t relax because I was traveling by myself and didn’t want to take my cake into the bathroom with me to pee. Fortunately, I ran into a friend in the airport bar whose flight to Albuquerque had been delayed, so she was able to watch my cake while I ran to the ladies’ room.
Getting onto the plane was also terrifying because the first leg of my itinerary was Madison to Chicago, which is a short commuter flight on a very small plane. When the gate attendant in charge of gate checking carry ons came around the gate area, he told me that I would probably not to able to fit both of my carry ons onto the plane, which to me would have been a complete disaster. However, after a half hour of sitting in the gate area in terror, I was able to stow the cake under the seat in front of me and my other item in the overhead bin. I cannot tell you how relieved I was that this worked out.
In Chicago, I had to carry the cake from one end of the airport to the other to get to my next gate, but at least it fit more easily onto this plane than the last one. A flight attendant even saw it in the overhead bin and offered to put an ice pack on the box to keep the cake cool.
I arrived in California late Friday night and the party was scheduled for Sunday afternoon. On Friday, all I could do was open the box to verify that the cake hadn’t completely collapsed before I fell asleep. I spent Saturday playing with the kids, so I didn’t get to unpack the cake completely until Saturday evening after the kids went to bed.
Amazingly, the cake came through the journey completely unscathed. Literally only one piece broke, and it was a piece that I had extras of, so it didn’t even matter. Even in my best case scenario, I had expected to have to effect at least minor repairs. I was completely flabbergasted by how well the cake traveled.
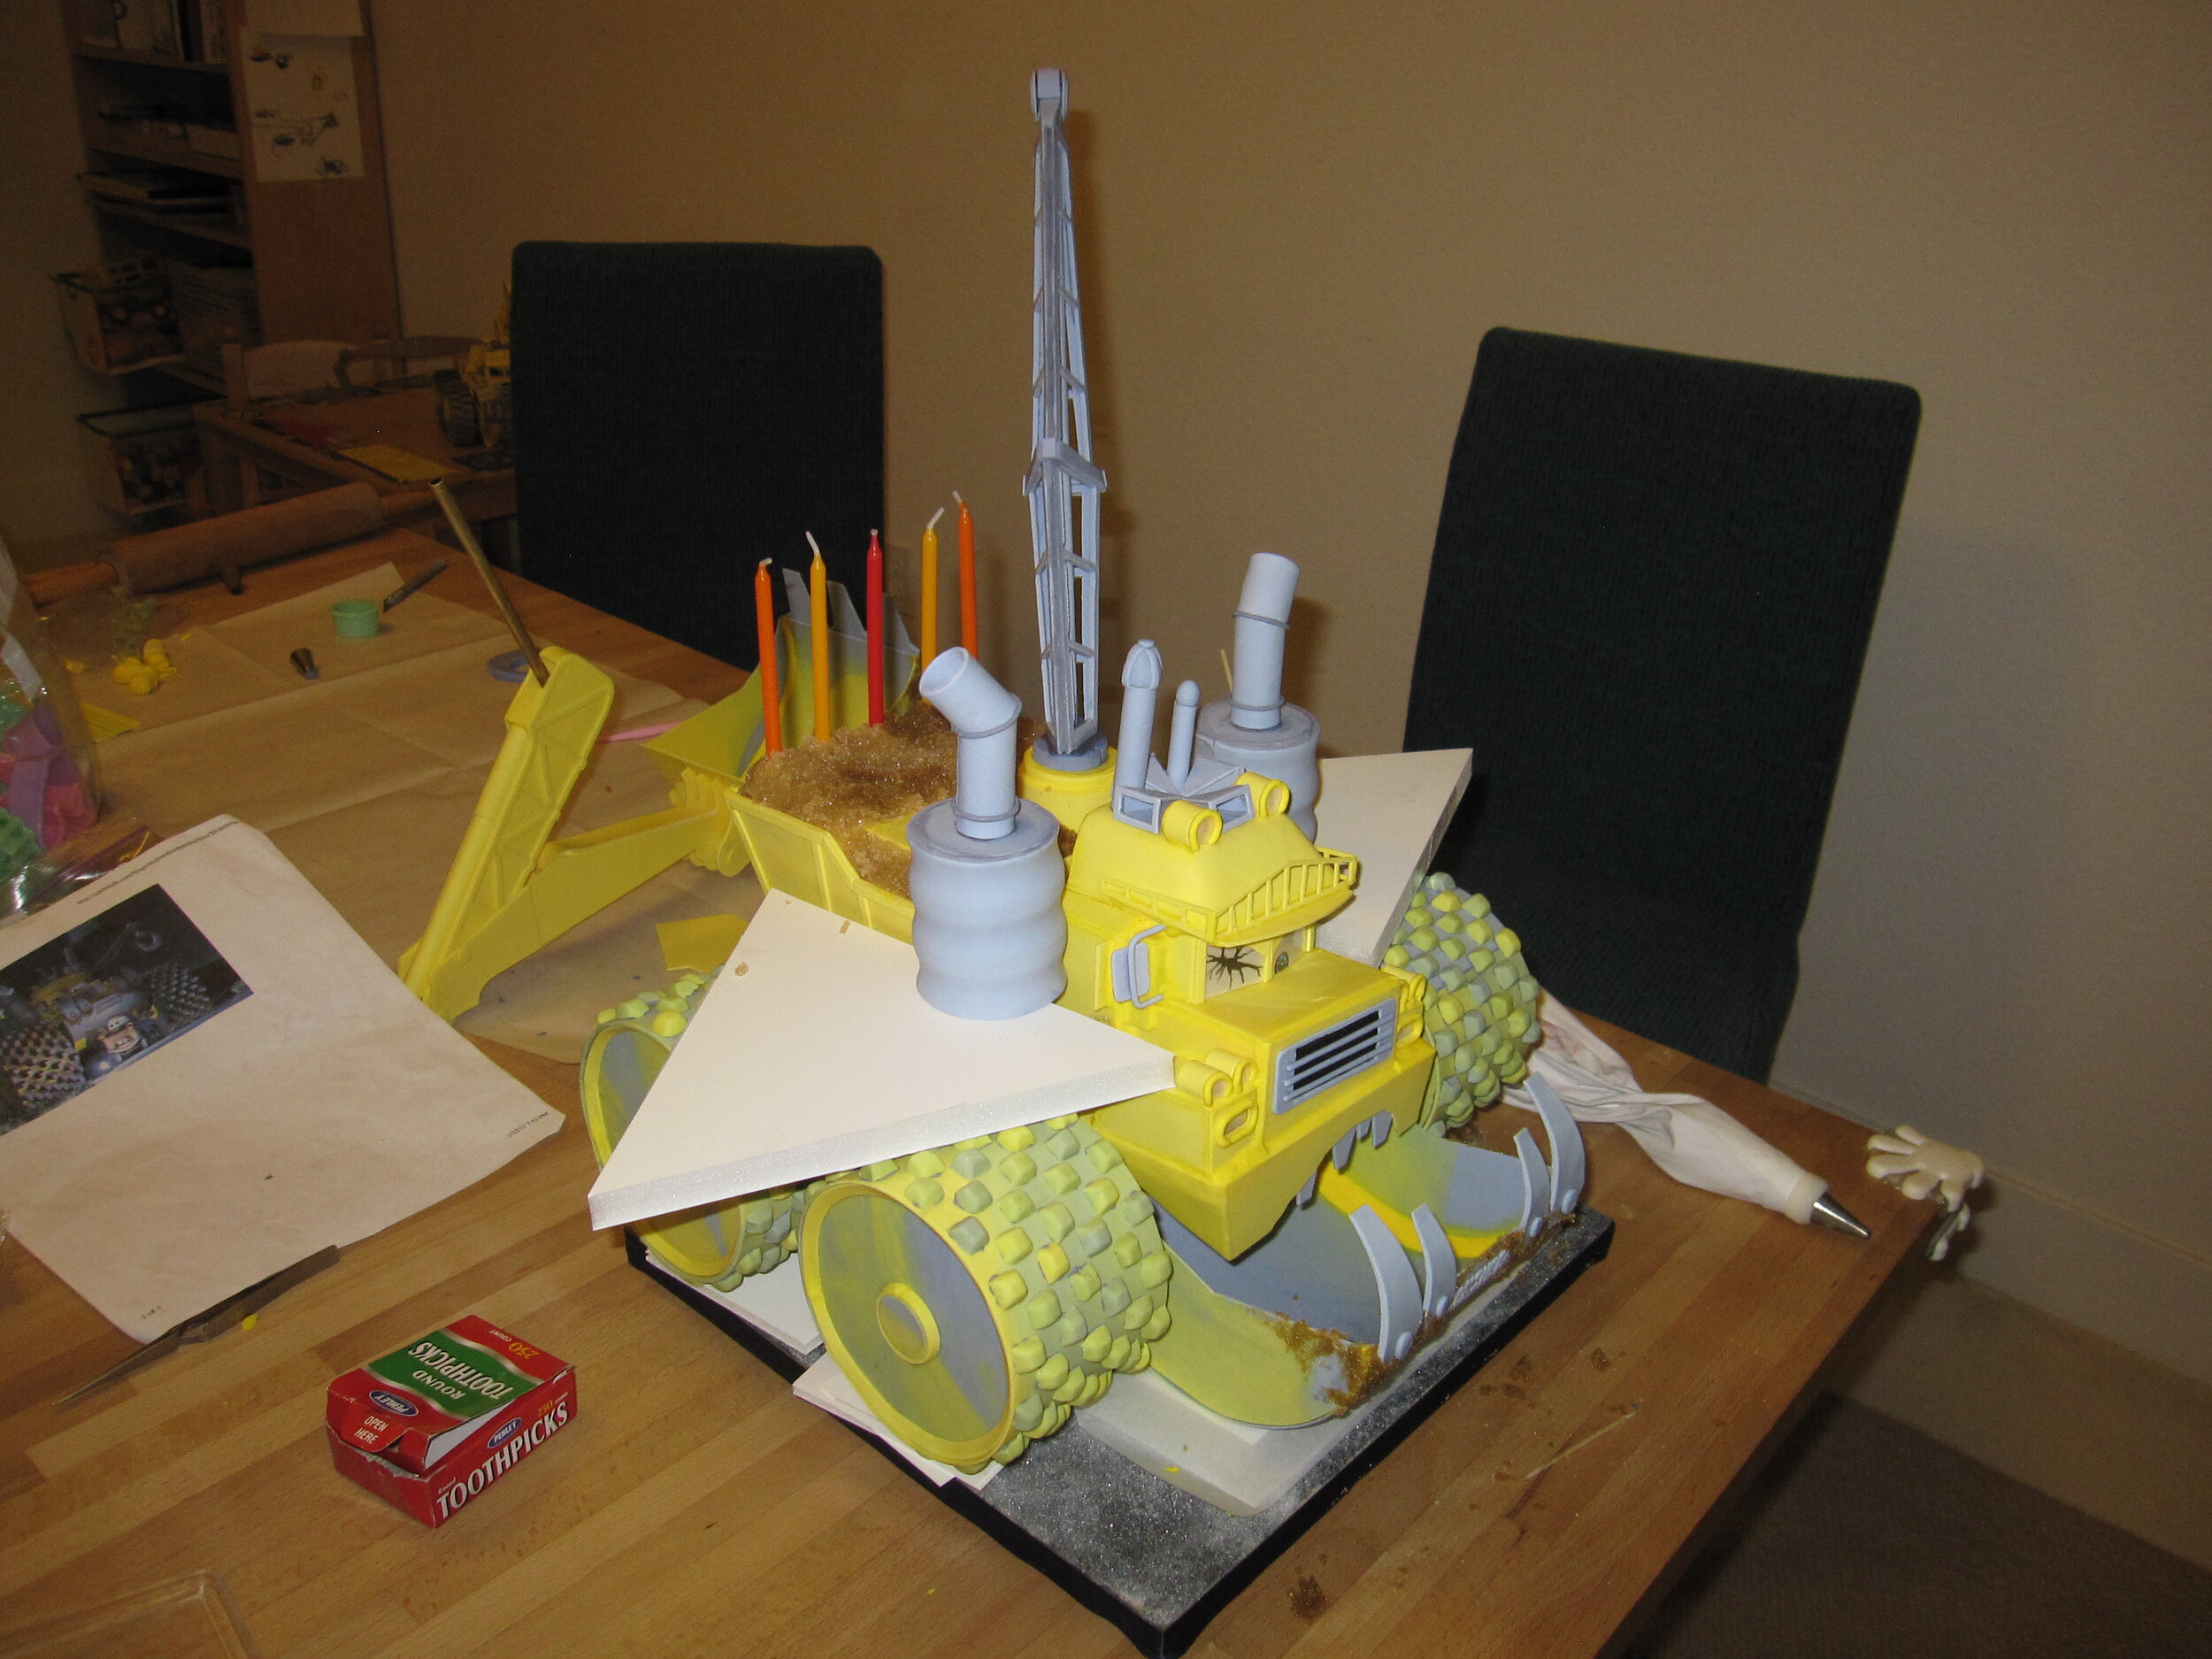
I spent Saturday night completing the assembly of the cake, installing the hook and the scoop, and adding finishing touches to the paint job. I also used some pressed sugar colored with brown food coloring for dirt on the teeth and in the dumper bed, where I also installed the five candles.

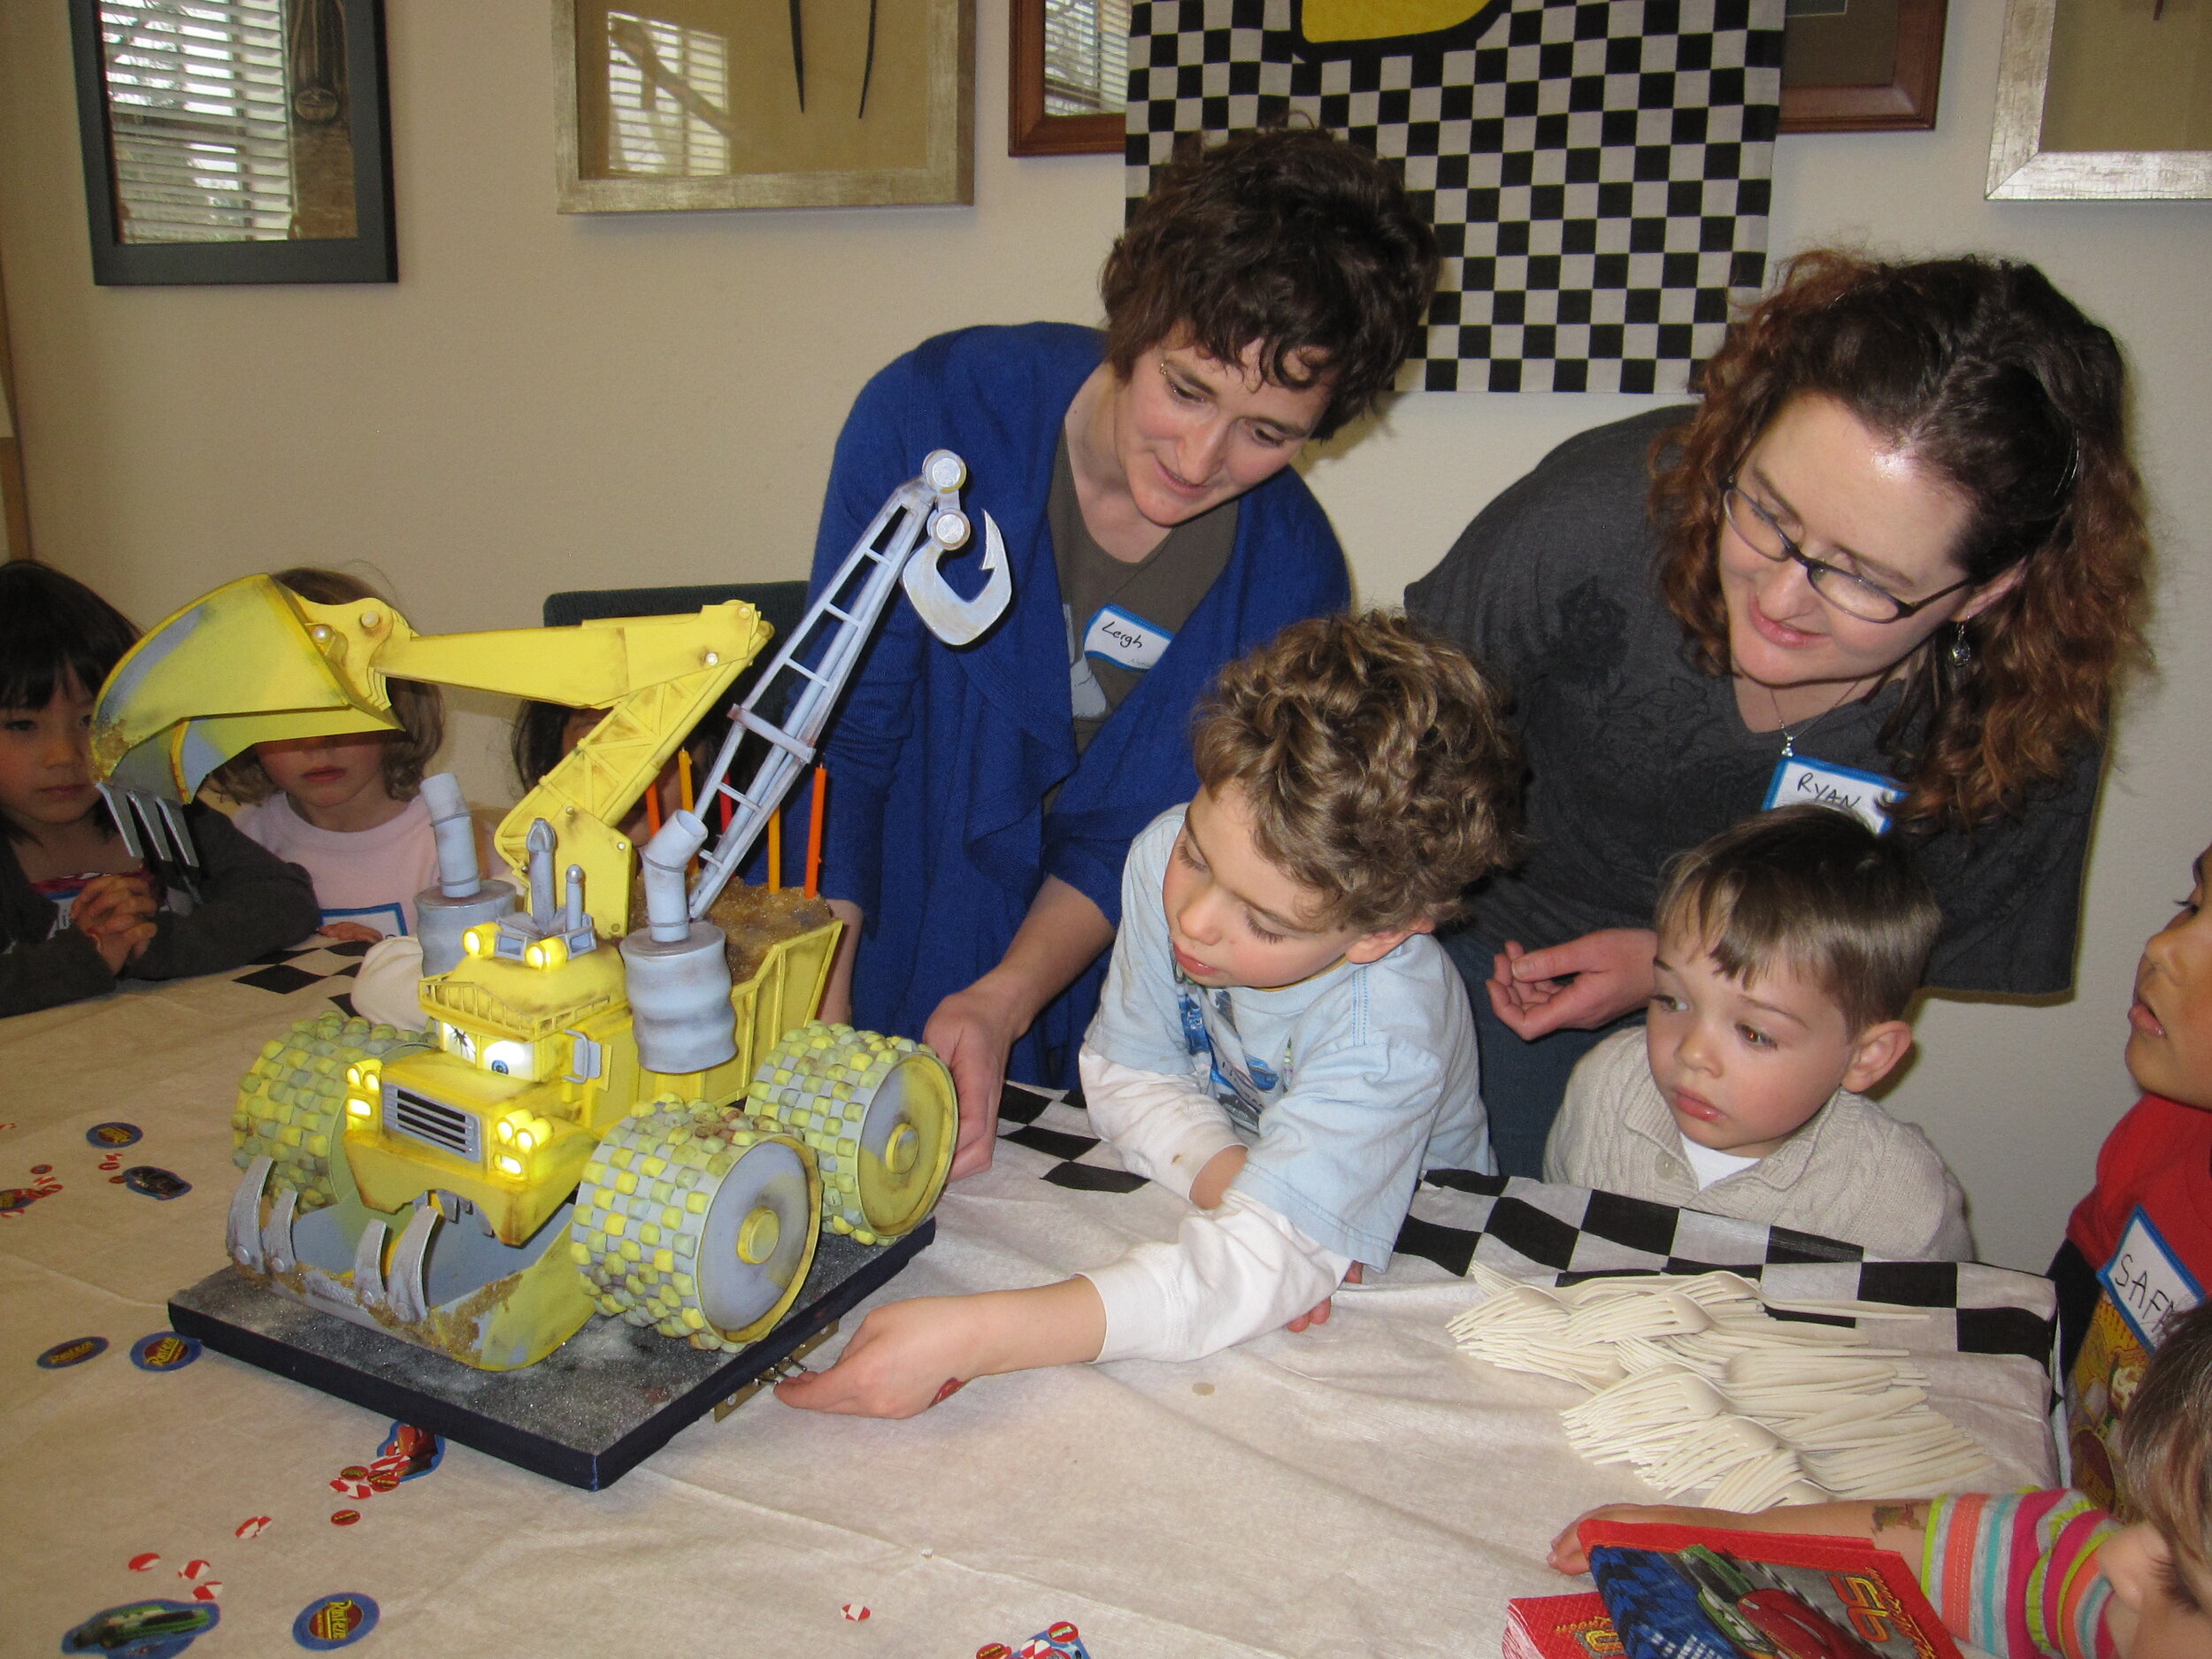
The party was fantastic. Our friend Sara brought awesome Cars decorations and balloons. My sister had invited Alex’s entire preschool class plus several other friends, so there were about 20 children. I’m not sure how they even all fit in the house.
Sadly, Banshee’s wheels didn’t spin (I think the rubber bands weren’t tight enough) and he didn’t go up and down (I think the cake was too heavy for the motor), but otherwise he was very well received. The most important thing is that Alex was happy. Happy and full of sugar.

Zoom! Boom! Bully Cake
For my niece’s fourth birthday, I made a cake based on Zoom! Boom! Bully from John Scieszka’s Trucktown.

Those of you who don’t happen to be immersed in the magical world of three- to five-year-old children are probably not familiar with John Scieszka’s Trucktown. So I recommend that you follow the link so you know what the heck I’m talking about.
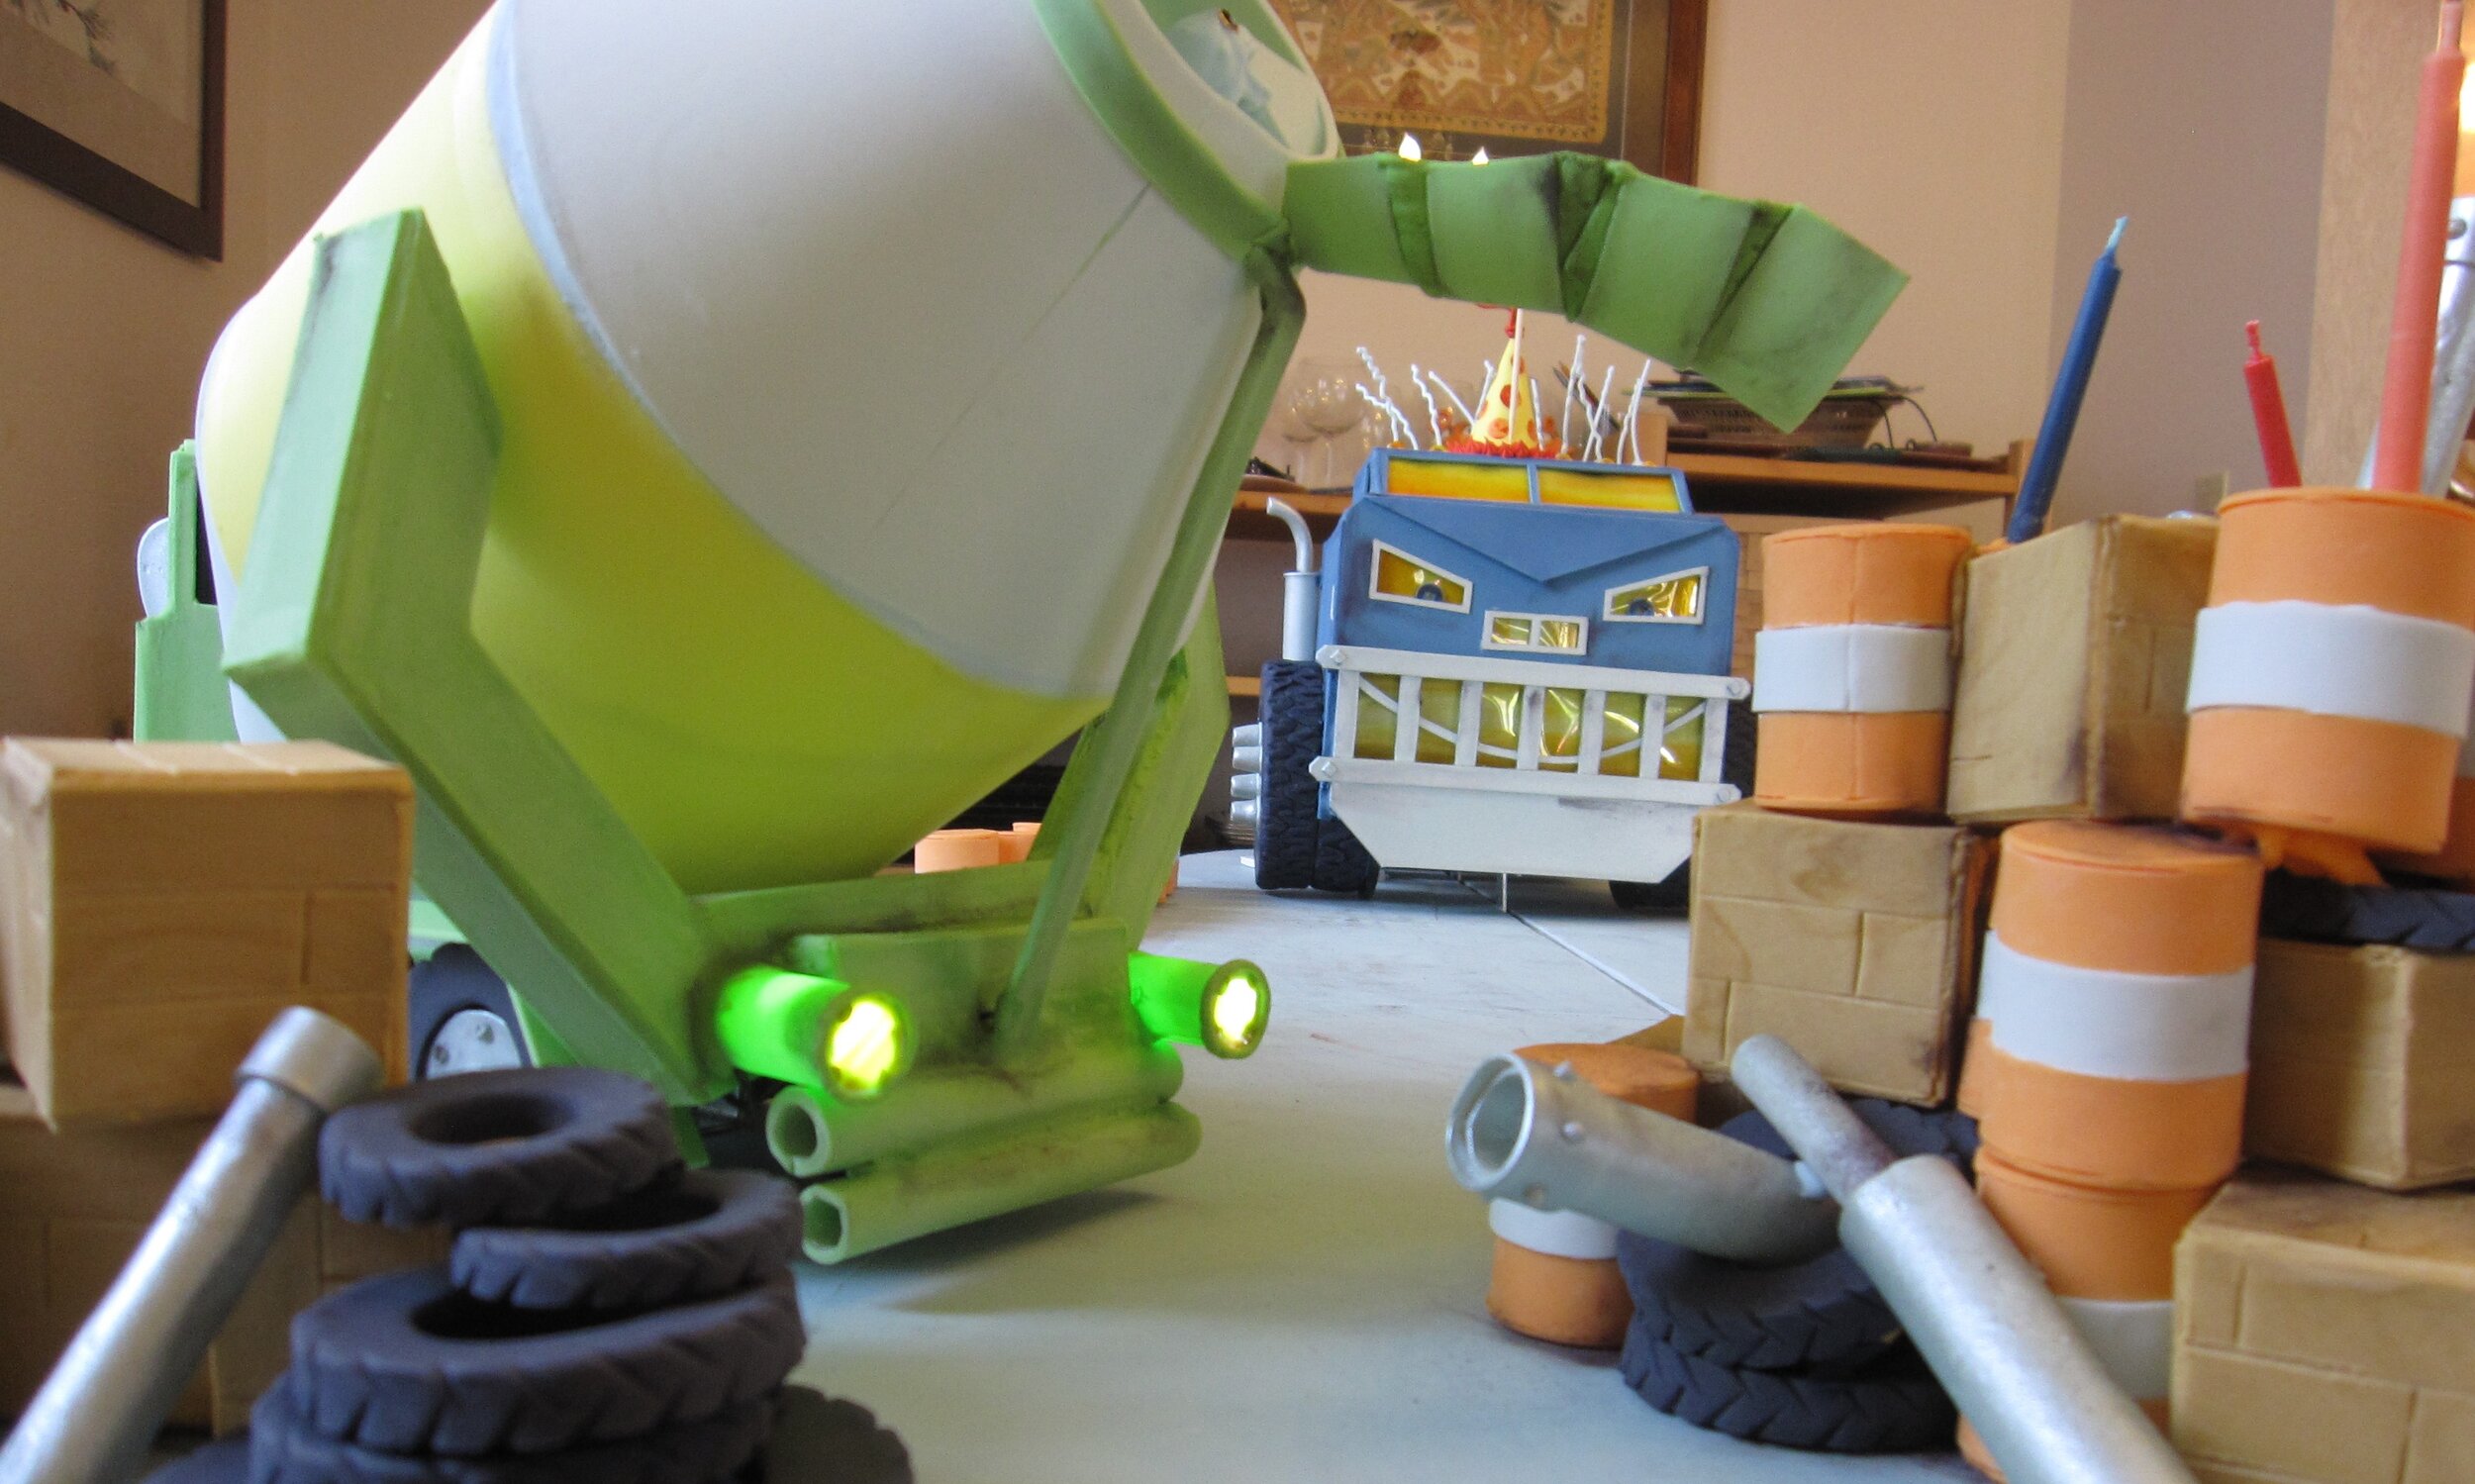
My personal favorite book in the Trucktown series is actually Smash! Crash!, but since the occasion for this cake was my niece Alex’s fourth birthday, Zoom! Boom! Bully was a more appropriate reference. The basic plot is that various denizens of Trucktown stack up crate, barrels, and tires in the middle of the street, but are periodically disrupted by the aptly named Big Rig smashing into them (Zoom! Boom!). The other trucks then exclaim about what a bully Big Rig is. The big surprise in the end is that it’s Big Rig’s birthday and the other trucks are making him a birthday cake out of the crates, barrels, and tires, which Melvin the cement mixer then pours cement “icing” on. Big Rig, very touched by the other trucks’ thoughtful gesture, picks up the “cake”, takes it back to his garage, and proceeds to gleefully smash it while wearing a festive yellow party hat.
I decided to recreate the penultimate moment of the book in cake form, consisting of three components:

1) The “cake” made of tires, crate, and barrels.

2) Melvin the cement mixer, with a rotating drum in the process of dumping cement onto the “cake”.

3) Big Rig, who would smash face first into the “cake”.
When I explained this concept to Alex she was very enthusiastic, if a bit disappointed that Jack Truck and Dump Truck Dan wouldn’t be on the cake.
The first thing I had to do was figure out how the heck I was going to make any of this happen. The easiest way to describe the process is probably to take each piece separately, though of course these projects were running concurrently.
Melvin the Cement Mixer
I learned a lot about cement mixer drums. The first thing I learned was that it’s very difficult to find detailed schematics of them on the internet. Eventually I resorted to studying Alex’s toy cement mixer. As far as I’ve been able to determine from these authoritative sources, cement mixer drum interiors consist of a series of semicircles, angled and staggered such that when the drum turns one way the cement is propelled towards the bottom of the drum and when it turns the other way the cement is pushed up and out the chute.
I made a whole series of Bristol board mockups with various sizes and densities of semicircles, trying them out using little pieces of paper as a cement substitute. None of them even came close to working. So I branched out and tried some other variations on the internal structure. Finally I settled on a helical arrangement of triangular wedges spiraling up towards the top of the drum. This seemed to at least sort of work.
With the basic structure settled, it was time to remake the drum in gum paste. The exterior of the drum was made in three pieces around Bristol board forms. Once these and the myriad little triangular wedges were dry, I assembled them with royal icing around a brass tube for the center support. Assembly was a lengthy process, as I had to wait for the icing on each wedge to dry before attaching the next one.

With the drum assembled around the central tube, I superglued the tube to the shaft of a reversible gear head motor (once I had figured out how to wire up the motor to make it reversible.) Mounting the drum and motor assembly to the base was a real challenge. I had made a pretty simple base for Melvin out of a cut-up aluminum baking sheet, covered with gum paste, and elevated off the wooden base for the entire cake with L-brackets, so the body of the truck would ultimately appear to be resting on its tires. In Zoom! Boom! Bully, Melvin’s drum appears to be supported from beneath in the middle by two angled beams, but there doesn’t seem to be a support for the back of the drum. This, of course, also raises the question of what Melvin’s rear chute is attached to.
My plan was to build the side support beams out of gum paste around pieces of brass, bolted to the aluminum base. Because, unlike the people illustrating the book, I physically needed something on the back to support both the drum and the chute, I decided on a brass ring mounted on a strip of brass and wrapped in gum paste, also bolted to the aluminum base.

The first time that I put this all together with the motor and the gum paste drum, I set it up so that the lowest point on the drum was resting on the aluminum base, on which I had put some UHMW tape to keep friction to a minimum. I thought that this would help to support the weight of the drum and keep stress off the motor. This turned out to be a very bad plan, as I had failed to account for the fact that, in spite of my best efforts, I had failed to center the drum perfectly on the central brass tube. This meant that when I turned the motor on, as soon as the part of the drum that was slightly further from the axis of rotation got around to the bottom, it jammed against the base. I turned the motor off as soon as I realized what has happened, but not soon enough. As the central brass tube was still trying to rotate while the drum itself was jammed against the base, the royal icing connected the gum paste drum pieces to the brass tube cracked. D’oh!
A few tense hours and one major royal icing repair later, the drum was reattached to the tube. In order to prevent this from happening again, I made a new, slightly higher brass ring to support the back of the drum and raised the motor, and therefore the front of the drum, about a half an inch as well. That way, the drum never touched the actual aluminum base and was supported only by the motor on one end and the brass ring on the other end. It worked!
Once the drum turning mechanism was in place, finishing the back of the truck was relatively simple. I covered the motor in green gum paste and assembled the gum paste pieces of the side support beams. Having previously made tires out of black fondant and hubcaps out of gum paste, sprayed silver, it was easy to attach these, as well as the gum paste wheel wells.
I had also wired up some white LEDs to use for Melvin’s taillights and headlights, so I put the LEDs for the taillights in place and then ran the wires underneath the aluminum base so they’d be in place for the headlights once I got his head assembled. The taillights themselves I made out of gum paste cylinders, capped with rice paper (to diffuse the light) and yellow gelatin (to give the light the correct hue.) In the past, when I’ve needed sheet gelatin (see the Tardis Cake and the Flying Saucer Cake) I’ve used the pre-made kind, but since that has a strange diamond pattern on it, this time I tried making my own flat sheet gelatin, using these instructions that I found on the internet. After a few abortive efforts, it worked pretty well.
Assembling the chute took a little time, because it was made of six separate pieces, which had to be attached one at a time, with sufficient time for the connective royal icing to dry before attaching the next one.

With the back of Melvin thus complete, I had to make his head, the only part of Melvin that contained actual cake. This went very smoothly. Having made all the exterior gum paste pieces in advance, it was simply a matter of carving the cake into the appropriate shape, covering it with fondant, and then setting it in place on the aluminum base. Then I could assemble the gum paste exterior with royal icing, including more tires and wheel wells, the ears / side view mirrors, and eyeglasses / headlights (which were assembled around the rest of the strand of LEDs.) To fill gaps and hide seams, I used royal icing, smoothed with a damp paintbrush.
For cement, I made some white chocolate ganache, tinted grey with black powdered food coloring. Mind you, at this point I still didn’t know whether the drum was properly configured to actually push the cement out and down the tube, and I wouldn’t find out until the party.
Big Rig
My biggest challenge of this cake was figuring out how to make Big Rig roll. It was also pretty high pressure because, let’s face it, if Big Rig didn’t smash into the “cake” the whole project would pretty much be a blatant failure. With almost all of my cakes, I accept that there is a fairly high probability that it might not work as I intend. My philosophy is that if you always know that what you’re doing will work, you’re not trying hard enough. Which is fine when the only people who are going to be disappointed with a failure are me, or my adult friends, or the guests at my friends’ wedding. But I really didn’t want to disappoint Alex. So in this particular case, I really couldn’t let failure be an option.
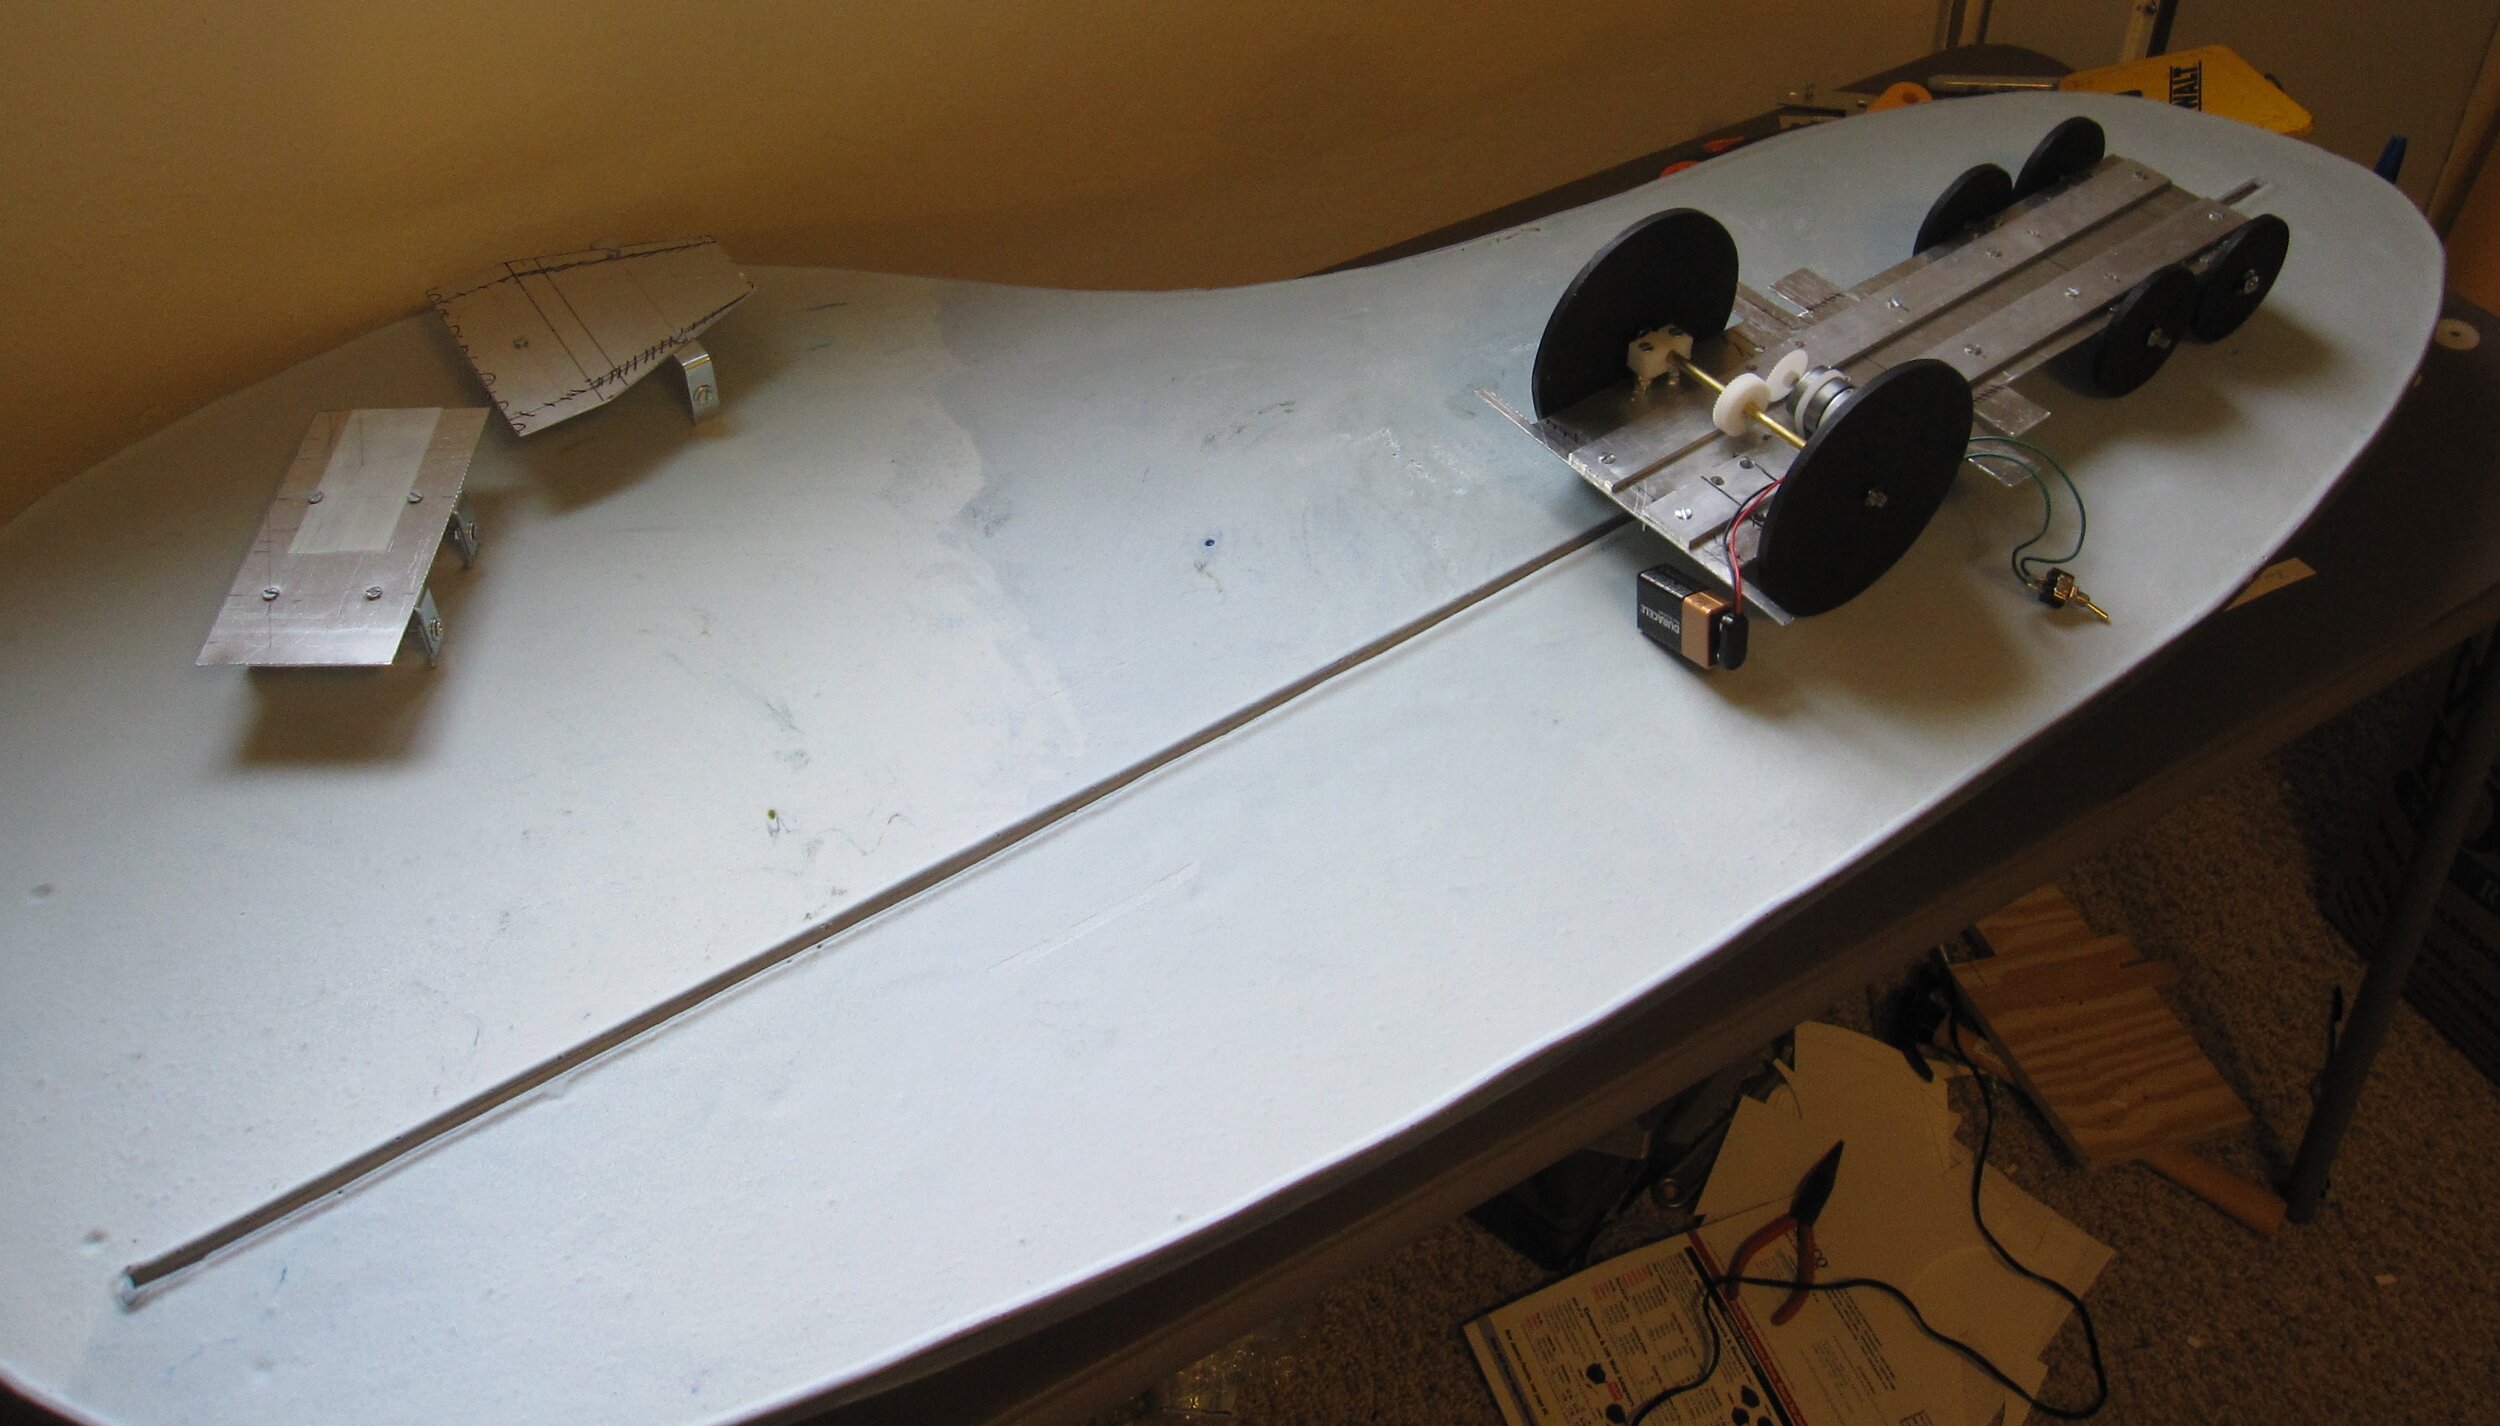
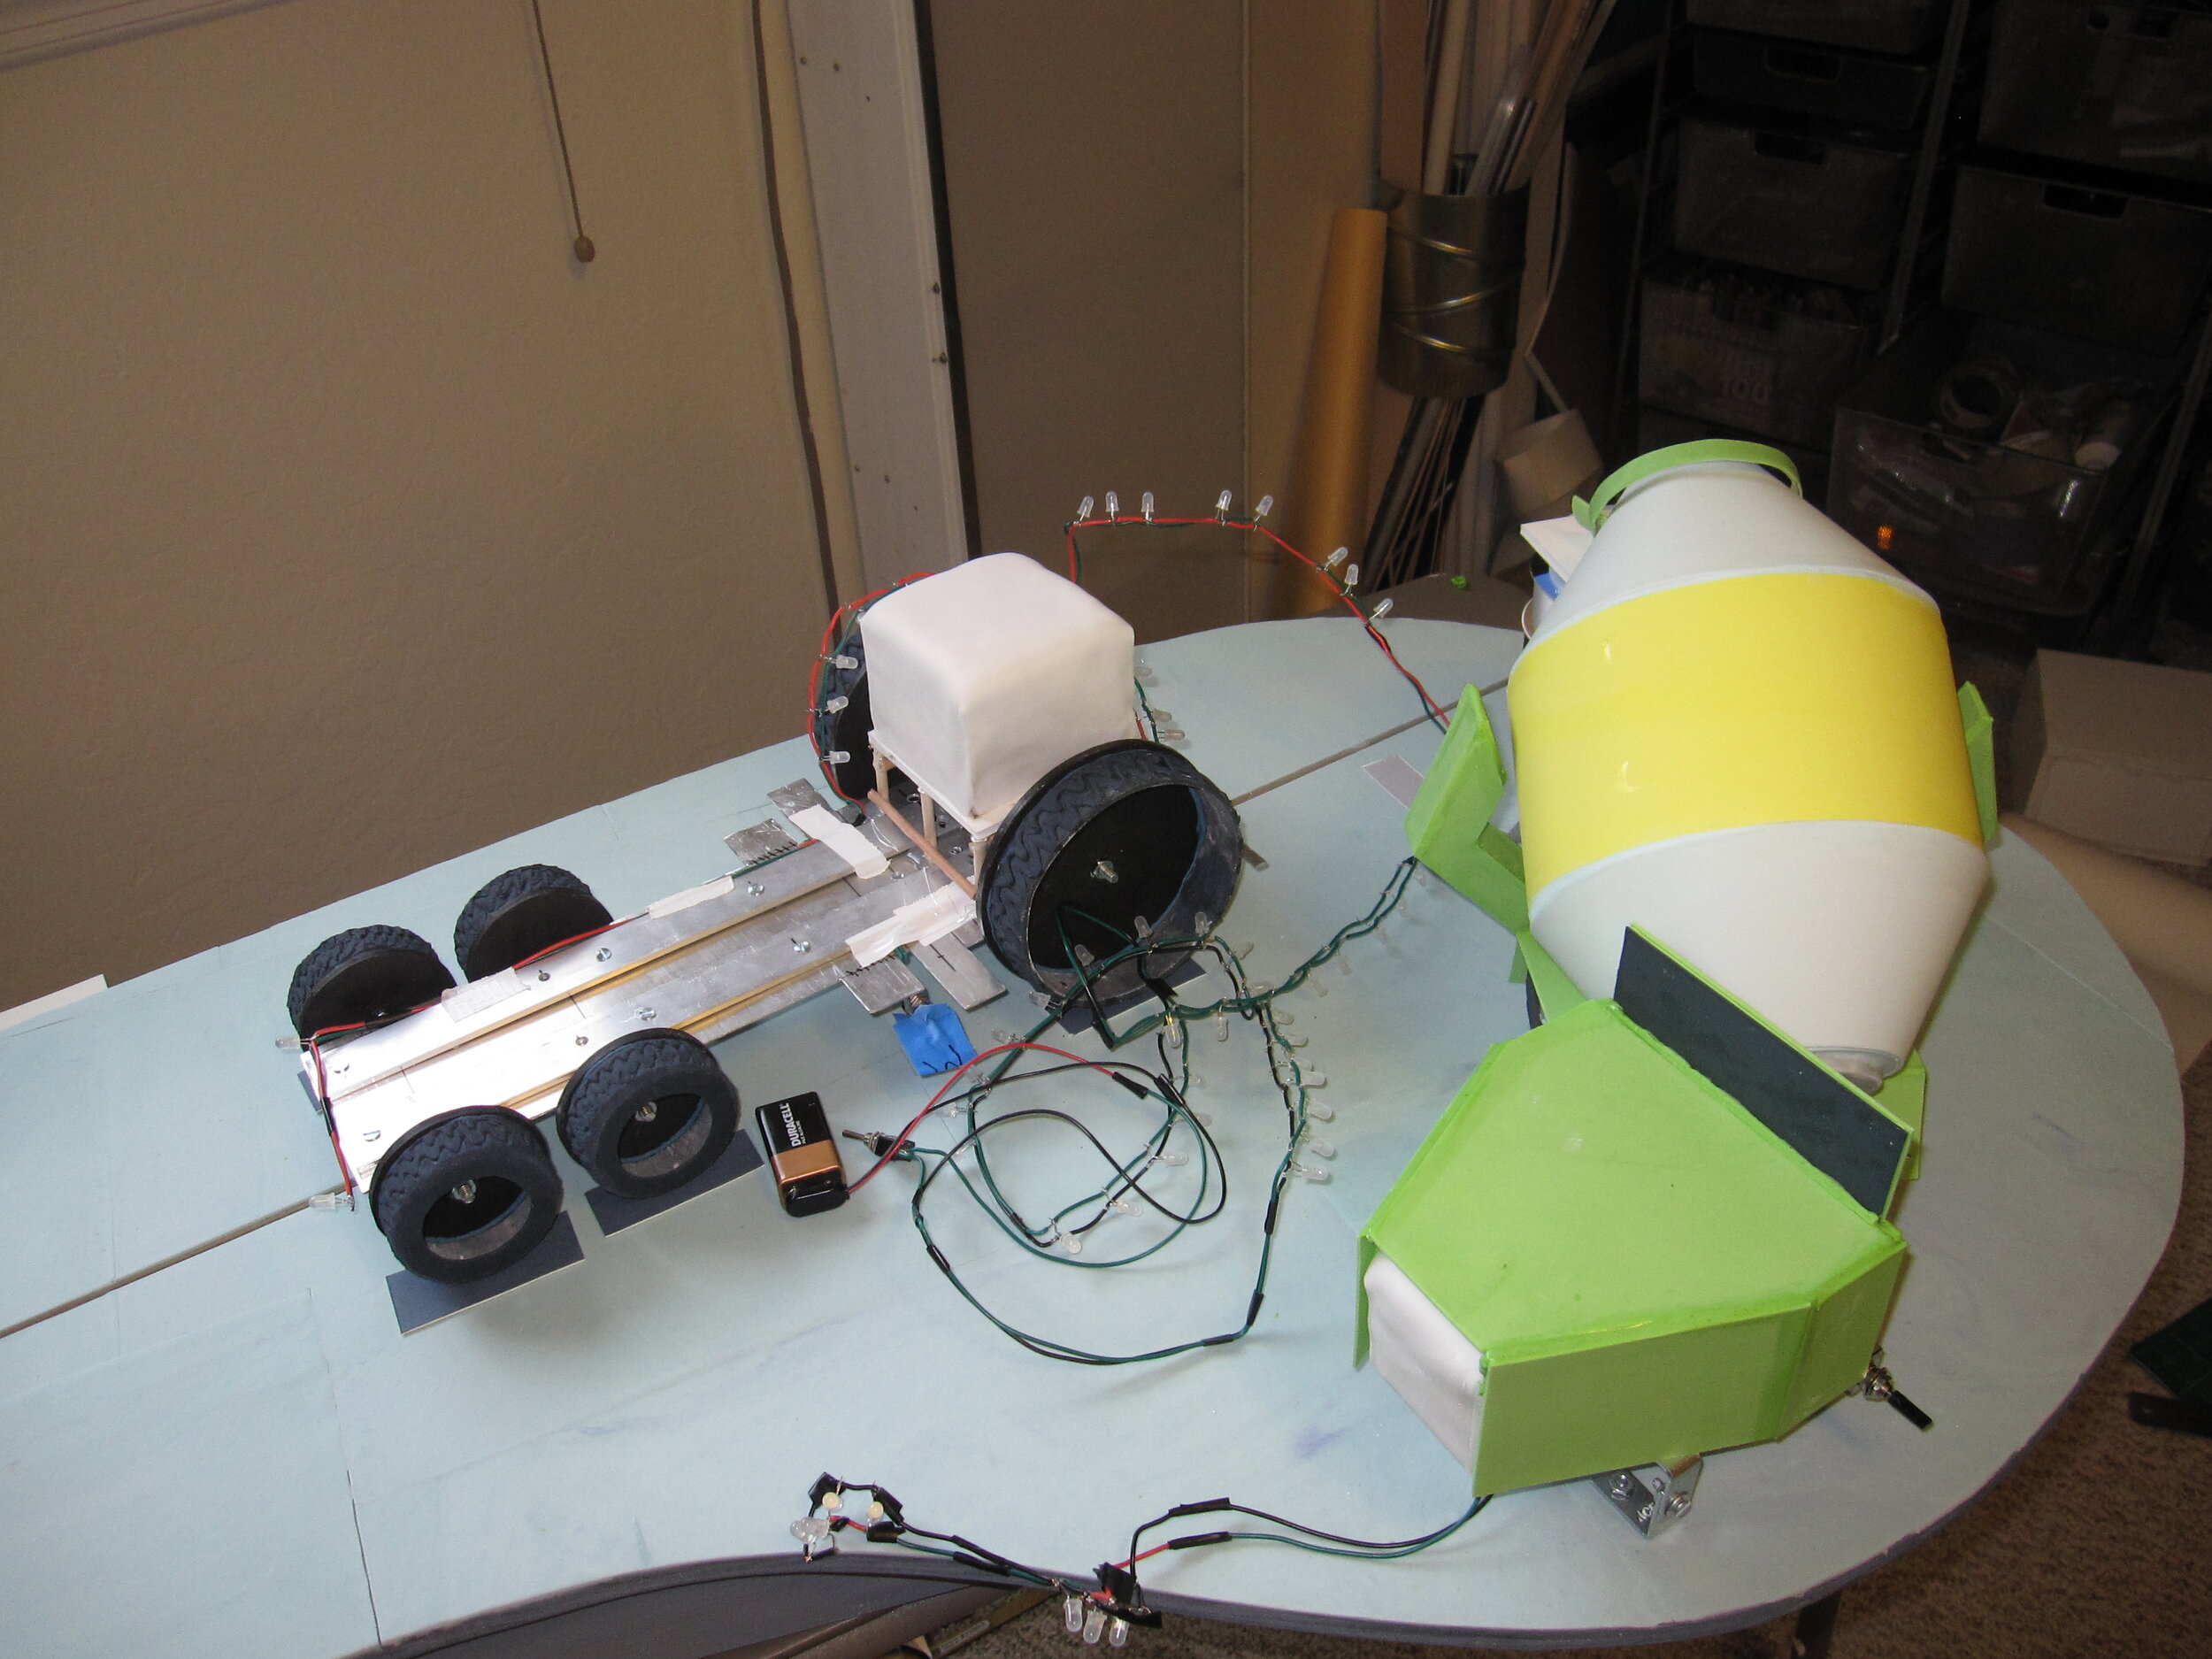
Keeping Big Rig on the right trajectory was the easy part. I attached two L-brackets to the bottom of Big Rig’s aluminum base, a material which I had selected to keep his weight as low as possible. Then I cut a track in the plywood base for the entire cake, running from the far end where Big Rig would start, leading to the end of the base where the “cake” would sit. That way, the L-brackets, slotted into the plywood track, which I had lined with UHMW tape to reduce friction, would keep Big Rig on target to the “cake.” All I had to do was get him to move.
My first attempt at a drive mechanism was to connect a hobby motor directly to the shaft of one of the front wheels (made out of plywood, to be covered later with gum paste tires), so it would basically be a one-wheel drive car. This failed for at least two reasons. First, because the two front wheels weren’t connected to each other via a complete axle, both had a tendency to bind up in their bushings, so that moving even the light aluminum base without any cake on it took all the motor’s power. Second, because only one wheel was driving the truck, it had a tendency to try to pull the truck off course so that the L-bracket bound up in the track.
So I scrapped that and tried something else. This time, I connected the two front wheels with a brass and threaded rod axle. My plan was to transfer the power from the motor to the axle with a heavy-duty rubber band under tension. This plan failed even before I connected it to the wheels, as the minute that I started experimenting with putting tension on a rubber band around the shaft of any of the hobby motors I had in hand it became clear that none of my motors had nearly enough torque to get the job done.
I went online and located a promising-looking high-torque motor. While I was waiting for that to arrive, I started playing around with the possibility of a motor-less drive mechanism. My first thought was a tension spring. Unfortunately, a few major problems with this idea soon became clear. First, the length difference between the relaxed spring and the spring under tension wasn’t nearly enough. I couldn’t pull the truck all the way back to the end of the track, and even with the spring fully relaxed I was afraid that the truck wouldn’t even reach the “cake” to smash it. Second, I was very scared that, if I had to keep Big Rig under that kind of tension for any length of time there was a significant risk of premature smashing, which would be a real tragedy. Third, I really wanted Big Rig’s tires to spin on their own, so I could start the wheels spinning, and then release the truck for the final smash. There’s a great illustration in Zoom! Boom! Bully where Big Rig’s tires are spinning into a whirl of smoke just as Jack shouts, “Stop!” and the other trucks reveal that the “cake” is for Big Rig’s birthday. I really wanted to recreate this moment in cake before the smash, and that required motor power directly to Big Rig’s wheels.
I managed to solve the first of these problems by substituting a jumbo-sized rubber band for the spring. The rubber band had a much higher stretch-to-length ratio than the spring, and the flexibility of the rubber band meant that even after its tension was exhausted, it at least wouldn’t arrest the momentum of the truck. The rubber band also seemed to have sufficient power to move the truck fairly quickly, even with the projected added weight of the cake and gum paste. But the rubber band still left my other two concerns unaddressed. It still required the truck to be under tension for a longer period of time than I was comfortable with, unless I could come up with a release mechanism that I could set after the cake was completed and moved into place. And in order to achieve the effect I wanted with the tires spinning prior to release, I really needed tires that were legitimately motor-powered.
Fortunately, when my high-torque motor arrived, early signs were encouraging. Unlike the motors I was trying before, it was clearly powerful enough to withstand the tension on the rubber band. So I mounted the motor to the cake base and ran the rubber band to connect the motor shaft to the axle. Initially, I was delighted with the result. With no weight on the aluminum base, the truck drove great. However, as soon as I put some weight on it, to mimic the weight of the cake and gum paste I was planning to put onto Big Rig, it stopped working altogether, as the added weight was sufficient to counteract the tension on the rubber band and cause it just to slip uselessly around the axle. I tried to mitigate this problem by putting something sticky on the axle, but this just made the rubber band stick to itself and get wound up around the axle.
Next, I tried using gears to transfer the power from the motor to the axle, which required a complete redo of the front bushings to leave space between the axle and the aluminum base for the gear. Like the rubber band drive, this worked great until I put any weight on the base. Unlike with the rubber band, the truck did at least move with additional weight on it. It just moved very slowly. I did have hopes, though, that if I kept the cake as light as I possibly could, it might work.
To give it an extra boost of power, I decided to combine this partially successful motor solution with my partially successful rubber band solution. I designed a release mechanism consisting of a piece of U-shaped channel that ran across the track, underneath the base, attached to a dowel handle leading out the side of the base. That way, with the rubber band connected to one of the L-brackets under the truck base on one end and an eye bolt at the “cake” end of the track at the other end, I could finish decorating Big Rig with the rubber band relaxed, and then pull him back and set the L-bracket into the U-channel. This would hold him in place, and hold the front wheels a fraction of an inch off the base, so I could turn the motor on, let the wheels spin freely for a second, and then pull the dowel to release him. The rubber band would pull Big Rig forward while the wheel simultaneously pushed him forward. I could only hope that would provide enough force to make him powerfully smash into the “cake.”
And thus ends the saga of making Big Rig go, but I still had to actually make Big Rig. Because Big Rig has a kind of maniacally glowing face, as well as taillights and a menacing glow inside his wheel wells, he needed a lot of LEDs. Fortunately, by this point I’ve done so many LED-intensive cakes that I could basically just chop and splice segments together as needed, so the wiring went pretty quickly.
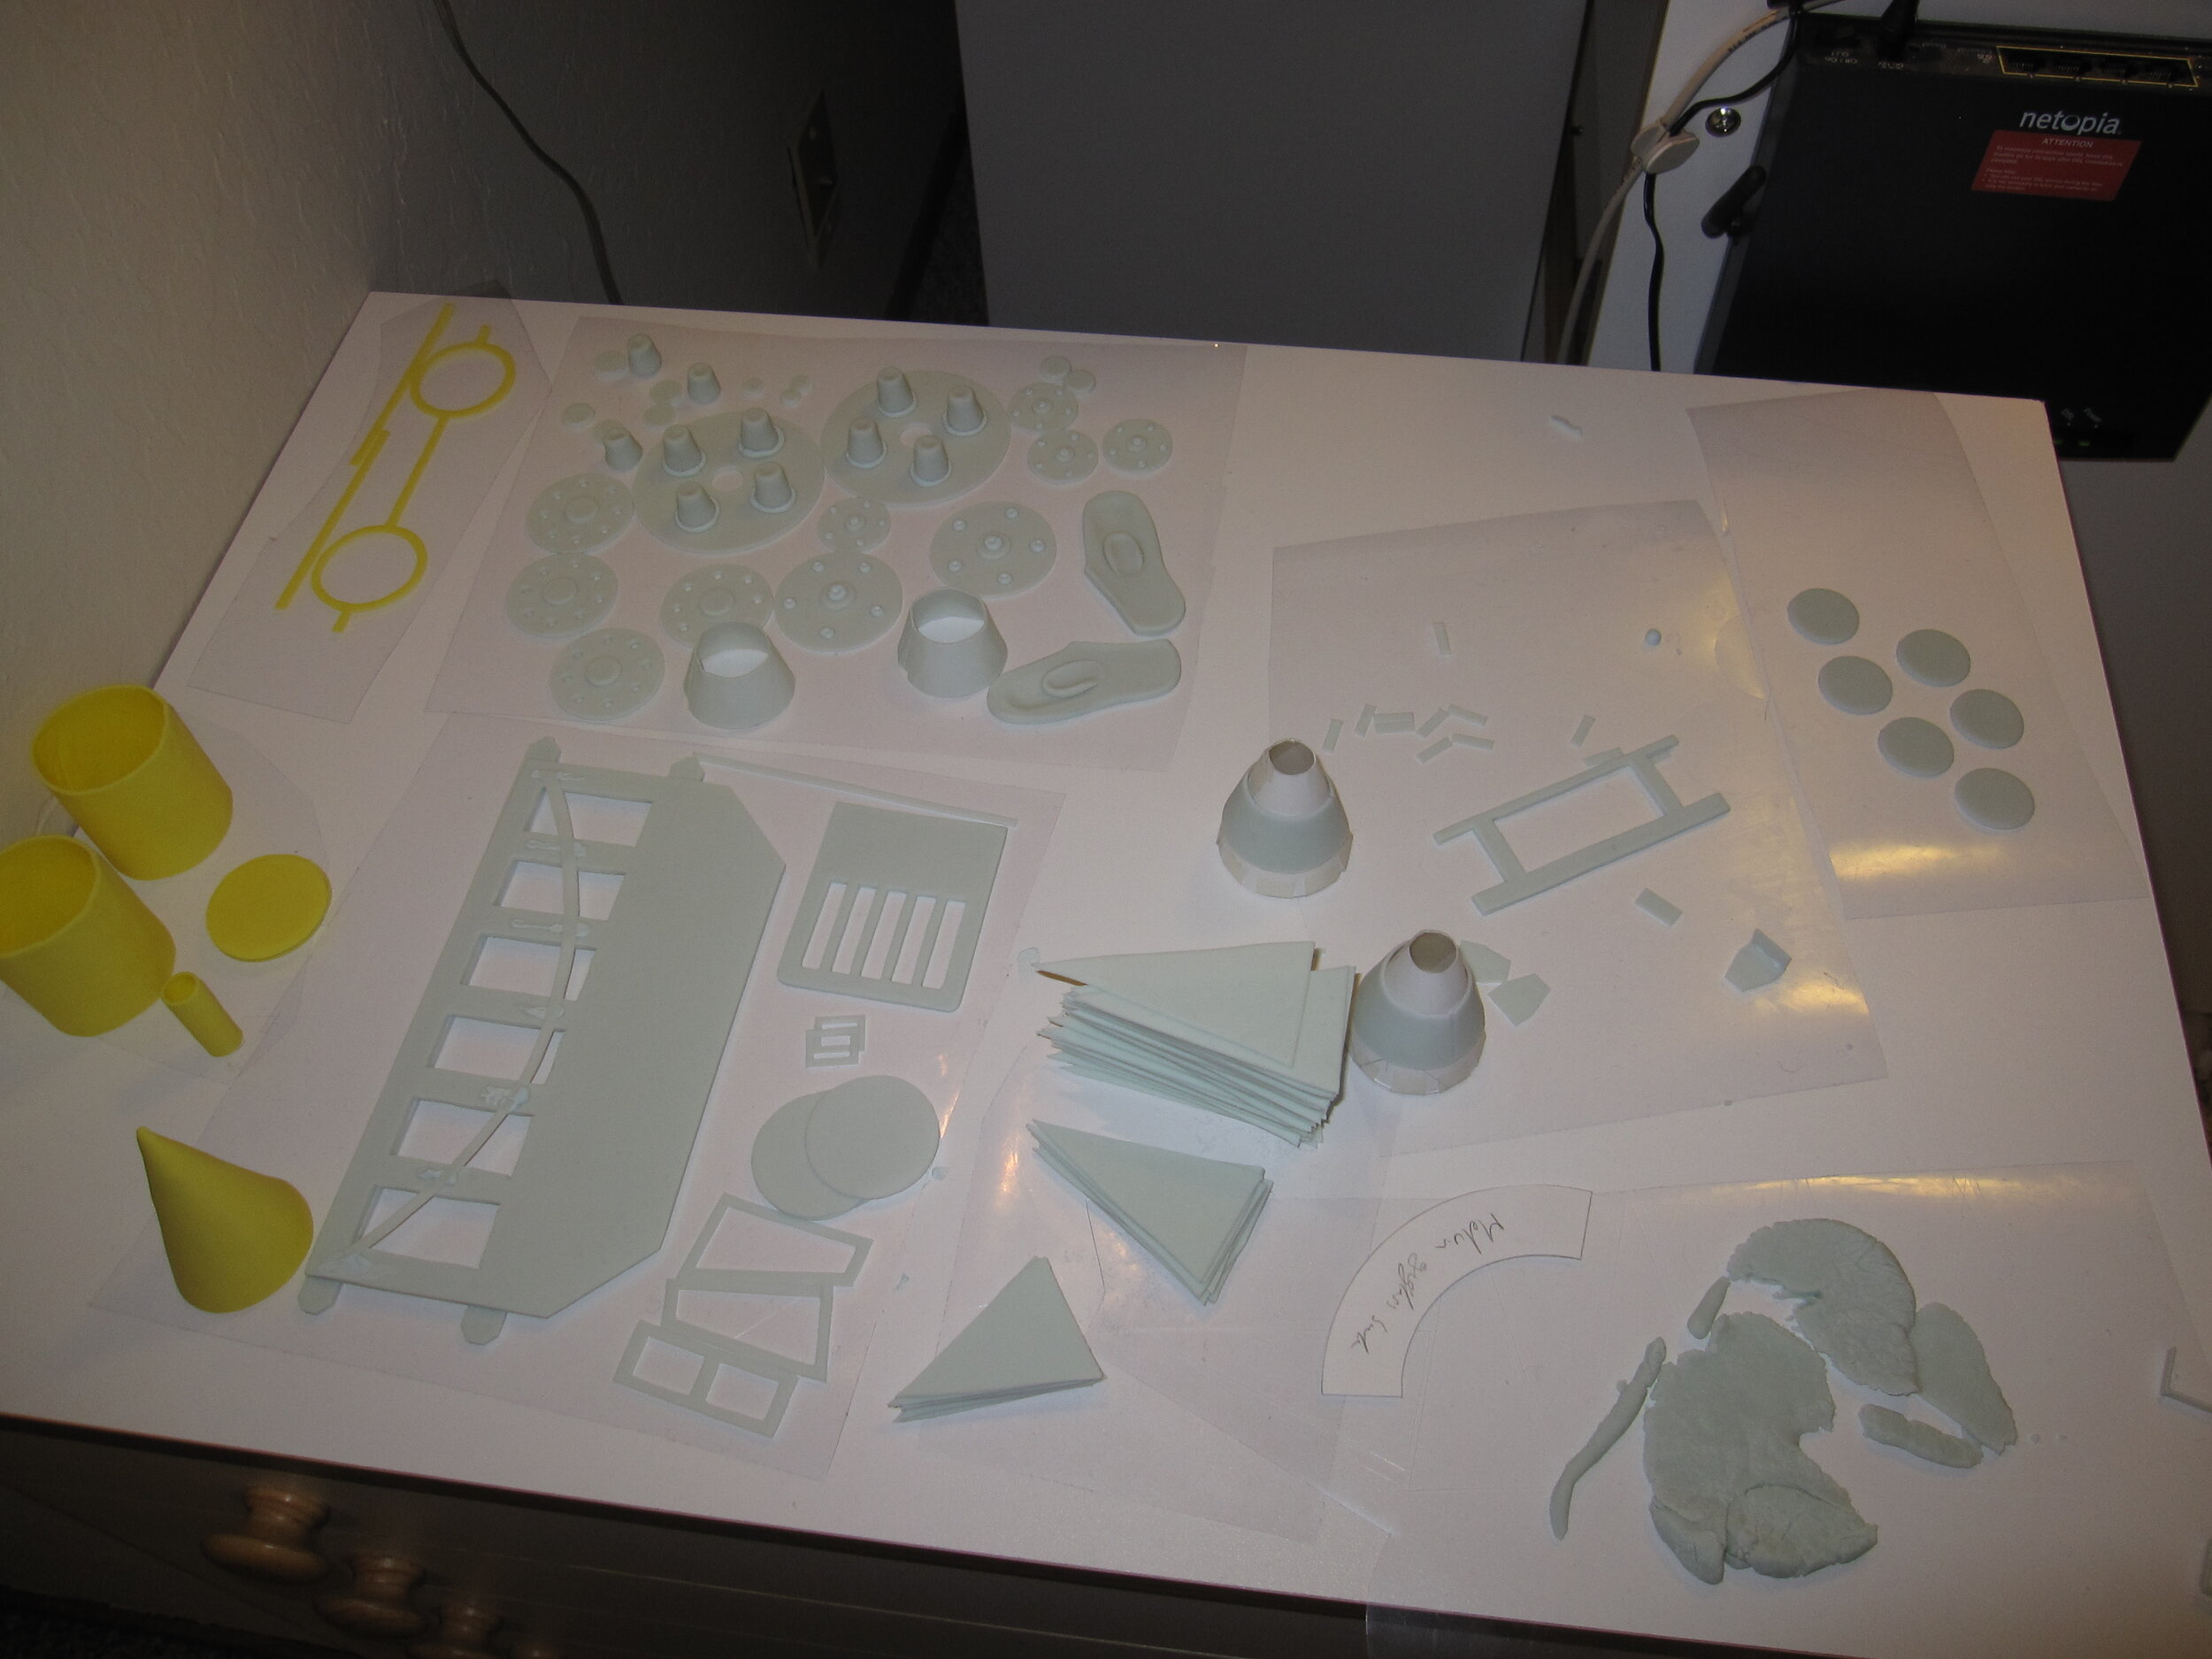
All the gum paste pieces, including tires, hubcaps, fuel tanks, bumpers, walls, trim, and yellow party hat, were made and dried in advance. To get the requisite orange and yellow glow out of Big Rig’s eyes, mouth, etc. I made sheets of gelatin with fades from yellow to orange, backed with rice paper to diffuse the light form the LEDs.

The cake itself was limited to the back of Big Rig and a very small square of cake inside his cab. At the party, someone pointed out that it was like a little cake engine block. I couldn’t put a bigger cake inside his head, because I needed to leave space around it for the LEDs. I kept the fondant layer on the cakes (necessary to prevent the gum paste from touching the buttercream icing, which softens dried gum paste) as thin as possible to keep the weight down. Fortunately, since I was covering the entire thing with pre-made gum paste pieces, the fondant didn’t have to look particularly nice.
With the cakes in place, attaching the gum paste exterior and all the trim pieces was really quite simple. The only problem I had was that when I redid the front axle bushings to accommodate the gears, I had failed to make the corresponding changes to the templates for Big Rig’s cab, so the sides, front, and back of the cab were all about half an inch too short. Fortunately, I had some extra dry blue gum paste pieces that I was able to cut down to patch the gaps. With some liberal royal icing spackle, it turned out just fine. The finishing touches were the royal icing antennae on the top. I have no idea why Big Rig needs so many antennae (which is what I told Alex when she asked me that question) but he has them in the book, so he had them in the cake.
“Cake”
Although the “cake” was the easiest component in that it didn’t have to do anything but sit there and be smashed, it also required more individual gum paste pieces than (I think) Melvin and Big Rig put together. Each barrel was made of five separate gum paste pieces and each crate required six. At the early planning stages of this project, I had envisioned putting tiny individual pieces of cake inside each crate and each barrel. Considering that the crates were only an inch and a half on each side, and the barrels were even smaller, I’m very glad that I came to my senses before I tried to do this. It’s not like there wasn’t already more cake than our guests would possibly eat anyway. Instead, I just put a little square of cake inside the “cake”, surrounded by the hollow crates and barrels and fondant tires. This probably made for a better smash in the long run anyway.

In addition to the crates and barrels, the cake also included a selection of fondant tires and gum paste pipes. Since I had made way more of all these things than were actually required, I used the extras to create bonus piles of stuff around the perimeter of the plywood cake base.
Finishing touches
With everything assembled, I actually went to bed at a relatively reasonable hour the night before the party. The next morning, as I was putting on the finishing touches – mostly adding a little dirt and grime with black powdered food coloring – Alex came in to inspect my work. She walked around it, studying it very carefully and commenting favorably on specific elements, like Big Rig’s tires and Melvin’s articulation. She then pointed out that I needed to put eyes on the chicken hood ornament on Melvin’s nose, which was already on my list of details to finish up before the party.

Alex then noted that I hadn’t made a hitch for the back of Big Rig. I had considered making a hitch for Big Rig, but decided against it because it doesn’t play any role in this scenario and because in some of the images in the source book, he doesn’t appear to have a hitch. Alex listened patiently to this explanation and then countered by pointing out that, in Truckery Rhymes, Big Rig is shown towing a trailer, which he couldn’t do if he didn’t have a hitch. I was forced to bow to her superior logic and quickly made a gum paste hitch. Actually, it even looked better from an aesthetic point of view, as the silver hitch made the solid blue rear section of Big Rig much more interesting. What I especially love about Alex’s argument is that it draws not just upon the specific source book for this project – Zoom Boom Bully – but upon the rest of the Trucktown canon as well. I also enjoy that it is a functional argument. Her point was not merely that Big Rig should have a hitch because he is shown with a hitch in the illustrations, but that Big Rig needs a hitch or he would be unable to fulfill his function as a big rig.

With the hitch completed, I got Alex’s dad to help me move the cake out to the dining room. Then came the stressful moment when I had to pull Big Rig back into his release mechanism. I was terrified that I was either going to lose my grip and send him crashing into the “cake” or crack Big Rig’s head to pieces in the effort of pulling back the rubber band. Fortunately I avoided either catastrophe and got Big Rig primed for release with only the loss of one fuel tank that was easily reattached.

Alex then consulted the source material for one final check on the accuracy of my work. She pointed out that, in the book, the “cake” is shown on a wooden palette, and I had failed to put my cake version of the “cake” onto a palette. I explained that I had noticed that and had considered putting the “cake” on a palette but had decided against it as I was afraid that the palette would arrest Big Rig’s movement so that he wouldn’t smash into the “cake” as effectively. Alex considered this carefully and then decided that perhaps Big Rig had taken the “cake” home on the palette and then removed it from the palette in order to smash it. I agreed that was an excellent explanation.
The party
With only one exception, the cake worked very well. Melvin’s drum turned flawlessly, but sadly, he did not actually pour cement. Either the drum and/or the wedges inside weren’t angle correctly or I had made the ganache too thick. Also, I didn’t really know which way the drum was supposed to be turning to make the cement come out. Cement mixers are complicated. Oh well, at least the drum turned.

Most importantly, Big Rig worked! Zoom! Boom! One of the barrels even flew off the table. Big Rig’s front bumper cracked beautifully so that he wound up with an excellent jagged evil grin.

Alex had a great time eating various gum paste bits (and a little bit of actual cake.) I particularly enjoyed it when she ate one of Melvin’s eyes, revealing the LEDs and leaving Melvin looking like a mangled cyborg.

The next day, as Alex was helping me to disassemble the remains of the cake and salvage the electronic components, she told Melvin (who was by this point essentially just a severed head) that he was her favorite cake ever. I call that a big success. Alex was a very tough audience with an incredible eye for detail. She was tremendously critical, but with such sincerity and such admiration. She has absolute confidence in my ability to execute a perfect cake version of Big Rig, so of course she wants to point out my errors so that I can correct them. It’s such a charming combination of exactitude and blind faith. She’s the perfect manager.
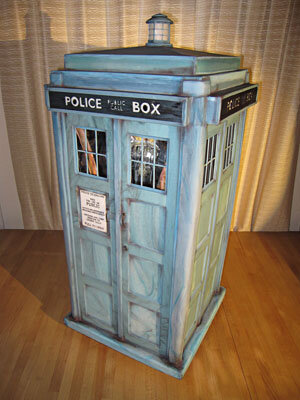
TARDIS Cake
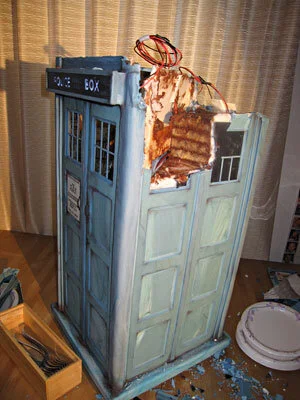
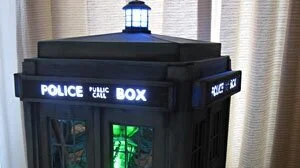
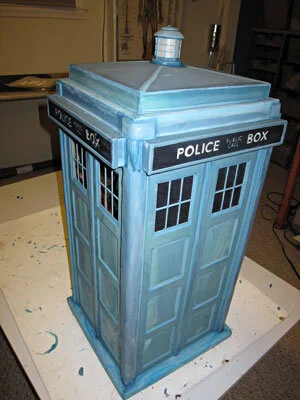
It's a TARDIS! It's bigger on the inside! It's two feet tall (quarter scale)! And aside from the lights, everything you see is edible.
It's a TARDIS! It's bigger on the inside! It's two feet tall (quarter scale)! And aside from the lights, everything you see is edible.
I love Dr. Who. Just a few weeks ago my sister-in-law and I waited in line for five hours to get good seats at the Dr. Who panel at Comic-Con. Totally worth it!
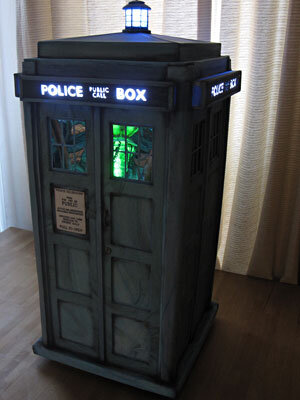
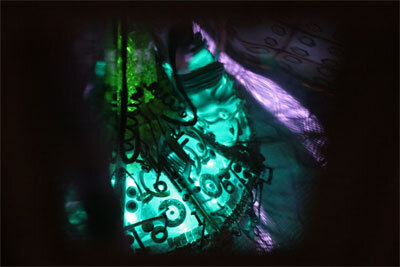
Since I would have to be a Time Lord to make a Tardis cake that could actually go anywhere in time and space, I decided to do the next best thing - make a Tardis cake that's bigger on the inside. Or at least appears to be. Like I said, I'm not a Time Lord. I chose to go with the new Tardis interior because, as it is both more organic and more interestingly illuminated than any previous Tardis interior, I thought it would be the most visually effective.
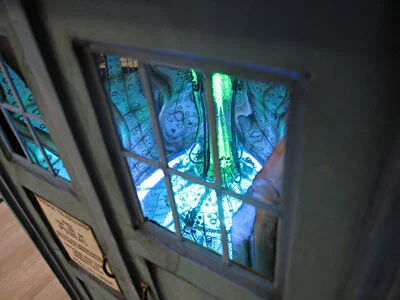
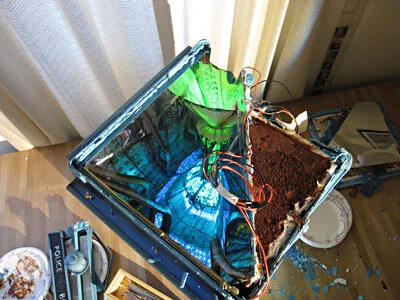
First I had to figure out the best way to create the illusion of a more spacious interior. I tried to consult the internet about optical illusions, but didn't find anything helpful, so I went with old fashioned trial and error. I played around with a lot of different configurations, eventually settling on two convex mirrors arranged at about a 45 degree angle. To get the curve I wanted, I used flexible carnival mirror, glued onto my custom made wood and mat board form.

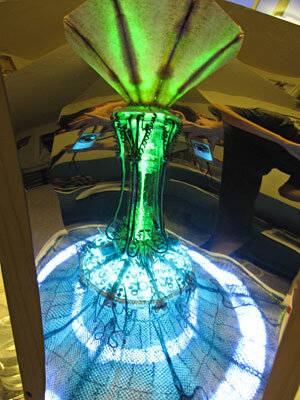
Next, in order to illuminate the inside of the Tardis and the "Police Box" signs on the outside, I needed to learn at least a little bit about electronics. So I ordered a DIY Electronics Kit from the MakerShed that was really sort of geared for pre-teens, but it was also very helpful. Armed with new-found knowledge of resistors and LEDs, I trolled the internet for the best deals and ordered a total of 385 LEDs in blue, aqua, green, yellow, white, and flashing white. They didn't all make it into the cake, but I did wind up using enough of them that I used seven nine-volt batteries to power them. I embedded these batteries into a plywood base and mounted the mirrors.
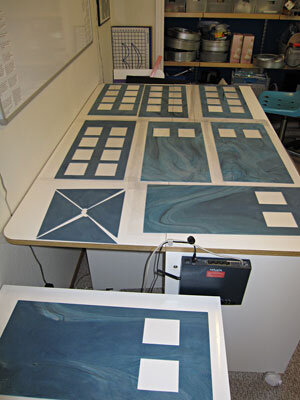
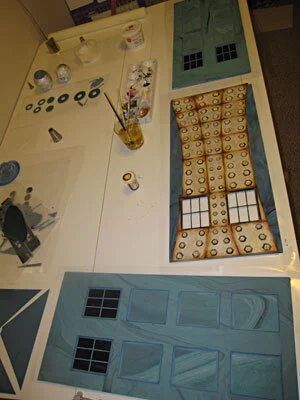
With my structure in place, it was time to start making gum paste pieces. The exterior required fifty-two separate pieces of gum paste - two for the panels on each of the four sides plus one inward-facing panel for the side that looked into the interior and three to back the windows on the other three sides, six for each of the four "Police Box" signs (some of which were quite tedious, as I had to painstakingly cut out the words to let the light through), and sixteen for the roof. Later I needed an additional seventy-two pieces of gum paste for the window frames and mullions. I went with a grey-blue marbled effect because I thought it would look more convincing and more interesting than a uniform color field.
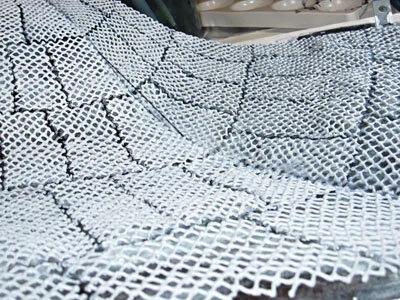
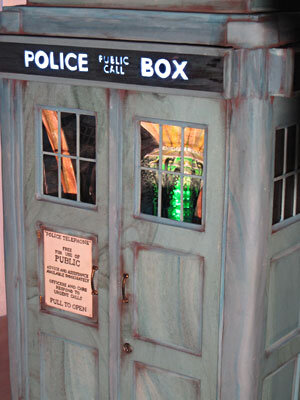
To make the interior I started with a gum paste floor with cutouts to let the light through from all the white LEDs embedded in the base. In order to enhance the illusion of interior space and elevate the bottom of the central console sufficiently to make it easily visible through the windows, I gave the floor a serpentine curve, supported by gum paste struts. Then I stuck a layer of rice paper to the top of the gum paste floor and painted it dark grey with food coloring. On top of this I piped grey royal icing expanded steel. It went pretty quickly, because I got a lot of practice making royal icing expanded steel when I was making the Demolition Cake. To give it a nice sheen, I went over it with some silver luster dust.
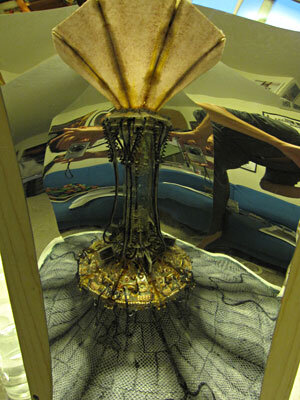
Now it was time to make the control console. Fortunately, thanks to the mirrors, I only needed to make one eighth of it. The console structure is gum paste and sheet gelatin, assembled around blue, green, and aqua LEDs and attached to the mirrors with clear piping gel. Then I had a good time sticking on a myriad of gum paste and royal icing levers, dials, cables, monitors, etc. At times the mirrors made things a little difficult because it was sometimes hard to remember which was the real console and which was the reflection. Liberal use of silver, bronze, and gold luster dust made everything nice and shiny.
With the interior finished, I assembled the exterior gum paste pieces, adding the royal icing molding around the perimeter of each recessed panel, and installing the window mullions and backing.
It was at this point in the process that we decided that we really should schedule a party so that we would have something to do with this cake when it was finished. Fortunately, we have a lot of nerd friends, so we soon had about forty positive rsvps to our evite. It was also at this point in the process that I took some time off to go to Comic-Con and then on a family trip to Colorado, so my gum paste pieces had a long time to thoroughly dry. This was definitely an advantage, because it would have been very hard to assemble the cake with anything less than 100% dry gum paste and because the pieces were so large that they did require some significant drying time.

A week before the party I began assembling the exterior, beginning by putting together the "Police Box" signs around my strings of white LEDs. I backed the cutout letters with rice paper, both to diffuse the light and so that I could stick the free-floating interior pieces of the O's, P's, A's, and B's to the rice paper.
Because of the mirrors and the interior space only a little less than half of the interior was actually going to be made of cake. This meant that I could install two of the four sides prior to baking any cake and even attach and solder their respective "Police Box" signs.

Three days before the party I baked the cake. We decided to go with a banana cake with chocolate buttercream icing because, to quote the Doctor, "You should always bring a banana to a party. Bananas are good." I needed a total of eight two inch tall, ten inch square cakes. Of the eight cakes, seven of them were cut in half on the diagonal and stacked in the body of the Tardis. The last cake was reserved for the square top section.
With the cakes in place, I covered them with a layer of fondant, to prevent the gum paste exterior pieces from coming into contact with the buttercream, which would moisten, soften, and weaken the gum paste. Then I was able to install the last two side pieces and their respective "Police Box" signs.

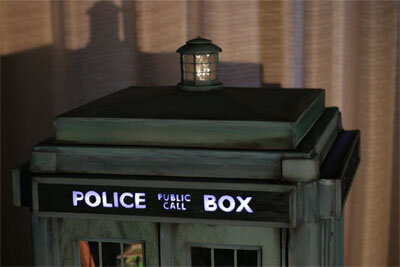
I put the top section together separately, carving the slanted roof, covering it with fondant, and then assembling the gum paste pieces around it with royal icing. I left a hole through the middle, so that I could run blinking LEDs through it for the light on top. Once the top section was in place, my Tardis really started to look like a complete piece, but it still needed a lot a detail work.
I used fondant rather than gum paste to cover the base and for the trim on the corners and in the center of each side panel because some of them needed to be relatively thick, which is easier to accomplish with fondant. I did use gum paste, however, for the thin strips of molding around the perimeter of each "Police Box" sign.
To make the little light on top, I wrapped rice paper around gum paste circles, then put panels of sheet gelatin on top of that, followed by gum paste trim and royal icing mullions. The curved top is gum paste dried over Styrofoam balls.
With all the major features in place, I went over the entire structure with royal icing smoothed with a damp paintbrush, to hide unwanted seams and fill in a few gaps. Then, to give it that distressed look of a vehicle that's been to the end of the universe and back again, I went into all the corners with some black powdered food coloring on a soft paintbrush.
To make the sign for the front of the Tardis, I blew up an image of it to the correct size and then essentially made some edible transfer paper by coating the back with black powdered food coloring. I put this on top of a dry white piece of gum paste and traced all the letters with a stylus to transfer the text onto the gum paste below. Then I painted over the letters with black paste color.
The finishing touches were the royal icing handles, hinges, and tacks to hold on the sign, and the gum paste lock.

Carrying the cake to the table for the party was a bit stressful and difficult, as it probably weighed fifty pounds and all of the weight was in one half of the cake. Part of me was convinced that, after literally months of planning and building, I was going to drop it at the penultimate moment. But actually the move went perfectly smoothly. I got my brother-in-law to help me and he even bravely volunteered to carry the heavy end.

I'm really pleased with the way this one came out, maybe more so than any cake I've ever made before. Please note that, with the exception of the mirrors, the electronics, and the wooden base and dowels and foam core separators that would needed in any cake this size, it is entirely edible. (And if anyone knows how to make an edible mirror, please let me know.) It's hard to capture the "bigger-on-the-inside" effect in a photo, but I do think it was pretty darned successful. By an odd coincidence, Cake Wrecks (one of my favorite websites) did a Dr. Who post on the very same day that we had our party, so I immediately sent them photos of the cake, mere hours after it had been consumed, and they very kindly posted it right away!
For hours after we attended the Dr. Who panel at Comic-Con, my sister-in-law and I were all a-twitter about how awesome it was; now I still kind of feel that way about this cake.