Zombie Cake
I made this cake version of our logo for a gala party we threw to celebrate our 100th review on theyrecoming.com.
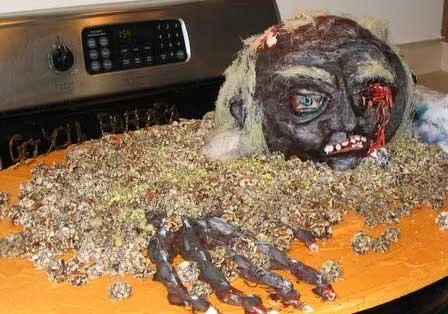
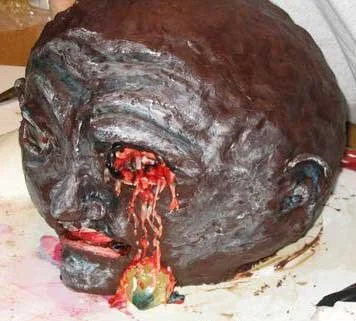
The highlight of the party, if I do say so myself, was my zombie cake, which we named Orville, after the dead guy in Children Shouldn't Play with Dead Things, though it looked nothing like him. In effect, it was a three-dimensional version of our logo, a zombie rising up out of the grave, or, in this case, rising up out of a field of my homemade French cream candies. The head was made of sour cream chocolate chip cake, dyed red to resemble brain matter, covered with modeling chocolate and various other frosting and hard candy details. The hand was made of mint-flavored hard candy bones covered with chocolate. Green hard candy letters around the perimeter reminded everyone that "They're coming to get you, Barbara." At the height of the party we gathered everyone around it to witness the thrilling moment when raspberry flavored blood spurted from his eyes and poured from his mouth. In fact, it sprayed a bit further than I expected it to. Fortunately only my sister and I were hit.
I calculated that, between the cake, the French creams, and the bloody eyeball cordial cherries, I went through 15 pounds of granulated sugar, 2 bags of powdered sugar, 8 large bags of chocolate chips, 2 bottle of corn syrup, 8 pounds of dark chocolate, and 4 pounds of white chocolate. I have a slight tendency to go overboard with these things. We have a lot of eyeballs left over.
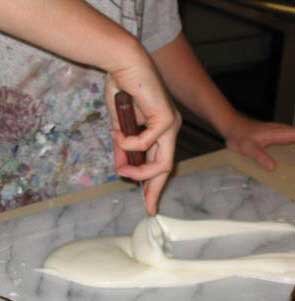
The first step is to make the French creams that will be used for the dirt in the zombie presentation. The creams have a flavored fondant center, dipped in chocolate, and then rolled in chopped nuts. Here, I am preparing the fondant by working it on a marble slab.

These are the completed fondant centers. The colors are all flavored differently -- I believe these are chocolate, pistachio, cherry, and orange. At this point, we're five days before the party.
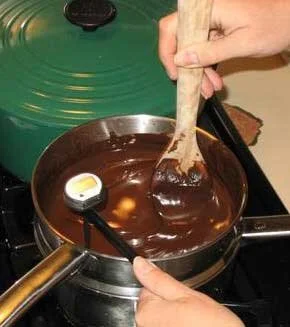
Here, I am tempering the chocolate to prepare it for dipping the creams. I’m using a double boiler and candy thermometer.
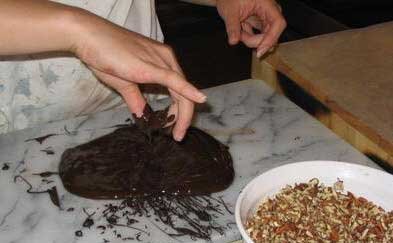
After the chocolate was tempered, I poured out a portion onto the marble slab. I dipped each fondant center into the chocolate, and then rolled it in the chopped nuts. The candies were completed four days before the party.
As a side dish to the zombie cake, I decided I also wanted to make cordial cherry eyeballs. Before dipping the maraschino cherries, they were soaked in rum or brandy for several days. They were then dipped in the center filling and left to dry. After this, I dipped them in white chocolate. Dark chocolate is better, but it wouldn't really work for the eyeball concept.
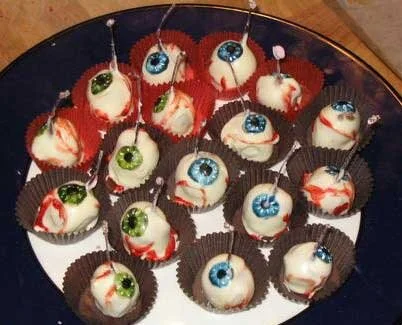
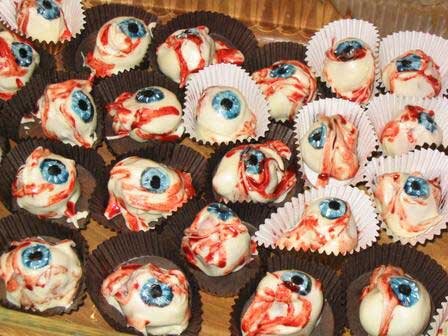
Yes, we had lots of eyeballs. They were painted using powdered food coloring dissolved in melted cocoa butter.
And we finally start the cake! Yes, it really did require that much cake. We used a recipe from The Joy of Cooking for a very yummy sour cream chocolate chip cake. Red food coloring swirled in the batter gave it a delicious-looking bloody brain color. Any light-colored cake would work as well.

This is me straining the fresh raspberry sauce which will be used for blood. This is great over cake or ice cream, even if your dessert doesn't bleed. Puree 1 pint of raspberries, 3 tablespoons of sugar, and 2 teaspoons of lemon juice in a food processor. Then strain the mixture through a fine sieve to remove the seeds.
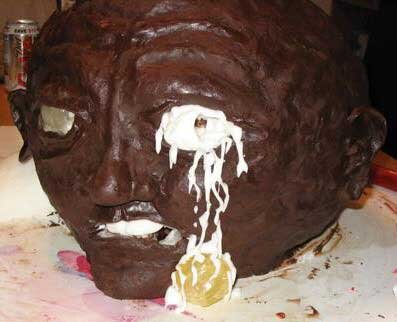
Ok, we've skipped a few steps here (clearly). This is the completed base of the cake. There are 5 layers of cake here, frosted with a chocolate ganache, which is made by melting semisweet chocolate with cream, and if you like (and why wouldn't you?) flavored with liqueur. Because it's so tall, we had to use interior supports, or the whole thing would have just toppled over. I cut a circle of foam core and stacked it between the middle layers. It's supported below with wooden dowels pushed into the cake, trimmed to just below the level of the layer. Of course, it was a little more complicated than that, since the plumbing system also had to be installed. You can see the large pastry bag to the right of the head, which is filled with whole lot of raspberry syrup. The bag is attached to a plastic tube, which curves behind the cake and enters in the back. Inside the cake, there's plumbing to send the syrup to outlets behind both eyes and the mouth. The outlets are blocked with frosting to prevent premature ejaculation, so to speak.
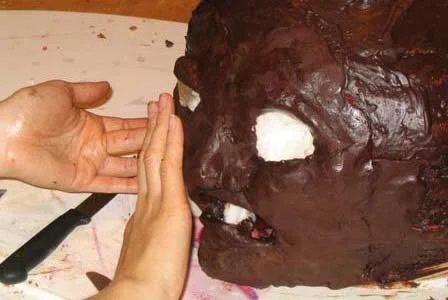
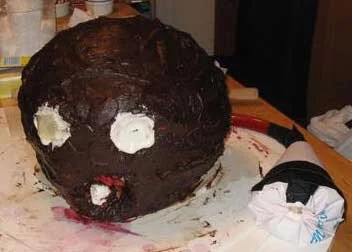
Once the base of the cake was completed, I started sculpting the facial features out of modeling chocolate, which is semisweet chocolate melted with corn syrup. Once chilled, it's very easy to work with and pretty tasty.
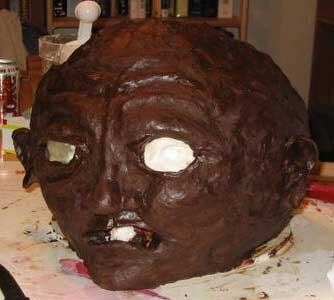
This is the completed face, with all the modeling chocolate details.

These are hard candy eyeballs, which were made by pouring out hot candy (sugar, water, corn syrup, and coloring) and pushing it into icky globs as it cools. Orville's right eye is already covered with a candy eye, so when the blood is pushed through, it'll fill up behind the eye before spilling out.
Orville's left eye has fallen out, so the other candy eyeball is just placed on the base. The blood details are done with royal icing.
The next step is to paint the face details and the blood. The paint is powdered food coloring mixed with melted cocoa butter. It has a consistency kind of like oil paints, and the cocoa butter can be melted in the microwave.
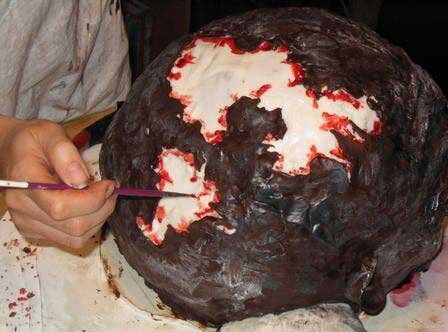
Here's me painting blood on the bits of exposed skull. The skull is done with royal icing, with modeling chocolate layered over it to make the ragged edges.

Here's Orville's hand, rising up out of the orange ground. Prior to placing the hand, the base was frosted with royal icing colored to match our site. The bones of the hand are mint-flavored hard candy, dipped in dark chocolate. The finger nails are royal icing.
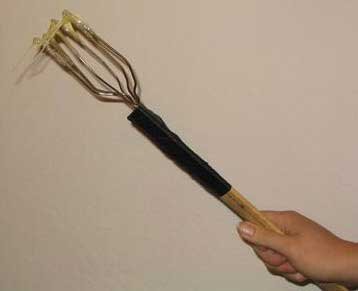
I display my zombie hair-making tool. I made it by cutting up some old coat hangers taped to a ruler, creating sort of a deformed whisk. To make the hair, I dipped the ends of the deformed whisk in hot candy, and then whipped it back and forth over two wooden spoons attached to the edge of the counter. As the candy cooled, it hardened into wispy somewhat hair-like strands.

Here's the skull with the hair attached. The strands are thin enough that they just kind of melt onto the head.

Note the lovely hairy eyebrows. Orville's left shoulder is the raspberry blood-filled bag, covered with a t-shirt. His right shoulder is made of fondant (cake fondant, not the kind used as the centers of the chocolate creams).

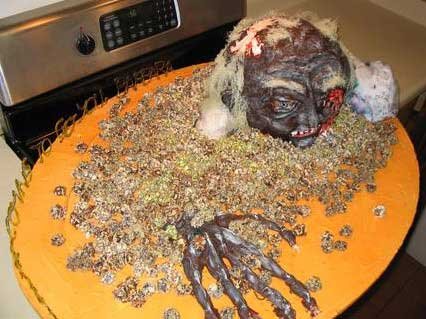
You can see the layers on the platform here, created to give Orville uneven ground to climb out of. The platform is made out of foam core, glued together in layers and covered with royal icing.
And here we have the full dirt presentation. The French creams are arranged around Orville, creating a lovely field of dirt. The different types of nuts create a nicely varied texture.

This is the hard candy lettering that followed the curve of the base, reminding us, "They're Coming To Get You, Barbara!". Usually I just pour the hot candy directly onto the marble slab in the shape I want. The letters require more detail than that method allows. The candy is hot enough to melt a paper or plastic pastry tube, so I used a 70's-era metal pastry tube, and filled that with the hot candy. I wasn't able to find a similar one online, and I'm not sure they're even made any more.

Orville looks pretty happy in the French cream dirt. Too bad about his eye.
Wow, Orville has big hands. You can see that the shirt covering the raspberry blood bag has now been distressed (as you'd expect a zombie's shirt to be).

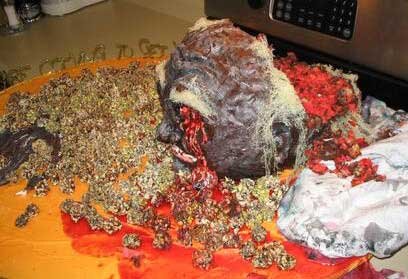
And here we are post-explosion! When I squished Orville's left shoulder, the blood shot out his left eye, slightly splattering both of us (but fortunately none of our guests).

I put our cleaver to good use serving the cake.
We did a fair job on the back of Orville's head, but of course we had at least three quarters of the cake left. My sister brought it in to work the next Monday, but her co-workers were oddly hesitant to cut into the face. She eventually dissected him and removed the face and all the plumbing, and that seemed to be more appetizing.

Lovely parting shot, eh? During the first spurt of blood, the frosting cap over the mouth didn't come off. Once I removed it, the blood just kind of oozed out the mouth, it was very nice. I really like the little drops of blood on the right cheek.