Woyzeck
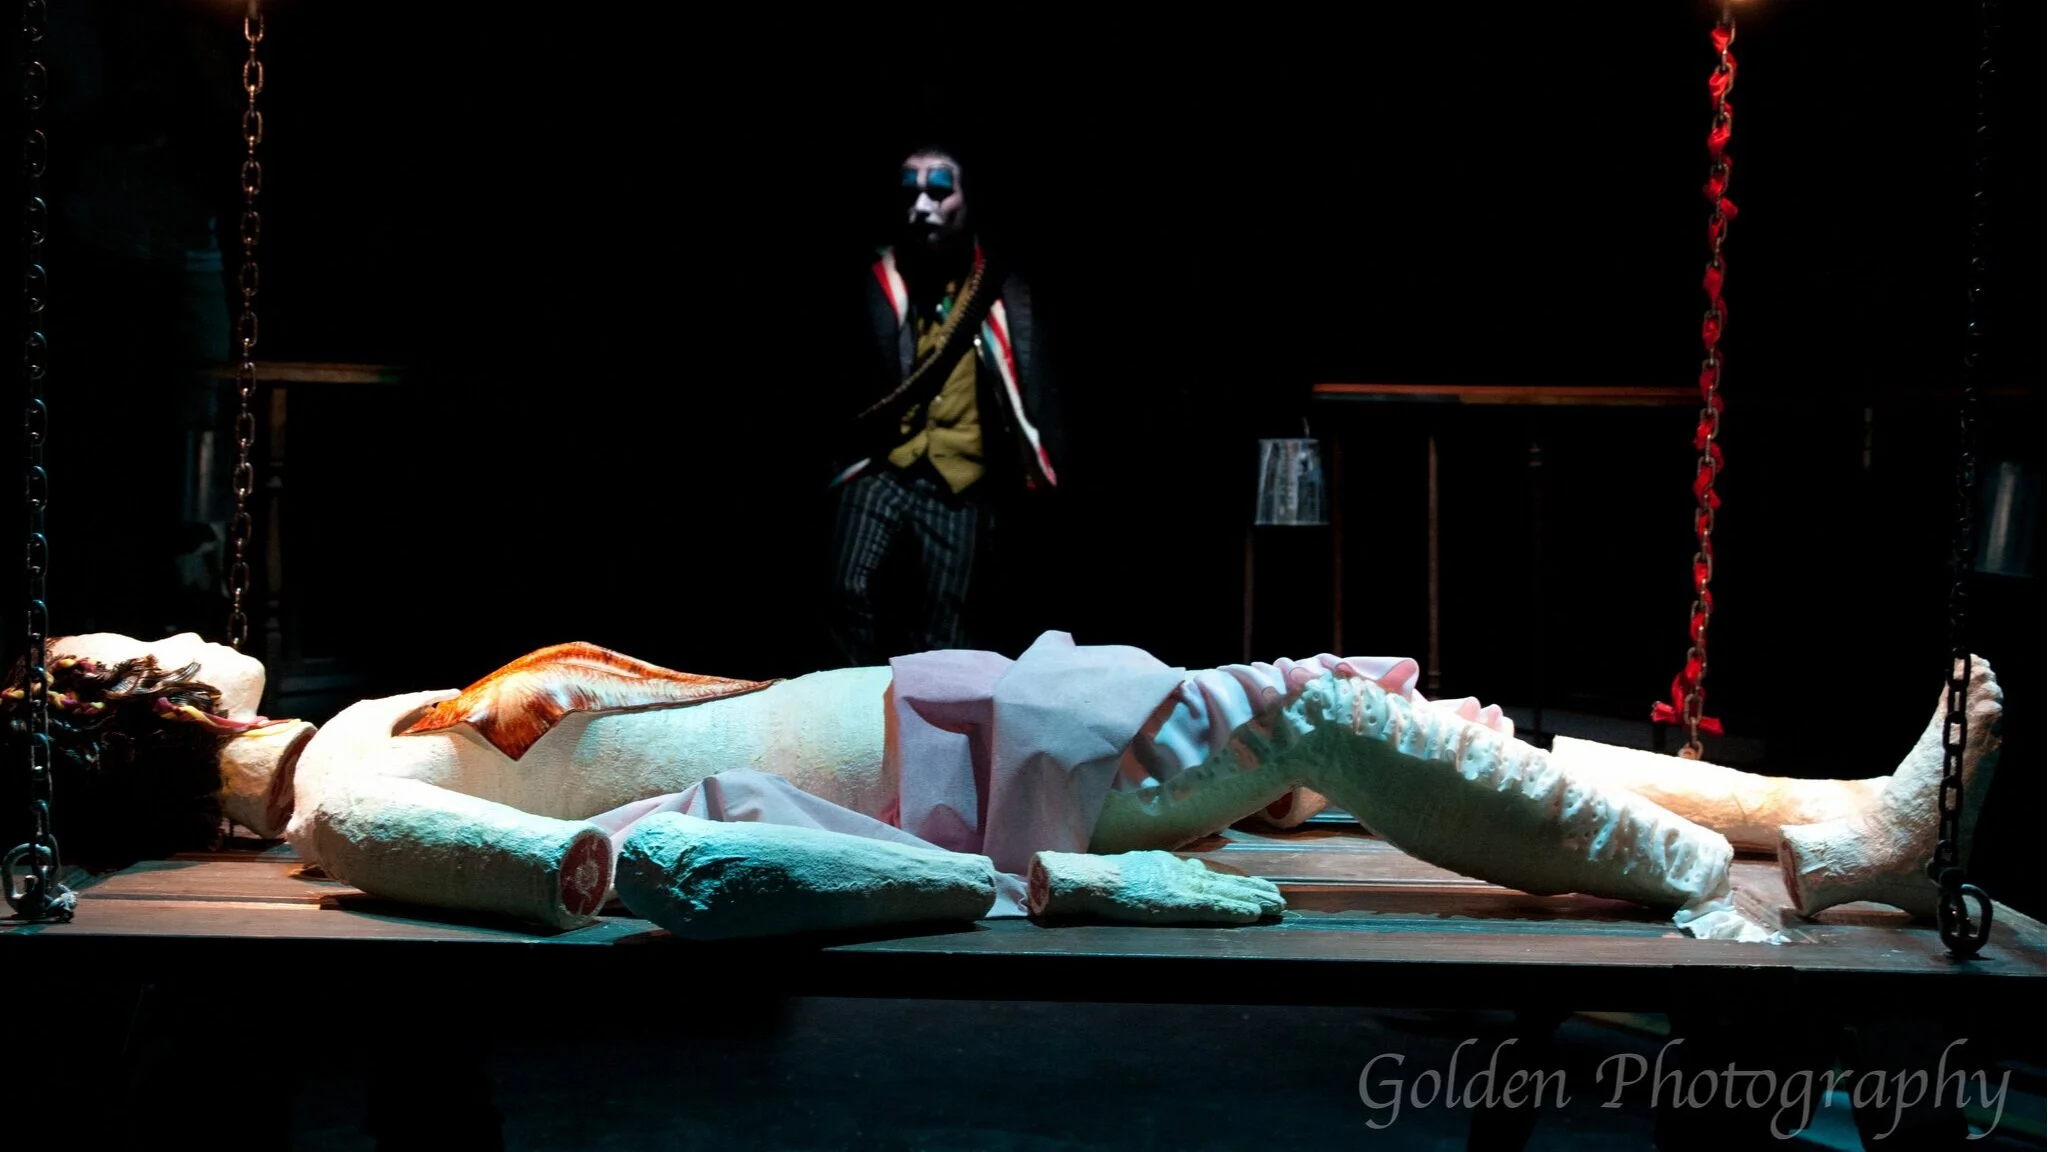
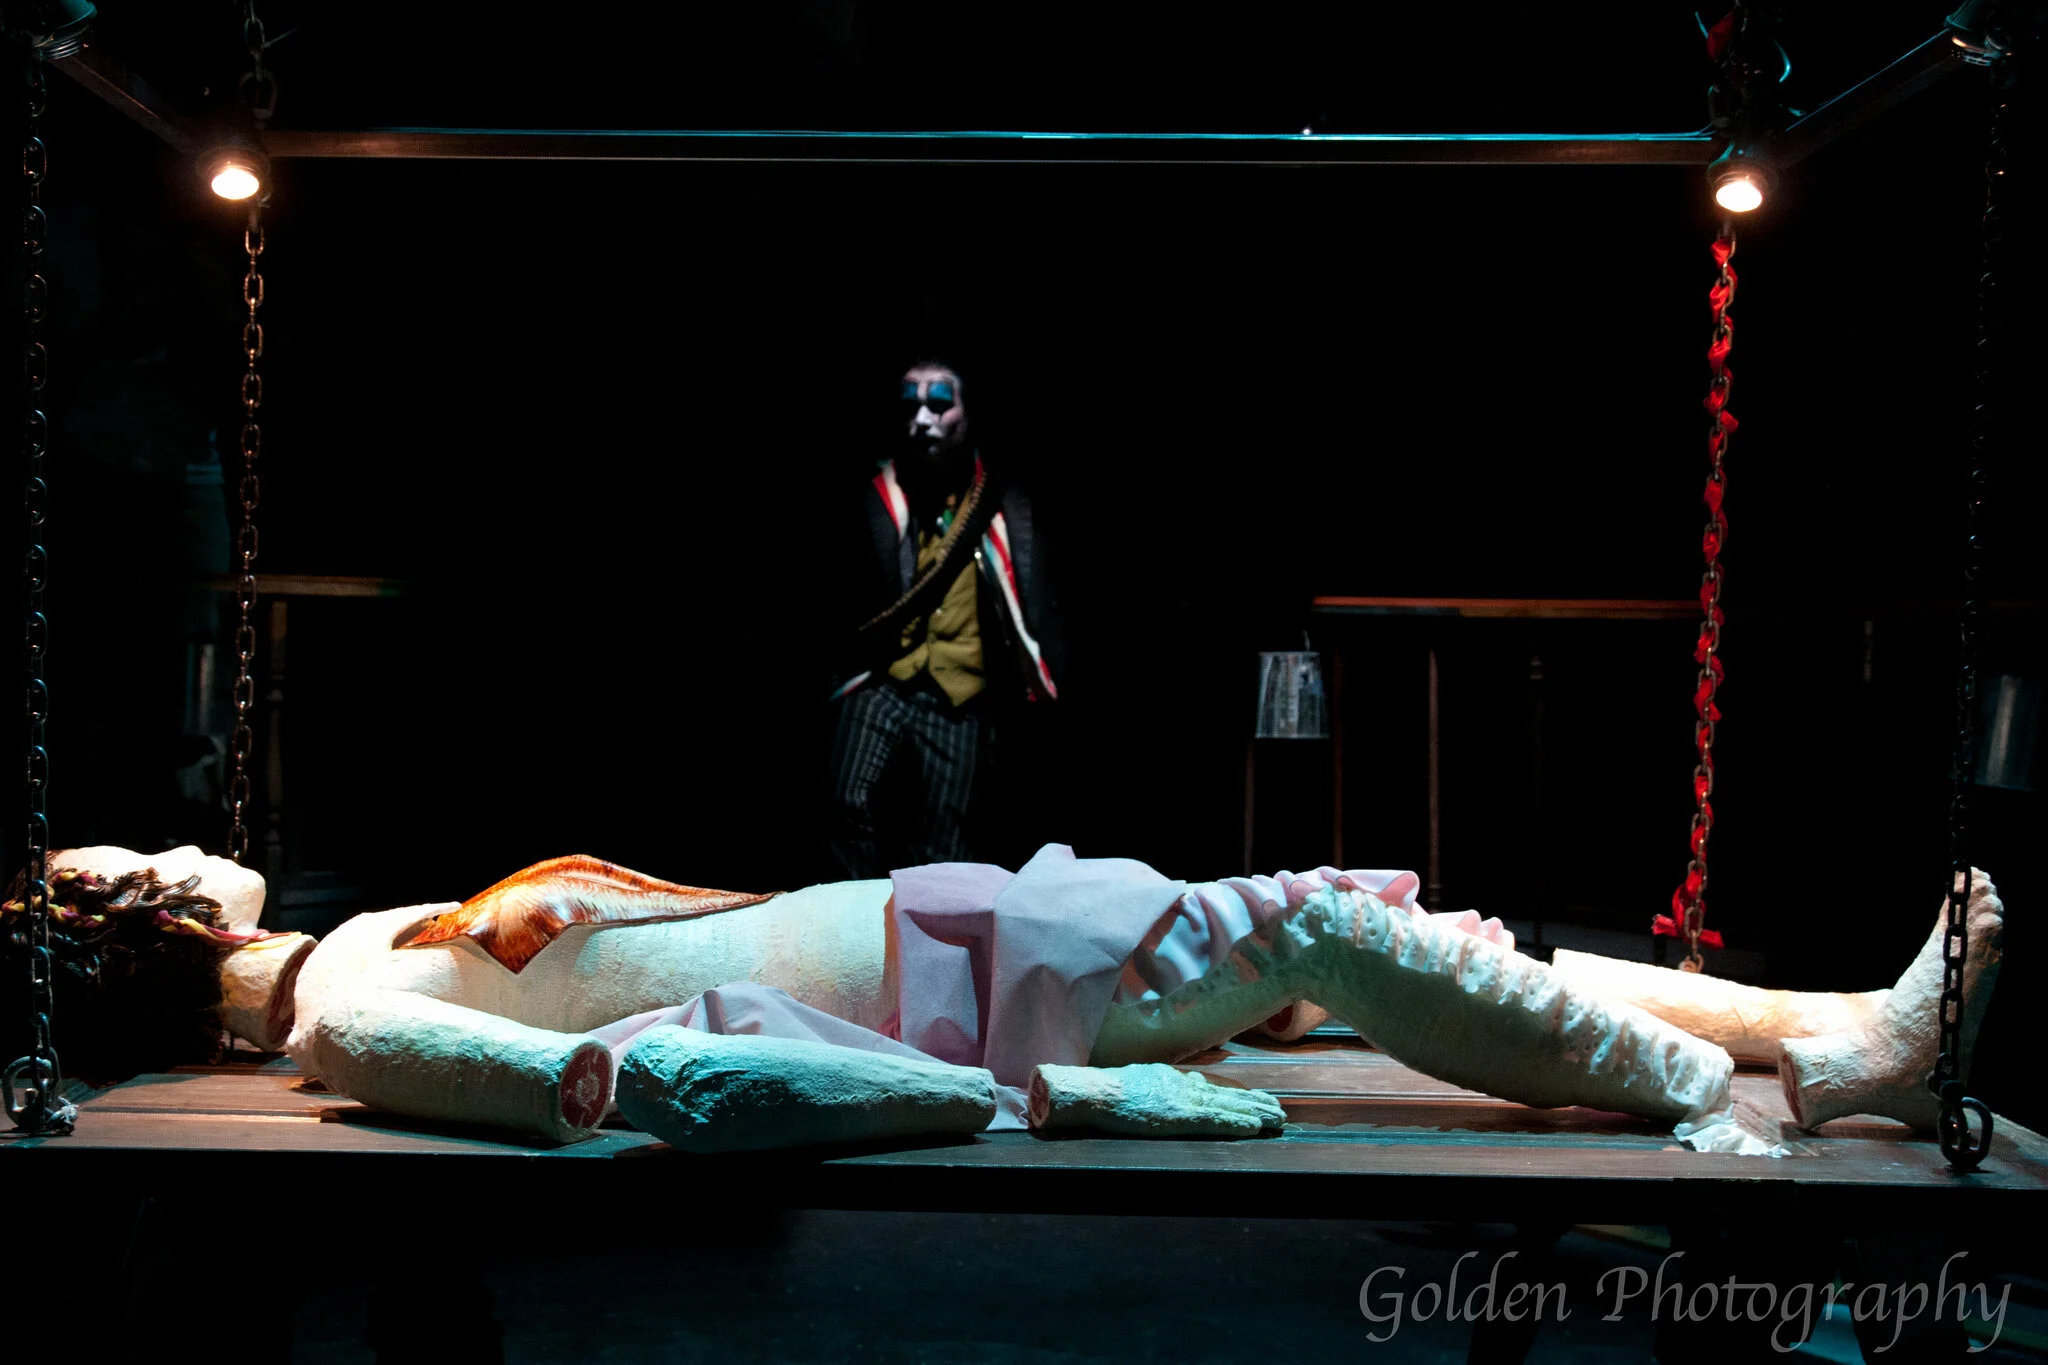
I was the production designer for a production of Woyzeck at the University of Wisconsin - Madison’s University Theatre. At the end of the play, the corpse of Woyzeck’s murdered lover Marie was lowered from the ceiling. The corpse was made of styrofoam, but I used fondant to decorate it as I would a cake. The open chest cavity was full of pea-flavored cake balls.
I was the production designer for a production of Woyzeck at the University of Wisconsin - Madison’s University Theatre. The title characters eats nothing but peas, so the director, Kristin Hunt, and I created a pea-flavored tasting menu that we served to the audience over the course of the play.
The tasting menu began with a single pea and included pea flavored gum, pea flavored soda, and pea flavored jello. At the end of the play, the corpse of Woyzeck’s murdered lover Marie was lowered from the ceiling. The corpse was made of styrofoam, but I used fondant to decorate it as I would a cake. The open chest cavity was full of pea-flavored cake balls. As the audience filed out of the theater, they were invited to take a cake ball from the corpse.
Halloween Wars!
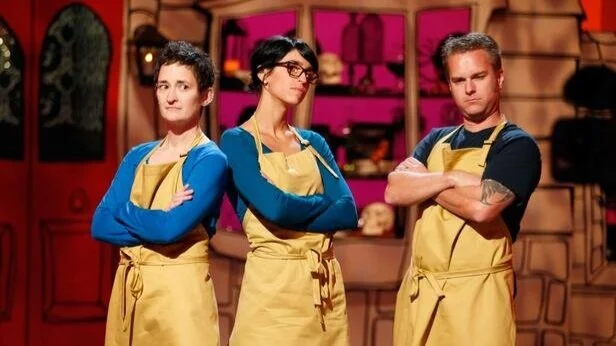
Check it out – I’m a warrior of Halloween Wars! You can watch my TV debut on Food Network, October 7th at 9:00 Eastern and Pacific.

Check it out - I'm a warrior of Halloween Wars! You can watch my TV debut on Food Network, October 7th at 9:00 Eastern and Pacific.
UPDATE: Here are the pieces we made.


Eyeball Cordial Cherries
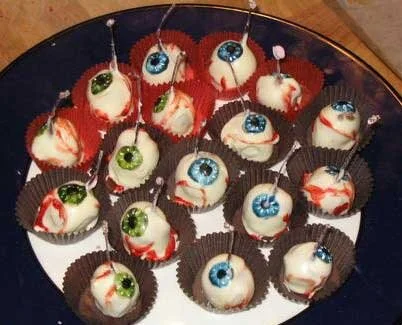
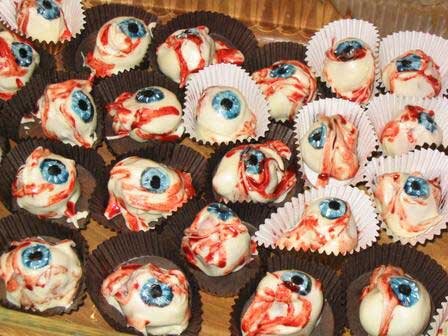
One of my personal favorite candy invention. They squish just like a real eyeball (maybe?) when you bite into them and they taste delicious!
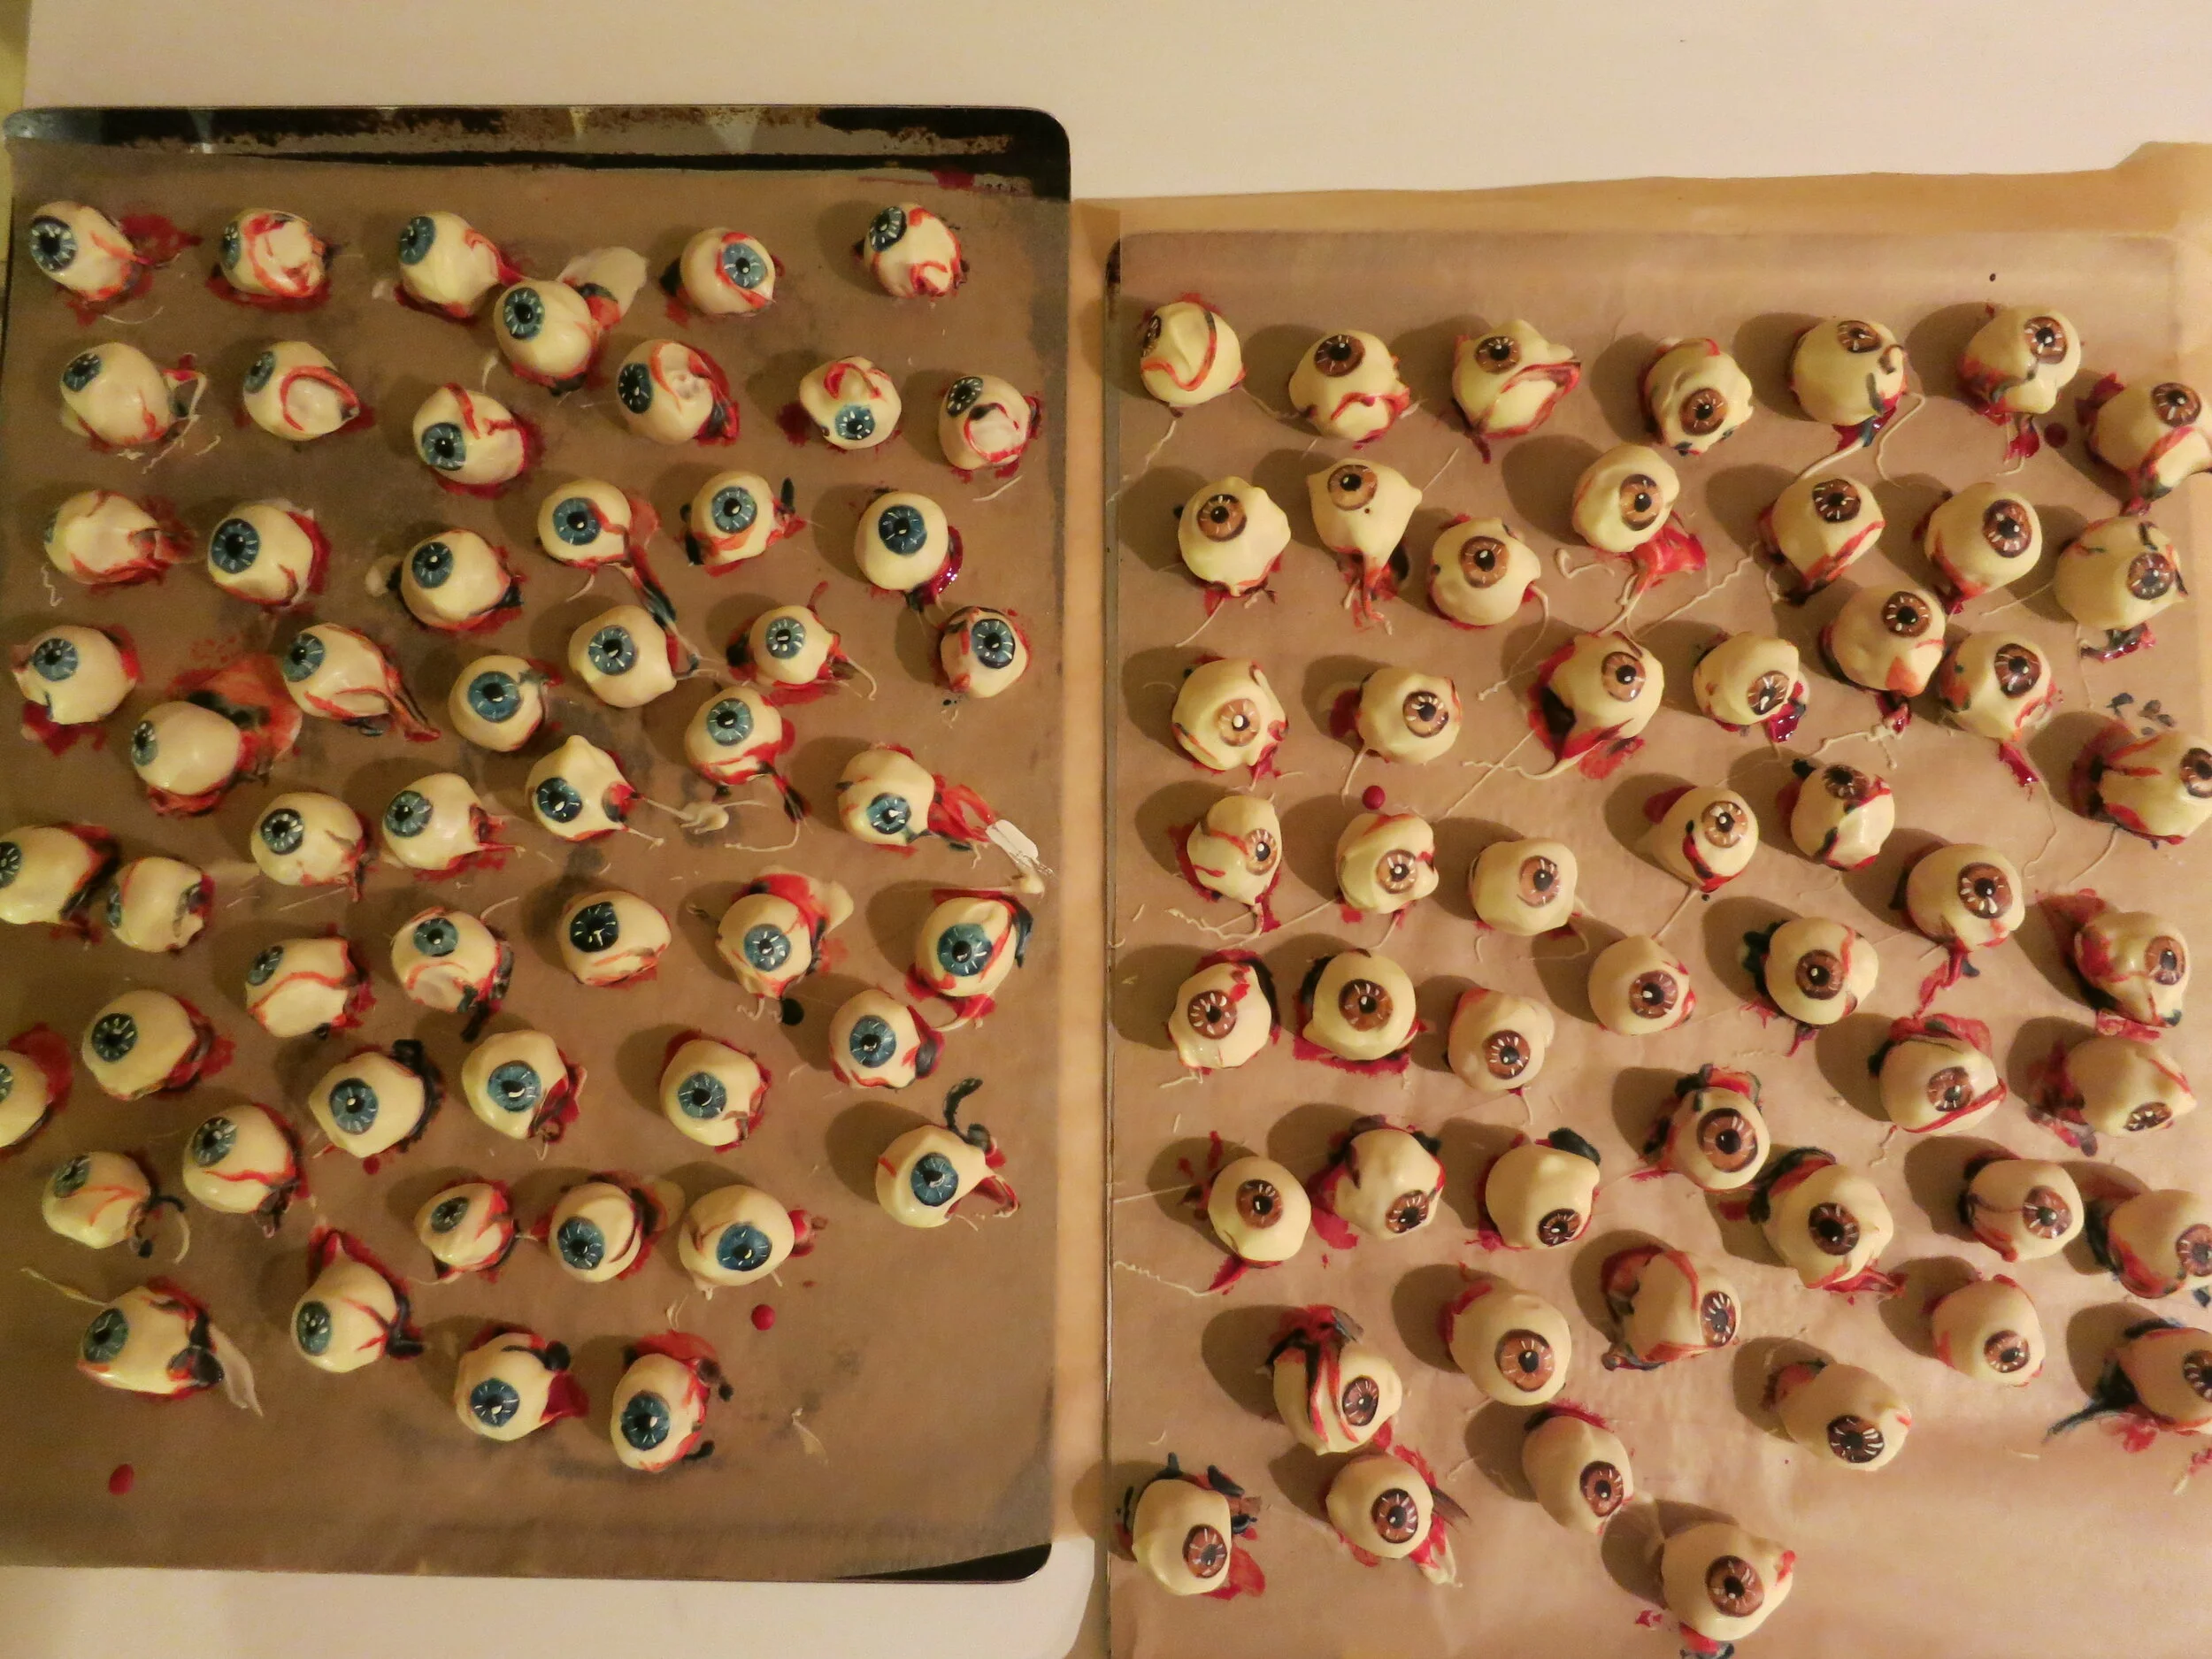
One of my personal favorite candy inventions. They squish just like a real eyeball (maybe?) when you bite into them and they taste delicious! The color of the iris distinguishes between the brandy-soaked and non-brandy soaked varieties.

Circulating Heart Cake
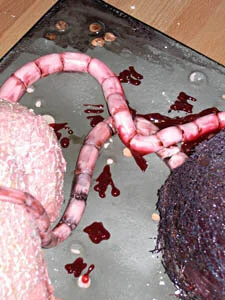
Some variation on a bleeding heart cake is a relatively standard feature of our annual Pumpkinfest. This year, I was trying to make a cake through which "blood" (cranberry juice) would continuously and visibly circulate.
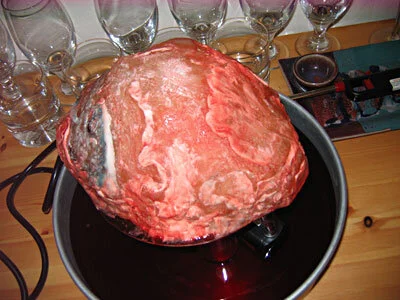
Some variation on a bleeding heart cake is a relatively standard feature of our annual Pumpkinfest. This year, I was trying to make a cake through which "blood" (cranberry juice) would continuously and visibly circulate.
Concept: A cake, shaped like a heart and covered with fondant, sitting on top of a platform elevated above a reservoir full of cranberry juice. In the reservoir, a pump attached to a tube leading up the side of the cake to pump the cranberry juice up and over the cake. To contain the juice and insure that it spread nicely over the surface of the cake, an isomalt (sugar substitute) shell, also in the shape of a heart, placed over the cake, leaving about an eighth inch of space for the juice to flow between the cake and the outer shell. In the opposite side of the elevated platform from the tube, a series of holes to drain the juice back into the reservoir and begin the whole cycle all over again.

Step 1: Make an isomalt shell shaped like a heart. At first, I had hoped to find something that was already in the shape of a heart, cover it with tin foil, and pour isomalt over the top. I wanted to use isomalt rather than sugar because it's more transparent. Unfortunately, in spite of having access to numerous seasonal Halloween stores, I was unable to locate anything that was a) accurately heart-shaped, b) big enough that I would be able to get sufficient cake for our guests inside, and c) able to resist the heat of liquid isomalt. I therefore had to make my tin foil heart mold from scratch. I started with a cereal bowl, upside down, and built up the rest of the heart shape around the bowl with wadded up tin foil. To get as smooth a surface as possible to pour over, once I had a shape I was happy with, I spread one final layer of tin foil on top and smoothed it as much as I possibly could. As you may recall from my description of the jellyfish cake, the problem that I often have with pouring sugar or isomalt over tin foil is that the little ridges of the tin foil get stuck in the solidified sugar and are very tedious and nerve-wracking to remove with tweezers and a damp paintbrush.
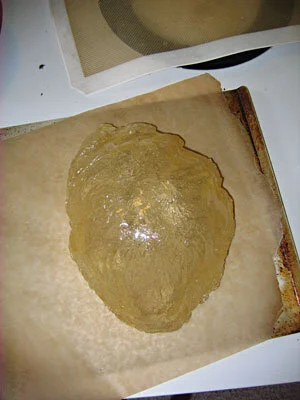
I put this tin foil heart onto a silpat mat and melted down my isomalt. In my earlier discussion of the jellyfish cake I described some of the problems that I have with making sugar domes. All of these problems apply equally to making isomalt hearts. I was also a little disappointed that the isomalt hardened somewhat cloudy, I think because I was working air into it as I pulled it back up the sides of my tin foil heart to prevent it from all pooling at the bottom. I was hoping for a transparent heart, but I had to settle for cloudy. I also think that there's something wrong with the bucket of isomalt that I have, because it always come out sort of yellow, when isomalt is supposed to be perfectly clear. At least the heart released from the tin foil better than any of my prior tin foil sugar projects.
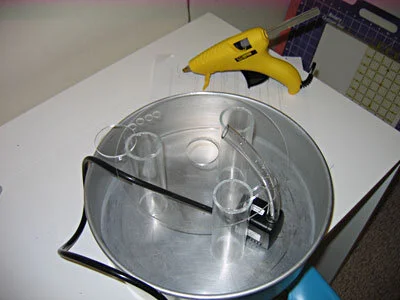
Step 2: Make an elevated platform, pump, and reservoir assembly. Rather than purchasing any new equipment for this project, with just a little glue and a few additional holes drilled, I was able to repurpose some of the acrylic circles and tubes from the Triple Animal Cake and the pump and tubing from the Fish Fountain Cake. I used a cake tin for the reservoir. Not the most aesthetically inspired choice, perhaps, but highly functional and readily available.
Step 3: Make a heart-shaped cake. Internal-organ-shaped cakes being something of a specialty of mine, the carving went pretty quickly. I covered it with white fondant - a much thicker layer than usual, as I wanted it to be able to stand up to the juice running over it without dissolving away and exposing the cake - then sculpted in some of the major features, like the divisions between the chambers. Then I moved it onto the acrylic platform, and positioned the tube tight up against it. To get some additional detail (though I wasn't overly concerned with extreme detail, since the whole thing was going to be under my isomalt shell) I piped on royal icing and shaped it with a slightly damp, soft paintbrush. I also covered the tube with royal icing, both to hold it in place and to camouflage it. I painted the cake with brighter colors than I might have ordinarily, because I wanted them to read through the translucent shell.
Step 4: Attach the isomalt shell. Unfortunately, once I plopped the shell over top of the cake, it looked more like an amoeba than a heart. I hadn't planned to decorate the top surface of the shell, because I wanted it to be as see-through as possible, but I felt that I had to do something to make it more identifiable. So I went over the top surface of the isomalt with royal icing details and texture, and then painted the surface with some reds and blues. This did make it look marginally more like a heart, but it also made it much more opaque, which proved to be unfortunate when I got around to plugging the pump in.

Step 5: Fill the reservoir with cranberry juice, cross your fingers, and plug in the pump. Because my isomalt was cloudy from the get-go and because I had further opaqued the surface with royal icing and food coloring, the pumping action, while technically successful was exceedingly subtle. I'm pretty sure that if I hadn't explained it to everyone, no one would have had any idea what the cake was or what it was doing. I tried to capture it on video, but all you can really see is the juice venting down the side and back into the reservoir. (Which, by the way, I really should have directed out the aorta.) The video is further compromised by the fact that my camera was in the process of kicking the bucket resulting in a distinct horizontal line across the frame and the fact that there was a toddler screaming in the background.
Conclusion: I still believe that there is potential in the concept of a cake with fluids circulating inside, but I think it requires either a) a different form factor, b) a more competent isomalt handler, or c) both.
Heart Cupcakes
In the past, my heart-shaped cakes have tended to get bigger and bigger, resulting in things like a heart the size of a small dog and the infamous Thoracic Cavity Cake. This year I decided to buck the curve and make very small, individual-portion-sized heart-shaped cakes.

In the past, my heart-shaped cakes have tended to get bigger and bigger, resulting in things like a heart the size of a small dog and the infamous Thoracic Cavity Cake. This year I decided to buck the curve and make very small, individual-portion-sized heart-shaped cakes.
There were 18 people coming to Pumpkinfest, so I needed to make 18 little, cupcake-sized hearts. I also wanted them to bleed because what would be the point of making heart-shaped cupcakes that didn't bleed? I thought it would be a nice touch to have both red blood (arterial) and blue blood (venous), so I made a batch of fresh raspberry sauce and a batch of fresh blueberry sauce. Both of these sauces are very delicious and very easy to make. The only ingredients are berries, sugar, and lemon juice, mixed up in a blender and strained through a sieve to remove the seeds. The blueberry sauce was perhaps less blue than it might optimally have been, but I think we all know how hard it is to find appetizing blue food.
To contain the sauces, I made two gum paste cylinders per cupcake, for a total of 36. The idea was that one of them would be the aorta (full of red blood) and the other the superior vena cava (full of blue blood). Mounted vertically on the top of each cupcake, they would hold the fruit sauces until the cupcakes were cut into, at which point they would spill their gory contents over the plate.
For the cake itself, I started with cupcakes, which are relatively heart-shaped to begin with. I removed the paper from each one and set them in the middle of white paper plates, the better to emphasize the soon-to-be-spilt fruit sauces, and covered them with a thick later of chocolate buttercream frosting.
I didn't want to use fondant to cover and sculpt these hearts because I thought that the proportion of fondant to cake would be overpowering at cupcake scale (not that it probably makes that much difference anyway since most people peel the fondant off before they eat the cake.) For some reason, I also decided not to use buttercream frosting. I don't recall why I made that decision because in retrospect, buttercream would clearly have been the way to go. Instead, I decided to use white modeling chocolate. I didn't do a very good job of making the modeling chocolate, so it came out very hard and a little grainy. I used it anyway. I rolled out circles of the modeling chocolate to drape over the whole cupcake and then shaped it a bit with some gum paste sculpting tools. Then I used royal icing to pipe on detail veins and attach the cylinders sticking off the top.
Because I had used modeling chocolate I needed to color the hearts with powdered food coloring mixed into cocoa butter. Water-based colors don't stick to chocolate. To get the hearts nice and shiny, I then painted on a layer of red- or blue-tinted piping gel. Because the piping gel is water-based, it didn't spread smoothly, but rather beaded in rills and pockets, which I thought was actually kind of a nice effect.

Right before serving, I filled the tubes with my two fruit sauces.
Reactions were mixed. Adults more or less agreed that the cake was tasty, but that the modeling chocolate was too thick, hard, and grainy to eat. I really should have used buttercream. One little boy, who had been promised a cupcake adamantly refused to accept that these were, in fact, cupcakes in a slightly different configuration and had to be supplied with a normal-looking cupcake that we fortunately had in reserve. His little brother, on the other hand, took to the little hearts immediately, breaking off the aorta and jugular vein and gleefully drinking the contents like a proper little cannibal.

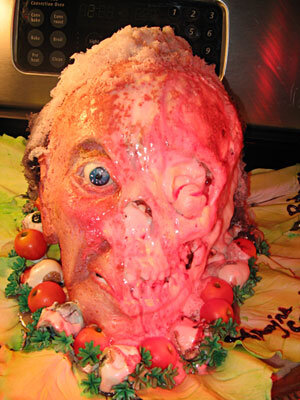
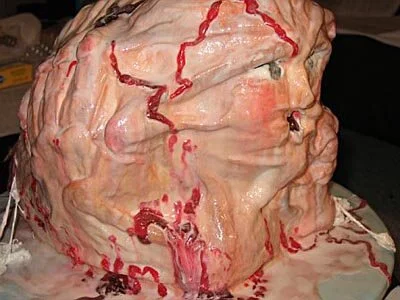
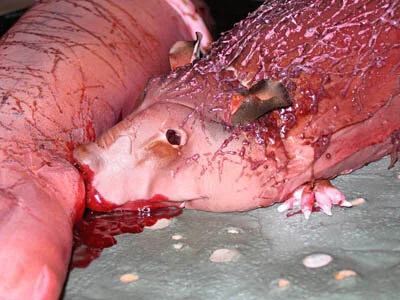
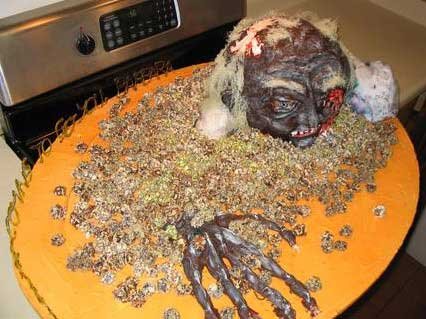
Melting Head Cake
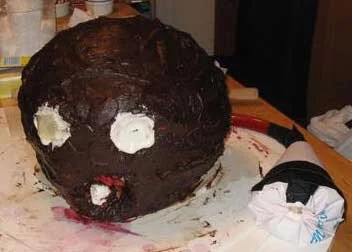
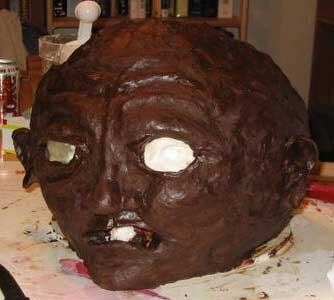
Bride of Zombiefest was the perfect opportunity for me to make a cake that has been percolating in my head for a while now. The idea was a severed head cake, served up on a silver platter with an attractive array of garnishes, with flesh that would melt off over the course of the party, revealing the grinning skull underneath.

I made this delightful severed head presentation for a party celebrating our 400th review on theyrecoming.com.
I admit that we celebrated Bride of Zombiefest before we had actually posted our 400th review on theyrecoming.com (which the party was ostensibly in honor of), but we were close and we needed to schedule it while I was still visiting my sister for the summer.
Bride of Zombiefest was also the perfect opportunity for me to make a cake that has been percolating in my head for a while now. The idea was a severed head cake, served up on a silver platter with an attractive array of garnishes, with flesh that would melt off over the course of the party, revealing the grinning skull underneath.
It was obvious that the skull should be made of royal icing, but the question of what to make the flesh out of proved to be a thornier problem. My initial plan was to use buttercream icing and put the cake on a hotplate. I'm glad that I decided to test this plan prior to implementation because the experimental buttercream nose, piped onto the experimental royal icing skull fragments, did not melt at all. Not even a little bit. My sister and I thought that the nose got a little shinier with the heat, but even that may have been wishful thinking.
This preliminary test did teach me a few important things, in addition to the big lesson that buttercream icing does not melt, at least not when I want it to. For instance, I learned that it is, in fact, safe to put buttercream icing onto royal icing, provided that the royal icing is dry first and it's the quick and easy buttercream, not the fancy cooked buttercream. I tried to put royal icing onto cake filled with the fancy buttercream for my sister's baby shower and the royal icing just dissolved into oily goo. I also learned that both red piping gel and seedless raspberry jam are fully compatible with royal icing. This was important because I needed something red to put on top of the skull and underneath the flesh so that the melting would also be bloody. I settled on the raspberry jam because it tastes better, but I actually think in retrospect that the red piping gel might have worked a little better.
At this point, though, I was far more concerned about the flesh's failure to melt. Clearly buttercream icing was not the answer, so I tried boiled icing. Boiled icing really doesn't taste very good at all, but I had high hopes for its melting properties as I confidently made another test nose and set it on the hot plate. And . . . nothing. No melting. Nothing even close to melting. Not so much as a little bit of softening or a sheen of moisture.
At this point I nearly gave up on the melting aspect of the cake. Bear in mind that while I was carrying out these tests the day of the party was fast approaching and I was already well into the creation of the advance elements of the cake - the bloody eyeballs, the skull, and the garnishes, which I will discuss in more detail later in this narrative. But I decided to persevere and test one final type of icing - whipped cream icing. I have never used whipped cream icing before because it is notoriously unstable and the cake, once frosted, has to be frozen or refrigerated. Surely this intimidating, unreliable icing would be fragile enough to melt off my cake!
I made a few test noses this time, so I could test the icing in the fridge and the freezer as well as on the hot plate. I also made test noses of a 50-50 mix of boiled icing and whipped cream icing, because I was afraid that the whipped cream icing, by itself, would be too unstable.(I also tried mixing the whipped cream icing with the buttercream icing, but this instantaneous collapsed into a lumpy mess.) It turned out, however, that the whipped cream icing is actually sturdier and more structural by itself than in conjunction with the boiled icing. And, to my lasting delight, it turns out that whipped cream icing does, in fact, melt when placed on a hotplate!
With rekindled hope for the melting face, I performed a few additional tests on the whipped cream icing to determine if it can be painted with an airbrush (It can.) and to determine if it can be painted with a paintbrush (It can, but only if it's thoroughly frozen.). At this point I also hit on the idea of using a heat lamp to melt the cake from above in conjunction with the hotplate melting it from below. Of course, I didn't have a heat lamp, but I tried a 60 watt bulb and even that melted the test nose, so I went out and bought a heat lamp from the hardware store across the street, as well as a 200 watt bulb. I would have bought two heat lamps, but they only had one, which, as you'll see later, was very fortuitous.
And thus ends the saga of my icing experiments, leaving me ready to move on the saga of the actual cake. So if you thought the icing story was long-winded and melodramatic, you ain't seen nothin' yet.

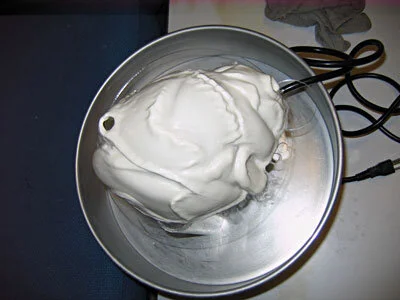
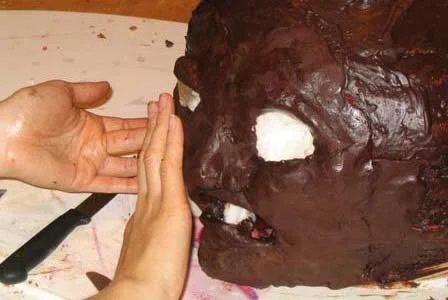
The first step of the cake construction was to make the royal icing skull. For maximum accuracy, I purchased a plastic skull to use as a mold. I used tin foil to cover the skull because it holds the shape really well, but it does have some disadvantages. Because tin foil is opaque it was hard to see the breaks between the skull segments and tin foil also seems to lengthen the dry time of the royal icing. This wouldn't be a problem except that I'm impatient and wasn't willing to wait more than a day to try to unmold the pieces, at which point they were not completely dry. Thus, it took me three tries to make a solid jawbone. I actually managed to wait three days before unmolding the last one, so it was completely dry and came off perfectly.
Unmolding aside, actually making the icing skull was really quite easy. I piped the icing on with a wide, flat tip, then smoothed it with a slightly damp paintbrush.

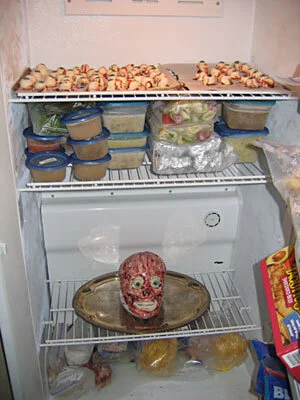
While I was making things out of royal icing, I also made fifty-odd little tiaras. Why, you ask? Well, we were afraid that a cake the size of a human head wouldn't serve the twenty-five to thirty guests we were expecting at our party, so we decided to make supplemental cupcakes. If the party was Bride of Zombiefest, and the cake was the Bride, then clearly the cupcakes should be the Bridesmaids of the Monster - little fuzzy monster cupcakes (with cotton candy fur; more on that later.) So they needed tiaras, which I piped flat, then draped over a roll of wrapping paper so they would dry with a nice curve. I also made little royal icing eyes for the cupcakes, with painted irises and tiny red veins.

The next pre-baking project was the eyeballs. I have made cordial cherry eyeballs several times before and they're also summarized in the description of the cake from our first Zombiefest. Basically, maraschino cherries are soaked in brandy for a few days then drained and dipped, first in a melted coating fondant, then in white chocolate. The nice thing about the eyeballs is that they actually look better when I don't dip the cherries neatly because weird drips and blobs look like veins and pools of blood. Once the chocolate is set, the eyeballs are painted with powdered food coloring dissolved in melted cocoa butter. Some of the eyeballs were served on their own; others were used as garnishes on the head's serving tray; still others served as the eyes of the head itself.
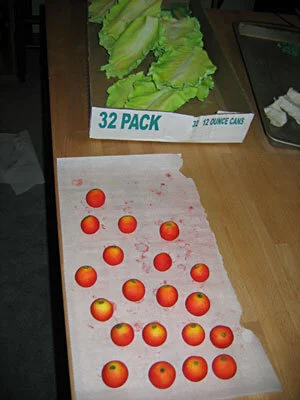
Next came the other garnishes for the head platter - lettuce, tomatoes, and parsley. My sister came up with the idea of how to make the lettuce. I bought actual lettuce (Romaine), dusted the back with corn starch, then pressed a very thin sheet of gum paste onto it so that the gum paste picked up all the lettuce veins. I then ripped the edge a little to get it rough, rolled the edge with a ball tool to ruffle and thin it, and draped the gum paste lettuce over a bed of wax paper so it would dry with nice shape. The parsley was even easier. I just used a very small gum paste flower cutter, then cupped it with a ball tool.
For the tomatoes, I used a 50-50 gum paste-fondant mix, mostly because I didn't have enough gum paste so I had to use the fondant to stretch it. I colored this mixture bright yellow and rolled it into cherry tomato-sized balls. I used an umbrella tool to make the little divot in the top and then rolled the tomato in my hand once more to get it nice and round.
I colored all of these garnishes with ground up chalk pastels and then steamed them in front of a kettle of boiling water to set the color and give it a little sheen.
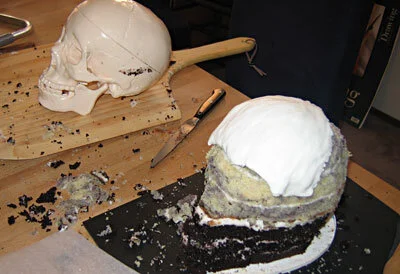
Finally, we're at the baking stage! I made a chocolate cake for the bottom of the head, then a lemon butter cake, swirled with black food coloring to give it a nice brain color, for the top of the head. I also made about fifty lemon butter cupcakes.
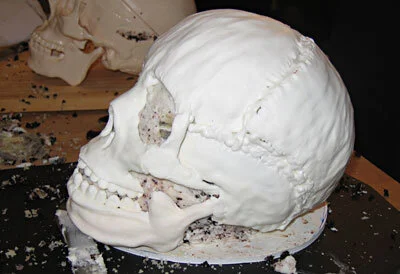
Once cool, I torted and filled the cakes with buttercream icing and, using my plastic skull as a model, carved the cake into the proper shape. My royal icing skull fit together remarkably well over top of the cake. At this point, it would actually have been a pretty cool looking cake in and of itself, but I was nowhere near done.

A coating of raspberry jam made the skull look delightfully freshly skinned, especially once I had popped the cordial cherry eyeballs into place.
At this point I transferred the cake onto its silver serving tray (borrowed from a church where a friend of mine works) and I could no longer avoid the part of the operation of which I was most terrified - the icing. I put the head in the freezer for a little while first so it would be nice and cold when the icing hit it.

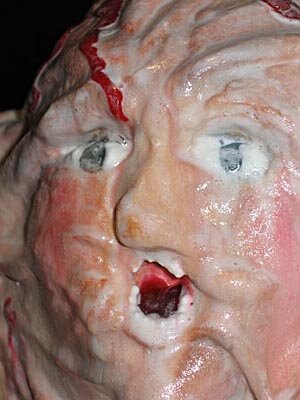
Actually icing the cake went more smoothly than I had feared. It took me three batches of whipped cream icing and between each batch I put the cake in the freezer. Piping the whipped cream icing for details like the nose, lips, ears, and eyelids was a little challenging because if I held the piping bag for too long the icing got too soft, but all in all I was happy with the face creation process. I was trying for a woman's face because she was supposed to be a bride, but it turned out looking androgynous, possibly skewed a little towards the masculine. I hoped that a little airbrushed makeup would tip it into womanhood. Into the freezer it went!

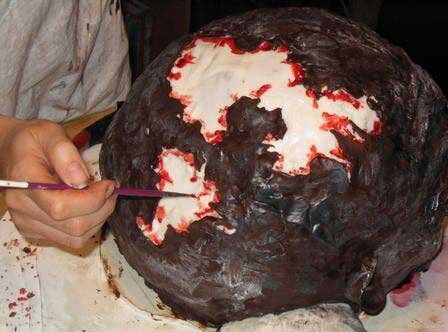
Airbrushing the cake was a little nerve-wracking because the room where I was working was really hot so I had to work fast. I also had to mask off the eyeballs and teeth with parchment paper which was very difficult to do without messing up the icing, but it all went pretty well in the end. The blue eyeshadow (I grew up in the 80's so it somehow got into my head that eyeshadow is always blue. Since I don't wear makeup myself, I've never really been disabused of this notion.), blush, and lipstick did make her look a little more feminine, but she still had a bit of an old man in drag vibe about her.

The garnishes went into place quickly and easily with a few dabs of royal icing and that was all I could do until right before the party. At this point, she was still bald, but my plan was to use cotton candy for the hair and cotton candy doesn't have a great deal of longevity. So the cake went into the freezer and I went to bed.
The party was scheduled for 12:30 in the afternoon, evening parties being inadvisable now that my sister has a five-month-old daughter. At about 9:00a.m. we started making cotton candy. First we made some colored cotton candy for the cupcake fur, using sugar mixed with powdered food coloring. A little ball of cotton candy went on top of each cupcake, followed by a tiara and a pair of eyes.
Our cotton candy machine is actually a children's toy that we purchased at a garage sale for three dollars, so it is perhaps not surprising that it overheated after about half of the cupcakes. I had a few moments of panic when I thought that it would not be in service to make hair for the cake itself, but my sister suggested putting it in the freezer to cool it off quickly, which worked like a charm.

Afraid that the machine would crap out altogether next time, I made the hair for the cake next - a tower of white hair with black Bride-of-Frankenstein-style streaks on the side. I assembled the hair on the tin-foil-covered plastic skull first, then plopped it readymade onto the cake. It looked like a wig and only exacerbated the resemblance to a drag queen - a very old one, given the gaunt cheeks, the white hair, and, due to the icing texture, the pockmarked skin. But I considered that a minor problem. My sister said she looked like Mrs. Haversham. Dad thought she looked like a French aristocrat, which also might have been pretty appropriate, given that whole guillotine escapade.
I added a little red piping gel blood to the mouth so she would look more dead and a little red piping gel blood writing on the lettuce stating, of course, that, "They're coming to get you, Barbara". Then I took a whole lot of photos and popped her back in the freezer to await the party.
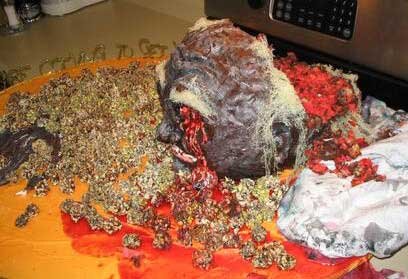
By this time the cotton candy machine had overheated again so I had to put it back in the freezer for a while before we could finish the cupcakes. But finish them we did, just before the party. By this time, the cotton candy on the first cupcakes was already wilting and we were afraid that the cotton candy hair on the cake herself would fare even worse, due to condensation from the freezer, so we decided that the cake would remain in the freezer until most of our guests had arrived, at which point we would dramatically reveal her, then turn on the heat lamps and hope for the best.
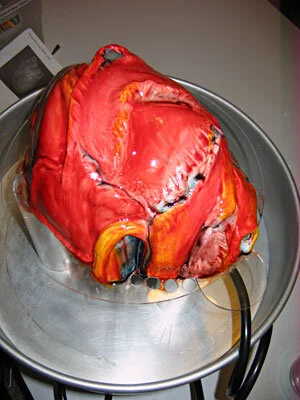
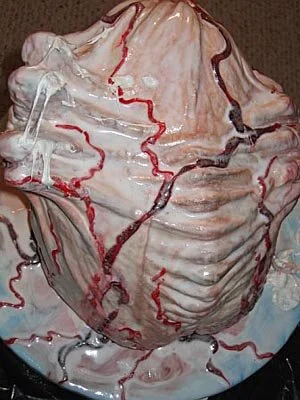
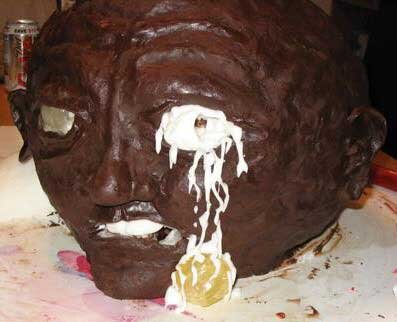
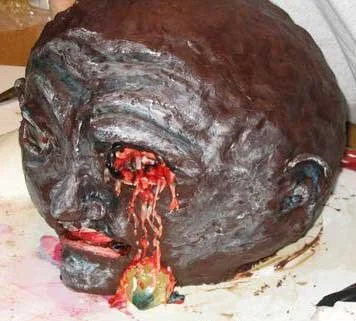
And . . . amazing enough . . . the best actually happened! Even better than I had hoped! I brought her out and set her on the hotplate, turned on the heat lamp on one side and the 200 watt bulb on the other and . . . her flesh started to melt! And, because I only had one heat lamp, at first only the left side of her face melted. Which was incredibly cool looking! She ended up with one side of her face still solid and the other melted all the way to the skull. The heat lamp even toasted the melted icing a bit at the closest point, so it looked like the skull had been cooked.
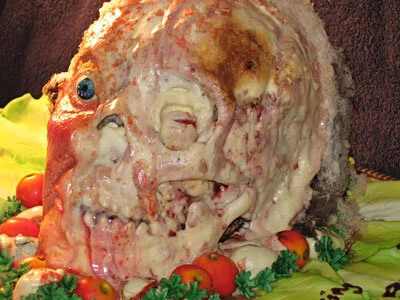
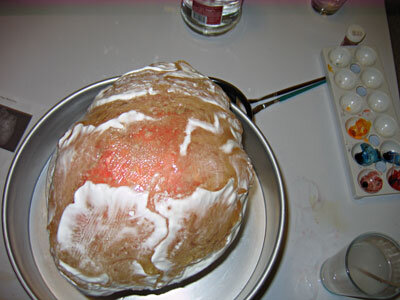
First, the hair melted, then the flesh on top of the skull. The eye socket started to appear, followed by the cheekbone, and the lower jaw. The nose was sloughed off, revealing the nasal cavity and the teeth appeared with a horrifying smile. The eyeball melted away, first crying tears of melted colored cocoa butter, then bursting open to reveal the shiny red cherry within. Red piping gel blood ran out of the mouth, mingling with the gooey white melted flesh.

Once the first side was thoroughly melted away, I switched the heat lamp to the other side until I was left with nothing but a gooey skull sitting in a pool of its own liquefied flesh. Even the garnish cordial cherry eyeballs melted away, leaving only bright cherries amidst the little red tomatoes.

In my darker moments I doubted the melting head cake. I'm ashamed to say that I even seriously considered throwing in the towel and just making a non-melting severed head cake. But that would have been unworthy. That would have been cowardly. I'm proud of myself that I didn't surrender to the temptation of taking the easy way out. I persevered and, in spite of the combined efforts of many different kinds of icing and a finicky cotton candy machine, I succeeded! It was a beautiful moment.

Gelatinous Man Cake
The Gelatinous Man was created for a small art show that some friends and I were hosting at my business school.
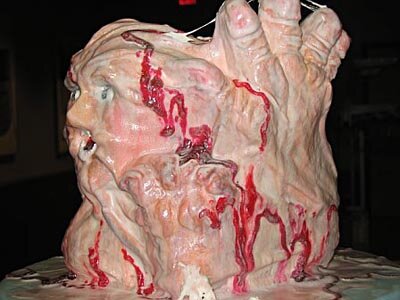
The Gelatinous Man was created for a small art show that some friends and I were hosting at my business school. Very few people at the show actually believed that he was cake until I cut into him, but then everyone agreed that he was delicious. One boy even expressed delight at the way the eyeball squished when he bit into it.
The concept for the Gelatinous Man developed out of a cake that I made when I was taking a Master Class from Colette Peters at the Wilton School for Cake Decorating and Confectionary Art. I referred to it as a Sea God cake. It was essentially a standard 3-tiered cake with a raised face on top spitting out a fountain of gum paste water. This got Colette and I talking about making a cake that had an entire man trapped inside, trying to get out. Naturally, when I finally got around to making the cake, it came out all oozy and bloody and moist. And so the Gelatinous Man was born. Or at least he's on the verge of being born. Or possibly he's just been absorbed into his odd, oozing sack. I can't say for sure. You'd have to ask him.
The first step was to make the base, which is simply two circles of 3/8" foam core glued together, one larger than the other. The smaller circle is only there to make it easier to pick up the cake by leaving a space under the upper plate to get your fingers into. It's a little trick I learned from watching cake competitions on the Food Network. The larger circle is covered with fondant, marbled with some royal blue food coloring. Just knead some of the color into the fondant until you come up with a cool marble texture, and then roll it out to about 1/8" thickness. It's very easy to stick the fondant to the foam core by brushing it with water.
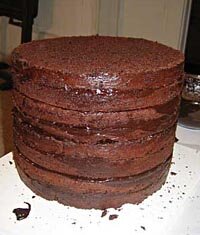
I started in on the cake itself by baking four 10" round cakes, using a really great chocolate cake recipe I got from one of Colette's books. I then torted and filled these with a plain chocolate ganache. Because the cake was so tall I had to put a layer of 3/16" foam core, supported by 1/4" dowels, in the middle. I also put a 3/16" foam core circle on the bottom of the cake to make it moveable before it was mounted on the final base. Both pieces of foam core were only 9" in diameter, instead of the 10" diameter of the cake so I would be free to carve into the cake without worrying about running into the foamcore.

Now for the fun part - carving the cake into the shape of a man trapped in some sort of membranous sack. I had a little sketch, which I had made in the margins of my Operations notebook during class. So I was sculpting a cake while consulting my Operations notes. I found this juxtaposition perhaps unduly amusing, because, as anyone else out there who has gone to business school doubtless already knows, Operations is about the most tedious class in existence (Sorry, Professor Rappold.) and I'm not just saying that because, as I write this, my final Operations project is due in eight hours. Using a paring knife, I started by cutting away the area around the face, the hands, one foot, and one knee. I carved the back into a slope with a ridge of spine running down the middle, then added a little butt crack at the bottom. I had to add some extra pieces to the top of the cake to get the requisite height on the fingers of Gelatinous Man's right hand.

Once I had the basic shape, I sealed the entire cake with a crumb coat of royal icing. Royal icing isn't the greatest tasting icing, of course, but I needed the stability of it to hold up to all the brushing and sculpting that would be required in subsequent steps. I had to wait for that crumb coat to dry before I could proceed to the next step.
My plan was to sculpt the details of the features by piping them on in essentially the right place, then smoothing and making fine detail with a damp paint brush. My first attempt at this failed because the water on the brush diluted the icing so much that it couldn't maintain its shape. So I scraped it off and started over again with much thicker icing, to the point where I could barely squeeze it out of the bag, and a slightly drier brush. This worked much better.
It took me two passes through using this technique to get the finished shape. The first pass created all the major shapes - toes and palms and cheeks, even details like the creases in the finger joints. The second pass added more fine details and built up heavily frosted areas like the heel, but mostly focused on stretching out the icing between elevated area - between the finger and the spine, for instance, and between the toes and the chin - to make it seem like Gelatinous Man was writhing inside and struggling against a contiguous membranous sack.
I ran into some difficulty with the nose. I couldn't make it as prominent as I wanted to because the icing wasn't sturdy enough and kept slumping into his open mouth. Clearly I needed something structural to stick into the cake to build the nose around. It needed to be edible, so I ran around my apartment for a while like a chicken with my head cut off, looking for a pretzel, which I already knew I didn't have. Then I stumbled across a packet of Lik-M-Aid that a friend gave me for Valentines Day. The little candy stick, which was already broken in half, was perfect. I stuck the broken end into the cake and built up a frosting nose around the protruding rounded end.

Now for color. My plan was to just add color to the regions that protruded, as if the sack was white but thin, so the flesh color underneath only showed through where Gelatinous Man was exerting pressure on his membranous prison. That plan didn't really pan out because I got carried away with the airbrush, and the whole thing ended up fleshier than I had anticipated. So I made the protrusive parts even darker and redder. Then I sprayed some dark blue and purple vein-ish lines along the stretched membrane areas. I believe that while, obviously, red is important for blood, in order to really evoke gore, you need blues as well. I also added some blue in the as-yet-empty eye sockets and red inside the mouth.
To complete the eyes, I piped in big blobs of clear piping gel for the irises then added royal icing whites over top of the piping gel. A bright red piping gel tongue enhanced the mouth.

With that I was ready to transfer Gelatinous Man onto his blue fondant-covered base. Considering that I was by myself, this went remarkably smoothly and I even got him relatively centered. To clean things up I piped a bead of royal icing around the seam between the cake and the base, and then smoothed it with a damp paintbrush. While I had the icing out, I put some little teeth in Gelatinous Man's mouth.
Now I had a good shape and some decent colors, but the cake still didn't sing. For one thing, it was too neat - no damp oozing, no blood - and for another thing, Gelatinous Man wasn't integrated with his base to create a unified piece.
To create the oozing, damp look I was going for, I made some very, very thin royal icing and used a paintbrush to apply it to the cake. Naturally, such watery icing pooled in the crevices and around the bottom of the cake, giving more of an illusion of depth and an indication of moist membrane. A somewhat unforeseen but beneficial effect of the dripping icing was that it made the airbrushed colors run and bleed. I think it made it look much more natural and frankly, I should have known that was going to happen, since I know that airbrush colors don't really set. It took three coats of this watery icing to really get the depth I was looking for, and by that time a whole bunch of icing had pooled on the base, so that Gelatinous Man appeared to be sitting in a puddle of his own melting flesh. It was a nice look, and effectively joined Gelatinous Man visually with his base.

I almost called it quits at this point, but I still thought it needed a little more, and I had a bunch of piping gel lying around. So I whipped up two different colors of red piping gel - a deep burgundy and a bright red. I painted a stripe of blue food coloring on the inside of a piping bag (I told you I'm a big fan of judicious use of blue in my gore effects.) fitted with a #8 round tip and filled it with the darker red piping gel. It was a little hard to control the piping gel on the vertical surfaces, but I ended up pretty happy with my big veins, so I then used the bright red piping gel in a bag with a #6 tip to make the smaller veins.
Now I had blood, but was once again faced with a piece that seemed unfinished. One more coat of watery icing did the trick, blending the veins into the cake, melting them just enough to make them seem integrated into the membrane rather than disconnected and sitting on top.

Once again I almost called it done. Then I remembered that I had bought a bag of marshmallows in the hopes of melting them into some sort of fibrous tendrils. This worked really well when I tried it on a practice bowl, but less well when I tried it on the cake because it was still a little wet so the marshmallow wouldn't stick easily. So I only used a little bit, but I still think it added a nice touch and it'll probably be a good technique to have in my arsenal in the future. Easy, too - I just popped the marshmallow in the microwave for fifteen seconds, and then stuck it wherever I wanted it with the tip of a knife. I only used three of the marshmallows, but I have since eaten the entire rest of the bag.
I could probably have gone on poking and prodding at this cake forever until it was just an indistinguishable blob of yuckiness, but fortunately, I ran out of time at this point and had to decide that I was done. I think it has firmly established me as the weirdest member of my MBA class.


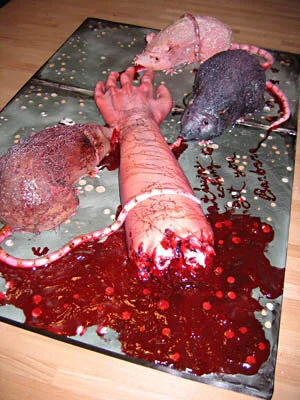
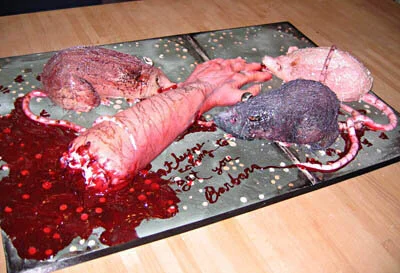
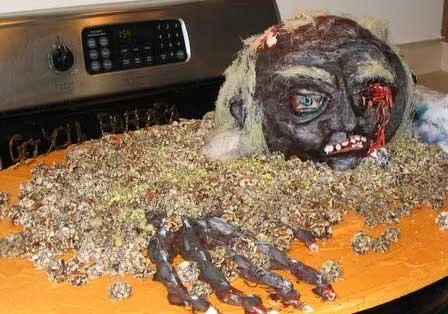
Killer Rats Cake
The Killer Rats Cake was made for Son of Zombiefest, our celebration of the posting of our 300th review.
Introduction
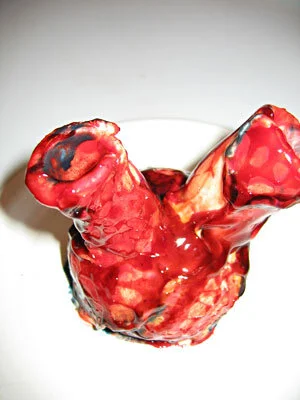
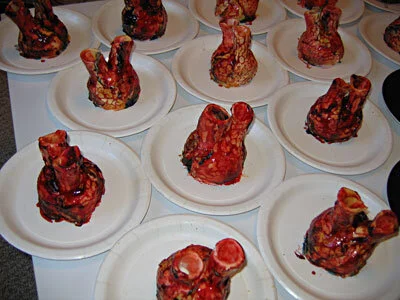
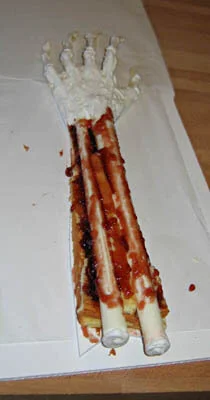
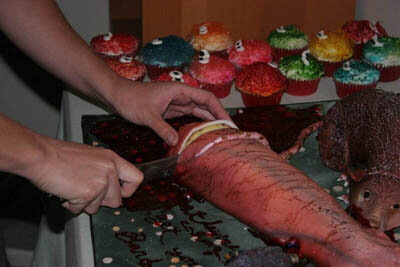
The Killer Rats Cake was made for Son of Zombiefest, our celebration of the posting of our 300th review. Actually, to be fair to the rats, I don't really know that they killed the man they're eating. It's possible that they simply came upon the severed arm and decided it would make a tasty snack. That's why I referred to it through much of this process as the Rat-Arm Cake, but my sister pointed out, and I agreed, that was a very uninspiring title, so "The Killer Rats Cake" it became. Like its illustrious predecessor, The Zombie Cake, The Killer Rats Cake began life as a pattern for a carved pumpkin. Both the pumpkin and the cake depict a severed human arm being devoured by three large, ugly rats. Well, ugly in their cake incarnation, at any rate; they're sort of cute on the pumpkin. The cake arm was constructed in layers, from the inside out, so that a slice of the cake looked like a cross-section of an arm, complete with ulna, radius, bone marrow, skin, etc. Admittedly, this did not make for a spectacularly dynamic presentation, at least as compared to the cakes that burned or shot blood or secreted bodily fluids, but I think it was just as effective, in its understated fashion. Sometimes even I opt for subtlety and finesse over gaudy drama.
Because the cake was created in several separate segments, then assembled, I'm going break up this narrative accordingly, although in reality these processes were occurring simultaneously.
The Rats
The first step in constructing the rats was to make the gum paste and fondant pieces that needed time to dry before they could be attached to the cake. I did this about five days before the party.
The rat ears are simply gum paste, rolled very thin, then cut into the shape of ears. I then thinned the edges even further with a ball tool and pinched the bottoms together to give the ears the appropriate shape.
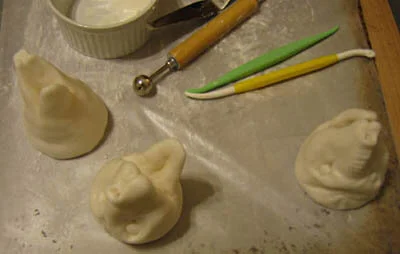
The rat faces were a much more difficult proposition. As I always do, I started by finding a few good research photos to work off of. Of course, I couldn't find any pictures of rats that were as mean as I wanted my rats to be, so I supplemented the photos with the use of a really ugly, vicious, battery operated rat toy that I once bought for my sister at a KB Toys that was going out of business.
I made the rat faces out of a fifty-fifty mixture of gum paste and fondant. At first I had a lot of trouble sculpting them because I couldn't figure out how to handle them and set them down without distorting the features I had already carved. Eventually I discovered that I shouldn't try to pick them up, just set them on wax paper, noses facing up, and work on them that way. After that, things went much more smoothly and, with the help of various gum paste sculpting tools and a lot of shortening to keep the gum paste-fondant mix moist enough to work for the requisite period of time, I was able to crank out three pretty vicious looking rat faces, two with open mouths, one with mouth clenched as if he were in the process of ripping off a succulent morsel of flesh.
The next step was to cut a foam core base for each rat, which obviously necessitated my planning the body shape and position of each rat, so I would be able to stick the base to the cake, then carve around it.
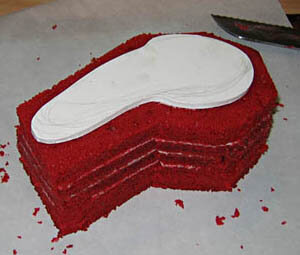
Finally it was time for the actual cake. My sister was kind enough to bake the cakes for me. We used a red velvet cake recipe so the rats would look nice and meaty inside, and we started with three 10" round cakes. I then took each cake, leveled the top and split it into two layers using a cake leveler. Cutting each of these layers in half along the diameter of the circle allowed me to assemble the four resulting pieces into a four layer cake shaped like a semi-circle. I used buttercream icing as my filling between layers.
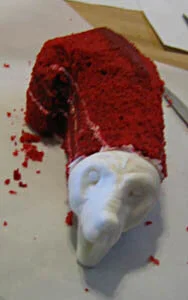
Once I had torted and filled all three cakes in that fashion, I was ready to carve, which is one of my favorite parts of the cake construction process. I started with the first cake upside down and stuck the foam core base to it with buttercream icing. Using a small, sharp kitchen knife I cut the cake so that it was about half an inch larger than the base all around, then flipped the cake sight side up. I then did the more detailed carving, rounding the body, giving the rat haunches, and cutting the front carefully so that the head would line up properly.
Having carved all three cakes, I was ready to attach the heads, which I did using buttercream icing, reinforced with a toothpick stuck between the back of the head and the front of the cake. I then frosted the rats with buttercream icing. I took two layers of icing, with some dry time in between, to cover most of the red in the cake.
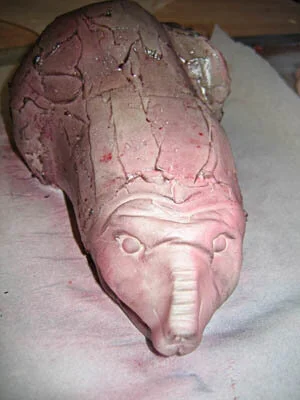
Before adding fur, I used my cake airbrush to put a base coat of color on each rat. I planned to make one white rat, one brown rat, and one grey rat. For the white rat I used a pink base coat with some darker red and orange shadows. For the brown rat, I used a reddish-brown base, but left some lighter pink highlights. For the grey rat, I used a medium grey base, but with lighter grey and pink highlights. Then I decided that I wasn't satisfied with them, so I airbrushed in even more shadows and highlights.
The next step was the application of fur, which was made of spun sugar. I had decided, after a few experiments, for the sake of time to make all the fur colorless, then airbrush on the colors. Using Jacque Torres's recipe for spun sugar, I set up two long wooden spoons hanging over the edge of the counter, wrapped half the kitchen in plastic bags, then proceeded to fling hot sugar absolutely everywhere.
Because my spun sugar tools had a tendency to get gunked up and need to be washed after only five or six uses, it was good that I had two. One was a whisk with the curved ends cut off; the other was a wooden ruler with some cut up pieces of wire taped to it. The wire ends of either tool were dunked into a bowl of hot sugar, then whipped back and forth over the two wooden spoons, leaving a trail of thin strands of sugar behind. I then scooped up these thin strands and draped them over the rat bodies. After I had finished the first rat, I decided I had put too much fur on it, so I did less fur on the other two. As it turned out, I was wrong. The first rat, the one with more fur, wound up looking better than the other two.
Airbrushing onto spun sugar turns out to be a tricky operation because the sugar is so thin that it tends to dissolve if it gets wet. Long story short, I oversprayed the rats and the two with less fur wound up looking patchy and diseased. I rationalized this by saying that the scene took place in some kind of abandoned government lab which was full of all sorts of chemicals and viruses and the like. No wonder the rats are diseased! The rat that I thought had too much fur wound up looking really good.

Before applying the final coat of airbrushed color, I stuck ears to each rat, by simply jamming the bottoms of the ears into the cakes. I obviously should have attached them better, because several of them fell off and later had to be reattached.
There are details too delicate to the airbrushed onto cake rats, so I went in with a little brush to paint the insides of mouths and ears and eyes and noses. I also gave little white royal icing teeth to the one rat whose mouth remained open. The other rat that was supposed to have an open mouth settled somewhere along the line and wound up with a closed mouth. The third rat, of course, had a closed mouth to begin with.
The rats still needed, feet, tails, and bloody snouts, but that had to wait until they were positioned on the cake base, so I'll cover that in the Assembly section, which means we're ready to move on to the arm.
The Arm
To begin with, I needed a picture of an arm to work from. I couldn't use my own arm as model, because I wanted a big, hairy man arm. So I turned to my brother-in-law, my sister's husband, who was a very good sport about me photographing his arm and incorporating it into the cake.
The first step was to make the fingernails out of gum paste. My brother-in-law has much flatter, squarer fingernails than I do, so it took me a while to get the hang of them and to find an appropriately curved surface to drape them over to dry. I also discovered that the key to sculpting realistic fingernails is the subtle, vertical striations. Take a close look, you'll see what I mean.
I wanted to experiment with the skin before trying it on the real cake, both to find a good skin texture and because I hadn't used the airbrush much before and I wanted to make sure I knew how to handle it. So I rolled out some fondant and tried texturing it by pressing on it with various fabrics. The winning texture came from a blue dishtowel. I then made a couple of samples complete with protruding veins and let them dry before practicing airbrushing on them.
On the extras of one of the Lord of the Rings DVDs I saw a special effects guy explaining how the way to get a realistic skin coloring on a mask was to work outwards form the inside, that is, start with the veins, and build up the color in layers from there. So I tried it. I started by painting in blue and purple veins, then built up layers of reds, browns, yellows, pinks, and eventually white highlights on top. I think it worked pretty well, except that I need to learn some patience and let each layer dry completely before I do the next one.
Next came the bones. The bones of the hand are made from hard candy, colored with white and a bit of yellow and brown food coloring. I poured it onto a silpat mat into the shape of finger and hand bones, making many more than I needed, so I'd be able to mix and match the appropriate ones.
I wanted to make the arm bones out of white chocolate, but I had trouble getting it to set up properly, so I wound up using candy melts instead, which really don't taste as good. For molds for the bones I wrapped acetate paper into thin cones. I filled these with melted candy, then dumped then candy out, leaving only a thin coating on the inside of the acetate. I needed hollow bones, of course, in order to fill them with marrow. I then set them upside down to dry, stuck through holes in a FatTire Amber Ale box that was sitting on a wire mesh, so excess candy could still drain out of them. Once that layer of candy dried, I repeated the process to build up thicker walls. Once they were dry it was easy to cut the bones to the correct length with a little patience and a serrated blade. Before filling them with marrow, I plugged up the smaller ends with royal icing.
The marrow inside of the bones is made of lemon curd, which my sister made for me. If you haven't had it, it's kind of like a super-intense lemon pudding, and we thought it would have just the right consistency for jiggly bone marrow.
After just a few seconds in the microwave, the lemon curd was soft enough to put into a piping bag and pipe into the hollow arm bones. I also put a little fresh raspberry sauce (basically just raspberries pureed with a bit of sugar and lemon juice and strained to remove the seeds) into the piping bag because I thought that bone marrow should have some red in it. Once each bone was full, I plugged the other end with royal icing as well.
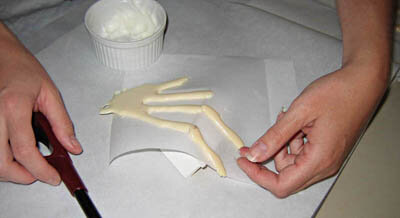
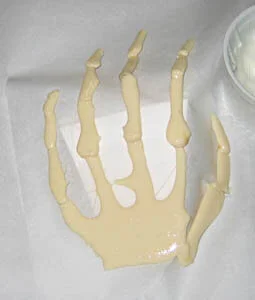
Assembling the bones of the hand took some doing. I built a form out of foam core to assemble the hand on in order to get the somewhat tented shape of a relaxed hand, then draped wax paper over that. One by one I selected bones and stuck them together by melting the ends with one of those big red lighters. Worried that this wouldn't be stable enough, I then piped royal icing over the top of the bones. In retrospect, I should perhaps have just made the bones out of royal icing in the first place. In any event, I should have given the royal icing more time to dry, because the hand wound up collapsing somewhat under the weight of the fondant skin and turned out flatter than I had hoped.

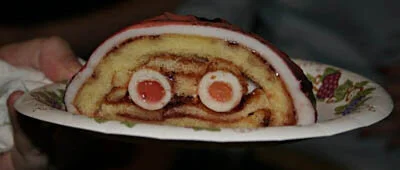
The actual meat of the arm is made of a jelly roll cake, which was easy to cut into appropriate pieces and to wrap around the arm bones. The first step in assembling the arm was to stick a layer of cake onto the previously cut foam core base for the arm, using red currant jelly. I then slathered on another layer of red currant jelly and positioned the arm and hand bones. I added yet another layer of royal icing to the hand at this point, both to attach it to the arm bones and to give it a little more thickness and dimension. Then came another layer of red currant jelly, then more jelly roll cake and even more red currant jelly. I wanted to make sure the arm looked nice and red inside when it was sliced.


I was finally ready for the nerve wracking process of skinning the arm. Or would it be unskinning the arm, since skinning usually means to remove the skin? Anyway, this was quite scary because effective skin needs a lot of subtle sculpting and texturing, but there is very limited period of time in which the fondant is still workable before it dries out. Gamely, I rolled out the fondant, and draped it over the arm. I covered the arm itself with plastic wrap to keep it moist and started with the hand, carefully trimming and pinching around the finger, adding veins and knuckles and pushing the gum paste fingernails into the soft fondant. I worked as quickly but as carefully as I could, so I could turn my attention to the arm itself. I made veins, protruding from the skin, running the length of the arm and then swiftly grabbed my blue texturing dishtowel. I was almost too late. The texture didn't come out as prominently as I had hoped, because the fondant had dried beyond the ideal texturing point, but I did get some good skin texture in places. I was content. I also pulled and frayed the skin at the back of the arm to give it that all-important violent torn away look.

Next step - coloring. Again, the build up from the purple-blue veins all the way to the white highlights. I clearly didn't learn my lesson last time because again I failed to allow sufficient dry time between coats, which resulted in a few runny spots. I cursed myself and added some brown and purple shadows to cover the imperfections.
The hair making process has been amply discussed in the Rats section, so suffice it to say that I carefully draped the arm hair in the appropriate direction, in some places almost hair by hair. Again, I overairbrushed a little when I went to make the hair brown, but at least it stuck the hair firmly down to the arm. Finally, the fingernails required some brush painting to get the subtle coloring just right. Take a look at your own fingernails; they're more complicated that you think!
And here we will leave the arm for a little while, while I move on to the base.

The Base
Obviously, it would not be very fitting to simply plop a severed arm down on a cookie sheet and call it done. No, I needed a more appropriate base.I decided to go with a sidewalk - simple enough not to distract from the central composition of arm and rats, large enough to give ample room for bloody piping gel rat footprints, apt yet non-specific enough to allow the viewer to construct the scenario of his or her choice around this glimpse of carnage.
I bought a sheet of 3/8" foamcore, figuring that the standard 3/16" foamcore that I use for the cake bases wouldn't be sturdy enough to support that many rats. After carefully studying the sidewalk in front of our house, I was ready to begin. First, I made the grout line between two sidewalk squares with some light grey icing and a large scooped decorating tip.

I mixed three different colors of royal icing to use for the small round rocks embedded in the concrete. Using two different sized round decorating tips for each color I piped dots of icing them squished them down and simultaneously textured them with a damp rag. This took much longer than I expected it to, but eventually I had a good coverage of small rocks, which had to dry before the next step.
I used a modified run in icing technique for the concrete. I made two shades of grey icing and watered them down just a bit, so they were easy to spread, but not as thin as regular run in icing. I filled a pastry bag with both colors at once to get a nice random variation of color and attached a wide, flat tip. I used the bag to fill in icing around each rock, then used a knife to spread icing in the larger areas. This took much longer than I had anticipated and I was soon cursing myself for making so many stupid little rocks.
Once that layer of icing had dried it was time to paint. In order to maker the sidewalk look distressed and dirty I went in with some black food coloring and painted stains, mostly around the grout line and around the edges. A thin black ribbon glued around the perimeter of the foamcore finished off the edge nicely.
At this point I'm in a position to describe for you the dramatic conclusion of my cake making saga, but I'm going to pause for moment and go off on a few tangents describing a few other culinary marvels of our party. Hopefully, this will heighten the tension for you and make my eventual return to the cake itself all the more enjoyable.
The Cupcakes
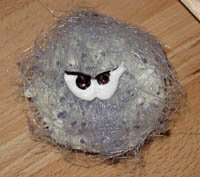
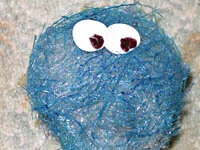
My sister and I were concerned that The Killer Rats Cake might not be sufficient to feed all our guests, which is exactly the opposite of the problem that we usually have with my cakes. As it turned out, we needn't have worried (we had two whole rats left at the end of the party) but to guard against the possibility of insufficient cake we decided to make supplemental cupcakes. My sister came up with the brilliant idea of making them monster cupcakes, covered in fur, with googly eyes.
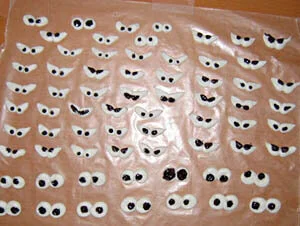
Several days in advance Barbara May piped a selection of royal icing eyes onto wax paper with lots of different expressions - angry eyes, sad eyes, scary eyes, surprised eyes . . . Once they were dry she painted in little black food coloring irises.
While she was making the red velvet cakes for me to carve into rat bodies she also made several dozen red velvet cupcakes and iced them with the cream cheese icing that traditionally accompanies red velvet cake.
While I was making spun sugar for the rat fur and the arm hair I also made fur for all of the cupcakes, just scooping up a wad of spun sugar and plopping it atop each cupcake. Have you gathered yet that there was a lot of spun sugar involved in this entire operation? My sister and I did our best to clean it all off of the kitchen floor, walls, cabinets, etc., not to mention our shoes, but it wouldn't surprise me if she were still finding ants embedded in elusive deposits of sugar in various corners of her kitchen. And you should have seen the weird looking mess when we put our shoes outside on the porch because they were too sticky to leave in the house and the sugar on the soles melted in the heat into gooey, sticky puddles!
Anyway, once the cupcakes all had fur I sprayed them various bright colors with my airbrush and turned them back over to my sister to stick eyes onto. Interestingly, many of the cupcakes had entirely different facial expressions depending on the side from which they were viewed. Some seemed angry from one angle, but worried from another angle or alarmed from onside, but sad from the other. And they all looked like the bastard children of Muppets and those aliens from Critters.
All in all, they were delicious, cute, and incredibly sticky to eat. Clearly a winning combination!
The Truffles
The final culinary element of our party that I'm going to discuss here is the googly-eyed truffles. Mom had just given us about twelve pounds of fancy chocolate, so we decided to try out some new truffle recipes -brandy truffles, jasmine truffles, ginger truffles, and mint truffles. All the recipes involved soaking various things in cream for various periods of time then pouring the hot cream over chopped chocolate. This mixture is then stirred until smooth and set aside, wrapped in plastic, to cool.
The nest step is to form the centers, which turned out to be much harder than we had anticipated, since the consistency of the chocolate was, well, inconsistent. But we persevered and soon, after letting the centers sit for a bit to dry, my sister was ready to dip them all one by one into melted chocolate, an operate that requires non-sweaty hands and a lot of patience, but also satisfies the little girl inside all of us who liked to make mud pies. (My sister and I actually mud pie recipe books. Mom still has them in the scrapbook.)
In order to make the truffles appropriate to the horror theme of the party and to integrate them with the cupcakes, my sister then decided to give them all googly eyes with little dabs of white chocolate and even smaller dabs of dark chocolate for irises. This had the dual beneficial effects of making the tray of truffles just cute as the dickens and allowing our guests to distinguish between truffle flavors by the direction the eyes were looking. I don't remember which eyeball direction corresponded to which flavor, but one flavor was looking up (or down), one was looking to the side, one straight ahead, and one flavor was cross-eyed!
OK, are you all ready? Take a deep breath because it's time to return to the final chapter of The Killer Rats Cake saga! That's right; it's finally time for the assembly.
The Assembly
So here I was, the day of the party with three rats perched on the counter and a human arm safely stowed away in the refrigerator. Moving everything into place on the base was a risky operation, especially for the hand, which wasn't entirely supported by the foam core base of the arm. But with my natural manual dexterity, a flat spatula, and my sister standing by to peel wax paper off the bottoms of the rats, the transfers were all accomplished successfully. The rats lost a bit of hair off their butts when the wax paper was removed, but I stuck most of it back on and, as they were all sort of scruffy and patchy already, it made little difference.


I chose to position the rat whose mouth had remained open prominently at the end of the hand, about to chow down on the middle finger. The rat whose mouth had closed against my will I shoved up into the wrist area, so its nose was nuzzled up to the arm. I left some space between the arm and the rat with the clenched mouth so that that I was able to cut a bit of the flesh of the arm and pull out a piece of skin to put in the rat's mouth.
Now, as we all know, a rat is nothing without a nice icky tail, and since I was going to exceptionally gross rats, I made them exceptionally long, slimy tails. I made the tails out of fondant, rolled into long strands, then segmented with a plastic fondant tool. Making the tails at this late stage, with fresh, soft fondant, allowed me to drape them grotesquely over the arm and around the other rats. I think the tails really unified the piece.
While I had the fondant out I also make little feet for the rats. I then painted the tails and the feet with some paste food colors and water, varying the colors slightly from rat to rat, but mostly using reds, pinks, browns, and black.
Now, my composition was complete except for the blood. No severed arm lying on a sidewalk could be complete without copious amounts of spilled blood, so I busted out the piping gel and the red food coloring. Piping gel doesn't really taste all that good; it's just gooey sugar, but it has a great wet, glossy sheen to it. I mixed some that was a nice, deep, blood red and put it in a piping bag with a small round tip. I did the detail work first with this - little bloody rat footprints, and a blood trail from one of the rats' tails that spelled out, of course, "They're coming to get you, Barbara." I also made sure to get blood in and around each rat's mouth and into the fresh wound in the side of the wrist. Then I slathered lots of blood around and on the torn stump of the arm, washed the slimy red goo off my hands, and went to look for a cold beer.


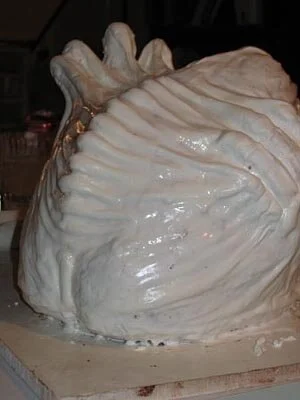
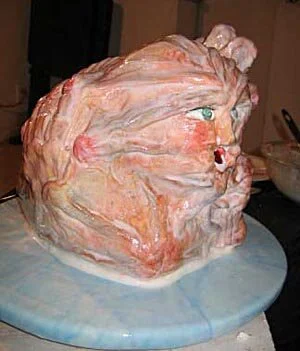
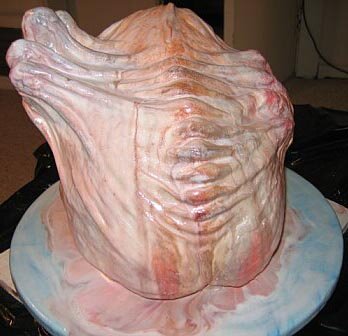
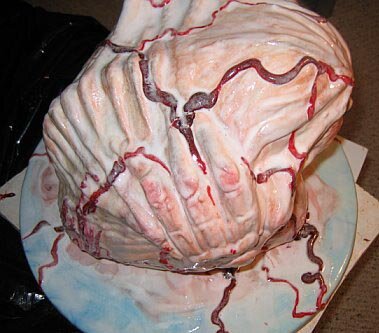
Thorax Cake
I generally make a bleeding heart cake for our annual pumpkin carving party (Pumpkinfest). Sometimes the heart beats, sometimes it's anatomically correct, and so on and so forth. This year I decided to go the whole hog and make an entire thoracic cavity cake.
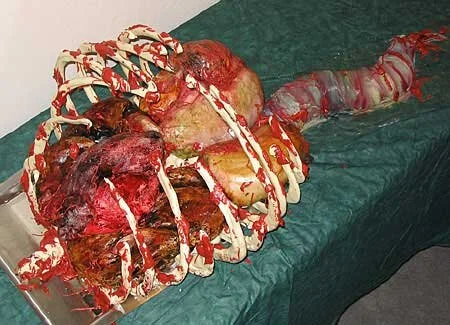
The Thorax Cake - grossing out the internets since 2003.
I generally make a bleeding heart cake for our annual pumpkin carving party (Pumpkinfest). Sometimes the heart beats, sometimes it's anatomically correct, and so on and so forth. This year I decided to go the whole hog and make an entire thoracic cavity cake. The plan was for each organ to be made out of a different kind of cake and to secrete a different color of fluid when it was cut into. Previous heart cakes have bled fresh, homemade raspberry sauce. This year I made raspberry, strawberry, kiwi, mango, and blueberry sauces. Sadly, the organs didn't bleed as well as I had hoped when I cut the cake, as each organ was relatively small and couldn't hold much sauce. Also all the moving around after filling the organs made it hard to keep the sauce contained in the little cavities I hollowed out. The heart bled pretty well, but the other organ fluids weren't very dramatic. On the bright side, there were lots of leftover sauces, which were all quite delicious. But I'm getting ahead of myself. My intended organ-cake-sauce combinations were as follows.
Heart - orange cake with raspberry sauce
Lungs - apple spice cake with strawberry sauce
Kidneys - orange cake with blueberry sauce
Stomach - ginger cake with mango sauce
Liver - chocolate cake with kiwi sauce
Small Intestine - jelly roll with red currant jelly
Unfortunately the liver suffered a complete structural failure when I tried to transfer into place within the rib cage, so it had to be eliminated from the presentation. I like to think that the liver was the tastiest bit and so whoever ripped this unfortunate man apart (My sister thinks it was Klingon because it was slightly larger than life size, but I'm not sure Klingons have the same internal organ structure.) ate the liver first before it ever got to our pumpkin party.

After baking all the different types of cakes, I carved them into the shapes of the appropriate organs, using my handy Gray's Anatomy as a reference.
I then flipped each organ over, hollowed out a cavity in the center and frosted the inside of the cavity and the underside of the cake with buttercream frosting. After spooning in the fruit sauces, I sealed the cavities with a layer of fondant icing and flipped the organs back over. The heart and the lungs I covered with white modeling chocolate and the kidneys and stomach I covered with fondant icing. Both had their advantages and their disadvantages. White modeling chocolate tastes better than fondant and it sticks to itself better than fondant, but it's more difficult to work with on cakes like these which were relatively unstable due to the hollows in the middle. Also, modeling chocolate is difficult to paint with paste food coloring, which is what I usually use. It can be painted easily with powdered food coloring, but I didn't have any cocoa butter to dissolve the powder in. The fondant is easy to roll out and wrap around the cake and very easy to paint but it doesn't hold sculptural detail as well as modeling chocolate.
At this point, I took a break from the cakes in order to assemble the white chocolate rib cage in which all the organs were to be placed.
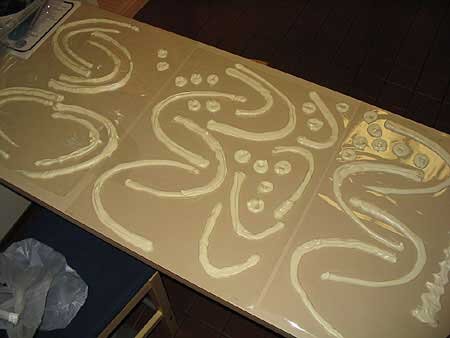
I tempered white chocolate chips in the microwave and piped ribs and vertebrae onto acetate with a plastic piping bag. I drew ribs onto paper which I placed underneath the acetate to insure that the ribs would be the same shape and the right size.
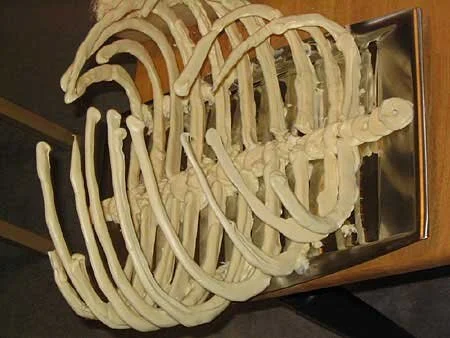
Dipping each piece into a bowl of melted white chocolate, it was relatively easy to assemble the rib cage on a silver tray. (The tray's last use was for passing out cookies at my sister's wedding.) Of course, with all the organs on top of it, virtually no one ever actually saw the fact that there was a complete spinal column underneath all the cake so some might say there was a bit of wasted effort there, but I say if you're going to make an edible, anatomically correct chest cavity dessert tray, you might as well do it right!

Once the rib cage was dry, I placed all the organs except the liver in the appropriate places inside it (again using Gray's Anatomy as a guide. This is, by the way, the only use that Gray's Anatomy ever sees in our household.)
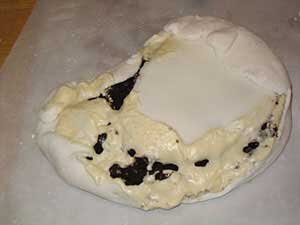
It was at this point that I realized the liver was beyond salvaging. (I had problems with the liver from the moment I tried to take it out of the cake tin.)
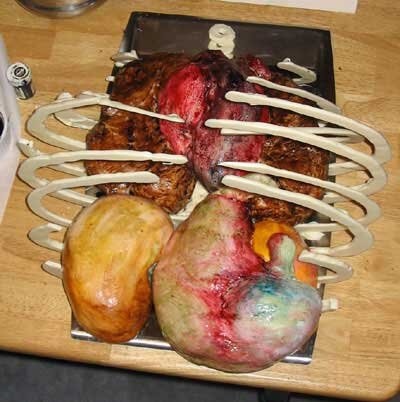
I'm not really sure what colors kidneys and stomachs and such are supposed to be, but, drawing on my vast experience watching people in movies being disemboweled, I gave it my best shot.
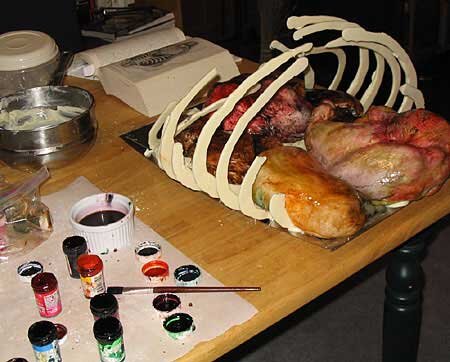
I'm not sure how accurate the results were, but they were definitely gross.
At this point my sister came home from a party and helped me move the cake to its final location so I could attach the intestine, which was to be trailing out of the rib cage so as to suggest that the person to whom the thorax had belonged had been ripped apart, rather than carefully dissected.
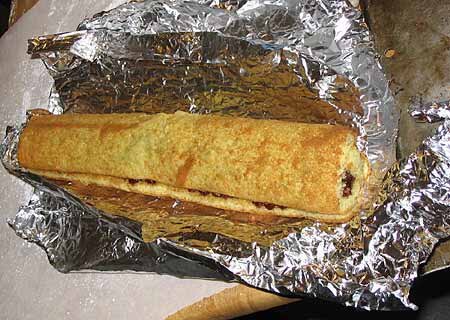
I bent the jelly roll (which I was quite proud of; I'd never made that kind of cake before and I sometimes have problems with whipping eggs. Fortunately, I was visiting my mom recently and she told me that it's very important the mixer and bowl be very clean and perfectly dry or the egg whipping won't work, so I didn't have any problems at all this time. Thanks, Mom!) into appropriate curves and covered it with white chocolate. I was, by this point, out of both kinds of frosting, lacked the ingredients to make more, and it was four o'clock in the morning so I couldn't get any more. That's why I just used plain white chocolate to cover the intestine. It looked fine, but was pretty difficult to paint, again because I lacked cocoa butter and so couldn't use the powdered food colors.
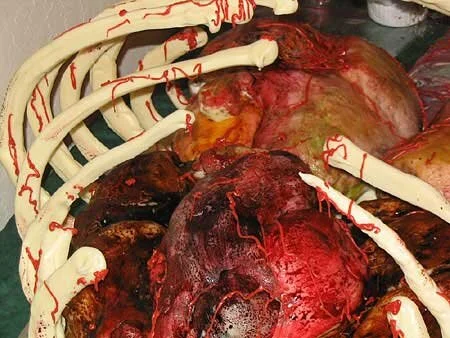
All that was left was to add the buttercream frosting blood, so it wouldn't look so pristine.
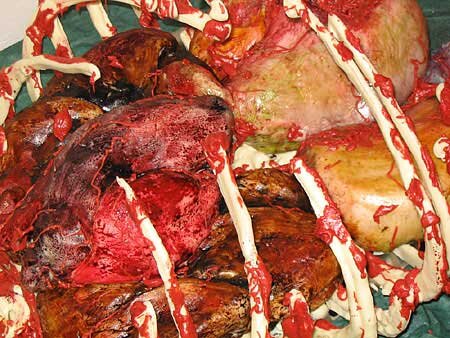
I did little veins on the organs first with a piping bag, then put big globs of gore on the ribs with a knife. A little spritz of corn syrup to give it that all-important oozing, wet look and I was done!
Tragically, the next day was very hot and, as white chocolate melts at about 95 degrees Farenheit, this caused major structural failure of the rib cage. By the time our guests arrived for Pumpkinfest, the rib cage had collapsed almost completely. It was nice and stable in the middle of the night when it was cool, though, I swear! So we put a photo of it in its original state up on the computer monitor. Actually, even with the rib cage broken, it looked pretty gruesome and neat, but it was better before. As I mentioned before, the cutting of the cake was not as dramatic as I had hoped, but, considering that I make all this up as I go along, I think the whole project didn't go too badly at all. And everyone said the cakes and sauces were all delicious, despite the excessive amounts of frosting required for this sort of project.

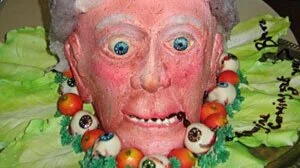
Zombie Cake
I made this cake version of our logo for a gala party we threw to celebrate our 100th review on theyrecoming.com.
I made this cake version of our logo for a gala party we threw to celebrate our 100th review on theyrecoming.com.
The highlight of the party, if I do say so myself, was my zombie cake, which we named Orville, after the dead guy in Children Shouldn't Play with Dead Things, though it looked nothing like him. In effect, it was a three-dimensional version of our logo, a zombie rising up out of the grave, or, in this case, rising up out of a field of my homemade French cream candies. The head was made of sour cream chocolate chip cake, dyed red to resemble brain matter, covered with modeling chocolate and various other frosting and hard candy details. The hand was made of mint-flavored hard candy bones covered with chocolate. Green hard candy letters around the perimeter reminded everyone that "They're coming to get you, Barbara." At the height of the party we gathered everyone around it to witness the thrilling moment when raspberry flavored blood spurted from his eyes and poured from his mouth. In fact, it sprayed a bit further than I expected it to. Fortunately only my sister and I were hit.
I calculated that, between the cake, the French creams, and the bloody eyeball cordial cherries, I went through 15 pounds of granulated sugar, 2 bags of powdered sugar, 8 large bags of chocolate chips, 2 bottle of corn syrup, 8 pounds of dark chocolate, and 4 pounds of white chocolate. I have a slight tendency to go overboard with these things. We have a lot of eyeballs left over.
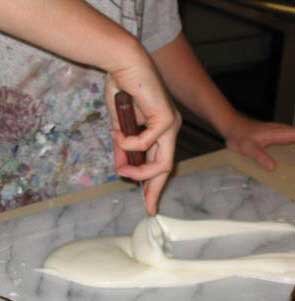
The first step is to make the French creams that will be used for the dirt in the zombie presentation. The creams have a flavored fondant center, dipped in chocolate, and then rolled in chopped nuts. Here, I am preparing the fondant by working it on a marble slab.

These are the completed fondant centers. The colors are all flavored differently -- I believe these are chocolate, pistachio, cherry, and orange. At this point, we're five days before the party.
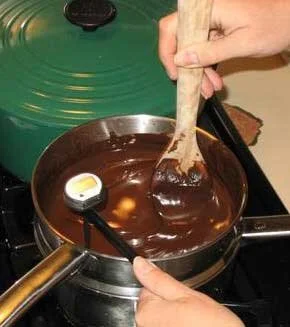
Here, I am tempering the chocolate to prepare it for dipping the creams. I’m using a double boiler and candy thermometer.
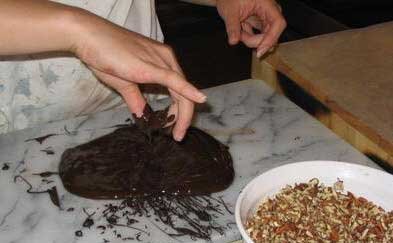
After the chocolate was tempered, I poured out a portion onto the marble slab. I dipped each fondant center into the chocolate, and then rolled it in the chopped nuts. The candies were completed four days before the party.
As a side dish to the zombie cake, I decided I also wanted to make cordial cherry eyeballs. Before dipping the maraschino cherries, they were soaked in rum or brandy for several days. They were then dipped in the center filling and left to dry. After this, I dipped them in white chocolate. Dark chocolate is better, but it wouldn't really work for the eyeball concept.
Yes, we had lots of eyeballs. They were painted using powdered food coloring dissolved in melted cocoa butter.
And we finally start the cake! Yes, it really did require that much cake. We used a recipe from The Joy of Cooking for a very yummy sour cream chocolate chip cake. Red food coloring swirled in the batter gave it a delicious-looking bloody brain color. Any light-colored cake would work as well.

This is me straining the fresh raspberry sauce which will be used for blood. This is great over cake or ice cream, even if your dessert doesn't bleed. Puree 1 pint of raspberries, 3 tablespoons of sugar, and 2 teaspoons of lemon juice in a food processor. Then strain the mixture through a fine sieve to remove the seeds.
Ok, we've skipped a few steps here (clearly). This is the completed base of the cake. There are 5 layers of cake here, frosted with a chocolate ganache, which is made by melting semisweet chocolate with cream, and if you like (and why wouldn't you?) flavored with liqueur. Because it's so tall, we had to use interior supports, or the whole thing would have just toppled over. I cut a circle of foam core and stacked it between the middle layers. It's supported below with wooden dowels pushed into the cake, trimmed to just below the level of the layer. Of course, it was a little more complicated than that, since the plumbing system also had to be installed. You can see the large pastry bag to the right of the head, which is filled with whole lot of raspberry syrup. The bag is attached to a plastic tube, which curves behind the cake and enters in the back. Inside the cake, there's plumbing to send the syrup to outlets behind both eyes and the mouth. The outlets are blocked with frosting to prevent premature ejaculation, so to speak.
Once the base of the cake was completed, I started sculpting the facial features out of modeling chocolate, which is semisweet chocolate melted with corn syrup. Once chilled, it's very easy to work with and pretty tasty.
This is the completed face, with all the modeling chocolate details.

These are hard candy eyeballs, which were made by pouring out hot candy (sugar, water, corn syrup, and coloring) and pushing it into icky globs as it cools. Orville's right eye is already covered with a candy eye, so when the blood is pushed through, it'll fill up behind the eye before spilling out.
Orville's left eye has fallen out, so the other candy eyeball is just placed on the base. The blood details are done with royal icing.
The next step is to paint the face details and the blood. The paint is powdered food coloring mixed with melted cocoa butter. It has a consistency kind of like oil paints, and the cocoa butter can be melted in the microwave.
Here's me painting blood on the bits of exposed skull. The skull is done with royal icing, with modeling chocolate layered over it to make the ragged edges.

Here's Orville's hand, rising up out of the orange ground. Prior to placing the hand, the base was frosted with royal icing colored to match our site. The bones of the hand are mint-flavored hard candy, dipped in dark chocolate. The finger nails are royal icing.
I display my zombie hair-making tool. I made it by cutting up some old coat hangers taped to a ruler, creating sort of a deformed whisk. To make the hair, I dipped the ends of the deformed whisk in hot candy, and then whipped it back and forth over two wooden spoons attached to the edge of the counter. As the candy cooled, it hardened into wispy somewhat hair-like strands.

Here's the skull with the hair attached. The strands are thin enough that they just kind of melt onto the head.

Note the lovely hairy eyebrows. Orville's left shoulder is the raspberry blood-filled bag, covered with a t-shirt. His right shoulder is made of fondant (cake fondant, not the kind used as the centers of the chocolate creams).

You can see the layers on the platform here, created to give Orville uneven ground to climb out of. The platform is made out of foam core, glued together in layers and covered with royal icing.
And here we have the full dirt presentation. The French creams are arranged around Orville, creating a lovely field of dirt. The different types of nuts create a nicely varied texture.

This is the hard candy lettering that followed the curve of the base, reminding us, "They're Coming To Get You, Barbara!". Usually I just pour the hot candy directly onto the marble slab in the shape I want. The letters require more detail than that method allows. The candy is hot enough to melt a paper or plastic pastry tube, so I used a 70's-era metal pastry tube, and filled that with the hot candy. I wasn't able to find a similar one online, and I'm not sure they're even made any more.

Orville looks pretty happy in the French cream dirt. Too bad about his eye.
Wow, Orville has big hands. You can see that the shirt covering the raspberry blood bag has now been distressed (as you'd expect a zombie's shirt to be).

And here we are post-explosion! When I squished Orville's left shoulder, the blood shot out his left eye, slightly splattering both of us (but fortunately none of our guests).

I put our cleaver to good use serving the cake.
We did a fair job on the back of Orville's head, but of course we had at least three quarters of the cake left. My sister brought it in to work the next Monday, but her co-workers were oddly hesitant to cut into the face. She eventually dissected him and removed the face and all the plumbing, and that seemed to be more appetizing.

Lovely parting shot, eh? During the first spurt of blood, the frosting cap over the mouth didn't come off. Once I removed it, the blood just kind of oozed out the mouth, it was very nice. I really like the little drops of blood on the right cheek.

Easy Heart Cake
Instructions on how to make a simple heart cake that bleeds raspberry sauce when you cut it. It's easy, delicious, and sure to be a hit at your next Valentine's Day party!

Instructions on how to make a simple heart cake that bleeds raspberry sauce when you cut it. It's easy, delicious, and sure to be a hit at your next Valentine's Day party!
We thought you all might enjoy the instructions for this simple bleeding heart cake because it's quick and easy to make and delivers a dramatic effect for very little effort. It also requires almost no baking skills or cake decorating experience.
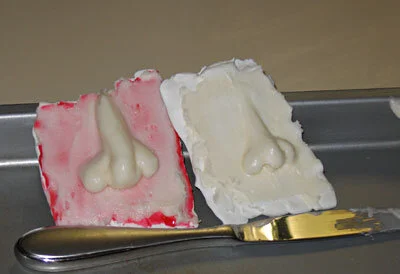
To start with, you'll need to bake a cake in a heart-shaped pan. Any kind of cake will work, including any simple, boxed cake mix, though I like to make mine from scratch. Ideally, make two cakes, to stack one on top of the other. A deeper cake will give you much more space on the inside to fill with blood. You want it to really pour out, don't you?
Once both cakes are baked and cool, level off the tops with a bread knife or cake leveler so your cake will be nice and flat. Then, frost the top of one tier with icing (or any other filling, jam, etc. that you want to use) and stack the other tier on top of it. It works best if you put the two cut sides of the cakes together, leaving the two perfectly flat sides that were at the bottom of the cake pan to be the top and bottom of the finished cake.

Now, scoop a sizable hollow out of the bottom of the cake. The bottom, of course, is on top, if you follow me, as the cake is upside-down at this point. The larger the hole you hollow out, the more blood you will be able to fit inside the cake. Of course, you'll also have less cake, so it's sort of a judgment call. Just make sure to leave a decent layer of cake on top of the hollow. You don't want the whole cake collapsing in on itself.
Once you have a hollow you're happy with, frost the inside with buttercream icing. Do a thorough job, so the cake is totally sealed. You don't want the blood to soak into the cake. While you're frosting things, also frost the bottom of the cake where it'll come in contact with the plate. Be generous. This icing is what keeps the blood from seeping out around the edges of the cake.
Now you're ready to add the blood. I like to use fresh raspberry sauce because it's bright red and totally delicious, but of course any red sauce or syrup will work as well. If you'd like to make the fresh raspberry sauce, it's quite easy. Just puree some raspberries and add a smidge of lemon juice and sugar to taste. Then strain the liquid to get the seeds out.
Fill the hollow carefully with blood. Make it fairly full, but definitely not overflowing. Now, set the plate or tray you're going to be using upside down on top of the cake. Squish it down into the icing so that the edge is sealed. Be sure to use a waterproof tray or plate, not a cardboard cake circle, because the sauce will soak into cardboard. I like to use a white plate because the blood shows up well on it.

Carefully holding the cake onto the plate, flip the entire assembly over, so the cake and plate are now right side up. Congratulations! You now have a cake full of blood and you're ready to start decorating.
You can, of course, decorate the cake any way you'd like, using any kind of icing. I've gone in two opposite directions with my decor. The first time I made this cake, I iced it with bright pink buttercream, and then added white trim so it looked like a lovely, innocent valentine heart until blood started pouring out of it. The next time, I made the cake look evil from the outset with sickly maroon and grey icing and candles shaped like tombstones. I leave it to you to decide which option is more effective.
When it's time to cut the cake, I like to do the honors with a meat cleaver. Failing that, I recommend you use the biggest knife available. If you separate the cake a little with the knife while making the first cut, you'll get an even more impressive flow of blood.
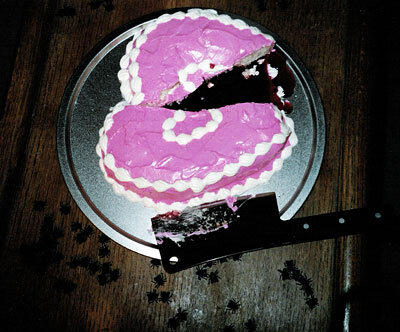
An alternate version of this cake I once did involved the heart actually beating. Instead of just pouring the blood into a hollow in the cake, I poured it into a Ziploc bag. The bag was then attached to a turkey baster via a length of rubber tubing. I placed the bag inside the hollow in the cake, leaving the baster outside, concealed under a piece of fabric that I draped decoratively around the perimeter of the cake. The hollow in this cake was deeper than the hollow in the other version of the cake, so that the bag was very near the surface of the cake. When I squeezed the bulb of the turkey baster in rhythm, the bag expanded and contracted, pushing up the top of the cake, so the heart appeared to be beating.
Of course, this version of the cake isn't optimal for serving, since in order to get the blood out, you have to pull the bag out of the cake, puncture the bag, and pour the blood either into a bowl or on top of the cut pieces of cake. This is inconvenient, but does have the advantage of being entertainingly messy. I wound up with the hands dripping with raspberry blood sauce! Jason Voorhees himself never looked better!
Another variation I've done, which requires a little more sculptural skill, is to make an oversized anatomical heart. For this cake, I started with a large round cake, and then carved it into the shape of a heart. I used fondant icing to cover the cake and to sculpt additional veins and arteries, then painted the whole thing with food coloring, mostly red (obviously) and blue. The bleeding mechanism is the same as for the basic heart cake. When I made this cake I also poured a layer of clear hard sugar over the top, so cutting the cake would be like breaking someone's heart. I don't recommend this, though. It just made the cake very difficult to cut. Maybe this would work if you were planning to smash the cake with a hammer. If you spray or brush the cake with a little thinned corn syrup, you'll get the same oozy, wet look without the inconvenient hard candy shell.