Fancy 18th Birthday Entremets
For their 18th birthday, instead of a cake, my niece requested a triple layer (dark chocolate, milk chocolate, white chocolate) mousse that I sometimes make, but fancy enough to celebrate such an important birthday.
For their 18th birthday, instead of a cake, my niece requested a triple layer (dark chocolate, milk chocolate, white chocolate) mousse that I sometimes make, but fancy enough to celebrate such an important birthday. This is what I came up with.
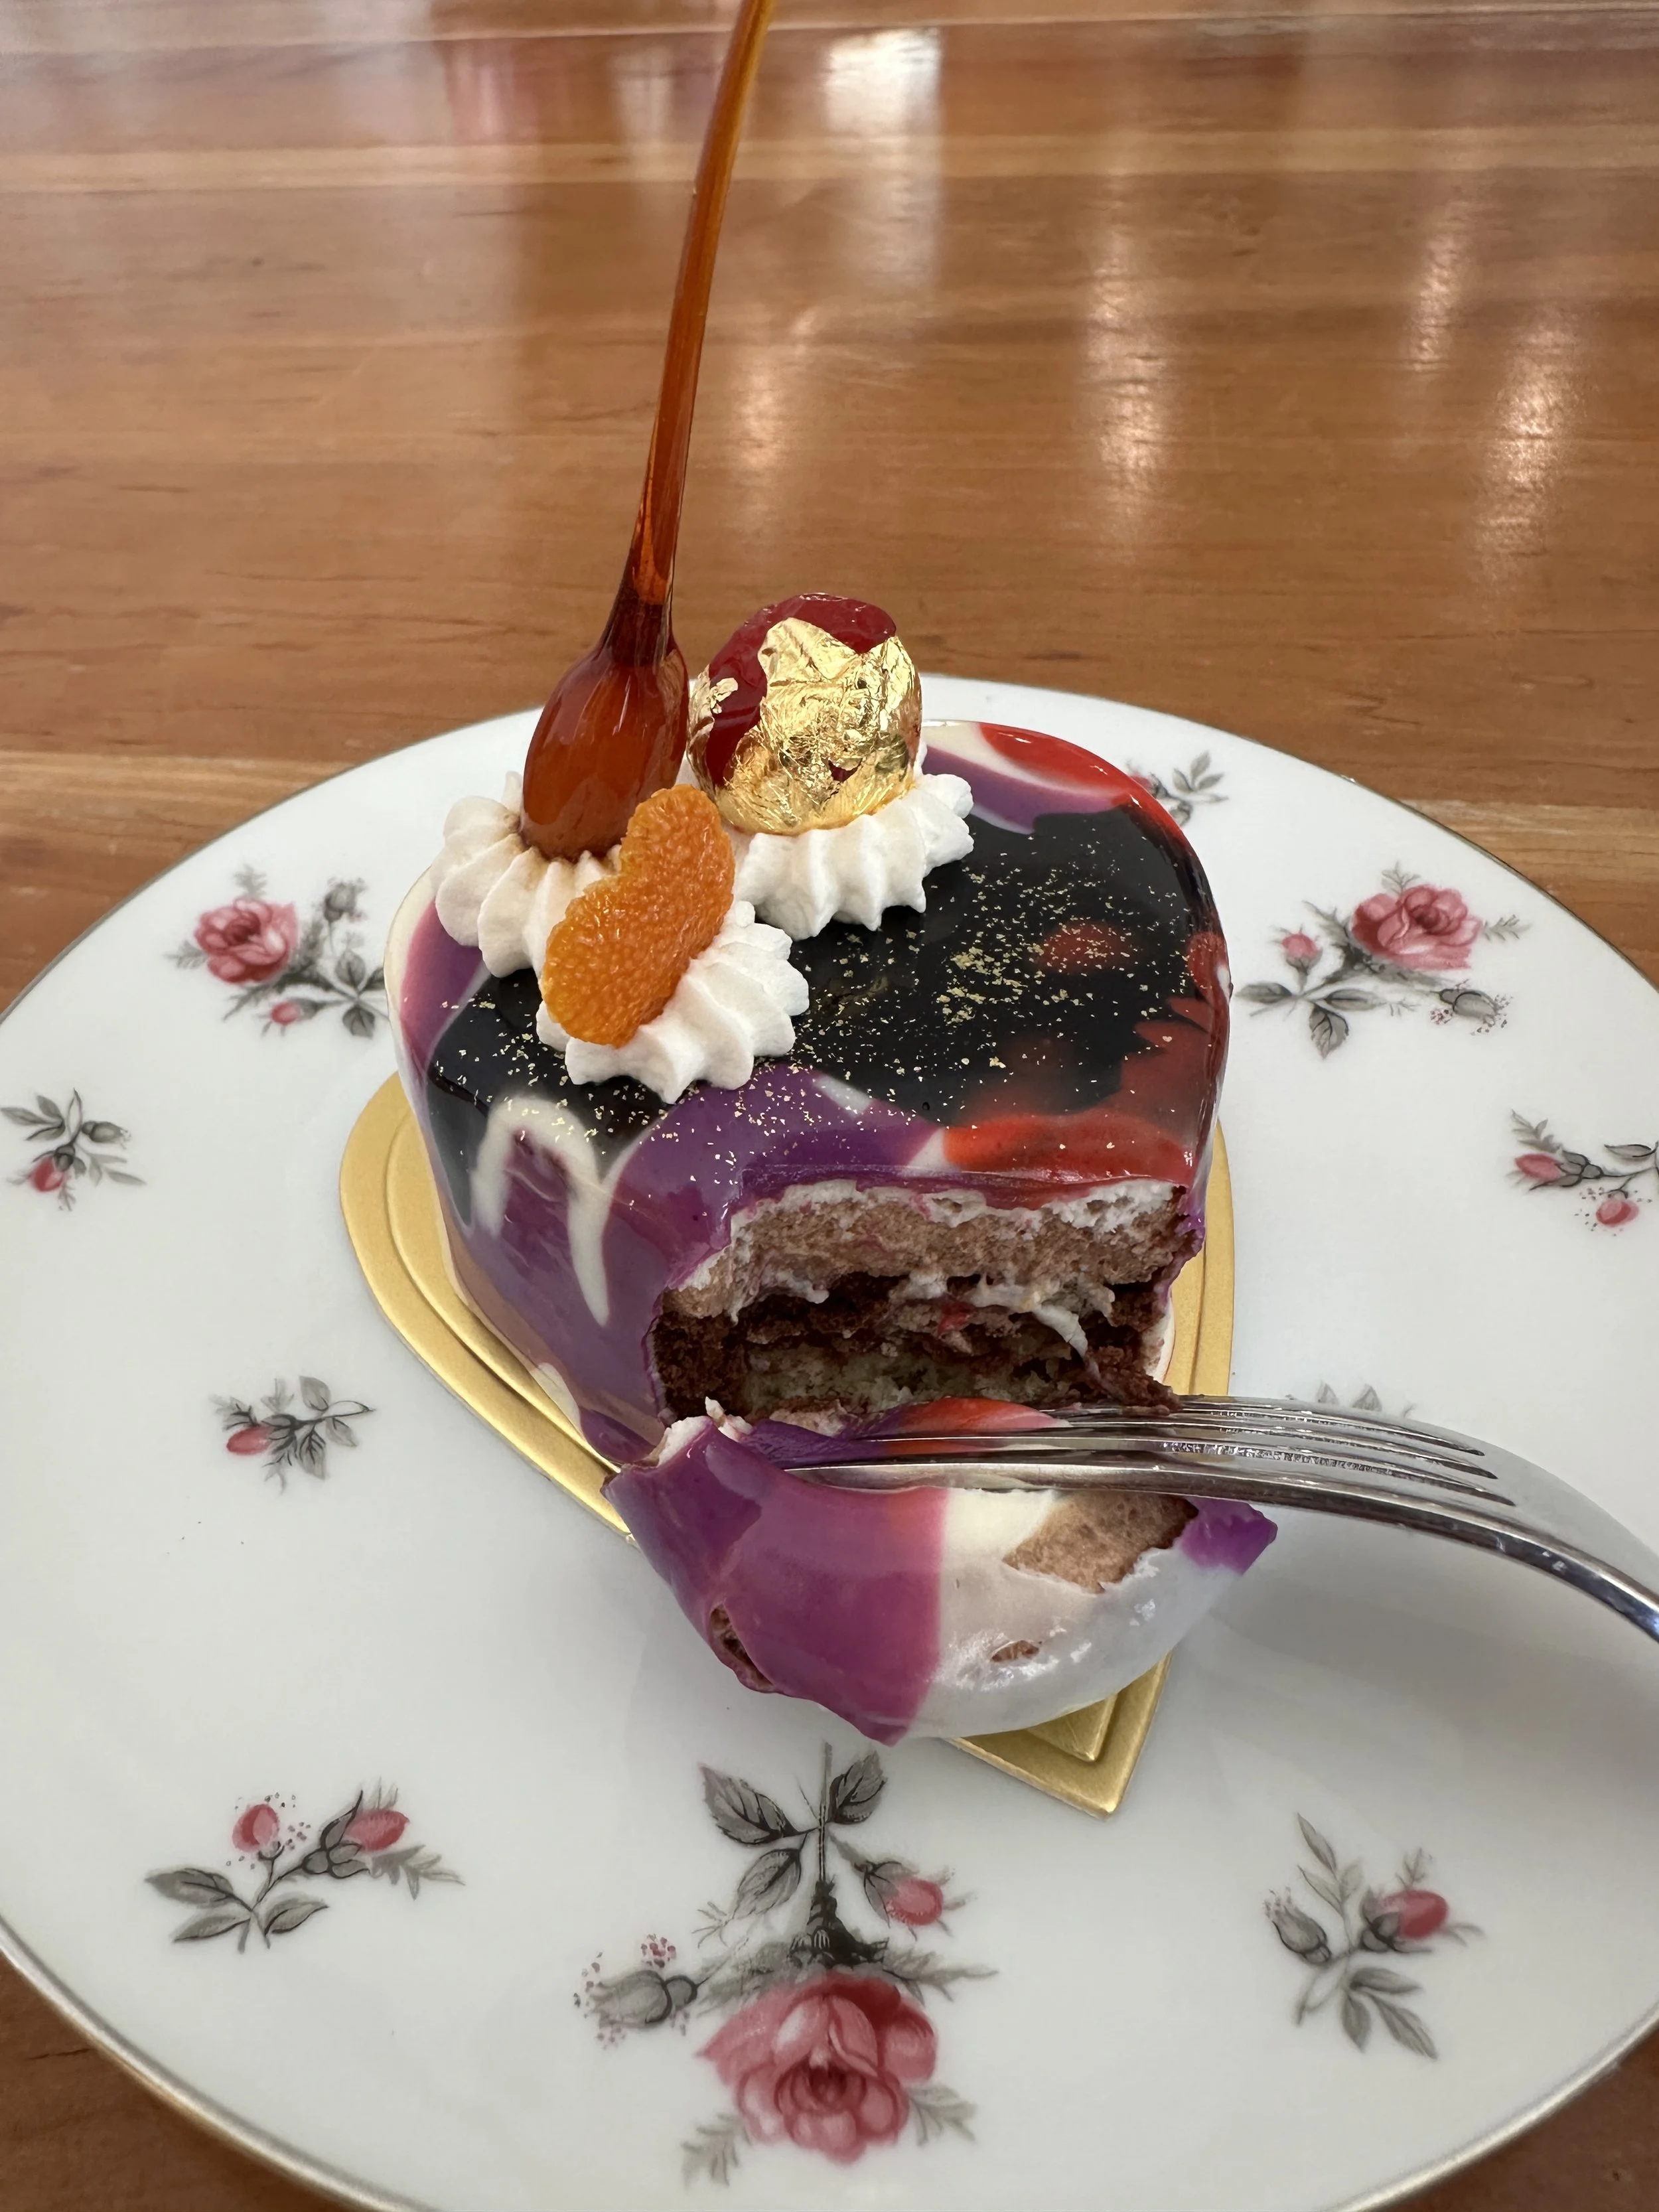
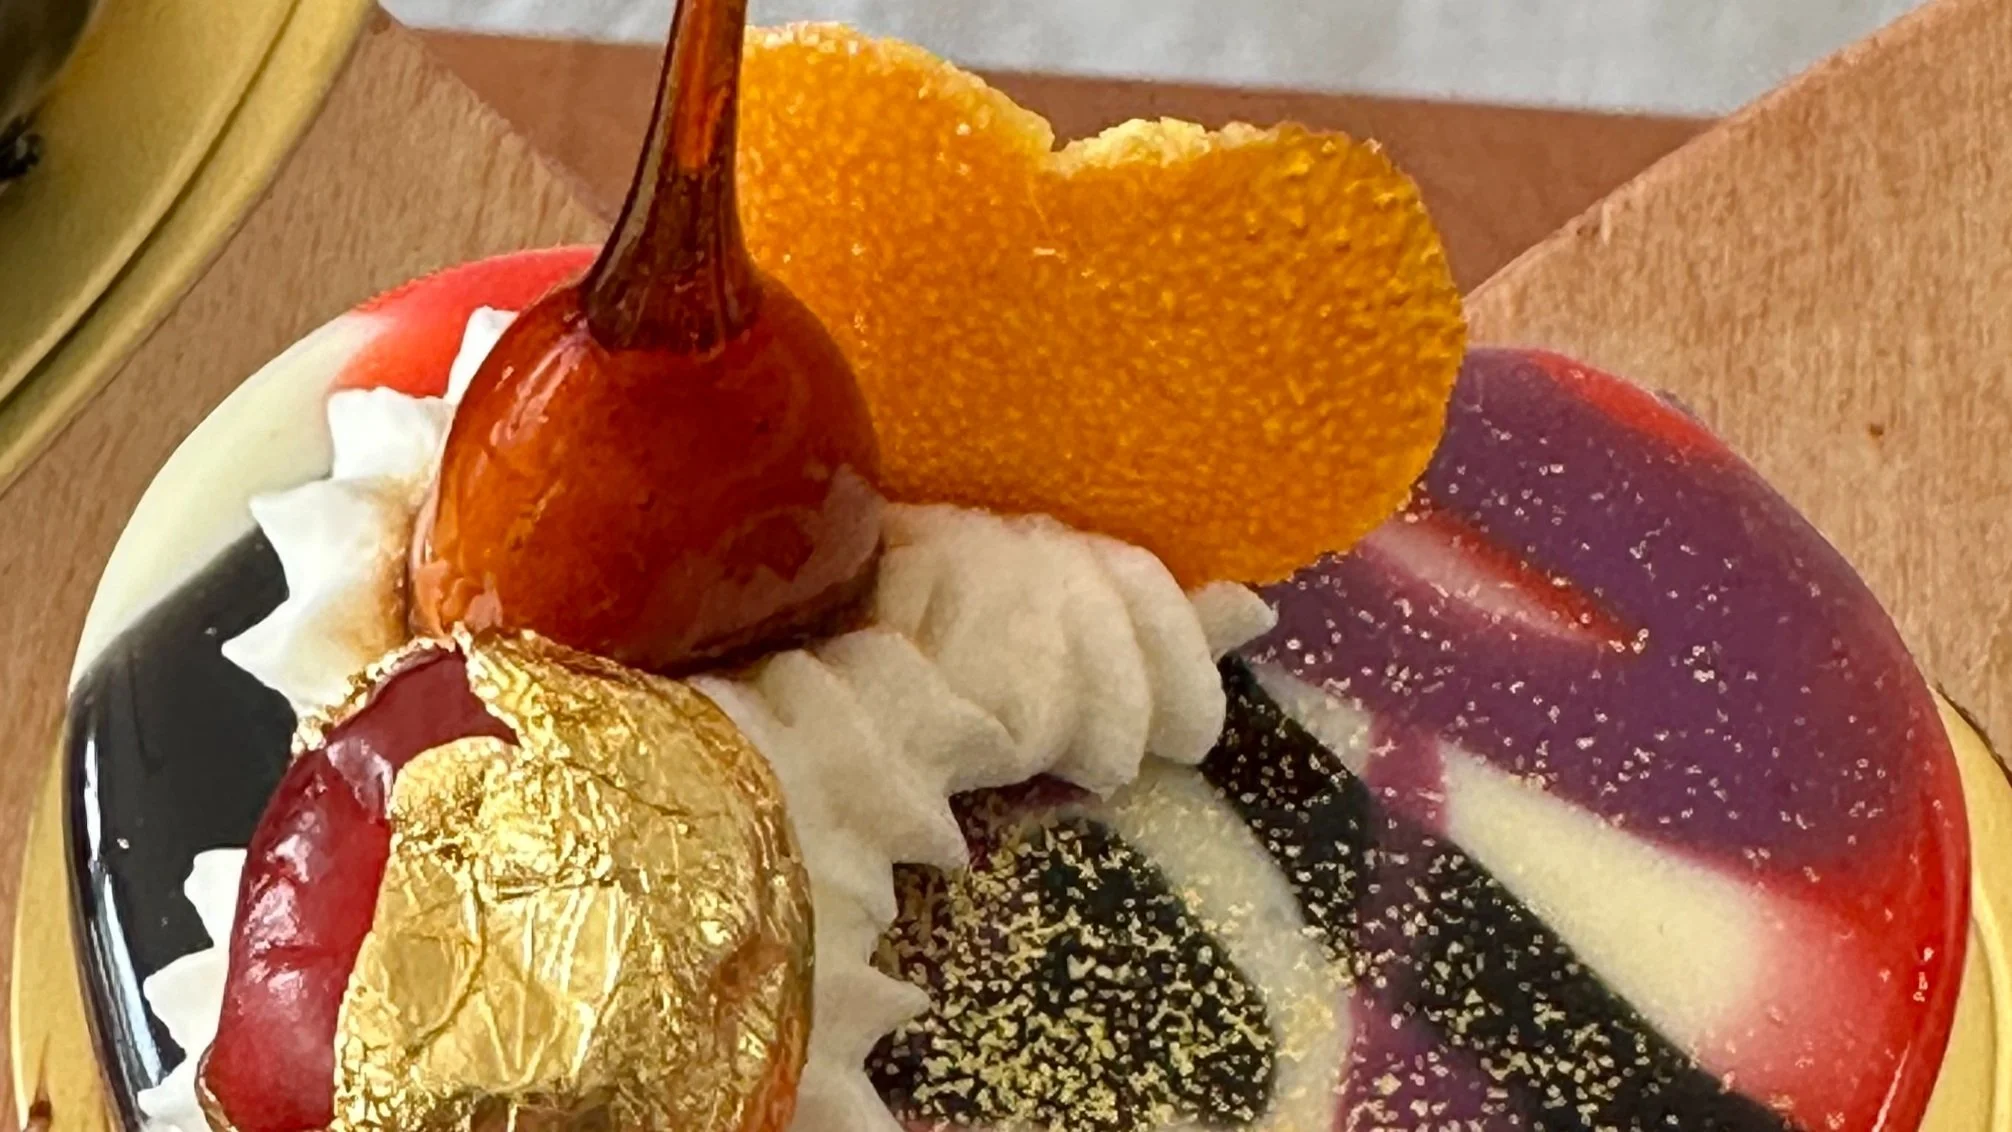
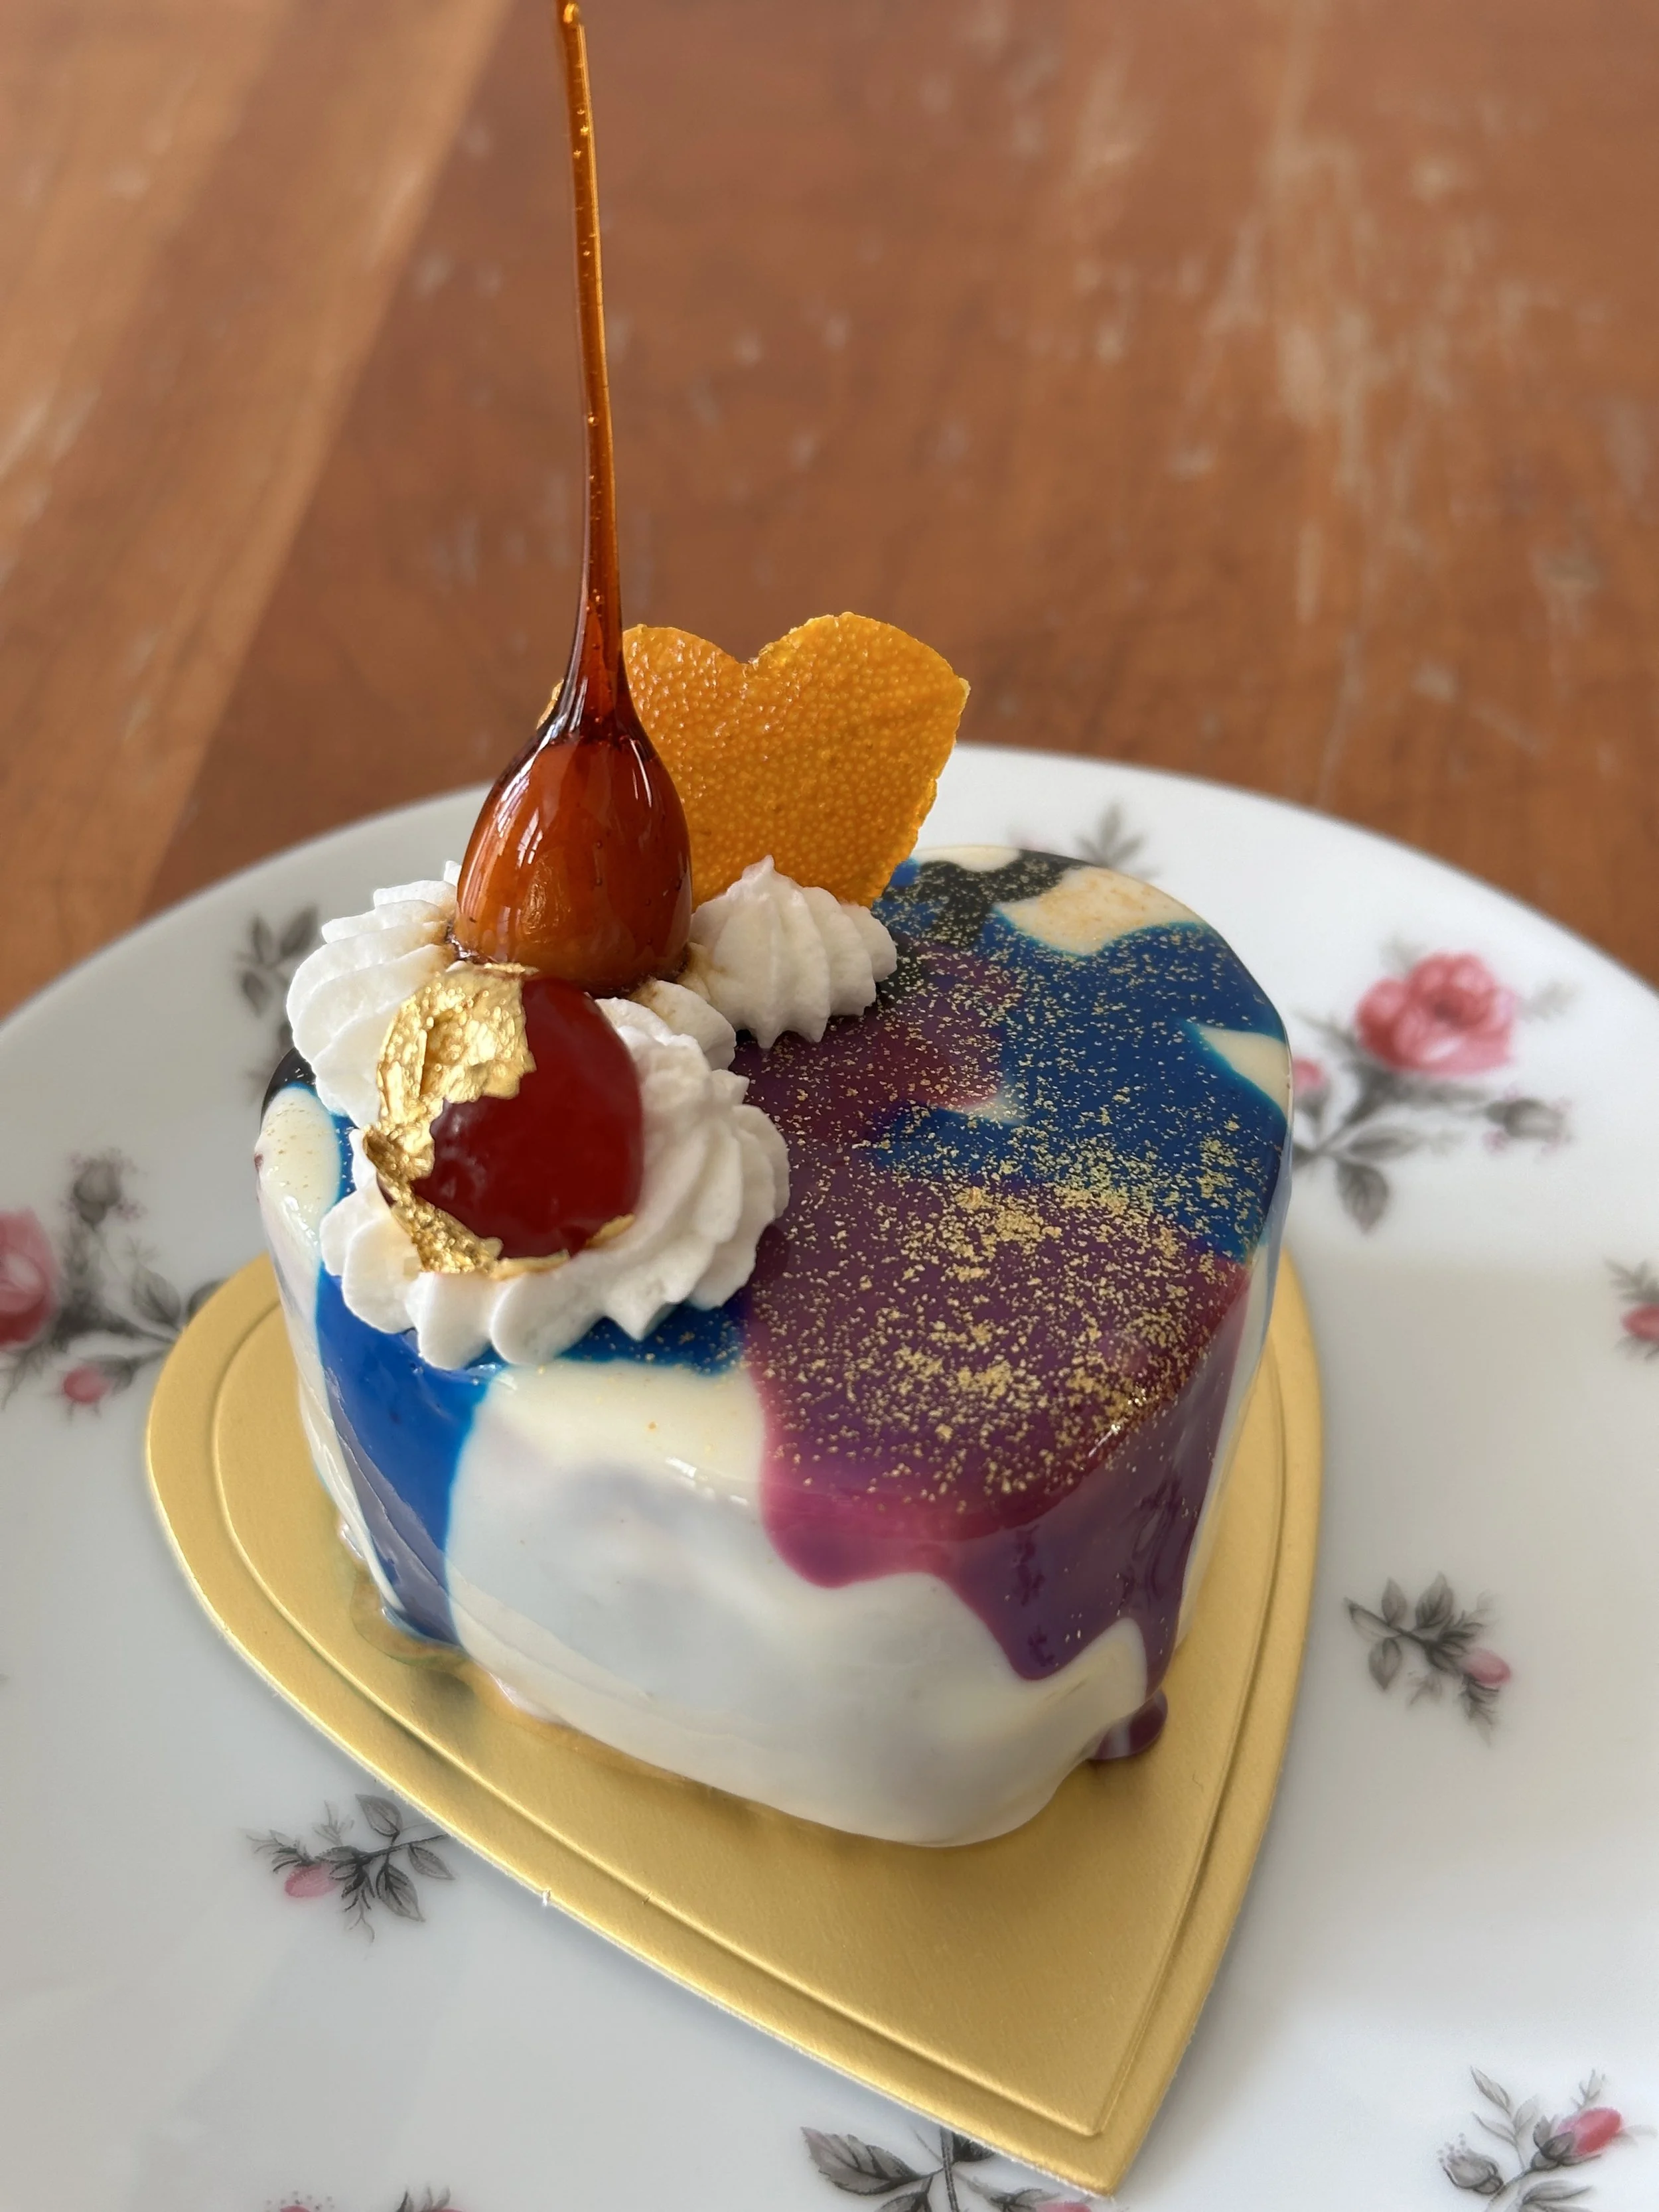
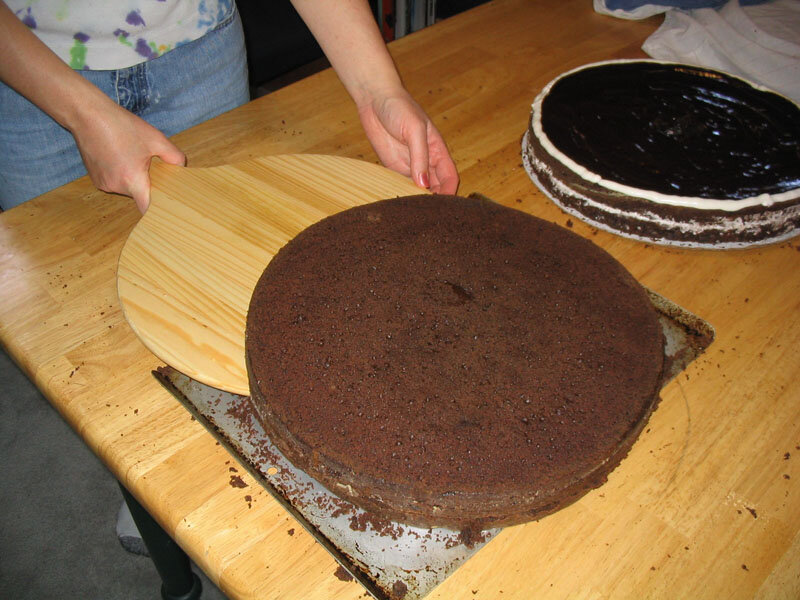
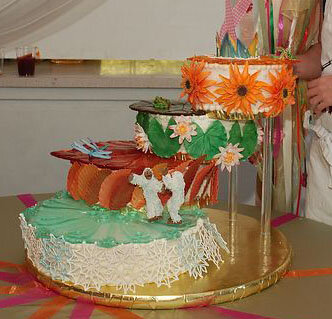
Inside, there is almond genoise, dark chocolate marquise, milk chocolate mousse, and white chocolate mousse. The outside is mirror glaze, with colors inspired by Acheron, a new character in Honkai: Star Rail that my niece is excited about. The decorations are a caramel almond, a candied orange rind heart, and a gold leafed maraschino cherry.
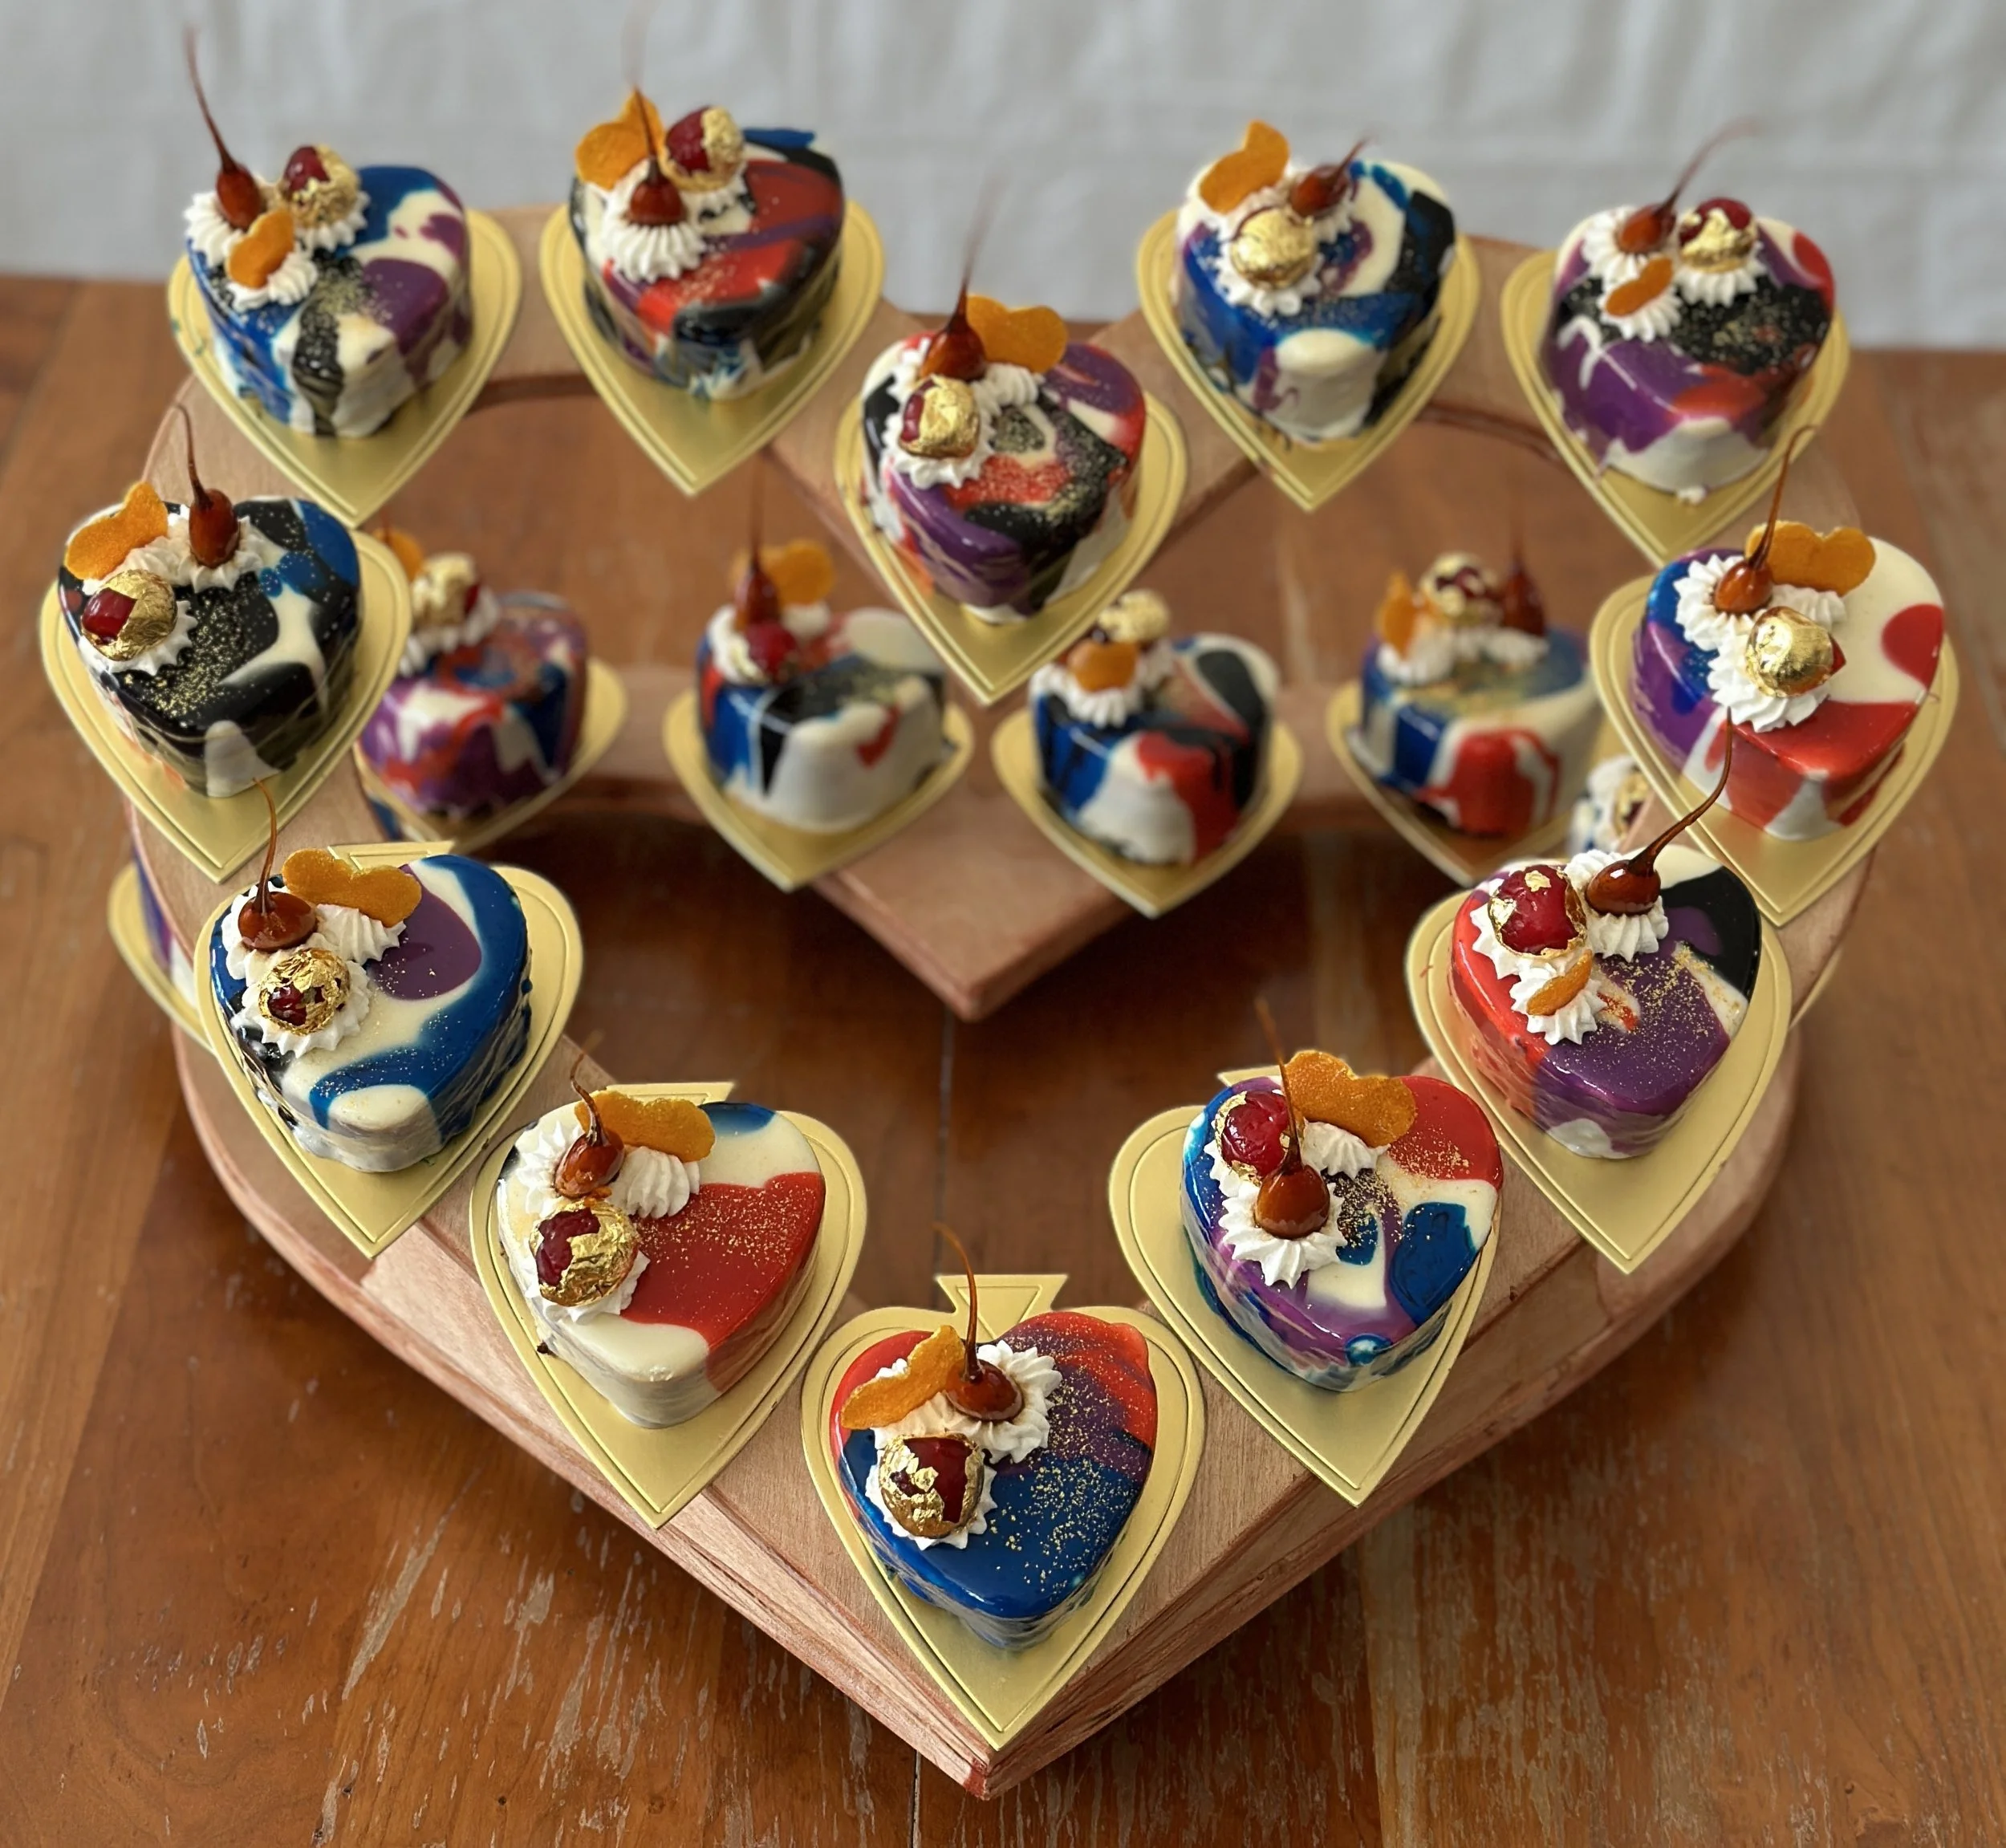
I served them on a custom two-tier heart-shaped stand, designed to fit 18 entremets for 18 years. It looked nice, but I should have made it slightly less sloped because I got scared that they would slip off so I used double-stick tape to hold them in place.
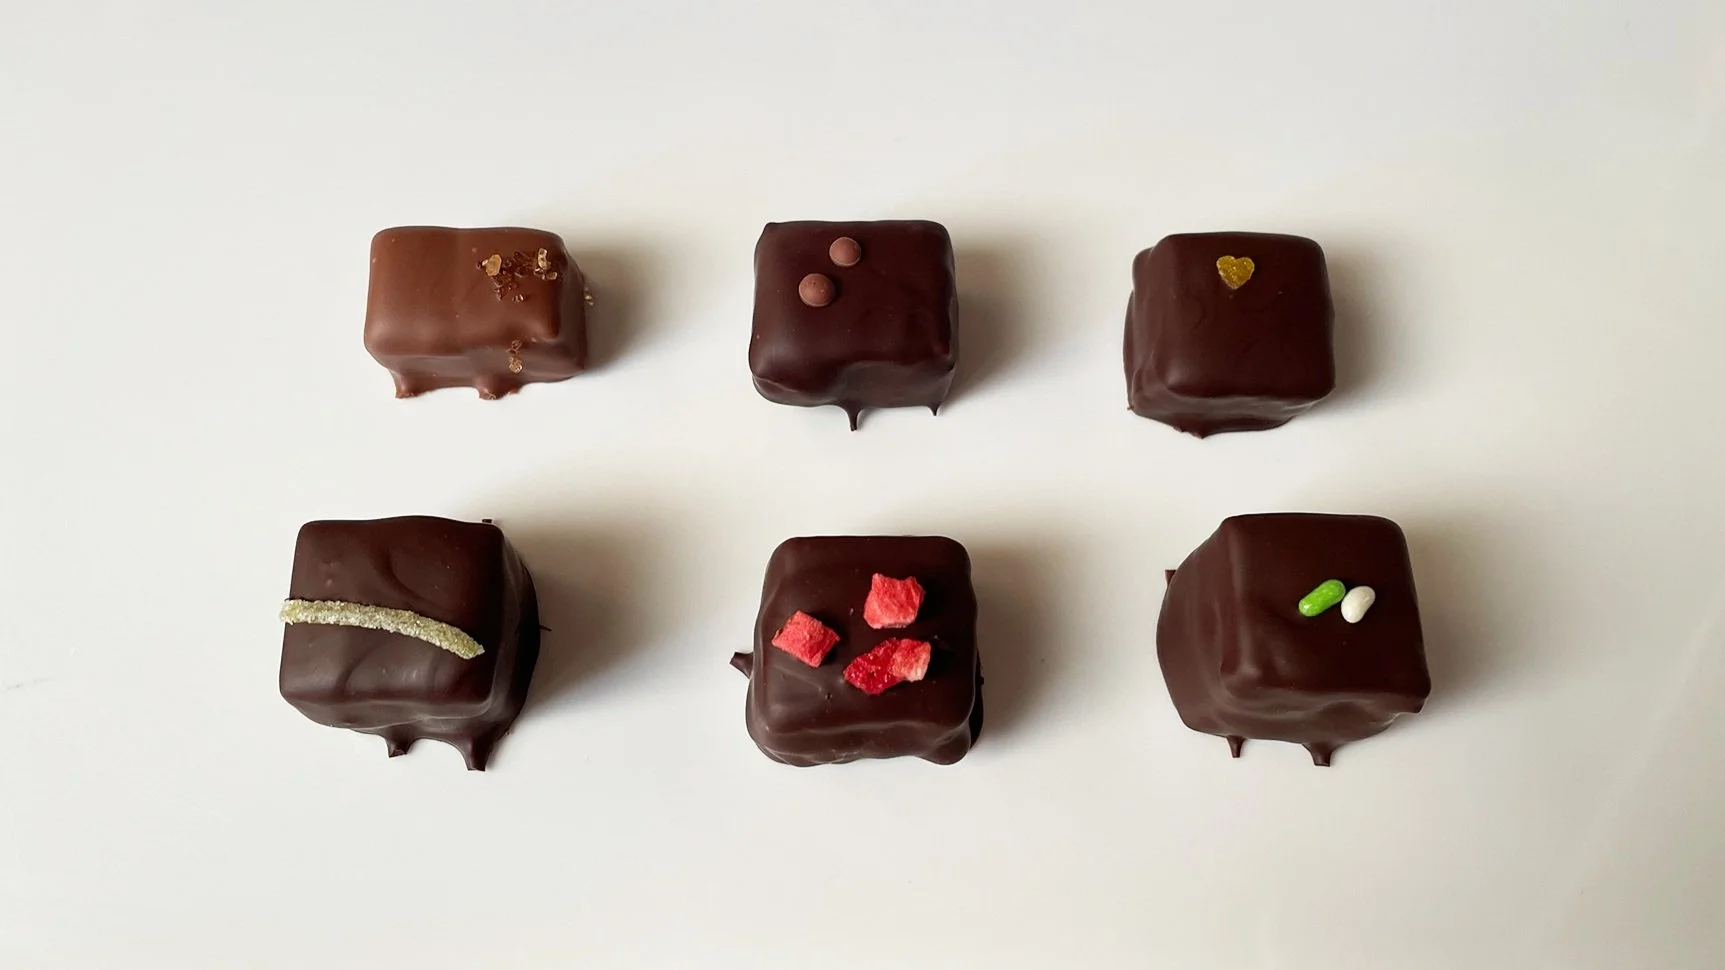
Holiday Candy 2023
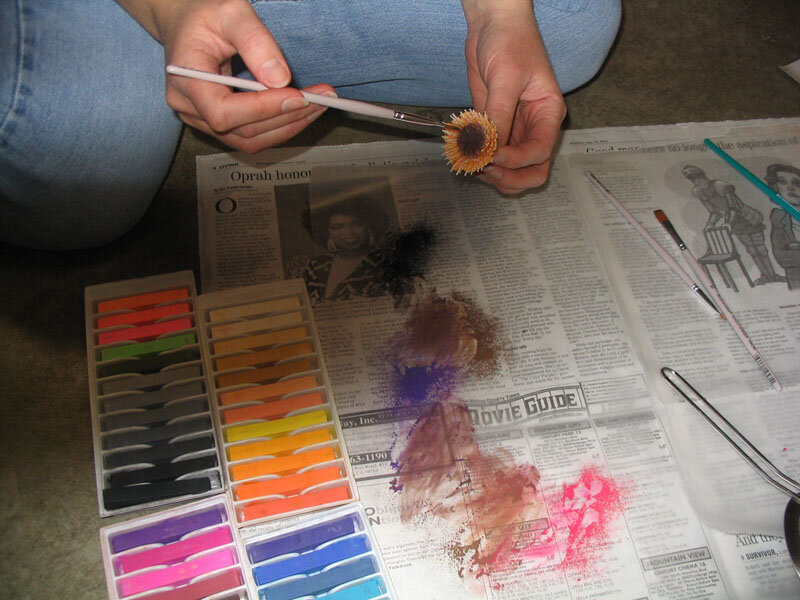
This year’s candy included lapsang souchong ganache and caramel, wasabi marshmallow and ginger ganache, ras el hanout walnut marzipan, tequila marshmallow and jalapeños lime ganache, balsamic vinegar marshmallow and strawberry ganache, and pernod marshmallow and sage ganache.
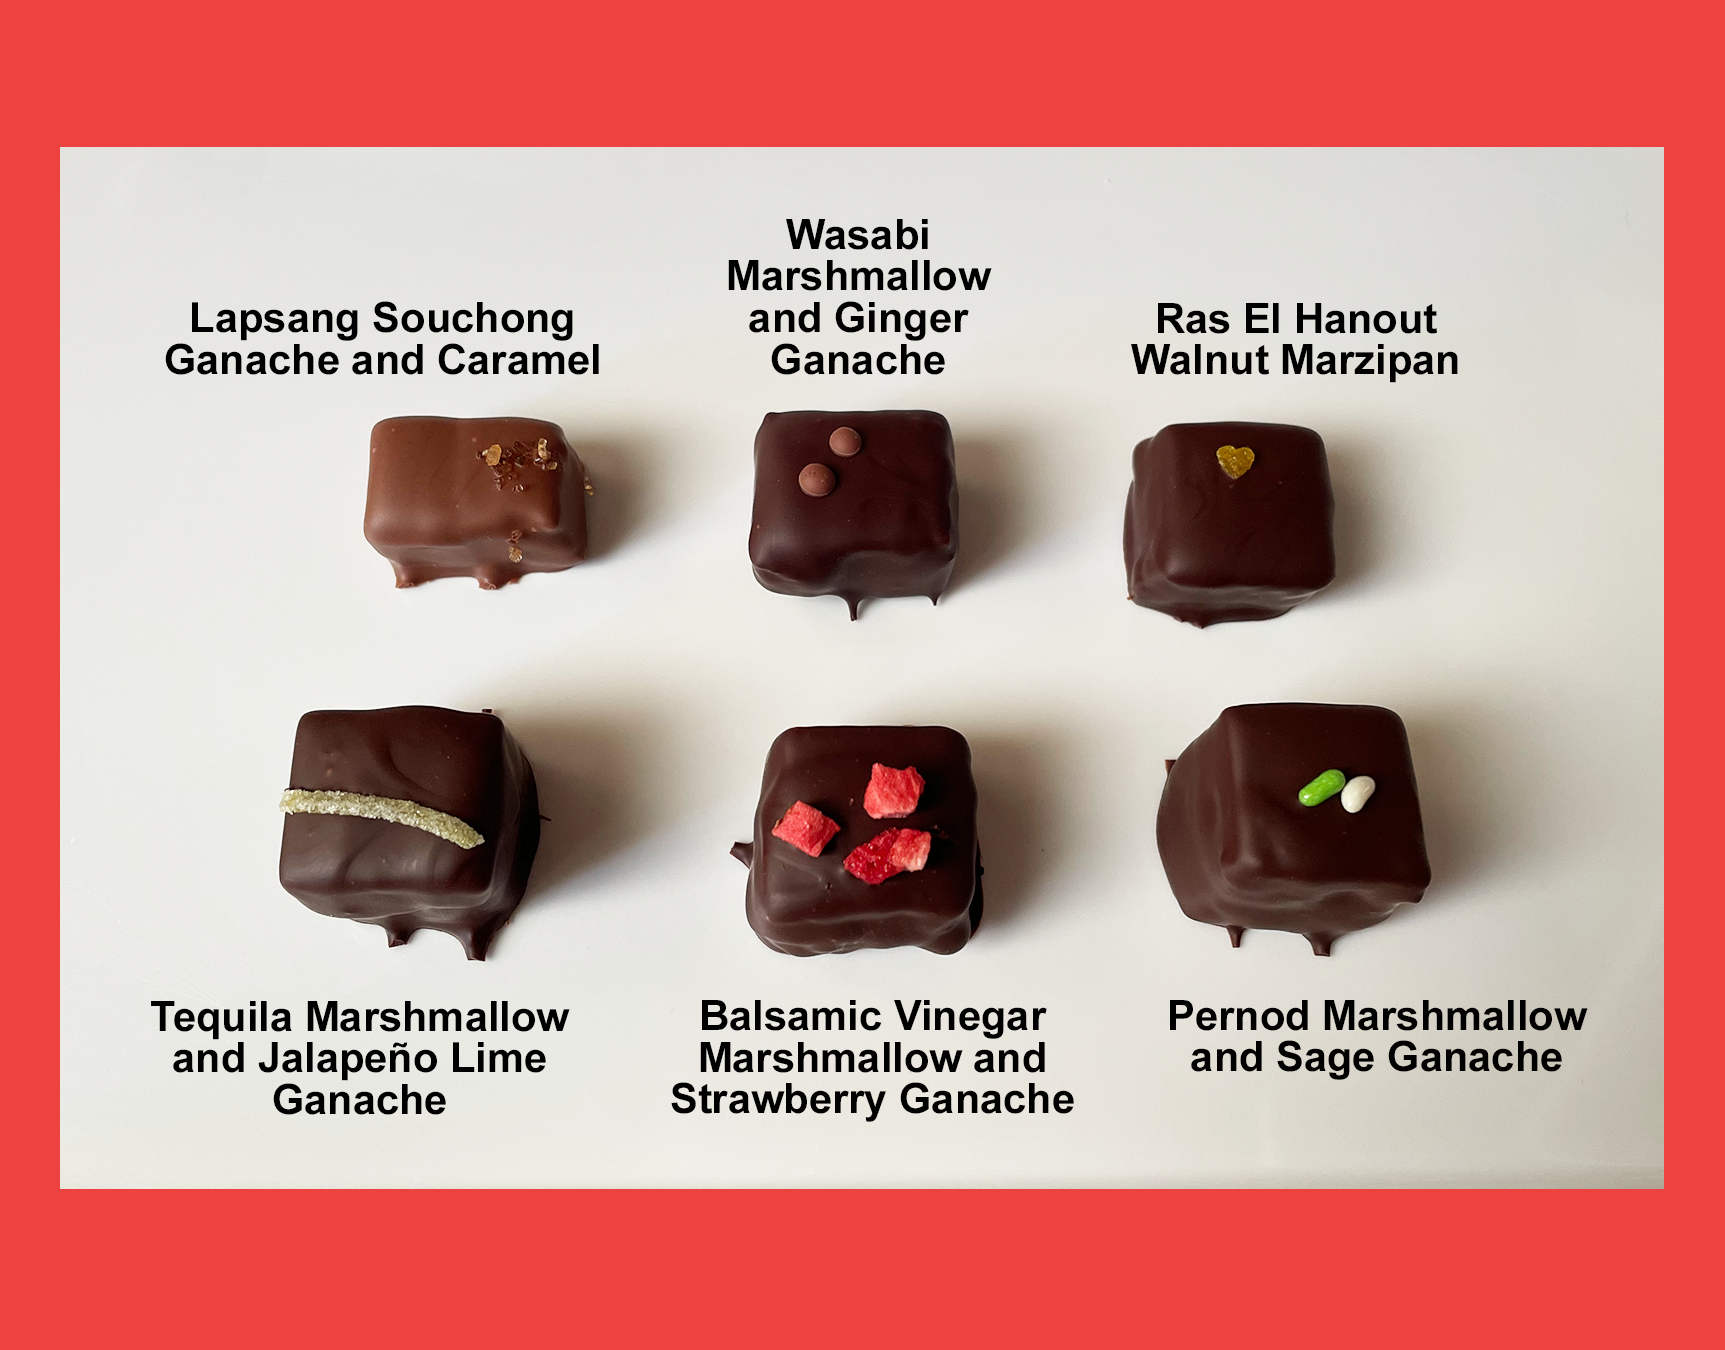
This year’s candy included lapsang souchong ganache and caramel, wasabi marshmallow and ginger ganache, ras el hanout walnut marzipan, tequila marshmallow and jalapeños lime ganache, balsamic vinegar marshmallow and strawberry ganache, and pernod marshmallow and sage ganache.
Fundraiser Candy
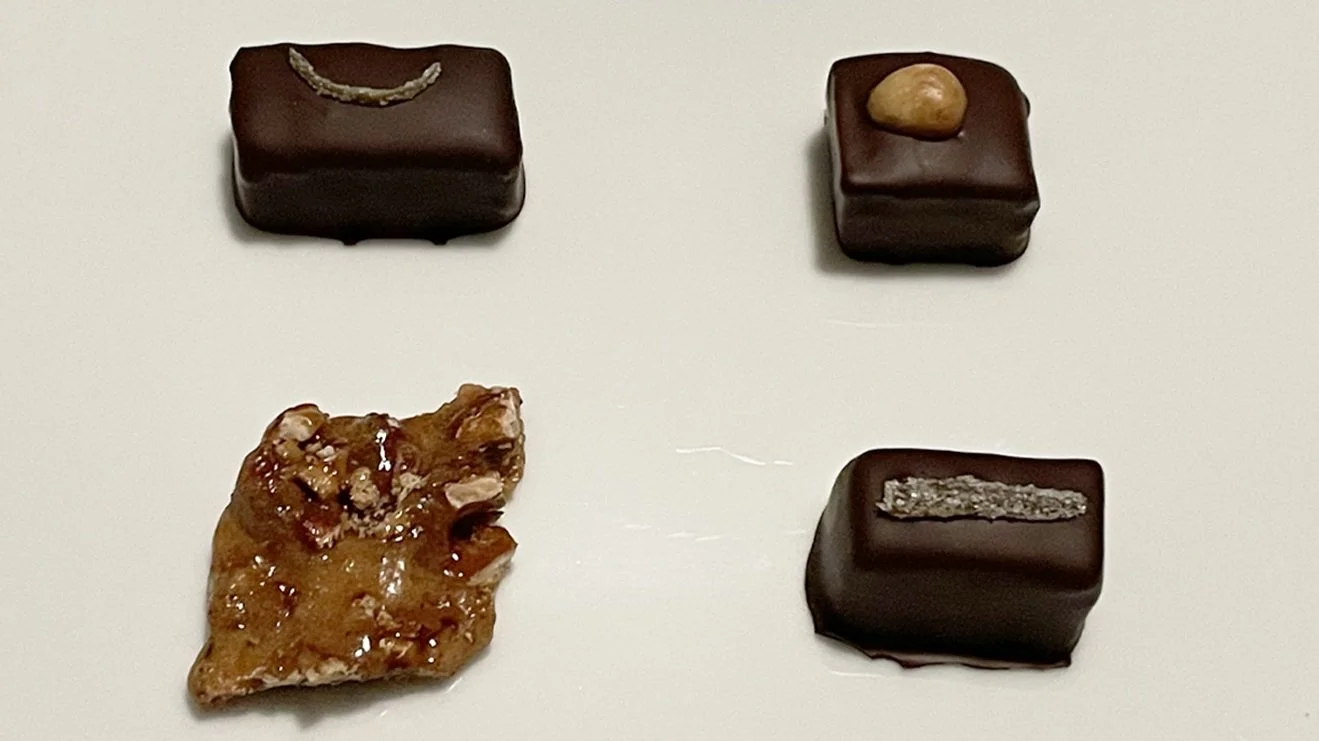
I’m on the Board of Director of a fantastic little theater company called Teatro Visión. For our annual fundraiser this year, I made candies as a thank you to our donors.

I’m on the Board of Director of a fantastic little theater company called Teatro Visión. For our annual fundraiser this year, I made candies as a thank you to our donors. Flavors were habañero lime white chocolate ganache, coffee dark chocolate & hazelnut milk chocolate ganache, chipotle pecan brittle, and ube marshmallow with candied ginger on top.
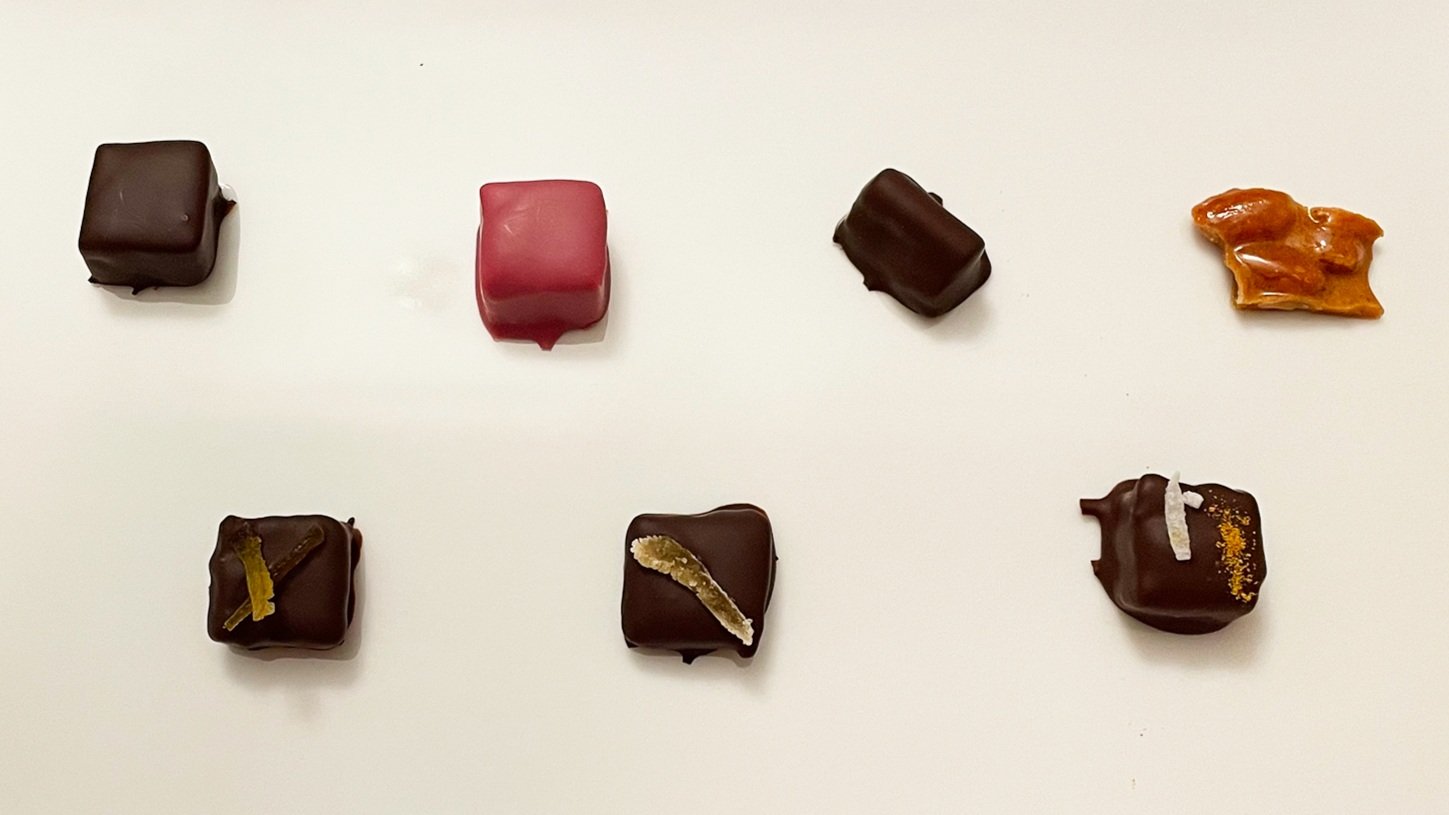
Holiday Candy 2022
This year’s candy included anise black pepper marshmallows, coffee nutmeg marshmallows, spiced cinnamon ganache, paprika cinnamon toasted almond brittle, tarragon ganache with candied grapefruit peel, ginger caramel ganache, and coconut curry black sesame ganache.
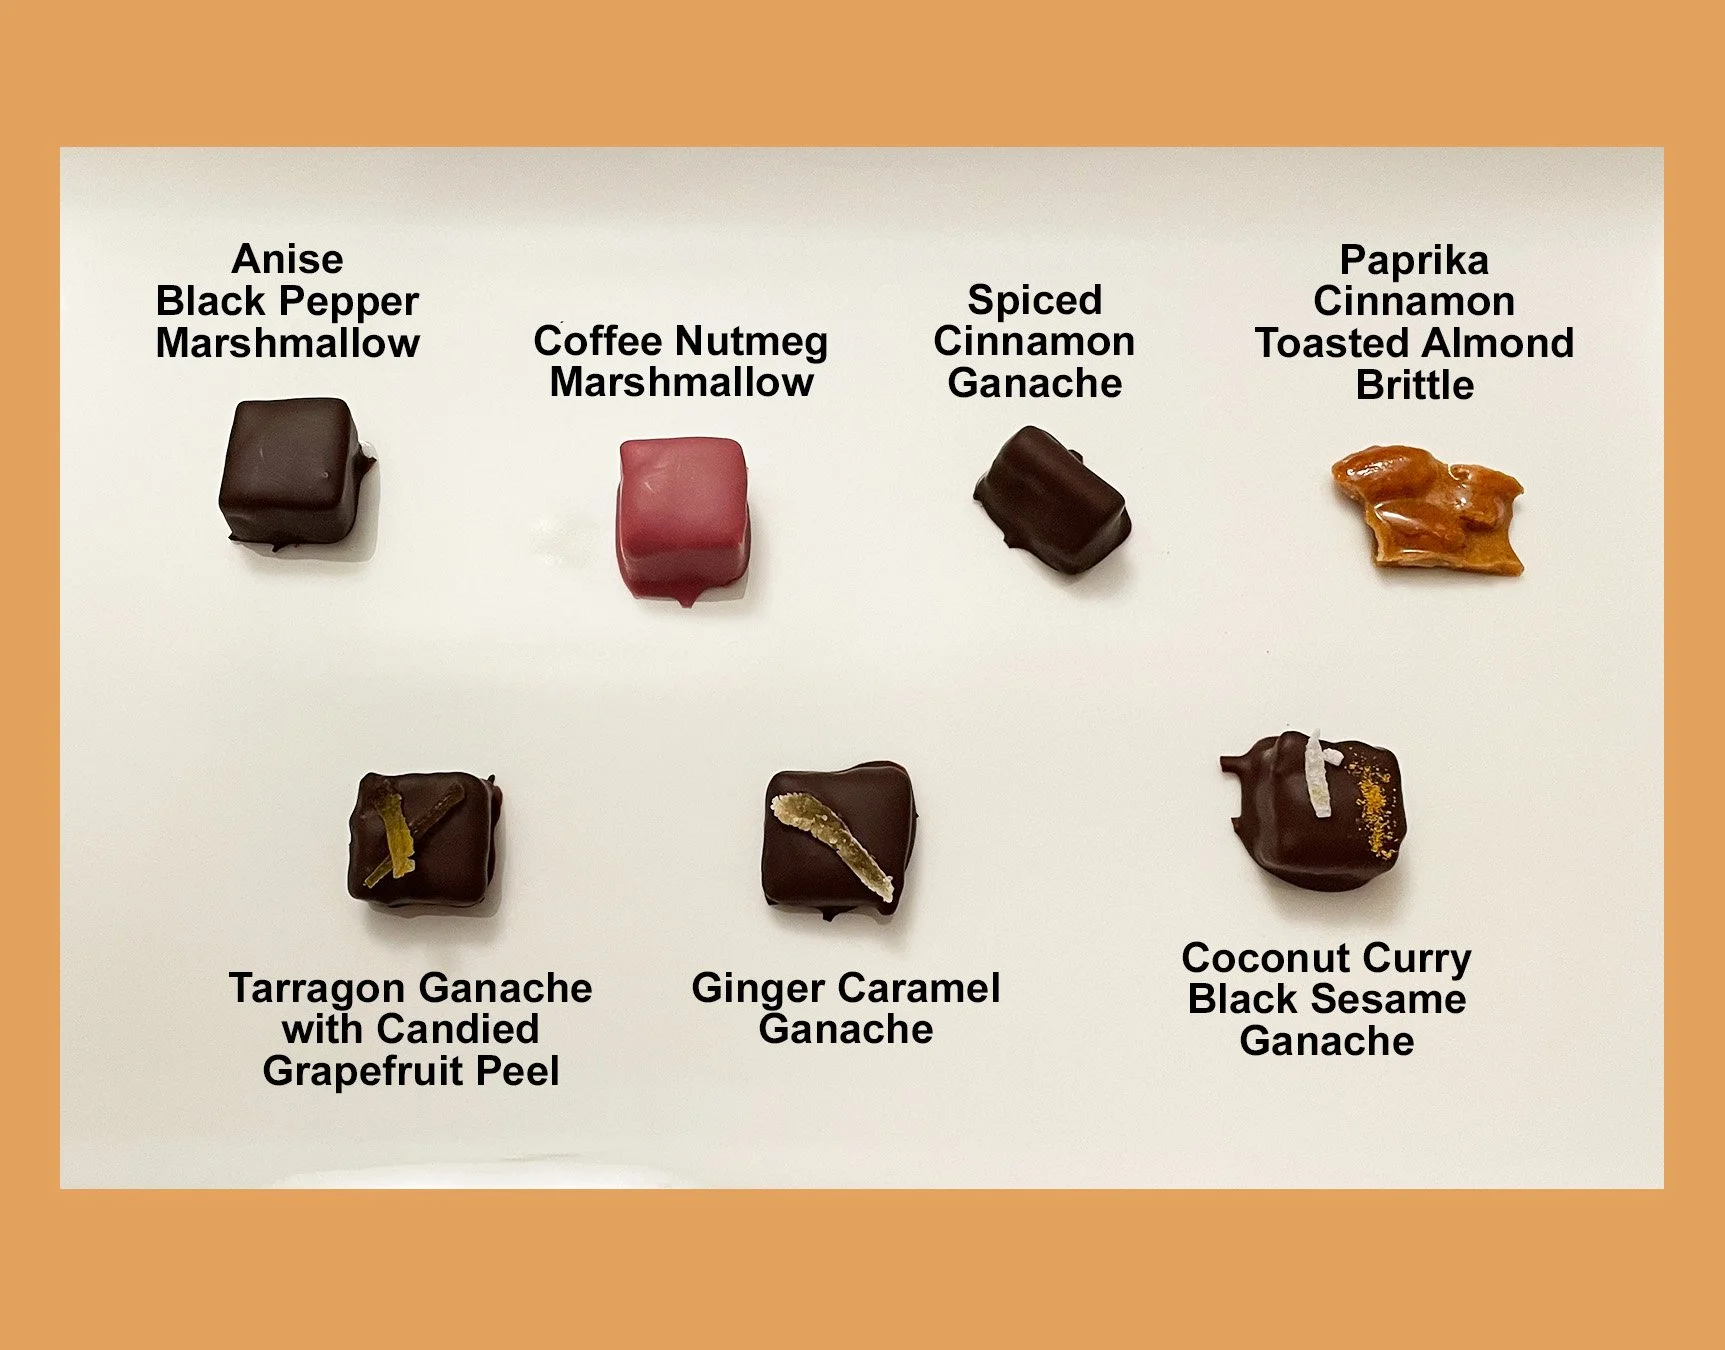
This year’s candy included anise black pepper marshmallows, coffee nutmeg marshmallows, spiced cinnamon ganache, paprika cinnamon toasted almond brittle, tarragon ganache with candied grapefruit peel, ginger caramel ganache, and coconut curry black sesame ganache.
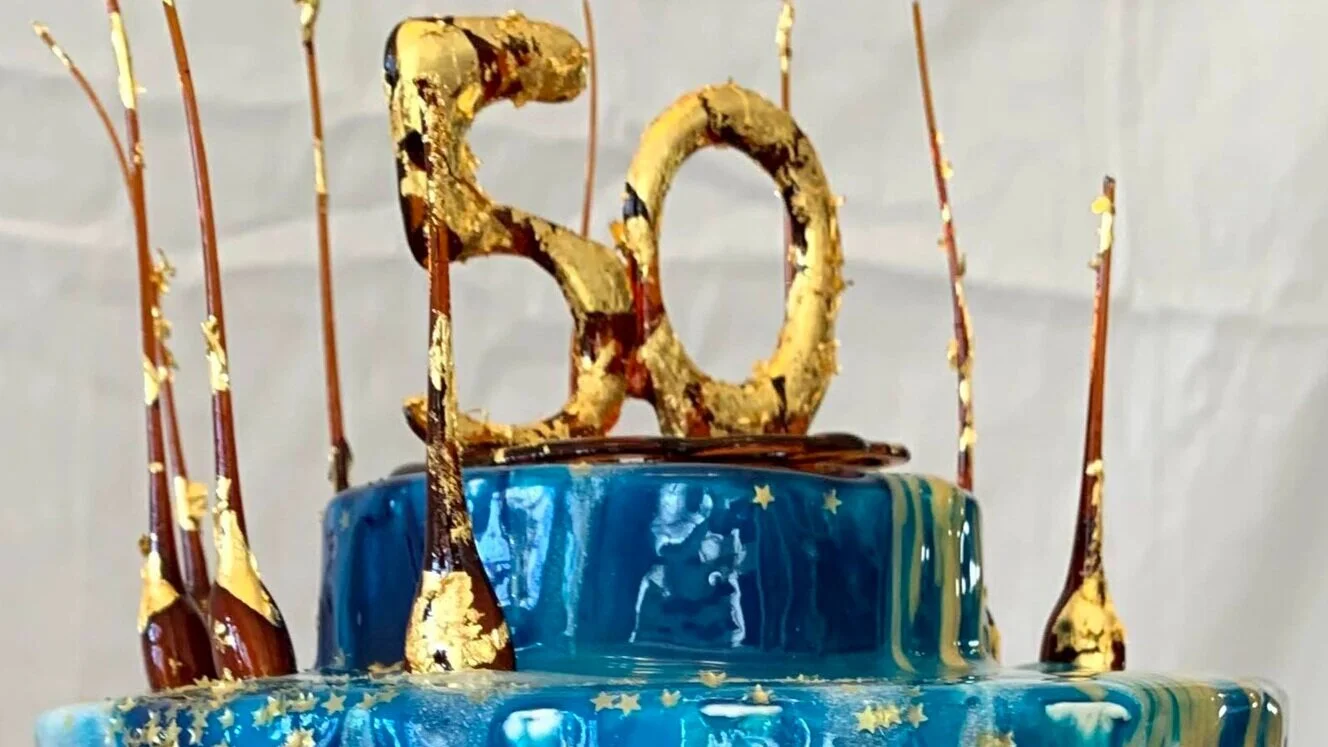
50th Anniversary Cake
We couldn’t celebrate my parents’ 50th anniversary in person, but that didn’t stop me from making them a cake!
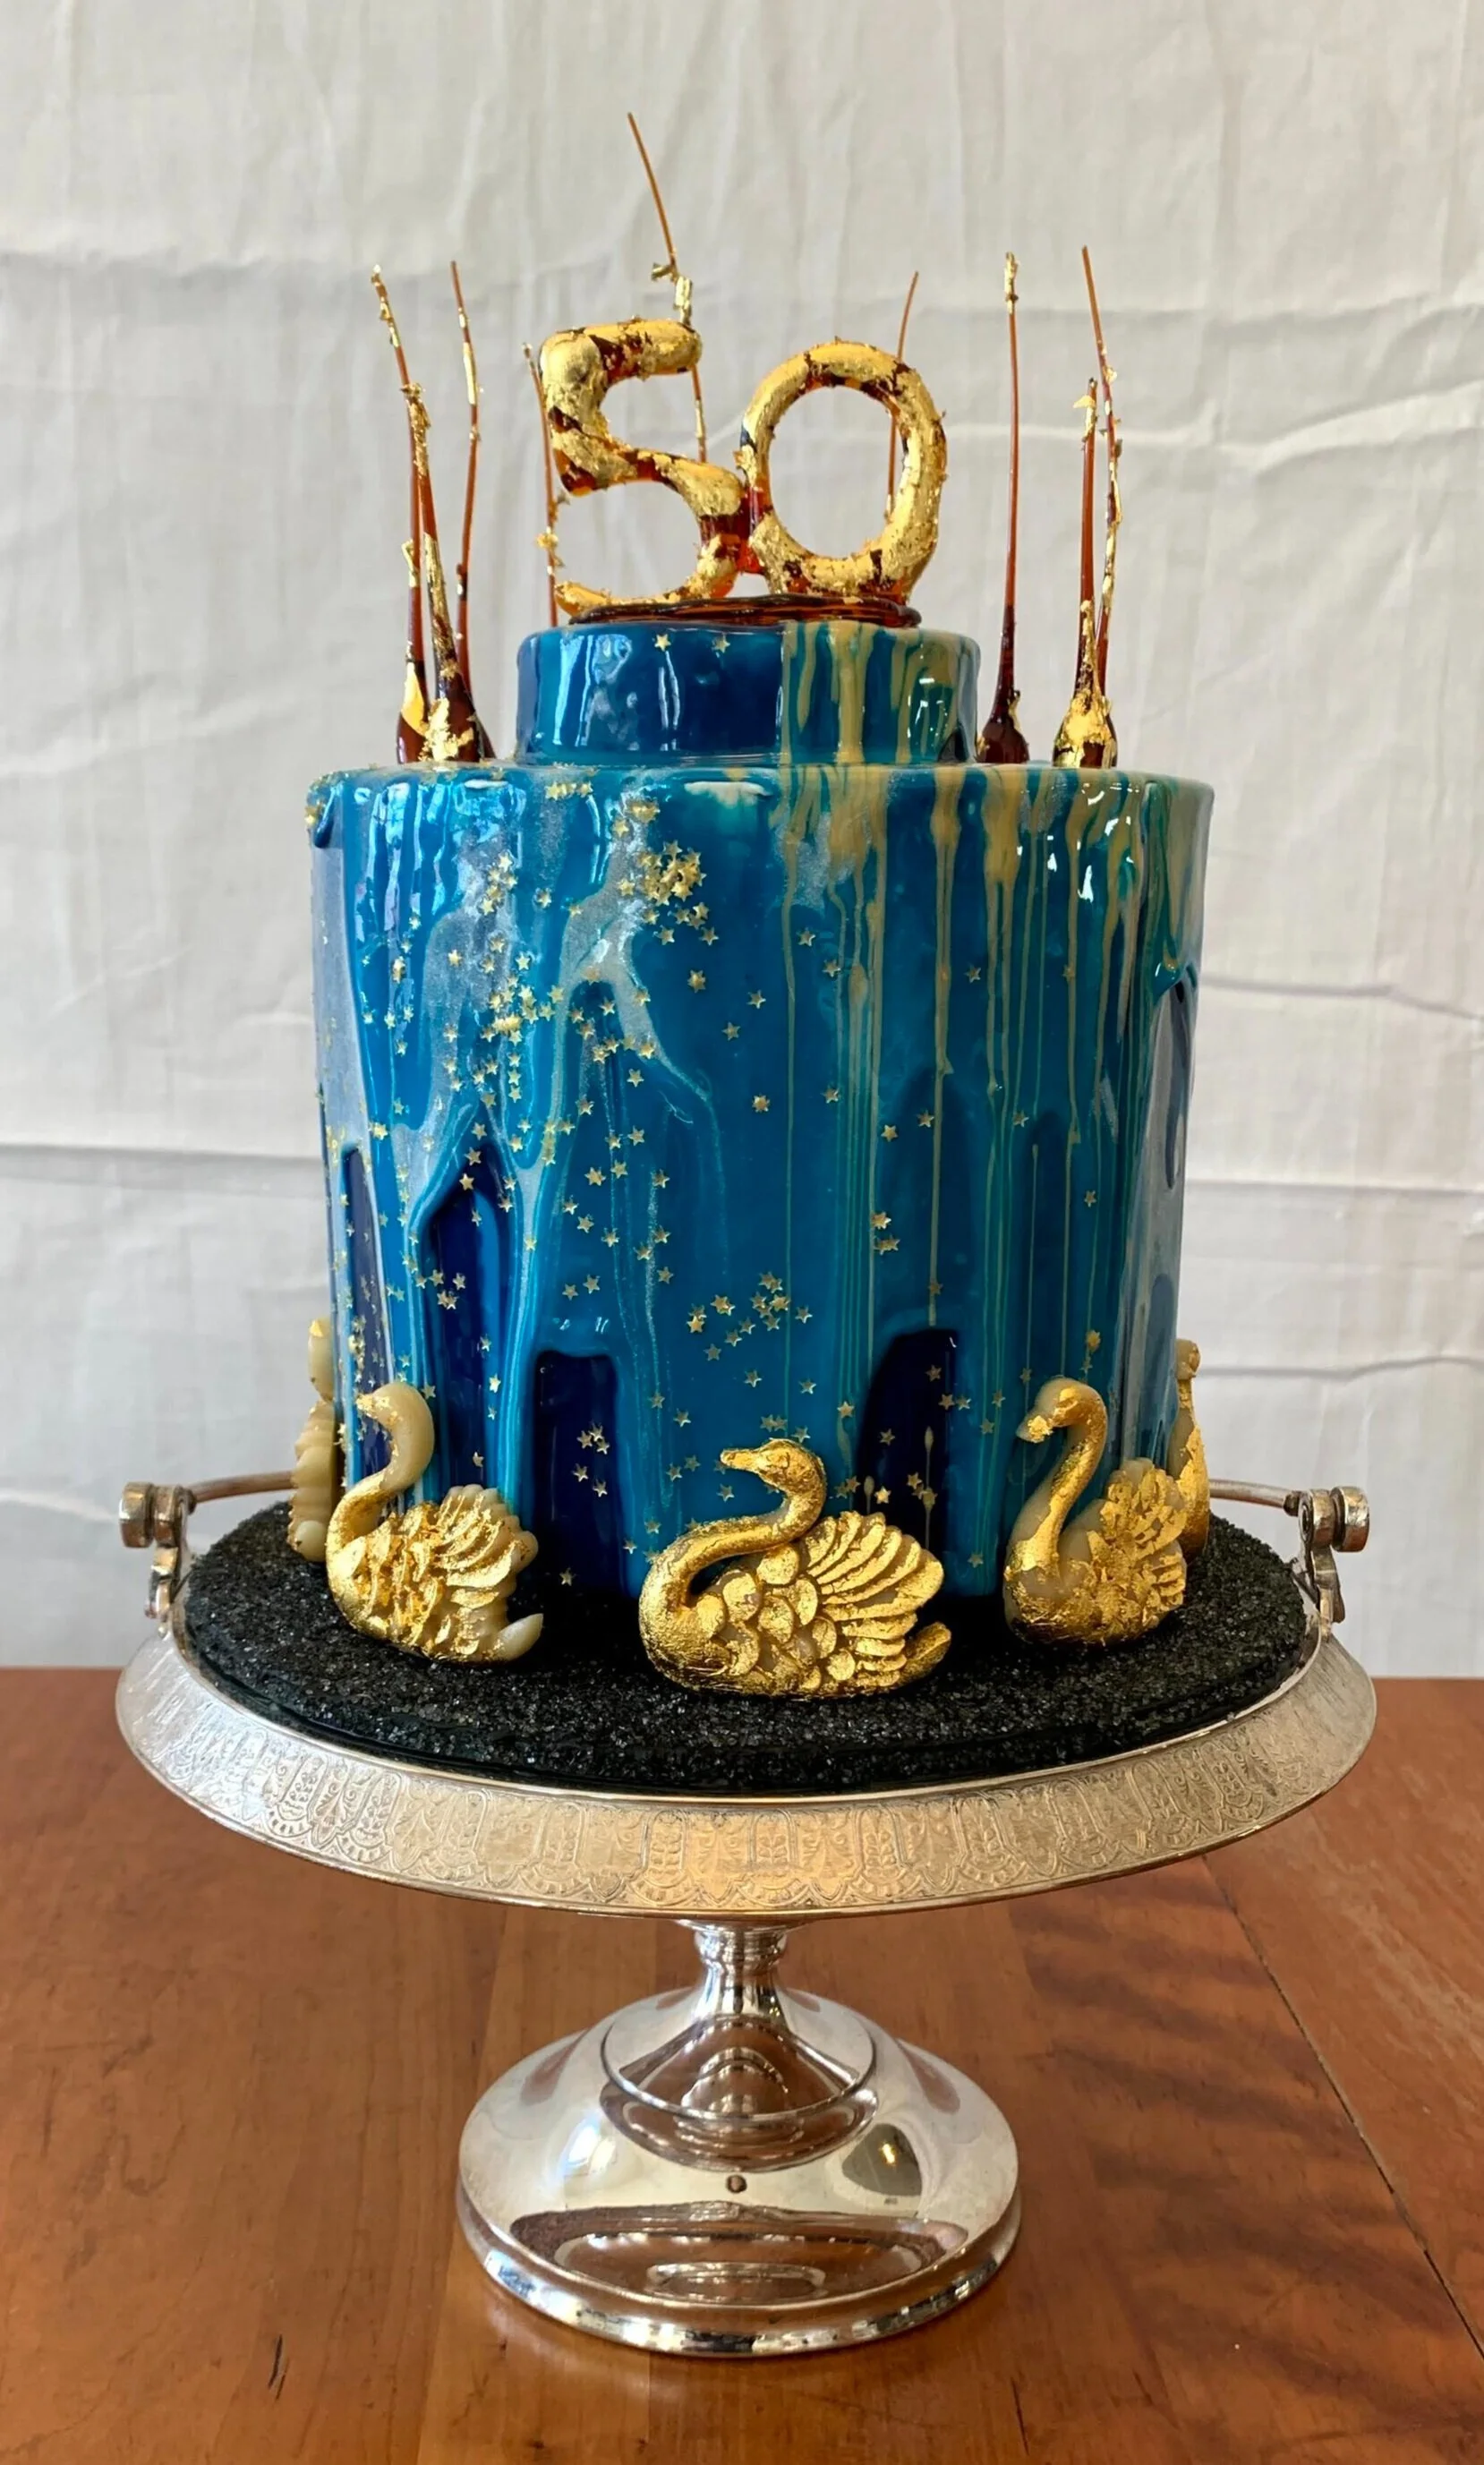
We couldn’t celebrate my parents’ 50th anniversary in person, but that didn’t stop me from making them a cake! I tried to make a nice small cake that would be a reasonable size for two people. As usual, despite my best efforts, I made four times as much cake as the occasion required.
The outside of the cake is a blue, white, and gold mirror glaze with golden star sprinkles.

The swans at the bottom are marzipan with gold leaf on them because there were little plastic swans on Mom and Dad’s wedding cake 50 years ago.
The 50 on top is made of caramel and around the perimeter are almonds dipped in caramel.

The platter that the cake is on was (we believe) used in the wedding of some of Dad’s ancestors back three or four generations. We think it dates to the late nineteenth century. My sister and I had it repaired and replated specially for this occasion.
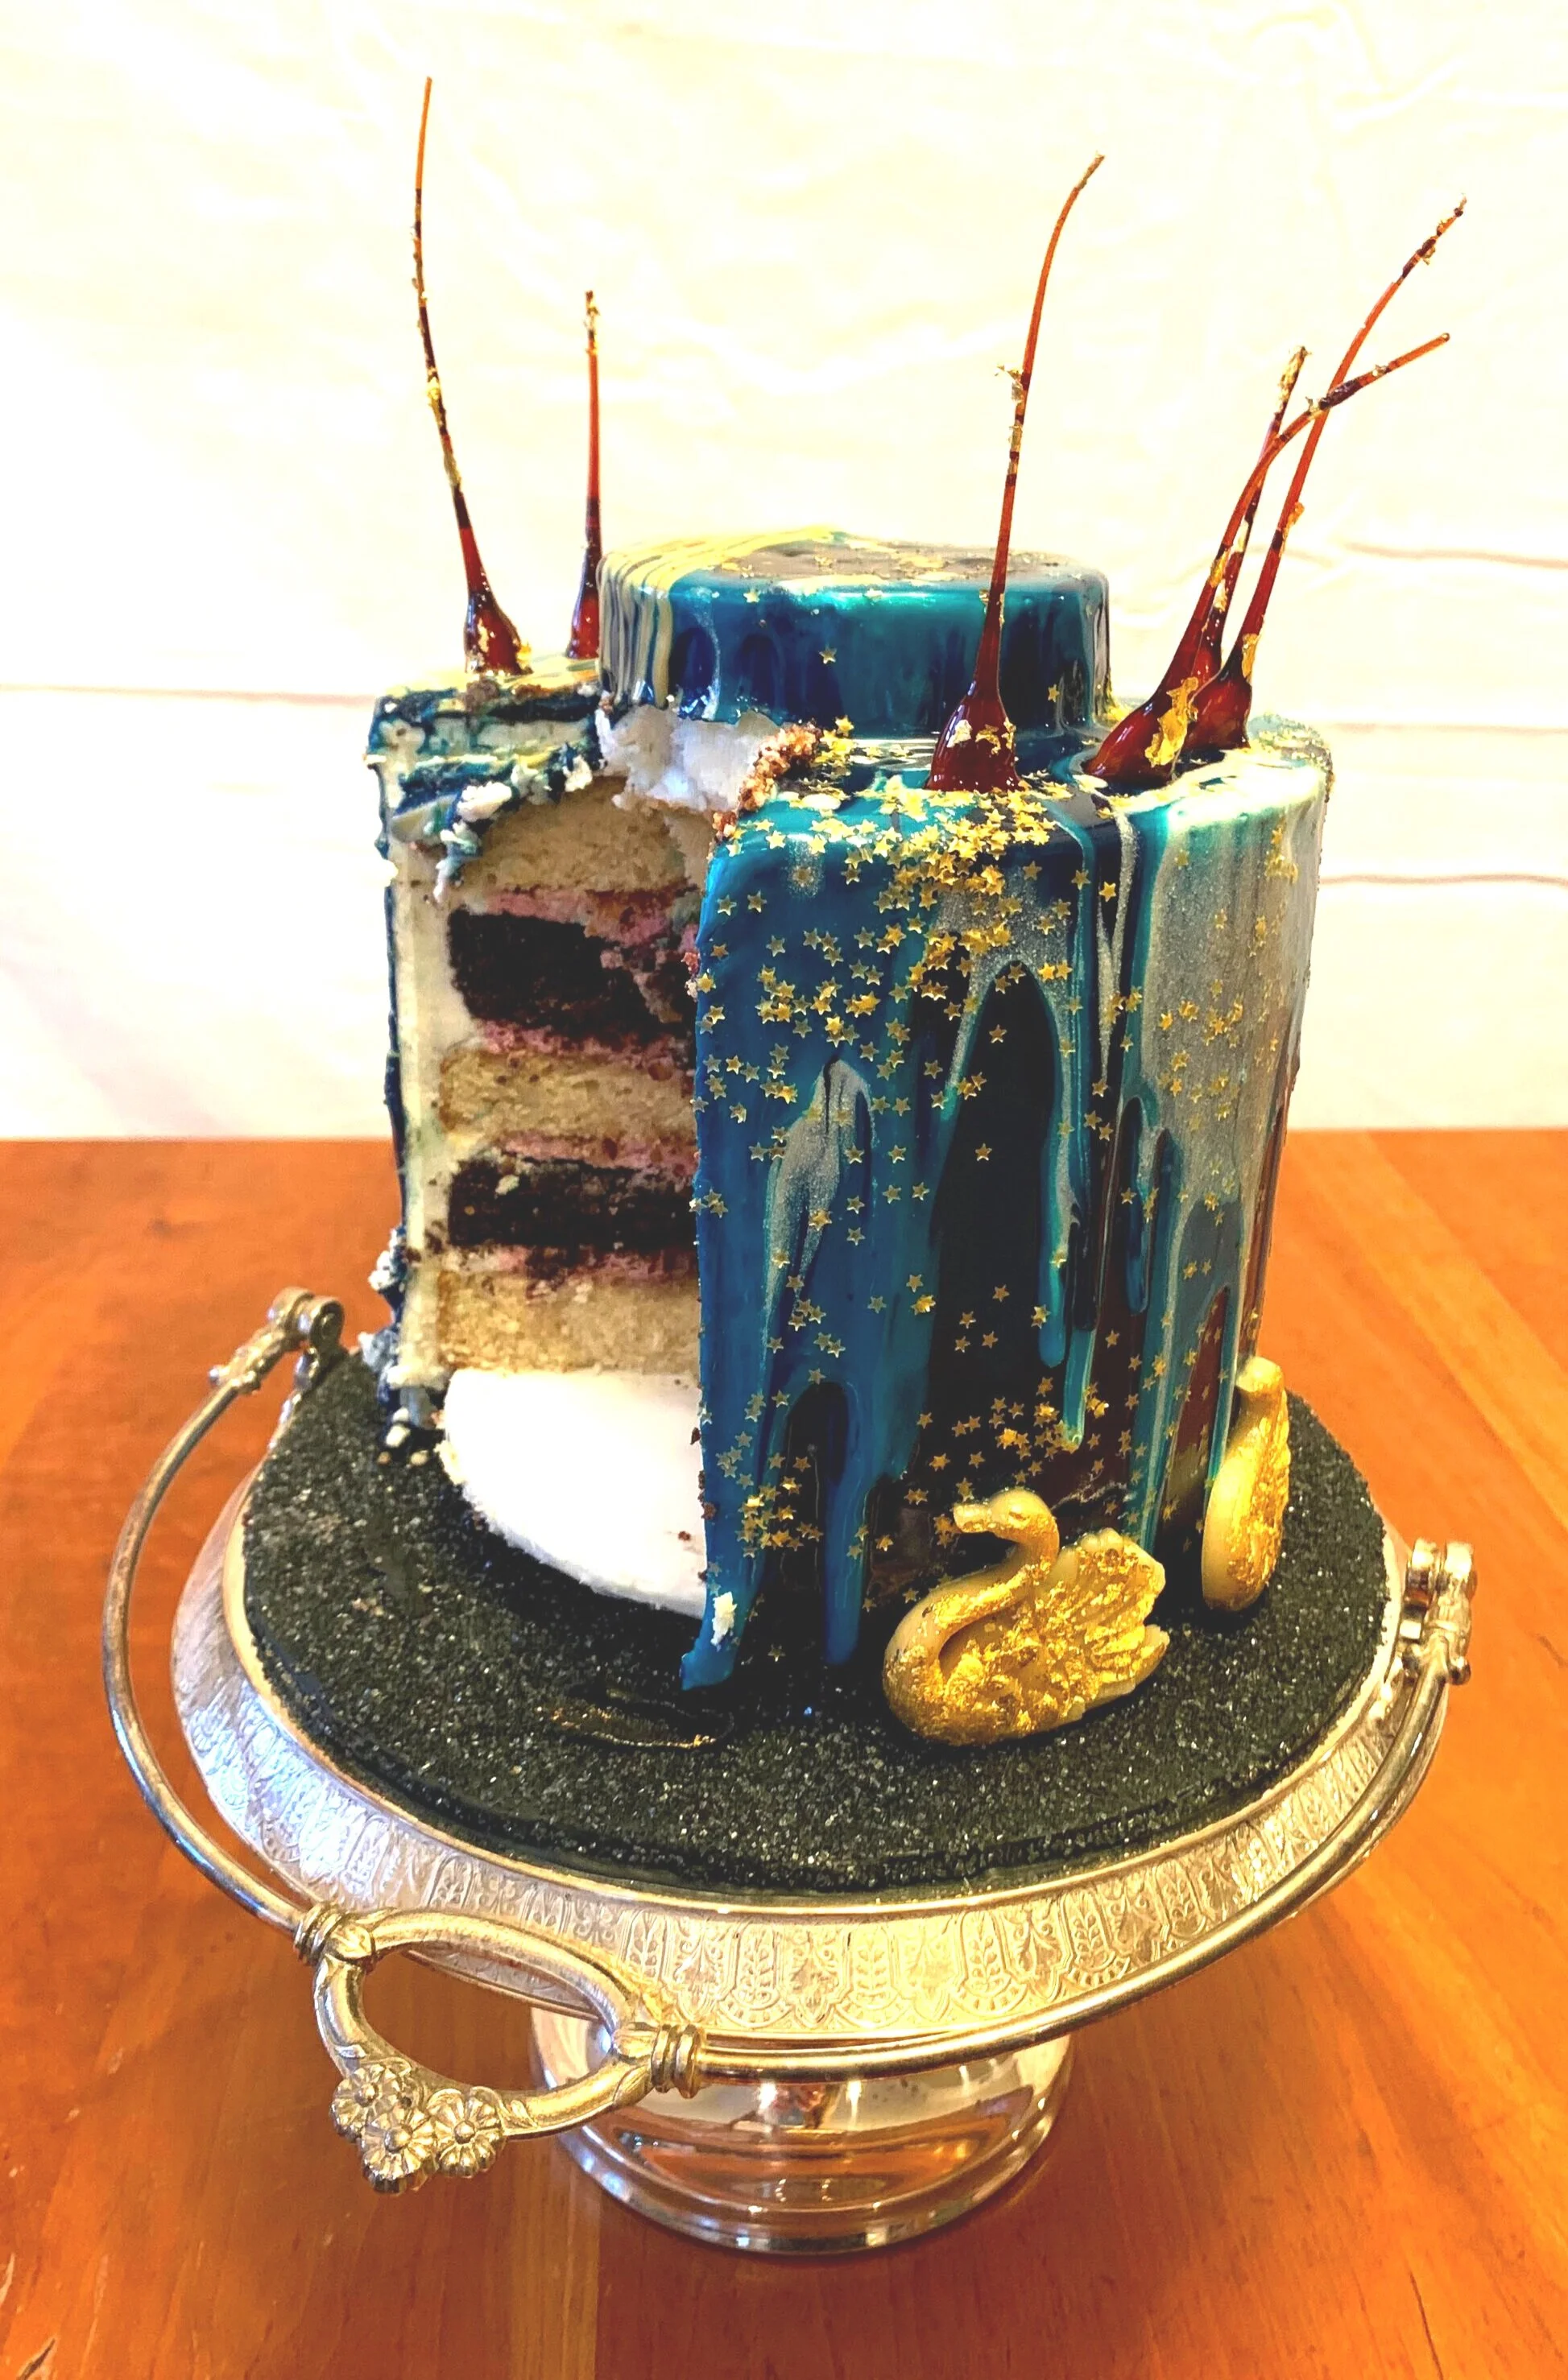
On the inside, the cake is alternating layers of almond cake and chocolate cake with cherry swiss buttercream between the layers. It’s meant to be reminiscent of a gelato bar that was served at Mom and Dad’s wedding, which is half chocolate, half almond with cherries in the middle.


Cocao Nib Panna Cotta
I have never made a panna cotta before, so I’m pretty happy with how this turned out.

I have never made a panna cotta before, so I’m pretty happy with how this turned out. The blackberries are sugared with sage sugar because my mom has an overproducing sage plant so I’ve been adding sage to everything.
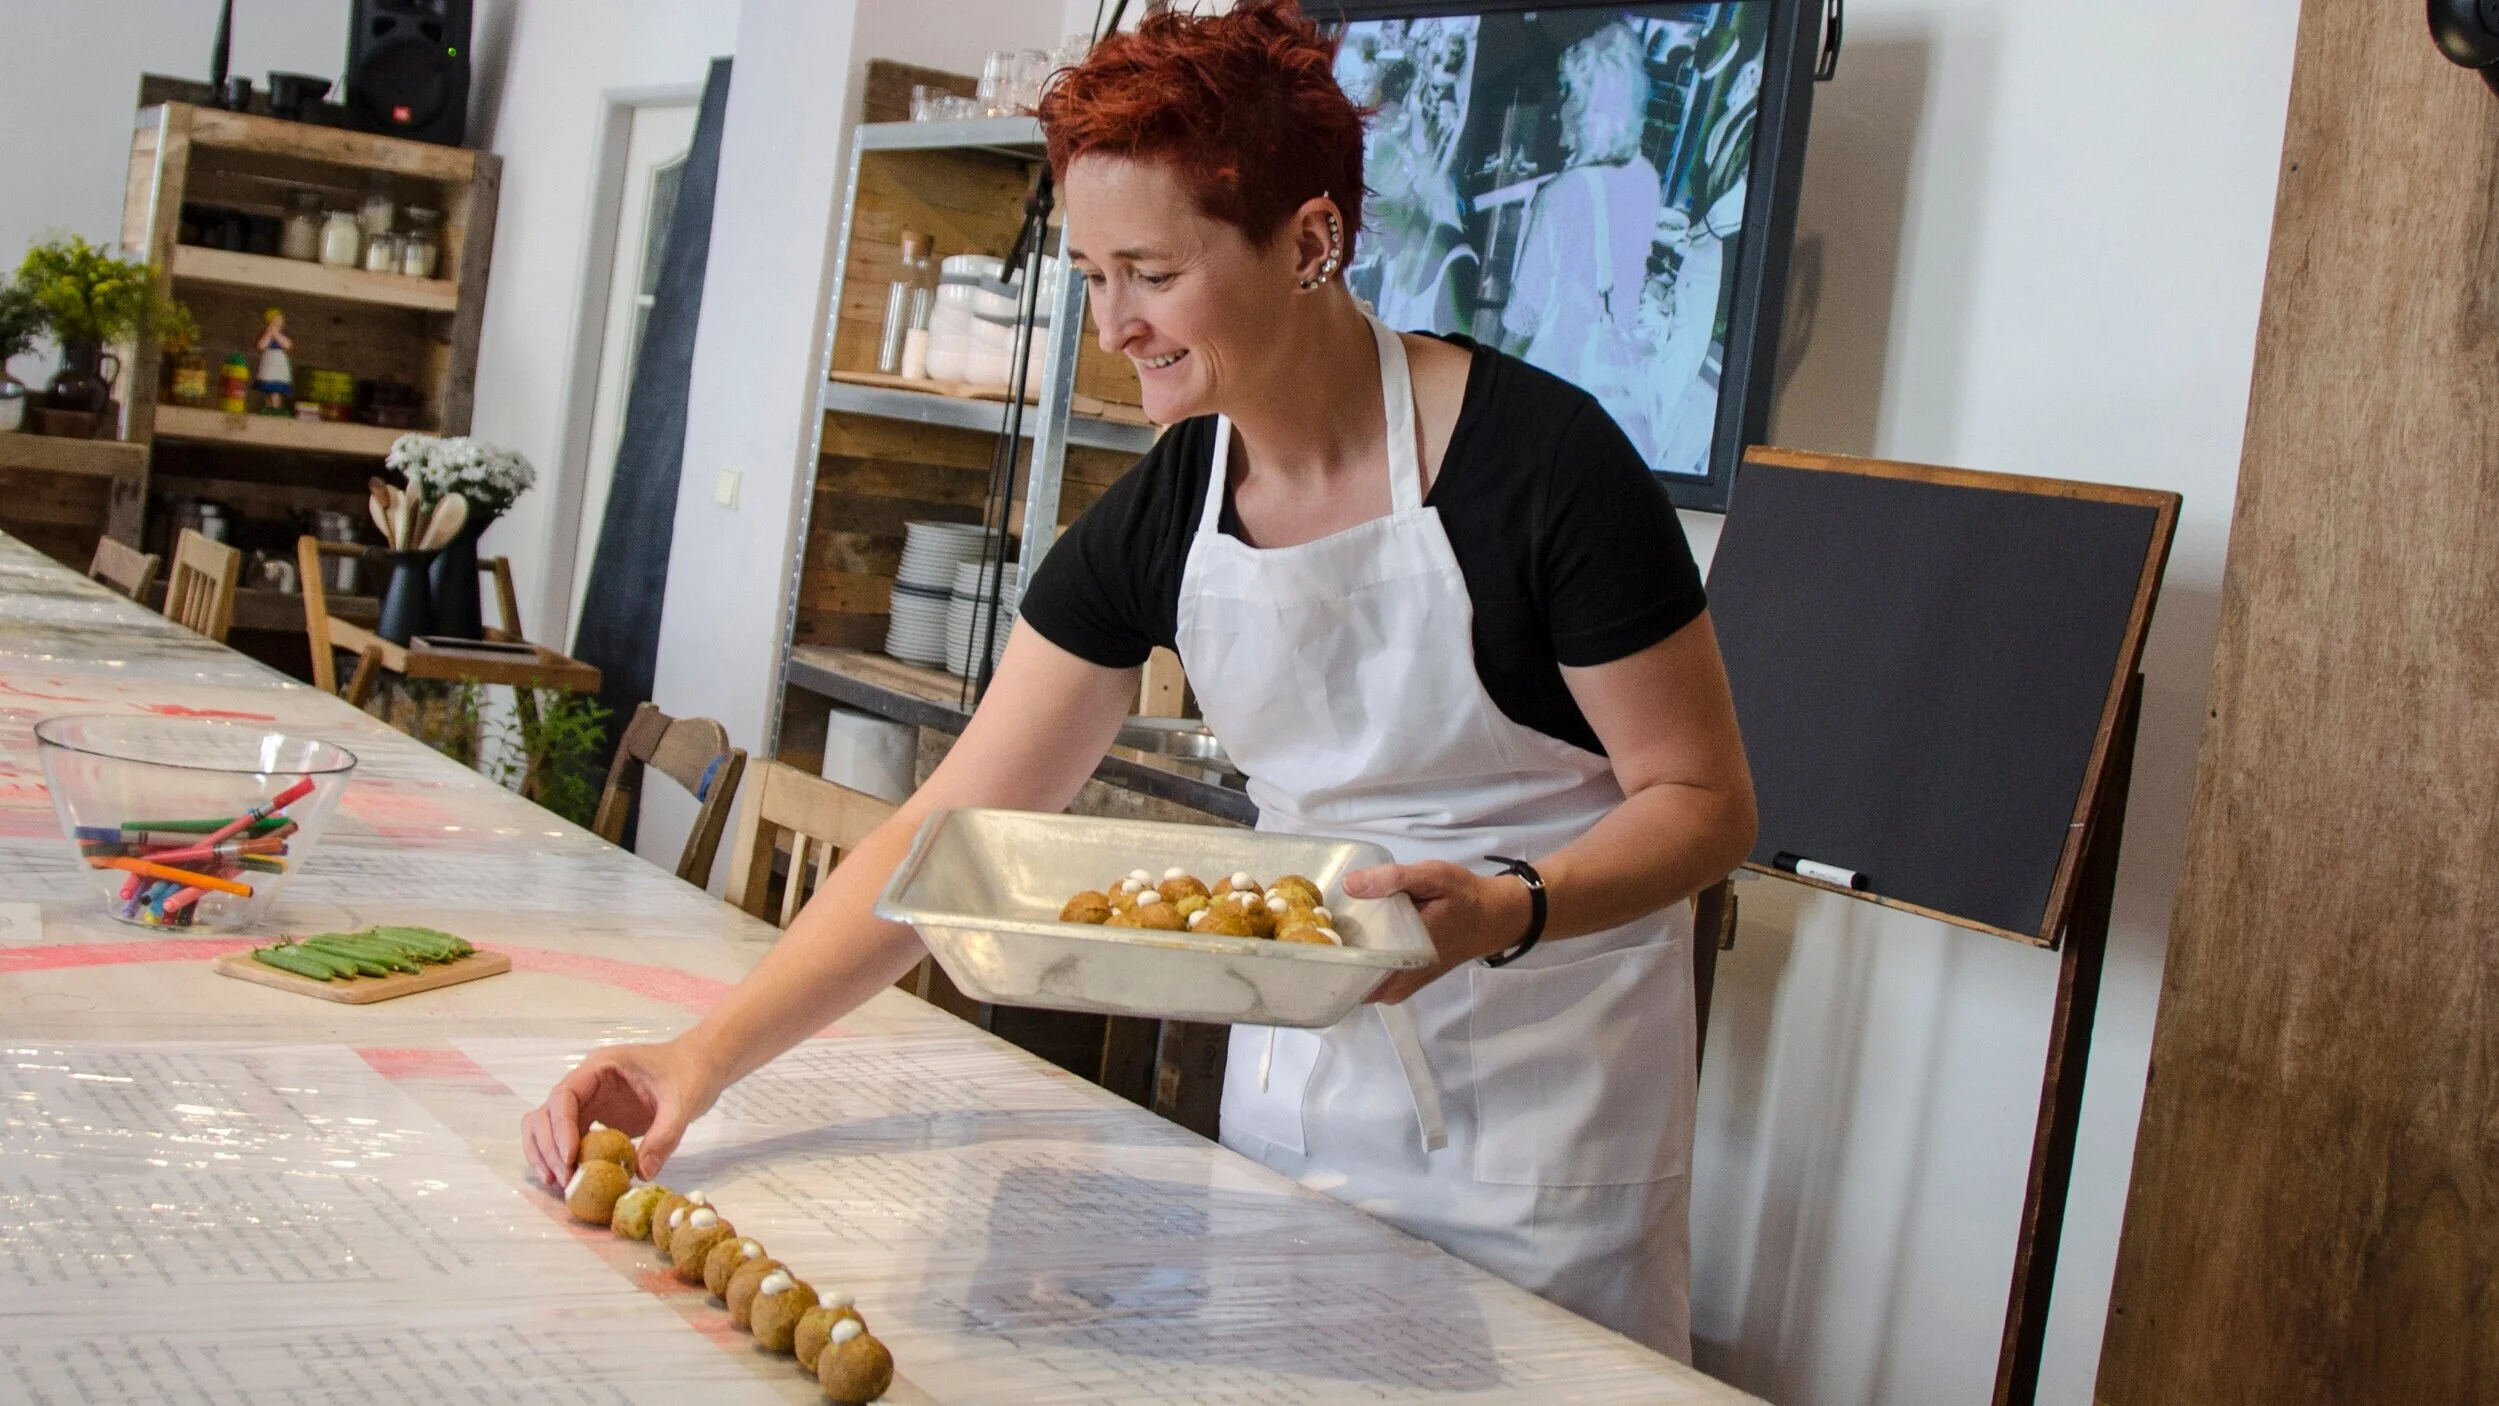
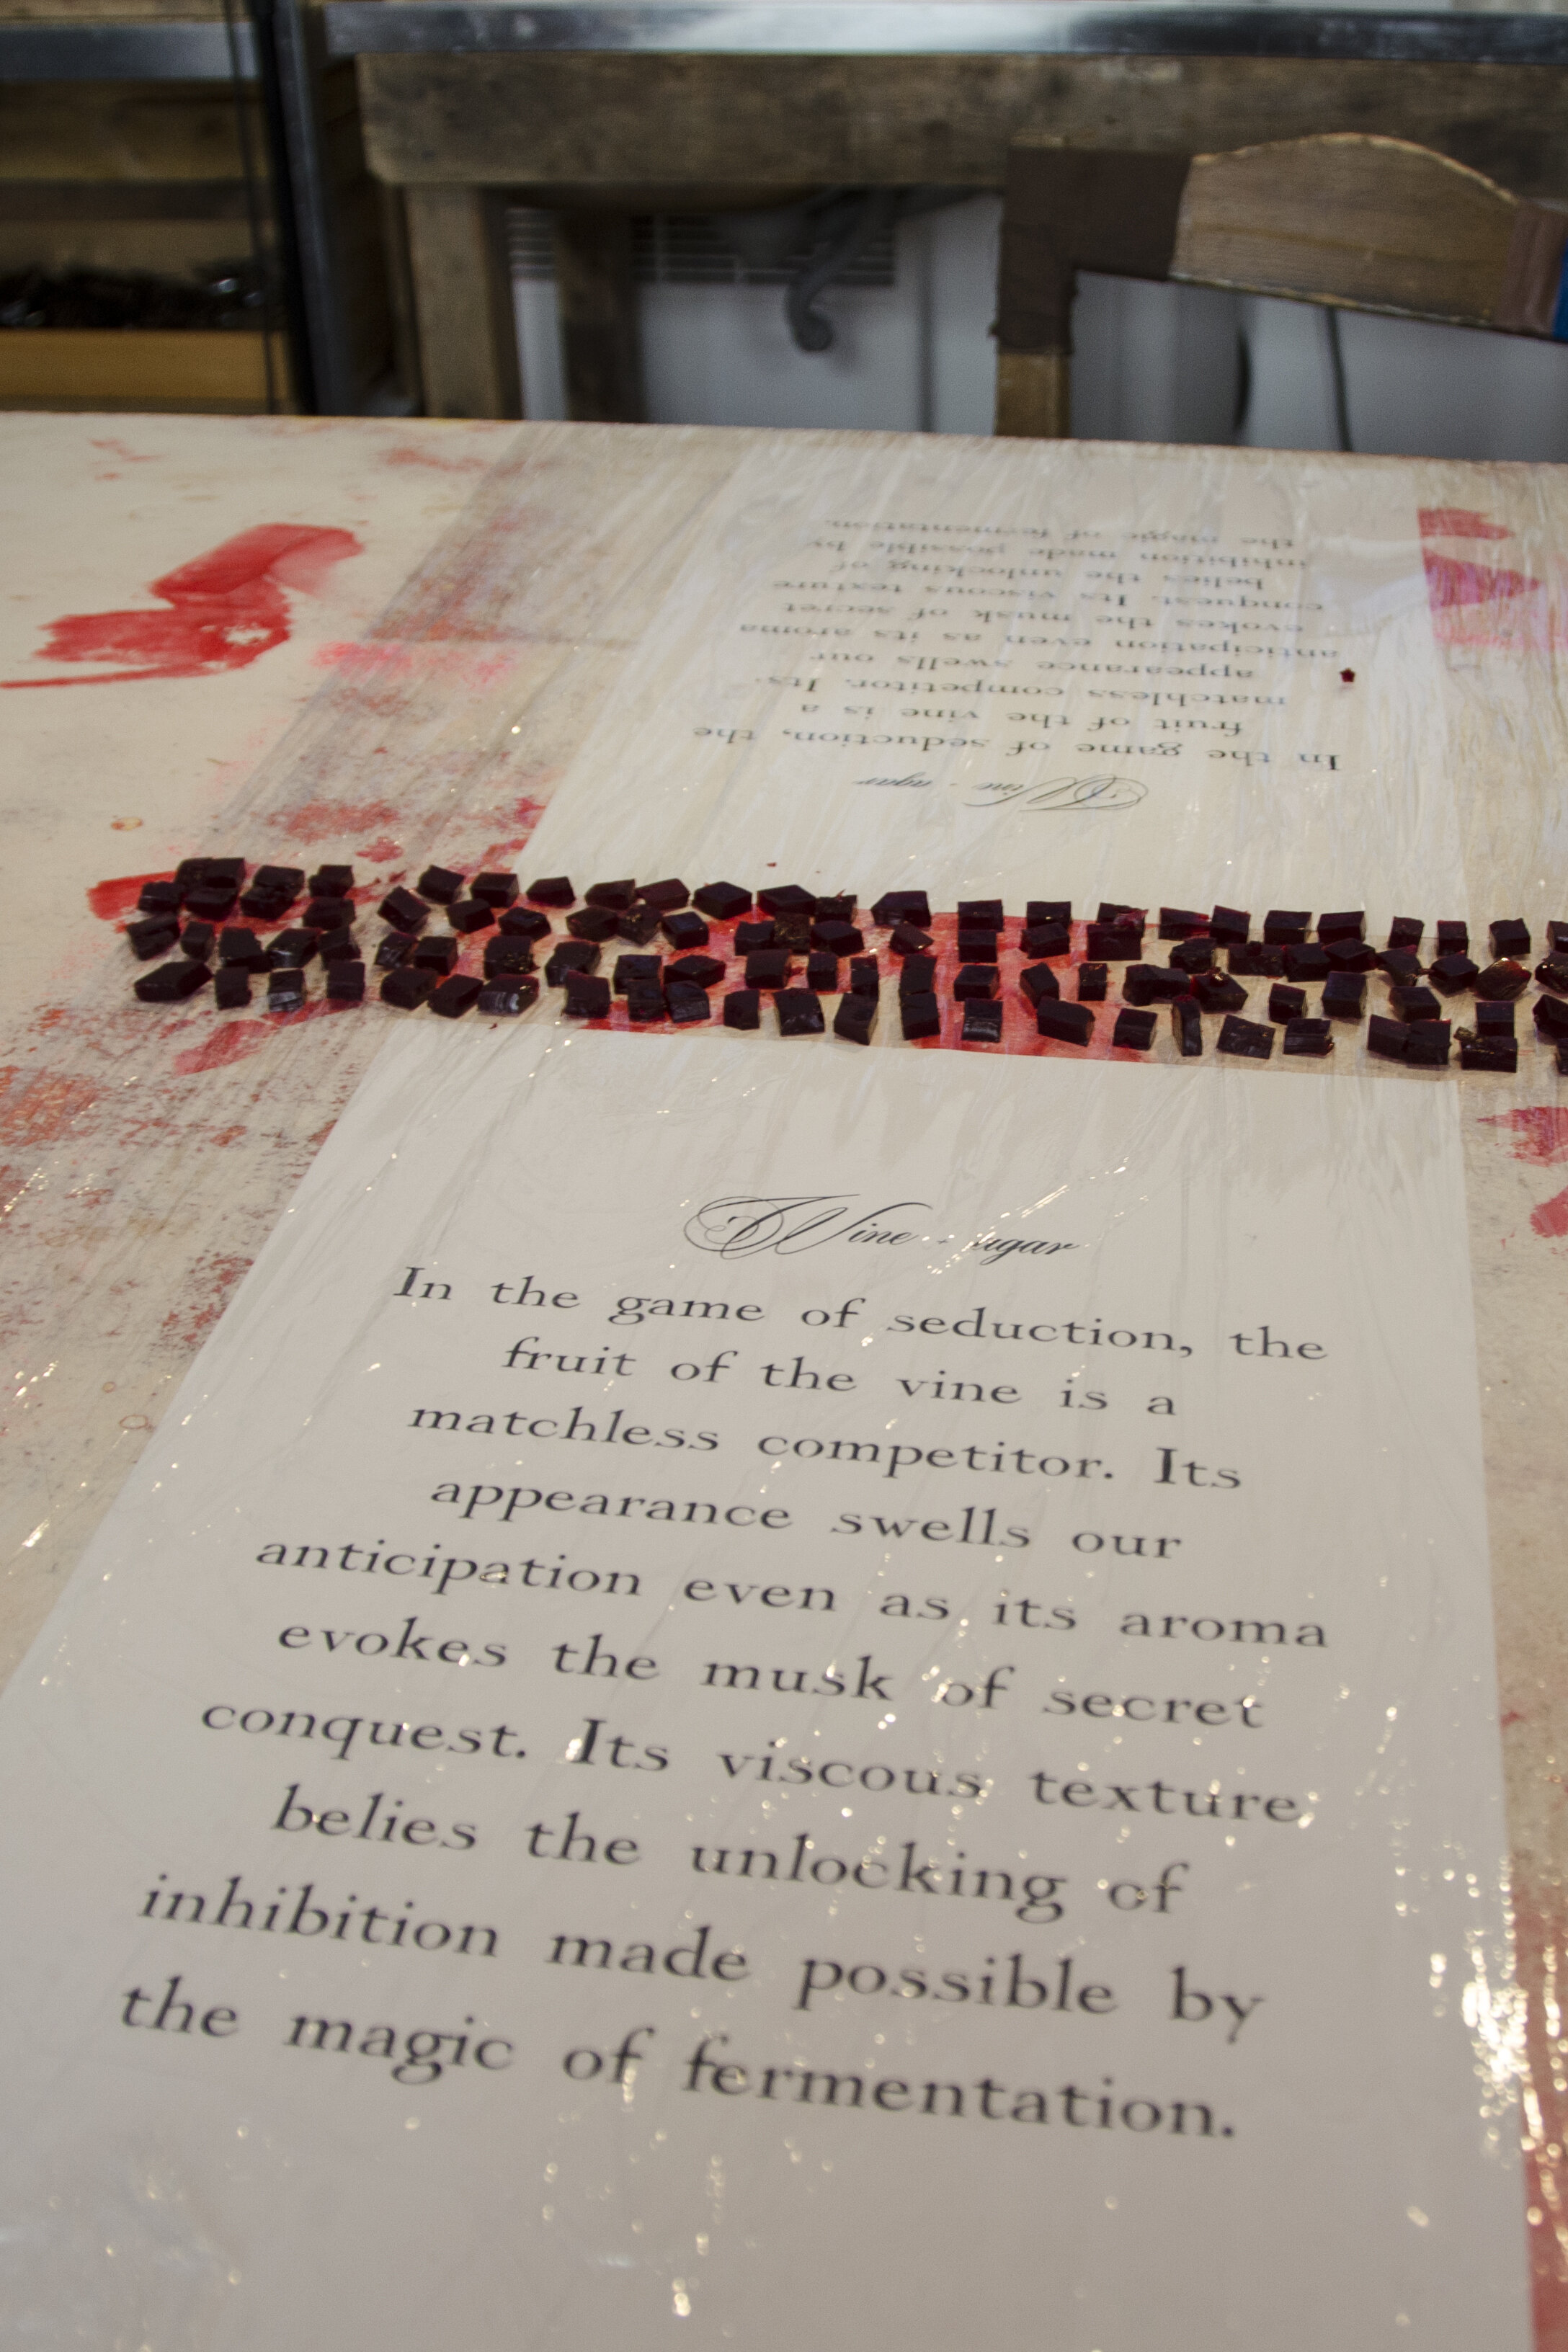
Edible Dramaturgy: Exploring death and fetish through candy
This is a performance I did with my friend and collaborator Kristin Hunt at the Makers Exhibition at the 2015 Prague Quadrennial of Performance Design and Space. The menu consisted of single peas, pea gummies, pea soda, capsaicin spun sugar, red wine gummies, black pepper conversation hearts, and pea cake balls filled with garlic marshmallow.

This is a performance I did with my friend and collaborator Kristin Hunt at the Makers Exhibition at the 2015 Prague Quadrennial of Performance Design and Space. It’s based on two of our previous edible dramaturgy performances, Woyzeck (2013) and Miss Julie (2014). Guests were presented parallel, five-course tasting menus that led them through Woyzeck’s increasing madness and Miss Julie’s sexual surrender through the scent, taste, and texture of the food.
The menu consisted of single peas, pea gummies, pea soda, capsaicin spun sugar, red wine gummies, black pepper conversation hearts, and pea cake balls filled with garlic marshmallow.


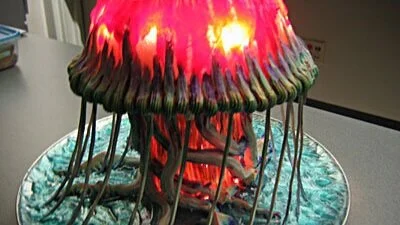
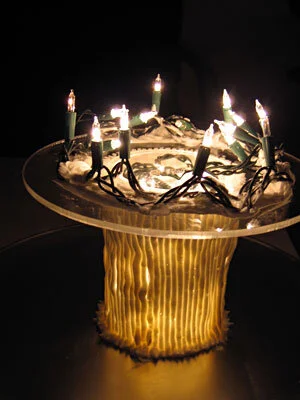
Jellyfish Cake
One of the first things that I did when I arrived at MBA school was to brag to my new friends about my cake-making prowess. Naturally, my bravado was met with a request for a birthday cake. At this point I had known the birthday girl for all of two months. Not having that much to go on in terms of personalizing the cake, I decided to make a glowing jellyfish, based solely on the fact that she had happened to mention a recent trip to the aquarium.

One of the first things that I did when I arrived at MBA school was to brag to my new friends about my cake-making prowess. Naturally, my bravado was met with a request for a birthday cake. At this point I had known the birthday girl for all of two months. Not having that much to go on in terms of personalizing the cake, I decided to make a glowing jellyfish, based solely on the fact that she had happened to mention a recent trip to the aquarium.
The plan was for me to serve this cake during class at our Arts Administration Seminar, which meant that I had to transport it from my apartment to school. Naturally, I responded to this requirement by making a cake based on one of the most delicate, ethereal creatures on earth.

Because I wanted the jellyfish to glow from within, my first step was to make a hollow dome of hard sugar to serve as the bell of the jellyfish through which the light would shine. This marked my second attempt to make such a sugar dome (the first being the Cyndi Lauper cake) and it remains a very difficult thing to accomplish (or at least a very difficult thing for me to accomplish.) I used a metal bowl as the mold, covered with tin foil because I wasn't confident in my ability to release the sugar from the bowl otherwise. The problem with tin foil, of course, is that it doesn't lie perfectly flat and thus has a tendency to form ridges that get stuck in the sugar and have to be carefully pried out with tweezers and/or melted out with a wet paintbrush. The other huge problem that I always have in making sugar domes is that melted sugar, being a liquid, has a strong tendency to flow down the side of the bowl and thus form a deformed letter "o" with a bowl in the middle, rather than a dome. I counteracted this downward tendency by continually pulling the sugar back up the side of the bowl with a spoon until it cooled and hardened enough to stay in place. As you can imagine, this didn't result in the pristine, glasslike surface that I would have liked, so I had to settle for a streaky, lumpy jellyfish bell.
Next, I needed to get my glowing mechanism functional. My plan was very simple - put some Christmas lights between the cake on the inside and the sugar dome on the outside, forming the bell of the jellyfish. Obviously, in order to have some sense of the jellyfish floating gracefully in the ocean, I would need to raise this bell up on a pedestal from which the arms and tentacles could descend. I bought an acrylic cake stand that consisted of a round acrylic plate that sat atop a 6" diameter acrylic cylinder. In order to run the Christmas lights down from the bell, I drilled a hole in the top plate. This also allowed me to wad some of the Christmas lights inside the cylinder so that the tentacles would also glow from within. The strand of Christmas lights was too long for me to fit all of them into the cylinder and I still needed a way to get the plug out of the cake and into the outlet, so I mounted the acrylic cake stand onto a silver tray, which I also drilled a hole in so that the Christmas lights could come out the bottom of the tray. Then I took the remaining Christmas lights and taped them to the bottom of the tray, carefully, so that it was still able to sit relatively stably. This had the pleasant effect of making the cake appear to be floating on a bed of light, as if, perhaps, some phosphorescent fish were swimming around in the depths below.

To make the acrylic cylinder look more like a life form and less like an architectural necessity, I piped vertical stripes of royal icing all around it, using a big round tip. I think it was a #8. Because I was going for an organic look, I deliberately let some of the lines curve and slump a bit.

There wasn't a whole lot of room for the actual cake, but fortunately it only needed to serve eight people. I made a 6" round cake, carved it into a hemisphere and covered it with fondant. The cake fit easily into the center of the circle of Christmas lights, and I slathered on a whole mess of royal icing to conceal the green cord. I plopped the sugar dome over top of everything and more or less had a proto-jellyfish. But it still needed a lot of work.
For one thing, I wasn't happy with an all-white jellyfish, though in retrospect, it may have maintained a more ethereal quality with a more muted palette. Instead, I piped on a bunch of bright red and blue piping gel and painted the royal icing around the cylinder with food coloring to match.
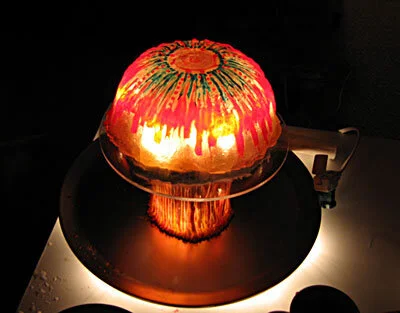
At this point it looked more like an eerily glowing mushroom than a jellyfish. I needed life. I needed movement. I needed fondant tentacles. I had the good sense to leave these mostly white, with just some blue and purple edging and red accents on the tips, which certainly kept them more ghostly than they would have been with more color.
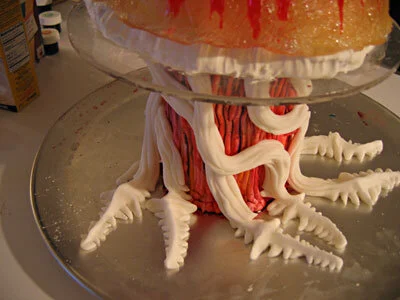
My next problem was that the acrylic circle of my cake stand was about two inches bigger in diameter than my sugar dome, so I needed some way to conceal the overhang. I used a big star tip to pipe a sort of elongated inverted shell border around the perimeter of the dome. Apparently the inverted shell border is a bit of a go-to decorating technique for me when trying to conceal imperfections. I went on to use it again on my niece's first birthday cake, with similarly unimpressive results. I also went in around the base of the cake with piping gel tinted blue to indicate water.
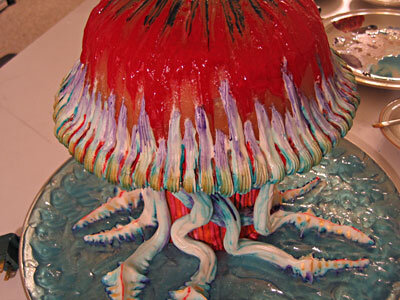
My jellyfish still looked too static for my taste, so I made some wispy royal icing arms to set round the edge of the bell. I attached them to the cake before I realized that would doubtless break during transport so I took them back off and painted them with some blue and green luster dust. I guess because I had the luster dust in hand I went a little shine-crazy at this point, slinging utterly garish amounts of blue, purple, and gold luster dust all over the place. Sometimes I just lose control of my paintbrush.

I had a bit of trouble transporting the cake to school because I drive a little pickup truck, which is great for buying lumber and for piling all your stuff in the back and moving across the country, but not very good for transporting cakes. Obviously it would be unwise to just chuck the cake into the bed, so I had to put it in front. Sadly, it wouldn't fit in the footwell, so I had to put it on the passenger seat, which, being designed for human butts, not for cakes, is neither flat nor level. I also had to drive down my driveway, which was both steep and bumpy. The upshot of all this was that the cake got knocked around a bit in transit and I had to make some repairs on site, as well as attach the wispy arms around the perimeter.

In conclusion, this was by no means my greatest moment as a cake decorator, but my friend still seemed to appreciate it.
Cyndi Lauper Cake
This cake was intended to be presented to Cyndi Lauper on The Graham Norton Effect. Unfortunately, it didn't survive being FedExed from Colorado to New York.
This cake was intended to be presented to Cyndi Lauper on The Graham Norton Effect. Unfortunately, it didn't survive being FedExed from Colorado to New York.
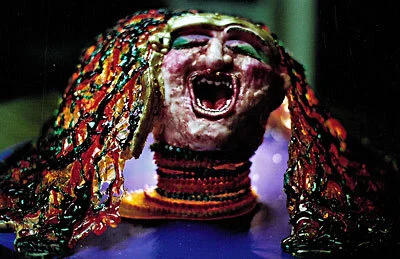
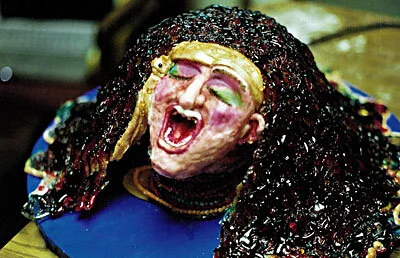
As my mom pointed out to me, I had no idea five or so years ago when my sister and I started theyrecoming.com (our horror movie review website) into what strange adventures it might soon lead me. The one it's led me into most recently involved sculpting a bust of Cyndi Lauper in cake to be FedExed to New York City and presented to Cyndi on a show called The Graham Norton Effect, which I had never even heard of until they contacted me about two months ago. Evidently, someone at the show had found their way to theyrecoming.com and seen the photos of my thoracic cavity cake and my zombie cake. Initially, they wanted me to make a werewolf cake for Seth Green, but they didn't give me enough lead time and I was really busy that weekend, so I had to tell them no, but please keep me in mind for the future. The next time they contacted me they wanted a cake for Cyndi Lauper and, as they gave me a few weeks notice this time and I'm a sucker for rock of the 80's, I enthusiastically agreed, providing they could come up with a way to transport the cake from the little Colorado mountain town where I spend my summers to the Big Apple.
I decided to make the cake a portrait of Cyndi with her mouth open, singing or possibly screaming, however one wants to interpret it. Behind the head, which was to be made out of cake, the hair would be a big dome of colorful hard candy with a light bulb underneath. My goal was to give the impression of something along the lines of a Tiffany lampshade. The folks at The Graham Norton Effect were excited about the idea, so I set about the planning and supplying stages. I believe I've mentioned before that I spend the summers in a little town about two hours away from the nearest big city, so supplies are a bit harder to obtain here than usual. Fortunately, the internet knows no petty geographical bounds, so I was able to order some powdered food colors and cocoa butter, which I didn't end up using after all and my sister sent me some paste colors and paintbrushes and luster dust and suchlike from California.

The weekend before the weekend I was to make the cake I was planning to drive to Indiana for a friend's wedding. Yes, I drove eighteen hours just to go to one party, then turned around and drove back. I loved every minute of it. This afforded me an opportunity to pick up supplies at places like Home Depot and Wal-Mart. I was looking for a good, battery-operated method of lighting up the sugar dome, but I never came up with one that I was really satisfied with, so I went with the tried and true method of a plug in light bulb. I also needed a big metal bowl, which I planned to cover with tin foil and use as a mold for the sugar dome. I found one at Wal-Mart that I thought would be perfect. As it turns out, I was wrong.
I returned to Colorado on the evening of Tuesday, September 7 and the cake was due to be shipped to New York on Monday, September 13 for a taping on Tuesday, September 14. The next day I got up and drove forty-five minutes to the nearest Safeway to get all my supplies (mostly sugar and corn syrup, neither of which, as it turned out, I bought nearly enough of.) My goal for that evening was to make the sugar hair dome. I covered the top of my kitchen table with tin foil, then set the bowl on top of some tuna cans to give it a bit more height and covered it with tin foil as well. Using the hard candy recipe from my favorite candy cookbook (The Practical Candymaking Cookbook) my plan was to first create an under layer of clear (or as clear as cooked sugar gets, which is sort of amber) sugar then pour various bright colors of sugar onto that to give the impression of wavy hair. I had forgotten to ask my sister to send me my good candy thermometer, so I bought a cheap one at Safeway, which evidently is cheap for a very good reason. It worked fine for the first batch or two of candy, then condensation formed inside it which made it impossible to read and when I tried to wipe off the inside I inadvertently moved the paper scale inside so it ceased to be accurate at all. I gave up on the thermometer altogether after a while and went by the sound of the bubbling and the color of the sugar. I think I did a remarkably good job of it, too, if I do say so myself.
Building up the preliminary shell of clear sugar went fairly well expect that it was impossible to get it smooth because of the steep slope of the sides of the bowl. Eventually I had a fairly even coating of clear sugar and proceeded to the colored sugar, which was a complete failure. My plan had been to spoon the colored sugar into attractive swirls of hair but this proved to be impossible to do with any kind grace or precision on such a steep slope, so I just ended up with sort of messy wedges of red and purple sugar, which looked really sloppy and non-specific. I set that one aside (just in case I wanted it again later) and started again.
This time my plan was to draw specific wavy hair shapes onto the tin foil over the bowl with royal icing, then fill the spaces with clear sugar, which I would then paint bright colors with food coloring. I took me two tries to get royal icing shapes I was happy with (and this time I didn't set the bowl onto the tuna cans so it was bit shorter) and it proved difficult again to fill the more vertical surfaces of the bowl neatly. I had to do it with my little metal pastry tube from the sixties, which my sister got me at a garage sale or flea market or something, which is awesome because they're pretty much impossible to find. This is a very time-consuming process and it involved a lot of me burning myself with hot sugar. About halfway through the process I ran out of sugar and went to bed.
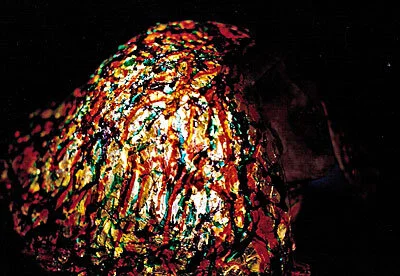
By the time I woke up the next morning. I had an even better idea - I would start over with a solid, clear sugar shell, then drizzle bright colors of sugar over it in abstract patterns. This would eliminate my difficulty in forming neat, specific shapes and give the cake a wild, carefree look, which I felt would be appropriate to Cyndi Lauper. This was also the day I had planned to bake the cake itself, which I had to do in my friend's cabin because I don't have an oven. I also borrowed a bowl similar to the one I had bought but slightly smaller on which to create my new sugar dome. This way I could start on a new dome without trashing the half-finished dome I had been working on the night before (just in case.) This time I created a more graceful shape (I hoped) than the natural shape of the bowl by taping pieces of paper over it to the bowl and to the table to form ogee-like curves. It formed a good shape, but made the finished product harder to remove from the table.

I spent the morning running back and forth between the two cabins, coating the bowl with clear sugar and baking three 6" round cakes, using a recipe for white cake I got from a book by Colette Peters. This was my first experience baking at a high altitude (about 8,300 feet) so I was a little nervous, but it seemed to go really well. I went online to get tips on high altitude baking (increase eggs, decrease baking powder, decrease sugar, etc.) I followed those and it went without a hitch expect that it seemed to take longer to bake than I expected, but maybe the oven just wasn't as hot as it said it was.
By three in the afternoon I had all the cakes baked and most of a good, solid layer of sugar on the bowl and I had to go to work for a few hours. By the time I came back the sugar on the bowl had had a chance to cool completely, which, I discovered, was a very bad thing. The first time I poured another coat of hot sugar onto a thin spot, the sugar dome started to crack. Evidently sugar can't take that quick a change in temperature. This was make even worse by the fact that I had, for some inexplicable reason, removed the sugar dome from its supporting structure of bowl and paper and even in some sections started to remove the underlining of tinfoil (to assure myself that it was possible), so the hot sugar started drooping through cracks and the dome started to sag. I hurriedly pressed the still-pliable sugar into a tolerable shape and put the bowl back underneath. Clearly, I would have to re-coat the entire dome with hot sugar before I started drizzling hot colored sugar onto it or the whole thing would crack apart. I tried to warm up the sugar dome by setting it in front of the radiator and by rubbing it with a hot, damp sponge, but that didn't help much. Every time I poured more hot sugar onto a cool section of the dome, more cracks appeared. Finally, I had a very thick layer of sugar on everything and all the cracks were sealed and covered up. (By this time I had also made two additional trips to the little grocery store across the street to buy more sugar and corn syrup. I bought pretty much all the corn syrup they had. Ordinarily things are much more expensive there than at a big grocery store, but fortunately the corn syrup was inexplicably cheaper.) I was ready to start on the colored sugar. Finally, something went right and the sugar drizzling went smoothly and looked good. I used bright red, bright purple, and bright greenish-blue. Once this cooled I pulled it off the form and peeled away the tin foil. This was easier said than done and I had to use tweezers to get the foil out of a few of the crevices, but eventually I got (almost) all of it.

Finally my sugar dome was ready and I was ready to start sculpting the cake. I didn't have my cake leveler so I had to eyeball it, but fortunately the cakes were small in diameter so it was pretty easy. I filled the cake with raspberry jam, then, working from a photo I found online, carved it into the rough shape of Cyndi's head with an open mouth. I gave the leftover cake bits to my friend who lent me her oven. To crumbcoat the head I used an apricot glaze, made by boiling and straining apricot jam.
Next, I mounted the head onto a neck, which I had made by stacking circles and oblong shapes of clear sugar on top of each other. This, I hoped, would look more graceful than simply plopping a severed head onto a tray. There's a reason why classical busts always include the shoulders.
My plan at this point had been to use white modeling chocolate to sculpt the facial features, but an old problem I had the first time I used white modeling chocolate resurfaced. Evidently I had added too much corn syrup because the modeling chocolate was very sticky and didn't set up right. I also had a hard time getting it to stay in place on the cake. I went to my backup plan, which was to use royal icing. Unfortunately, in the process of removing the modeling chocolate I had already put on, I ripped the nose off of the cake, so I would have to build it up again with icing. I put a preliminary coat of royal icing onto the whole head and went to bed to let it dry.
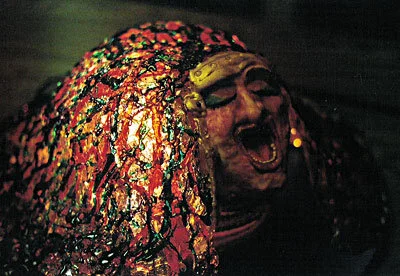
The next day, for some incomprehensible reason, I tried the modeling chocolate again. Again, it failed miserably and pulled off some of the royal icing in the process, so I had to redo it. Eventually, I had a good base coat of royal icing on the head and a royal icing beaded necklace around each tier of the sugar neck and could position the head and the sugar hair on the plywood circle I had cut to use as a base. The lightbulb was already mounted to the base, wired and ready to go. I had to move it once because the head sat further back than I expected, but that was easily accomplished. By some miracle the head and neck together were actually the right height to fit with the hair and the whole structure together seemed remarkably stable, a major concern for a cake that had to travel across the country. I lit it up to see what it looked like and was thrilled with the result!
I used a large #12 round decorating tip and a medium #6 round decorating tip to pipe in royal icing features like lips, nose, ears, and cheekbones, then carefully smoothed and shaped them with a slightly damp, soft paintbrush. I put in a tongue and eyelids with a flat #104 decorating tip and again smoothed with the paintbrush. The nose took two applications to get it built up enough, but all in all it was quite successful. I even added a uvula at the back of the throat.
Once the royal icing had dried overnight, I was ready to paint the face. I had gotten powdered food coloring to use when I thought I would be painting onto white modeling chocolate, but with the royal icing I could use paste colors, thinned with water. First the skin tone went on, then rouge, lipstick, and bright, gaudy pink and green eyeshadow. I also painted each beaded necklace a different bright color. Then I added more details with royal icing, such as eyebrows and eyelashes and a head scarf to cover the less-than-perfect edge of the sugar dome hair, then painted those. I used some gold luster dust on the lips and blue luster dust on the eyelids to make it shine and used a few little drops of sugar I had saved for earrings and ornaments on the head scarf. Oh, at some point in there I decided that I didn't like the shape of the lips and had to go back and add more royal icing and touch up the paint job. The finished skin was a little lumpier than would have been ideal, but other than that, and a slightly odd chin shape due to some frosting sagging, I'd say it wasn't half bad.
Finally my cake was done! Hooray! Now my only problem was packing and freezing it for transport. The packing method I came up with pretty darned smart, if I do say so myself. Like many of my "brilliant" ideas, it came to me as I was drifting off to sleep. First I covered the cake in plastic wrap, then tied it inside a plastic bag. I cut another plywood circle, about two inches bigger in diameter than the one on which the cake was mounted. I screwed the cake base to this so it wouldn't shift around. ThenI wrapped about six layers of cardboard around this, forming a squat little tube, the excess space of which I filled with foam peanuts, then closed the top with a triple layer of cardboard. The result looked a lot like a giant hatbox and was far too large to fit in a standard freezer. Fortunately (and this is one of the big advantages of living in a small town) I have a friend who runs a restaurant and he let me stick the cake in his giant freezer.
On Monday morning, I got up, fetched the cake, then spent three hours waiting around for FedEx to arrive to pick it up. He had a little trouble finding my cabin because the street address isn't actually posted anywhere on the property but I guided him in by phone and a few minutes later my rustic little cake was on its merry way to the big city! Sounds like the premise for a Broadway musical, doesn't it?
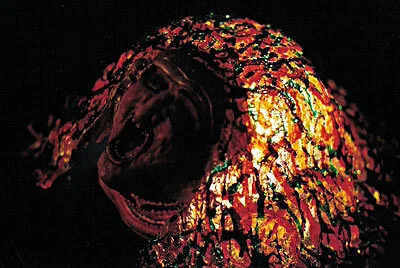
Sadly, perhaps cakes were not meant to be shipped cross-country as I'm told the cake arrived in New York broken. I never knew what, precisely, was broken or to what extent, but evidently the damage was severe enough to preclude the use of the cake on the show, because it never put in an appearance (though my name did appear for about a third of a second in the special thanks section of the credits.) I like to think that someone showed the photos of the cake I sent to Cyndi Lauper. I also like to envision the crew of the show munching on Cyndi Lauper's smushed face in the break room.
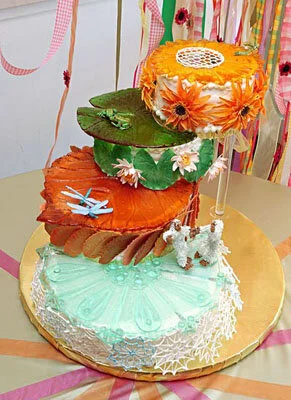
Seasons of Love Cake
Two of our dearest friends were getting married and we got to make the cake! Being the incredibly brave and trusting souls that they are, they gave us a free hand. They didn't have any idea what the cake was going to look like until they showed up for the wedding! If that's not trust, I don't know what is!
This is by far the most complicated cake we've made. My sister and I spent the entire day before the wedding working on it (about 18 hours, each) but during the week before, I spent about 50 hours and my sister (due to her day job) spent about 30 hours working on it. That all adds up to about 120 woman-hours and an incredibly fun project.
We didn't keep close track of the cost, but we estimate we spent about $500 on supplies, including all the ingredients, gum paste, cake pan and leveler, and the silicone mold compound for the sugar plates (which was the biggest single expense).
Introduction
Two of our dearest friends were getting married and we got to make the cake! Being the incredibly brave and trusting souls that they are, they gave us a free hand. They didn't have any idea what the cake was going to look like until they showed up for the wedding! If that's not trust, I don't know what is!
Naturally, being who we are, we came up with an incredibly complicated and time-consuming concept. We called it the Seasons of Love cake, because our idea involved each tier representing a different season of the year and of the couple's life together. We also tried to flavor each tier to match the season it represented. All four tiers were made with the same chocolate cake recipe, but my sister came up with the great idea to add different flavorings to the batter for each season. We also used a different filling for each layer, as follows.
Winter - Chocolate cake with chocolate chips added to the batter with a mint chocolate ganache filling
Autumn - Chocolate cake with hazelnuts added to the batter with a chocolate hazelnut spread filling
Summer - Chocolate cake with orange zest added to the batter with a cherry jam filling
Spring - Chocolate cake with orange zest added to the batter with an orange marmalade filling
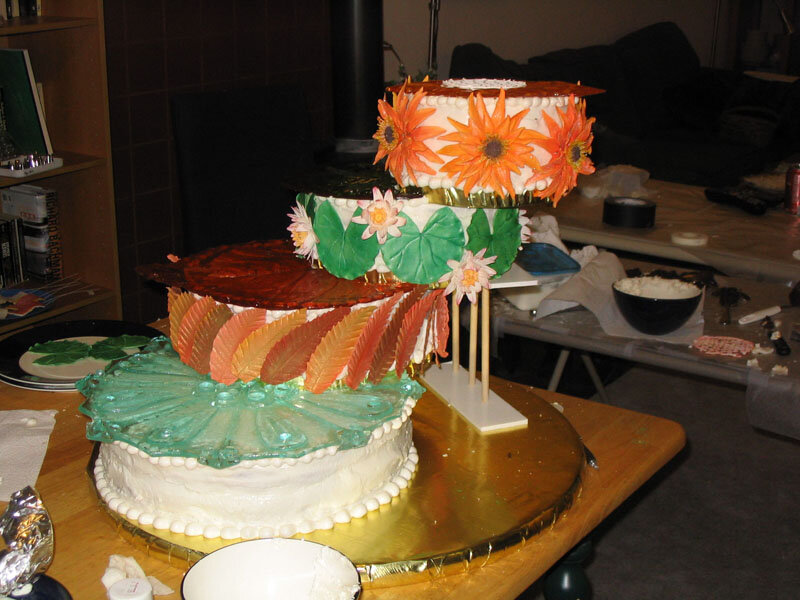
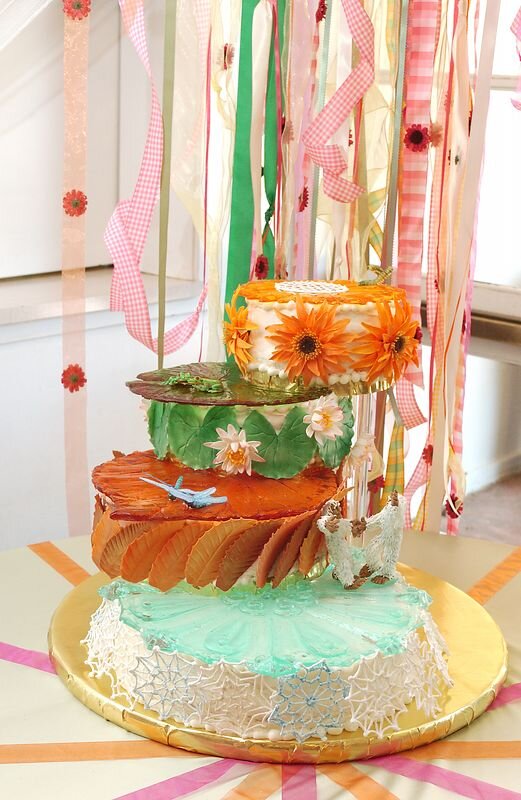
Each tier of the cake was to be topped with a sculpted sugar plate appropriate to the season, then the sides wrapped with seasonally appropriate leaves, flowers, etc. as follows.
Winter - Blue snowflake sugar plate with royal icing snowflakes around the sides
Autumn - Red leaf sugar plate with gum paste autumn leaves around the sides
Summer - Green lily pad sugar plate with gum paste lily pads and lilies around the sides
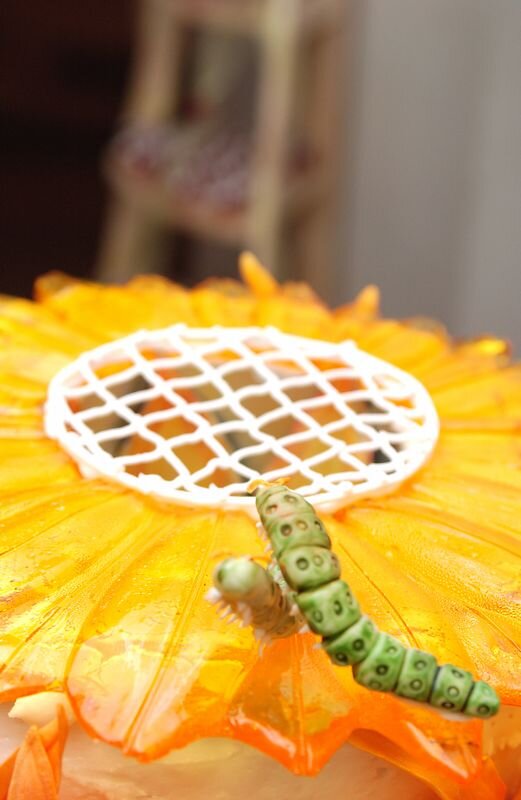
Spring - Yellow flower sugar plate with gum paste gerbera daisies around the sides
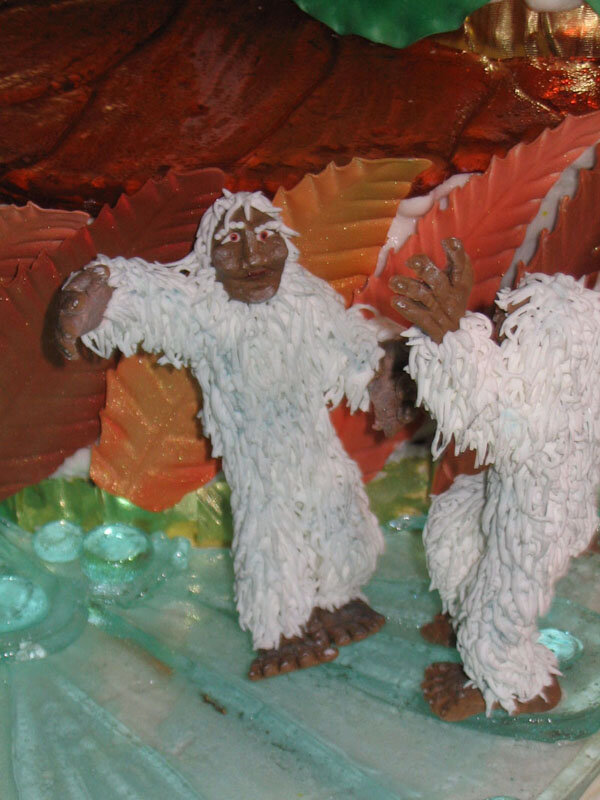
Each tier also got a symbolic bride and groom in the form of a pair of life-size little animals sitting on the sugar plate.
Winter - Pygmy yeti
Autumn - Dragonflies
Summer - Frogs
Spring - Caterpillars
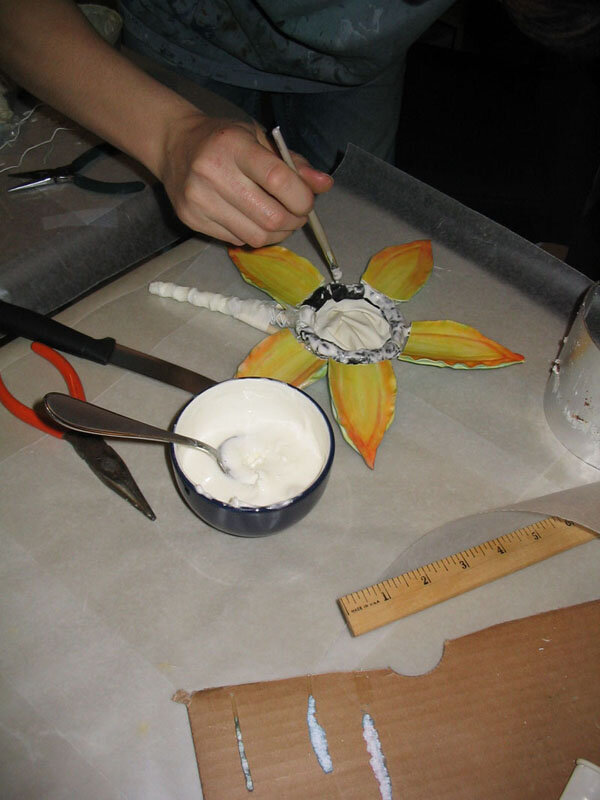
The final touch was to involve a giant gum paste flower blooming out of the top of the cake.
In case all of that doesn't sound like enough, I also came up with a structural design for the cake wherein each layer was cantilevered out from the layer underneath so that it appeared to defy gravity.
I think trying to give you a straight, chronological report of our cake-creating activities would be more confusing than anything else, so I've divided my narrative into sections each describing one aspect of the project. I'll warn you now; it's a pretty long narrative. Enter at your own risk!
Baking, Torting, and Filling
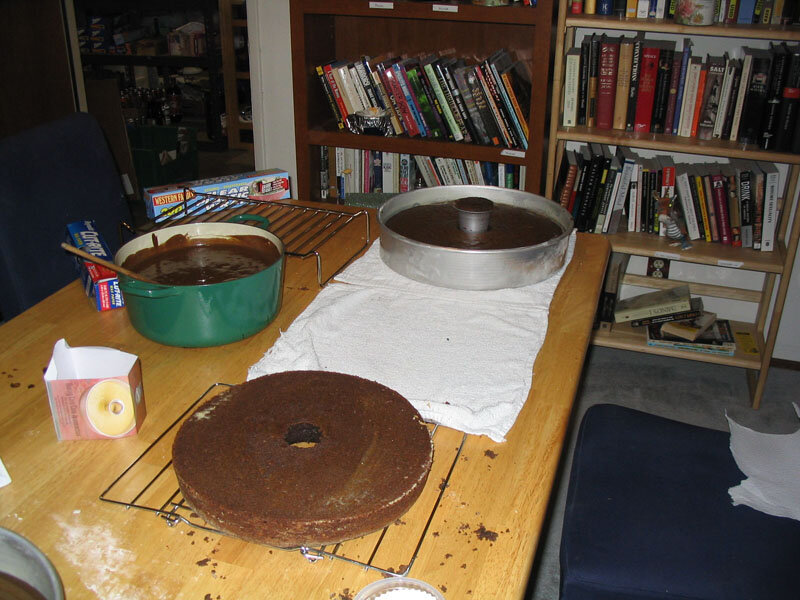
Baking all the cake was pretty much an all-day project (and that's not even counting the enormous shopping trip the day before. Who would have imagined anyone could ever need so much butter?) The smallest tier, the spring tier, was 6"in diameter, summer was 8", autumn 10", and winter 12", so I had to bake two 2" high cakes in each of those sizes for a total of eight cakes, which adds up to a whole lot of cake batter!
Fortunately for me we had decided to make all four layers using the same basic cake recipe so I was able to mix a lot of batter at one time and I never had to wash out the mixer between batches. This meant that I had to add the extra ingredients (chocolate chips, hazelnuts, or orange zest) to the batter by hand
.It all went remarkably smoothly (especially for such a huge project involving me and a kitchen) and eight hours later I had a fridge full of carefully wrapped cakes and a mountain of chocolate-covered dishes.
Torting, filling, and frosting the cakes, however, turned out to be more time-consuming than we could ever have imagined. Fortunately for me, my sister handled that part of it.
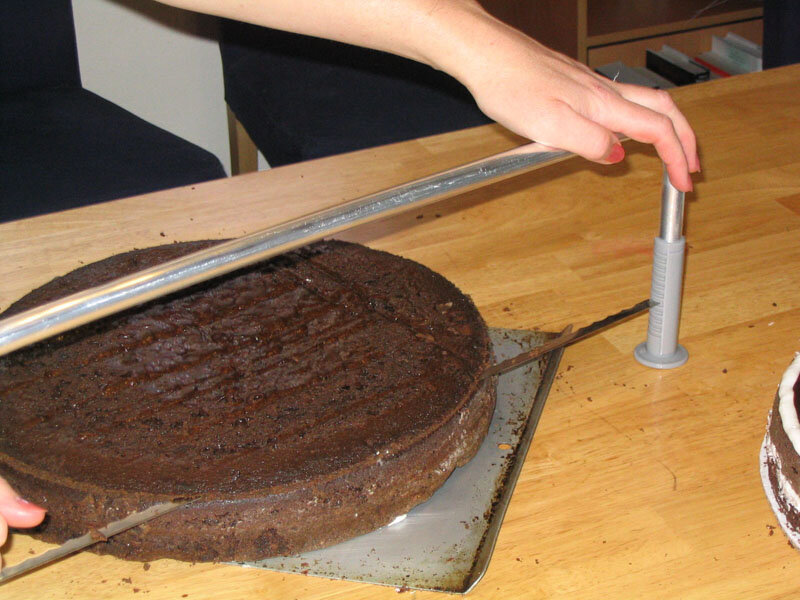
The first step is to level off the top of each cake, for which purpose we bought a special cake-leveling tool, which is like a fine saw turned sideways with feet on it. We thought this would be easier to do when the cakes were cold because then they don't crumble as much but this turned out not to be the case at all. Apparently our cakes were too cold, because our saw wouldn't go through the cake at all the first time we tried it straight out of the freezer. So we let the cakes thaw and tried again with much greater success. We still had to be careful on the larger tiers not to let the cake distort the blade of our tool, which happened if we tried to work too quickly. We found it worked best if my sister held the saw while I held and rotated the cake. After each piece was level on top we had to go through the same process again to split each cake in half, giving us four thin layers of cake per tier between which we could spread our fillings.

The first step in assembling those four separate pieces into an entire tier is to stick the bottom layer onto the cardboard base with a little bit of buttercream icing. Then my sister piped a thick dam of buttercream icing around the edge of that layer to hold in the filling. The filling can then be spread on the cake without fear of it leaking over the sides. The next layer of cake is placed on top of this and pressed down firmly, then the process is repeated until all four layers are in place.
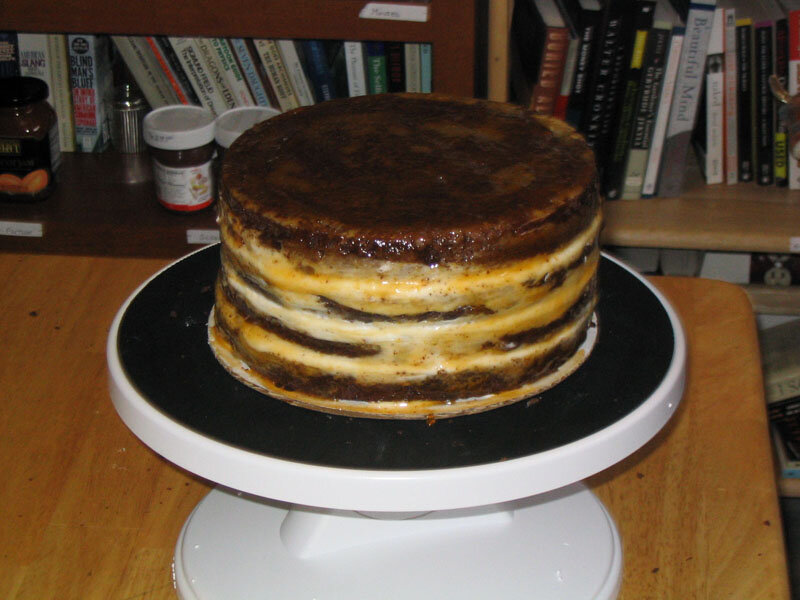
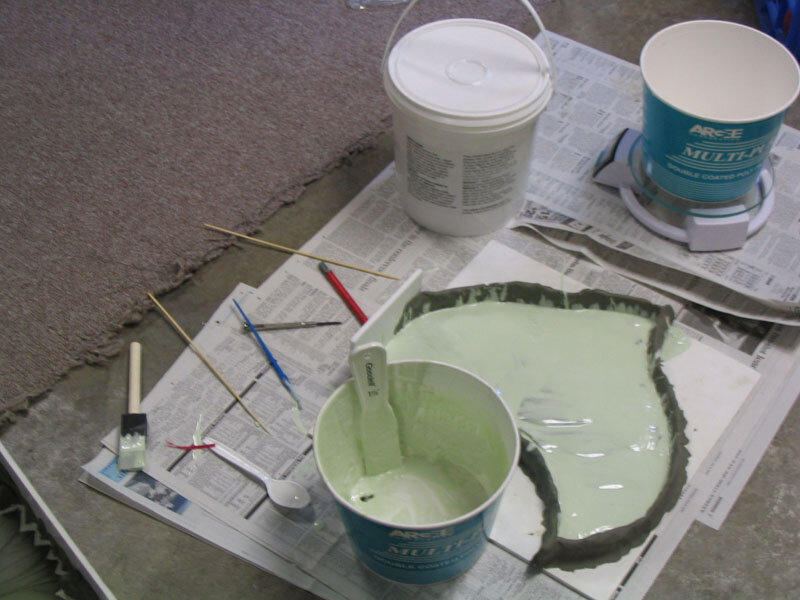
Her next step was to put a crumb coat on each tier. This is a preliminary undercoat of icing to keep the crumbs from the cake from getting into the final icing coat. She decided to use a glaze of apricot jam for this, which she made by heating the jam and then pressing it through a sieve to remove the stringy bits. Applied with a pastry brush in a thin layer, it picks up the stray crumbs and keeps then in place when it dries. In retrospect, it would have been a better idea to use thinned buttercream icing for this, since we had some trouble with the dark cake showing through the icing.
While I'm on the subject of buttercream icing, I should add a sidebar here about my sister’s experiments with buttercream icing. One flaw that buttercream icing has is that, because it is made with butter, it isn't truly white. Buttercream icing can be made with Crisco instead, which does make it white, but it doesn't taste as good. To decide the best way to make the buttercream icing for this cake, she made several batches with slight variations such as using a very light colored butter, or using Crisco but with artificial clear butter flavoring, or adding a bit of white food coloring to icing made with regular butter. We decided that the loss of taste wasn't worth the loss of color and decided against using the Crisco. There was only a very slight color difference anyway.
Once the crumb coat dried, she went back to each tier with a layer of buttercream icing. Unfortunately, you could still see the cake through the first layer of icing, and she had some trouble with the second layer sagging and dripping. But she cleaned it all up and the resulting cake tiers were by far the neatest cake tiers we've ever frosted, though I will say that my sister didn't make it look quite as easy as Sandy, our instructor at our Wilton master class in cake decorating. I'll bet she will next time, though.
Gravity-defying Structure
I was determined to make this a cake that defied, or appeared to defy, gravity. I'd like to be able to claim that it was some kind of metaphor for the happy couple's love defying the pressures of life that weigh us all down or some such sentimental hoo-hah, but really, I think it was just because I was convinced I could do it and thought that would be really cool.
The result - my plan for a cake on which each tier sat only halfway on the tier beneath, the other half cantilevered out in an attractive spiral. I hope to one day adapt this design to allow me to render a strand of DNA in cake. For a while I contemplated having each layer actually next to the previous layer, and slightly elevated, not sitting on top of it at all. While I still believe this to be theoretically possible, I'm glad I didn't try it this time because this way was hard enough.
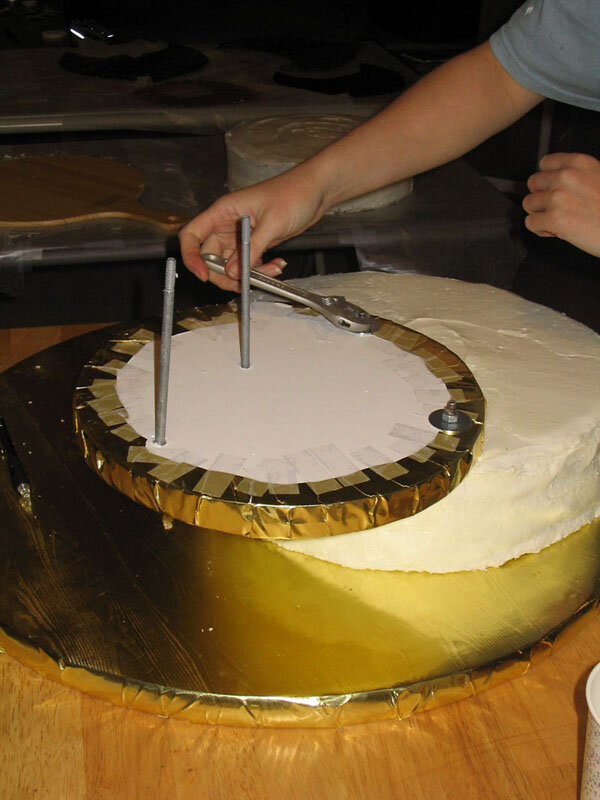
Each tier was to be supported by a circle of 1/2" foamcore, on top of which would rest the cardboard base of each tier, on top of which rested the actual cake. To hold them in place, each tier had to be bolted to the foamcore base of the tier beneath. This necessitated some complicated and mystical-looking hole cutting in each piece of foamcore to allow both for the bolts themselves and for various bolt heads and bolt ends from the layers above and below. I felt like a sorcerer, which is always a good thing to feel like.
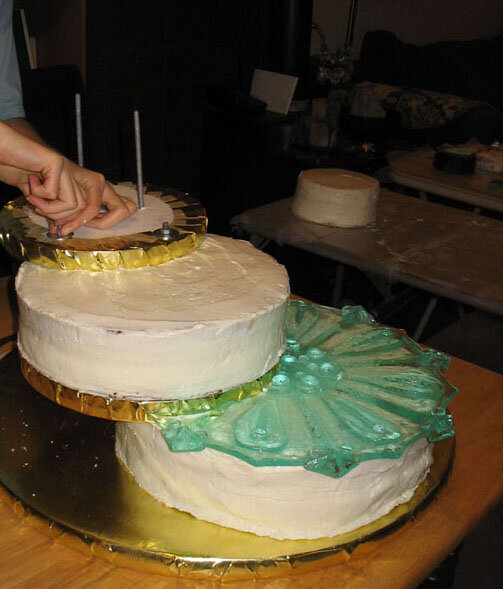
The assembly of the cake was an arduous and nerve-wracking process. Each tier was individually torted and frosted by my sister in advance. Then we started with the large, wooden, circular base, which already had holes drilled for the two bolts to hold the second tier. The heads were also countersunk to allow the base to sit flat on the table. The bolts were inserted first, then the largest tier of the cake, with holes precut in its cardboard base, was lowered into place over the bolts, which, for sanitary reasons, we wrapped in plastic wrap, though we also washed them well first. Next we positioned the foamcore base for the second tier and marked on the first tier where it would sit because we had to insert some 1/4" wooden dowels into the first tier of the cake to support the weight of the tier above. Otherwise, each tier would crush the tier beneath and the entire cake would collapse. I put nine or ten dowels into the fist tier of the cake, arrayed evenly about an inch back from the edge of the area where the next tier would sit. That done, we were ready to bolt the foamcore for the second tier into place. By the way, a cake that requires a crescent wrench to assemble is very funny.
The foamcore base of the second tier already had the bolts to go through to the next tier in it at this point. In fact some of the bolts had to be glued in place in advance because the layers of foamcore were covered with gold foil and the bolts had to be in place before that in order for the heads to be hidden. Therefore, we were all set to lower the second tier onto those bolts and repeat the process described above for the third and fourth tiers. Bear in mind that this entire time, despite my professed confidence in my design, I was pretty much expecting the cake to collapse at any moment.
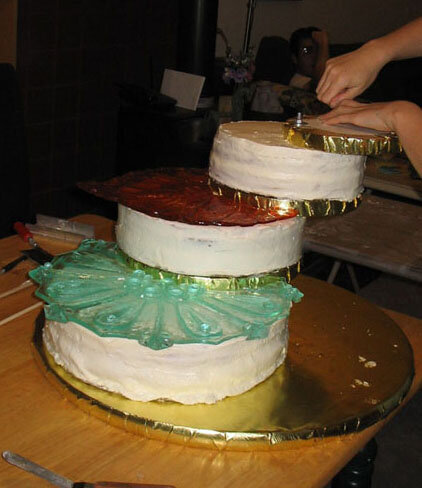
Miraculously, it all went together and appeared to be stable! We propped it up with temporary dowel supports to make sure and later we went out to get some attractive clear plastic supports from TAP Plastics, which we used for transport and actually had to put back in as a precautionary measure halfway through the reception. The layers did begin to settle and tip a bit, which I suspect indicates that the dowels were being tipped over inside the layers. I'm sure I could solve this problem next time by using an internal support with a wider base, like a plastic ring or oval. All in all, I'd say my first foray into the world of gravity-defying pastry was a roaring success!
Sugar Plates
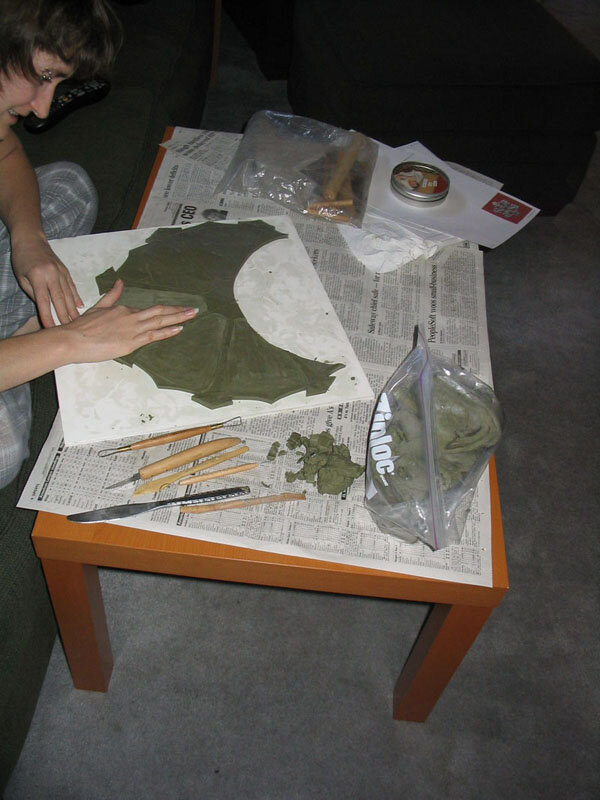
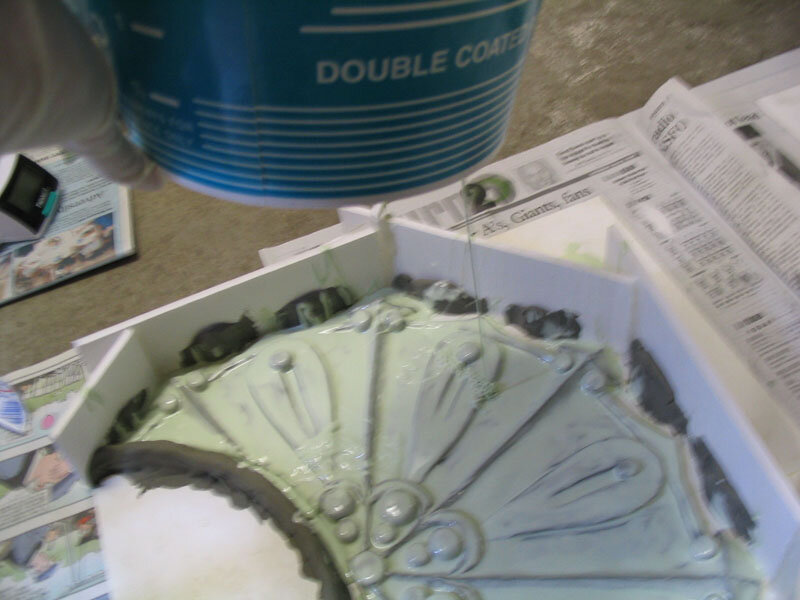
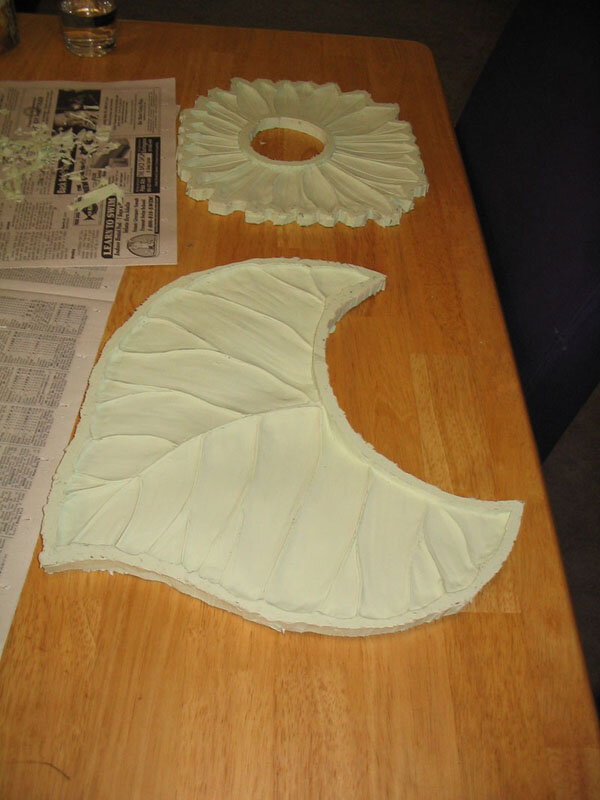
Each layer of the cake is topped with a seasonally appropriate giant sugar plate - a blue snowflake for winter, a red leaf for fall, a green lily pad for summer, a yellow flower for spring. Modern technology being the marvelous thing that it is, ordinary people like you and I are now able to make our very own rubber, food-safe hard candy molds in the comfort of our own homes! Amazing, isn't it? We purchased five pounds of a two-part, food-safe rubber mold compound from a site called chefrubber.com, which, by the way, has all kinds of products that look super fun.
Our first step was to try out our new toy. I made a little leaf out of non-toxic clay and put it in the bottom of a paper cup. We tried out the rubber, carefully mixing the correct proportion using my sister-in-law's kitchen scale and it worked great! First we painted a thin layer of rubber onto the clay positive with a soft brush to make sure it got into all the little crevices, then we poured more rubber on top of that. The pouring process was a bit difficult, as in order to avoid getting bubbles in the mold, we had to pour the rubber in a very thin stream out a tiny hole in the mixing cup. The mold dried sturdy and detailed, and it pulled away easily from both the cup and the clay. We make some hard candy and poured it into the mold once again with great success! The candy took all the fine detail of the mold and then peeled away easily once it cooled.
Emboldened by our success, I sat down to sculpt each of the large plates for the cake, again out of non-toxic clay, on sheets of foamcore. Once they were complete, I built up foamcore walls around each to contain the poured rubber, filling in some large spaces with excess clay, to minimize the amount of rubber needed to fill the mold box.
My sister was at work the day I had chosen as my mold-pouring extravaganza so I was left on my own with a fairly nerve-wracking procedure to perform, but I bravely rose to the challenge. My first mistake was trying to mix too much of the compound at once. Although it doesn't completely cure for 24 hours, it starts to set up after only about half an hour. If that seems like plenty of time to pour out a paper cup of rubber, bear in mind that I was pouring it through a pinhole. It's pretty time consuming. Also that I had to paint on a coat of the rubber before I could start pouring. So my first batch started to set before I was done pouring, resulting in me desperately ripping larger and larger holes in the side of my paper bucket until finally I gave up and just poured it over the side. (If you're wondering why I didn't just scrap that batch of rubber and start over, it was because I wasn't sure I would have enough to do all four molds and so I couldn't afford to waste any. It's not something I could just run out to the grocery store and buy more of.) This did, indeed result in quite a few bubbles. I popped the larger ones with a pin and, as always, hoped for the best.
The rest of the pouring went better, as I worked in smaller batches, though I was also worried by one batch that I didn't quite mix as well as I should have, but it seemed to set up with no adverse effects. By the end I was such a pro that I was pouring rubber into one mold box with one hand while painting rubber onto another clay positive with the other hand. I even took pictures with my right hand of my left hand pouring the rubber into the mold box.
An anxious day followed until I could safely pull the molds off of the clay positives, but it was worth the wait. The molds looked great! We washed them with soap and water, as per the instructions and we were ready to the pour the sugar plates.
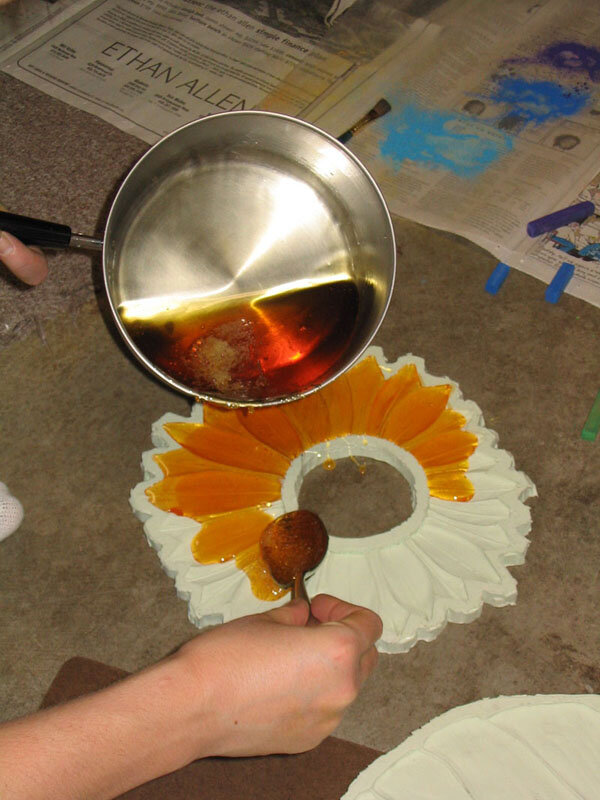
My original plan had been to pour each plate in two different colors so, for instance, the autumn leaves would be a light gold in the veins and darker amber in the areas in between. I expected that the second color of sugar, poured over the first, would melt the first color and the two would blend smoothly together. Boy, was I wrong. I tried this experiment first on the autumn leaf and it didn't work at all. Not only did the two colors not blend together at all, but the second color didn't flow all the way in next to the first color, so I had big ugly grooves on my sugar plate. I decided to try it with just one color.
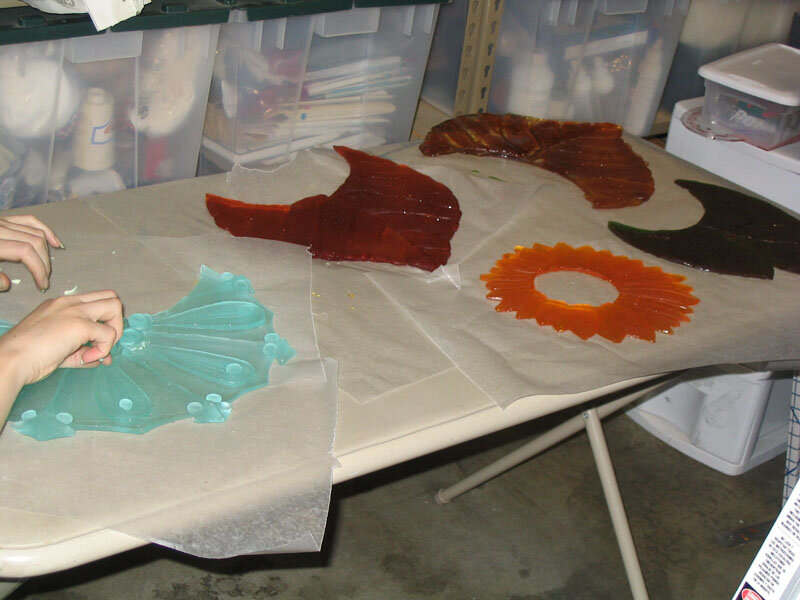
Not only did this produce a nice, clean leaf, but it was also much faster, easier, less wasteful of sugar and it even produced some of the bi-tonal effect I was looking for all on its own. Because sugar is translucent and the molds were of various thicknesses, the deep areas looked much darker than the shallow areas. I was really pleased with the result.
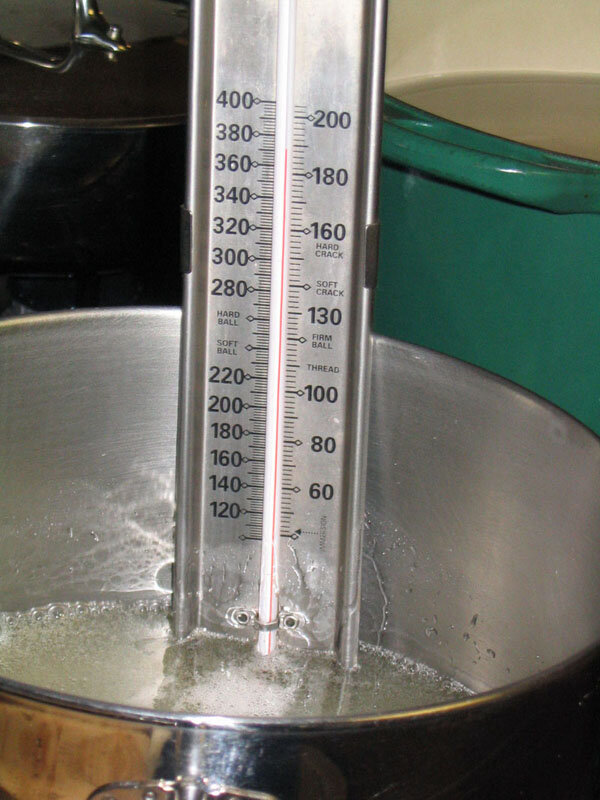
I proceeded to pour the yellow flower and the green lily pad this way, which brought me finally to the largest sugar plate, the snowflake. Now, we wanted the snowflake to be a very pale blue, just a hint of color, really. To accomplish this with sugar would be very difficult because cooked sugar always has a bit of an amber tint. We decided to try using a clear sugar substitute called isomalt, which we learned about at a Pulled Sugar class we took recently. Isomalt is pretty amazing stuff. It comes in the form of opaque white crystals, larger than sugar crystals and you don't need to add water or anything or even stir it while it melts. It won't burn the way sugar will and, unlike sugar, it's perfectly clear. You also have to heat it to a much higher temperature than sugar, which was a little scary, especially since I was stupid enough to do this barefoot, instead of wearing my steel-toed boots, which should have been the obvious thing to do, considering that this process involved me carrying a pot of 400 degree liquid from the kitchen to the garage. Fortunately, the whole thing went without mishap, although I was shocked by how quickly the isomalt heated up. It didn't behave the way sugar does at all, which I suppose is to be expected. I tinted the melted isomalt with just a smidge of blue food coloring and poured the snowflake, which turned out beautifully.

For the finishing touch I rubbed each sugar plate once over with a damp cloth to give it a glossy finish. They had a sort of frosted glass look when they first came out of the molds, which was also nice, but the advantage of the glossy finish is that then if you later drop icing or something onto the sugar plate (which my sister and I considered to be more or less inevitable), you can wipe it off without damaging the finish of the plate.
Side Decorations
Winter
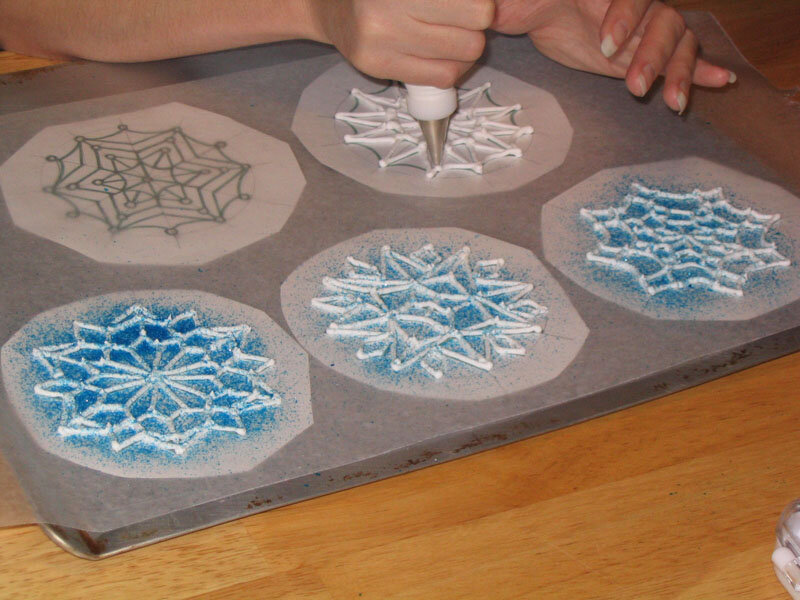
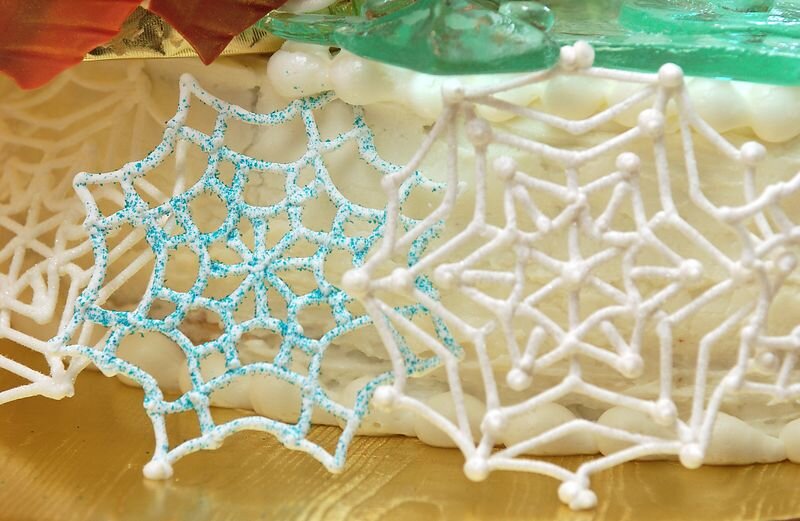
The sides of the winter layer called for royal icing snowflakes. The first step, as always, was to find suitable research photos, so I went online until I had more pictures of snowflakes than anyone should be able to use in a lifetime. Using these as a reference, I drew up six different snowflake patterns. These I taped to a cookie sheet then covered with wax paper. Using a #3 decorating tip, I piped royal icing over each pattern, then sprinkled it with edible glitter (clear, silver, or blue) before the frosting had a chance to dry.
These proved to be extremely popular with the children at the wedding, who kept coming back to the kitchen asking for "snowflake candy." Fortunately, I made about twice as many as I actually needed for the cake, because I was afraid of breakages, so there were plenty to go round. There was one extremely sad incident involving the four-year-old daughter of a good friend of ours, whose piece of snowflake candy fell on the ground and broke. To make up for it I made snowflake candy again (in a slightly sturdier form) to serve at a dinner party that they were coming to a few days later, but unfortunately at the last minute they couldn't make it, so we put the snowflakes in bowls of ice cream and served them to the other guests, which also proved to be quite popular, even among the adults.
Autumn
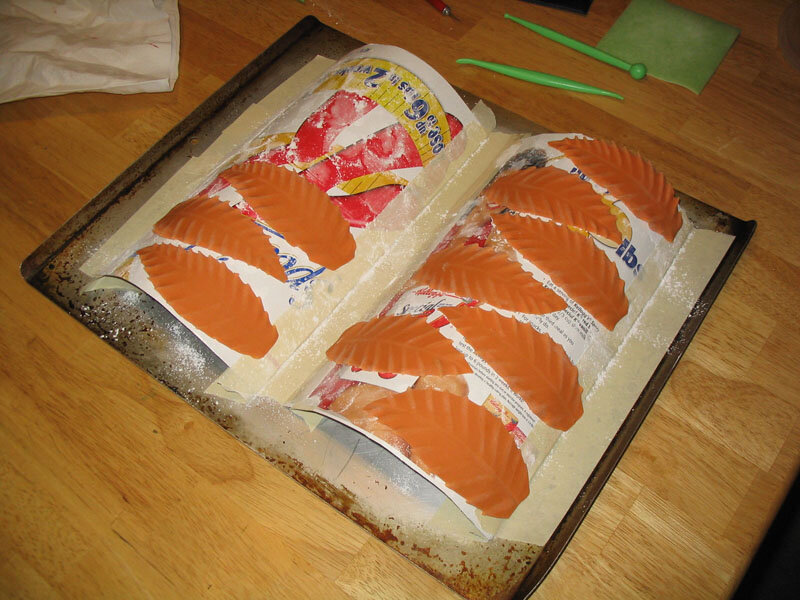
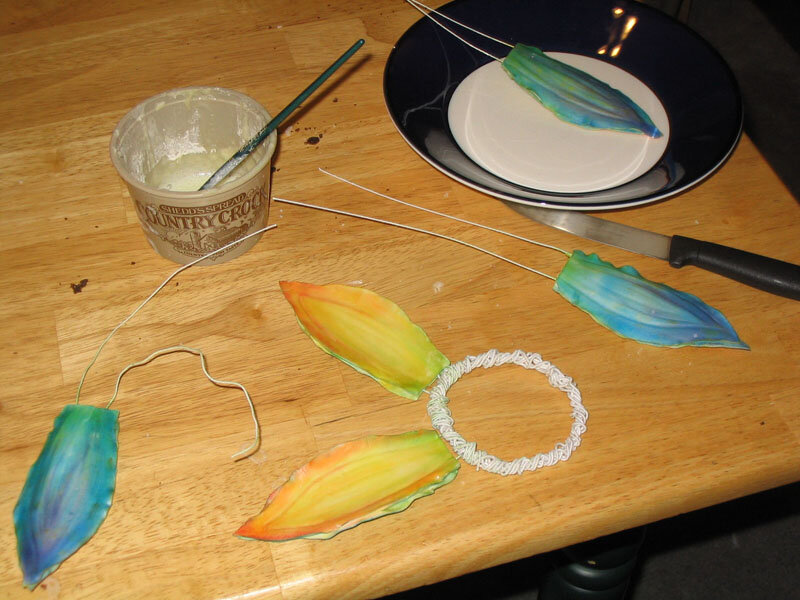
For the sides of the autumn layer I made large gum paste leaves. Actually, they were a little larger than would really have been optimal, but oh well. I didn't have any gum paste cutters big enough to do the job, so I drew myself a paper pattern and cut each leaf out by hand, then drew in veins with a knife tool. All of my flower formers were also too small for these leaves, so I made my own out of the sides of a cereal box taped to a cookie sheet to get the curve I wanted. Once they were generously dusted with cornstarch to prevent sticking the leaves were draped over these to dry.
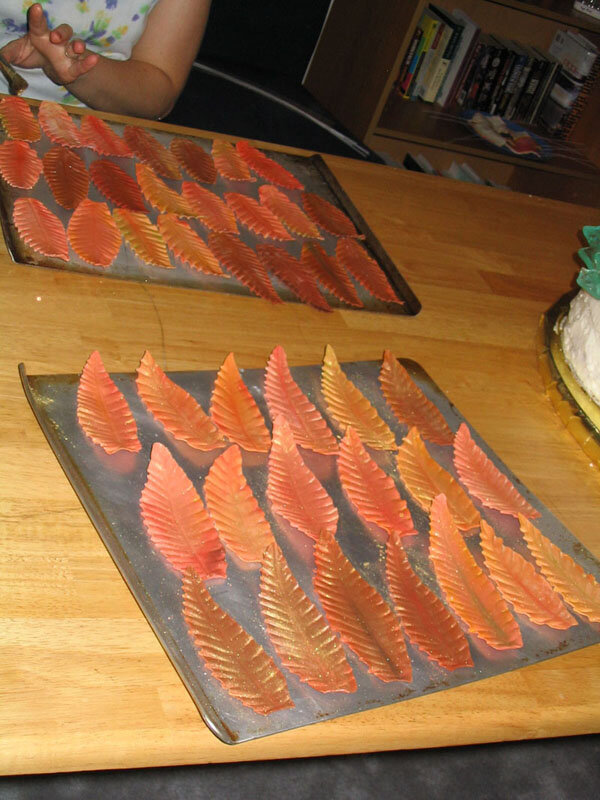
I started with three different colors of gum paste - orange, red, and brown. Once the leaves were dry I went in and added more color variations with chalk pastels - various reds, yellows, browns, oranges, and greens until each leaf was different. I steamed them to set the colors (a neat trick, by the way. You just set a kettle or pot of water boiling and wave the leaf for a few seconds in front of the steam. It keeps the colors from rubbing off and gives it a nice sheen.) For the finishing touch, my sister dusted them with gold luster dust.
Summer
For the summer layer, my sister made gum paste lily pads and I made a few gum paste lilies to go with them.

The lily pads are made of green gum paste, rolled thin, then cut into a circle with a little wedge cut out. My sister then drew in veins and softened the edges with a ball tool. Once the lily pads were dry, we painted them with some thinned green piping gel so they would have the shiny, wet look of a real lily pad.
For the lilies my sister first made yellow centers around green floral wire. (We were following instructions in our gum paste flower book, but they were a little unclear sometimes, so she actually made them far too large the first time and had to do it over.) Once those were dry, she then cut daisy shapes out of yellow gum paste, softened the edges and added veins on the inside, and then built up the interior yellow petals from the inside out on top of the round center. These were left to dry upside down for a day or so.
Once these were dry I got some white gum paste to make the outer petals and some coffee cups covered with tin foil with a hole punched in the middle to assemble the flowers on. The white outer petals of the lilies are assembled from the outside in, so I made the largest petals first, cutting out the gum paste with one of my cutters, and adding veins with a knife tool. The first row of petals lies on the tin foil, arranged around the center hole, making sure to leave the hole exposed. The next layer of petals goes on top of that, glued with meringue powder, staggered and supported by cotton balls so as to give the petals the necessary lift and curve. This goes on until the flower is pretty much filled up, then the center is dropped into place with the wire going through the hole in the tin foil. The hardest part was not gluing the cotton balls to the flower. I didn't entirely succeed in all cases.
Once these dried, I pried all the cotton balls out, then added a little pink chalk pastel to the tips of each flower petal and the lilies were ready to go. The nice thing about the wire is that they can easily be stuck straight into the side of the cake.
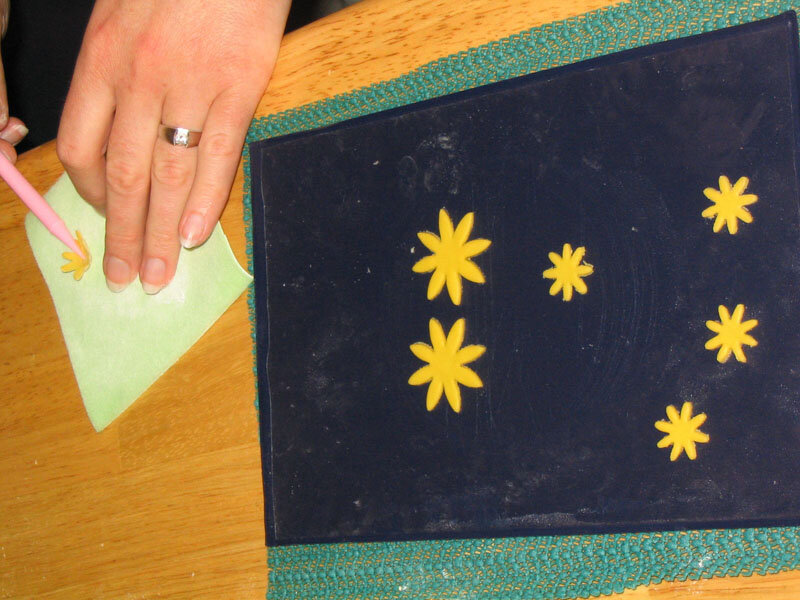
Spring
We chose what might well be the most time-consuming flower in the universe for the spring layer of the cake - the gerbera daisy. Somehow, my sister got stuck with all the tedious, boring jobs, like making millions of tiny daisy petals and I got to have all the exciting jobs like pouring boiling sugar into rubber molds and sculpting yeti out of gum paste. I didn't plan that deliberately, by the way, but I'm also not complaining.
Like the water lilies, she started with forming a center on top of some stiff floral wire, since it needed to be strong enough to support the weight of all the petals. After the center dried, she wrapped it several times with orange gum paste rolled very thin with the edge scored and tiny pieces of very thin floral wire pressed gently into gum paste. This created little stamens around the center. Once that dried, she colored it with non-toxic chalk pastel powder (created by grating the pastels through a sieve).

Along the way, she worked on making the roughly 75 large and 75 small petals required for the 5 daisies. Each one was cut from orange gum paste using a large daisy cutter. She thinned the edges and elongated them to make a more natural shape, then pressed veins down the center. Using meringue powder and water, she attached the petal to short length of very thin floral wire and let it dry on flower former to create a nice curve. The instructions actually called for inserting the wire inside the petal, but when we tried that it seemed very awkward and required rolling thicker petals than we wanted. Once the petals were dry, she brushed them with several shades of orange chalk pastel, and then set the color by briefly holding them over boiling water. The steam also gave them a nice sheen.
Finally, she was ready to assemble the flowers! First, she dipped the tips of the stamens in meringue powder and water and then dipped them into gold edible glitter. Then she attached the petals to the center stem with the small ones closer to the center. As a final touch, she brushed the petals with gold lustre dust.
Bride & Groom Figures
Rather than content ourselves with just one happy couple on the top of the cake, we decided to put a "bride and groom" on each tier of the cake. In keeping with our nature and seasons themes, we set about to select an animal appropriate to each season. Once we had come up with caterpillars for the spring layer, frogs for the summer layer, and dragonflies for the autumn layer we ran into a problem - each of the aforementioned animals can be sculpted and put on a cake full scale, which for some reason I thought was really important and my sister at least humored me, but we were unable to think of a winter animal which would fit on the cake in full scale. Penguins and polar bear were right out, of course, and though we may have been able to come up with some sort of winter mouse, we still weren't satisfied. Then it hit us - pygmy yeti! What could be more perfect? Due to its small size, the pygmy yeti is even more elusive than its larger, more famous cousins such as the migo, the sasquatsch, Bigfoot, and, of course, the standard yeti. In fact, it has yet to be proved that the curious little critter exists outside of this cake and our imaginations, but, if it does, rest assured that it is the same size as the ones I sculpted for this cake. Many of the wedding guests erroneously assumed that I had created small-scale versions of regular yeti, but that just goes to show you the abysmal state of yeti education in this country. That's education about yeti, not education directed at yeti, by the way, though I imagine that a lot of progress could probably be made in that area as well.
Spring - Caterpillars
We decided on these little green caterpillars because they would stand out nicely on the yellow sugar flower. I always like to have a research photo to work from, so I found a good one with a google image search. These were by far the easiest critters to create. I simply rolled a cylinder of gum paste, and then created the segments with a plastic knife tool from my rolled fondant set. The little spots are made by gently pushing a round decorating tip into the gum paste. I believe I used a #3. A little rolled string of gum paste stuck to the head created the antennae and then the caterpillars were set (arranged in what I hope was a graceful curve) on a large flower former, generously dusted with cornstarch to prevent sticking, to dry. The flower former lifted the front half of the caterpillars off the ground, so when they were set on the cake, they were rearing up the air and twined together. A few dabs of royal icing with a #1 tip created the tiny feet.
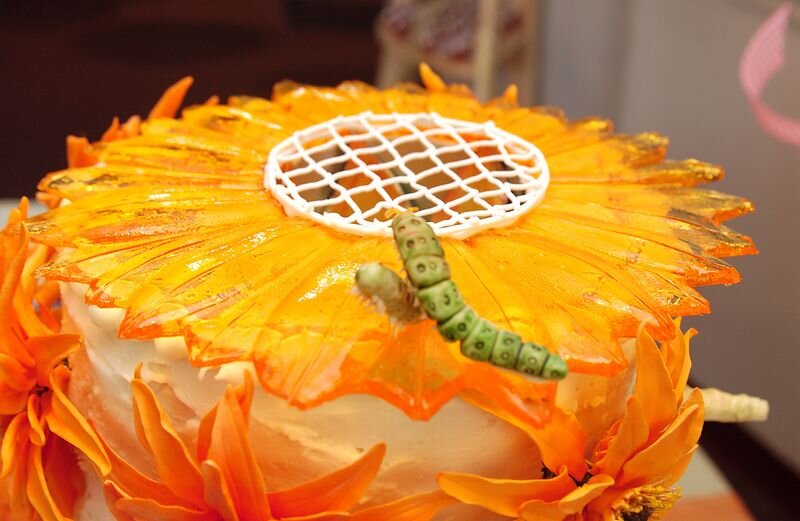
Once everything was dry, I painted them with paste food colors, thinned with water. The only tricky part is not to work one area over too much because it dissolves the gum paste. Just paint one quick coat, then set them aside to dry. I also did a little light dusting of chalk pastel once the food coloring dried to give them a more natural look and to make the two caterpillars look slightly different in color and in shade from each other, which I thought would be more realistic.
Summer - Frogs
I made the frog bodies and the legs separately, then glued them together with meringue powder once they had dried. One of the gum paste books we were using for reference actually had a picture of a gum paste frog, though it didn't have directions on how to make it. It did, however, provide me with the tip that bulging eyes could be made by pressing a decorating tip into the gum paste, which worked great! I believe I used a #8 for the eyes and a #5 for what I think are ears, directly behind the eyes. I also used a #16 star tip to make the rough skin texture on the frogs' backs. The mouth and the little lines on the back were done with the knife tool. I had to do all this pretty quickly because gum paste has a very short working time before it dries out and starts to crack.

That pretty much did it for the bodies, so I set to work on the legs. The back legs didn't need any reinforcement, but I had to put little #32 wires into the front legs, so they would be strong enough to hold the frog bodies up off the ground a bit.
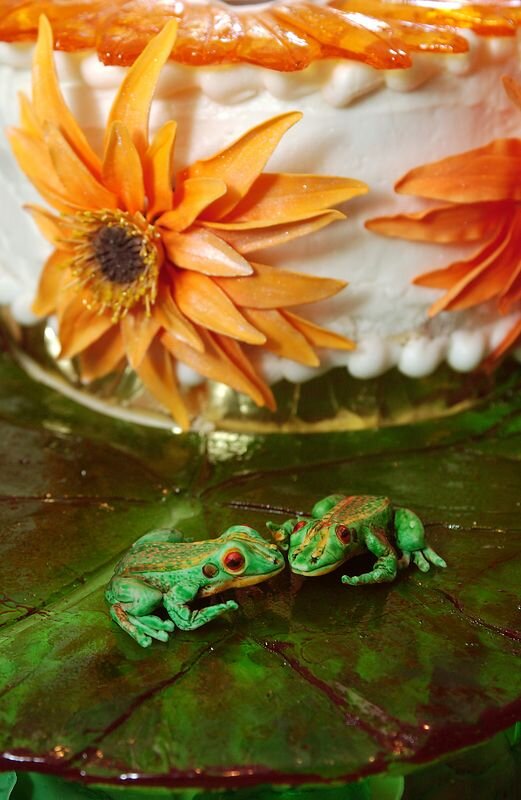
Once the frogs were dry and the pieces glued together, I painted them with paste food colors. I thought about making them red, so they'd contrast with their green sugar lily pad, but we decided against that because we though red frogs might look poisonous and went with standard green instead. First I painted the undersides a yellow ochre (again, working from research I found online) and let that dry before painting the tops green. I used a slightly different shade of green for each frog, so they wouldn't look identical. The eyeballs I painted red, then added a black iris once the red was dry. As with the caterpillars, I added a dusting of chalk pastel to soften the bright green of the food coloring and add a bit of shadow and highlight.
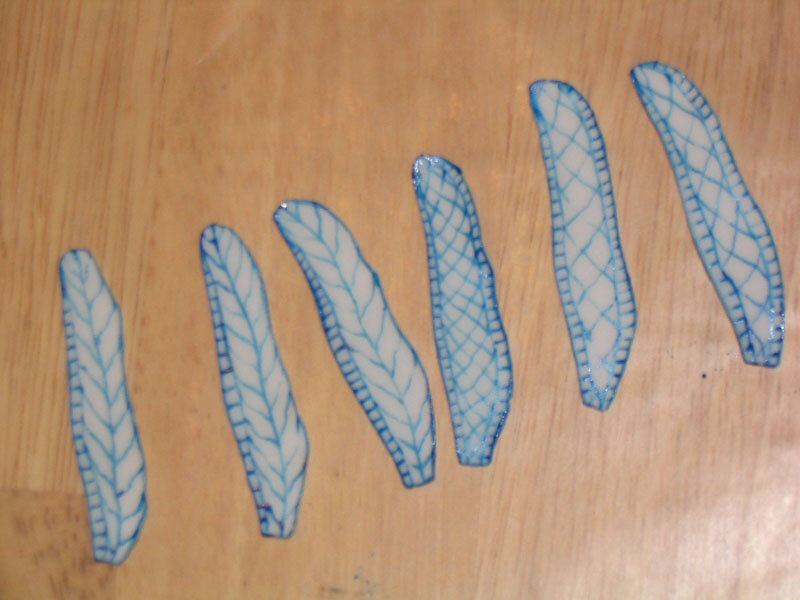
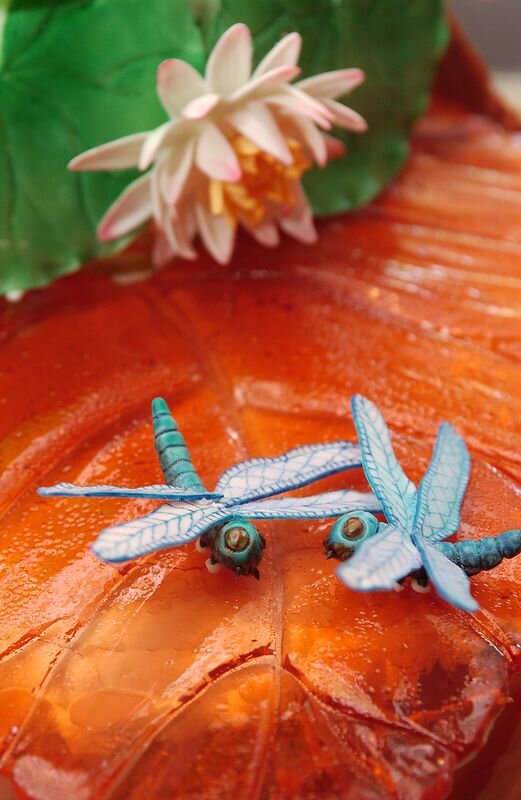
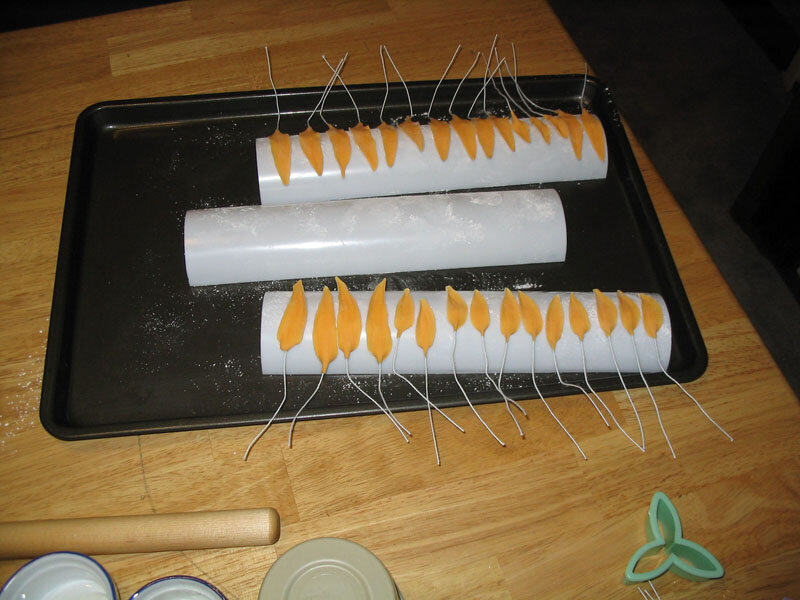
Autumn - Dragonflies
Our gum paste book actually did have directions for making a dragonfly, so I just followed those and used their picture as a reference. The bodies were made much the same way as the caterpillars - a cylinder of gum paste segmented with a plastic knife tool. The shape of the body is slightly different from that of the caterpillars, being rounder and fuller at the head and more tapered at the tail, but the idea is the same. The eyes, like the frogs' eyes, were made with a round decorating tip. The first time I made the wings, following the book's instructions, I wasn't happy with them. Their shape wasn't delicate and specific enough because I had flattened them with the rolling pin again after cutting them out. Also, the wire inside the wings made it impossible to get them as flat as I wanted them to be. I trashed the first set of wings and started again. This time I didn't put wires inside and it worked a lot better. I also rolled the gum paste thinner, cut out a specific shape using a pattern I made out of paper, then carefully thinned only the lower edge with a ball tool. Finally happy with the wings, I set everything aside to dry.
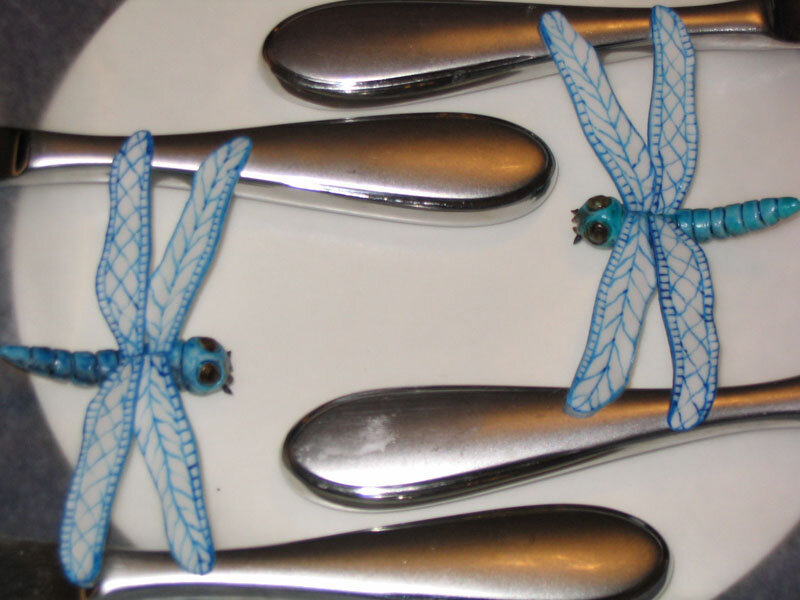
Next, I painted delicate veins on both sides of the wings with blue food coloring. I also painted the bodies with blue food coloring, a slightly different shade for each dragonfly, and added darker shading between each segment with black food coloring. Tiny feelers were added with royal icing and a #1 decorating tip, and the eyes were painted with black piping gel to make them glossy.
The wings were glued to the bodies with meringue powder. One fell off when I was positioning them on the cake, but I glued it back on. A light dusting of blue luster dust on the wings gave them that little extra shine. Amazingly, the dragonflies were even sturdy enough for one guest to take one home to keep.
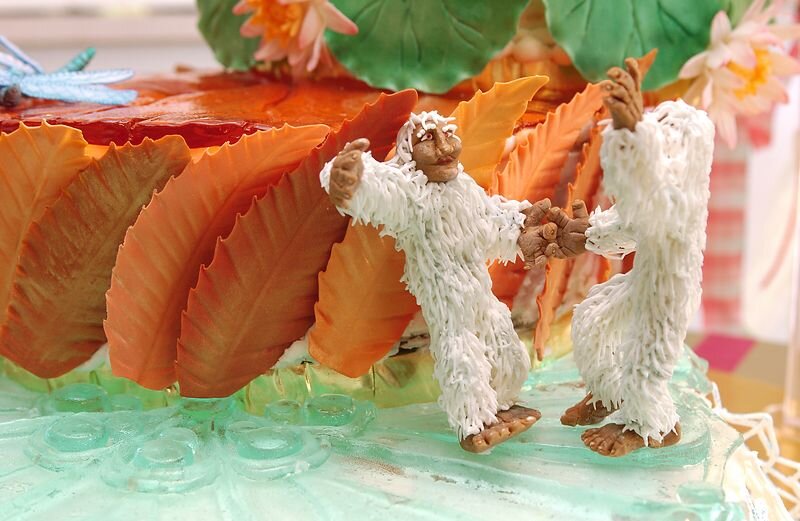
Winter – Pygmy Yeti
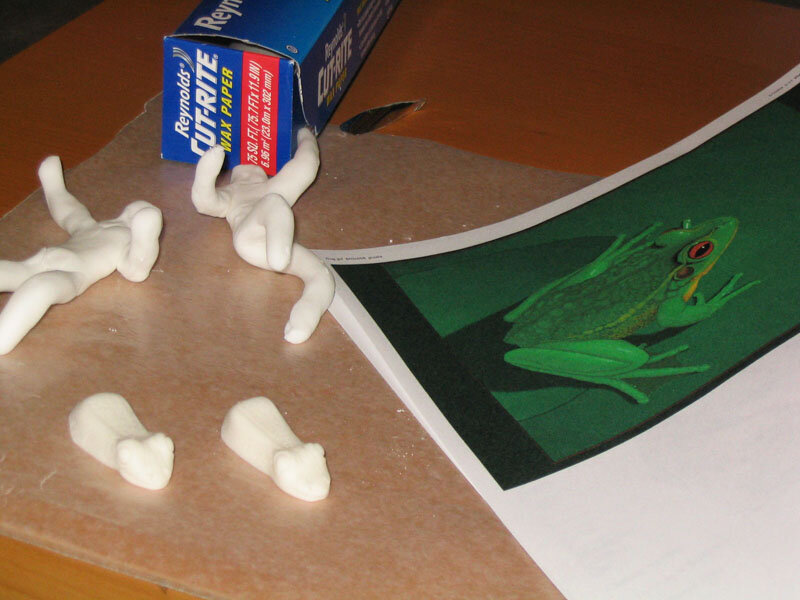
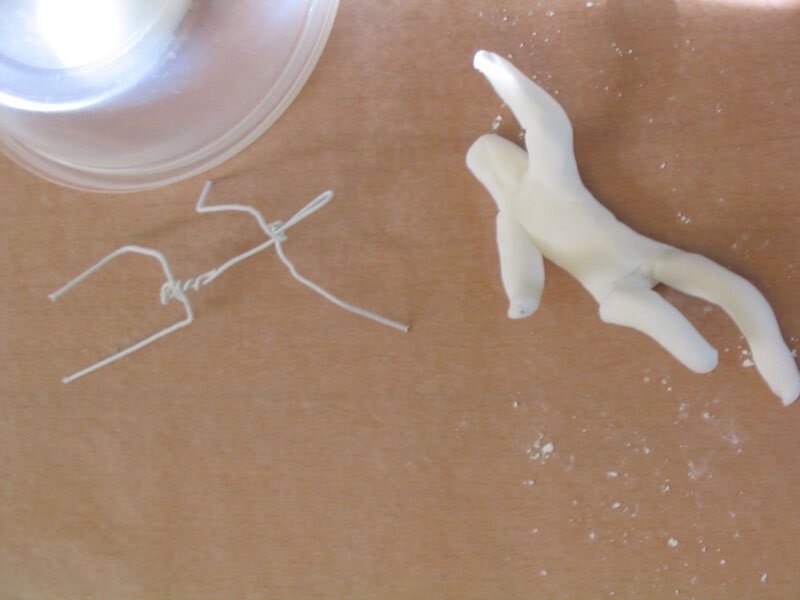
The pygmy yeti were by far the most time consuming creatures to make, plus I didn't have any reference to work from, so I had to make it up as I went along. In order to make them stand upright without collapsing under their own weight, I gave the yeti internal wire frameworks, made from #20 white floral wire. I covered this with fondant in the basic shape of a yeti body. I chose fondant instead of gum paste because it has a much longer working time before it dries out than gum paste and I didn't want to have to rush.

The face, hands, and feet are gum paste, colored a nice, rich, yeti-skin brown. I could only do one extremity at a time, then I had to wait for that one to dry before making the next one, so it was quite a drawn out process. At first I had a lot of trouble with the gum paste drying out too quickly (I didn't have the option of using fondant here, because fondant doesn't take fine detail as well as gum paste.), but I discovered that it I kept dipping my plastic sculpting tool in Crisco, it kept the gum paste moist and workable for a longer period of time. I used my own feet as a model (I have surprisingly large feet for someone my size, so they actually made pretty good models for yeti feet.) and I made the toenails and fingernails with #2 and #4 round decorating tips. (Can you tell I really like this new technique I learned?) The feet in particular turned out really well, which is important for such a close relative of Bigfoot, and surprised the heck out of me because I can't draw feet to save my life.
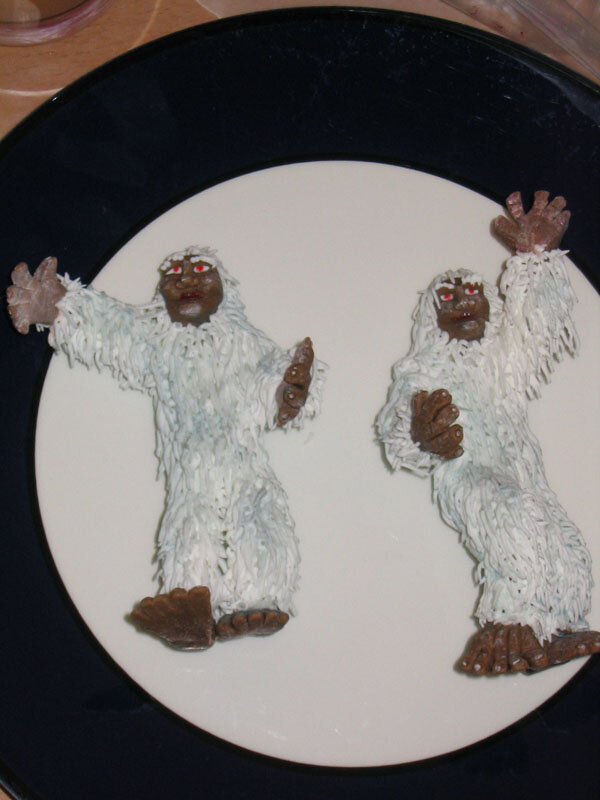
The next step was to give the yeti hair. I toyed with the idea of making the hair out of gum paste, but decided to use royal icing instead. I think I made the right choice. It was another very time-consuming process, but the results were worth it. I drew in each hair individually with a #1 tip and it had to be done in two stages, so that the yeti always had a dry side to lay them down on. I also gave them little royal icing eyebrows and eyeballs.
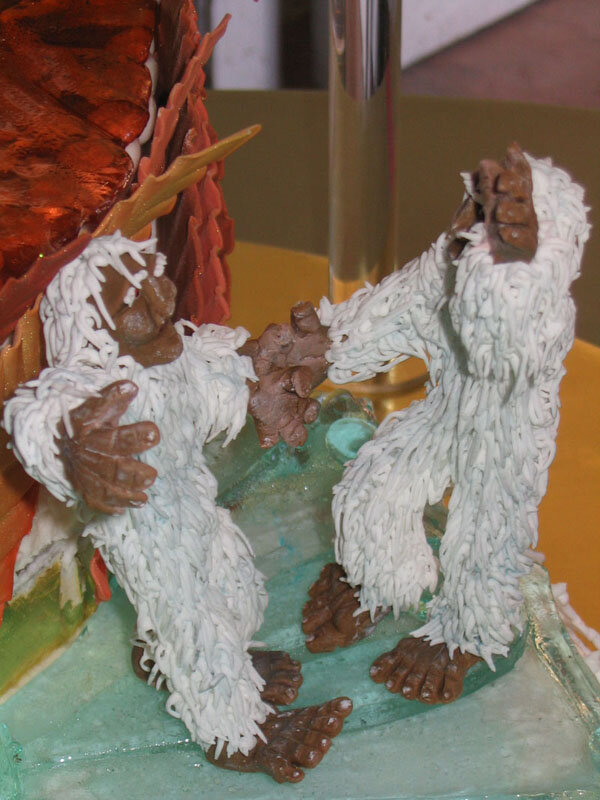
A dusting of a few grey and blue shades of chalk pastel gave the fur that slightly-dingy-wild-animal look and some pink and ivory chalk pastels on the face, hands, and feet, added highlights and emphasized the toenails and fingernails. I'm not sure how I came to the conclusion that pygmy yeti have red irises, but apparently they do. Those are painted with food coloring.
Originally, I had planned for the yeti to be skipping hand-in-hand, but when I put them together they looked like they were jitterbugging, so I went with that instead. We kept the yeti after the cake cutting to give to the bride and groom when they returned from their honeymoon.
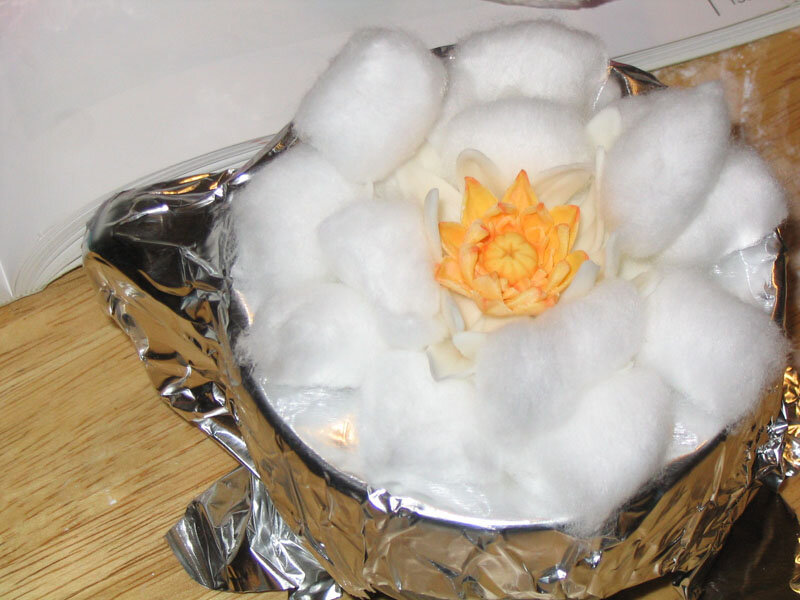
Blooming Flower Mechanism
Apparently, just making a cake isn't enough for us. No, our cakes have to do something, even if we don't have time to make it work right. Oh well. We went through about four hundred different concepts and in the end we didn't settle on one so much as we went with the one we happened to be working on when the day of the wedding rolled around.
It all started with the concept of a big flower blooming out of the center of the cake. Nice metaphor for the commencement of the happy couple's new life together, right? Right. But it also raises a very important question - what should be inside the flower? Clearly the center of the flower suddenly becomes the most important spot on the cake, so it has to contain something meaningful, right? We were tossing around a lot of different ideas, including Homer and Marge cake toppers and tiny sugar words saying "love" or "joy" or something along those lines, when my sister suddenly hit on the solution we were looking for - a butterfly! This naturally brought up the idea that the butterfly should actually fly out of the flower, which led to the question - how do me make an edible butterfly light enough that it would be lifted by a tiny fan sitting inside the cake? The solution we came up with was to make the butterflies wings out of petals of edible flowers, but I don't actually know if that would have worked or not because fan difficulties prevented us from ever getting as far as actually making the butterfly.
The first fan I tried was one of the little ones you can buy at Radio Shack to cool computers, which was just the right size to fir inside the cake, but, as it turned out, wasn't even powerful enough to launch edible glitter into the air, let alone flower petals or an edible butterfly. So I set out to look for another fan, but with little success. Fans powerful enough were too big and had to be plugged in, fans small enough and battery-powered were too weak. On the day of the wedding I went to a nail salon to get a manicure and pedicure and at every manicure station was a tiny fan, just the right size, for drying nails in front of, but by the then it was too late. Live and learn. I'll remember it for next time.
At this point I came up with another plan. Instead of using a fan, I'd make the center of the flower out of a piece of balloon, which would be stretched as the flower raised up, then released, thereby launching the flower petals and edible glitter inside into the air. We had to give up on the butterfly at this point because this launch mechanism would have resulted in an apparently dead butterfly catapulting into the air, and then smashing into one of the lower tiers of the cake, possibly taking out a frog or a dragonfly in the process.
Finally having a plan in hand that I had good reason to believe would work, I set about making the petals of the large flower, which was to bloom out of the cake. I made six, to be safe, though I only planned to use five. They needed wires inside to hold them to the center and to strengthen them, so I made two sides of each petal, and then glued them together with wires sandwiched in between. Each petal was made by rolling out the gum paste, cutting it out using a paper pattern I had drawn, then softening the edges with a ball tool and drawing in subtle ridges with a dogbone tool. I then set them on a flower former dusted with cornstarch to dry.
Once the petals were completed, I made the discovery that they were way, way too big to fit in the tube we were using and they had altogether the wrong curve to them, which wasn't as upsetting as it might have been because I had, for some inexplicable reason, painted all these petals with hideous bright pinks and yellows. I don't pretend to know what I was thinking when I did that. I'd like to be able to claim that I was under some sort of evil outside influence, but no, it was all my fault. In any event, it's just as well that I couldn't use those petals.
While I'm hovering near the subject of the cardboard tube, I've got a funny story about that, too. My sister and I were trying to figure out where we were going to find a tube the right size to use in our mechanism. We had some mailing tubes, but they were a little too small. Suddenly, in a blinding flash, inspiration smacked me upside the head. "Oatmeal!" I yelled, and rushed to the kitchen, my sister hot on my heels, where I triumphantly extracted from the cabinet a cylindrical container of oatmeal, which turned out to be much too big for our purposes. This did, however, put us onto the track of food containers, and my sister soon returned from the grocery store with a container of cashews, which was just the right size. Several hours later, after we had eaten half the cashews, my sister realized that the cashew container was exactly the same size as the container in which the gum paste mix is packaged. We had three of these in the house the entire time. Obviously we aren't the most observant people in the history of the universe, or maybe we just need to learn to think things through for a few minutes before rushing off in pursuit of something that was right in front of our noses the whole time.
Returning to the topic of the petals, I started over with a new, much smaller petal pattern and this time I curved them the correct way to make them actually fit inside the tube. Once they were dry and their support wires were safely sandwiched in between the two layers of the petals, I set about coloring them. Mindful of past mistakes, I decided to color them with chalk pastels instead of food coloring, allowing for much more natural colors and smoother color blends. I went with a blue and purple color scheme on the bottom of the petals and a yellow and orange scheme on the tops. Remember, it's an idealized fantasy flower. I can make it any color I want. So there. I also added some greens at the bottom of each petal for a more natural stem to petal transition. Then I steamed all the petals to set the colors and make them a little shiny (a trick we learned at our Wilton master class in cake decorating we took last spring.)

With the petals complete, I had only to create the launch mechanism. I first made a ring of several layers of thick floral wire. To this, I taped a cut section of balloon, in which to place the glitter. At this point, we reached the hilarious realization that my launch mechanism looked like a giant condom, but I didn't let that deter me. I attached a wooden dowel handle to the giant condom, then wrapped the wires inside the flower petals into the wires around the perimeter of the condom and the flower was ready to be installed in the cake.
In order for that to happen I had to carve out a large circle in the center of the top tier of the cake. Well, not in the center, actually. It was more off to one side because I convinced my sister that would look more in keeping with the cantilevered, spiral design of the cake. In retrospect, I don't think I was right about that, but oh well. Even I can't be right all the time. Once I had hollowed out the large circle in the center of the top tier, I inserted the cardboard tube from the cashews (cut down to the right height) into the cake, then carved a groove for the handle of the flower to travel in. At about this point, I realized that the tier was slightly shorter than I had figured on and my petals were too long to fit inside the cake, so I had to take them off the condom, remove the wires, carefully cut off the bottom of each petal, reinsert the wires, and rewire them to the condom. After a surprisingly smooth execution of this procedure, I was ready to insert the flower in the cake.
In order for the glitter to be launched into the air, the balloon had to be pulled tight, then released when the flower was lifted up and out of the cake. After experimenting with all manner of clamps and dismembering a little model-making clamp assembly I own, I hit on the solution of putting a tack down through the center of the balloon into the foamcore beneath the cake. This would hold the balloon for a little while until it stretched enough that the hole in the balloon would pass over the head of the tack, releasing the balloon. That done, I poured gold edible glitter into the center of the flower, covered the opening in the sugar flower with a sort of royal icing grid, and prayed for the best.
Assembly
Once the structure of the entire cake was together, it remained only to arrange and attach all of our pre-made decoration. For some reason I expected this to be much easier than it was.
The sugar plates actually were easy - they just plopped right down in place. We wet the icing on top of each tier first to make sure they stuck, but that may not have even been necessary. Incidentally, it would have been quite a neat, elegant looking cake with just the sugar plates and no other decorations.

I then piped bead borders around the top and bottom of each tier to hide various and sundry imperfections, then set about attaching the decorations.
We had decided not to attach the figures or the snowflakes until we arrived at the reception site because we didn't want them to break en route, so I had nothing to do on the winter layer for the moment. Which was fine with me because the autumn layer gave me more than enough trouble for two. It took me while to figure out the best way to arrange the autumn leaves around the side of the autumn tier because they were too tall to really fit under the sugar plate and not curved enough to go to the outside of the sugar plate, which extended in some places several inches beyond the cake. After a few abortive attempts, I settled on angling all the leaves so they would fit under the sugar plate and eventually managed to get them all stuck on with royal icing. (Quite a few of them fell off in the car on the drive to the church, but we just stuck them back on once we arrived.)
The summer layer was much easier, because the lily pads were just the right size, possibly because my sister made those, since everything I made for this cake for some reason came out too big. They stuck on easily and the lilies were laughably easy to stick in between.
Spring was also a breeze (again, my sister made these flowers). The gerbera daisies had big wire bases, which I stuck right into the sides of the cake. I placed a delicate royal icing mesh over the hole in the center of spring's sugar plate out of which the flower was to bloom and spring was finished.
That was it for the home assembly - the rest would have to wait until we arrived at the church, which, by the way, is a saga all by itself. There may be no more stressful car ride in the world than a car ride with a cantilevered cake in the back seat. Fortunately for me, My sister drives a station wagon, while I drive a truck, so she was the logical choice for cake chauffer. Because our plans on the day of the wedding called for her to drive to get the bride while I drove to get plastic supports for the cake we needed to take two separate cars, so I couldn't even be in the car with her to offer to moral support. The best I could do was to give her the occasional thumbs-up when she glanced in the rear view mirror.
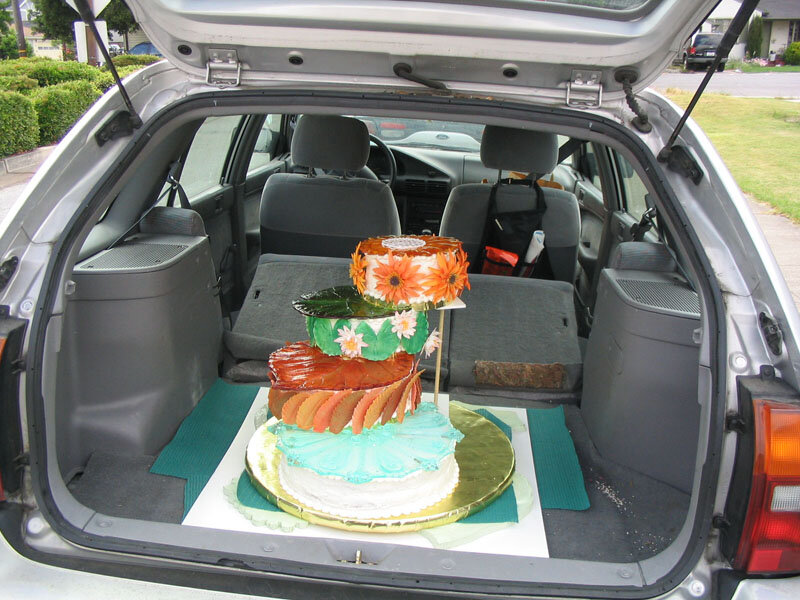
Even just moving the cake from our table to the car was scary. It was pretty darn heavy for a cake, let me tell you, and the round board it was sitting on was only a few inches smaller than our door. We got it safely ensconced in my sister's station wagon, on top of some non-slip material to keep it from shifting. To protect it against dust and such we built a box of foamcore around it and, making sure that our temporary dowel rod supports were firmly in place, we were ready to go!
I can't even imagine how nervous my sister must have been, listing to every creak or snap from the back of the car and cringing at every pothole. It was bad enough just following her. We only pulled over once on the forty minute drive to the church when my sister heard a noise which turned out to only be a few of the autumn leaves falling off.
We made it to the church unscathed and it remained only to get it in the building and onto its table, a process that was greatly assisted by the presence in the church kitchen of a rolling cart.
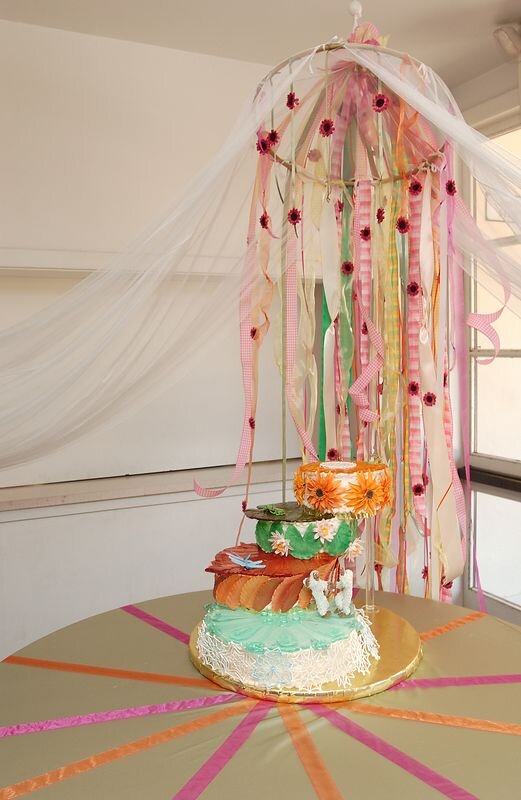
Once the cake was safely in place on the designated cake table (around which the bride and her helpers had erected a lovely ribbon canopy). My sister set about repairing the fallen autumn leaves while I rushed off to the local TAP plastics to get thick plastic rods to use as temporary supports for the cake (much more attractive than the temporary supports we had been using which I made out of dowel rod and foamcore.) I returned to find that the leaves were mended and that my plastic supports were, indeed, quite attractive.
At this point I took over the project of putting the finishing touches on the cake so that my sister (who was also the matron of honor) could scamper off to help the bride prepare. The snowflakes were simple to attach with a little royal icing, as were the various animal couples. I was very careful to position the caterpillars on the top tier so that they wouldn't be crushed by the giant flower when it bloomed out of the cake. That done, I headed out for a well-deserved manicure and pedicure.
Presentation
We kept the plastic supports in place until the ceremony was over (I cried; my sister cried; the bride cried; it was a great success.) and the reception began. Then we took them out and hoped for the best. Everything seemed fine, so we went to enjoy the sangria with little plastic monkeys on the glasses. After about forty-five minutes we checked the cake and decided to put the supports back in as a safety precaution because it had tipped a little bit, but it probably would have been fine without them as it wasn't long after that that we were called upon to serve the cake.
Of course, before the cake was served, the flower had to bloom. Or fail miserably. I couldn't be certain which. We gathered all the guests around the cake where my sister and I described our concept then I warned everyone that, while I hoped the cake was about to do something dramatic, it was possible that it was going to be a complete flop. Then I took hold of the handle and raised the flower. At first, nothing happened. The balloon was too firmly attached to the bottom of the cake and wasn't letting go. A great sigh ran through the assembled celebrants. I gave one last desperate tug and the balloon broke free! Gold glitter spewed into the air and was greeted by cheers! The flower didn't quite make it all the way out, so it only opened part way, but it was a heck of a lot better than nothing.
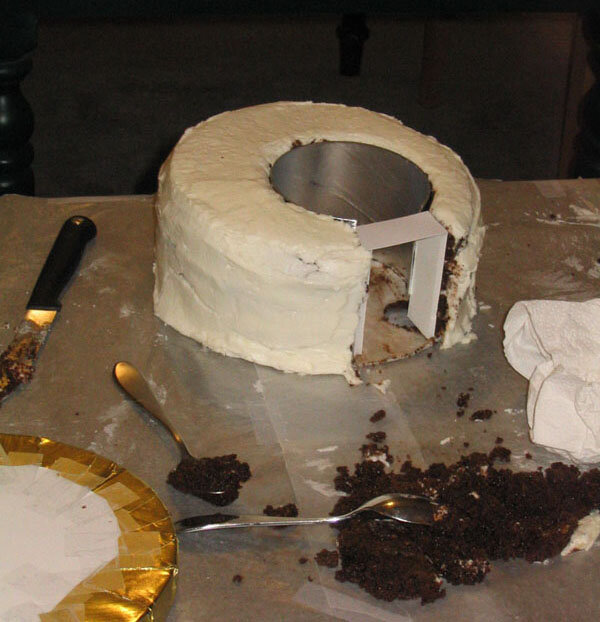
We pulled the sugar plate off of the top tier so the bride and groom could cut their first piece, then we moved the whole shebang into the kitchen to cut it into servings. We've never cut a cake this big before, but we had a diagram of how it's usually done and I think we did pretty well. I unbolted and disassembled the cake and removed the dowels while my sister and another woman from the church cut the pieces. I also answered questions about gum paste and sugar and isomalt from a few astute young boys who were fascinated by the whole thing and hung around the kitchen the entire time we were serving the cake then took various gum paste flowers and lily pads and such home with them to keep. It's nice to be appreciated.

Our work finally done, we kicked back on a bench in the courtyard to revel in our success, drink sangria, and watch some nearby children make long, beautiful, unintentionally pornographic chains out of the plastic drink monkeys.

For the moment we chose not think about the absolutely giant mess we had waiting for us in the dining room, kitchen, and garage at home.
Resources
We also learned many of our techniques (and had a fabulous time) at the Wilton School in Darien, Illinois. We took the The Master Course, Introduction to Gum Paste, Introduction to Rolled Fondant, and Introduction to Pulled Sugar. Sandy, our Master Course instructor, was one of the best teachers either of us had in any subject.
Our source for the food-safe mold making material (we used the Perfect Soft Silicone). They also have a helpful guide to mold making.

Zombie Cake
I made this cake version of our logo for a gala party we threw to celebrate our 100th review on theyrecoming.com.
I made this cake version of our logo for a gala party we threw to celebrate our 100th review on theyrecoming.com.
The highlight of the party, if I do say so myself, was my zombie cake, which we named Orville, after the dead guy in Children Shouldn't Play with Dead Things, though it looked nothing like him. In effect, it was a three-dimensional version of our logo, a zombie rising up out of the grave, or, in this case, rising up out of a field of my homemade French cream candies. The head was made of sour cream chocolate chip cake, dyed red to resemble brain matter, covered with modeling chocolate and various other frosting and hard candy details. The hand was made of mint-flavored hard candy bones covered with chocolate. Green hard candy letters around the perimeter reminded everyone that "They're coming to get you, Barbara." At the height of the party we gathered everyone around it to witness the thrilling moment when raspberry flavored blood spurted from his eyes and poured from his mouth. In fact, it sprayed a bit further than I expected it to. Fortunately only my sister and I were hit.
I calculated that, between the cake, the French creams, and the bloody eyeball cordial cherries, I went through 15 pounds of granulated sugar, 2 bags of powdered sugar, 8 large bags of chocolate chips, 2 bottle of corn syrup, 8 pounds of dark chocolate, and 4 pounds of white chocolate. I have a slight tendency to go overboard with these things. We have a lot of eyeballs left over.
The first step is to make the French creams that will be used for the dirt in the zombie presentation. The creams have a flavored fondant center, dipped in chocolate, and then rolled in chopped nuts. Here, I am preparing the fondant by working it on a marble slab.

These are the completed fondant centers. The colors are all flavored differently -- I believe these are chocolate, pistachio, cherry, and orange. At this point, we're five days before the party.
Here, I am tempering the chocolate to prepare it for dipping the creams. I’m using a double boiler and candy thermometer.
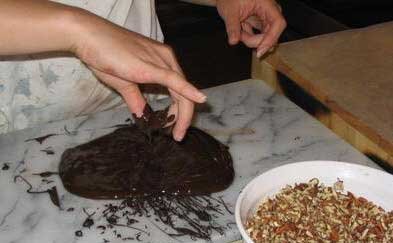
After the chocolate was tempered, I poured out a portion onto the marble slab. I dipped each fondant center into the chocolate, and then rolled it in the chopped nuts. The candies were completed four days before the party.
As a side dish to the zombie cake, I decided I also wanted to make cordial cherry eyeballs. Before dipping the maraschino cherries, they were soaked in rum or brandy for several days. They were then dipped in the center filling and left to dry. After this, I dipped them in white chocolate. Dark chocolate is better, but it wouldn't really work for the eyeball concept.
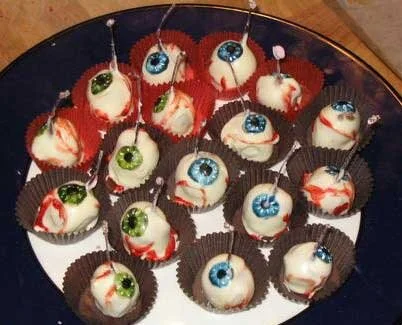
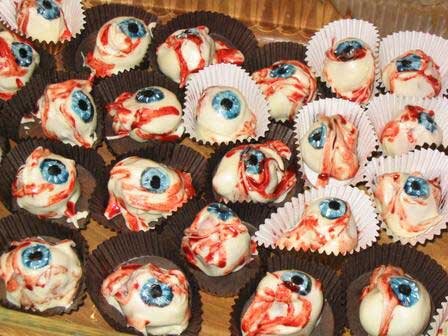
Yes, we had lots of eyeballs. They were painted using powdered food coloring dissolved in melted cocoa butter.
And we finally start the cake! Yes, it really did require that much cake. We used a recipe from The Joy of Cooking for a very yummy sour cream chocolate chip cake. Red food coloring swirled in the batter gave it a delicious-looking bloody brain color. Any light-colored cake would work as well.

This is me straining the fresh raspberry sauce which will be used for blood. This is great over cake or ice cream, even if your dessert doesn't bleed. Puree 1 pint of raspberries, 3 tablespoons of sugar, and 2 teaspoons of lemon juice in a food processor. Then strain the mixture through a fine sieve to remove the seeds.
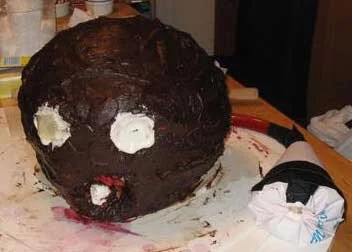
Ok, we've skipped a few steps here (clearly). This is the completed base of the cake. There are 5 layers of cake here, frosted with a chocolate ganache, which is made by melting semisweet chocolate with cream, and if you like (and why wouldn't you?) flavored with liqueur. Because it's so tall, we had to use interior supports, or the whole thing would have just toppled over. I cut a circle of foam core and stacked it between the middle layers. It's supported below with wooden dowels pushed into the cake, trimmed to just below the level of the layer. Of course, it was a little more complicated than that, since the plumbing system also had to be installed. You can see the large pastry bag to the right of the head, which is filled with whole lot of raspberry syrup. The bag is attached to a plastic tube, which curves behind the cake and enters in the back. Inside the cake, there's plumbing to send the syrup to outlets behind both eyes and the mouth. The outlets are blocked with frosting to prevent premature ejaculation, so to speak.
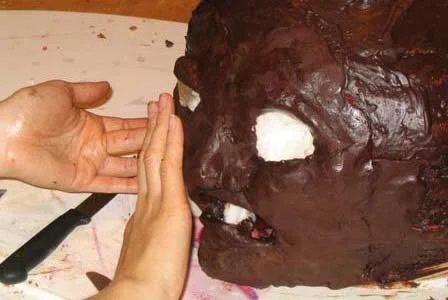
Once the base of the cake was completed, I started sculpting the facial features out of modeling chocolate, which is semisweet chocolate melted with corn syrup. Once chilled, it's very easy to work with and pretty tasty.
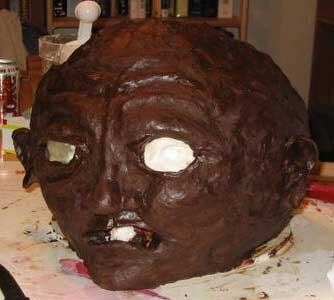
This is the completed face, with all the modeling chocolate details.

These are hard candy eyeballs, which were made by pouring out hot candy (sugar, water, corn syrup, and coloring) and pushing it into icky globs as it cools. Orville's right eye is already covered with a candy eye, so when the blood is pushed through, it'll fill up behind the eye before spilling out.
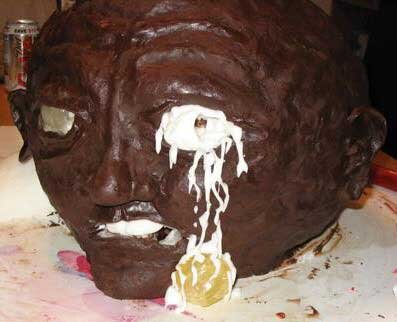
Orville's left eye has fallen out, so the other candy eyeball is just placed on the base. The blood details are done with royal icing.
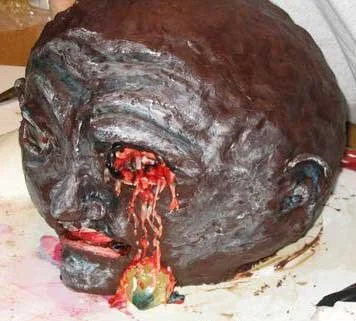
The next step is to paint the face details and the blood. The paint is powdered food coloring mixed with melted cocoa butter. It has a consistency kind of like oil paints, and the cocoa butter can be melted in the microwave.
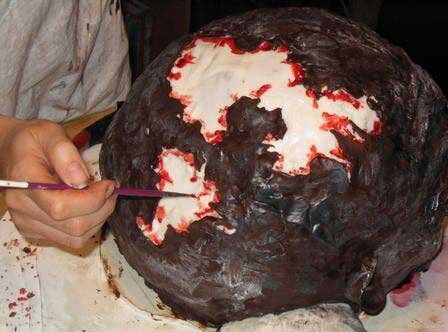
Here's me painting blood on the bits of exposed skull. The skull is done with royal icing, with modeling chocolate layered over it to make the ragged edges.

Here's Orville's hand, rising up out of the orange ground. Prior to placing the hand, the base was frosted with royal icing colored to match our site. The bones of the hand are mint-flavored hard candy, dipped in dark chocolate. The finger nails are royal icing.
I display my zombie hair-making tool. I made it by cutting up some old coat hangers taped to a ruler, creating sort of a deformed whisk. To make the hair, I dipped the ends of the deformed whisk in hot candy, and then whipped it back and forth over two wooden spoons attached to the edge of the counter. As the candy cooled, it hardened into wispy somewhat hair-like strands.

Here's the skull with the hair attached. The strands are thin enough that they just kind of melt onto the head.

Note the lovely hairy eyebrows. Orville's left shoulder is the raspberry blood-filled bag, covered with a t-shirt. His right shoulder is made of fondant (cake fondant, not the kind used as the centers of the chocolate creams).

You can see the layers on the platform here, created to give Orville uneven ground to climb out of. The platform is made out of foam core, glued together in layers and covered with royal icing.
And here we have the full dirt presentation. The French creams are arranged around Orville, creating a lovely field of dirt. The different types of nuts create a nicely varied texture.

This is the hard candy lettering that followed the curve of the base, reminding us, "They're Coming To Get You, Barbara!". Usually I just pour the hot candy directly onto the marble slab in the shape I want. The letters require more detail than that method allows. The candy is hot enough to melt a paper or plastic pastry tube, so I used a 70's-era metal pastry tube, and filled that with the hot candy. I wasn't able to find a similar one online, and I'm not sure they're even made any more.

Orville looks pretty happy in the French cream dirt. Too bad about his eye.
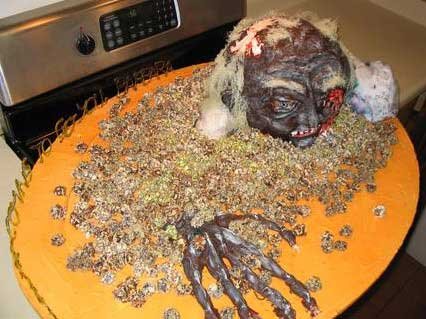
Wow, Orville has big hands. You can see that the shirt covering the raspberry blood bag has now been distressed (as you'd expect a zombie's shirt to be).

And here we are post-explosion! When I squished Orville's left shoulder, the blood shot out his left eye, slightly splattering both of us (but fortunately none of our guests).

I put our cleaver to good use serving the cake.
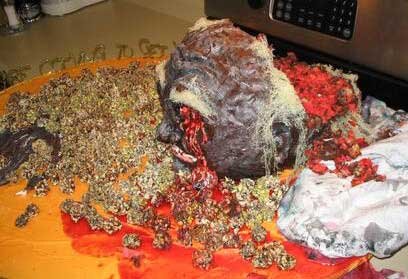
We did a fair job on the back of Orville's head, but of course we had at least three quarters of the cake left. My sister brought it in to work the next Monday, but her co-workers were oddly hesitant to cut into the face. She eventually dissected him and removed the face and all the plumbing, and that seemed to be more appetizing.

Lovely parting shot, eh? During the first spurt of blood, the frosting cap over the mouth didn't come off. Once I removed it, the blood just kind of oozed out the mouth, it was very nice. I really like the little drops of blood on the right cheek.