Sneetch Cake
I have been looking forward to seeing my niece and nephew perform in school plays since before they were born. Finally, my dream has come true. At her pre-K graduation, my niece Alex appeared in their stage adaptation of Dr. Suess’s The Sneetches. My completely and totally unbiased expert opinion is that Alex was clearly the best Sneetch in the bunch. To celebrate her accomplishment, I decided to make her a Sneetch cake.
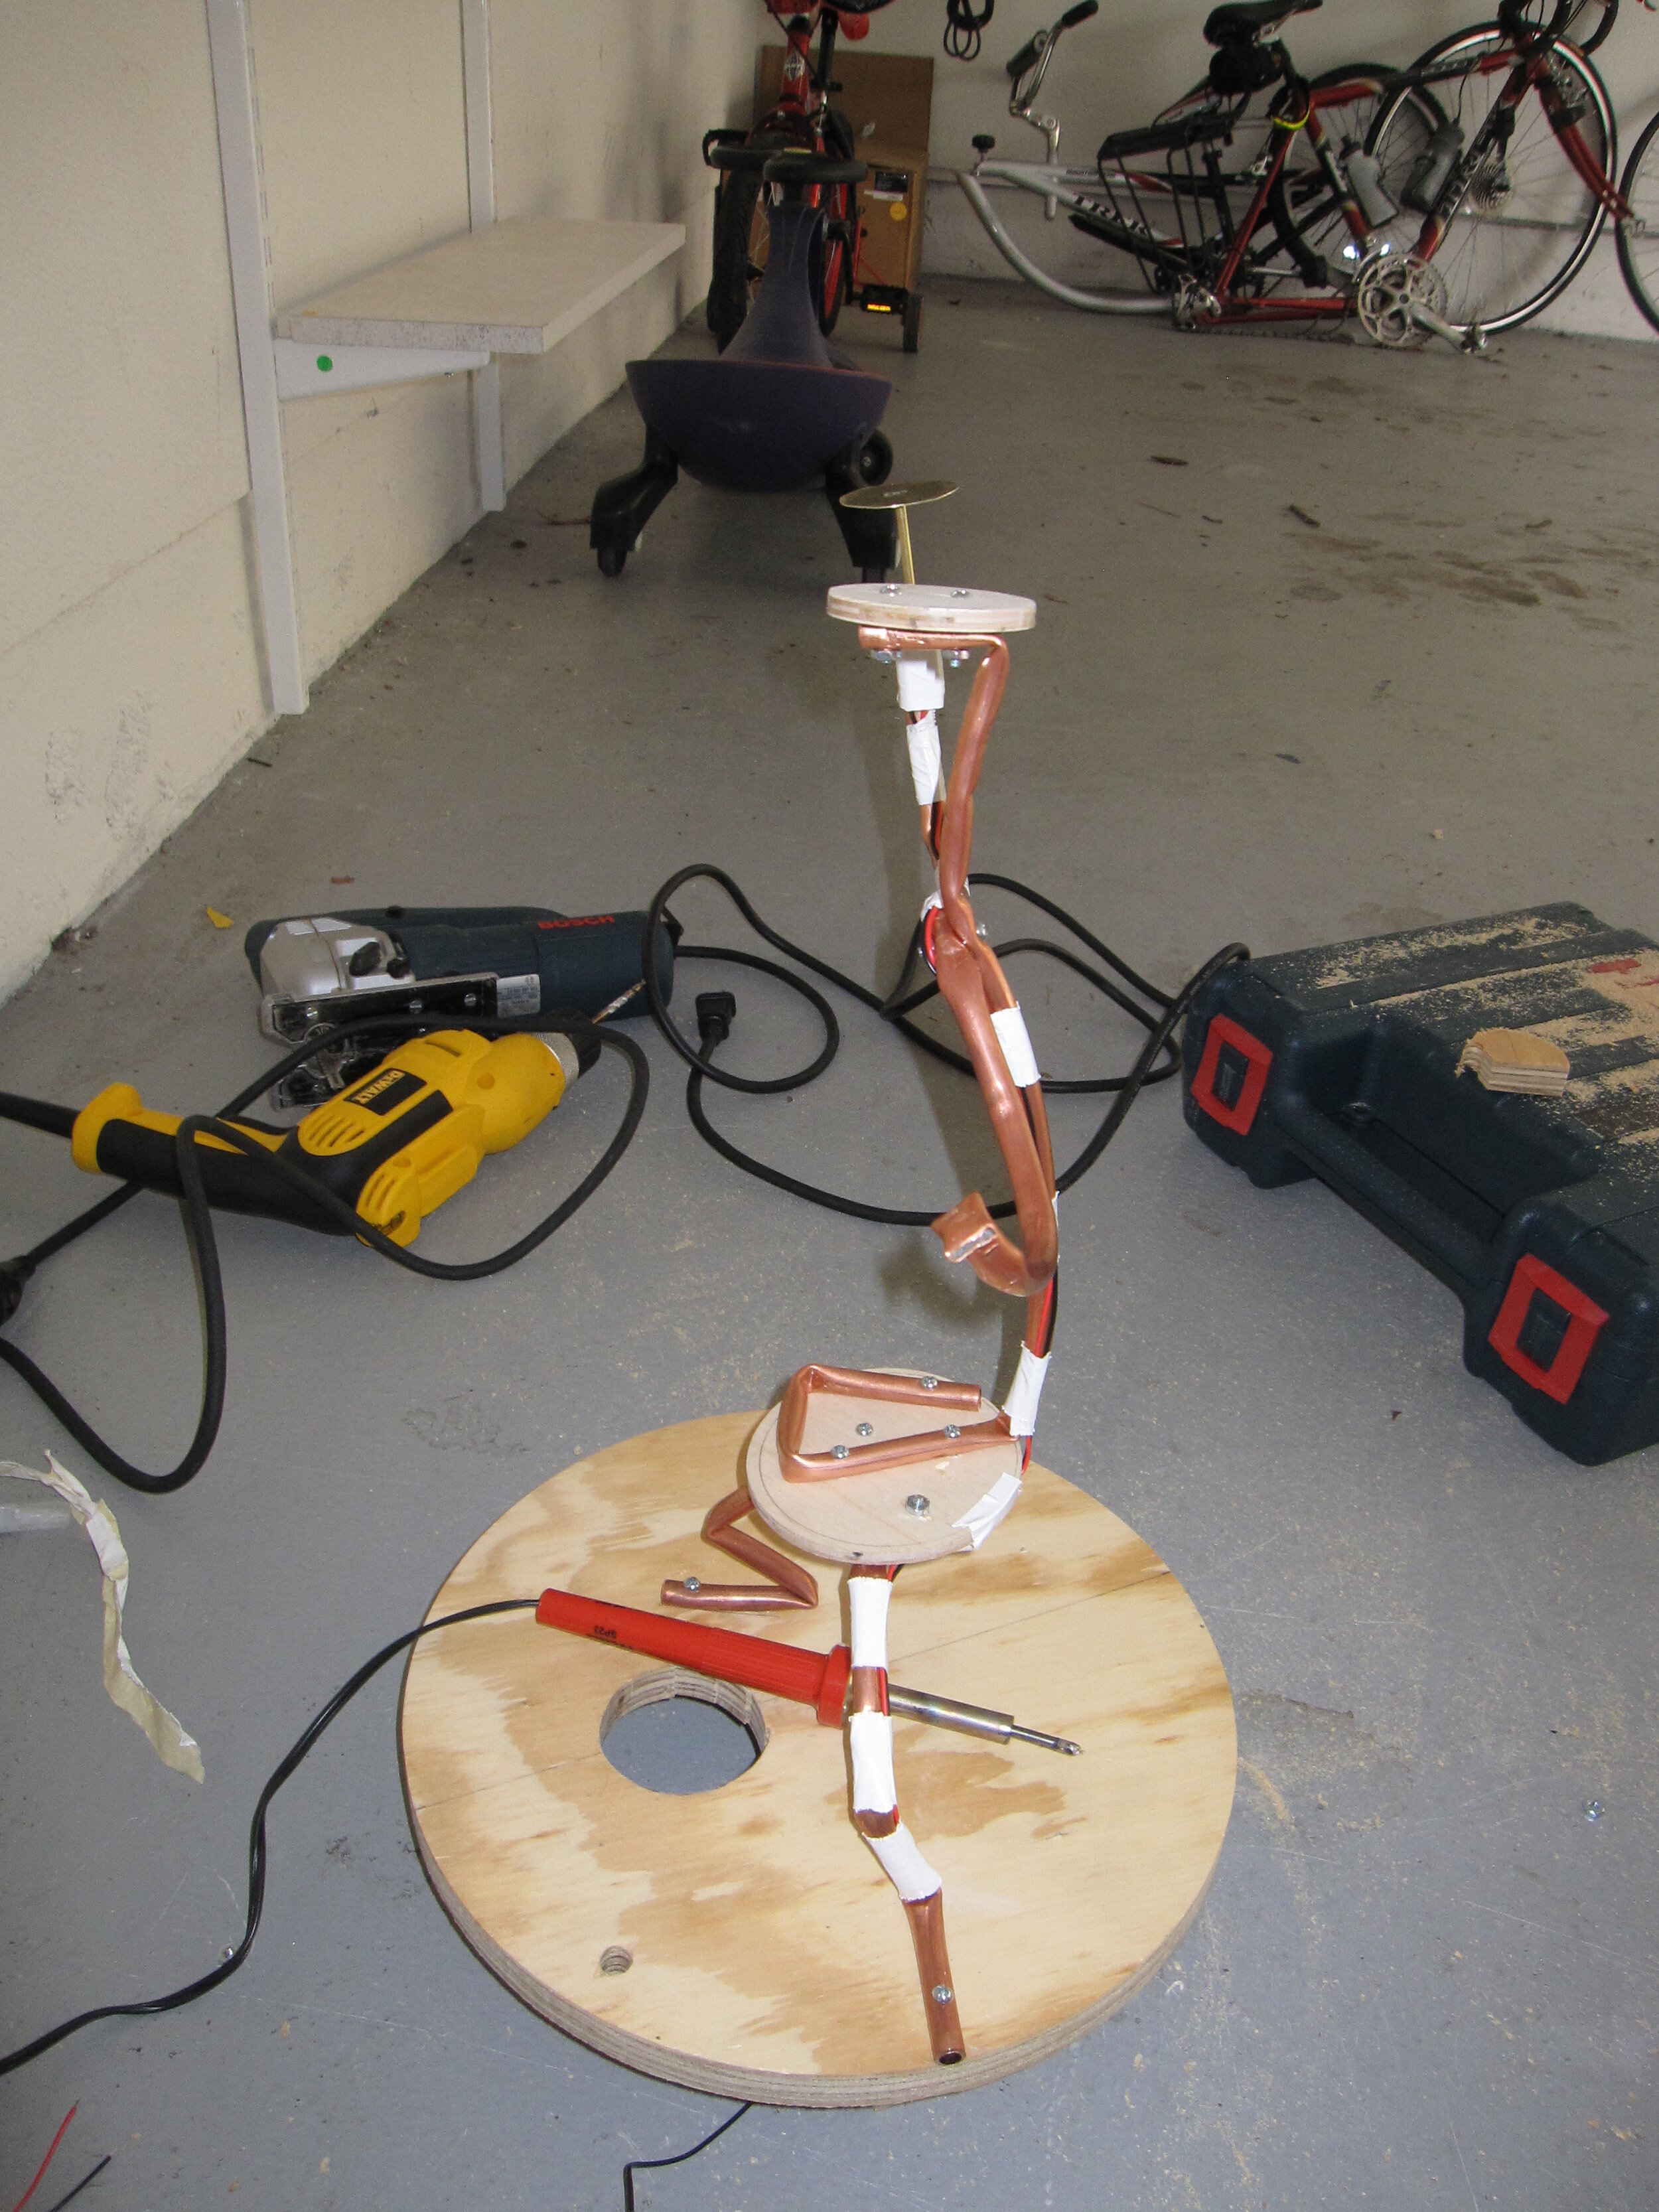
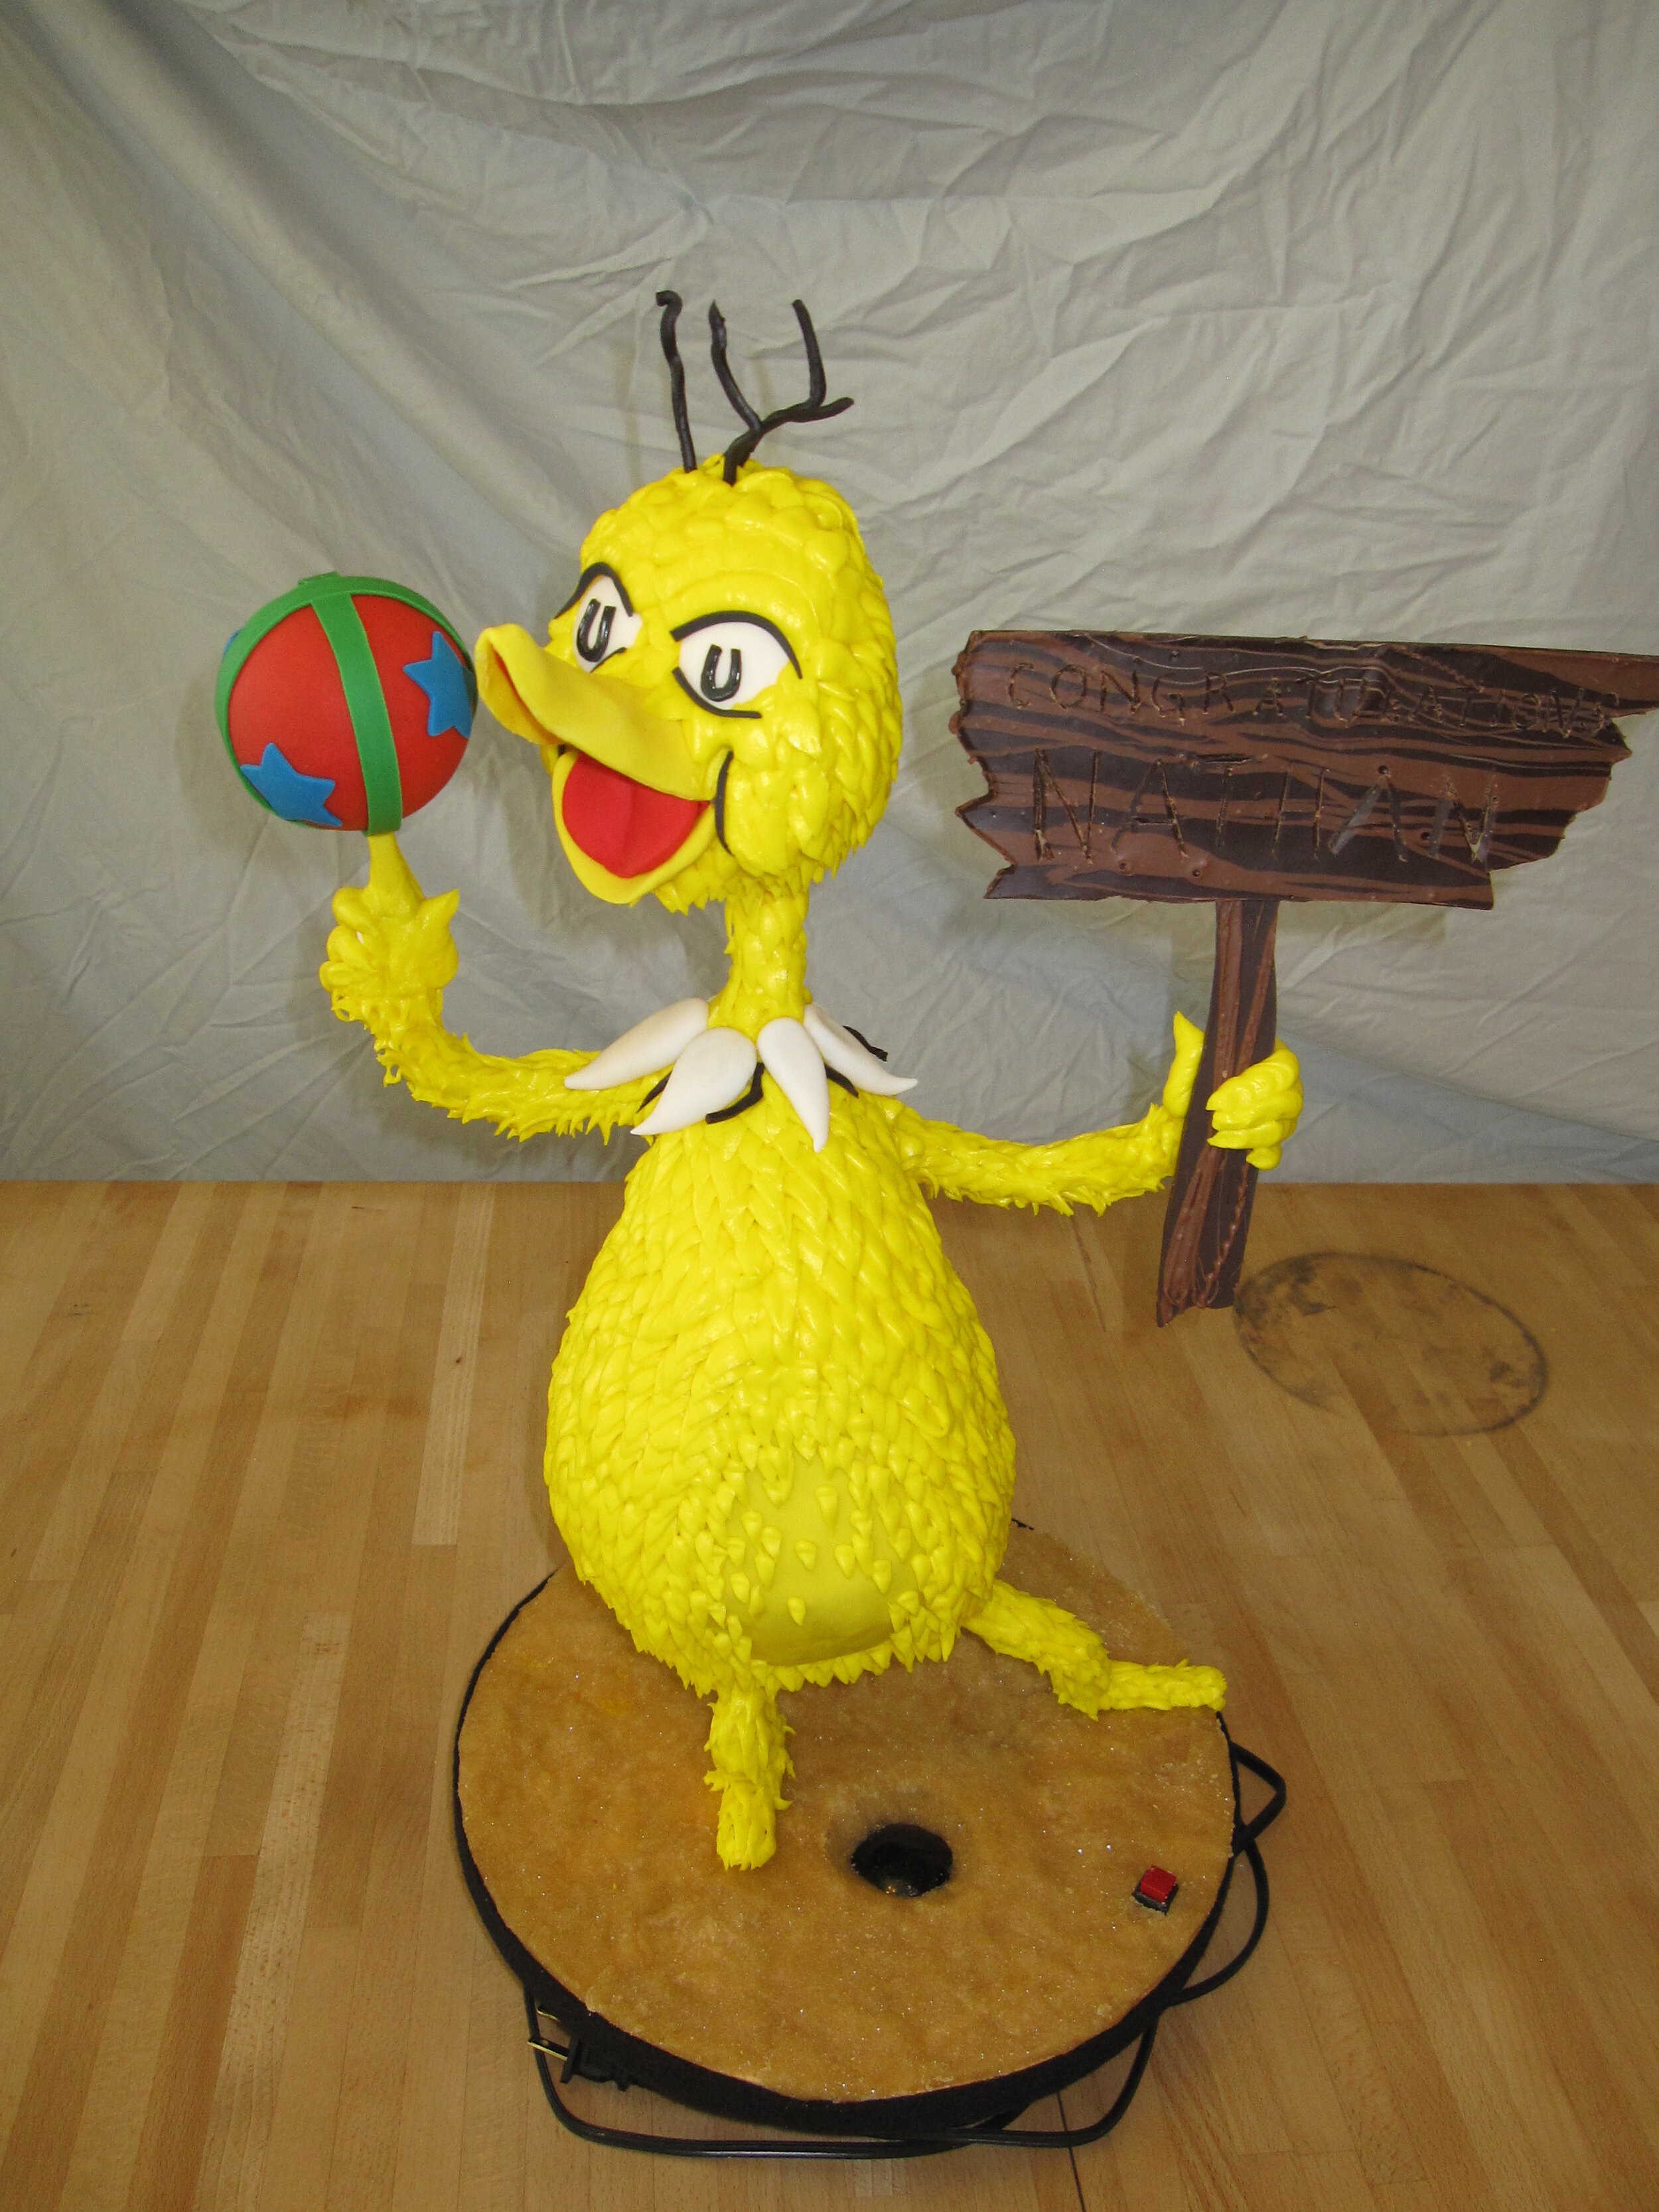
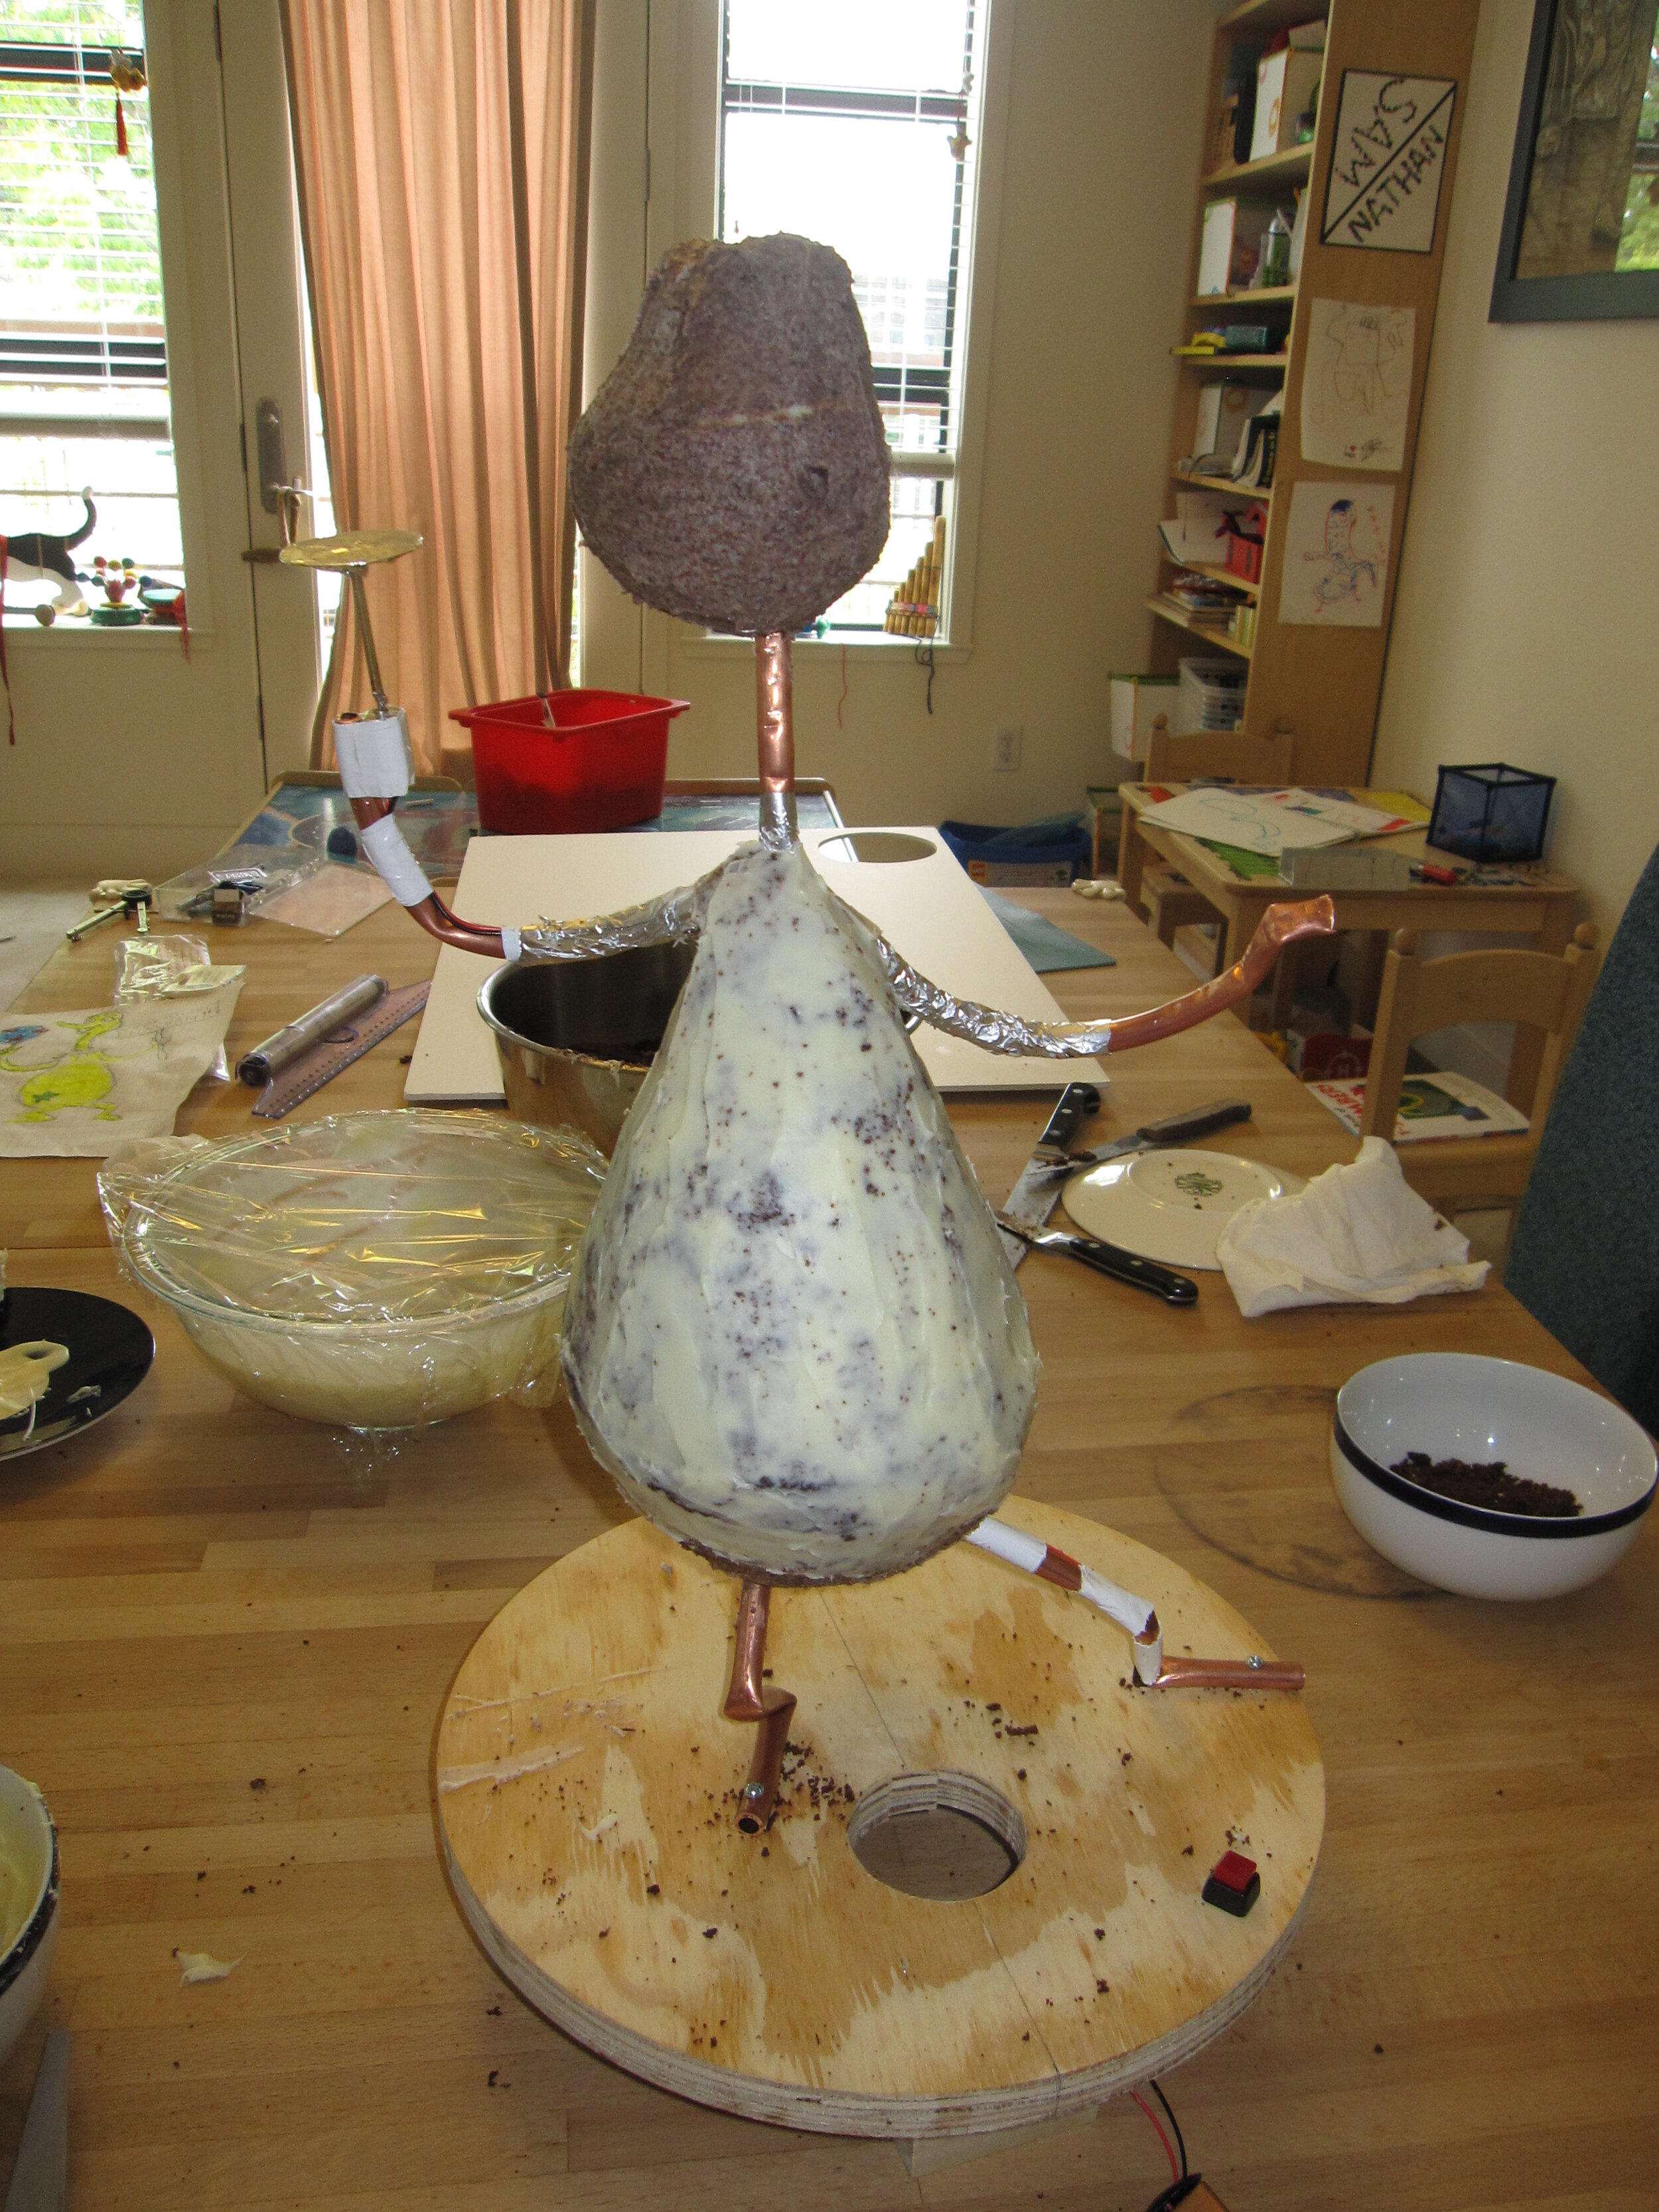
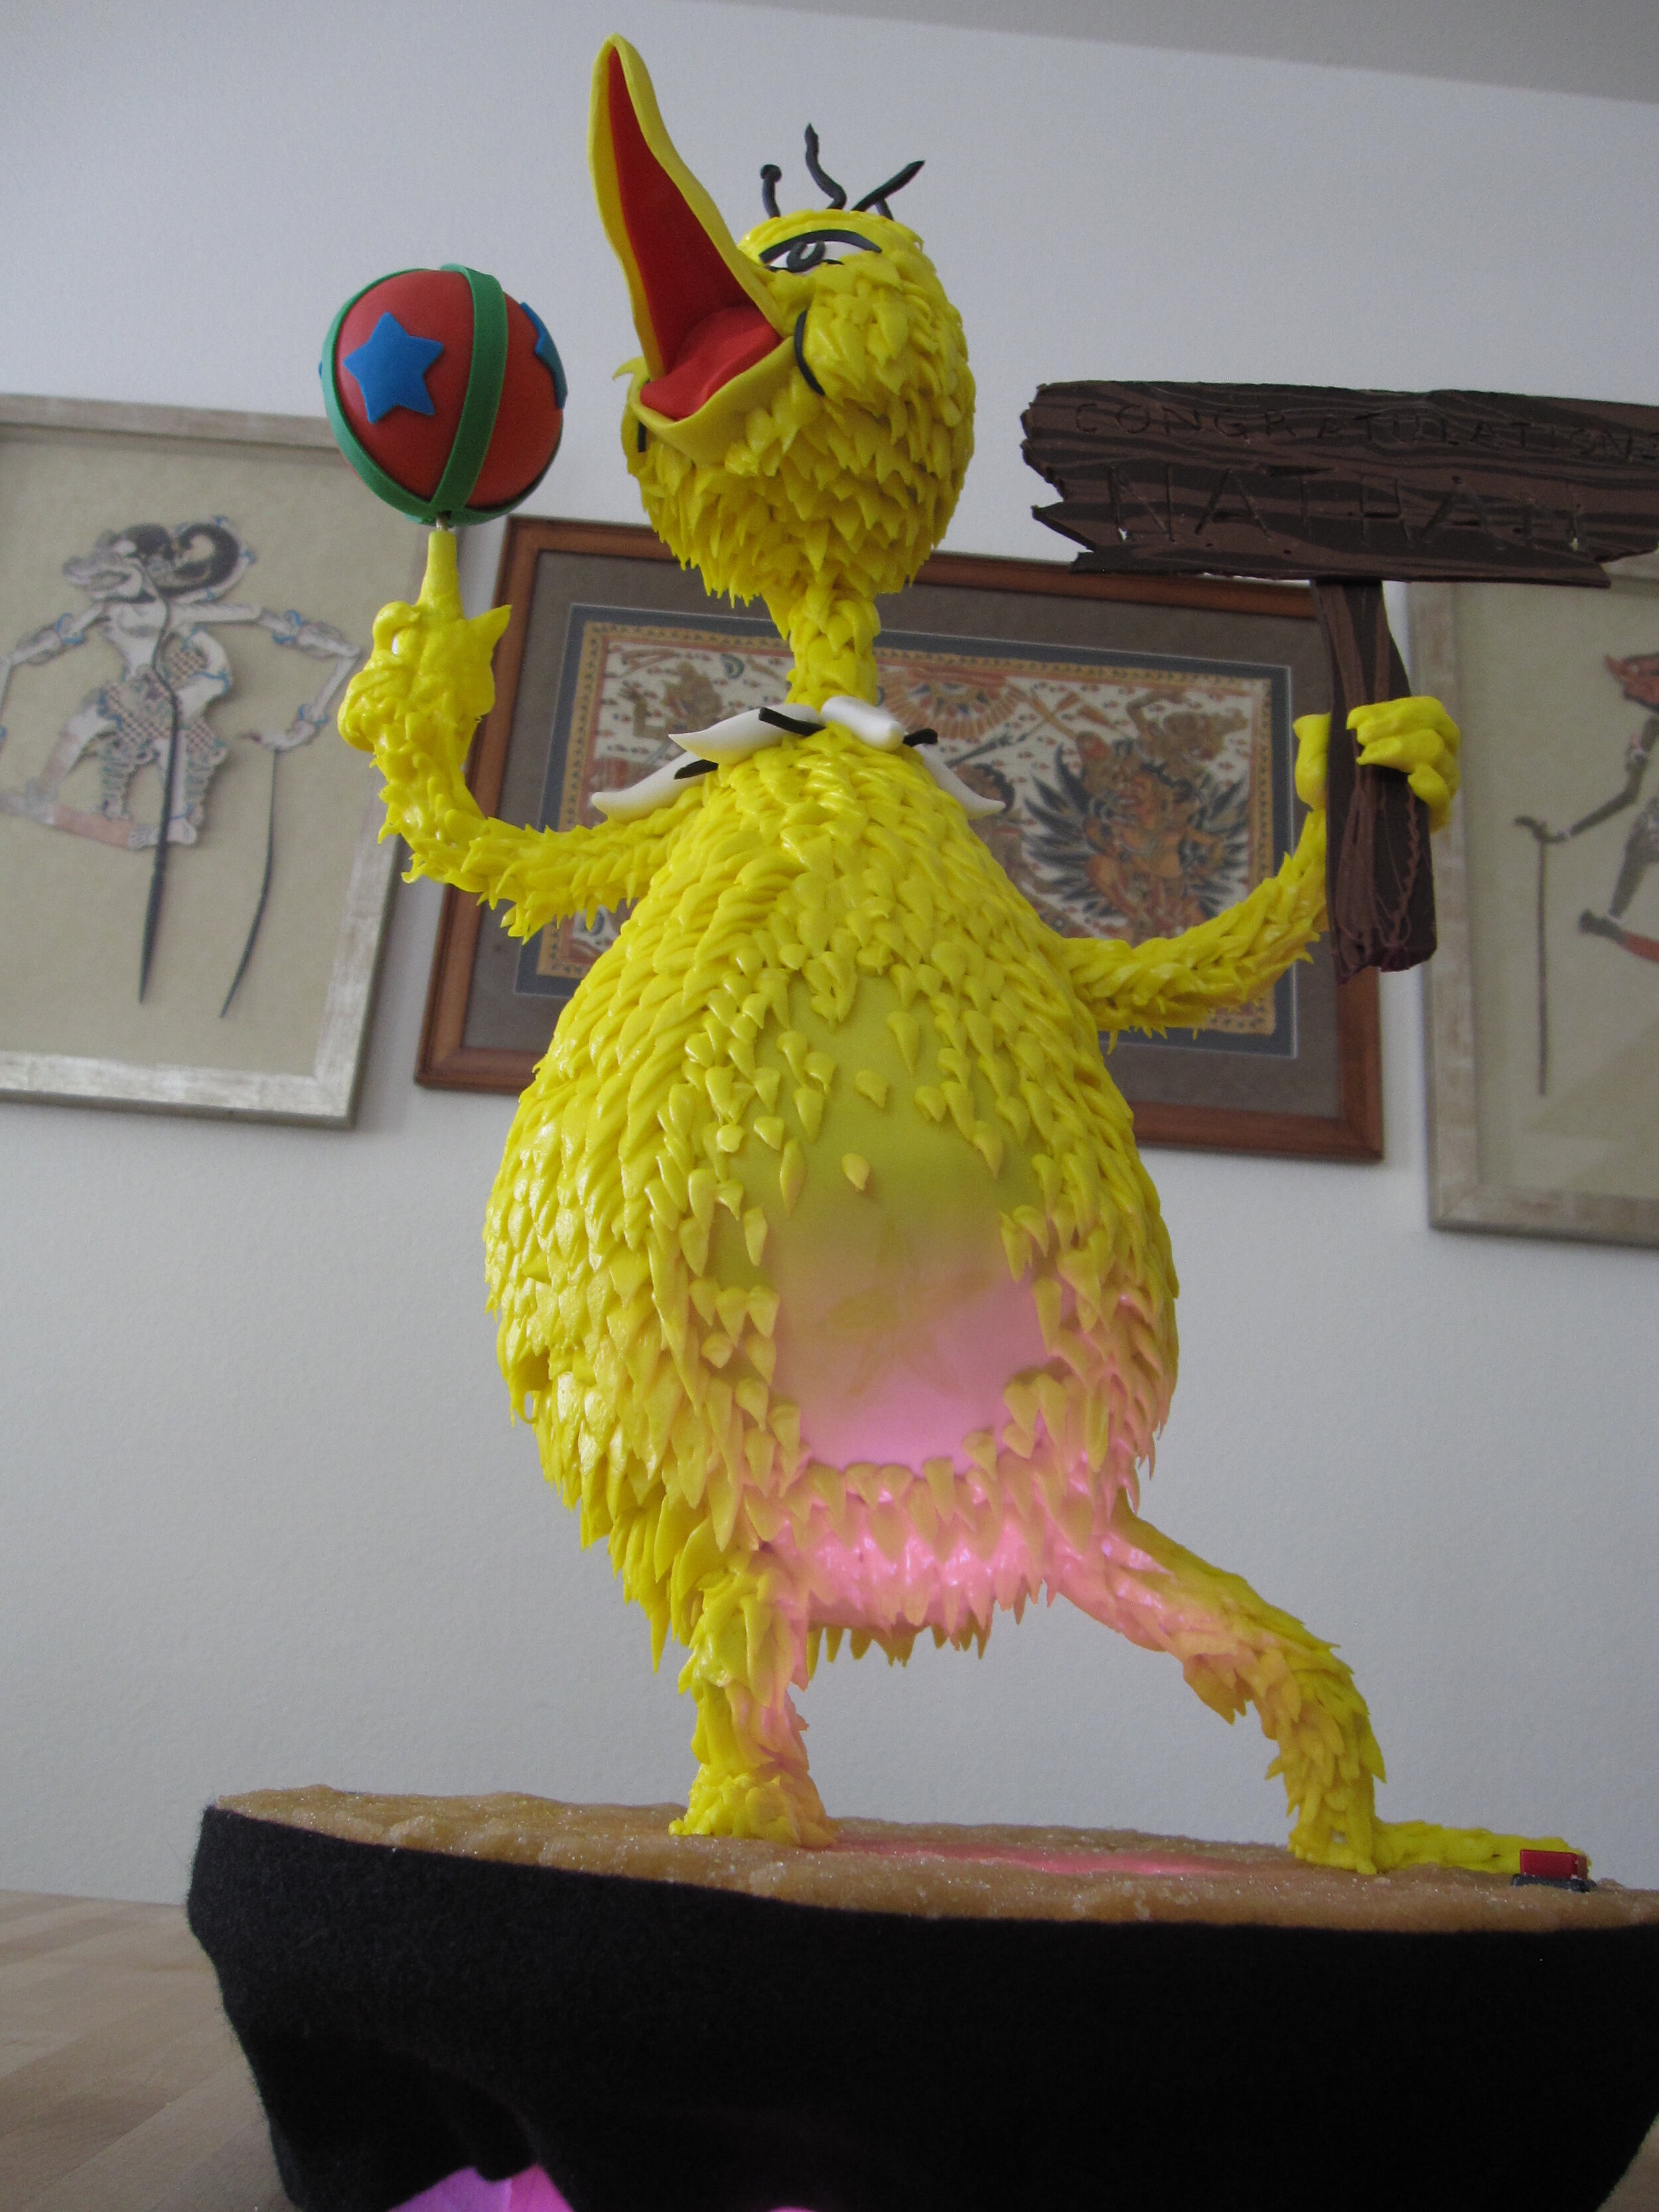
It would have been fairly easy to make a Sneetch sitting down, so of course I didn’t go that route. I wanted to make a standing up Sneetch because it would give me the opportunity to try one of the copper tubing armatures that I always see on Food Network Challenge and Ace of Cakes. I chose to attempt the pose of a proud newly-starred Sneetch thrusting out its belly. Ultimately, I'm not convinced that I fully achieved the balance and expression that I was looking for in the pose, so next time I'll have to take a little more care with the shape of the armature.
I’m not really sure if I made my armature according to industry best practices, but it seemed to work. I used 3/8” copper tubing, which was relatively easy to bend. I don’t think it would have supported a much larger cake, especially as the tight bends tend to get rather weak. I used ¼” plywood to make the circles to support the butt and the head and then I bolted the whole thing to a ¾” plywood circle for the base.
At this point, prior to the actual performance of The Sneetches, I knew nothing about the play except that Teacher Christine was playing the role of Sylvester McMonkey McBean and that it involved playing with a ball. So I decided to have my Sneetch twirling a ball on his finger. Alex and I have also been playing with a motor recently as part of a kit of science experiments related to light. The idea is that if you stick a circle of paper colored, for instance, half blue and half green onto the axle of the motor, when it spins the colors will blend together and you’ll see cyan. My thought was that if I made the ball red, blue, and green and got it to spin fast enough, then the colors would blend in the eye and look white – or at least yellowish grey.
To make this happen, I wired up a little hobby motor and soldered a circular brass platform to the top of it to hold up the cake ball. Because the cake ball was going to be pretty small, I just duct taped the motor to the top of the copper tubing arm.
The only gum paste pieces that I made in advance were the nose / beak (I’m not sure of the exact anatomy of a Sneetch), the eyes, and the ball, which I formed around a 3” diameter rubber ball.
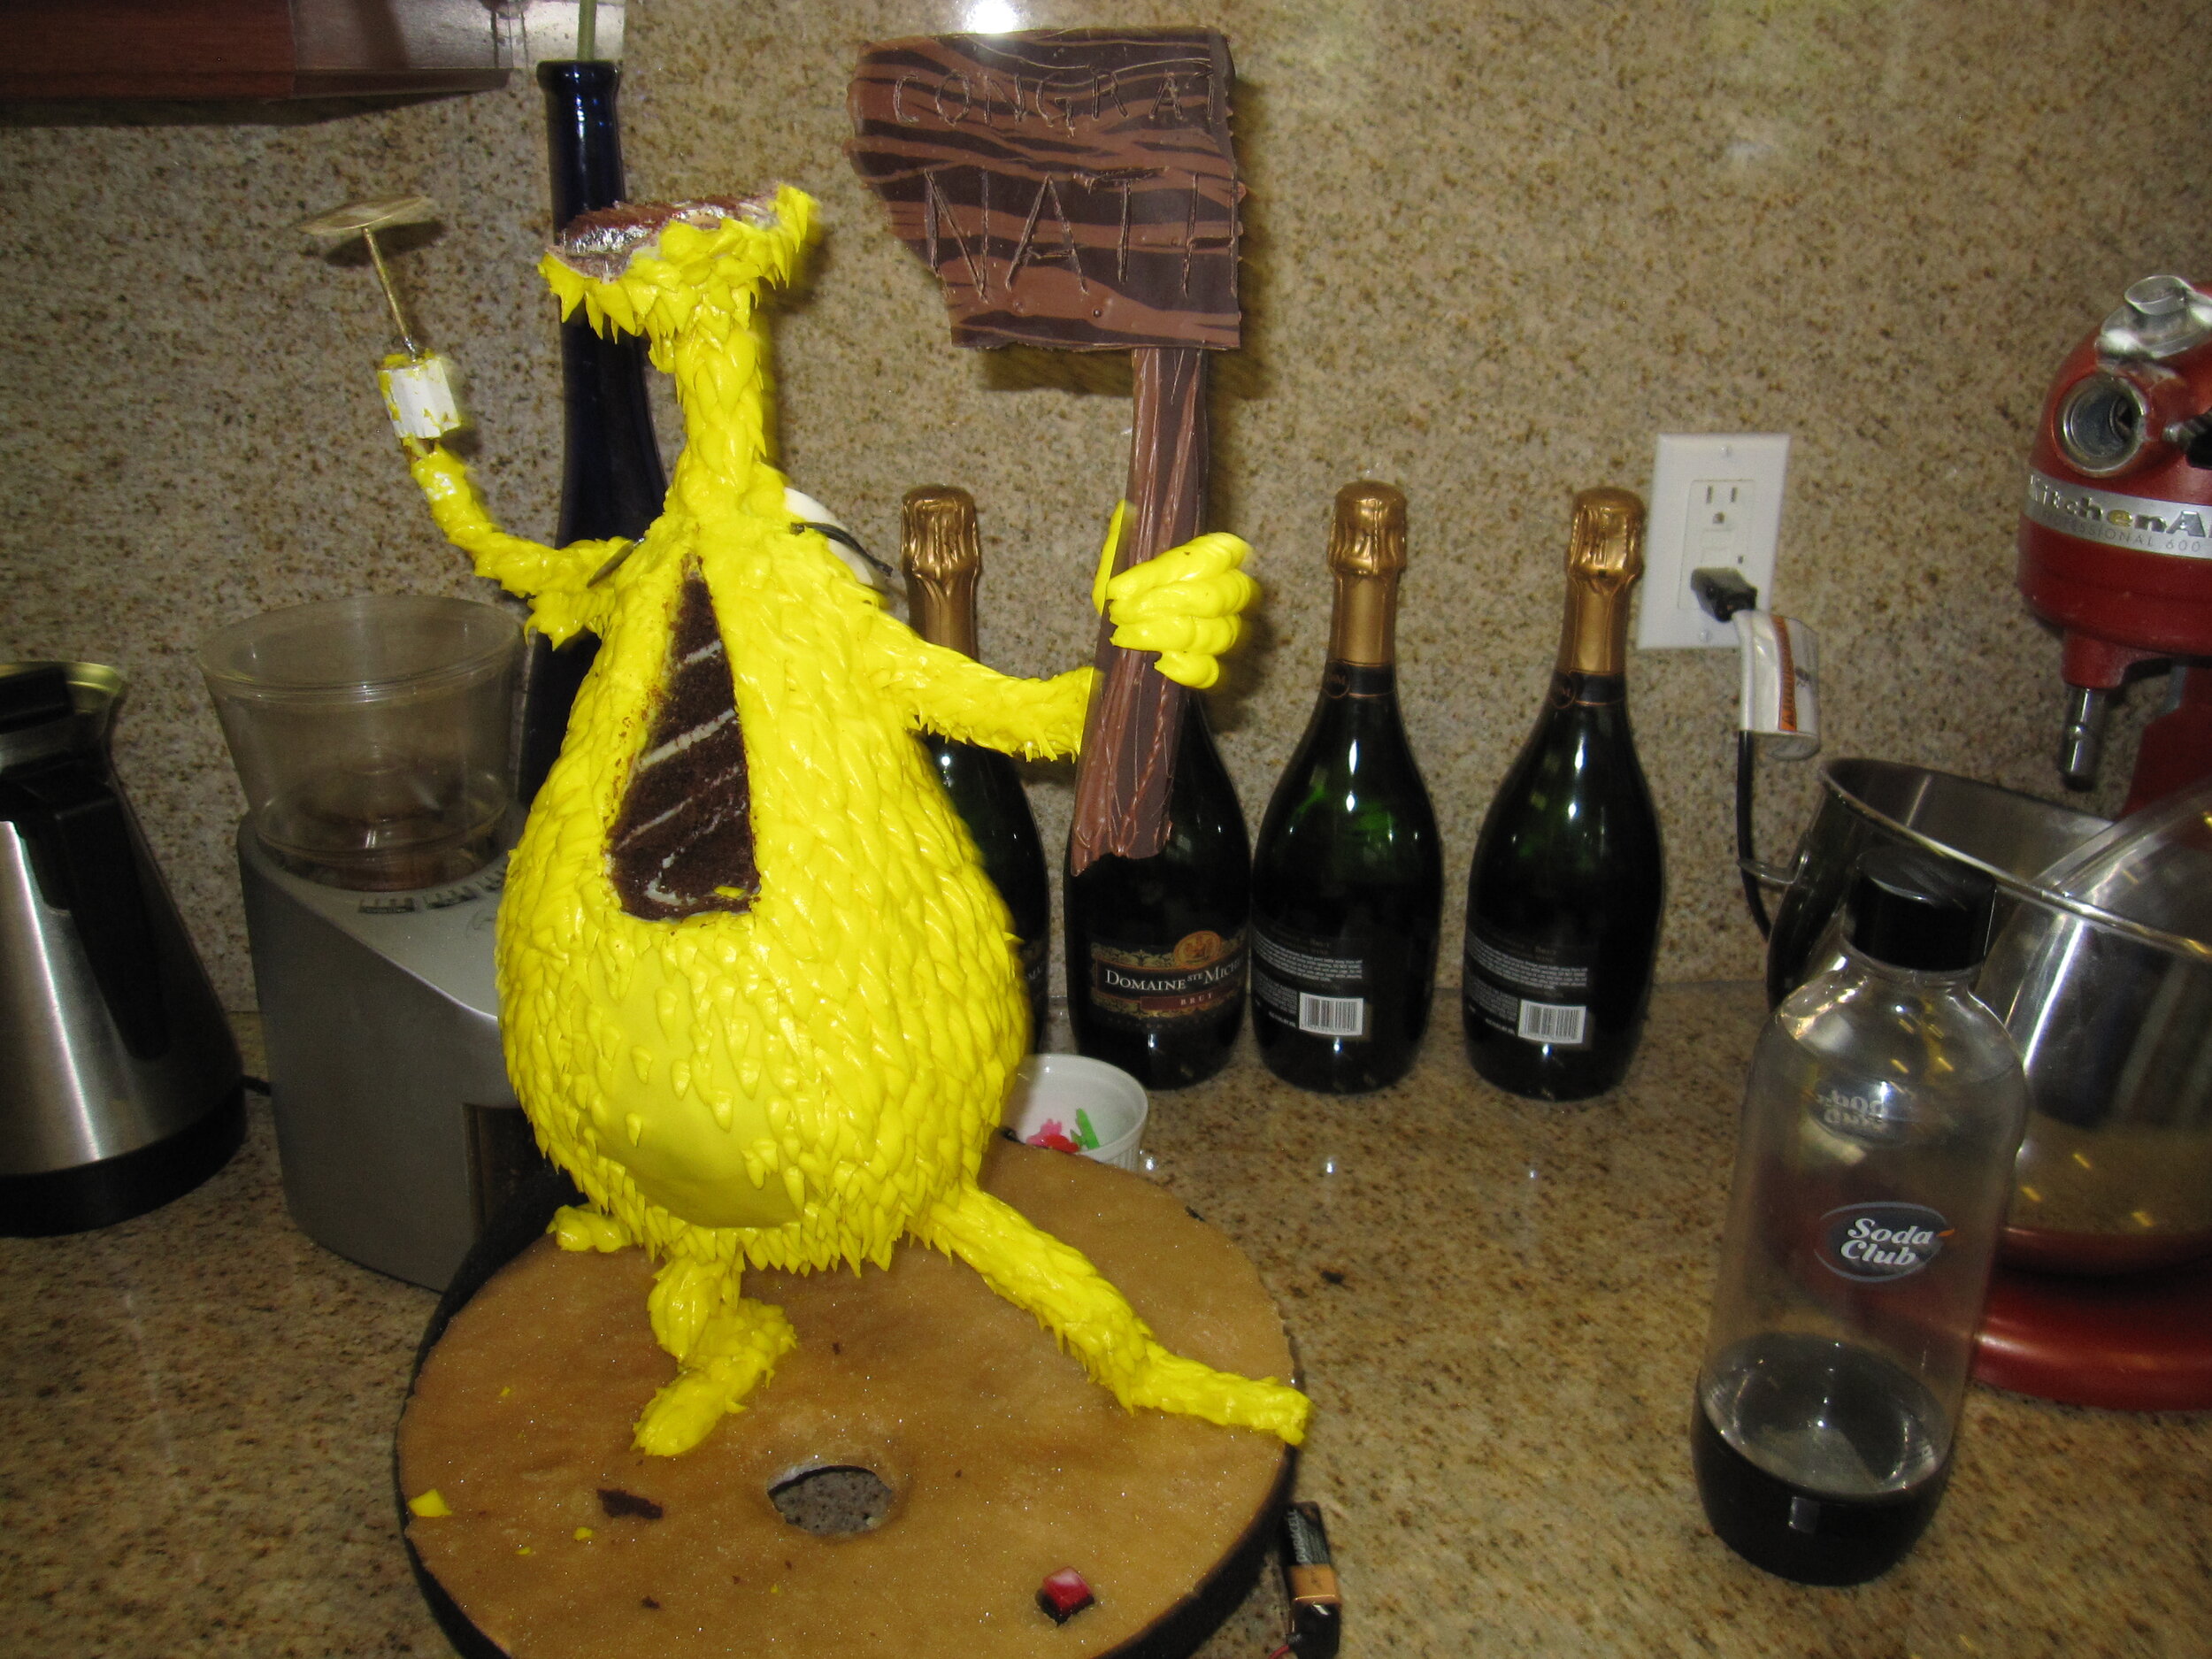
The crux of anything Sneetch-related is, of course, the belly star, or lack thereof. My plan was to attempt to use a technique that I saw Mary Maher use on Last Cake Standing – glow-in-the-dark piping gel. By painting the star with club soda, which contains quinine, which fluoresces under blacklight, and implanting a blacklight in the base of the cake, I hoped to be able to make the belly star appear and disappear like in the story.
The first step in bringing this idea to life as to test the club soda. I tried a couple different ways of incorporating the club soda into piping gel, as well as just painting with the pure club soda. The most effective glow turned out to come from the star painted solely with the pure club soda, but overall it wasn’t really as impressive as I hoped that it would be. But I went ahead with it anyway, by cutting a hole in the cake’s plywood base and sticking my blacklight bulb in underneath. I frankly wasn’t confident that the effect would be anything to write home about, but it was the best I could do for a first try. I covered the base with brown pressed sugar to simulate the Sneetches’ beaches.
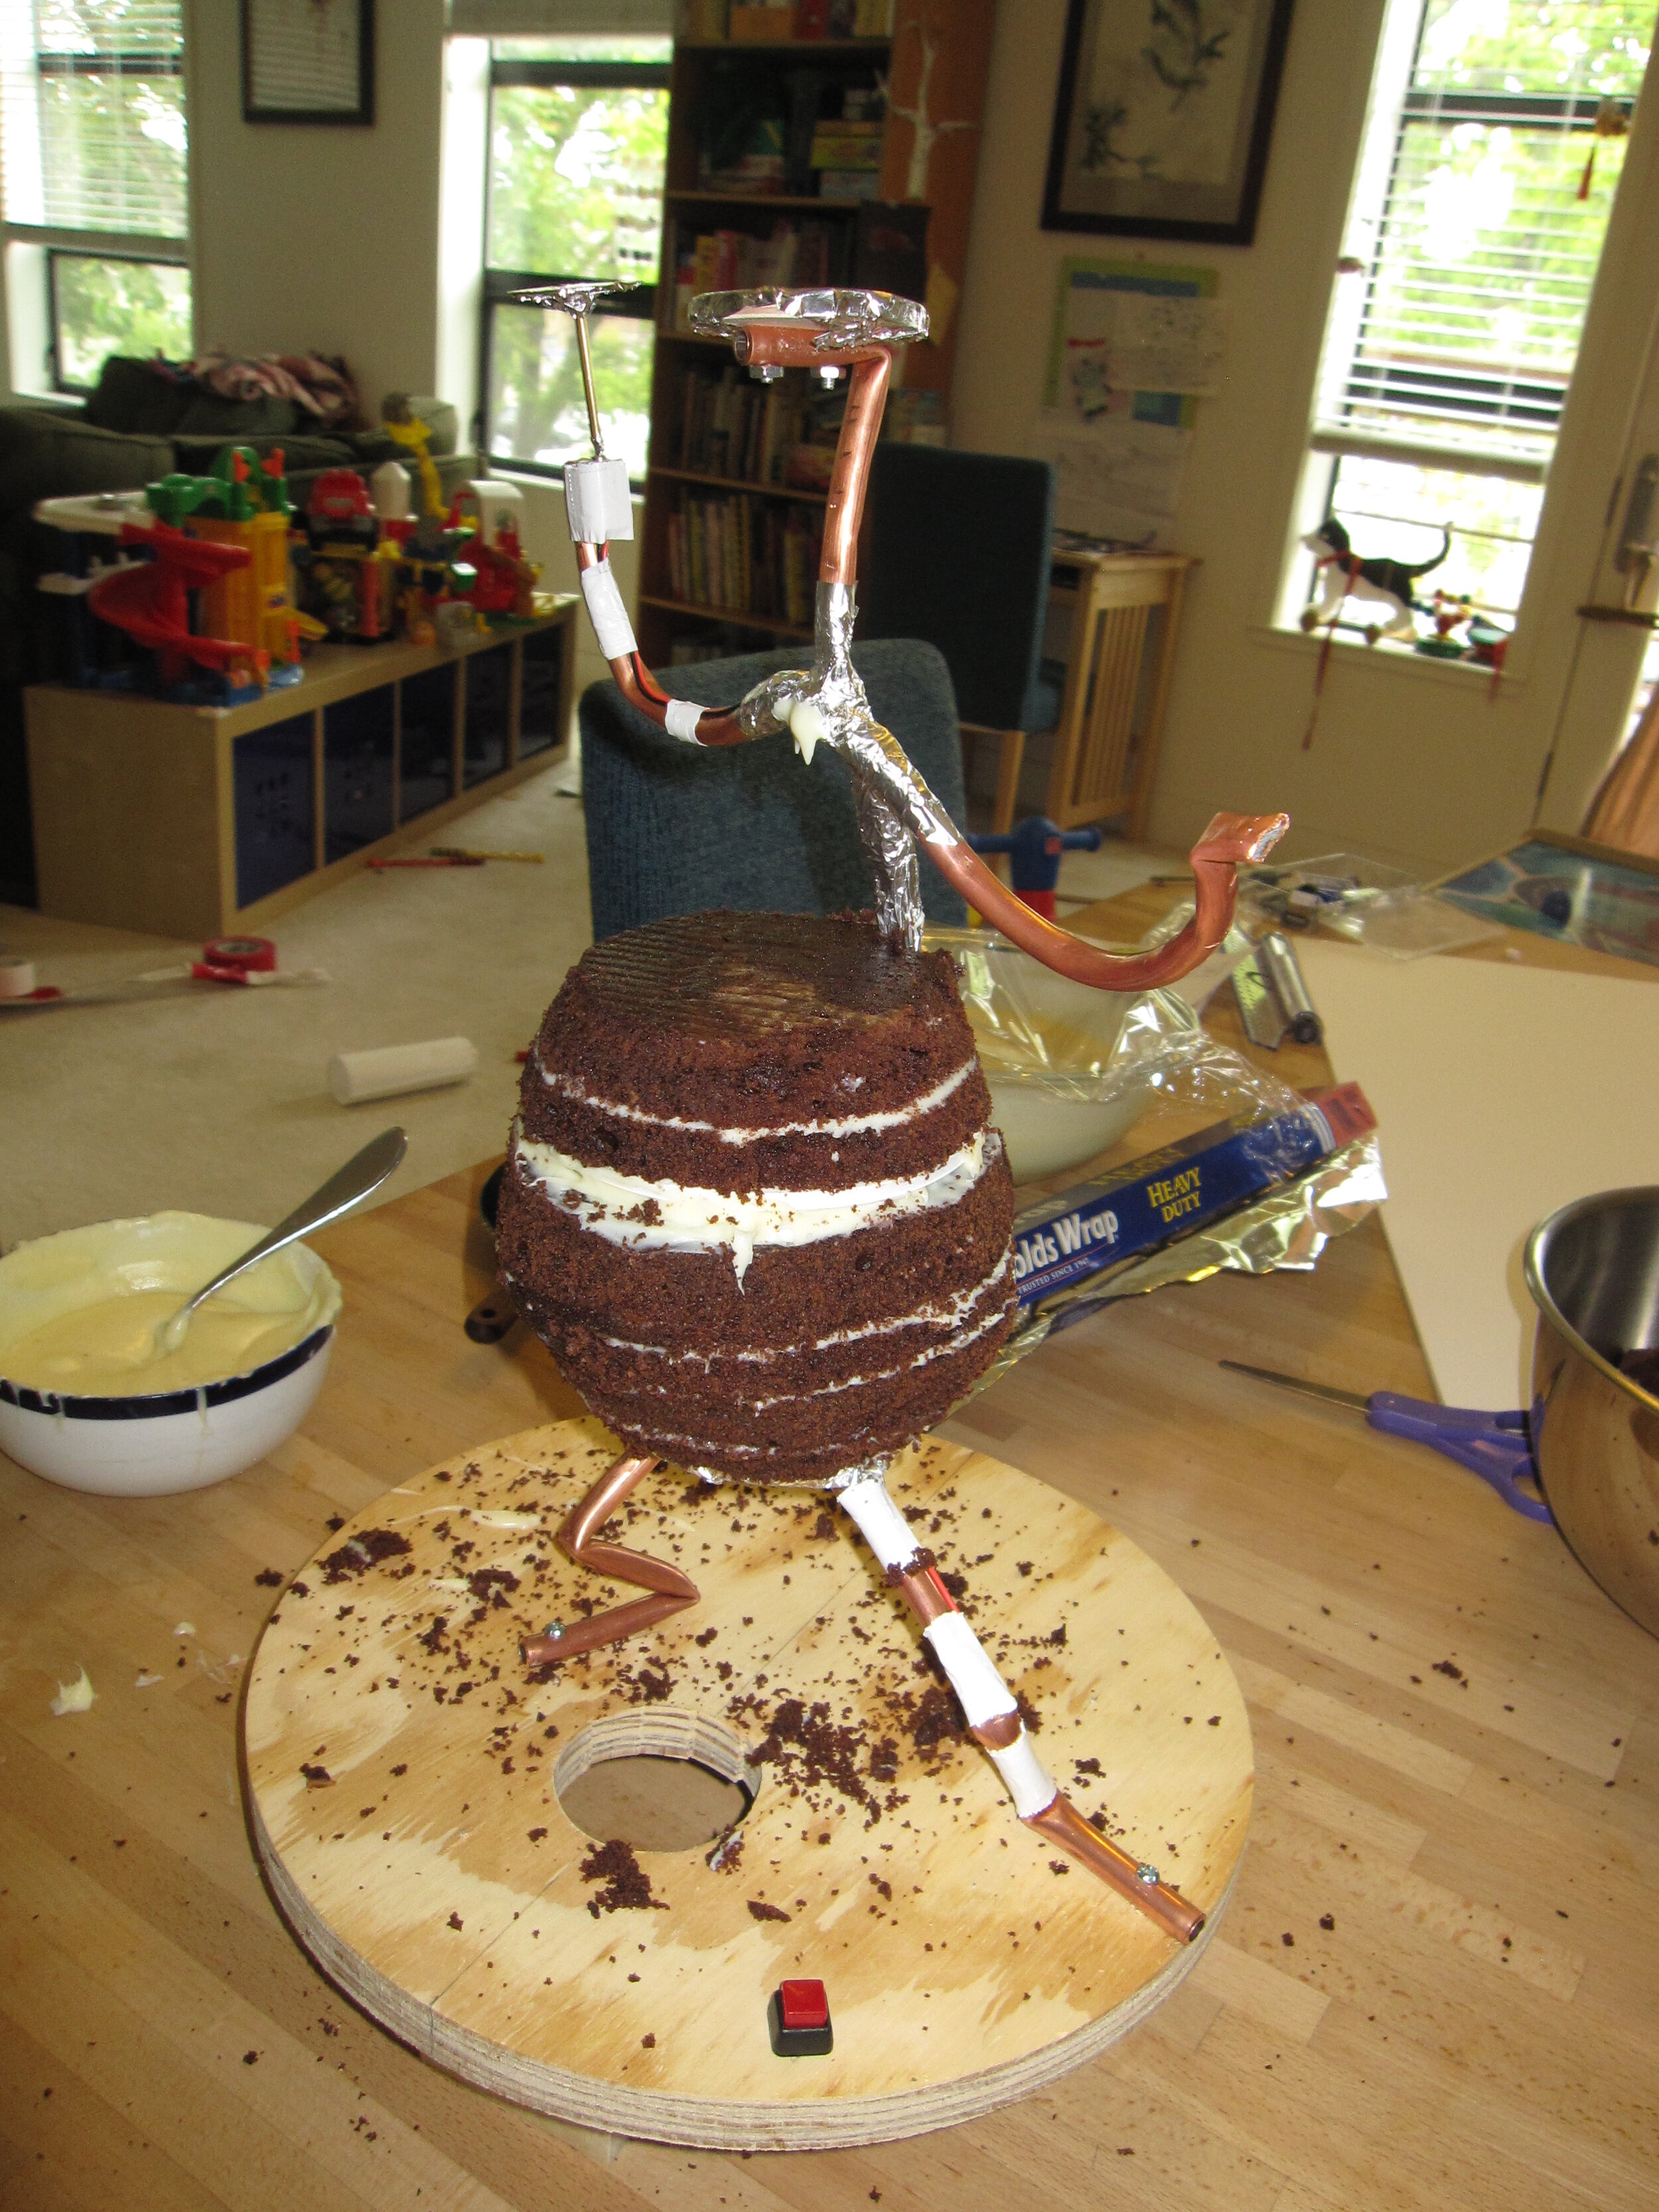
Because I was trying to keep the cake small, I started with just six 6” round cakes – 4 for body and two for the head with enough scrap left over for the ball. I torted and filled them using a white chocolate ganache because I wanted to make sure that the cake had the stability that you get from such a firm frosting.
After I carved the cake into the basic shape, I tried out another a new technique that I saw someone do on Food Network Challenge. I don’t remember who I saw doing this, but I think they called it “spackle.” Basically, you take the cut-off scraps of cake and stir it into some icing so that it makes a pretty thick paste. Then you can use the spackle to really smooth out the surface of the cake and fill in any gaps. I found that it worked perfectly to round out the curves of the head and the butt underneath the plywood bases and to fill in the seam where the body cake was notched out around the copper backbone.
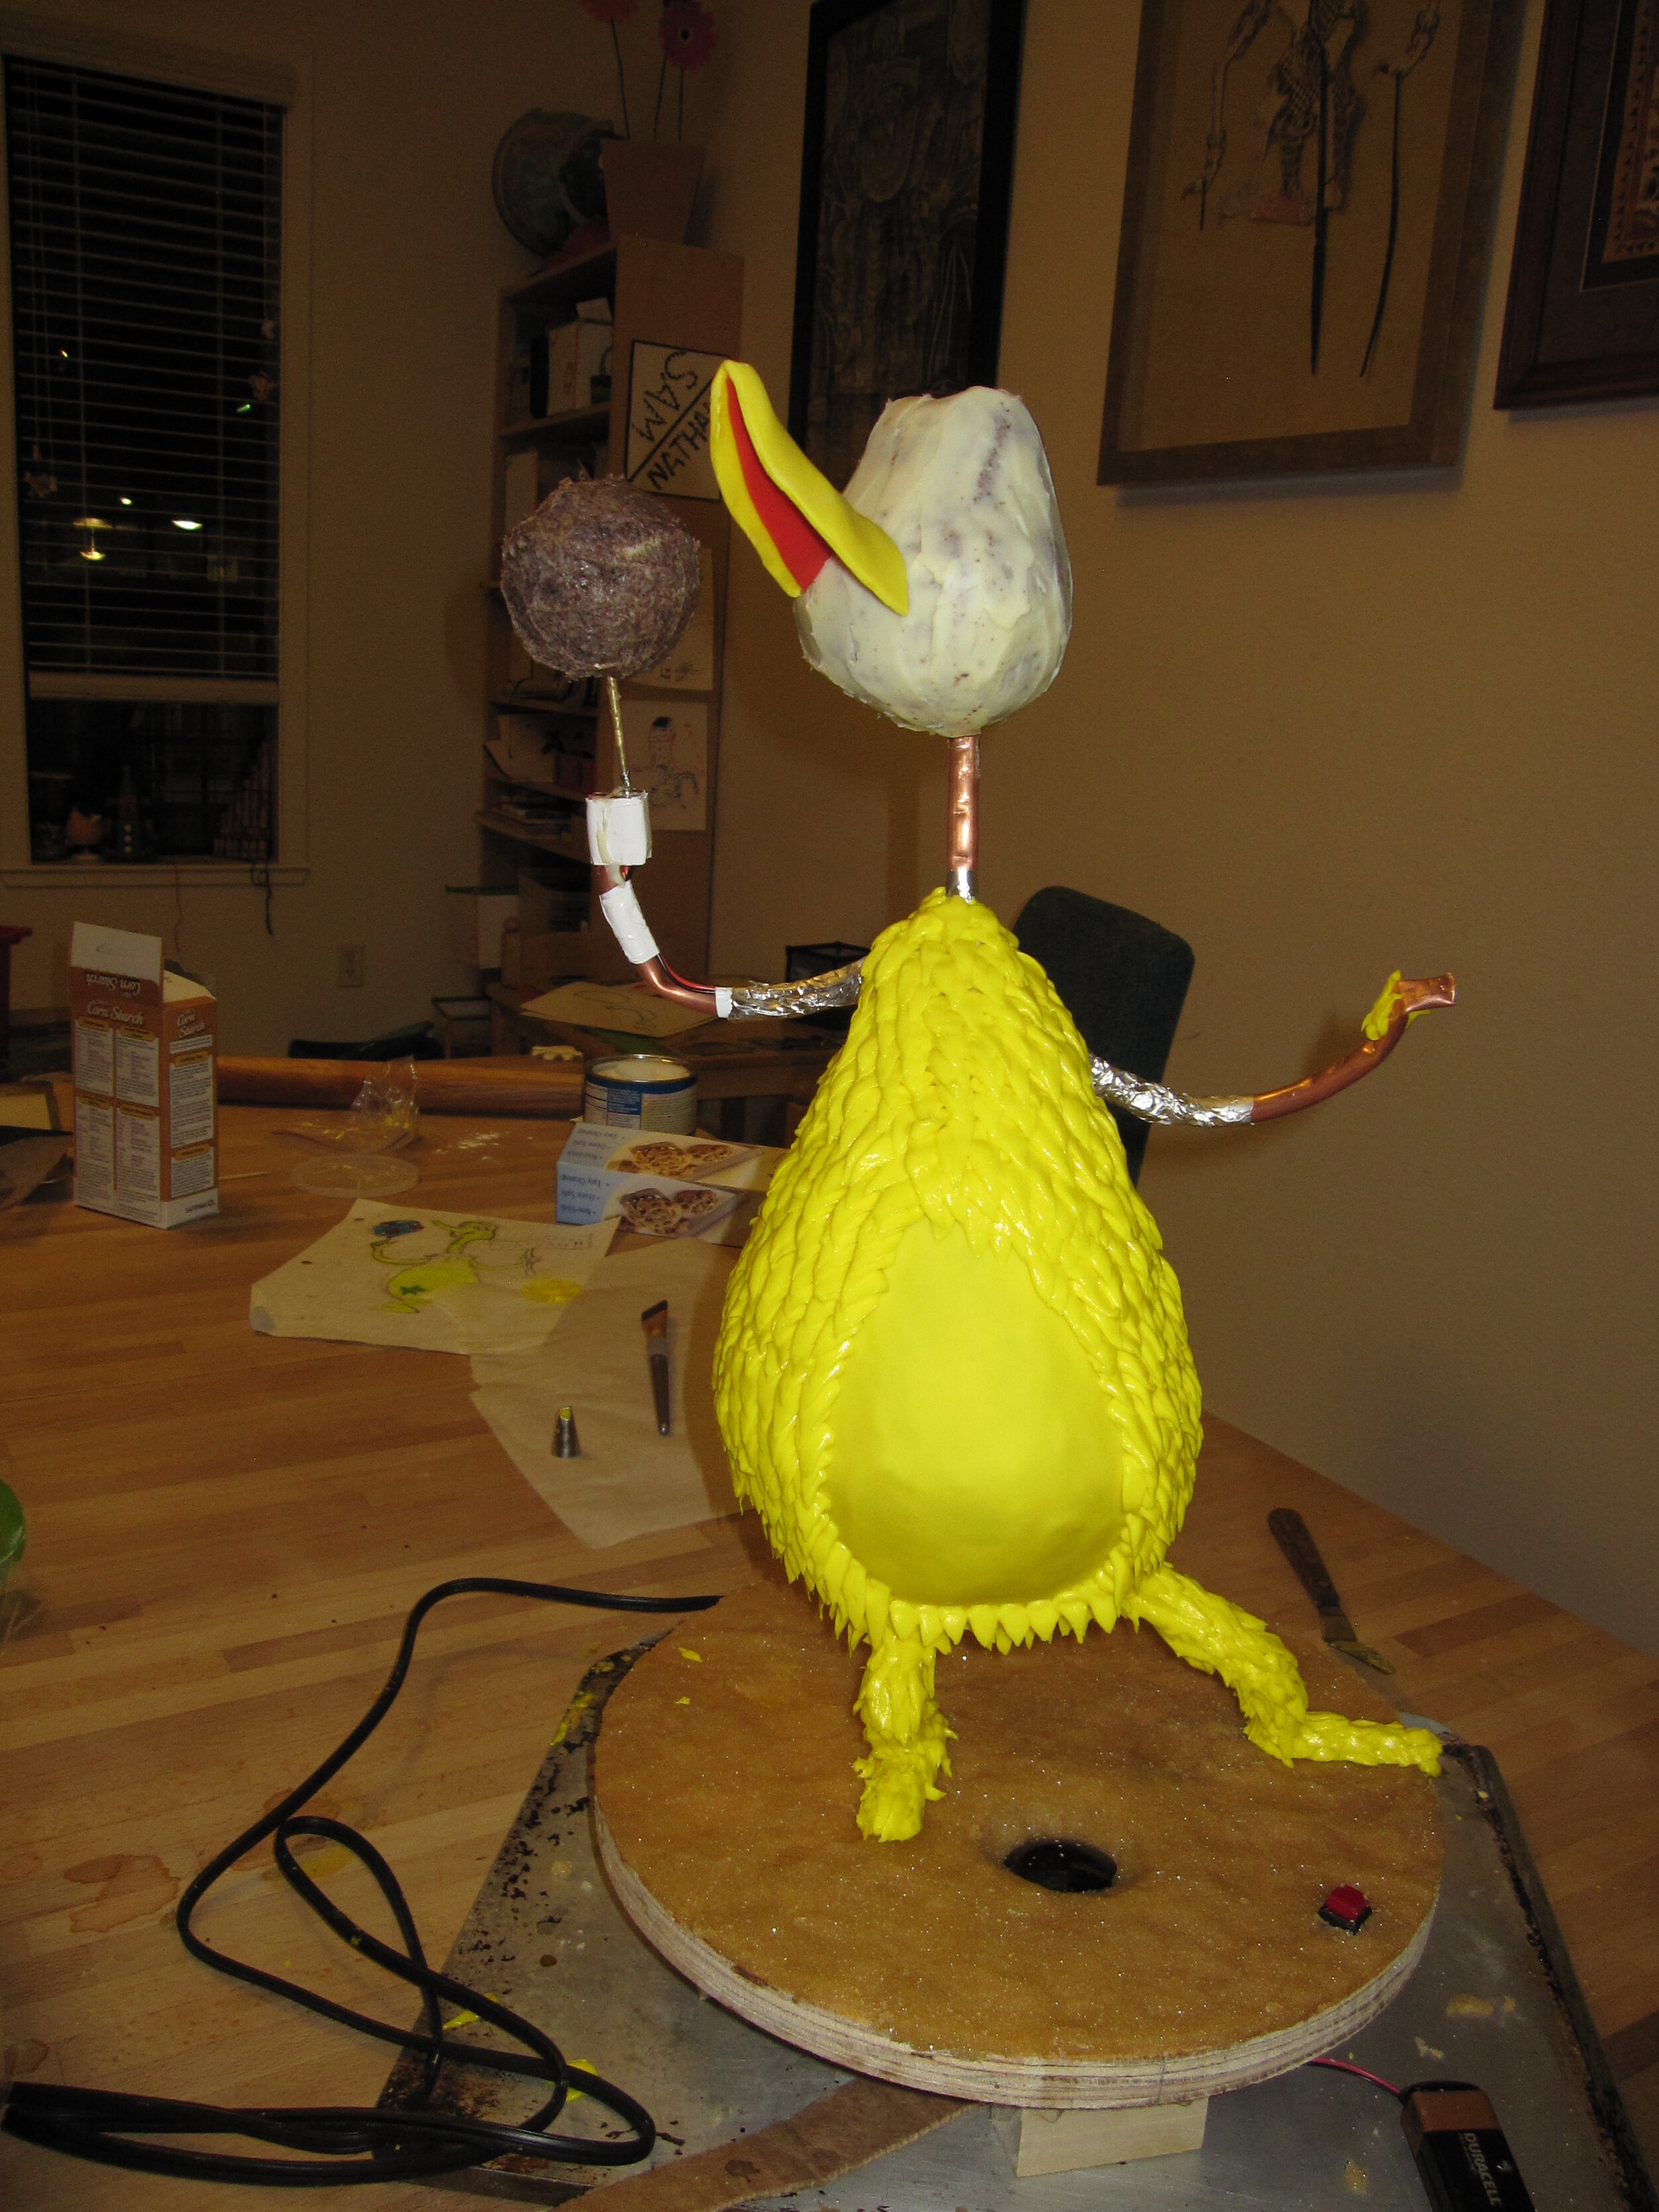
For the fur / feathers (again, I’m not sure what kind of animals Sneetches actually are), I decided to used piped buttercream. I don’t generally use a lot of buttercream. I think I may be using a substandard recipe because I often have trouble with my buttercream breaking down. This time was no exception. My buttercream started out at the right consistency, but with the heat of my hand it rapidly got too liquidly in the piping bag. So I didn’t get the definition I was looking for in some of the Sneetch’s coat.
On the belly area, I used a gum paste panel instead of the buttercream so I would be able to paint on the club soda star. This gave me a little trouble in blending the belly into the rest of the body. I’m still not 100% happy with the result, because real Sneetches’ bellies aren’t discernibly different in texture from the rest of their bodies, but I think I did a tolerable job of keeping it from being too jarring.
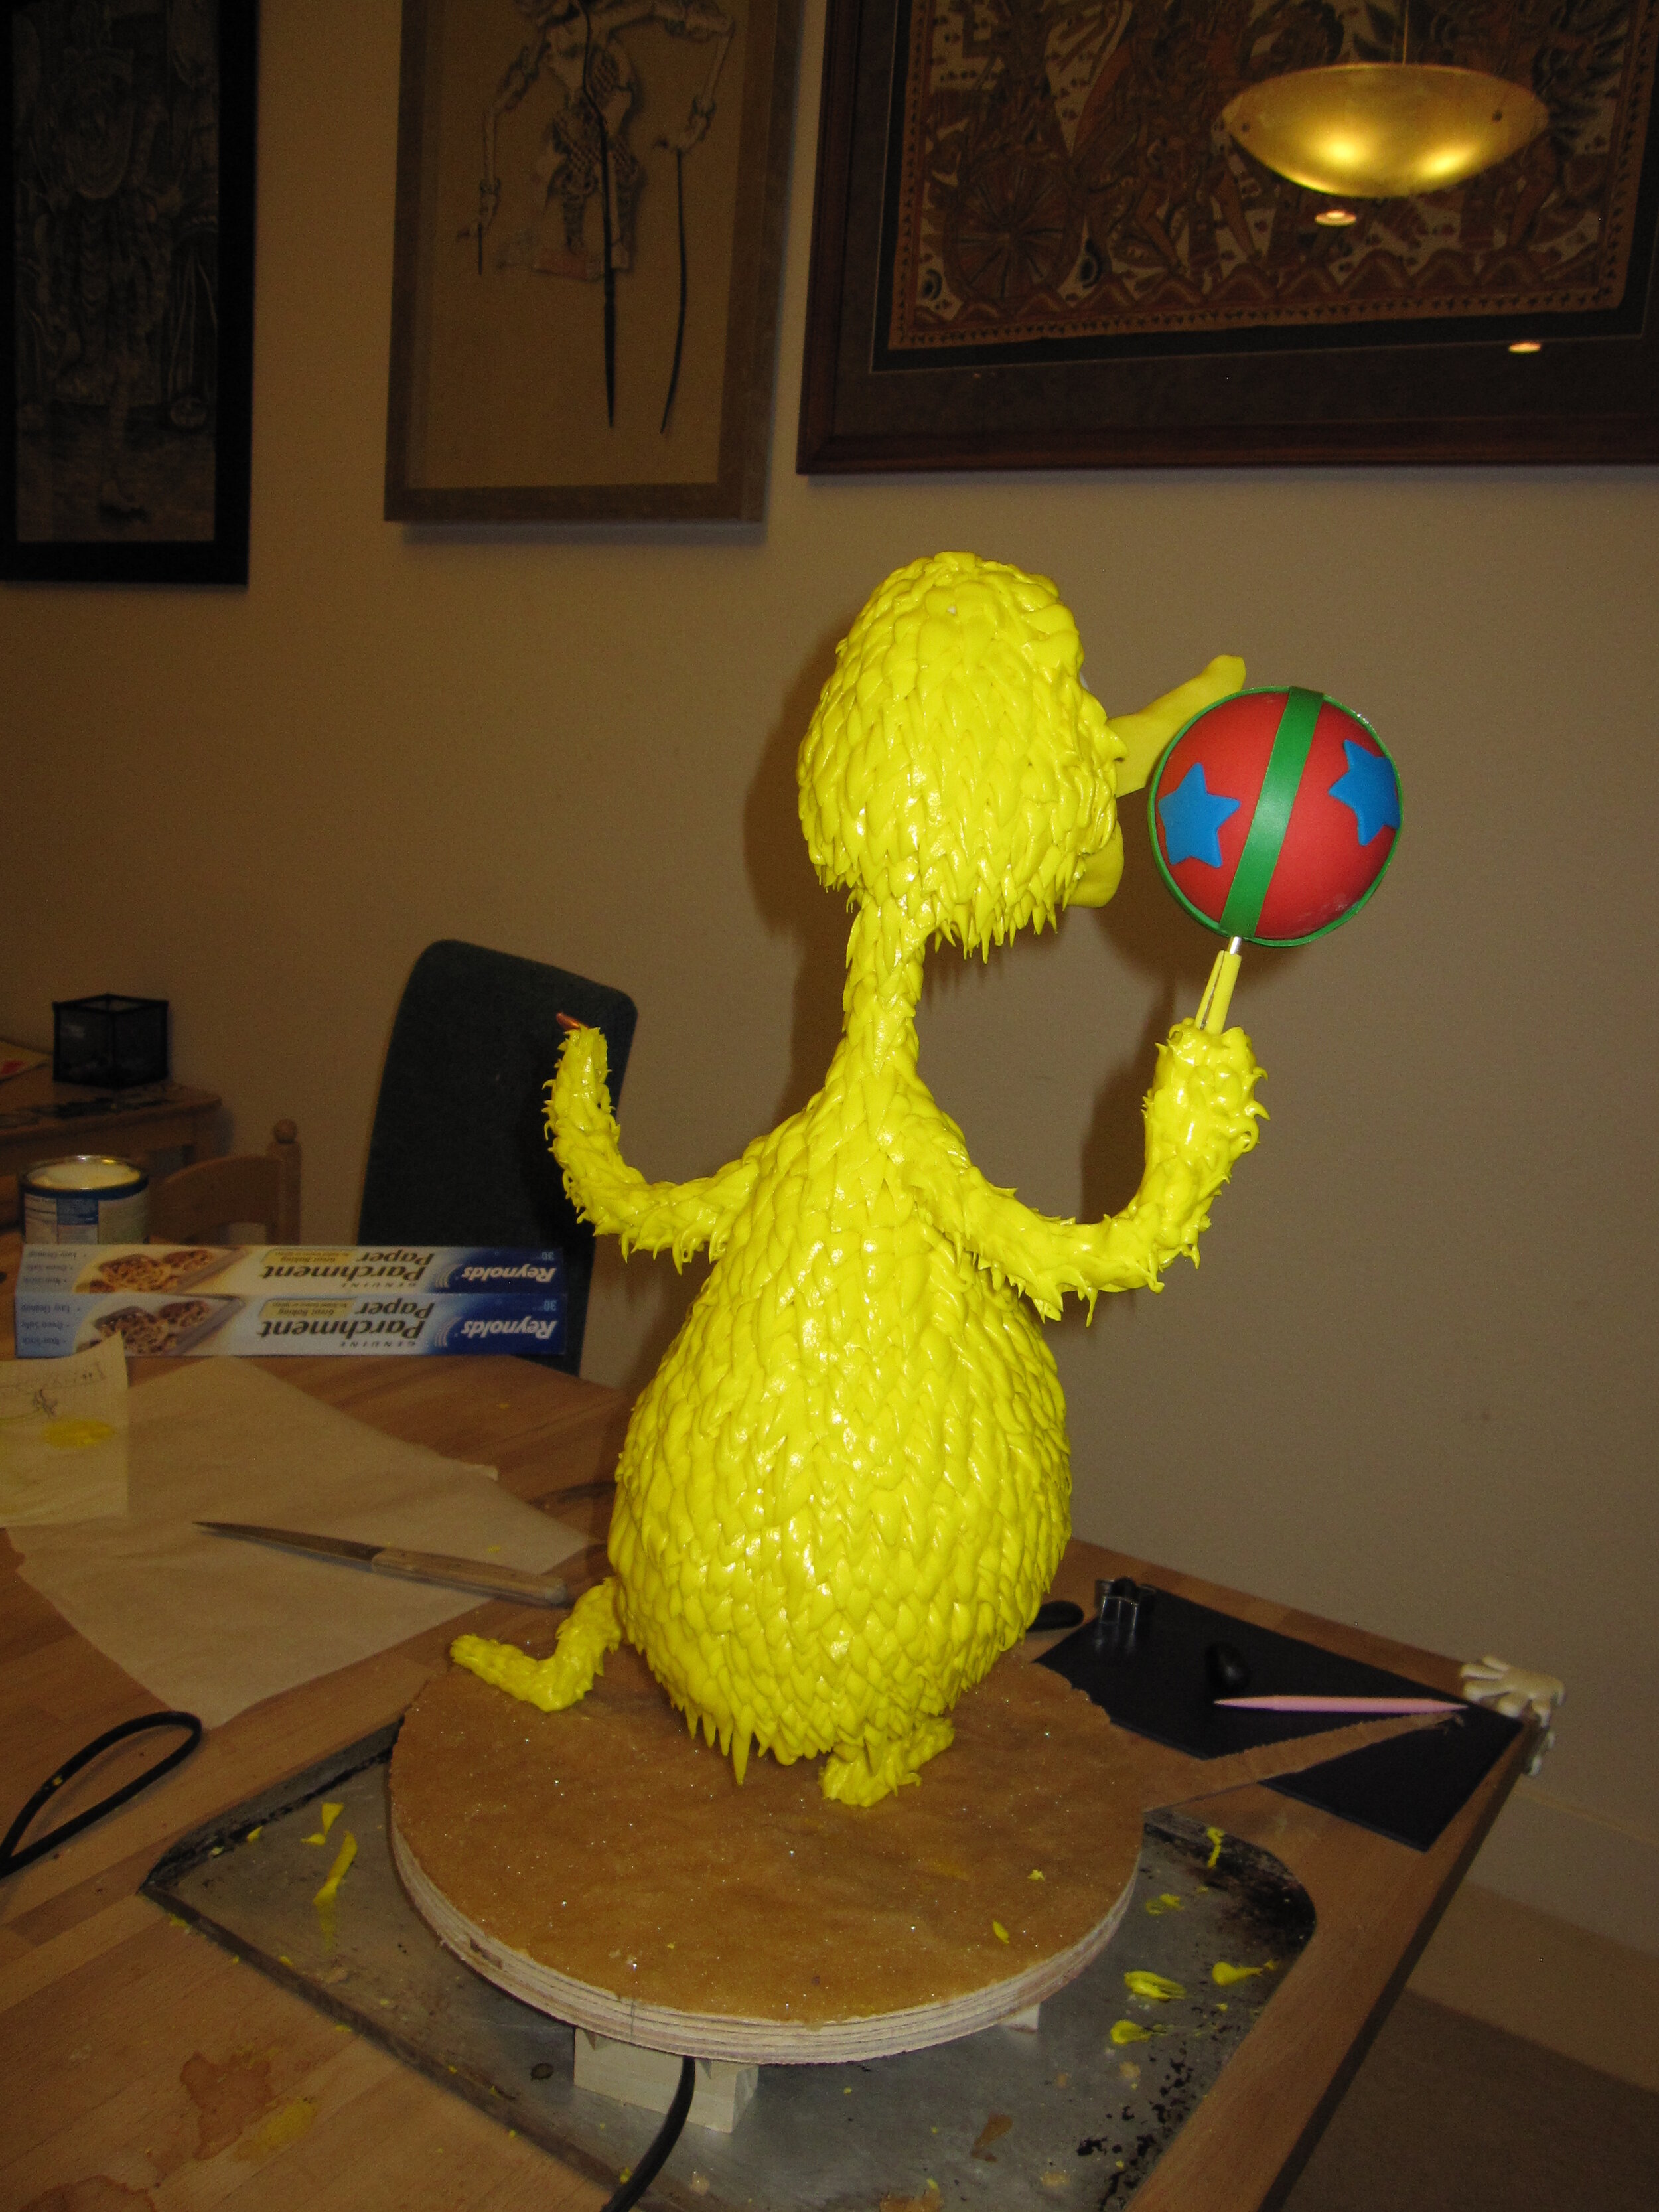
The ball went together quite easily. I made the ball itself in two halves of red gum paste and then hid the seam with a green gum paste stripe. For the blue to complete my attempt at RGB color mixing I added blue stars. I fully expected Alex to criticize my color choice because in my carelessness I had reversed the colors of the ball as seen in the book. In the book, it’s a blue ball with red stars. Alex is normally a stickler for this kind of detail, but she must have really liked the cake because she actually didn’t even mention the ball colors. I also fully expected that my color mixing wouldn’t be fully successful because I didn’t have the food colors that I really needed. I didn’t have royal blue, so I had to use sky blue and I didn’t have emerald green, so I had to use kelly green.
At this point I also realized that I had constructed the spinning mechanism in such a way that not only would the ball spin, but also the finger that it was sitting on. Oops. Obviously this was unacceptable, so I had to whip up a little gun paste sleeve to conceal the spinning tube underneath the ball.
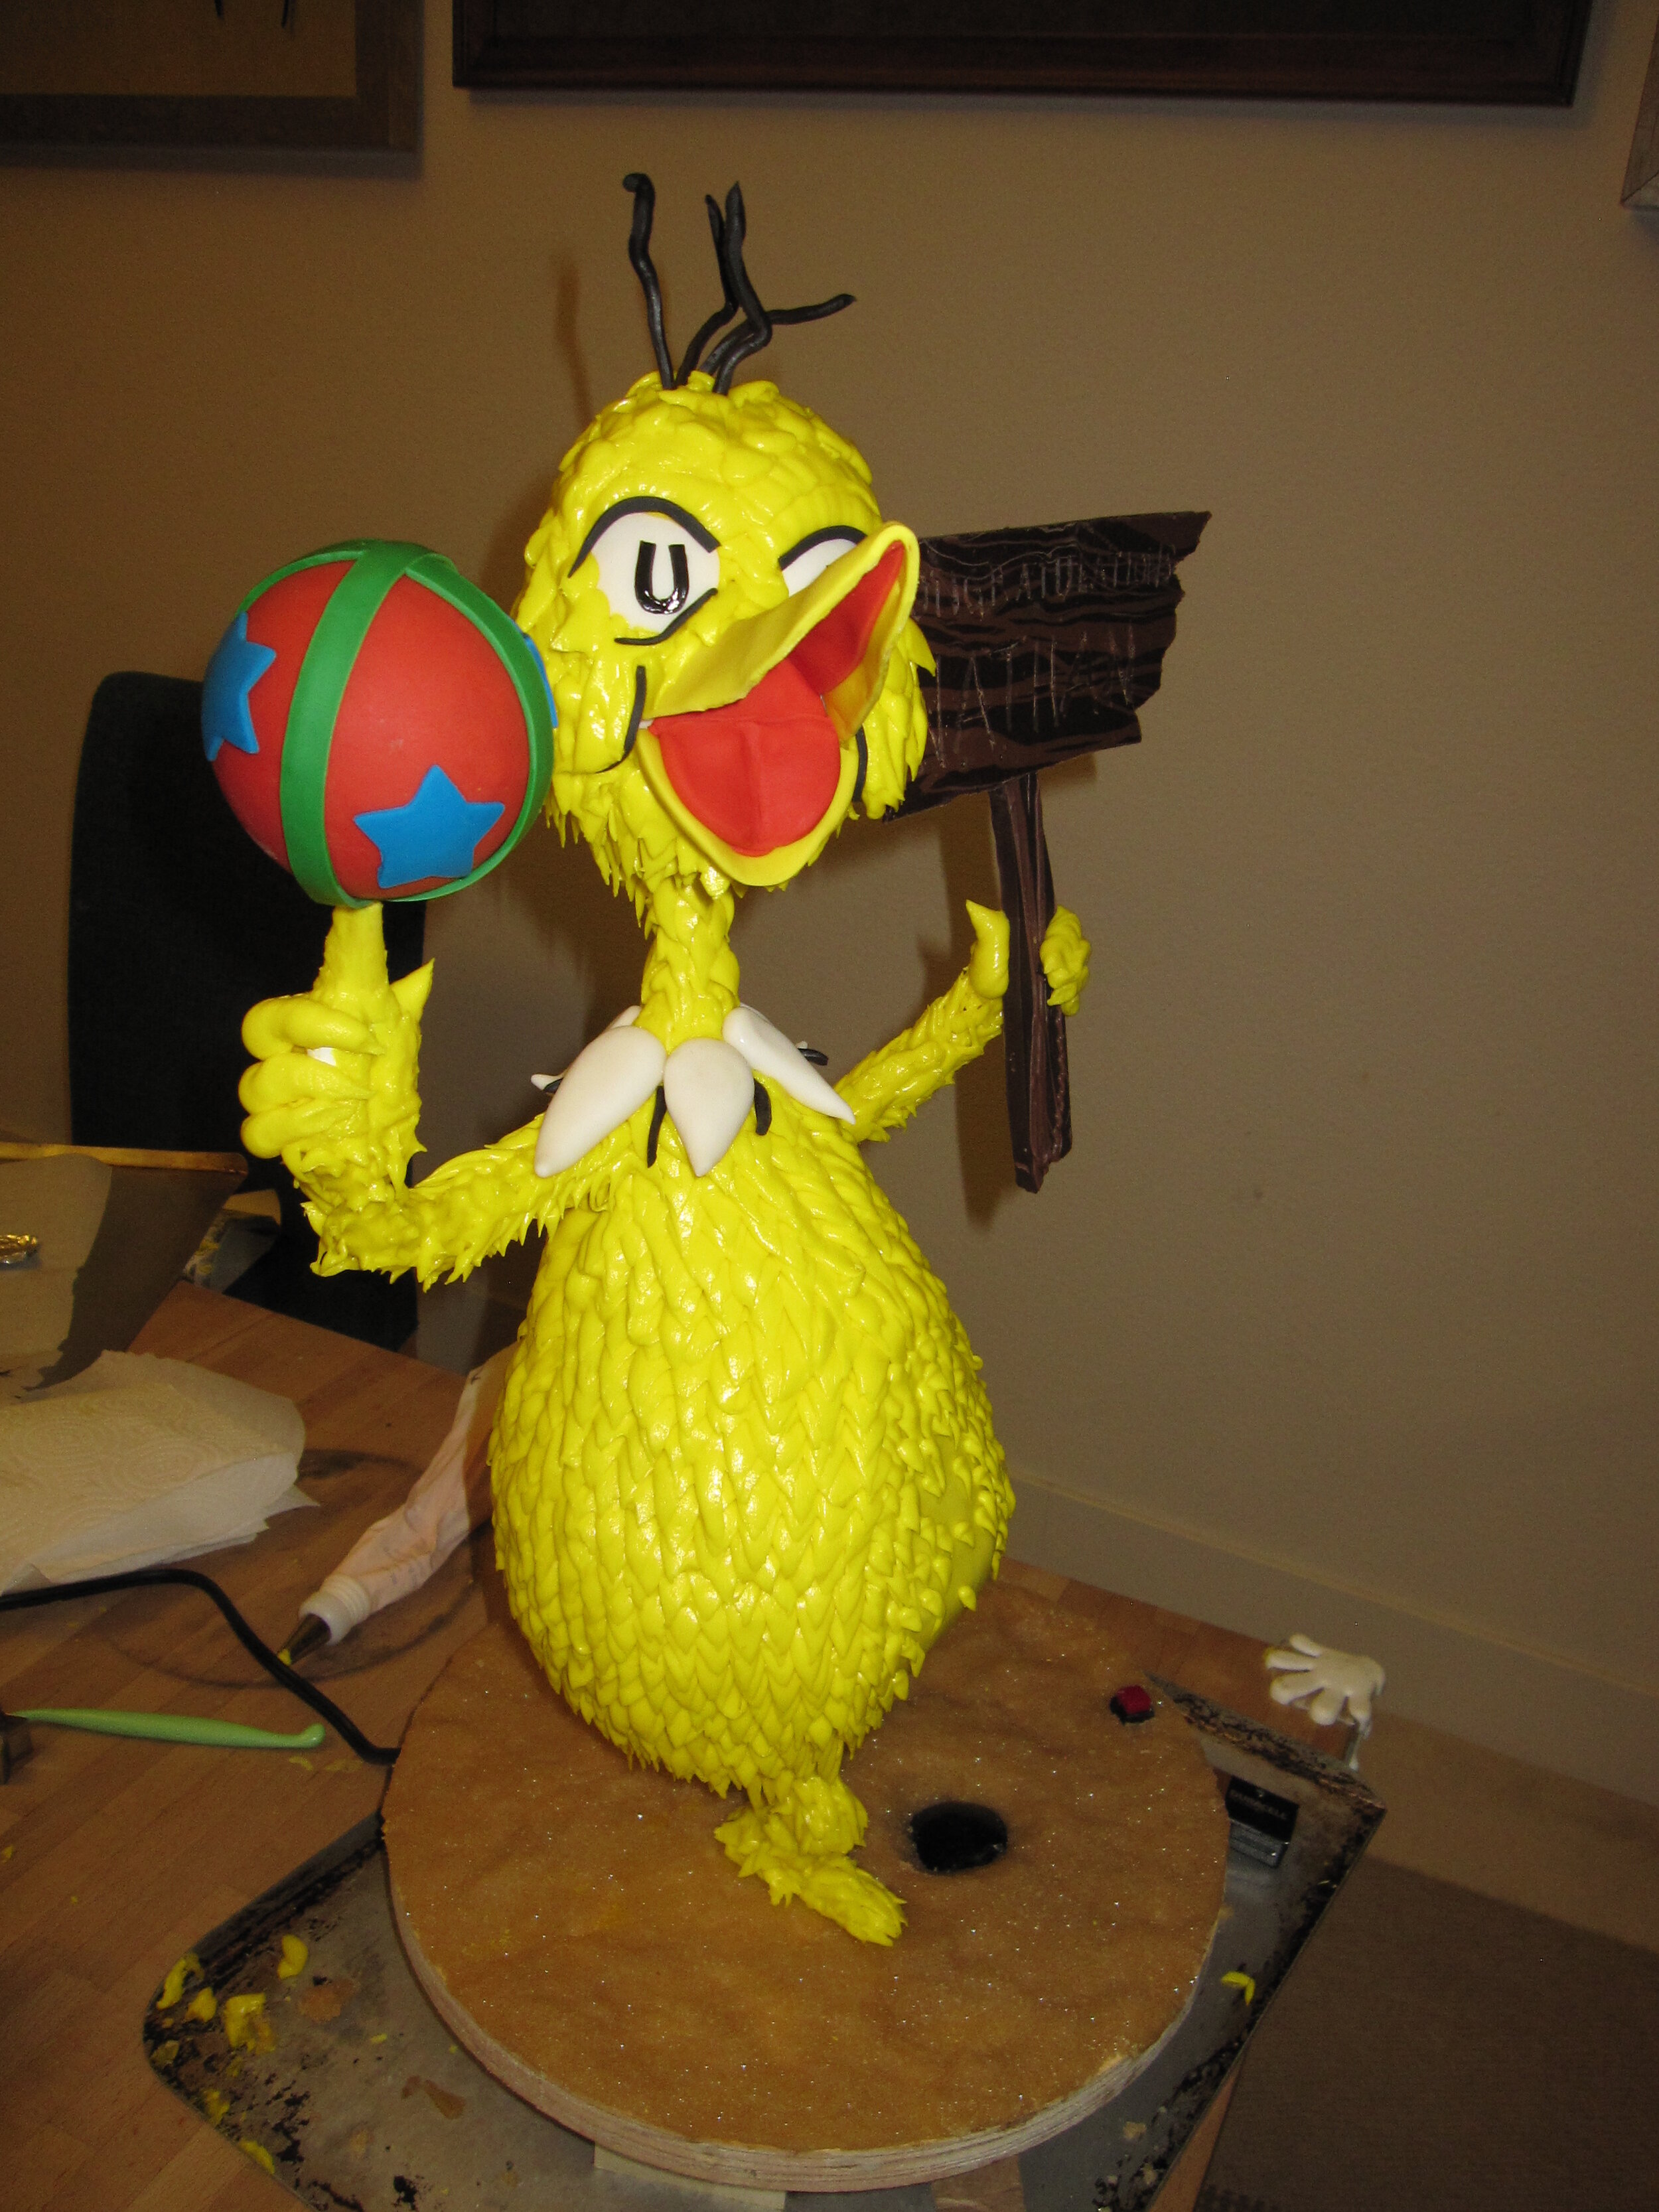
For the final details, I used a combination of gum paste and dark chocolate tinted with black food coloring. The only thing I really wasn’t happy with was the shape of the eyes. Real Sneetches have eyes that are slightly taller than they are wide. Mine wound up wider than they were tall, which made my Sneetch look slightly untrustworthy.
We served the cake at a very small graduation party. Alex was delighted, though she was also deeply concerned with the effects.
When we plugged in the blacklight it got very hot, which began to melt the pressed sugar above it. So Alex spent the entire few minutes that the blacklight was on begging us to turn it off, apparently under the impression that it might melt the entire cake. The star did show up a little bit in the blacklight, but it certainly wasn’t an attention-grabbing effect.
The ball spun well, though not fast enough to fully blend the colors the way that I had hoped. Again, Alex was deeply concerned, this time because the ball’s rotation shook the entire cake on its thin little legs.
Alex’s little brother Sam was especially delighted with the cake ball. For days after he ate it, he kept asking us, “Where’s-a cake ball?” and we had to keep reminding him that it was in his tummy.