50th Anniversary Cake
We couldn’t celebrate my parents’ 50th anniversary in person, but that didn’t stop me from making them a cake!
We couldn’t celebrate my parents’ 50th anniversary in person, but that didn’t stop me from making them a cake! I tried to make a nice small cake that would be a reasonable size for two people. As usual, despite my best efforts, I made four times as much cake as the occasion required.
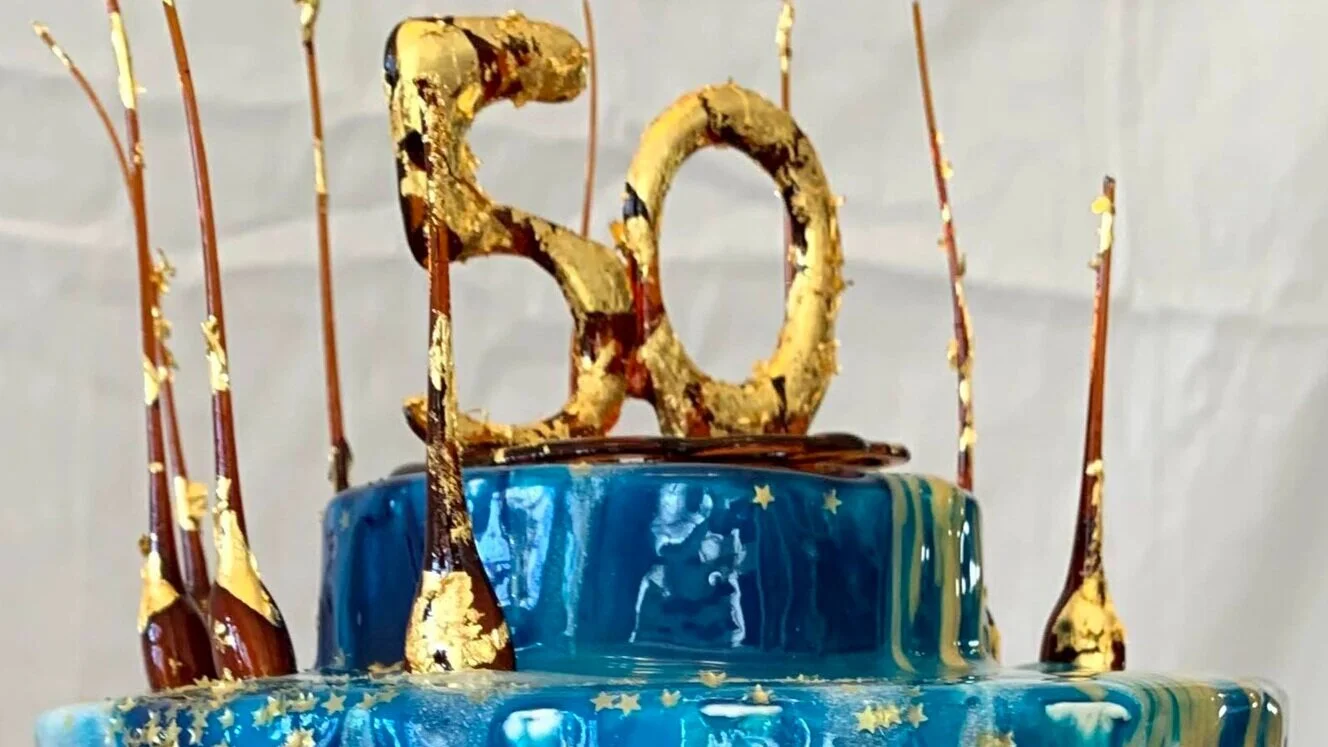
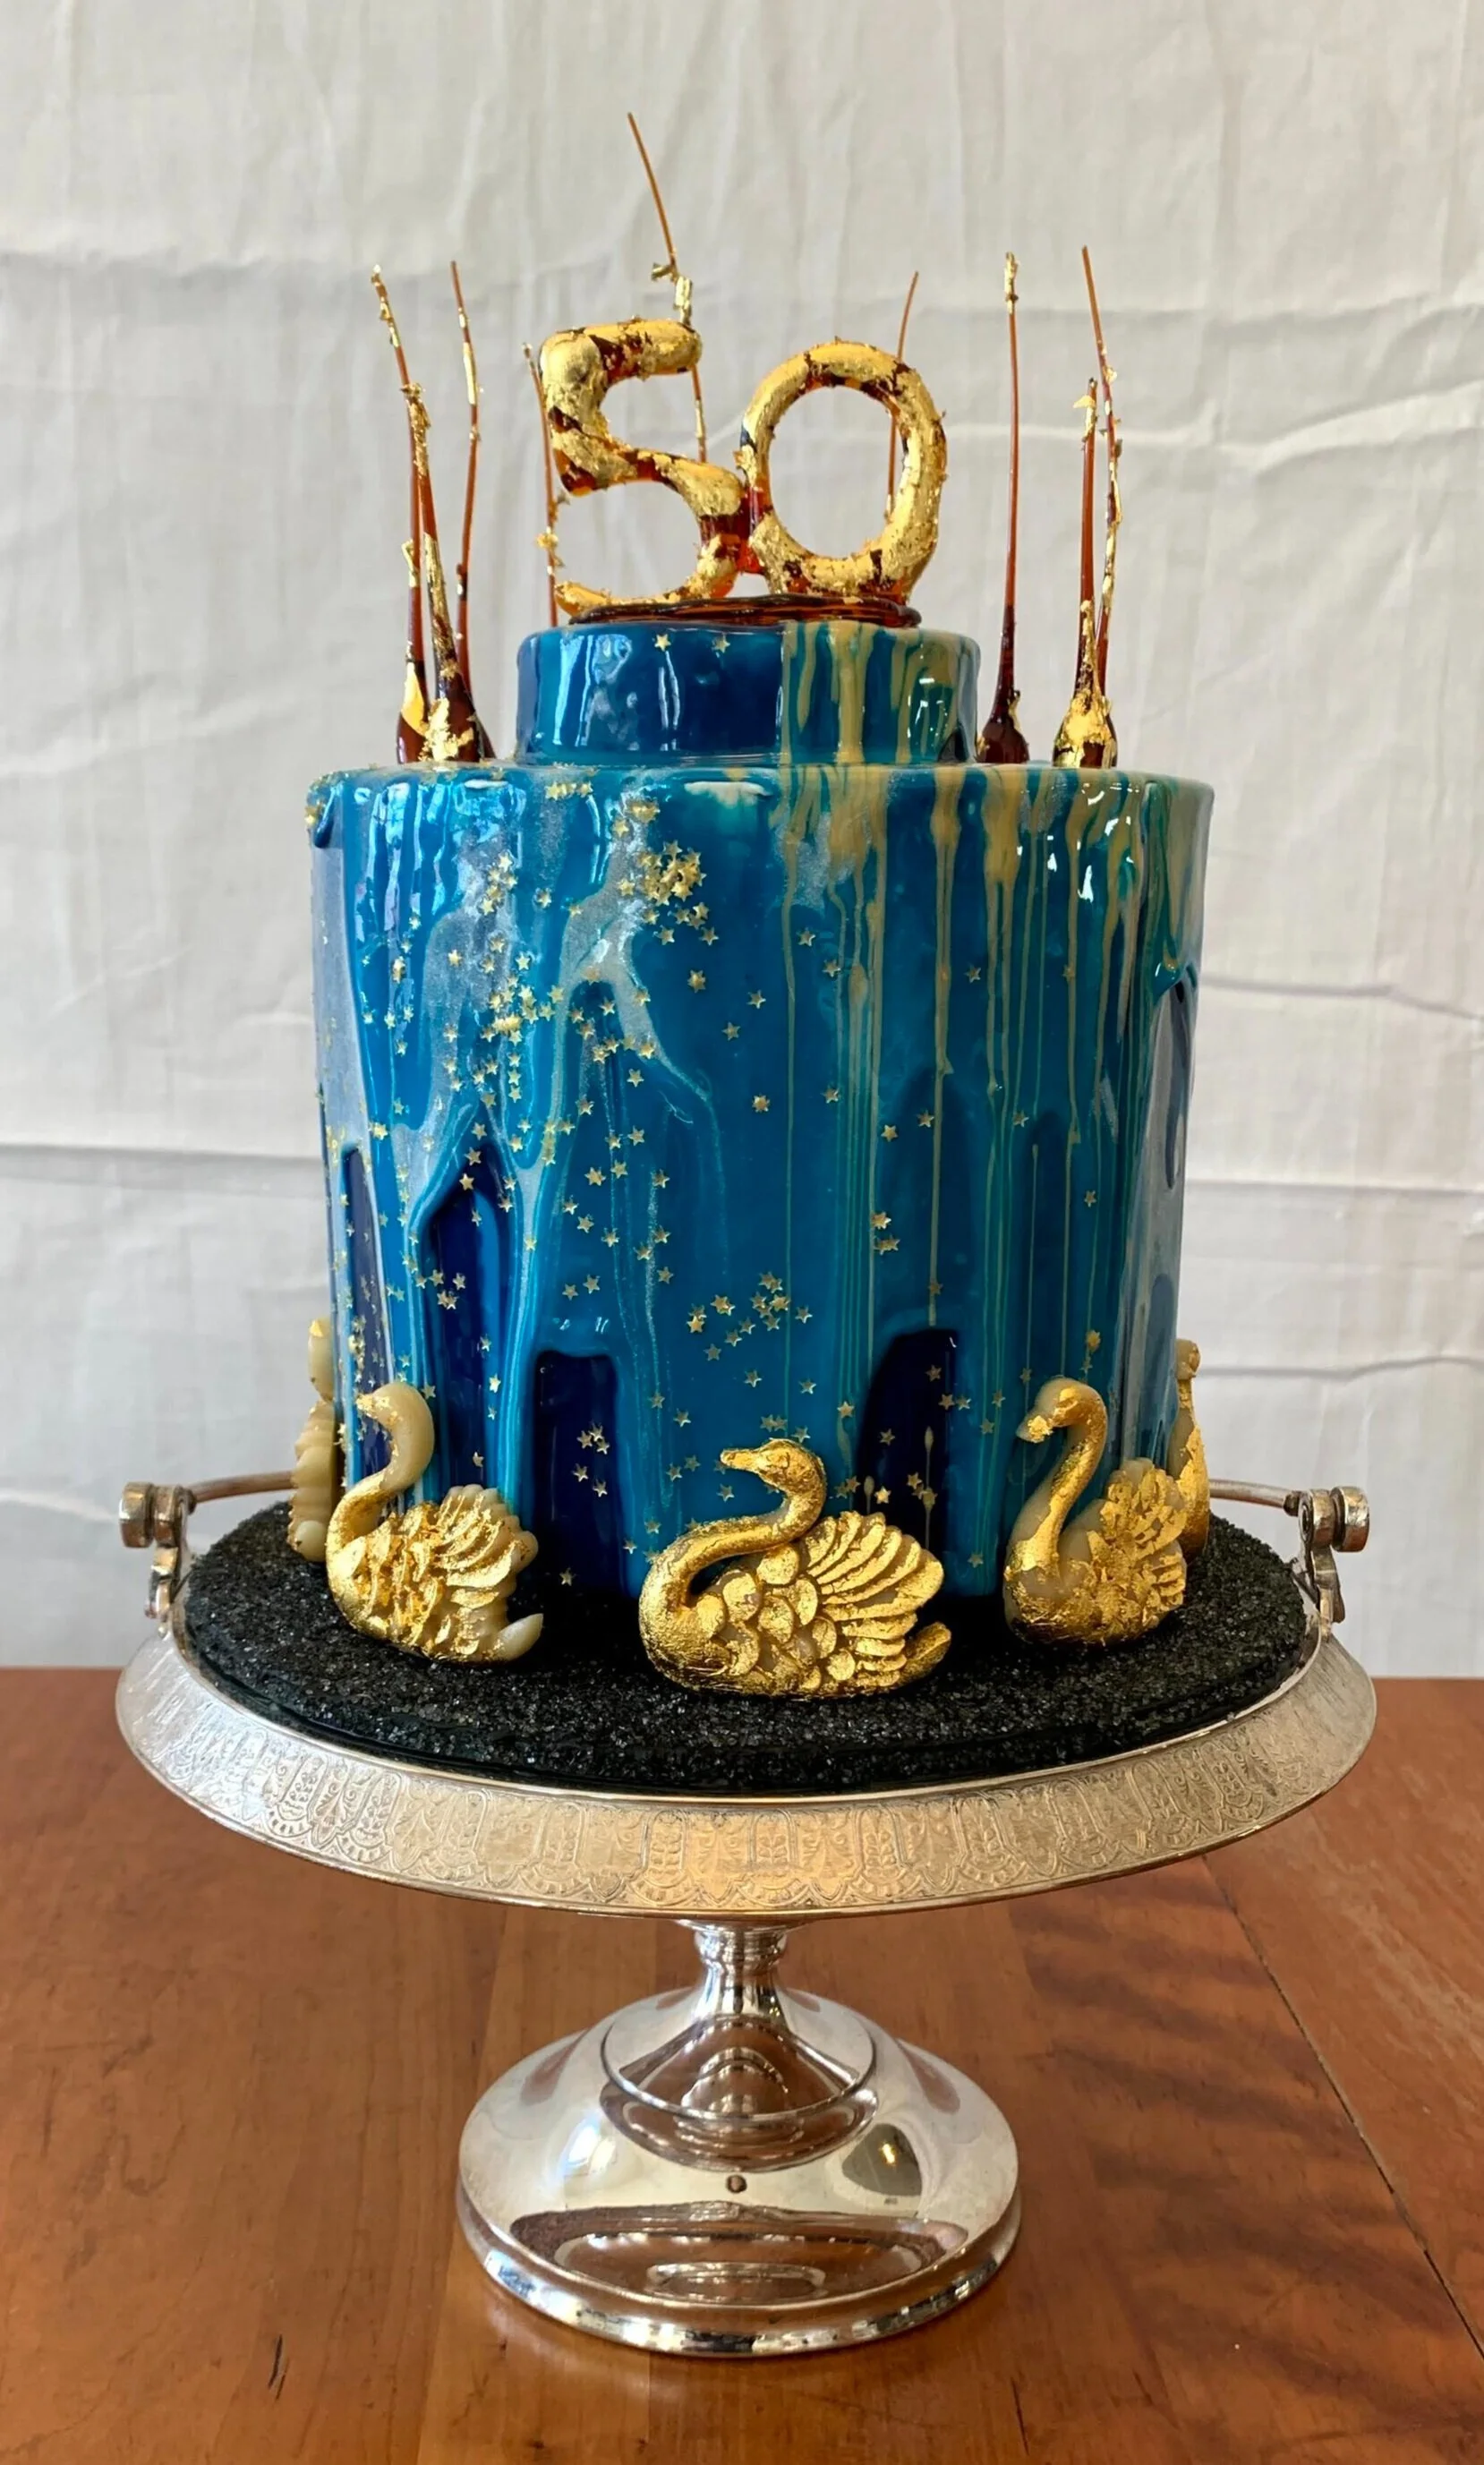
The outside of the cake is a blue, white, and gold mirror glaze with golden star sprinkles.

The swans at the bottom are marzipan with gold leaf on them because there were little plastic swans on Mom and Dad’s wedding cake 50 years ago.
The 50 on top is made of caramel and around the perimeter are almonds dipped in caramel.

The platter that the cake is on was (we believe) used in the wedding of some of Dad’s ancestors back three or four generations. We think it dates to the late nineteenth century. My sister and I had it repaired and replated specially for this occasion.
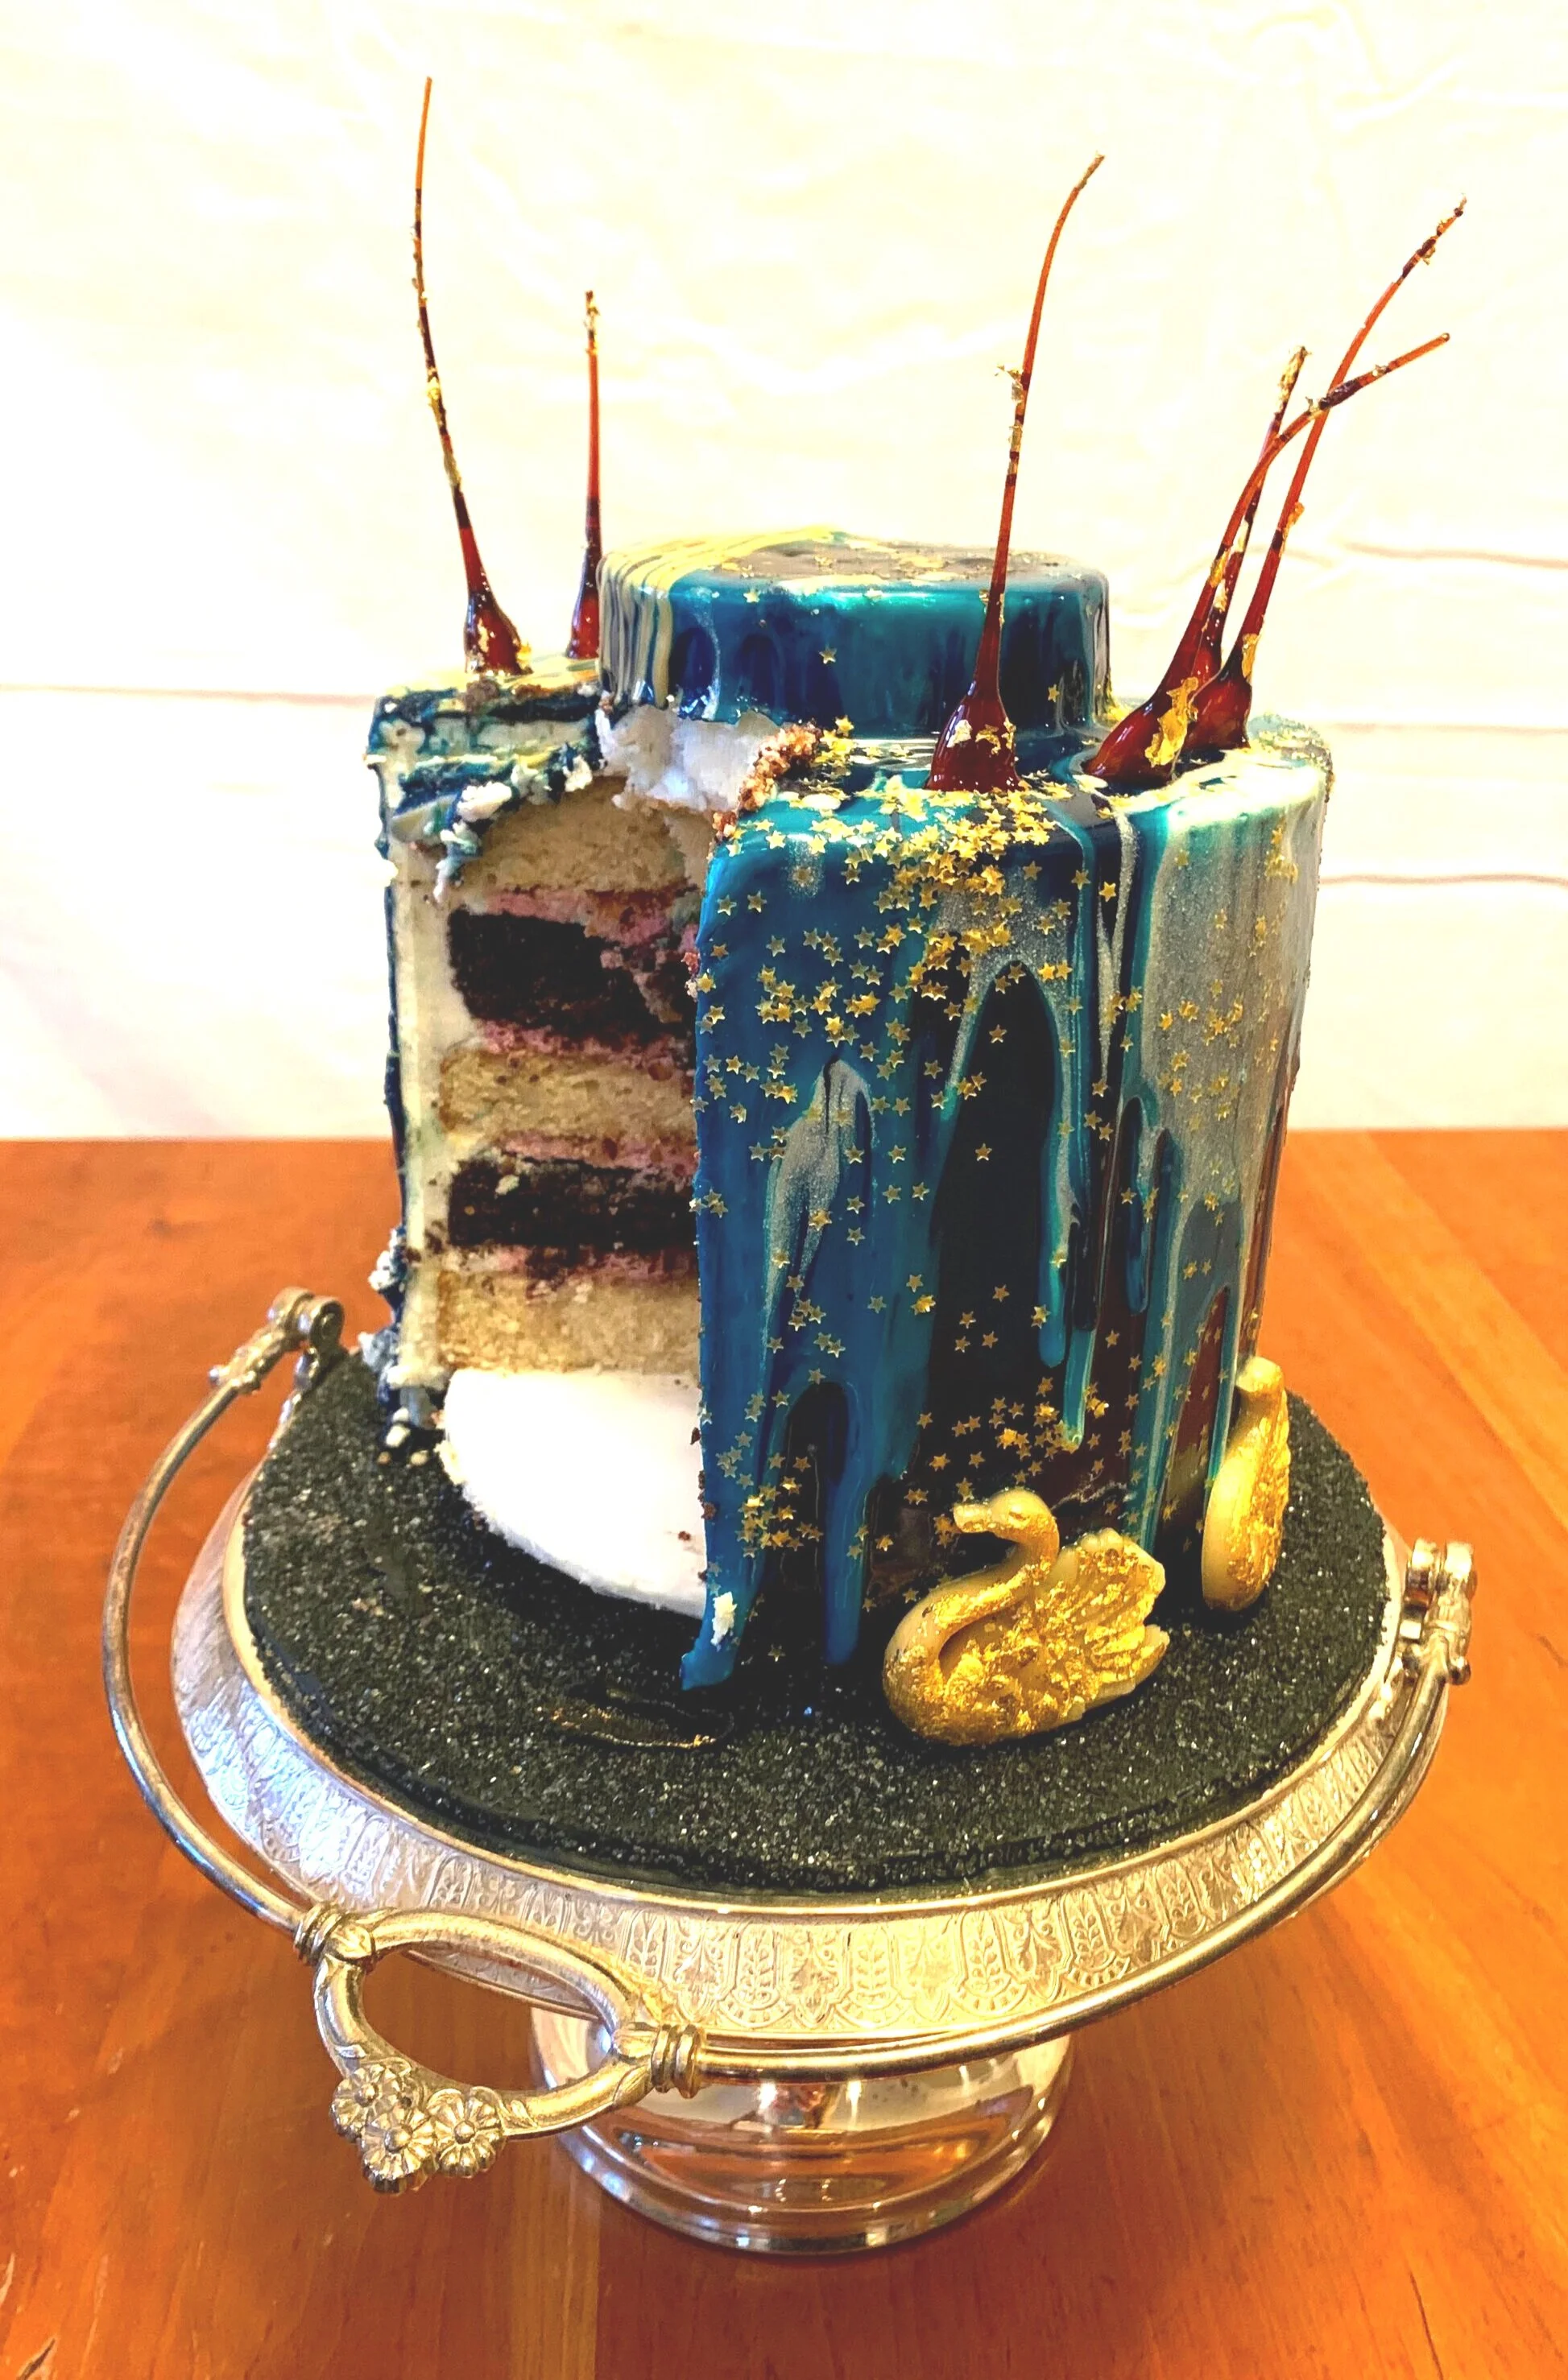
On the inside, the cake is alternating layers of almond cake and chocolate cake with cherry swiss buttercream between the layers. It’s meant to be reminiscent of a gelato bar that was served at Mom and Dad’s wedding, which is half chocolate, half almond with cherries in the middle.

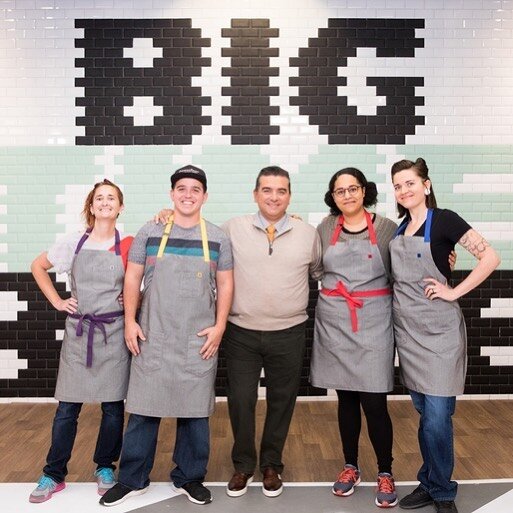
Big Time Bake
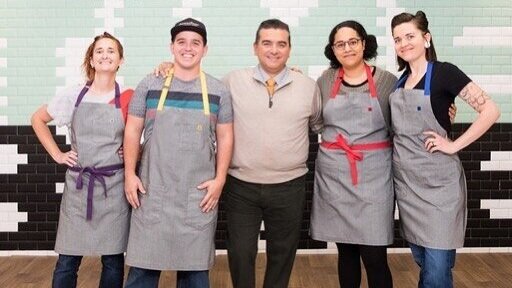
I’m back on the Food Network! You can watch me in the “Fantasy” episode of Big Time Bake.

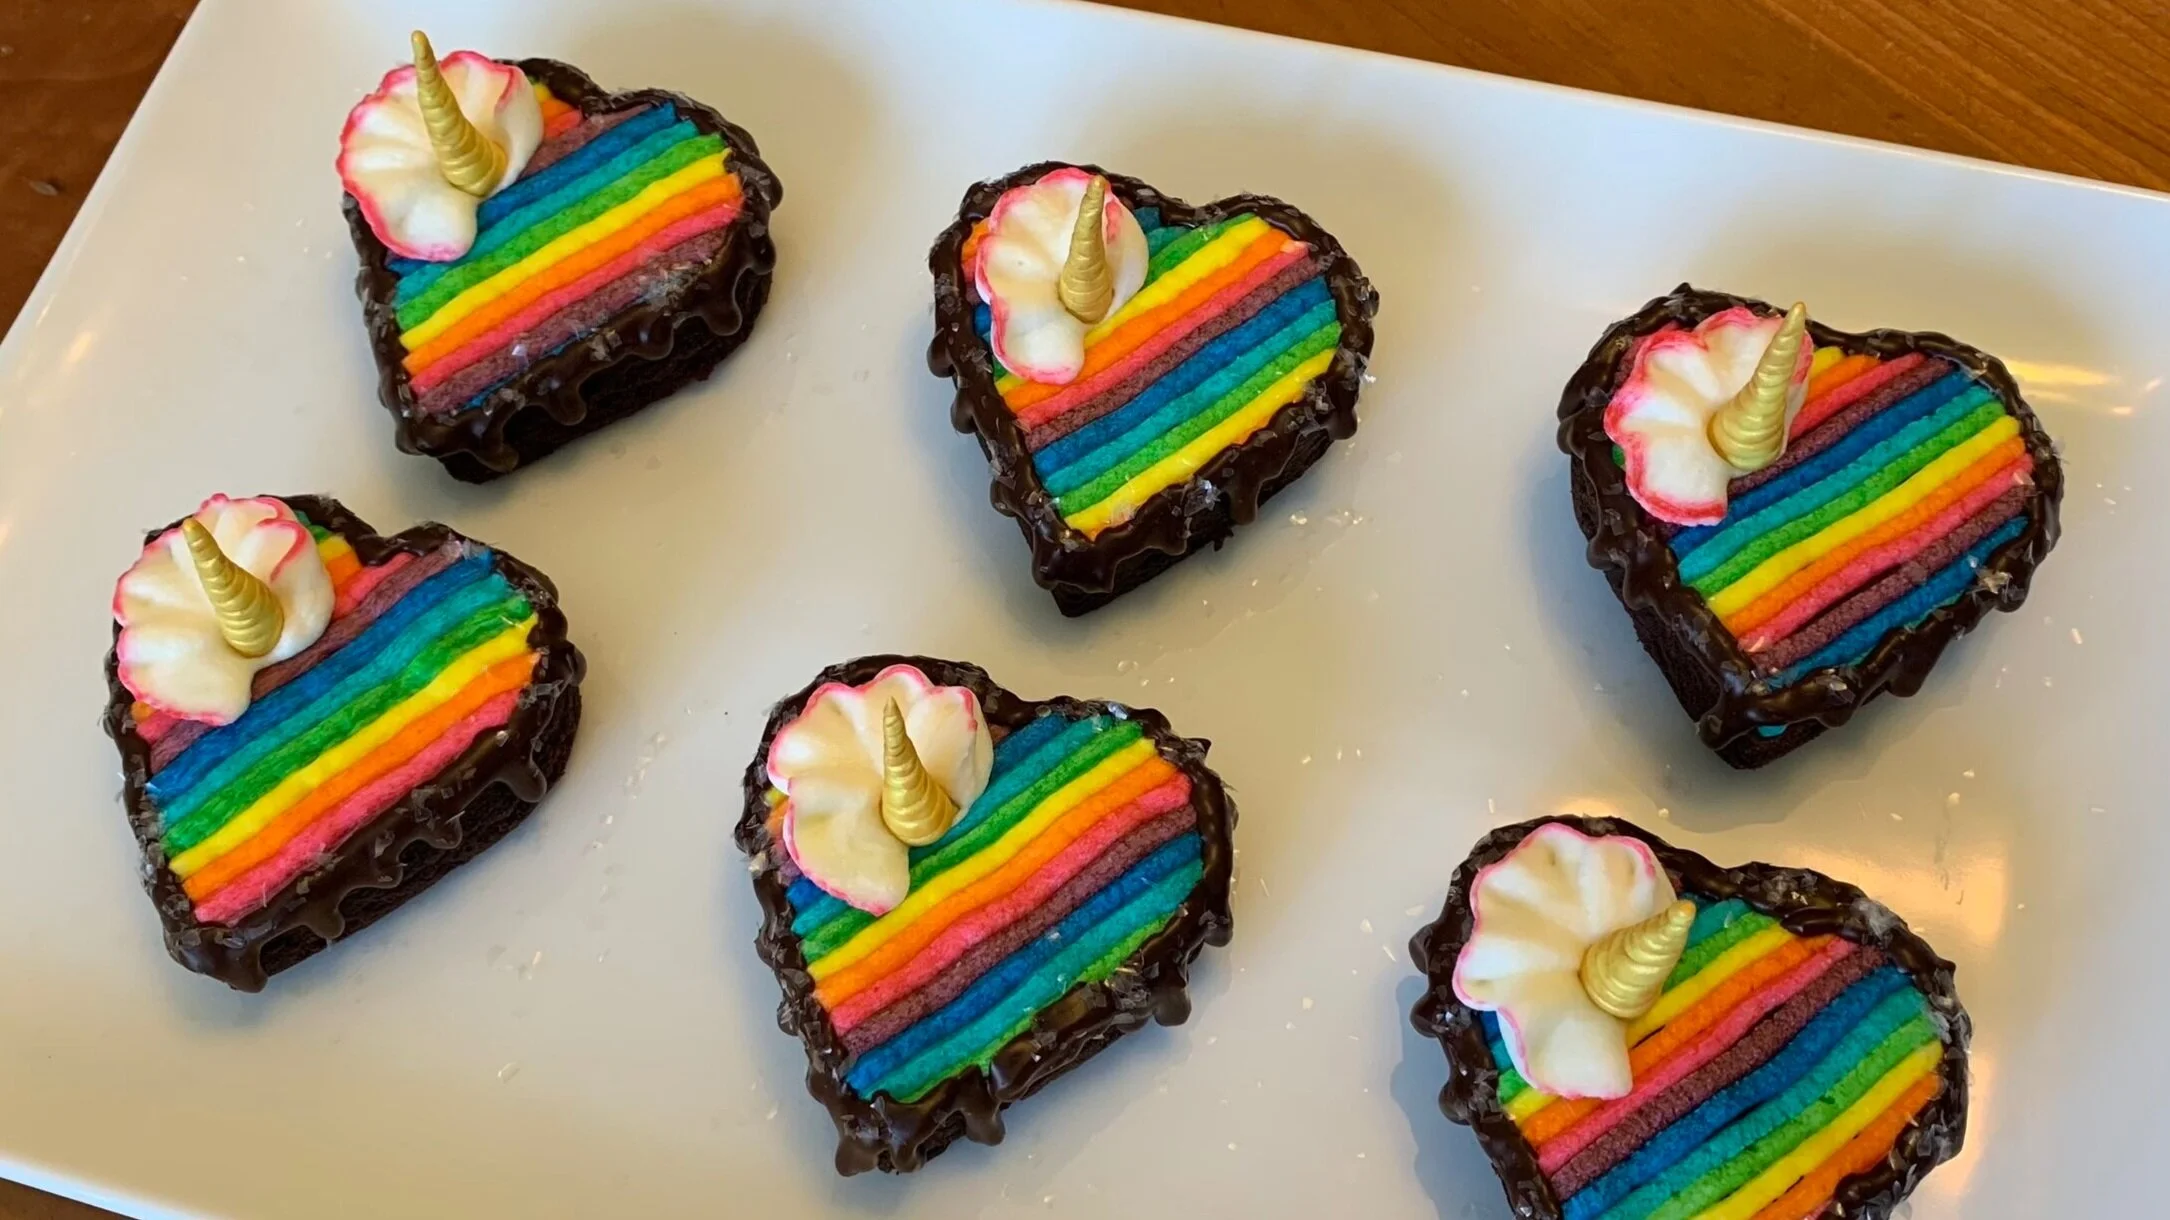
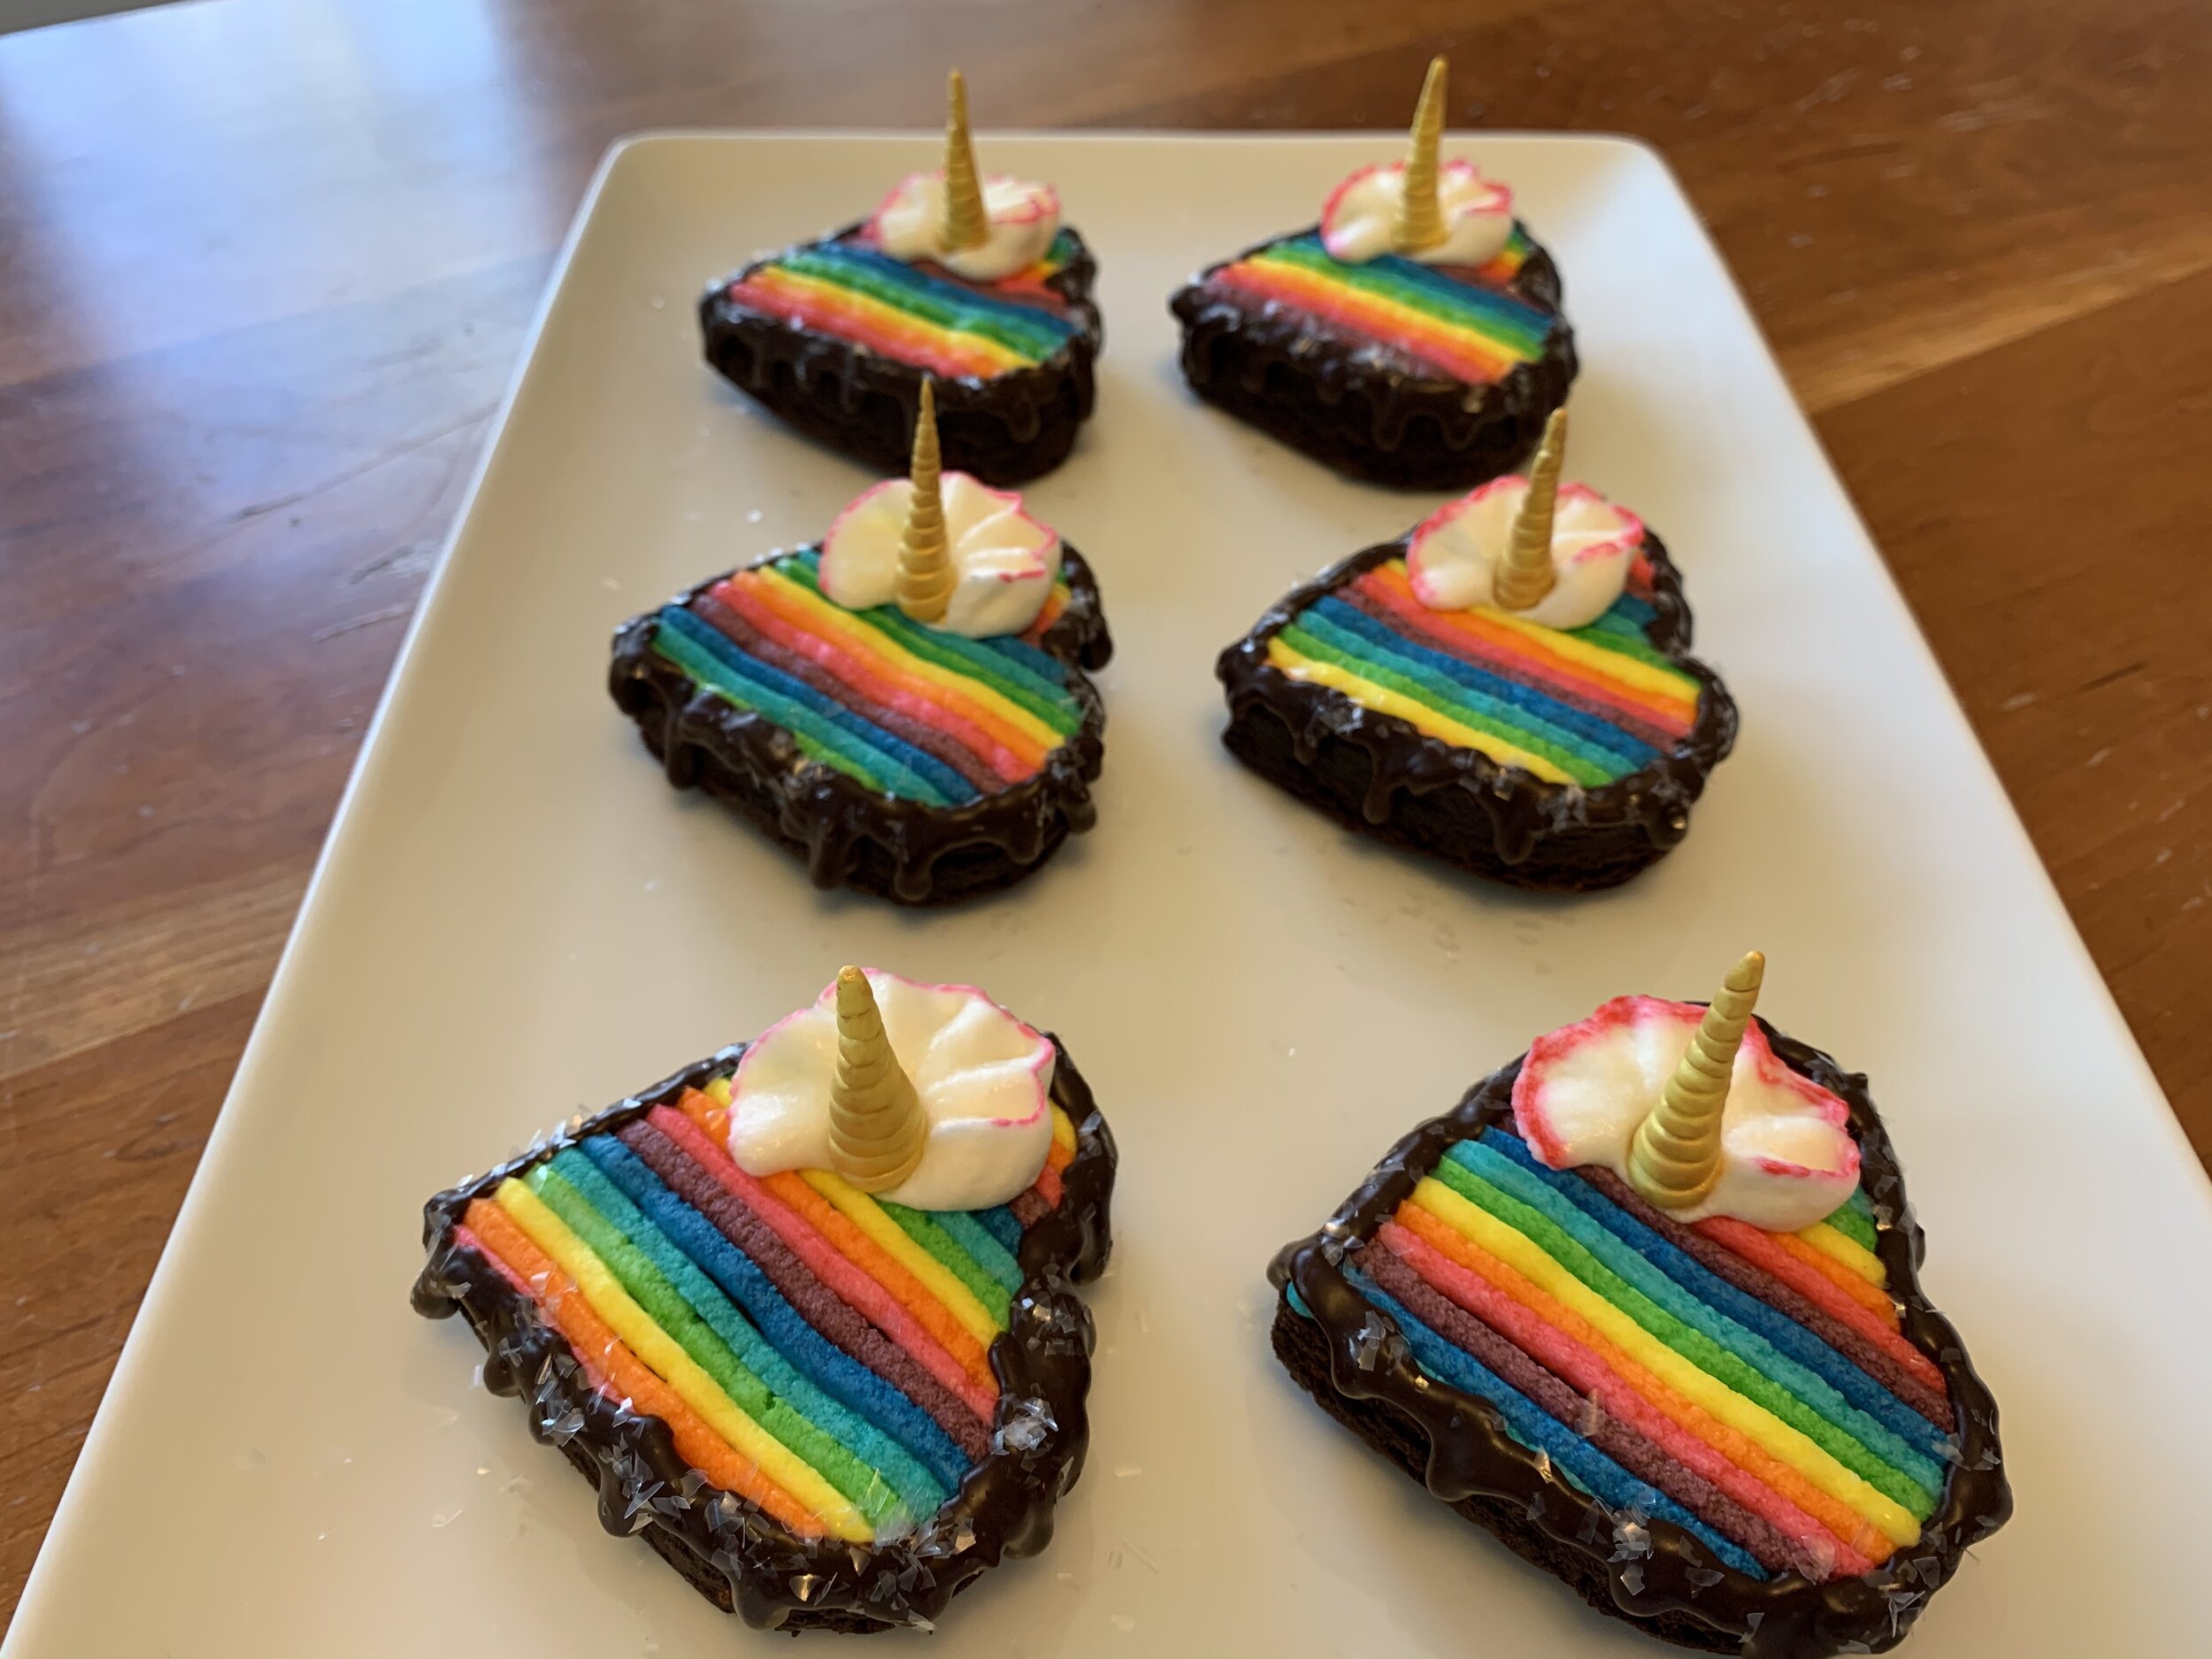
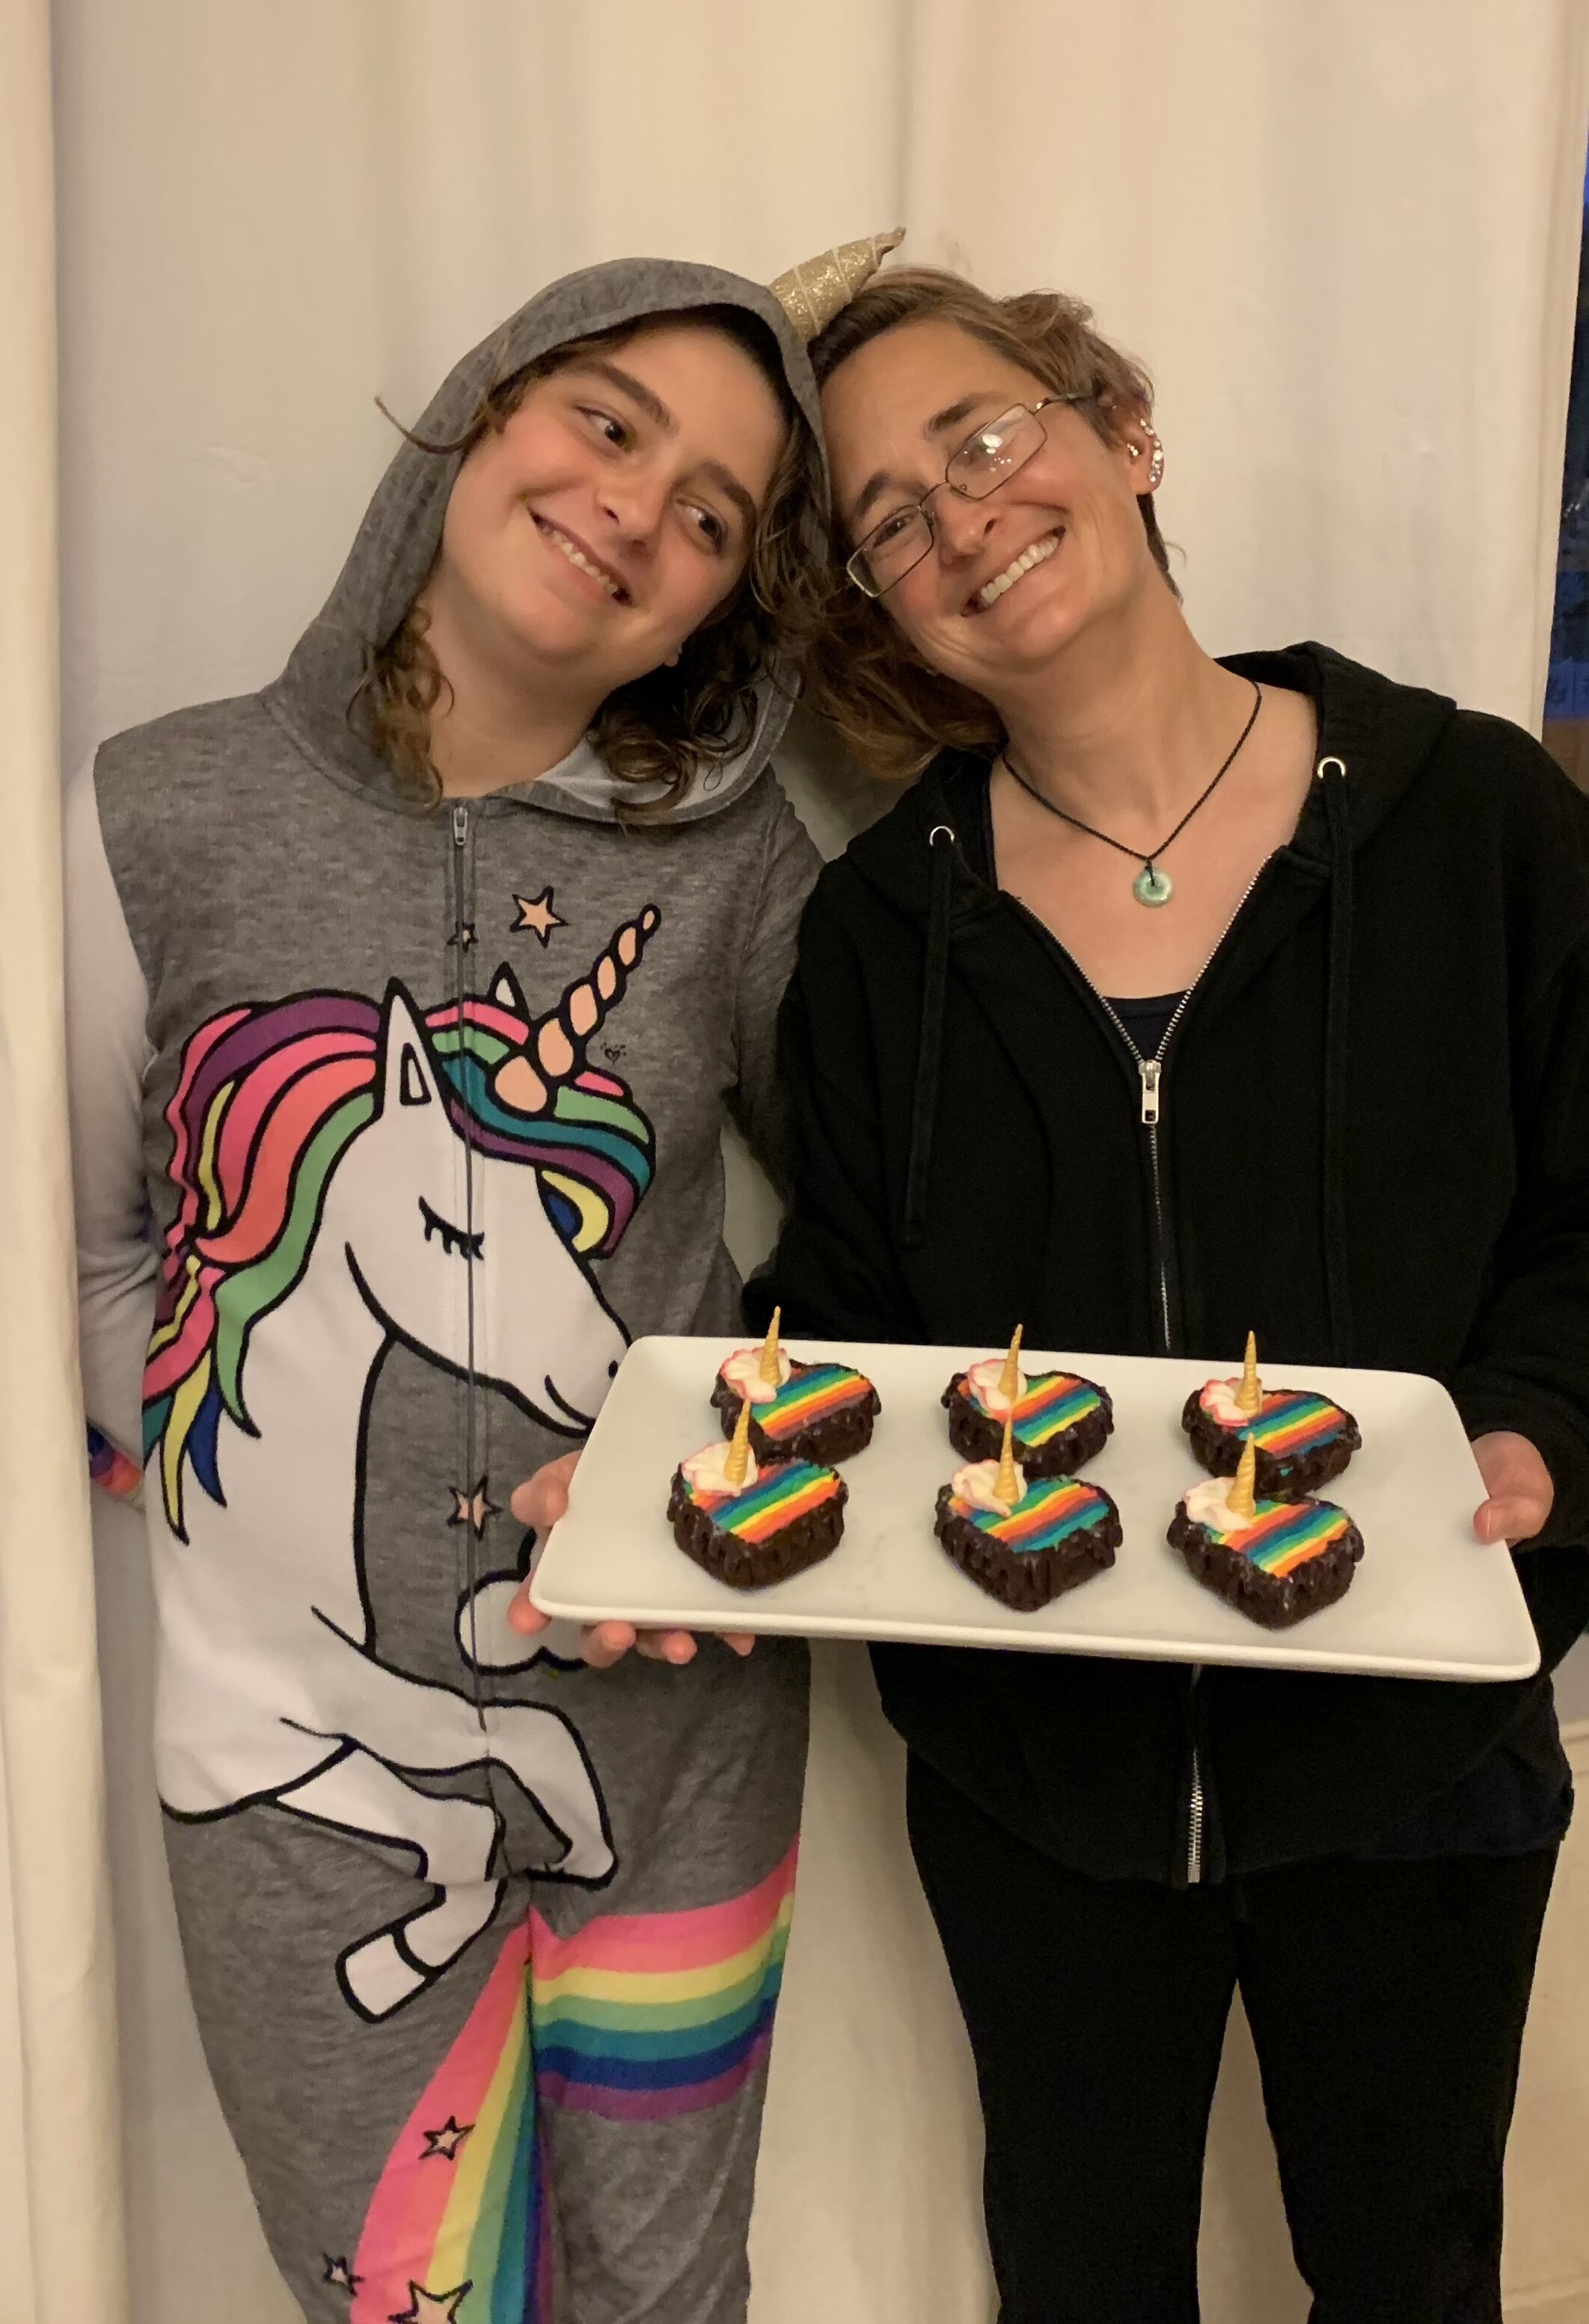
Rainbow Unicorn Brownies
Rainbow Unicorn Brownies for my rainbow unicorn angel!

Rainbow unicorn brownies for my rainbow unicorn angel!

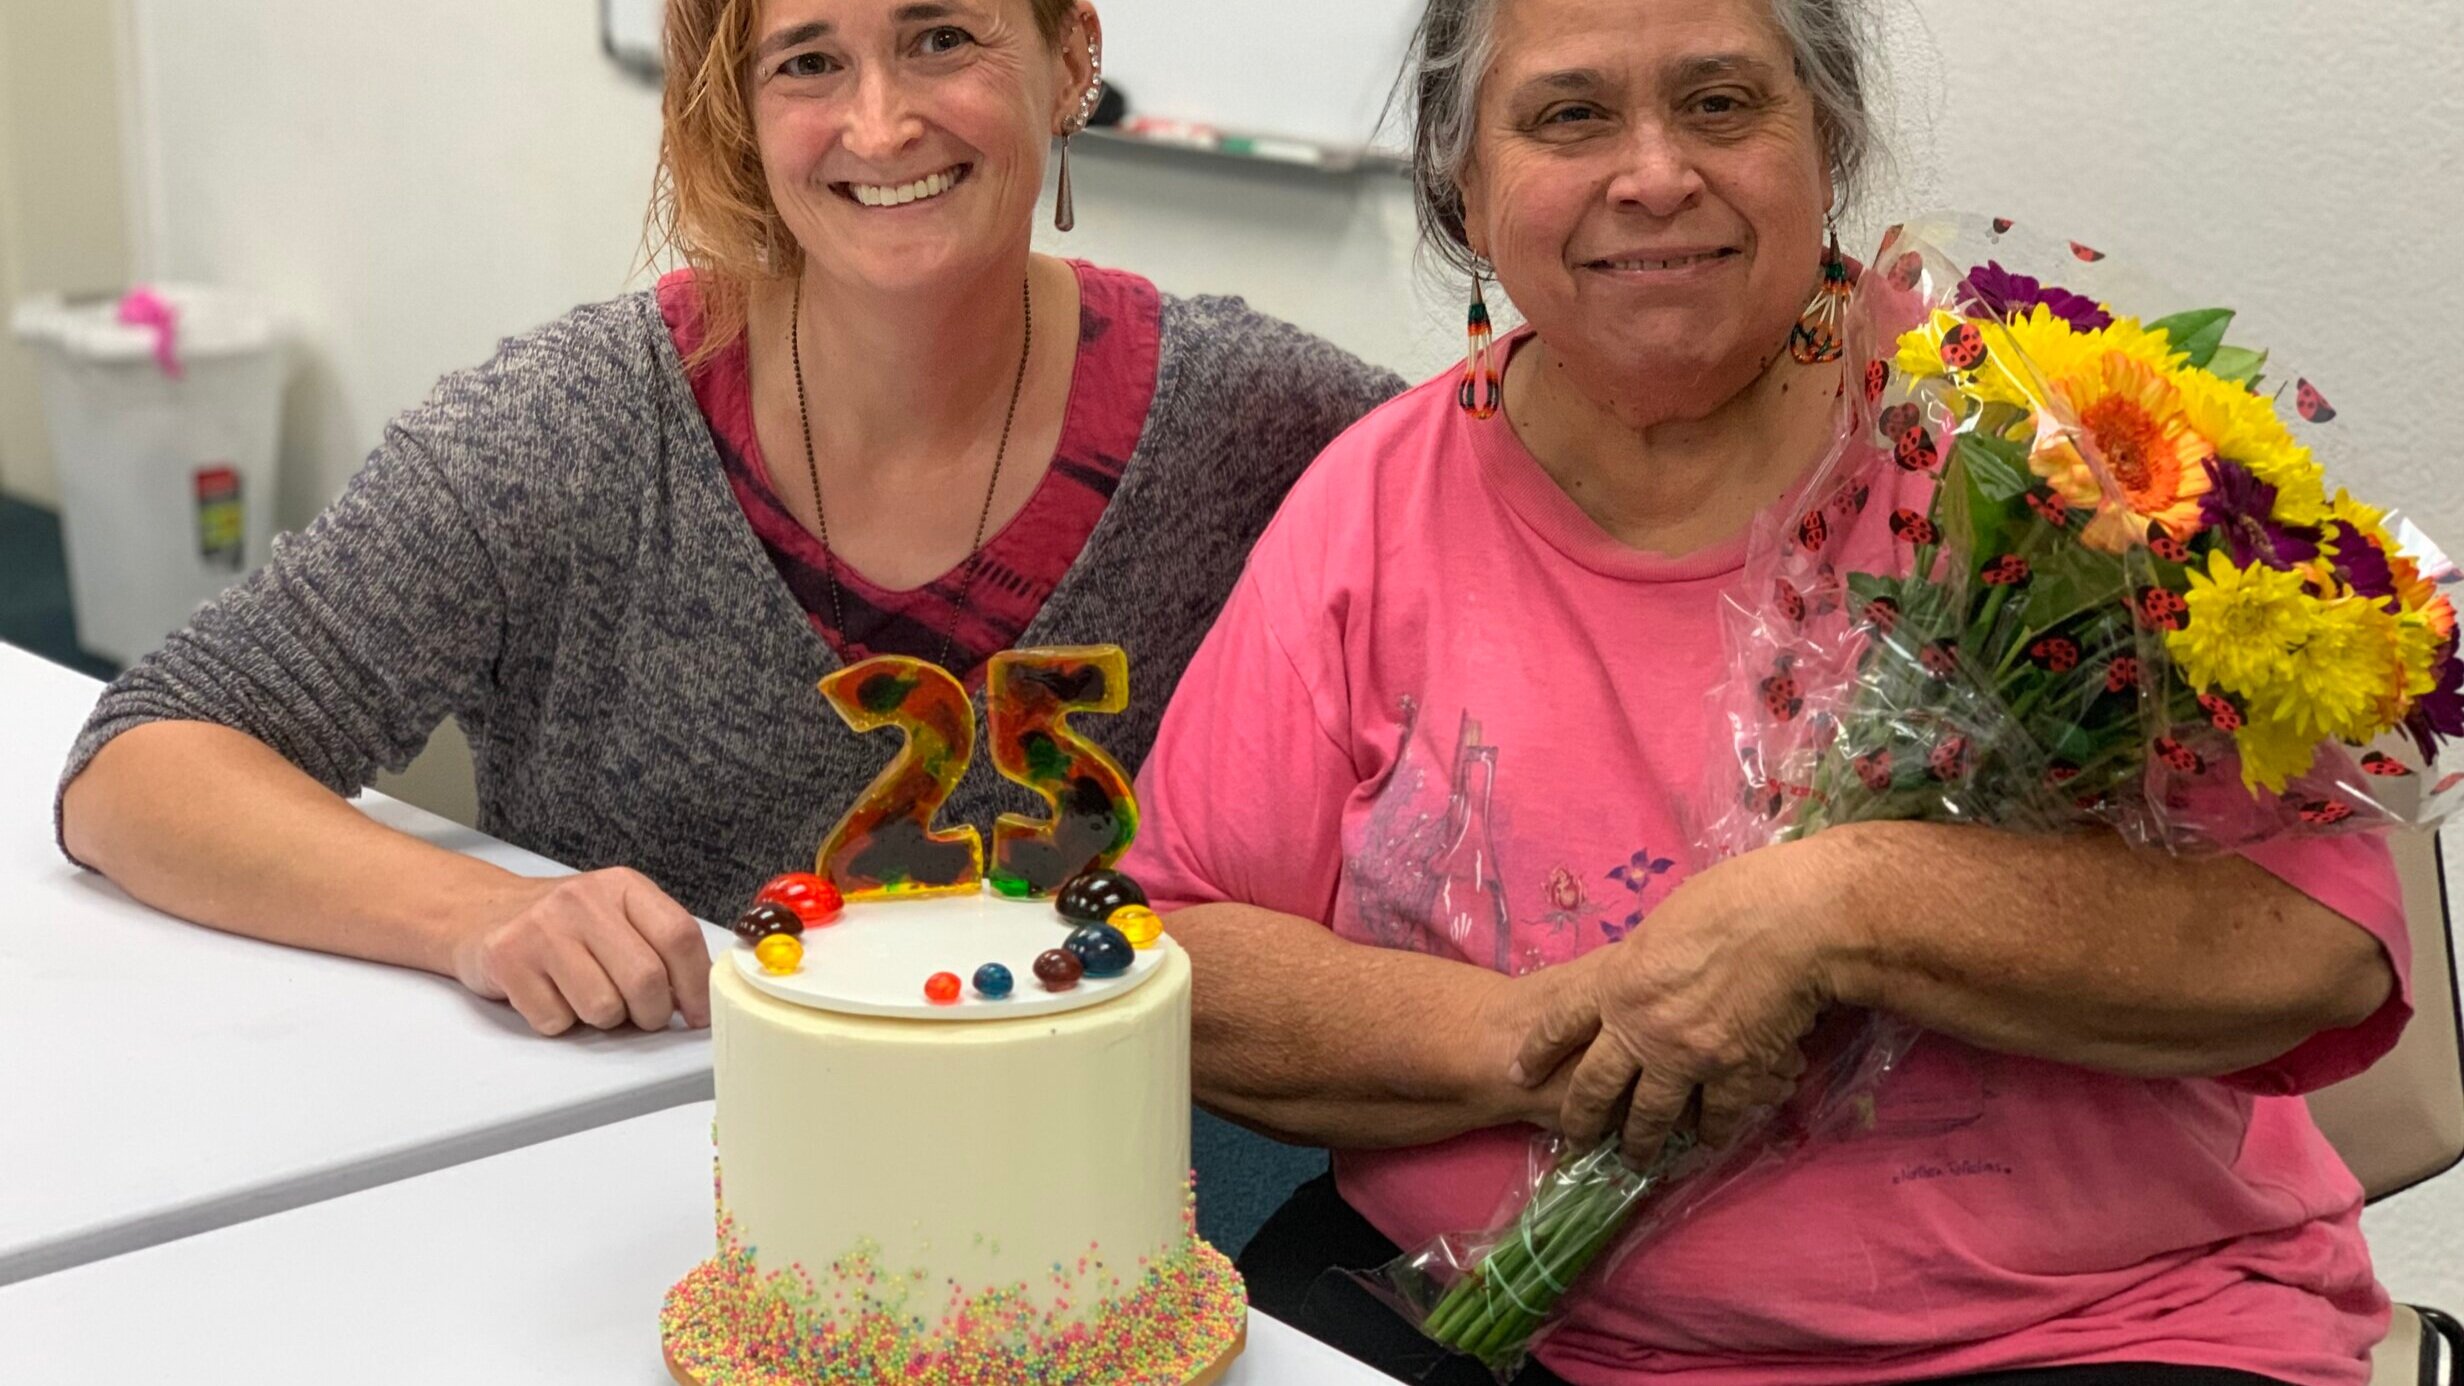
25 Cake
My friend just reached 25 years working for our theater company! I made her this cute little cake to celebrate.

My friend just reached 25 years working for our theater company! I made her this cute little cake to celebrate. The cake is Mexican chocolate and vanilla with buttercream frosting. The topper is isomalt.

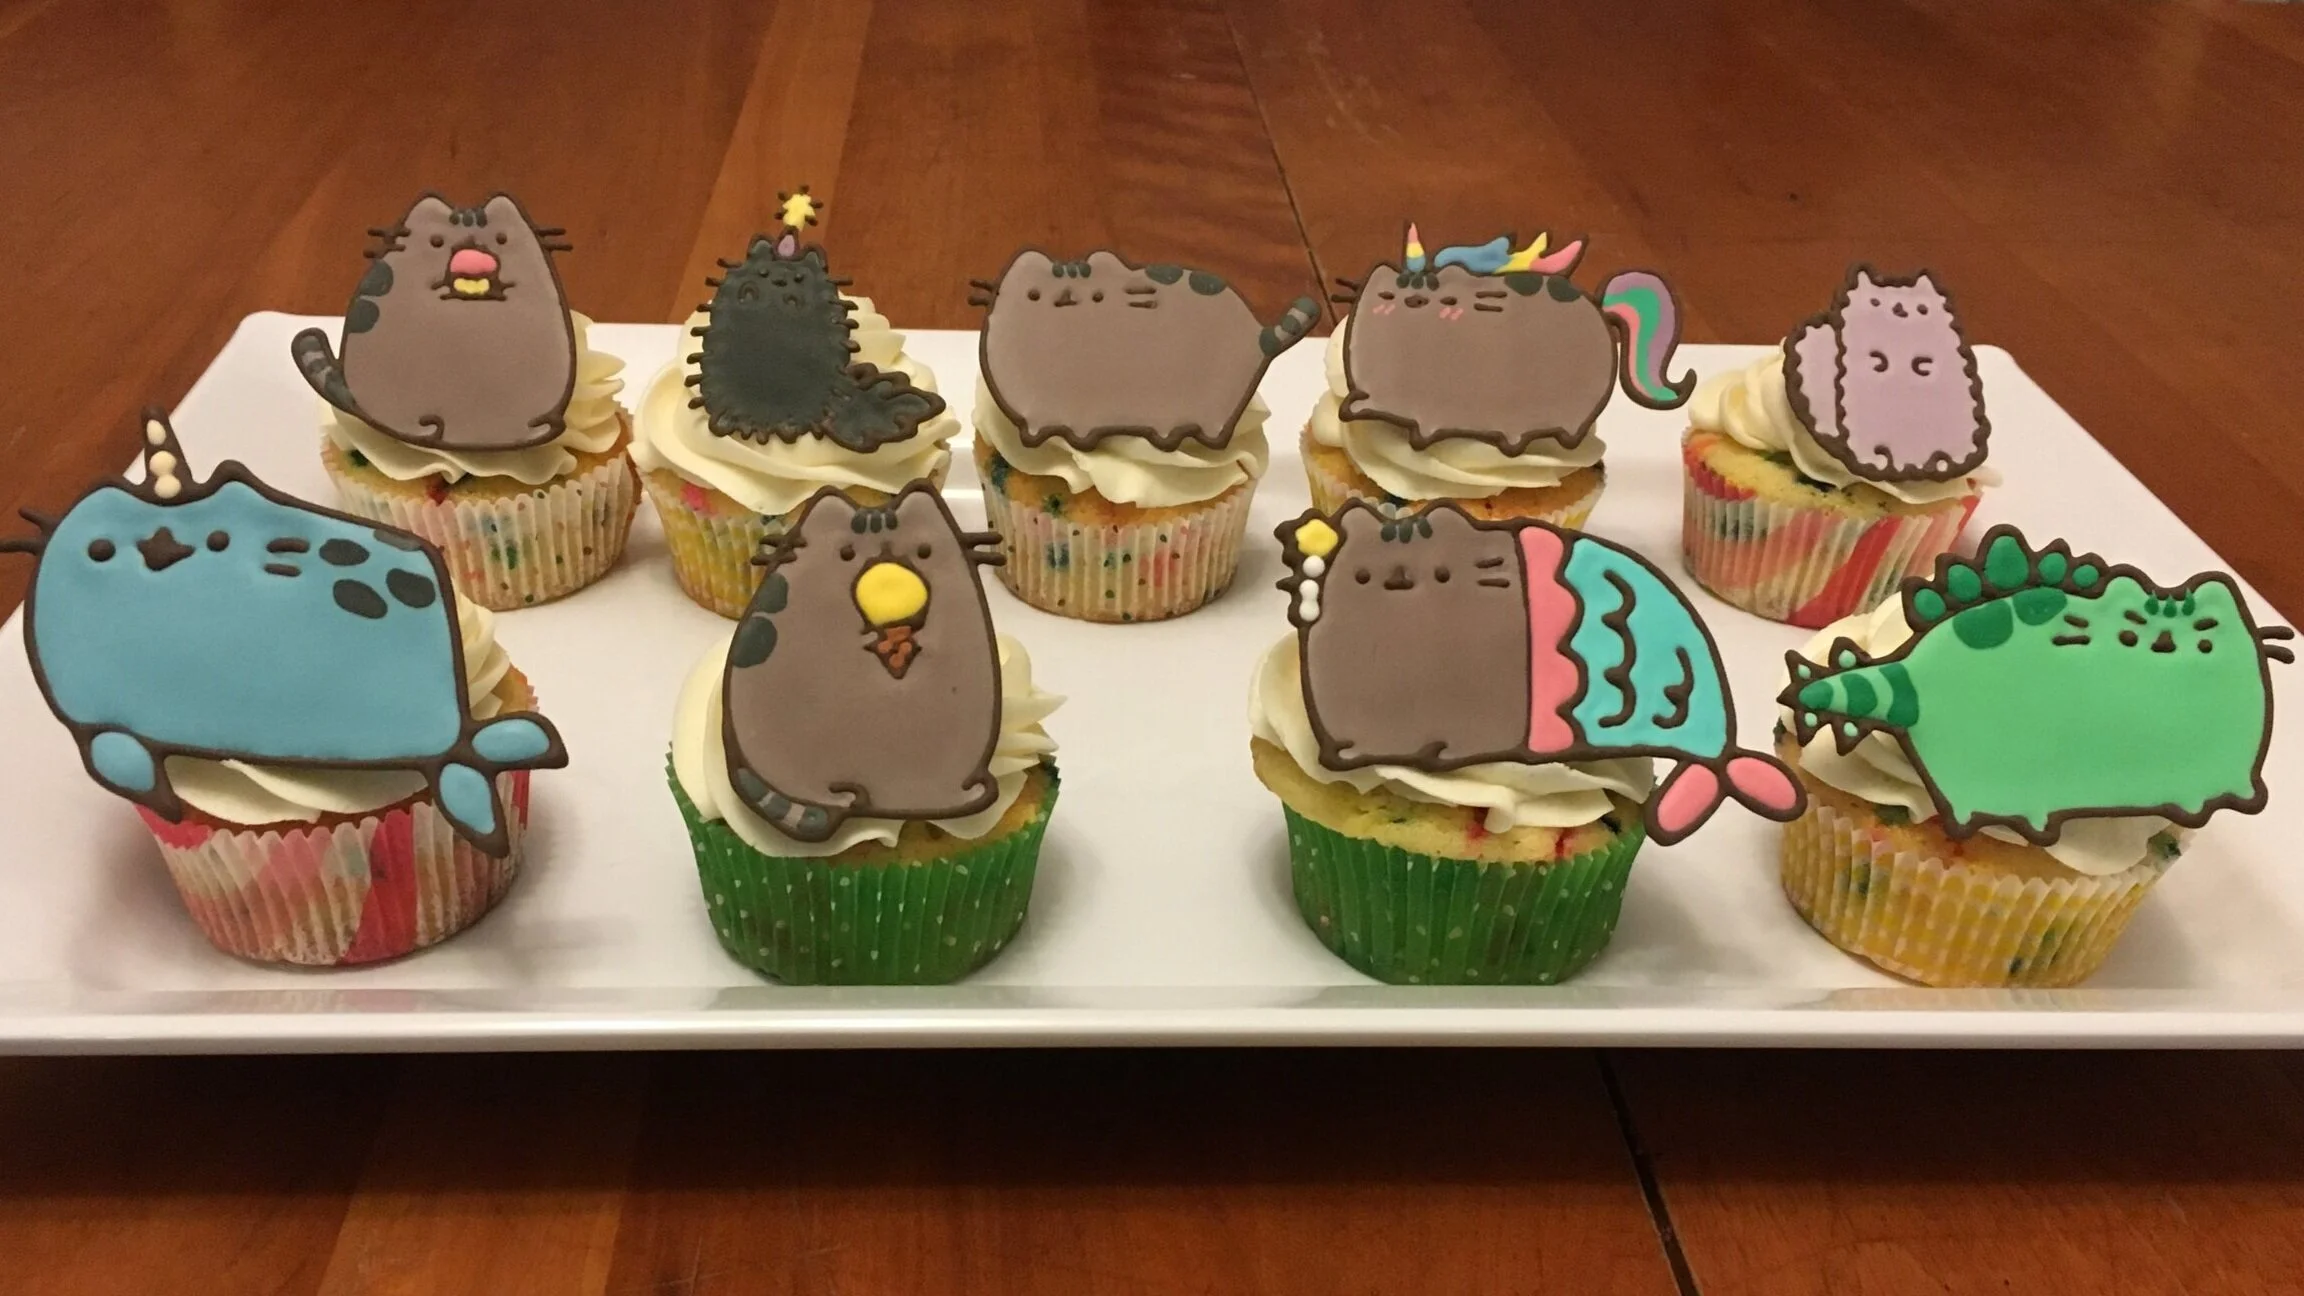
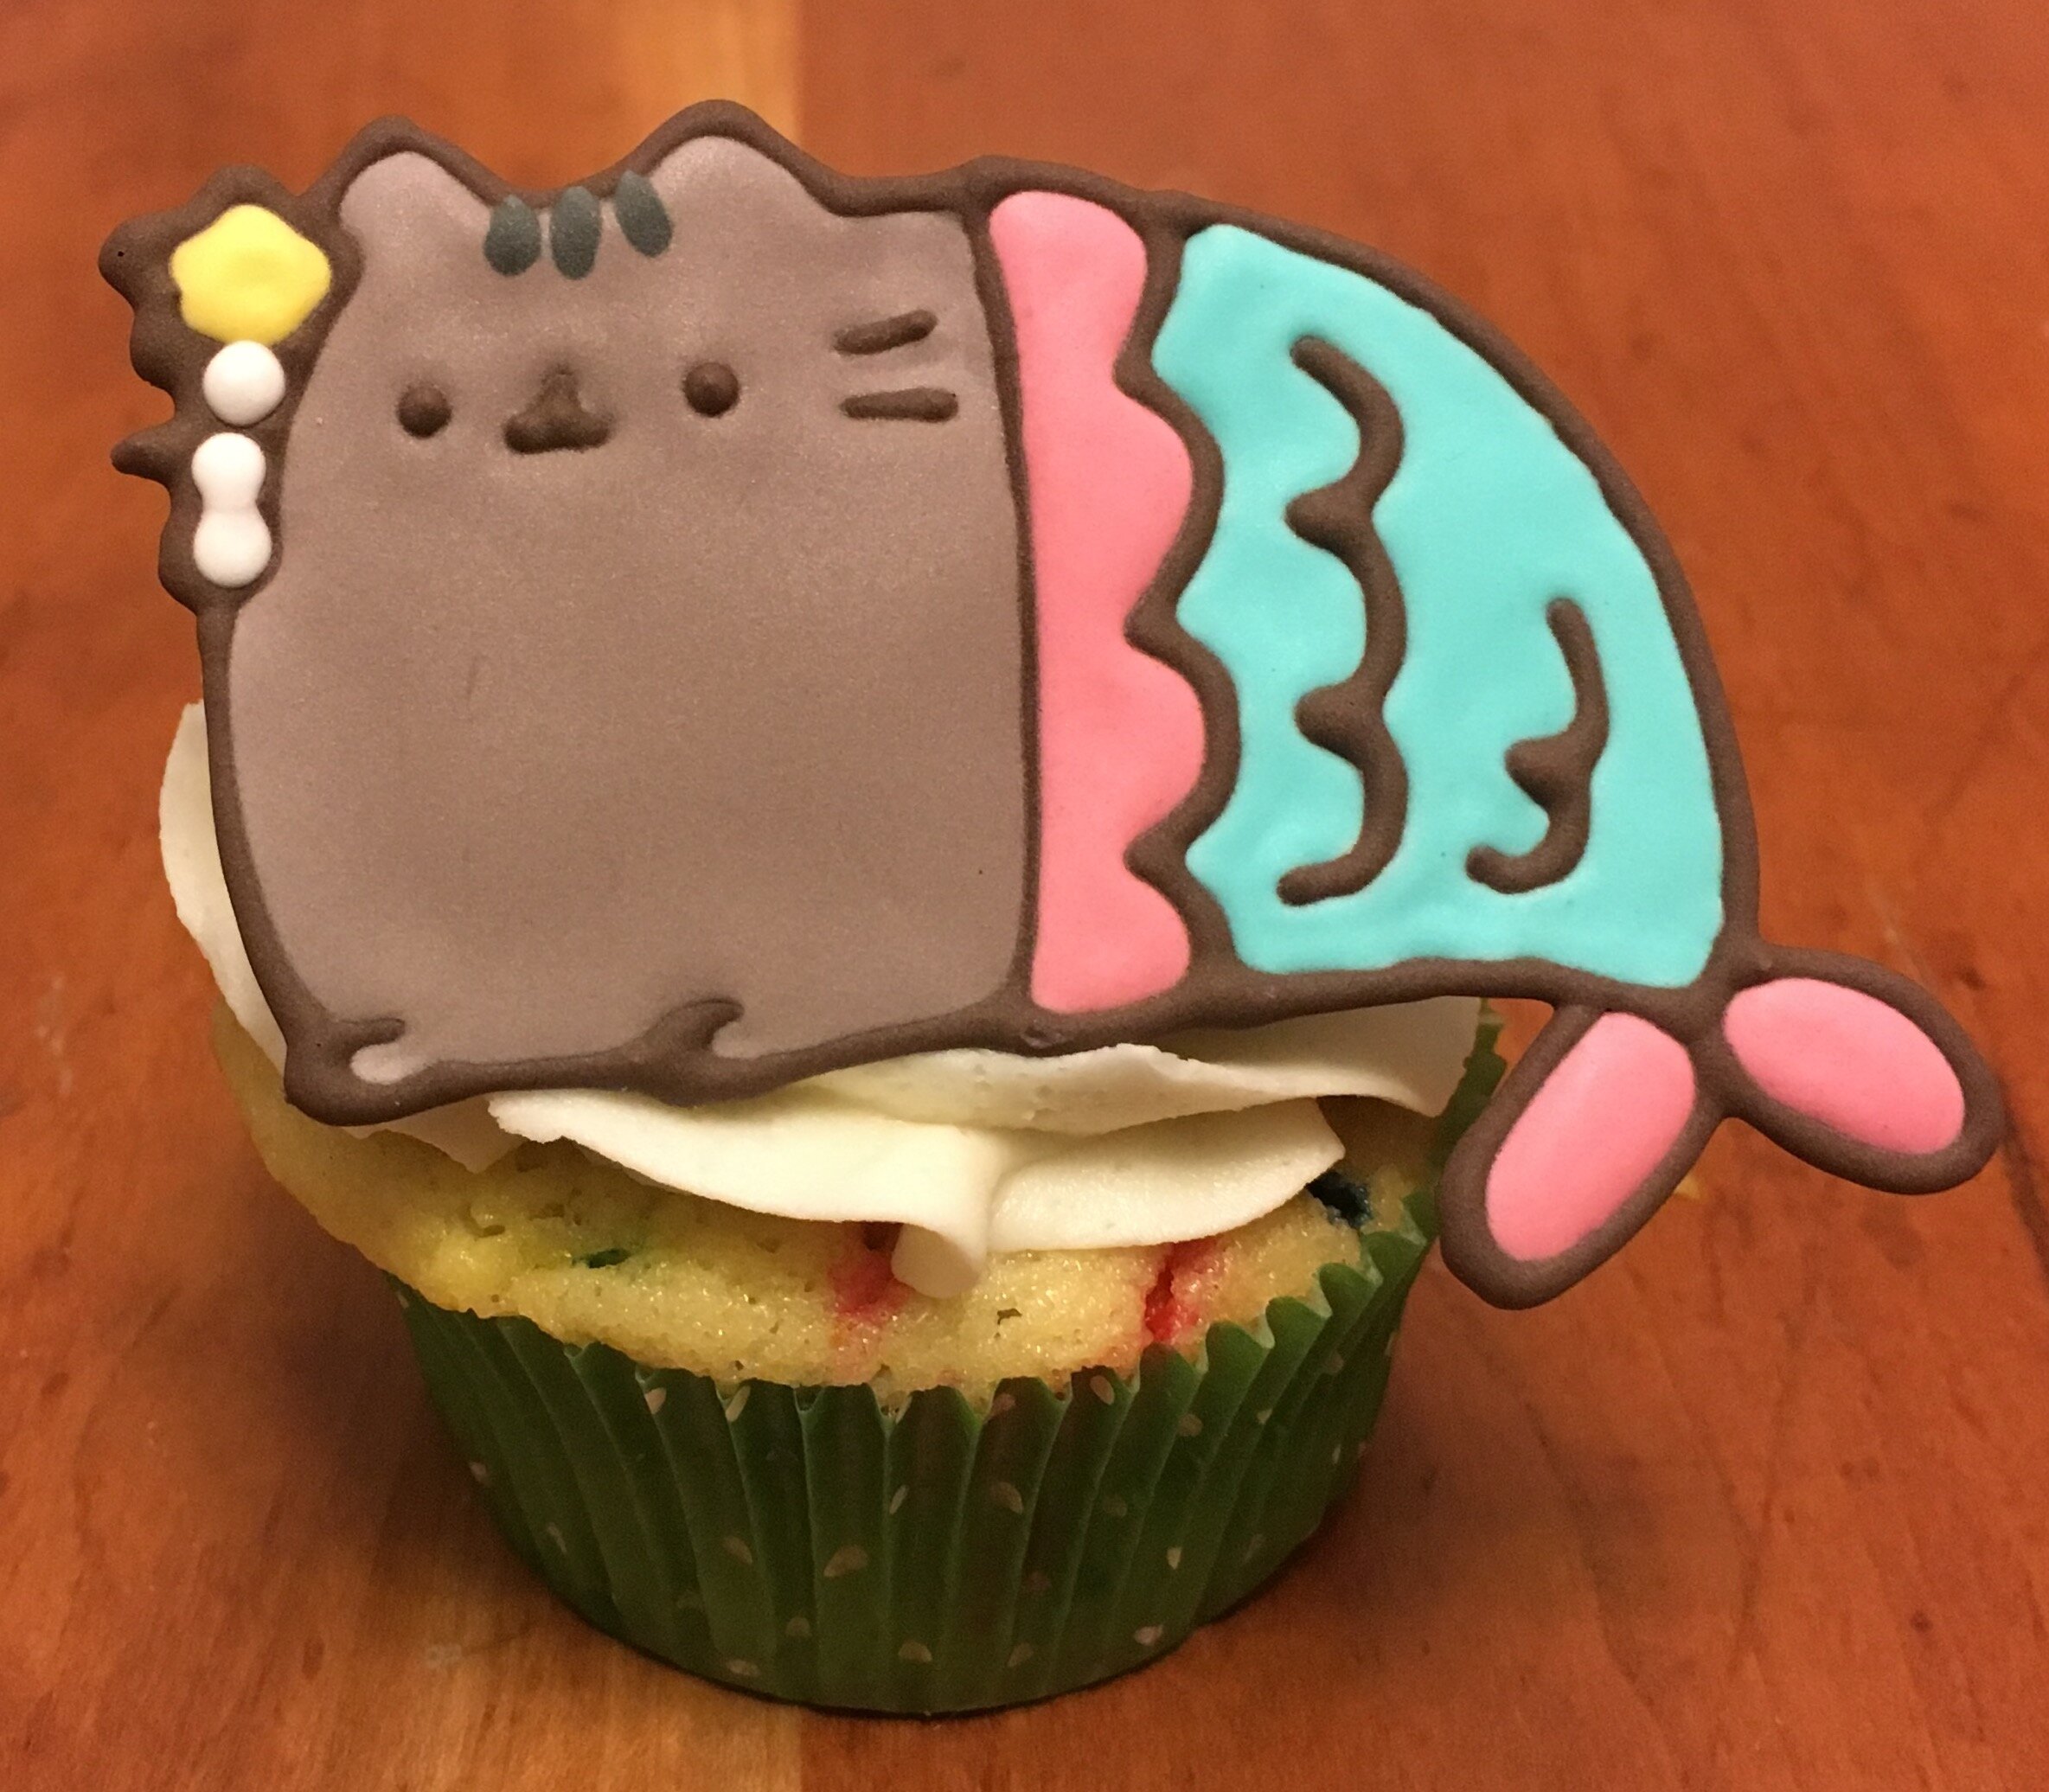
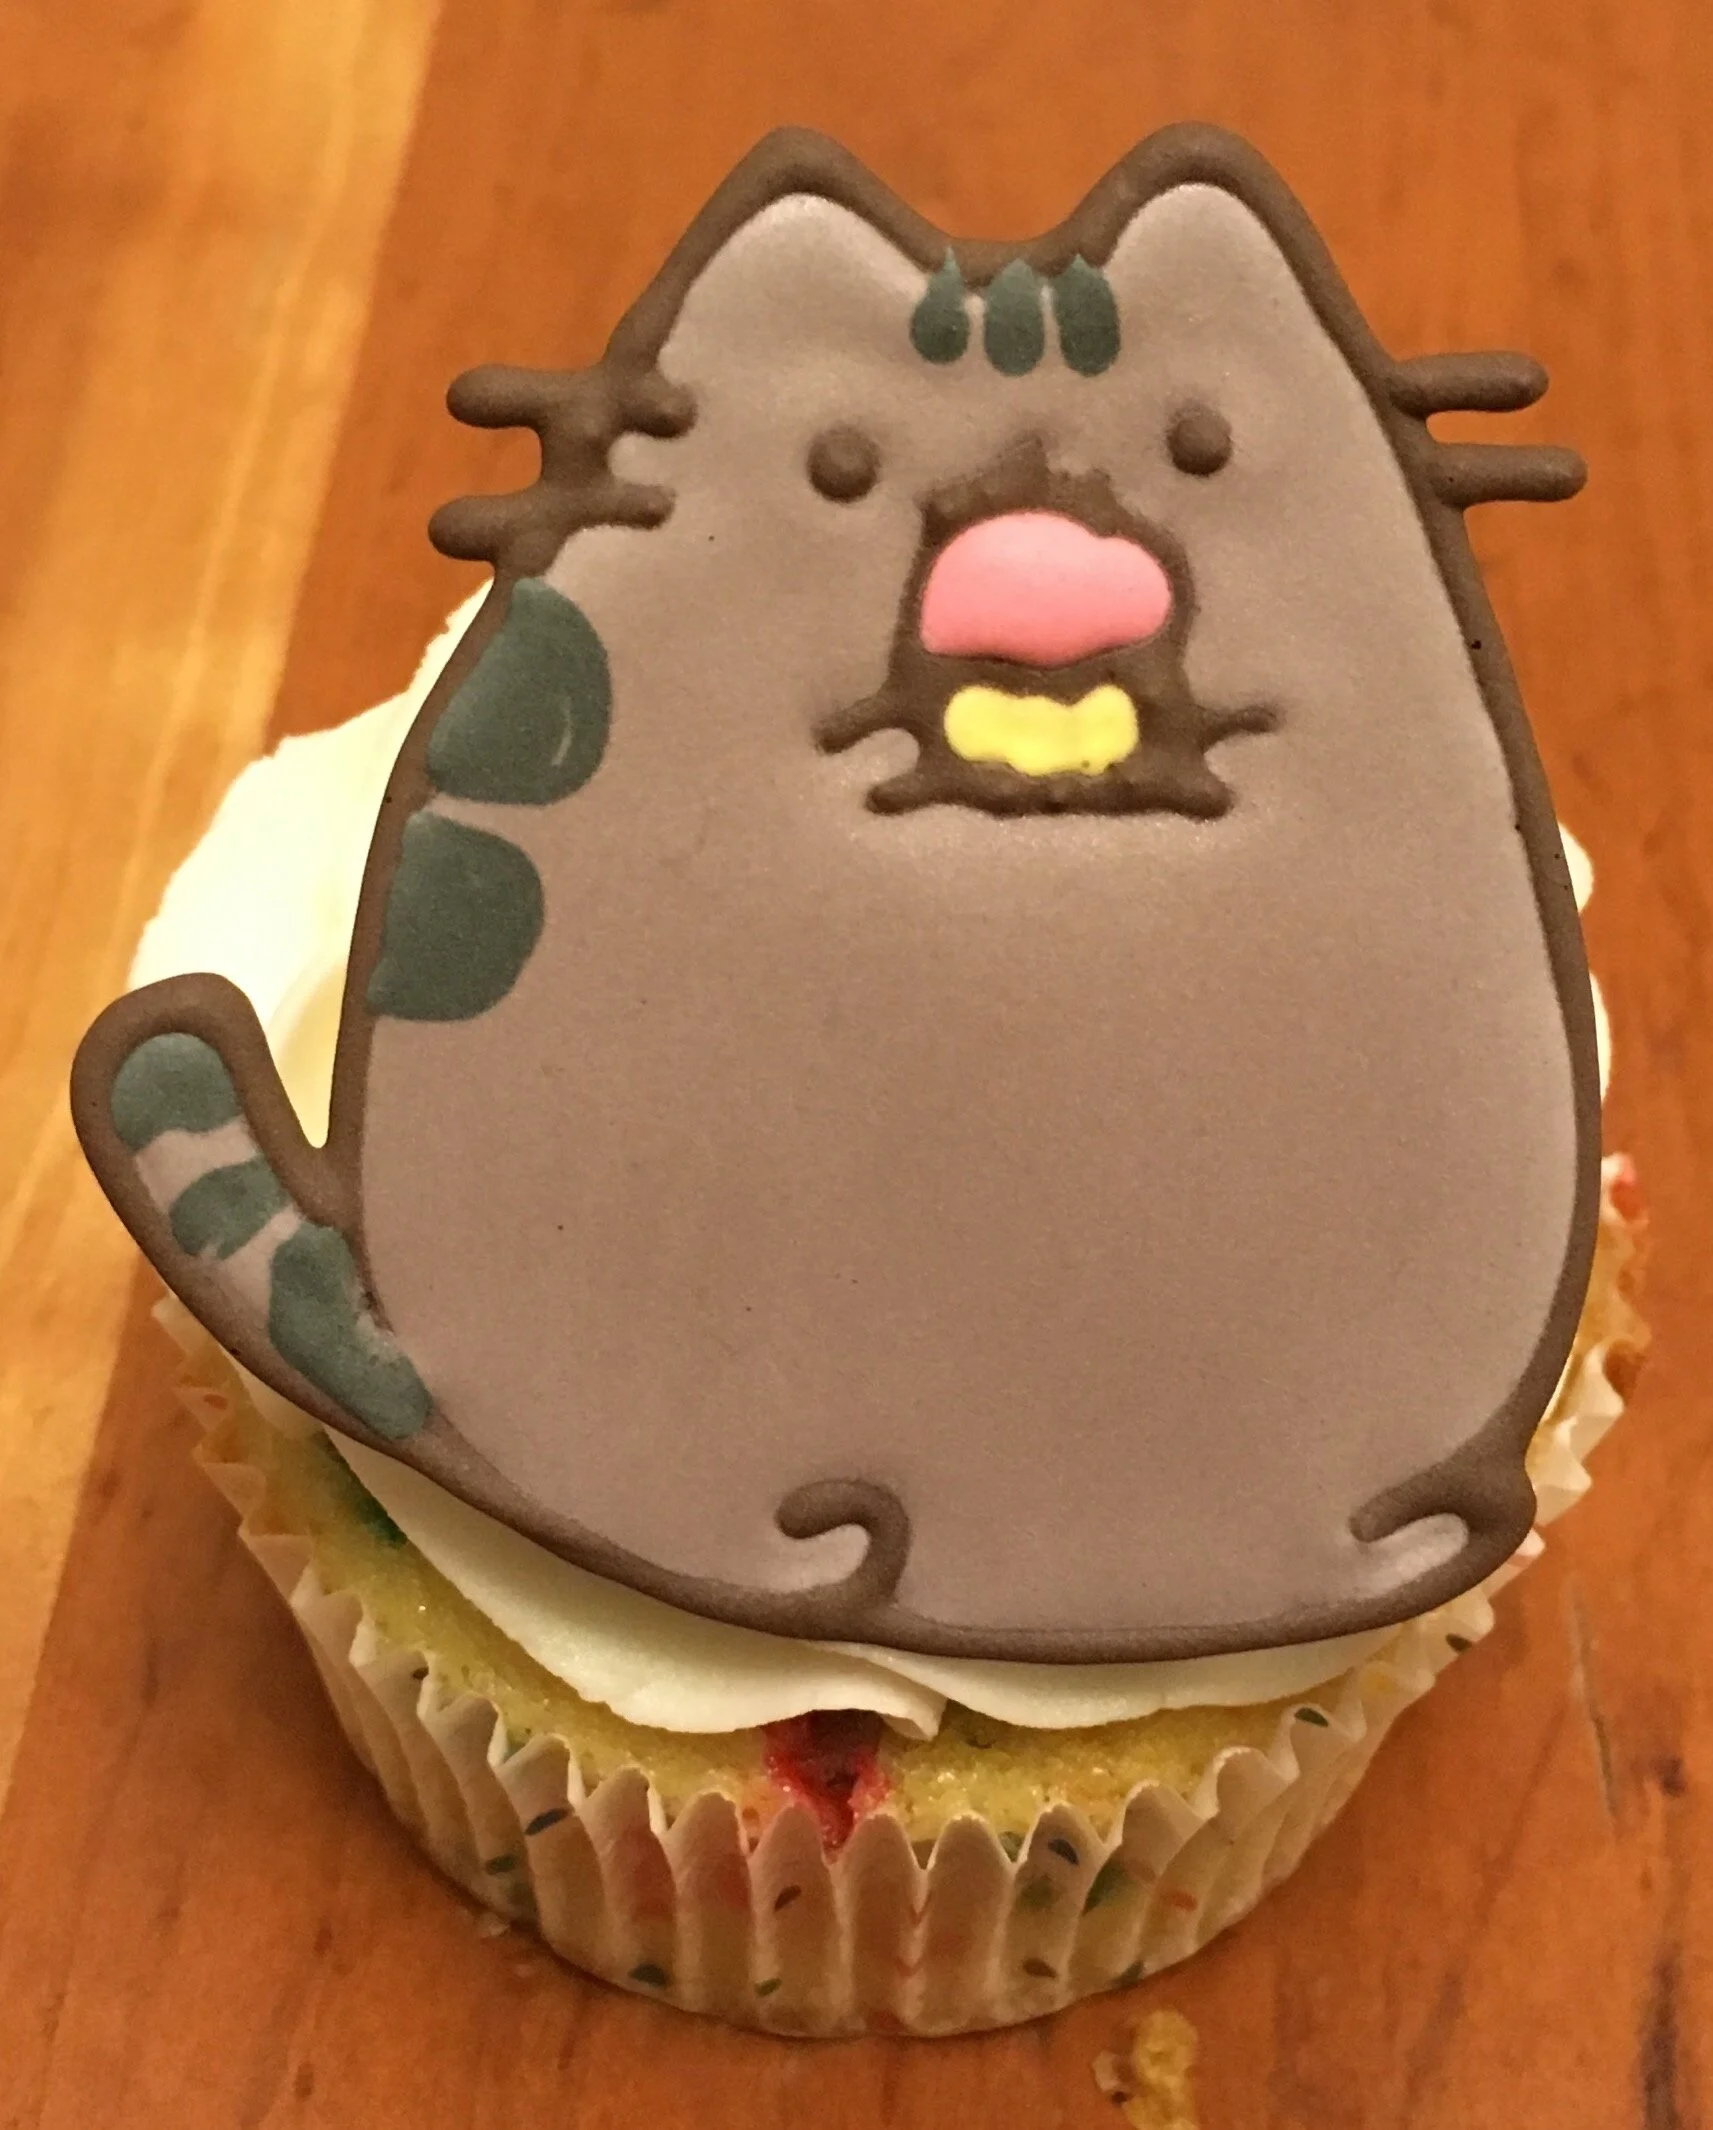
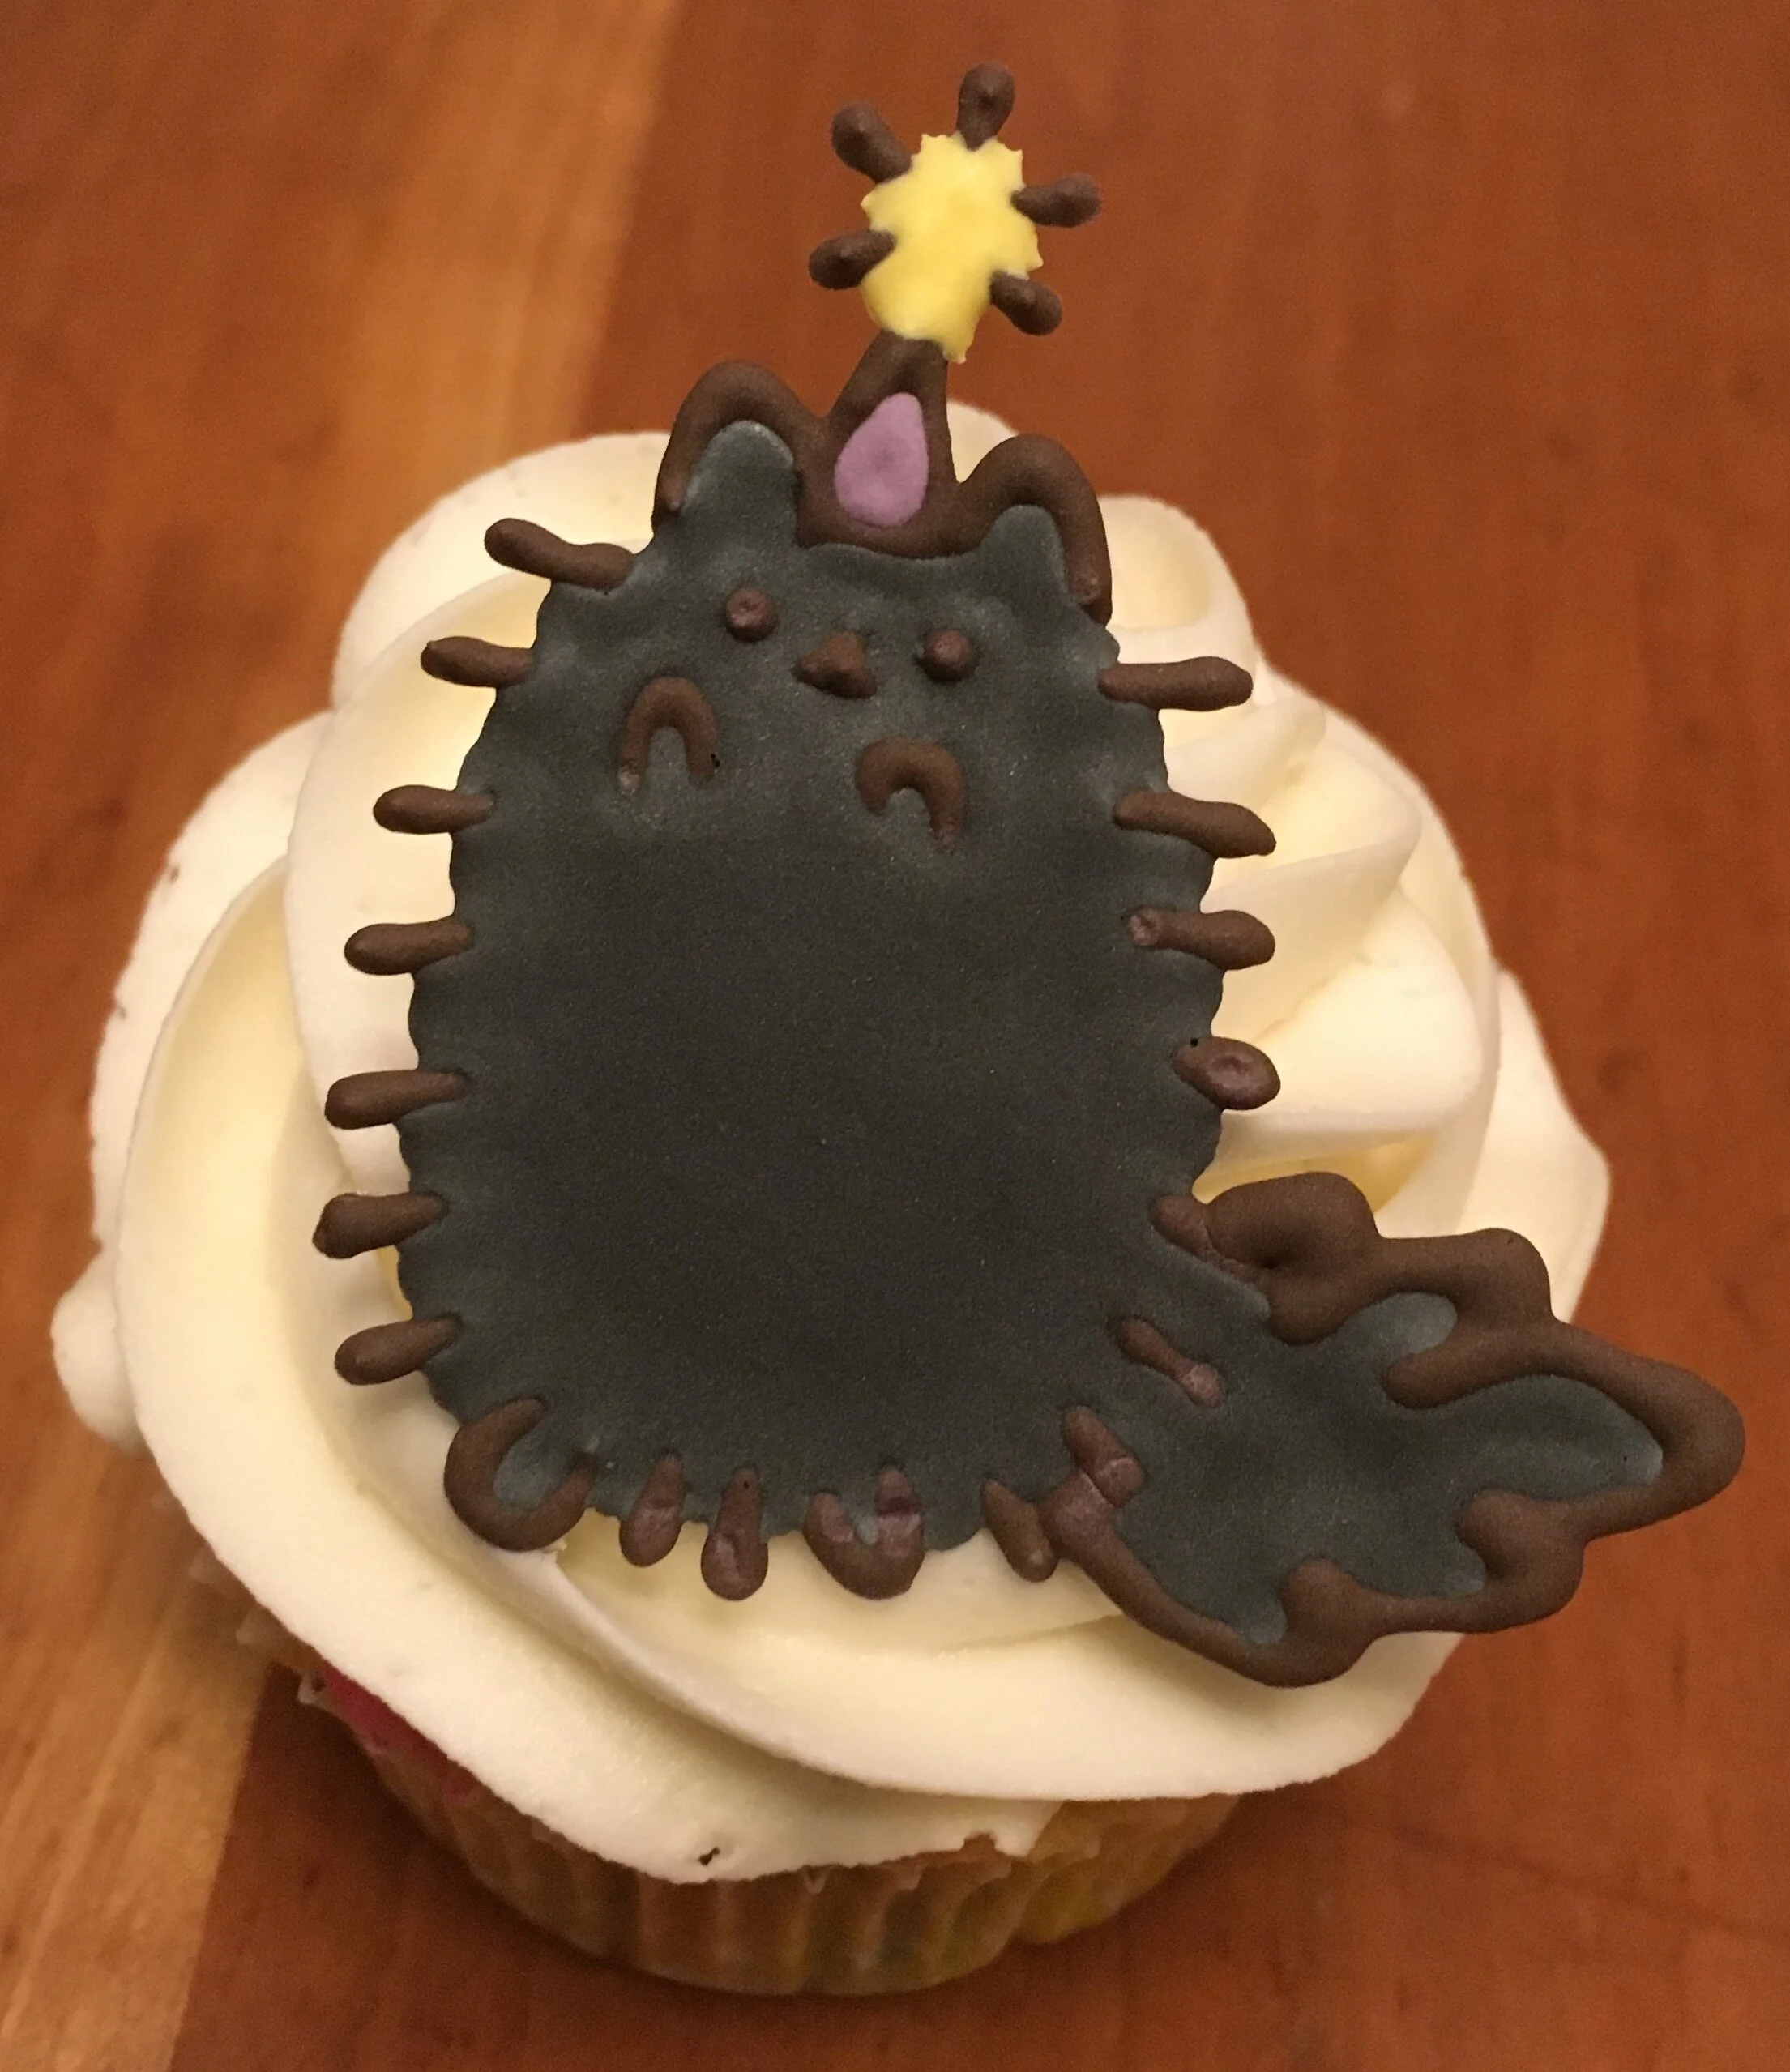
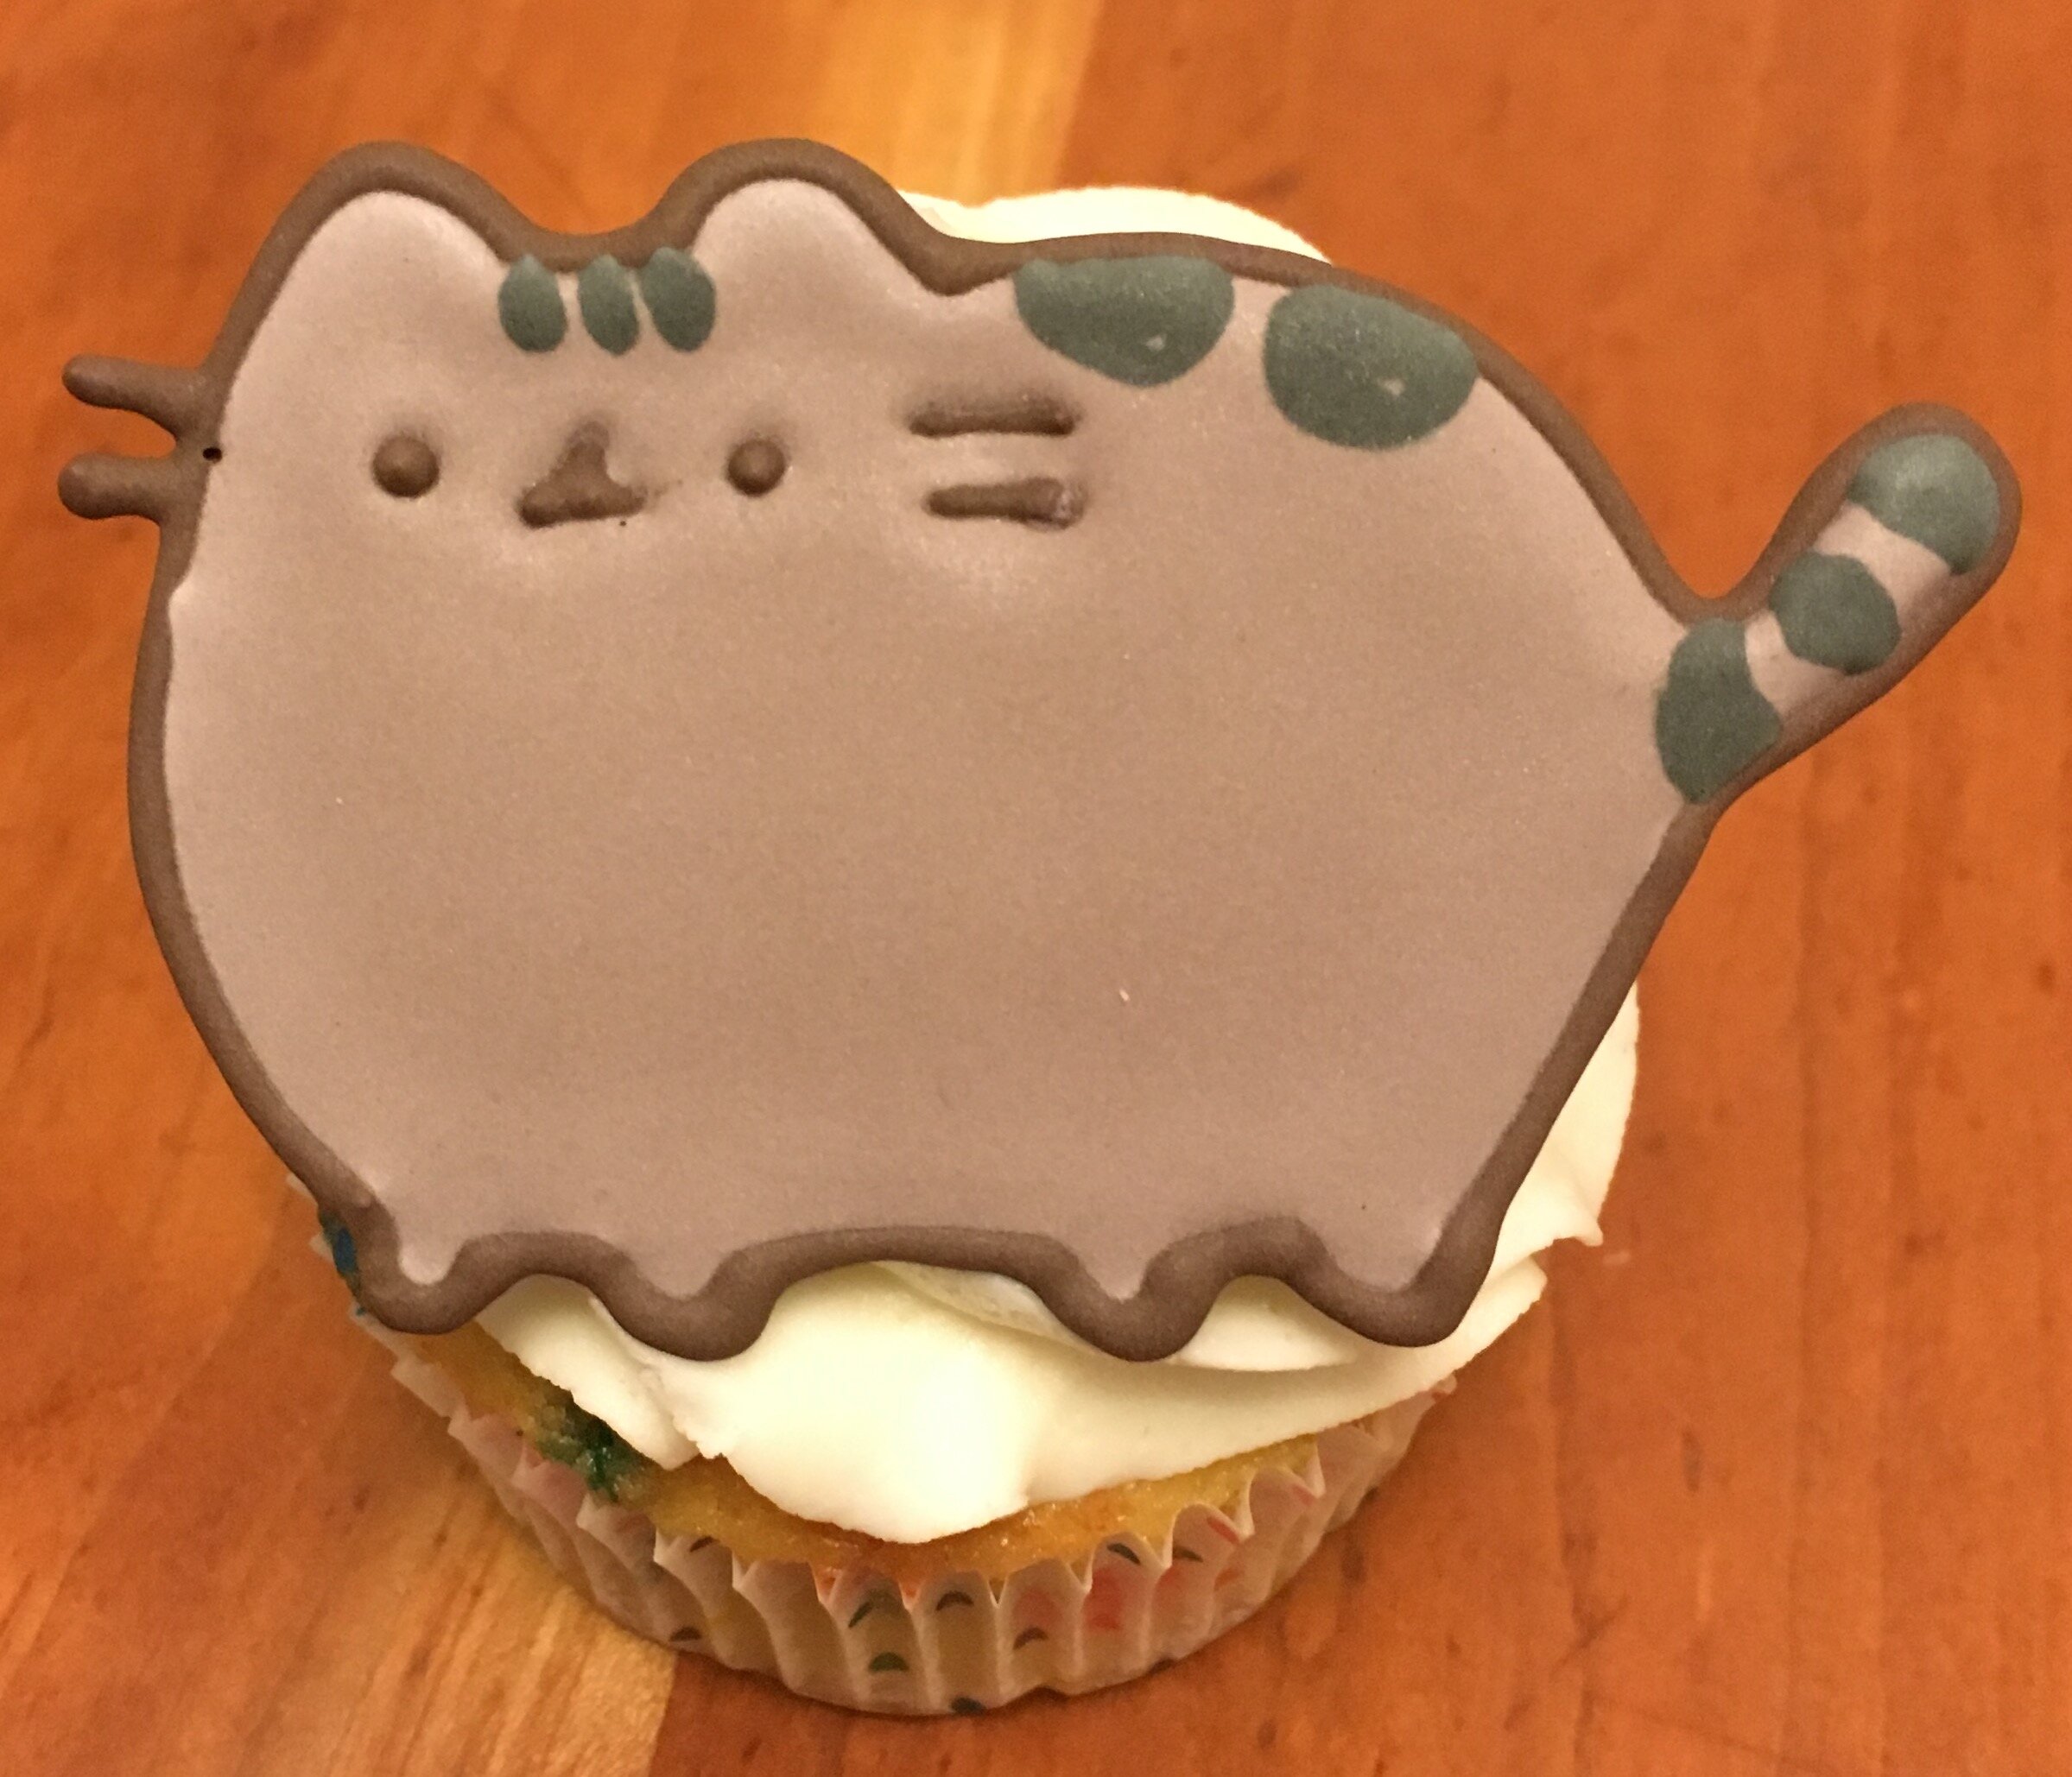
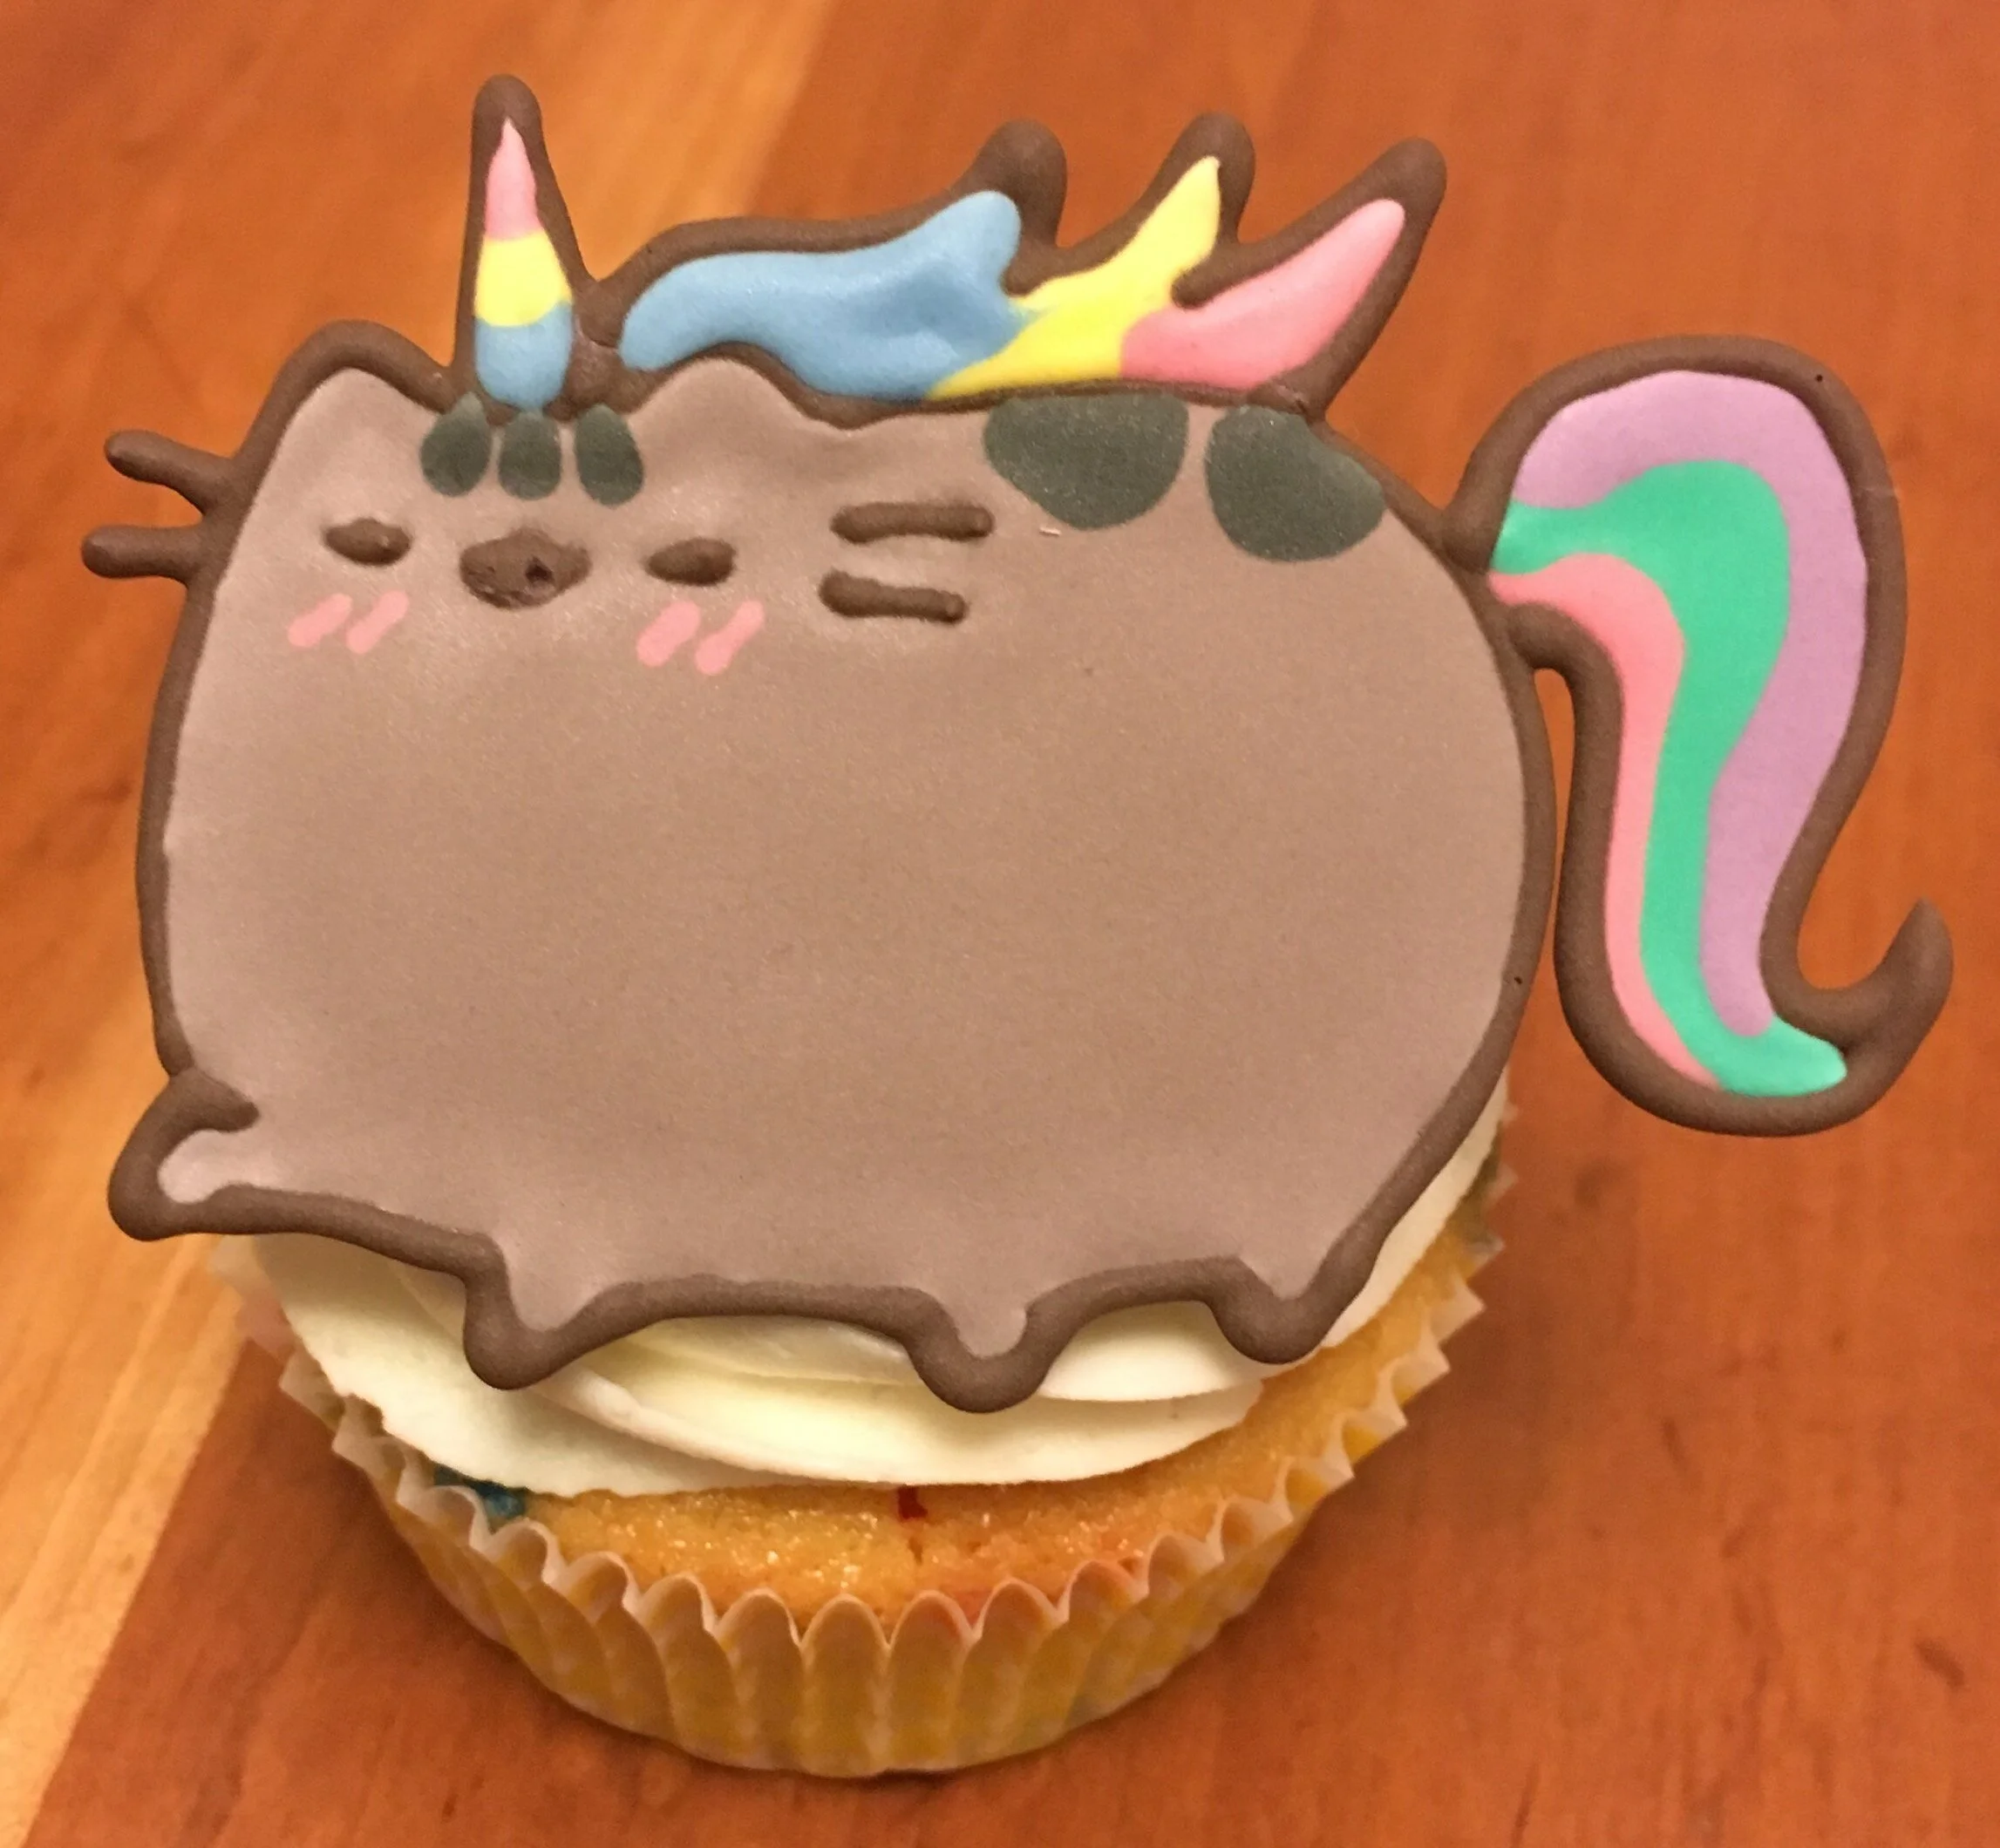
Pusheen Cupcakes
If you haven’t figured it out already from the Rainbow Pusheen Cake, my nephew loves Pusheen. For Christmas, he got a Pusheen calendar that indicates that February 18 is Pusheen’s birthday. So naturally we had to have a party.
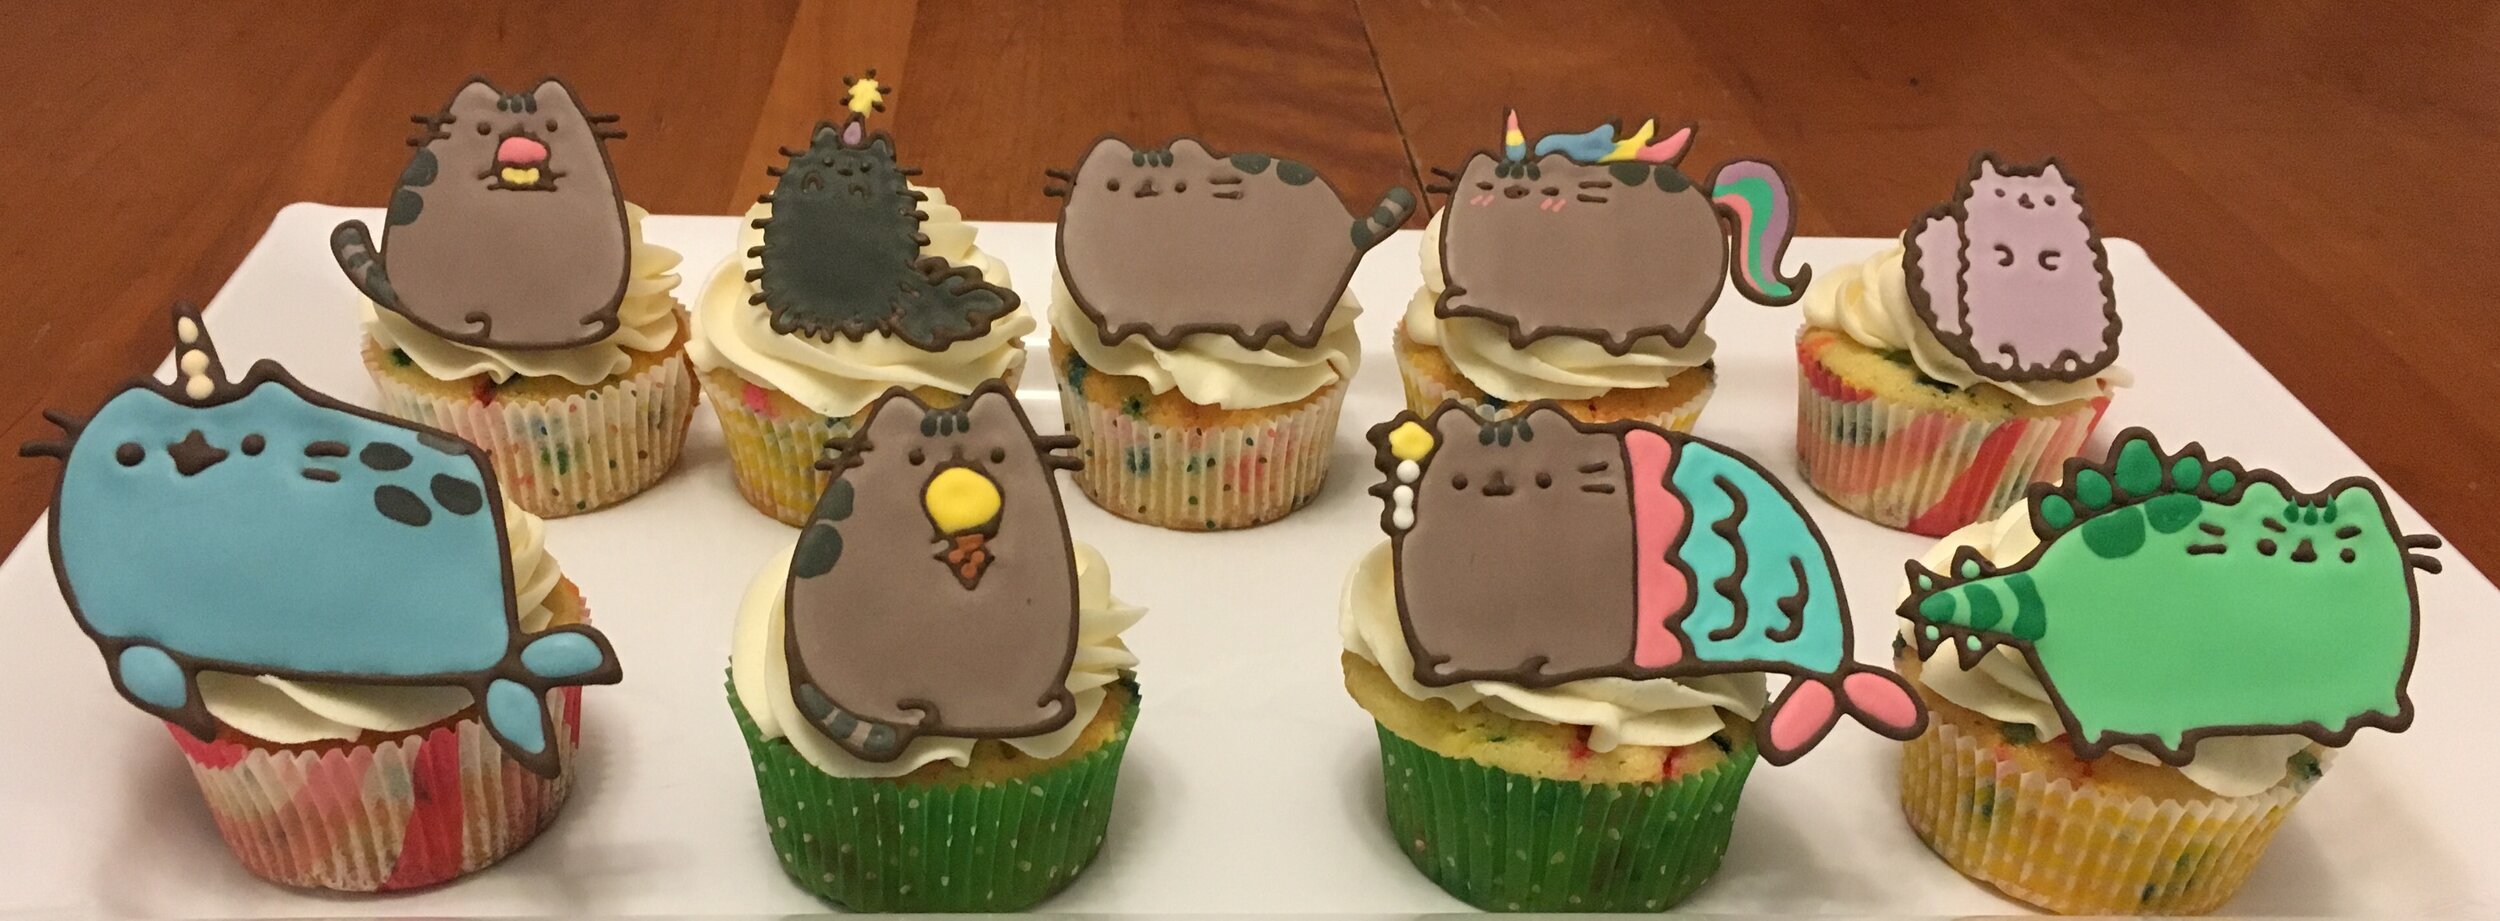
If you haven’t figured it out already from the Rainbow Pusheen Cake, my nephew loves Pusheen. For Christmas, he got a Pusheen calendar that indicates that February 18 is Pusheen’s birthday. So naturally we had to have a party. The cupcake toppers are run-in sugar portraits of all the stuffed Pusheens that he owns, plus Pusheen’s siblings, Pip and Stormy. Happy birthday, Pusheen!


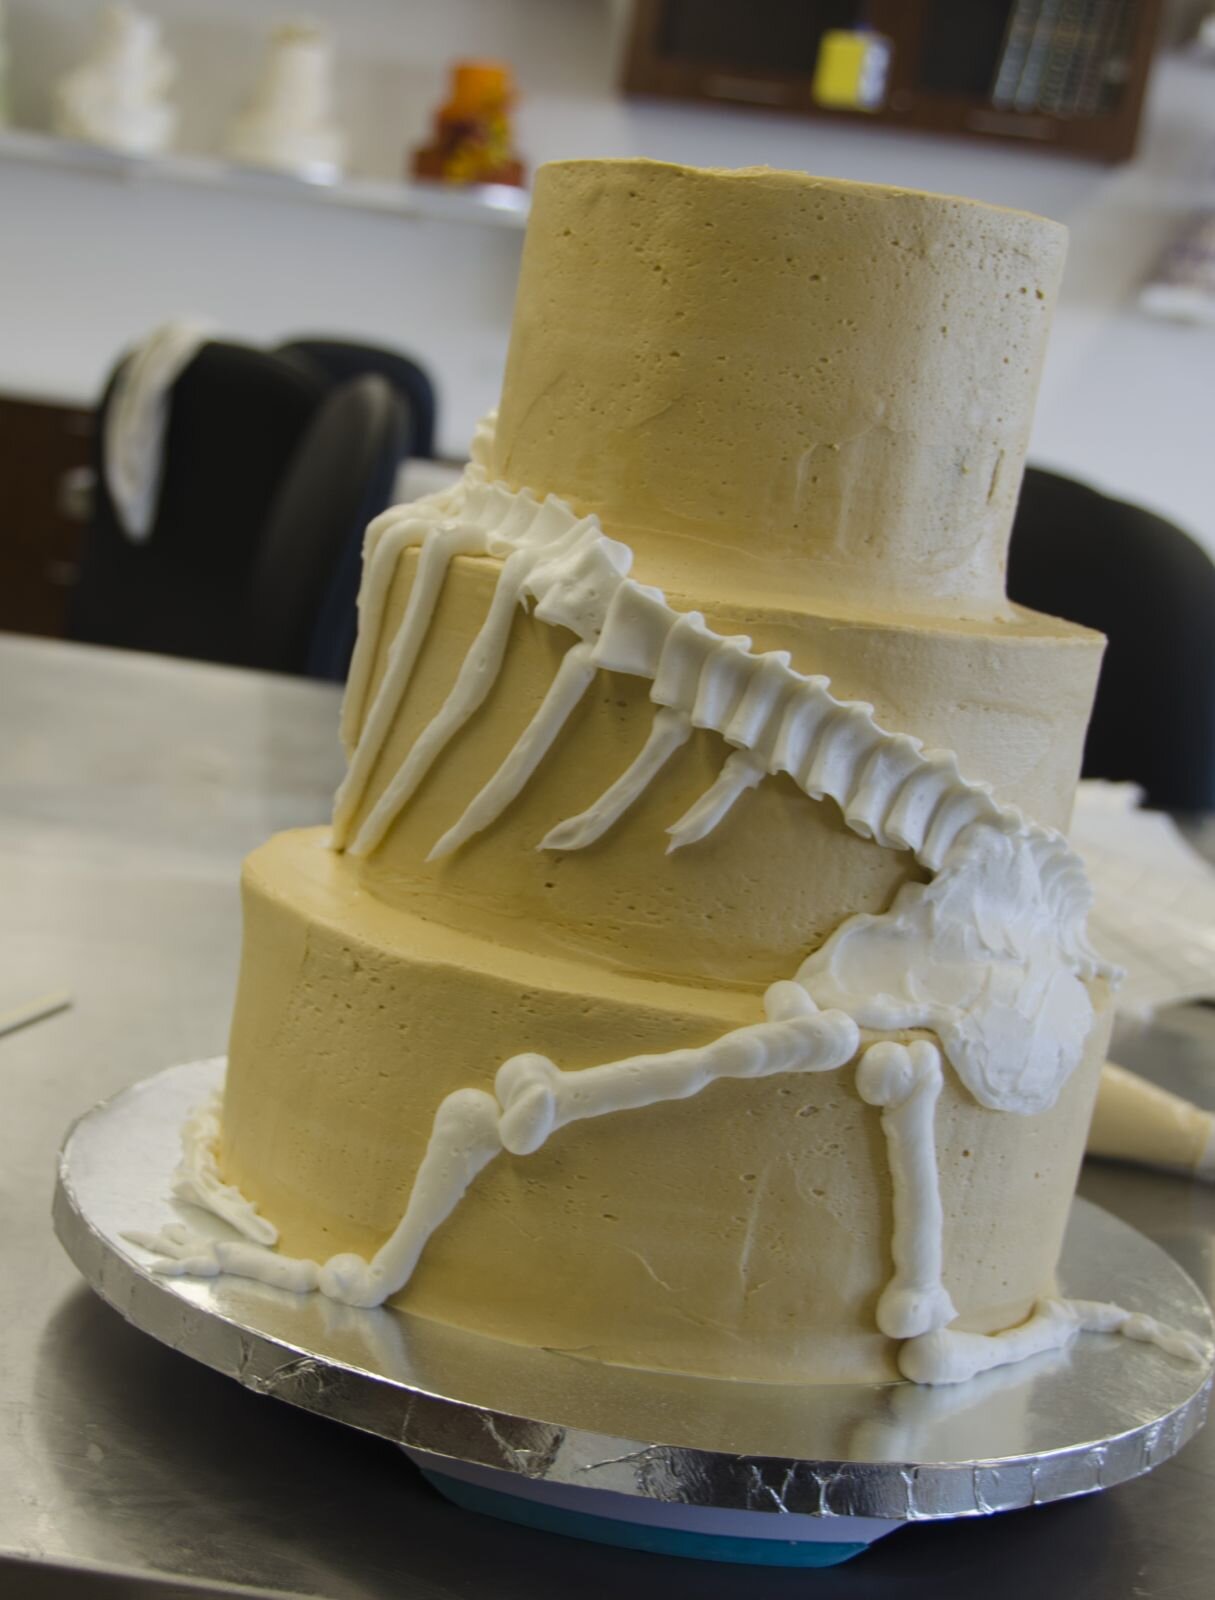
Dinosaur Skeleton Cake
This is a cake that I made for a class at the Wilton School on tiered cakes and buttercream. I don’t do many buttercream cakes or many traditional tiered cakes, so I’m pretty pleased with the results.

This is a cake that I made for a class at the Wilton School on tiered cakes and buttercream. I don’t do many buttercream cakes or many traditional tiered cakes, so I’m pretty pleased with the results. It’s not as impressive as many of my cakes, but I think it’s still pretty fun.
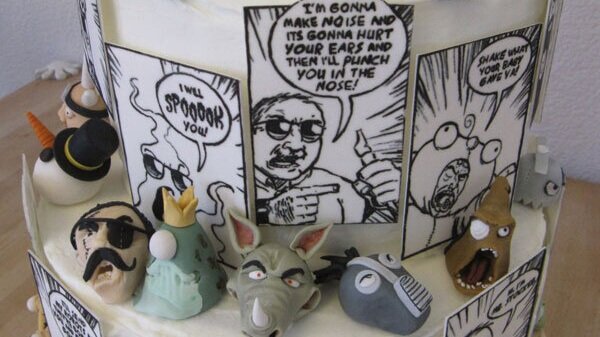
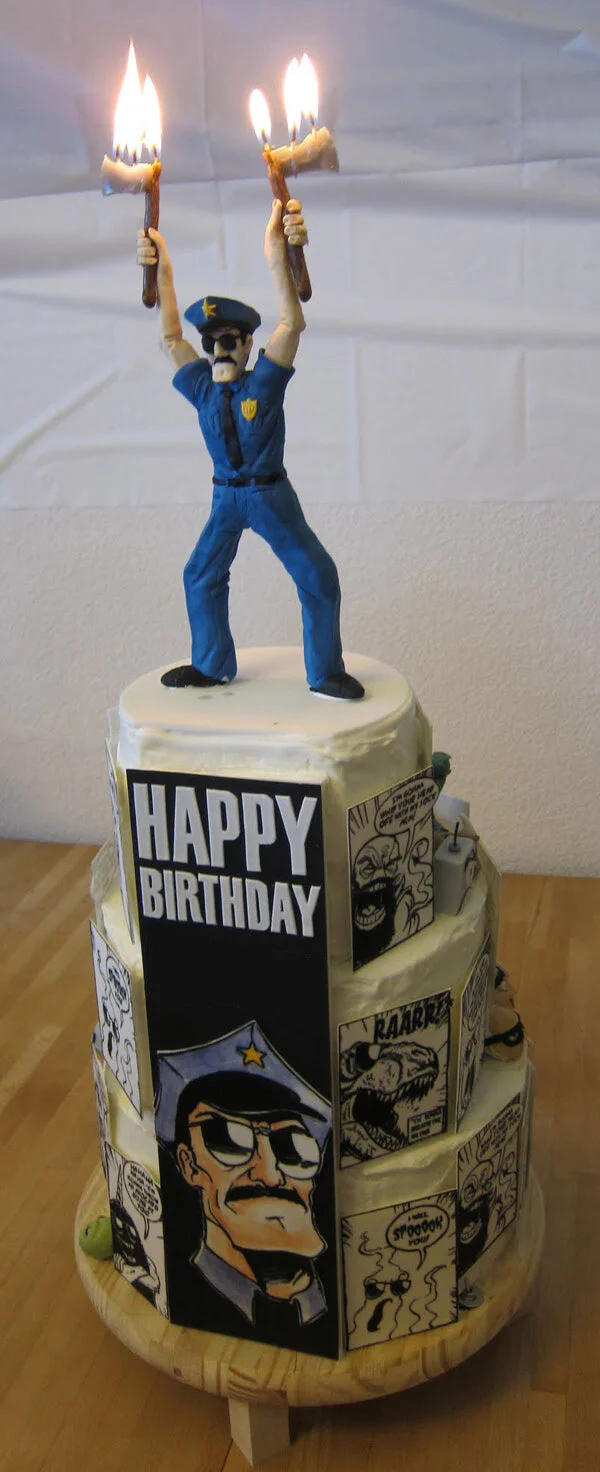
Axe Cop Cake
For my niece’s sixth birthday we decided on an Axe Cop theme. Axe Cop’s favorite food is birthday cake with a candle of himself on it, so I took that as my starting place for the cake.

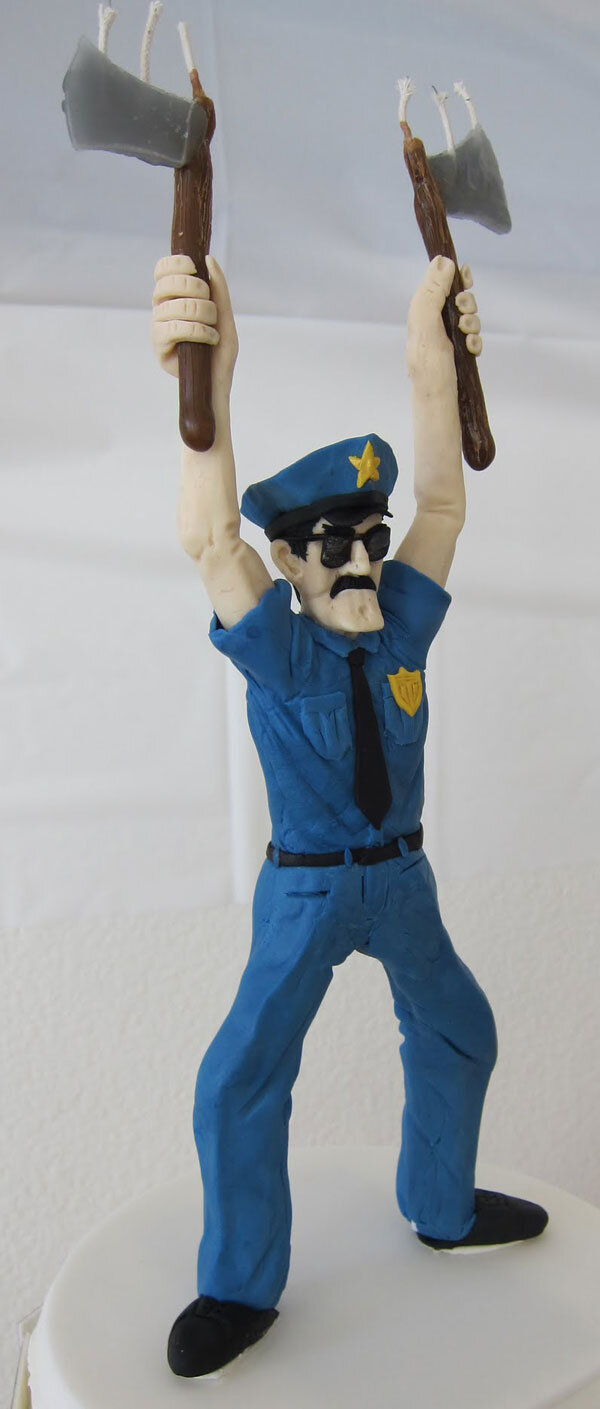

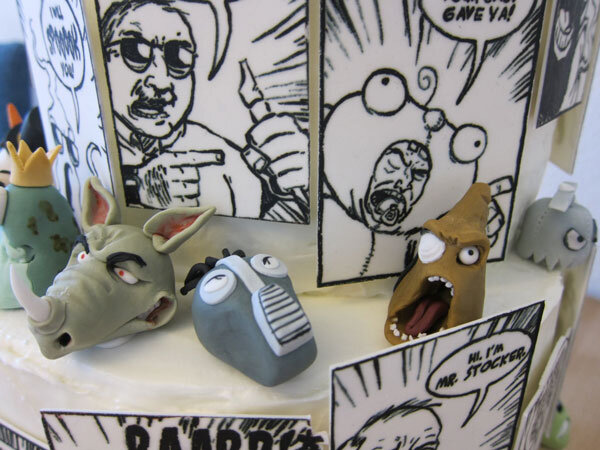
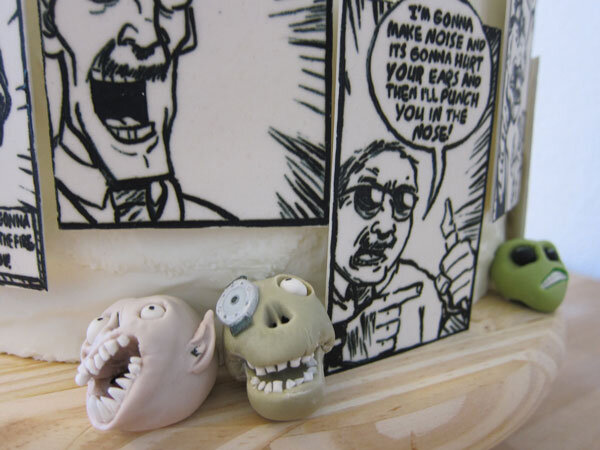
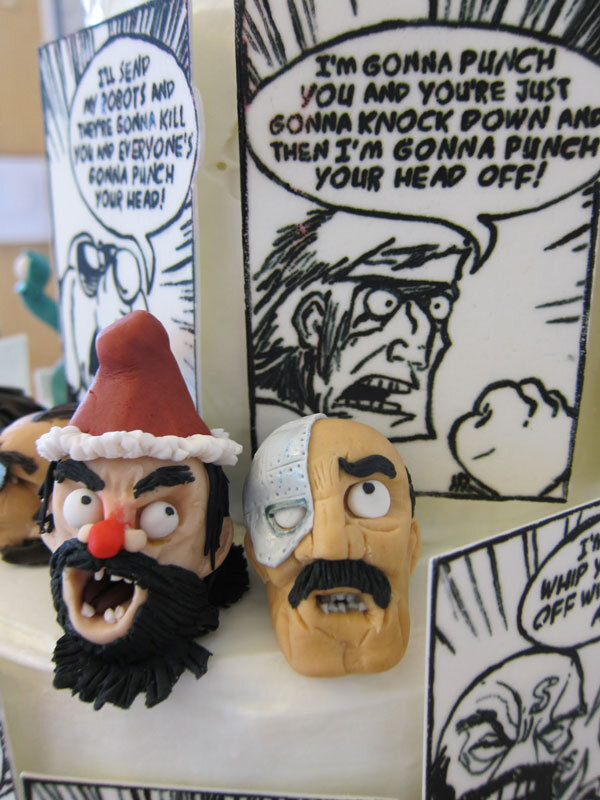
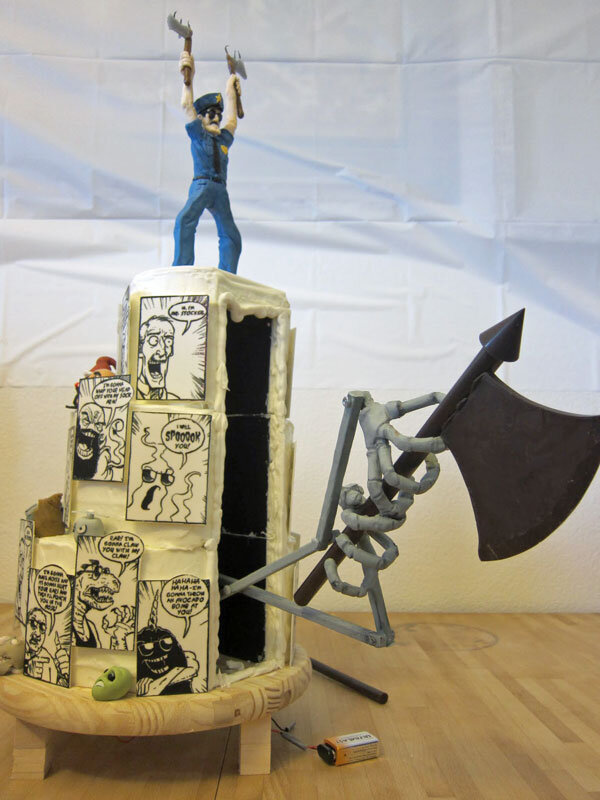
The cake topper is gum paste with axe candles in his hands. The gum paste comic panels around the sides are all of Axe Cop’s team members with their catch phrases. The gum paste heads are bad guys’ heads that Axe Cop has chopped off.


Axe Cop also has a robot that lives in his moustache and hands him weapons at need. So I made robot arms holding a chocolate axe and concealed them inside the cake. Right before we served the cake, Alex flipped the switch and the arm smashed dramatically out of the cake. Sadly, the chocolate axe broke on the way out, but I had a spare on hand for the photo op.
Zebra Cupcakes
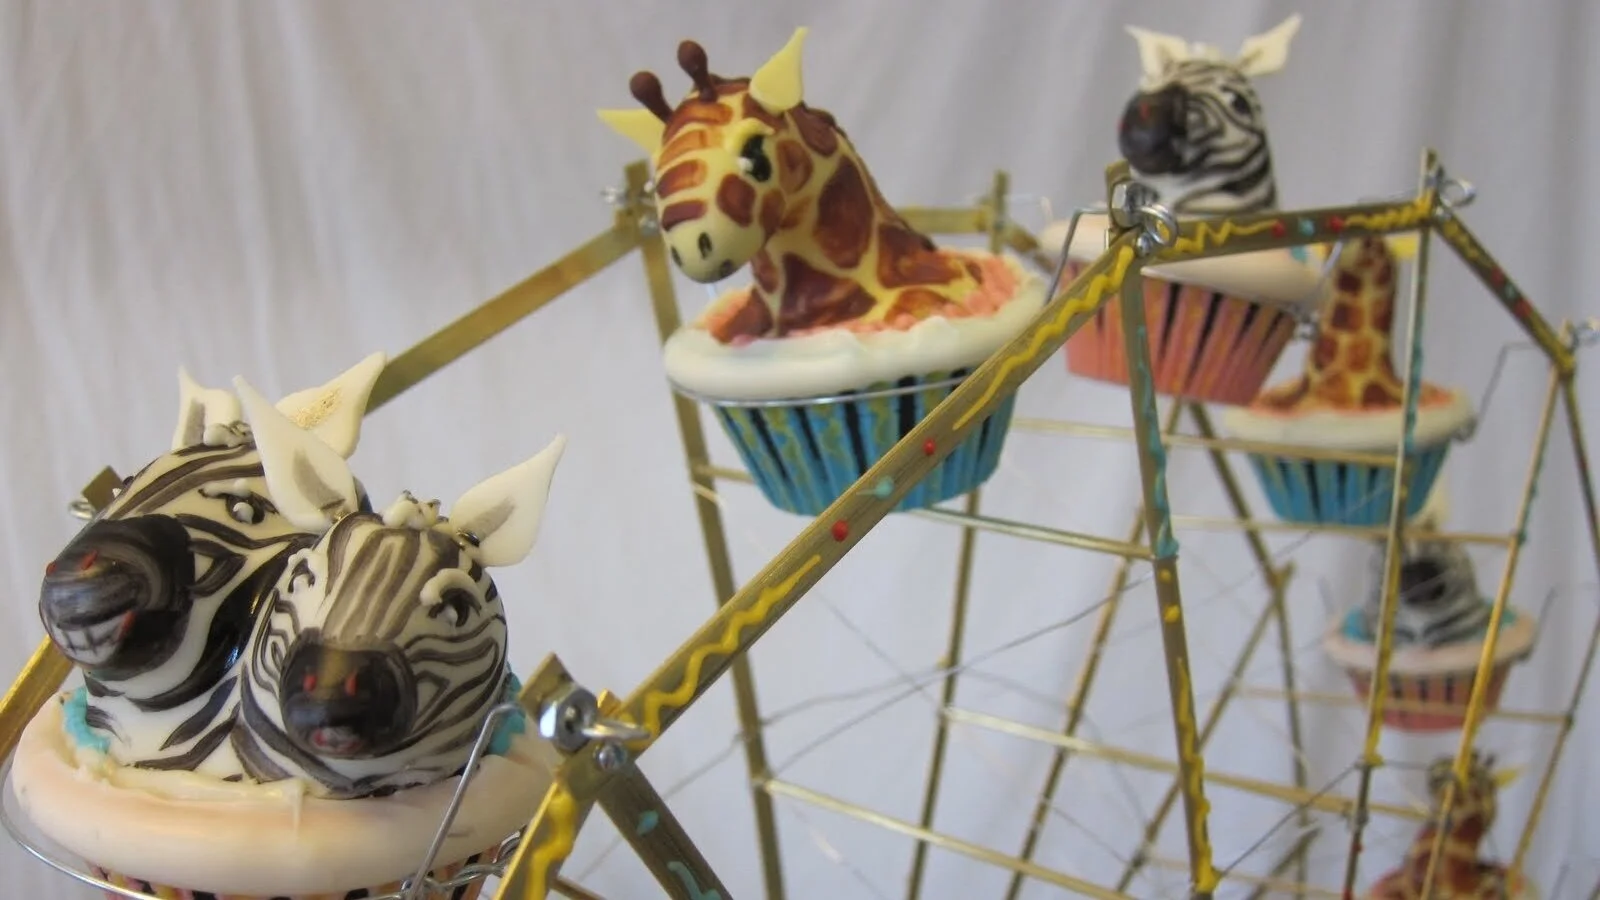
When I asked my nephew Sam what he wanted for his third birthday cake, he immediately responded, “Zebra cupcake!" I have no idea where he got this idea, or what exactly he thinks a zebra cupcake looks like.

When I asked my nephew Sam what he wanted for his third birthday cake, he immediately responded, “Zebra cupcake!” I have no idea where he got this idea, or what exactly he thinks a zebra cupcake looks like. To my knowledge, he has never seen anything that could reasonably be called a zebra cupcake. I tried to encourage him to elaborate on the idea of a zebra cupcake, but he wasn’t very forthcoming. So I was left to interpret his request as best I could.
I don’t quite recall my thought process, but I ultimately decided to make zebras riding a big ferris wheel with a lion jumping up to try to get them. Mostly, I probably just wanted to see if I could make a ferris wheel. Initially, I had considered making the ferris wheel motorized, but after consulting Sam’s mom and his big sister, Alex, I decided that Sam would like it more if he could operate the ferris wheel himself with a hand crank. Based on the usual size of cupcakes, I calculated that, in order to accommodate the sixteen cupcake cars that I planned to make, the ferris wheel would need to be about two feet in diameter.

I was at a little bit of a disadvantage in building the ferris wheel because I was visiting my sister and didn’t have my jigsaw with me, so I had to come up with a way to build a ferris wheel with a minimal number of cuts. I began by making each of the sixteen spokes out of brass strips joined by brass tube and steel wire, scratching the heck out of my fingertips in the process. I joined all of these together, using lots of tiny bolts and quart paint can lids as the hubs. On the perimeter of the wheel, I connected the spokes with more brass strips and more teeny tiny bolts. Unfortunately, I didn’t get the two halves of the hub aligned exactly perfectly, so the spokes wound up a tiny bit torqued. It didn’t ultimately impact the functionality of the wheel, but I’ll know to pay more attention to that next time. You know, the next time I make a zebra cupcake ferris wheel. Though the lesson would probably be applicable to other African animal cupcake ferris wheels as well.

For the frame to hold up the ferris wheel, I used half-inch aluminum channel, bolted together and embedded in the wooden base. To my surprise, the wheel turned perfectly as soon as I mounted it in the frame and attached the crank handle. The next challenge, though, was to make the cars work.
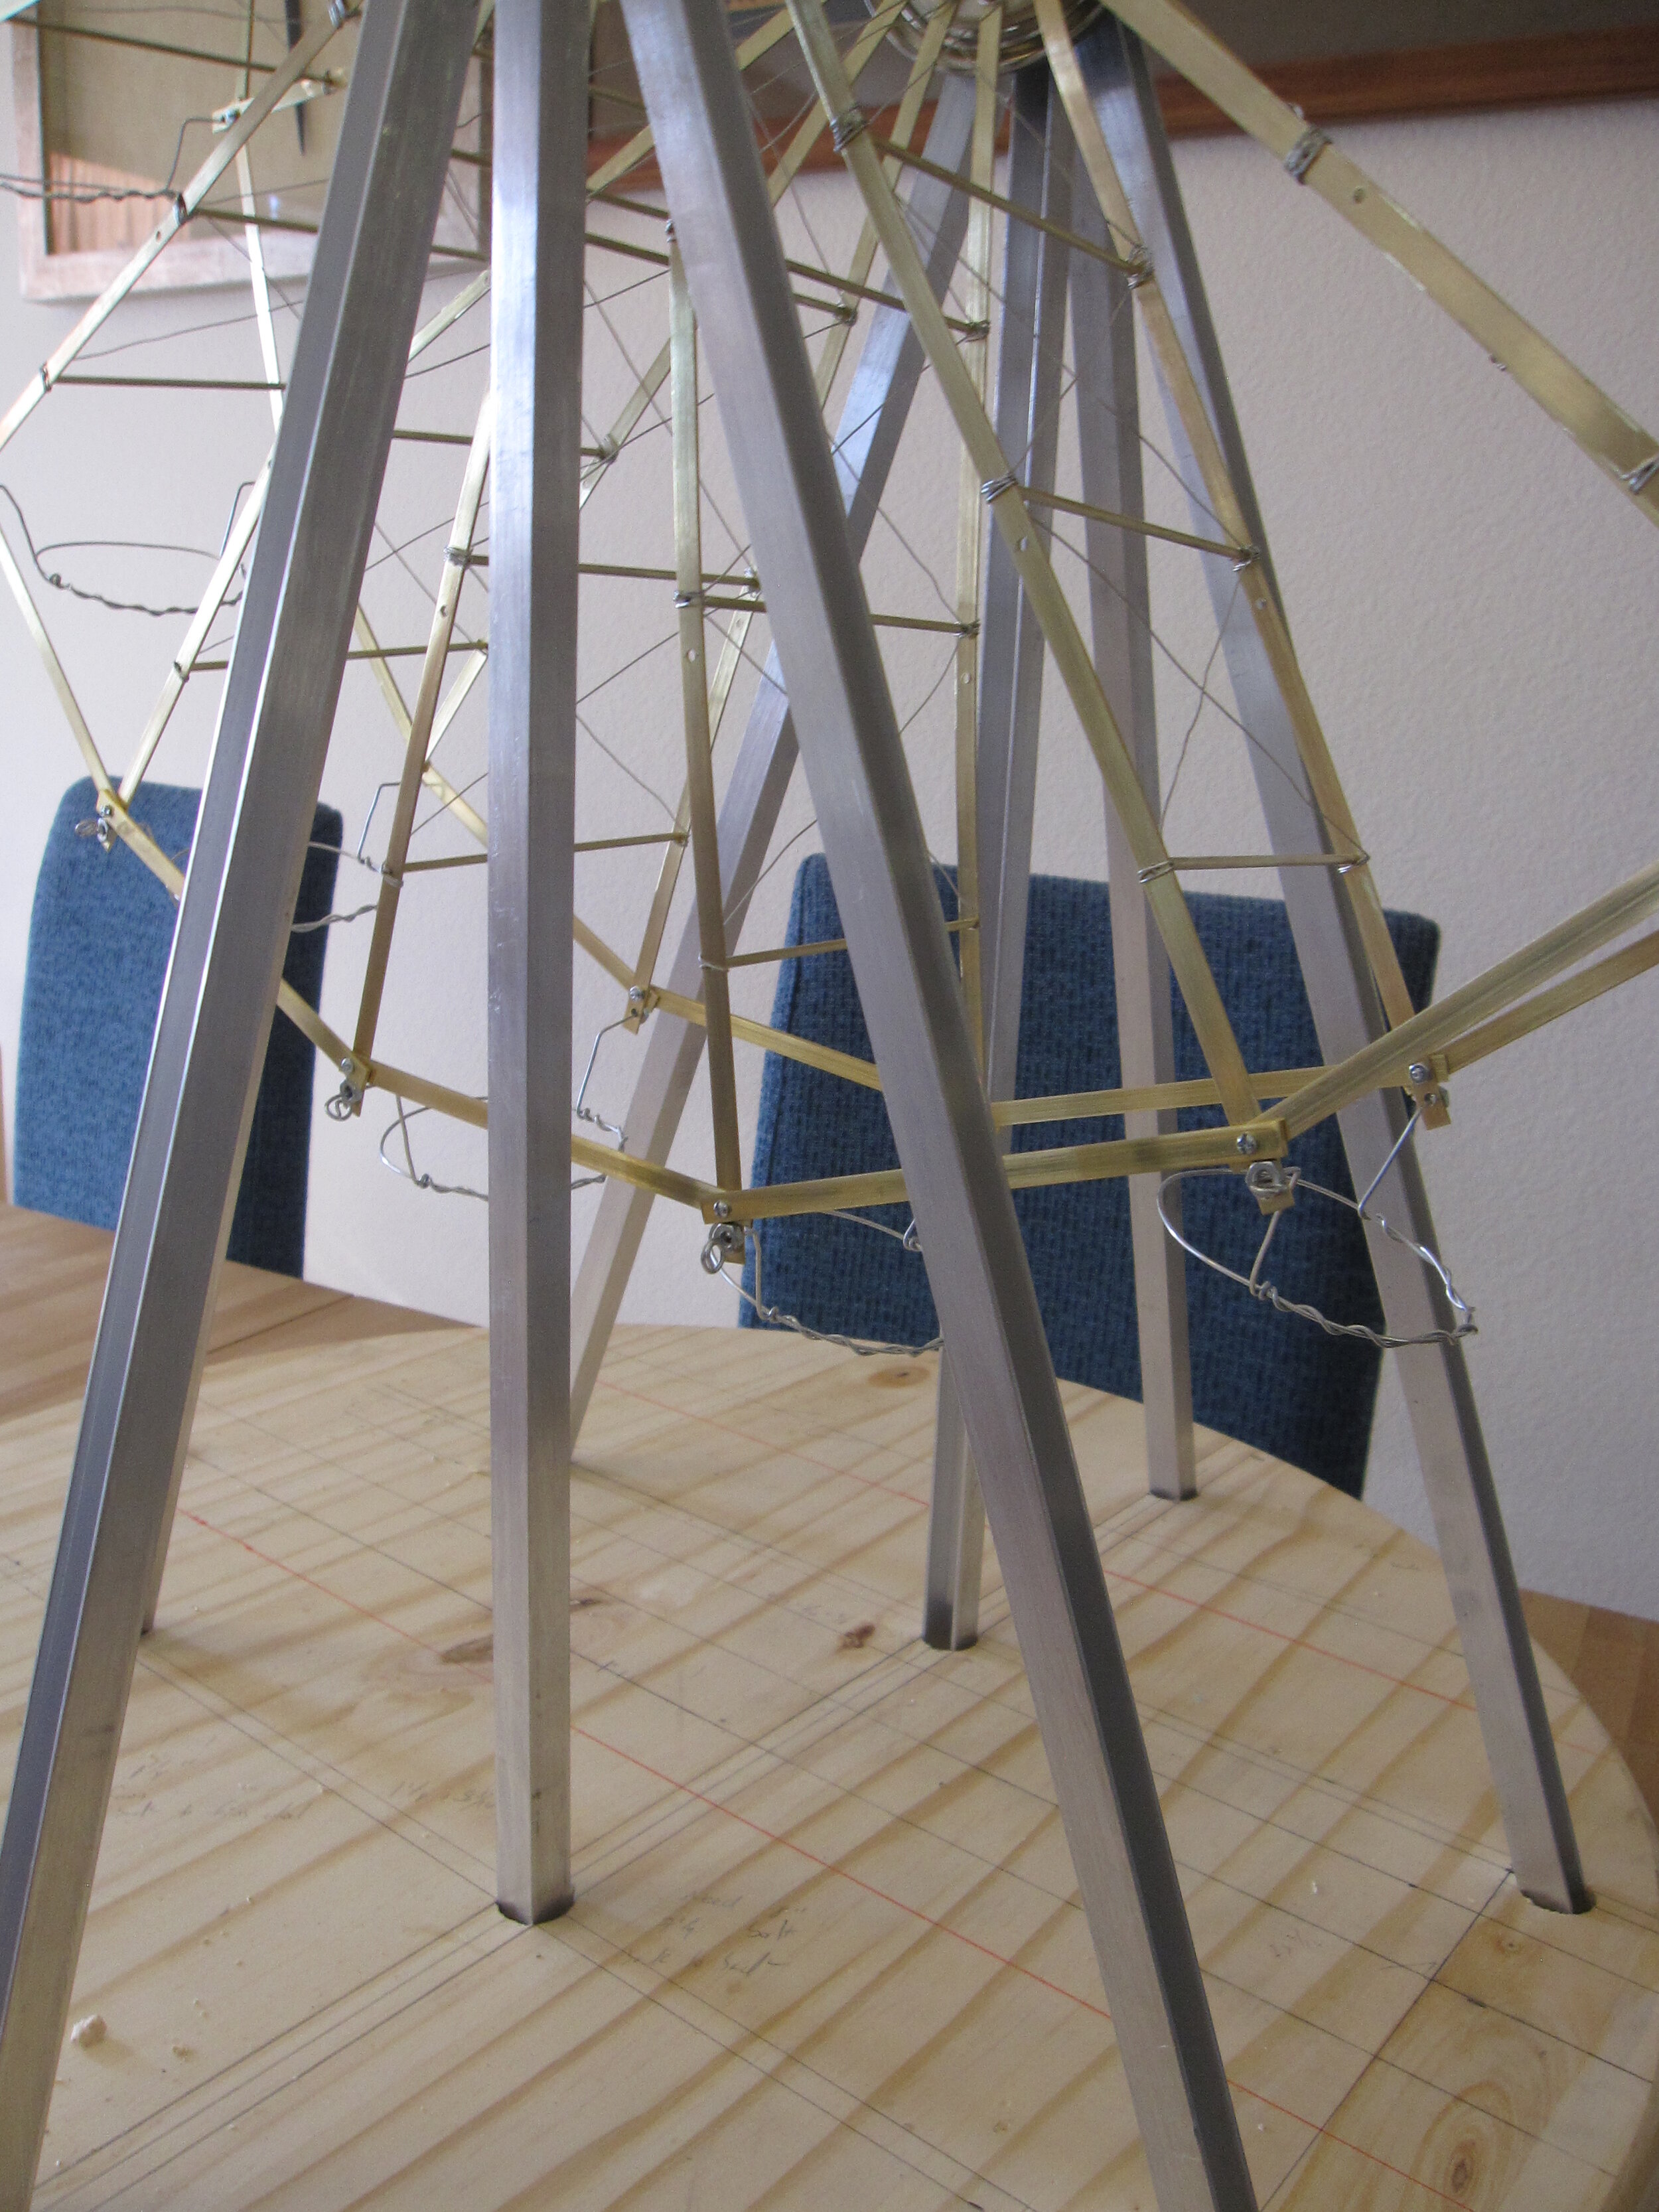
I really wanted people to be able to pick up the entire cupcake car and eat the entire thing. So I made basically little wire rings to set the cupcakes in. Obviously, these had to spin freely so that the cupcakes stayed upright all the way around the wheel (this being the essence of a ferris wheel). This would have been very easy if I had kept the strips connecting the spokes back from the end of the spokes about an additional half an inch. As it was, I had a bit of a struggle to keep the rings from catching on the brass strips, but in the end I managed it. One more thing I’ll know to do differently the next time I make a cupcake ferris wheel.
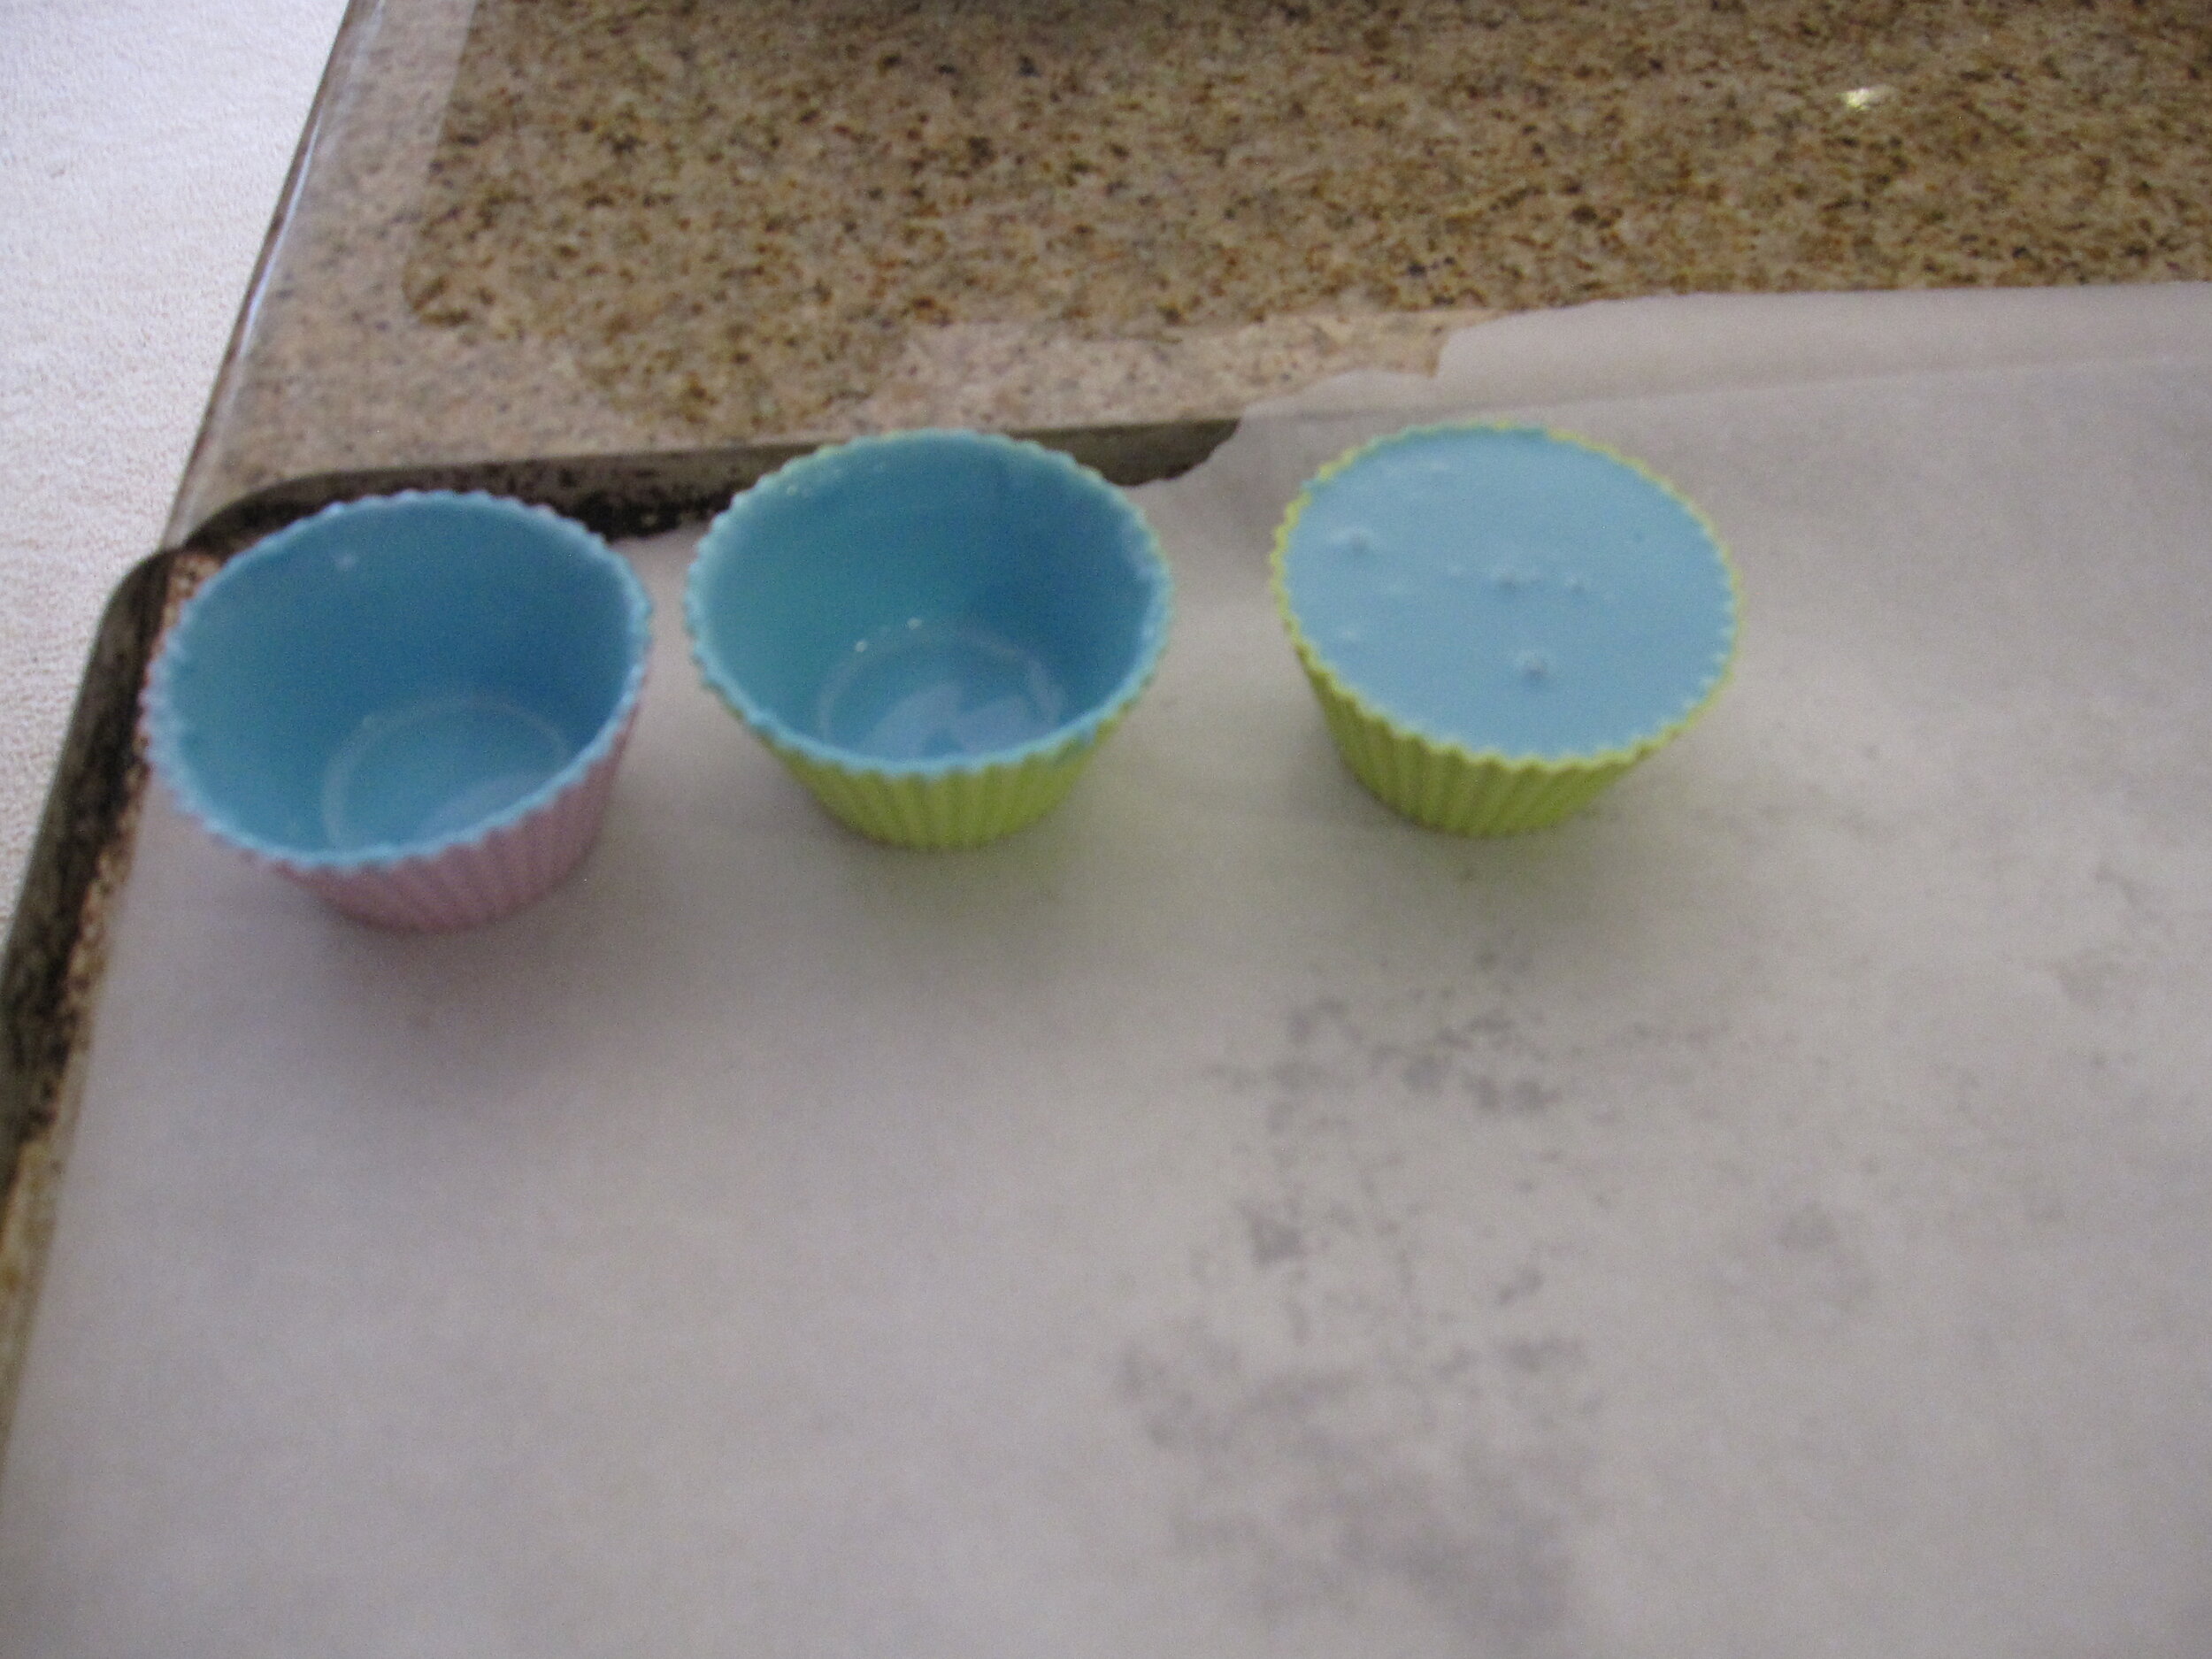
In order to make the cups themselves edible, I poured candy melts into silicone cupcake cups. For many years, I have been vehemently opposed to candy melts because I think they taste disgusting and the colors they come in are generally not in tune with my aesthetic, but my sister gave me that trendy little cake pop kit for Christmas, and I wanted to try out some of the techniques. I have been confirmed in my belief that they taste disgusting, but I suppose that they do have their uses. After all, I use fondant, too, and that doesn’t taste very good either.
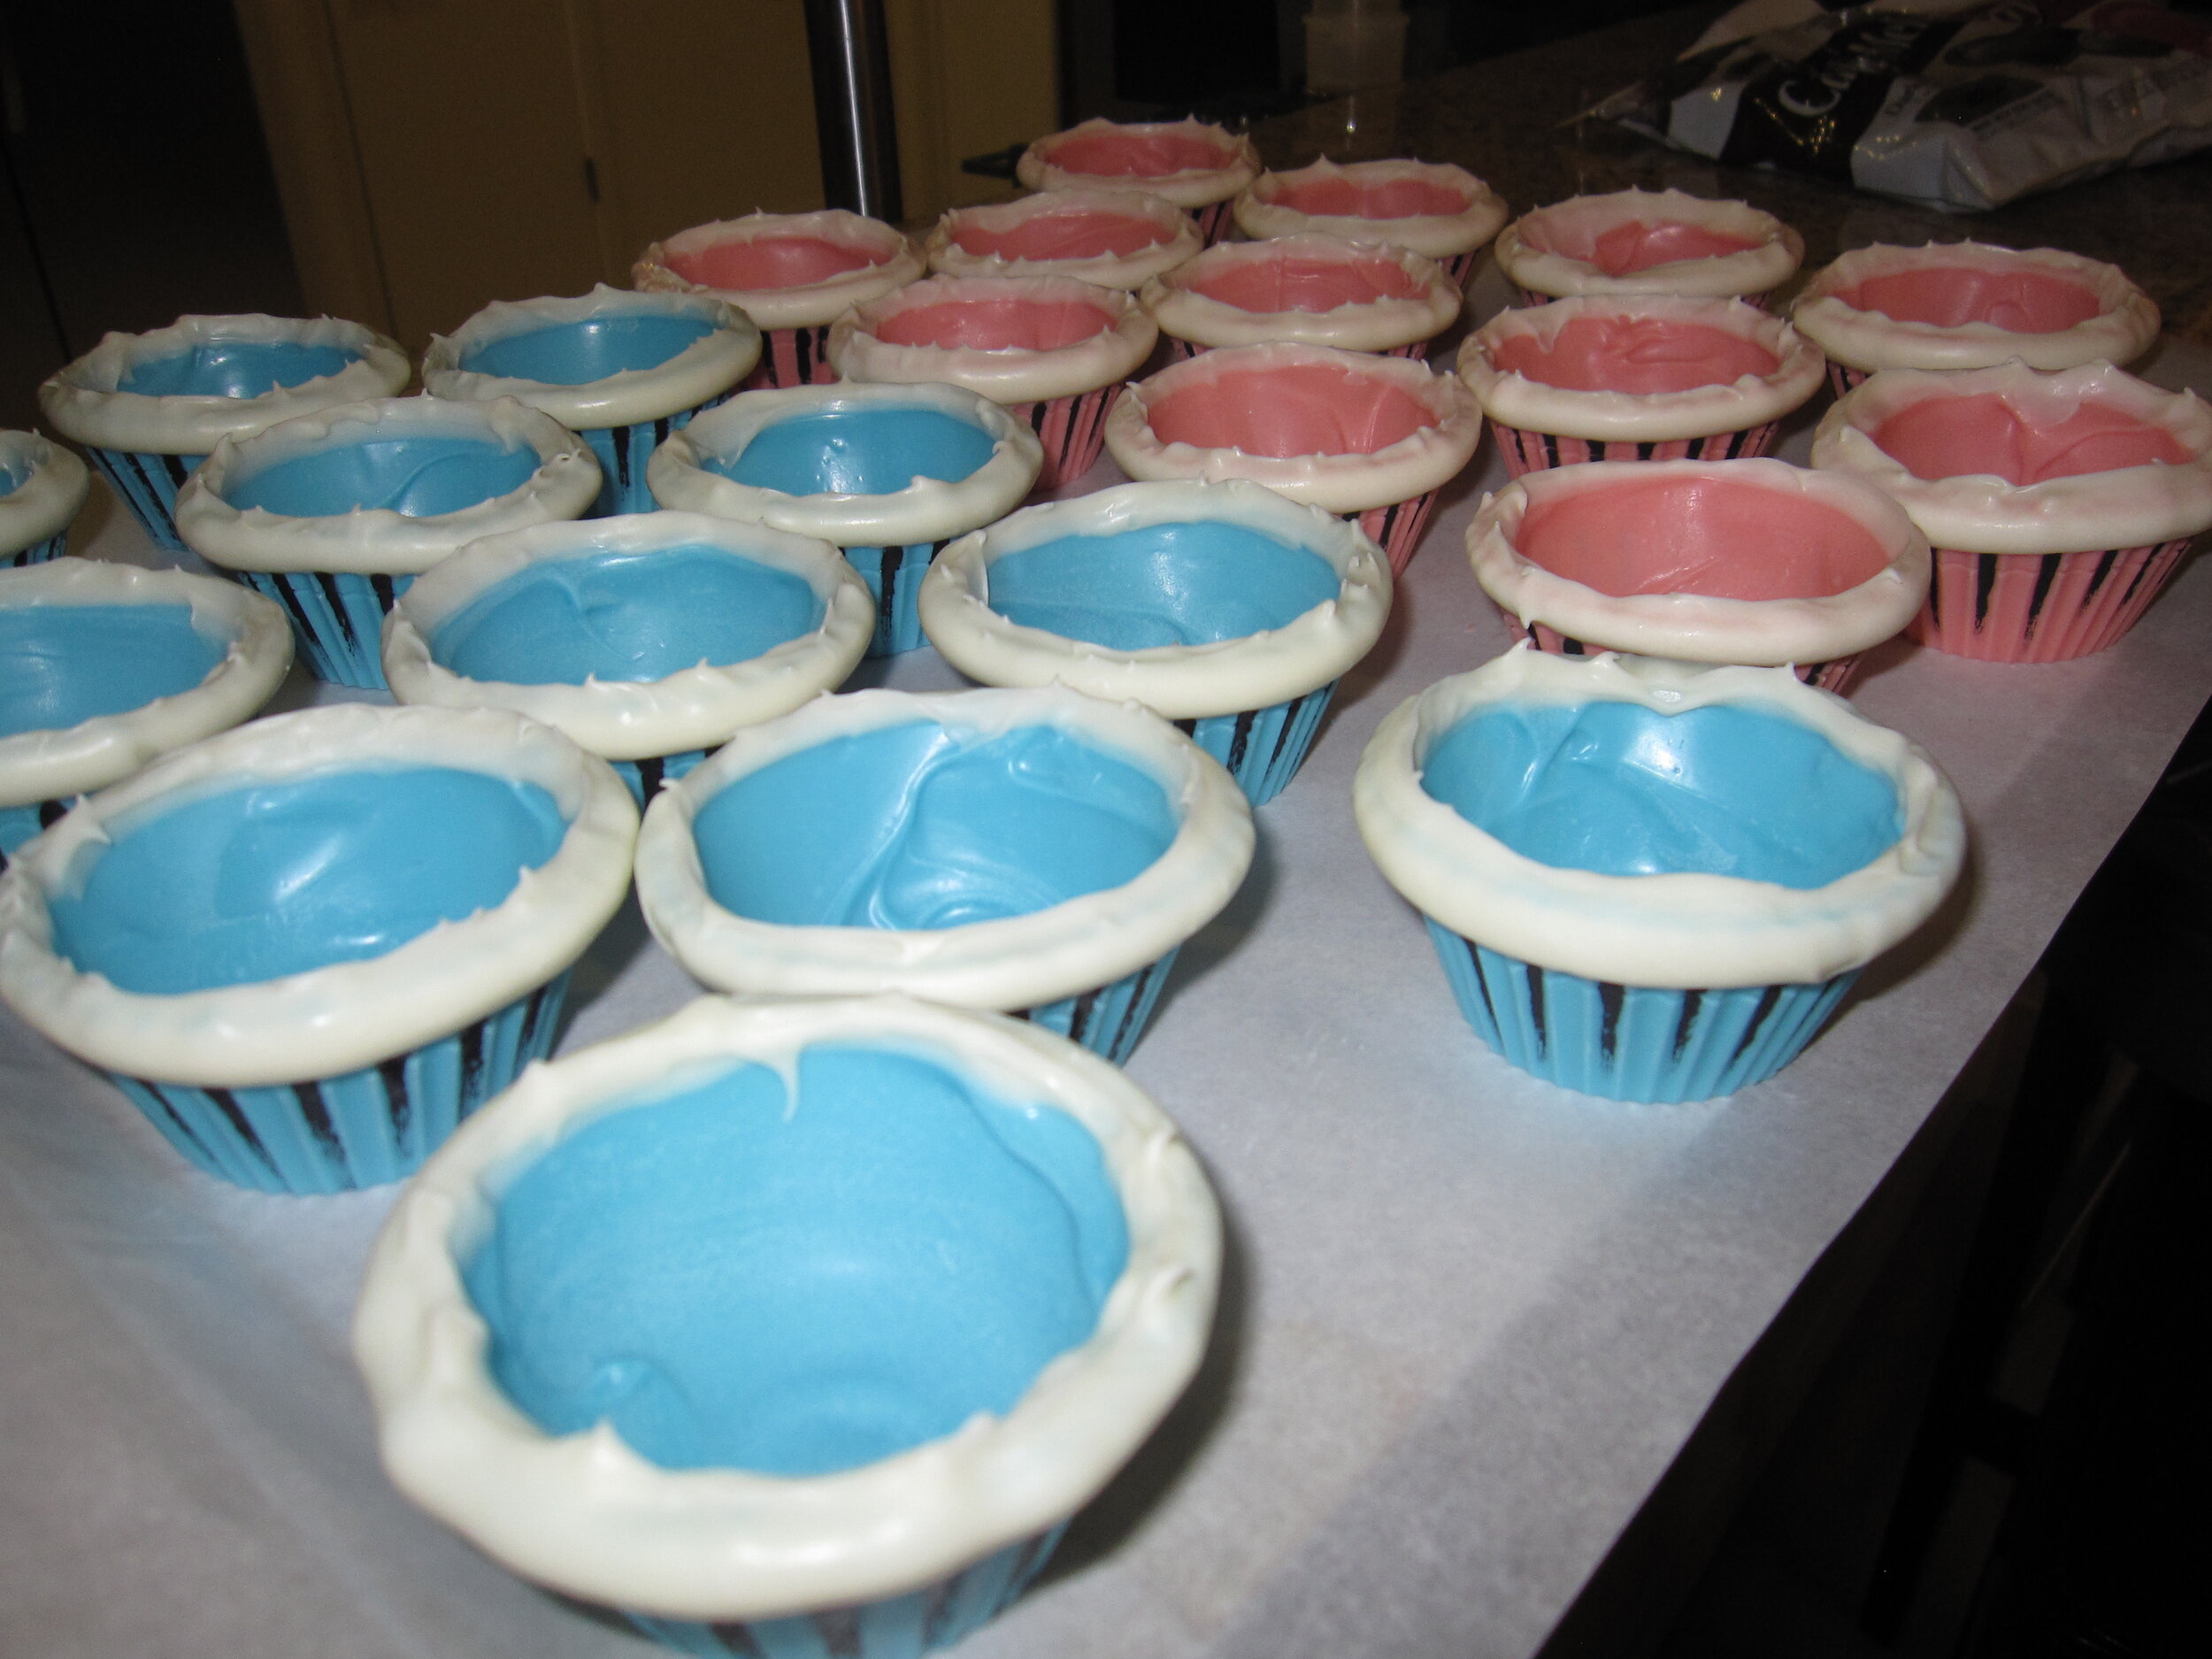
I let Sam pick out the colors of candy melts that he wanted for the cups and he chose pink and baby blue. Much like candy melts in general, this is basically the exact opposite of my aesthetic (and, as my sister pointed out, made it look a bit like a baby shower cake) but, hey, it’s his birthday. Who am I to argue? I gave the cups a second coat of candy melt on the inside to give them added structural stability and to make sure that the weight of the cupcake was concentrated in the bottom so they wouldn’t flip upside down. I dipped the top edge in white candy melt to give them a decorative rim that would also serve to hold them in the wire rings more effectively. I then attempted to ameliorate the pastel-ness of the cups by giving them distressed black streaks in some of the flutes of the cupcake cups. I told myself I was striving for a vaguely Victorian steam-punk aesthetic. I’m not sure that I entirely got there.
A few days before the party, I made a very important discovery. Sam’s grandparents gave him an awesome set of Little People animals for his birthday, which he absolutely loved. He even refused to eat dinner because he was too busy playing with them, which, coming from Sam, is a huge complement. He pulled the giraffe out of the bag and proudly exclaimed, “Zebra!” Uh oh. I remembered that Sam does not always differentiate between zebras and giraffes. So I pulled out the zebra and the giraffe and asked him which one was a zebra cupcake. First he pointed to the giraffe. Then he pointed to the zebra. So I decided to hedge my bets and make both zebra and giraffe cupcakes.
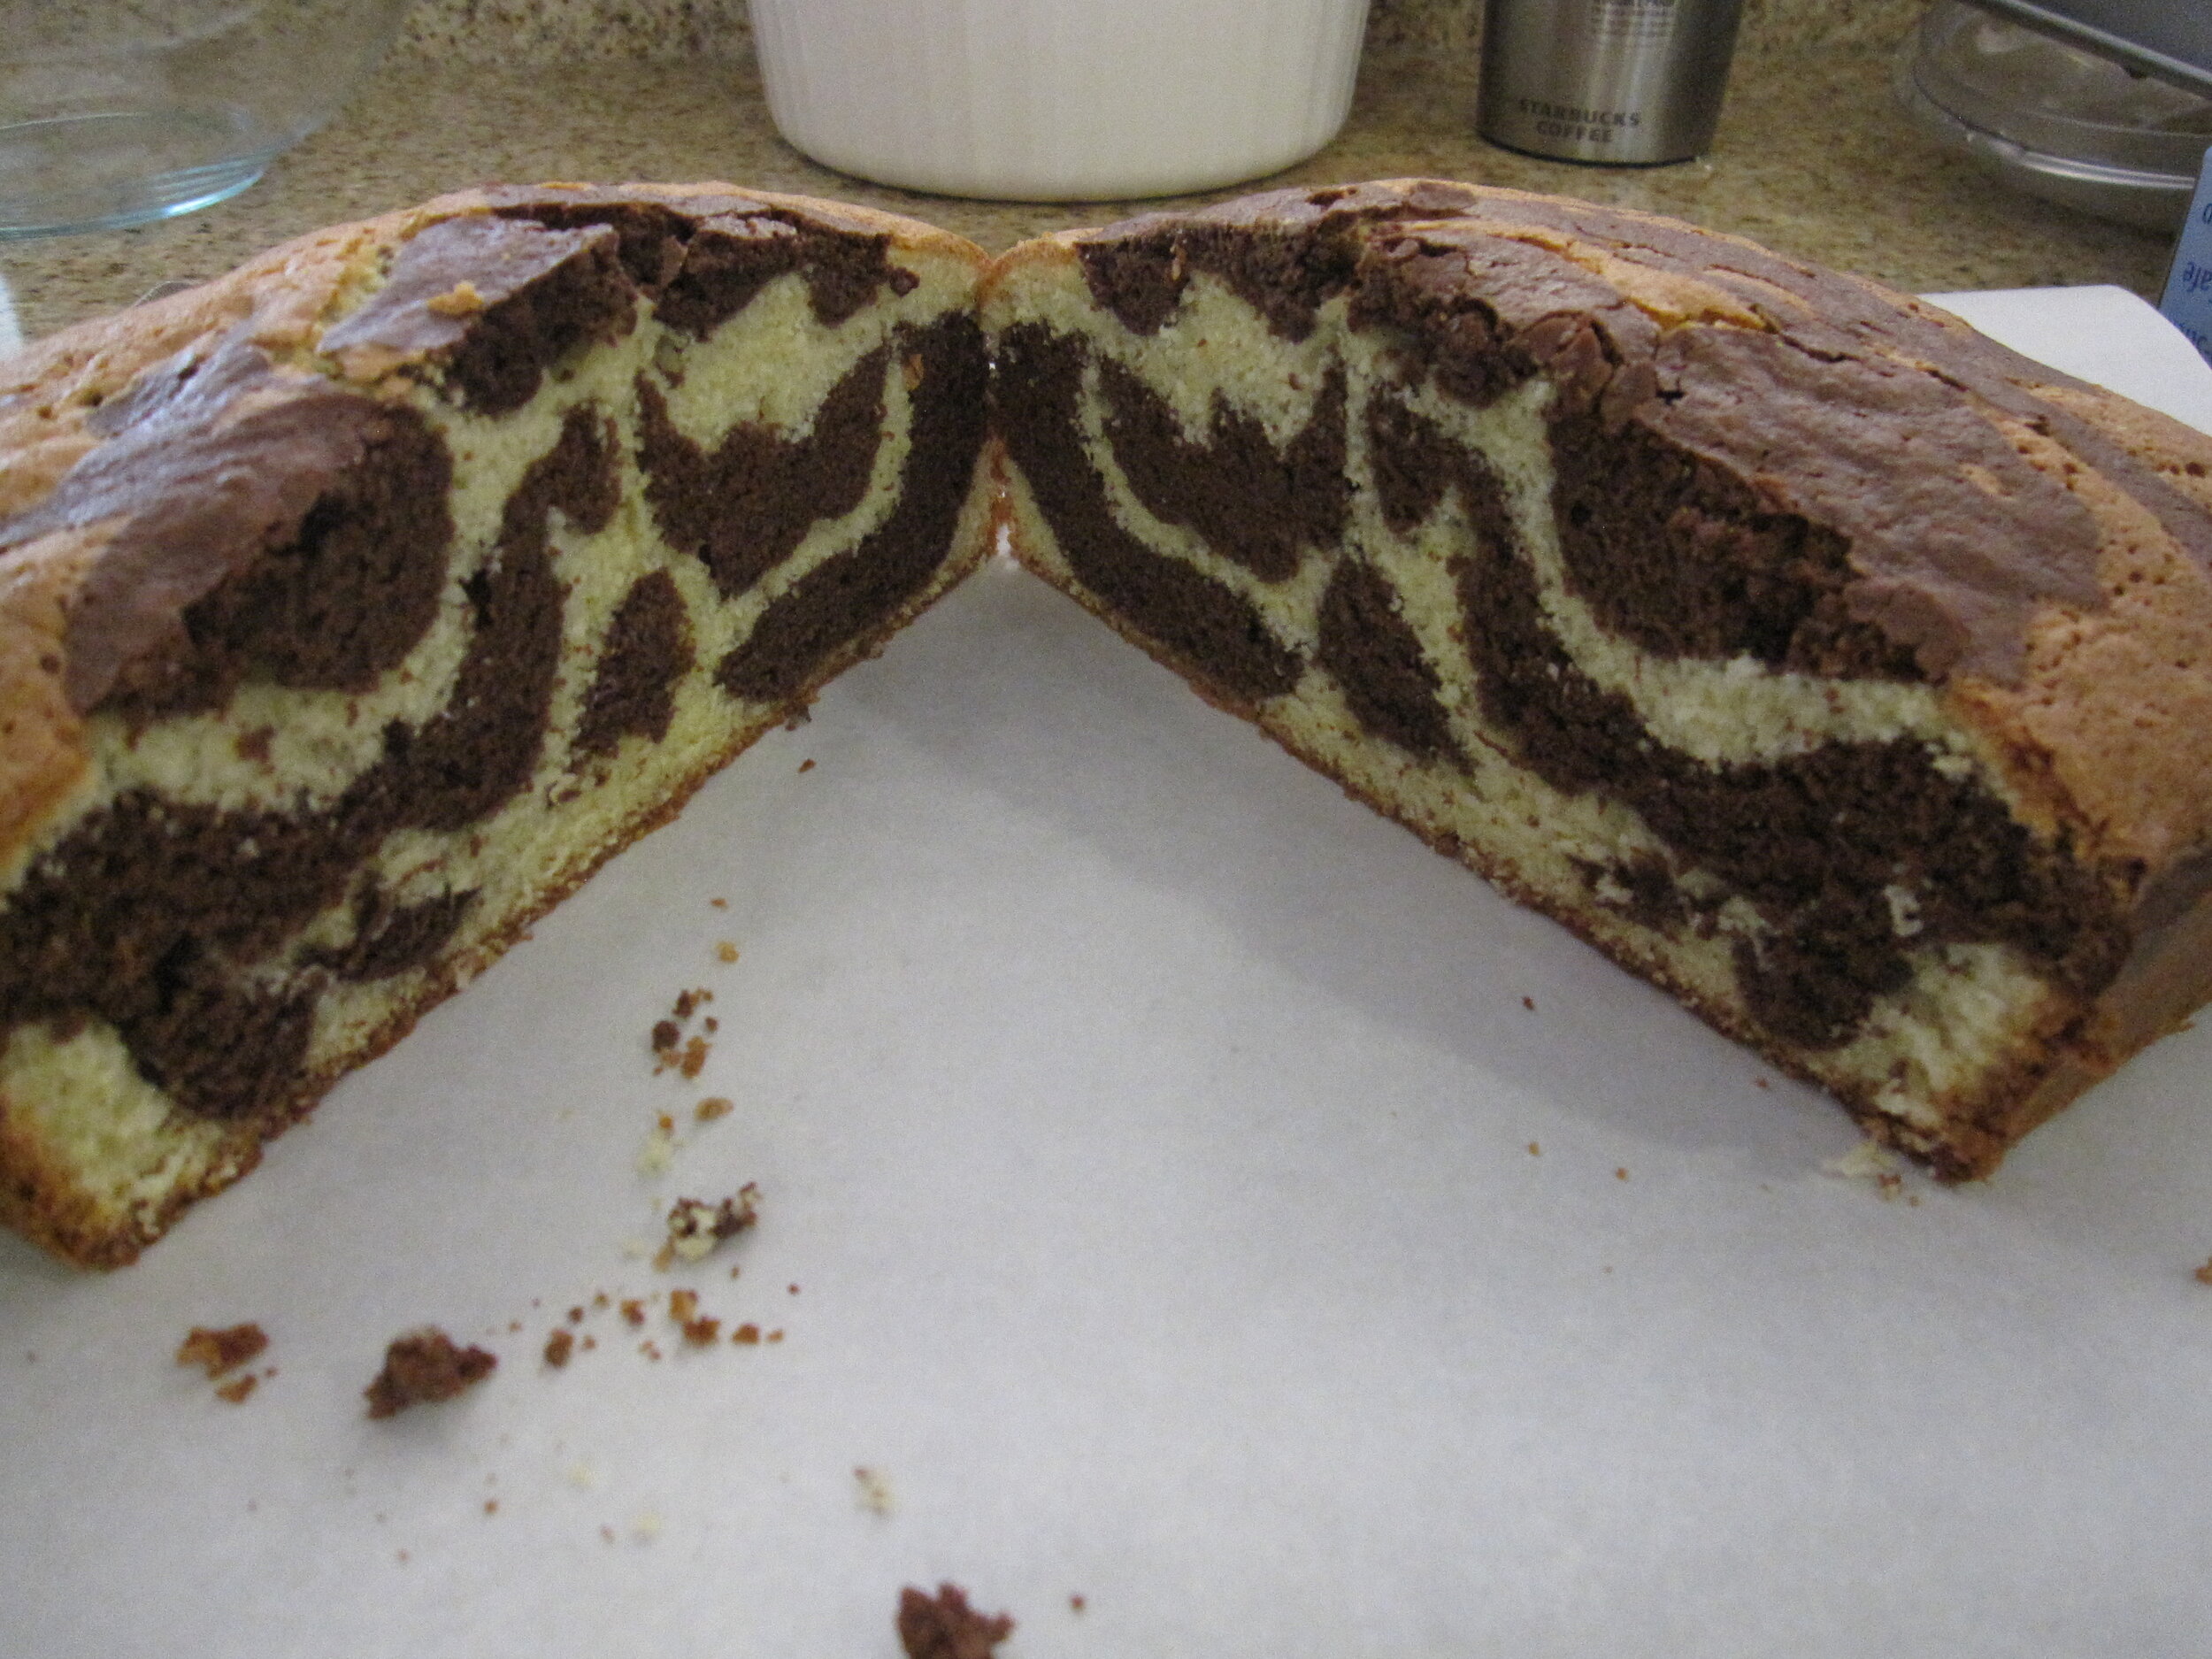
For the cake recipe, I used a new marbled olive oil cake recipe. I had initially chosen this recipe because the marbling resembled zebra stripes. It actually turned out to be perfect because the marbling, both in color and in pattern, is about halfway between a zebra and a giraffe. It also turned out to be quite delicious. Generally, when I’m making a cake, the last thing I want to do is eat cake, but I snacked on this cake the entire time.
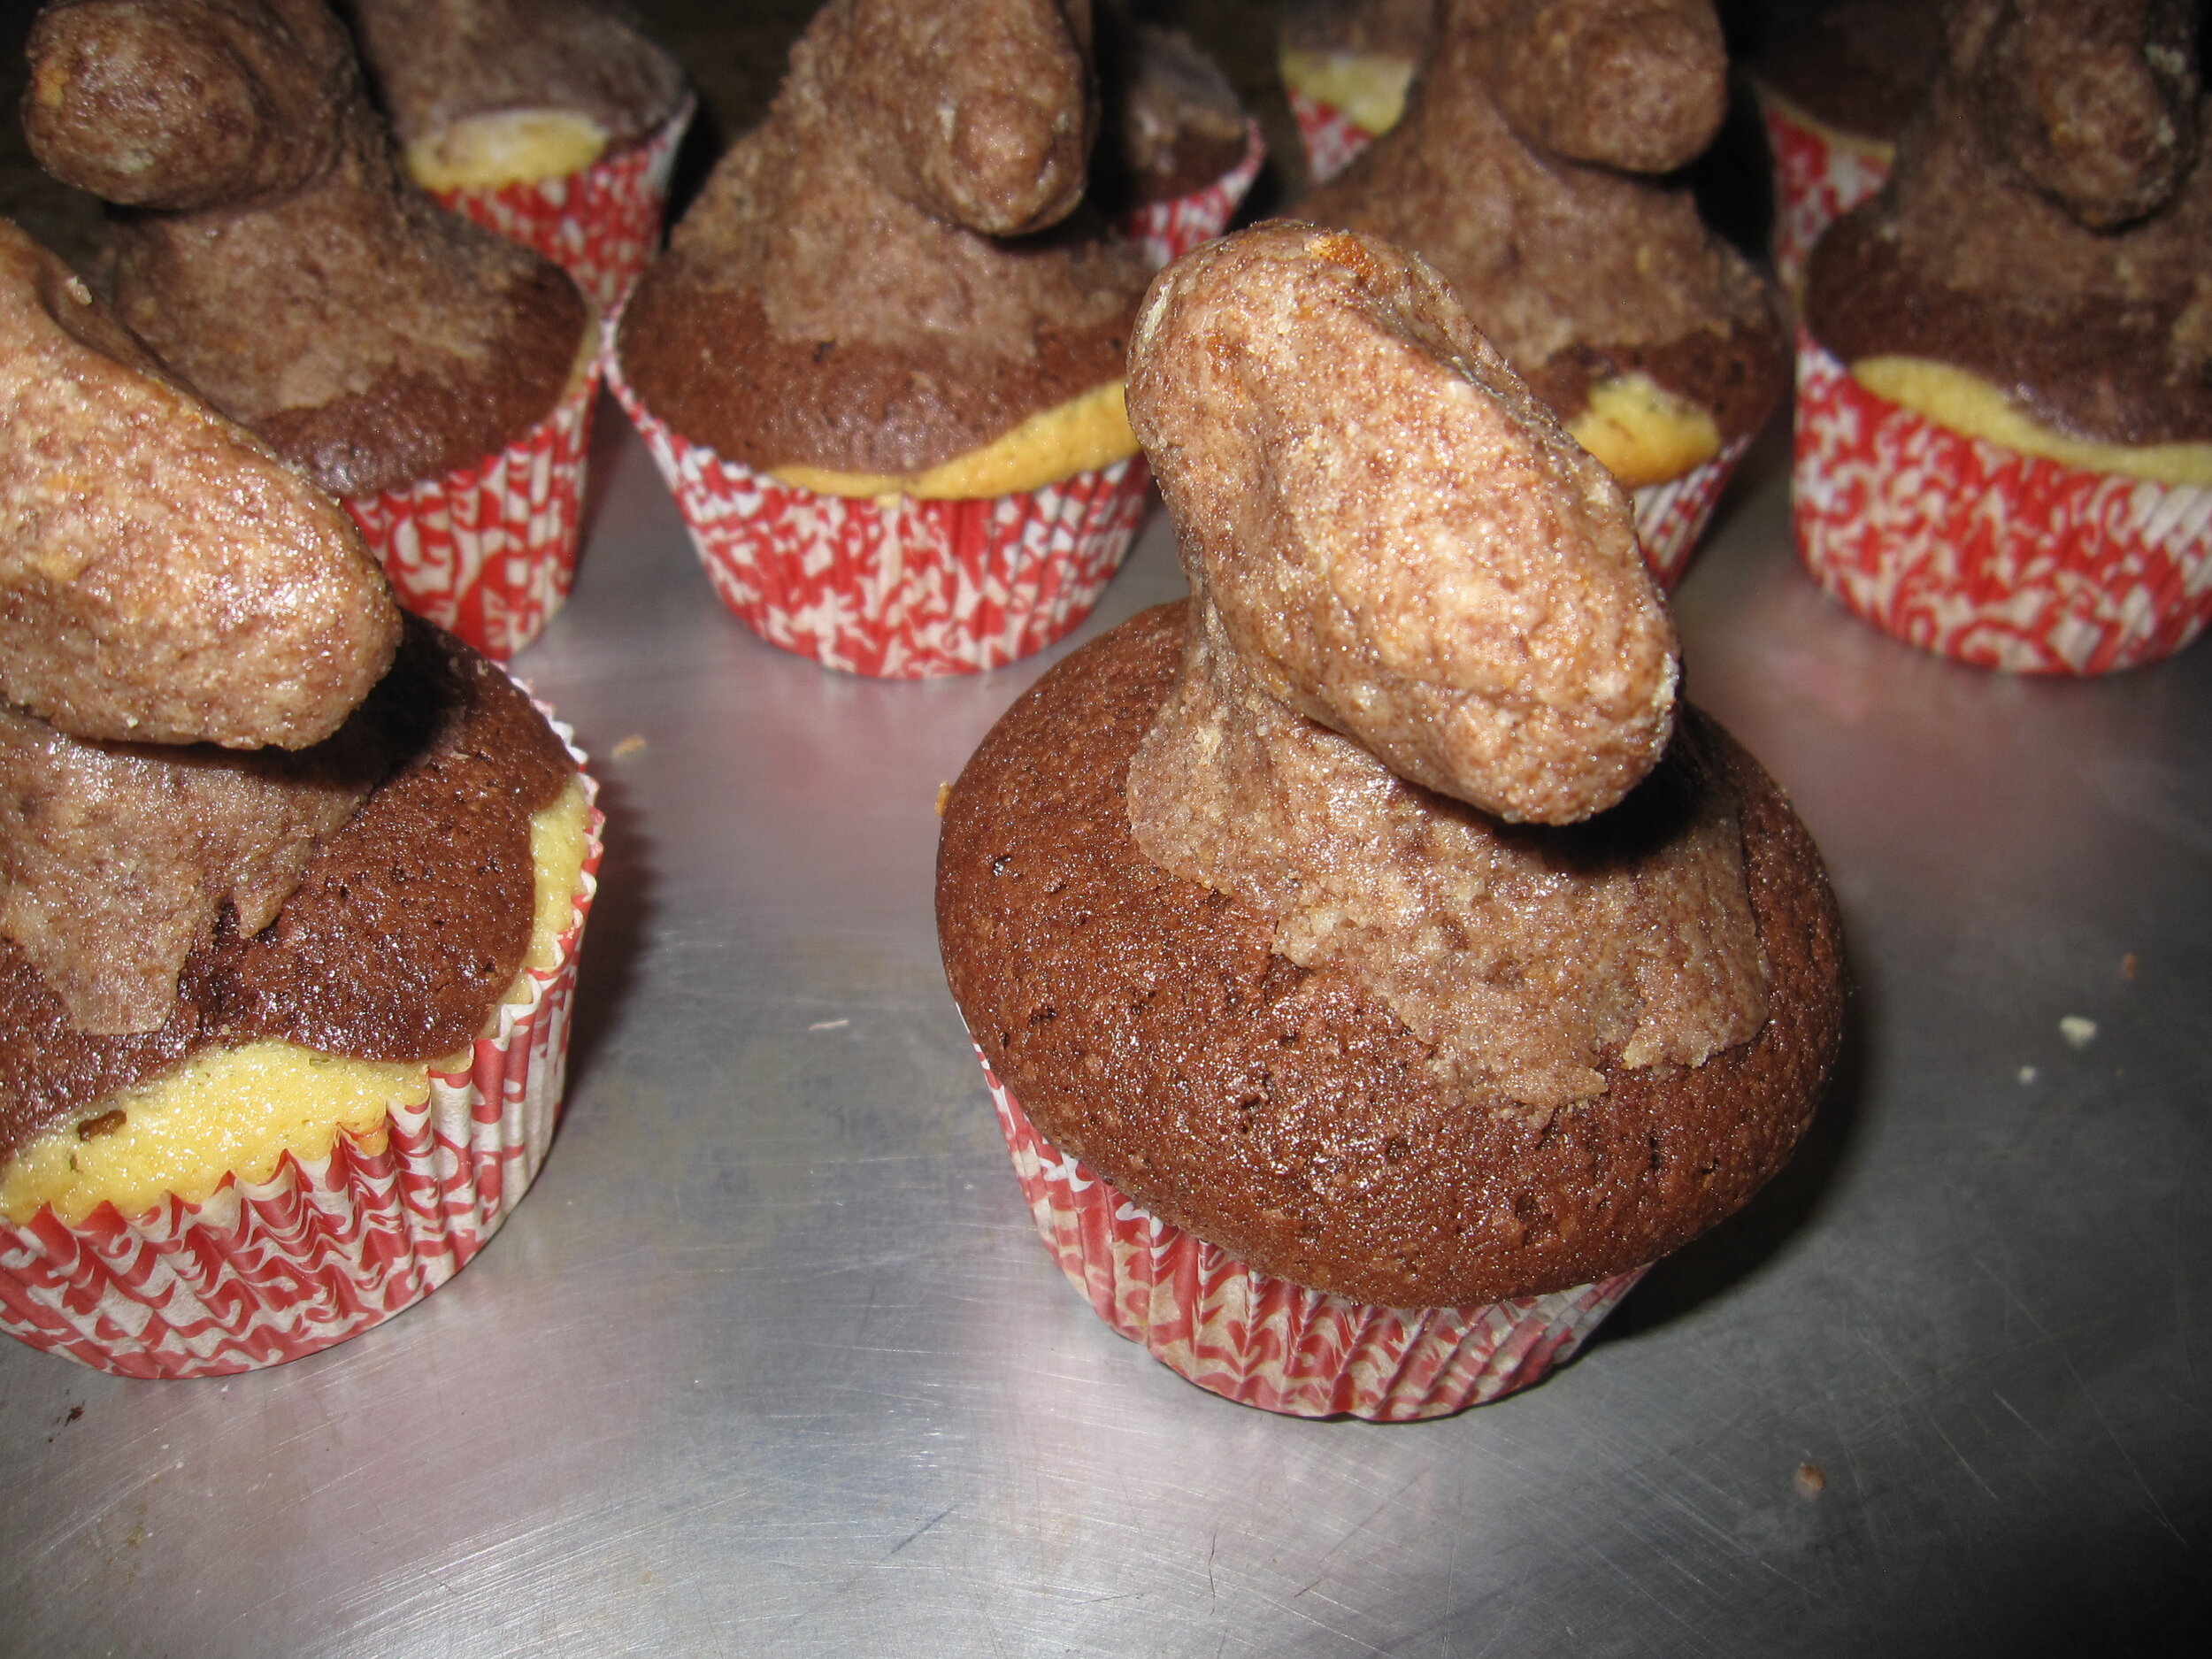
Once the cupcakes were baked, I used essentially the cake pop technique to add zebra and giraffe heads to them. This involves crumbling up cake and mixing it with frosting to make a thick paste and then shaping it as desired. To make the zebra heads, I did this directly on top of the cupcakes. Because the giraffes needed long, thin necks, I made them separately then popped them in the refrigerator to harden up enough that I could then embed them in the cupcakes.
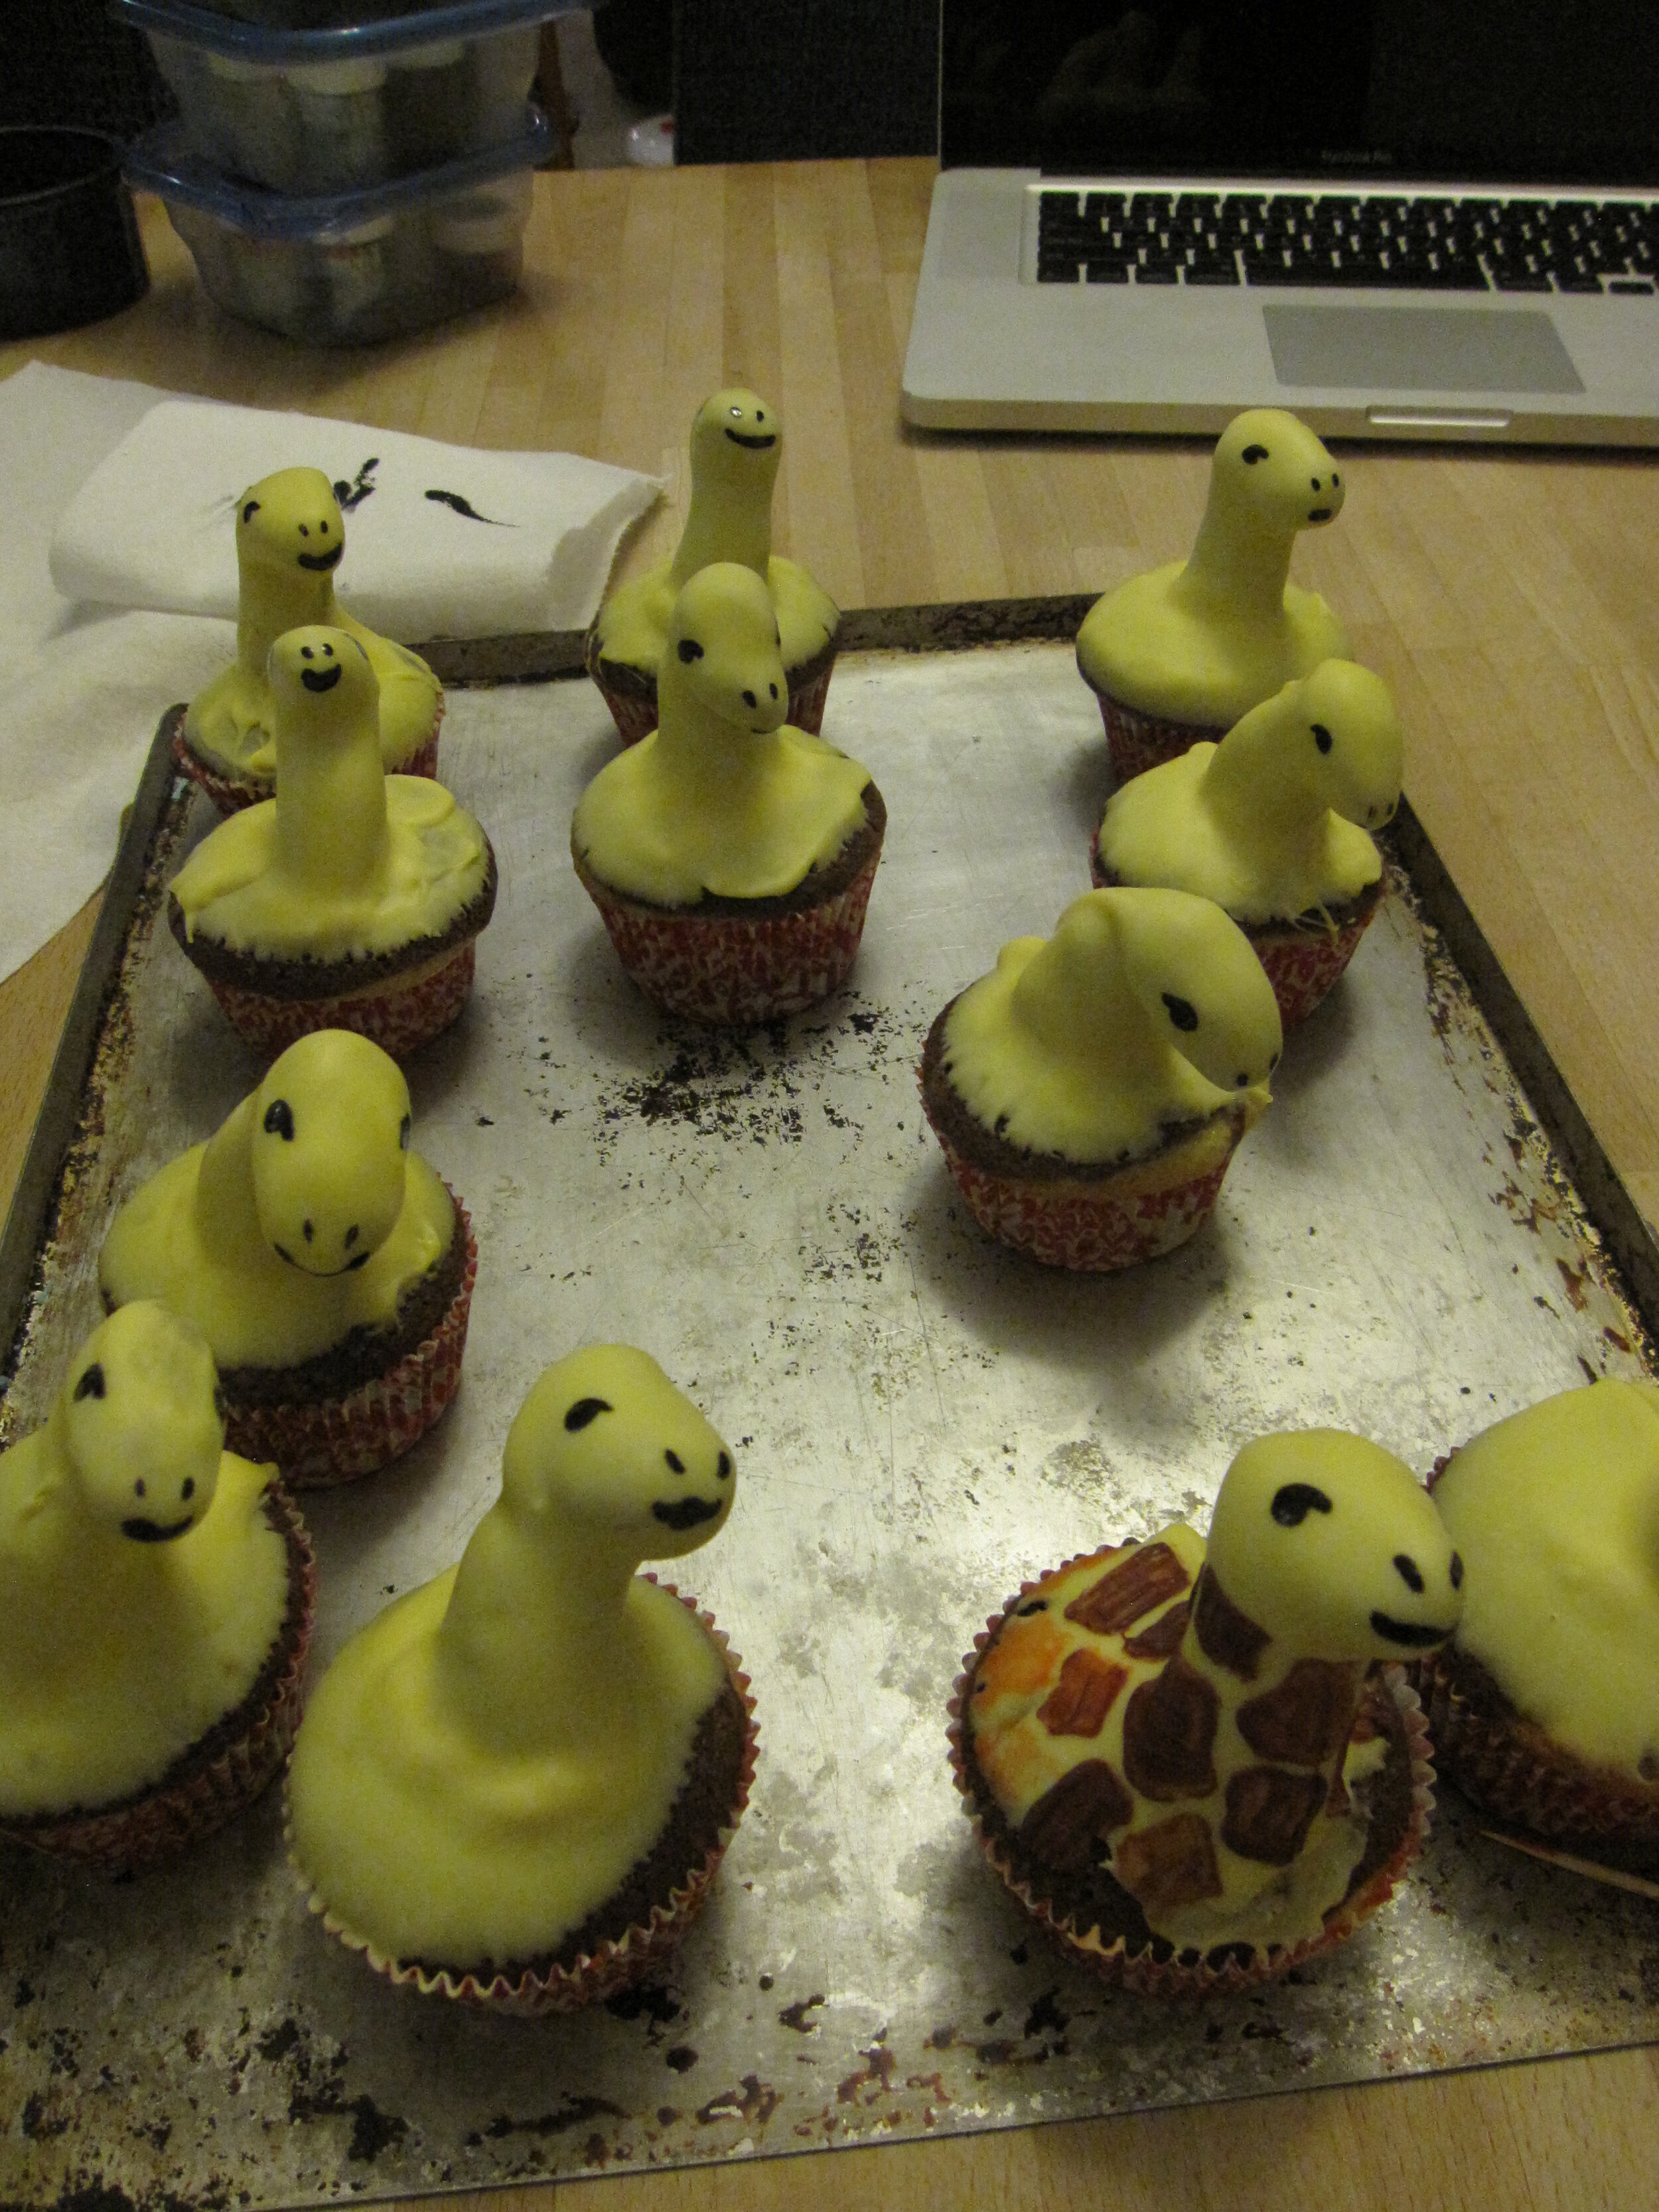
I dipped the zebras in white candy melts and the giraffes in yellowish candy melts. Once this hardened, I peeled the paper off the cupcakes and set the cupcakes in the candy melt cups. Then I used food coloring and candy melts to paint on the patterns, mouths, and eyes. I tried to make them look smug about the fact that the lion couldn’t reach them. I think that next time I should make the eyes more prominent by using something three-dimensional like a candy sprinkle. I also added candy melt ears, manes, and (in the case of the giraffes) horns.
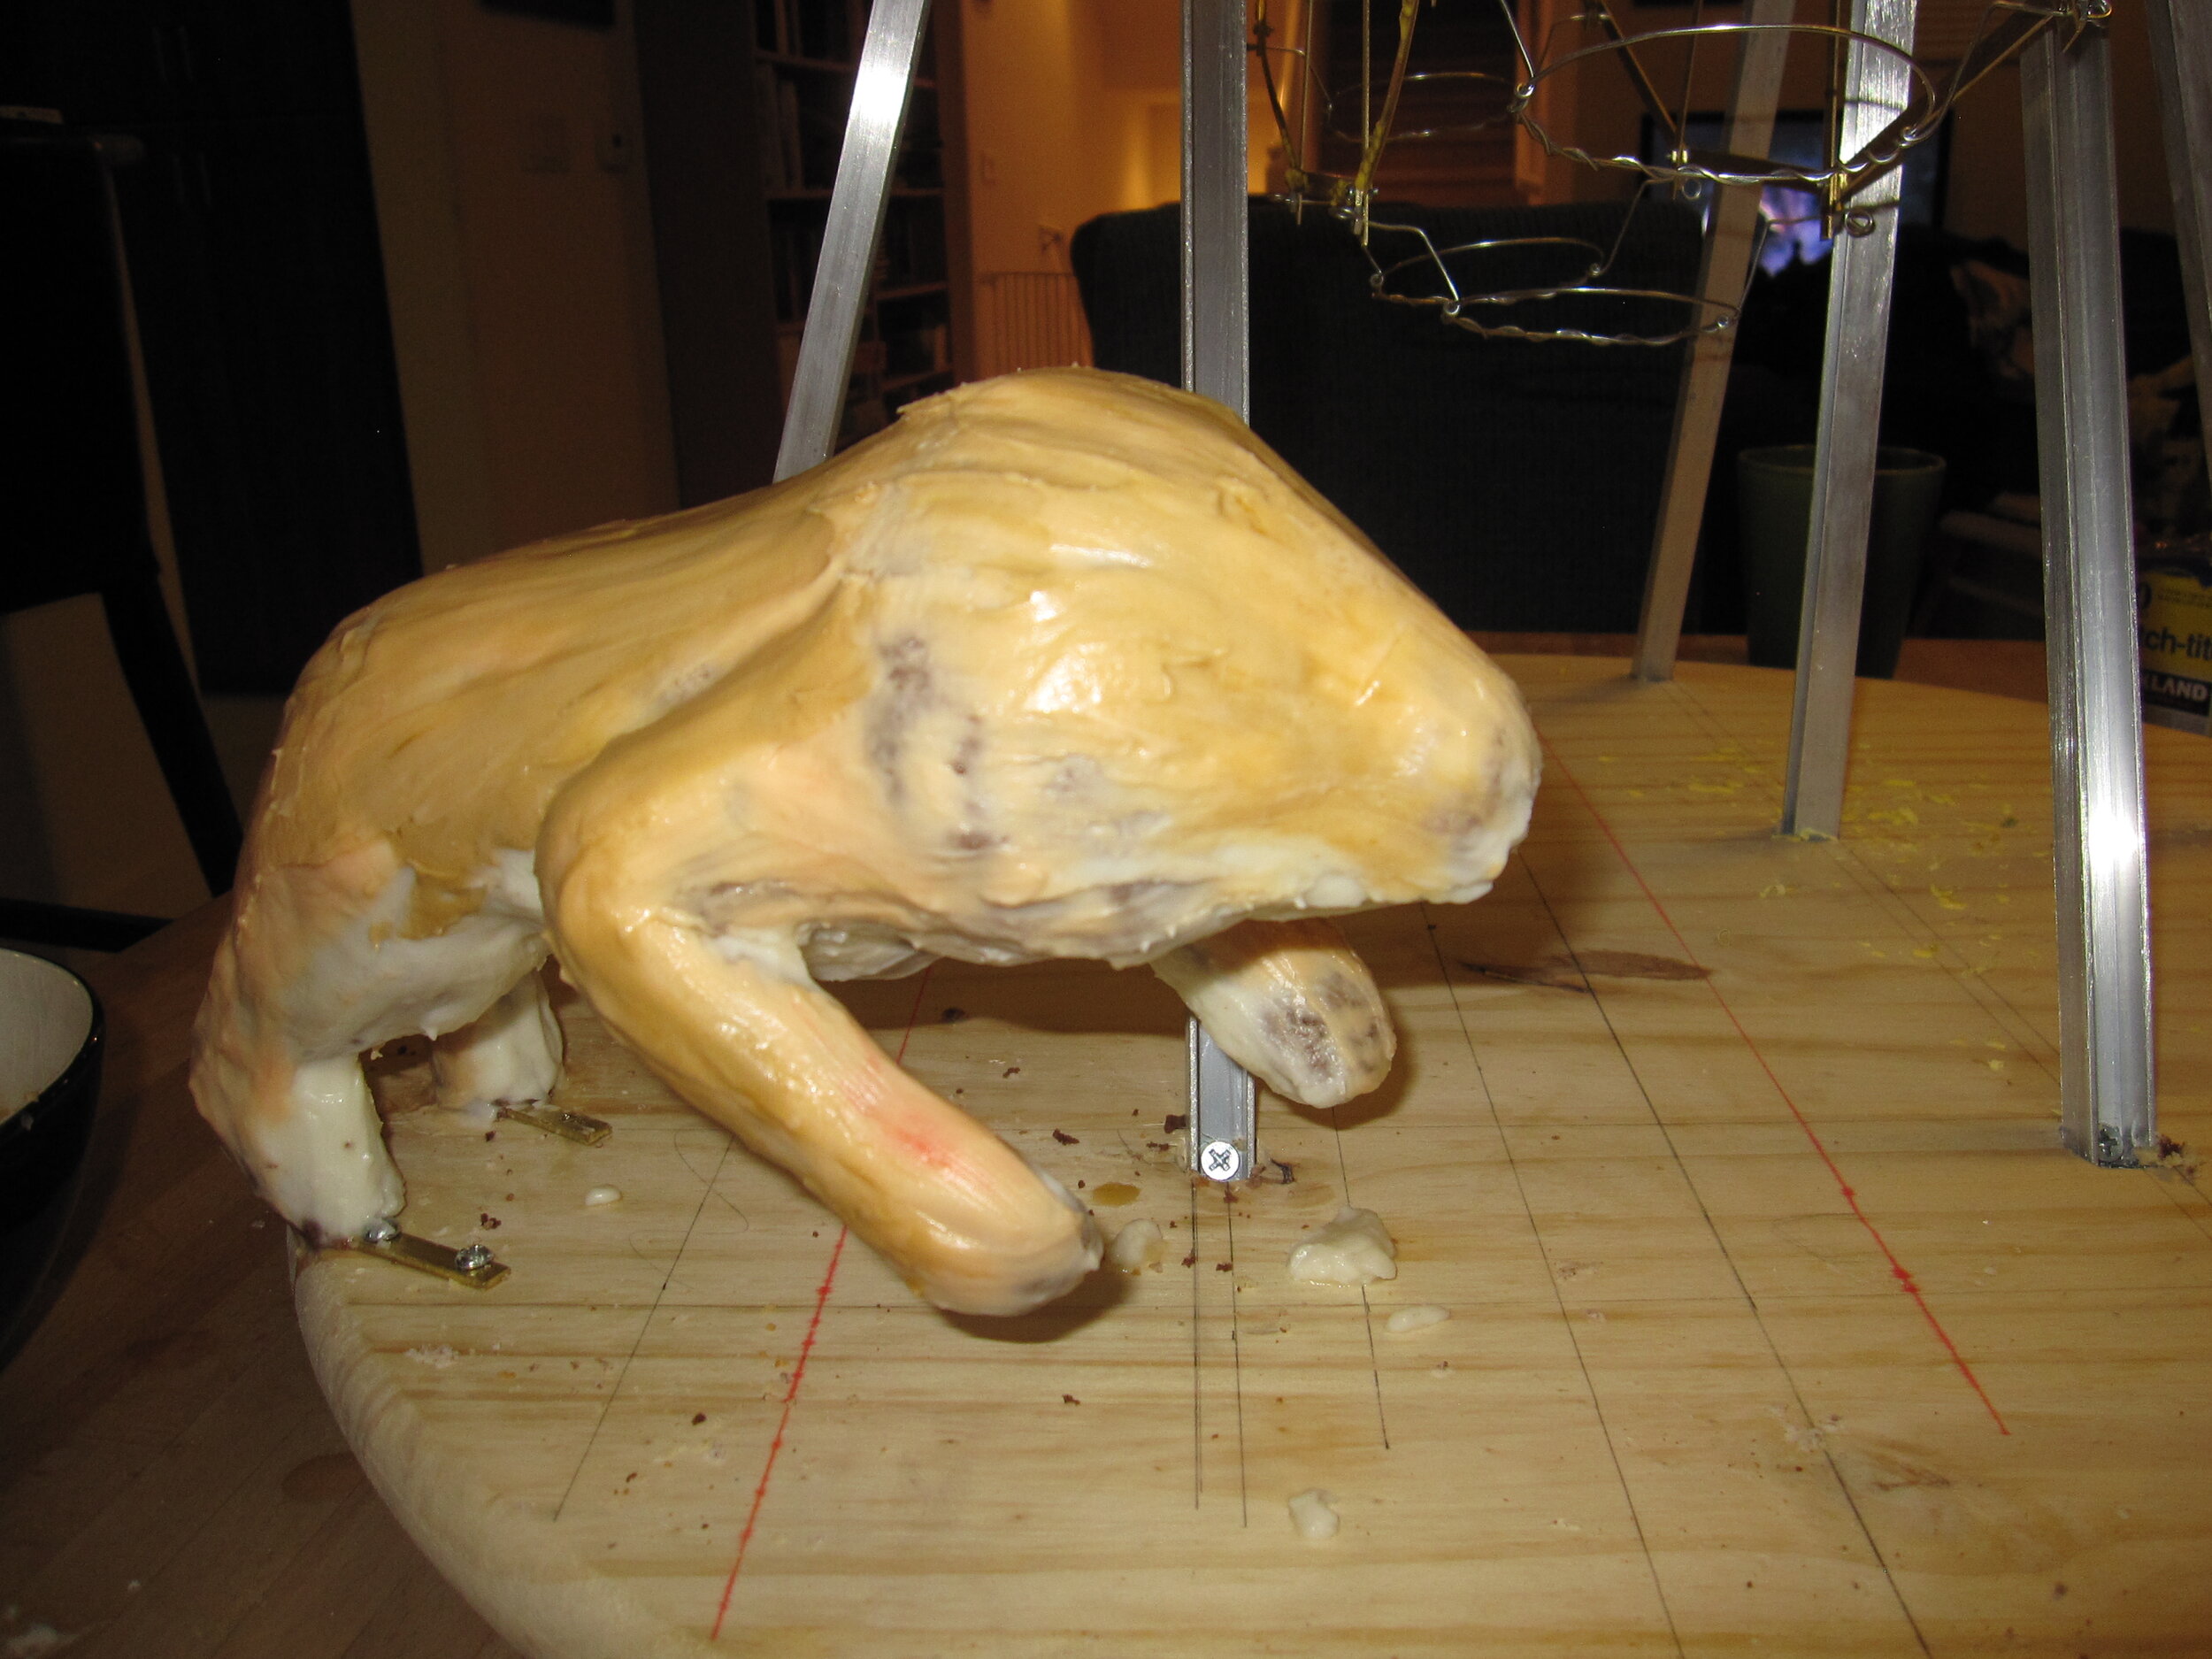
To make the lion look like it was in mid-lunge, I made a base for it using brass strips and foam core so that only the back two feet would be touching the ground. I bolted this to the cake base and built the lion on top of it. I wish that the base had been a little bigger, because I couldn’t really place the lion in the way I would have liked. He wound leaping more alongside the ferris wheel than at the ferris wheel. I also wish I had waited until the cake cooled completely before I put it on the base, because then I would have had less trouble with the cake melting the icing and sliding on the base. After I carved the cake and added a little mass with some of the cake pop goo, I used buttercream icing for the fur and candy melt for the ears and tail. In the end, I wasn’t particularly happy with the way the lion turned out. It was more awkward than scary, but not cartoony enough to be fun. Just as I was feeling most disappointed in how the lion turned out, Sam woke up and saw it. He gave a squeal of unmitigated delight and yelled “A lion!” So apparently, my lion wasn’t such a failure after all. For days after the party, Sam wandered around saying, “I ate the tail!”
At an early point in the process, I had planned to dip the entire ferris wheel in candy melt. Fortunately, I gave this idea up before I tried it, as the results would doubtless have been disastrous. However, I also couldn’t leave it entirely unadorned. For one thing, it clashed with the baby shower pink and blue cupcake cups. For another, Alex pointed out to me that ferris wheels are colorful. So I decorated it with red, blue, and yellow candy melt squiggles and dots. I was reasonably pleased with this effect and Alex also gave it her stamp of approval.

The final touches were to decorate the base. By this time it was the morning of the party and I had been up all night working on the cake. So the base sort of got short changed. I threw down a layer of pressed sugar dirt and then brushed on some different shades of brown food coloring. I didn’t have my airbrush with me, so the results weren’t as subtle as I would have liked. I also tried something new to make the savannah grasses. I used puff pastry, brushed with green food coloring, and cut into grass shapes. In the end, it looked more like french fries than grass, but it was still a fun experiment.
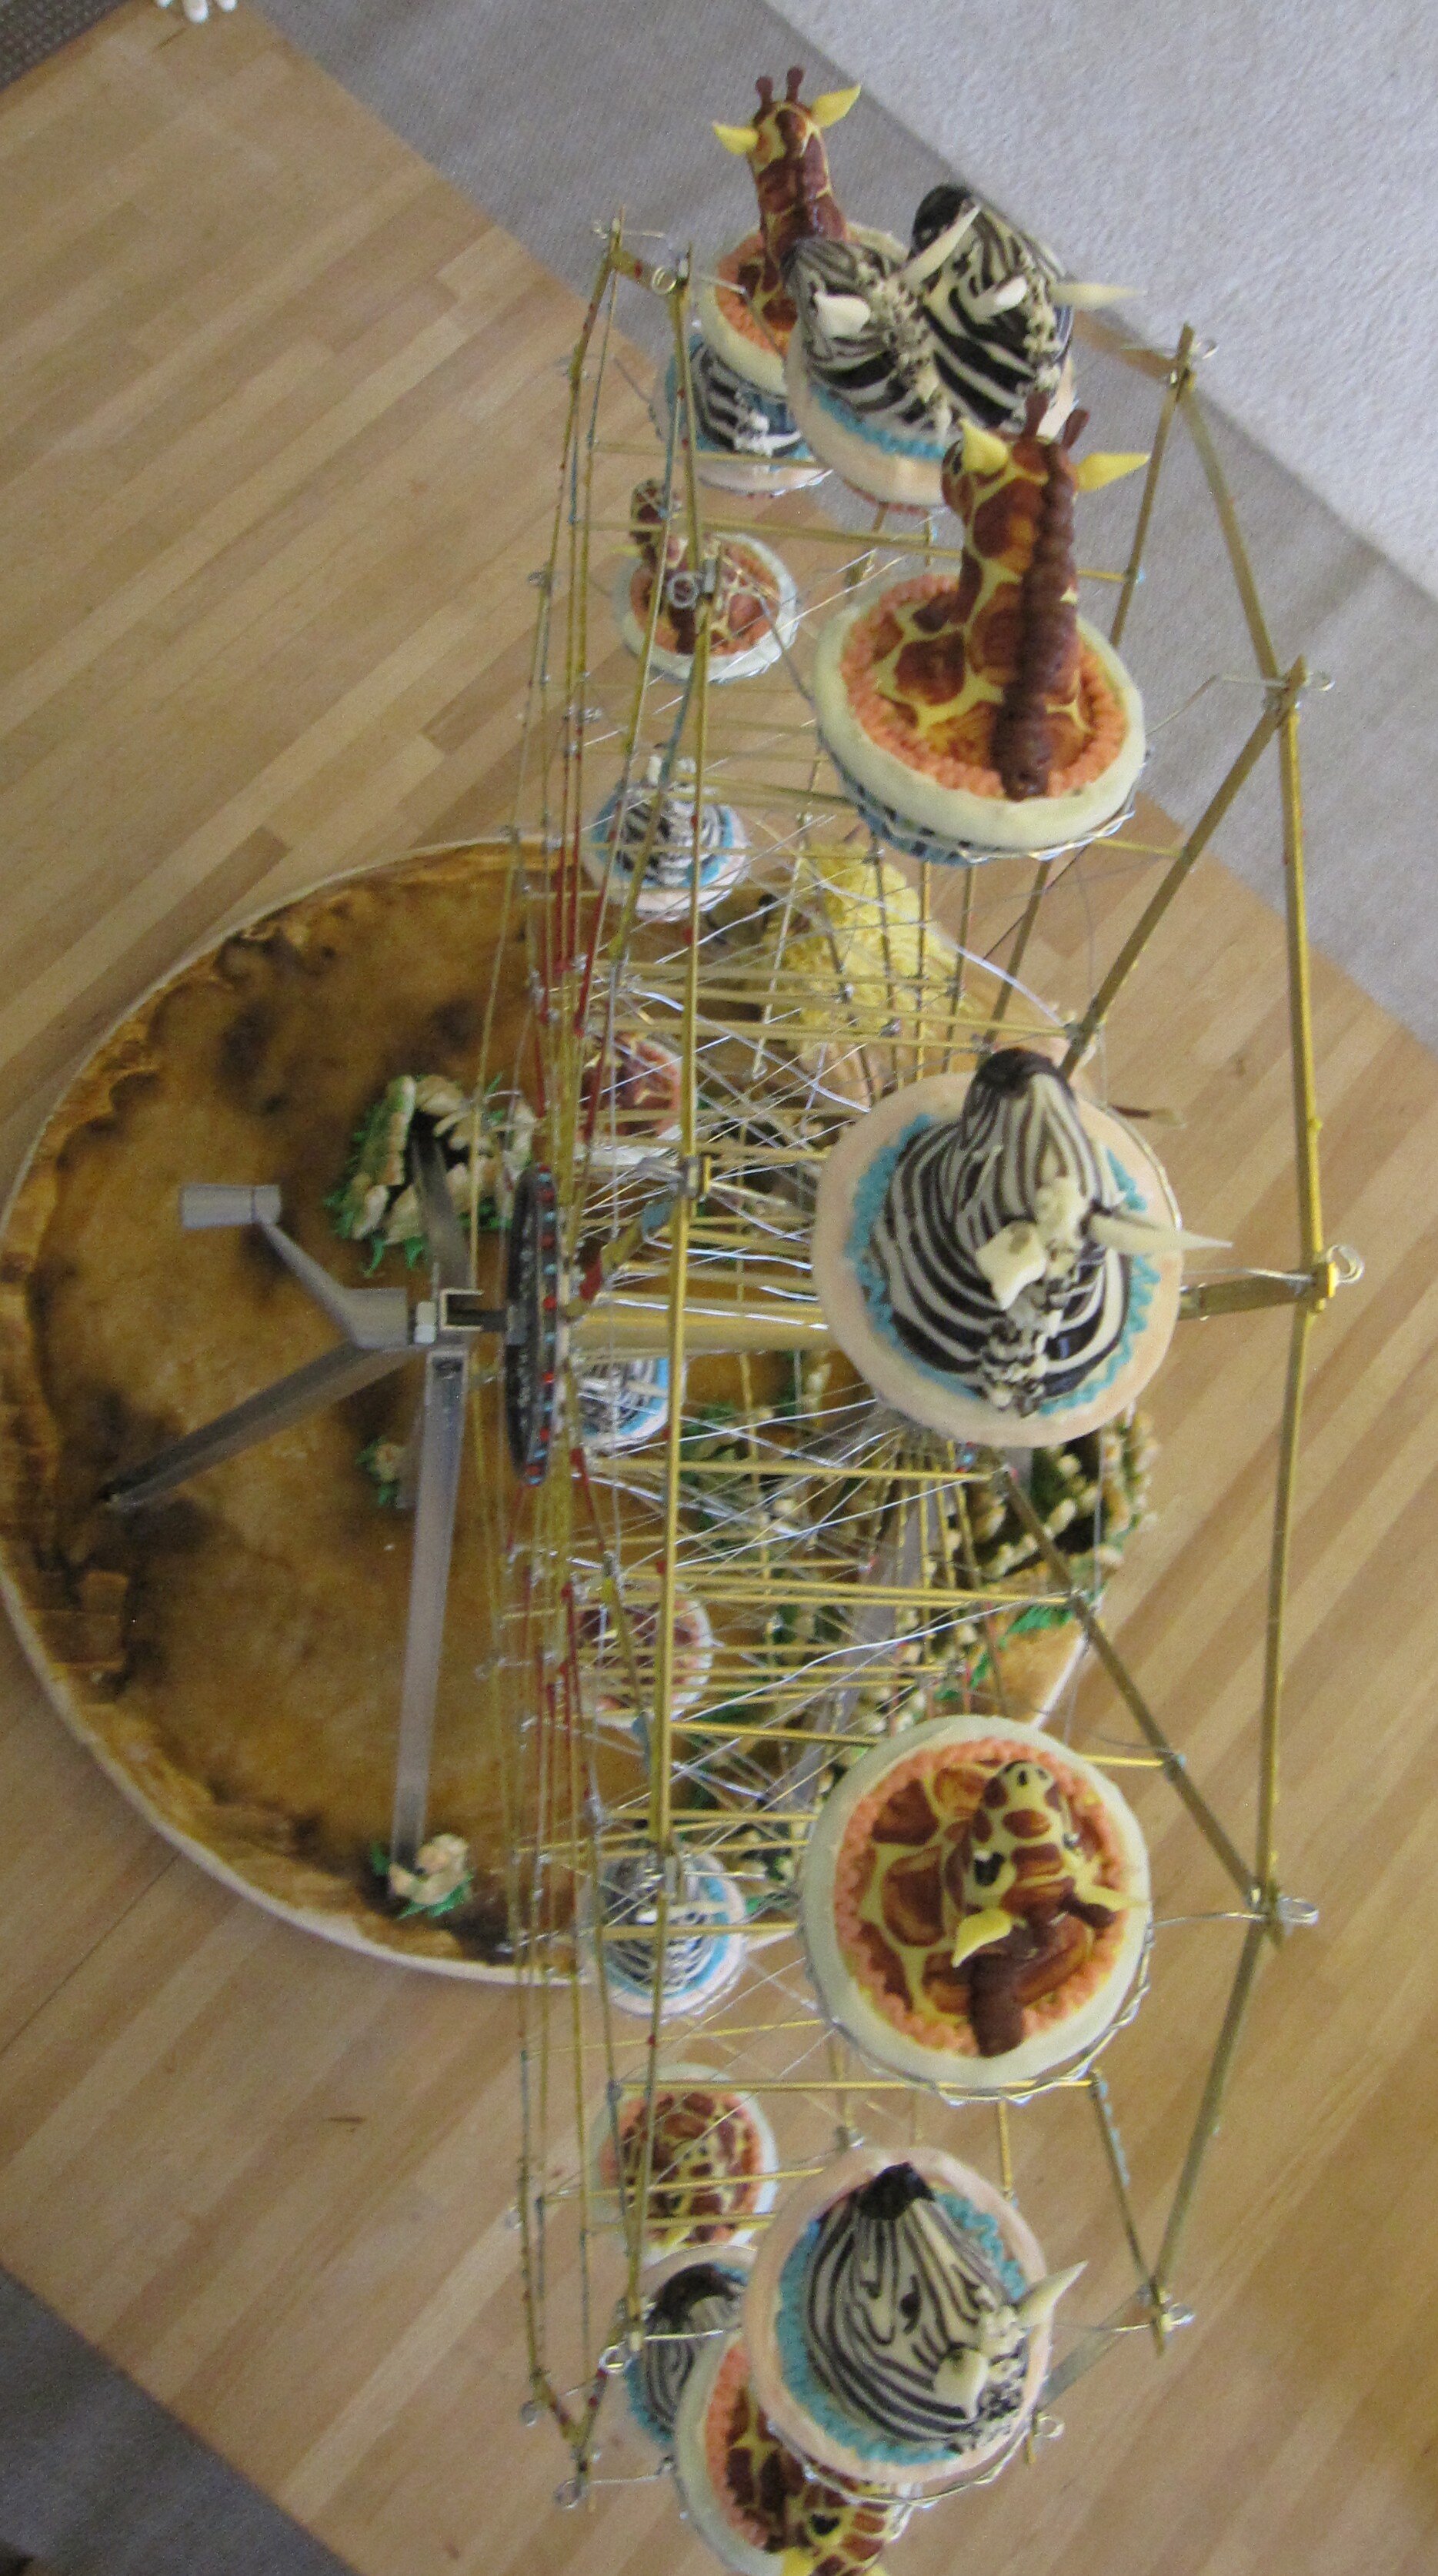
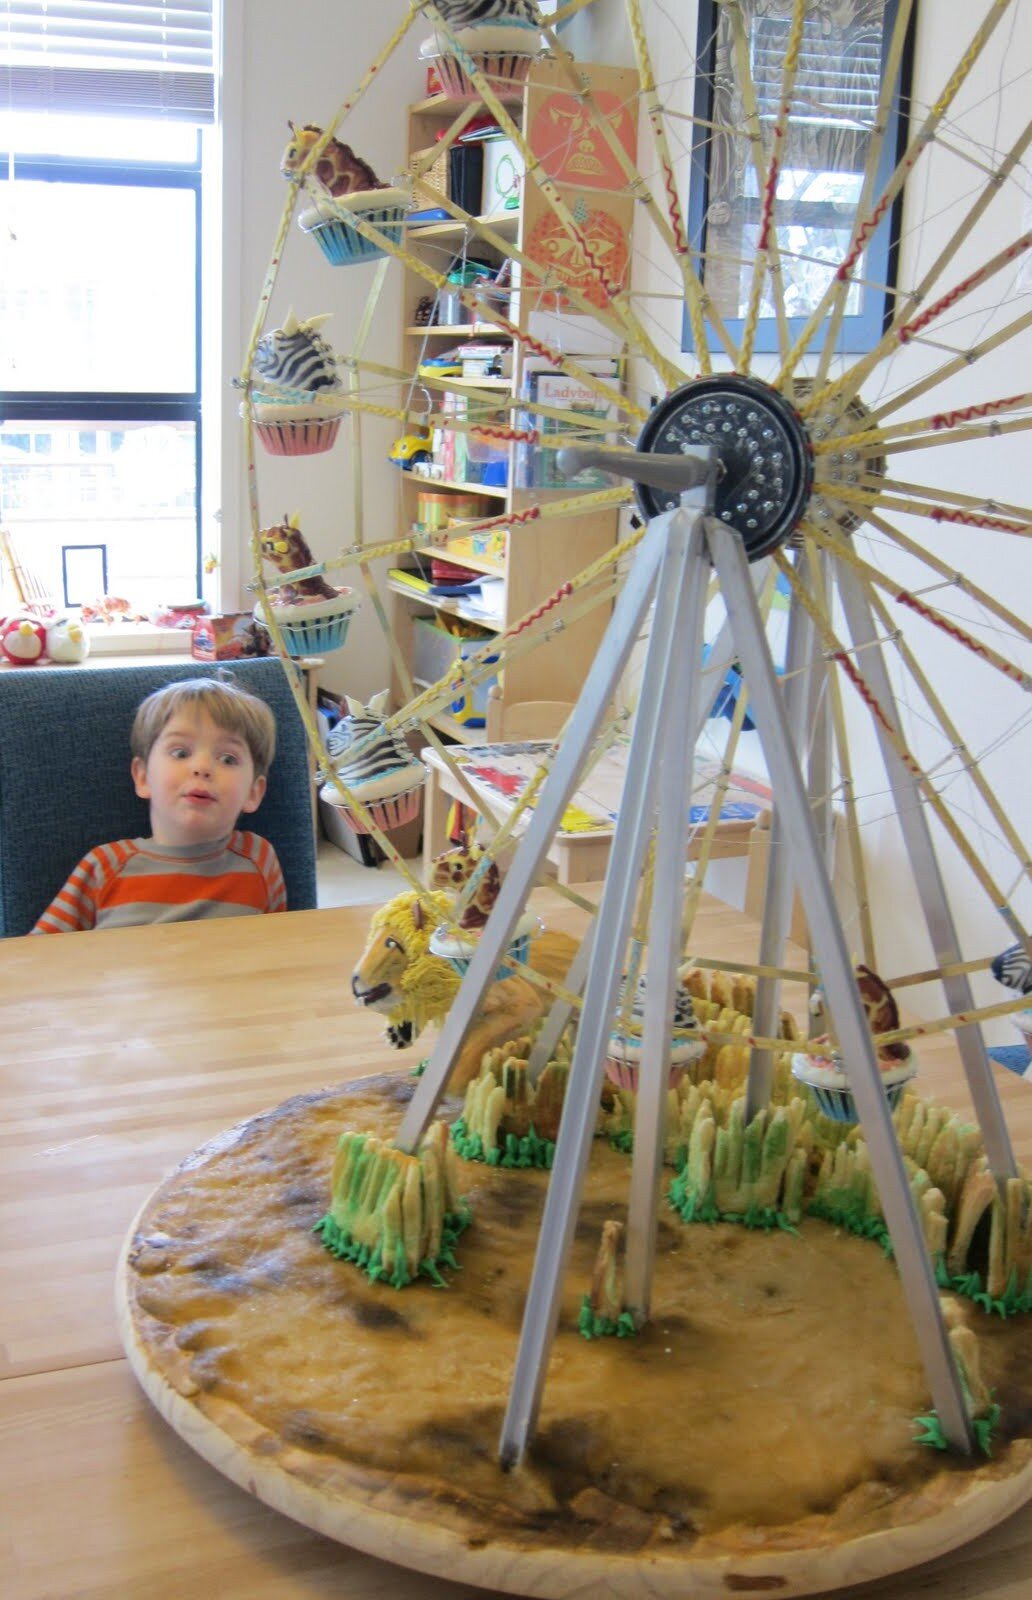
Right before the party, I set all the animals in the ferris wheel. I had to make a few tweaks to get them all to rotate freely, but all in all it really worked remarkably well. Only one zebra fell out in the process, but I had extras, so it wasn’t a problem.The party was great. All the kids took a turn spinning the ferris wheel and they were all very serious about not spinning it too fast. I served the lion to the adults, because it didn’t have candy melt all over it. The kids, of course, loved the candy melts. In fact, Alex ate only the candy melt portion and ignored the actual cake. Of course, I still have no idea what Sam actually imagined that zebra cupcakes are, but he seemed pleased with what I came up with, which is really all that matters. And now he has a two-foot diameter metal ferris wheel to treasure forever.

Mater and Lightning McQueen Cake
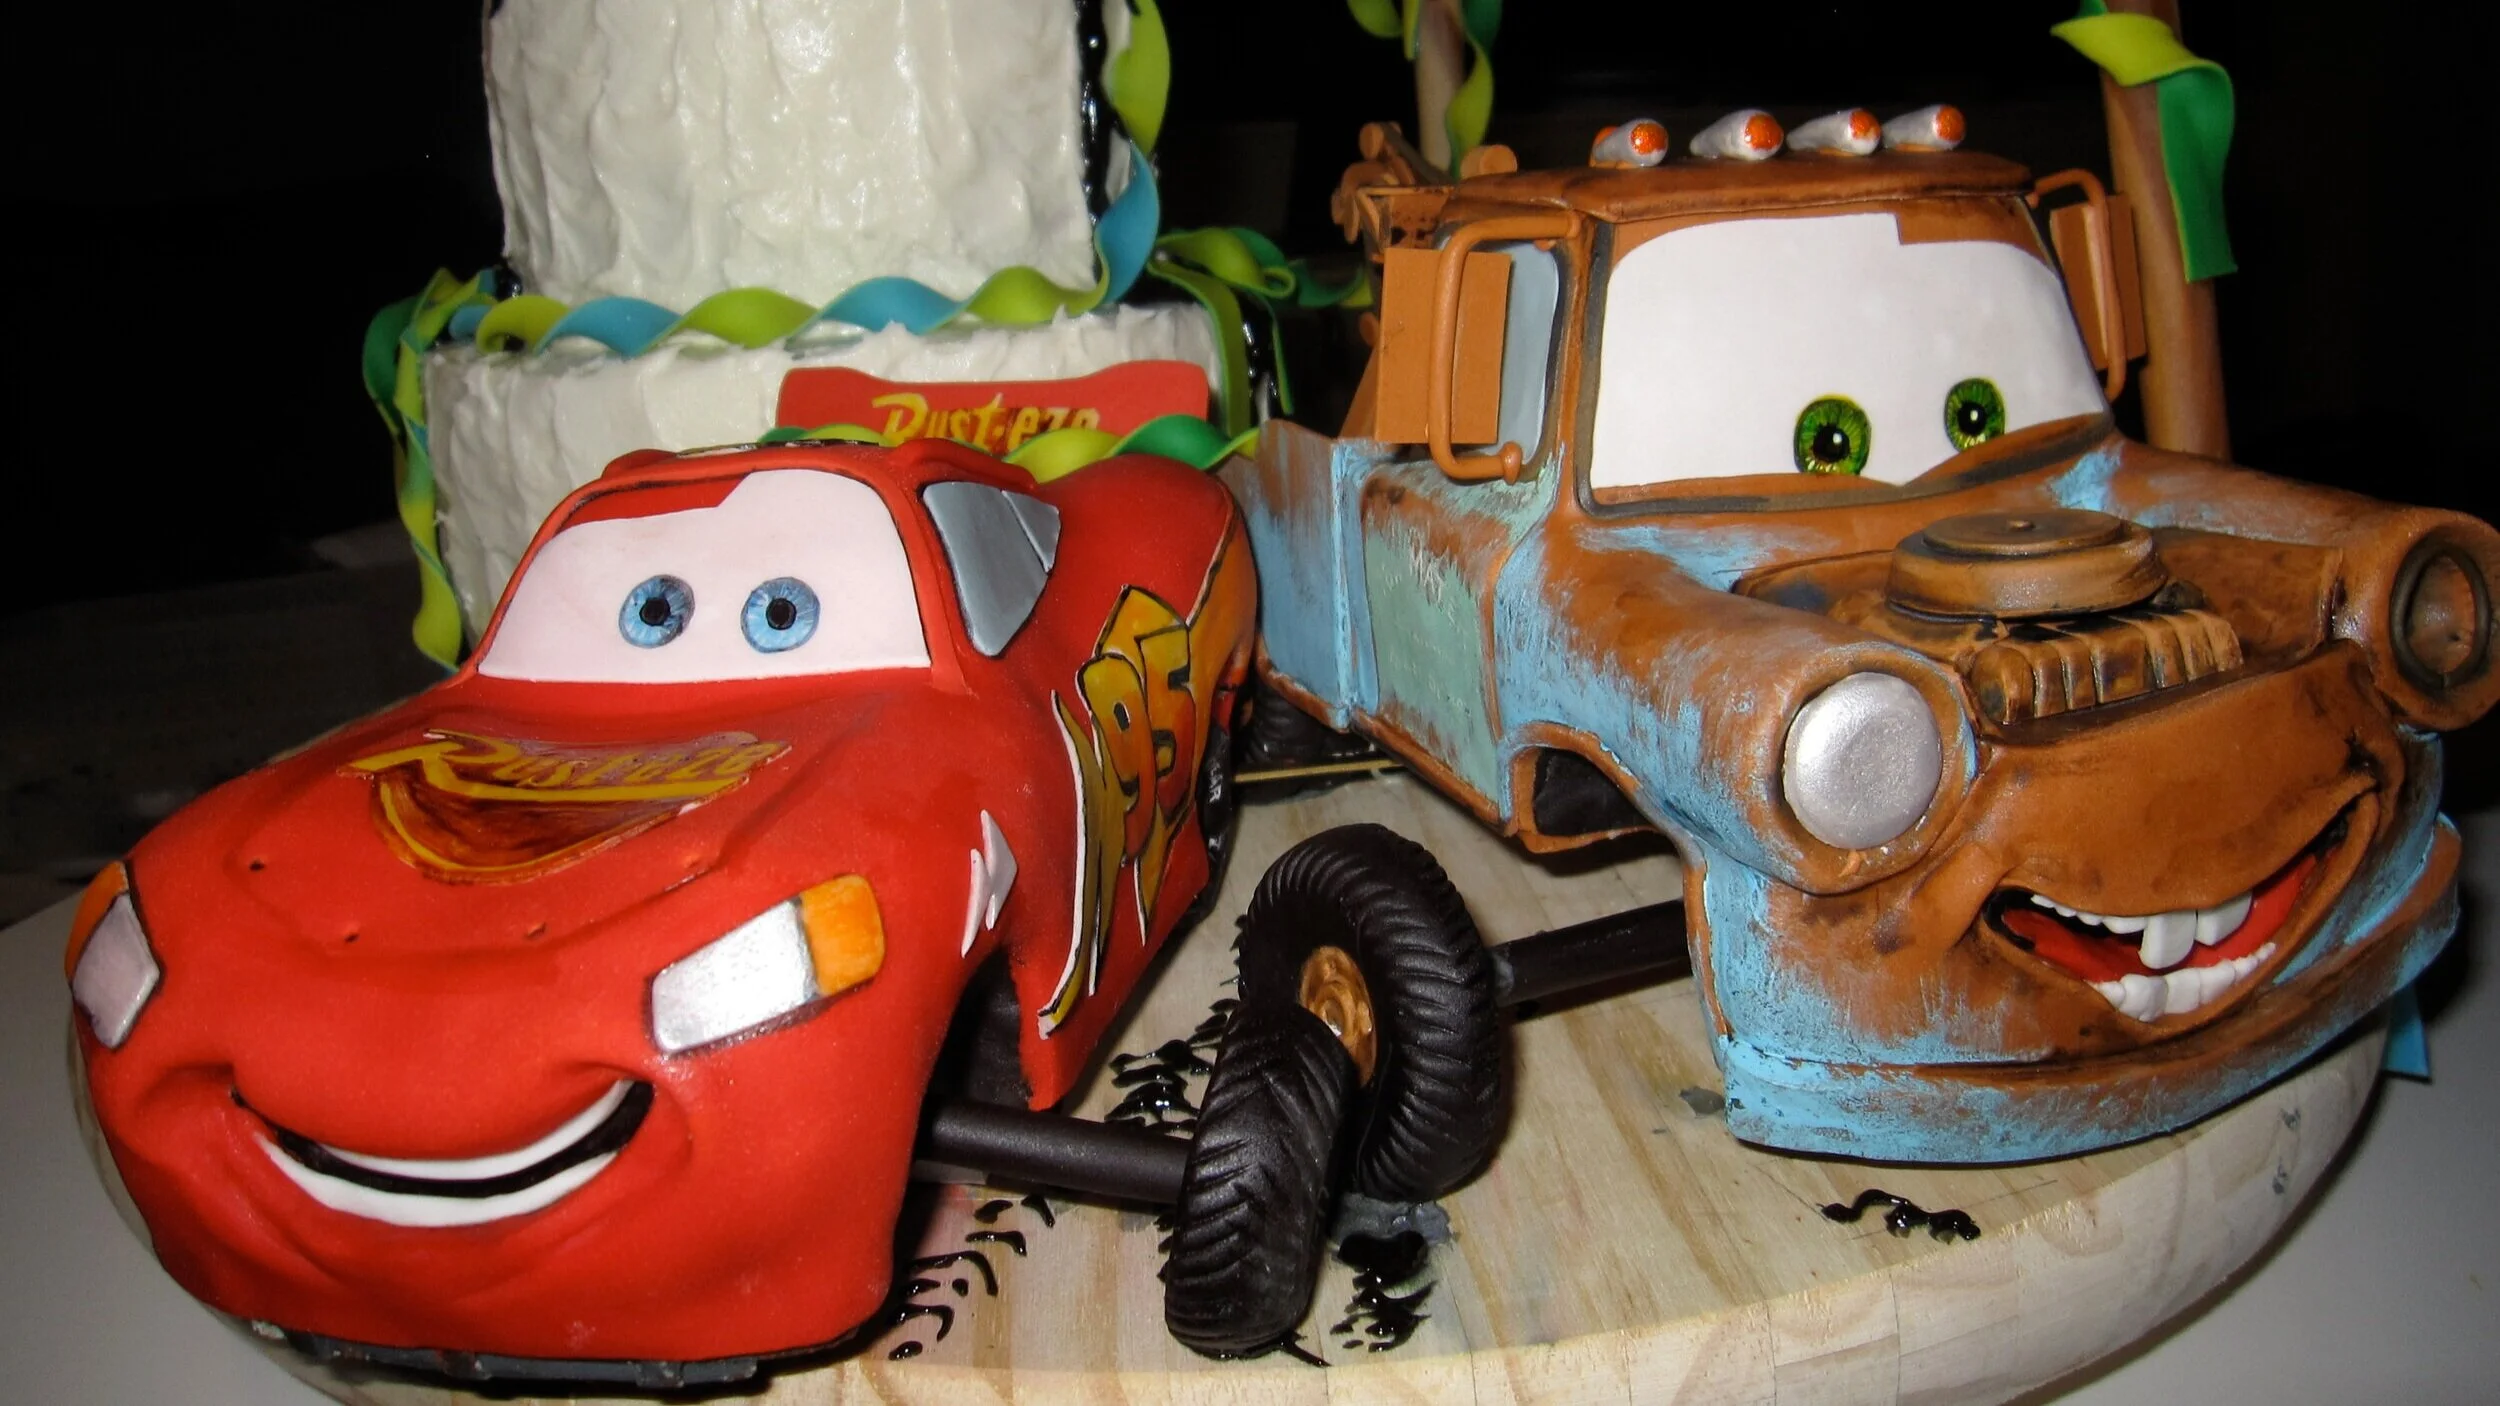
For my little friend Max’s second birthday cake, the only guideline that his parents gave me was that the party was Cars themed. So I asked my five-year-old niece for her expert advice on designing a Cars cake. She suggested that I make Mater and Lighting bumping tires.
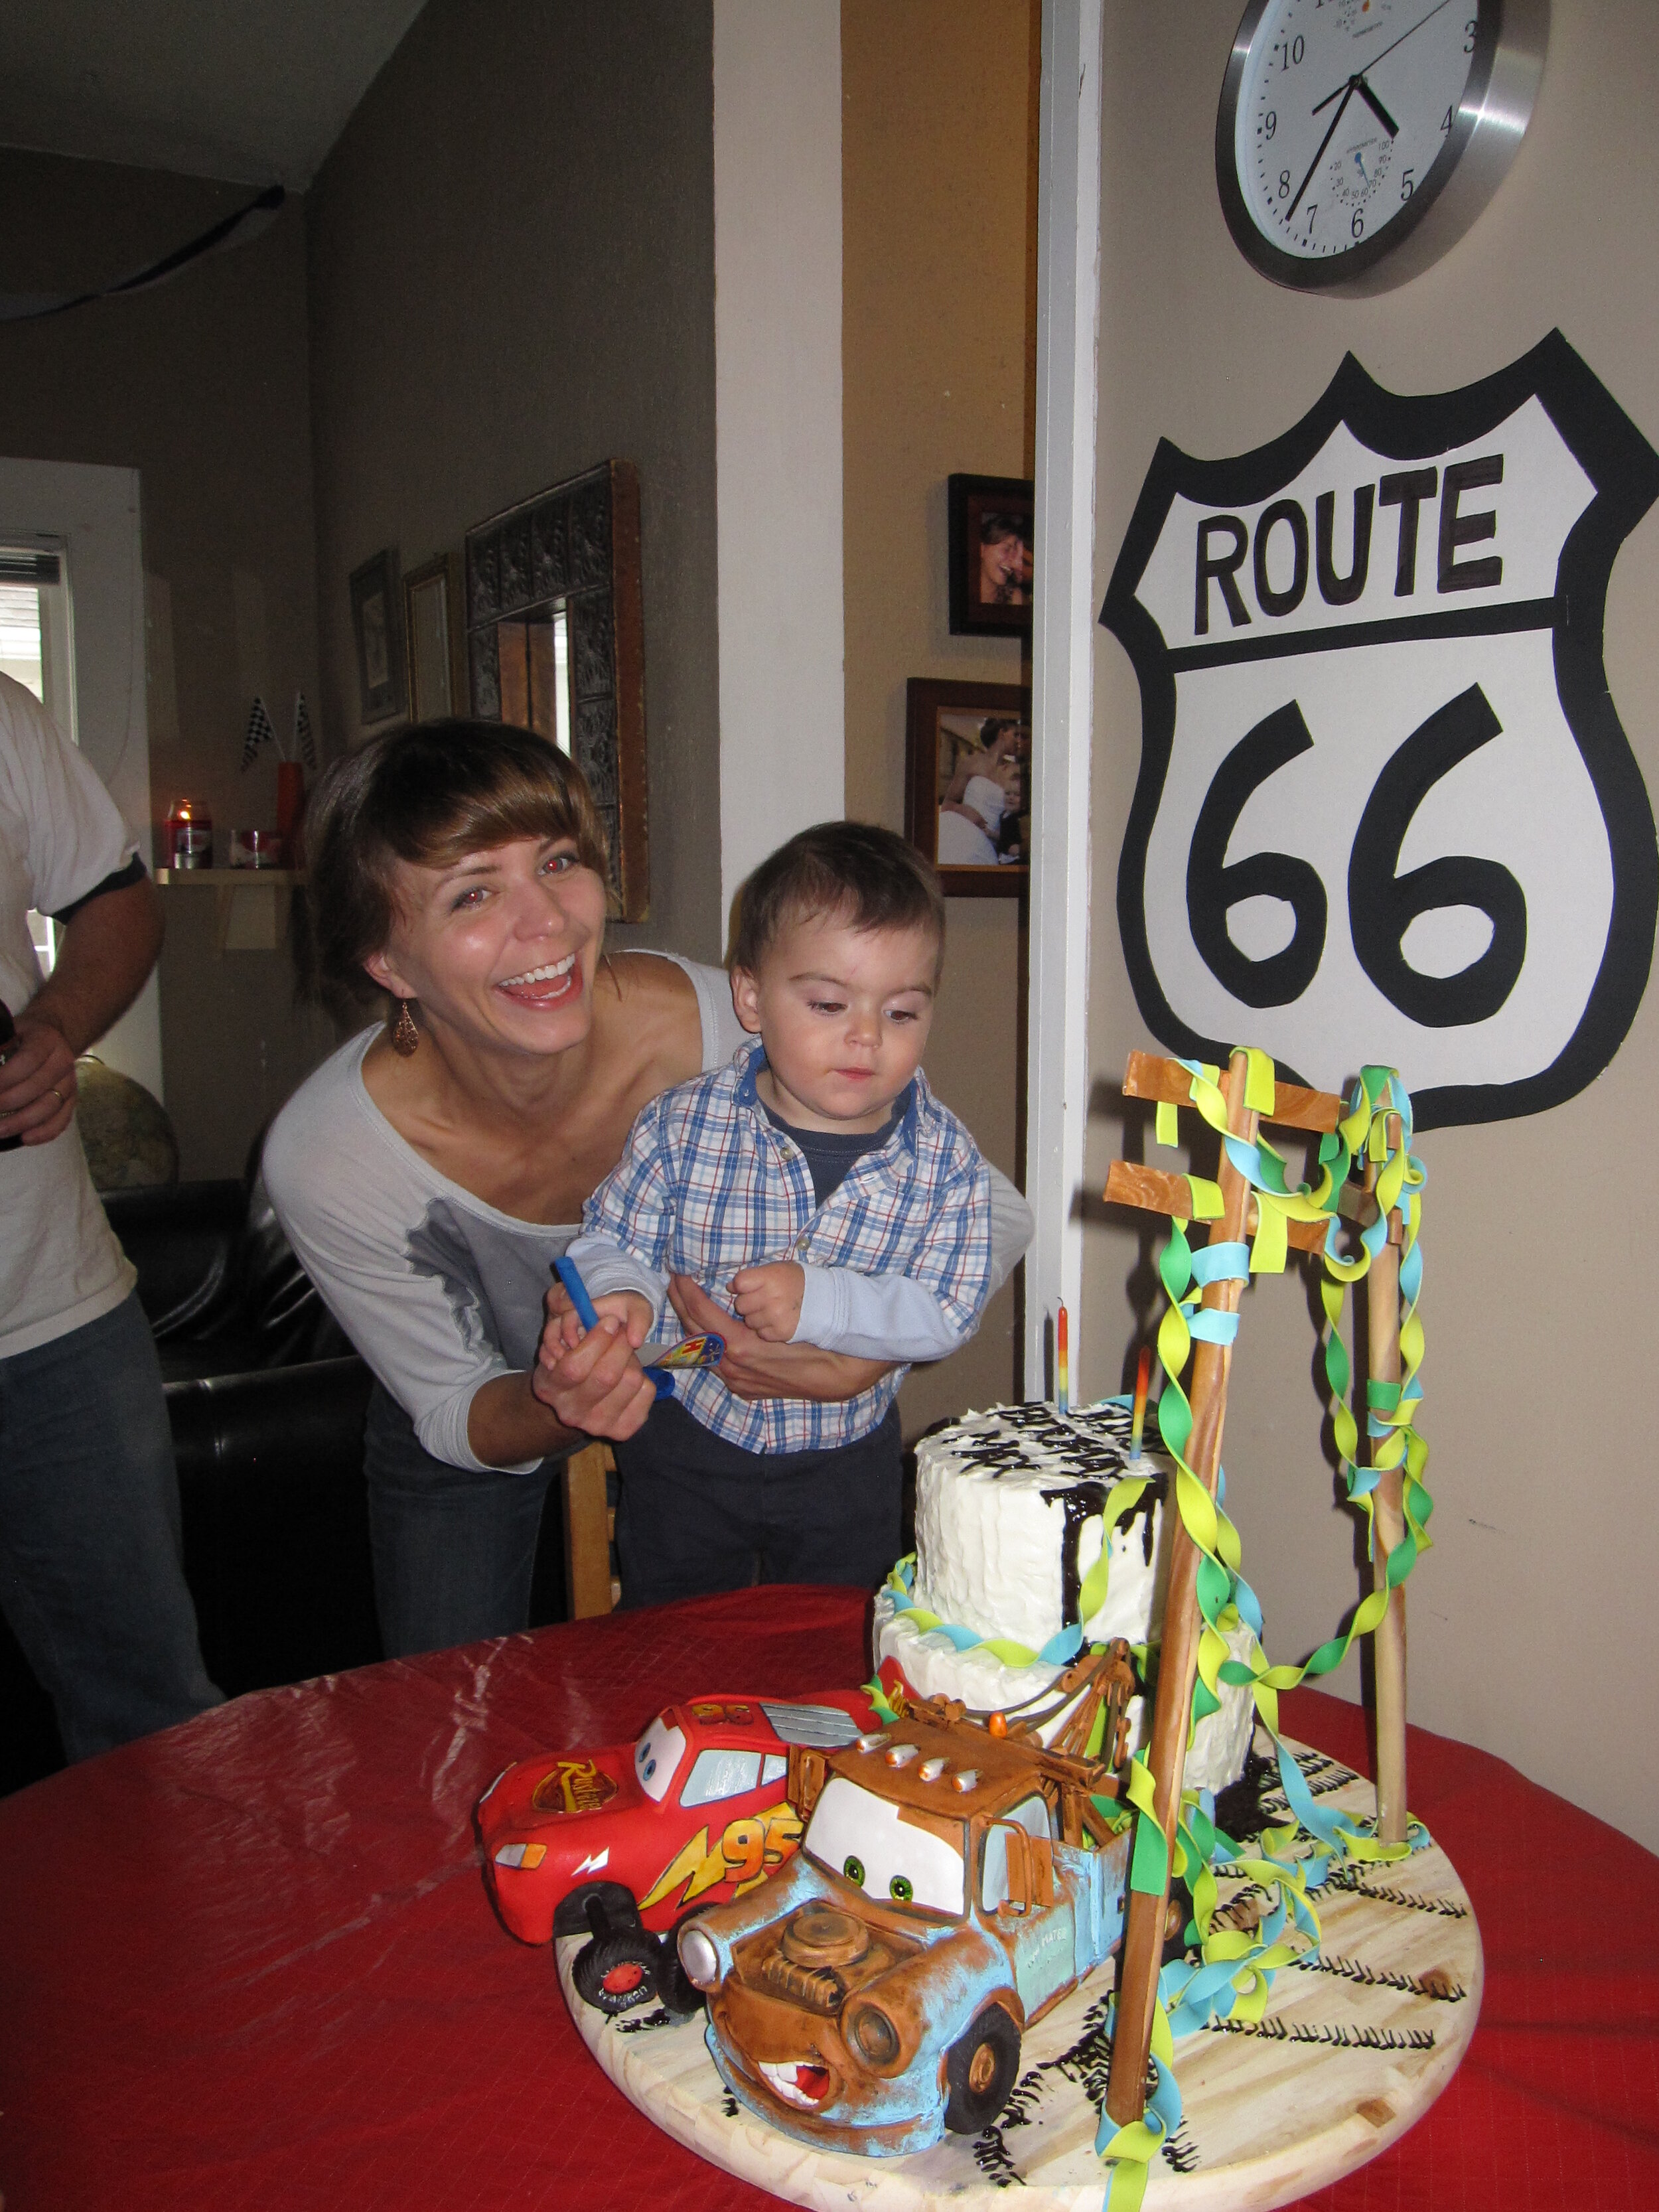
For my little friend Max’s second birthday cake, the only guideline that his parents gave me was that the party was Cars themed. So I asked my five-year-old niece for her expert advice on designing a Cars cake. She suggested that I make Mater and Lighting bumping tires. What she meant by this was the Cars equivalent of the fist-bump. So the idea that I came up with was a scene wherein Lightning and Mater had just made a cake for Max and decorated it with oil (because that would be delicious to a car). Of course, Mater and Lightning probably haven’t had much experience with making cakes and decorating for parties, so they’ve made a bit of a mess of things, with oil spills and torn streamers. My plan was to have Lightning hanging from birthday streamers wrapped around telephone poles, as if he’d gotten himself tangled while hanging them. This was, of course, meant to be reminiscent of the scene in Cars where Lightning gets tangled in the telephone wires. In the end, this didn’t work out, but I still think the cake overall was a success (and that, next time, I could make the hanging effect actually work).
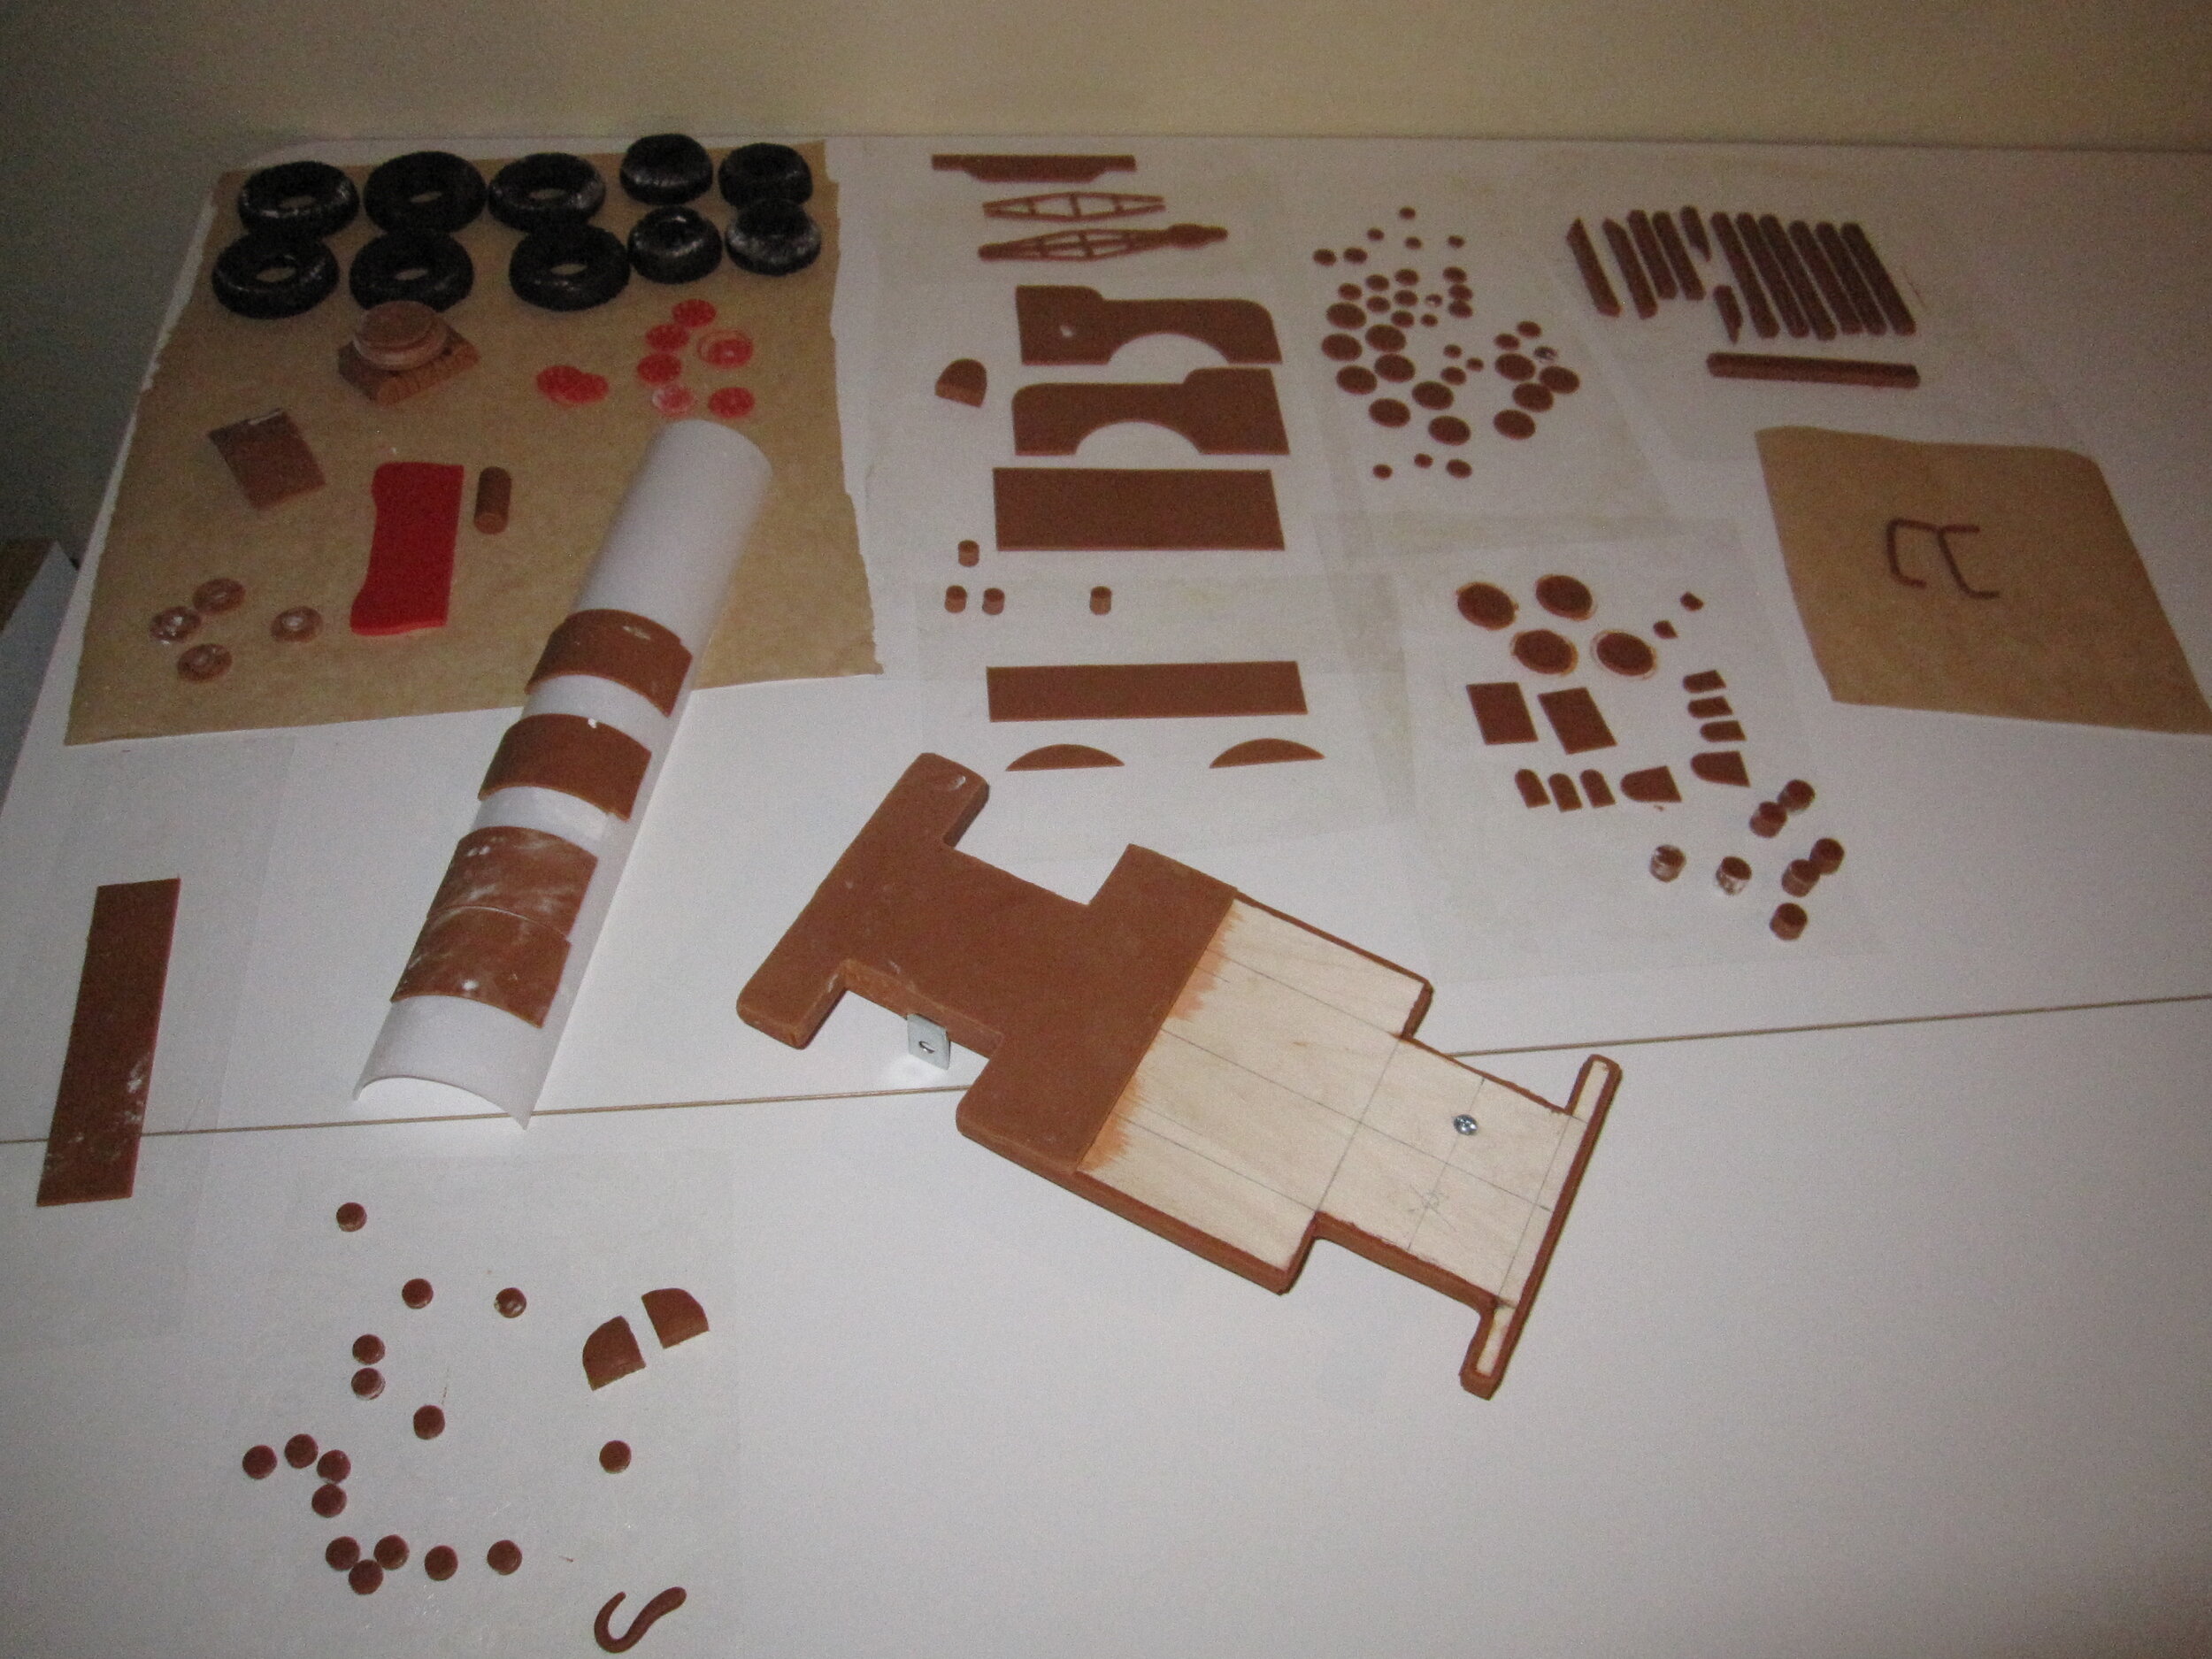
As with many of my cakes, I made a lot of gum paste pieces in advance, especially for Mater’s bed and tow hook. And, of course, I made fondant tires, which are coming to be quite a specialty of mine. I was especially pleased with Lightning’s tires, once I painted “Lightyear” on them.
I made the telephone poles out of aluminum rod covered with fondant and I made a wooden base for Lightning with brass strips bolted to it, with which I planned to hang Lightning from the telephone poles. This meant that I had to make Lightning’s entire undercarriage, since it would all be visible. I’m not sure whether Lightning’s undercarriage is ever visible in the movie, but I found a Lightning toy that had a fairly detailed undercarriage for me to copy.
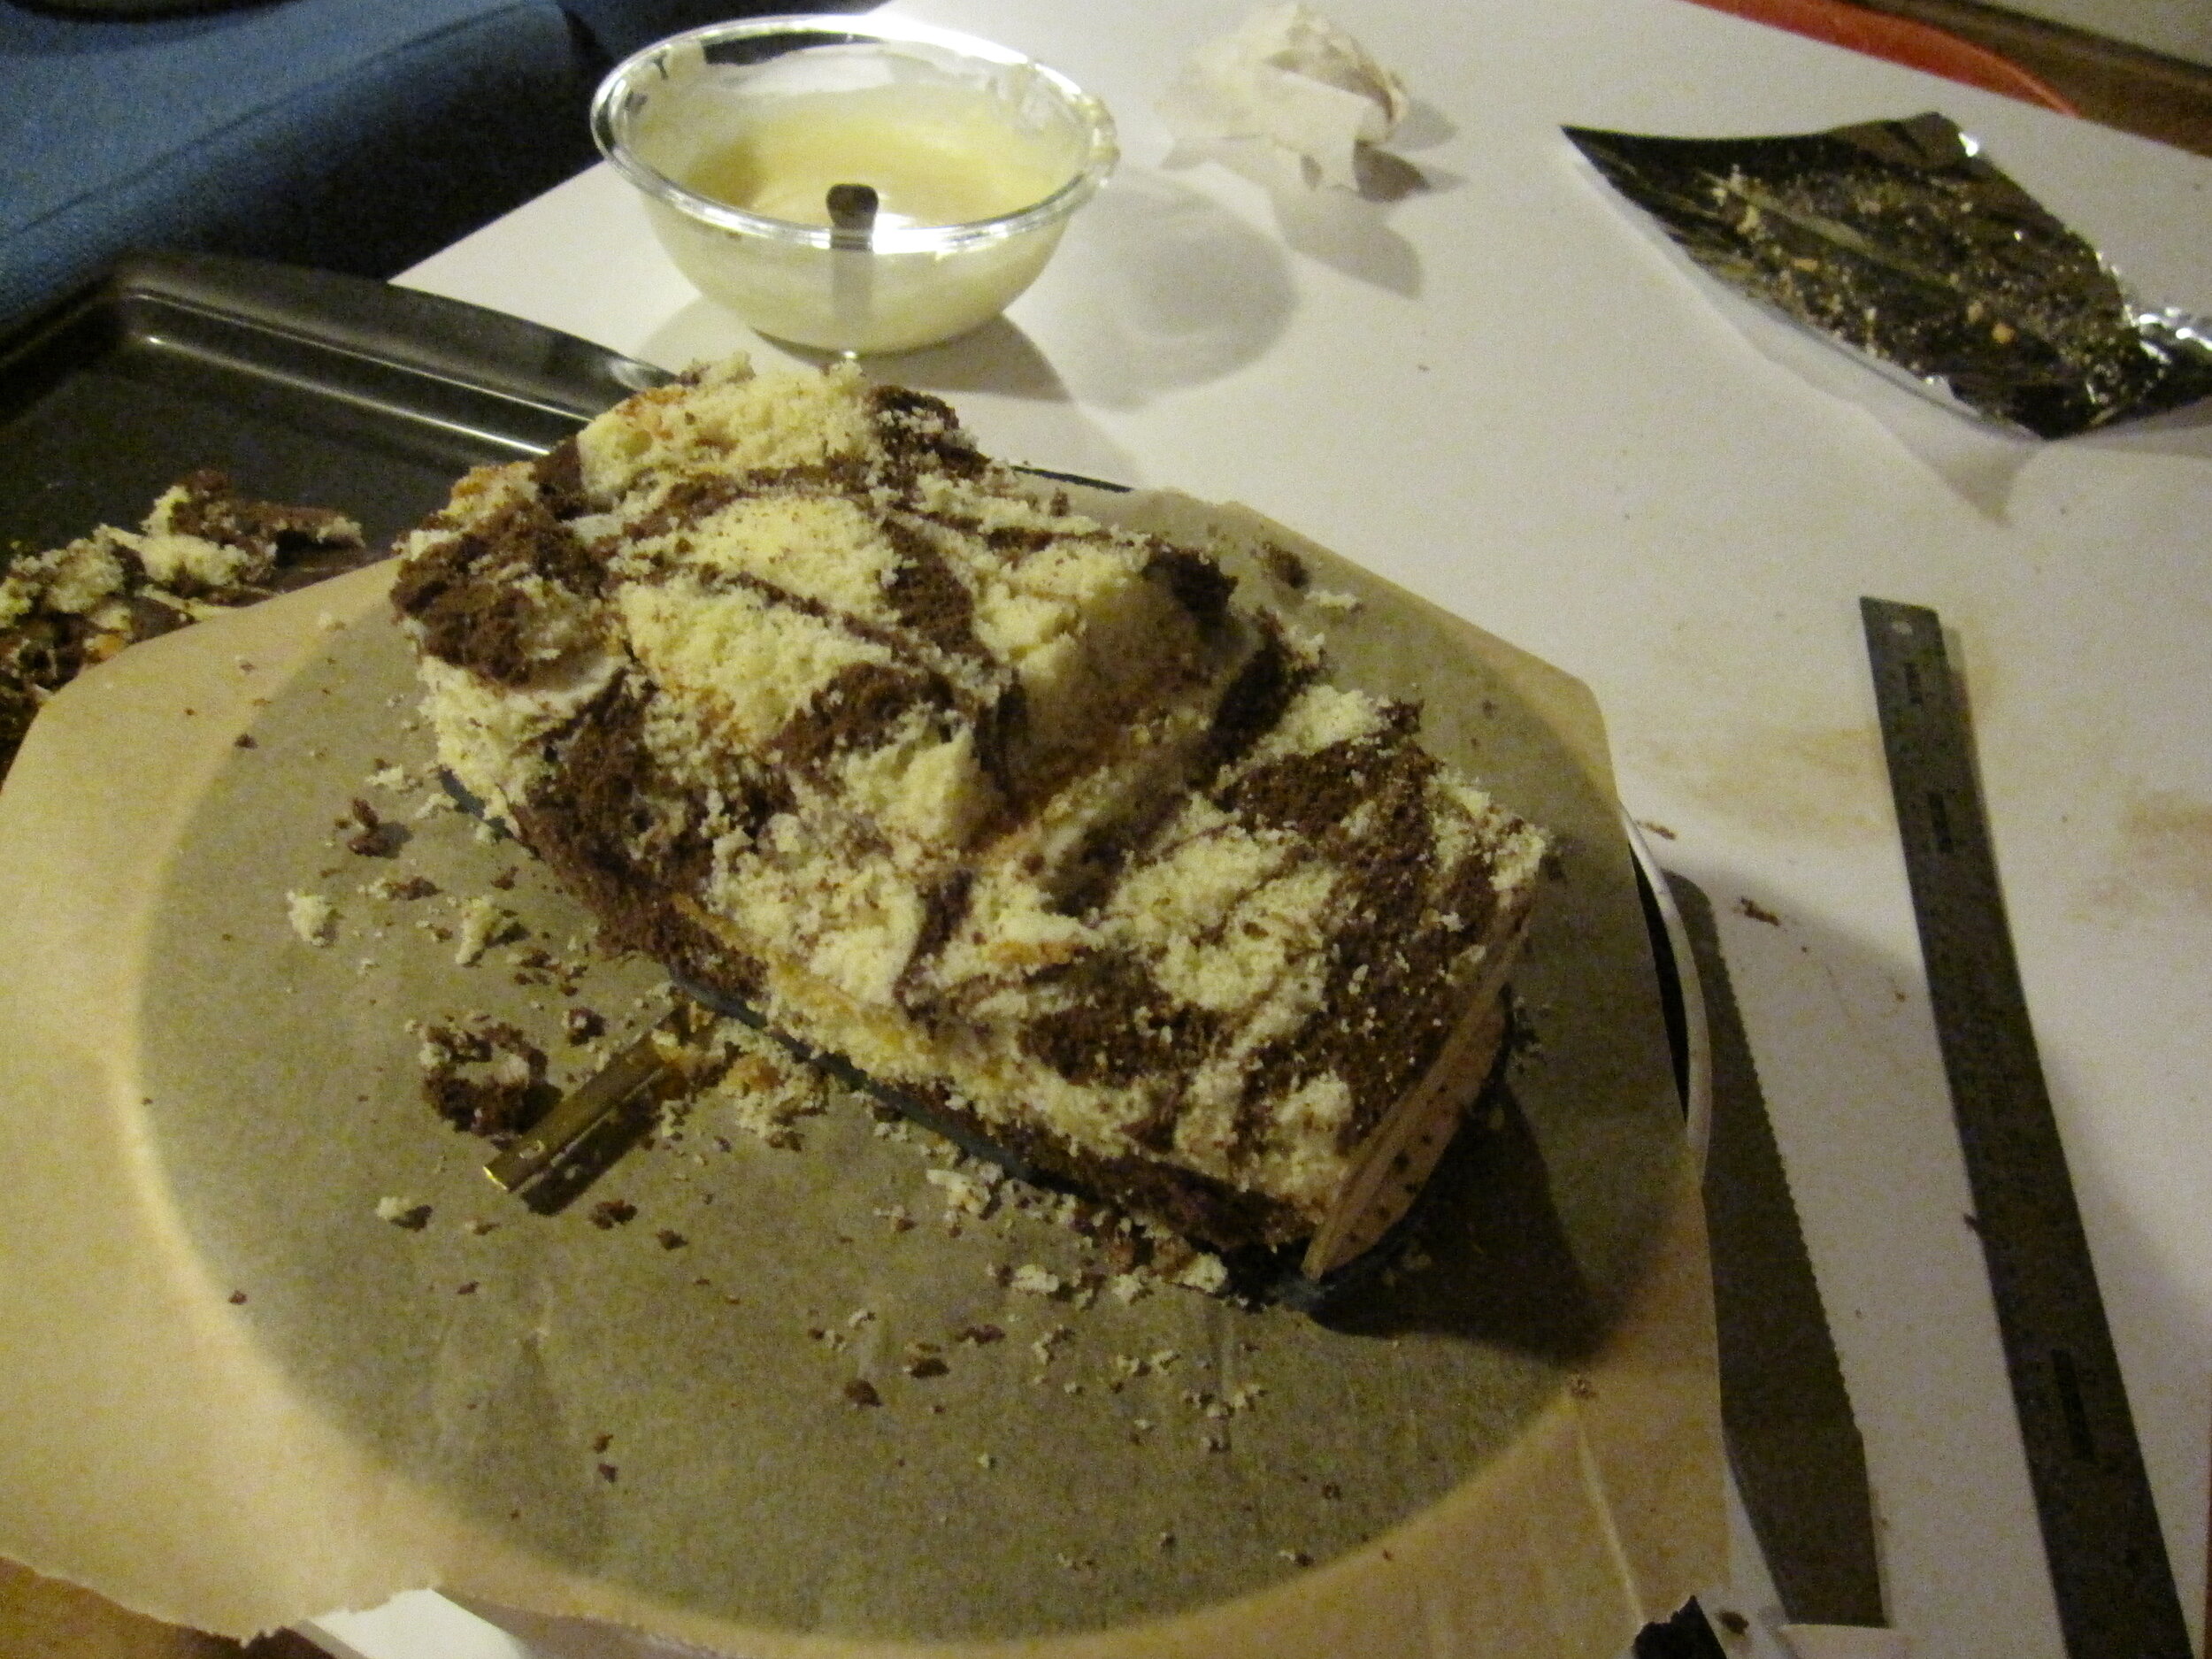
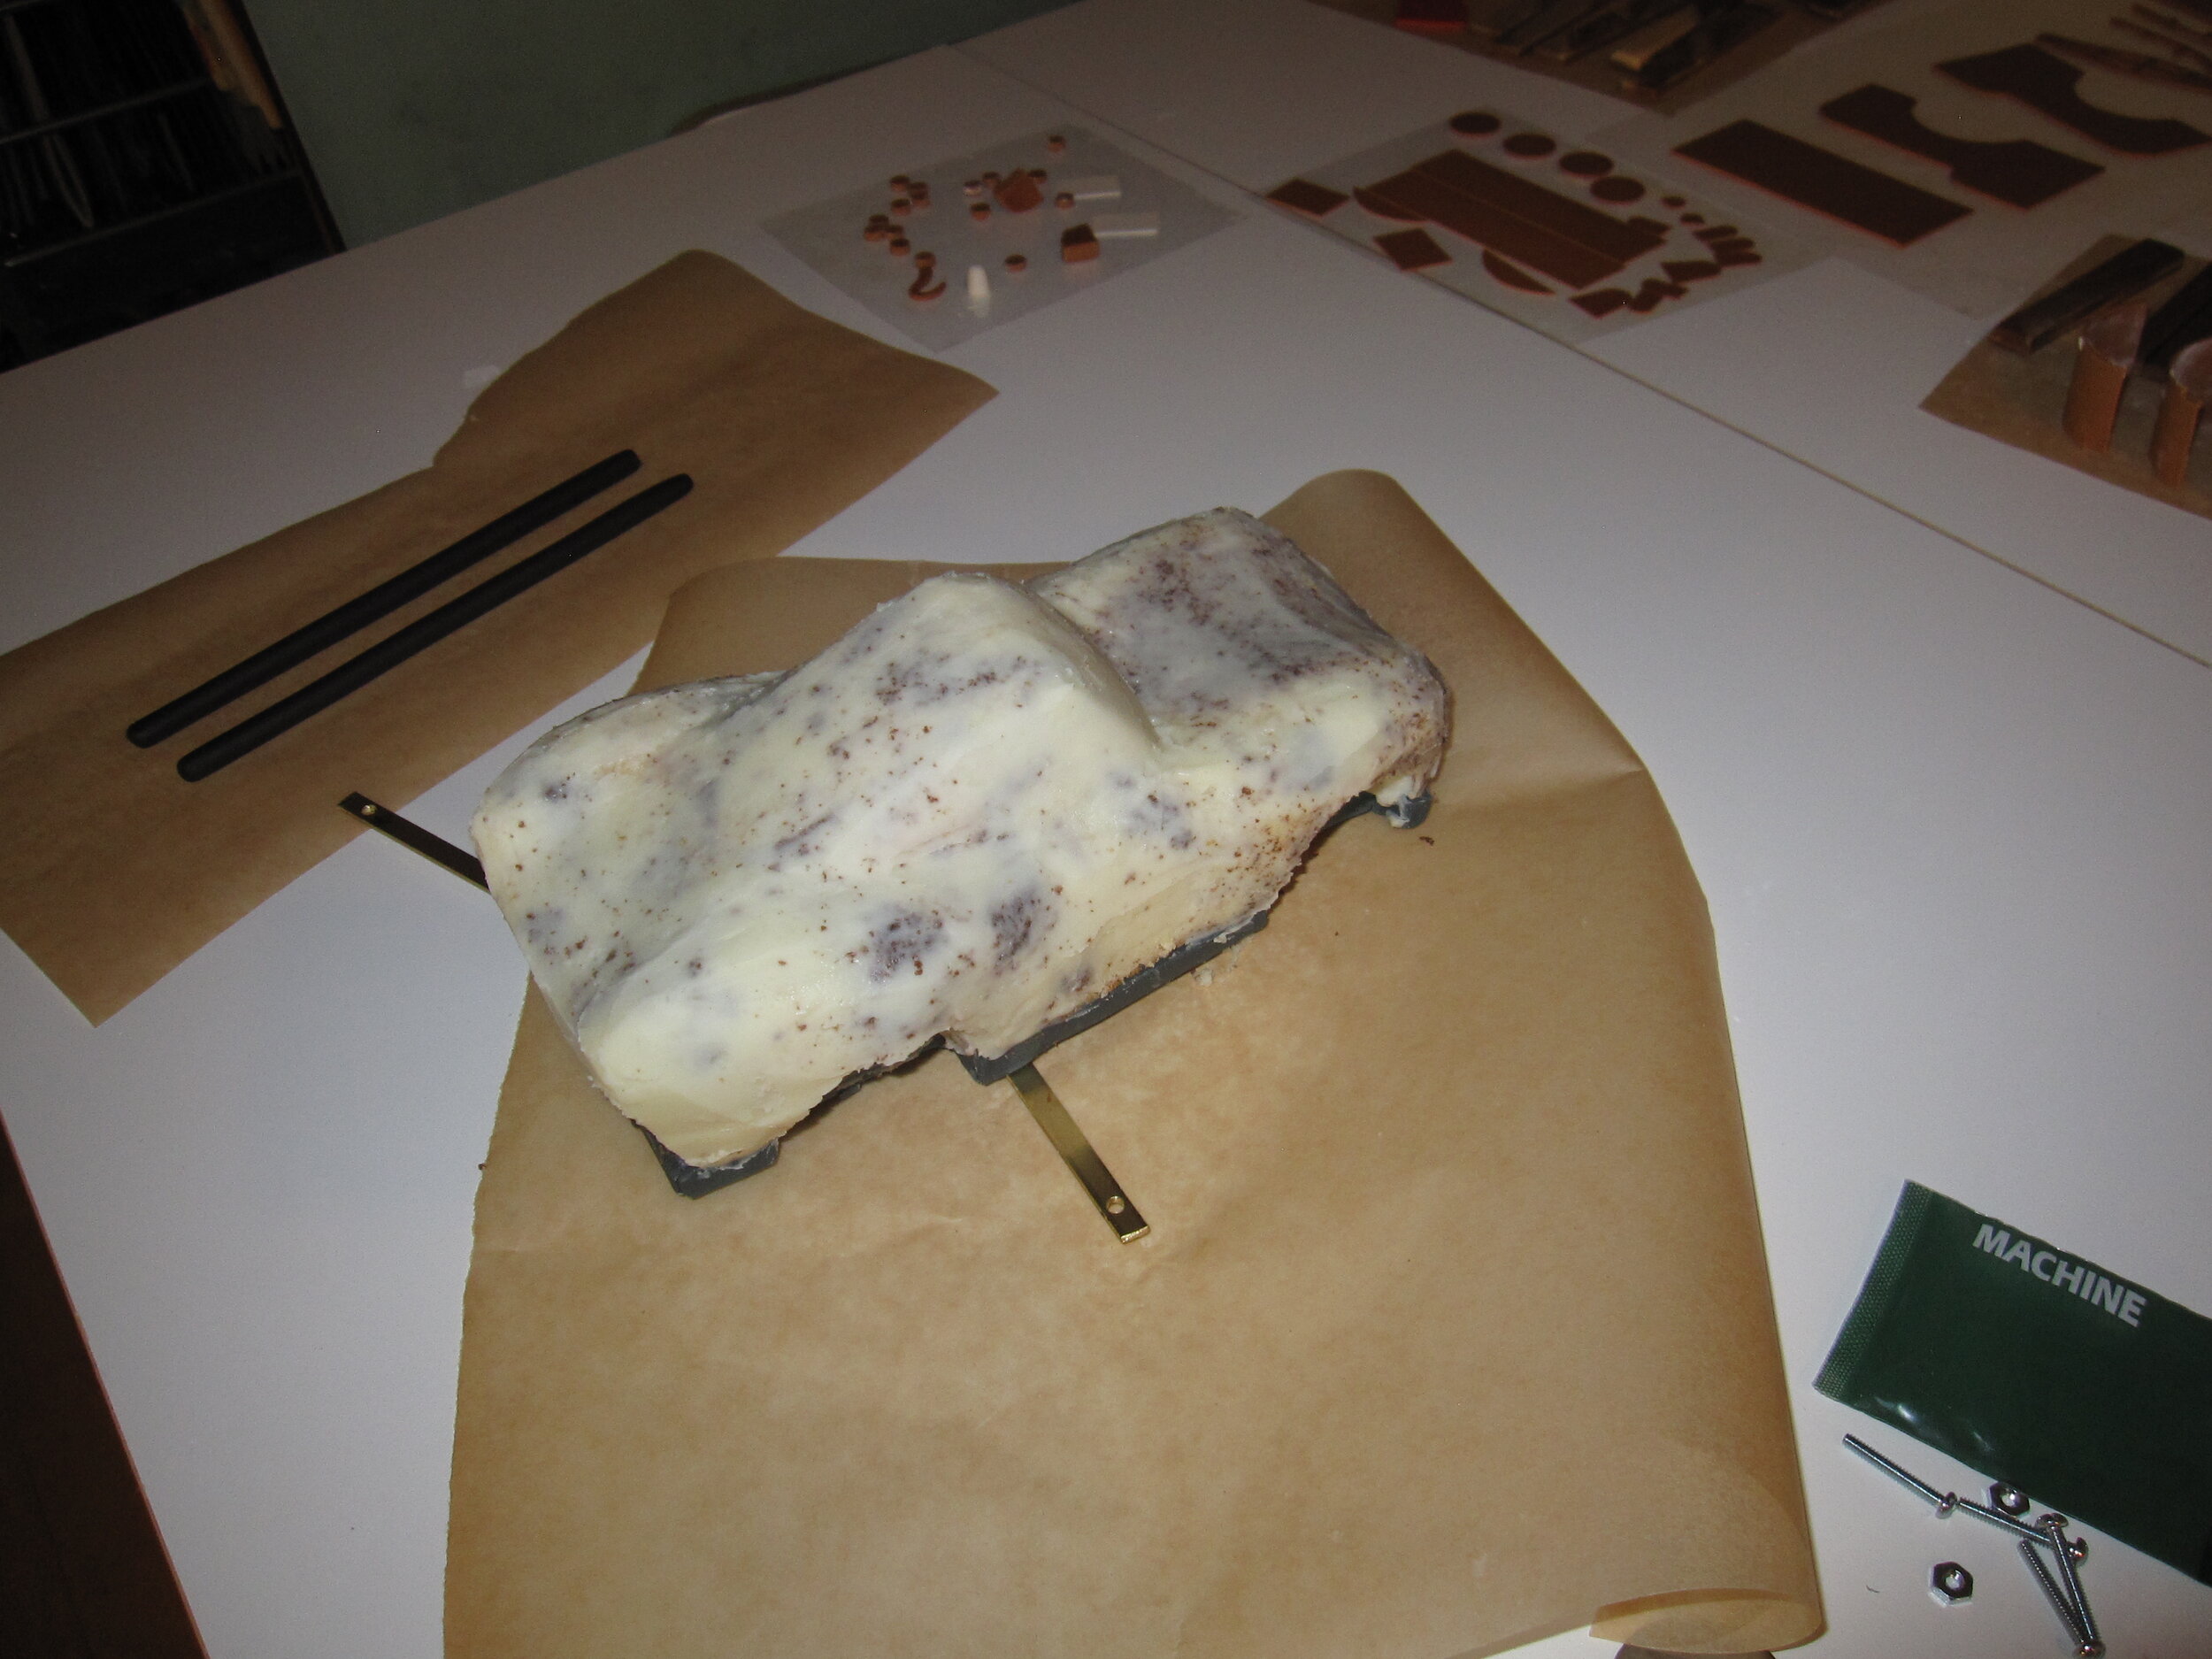
With the advance work done, it was time to make the cake. I tried a new marble cake recipe because Max’s mother told me that she likes marble cake. I think it was a tasty recipe, but, oddly, it was a little more challenging than a monochromatic cake to carve. The two colors made the shape of the cake a little harder to perceive as I was working on it.
The little birthday cake was pretty easy, even though I actually don’t do very many simple stacked cakes because they don’t generally interest me. I did a simple buttercream icing on it, and textured it a bit with a spatula. I was striving for that fine line between making the cake look like Lightning and Mater didn’t have much experience making cakes and making the cake look like I didn’t have much experience making cakes. I think I walked the line relatively successfully.
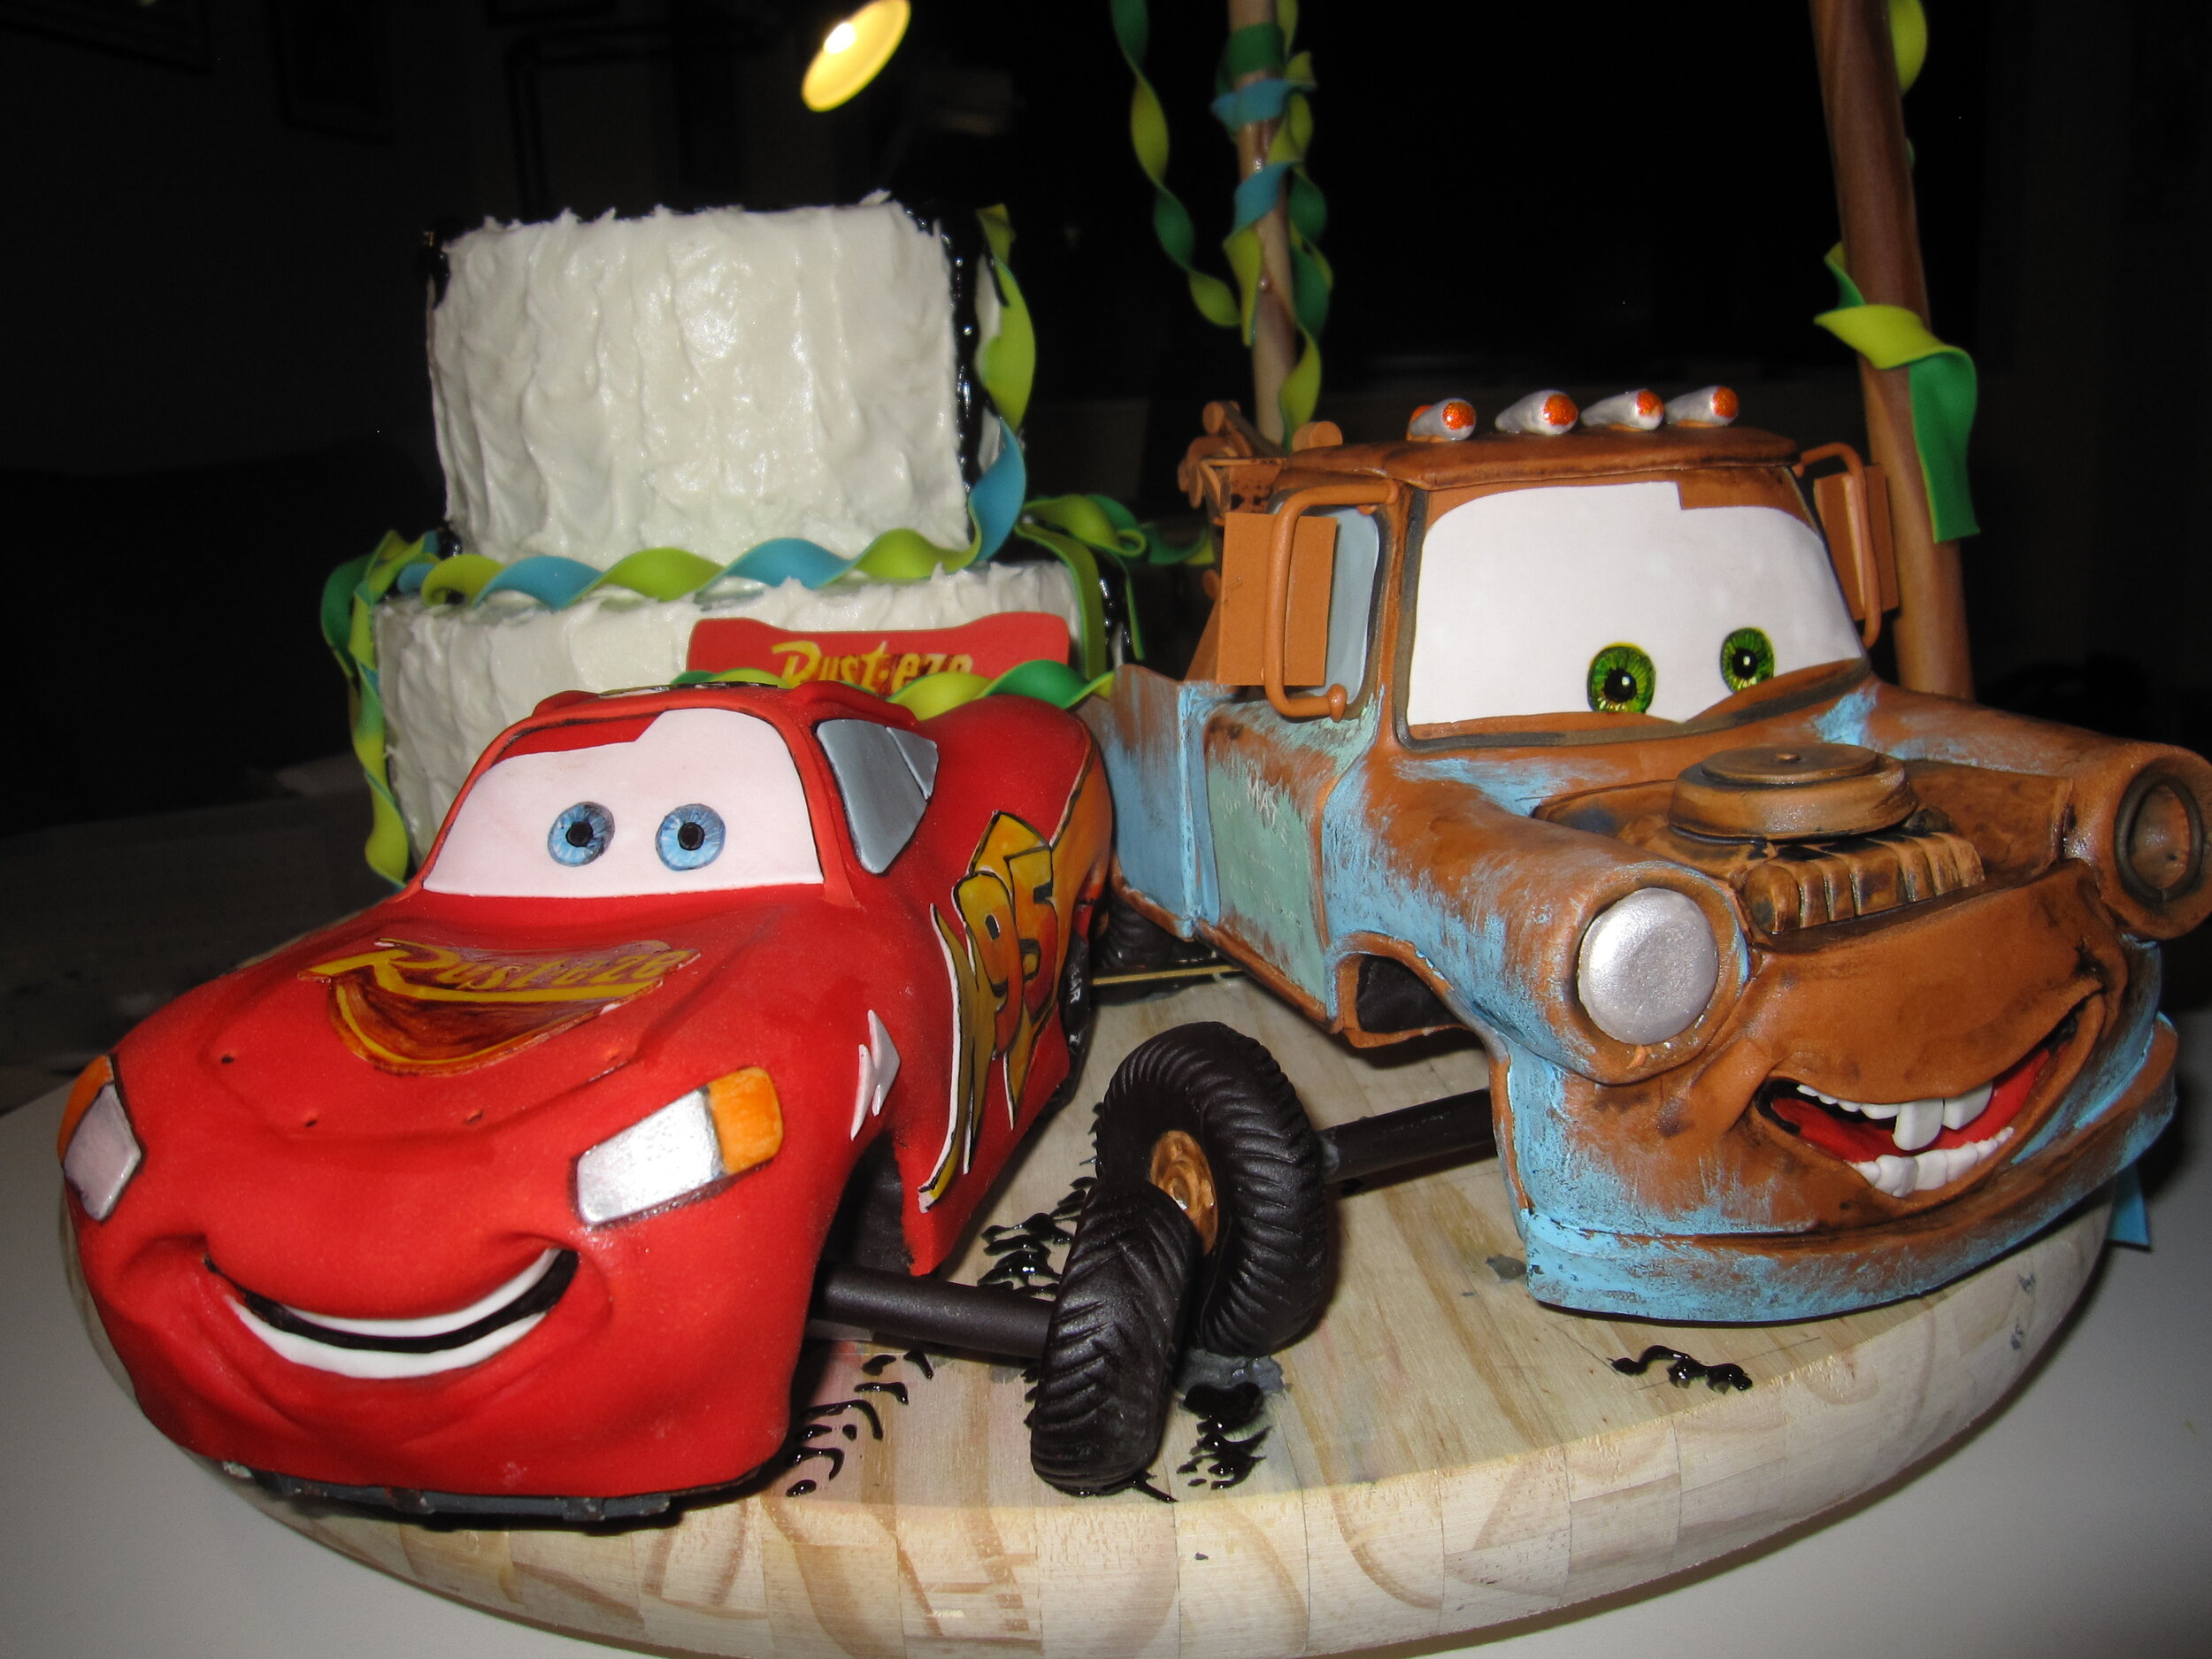
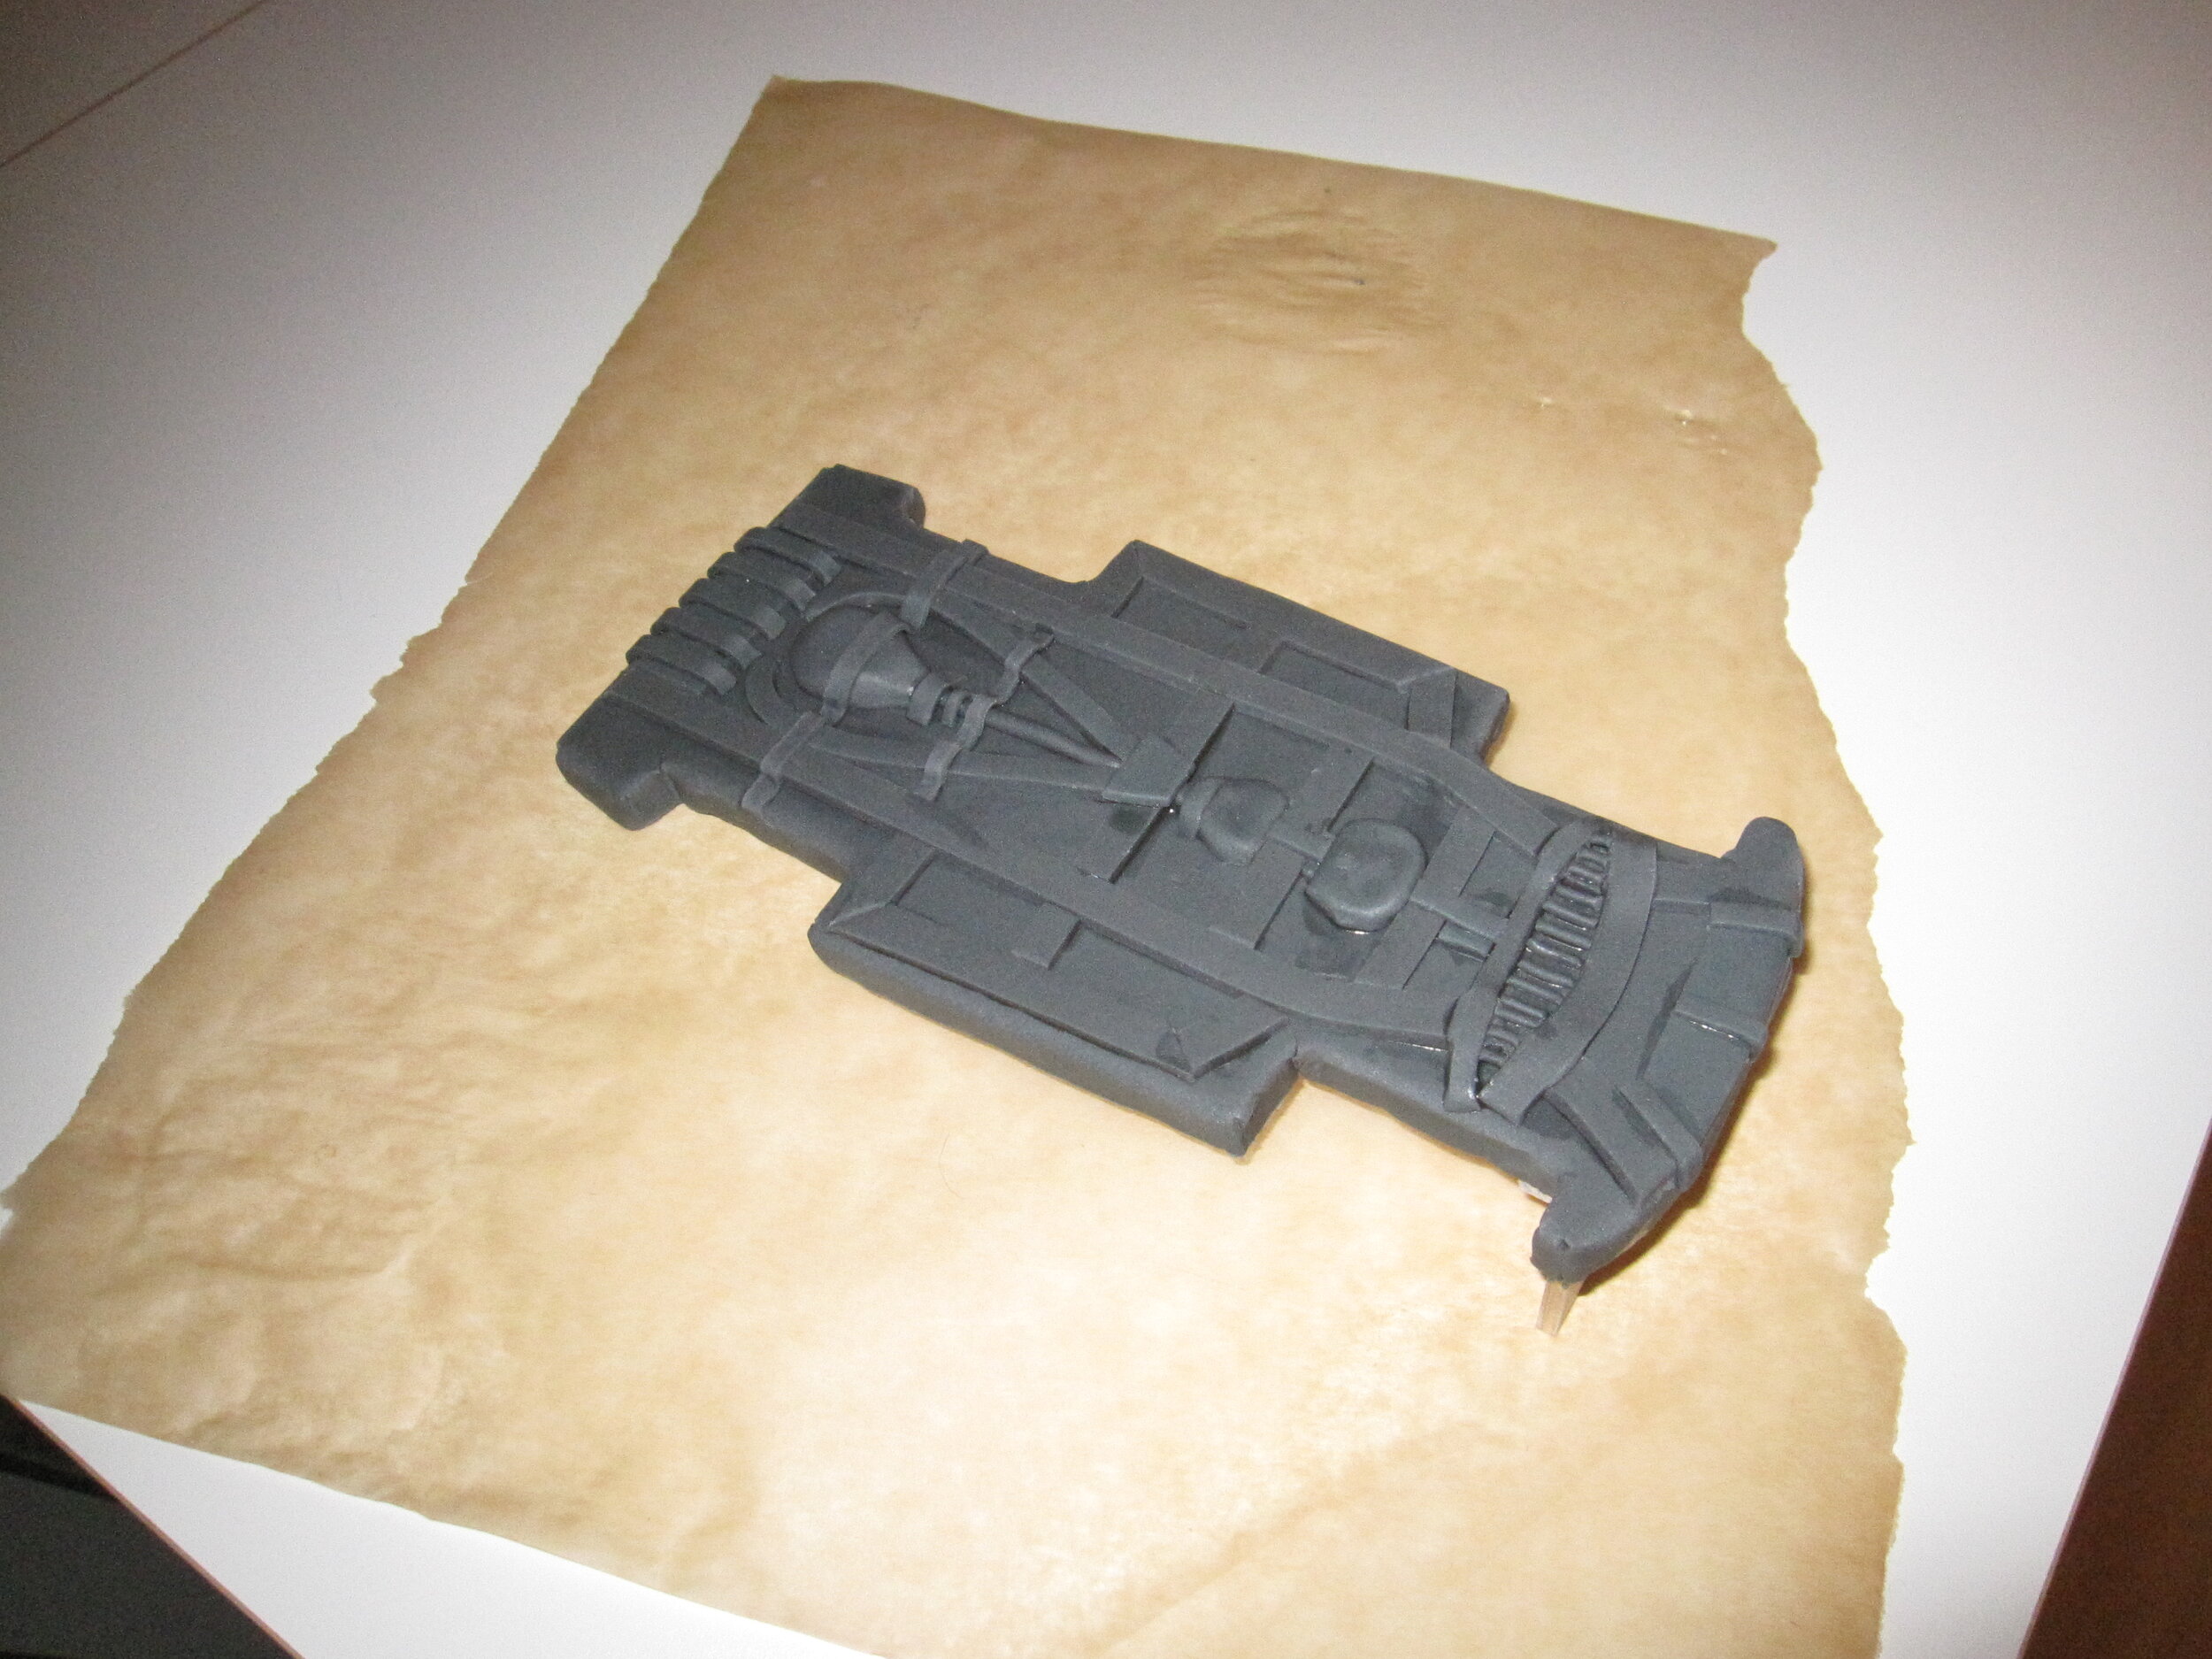
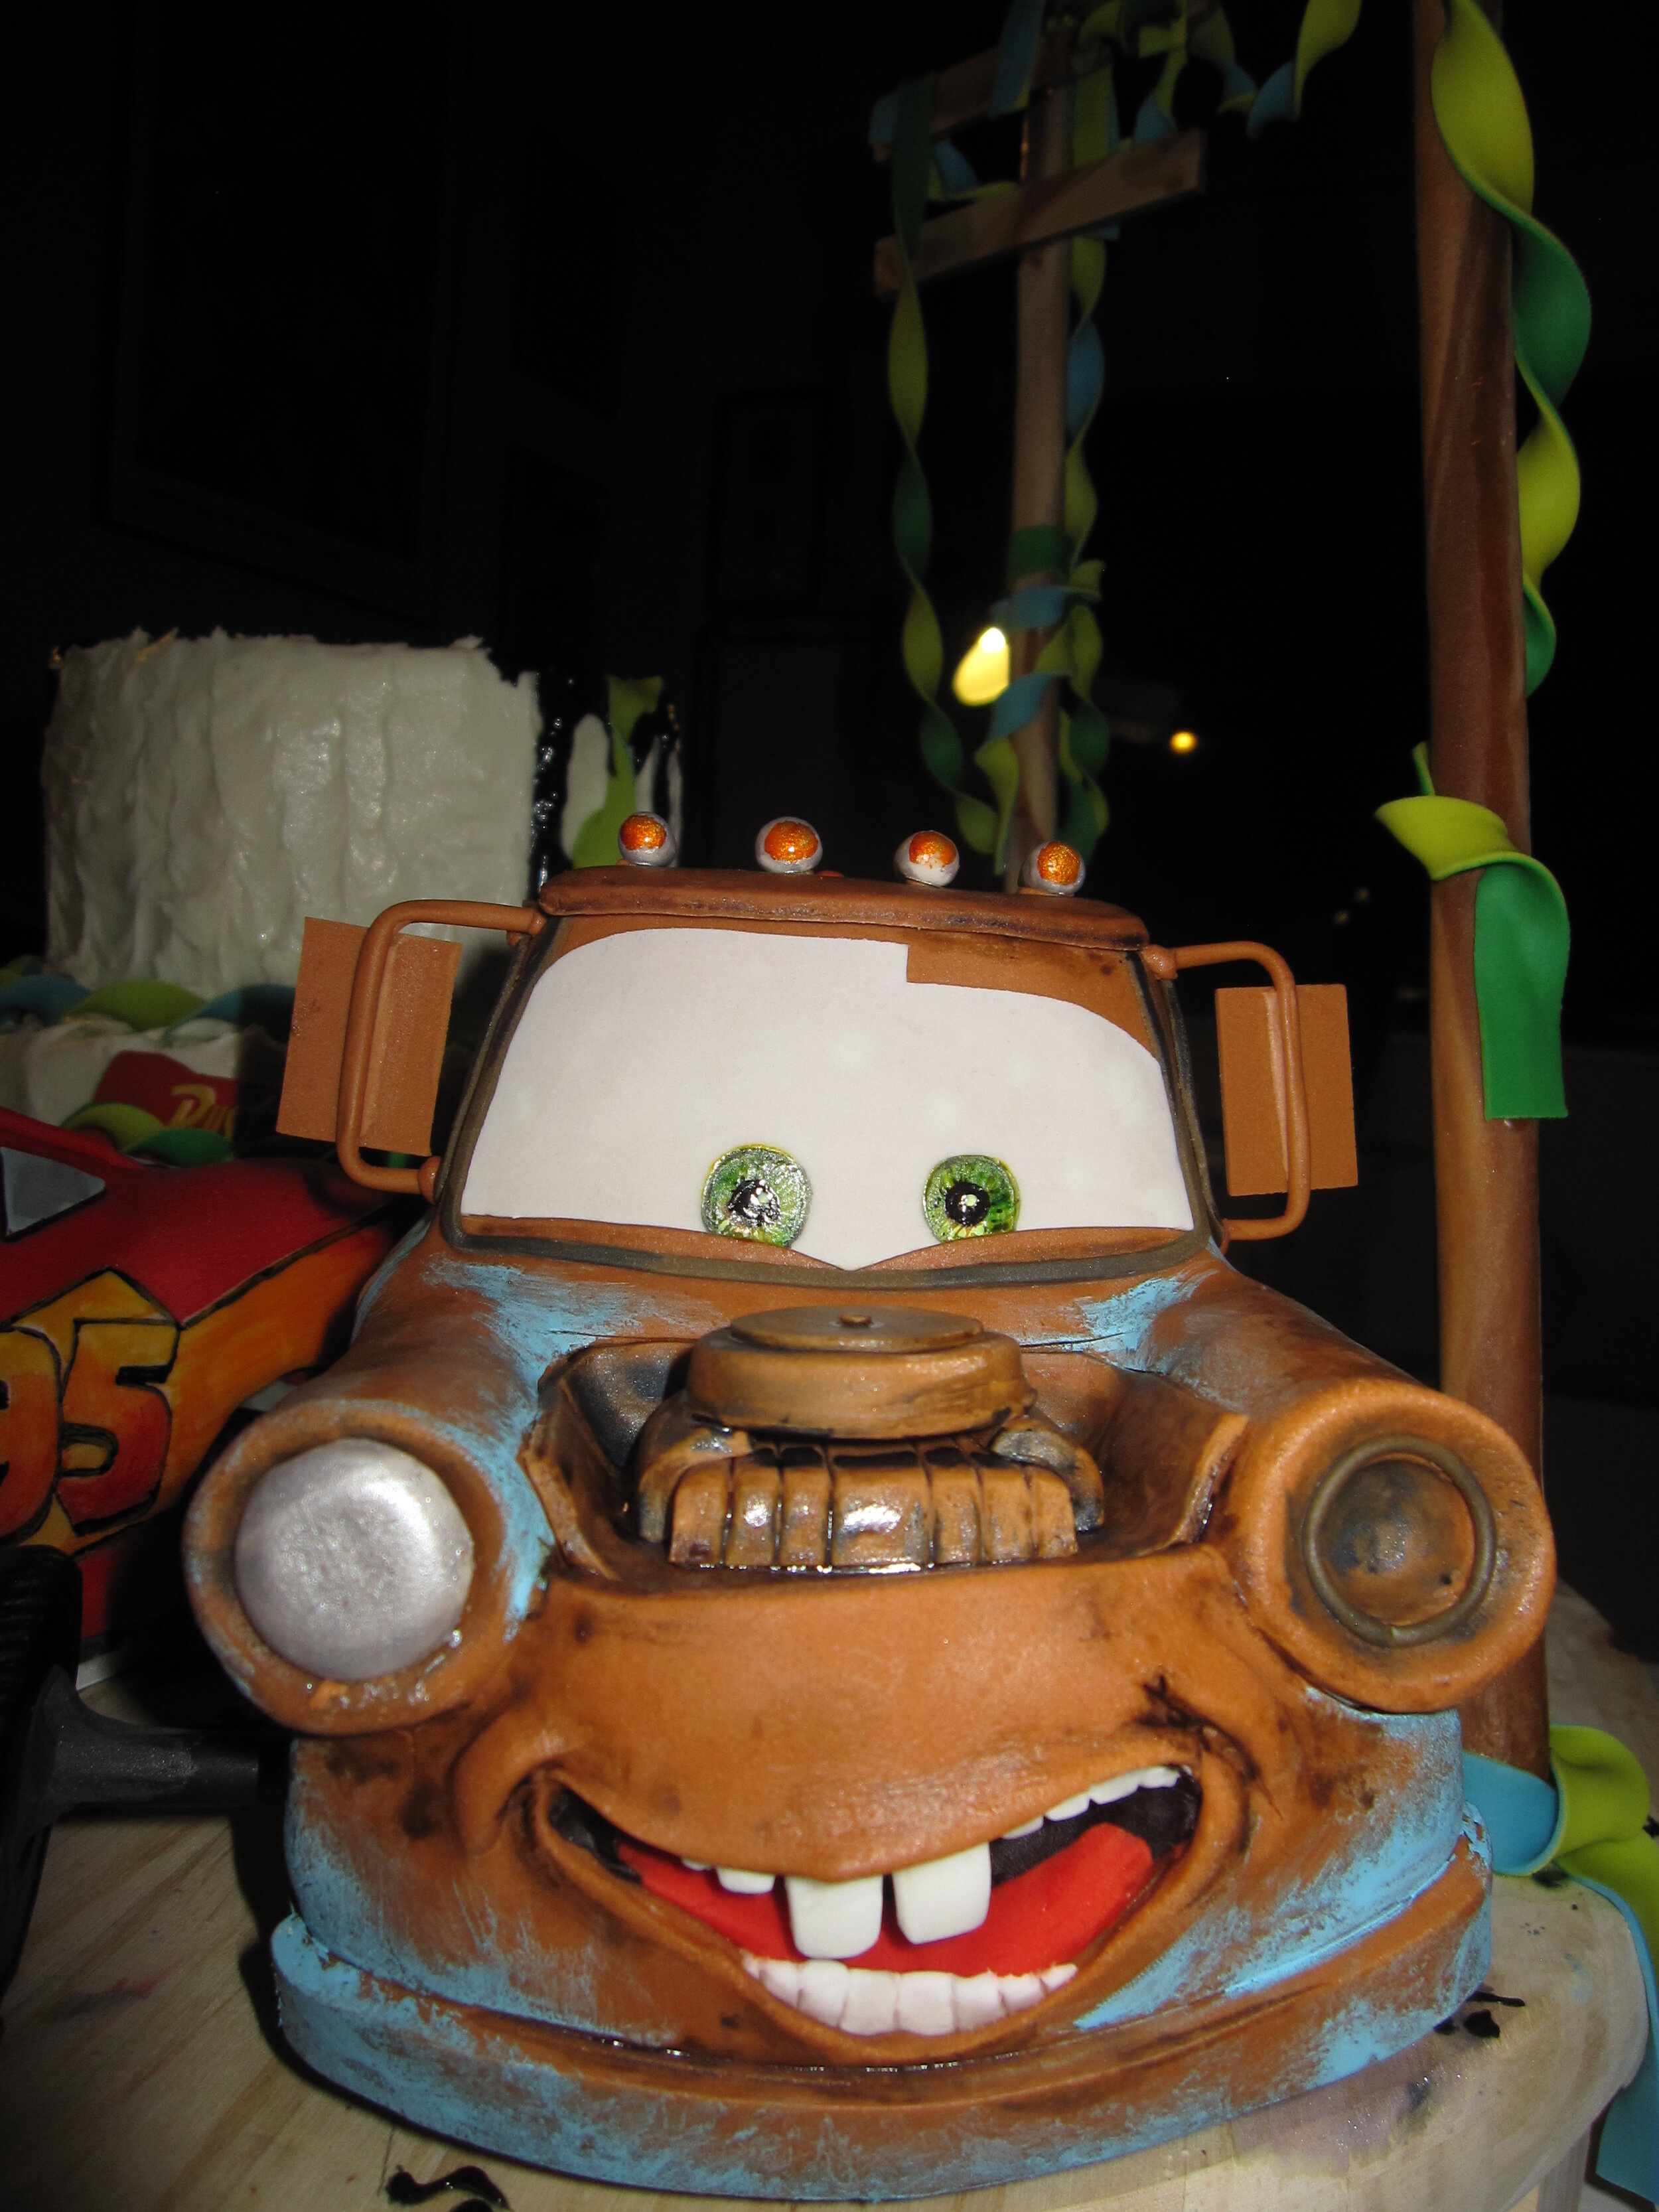
Carving Mater and Lightning went well, again using toys as helpful models. After a quick crumb coat, I was ready to cover them with fondant. Then the challenge was to get all the details on, since both Lightning and Mater have very specific paint jobs. (For those Cars aficionados out there, I went with the original Cars Mater and Lightning, as opposed to the Cars 2 Mater and Lightning, having ascertained that Max hadn’t yet seen Car 2 yet.)

Mater, of course, is so rusty that you start with the brown and then add the patches of blue and green paint on top. I assembled his bed and tow hook with royal icing, which took a bit of time, but it wound up sturdier than I was afraid it might be, which is good since I had to take the cake on a two hour drive to get to the party. I applied white gum paste for the eyes / windshield and blue-grey gum paste for the side windows and then added some extra brown gum paste trim.
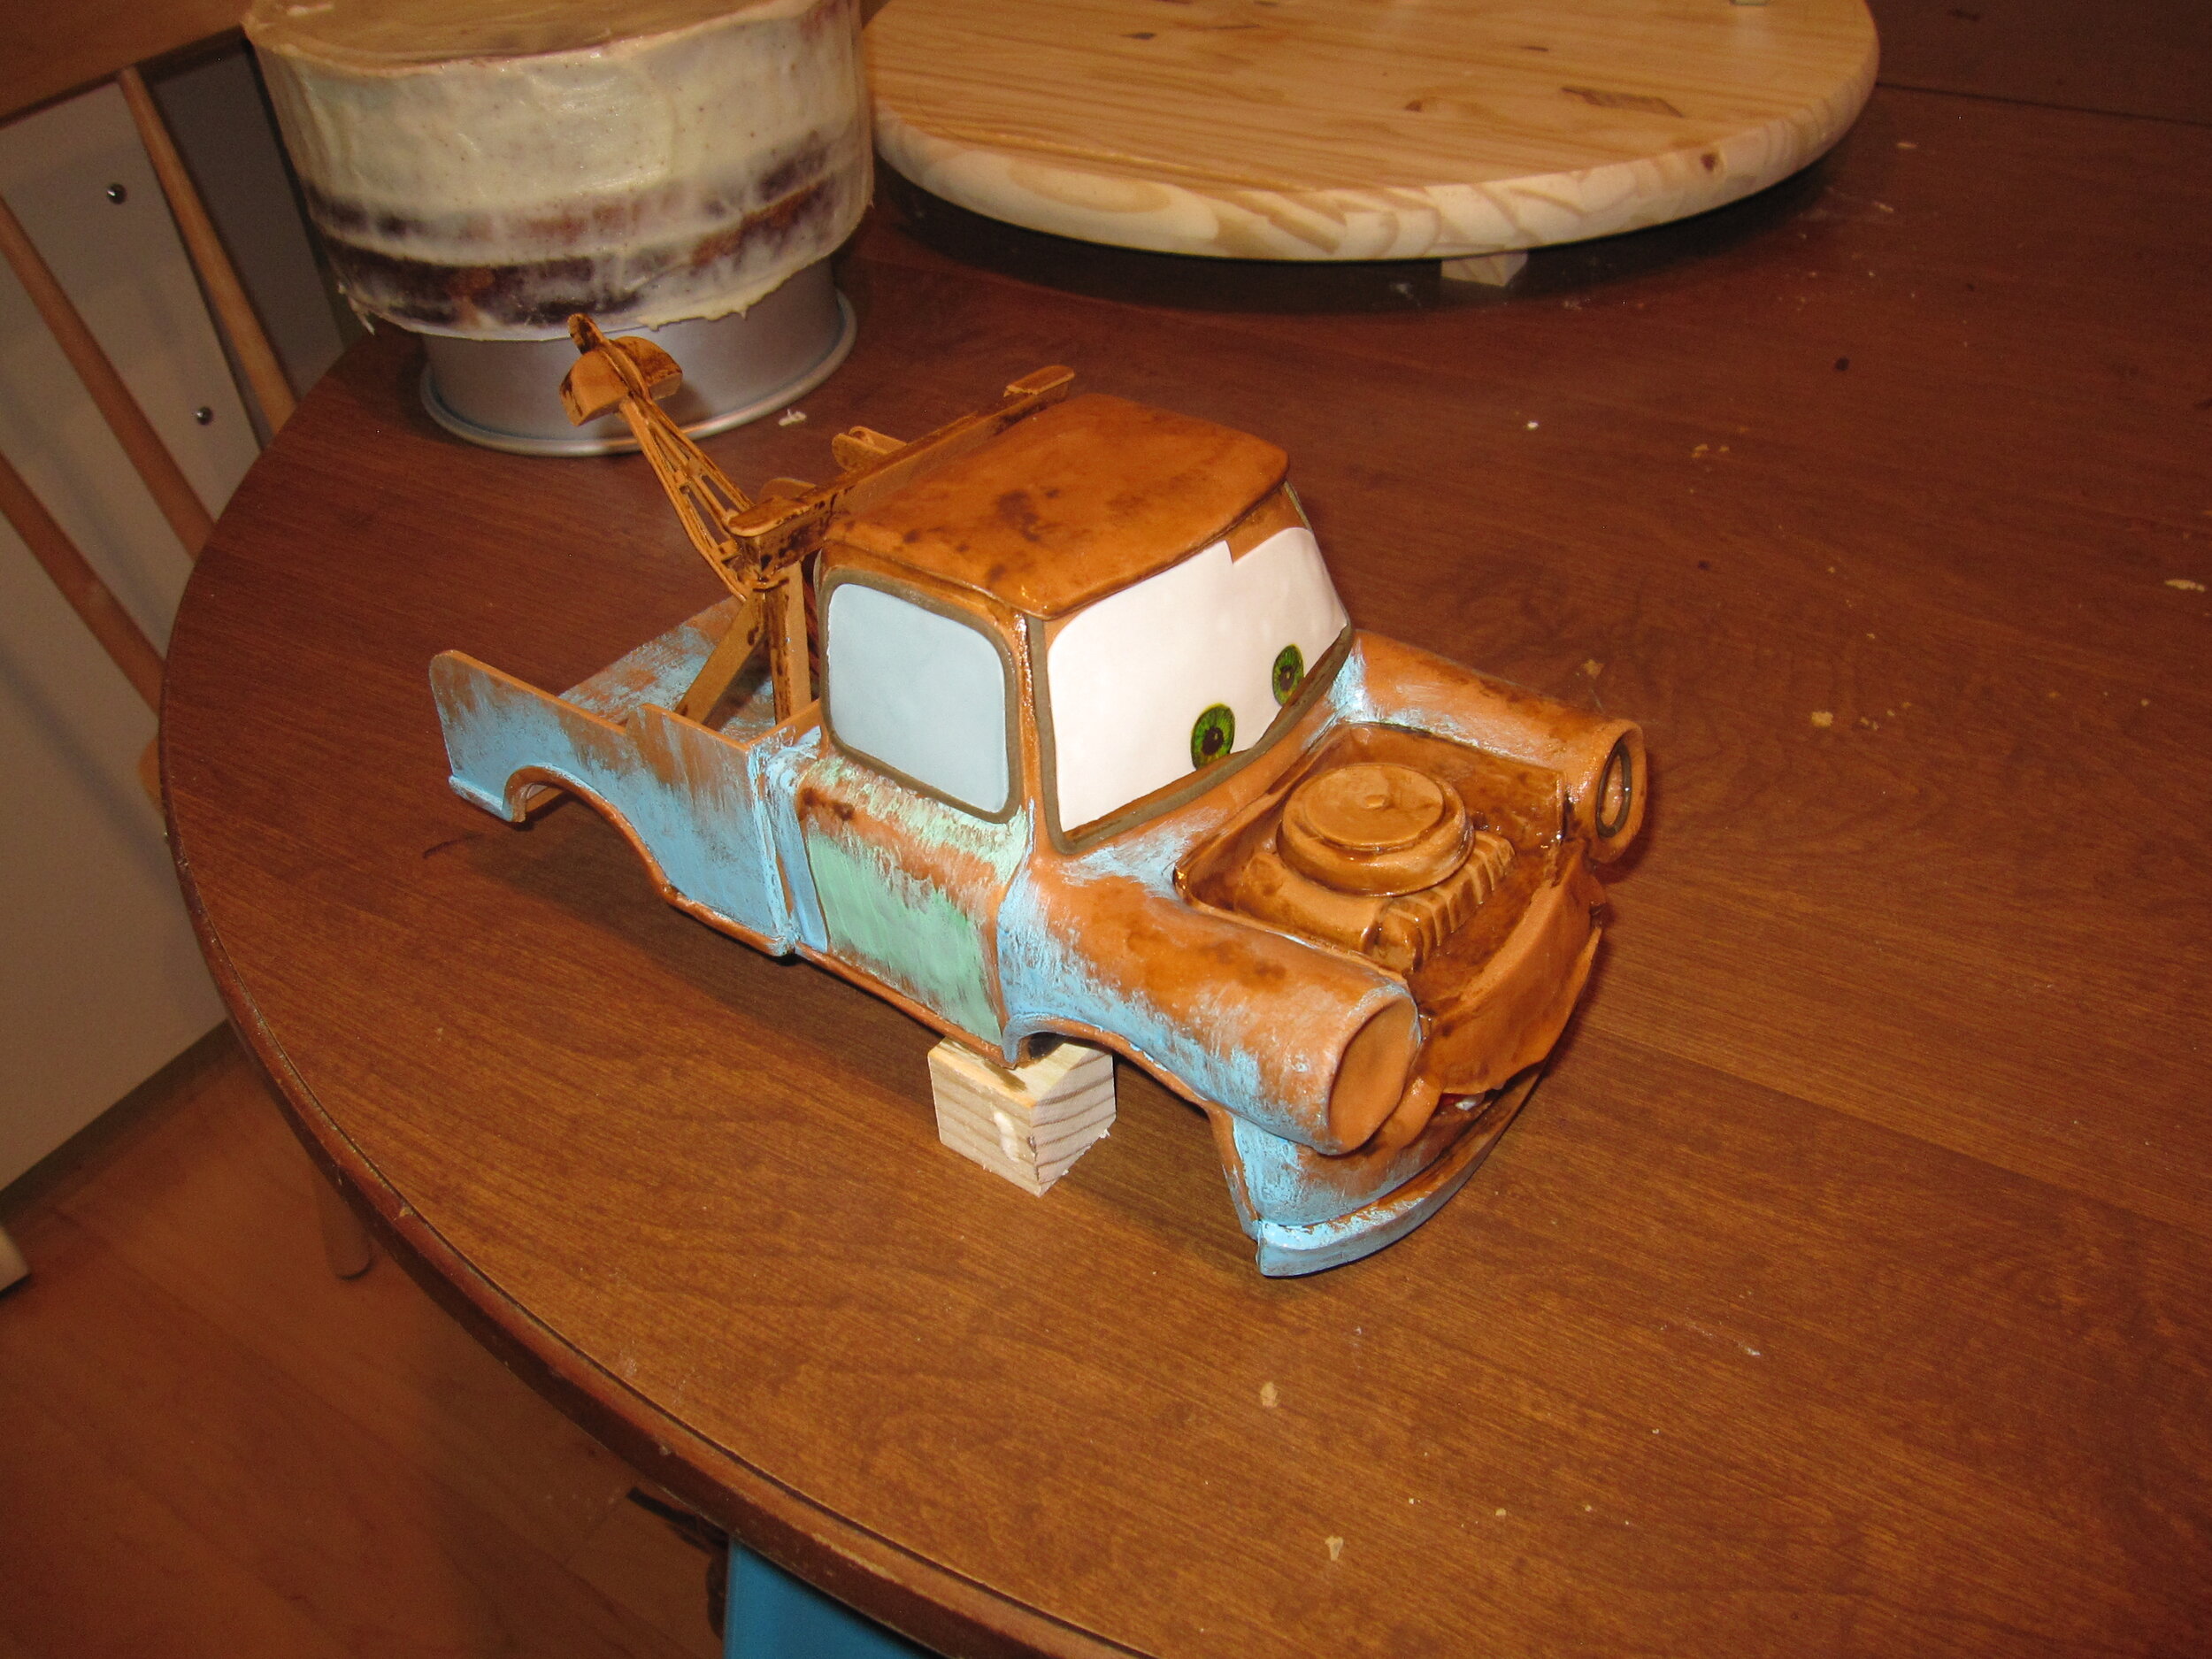
To paint the blue and green, I used white food coloring mixed with paste colors. The nice thing about this was that when I then went in with more white to write the text on Mater’s doors, it created a little dark shadow around the letters, where the green paint pulled very slightly away from the brown fondant underneath. This helped highlight the text really nicely. Then I went in with some darker brown to make the rusty parts more interesting before adding the final details like the lights on his head and his one headlight. The most important touches were, of course, his big white gum paste buckteeth, which, looking at them now, I think I made a little too small.
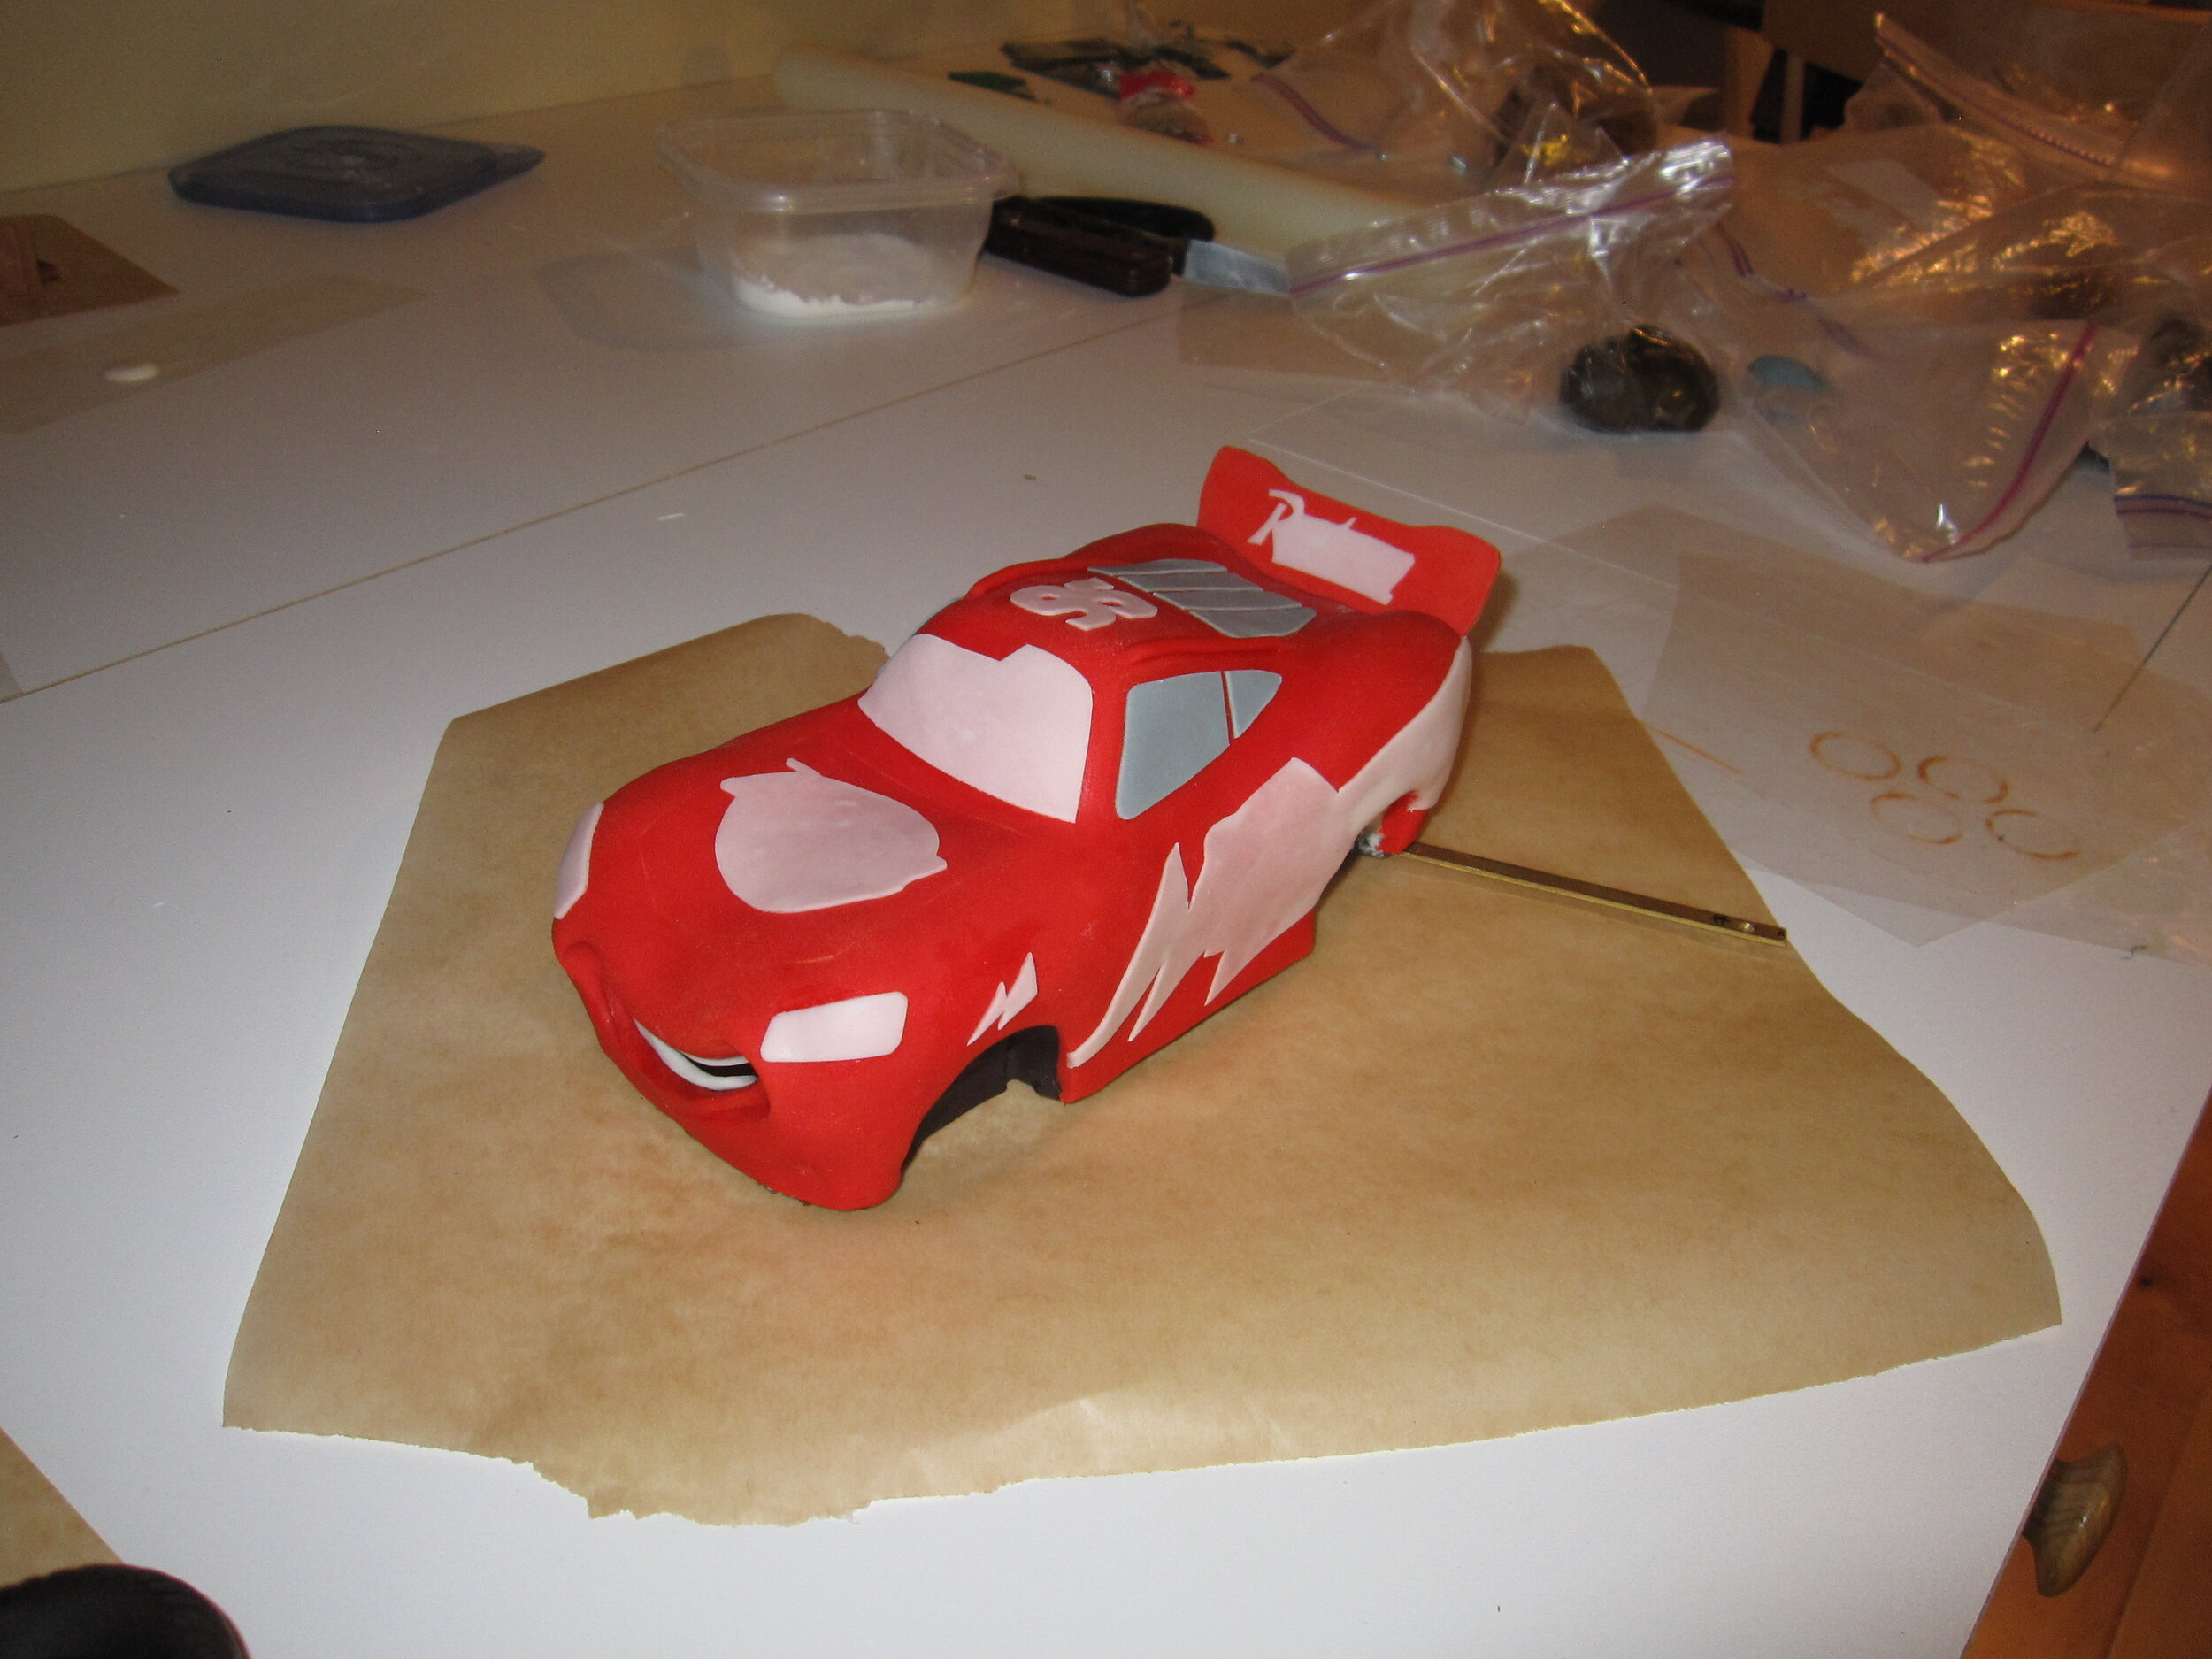
For Lightning, I made templates for all of the decals, and then cut them out of white gum paste and applied them.
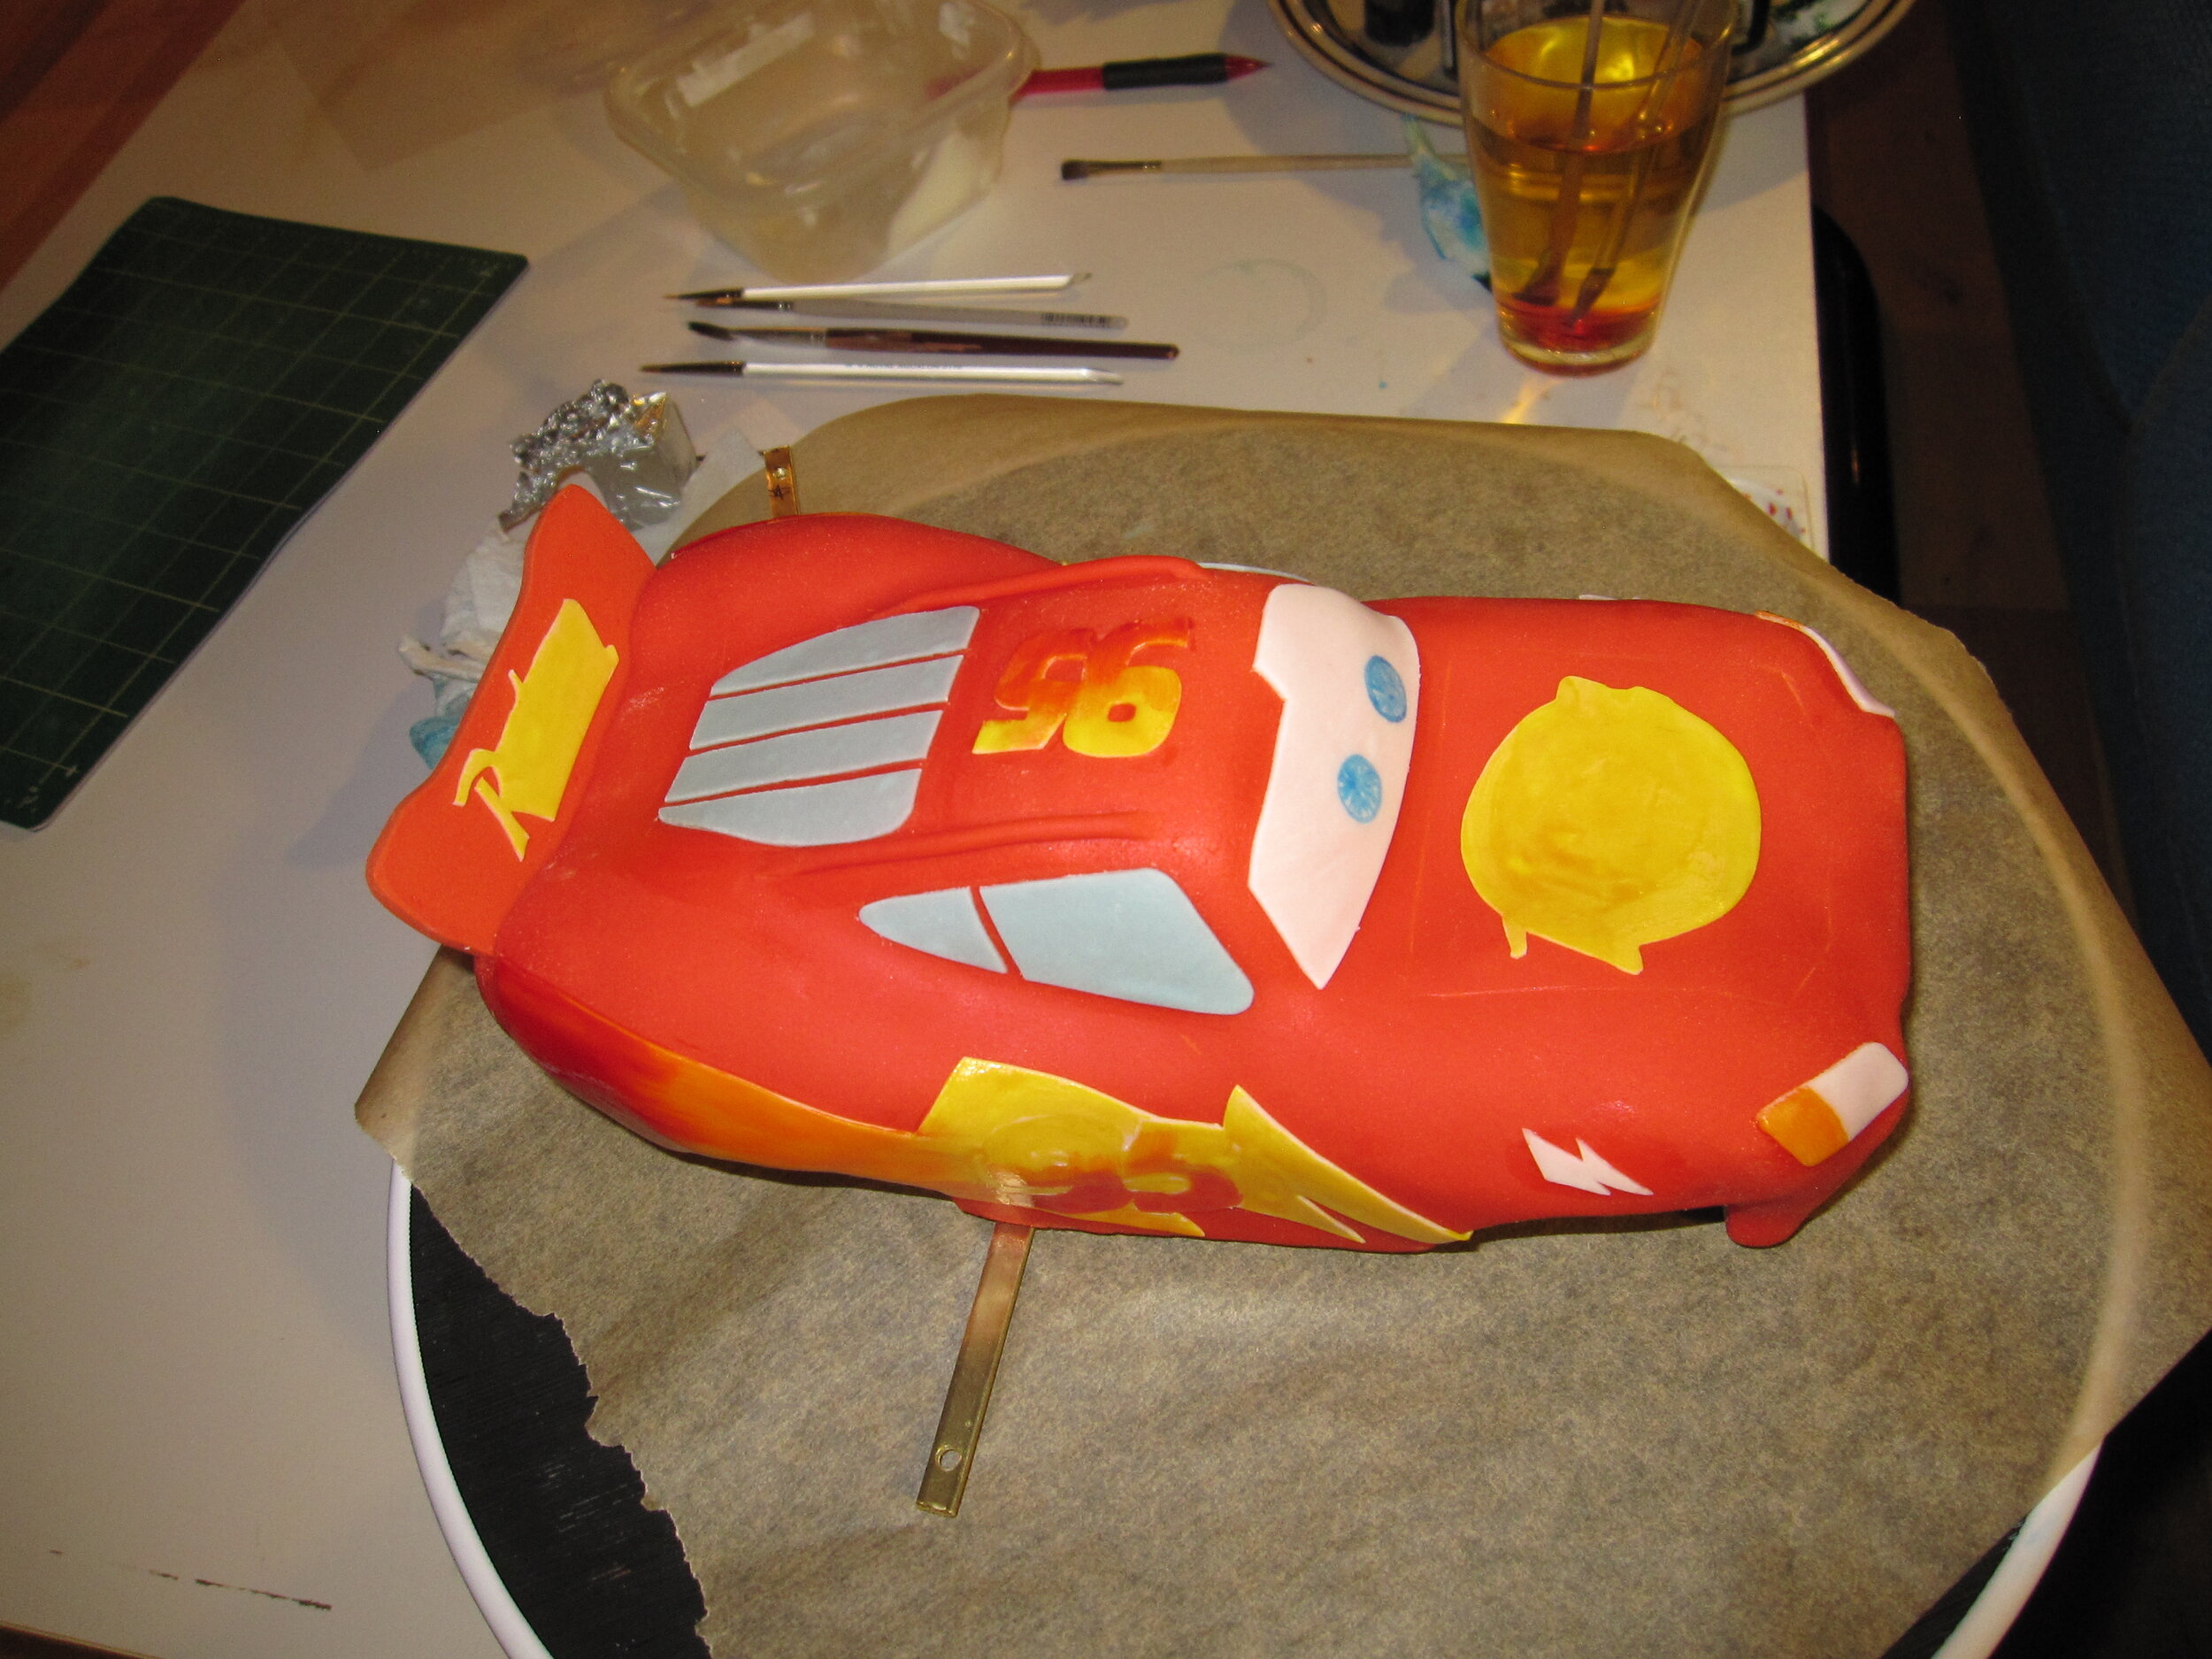
I think I did a decent job painting in all the colors, though I wasn’t entirely happy with the Rust-eze sign on his nose, since the brushstrokes were still fairly evident. This is probably the sort of project where the ability to print edible images would really come in handy.
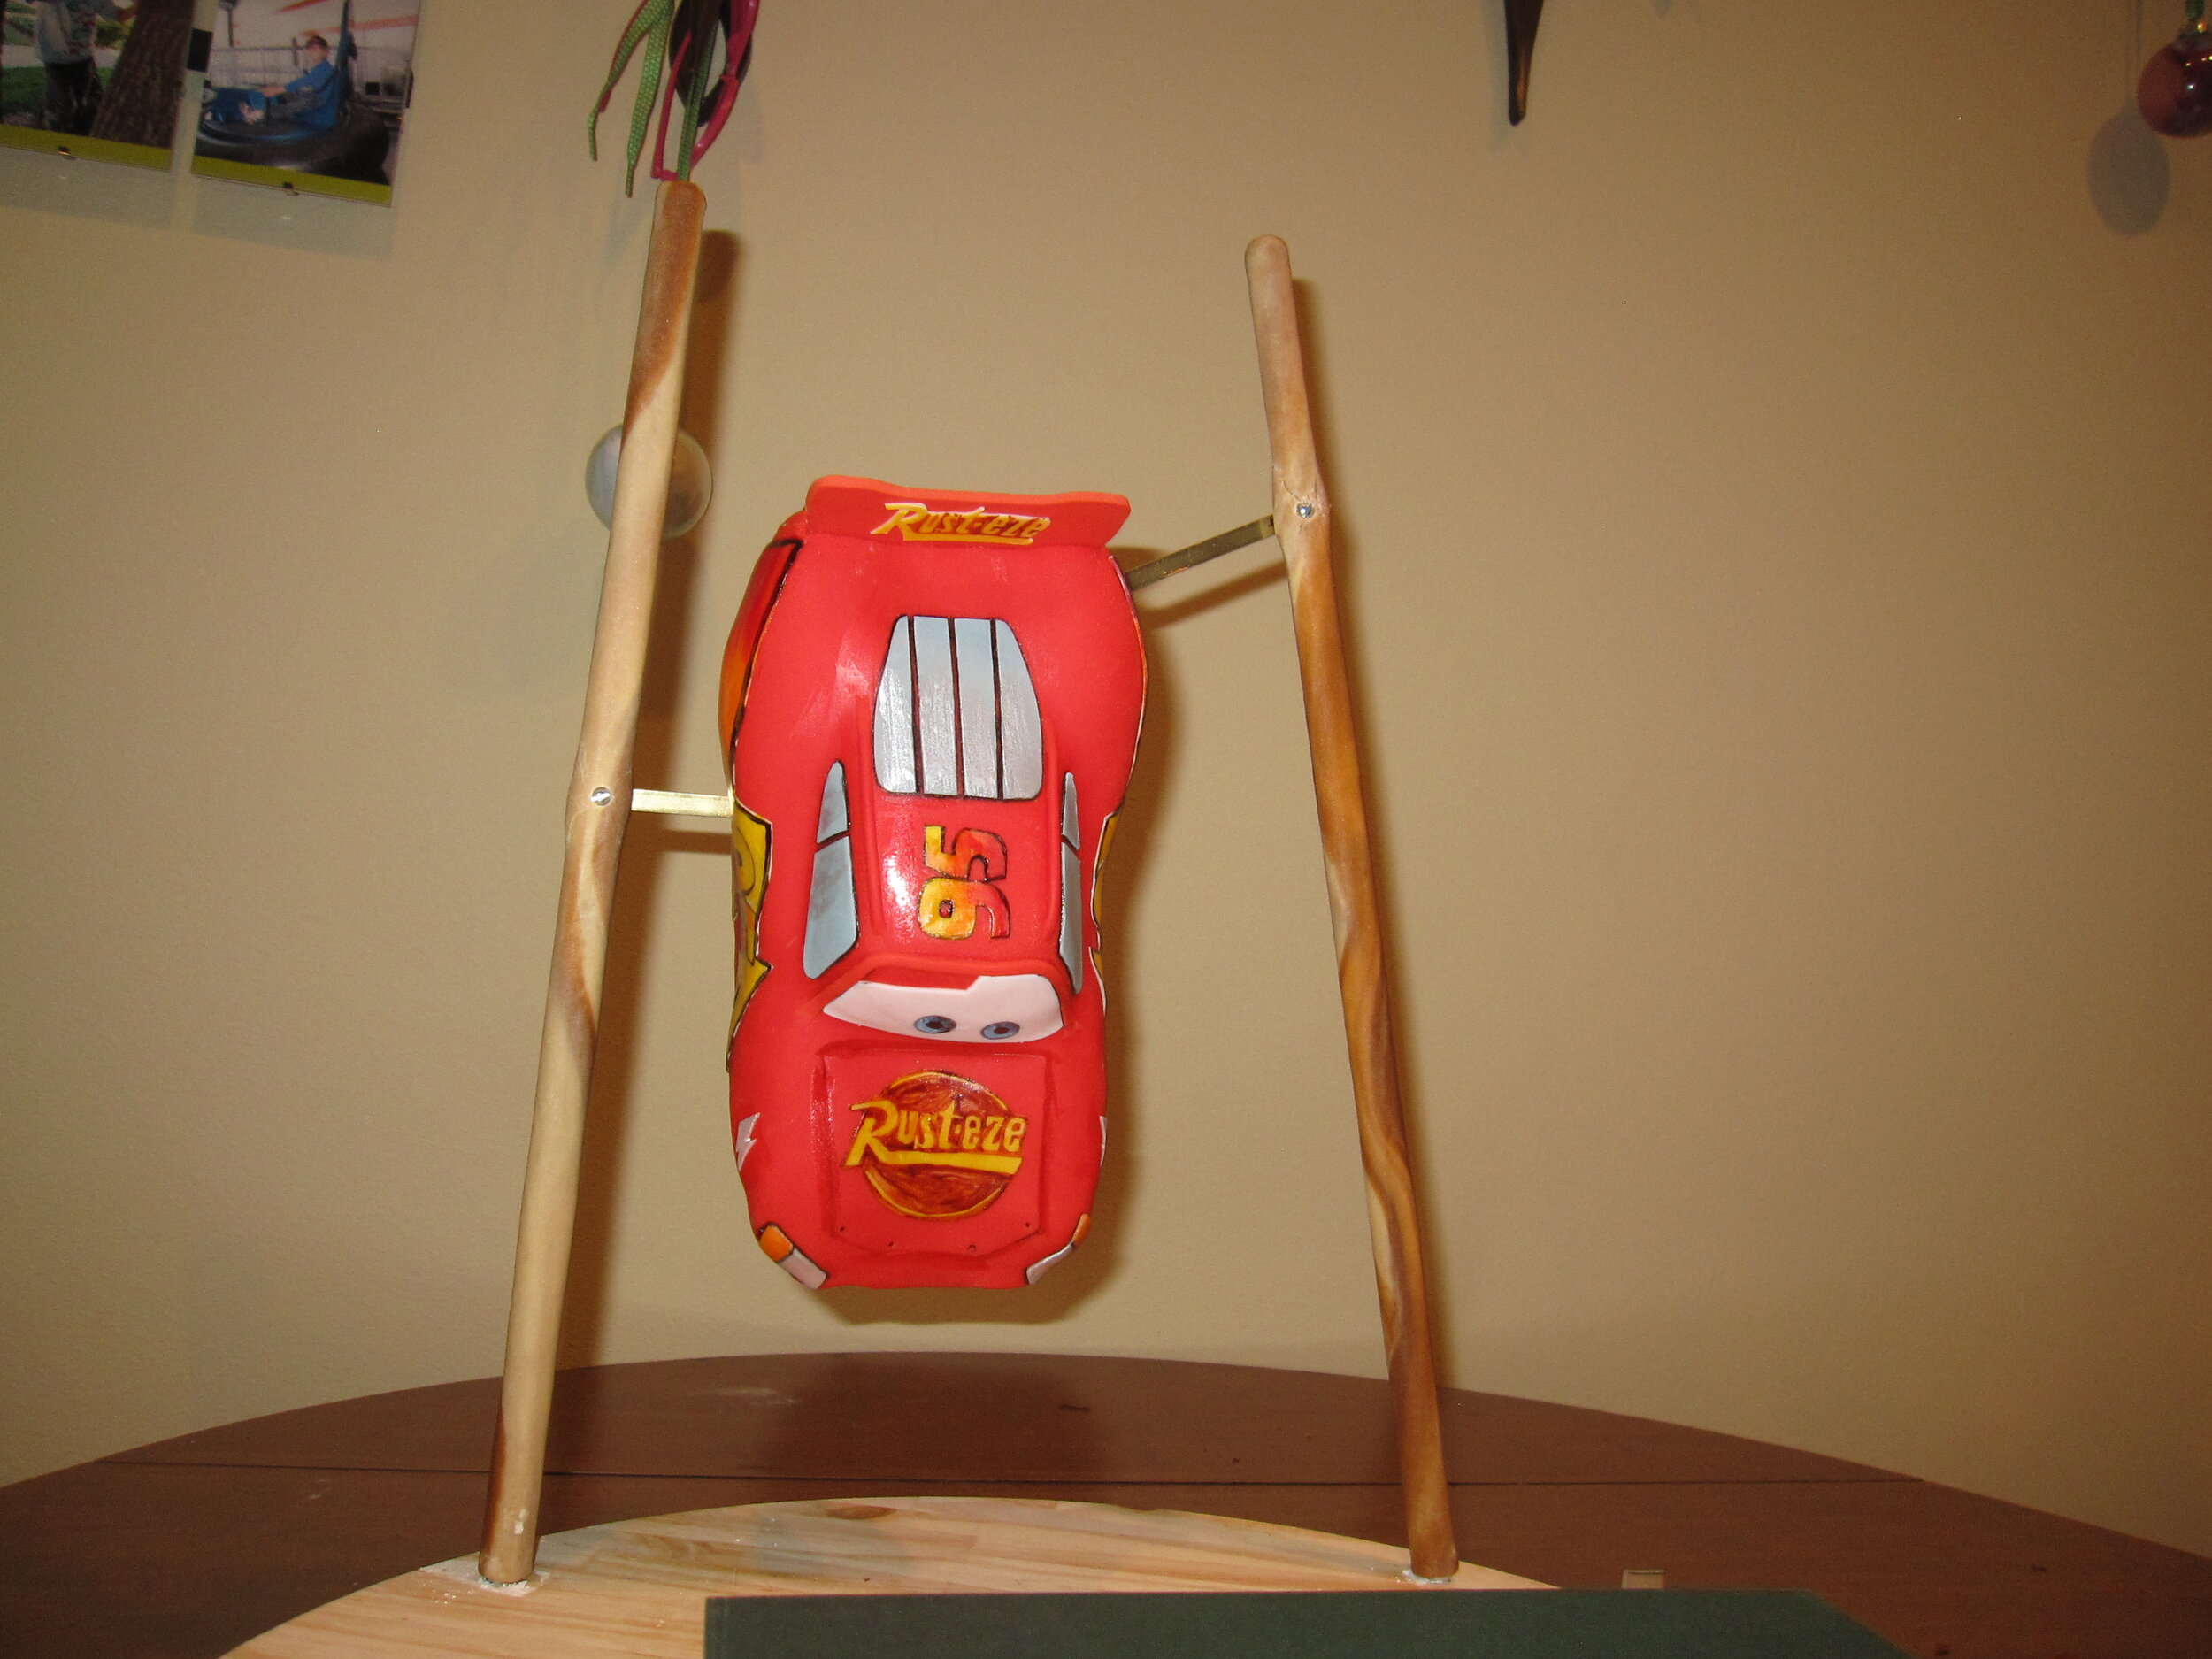
At this point, I made my attempt to hang Lightning. At first, this seemed to go fairly well. The poles were strong enough to hold him up and he seemed fairly stable. Unfortunately, after hanging there for a little while, he began to separate from his base and fall forwards. Fortunately, I noticed this and was able to catch Lightning before he did an actual header down from his perch. At this point, I decided it would be a lot smarter of me to take him down and put him on the ground – although I do maintain that, given another chance, I could have made this work.
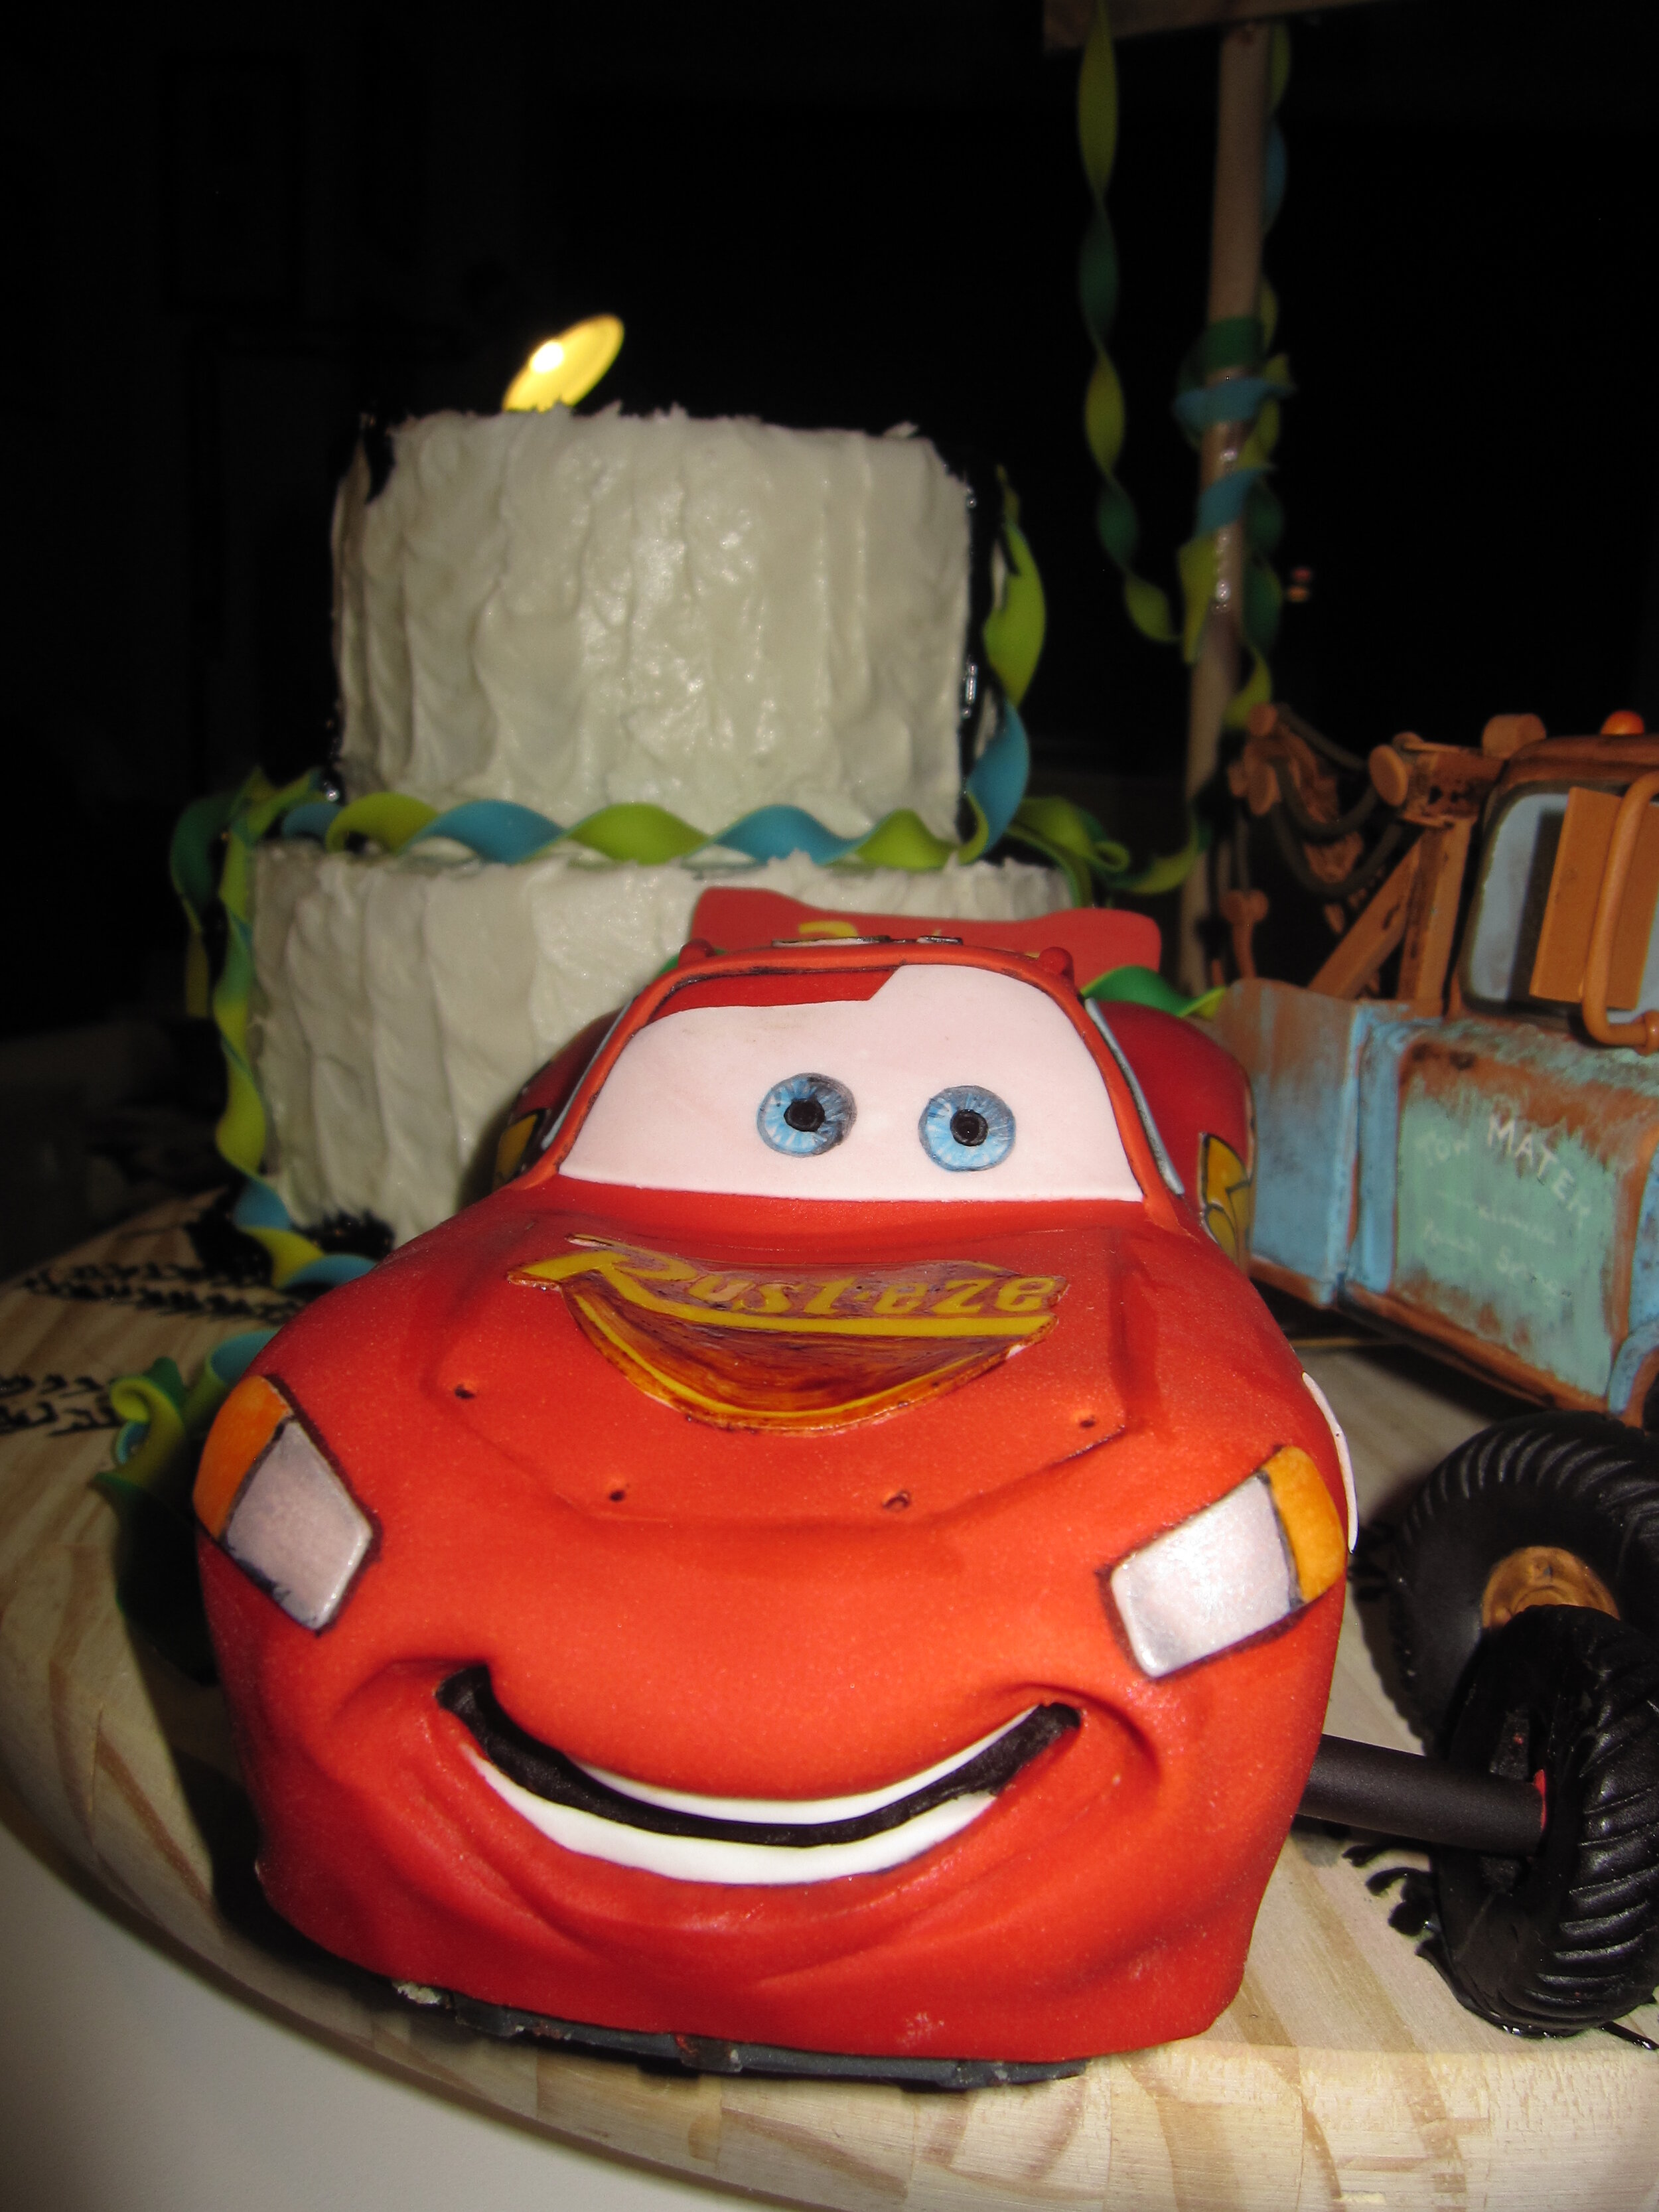
With all three cakes – Mater, Lightning, and the birthday cake – in place on the base, it was time for final touches. The fist-bumping tires read well, I thought. I used piping gel colored black to write “Happy Birthday Max” on top of the cake, as well as to glob big oil drips all over the cake. I also added oil tracks crisscrossing the board, as if Lightning and Mater had tracked it around while setting up for the party.
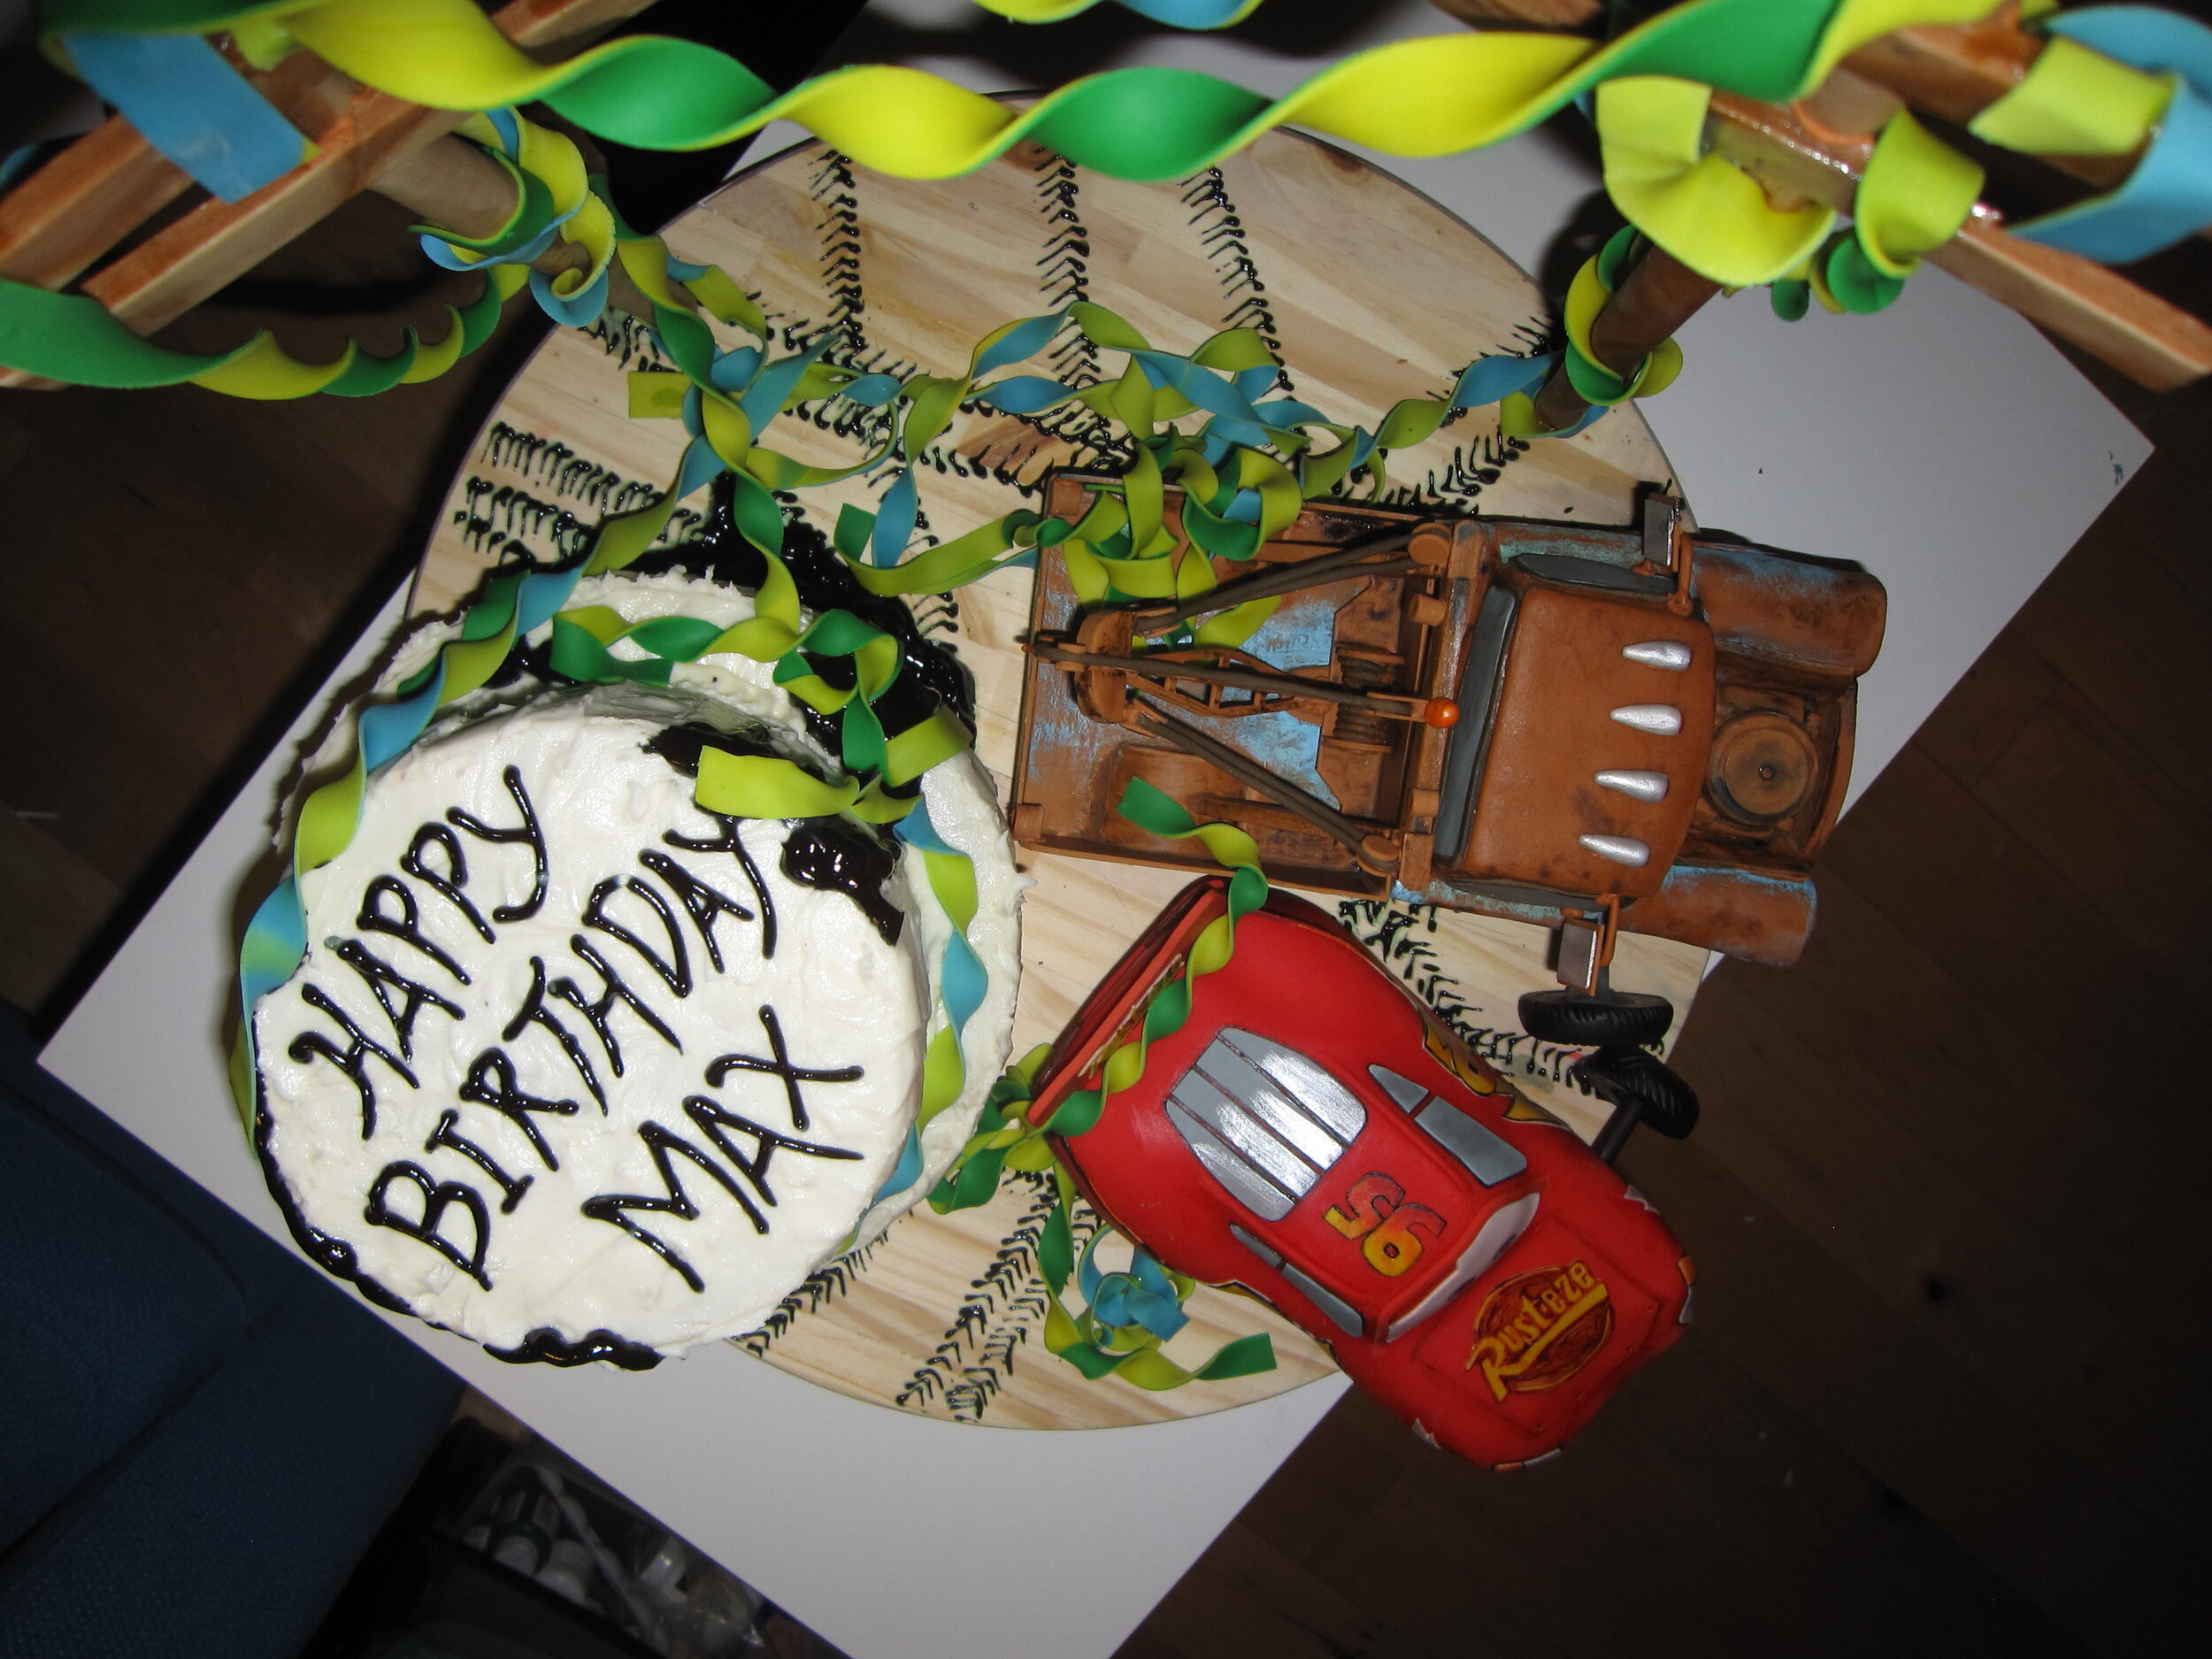
The very last touch was the addition of the streamers. To give them the look of two colors of streamer wound together, I rolled out two very thin pieces of gum paste and them stuck them one on top of the other and rolled them once to stick them together before cutting them to width.

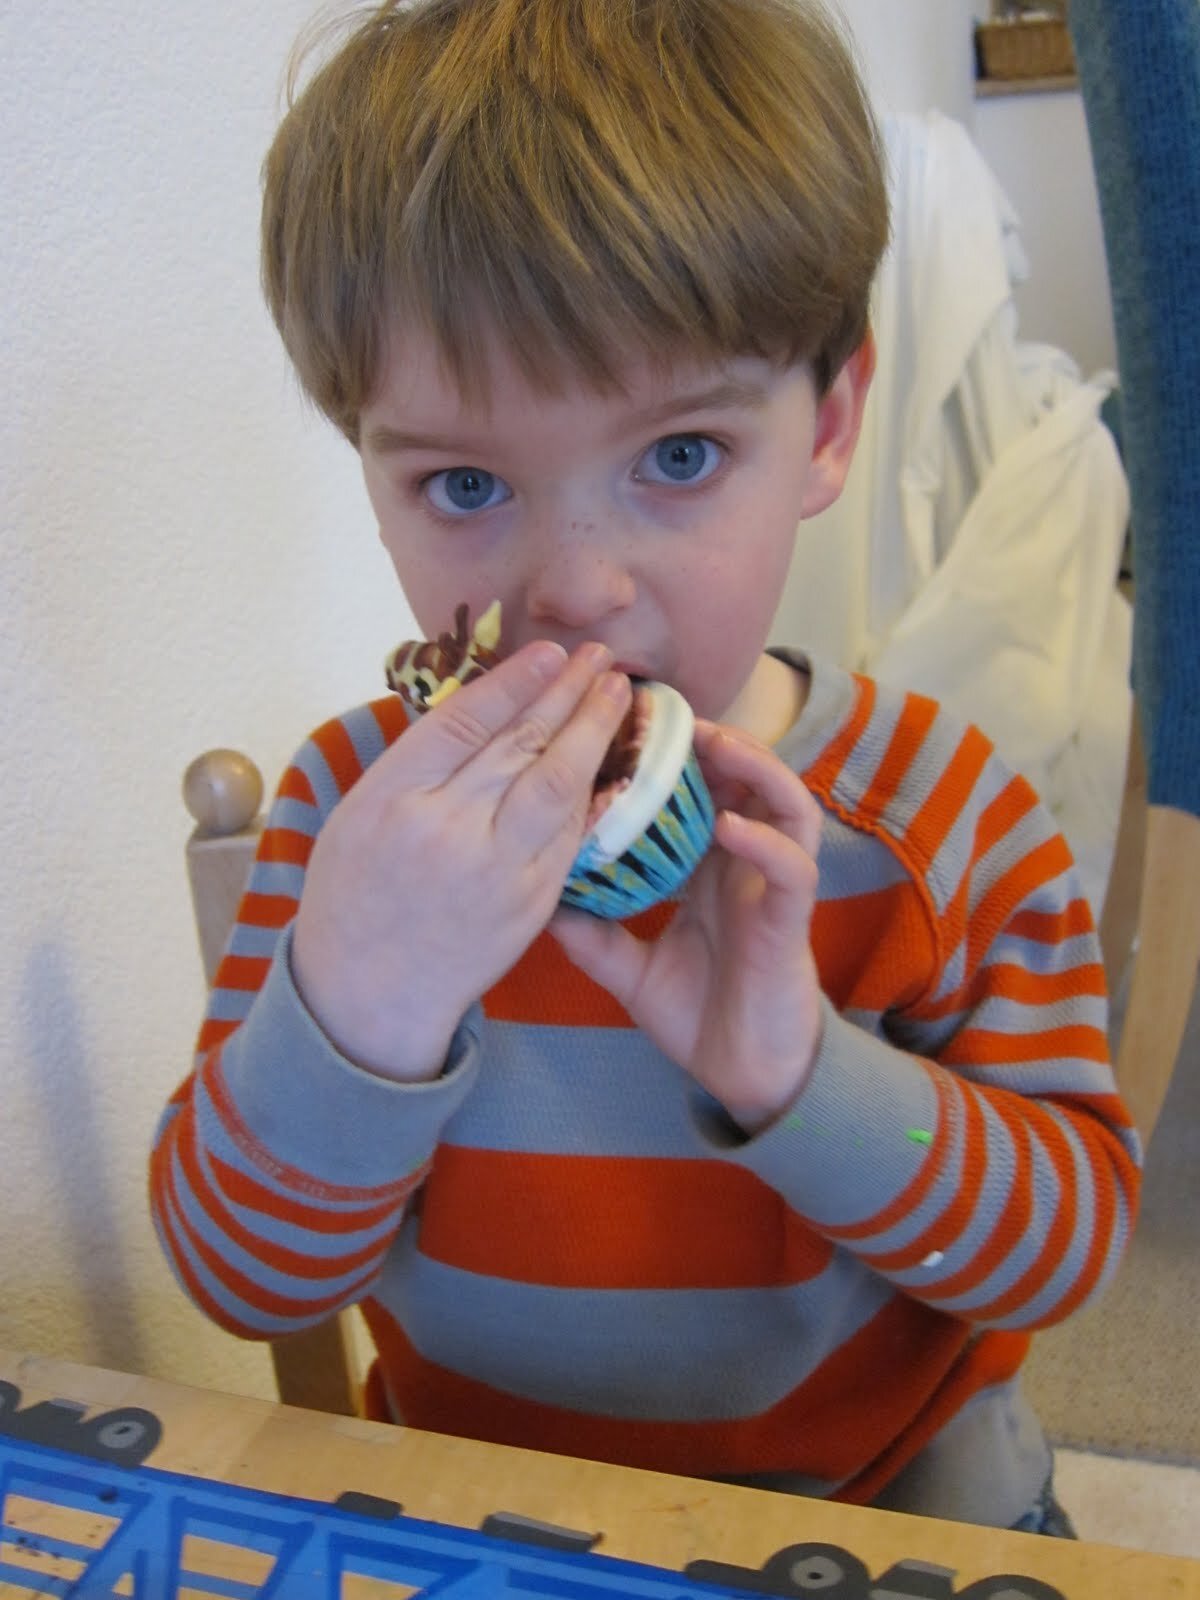
I am sad that I didn’t manage to get Lightning to hang from the telephone poles, because I think that would have been super cool. But Max (and everyone else at the party) seemed to really like the cake. Like all children (at least in my experience), Max for some reason especially enjoyed the fondant tires.

Sneetch Cake
I have been looking forward to seeing my niece and nephew perform in school plays since before they were born. Finally, my dream has come true. At her pre-K graduation, my niece Alex appeared in their stage adaptation of Dr. Suess’s The Sneetches. To celebrate her accomplishment, I decided to make her a Sneetch cake.
I have been looking forward to seeing my niece and nephew perform in school plays since before they were born. Finally, my dream has come true. At her pre-K graduation, my niece Alex appeared in their stage adaptation of Dr. Suess’s The Sneetches. My completely and totally unbiased expert opinion is that Alex was clearly the best Sneetch in the bunch. To celebrate her accomplishment, I decided to make her a Sneetch cake.
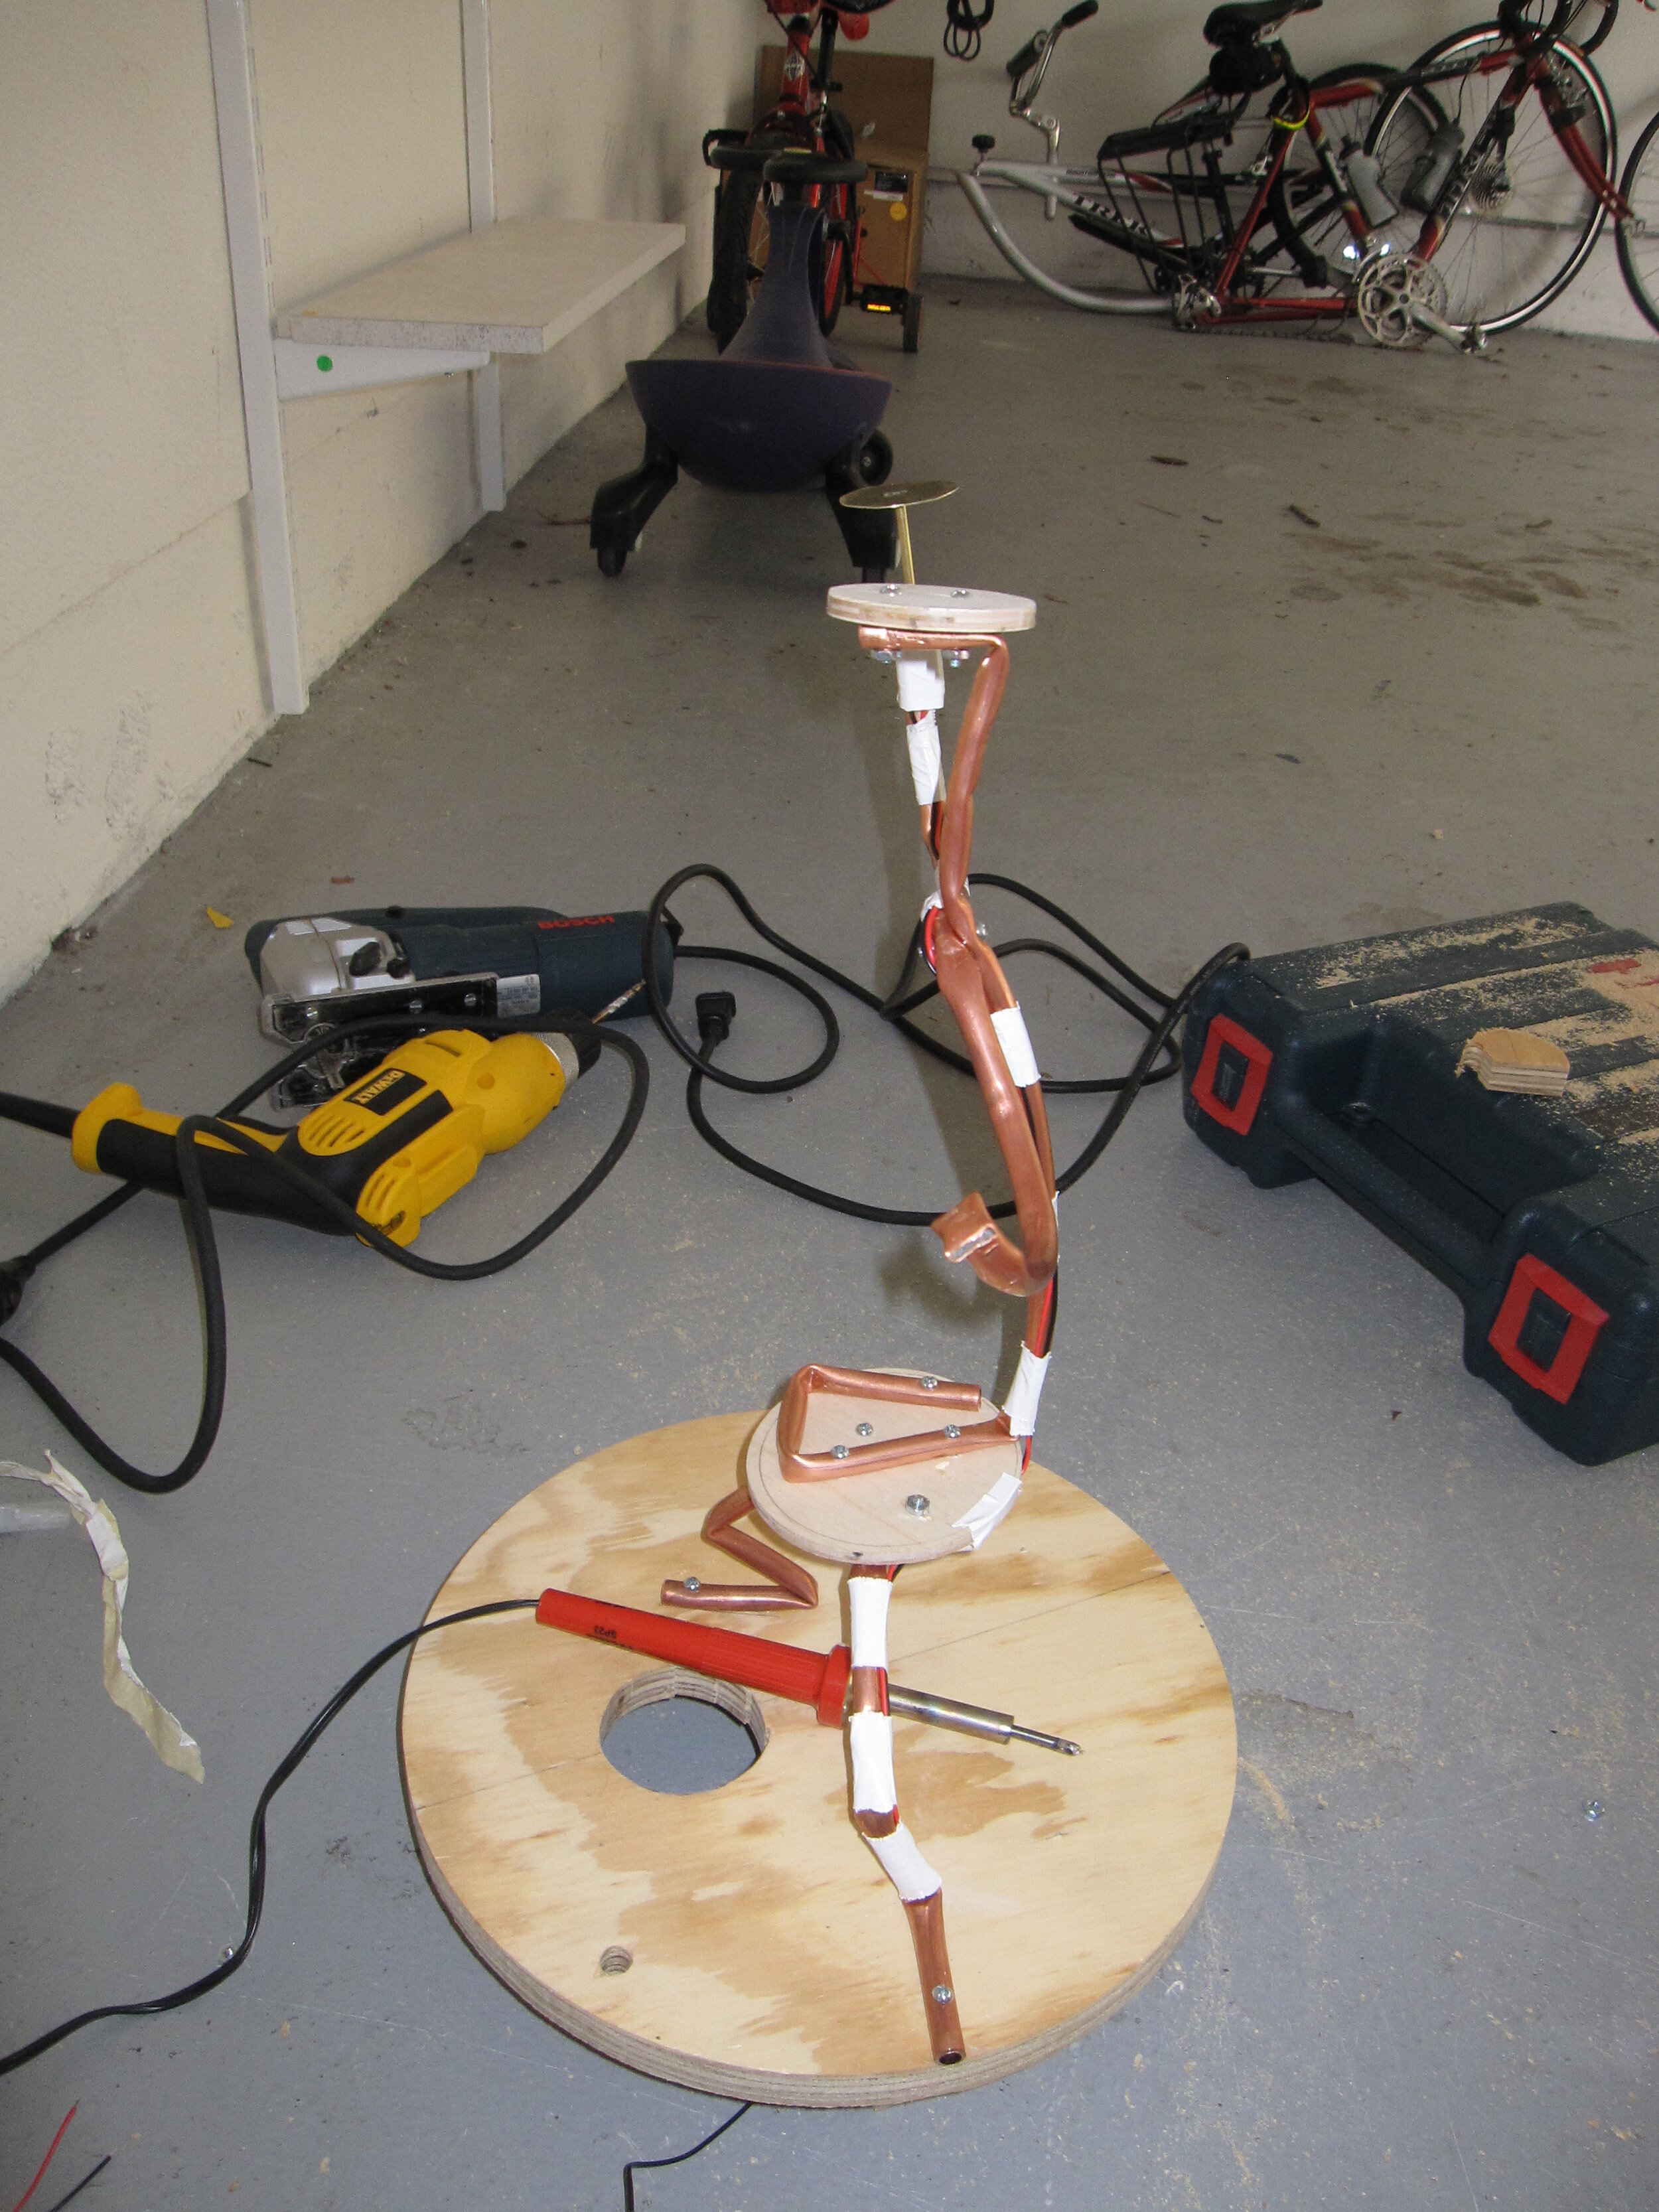
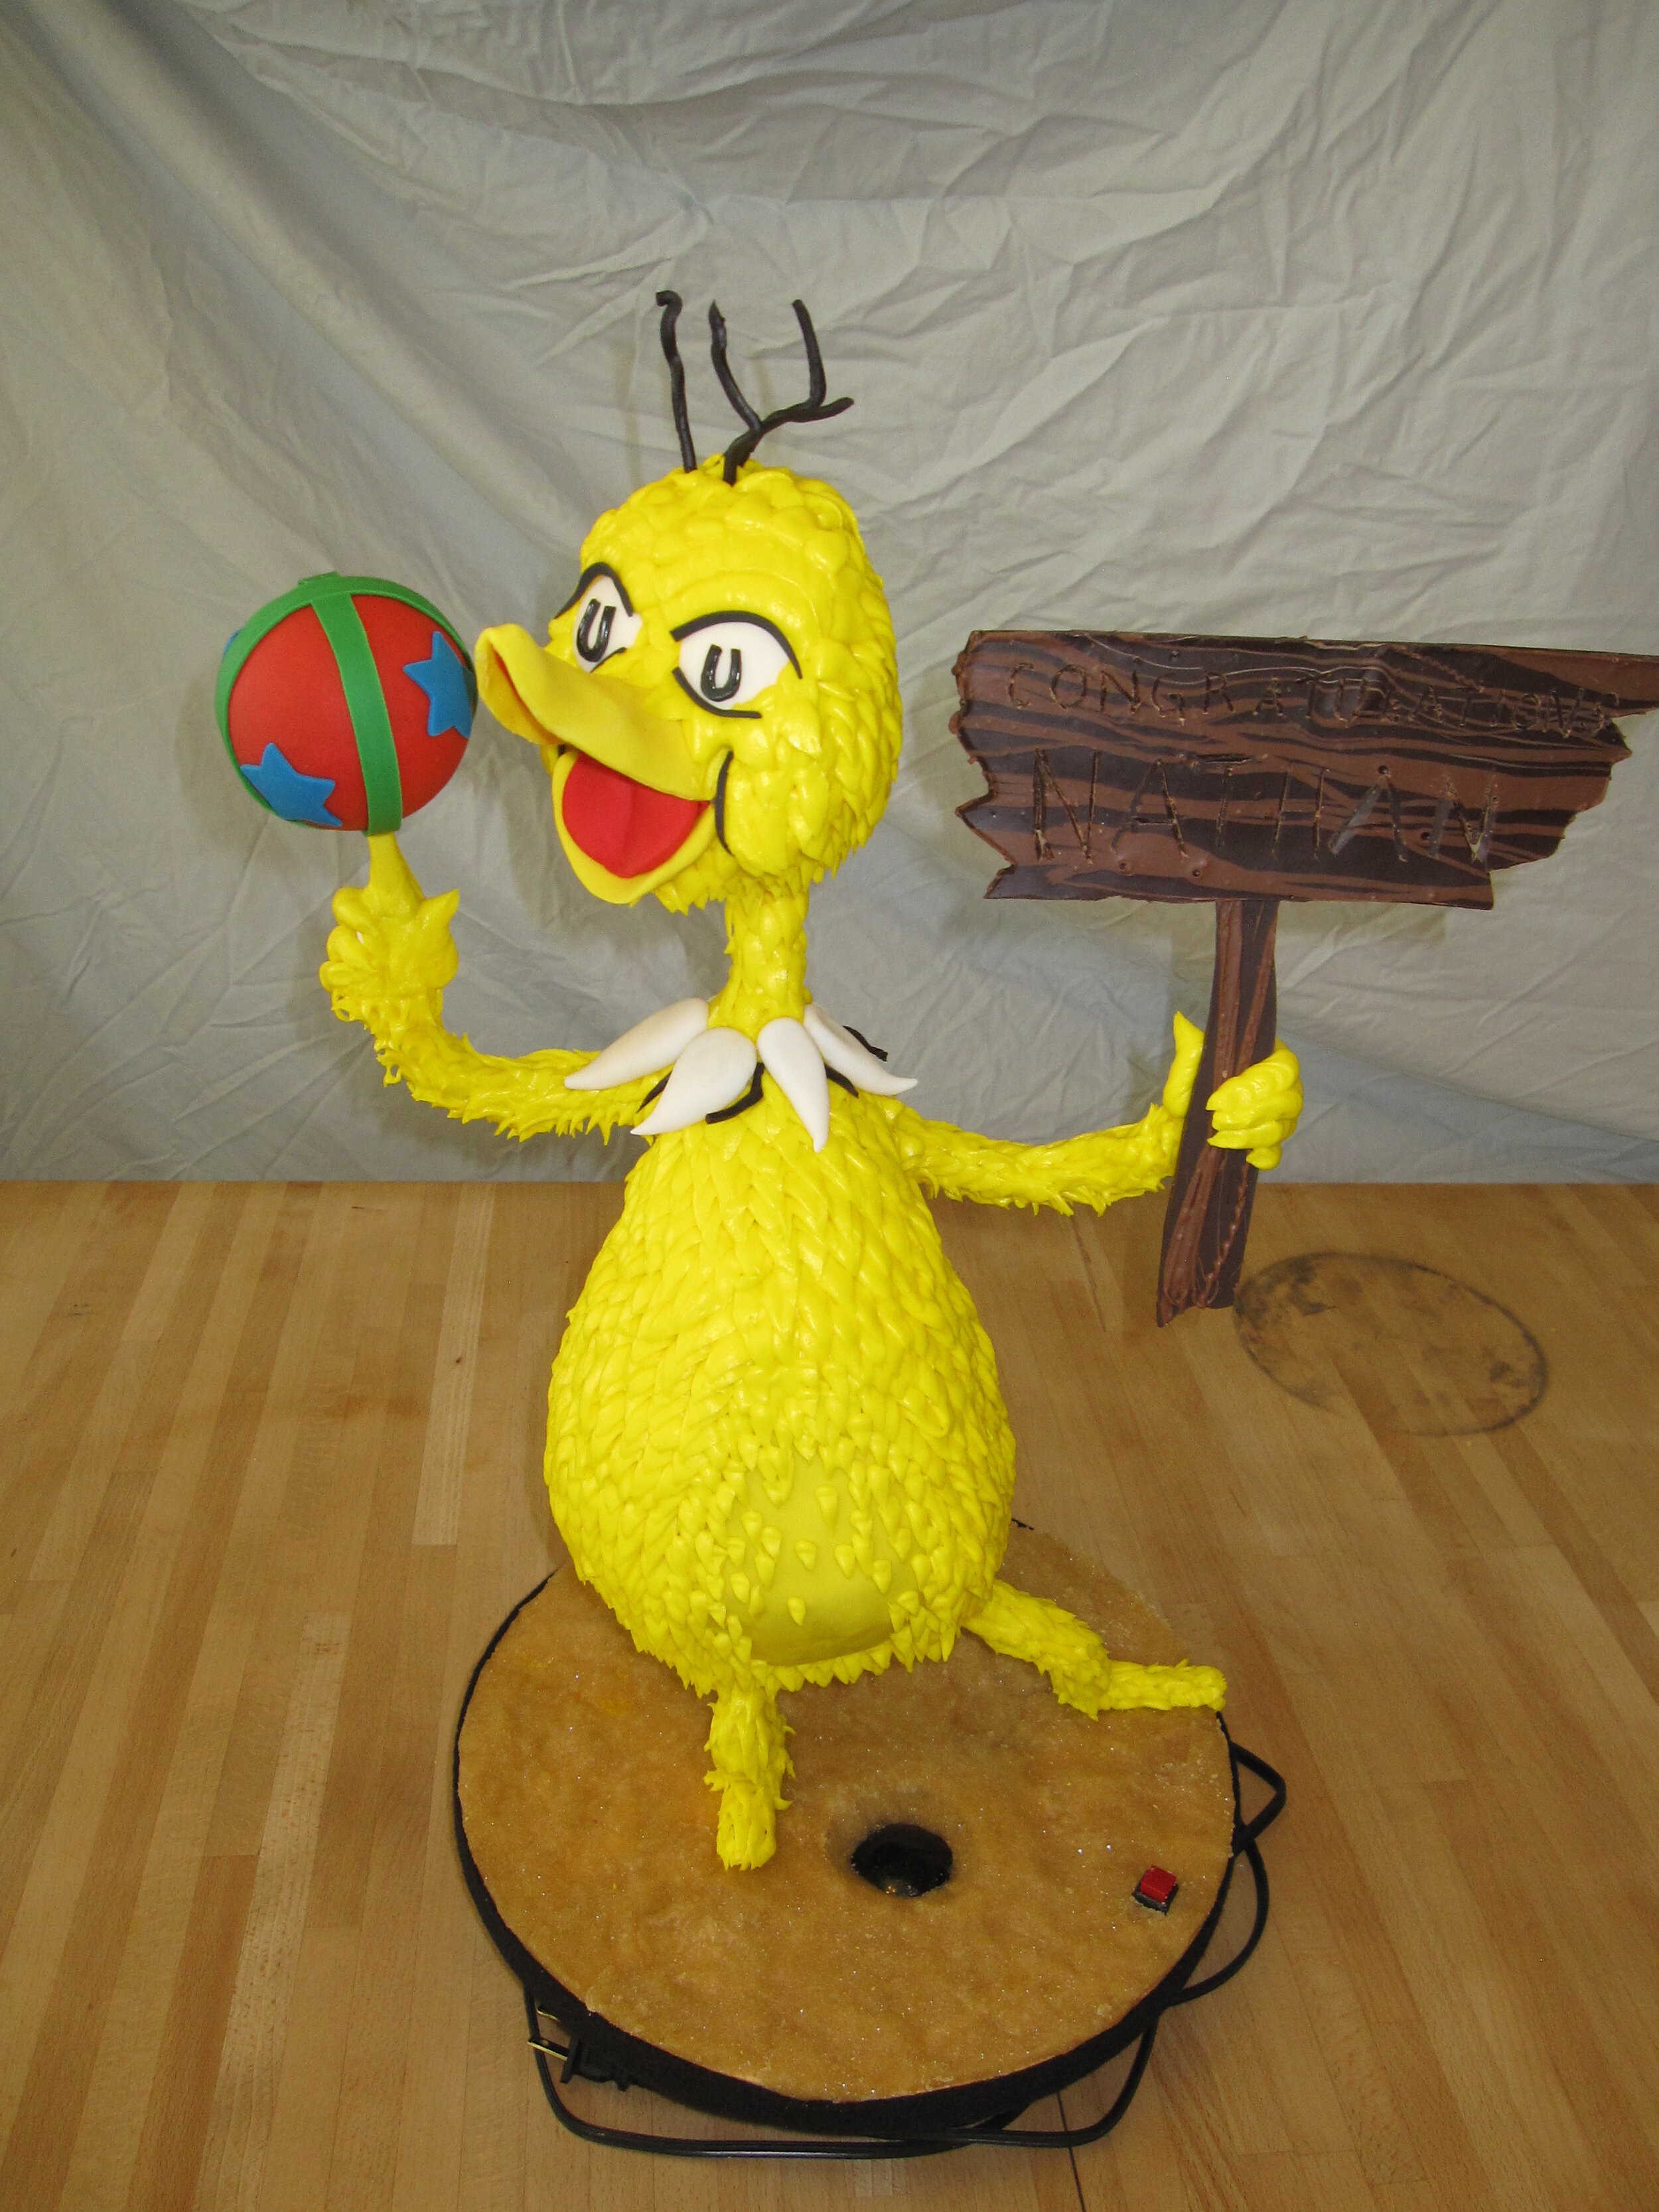
It would have been fairly easy to make a Sneetch sitting down, so of course I didn’t go that route. I wanted to make a standing up Sneetch because it would give me the opportunity to try one of the copper tubing armatures that I always see on Food Network Challenge and Ace of Cakes. I chose to attempt the pose of a proud newly-starred Sneetch thrusting out its belly. Ultimately, I'm not convinced that I fully achieved the balance and expression that I was looking for in the pose, so next time I'll have to take a little more care with the shape of the armature.
I’m not really sure if I made my armature according to industry best practices, but it seemed to work. I used 3/8” copper tubing, which was relatively easy to bend. I don’t think it would have supported a much larger cake, especially as the tight bends tend to get rather weak. I used ¼” plywood to make the circles to support the butt and the head and then I bolted the whole thing to a ¾” plywood circle for the base.
At this point, prior to the actual performance of The Sneetches, I knew nothing about the play except that Teacher Christine was playing the role of Sylvester McMonkey McBean and that it involved playing with a ball. So I decided to have my Sneetch twirling a ball on his finger. Alex and I have also been playing with a motor recently as part of a kit of science experiments related to light. The idea is that if you stick a circle of paper colored, for instance, half blue and half green onto the axle of the motor, when it spins the colors will blend together and you’ll see cyan. My thought was that if I made the ball red, blue, and green and got it to spin fast enough, then the colors would blend in the eye and look white – or at least yellowish grey.
To make this happen, I wired up a little hobby motor and soldered a circular brass platform to the top of it to hold up the cake ball. Because the cake ball was going to be pretty small, I just duct taped the motor to the top of the copper tubing arm.
The only gum paste pieces that I made in advance were the nose / beak (I’m not sure of the exact anatomy of a Sneetch), the eyes, and the ball, which I formed around a 3” diameter rubber ball.
The crux of anything Sneetch-related is, of course, the belly star, or lack thereof. My plan was to attempt to use a technique that I saw Mary Maher use on Last Cake Standing – glow-in-the-dark piping gel. By painting the star with club soda, which contains quinine, which fluoresces under blacklight, and implanting a blacklight in the base of the cake, I hoped to be able to make the belly star appear and disappear like in the story.
The first step in bringing this idea to life as to test the club soda. I tried a couple different ways of incorporating the club soda into piping gel, as well as just painting with the pure club soda. The most effective glow turned out to come from the star painted solely with the pure club soda, but overall it wasn’t really as impressive as I hoped that it would be. But I went ahead with it anyway, by cutting a hole in the cake’s plywood base and sticking my blacklight bulb in underneath. I frankly wasn’t confident that the effect would be anything to write home about, but it was the best I could do for a first try. I covered the base with brown pressed sugar to simulate the Sneetches’ beaches.
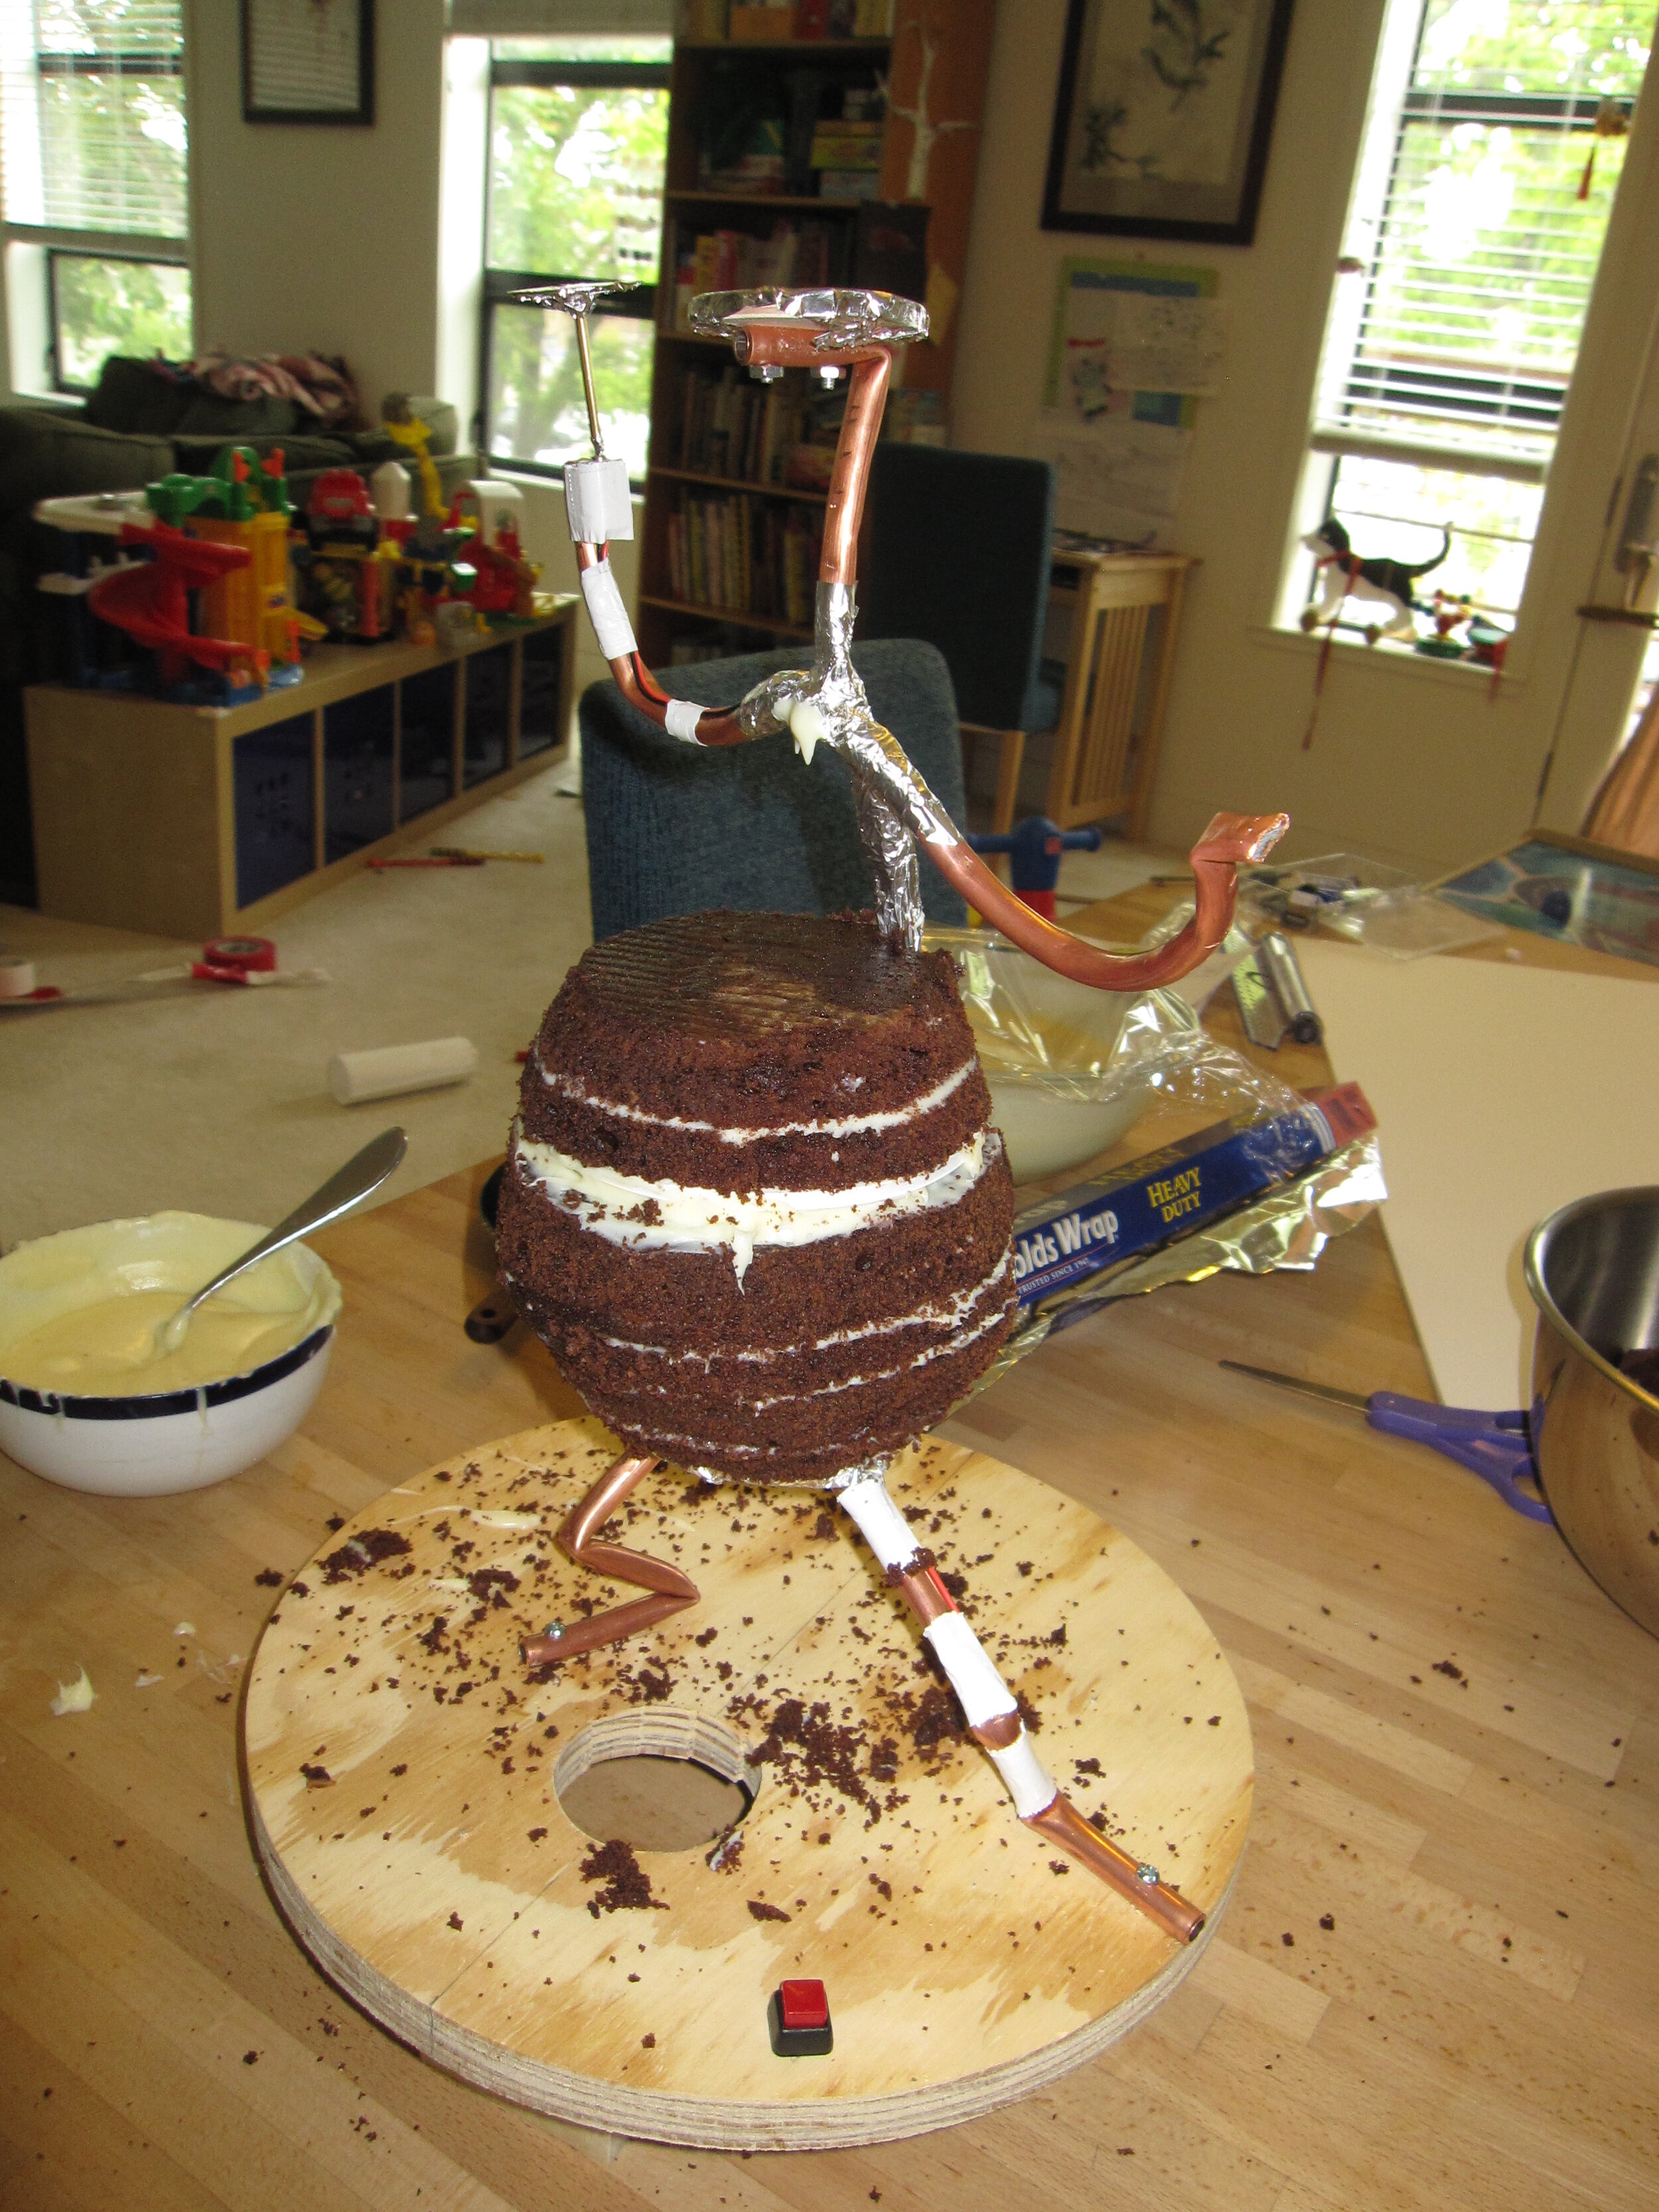
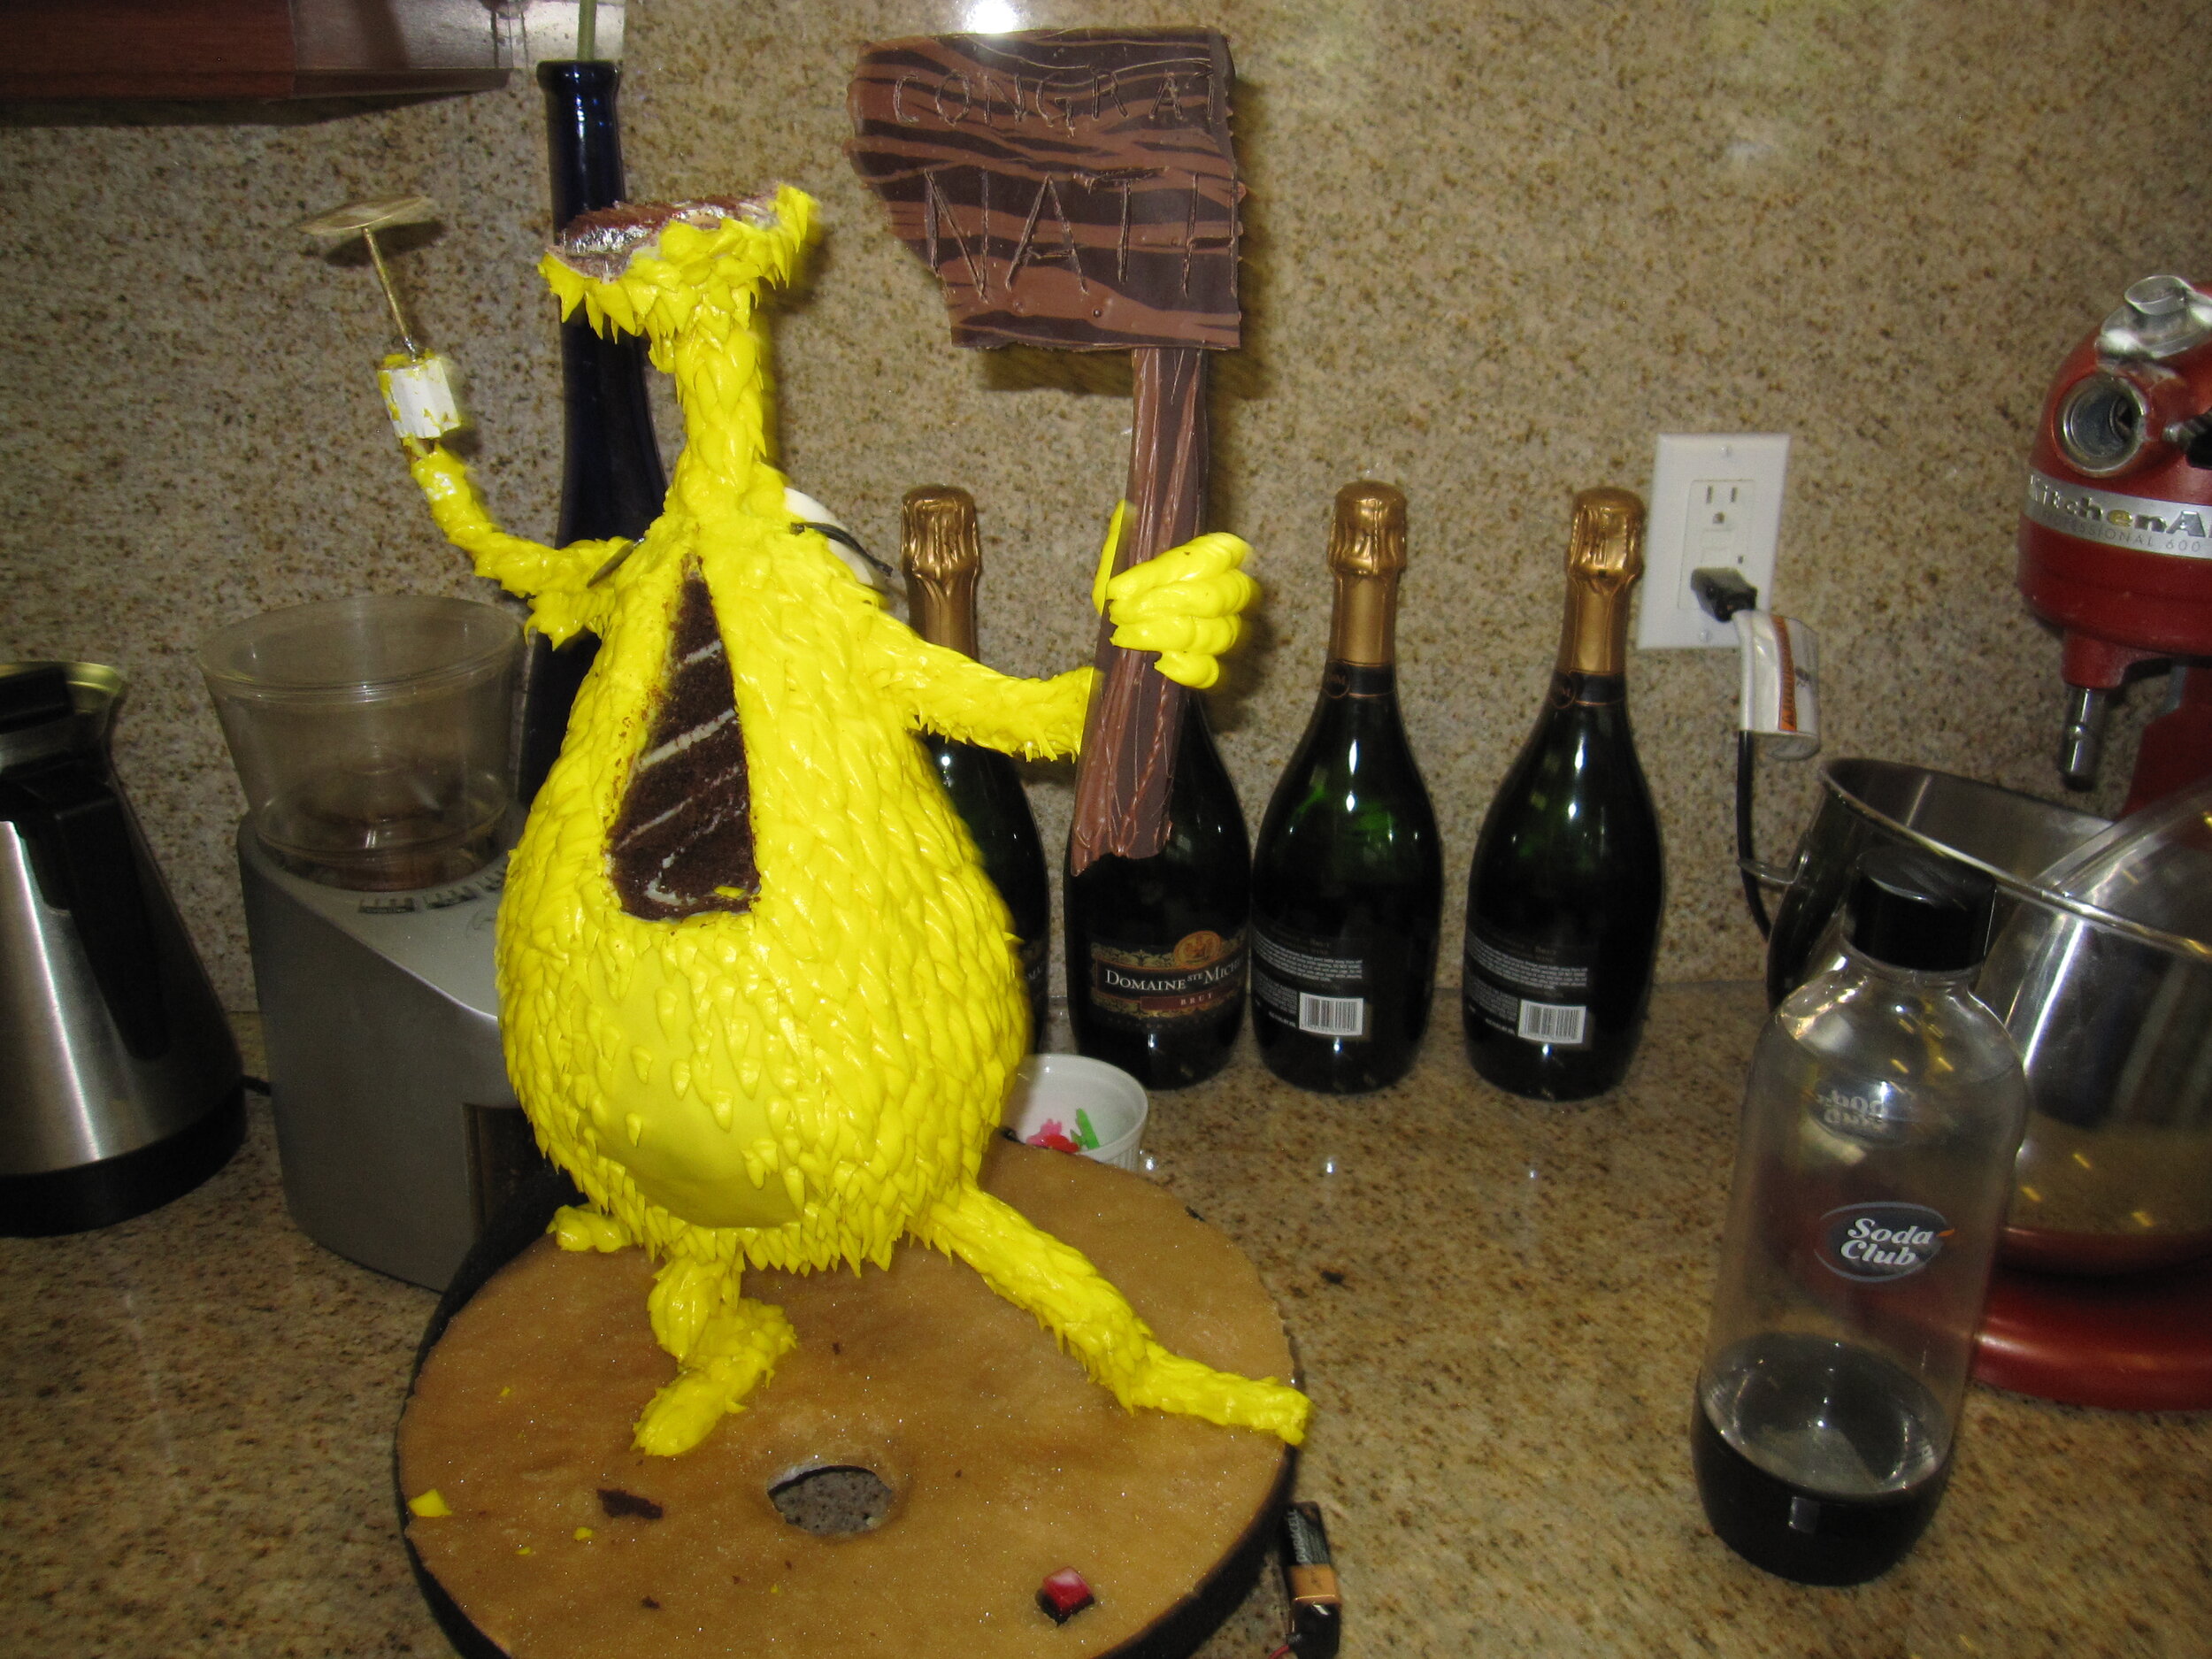
Because I was trying to keep the cake small, I started with just six 6” round cakes – 4 for body and two for the head with enough scrap left over for the ball. I torted and filled them using a white chocolate ganache because I wanted to make sure that the cake had the stability that you get from such a firm frosting.
After I carved the cake into the basic shape, I tried out another a new technique that I saw someone do on Food Network Challenge. I don’t remember who I saw doing this, but I think they called it “spackle.” Basically, you take the cut-off scraps of cake and stir it into some icing so that it makes a pretty thick paste. Then you can use the spackle to really smooth out the surface of the cake and fill in any gaps. I found that it worked perfectly to round out the curves of the head and the butt underneath the plywood bases and to fill in the seam where the body cake was notched out around the copper backbone.
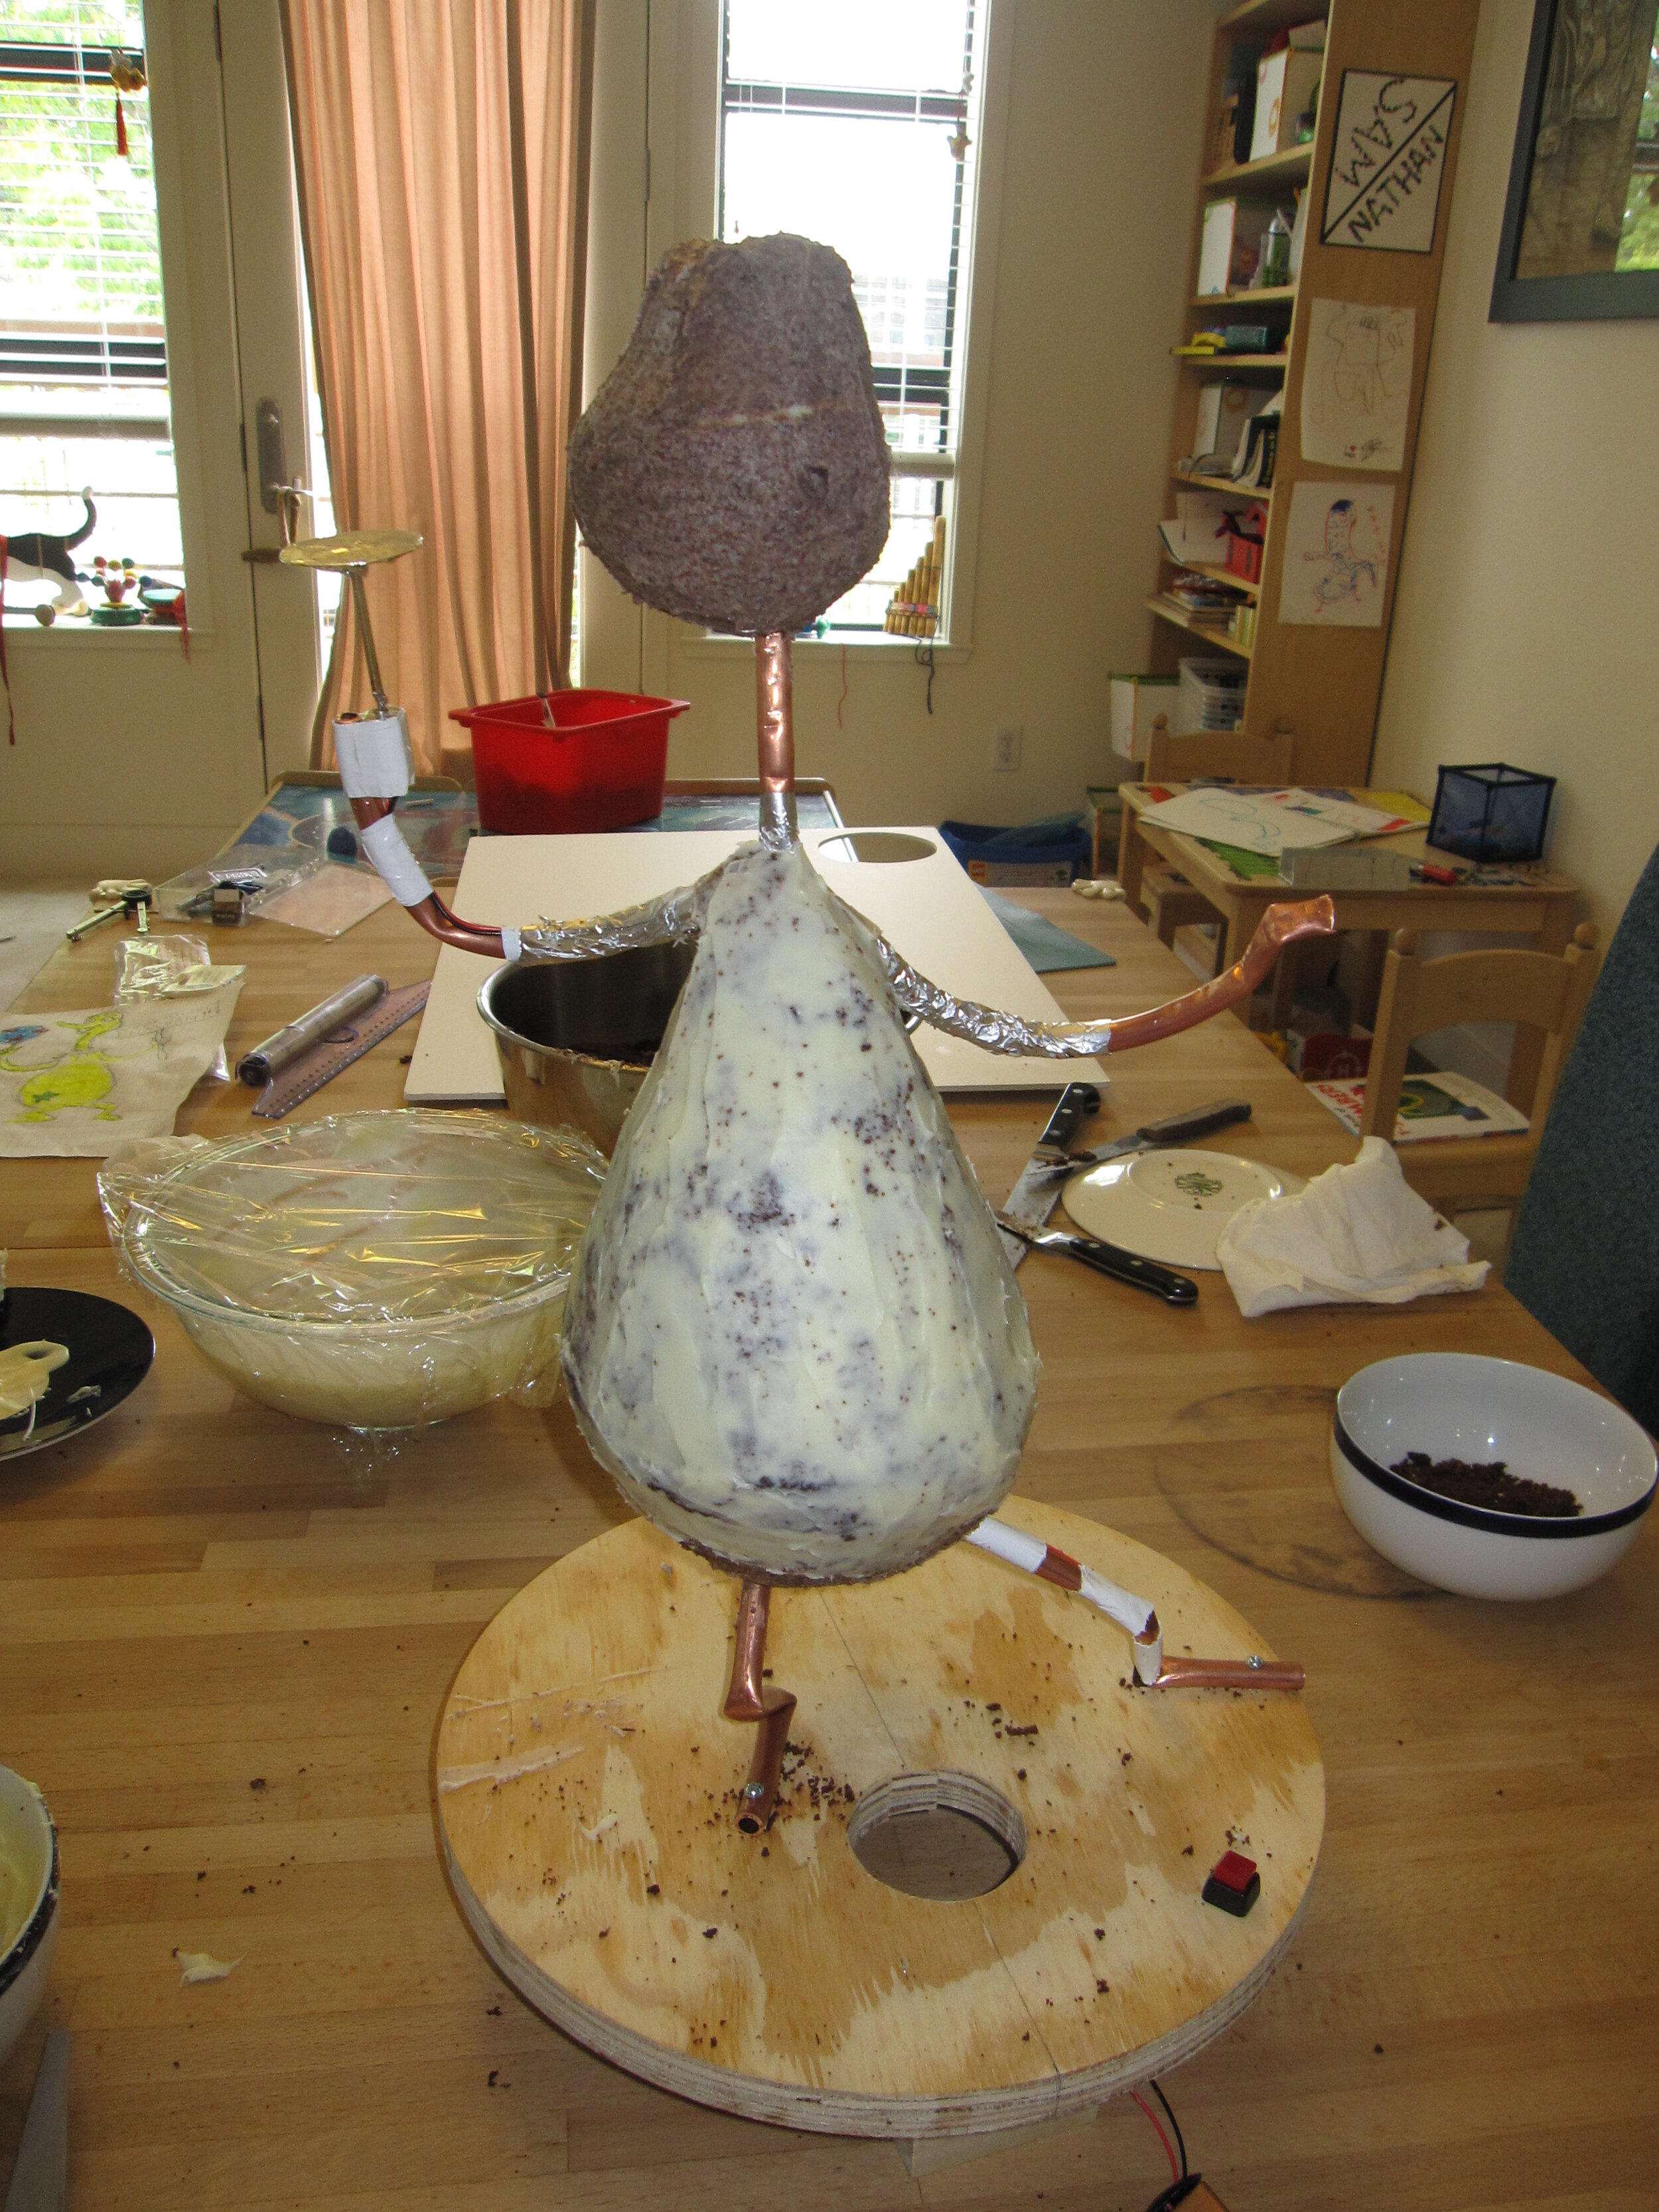
For the fur / feathers (again, I’m not sure what kind of animals Sneetches actually are), I decided to used piped buttercream. I don’t generally use a lot of buttercream. I think I may be using a substandard recipe because I often have trouble with my buttercream breaking down. This time was no exception. My buttercream started out at the right consistency, but with the heat of my hand it rapidly got too liquidly in the piping bag. So I didn’t get the definition I was looking for in some of the Sneetch’s coat.
On the belly area, I used a gum paste panel instead of the buttercream so I would be able to paint on the club soda star. This gave me a little trouble in blending the belly into the rest of the body. I’m still not 100% happy with the result, because real Sneetches’ bellies aren’t discernibly different in texture from the rest of their bodies, but I think I did a tolerable job of keeping it from being too jarring.
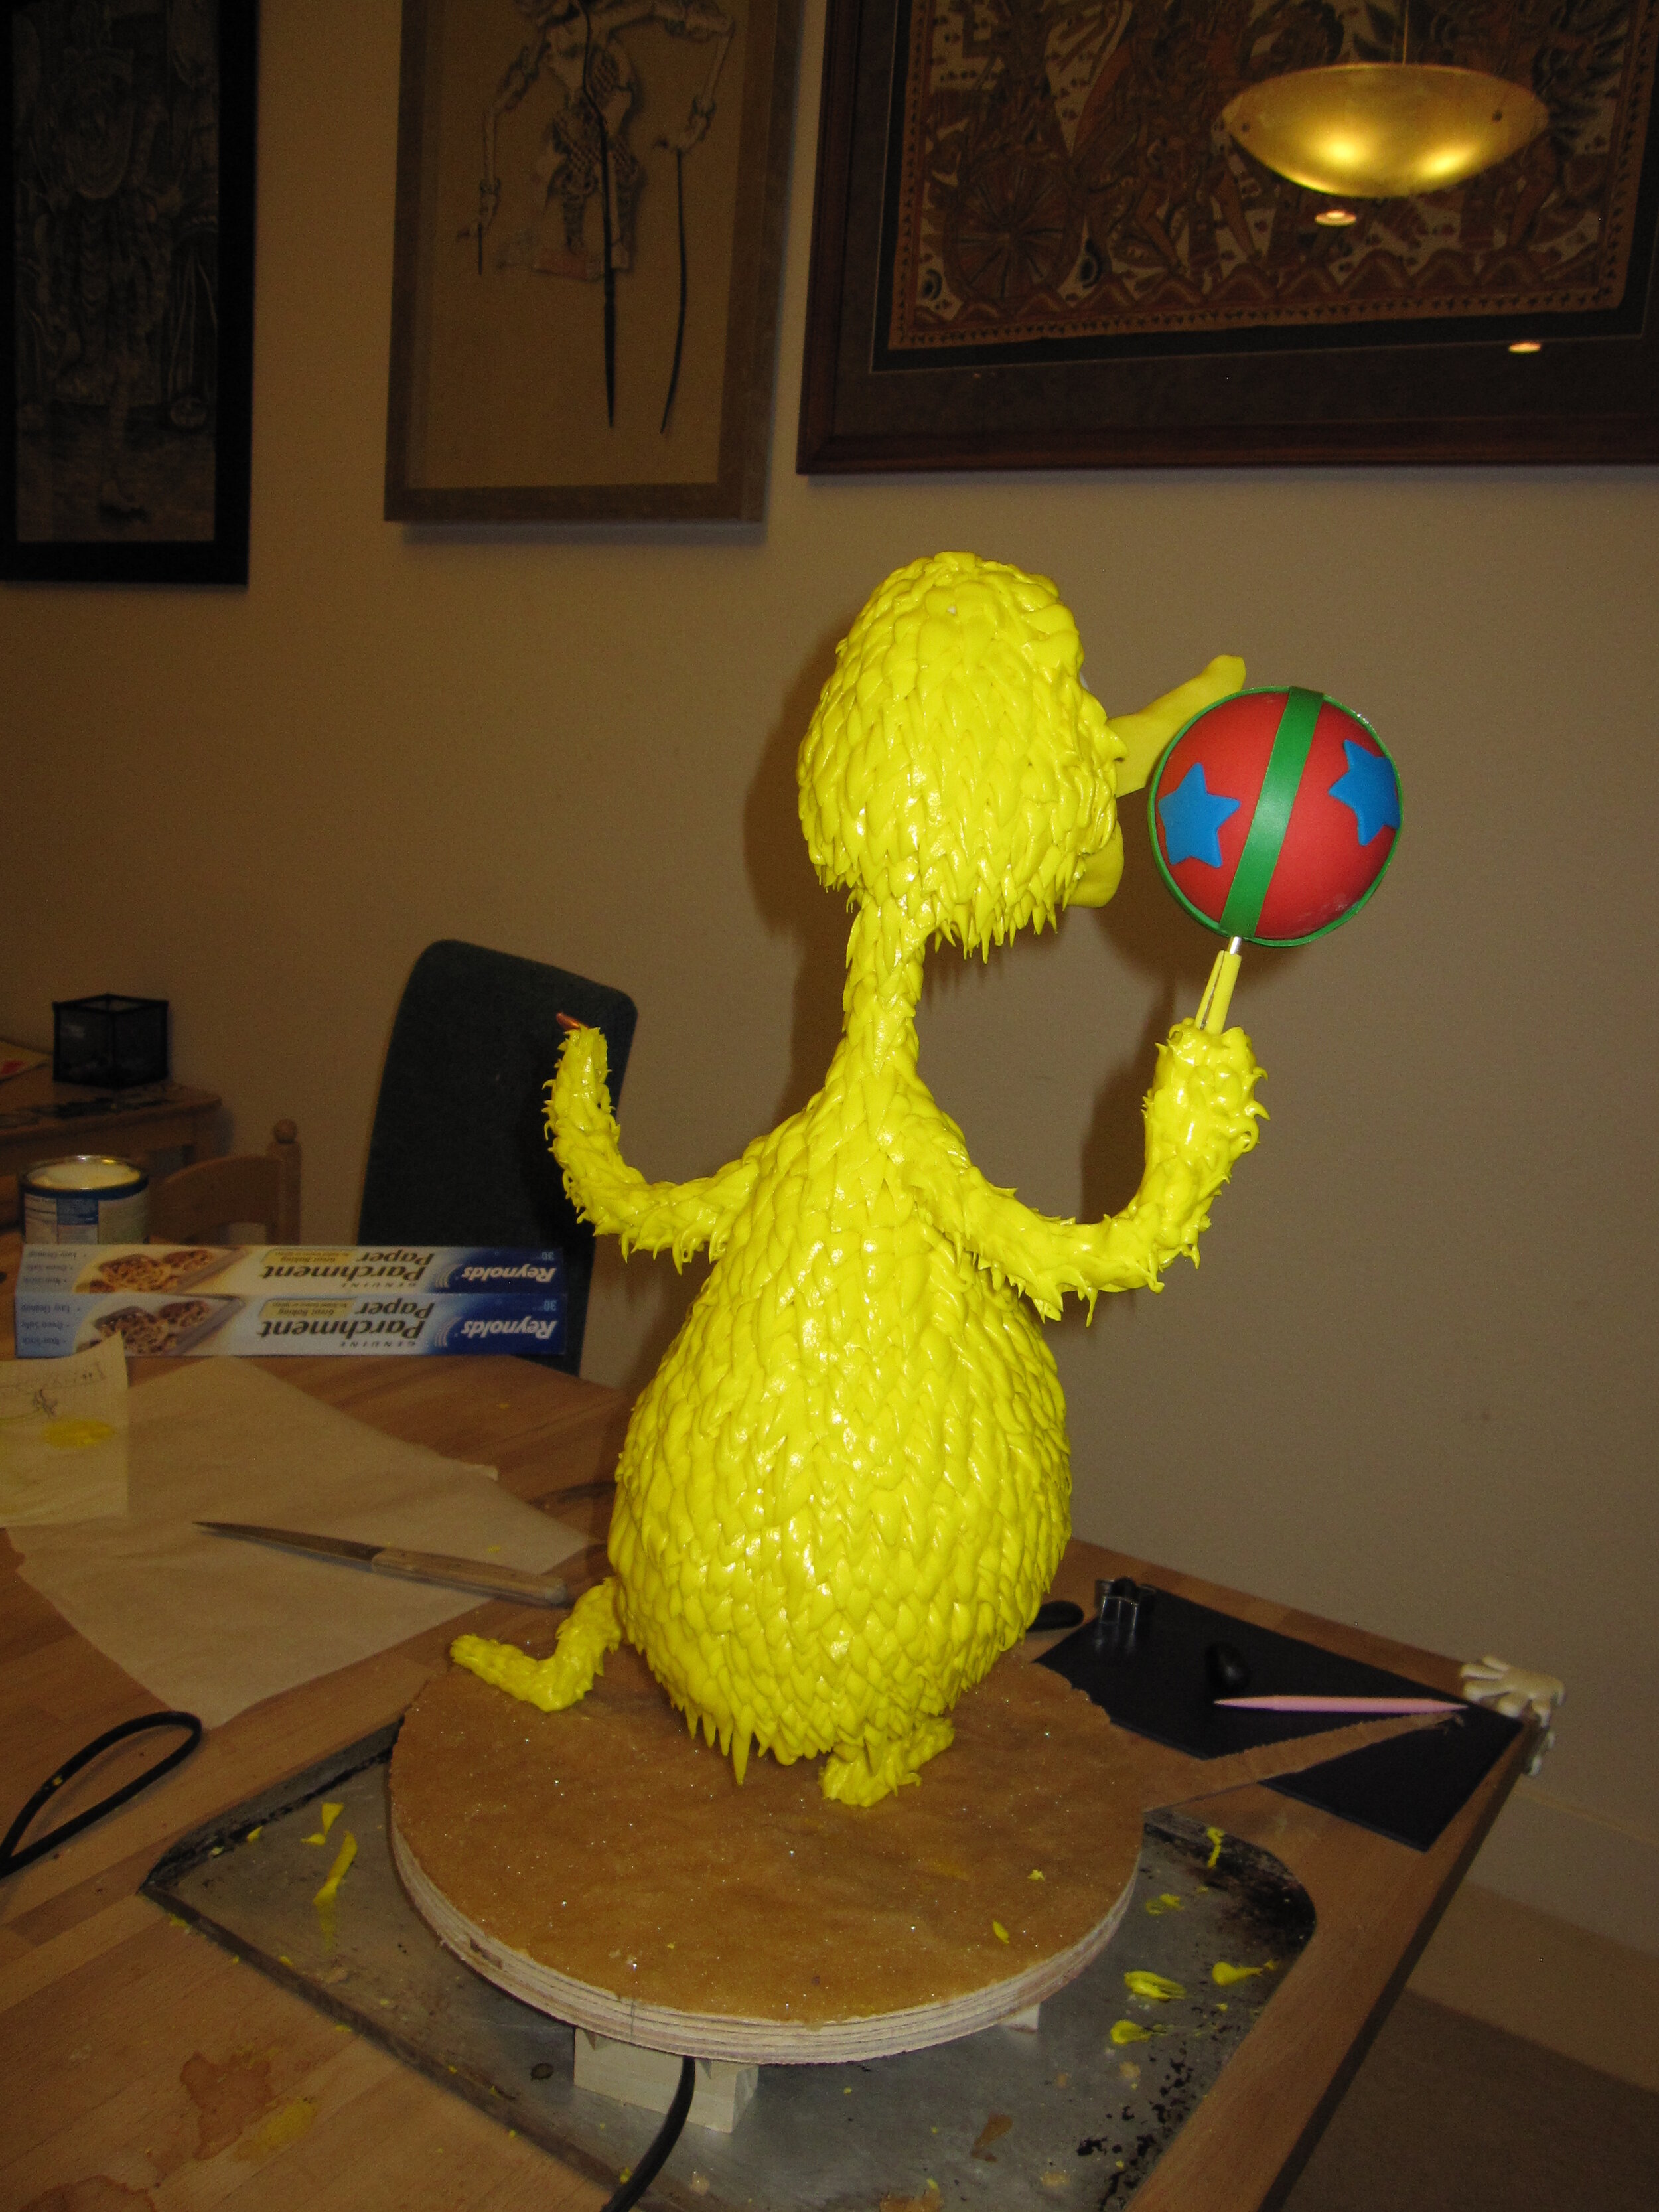
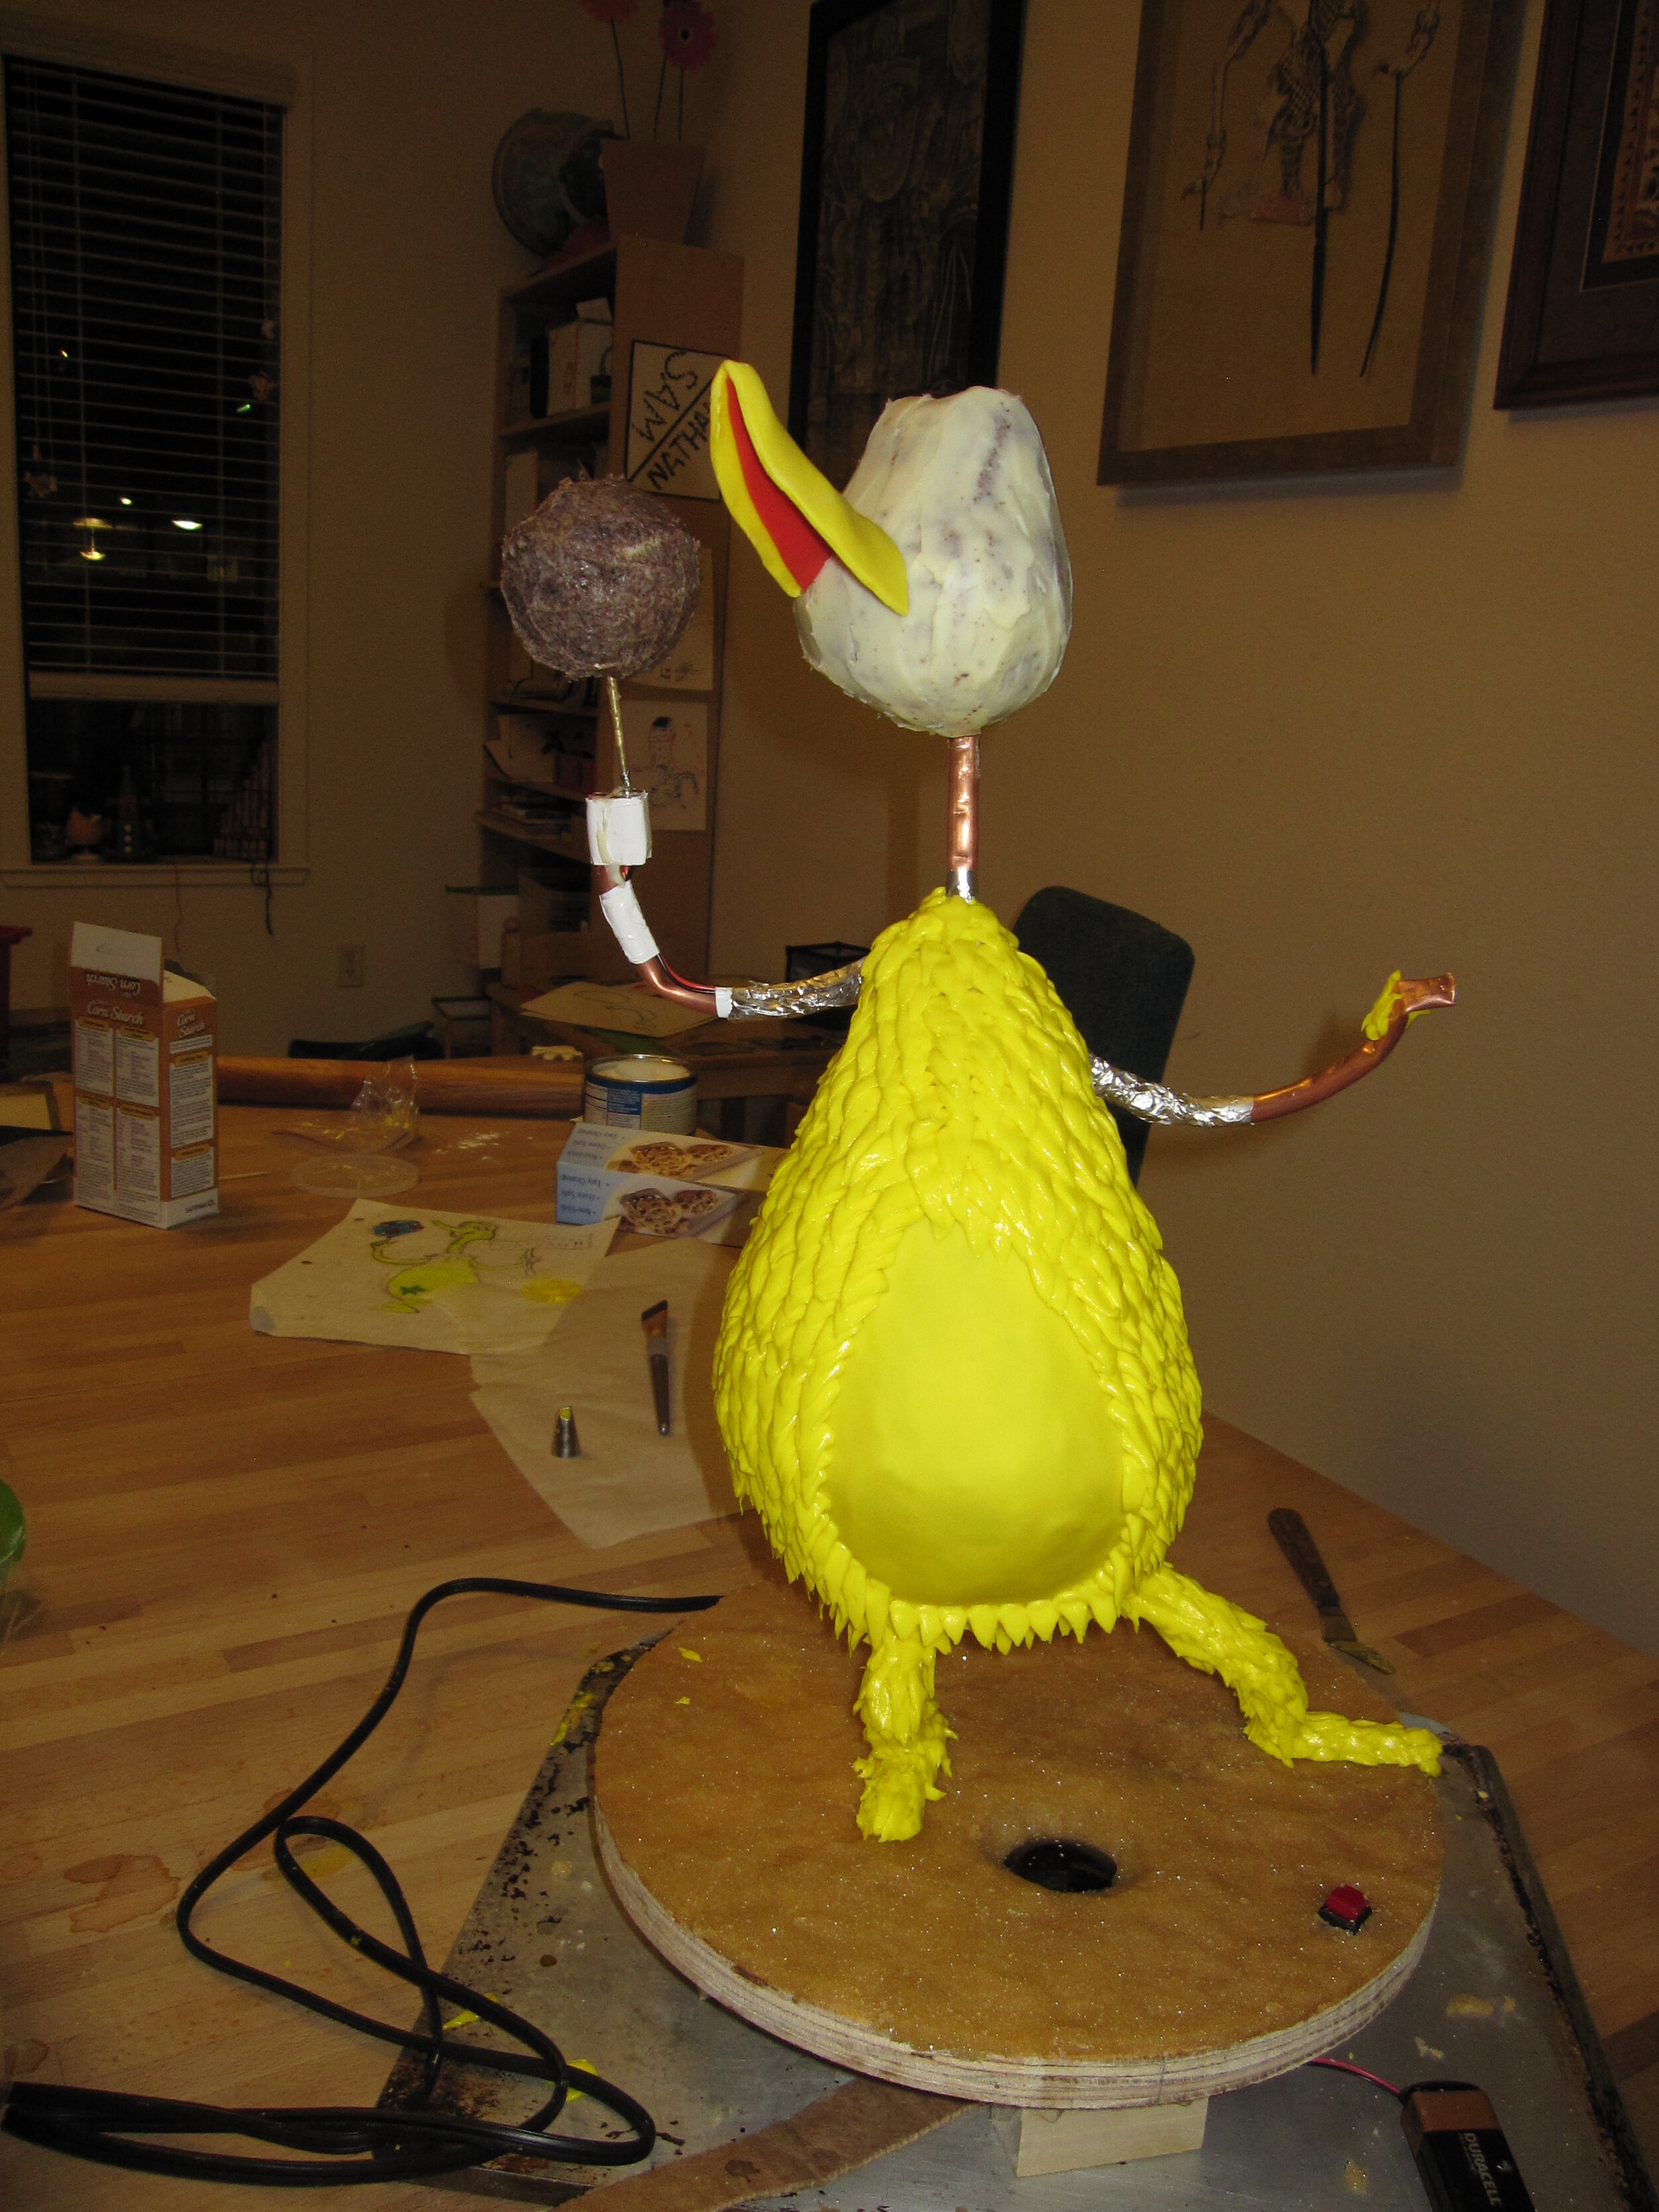
The ball went together quite easily. I made the ball itself in two halves of red gum paste and then hid the seam with a green gum paste stripe. For the blue to complete my attempt at RGB color mixing I added blue stars. I fully expected Alex to criticize my color choice because in my carelessness I had reversed the colors of the ball as seen in the book. In the book, it’s a blue ball with red stars. Alex is normally a stickler for this kind of detail, but she must have really liked the cake because she actually didn’t even mention the ball colors. I also fully expected that my color mixing wouldn’t be fully successful because I didn’t have the food colors that I really needed. I didn’t have royal blue, so I had to use sky blue and I didn’t have emerald green, so I had to use kelly green.
At this point I also realized that I had constructed the spinning mechanism in such a way that not only would the ball spin, but also the finger that it was sitting on. Oops. Obviously this was unacceptable, so I had to whip up a little gun paste sleeve to conceal the spinning tube underneath the ball.
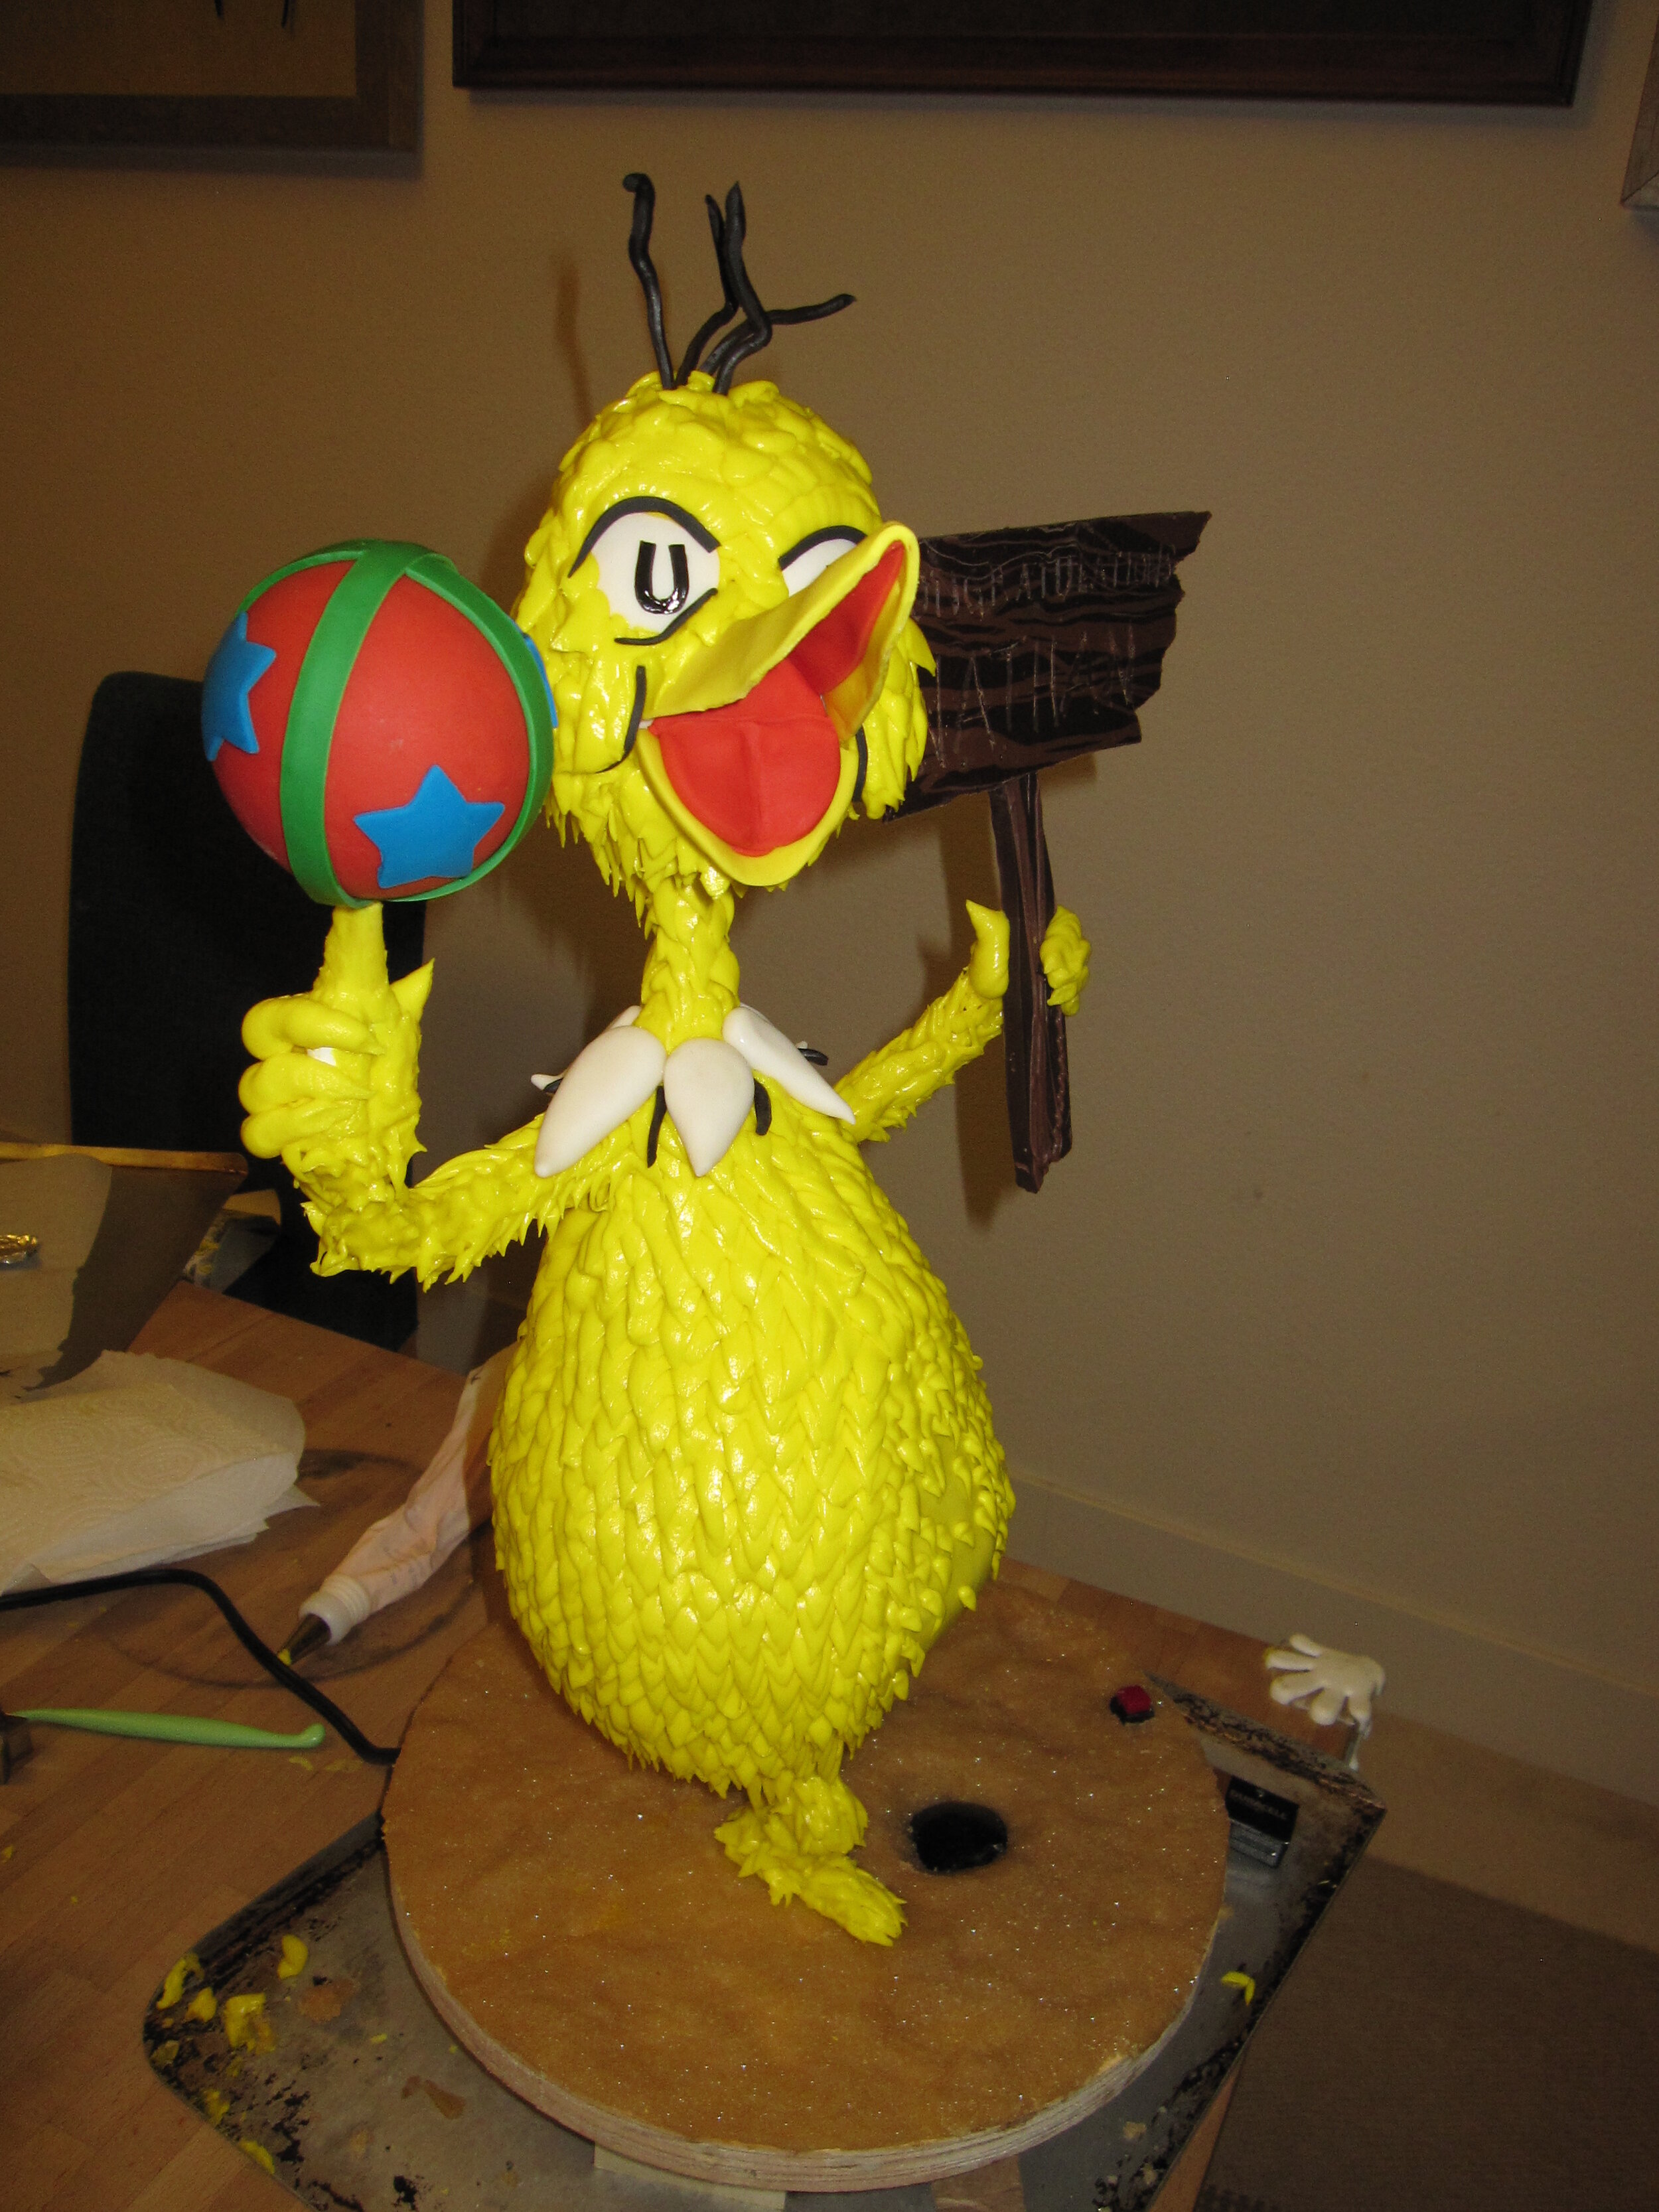
For the final details, I used a combination of gum paste and dark chocolate tinted with black food coloring. The only thing I really wasn’t happy with was the shape of the eyes. Real Sneetches have eyes that are slightly taller than they are wide. Mine wound up wider than they were tall, which made my Sneetch look slightly untrustworthy.
We served the cake at a very small graduation party. Alex was delighted, though she was also deeply concerned with the effects.
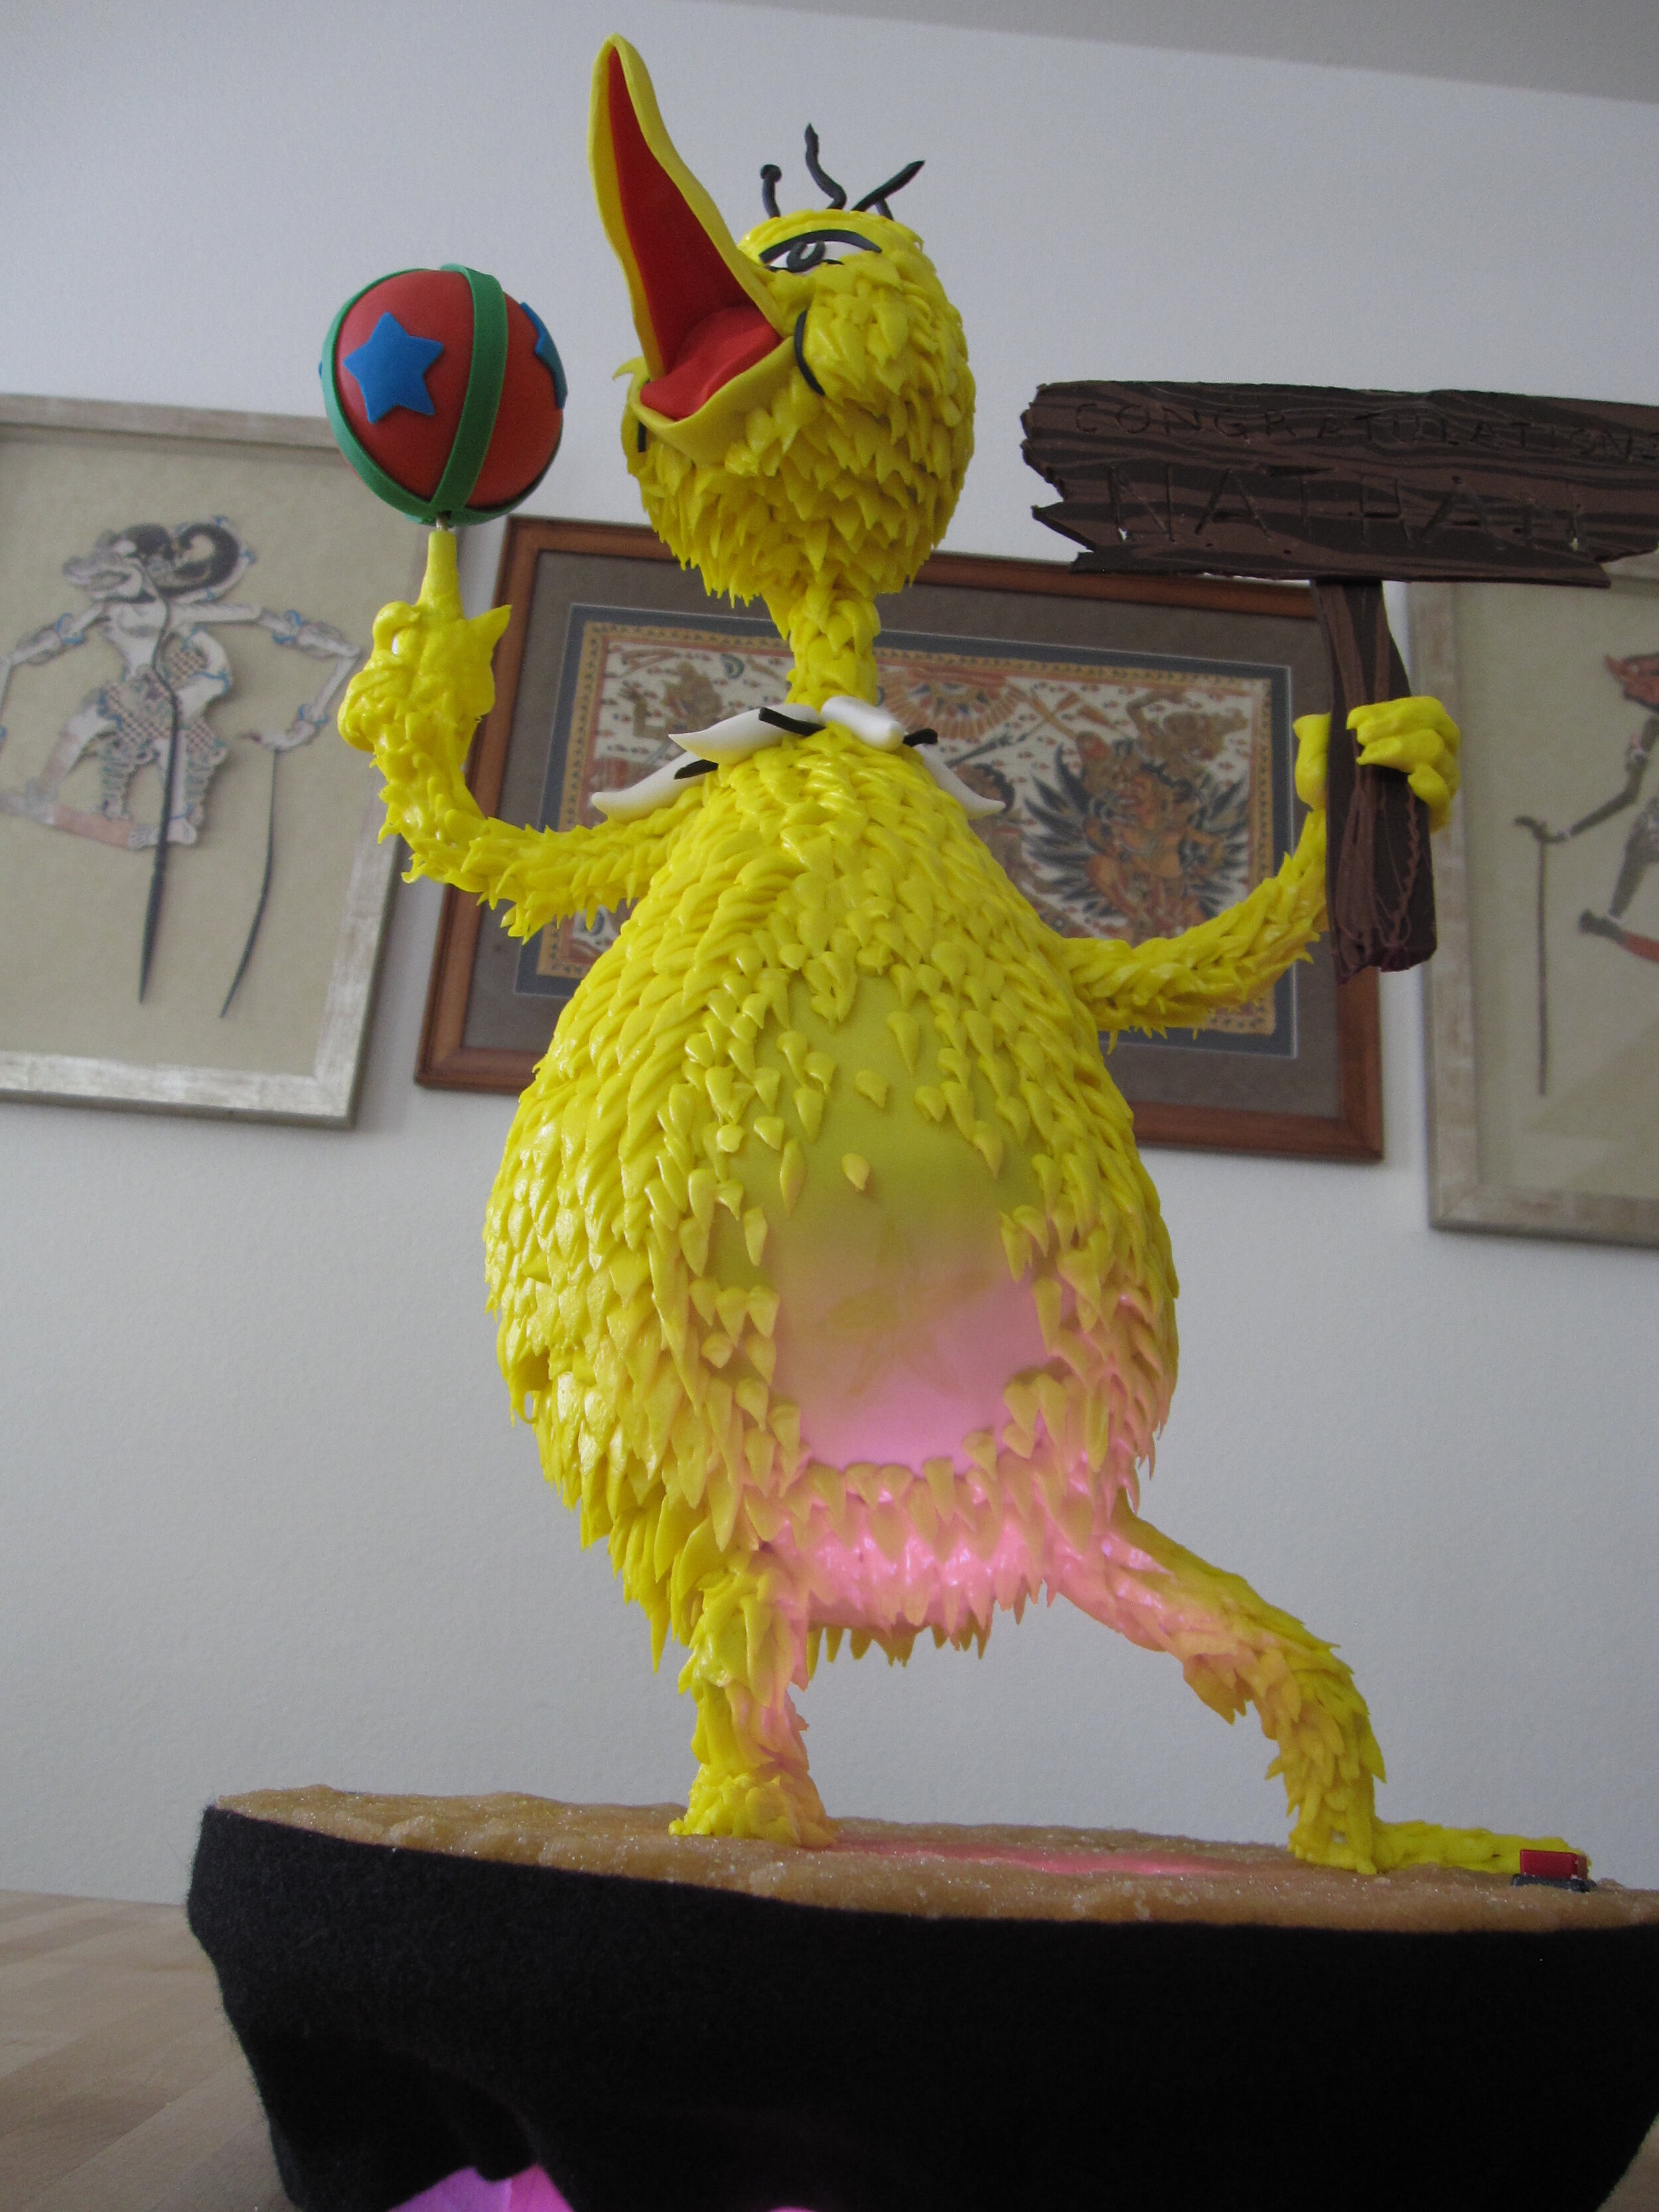
When we plugged in the blacklight it got very hot, which began to melt the pressed sugar above it. So Alex spent the entire few minutes that the blacklight was on begging us to turn it off, apparently under the impression that it might melt the entire cake. The star did show up a little bit in the blacklight, but it certainly wasn’t an attention-grabbing effect.
The ball spun well, though not fast enough to fully blend the colors the way that I had hoped. Again, Alex was deeply concerned, this time because the ball’s rotation shook the entire cake on its thin little legs.
Alex’s little brother Sam was especially delighted with the cake ball. For days after he ate it, he kept asking us, “Where’s-a cake ball?” and we had to keep reminding him that it was in his tummy.
Spider Cupcakes
The spider cupcakes were my first commissioned baking project for my niece's preschool, to be part of the bake sale at their fall carnival. My goal was to show off and entertain myself while not traumatizing the children or horrifying the parents.

The spider cupcakes were my first commissioned baking project for my niece's preschool, to be part of the bake sale at their fall carnival. My goal was to show off and entertain myself while not traumatizing the children or horrifying the parents.
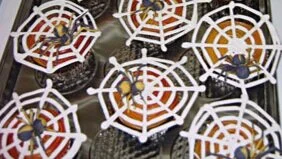
It wasn't actually a Halloween carnival, but it was in October, so I figured that gave me license to make something a bit spooky, though the fact that the audience was two-to-five-year-olds placed some obvious restraints on what I could get away with. Because my time was also fairly limited I decided to go with the restrained elegance of a basic spider and web design.
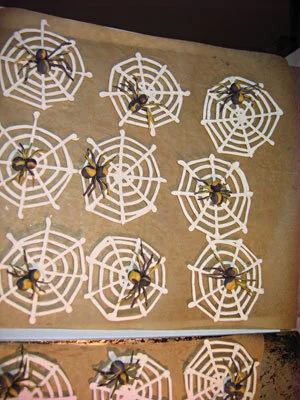
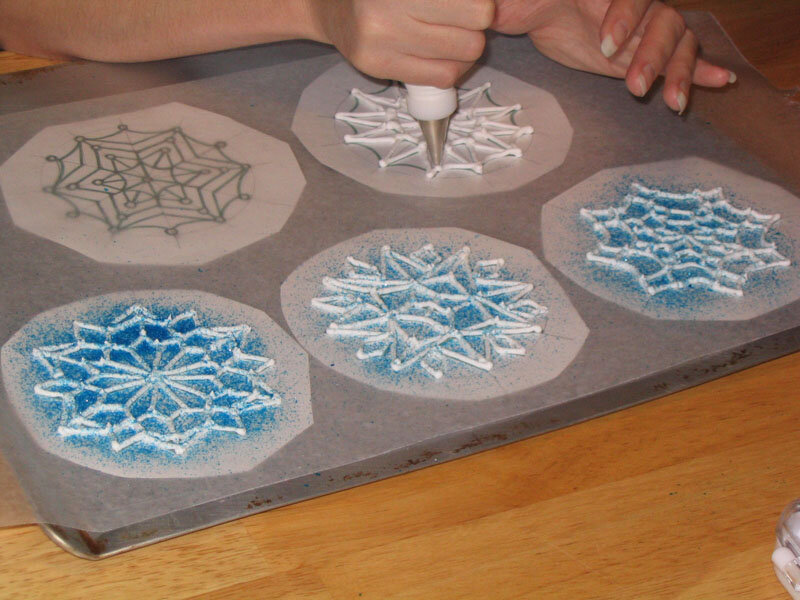
I made the webs freehand with white royal icing from a medium-sized round piping tip. As I learned from the snowflakes on the Season of Love Cake, little kids love crunchy royal icing candy. At first I tried a few methods of making curved webs - piping them over bowls and such - but the results weren't particularly inspiring, so I decided just to make them flat, which was much easier.
For the spiders, I was going for something leaning towards refined and arty (as opposed to ugly and scary or goofy and cartoony). I decided on a simple two-color palette. The dominant color was a deep grey-purple, highlighted with yellow. In the interests of maintaining a clean, elegant look I went relatively minimalist with the spiders. Each one was made up simply of two balls - one for the cephalothorax and one for the abdomen - plus, of course, eight legs. I made all these pieces out of gum paste. For the heads and bodies I started with three equal sized pieces - two purple and one yellow. I placed the two purple pieces on either side of the yellow piece and rolled the whole thing into a ball, resulting in purple spiders with irregular yellow stripes down their backs. For the legs, I just put a piece of yellow alongside a piece of purple and rolled them into very thin, striped ropes, which I cut to length and bent at the knee.
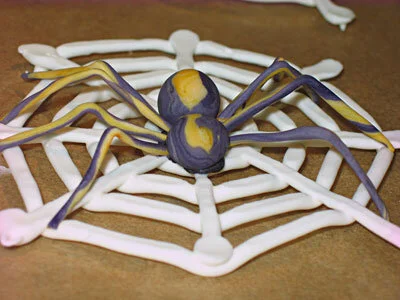
Before I even made the cupcakes, I was able to assemble the spiders on the webs. I'm pleased to say that I went to the trouble of tinting the royal icing that I used to stick the spiders together the same purple as the gum paste. I often find myself to be too lazy to tint my royal icing adhesive appropriately, and I always regret it. The key to assembling convincing spiders is to remember that the legs are attached to the cephalothorax, not the abdomen.

With my spiders settled comfortably on their webs, it was time to make cupcakes. I used some special Halloween cupcake paper cups for most of them, but I ran out and had to use plain silver for the rest. My initial plan had been to frost the cupcakes with buttercream icing the color of fall leaves, and then texture it like a leaf by gently pressing it with a piece of lettuce. That way (I thought) it would look like the spiders had spun their webs in a tree covered with fall leaves. It didn't work at all. The buttercream just stuck to the lettuce and rather than nicely textured, it wound up bumpy and ugly. So I gave up on that idea and just piped the icing in a swirl with a big star tip and then plopped the spider webs on top, which looked fine. Frankly, even if my plan to make the leaf texture had worked, it wouldn't have read very well through the spider web anyway.
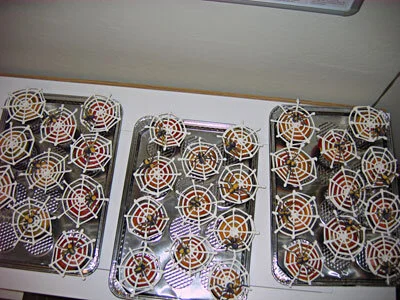
The cupcakes were very well received when I dropped them off at the preschool. I'm told that they were even sold for more money than the standard cupcakes at the bake sale. It's nice when I'm able to combine my love of showing off my cakes with something that actually benefits other people.
Digger Cake
The digger cake was for my niece's second birthday. I figured that two was old enough that I should make the cake relate to her interests, but young enough that I still had majority creative control.
The digger cake was for my niece's second birthday. I figured that two was old enough that I should make the cake relate to her interests, but young enough that I still had majority creative control.
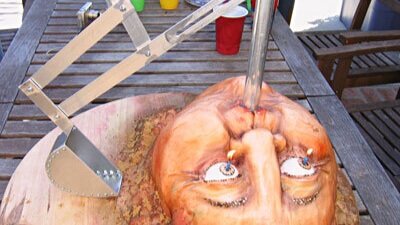
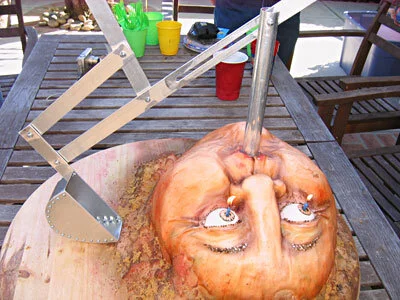
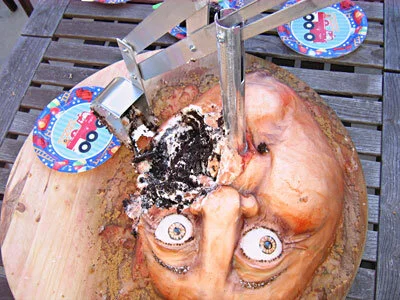
My niece loves trucks. Excavators were an early favorite. So when it came time to make her second birthday cake, I thought she'd enjoy a cake with a digger built right in. To amuse myself, I decided to make the cake shaped like a giant face, rising up out of the dirt with the digger coming out of its mouth. I liked the idea of gouging out the cake's cheek with a big metal scoop.
The first order of business was to make the scoop. I purchased some plans from somewhere on the internet and adapted them a bit to suit my own needs. I needed the digger to be able to reach all parts of the cake, so it had to spin 360 degrees and it had to move from the perimeter of the cake to the center.
Basically, the mechanism I came up with consisted of a 1" ID steel tube 4" long, mounted to a heavy wooden base. Nested inside that tube was a length of 1" OD aluminum tube about 1' in height. This inner tube had a notch cut into the top so that the digger arm could slide up and down within it. Then a bolt ran through the top of the tube and through the aluminum bar that formed the main arm of the digger. This arm had a track cut in it so that it could slide in and out, closer to and further from the digger's pivot point. Connected to this digger arm was another handle, connected in turn to the scoop itself, so that it could be used to rotate the scoop up and down.
As soon as my niece saw the scoop she was determined to master its use, which actually required a fair amount of manual dexterity. Since manual dexterity is not a strong suit of most not-quite-two-year-olds, she had some initial trouble and got very frustrated the first day, but she was determined and within a few days she was using it like a pro. Then I had to reclaim it so that I could actually use it for the cake.
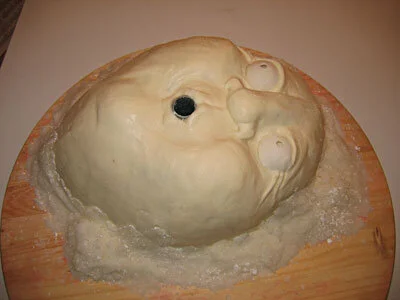
I used chocolate cake, of course, since that way it would look like dirt when we scooped it up. I started with some oval cakes and carved them into a big, sort of cartoonish, oversized face shape. Since it was for a child's birthday party and it was going to be gouged out with a metal scoop I didn't want it to be 100% realistic. That seemed like it would be too macabre for the occasion.

Because I wanted it to be easy to dig, I wanted to ice the cake with standard buttercream, rather than fondant, which I thought would be difficult to tear through with the scoop. So I used a nice thick coating of buttercream icing and smoothed it with a damp paintbrush. For the eyes, I made some little gum paste half spheres and cut out the irises so I'd have somewhere to stick the candles. With those in place, I piped more buttercream on to get the details of the eyelids, lips, and nose.

Then, to make it look like the face was rising up out of the dirt I made a batch of pressed sugar, which is just regular white sugar with a bit of water mixed in thoroughly. It can then be pressed into a mold, or, as in this case, shaped by hand. I used it to build up a hill of sugar around the face. For good measure, I put a few blobs of dirt onto the face itself, as if the face had just risen from the earth and hadn't yet shaken off the detritus.

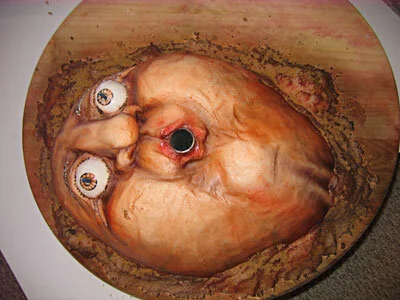
My next step was to airbrush the face. I started by putting in some blue veins as an undercoat, then built up shades of flesh tone, red, and brown, then some dark purple for shadows. I wasn't altogether happy with how the dirt looked, so I sprinkled on some brown sugar to give it more variety and depth.

I hadn't masked off the gum paste eyeballs, so I had to carefully wash off the airbrush color with a damp paintbrush. For eyebrows and eyelashes I piped on some royal icing detail, then painted in irises, painted the eyebrows and lashes, and painted on some white highlights on the eyes and lips.

With two candles stuck through the eye holes and the aluminum digger planted in the mouth, I was done.
My niece loved it, and even helped use the digger to serve our guests. And once the cake was gone, she still had a digger to use in her sandbox.
Heart Cupcakes
In the past, my heart-shaped cakes have tended to get bigger and bigger, resulting in things like a heart the size of a small dog and the infamous Thoracic Cavity Cake. This year I decided to buck the curve and make very small, individual-portion-sized heart-shaped cakes.

In the past, my heart-shaped cakes have tended to get bigger and bigger, resulting in things like a heart the size of a small dog and the infamous Thoracic Cavity Cake. This year I decided to buck the curve and make very small, individual-portion-sized heart-shaped cakes.
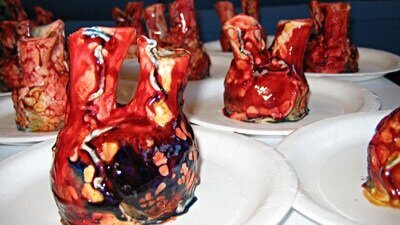
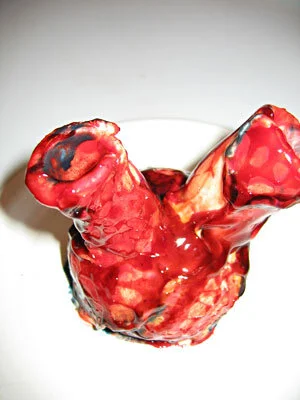
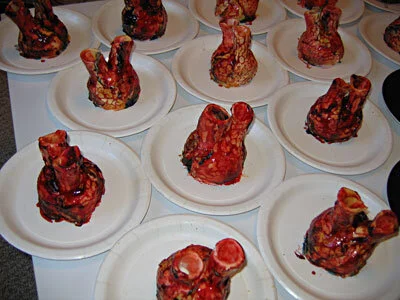
There were 18 people coming to Pumpkinfest, so I needed to make 18 little, cupcake-sized hearts. I also wanted them to bleed because what would be the point of making heart-shaped cupcakes that didn't bleed? I thought it would be a nice touch to have both red blood (arterial) and blue blood (venous), so I made a batch of fresh raspberry sauce and a batch of fresh blueberry sauce. Both of these sauces are very delicious and very easy to make. The only ingredients are berries, sugar, and lemon juice, mixed up in a blender and strained through a sieve to remove the seeds. The blueberry sauce was perhaps less blue than it might optimally have been, but I think we all know how hard it is to find appetizing blue food.
To contain the sauces, I made two gum paste cylinders per cupcake, for a total of 36. The idea was that one of them would be the aorta (full of red blood) and the other the superior vena cava (full of blue blood). Mounted vertically on the top of each cupcake, they would hold the fruit sauces until the cupcakes were cut into, at which point they would spill their gory contents over the plate.
For the cake itself, I started with cupcakes, which are relatively heart-shaped to begin with. I removed the paper from each one and set them in the middle of white paper plates, the better to emphasize the soon-to-be-spilt fruit sauces, and covered them with a thick later of chocolate buttercream frosting.
I didn't want to use fondant to cover and sculpt these hearts because I thought that the proportion of fondant to cake would be overpowering at cupcake scale (not that it probably makes that much difference anyway since most people peel the fondant off before they eat the cake.) For some reason, I also decided not to use buttercream frosting. I don't recall why I made that decision because in retrospect, buttercream would clearly have been the way to go. Instead, I decided to use white modeling chocolate. I didn't do a very good job of making the modeling chocolate, so it came out very hard and a little grainy. I used it anyway. I rolled out circles of the modeling chocolate to drape over the whole cupcake and then shaped it a bit with some gum paste sculpting tools. Then I used royal icing to pipe on detail veins and attach the cylinders sticking off the top.
Because I had used modeling chocolate I needed to color the hearts with powdered food coloring mixed into cocoa butter. Water-based colors don't stick to chocolate. To get the hearts nice and shiny, I then painted on a layer of red- or blue-tinted piping gel. Because the piping gel is water-based, it didn't spread smoothly, but rather beaded in rills and pockets, which I thought was actually kind of a nice effect.

Right before serving, I filled the tubes with my two fruit sauces.
Reactions were mixed. Adults more or less agreed that the cake was tasty, but that the modeling chocolate was too thick, hard, and grainy to eat. I really should have used buttercream. One little boy, who had been promised a cupcake adamantly refused to accept that these were, in fact, cupcakes in a slightly different configuration and had to be supplied with a normal-looking cupcake that we fortunately had in reserve. His little brother, on the other hand, took to the little hearts immediately, breaking off the aorta and jugular vein and gleefully drinking the contents like a proper little cannibal.

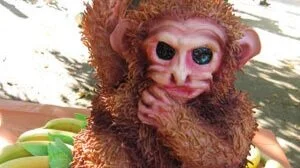
Poo-Flinging Monkey Cake
I made this creepy poo-flinging monkey cake for our little friend Isaac's first birthday party. This was a special request by Isaac's mother, who was also the recipient of the dancing yeti wedding cake.

I made this creepy poo-flinging monkey cake for our little friend Isaac's first birthday party. This was a special request by Isaac's mother, who was also the recipient of the dancing yeti wedding cake.
What does every little boy want for his first birthday? That's right - a cake shaped like a creepy-looking monkey! And what's even better than a creepy-looking monkey cake? That's right - a creepy-looking monkey cake that flings poo, just like a real monkey.
OK, maybe that's not exactly what my little friend Isaac would have requested for his first birthday cake, but he can't talk, and that is exactly what his mom requested.

The first step, of course, was to figure out exactly how the poo mechanism should work. My first thought was to make it a sort of catapult, but thenI realized that it would be more fun if it could fling poo repeatedly without a complicated reset of the mechanism. So I decided to go with a spring-loaded hinge. I made an armature for the arm and hand out of wood and brass tubing - I felt that it was necessary to have a metal structure within each individual finger so they wouldn't break off when I pulled the arm back to release the poo. The arm was connected via the spring hinge to a post, which was in turn secured to the heavy wooden base of the cake.

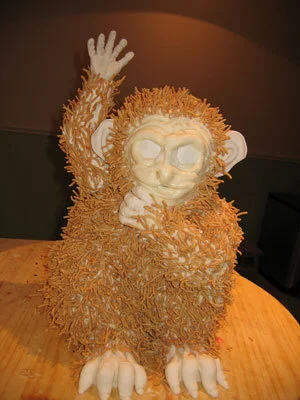
Before I made the cake, I sculpted the arm out of gum paste and fondant around the wooden armature, which meant that I had a sort of ghostly white monkey arm on a stick. I did load it up with some raisinettes (aka cake monkey poo), which it flung quite effectively, so I was ready to move onto the cake.
My sister was kind enough to actually bake the cakes for me. Fortunately she baked more than I asked her to, because the amount that I asked her to make would not have been enough. I had to cut notches in each tier and slide them into place around the arm support post. When I was done, I had what appeared to be a squat, one-armed robot, at least until I carved it into a more monkey-like shape.

This cake marked my first experiment with using rice krispie treats to sculpt additively onto my cakes. It's a technique that I learned, like so many others, from reading Colette Peters' books. My plan was to sculpt the tail, haunches, and second arm out of rice krispie treats. Not having ever made rice krispie treats myself, for some reason I thought they solidified really quickly. "I'll have to work fast," I thought, "but once I get them into shape they'll hold really well." Yeah, it didn't work out that way atall.

I'm not sure whether it was because it was really wet out or just because that's the way rice krispie treats are, but they didn't behave at all the way I expected them to. As I started sculpting them, they were just gooey and collapsing everywhere. I hollered for my sister to bring me skewers! Hurry! Hurry! Yikes! I stuck in skewers, here, there, everywhere! Anything to hold those rice krispie treats together and to hold them in place. Pretty soon I had a proto-monkey which appeared to be undergoing a truly ghastly acupuncture session. But at least it had arms and legs. I added some detail to the hand and feet with fondant.
I made the facial features by piping buttercream and sculpting it with a paintbrush. It was kind of hard to make it look like a monkey rather than like a sort of withered old man, but I think I did OK. I was using one of my baby niece’s animal picture books as a reference. It was very nice of her to share it with me.
The ears I had made a few days in advance out of gum paste with skewers embedded in them so I could just stab them into place in the cake.
What's the point of a poo-flinging monkey without gross, matted fur? It would have been easy to make the fur out of frosting, but that tends to be too cartoonish for my taste. So I came up with a different plan - those little crunchy chow mein noodles. I know, I know it sounds a little weird. But potato chips and chocolate can be good. Those little shoestring potato snacks and chocolate can be good. I though it was workable. And they looked GREAT! It took me quite a while to cover the entire monkey and I seriously underestimated the amount of noodles it would take. Fortunately, there was some confusion as to who was buying how many packages of noodles, and we wound up buying approximately twice as many as I thought I would need. Which turned out to be just barely enough.

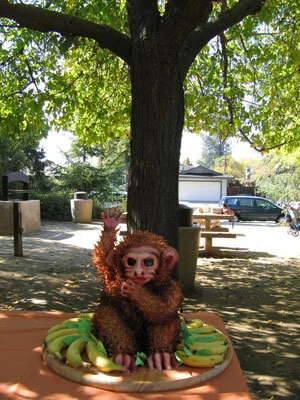
The noodles were already a pretty good base monkey color, so I just airbrushed in some mottling and some shadows. I painted the eyes with black food coloring and then went over that with clear piping gel to get the necessary depth and sheen. With that, the monkey itself was done. Left to my own devices I probably would have left it at that, but fortunately my sister gave me the kick in the ass that I needed to make it a better presentation. She came up with the idea of surrounding the monkey with bananas. So we bought about sixteen bananas and I made some gum paste leaves to fill in the gaps. It looked quite regal really, like he was a monkey king sitting on his banana throne.
The party was in an outdoor park, which was a great setting. We arranged the monkey on a picnic table underneath a big tree, with a convenient bowl of raisinettes to use as poo. The green leaves of the tree complimented the green leaves on the cake perfectly and I got to bask in the compliments of the guests at the party in the next picnic area as well as those of the guests at our party. I actually went to the party thinking that the cake was entirely innocuous and mainstream, at least compared to all my other cakes. But the unanimous verdict was that it was actually quite creepy, primarily due to the huge, hypnotic, glassy eyes.

The weight of all the gum paste and frosting and chow mein noodles on the arm made the poo flinging a little more sluggish than it was in my initial tests, so the monkey only threw his poo about two feet in front of him. Oh well, next time maybe I can get a better angle of release.
Cutting the cake was very funny because I had to cut it away around the arm mechanism. We ended up with a monkey arm hovering above a field of cake and banana carnage. The verdict on the chow mein noodles with the cake was mixed. Some people thought it worked quite well - a bit of crunch, a bit of salt - while others just found it weird and incongruous and ate around it. The birthday boy himself didn't weigh in on that particular issue, as he doesn't have enough teeth to get any of the chow mein noodles, but he certainly seemed to enjoy the cake. No one's quite sure how he got some on the back of his head, though.


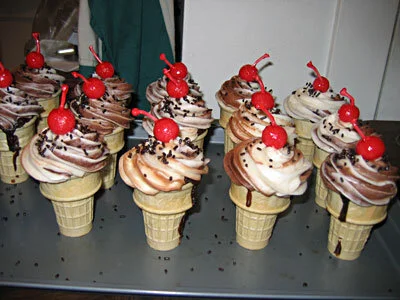
Ice Cream Cone Cupcakes
When my sister and I were kids our mom used to make us ice cream cone cupcakes. These are my grown-up version.
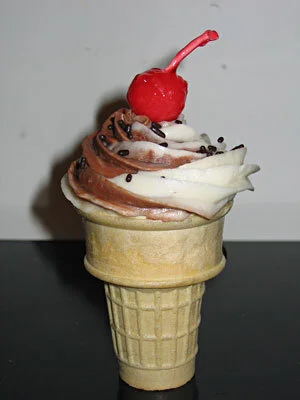
When my sister and I were kids our mom used to make us ice cream cone cupcakes. These are my grown-up version.
The basic technique of the ice cream cone cupcake hasn't changed since Mom made them for us thirty years ago. Any cake recipe works fine. I used my favorite chocolate recipe. Set up the cake cones (the kind with the flat bottom) on a baking sheet and carefully spoon in the batter, filling each one about three quarters full. I was not as careful as I should have been and wound up with some drips down the sides. On the plus side, the drips get dark when the cupcakes bake and make it look like the ice cream is melting and dripping down the side of the cone.
Ideally, once baked, the cupcakes will wind up with the cake doming up nicely above the lip of the cone. Once they're cool, they're ready to frost. Of course, they're fun and delicious any way you decorate them. I wanted to try to make mine look like real ice cream cones.

I mixed up a batch of buttercream frosting, half vanilla and half chocolate. Then I got a big piping bag with an extra large star decorating tip in it, to imitate the shape of ice cream that comes out of a soft serve dispenser. To mimic the pattern of vanilla and chocolate that you get on a soft serve swirl cone, I filled one side of the piping bag with the vanilla frosting and the other side with the chocolate. When I piped the frosting onto the cupcakes in a spiral, starting at the outside edge of the cone and moving inwards and upwards, it created something pretty similar to the classic swirl cone design.
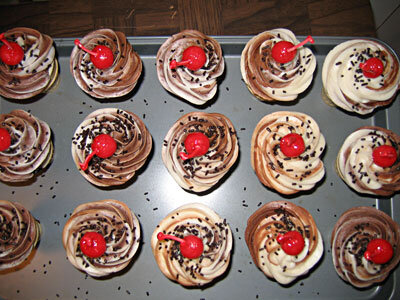
To make them look even more like real ice cream cones (and because jimmies are good in that take-you-back-to-childhood kind of way) I added some chocolate jimmies on top. I also made maraschino cherries for the top by rolling out balls of pink marzipan, sticking in a premade royal icing stem and coating the whole thing with bright red piping gel. I suppose that I could have used real maraschino cherries, but I was concerned that they would be wet enough to dissolve the frosting. Plus I think marzipan tastes better than real maraschino cherries.
I was very pleased with how my ice cream cone cupcakes looked, but they did suffer from the classic flaw of all ice cream cone cupcakes - you have to eat the top first, so by the time you get to the bottom of the cone, there's no frosting left. I recall having this issue in my childhood as well. In this case, the contrast was exacerbated by the fact that the tops of the cupcakes had almost too much frosting because I had piped it on quite thickly in order to get the swirl cone aesthetic.
If I were to create these again, I would therefore make sure to fill the cupcakes inside the cone either with some kind of frosting or with some other custard or cream filling. I would think I could accomplish this just by jamming a decorating bag with a nice big round tip deep into the cones once they're cool, and squeezing. At least that looked like what they did when they filled their cupcakes on the Food Network Cupcake Challenge.
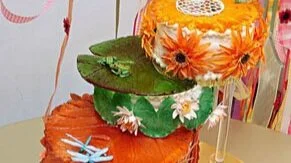
Seasons of Love Cake
Two of our dearest friends were getting married and we got to make the cake! Being the incredibly brave and trusting souls that they are, they gave us a free hand. They didn't have any idea what the cake was going to look like until they showed up for the wedding! If that's not trust, I don't know what is!
This is by far the most complicated cake we've made. My sister and I spent the entire day before the wedding working on it (about 18 hours, each) but during the week before, I spent about 50 hours and my sister (due to her day job) spent about 30 hours working on it. That all adds up to about 120 woman-hours and an incredibly fun project.
We didn't keep close track of the cost, but we estimate we spent about $500 on supplies, including all the ingredients, gum paste, cake pan and leveler, and the silicone mold compound for the sugar plates (which was the biggest single expense).
Introduction
Two of our dearest friends were getting married and we got to make the cake! Being the incredibly brave and trusting souls that they are, they gave us a free hand. They didn't have any idea what the cake was going to look like until they showed up for the wedding! If that's not trust, I don't know what is!
Naturally, being who we are, we came up with an incredibly complicated and time-consuming concept. We called it the Seasons of Love cake, because our idea involved each tier representing a different season of the year and of the couple's life together. We also tried to flavor each tier to match the season it represented. All four tiers were made with the same chocolate cake recipe, but my sister came up with the great idea to add different flavorings to the batter for each season. We also used a different filling for each layer, as follows.
Winter - Chocolate cake with chocolate chips added to the batter with a mint chocolate ganache filling
Autumn - Chocolate cake with hazelnuts added to the batter with a chocolate hazelnut spread filling
Summer - Chocolate cake with orange zest added to the batter with a cherry jam filling
Spring - Chocolate cake with orange zest added to the batter with an orange marmalade filling
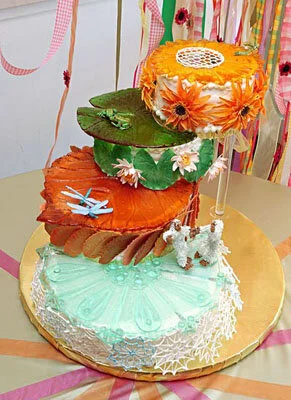
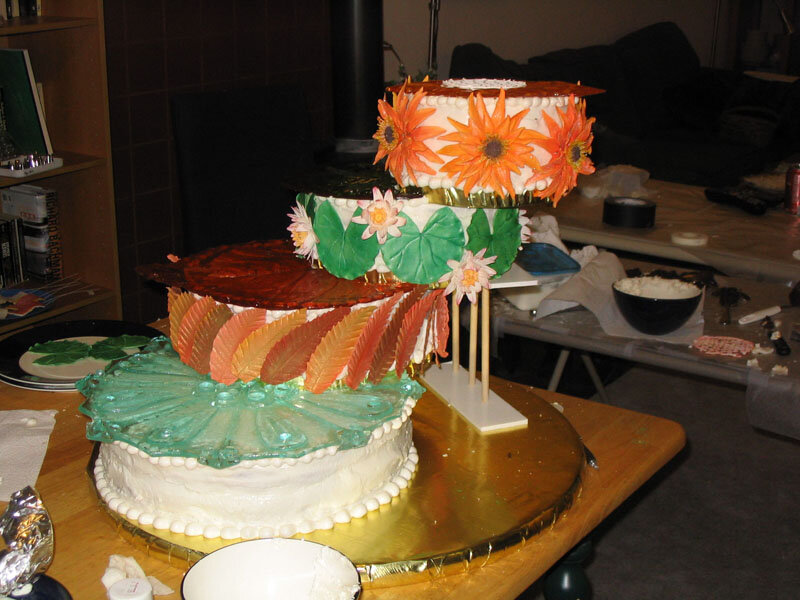
Each tier of the cake was to be topped with a sculpted sugar plate appropriate to the season, then the sides wrapped with seasonally appropriate leaves, flowers, etc. as follows.
Winter - Blue snowflake sugar plate with royal icing snowflakes around the sides
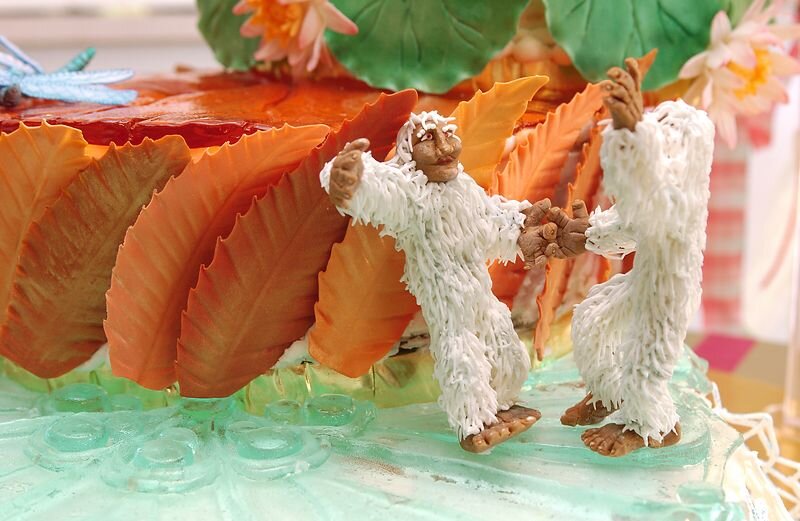
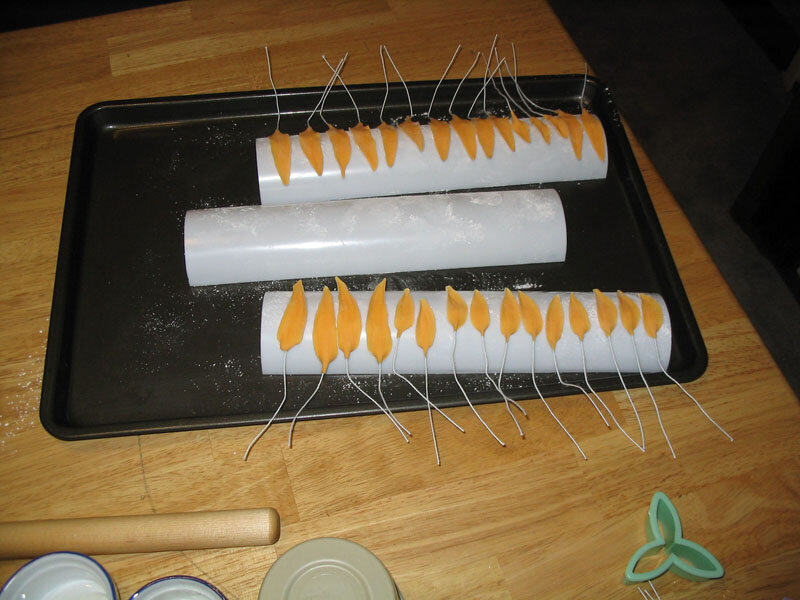
Autumn - Red leaf sugar plate with gum paste autumn leaves around the sides
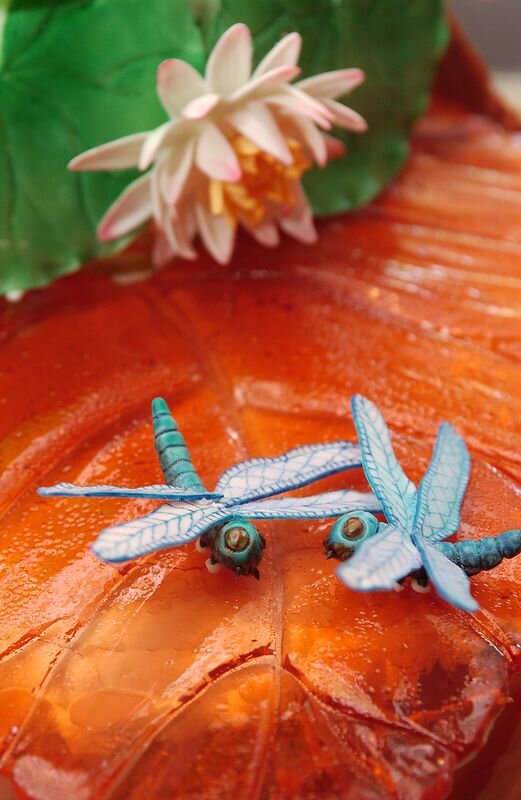
Summer - Green lily pad sugar plate with gum paste lily pads and lilies around the sides
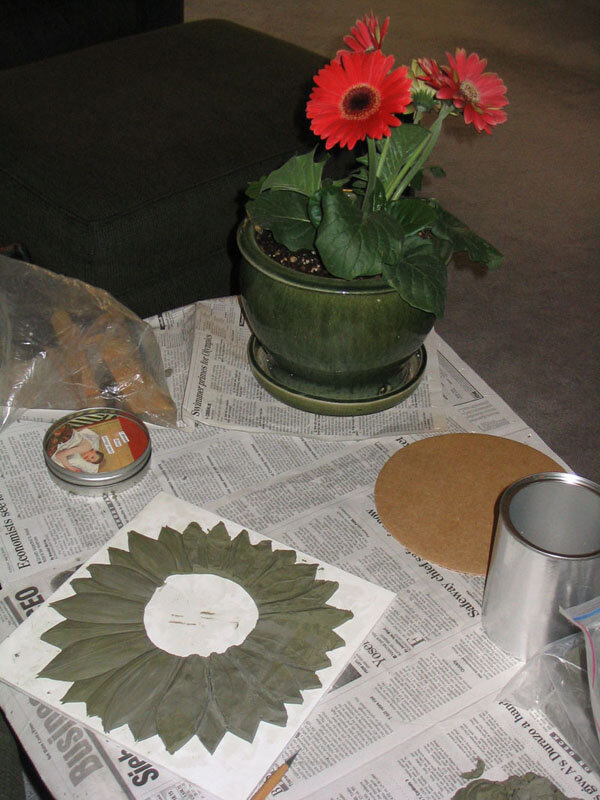
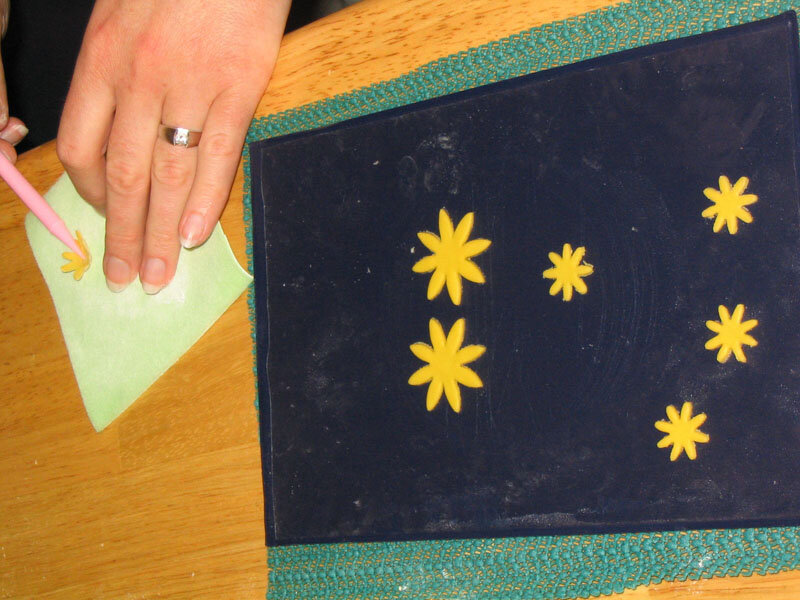
Spring - Yellow flower sugar plate with gum paste gerbera daisies around the sides
Each tier also got a symbolic bride and groom in the form of a pair of life-size little animals sitting on the sugar plate.
Winter - Pygmy yeti
Autumn - Dragonflies
Summer - Frogs
Spring - Caterpillars
The final touch was to involve a giant gum paste flower blooming out of the top of the cake.
In case all of that doesn't sound like enough, I also came up with a structural design for the cake wherein each layer was cantilevered out from the layer underneath so that it appeared to defy gravity.
I think trying to give you a straight, chronological report of our cake-creating activities would be more confusing than anything else, so I've divided my narrative into sections each describing one aspect of the project. I'll warn you now; it's a pretty long narrative. Enter at your own risk!
Baking, Torting, and Filling
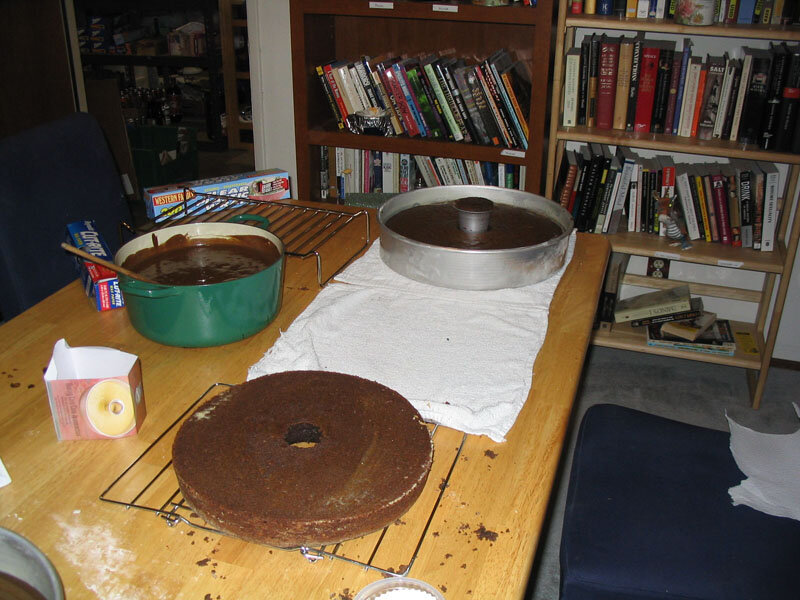
Baking all the cake was pretty much an all-day project (and that's not even counting the enormous shopping trip the day before. Who would have imagined anyone could ever need so much butter?) The smallest tier, the spring tier, was 6"in diameter, summer was 8", autumn 10", and winter 12", so I had to bake two 2" high cakes in each of those sizes for a total of eight cakes, which adds up to a whole lot of cake batter!
Fortunately for me we had decided to make all four layers using the same basic cake recipe so I was able to mix a lot of batter at one time and I never had to wash out the mixer between batches. This meant that I had to add the extra ingredients (chocolate chips, hazelnuts, or orange zest) to the batter by hand
.It all went remarkably smoothly (especially for such a huge project involving me and a kitchen) and eight hours later I had a fridge full of carefully wrapped cakes and a mountain of chocolate-covered dishes.
Torting, filling, and frosting the cakes, however, turned out to be more time-consuming than we could ever have imagined. Fortunately for me, my sister handled that part of it.
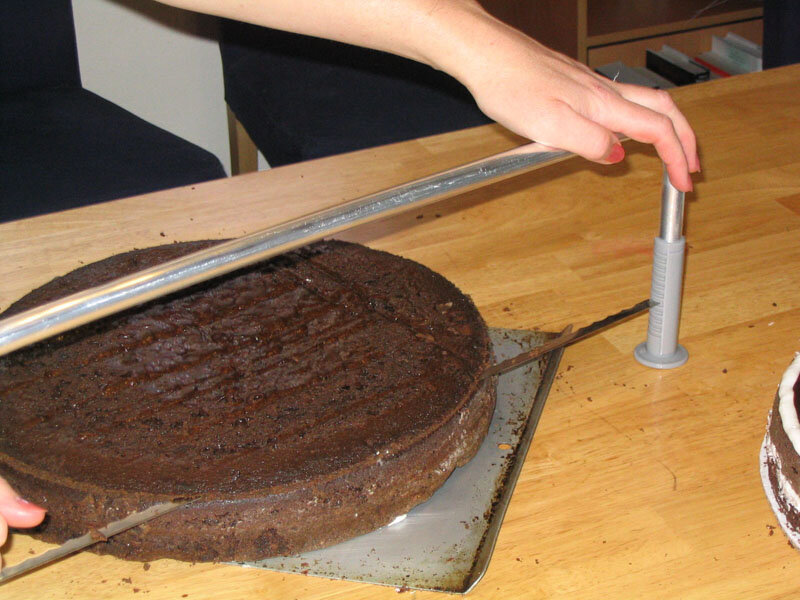
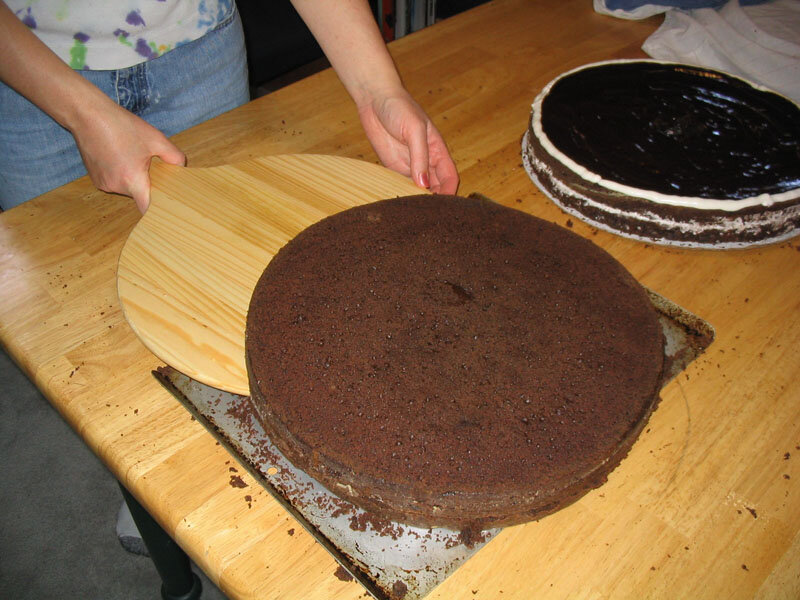
The first step is to level off the top of each cake, for which purpose we bought a special cake-leveling tool, which is like a fine saw turned sideways with feet on it. We thought this would be easier to do when the cakes were cold because then they don't crumble as much but this turned out not to be the case at all. Apparently our cakes were too cold, because our saw wouldn't go through the cake at all the first time we tried it straight out of the freezer. So we let the cakes thaw and tried again with much greater success. We still had to be careful on the larger tiers not to let the cake distort the blade of our tool, which happened if we tried to work too quickly. We found it worked best if my sister held the saw while I held and rotated the cake. After each piece was level on top we had to go through the same process again to split each cake in half, giving us four thin layers of cake per tier between which we could spread our fillings.

The first step in assembling those four separate pieces into an entire tier is to stick the bottom layer onto the cardboard base with a little bit of buttercream icing. Then my sister piped a thick dam of buttercream icing around the edge of that layer to hold in the filling. The filling can then be spread on the cake without fear of it leaking over the sides. The next layer of cake is placed on top of this and pressed down firmly, then the process is repeated until all four layers are in place.
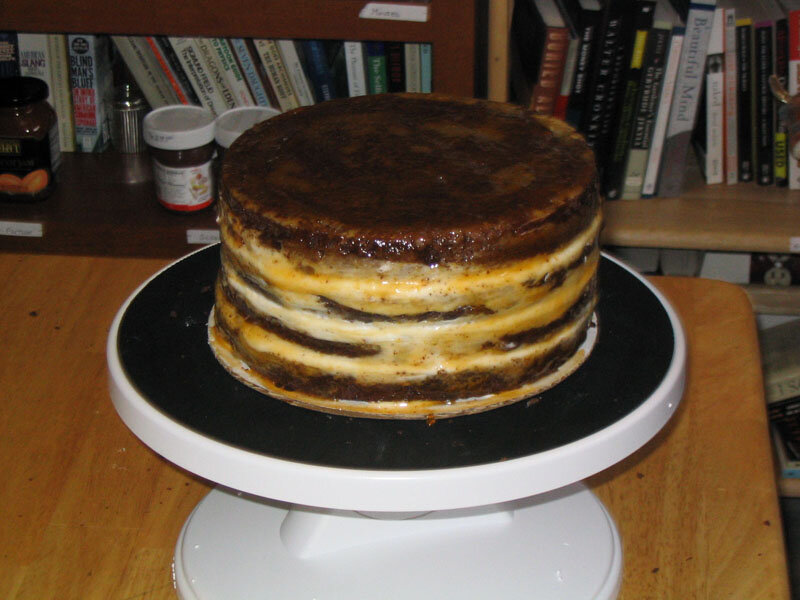
Her next step was to put a crumb coat on each tier. This is a preliminary undercoat of icing to keep the crumbs from the cake from getting into the final icing coat. She decided to use a glaze of apricot jam for this, which she made by heating the jam and then pressing it through a sieve to remove the stringy bits. Applied with a pastry brush in a thin layer, it picks up the stray crumbs and keeps then in place when it dries. In retrospect, it would have been a better idea to use thinned buttercream icing for this, since we had some trouble with the dark cake showing through the icing.
While I'm on the subject of buttercream icing, I should add a sidebar here about my sister’s experiments with buttercream icing. One flaw that buttercream icing has is that, because it is made with butter, it isn't truly white. Buttercream icing can be made with Crisco instead, which does make it white, but it doesn't taste as good. To decide the best way to make the buttercream icing for this cake, she made several batches with slight variations such as using a very light colored butter, or using Crisco but with artificial clear butter flavoring, or adding a bit of white food coloring to icing made with regular butter. We decided that the loss of taste wasn't worth the loss of color and decided against using the Crisco. There was only a very slight color difference anyway.
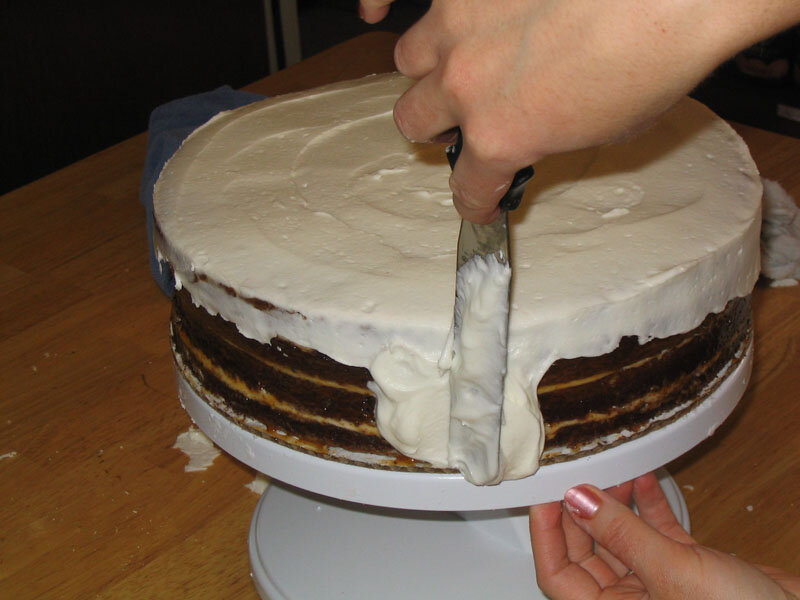
Once the crumb coat dried, she went back to each tier with a layer of buttercream icing. Unfortunately, you could still see the cake through the first layer of icing, and she had some trouble with the second layer sagging and dripping. But she cleaned it all up and the resulting cake tiers were by far the neatest cake tiers we've ever frosted, though I will say that my sister didn't make it look quite as easy as Sandy, our instructor at our Wilton master class in cake decorating. I'll bet she will next time, though.
Gravity-defying Structure
I was determined to make this a cake that defied, or appeared to defy, gravity. I'd like to be able to claim that it was some kind of metaphor for the happy couple's love defying the pressures of life that weigh us all down or some such sentimental hoo-hah, but really, I think it was just because I was convinced I could do it and thought that would be really cool.
The result - my plan for a cake on which each tier sat only halfway on the tier beneath, the other half cantilevered out in an attractive spiral. I hope to one day adapt this design to allow me to render a strand of DNA in cake. For a while I contemplated having each layer actually next to the previous layer, and slightly elevated, not sitting on top of it at all. While I still believe this to be theoretically possible, I'm glad I didn't try it this time because this way was hard enough.
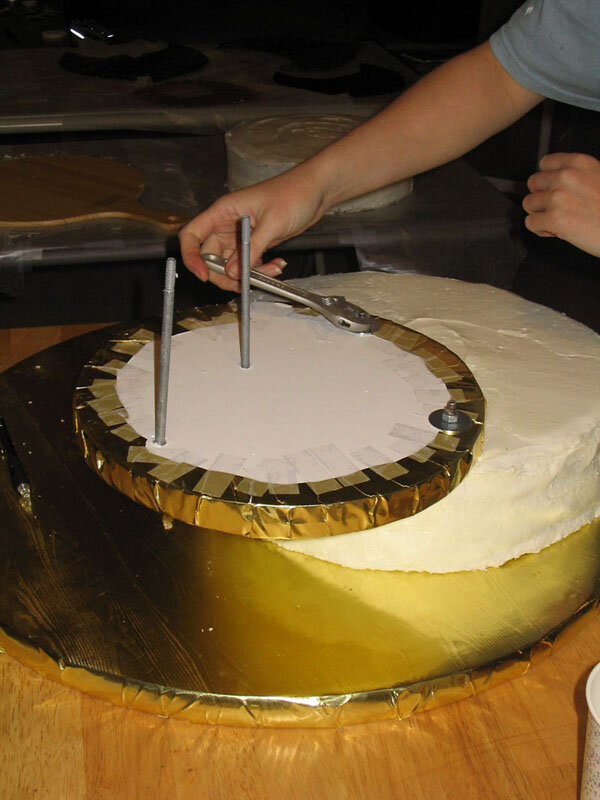
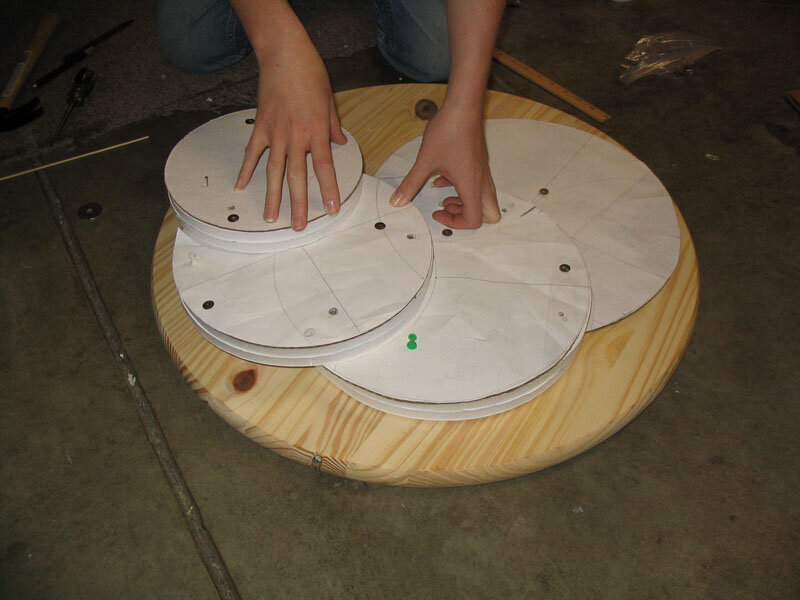
Each tier was to be supported by a circle of 1/2" foamcore, on top of which would rest the cardboard base of each tier, on top of which rested the actual cake. To hold them in place, each tier had to be bolted to the foamcore base of the tier beneath. This necessitated some complicated and mystical-looking hole cutting in each piece of foamcore to allow both for the bolts themselves and for various bolt heads and bolt ends from the layers above and below. I felt like a sorcerer, which is always a good thing to feel like.
The assembly of the cake was an arduous and nerve-wracking process. Each tier was individually torted and frosted by my sister in advance. Then we started with the large, wooden, circular base, which already had holes drilled for the two bolts to hold the second tier. The heads were also countersunk to allow the base to sit flat on the table. The bolts were inserted first, then the largest tier of the cake, with holes precut in its cardboard base, was lowered into place over the bolts, which, for sanitary reasons, we wrapped in plastic wrap, though we also washed them well first. Next we positioned the foamcore base for the second tier and marked on the first tier where it would sit because we had to insert some 1/4" wooden dowels into the first tier of the cake to support the weight of the tier above. Otherwise, each tier would crush the tier beneath and the entire cake would collapse. I put nine or ten dowels into the fist tier of the cake, arrayed evenly about an inch back from the edge of the area where the next tier would sit. That done, we were ready to bolt the foamcore for the second tier into place. By the way, a cake that requires a crescent wrench to assemble is very funny.
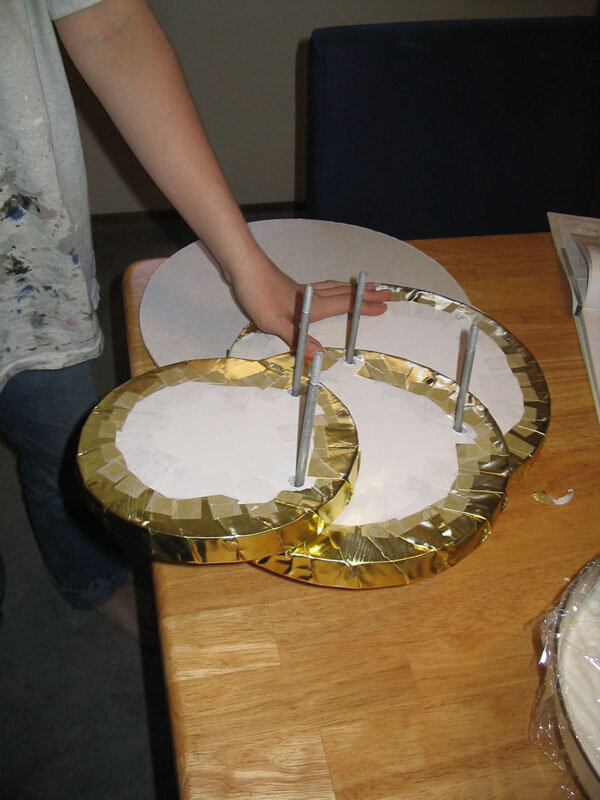
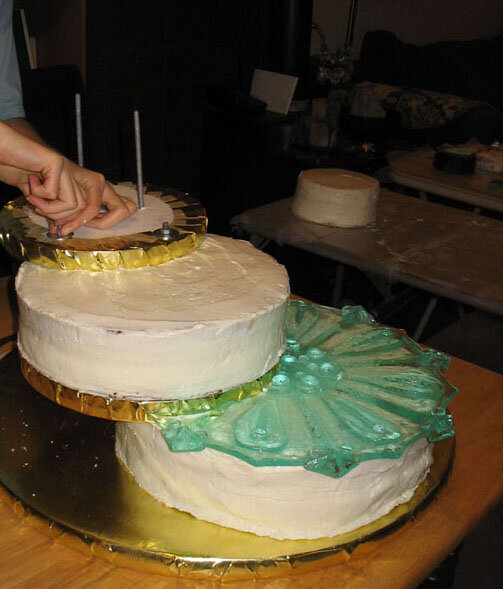
The foamcore base of the second tier already had the bolts to go through to the next tier in it at this point. In fact some of the bolts had to be glued in place in advance because the layers of foamcore were covered with gold foil and the bolts had to be in place before that in order for the heads to be hidden. Therefore, we were all set to lower the second tier onto those bolts and repeat the process described above for the third and fourth tiers. Bear in mind that this entire time, despite my professed confidence in my design, I was pretty much expecting the cake to collapse at any moment.
Miraculously, it all went together and appeared to be stable! We propped it up with temporary dowel supports to make sure and later we went out to get some attractive clear plastic supports from TAP Plastics, which we used for transport and actually had to put back in as a precautionary measure halfway through the reception. The layers did begin to settle and tip a bit, which I suspect indicates that the dowels were being tipped over inside the layers. I'm sure I could solve this problem next time by using an internal support with a wider base, like a plastic ring or oval. All in all, I'd say my first foray into the world of gravity-defying pastry was a roaring success!
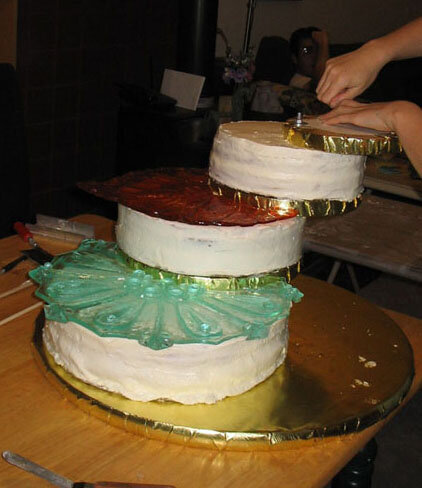
Sugar Plates
Each layer of the cake is topped with a seasonally appropriate giant sugar plate - a blue snowflake for winter, a red leaf for fall, a green lily pad for summer, a yellow flower for spring. Modern technology being the marvelous thing that it is, ordinary people like you and I are now able to make our very own rubber, food-safe hard candy molds in the comfort of our own homes! Amazing, isn't it? We purchased five pounds of a two-part, food-safe rubber mold compound from a site called chefrubber.com, which, by the way, has all kinds of products that look super fun.
Our first step was to try out our new toy. I made a little leaf out of non-toxic clay and put it in the bottom of a paper cup. We tried out the rubber, carefully mixing the correct proportion using my sister-in-law's kitchen scale and it worked great! First we painted a thin layer of rubber onto the clay positive with a soft brush to make sure it got into all the little crevices, then we poured more rubber on top of that. The pouring process was a bit difficult, as in order to avoid getting bubbles in the mold, we had to pour the rubber in a very thin stream out a tiny hole in the mixing cup. The mold dried sturdy and detailed, and it pulled away easily from both the cup and the clay. We make some hard candy and poured it into the mold once again with great success! The candy took all the fine detail of the mold and then peeled away easily once it cooled.
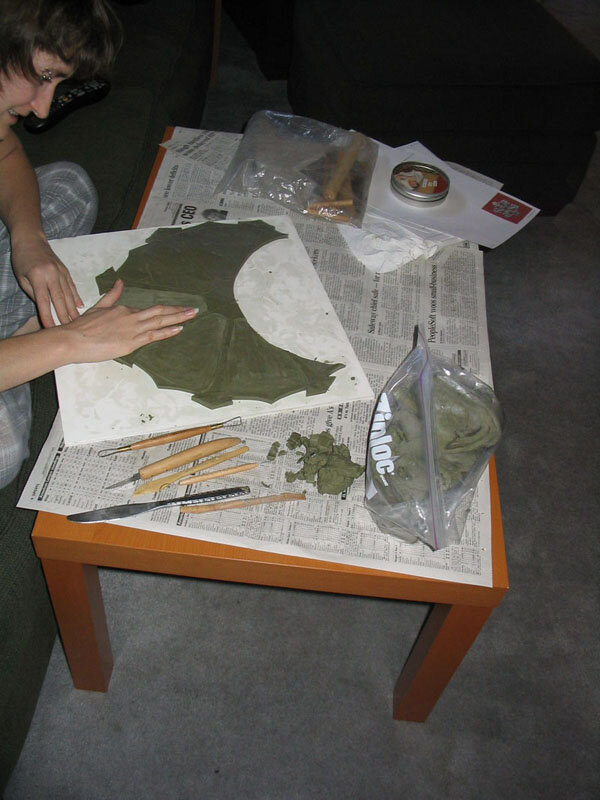
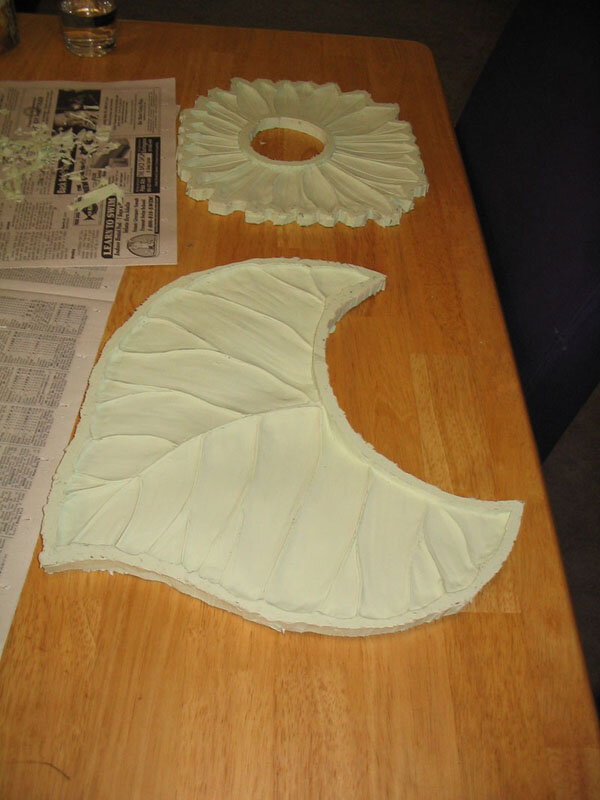
Emboldened by our success, I sat down to sculpt each of the large plates for the cake, again out of non-toxic clay, on sheets of foamcore. Once they were complete, I built up foamcore walls around each to contain the poured rubber, filling in some large spaces with excess clay, to minimize the amount of rubber needed to fill the mold box.
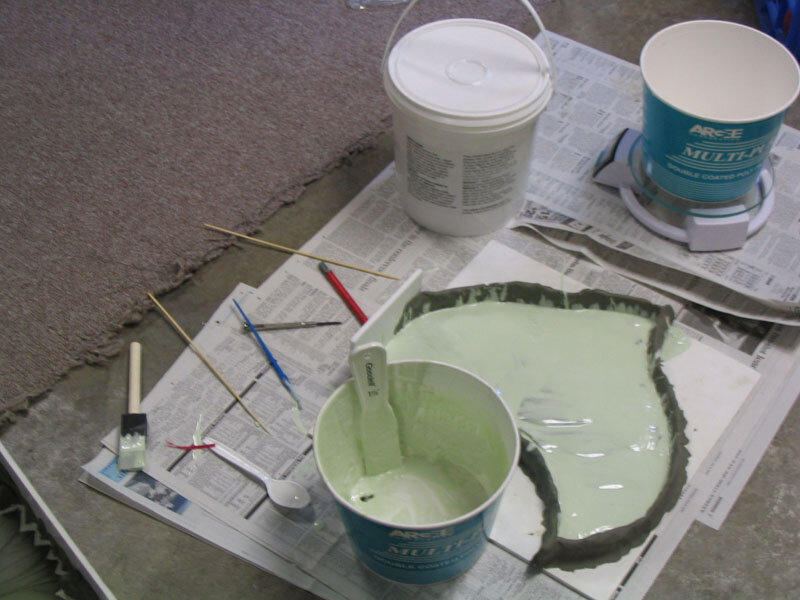
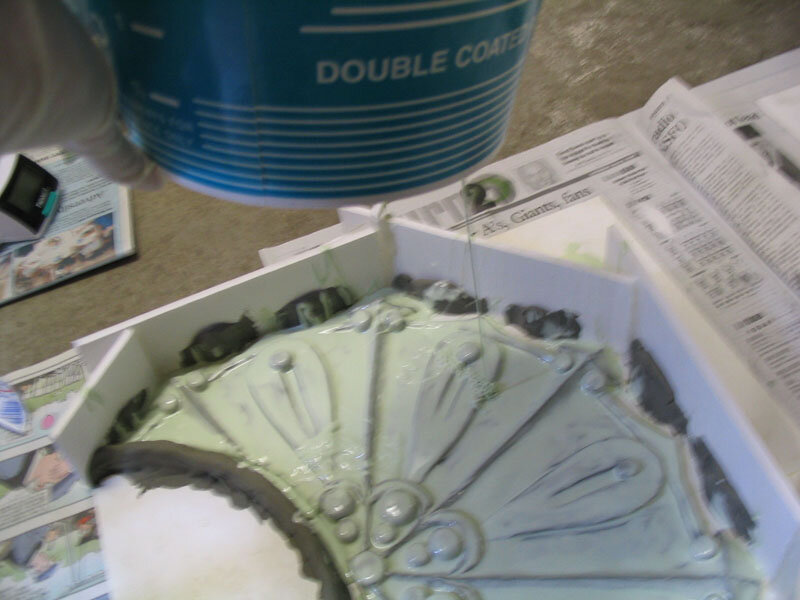
My sister was at work the day I had chosen as my mold-pouring extravaganza so I was left on my own with a fairly nerve-wracking procedure to perform, but I bravely rose to the challenge. My first mistake was trying to mix too much of the compound at once. Although it doesn't completely cure for 24 hours, it starts to set up after only about half an hour. If that seems like plenty of time to pour out a paper cup of rubber, bear in mind that I was pouring it through a pinhole. It's pretty time consuming. Also that I had to paint on a coat of the rubber before I could start pouring. So my first batch started to set before I was done pouring, resulting in me desperately ripping larger and larger holes in the side of my paper bucket until finally I gave up and just poured it over the side. (If you're wondering why I didn't just scrap that batch of rubber and start over, it was because I wasn't sure I would have enough to do all four molds and so I couldn't afford to waste any. It's not something I could just run out to the grocery store and buy more of.) This did, indeed result in quite a few bubbles. I popped the larger ones with a pin and, as always, hoped for the best.
The rest of the pouring went better, as I worked in smaller batches, though I was also worried by one batch that I didn't quite mix as well as I should have, but it seemed to set up with no adverse effects. By the end I was such a pro that I was pouring rubber into one mold box with one hand while painting rubber onto another clay positive with the other hand. I even took pictures with my right hand of my left hand pouring the rubber into the mold box.
An anxious day followed until I could safely pull the molds off of the clay positives, but it was worth the wait. The molds looked great! We washed them with soap and water, as per the instructions and we were ready to the pour the sugar plates.
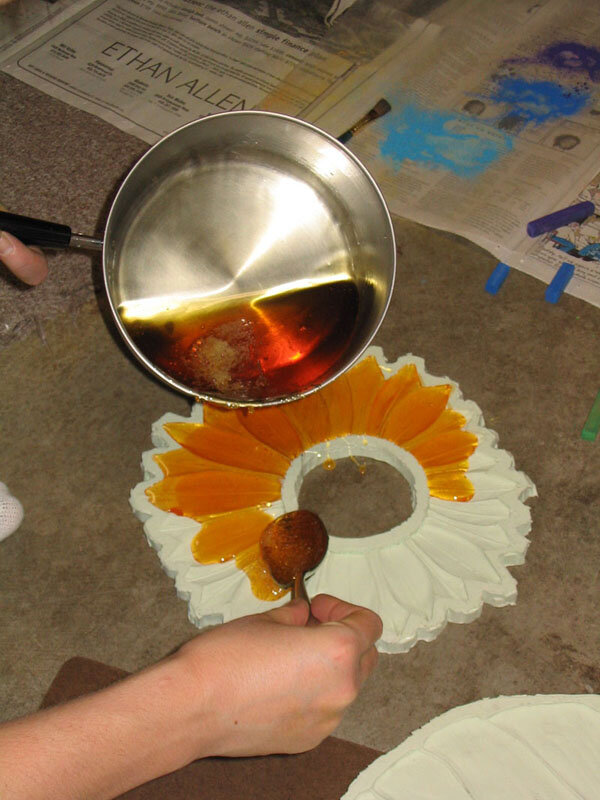
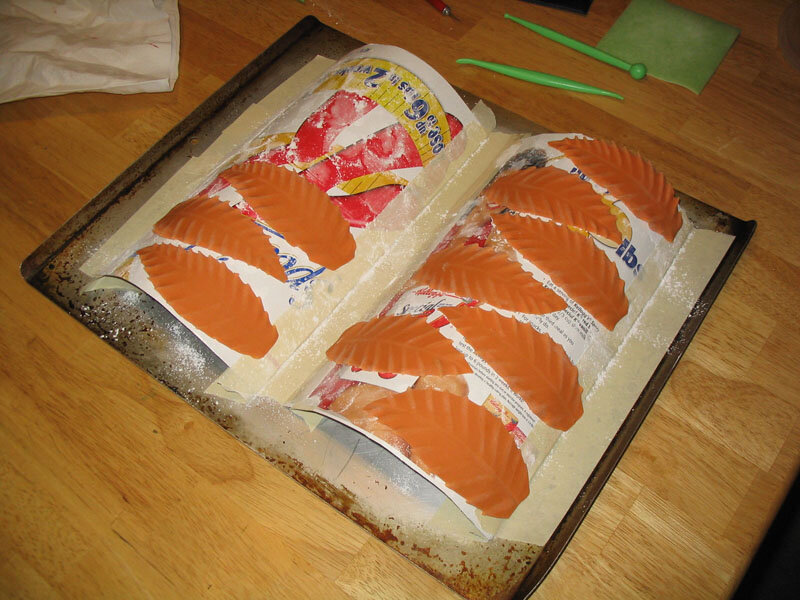
My original plan had been to pour each plate in two different colors so, for instance, the autumn leaves would be a light gold in the veins and darker amber in the areas in between. I expected that the second color of sugar, poured over the first, would melt the first color and the two would blend smoothly together. Boy, was I wrong. I tried this experiment first on the autumn leaf and it didn't work at all. Not only did the two colors not blend together at all, but the second color didn't flow all the way in next to the first color, so I had big ugly grooves on my sugar plate. I decided to try it with just one color.
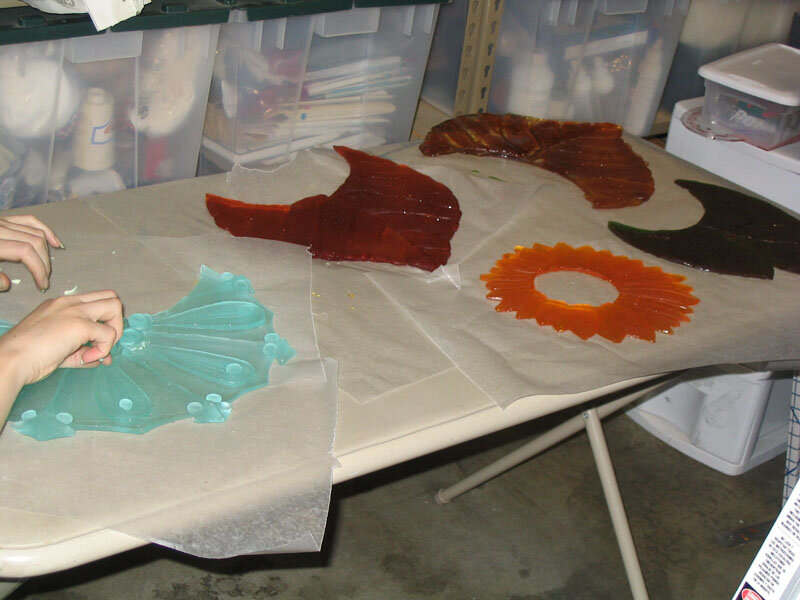
Not only did this produce a nice, clean leaf, but it was also much faster, easier, less wasteful of sugar and it even produced some of the bi-tonal effect I was looking for all on its own. Because sugar is translucent and the molds were of various thicknesses, the deep areas looked much darker than the shallow areas. I was really pleased with the result.
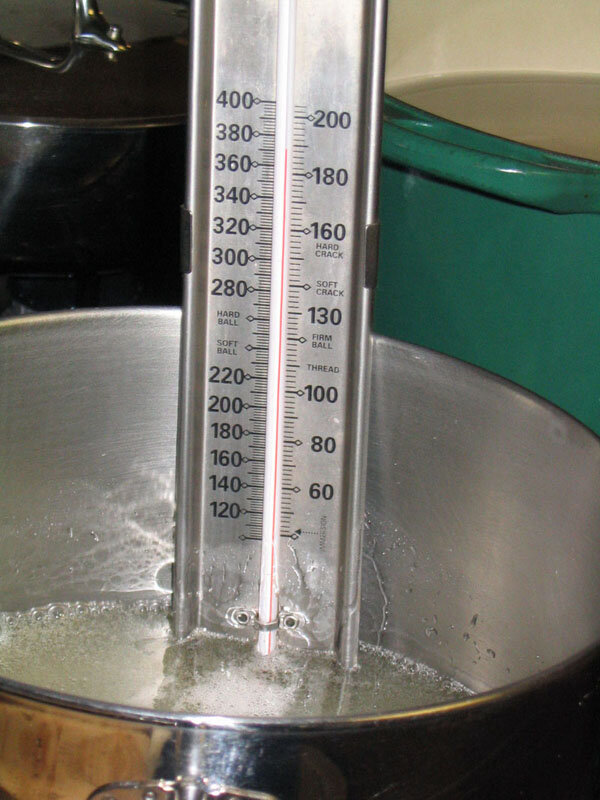
I proceeded to pour the yellow flower and the green lily pad this way, which brought me finally to the largest sugar plate, the snowflake. Now, we wanted the snowflake to be a very pale blue, just a hint of color, really. To accomplish this with sugar would be very difficult because cooked sugar always has a bit of an amber tint. We decided to try using a clear sugar substitute called isomalt, which we learned about at a Pulled Sugar class we took recently. Isomalt is pretty amazing stuff. It comes in the form of opaque white crystals, larger than sugar crystals and you don't need to add water or anything or even stir it while it melts. It won't burn the way sugar will and, unlike sugar, it's perfectly clear. You also have to heat it to a much higher temperature than sugar, which was a little scary, especially since I was stupid enough to do this barefoot, instead of wearing my steel-toed boots, which should have been the obvious thing to do, considering that this process involved me carrying a pot of 400 degree liquid from the kitchen to the garage. Fortunately, the whole thing went without mishap, although I was shocked by how quickly the isomalt heated up. It didn't behave the way sugar does at all, which I suppose is to be expected. I tinted the melted isomalt with just a smidge of blue food coloring and poured the snowflake, which turned out beautifully.

For the finishing touch I rubbed each sugar plate once over with a damp cloth to give it a glossy finish. They had a sort of frosted glass look when they first came out of the molds, which was also nice, but the advantage of the glossy finish is that then if you later drop icing or something onto the sugar plate (which my sister and I considered to be more or less inevitable), you can wipe it off without damaging the finish of the plate.
Side Decorations
Winter
The sides of the winter layer called for royal icing snowflakes. The first step, as always, was to find suitable research photos, so I went online until I had more pictures of snowflakes than anyone should be able to use in a lifetime. Using these as a reference, I drew up six different snowflake patterns. These I taped to a cookie sheet then covered with wax paper. Using a #3 decorating tip, I piped royal icing over each pattern, then sprinkled it with edible glitter (clear, silver, or blue) before the frosting had a chance to dry.
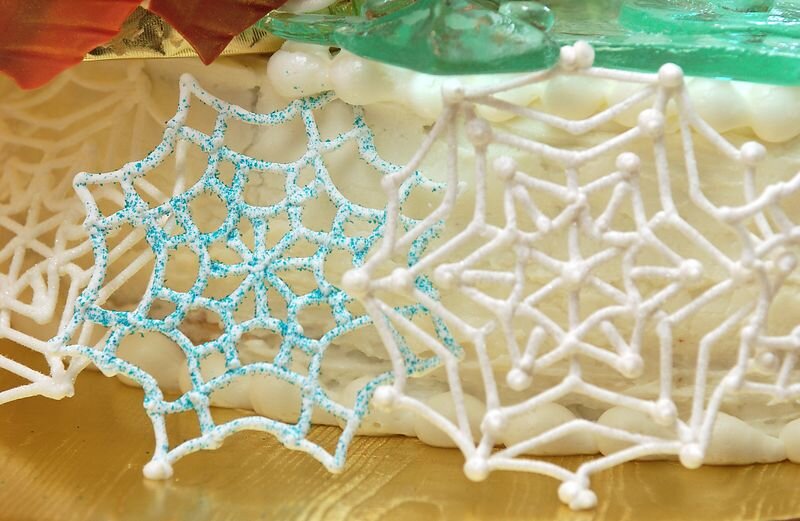
These proved to be extremely popular with the children at the wedding, who kept coming back to the kitchen asking for "snowflake candy." Fortunately, I made about twice as many as I actually needed for the cake, because I was afraid of breakages, so there were plenty to go round. There was one extremely sad incident involving the four-year-old daughter of a good friend of ours, whose piece of snowflake candy fell on the ground and broke. To make up for it I made snowflake candy again (in a slightly sturdier form) to serve at a dinner party that they were coming to a few days later, but unfortunately at the last minute they couldn't make it, so we put the snowflakes in bowls of ice cream and served them to the other guests, which also proved to be quite popular, even among the adults.
Autumn
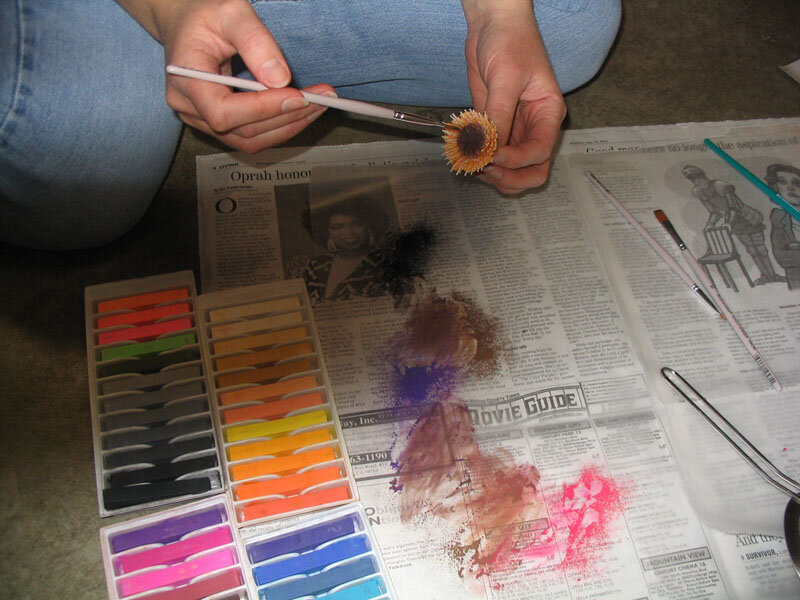
For the sides of the autumn layer I made large gum paste leaves. Actually, they were a little larger than would really have been optimal, but oh well. I didn't have any gum paste cutters big enough to do the job, so I drew myself a paper pattern and cut each leaf out by hand, then drew in veins with a knife tool. All of my flower formers were also too small for these leaves, so I made my own out of the sides of a cereal box taped to a cookie sheet to get the curve I wanted. Once they were generously dusted with cornstarch to prevent sticking the leaves were draped over these to dry.
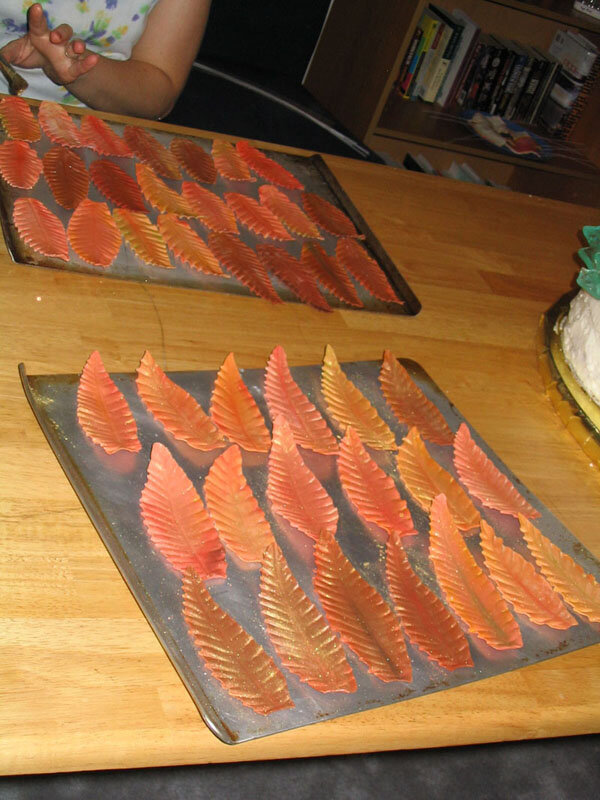
I started with three different colors of gum paste - orange, red, and brown. Once the leaves were dry I went in and added more color variations with chalk pastels - various reds, yellows, browns, oranges, and greens until each leaf was different. I steamed them to set the colors (a neat trick, by the way. You just set a kettle or pot of water boiling and wave the leaf for a few seconds in front of the steam. It keeps the colors from rubbing off and gives it a nice sheen.) For the finishing touch, my sister dusted them with gold luster dust.
Summer
For the summer layer, my sister made gum paste lily pads and I made a few gum paste lilies to go with them.

The lily pads are made of green gum paste, rolled thin, then cut into a circle with a little wedge cut out. My sister then drew in veins and softened the edges with a ball tool. Once the lily pads were dry, we painted them with some thinned green piping gel so they would have the shiny, wet look of a real lily pad.
For the lilies my sister first made yellow centers around green floral wire. (We were following instructions in our gum paste flower book, but they were a little unclear sometimes, so she actually made them far too large the first time and had to do it over.) Once those were dry, she then cut daisy shapes out of yellow gum paste, softened the edges and added veins on the inside, and then built up the interior yellow petals from the inside out on top of the round center. These were left to dry upside down for a day or so.
Once these were dry I got some white gum paste to make the outer petals and some coffee cups covered with tin foil with a hole punched in the middle to assemble the flowers on. The white outer petals of the lilies are assembled from the outside in, so I made the largest petals first, cutting out the gum paste with one of my cutters, and adding veins with a knife tool. The first row of petals lies on the tin foil, arranged around the center hole, making sure to leave the hole exposed. The next layer of petals goes on top of that, glued with meringue powder, staggered and supported by cotton balls so as to give the petals the necessary lift and curve. This goes on until the flower is pretty much filled up, then the center is dropped into place with the wire going through the hole in the tin foil. The hardest part was not gluing the cotton balls to the flower. I didn't entirely succeed in all cases.
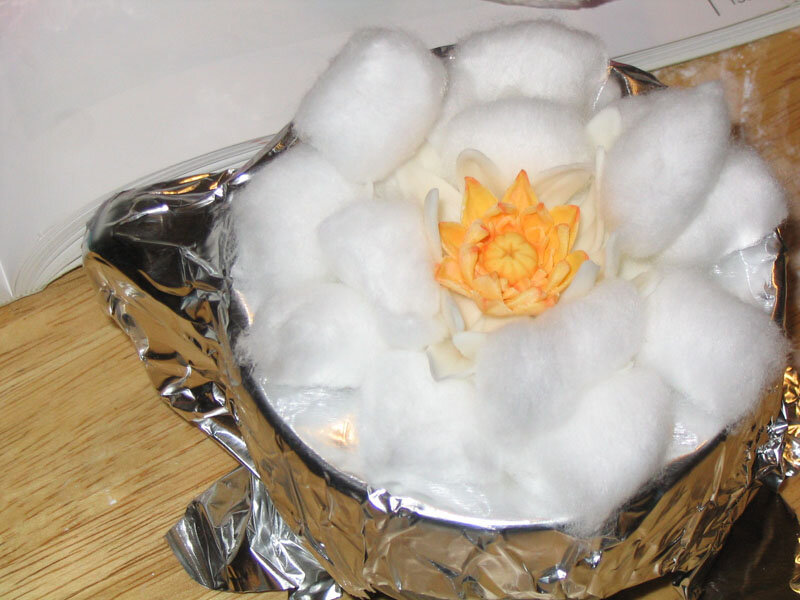
Once these dried, I pried all the cotton balls out, then added a little pink chalk pastel to the tips of each flower petal and the lilies were ready to go. The nice thing about the wire is that they can easily be stuck straight into the side of the cake.
Spring
We chose what might well be the most time-consuming flower in the universe for the spring layer of the cake - the gerbera daisy. Somehow, my sister got stuck with all the tedious, boring jobs, like making millions of tiny daisy petals and I got to have all the exciting jobs like pouring boiling sugar into rubber molds and sculpting yeti out of gum paste. I didn't plan that deliberately, by the way, but I'm also not complaining.
Like the water lilies, she started with forming a center on top of some stiff floral wire, since it needed to be strong enough to support the weight of all the petals. After the center dried, she wrapped it several times with orange gum paste rolled very thin with the edge scored and tiny pieces of very thin floral wire pressed gently into gum paste. This created little stamens around the center. Once that dried, she colored it with non-toxic chalk pastel powder (created by grating the pastels through a sieve).

Along the way, she worked on making the roughly 75 large and 75 small petals required for the 5 daisies. Each one was cut from orange gum paste using a large daisy cutter. She thinned the edges and elongated them to make a more natural shape, then pressed veins down the center. Using meringue powder and water, she attached the petal to short length of very thin floral wire and let it dry on flower former to create a nice curve. The instructions actually called for inserting the wire inside the petal, but when we tried that it seemed very awkward and required rolling thicker petals than we wanted. Once the petals were dry, she brushed them with several shades of orange chalk pastel, and then set the color by briefly holding them over boiling water. The steam also gave them a nice sheen.
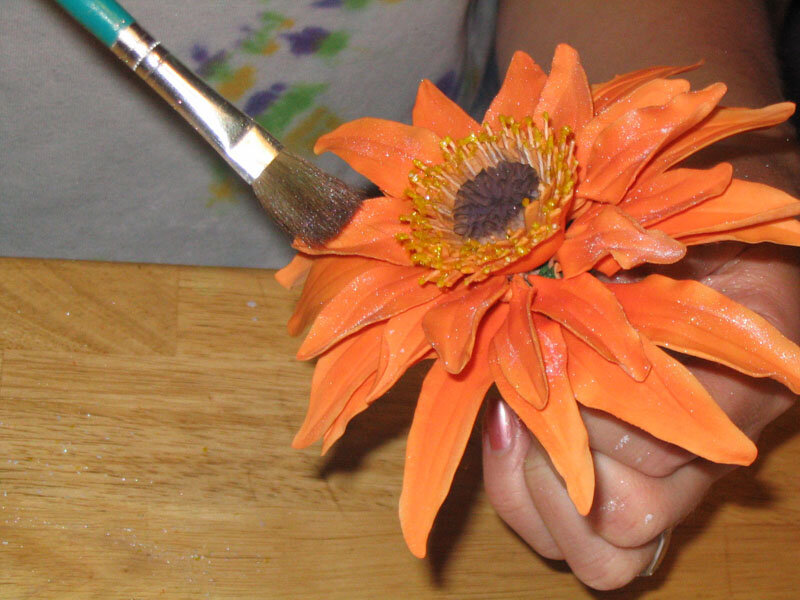
Finally, she was ready to assemble the flowers! First, she dipped the tips of the stamens in meringue powder and water and then dipped them into gold edible glitter. Then she attached the petals to the center stem with the small ones closer to the center. As a final touch, she brushed the petals with gold lustre dust.
Bride & Groom Figures
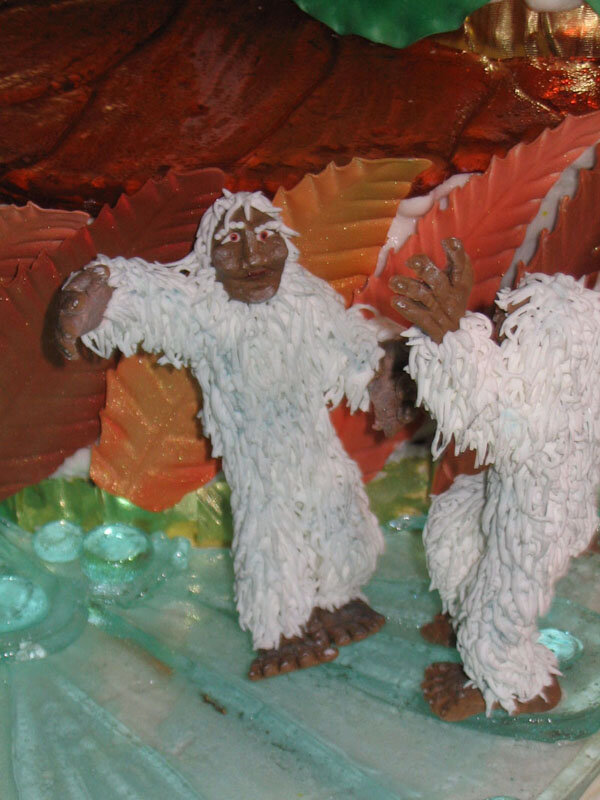
Rather than content ourselves with just one happy couple on the top of the cake, we decided to put a "bride and groom" on each tier of the cake. In keeping with our nature and seasons themes, we set about to select an animal appropriate to each season. Once we had come up with caterpillars for the spring layer, frogs for the summer layer, and dragonflies for the autumn layer we ran into a problem - each of the aforementioned animals can be sculpted and put on a cake full scale, which for some reason I thought was really important and my sister at least humored me, but we were unable to think of a winter animal which would fit on the cake in full scale. Penguins and polar bear were right out, of course, and though we may have been able to come up with some sort of winter mouse, we still weren't satisfied. Then it hit us - pygmy yeti! What could be more perfect? Due to its small size, the pygmy yeti is even more elusive than its larger, more famous cousins such as the migo, the sasquatsch, Bigfoot, and, of course, the standard yeti. In fact, it has yet to be proved that the curious little critter exists outside of this cake and our imaginations, but, if it does, rest assured that it is the same size as the ones I sculpted for this cake. Many of the wedding guests erroneously assumed that I had created small-scale versions of regular yeti, but that just goes to show you the abysmal state of yeti education in this country. That's education about yeti, not education directed at yeti, by the way, though I imagine that a lot of progress could probably be made in that area as well.
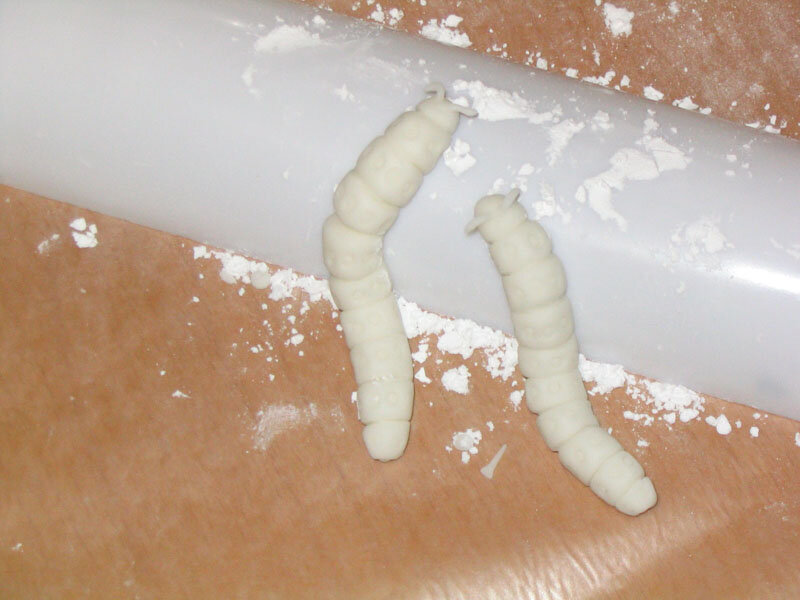
Spring - Caterpillars
We decided on these little green caterpillars because they would stand out nicely on the yellow sugar flower. I always like to have a research photo to work from, so I found a good one with a google image search. These were by far the easiest critters to create. I simply rolled a cylinder of gum paste, and then created the segments with a plastic knife tool from my rolled fondant set. The little spots are made by gently pushing a round decorating tip into the gum paste. I believe I used a #3. A little rolled string of gum paste stuck to the head created the antennae and then the caterpillars were set (arranged in what I hope was a graceful curve) on a large flower former, generously dusted with cornstarch to prevent sticking, to dry. The flower former lifted the front half of the caterpillars off the ground, so when they were set on the cake, they were rearing up the air and twined together. A few dabs of royal icing with a #1 tip created the tiny feet.
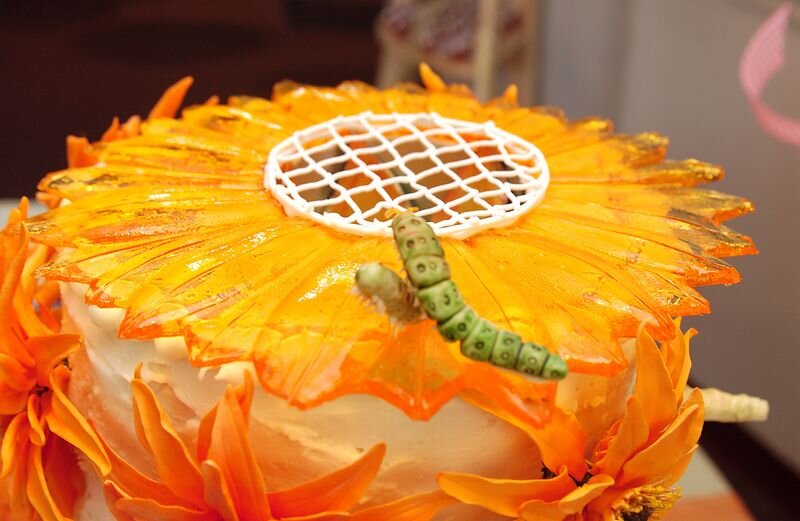
Once everything was dry, I painted them with paste food colors, thinned with water. The only tricky part is not to work one area over too much because it dissolves the gum paste. Just paint one quick coat, then set them aside to dry. I also did a little light dusting of chalk pastel once the food coloring dried to give them a more natural look and to make the two caterpillars look slightly different in color and in shade from each other, which I thought would be more realistic.
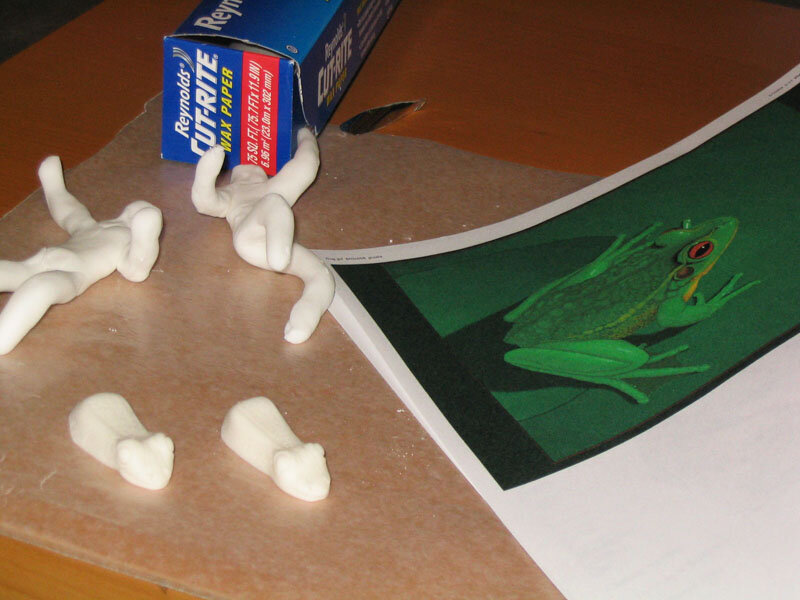
Summer - Frogs
I made the frog bodies and the legs separately, then glued them together with meringue powder once they had dried. One of the gum paste books we were using for reference actually had a picture of a gum paste frog, though it didn't have directions on how to make it. It did, however, provide me with the tip that bulging eyes could be made by pressing a decorating tip into the gum paste, which worked great! I believe I used a #8 for the eyes and a #5 for what I think are ears, directly behind the eyes. I also used a #16 star tip to make the rough skin texture on the frogs' backs. The mouth and the little lines on the back were done with the knife tool. I had to do all this pretty quickly because gum paste has a very short working time before it dries out and starts to crack.

That pretty much did it for the bodies, so I set to work on the legs. The back legs didn't need any reinforcement, but I had to put little #32 wires into the front legs, so they would be strong enough to hold the frog bodies up off the ground a bit.
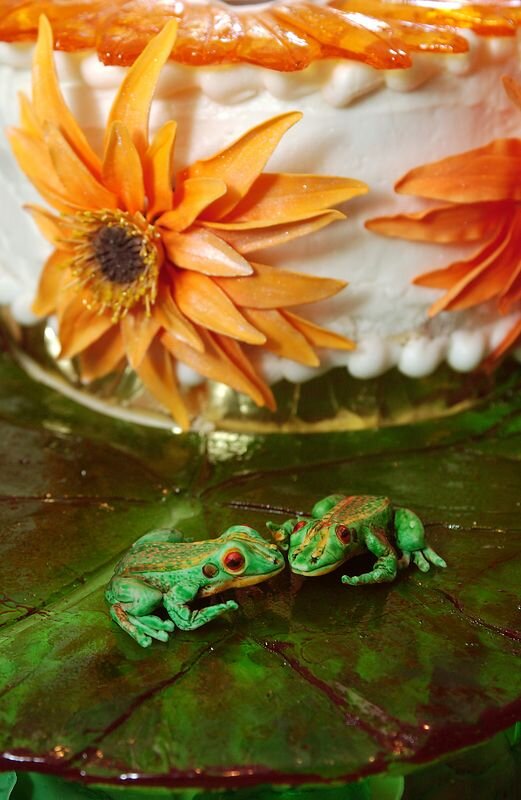
Once the frogs were dry and the pieces glued together, I painted them with paste food colors. I thought about making them red, so they'd contrast with their green sugar lily pad, but we decided against that because we though red frogs might look poisonous and went with standard green instead. First I painted the undersides a yellow ochre (again, working from research I found online) and let that dry before painting the tops green. I used a slightly different shade of green for each frog, so they wouldn't look identical. The eyeballs I painted red, then added a black iris once the red was dry. As with the caterpillars, I added a dusting of chalk pastel to soften the bright green of the food coloring and add a bit of shadow and highlight.
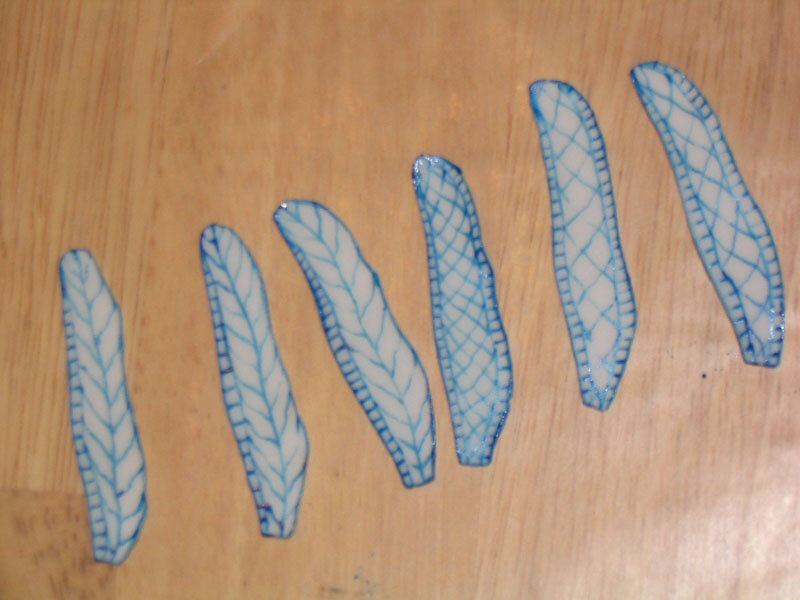
Autumn - Dragonflies
Our gum paste book actually did have directions for making a dragonfly, so I just followed those and used their picture as a reference. The bodies were made much the same way as the caterpillars - a cylinder of gum paste segmented with a plastic knife tool. The shape of the body is slightly different from that of the caterpillars, being rounder and fuller at the head and more tapered at the tail, but the idea is the same. The eyes, like the frogs' eyes, were made with a round decorating tip. The first time I made the wings, following the book's instructions, I wasn't happy with them. Their shape wasn't delicate and specific enough because I had flattened them with the rolling pin again after cutting them out. Also, the wire inside the wings made it impossible to get them as flat as I wanted them to be. I trashed the first set of wings and started again. This time I didn't put wires inside and it worked a lot better. I also rolled the gum paste thinner, cut out a specific shape using a pattern I made out of paper, then carefully thinned only the lower edge with a ball tool. Finally happy with the wings, I set everything aside to dry.
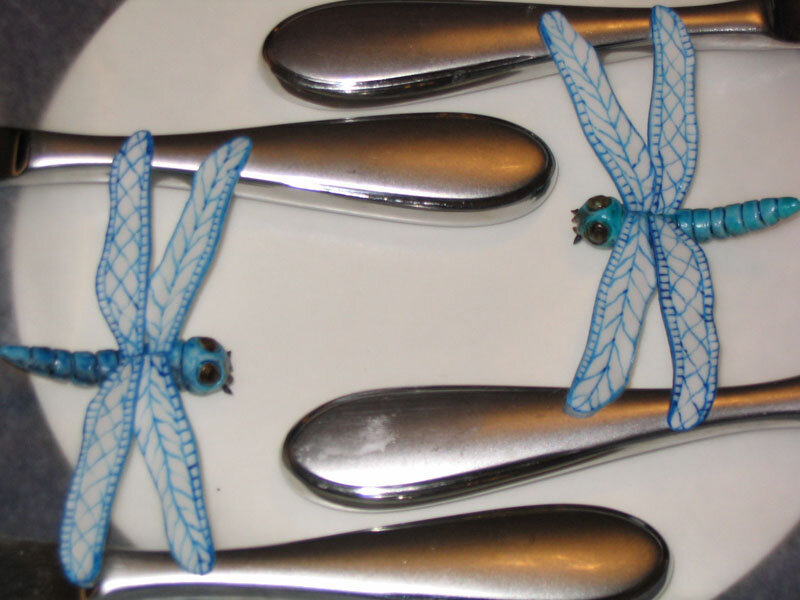
Next, I painted delicate veins on both sides of the wings with blue food coloring. I also painted the bodies with blue food coloring, a slightly different shade for each dragonfly, and added darker shading between each segment with black food coloring. Tiny feelers were added with royal icing and a #1 decorating tip, and the eyes were painted with black piping gel to make them glossy.
The wings were glued to the bodies with meringue powder. One fell off when I was positioning them on the cake, but I glued it back on. A light dusting of blue luster dust on the wings gave them that little extra shine. Amazingly, the dragonflies were even sturdy enough for one guest to take one home to keep.
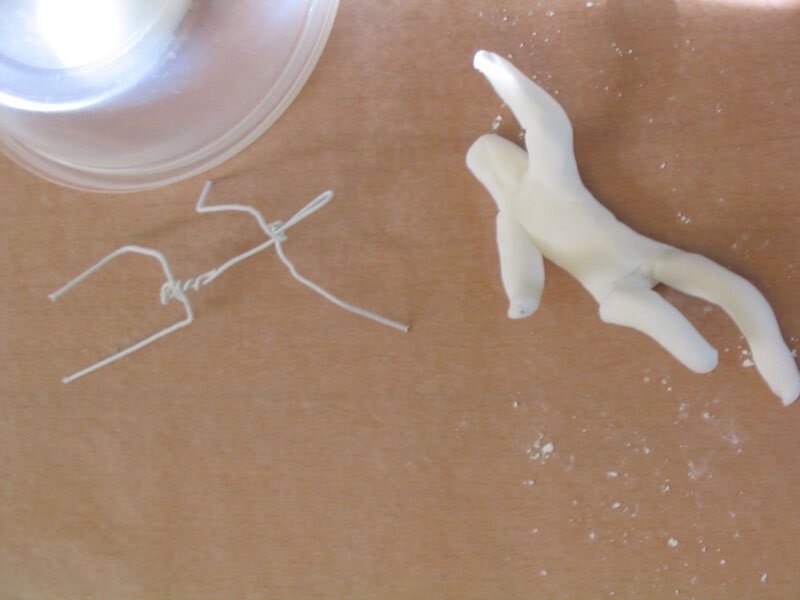
Winter – Pygmy Yeti
The pygmy yeti were by far the most time consuming creatures to make, plus I didn't have any reference to work from, so I had to make it up as I went along. In order to make them stand upright without collapsing under their own weight, I gave the yeti internal wire frameworks, made from #20 white floral wire. I covered this with fondant in the basic shape of a yeti body. I chose fondant instead of gum paste because it has a much longer working time before it dries out than gum paste and I didn't want to have to rush.

The face, hands, and feet are gum paste, colored a nice, rich, yeti-skin brown. I could only do one extremity at a time, then I had to wait for that one to dry before making the next one, so it was quite a drawn out process. At first I had a lot of trouble with the gum paste drying out too quickly (I didn't have the option of using fondant here, because fondant doesn't take fine detail as well as gum paste.), but I discovered that it I kept dipping my plastic sculpting tool in Crisco, it kept the gum paste moist and workable for a longer period of time. I used my own feet as a model (I have surprisingly large feet for someone my size, so they actually made pretty good models for yeti feet.) and I made the toenails and fingernails with #2 and #4 round decorating tips. (Can you tell I really like this new technique I learned?) The feet in particular turned out really well, which is important for such a close relative of Bigfoot, and surprised the heck out of me because I can't draw feet to save my life.
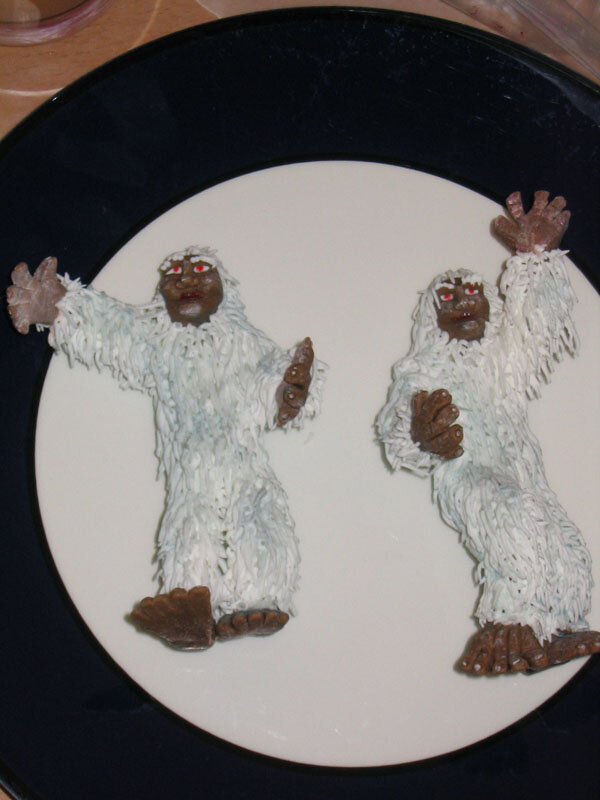
The next step was to give the yeti hair. I toyed with the idea of making the hair out of gum paste, but decided to use royal icing instead. I think I made the right choice. It was another very time-consuming process, but the results were worth it. I drew in each hair individually with a #1 tip and it had to be done in two stages, so that the yeti always had a dry side to lay them down on. I also gave them little royal icing eyebrows and eyeballs.
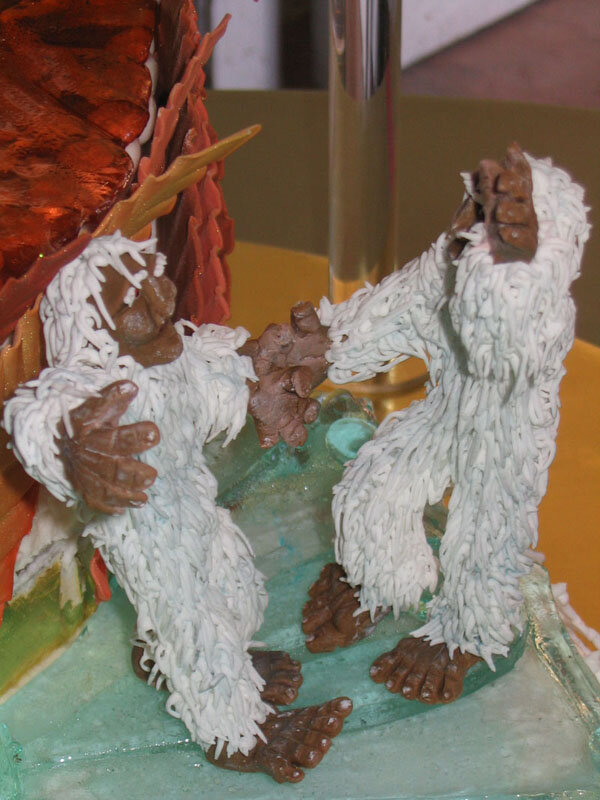
A dusting of a few grey and blue shades of chalk pastel gave the fur that slightly-dingy-wild-animal look and some pink and ivory chalk pastels on the face, hands, and feet, added highlights and emphasized the toenails and fingernails. I'm not sure how I came to the conclusion that pygmy yeti have red irises, but apparently they do. Those are painted with food coloring.
Originally, I had planned for the yeti to be skipping hand-in-hand, but when I put them together they looked like they were jitterbugging, so I went with that instead. We kept the yeti after the cake cutting to give to the bride and groom when they returned from their honeymoon.
Blooming Flower Mechanism
Apparently, just making a cake isn't enough for us. No, our cakes have to do something, even if we don't have time to make it work right. Oh well. We went through about four hundred different concepts and in the end we didn't settle on one so much as we went with the one we happened to be working on when the day of the wedding rolled around.
It all started with the concept of a big flower blooming out of the center of the cake. Nice metaphor for the commencement of the happy couple's new life together, right? Right. But it also raises a very important question - what should be inside the flower? Clearly the center of the flower suddenly becomes the most important spot on the cake, so it has to contain something meaningful, right? We were tossing around a lot of different ideas, including Homer and Marge cake toppers and tiny sugar words saying "love" or "joy" or something along those lines, when my sister suddenly hit on the solution we were looking for - a butterfly! This naturally brought up the idea that the butterfly should actually fly out of the flower, which led to the question - how do me make an edible butterfly light enough that it would be lifted by a tiny fan sitting inside the cake? The solution we came up with was to make the butterflies wings out of petals of edible flowers, but I don't actually know if that would have worked or not because fan difficulties prevented us from ever getting as far as actually making the butterfly.
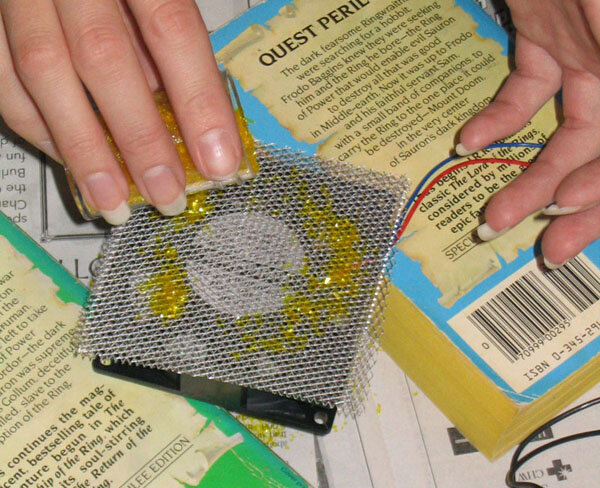
The first fan I tried was one of the little ones you can buy at Radio Shack to cool computers, which was just the right size to fir inside the cake, but, as it turned out, wasn't even powerful enough to launch edible glitter into the air, let alone flower petals or an edible butterfly. So I set out to look for another fan, but with little success. Fans powerful enough were too big and had to be plugged in, fans small enough and battery-powered were too weak. On the day of the wedding I went to a nail salon to get a manicure and pedicure and at every manicure station was a tiny fan, just the right size, for drying nails in front of, but by the then it was too late. Live and learn. I'll remember it for next time.
At this point I came up with another plan. Instead of using a fan, I'd make the center of the flower out of a piece of balloon, which would be stretched as the flower raised up, then released, thereby launching the flower petals and edible glitter inside into the air. We had to give up on the butterfly at this point because this launch mechanism would have resulted in an apparently dead butterfly catapulting into the air, and then smashing into one of the lower tiers of the cake, possibly taking out a frog or a dragonfly in the process.
Finally having a plan in hand that I had good reason to believe would work, I set about making the petals of the large flower, which was to bloom out of the cake. I made six, to be safe, though I only planned to use five. They needed wires inside to hold them to the center and to strengthen them, so I made two sides of each petal, and then glued them together with wires sandwiched in between. Each petal was made by rolling out the gum paste, cutting it out using a paper pattern I had drawn, then softening the edges with a ball tool and drawing in subtle ridges with a dogbone tool. I then set them on a flower former dusted with cornstarch to dry.
Once the petals were completed, I made the discovery that they were way, way too big to fit in the tube we were using and they had altogether the wrong curve to them, which wasn't as upsetting as it might have been because I had, for some inexplicable reason, painted all these petals with hideous bright pinks and yellows. I don't pretend to know what I was thinking when I did that. I'd like to be able to claim that I was under some sort of evil outside influence, but no, it was all my fault. In any event, it's just as well that I couldn't use those petals.
While I'm hovering near the subject of the cardboard tube, I've got a funny story about that, too. My sister and I were trying to figure out where we were going to find a tube the right size to use in our mechanism. We had some mailing tubes, but they were a little too small. Suddenly, in a blinding flash, inspiration smacked me upside the head. "Oatmeal!" I yelled, and rushed to the kitchen, my sister hot on my heels, where I triumphantly extracted from the cabinet a cylindrical container of oatmeal, which turned out to be much too big for our purposes. This did, however, put us onto the track of food containers, and my sister soon returned from the grocery store with a container of cashews, which was just the right size. Several hours later, after we had eaten half the cashews, my sister realized that the cashew container was exactly the same size as the container in which the gum paste mix is packaged. We had three of these in the house the entire time. Obviously we aren't the most observant people in the history of the universe, or maybe we just need to learn to think things through for a few minutes before rushing off in pursuit of something that was right in front of our noses the whole time.
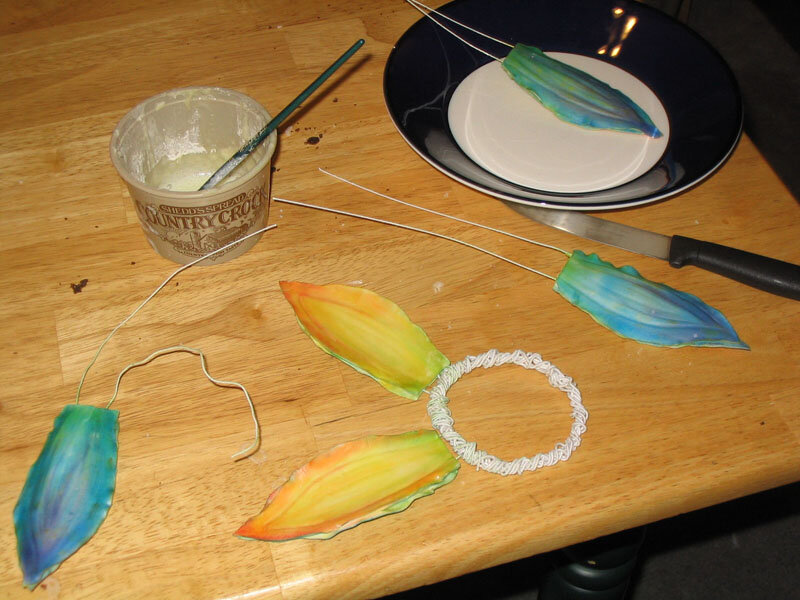
Returning to the topic of the petals, I started over with a new, much smaller petal pattern and this time I curved them the correct way to make them actually fit inside the tube. Once they were dry and their support wires were safely sandwiched in between the two layers of the petals, I set about coloring them. Mindful of past mistakes, I decided to color them with chalk pastels instead of food coloring, allowing for much more natural colors and smoother color blends. I went with a blue and purple color scheme on the bottom of the petals and a yellow and orange scheme on the tops. Remember, it's an idealized fantasy flower. I can make it any color I want. So there. I also added some greens at the bottom of each petal for a more natural stem to petal transition. Then I steamed all the petals to set the colors and make them a little shiny (a trick we learned at our Wilton master class in cake decorating we took last spring.)

With the petals complete, I had only to create the launch mechanism. I first made a ring of several layers of thick floral wire. To this, I taped a cut section of balloon, in which to place the glitter. At this point, we reached the hilarious realization that my launch mechanism looked like a giant condom, but I didn't let that deter me. I attached a wooden dowel handle to the giant condom, then wrapped the wires inside the flower petals into the wires around the perimeter of the condom and the flower was ready to be installed in the cake.
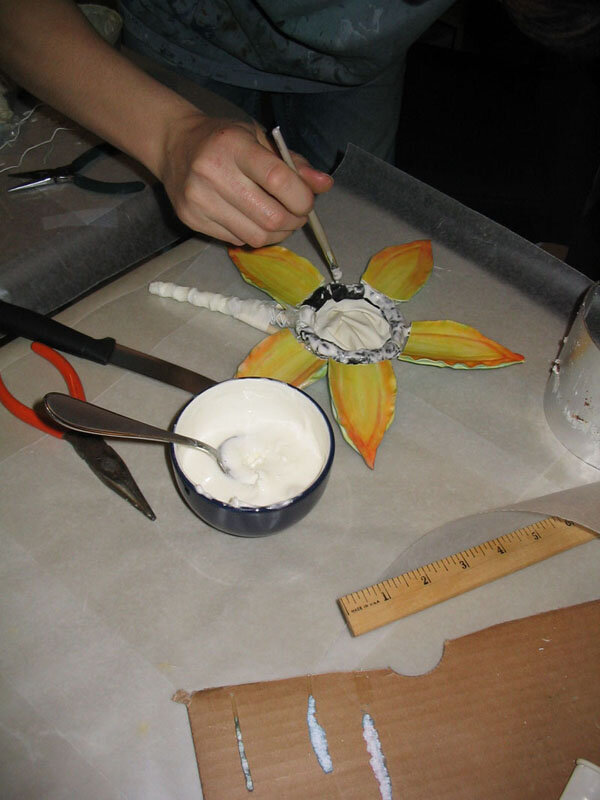
In order for that to happen I had to carve out a large circle in the center of the top tier of the cake. Well, not in the center, actually. It was more off to one side because I convinced my sister that would look more in keeping with the cantilevered, spiral design of the cake. In retrospect, I don't think I was right about that, but oh well. Even I can't be right all the time. Once I had hollowed out the large circle in the center of the top tier, I inserted the cardboard tube from the cashews (cut down to the right height) into the cake, then carved a groove for the handle of the flower to travel in. At about this point, I realized that the tier was slightly shorter than I had figured on and my petals were too long to fit inside the cake, so I had to take them off the condom, remove the wires, carefully cut off the bottom of each petal, reinsert the wires, and rewire them to the condom. After a surprisingly smooth execution of this procedure, I was ready to insert the flower in the cake.
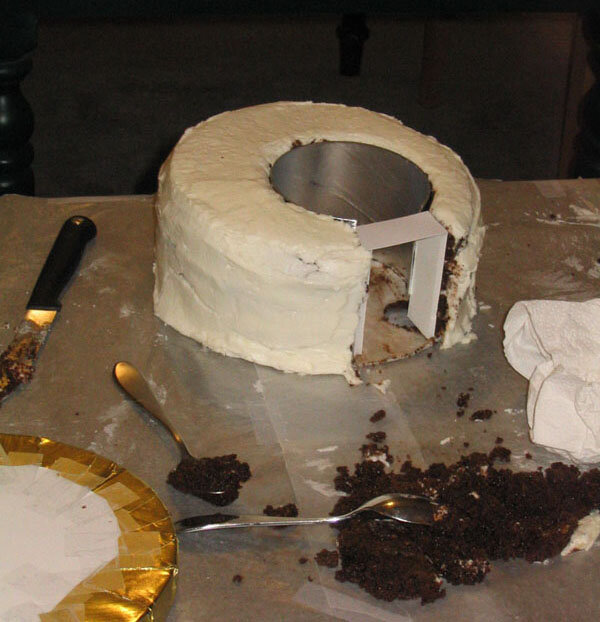
In order for the glitter to be launched into the air, the balloon had to be pulled tight, then released when the flower was lifted up and out of the cake. After experimenting with all manner of clamps and dismembering a little model-making clamp assembly I own, I hit on the solution of putting a tack down through the center of the balloon into the foamcore beneath the cake. This would hold the balloon for a little while until it stretched enough that the hole in the balloon would pass over the head of the tack, releasing the balloon. That done, I poured gold edible glitter into the center of the flower, covered the opening in the sugar flower with a sort of royal icing grid, and prayed for the best.
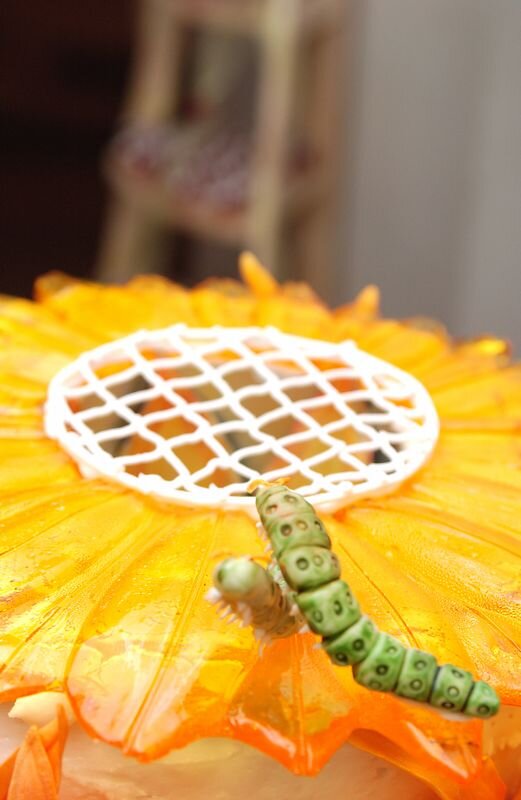
Assembly
Once the structure of the entire cake was together, it remained only to arrange and attach all of our pre-made decoration. For some reason I expected this to be much easier than it was.
The sugar plates actually were easy - they just plopped right down in place. We wet the icing on top of each tier first to make sure they stuck, but that may not have even been necessary. Incidentally, it would have been quite a neat, elegant looking cake with just the sugar plates and no other decorations.

I then piped bead borders around the top and bottom of each tier to hide various and sundry imperfections, then set about attaching the decorations.
We had decided not to attach the figures or the snowflakes until we arrived at the reception site because we didn't want them to break en route, so I had nothing to do on the winter layer for the moment. Which was fine with me because the autumn layer gave me more than enough trouble for two. It took me while to figure out the best way to arrange the autumn leaves around the side of the autumn tier because they were too tall to really fit under the sugar plate and not curved enough to go to the outside of the sugar plate, which extended in some places several inches beyond the cake. After a few abortive attempts, I settled on angling all the leaves so they would fit under the sugar plate and eventually managed to get them all stuck on with royal icing. (Quite a few of them fell off in the car on the drive to the church, but we just stuck them back on once we arrived.)
The summer layer was much easier, because the lily pads were just the right size, possibly because my sister made those, since everything I made for this cake for some reason came out too big. They stuck on easily and the lilies were laughably easy to stick in between.
Spring was also a breeze (again, my sister made these flowers). The gerbera daisies had big wire bases, which I stuck right into the sides of the cake. I placed a delicate royal icing mesh over the hole in the center of spring's sugar plate out of which the flower was to bloom and spring was finished.
That was it for the home assembly - the rest would have to wait until we arrived at the church, which, by the way, is a saga all by itself. There may be no more stressful car ride in the world than a car ride with a cantilevered cake in the back seat. Fortunately for me, My sister drives a station wagon, while I drive a truck, so she was the logical choice for cake chauffer. Because our plans on the day of the wedding called for her to drive to get the bride while I drove to get plastic supports for the cake we needed to take two separate cars, so I couldn't even be in the car with her to offer to moral support. The best I could do was to give her the occasional thumbs-up when she glanced in the rear view mirror.
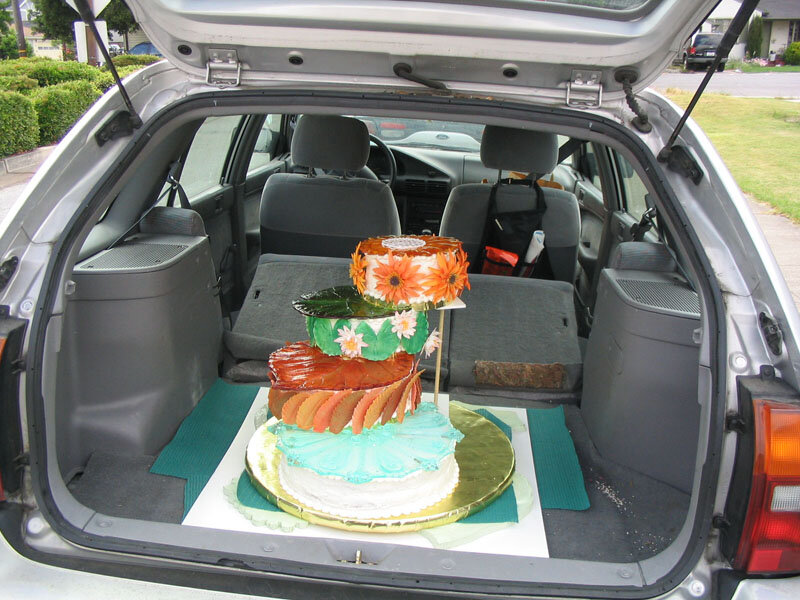
Even just moving the cake from our table to the car was scary. It was pretty darn heavy for a cake, let me tell you, and the round board it was sitting on was only a few inches smaller than our door. We got it safely ensconced in my sister's station wagon, on top of some non-slip material to keep it from shifting. To protect it against dust and such we built a box of foamcore around it and, making sure that our temporary dowel rod supports were firmly in place, we were ready to go!
I can't even imagine how nervous my sister must have been, listing to every creak or snap from the back of the car and cringing at every pothole. It was bad enough just following her. We only pulled over once on the forty minute drive to the church when my sister heard a noise which turned out to only be a few of the autumn leaves falling off.
We made it to the church unscathed and it remained only to get it in the building and onto its table, a process that was greatly assisted by the presence in the church kitchen of a rolling cart.
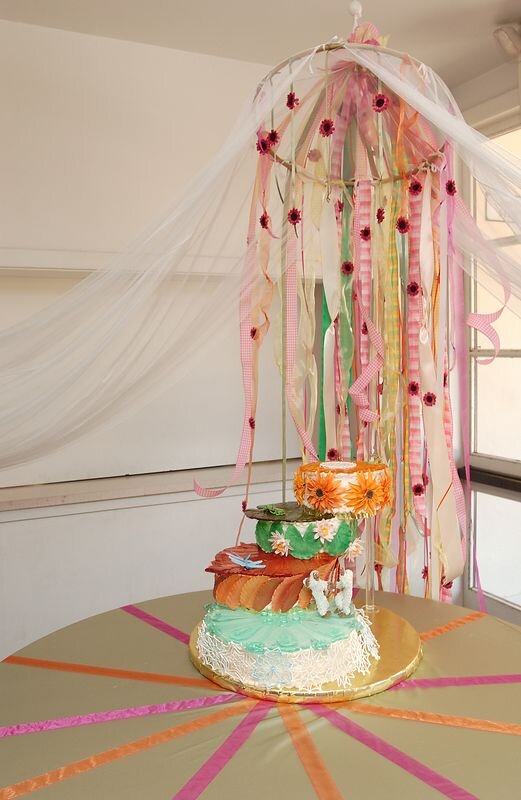
Once the cake was safely in place on the designated cake table (around which the bride and her helpers had erected a lovely ribbon canopy). My sister set about repairing the fallen autumn leaves while I rushed off to the local TAP plastics to get thick plastic rods to use as temporary supports for the cake (much more attractive than the temporary supports we had been using which I made out of dowel rod and foamcore.) I returned to find that the leaves were mended and that my plastic supports were, indeed, quite attractive.
At this point I took over the project of putting the finishing touches on the cake so that my sister (who was also the matron of honor) could scamper off to help the bride prepare. The snowflakes were simple to attach with a little royal icing, as were the various animal couples. I was very careful to position the caterpillars on the top tier so that they wouldn't be crushed by the giant flower when it bloomed out of the cake. That done, I headed out for a well-deserved manicure and pedicure.
Presentation
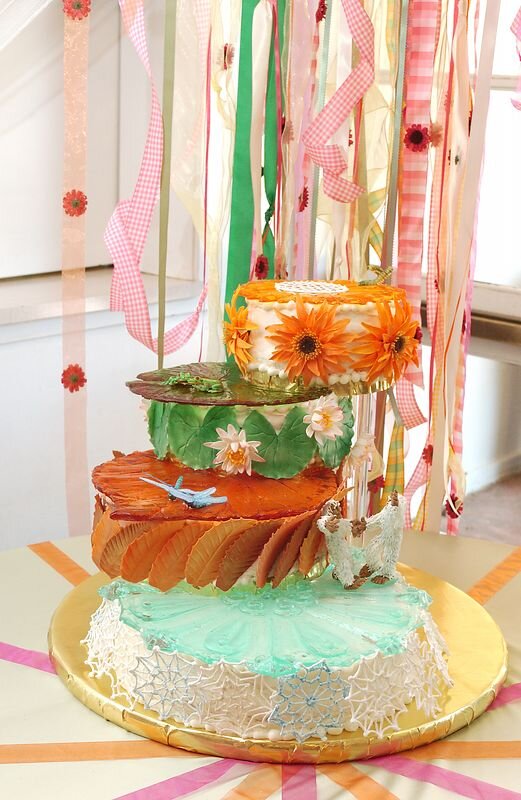
We kept the plastic supports in place until the ceremony was over (I cried; my sister cried; the bride cried; it was a great success.) and the reception began. Then we took them out and hoped for the best. Everything seemed fine, so we went to enjoy the sangria with little plastic monkeys on the glasses. After about forty-five minutes we checked the cake and decided to put the supports back in as a safety precaution because it had tipped a little bit, but it probably would have been fine without them as it wasn't long after that that we were called upon to serve the cake.
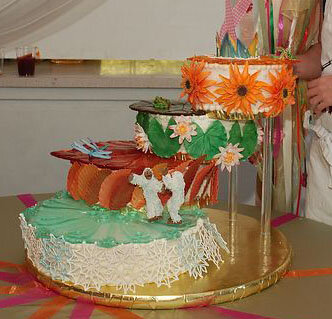
Of course, before the cake was served, the flower had to bloom. Or fail miserably. I couldn't be certain which. We gathered all the guests around the cake where my sister and I described our concept then I warned everyone that, while I hoped the cake was about to do something dramatic, it was possible that it was going to be a complete flop. Then I took hold of the handle and raised the flower. At first, nothing happened. The balloon was too firmly attached to the bottom of the cake and wasn't letting go. A great sigh ran through the assembled celebrants. I gave one last desperate tug and the balloon broke free! Gold glitter spewed into the air and was greeted by cheers! The flower didn't quite make it all the way out, so it only opened part way, but it was a heck of a lot better than nothing.
We pulled the sugar plate off of the top tier so the bride and groom could cut their first piece, then we moved the whole shebang into the kitchen to cut it into servings. We've never cut a cake this big before, but we had a diagram of how it's usually done and I think we did pretty well. I unbolted and disassembled the cake and removed the dowels while my sister and another woman from the church cut the pieces. I also answered questions about gum paste and sugar and isomalt from a few astute young boys who were fascinated by the whole thing and hung around the kitchen the entire time we were serving the cake then took various gum paste flowers and lily pads and such home with them to keep. It's nice to be appreciated.

Our work finally done, we kicked back on a bench in the courtyard to revel in our success, drink sangria, and watch some nearby children make long, beautiful, unintentionally pornographic chains out of the plastic drink monkeys.

For the moment we chose not think about the absolutely giant mess we had waiting for us in the dining room, kitchen, and garage at home.
Resources
We also learned many of our techniques (and had a fabulous time) at the Wilton School in Darien, Illinois. We took the The Master Course, Introduction to Gum Paste, Introduction to Rolled Fondant, and Introduction to Pulled Sugar. Sandy, our Master Course instructor, was one of the best teachers either of us had in any subject.
Our source for the food-safe mold making material (we used the Perfect Soft Silicone). They also have a helpful guide to mold making.

Thorax Cake
I generally make a bleeding heart cake for our annual pumpkin carving party (Pumpkinfest). Sometimes the heart beats, sometimes it's anatomically correct, and so on and so forth. This year I decided to go the whole hog and make an entire thoracic cavity cake.
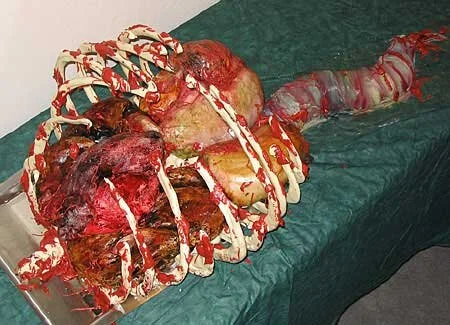
The Thorax Cake - grossing out the internets since 2003.
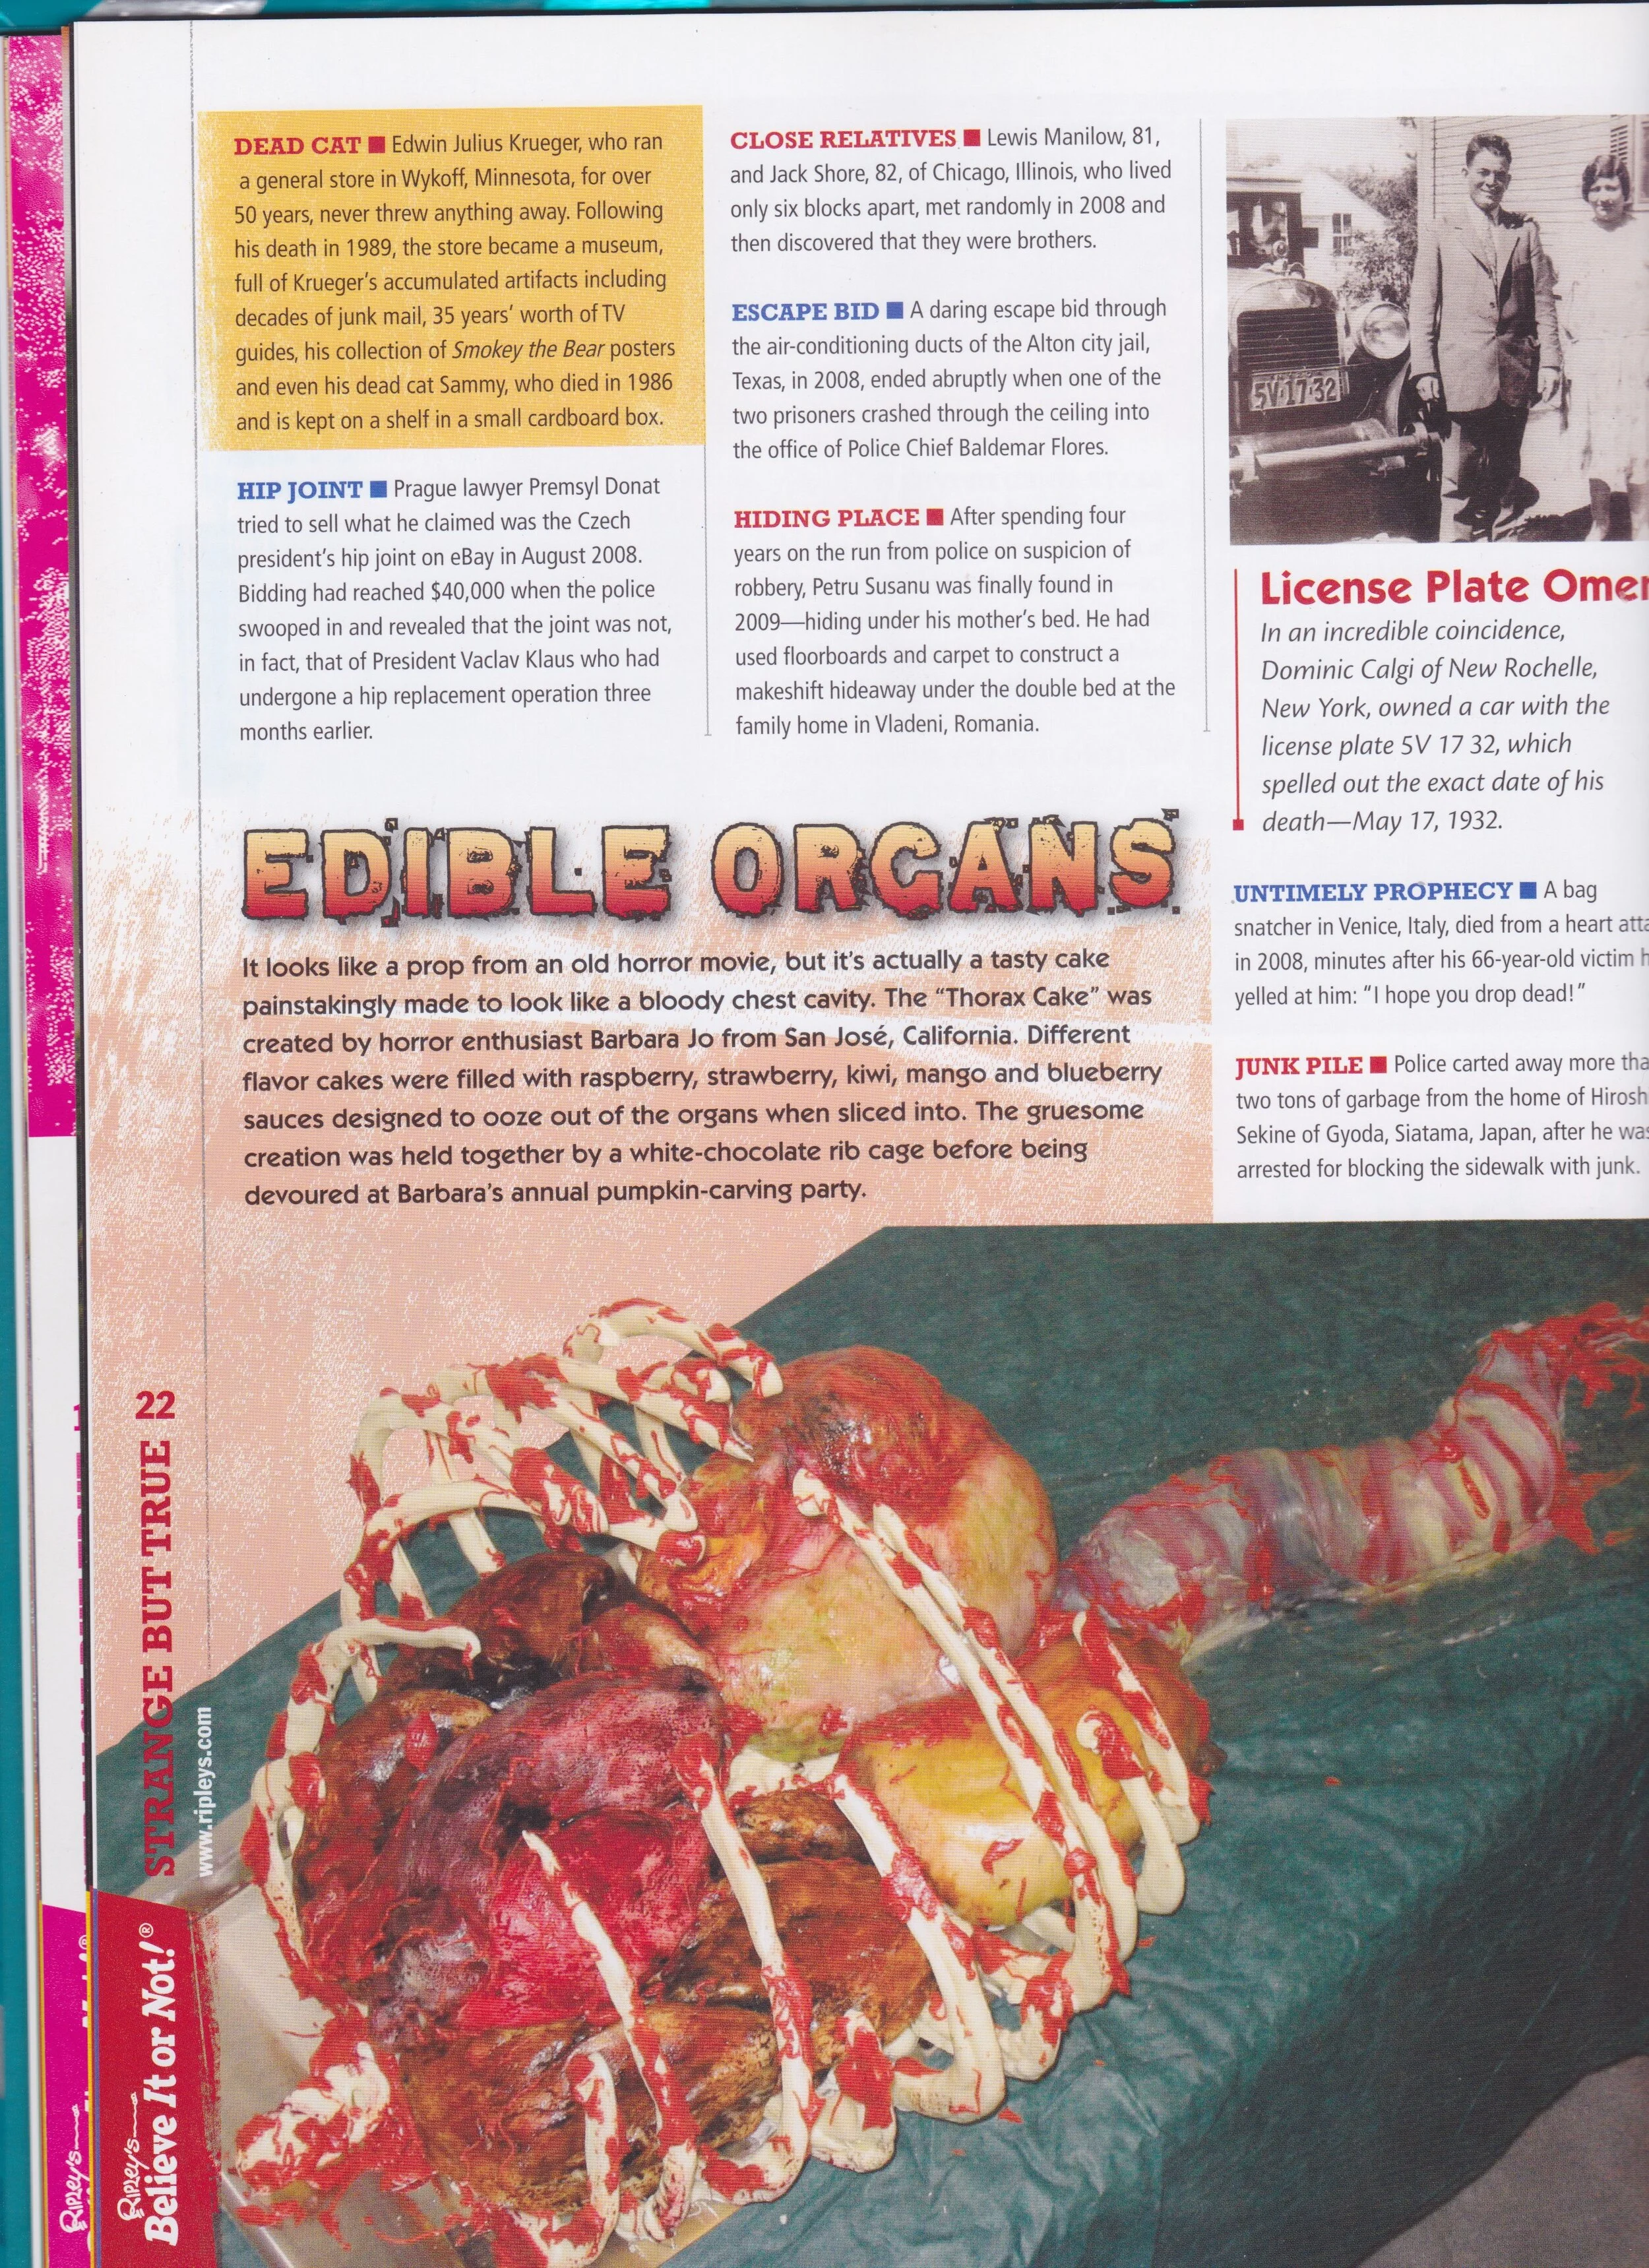
I generally make a bleeding heart cake for our annual pumpkin carving party (Pumpkinfest). Sometimes the heart beats, sometimes it's anatomically correct, and so on and so forth. This year I decided to go the whole hog and make an entire thoracic cavity cake. The plan was for each organ to be made out of a different kind of cake and to secrete a different color of fluid when it was cut into. Previous heart cakes have bled fresh, homemade raspberry sauce. This year I made raspberry, strawberry, kiwi, mango, and blueberry sauces. Sadly, the organs didn't bleed as well as I had hoped when I cut the cake, as each organ was relatively small and couldn't hold much sauce. Also all the moving around after filling the organs made it hard to keep the sauce contained in the little cavities I hollowed out. The heart bled pretty well, but the other organ fluids weren't very dramatic. On the bright side, there were lots of leftover sauces, which were all quite delicious. But I'm getting ahead of myself. My intended organ-cake-sauce combinations were as follows.
Heart - orange cake with raspberry sauce
Lungs - apple spice cake with strawberry sauce
Kidneys - orange cake with blueberry sauce
Stomach - ginger cake with mango sauce
Liver - chocolate cake with kiwi sauce
Small Intestine - jelly roll with red currant jelly
Unfortunately the liver suffered a complete structural failure when I tried to transfer into place within the rib cage, so it had to be eliminated from the presentation. I like to think that the liver was the tastiest bit and so whoever ripped this unfortunate man apart (My sister thinks it was Klingon because it was slightly larger than life size, but I'm not sure Klingons have the same internal organ structure.) ate the liver first before it ever got to our pumpkin party.

After baking all the different types of cakes, I carved them into the shapes of the appropriate organs, using my handy Gray's Anatomy as a reference.
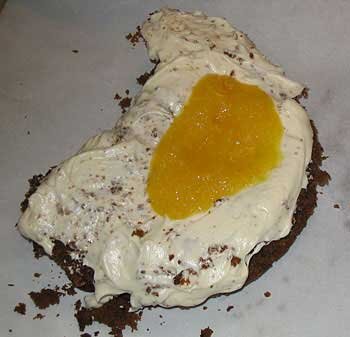
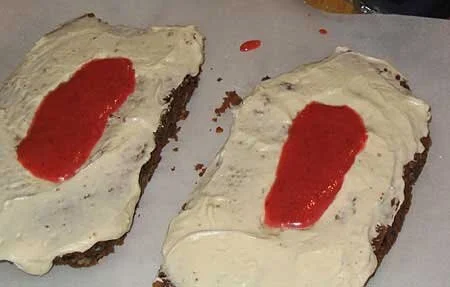
I then flipped each organ over, hollowed out a cavity in the center and frosted the inside of the cavity and the underside of the cake with buttercream frosting. After spooning in the fruit sauces, I sealed the cavities with a layer of fondant icing and flipped the organs back over. The heart and the lungs I covered with white modeling chocolate and the kidneys and stomach I covered with fondant icing. Both had their advantages and their disadvantages. White modeling chocolate tastes better than fondant and it sticks to itself better than fondant, but it's more difficult to work with on cakes like these which were relatively unstable due to the hollows in the middle. Also, modeling chocolate is difficult to paint with paste food coloring, which is what I usually use. It can be painted easily with powdered food coloring, but I didn't have any cocoa butter to dissolve the powder in. The fondant is easy to roll out and wrap around the cake and very easy to paint but it doesn't hold sculptural detail as well as modeling chocolate.
At this point, I took a break from the cakes in order to assemble the white chocolate rib cage in which all the organs were to be placed.
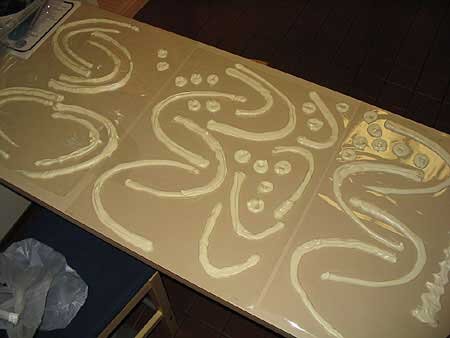
I tempered white chocolate chips in the microwave and piped ribs and vertebrae onto acetate with a plastic piping bag. I drew ribs onto paper which I placed underneath the acetate to insure that the ribs would be the same shape and the right size.
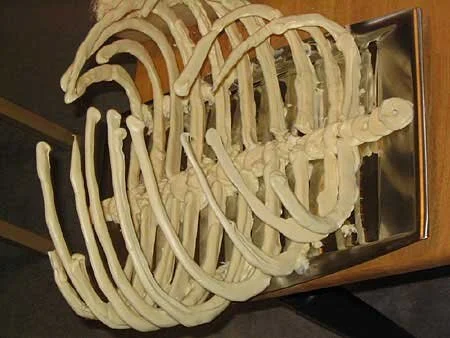
Dipping each piece into a bowl of melted white chocolate, it was relatively easy to assemble the rib cage on a silver tray. (The tray's last use was for passing out cookies at my sister's wedding.) Of course, with all the organs on top of it, virtually no one ever actually saw the fact that there was a complete spinal column underneath all the cake so some might say there was a bit of wasted effort there, but I say if you're going to make an edible, anatomically correct chest cavity dessert tray, you might as well do it right!

Once the rib cage was dry, I placed all the organs except the liver in the appropriate places inside it (again using Gray's Anatomy as a guide. This is, by the way, the only use that Gray's Anatomy ever sees in our household.)
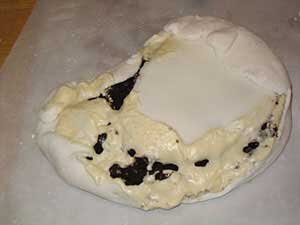
It was at this point that I realized the liver was beyond salvaging. (I had problems with the liver from the moment I tried to take it out of the cake tin.)
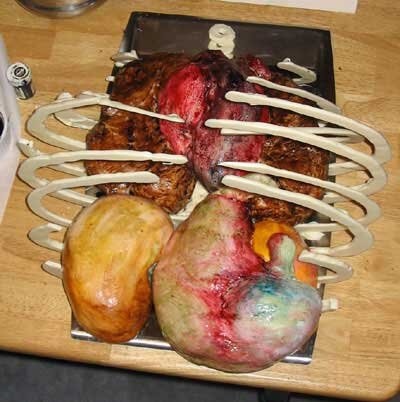
I'm not really sure what colors kidneys and stomachs and such are supposed to be, but, drawing on my vast experience watching people in movies being disemboweled, I gave it my best shot.
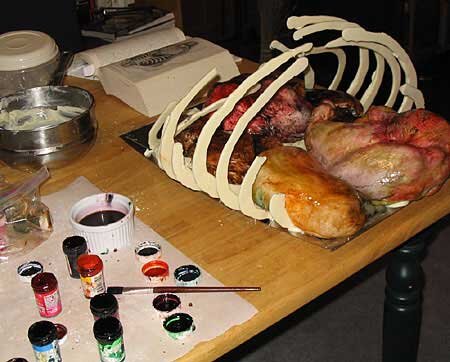
I'm not sure how accurate the results were, but they were definitely gross.
At this point my sister came home from a party and helped me move the cake to its final location so I could attach the intestine, which was to be trailing out of the rib cage so as to suggest that the person to whom the thorax had belonged had been ripped apart, rather than carefully dissected.
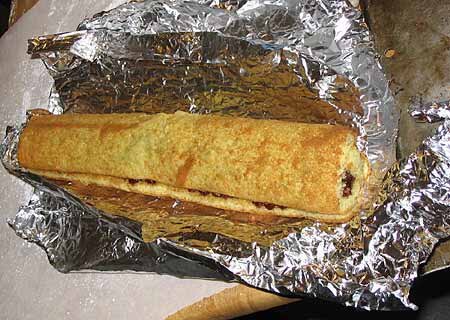
I bent the jelly roll (which I was quite proud of; I'd never made that kind of cake before and I sometimes have problems with whipping eggs. Fortunately, I was visiting my mom recently and she told me that it's very important the mixer and bowl be very clean and perfectly dry or the egg whipping won't work, so I didn't have any problems at all this time. Thanks, Mom!) into appropriate curves and covered it with white chocolate. I was, by this point, out of both kinds of frosting, lacked the ingredients to make more, and it was four o'clock in the morning so I couldn't get any more. That's why I just used plain white chocolate to cover the intestine. It looked fine, but was pretty difficult to paint, again because I lacked cocoa butter and so couldn't use the powdered food colors.
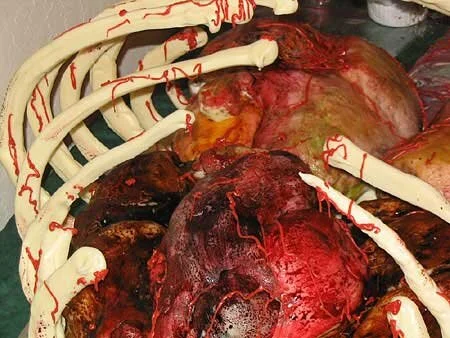
All that was left was to add the buttercream frosting blood, so it wouldn't look so pristine.
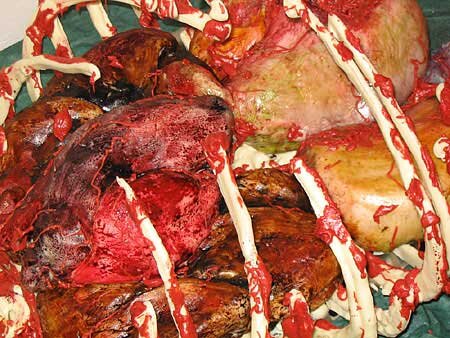
I did little veins on the organs first with a piping bag, then put big globs of gore on the ribs with a knife. A little spritz of corn syrup to give it that all-important oozing, wet look and I was done!
Tragically, the next day was very hot and, as white chocolate melts at about 95 degrees Farenheit, this caused major structural failure of the rib cage. By the time our guests arrived for Pumpkinfest, the rib cage had collapsed almost completely. It was nice and stable in the middle of the night when it was cool, though, I swear! So we put a photo of it in its original state up on the computer monitor. Actually, even with the rib cage broken, it looked pretty gruesome and neat, but it was better before. As I mentioned before, the cutting of the cake was not as dramatic as I had hoped, but, considering that I make all this up as I go along, I think the whole project didn't go too badly at all. And everyone said the cakes and sauces were all delicious, despite the excessive amounts of frosting required for this sort of project.