
Fish Fountain Cake
The second in my series of disintegrating cake (the first being the Melting Head Cake), the Fish Fountain was made for the Second Annual MBA Art Show at my business school.

The second in my series of disintegrating cake (the first being the Melting Head Cake), the Fish Fountain was made for the Second Annual MBA Art Show at my business school.
My goals in creating the Fish Fountain were:
To explore the impermanence of human achievement by creating a cake - a work of art that by its very nature must be destroyed to be appreciated - that preemptively destroys itself.
To show off for my classmates.
I think the main mistake that I made in designing this cake was that I was much more concerned with the functionality - the simple fact that it was a self-devouring fountain - than I was with the aesthetics, which, to be honest, were a bit of an afterthought and I was sort of making things up as I went along. I wish that I had put more thought into integrating the appearance of the cake with its actions. I also think that I could have made the melting more impactful had I made the exterior of the cake darker, because then when the color melted away to reveal the white fondant beneath it would have created a sharper contrast.
Instead, a fish was the first shape I thought of when I thought of a fountain, so I made a fish. Well, not just a fish, of course. In keeping with my usual style, I wanted to make it a bit monstrous and grotesque, so I decided to give it fins that were morphing into human hands and feet.

The first thing I did was make the hands and feet out of royal icing so they would have lots of time to dry. I piped the royal icing onto parchment paper, then set them over some curved cardboard pieces to give them a nice shape. In hopes that it would help the cake melt in an interesting fashion, I gave the fins some very thin sections and some very thick sections so they would dissolve at different rates.

Next I ran some tests on various form factors of sugar, to see how quickly they melted when left under a stream of water. I wanted the cake to melt quickly enough to be easily observable, but not so quickly that the cake would melt into a soggy inedible mess before everyone had a chance to appreciate the complexities of my concept. I experimented with pressed sugar, royal icing, isomalt sheets, hard candy sheets, and fondant. I also wanted to use multiple materials that would melt at different rates and create interesting textures. Everything worked pretty well, except for the pressed sugar, which dissolved too quickly to really be of any use to me.

Now I needed a fountain. I picked up two different little pumps at Home Depot as well as some tubing. After a fair amount of trial and error, I wound up with a plastic cake plate sitting in an ugly blue plastic bowl with a paper towel tube sticking up through the middle. Underneath the cake plate was my little pump, with a tube running up through the center of the paper towel tube. I wanted to make the water come out as close to vertically as possible, so that it would dissolve the cake all the way around and not just on one side. I knew I wouldn't be able to test it anymore once I had the cake in place, so I just had to set it up as best I could initially and hope.
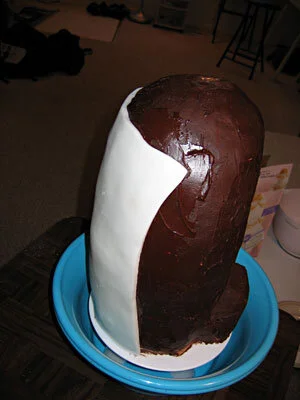
For the cake, I made my usual chocolate recipe, baked a whole mess of rounds, torted and filled them with chocolate ganache, and stacked them around the paper towel tube. Because it was so tall, I used dowels and foamcore circles every four inches or so. Then I carved it into basically a big oblong blob and crumb coated it with more chocolate ganache. In retrospect I should have given it a more contrapposto shape. It would have been more dynamic.

Rather than try to cover such a tall shape with just one piece of fondant, I used three. I also made them extra thick because I didn't to risk the cake itself getting soggy. First I covered the side with two rectangles, so that the seam would run right up the back and the belly of the fish. Then I put one more piece over the top that would serve as the fish head up to the gills. This had the highly unfortunate effect of making it look like a penis.

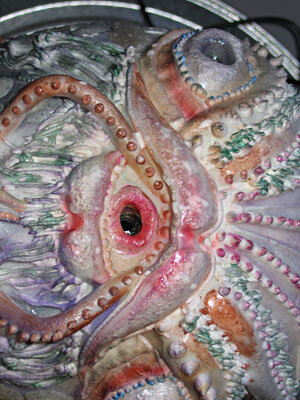
Next I added the larger fondant decorations to the face. Again, my propensity for making monsters came to the fore and the fish came out very dragon-y. I also ran textured fondant lines up the front and back to hide the seams in my initial fondant layer. Then I put my royal icing fins and tail in place, using big skewers to hold them until the royal icing dried.

At this point, because I hadn't planned the visuals well enough, my decorations got a bit out of hand. It was like the royal icing had a mind of its own. I piped fringe, dots, whiskers, stripes ... in an attempt to conceal the fact that I had made the fountain inside a cheap plastic bowl from Walmart, I covered the bowl with royal icing as well and tried to texture it like stone with a sponge. It wasn't the prettiest thing in the world, but it was probably marginally less ugly than the bowl. I also sponged some royal icing onto the cake itself, as I was vaguely planning to give that a bit of a stone appearance as well.

Once my royal icing dried I put a base coat of airbrushing on. To emphasize the fact that my fish-dragon was also part human, I put flesh tone on the fins/hands and tail/feet. Because I was going for a stone feel overall, I put a grey base coat on the rest of the cake and on the bowl.
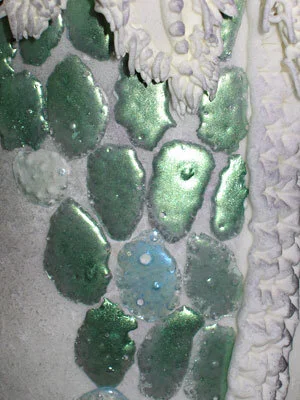
Now my fish needed scales. Of course, if I had really been committed to my stone texture idea, I would have sculpted the scales into the fondant before I applied my stone texture. But, as I said before, cohesive aesthetics was not my top priority. I thought by having several different media on the cake - royal icing, fondant, isomalt - I would get a more interesting melt. So I made some multicolored, iridescent scales by mixing isomalt powder with silver, purple, green, and blue luster dust, then melting little piles of the mixture in a 400 degree oven on a silpat mat. They came out nice and bubbly and organic-looking, but of course they did absolutely nothing to make the cake look like a stone fountain.
I stuck the scales to the cake using royal icing, gradating from green around the back ridge through blue and purple to the silver at the stomach ridge. Then these got out of control, too, and I started sticking scales on the face, the fingers, the toes, everywhere ... I just couldn't stop myself. Improv has never been a strong suit of mine - I really need a firm plan to work from, or I won't be happy with the results.
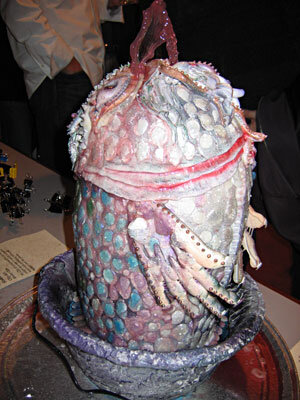
To try to better integrate the multitude of scales with the rest of the cake, I painted luster dust all over the rest of the cake, too. When I was done, my cake looked more like a disco ball than a fountain. And not a tasteful, restrained, silver disco ball. A ridiculous, garish, rainbow-colored disco ball.

On the bright side, the fountain-ness of it functioned quite well. I realized at the last minute that the bowl the cake was in would be nowhere near big enough to contain all the drips and splashes from the fountain, so I had a friend of mine bring a big silver tray to the art show to put the cake on. I had bought several gallons of cranberry juice to use instead of water, so I poured that in and plugged in the pump. I hadn’t gotten the angle on the tubing just right, so at first the juice all sprayed down one side of the fish. I had to prop one side up a bit with a stack of napkins to get it to flow evenly. I was glad that I had decided to use different types of sugar, because that really did enhance the texture of the melting.

I don’t recall exactly why I decided that the fountain should spray something red. Perhaps I didn’t exactly decide; perhaps after so many gory cakes blood red is just my default setting. My finance professor told me that I should have used Cabernet. He was right, it would have been classier to use wine, but I was too cheap to spend much money on a drink that was obviously going to be useless once it was all gummed up with melted sugar. And it did get gross – you have no idea how bubbly and sticky and gooey cranberry juice full of sugar and fondant can be.

Melting Head Cake
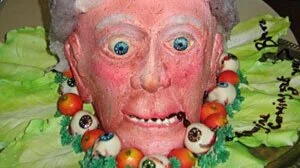
Bride of Zombiefest was the perfect opportunity for me to make a cake that has been percolating in my head for a while now. The idea was a severed head cake, served up on a silver platter with an attractive array of garnishes, with flesh that would melt off over the course of the party, revealing the grinning skull underneath.

I made this delightful severed head presentation for a party celebrating our 400th review on theyrecoming.com.
I admit that we celebrated Bride of Zombiefest before we had actually posted our 400th review on theyrecoming.com (which the party was ostensibly in honor of), but we were close and we needed to schedule it while I was still visiting my sister for the summer.
Bride of Zombiefest was also the perfect opportunity for me to make a cake that has been percolating in my head for a while now. The idea was a severed head cake, served up on a silver platter with an attractive array of garnishes, with flesh that would melt off over the course of the party, revealing the grinning skull underneath.
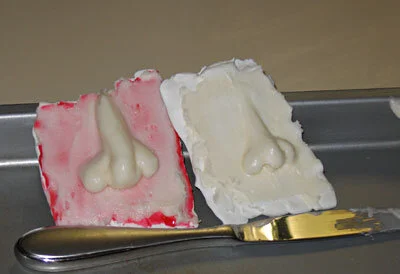
It was obvious that the skull should be made of royal icing, but the question of what to make the flesh out of proved to be a thornier problem. My initial plan was to use buttercream icing and put the cake on a hotplate. I'm glad that I decided to test this plan prior to implementation because the experimental buttercream nose, piped onto the experimental royal icing skull fragments, did not melt at all. Not even a little bit. My sister and I thought that the nose got a little shinier with the heat, but even that may have been wishful thinking.
This preliminary test did teach me a few important things, in addition to the big lesson that buttercream icing does not melt, at least not when I want it to. For instance, I learned that it is, in fact, safe to put buttercream icing onto royal icing, provided that the royal icing is dry first and it's the quick and easy buttercream, not the fancy cooked buttercream. I tried to put royal icing onto cake filled with the fancy buttercream for my sister's baby shower and the royal icing just dissolved into oily goo. I also learned that both red piping gel and seedless raspberry jam are fully compatible with royal icing. This was important because I needed something red to put on top of the skull and underneath the flesh so that the melting would also be bloody. I settled on the raspberry jam because it tastes better, but I actually think in retrospect that the red piping gel might have worked a little better.
At this point, though, I was far more concerned about the flesh's failure to melt. Clearly buttercream icing was not the answer, so I tried boiled icing. Boiled icing really doesn't taste very good at all, but I had high hopes for its melting properties as I confidently made another test nose and set it on the hot plate. And . . . nothing. No melting. Nothing even close to melting. Not so much as a little bit of softening or a sheen of moisture.
At this point I nearly gave up on the melting aspect of the cake. Bear in mind that while I was carrying out these tests the day of the party was fast approaching and I was already well into the creation of the advance elements of the cake - the bloody eyeballs, the skull, and the garnishes, which I will discuss in more detail later in this narrative. But I decided to persevere and test one final type of icing - whipped cream icing. I have never used whipped cream icing before because it is notoriously unstable and the cake, once frosted, has to be frozen or refrigerated. Surely this intimidating, unreliable icing would be fragile enough to melt off my cake!
I made a few test noses this time, so I could test the icing in the fridge and the freezer as well as on the hot plate. I also made test noses of a 50-50 mix of boiled icing and whipped cream icing, because I was afraid that the whipped cream icing, by itself, would be too unstable.(I also tried mixing the whipped cream icing with the buttercream icing, but this instantaneous collapsed into a lumpy mess.) It turned out, however, that the whipped cream icing is actually sturdier and more structural by itself than in conjunction with the boiled icing. And, to my lasting delight, it turns out that whipped cream icing does, in fact, melt when placed on a hotplate!
With rekindled hope for the melting face, I performed a few additional tests on the whipped cream icing to determine if it can be painted with an airbrush (It can.) and to determine if it can be painted with a paintbrush (It can, but only if it's thoroughly frozen.). At this point I also hit on the idea of using a heat lamp to melt the cake from above in conjunction with the hotplate melting it from below. Of course, I didn't have a heat lamp, but I tried a 60 watt bulb and even that melted the test nose, so I went out and bought a heat lamp from the hardware store across the street, as well as a 200 watt bulb. I would have bought two heat lamps, but they only had one, which, as you'll see later, was very fortuitous.
And thus ends the saga of my icing experiments, leaving me ready to move on the saga of the actual cake. So if you thought the icing story was long-winded and melodramatic, you ain't seen nothin' yet.

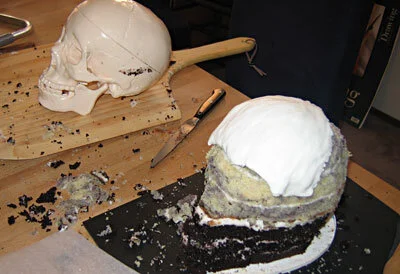
The first step of the cake construction was to make the royal icing skull. For maximum accuracy, I purchased a plastic skull to use as a mold. I used tin foil to cover the skull because it holds the shape really well, but it does have some disadvantages. Because tin foil is opaque it was hard to see the breaks between the skull segments and tin foil also seems to lengthen the dry time of the royal icing. This wouldn't be a problem except that I'm impatient and wasn't willing to wait more than a day to try to unmold the pieces, at which point they were not completely dry. Thus, it took me three tries to make a solid jawbone. I actually managed to wait three days before unmolding the last one, so it was completely dry and came off perfectly.
Unmolding aside, actually making the icing skull was really quite easy. I piped the icing on with a wide, flat tip, then smoothed it with a slightly damp paintbrush.

While I was making things out of royal icing, I also made fifty-odd little tiaras. Why, you ask? Well, we were afraid that a cake the size of a human head wouldn't serve the twenty-five to thirty guests we were expecting at our party, so we decided to make supplemental cupcakes. If the party was Bride of Zombiefest, and the cake was the Bride, then clearly the cupcakes should be the Bridesmaids of the Monster - little fuzzy monster cupcakes (with cotton candy fur; more on that later.) So they needed tiaras, which I piped flat, then draped over a roll of wrapping paper so they would dry with a nice curve. I also made little royal icing eyes for the cupcakes, with painted irises and tiny red veins.

The next pre-baking project was the eyeballs. I have made cordial cherry eyeballs several times before and they're also summarized in the description of the cake from our first Zombiefest. Basically, maraschino cherries are soaked in brandy for a few days then drained and dipped, first in a melted coating fondant, then in white chocolate. The nice thing about the eyeballs is that they actually look better when I don't dip the cherries neatly because weird drips and blobs look like veins and pools of blood. Once the chocolate is set, the eyeballs are painted with powdered food coloring dissolved in melted cocoa butter. Some of the eyeballs were served on their own; others were used as garnishes on the head's serving tray; still others served as the eyes of the head itself.
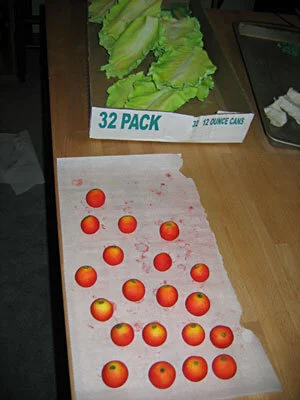
Next came the other garnishes for the head platter - lettuce, tomatoes, and parsley. My sister came up with the idea of how to make the lettuce. I bought actual lettuce (Romaine), dusted the back with corn starch, then pressed a very thin sheet of gum paste onto it so that the gum paste picked up all the lettuce veins. I then ripped the edge a little to get it rough, rolled the edge with a ball tool to ruffle and thin it, and draped the gum paste lettuce over a bed of wax paper so it would dry with nice shape. The parsley was even easier. I just used a very small gum paste flower cutter, then cupped it with a ball tool.
For the tomatoes, I used a 50-50 gum paste-fondant mix, mostly because I didn't have enough gum paste so I had to use the fondant to stretch it. I colored this mixture bright yellow and rolled it into cherry tomato-sized balls. I used an umbrella tool to make the little divot in the top and then rolled the tomato in my hand once more to get it nice and round.
I colored all of these garnishes with ground up chalk pastels and then steamed them in front of a kettle of boiling water to set the color and give it a little sheen.
Finally, we're at the baking stage! I made a chocolate cake for the bottom of the head, then a lemon butter cake, swirled with black food coloring to give it a nice brain color, for the top of the head. I also made about fifty lemon butter cupcakes.
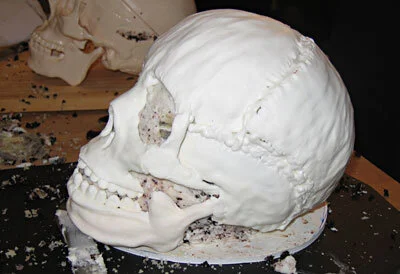
Once cool, I torted and filled the cakes with buttercream icing and, using my plastic skull as a model, carved the cake into the proper shape. My royal icing skull fit together remarkably well over top of the cake. At this point, it would actually have been a pretty cool looking cake in and of itself, but I was nowhere near done.

A coating of raspberry jam made the skull look delightfully freshly skinned, especially once I had popped the cordial cherry eyeballs into place.
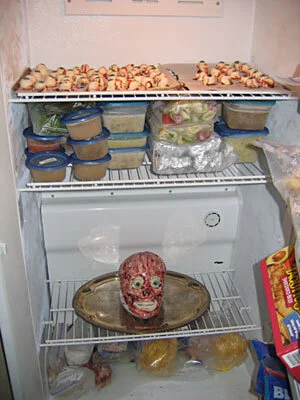
At this point I transferred the cake onto its silver serving tray (borrowed from a church where a friend of mine works) and I could no longer avoid the part of the operation of which I was most terrified - the icing. I put the head in the freezer for a little while first so it would be nice and cold when the icing hit it.

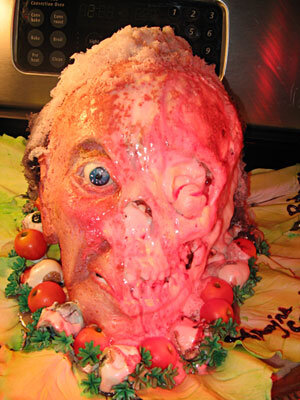
Actually icing the cake went more smoothly than I had feared. It took me three batches of whipped cream icing and between each batch I put the cake in the freezer. Piping the whipped cream icing for details like the nose, lips, ears, and eyelids was a little challenging because if I held the piping bag for too long the icing got too soft, but all in all I was happy with the face creation process. I was trying for a woman's face because she was supposed to be a bride, but it turned out looking androgynous, possibly skewed a little towards the masculine. I hoped that a little airbrushed makeup would tip it into womanhood. Into the freezer it went!

Airbrushing the cake was a little nerve-wracking because the room where I was working was really hot so I had to work fast. I also had to mask off the eyeballs and teeth with parchment paper which was very difficult to do without messing up the icing, but it all went pretty well in the end. The blue eyeshadow (I grew up in the 80's so it somehow got into my head that eyeshadow is always blue. Since I don't wear makeup myself, I've never really been disabused of this notion.), blush, and lipstick did make her look a little more feminine, but she still had a bit of an old man in drag vibe about her.

The garnishes went into place quickly and easily with a few dabs of royal icing and that was all I could do until right before the party. At this point, she was still bald, but my plan was to use cotton candy for the hair and cotton candy doesn't have a great deal of longevity. So the cake went into the freezer and I went to bed.
The party was scheduled for 12:30 in the afternoon, evening parties being inadvisable now that my sister has a five-month-old daughter. At about 9:00a.m. we started making cotton candy. First we made some colored cotton candy for the cupcake fur, using sugar mixed with powdered food coloring. A little ball of cotton candy went on top of each cupcake, followed by a tiara and a pair of eyes.
Our cotton candy machine is actually a children's toy that we purchased at a garage sale for three dollars, so it is perhaps not surprising that it overheated after about half of the cupcakes. I had a few moments of panic when I thought that it would not be in service to make hair for the cake itself, but my sister suggested putting it in the freezer to cool it off quickly, which worked like a charm.

Afraid that the machine would crap out altogether next time, I made the hair for the cake next - a tower of white hair with black Bride-of-Frankenstein-style streaks on the side. I assembled the hair on the tin-foil-covered plastic skull first, then plopped it readymade onto the cake. It looked like a wig and only exacerbated the resemblance to a drag queen - a very old one, given the gaunt cheeks, the white hair, and, due to the icing texture, the pockmarked skin. But I considered that a minor problem. My sister said she looked like Mrs. Haversham. Dad thought she looked like a French aristocrat, which also might have been pretty appropriate, given that whole guillotine escapade.
I added a little red piping gel blood to the mouth so she would look more dead and a little red piping gel blood writing on the lettuce stating, of course, that, "They're coming to get you, Barbara". Then I took a whole lot of photos and popped her back in the freezer to await the party.
By this time the cotton candy machine had overheated again so I had to put it back in the freezer for a while before we could finish the cupcakes. But finish them we did, just before the party. By this time, the cotton candy on the first cupcakes was already wilting and we were afraid that the cotton candy hair on the cake herself would fare even worse, due to condensation from the freezer, so we decided that the cake would remain in the freezer until most of our guests had arrived, at which point we would dramatically reveal her, then turn on the heat lamps and hope for the best.
And . . . amazing enough . . . the best actually happened! Even better than I had hoped! I brought her out and set her on the hotplate, turned on the heat lamp on one side and the 200 watt bulb on the other and . . . her flesh started to melt! And, because I only had one heat lamp, at first only the left side of her face melted. Which was incredibly cool looking! She ended up with one side of her face still solid and the other melted all the way to the skull. The heat lamp even toasted the melted icing a bit at the closest point, so it looked like the skull had been cooked.
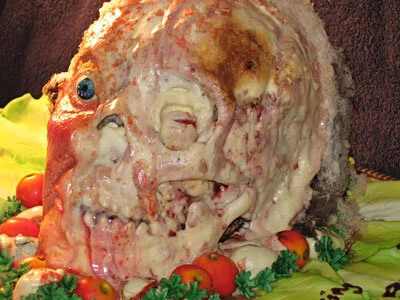
First, the hair melted, then the flesh on top of the skull. The eye socket started to appear, followed by the cheekbone, and the lower jaw. The nose was sloughed off, revealing the nasal cavity and the teeth appeared with a horrifying smile. The eyeball melted away, first crying tears of melted colored cocoa butter, then bursting open to reveal the shiny red cherry within. Red piping gel blood ran out of the mouth, mingling with the gooey white melted flesh.

Once the first side was thoroughly melted away, I switched the heat lamp to the other side until I was left with nothing but a gooey skull sitting in a pool of its own liquefied flesh. Even the garnish cordial cherry eyeballs melted away, leaving only bright cherries amidst the little red tomatoes.

In my darker moments I doubted the melting head cake. I'm ashamed to say that I even seriously considered throwing in the towel and just making a non-melting severed head cake. But that would have been unworthy. That would have been cowardly. I'm proud of myself that I didn't surrender to the temptation of taking the easy way out. I persevered and, in spite of the combined efforts of many different kinds of icing and a finicky cotton candy machine, I succeeded! It was a beautiful moment.