
Guardian Skywatcher Cake
For his 9th birthday, my nephew asked for Guardian Skywatcher from Legend of Zelda: Breath of the Wild. It was almost, but not quite, a total disaster.

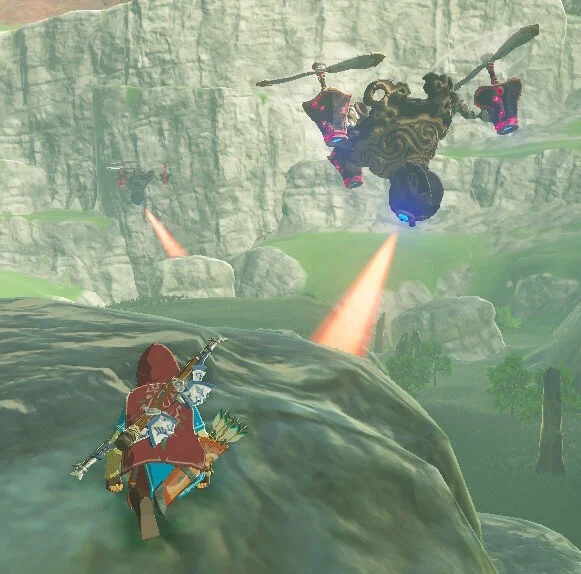
For his 9th birthday, my nephew asked for Guardian Skywatcher from Legend of Zelda: Breath of the Wild. If you aren’t familiar with it, it look something like this:
This was one of those cakes of which I just underestimated the difficulty. In retrospect, the difficulties should have been obvious. The shape of the Guardian Skywatcher is very undercut. It has pieces suspended off the sides by thin supports. The propellers are wide at the tips but narrow in the center. And the entire thing is flying. None of these things are easy to achieve in cake.

Yet I blundered into the project with big ambitions but minimal preparation. Long story short, it was almost, but not quite, a total disaster. Attaching the pieces on the sides was a nightmare. The propellers all broke before the party. Even the pink piping gel I used for the glowing sections faded before the party started. On the bright side, at least the entire structure didn’t collapse, which was a real possibility. Overall, clearly not my strongest work, but my nephew, who is among the sweetest people in the world, loved it anyway.


Flying Saucer Cake
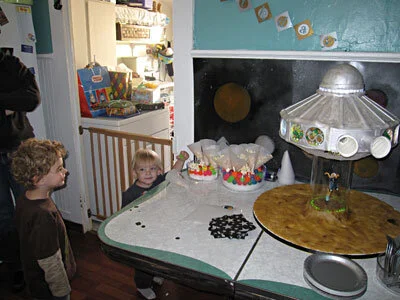
The occasion for the cake was my friend Isaac’s third birthday party. My goal in this design was to evoke the classic B-movie spaceships from the 50’s and 60’s (the title of the party’s evite was “Plan 3 from Outer Space”.)

I began this cake flush with the success of my recent Tardis cake. I received a bit of a comeuppance.
The occasion for the cake was my friend Isaac's third birthday party. (You may remember Isaac from his second birthday cake and his first birthday cake.)
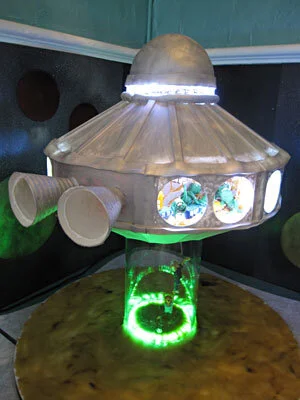
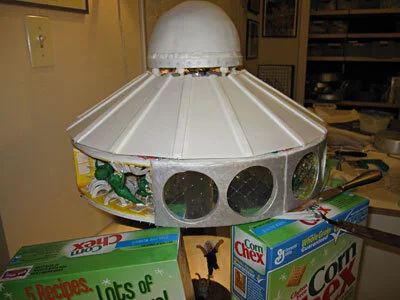
My goal in this design was to evoke the classic B-movie spaceships from the 50's and 60's (the title of the party's evite was "Plan 3 from Outer Space".) As I had so recently completed the Tardis cake, I was still interested in cakes with mirrors, LEDs, and visible interiors. I also wanted to personalize the cake, by including Isaac (in alien form), abducting his parents (in human form). So I designed a classic silver flying saucer with round portholes around the sides that would look into the lighted interior rooms of the ship, where alien Isaacs would be doing things that human Isaac loves to do - eating pretzels, climbing on unsafe things, splashing in a pool, and playing with trains. The entire ship would be mounted on a turntable, so it could slowly rotate. The turntable in turn would sit on a clear acrylic tube, representing the ship's tractor beam, within which I would enclose gum paste figures of Isaac's parents, in the process of being sucked up into the ship.

To make the rooms inside the ship, I started with two pieces of foam core - a 14" diameter circle for the bottom and a 14" diameter 2" ring for the top, so that I would later be able to put the cake inside. I split the space into eight equal slices with gum paste dividers, each with a row of white LEDs on top and bottom. I backed every other space with mirror, so that when their corresponding portholes were backed with mirrored window film and the LEDs were lit, they'd be mirrored ad infinitum within the ship, creating a spacey infinite corridor. For one of these spaces I used red LEDs instead of white, as that was where the conical thrusters would connect to the ship, thereby evoking a combustible power source.
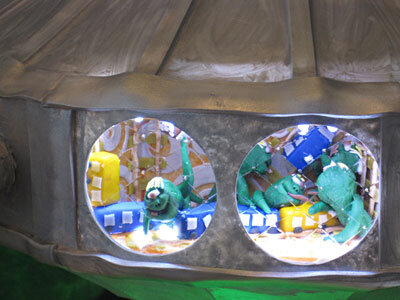
The remaining four spaces became the rooms for the alien-Isaacs. Because I was going for a little-boy's-birthday vibe combined with my 60's B-movie vibe I painted one room aqua, one lime green, one orange, and one yellow. These are all also colors that Isaac's mother has used to decorate their house. Then I appliqued each room with various gum paste squares and circles, painted silver.

I made the aliens out of gum paste, serpentine with green skin and one big eye. To make them reminiscent of Isaac, I gave them puffy cheeks and little shocks of blond hair.

For the portholes, I used a template to cut out gum paste rectangles with windows in them, and draped them over custom forms to dry. The thrusters were also gum paste, wrapped around cones to dry, and then coated with royal icing for a sort of corrugated steel texture. Once the portholes dried, I used royal icing to stick sheet gelatin window panes to the back and, in the case of the portholes in front of the mirrored room, a layer of mirrored window film.
My sister kindly baked the cakes for me. There was space inside the perimeter defined by the rooms to put a 3" tall 10" diameter cake.

To make the tapered upper section of the ship, I started with a 10" diameter cake on top of a 14" diameter cake. I carved these into a truncated cone, 3" high, tapering from 14" diameter at the bottom to 6" diameter at the top. To get the appropriate architectural feel, I covered the cake with a layer of fondant and then the fondant with 16 pre-made gum paste trapezoids. Then I dropped this whole section on top of the cylinder with the rooms.

For the very top of the ship, I carved some 6" round cakes into a hemisphere and covered that with fondant. I mounted this cake onto a foam core circle in which I had embedded a ring of LEDs and mounted it on top of the other cakes.
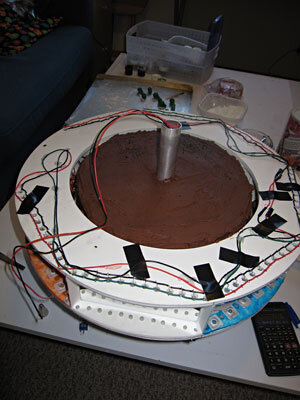
With the main body of the cake assembled, I needed to get the base together. I embedded a ring of green LEDs into the plywood base to illuminate the tractor beam and then set about creating the people being abducted. I started with a wire armature and built up the figures in gum paste around that.
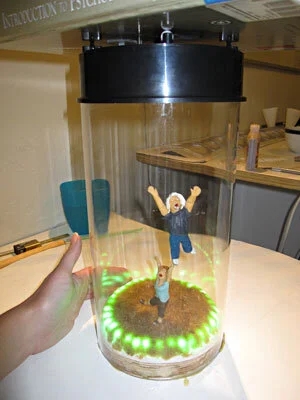
Once the figures were complete I installed the acrylic tube around them and then glued a turntable to the top of the tube. I had considered mounting the turntable at an angle, but I decided that might make it too hard for the turntable to rotate, so I kept the turntable level. As it turned out, I needn't have worried because the moment that I transferred my cake to the turntable it became clear that the turntable was nowhere near powerful enough to turn such a heavy cake. And thus my cake became stationary. Actually the turntable wasn't a total waste, as it still allowed me to turn the cake manually. This was convenient, since the cake was designed to be viewed from all angles, but it certainly lacked pizzazz.
With the cake mounted on the base my flying saucer still needed to taper at the bottom. Unfortunately, it proved to be far too difficult to attach the gum paste pieces that I had created for the bottom of the flying saucer and by this time it was so late that the royal icing would never have had time to dry. So I was forced to hot glue my Bristol board mockup to the bottom of the turntable. I don't like using non-edible materials any more than necessary, but in this case I felt that it was just too late to do anything else.

In fact, by this time it was about 5:00 am the morning of the party and it was too late for a lot of things. I had planned to finish all the edges very cleanly and wind up with a very polished final product that would live up to the standard that I set for myself with the Tardis Cake. Sadly, at 5:00 am, this was not meant to be. The best I could do was to whip up a few fondant ropes to cover the most egregious seams, slap a coat of silver luster dust on everything and go to bed. I was not thrilled with the results. I'd like to claim that it was some sort of homage to the shoddy special effects that we all love so much in our B-movies, but the sad truth is that it was just poor time management.
The next morning I just had time to cover the plywood base with a layer of pressed sugar and make it to the party in time to help hang up the decorations. The cake did make the car trip with no untoward effects, but there evidently was a lot of moisture trapped in the acrylic tube because the figures' gum paste limbs softened and wilted, so where their arms had meant to be pulled upwards by the inexorable force of the tractor beam, instead their arms curved despondently towards the earth.
I actually don't mind an occasional failure. When you're pushing the boundaries of a medium you have to expect a few unsuccessful trials. This failure irked me however, because in this instance my failure was not due to excessive ambition but to deficient planning. I view the first type of failure as an inevitable result of man's eternal striving to better himself, but the second is merely the inevitable result of opting to watch America's Next Top Model instead of working on the project at hand.

Circulating Heart Cake
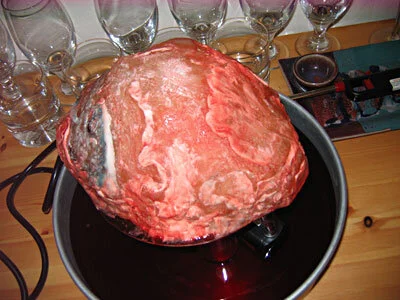
Some variation on a bleeding heart cake is a relatively standard feature of our annual Pumpkinfest. This year, I was trying to make a cake through which "blood" (cranberry juice) would continuously and visibly circulate.
Some variation on a bleeding heart cake is a relatively standard feature of our annual Pumpkinfest. This year, I was trying to make a cake through which "blood" (cranberry juice) would continuously and visibly circulate.
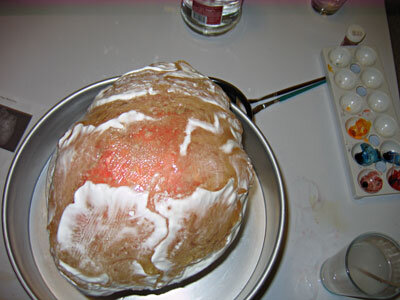
Concept: A cake, shaped like a heart and covered with fondant, sitting on top of a platform elevated above a reservoir full of cranberry juice. In the reservoir, a pump attached to a tube leading up the side of the cake to pump the cranberry juice up and over the cake. To contain the juice and insure that it spread nicely over the surface of the cake, an isomalt (sugar substitute) shell, also in the shape of a heart, placed over the cake, leaving about an eighth inch of space for the juice to flow between the cake and the outer shell. In the opposite side of the elevated platform from the tube, a series of holes to drain the juice back into the reservoir and begin the whole cycle all over again.

Step 1: Make an isomalt shell shaped like a heart. At first, I had hoped to find something that was already in the shape of a heart, cover it with tin foil, and pour isomalt over the top. I wanted to use isomalt rather than sugar because it's more transparent. Unfortunately, in spite of having access to numerous seasonal Halloween stores, I was unable to locate anything that was a) accurately heart-shaped, b) big enough that I would be able to get sufficient cake for our guests inside, and c) able to resist the heat of liquid isomalt. I therefore had to make my tin foil heart mold from scratch. I started with a cereal bowl, upside down, and built up the rest of the heart shape around the bowl with wadded up tin foil. To get as smooth a surface as possible to pour over, once I had a shape I was happy with, I spread one final layer of tin foil on top and smoothed it as much as I possibly could. As you may recall from my description of the jellyfish cake, the problem that I often have with pouring sugar or isomalt over tin foil is that the little ridges of the tin foil get stuck in the solidified sugar and are very tedious and nerve-wracking to remove with tweezers and a damp paintbrush.
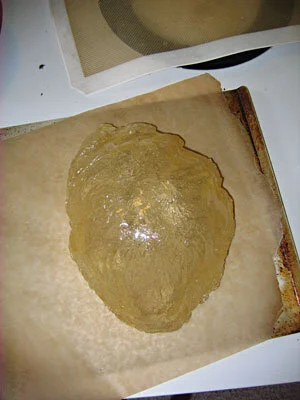
I put this tin foil heart onto a silpat mat and melted down my isomalt. In my earlier discussion of the jellyfish cake I described some of the problems that I have with making sugar domes. All of these problems apply equally to making isomalt hearts. I was also a little disappointed that the isomalt hardened somewhat cloudy, I think because I was working air into it as I pulled it back up the sides of my tin foil heart to prevent it from all pooling at the bottom. I was hoping for a transparent heart, but I had to settle for cloudy. I also think that there's something wrong with the bucket of isomalt that I have, because it always come out sort of yellow, when isomalt is supposed to be perfectly clear. At least the heart released from the tin foil better than any of my prior tin foil sugar projects.
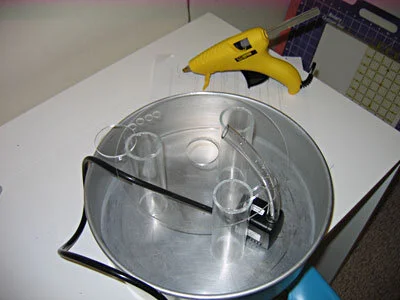
Step 2: Make an elevated platform, pump, and reservoir assembly. Rather than purchasing any new equipment for this project, with just a little glue and a few additional holes drilled, I was able to repurpose some of the acrylic circles and tubes from the Triple Animal Cake and the pump and tubing from the Fish Fountain Cake. I used a cake tin for the reservoir. Not the most aesthetically inspired choice, perhaps, but highly functional and readily available.
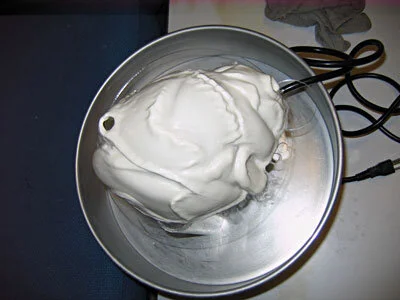
Step 3: Make a heart-shaped cake. Internal-organ-shaped cakes being something of a specialty of mine, the carving went pretty quickly. I covered it with white fondant - a much thicker layer than usual, as I wanted it to be able to stand up to the juice running over it without dissolving away and exposing the cake - then sculpted in some of the major features, like the divisions between the chambers. Then I moved it onto the acrylic platform, and positioned the tube tight up against it. To get some additional detail (though I wasn't overly concerned with extreme detail, since the whole thing was going to be under my isomalt shell) I piped on royal icing and shaped it with a slightly damp, soft paintbrush. I also covered the tube with royal icing, both to hold it in place and to camouflage it. I painted the cake with brighter colors than I might have ordinarily, because I wanted them to read through the translucent shell.
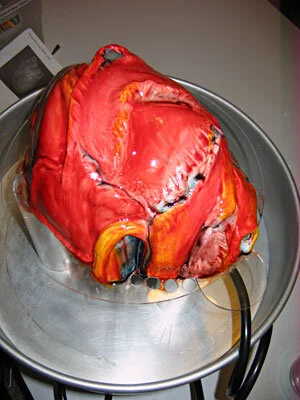
Step 4: Attach the isomalt shell. Unfortunately, once I plopped the shell over top of the cake, it looked more like an amoeba than a heart. I hadn't planned to decorate the top surface of the shell, because I wanted it to be as see-through as possible, but I felt that I had to do something to make it more identifiable. So I went over the top surface of the isomalt with royal icing details and texture, and then painted the surface with some reds and blues. This did make it look marginally more like a heart, but it also made it much more opaque, which proved to be unfortunate when I got around to plugging the pump in.

Step 5: Fill the reservoir with cranberry juice, cross your fingers, and plug in the pump. Because my isomalt was cloudy from the get-go and because I had further opaqued the surface with royal icing and food coloring, the pumping action, while technically successful was exceedingly subtle. I'm pretty sure that if I hadn't explained it to everyone, no one would have had any idea what the cake was or what it was doing. I tried to capture it on video, but all you can really see is the juice venting down the side and back into the reservoir. (Which, by the way, I really should have directed out the aorta.) The video is further compromised by the fact that my camera was in the process of kicking the bucket resulting in a distinct horizontal line across the frame and the fact that there was a toddler screaming in the background.
Conclusion: I still believe that there is potential in the concept of a cake with fluids circulating inside, but I think it requires either a) a different form factor, b) a more competent isomalt handler, or c) both.
Heart Cupcakes
In the past, my heart-shaped cakes have tended to get bigger and bigger, resulting in things like a heart the size of a small dog and the infamous Thoracic Cavity Cake. This year I decided to buck the curve and make very small, individual-portion-sized heart-shaped cakes.

In the past, my heart-shaped cakes have tended to get bigger and bigger, resulting in things like a heart the size of a small dog and the infamous Thoracic Cavity Cake. This year I decided to buck the curve and make very small, individual-portion-sized heart-shaped cakes.
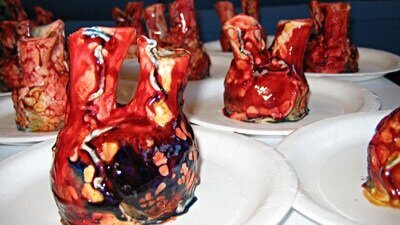
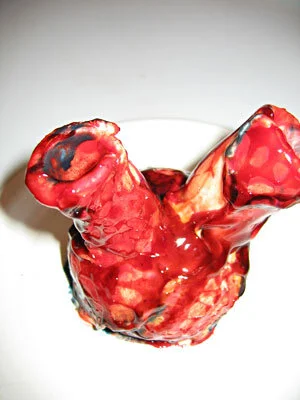
There were 18 people coming to Pumpkinfest, so I needed to make 18 little, cupcake-sized hearts. I also wanted them to bleed because what would be the point of making heart-shaped cupcakes that didn't bleed? I thought it would be a nice touch to have both red blood (arterial) and blue blood (venous), so I made a batch of fresh raspberry sauce and a batch of fresh blueberry sauce. Both of these sauces are very delicious and very easy to make. The only ingredients are berries, sugar, and lemon juice, mixed up in a blender and strained through a sieve to remove the seeds. The blueberry sauce was perhaps less blue than it might optimally have been, but I think we all know how hard it is to find appetizing blue food.
To contain the sauces, I made two gum paste cylinders per cupcake, for a total of 36. The idea was that one of them would be the aorta (full of red blood) and the other the superior vena cava (full of blue blood). Mounted vertically on the top of each cupcake, they would hold the fruit sauces until the cupcakes were cut into, at which point they would spill their gory contents over the plate.
For the cake itself, I started with cupcakes, which are relatively heart-shaped to begin with. I removed the paper from each one and set them in the middle of white paper plates, the better to emphasize the soon-to-be-spilt fruit sauces, and covered them with a thick later of chocolate buttercream frosting.
I didn't want to use fondant to cover and sculpt these hearts because I thought that the proportion of fondant to cake would be overpowering at cupcake scale (not that it probably makes that much difference anyway since most people peel the fondant off before they eat the cake.) For some reason, I also decided not to use buttercream frosting. I don't recall why I made that decision because in retrospect, buttercream would clearly have been the way to go. Instead, I decided to use white modeling chocolate. I didn't do a very good job of making the modeling chocolate, so it came out very hard and a little grainy. I used it anyway. I rolled out circles of the modeling chocolate to drape over the whole cupcake and then shaped it a bit with some gum paste sculpting tools. Then I used royal icing to pipe on detail veins and attach the cylinders sticking off the top.
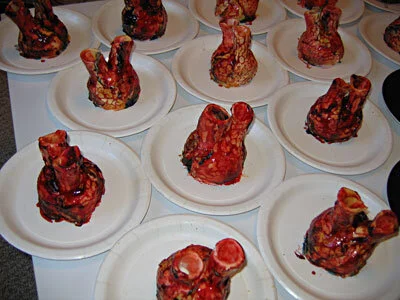
Because I had used modeling chocolate I needed to color the hearts with powdered food coloring mixed into cocoa butter. Water-based colors don't stick to chocolate. To get the hearts nice and shiny, I then painted on a layer of red- or blue-tinted piping gel. Because the piping gel is water-based, it didn't spread smoothly, but rather beaded in rills and pockets, which I thought was actually kind of a nice effect.

Right before serving, I filled the tubes with my two fruit sauces.
Reactions were mixed. Adults more or less agreed that the cake was tasty, but that the modeling chocolate was too thick, hard, and grainy to eat. I really should have used buttercream. One little boy, who had been promised a cupcake adamantly refused to accept that these were, in fact, cupcakes in a slightly different configuration and had to be supplied with a normal-looking cupcake that we fortunately had in reserve. His little brother, on the other hand, took to the little hearts immediately, breaking off the aorta and jugular vein and gleefully drinking the contents like a proper little cannibal.

Cyndi Lauper Cake
This cake was intended to be presented to Cyndi Lauper on The Graham Norton Effect. Unfortunately, it didn't survive being FedExed from Colorado to New York.
This cake was intended to be presented to Cyndi Lauper on The Graham Norton Effect. Unfortunately, it didn't survive being FedExed from Colorado to New York.
As my mom pointed out to me, I had no idea five or so years ago when my sister and I started theyrecoming.com (our horror movie review website) into what strange adventures it might soon lead me. The one it's led me into most recently involved sculpting a bust of Cyndi Lauper in cake to be FedExed to New York City and presented to Cyndi on a show called The Graham Norton Effect, which I had never even heard of until they contacted me about two months ago. Evidently, someone at the show had found their way to theyrecoming.com and seen the photos of my thoracic cavity cake and my zombie cake. Initially, they wanted me to make a werewolf cake for Seth Green, but they didn't give me enough lead time and I was really busy that weekend, so I had to tell them no, but please keep me in mind for the future. The next time they contacted me they wanted a cake for Cyndi Lauper and, as they gave me a few weeks notice this time and I'm a sucker for rock of the 80's, I enthusiastically agreed, providing they could come up with a way to transport the cake from the little Colorado mountain town where I spend my summers to the Big Apple.
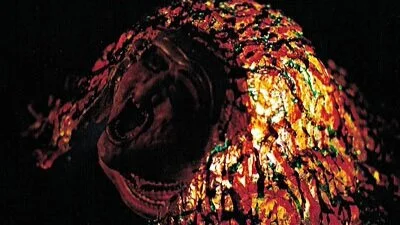
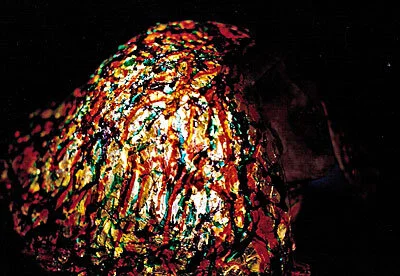
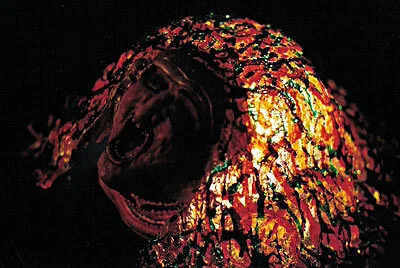
I decided to make the cake a portrait of Cyndi with her mouth open, singing or possibly screaming, however one wants to interpret it. Behind the head, which was to be made out of cake, the hair would be a big dome of colorful hard candy with a light bulb underneath. My goal was to give the impression of something along the lines of a Tiffany lampshade. The folks at The Graham Norton Effect were excited about the idea, so I set about the planning and supplying stages. I believe I've mentioned before that I spend the summers in a little town about two hours away from the nearest big city, so supplies are a bit harder to obtain here than usual. Fortunately, the internet knows no petty geographical bounds, so I was able to order some powdered food colors and cocoa butter, which I didn't end up using after all and my sister sent me some paste colors and paintbrushes and luster dust and suchlike from California.

The weekend before the weekend I was to make the cake I was planning to drive to Indiana for a friend's wedding. Yes, I drove eighteen hours just to go to one party, then turned around and drove back. I loved every minute of it. This afforded me an opportunity to pick up supplies at places like Home Depot and Wal-Mart. I was looking for a good, battery-operated method of lighting up the sugar dome, but I never came up with one that I was really satisfied with, so I went with the tried and true method of a plug in light bulb. I also needed a big metal bowl, which I planned to cover with tin foil and use as a mold for the sugar dome. I found one at Wal-Mart that I thought would be perfect. As it turns out, I was wrong.
I returned to Colorado on the evening of Tuesday, September 7 and the cake was due to be shipped to New York on Monday, September 13 for a taping on Tuesday, September 14. The next day I got up and drove forty-five minutes to the nearest Safeway to get all my supplies (mostly sugar and corn syrup, neither of which, as it turned out, I bought nearly enough of.) My goal for that evening was to make the sugar hair dome. I covered the top of my kitchen table with tin foil, then set the bowl on top of some tuna cans to give it a bit more height and covered it with tin foil as well. Using the hard candy recipe from my favorite candy cookbook (The Practical Candymaking Cookbook) my plan was to first create an under layer of clear (or as clear as cooked sugar gets, which is sort of amber) sugar then pour various bright colors of sugar onto that to give the impression of wavy hair. I had forgotten to ask my sister to send me my good candy thermometer, so I bought a cheap one at Safeway, which evidently is cheap for a very good reason. It worked fine for the first batch or two of candy, then condensation formed inside it which made it impossible to read and when I tried to wipe off the inside I inadvertently moved the paper scale inside so it ceased to be accurate at all. I gave up on the thermometer altogether after a while and went by the sound of the bubbling and the color of the sugar. I think I did a remarkably good job of it, too, if I do say so myself.
Building up the preliminary shell of clear sugar went fairly well expect that it was impossible to get it smooth because of the steep slope of the sides of the bowl. Eventually I had a fairly even coating of clear sugar and proceeded to the colored sugar, which was a complete failure. My plan had been to spoon the colored sugar into attractive swirls of hair but this proved to be impossible to do with any kind grace or precision on such a steep slope, so I just ended up with sort of messy wedges of red and purple sugar, which looked really sloppy and non-specific. I set that one aside (just in case I wanted it again later) and started again.
This time my plan was to draw specific wavy hair shapes onto the tin foil over the bowl with royal icing, then fill the spaces with clear sugar, which I would then paint bright colors with food coloring. I took me two tries to get royal icing shapes I was happy with (and this time I didn't set the bowl onto the tuna cans so it was bit shorter) and it proved difficult again to fill the more vertical surfaces of the bowl neatly. I had to do it with my little metal pastry tube from the sixties, which my sister got me at a garage sale or flea market or something, which is awesome because they're pretty much impossible to find. This is a very time-consuming process and it involved a lot of me burning myself with hot sugar. About halfway through the process I ran out of sugar and went to bed.
By the time I woke up the next morning. I had an even better idea - I would start over with a solid, clear sugar shell, then drizzle bright colors of sugar over it in abstract patterns. This would eliminate my difficulty in forming neat, specific shapes and give the cake a wild, carefree look, which I felt would be appropriate to Cyndi Lauper. This was also the day I had planned to bake the cake itself, which I had to do in my friend's cabin because I don't have an oven. I also borrowed a bowl similar to the one I had bought but slightly smaller on which to create my new sugar dome. This way I could start on a new dome without trashing the half-finished dome I had been working on the night before (just in case.) This time I created a more graceful shape (I hoped) than the natural shape of the bowl by taping pieces of paper over it to the bowl and to the table to form ogee-like curves. It formed a good shape, but made the finished product harder to remove from the table.

I spent the morning running back and forth between the two cabins, coating the bowl with clear sugar and baking three 6" round cakes, using a recipe for white cake I got from a book by Colette Peters. This was my first experience baking at a high altitude (about 8,300 feet) so I was a little nervous, but it seemed to go really well. I went online to get tips on high altitude baking (increase eggs, decrease baking powder, decrease sugar, etc.) I followed those and it went without a hitch expect that it seemed to take longer to bake than I expected, but maybe the oven just wasn't as hot as it said it was.
By three in the afternoon I had all the cakes baked and most of a good, solid layer of sugar on the bowl and I had to go to work for a few hours. By the time I came back the sugar on the bowl had had a chance to cool completely, which, I discovered, was a very bad thing. The first time I poured another coat of hot sugar onto a thin spot, the sugar dome started to crack. Evidently sugar can't take that quick a change in temperature. This was make even worse by the fact that I had, for some inexplicable reason, removed the sugar dome from its supporting structure of bowl and paper and even in some sections started to remove the underlining of tinfoil (to assure myself that it was possible), so the hot sugar started drooping through cracks and the dome started to sag. I hurriedly pressed the still-pliable sugar into a tolerable shape and put the bowl back underneath. Clearly, I would have to re-coat the entire dome with hot sugar before I started drizzling hot colored sugar onto it or the whole thing would crack apart. I tried to warm up the sugar dome by setting it in front of the radiator and by rubbing it with a hot, damp sponge, but that didn't help much. Every time I poured more hot sugar onto a cool section of the dome, more cracks appeared. Finally, I had a very thick layer of sugar on everything and all the cracks were sealed and covered up. (By this time I had also made two additional trips to the little grocery store across the street to buy more sugar and corn syrup. I bought pretty much all the corn syrup they had. Ordinarily things are much more expensive there than at a big grocery store, but fortunately the corn syrup was inexplicably cheaper.) I was ready to start on the colored sugar. Finally, something went right and the sugar drizzling went smoothly and looked good. I used bright red, bright purple, and bright greenish-blue. Once this cooled I pulled it off the form and peeled away the tin foil. This was easier said than done and I had to use tweezers to get the foil out of a few of the crevices, but eventually I got (almost) all of it.

Finally my sugar dome was ready and I was ready to start sculpting the cake. I didn't have my cake leveler so I had to eyeball it, but fortunately the cakes were small in diameter so it was pretty easy. I filled the cake with raspberry jam, then, working from a photo I found online, carved it into the rough shape of Cyndi's head with an open mouth. I gave the leftover cake bits to my friend who lent me her oven. To crumbcoat the head I used an apricot glaze, made by boiling and straining apricot jam.
Next, I mounted the head onto a neck, which I had made by stacking circles and oblong shapes of clear sugar on top of each other. This, I hoped, would look more graceful than simply plopping a severed head onto a tray. There's a reason why classical busts always include the shoulders.
My plan at this point had been to use white modeling chocolate to sculpt the facial features, but an old problem I had the first time I used white modeling chocolate resurfaced. Evidently I had added too much corn syrup because the modeling chocolate was very sticky and didn't set up right. I also had a hard time getting it to stay in place on the cake. I went to my backup plan, which was to use royal icing. Unfortunately, in the process of removing the modeling chocolate I had already put on, I ripped the nose off of the cake, so I would have to build it up again with icing. I put a preliminary coat of royal icing onto the whole head and went to bed to let it dry.
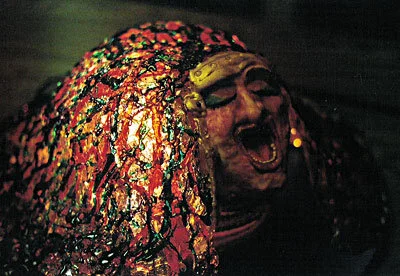
The next day, for some incomprehensible reason, I tried the modeling chocolate again. Again, it failed miserably and pulled off some of the royal icing in the process, so I had to redo it. Eventually, I had a good base coat of royal icing on the head and a royal icing beaded necklace around each tier of the sugar neck and could position the head and the sugar hair on the plywood circle I had cut to use as a base. The lightbulb was already mounted to the base, wired and ready to go. I had to move it once because the head sat further back than I expected, but that was easily accomplished. By some miracle the head and neck together were actually the right height to fit with the hair and the whole structure together seemed remarkably stable, a major concern for a cake that had to travel across the country. I lit it up to see what it looked like and was thrilled with the result!
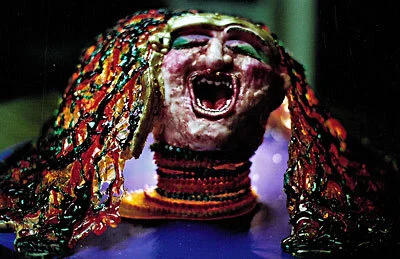
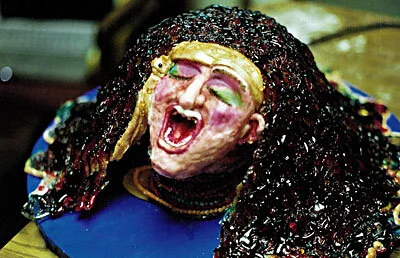
I used a large #12 round decorating tip and a medium #6 round decorating tip to pipe in royal icing features like lips, nose, ears, and cheekbones, then carefully smoothed and shaped them with a slightly damp, soft paintbrush. I put in a tongue and eyelids with a flat #104 decorating tip and again smoothed with the paintbrush. The nose took two applications to get it built up enough, but all in all it was quite successful. I even added a uvula at the back of the throat.
Once the royal icing had dried overnight, I was ready to paint the face. I had gotten powdered food coloring to use when I thought I would be painting onto white modeling chocolate, but with the royal icing I could use paste colors, thinned with water. First the skin tone went on, then rouge, lipstick, and bright, gaudy pink and green eyeshadow. I also painted each beaded necklace a different bright color. Then I added more details with royal icing, such as eyebrows and eyelashes and a head scarf to cover the less-than-perfect edge of the sugar dome hair, then painted those. I used some gold luster dust on the lips and blue luster dust on the eyelids to make it shine and used a few little drops of sugar I had saved for earrings and ornaments on the head scarf. Oh, at some point in there I decided that I didn't like the shape of the lips and had to go back and add more royal icing and touch up the paint job. The finished skin was a little lumpier than would have been ideal, but other than that, and a slightly odd chin shape due to some frosting sagging, I'd say it wasn't half bad.
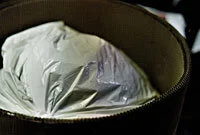
Finally my cake was done! Hooray! Now my only problem was packing and freezing it for transport. The packing method I came up with pretty darned smart, if I do say so myself. Like many of my "brilliant" ideas, it came to me as I was drifting off to sleep. First I covered the cake in plastic wrap, then tied it inside a plastic bag. I cut another plywood circle, about two inches bigger in diameter than the one on which the cake was mounted. I screwed the cake base to this so it wouldn't shift around. ThenI wrapped about six layers of cardboard around this, forming a squat little tube, the excess space of which I filled with foam peanuts, then closed the top with a triple layer of cardboard. The result looked a lot like a giant hatbox and was far too large to fit in a standard freezer. Fortunately (and this is one of the big advantages of living in a small town) I have a friend who runs a restaurant and he let me stick the cake in his giant freezer.
On Monday morning, I got up, fetched the cake, then spent three hours waiting around for FedEx to arrive to pick it up. He had a little trouble finding my cabin because the street address isn't actually posted anywhere on the property but I guided him in by phone and a few minutes later my rustic little cake was on its merry way to the big city! Sounds like the premise for a Broadway musical, doesn't it?
Sadly, perhaps cakes were not meant to be shipped cross-country as I'm told the cake arrived in New York broken. I never knew what, precisely, was broken or to what extent, but evidently the damage was severe enough to preclude the use of the cake on the show, because it never put in an appearance (though my name did appear for about a third of a second in the special thanks section of the credits.) I like to think that someone showed the photos of the cake I sent to Cyndi Lauper. I also like to envision the crew of the show munching on Cyndi Lauper's smushed face in the break room.