Big Time Bake
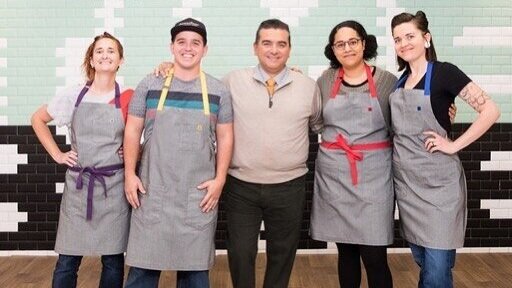
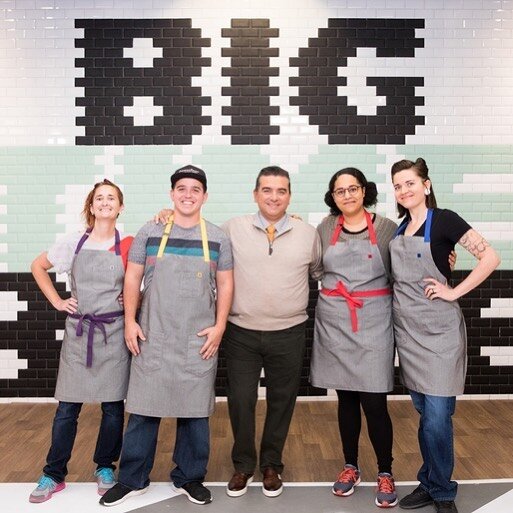
I’m back on the Food Network! You can watch me in the “Fantasy” episode of Big Time Bake.
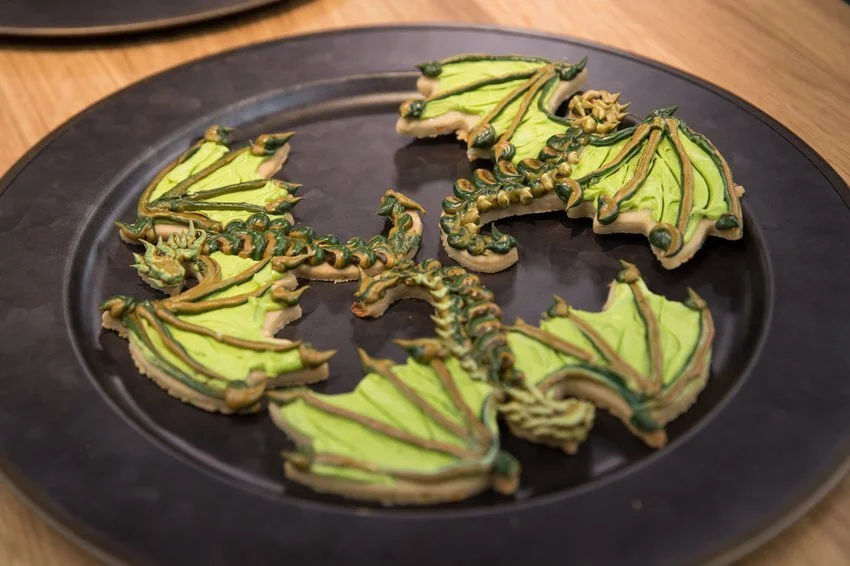

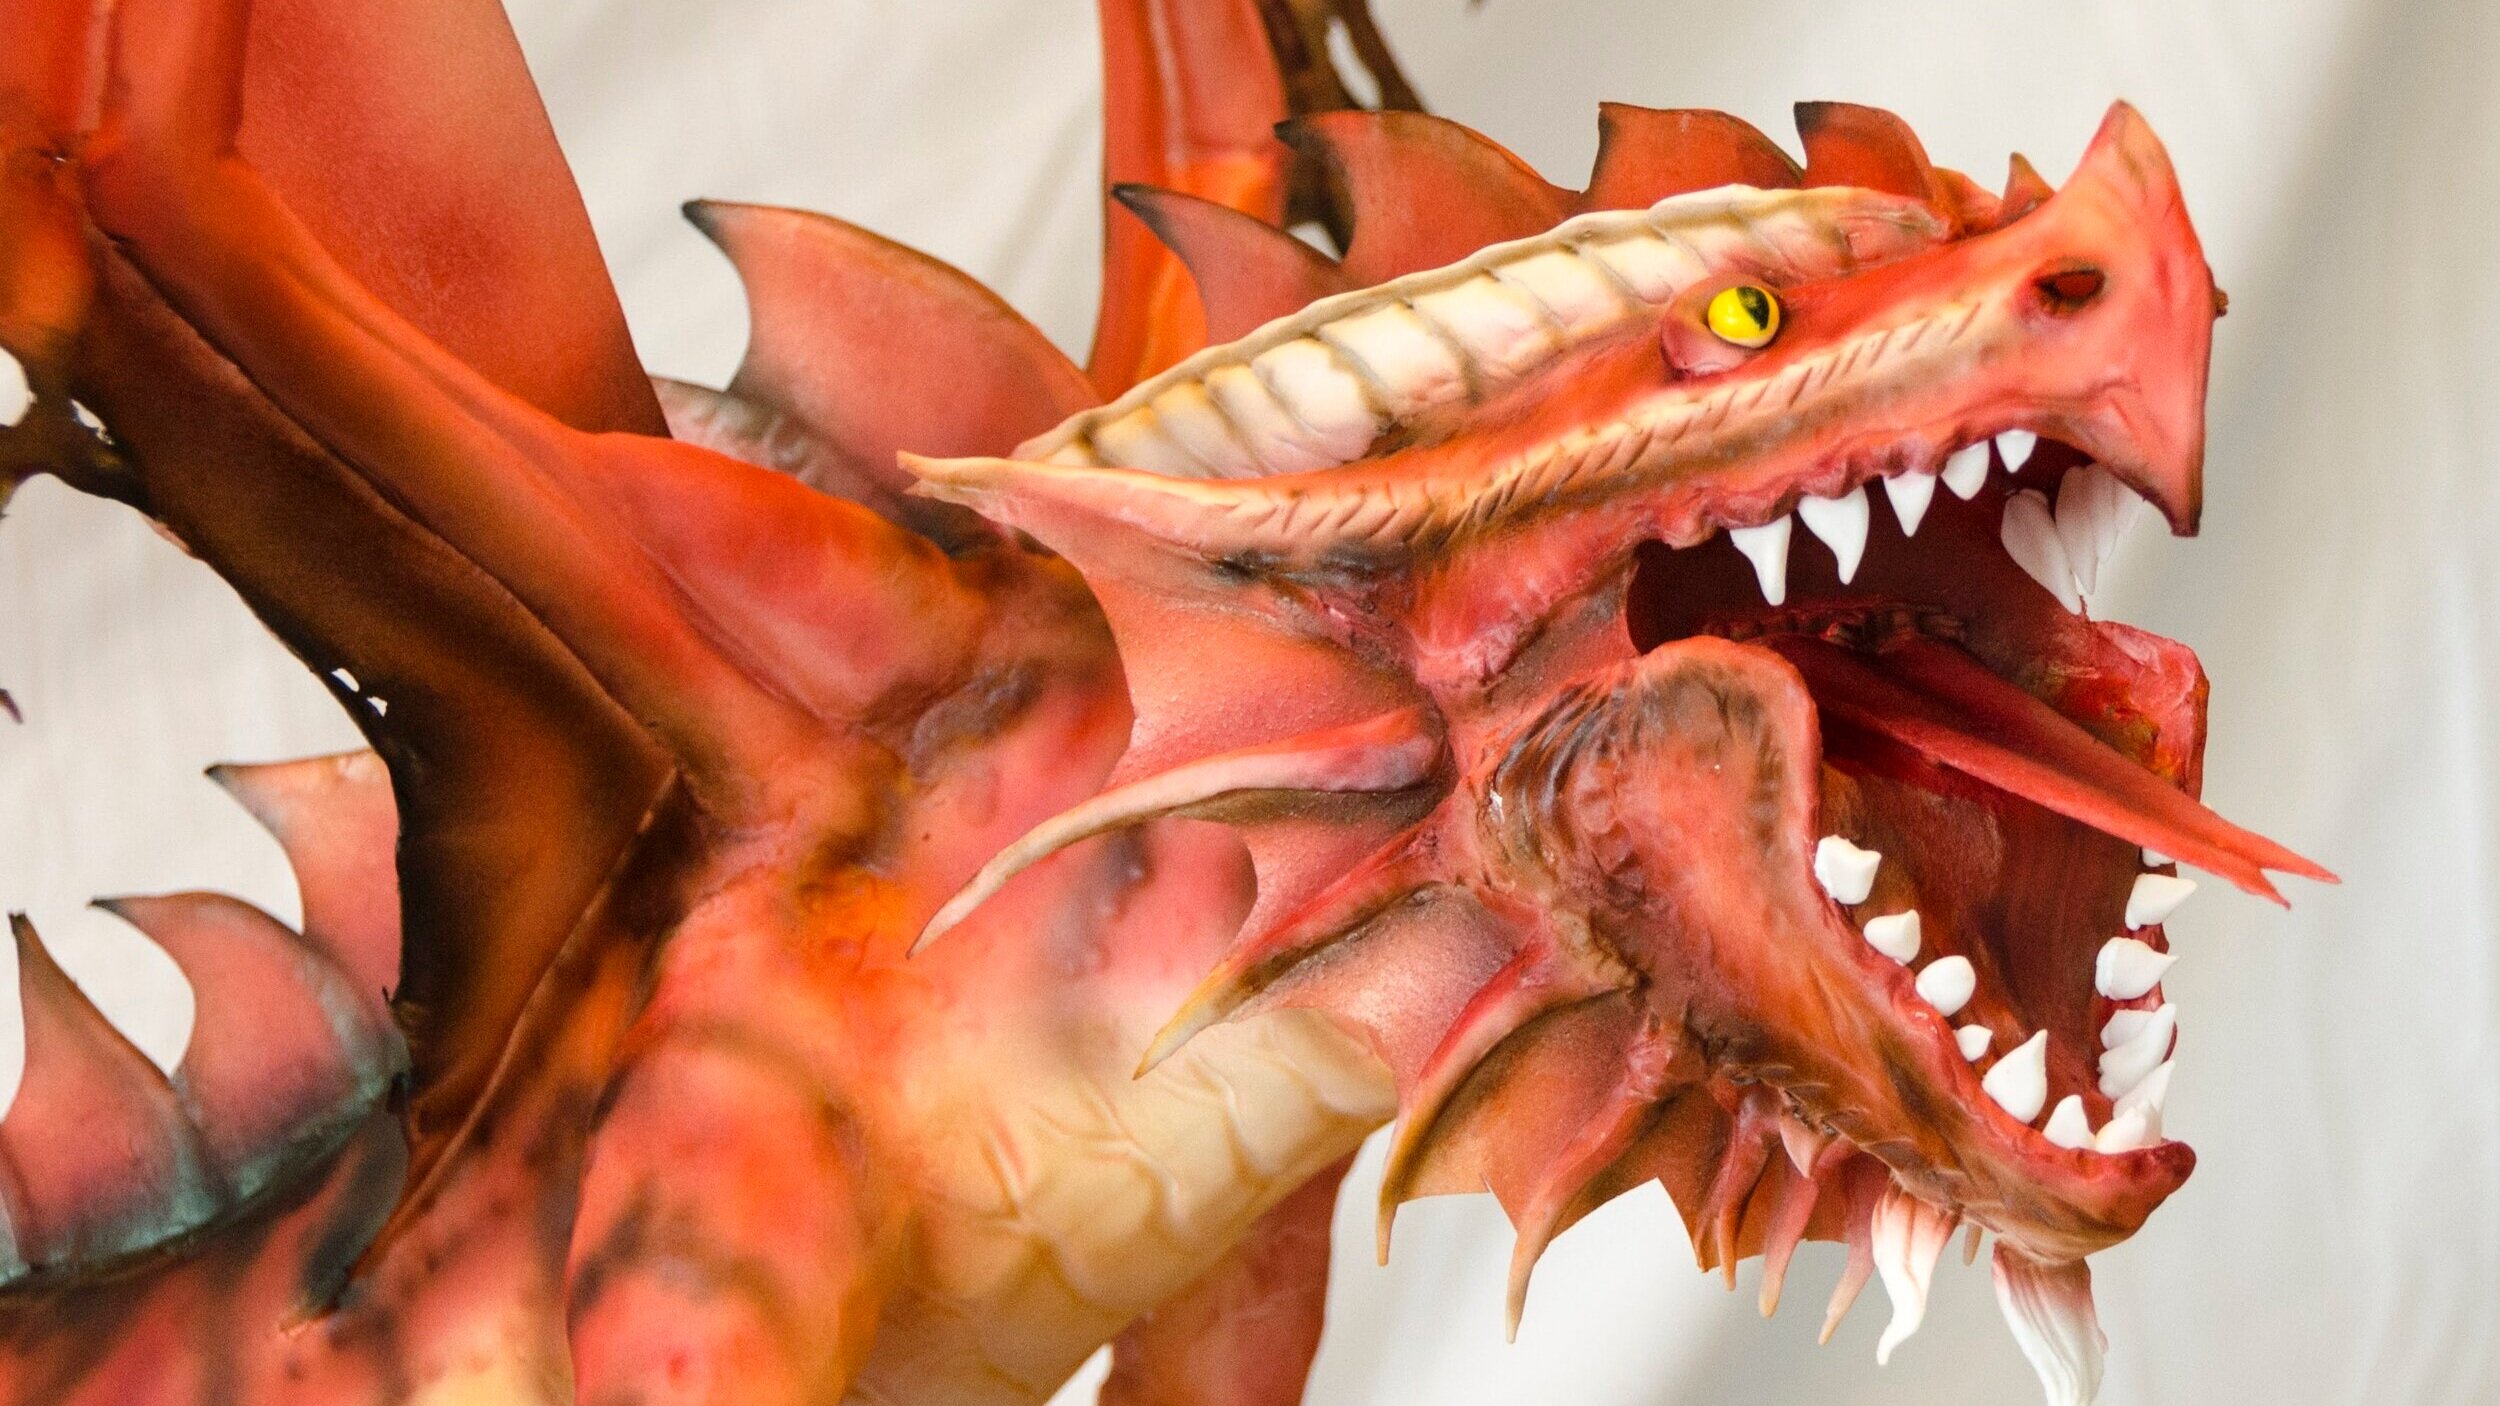
Ancient Red Dragon Cake
Our love of Dungeons and Dragons continues! For her birthday this year, my niece requested an Ancient Red Dragon, guarding a d20, sitting on rocks that spell out “Roll for initiative.” At this point, I’m becoming something of a dragon specialist (see my Frost Dragon Cake and my Norbert(a) Cake), so this seemed well within my skill set.

Our love of Dungeons and Dragons continues! For her birthday this year, my niece requested an Ancient Red Dragon, guarding a d20, sitting on rocks that spell out “Roll for initiative.” At this point, I’m becoming something of a dragon specialist (see my Frost Dragon Cake and my Norbert(a) Cake), so this seemed well within my skill set.
The chunks of rock themselves are sea foam candy, carved into the shape of the letters, with strips of red and orange LEDs behind them, hooked up to a basic flicker effects controller.
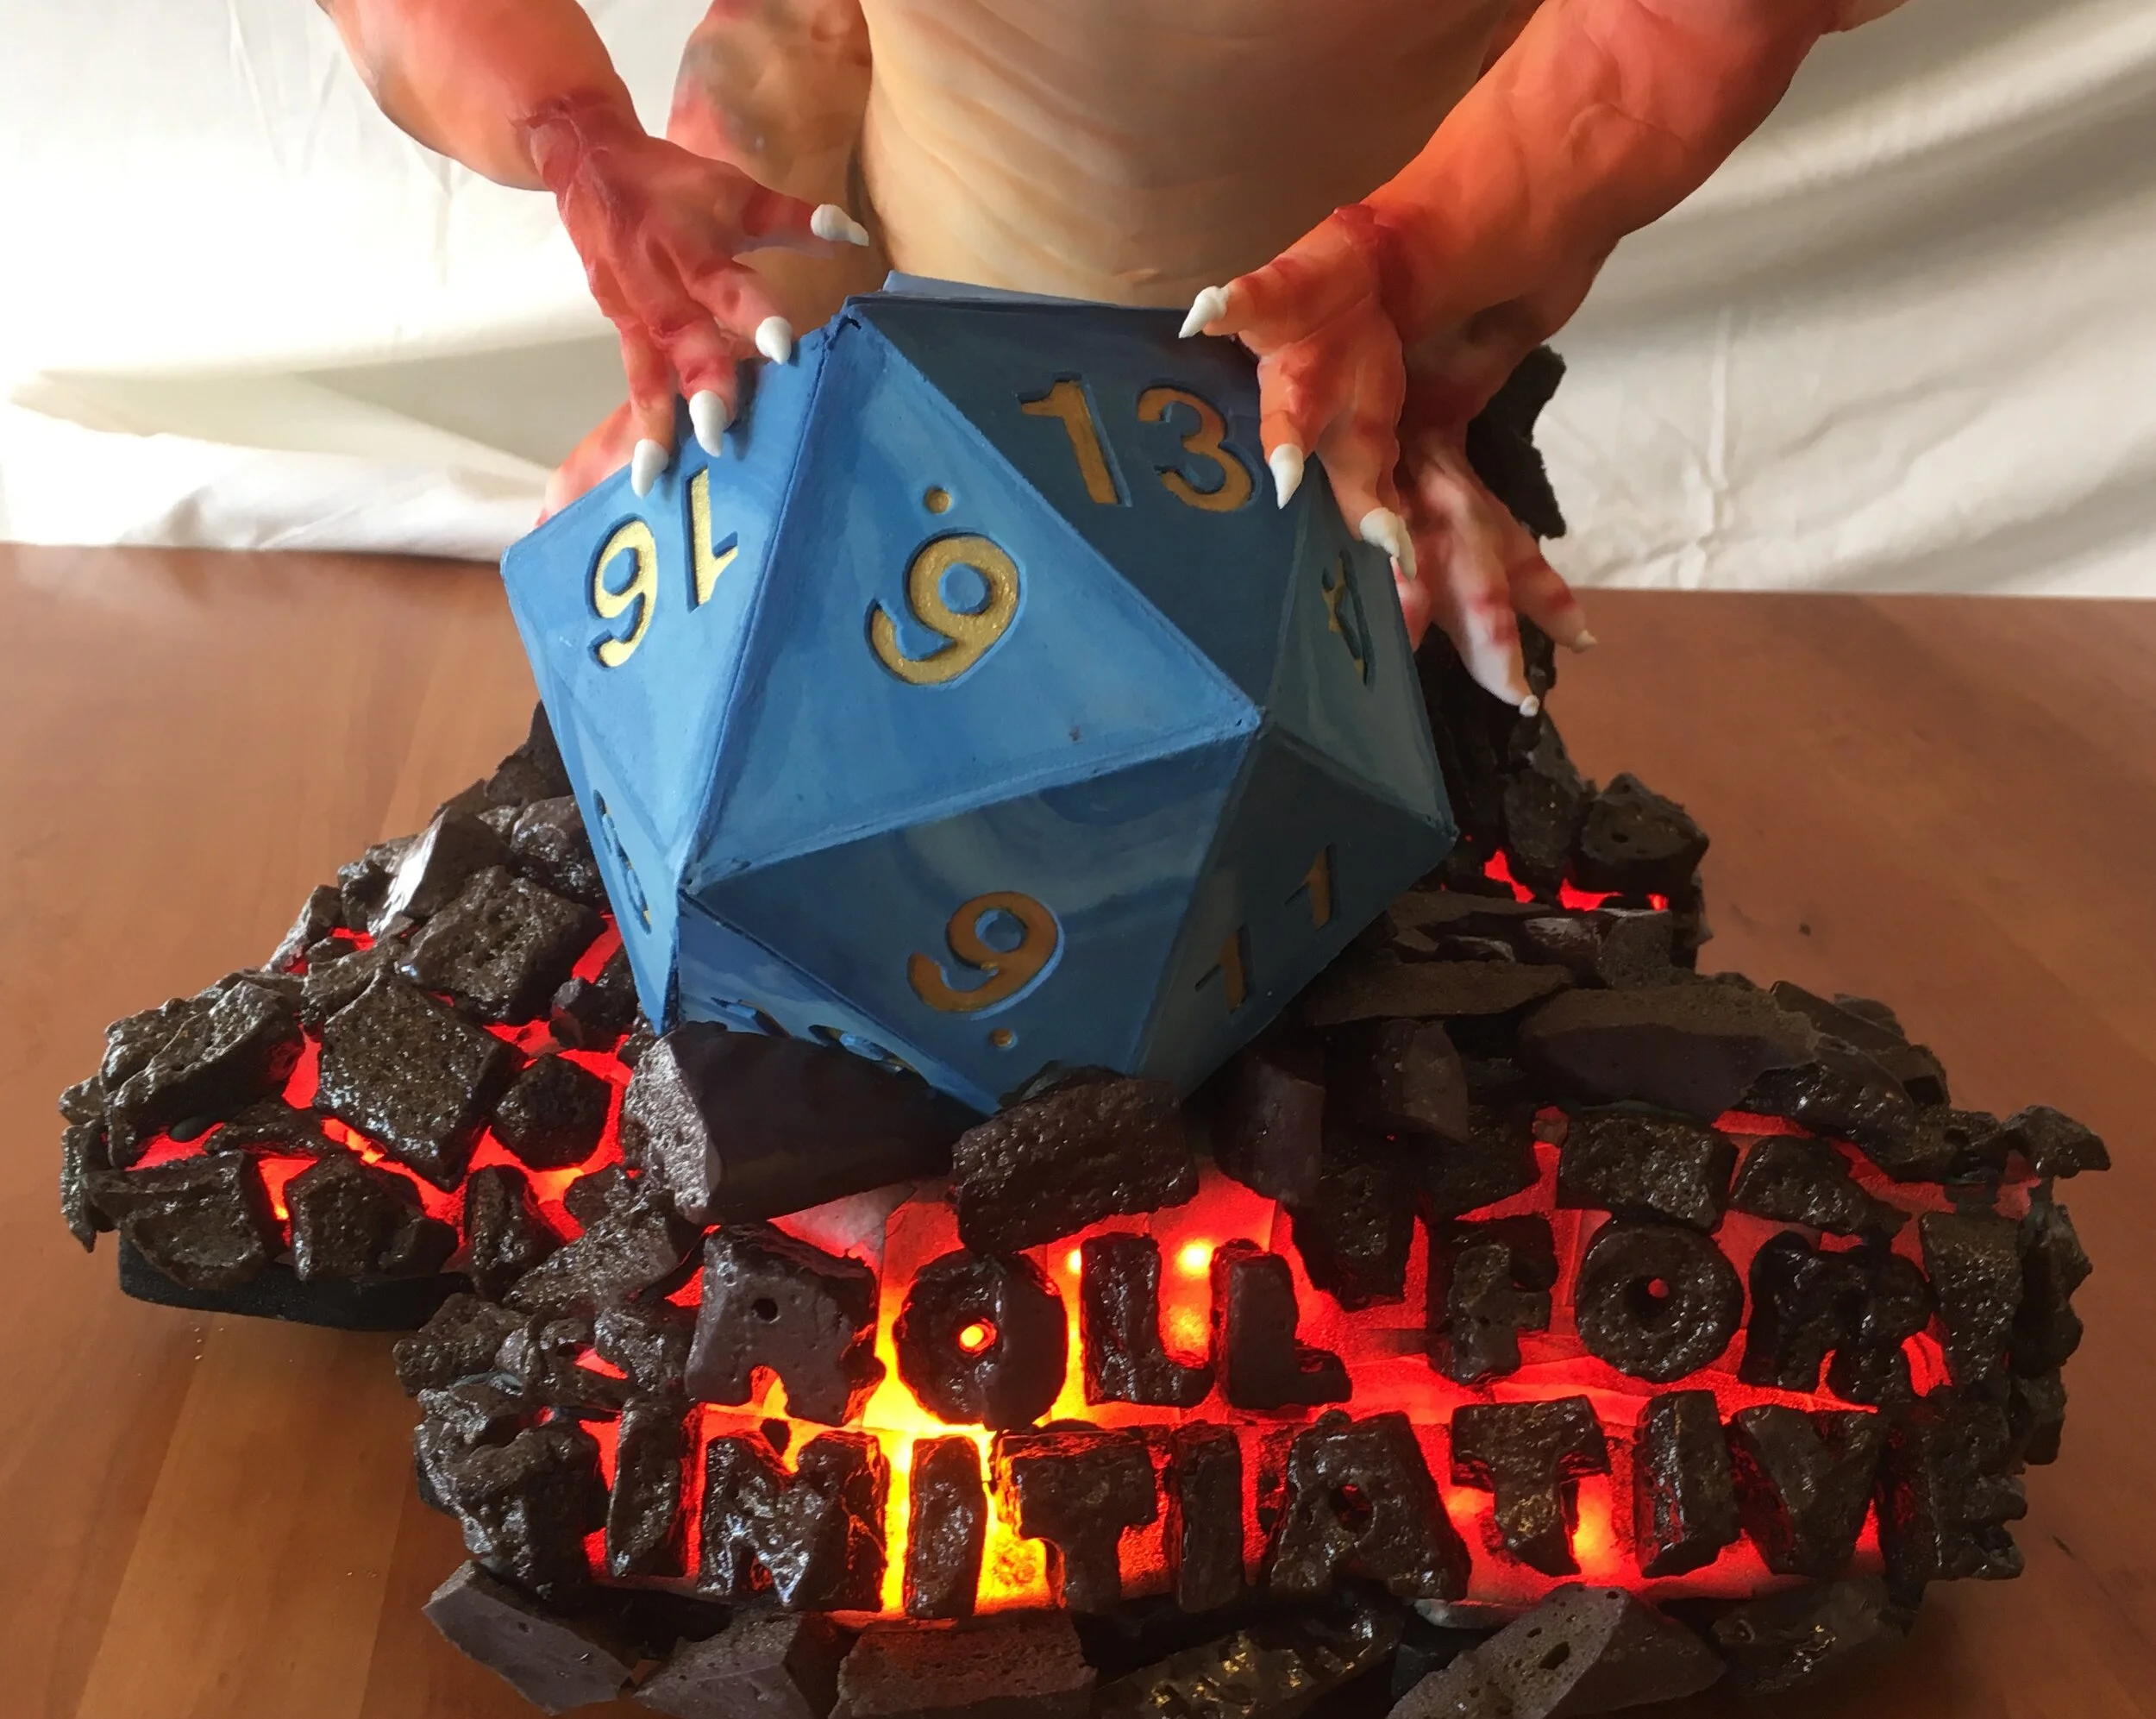
The sides of the d20 are made of gum paste, precut into triangles and assembled around the cake in the center. It turns out that an icosahedron is a very difficult shape to assemble accurately, so I had to do a little shaving and filling to make everything fit, but I was able to mostly hide the imperfections on the back and underside of the die.

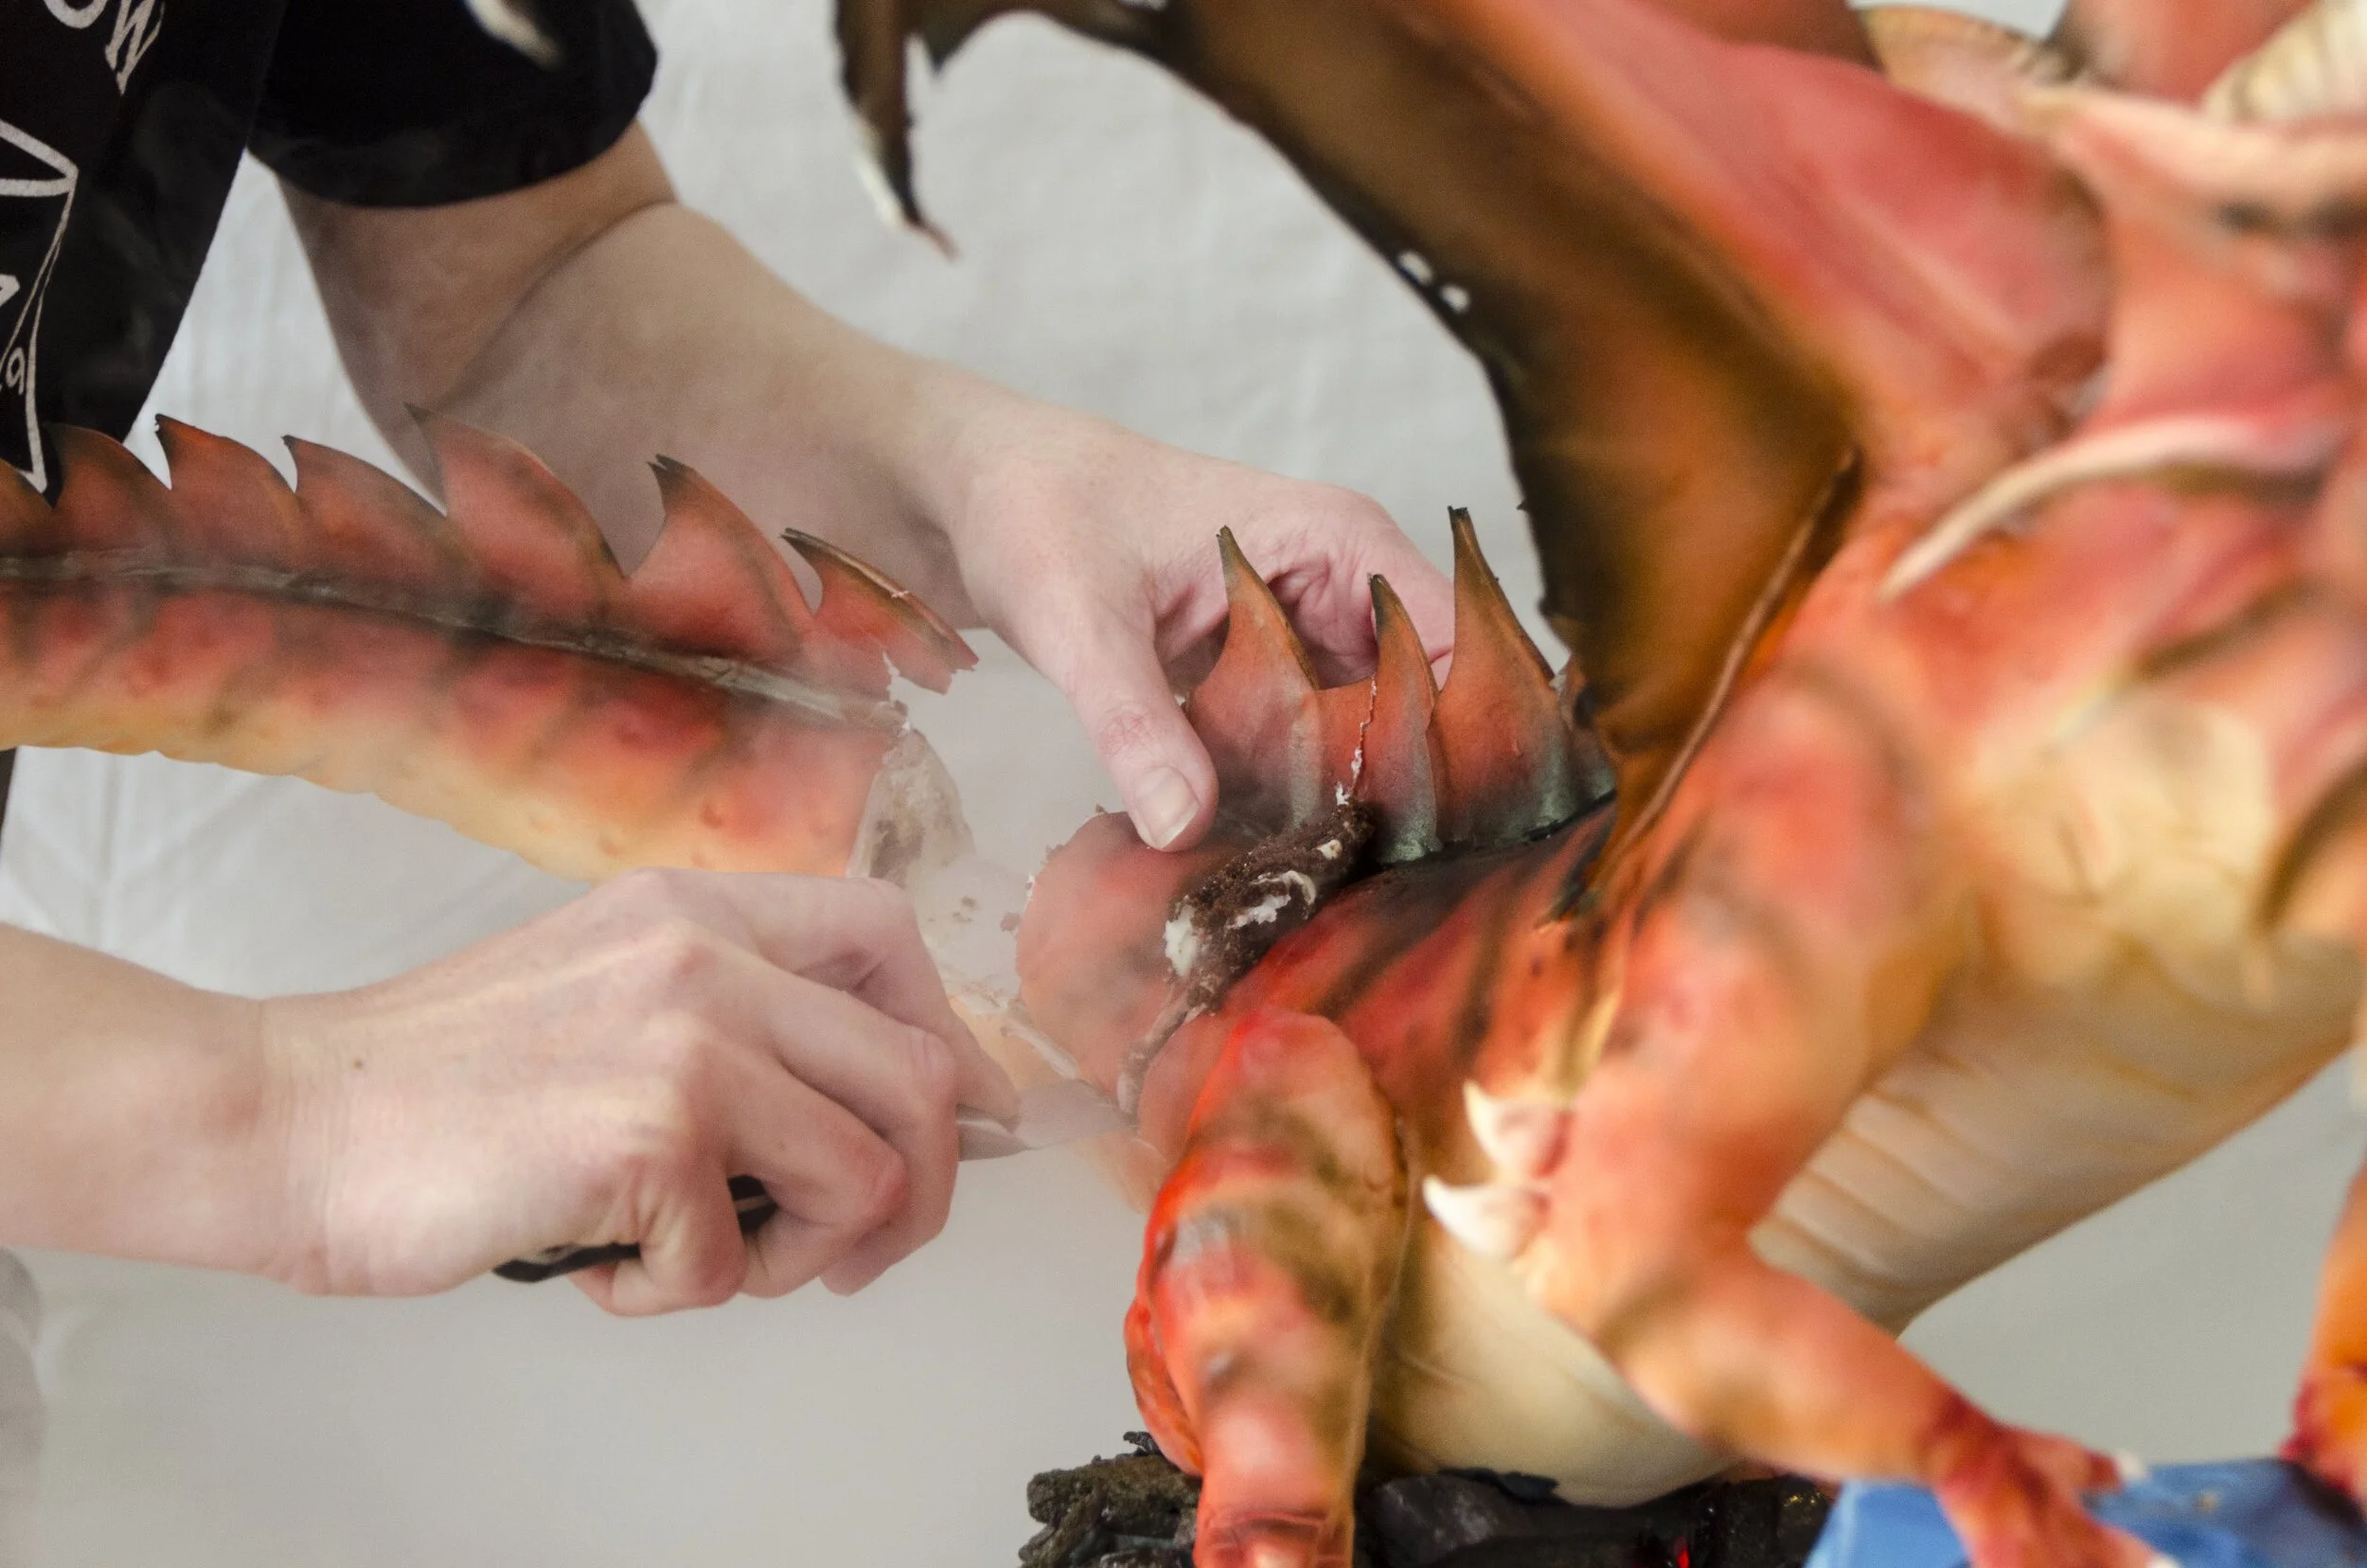
I premade the head out of gum paste, so it would be totally dry when I went to assemble the cake. The wings, the spines on its back, and the little fins around the mouth are made of wafer paper (of course with some wire support inside the wings.)
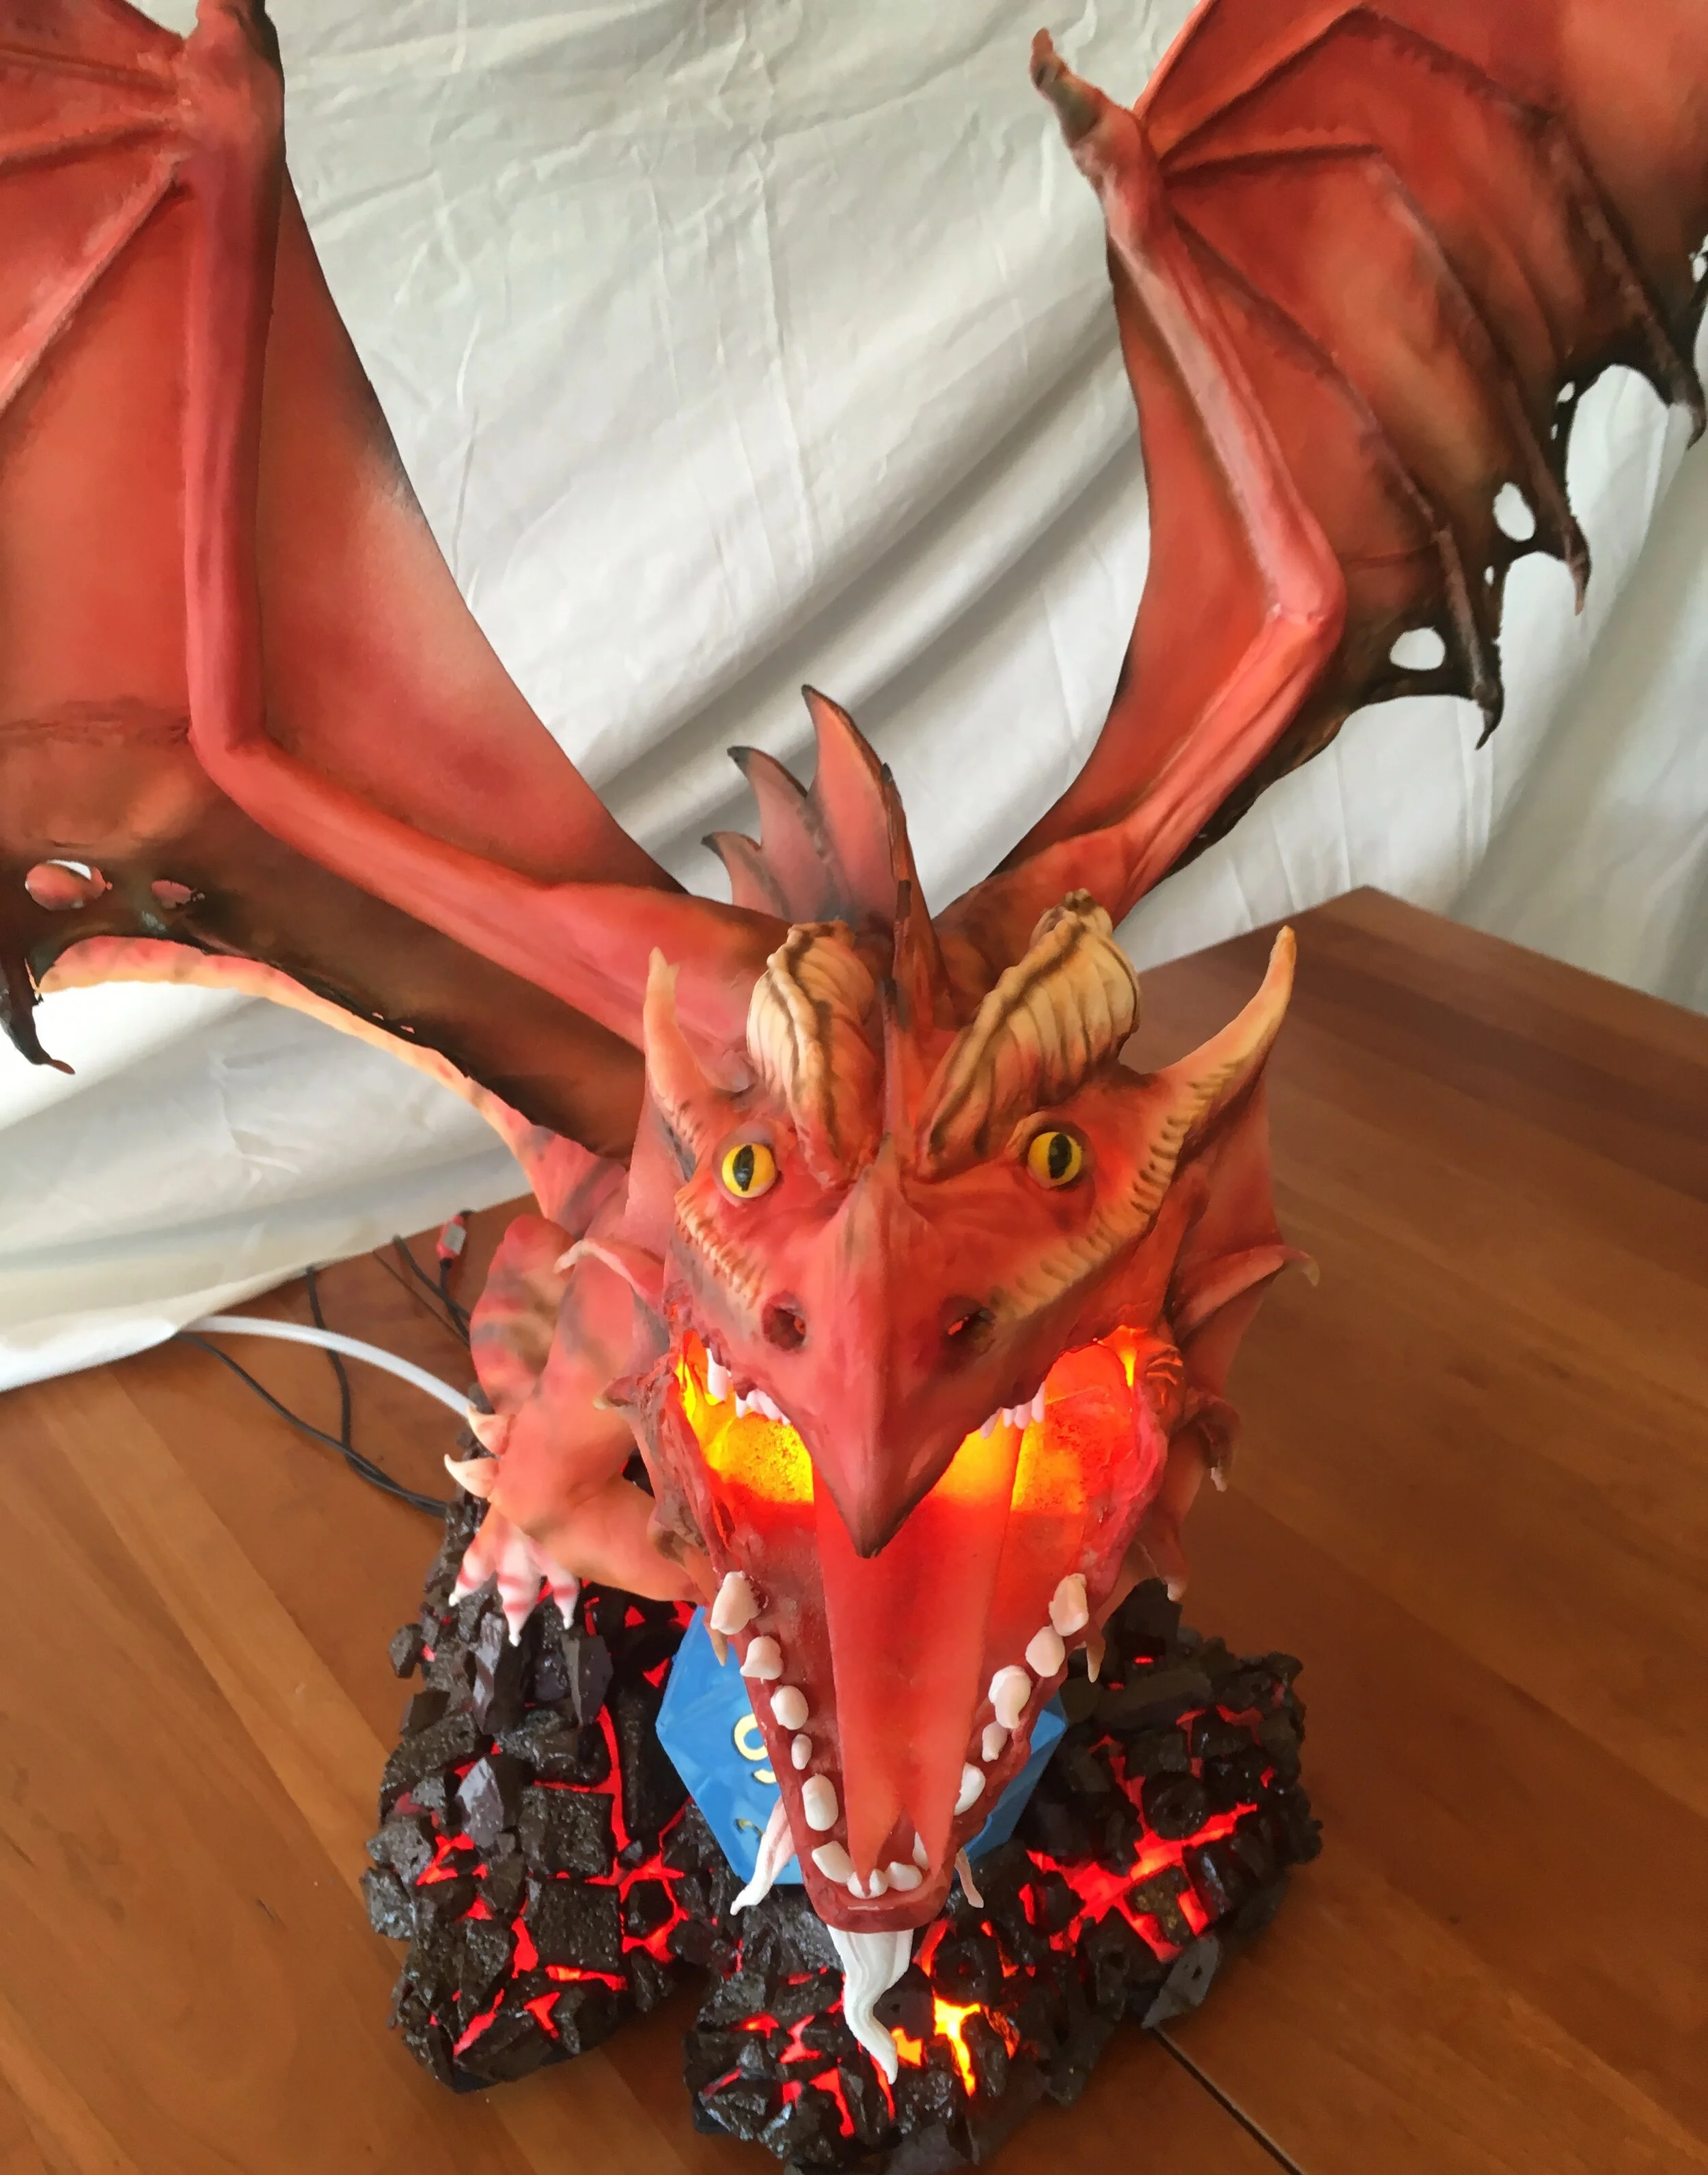
To make the mouth glow, I ran wires down the underside of the belly to a flame simulation LED under the tongue (which is also made of wafer paper). I really wanted smoke to come out of the mouth, too, so I ran a tube up the underbelly and into the mouth as well and hooked it up to the same dry ice fogger I made for the Frost Dragon Cake. The fog didn’t really come out of the mouth, I think because the tube I used was too narrow, so I unhooked it and just made a dramatic atmospheric cloud of fog around the whole scene.

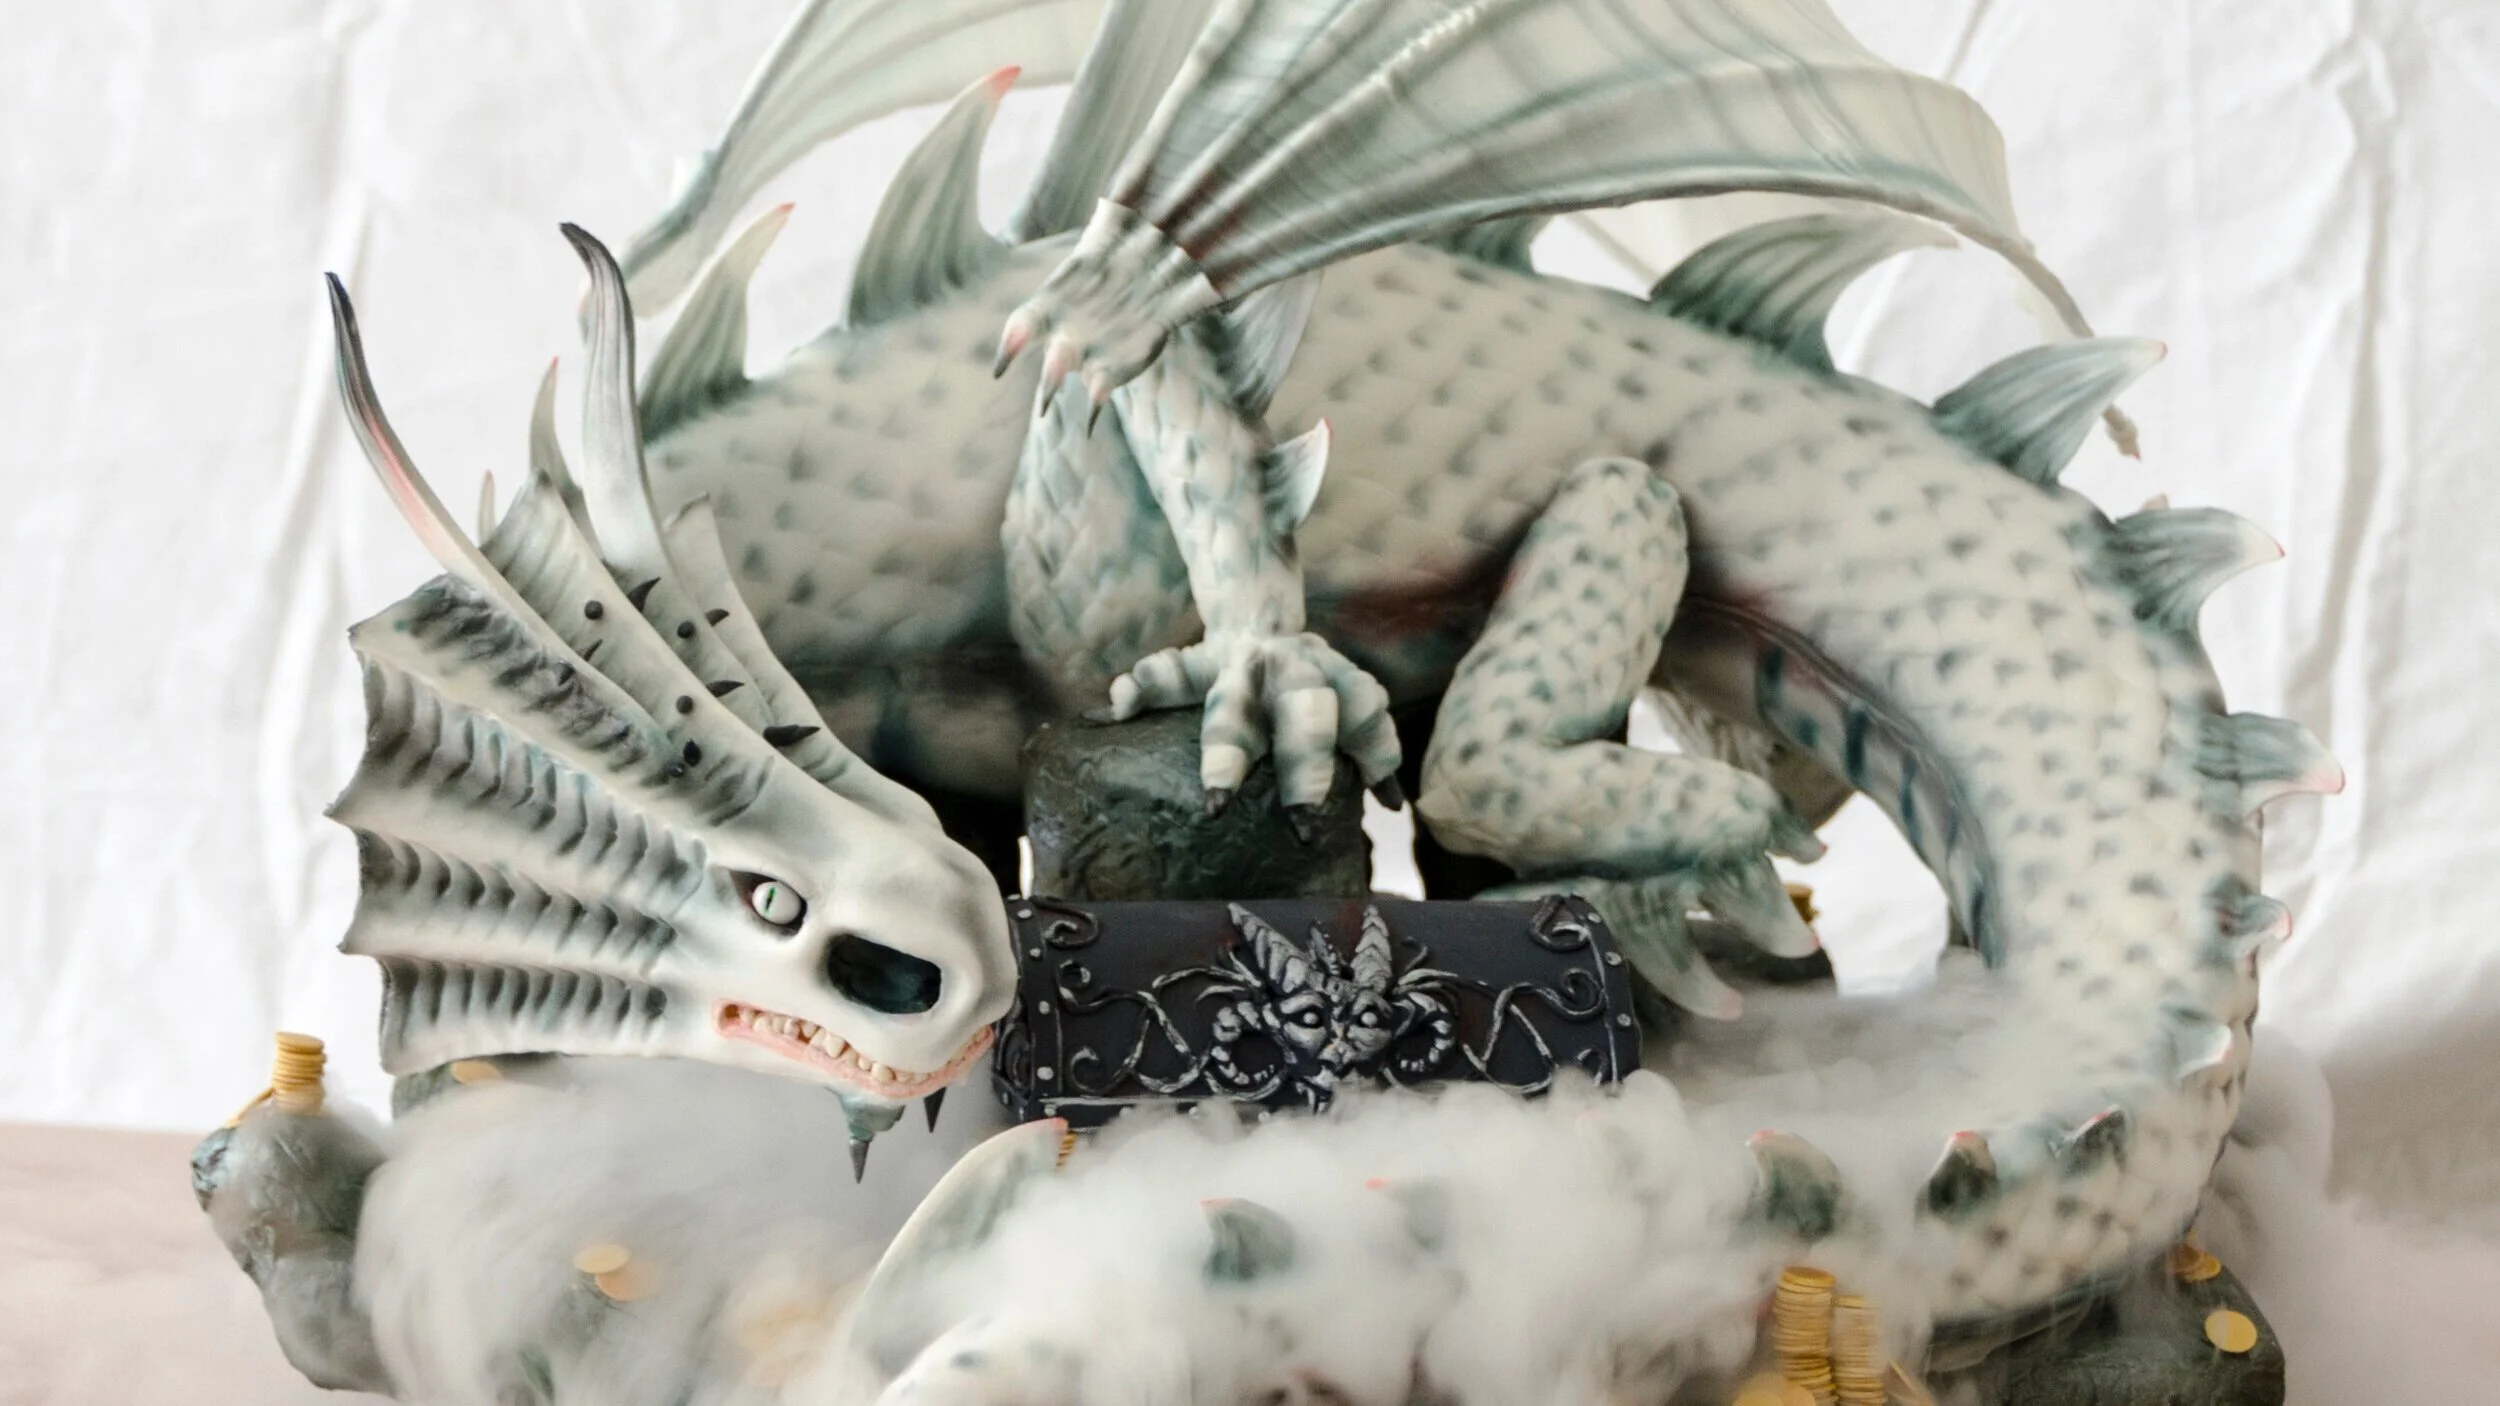
Frost Dragon Cake
My creative brief for this cake was a frost dragon from Dungeons and Dragons. Because no dragon is complete without a miasma of ominous fog, there is a dry ice fogger hooked up underneath the cake board.

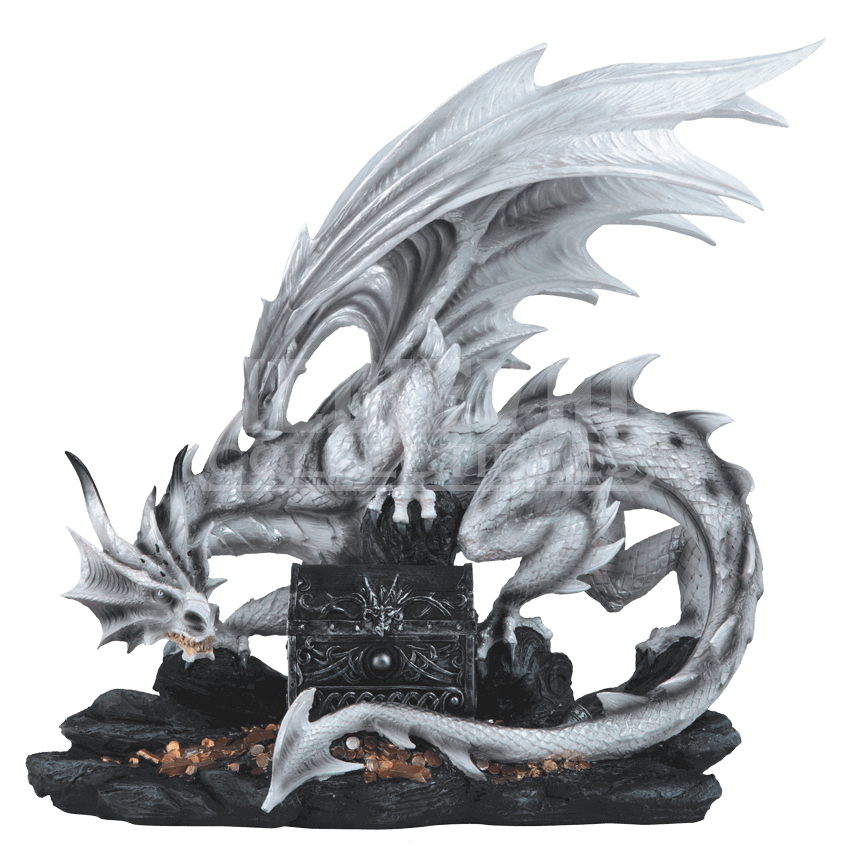
My creative brief for this cake was a frost dragon from Dungeons and Dragons. As far as I was able to discover, there is not actually a canonical frost dragon in D&D, but I found a photo of this figurine and my niece deemed it acceptable so I set about transforming it into cake.
The interior support structure of the dragon is made of foam core and 1/8” brass rod. The landscape around the dragon is rice krispie treats covered with royal icing, which I applied with an offset spatula then textured with a damp paper towel. The underbelly of the dragon is also made of rice krispie treats, as a result of which I was reminded of a valuable lesson – rice krispie treats don’t stick very well to foam core, at least not well enough to be used upside down, supporting the weight of a layer of fondant. The rice krispie treats began to separate from foam core, resulting in some big cracks on the dragon’s belly.

Before it got any worse, I added a few more rock formations to support the belly and patched the cracks with royal icing. About 2/3 of the tail is also rice krispie treats and the rest of the tail and body in chocolate cake, covered with fondant. The legs are a 50-50 mix of fondant and gum paste. I did all the scale texture with a highly sophisticated tool that I made by cutting a v-shaped notch into a piece of foam core.
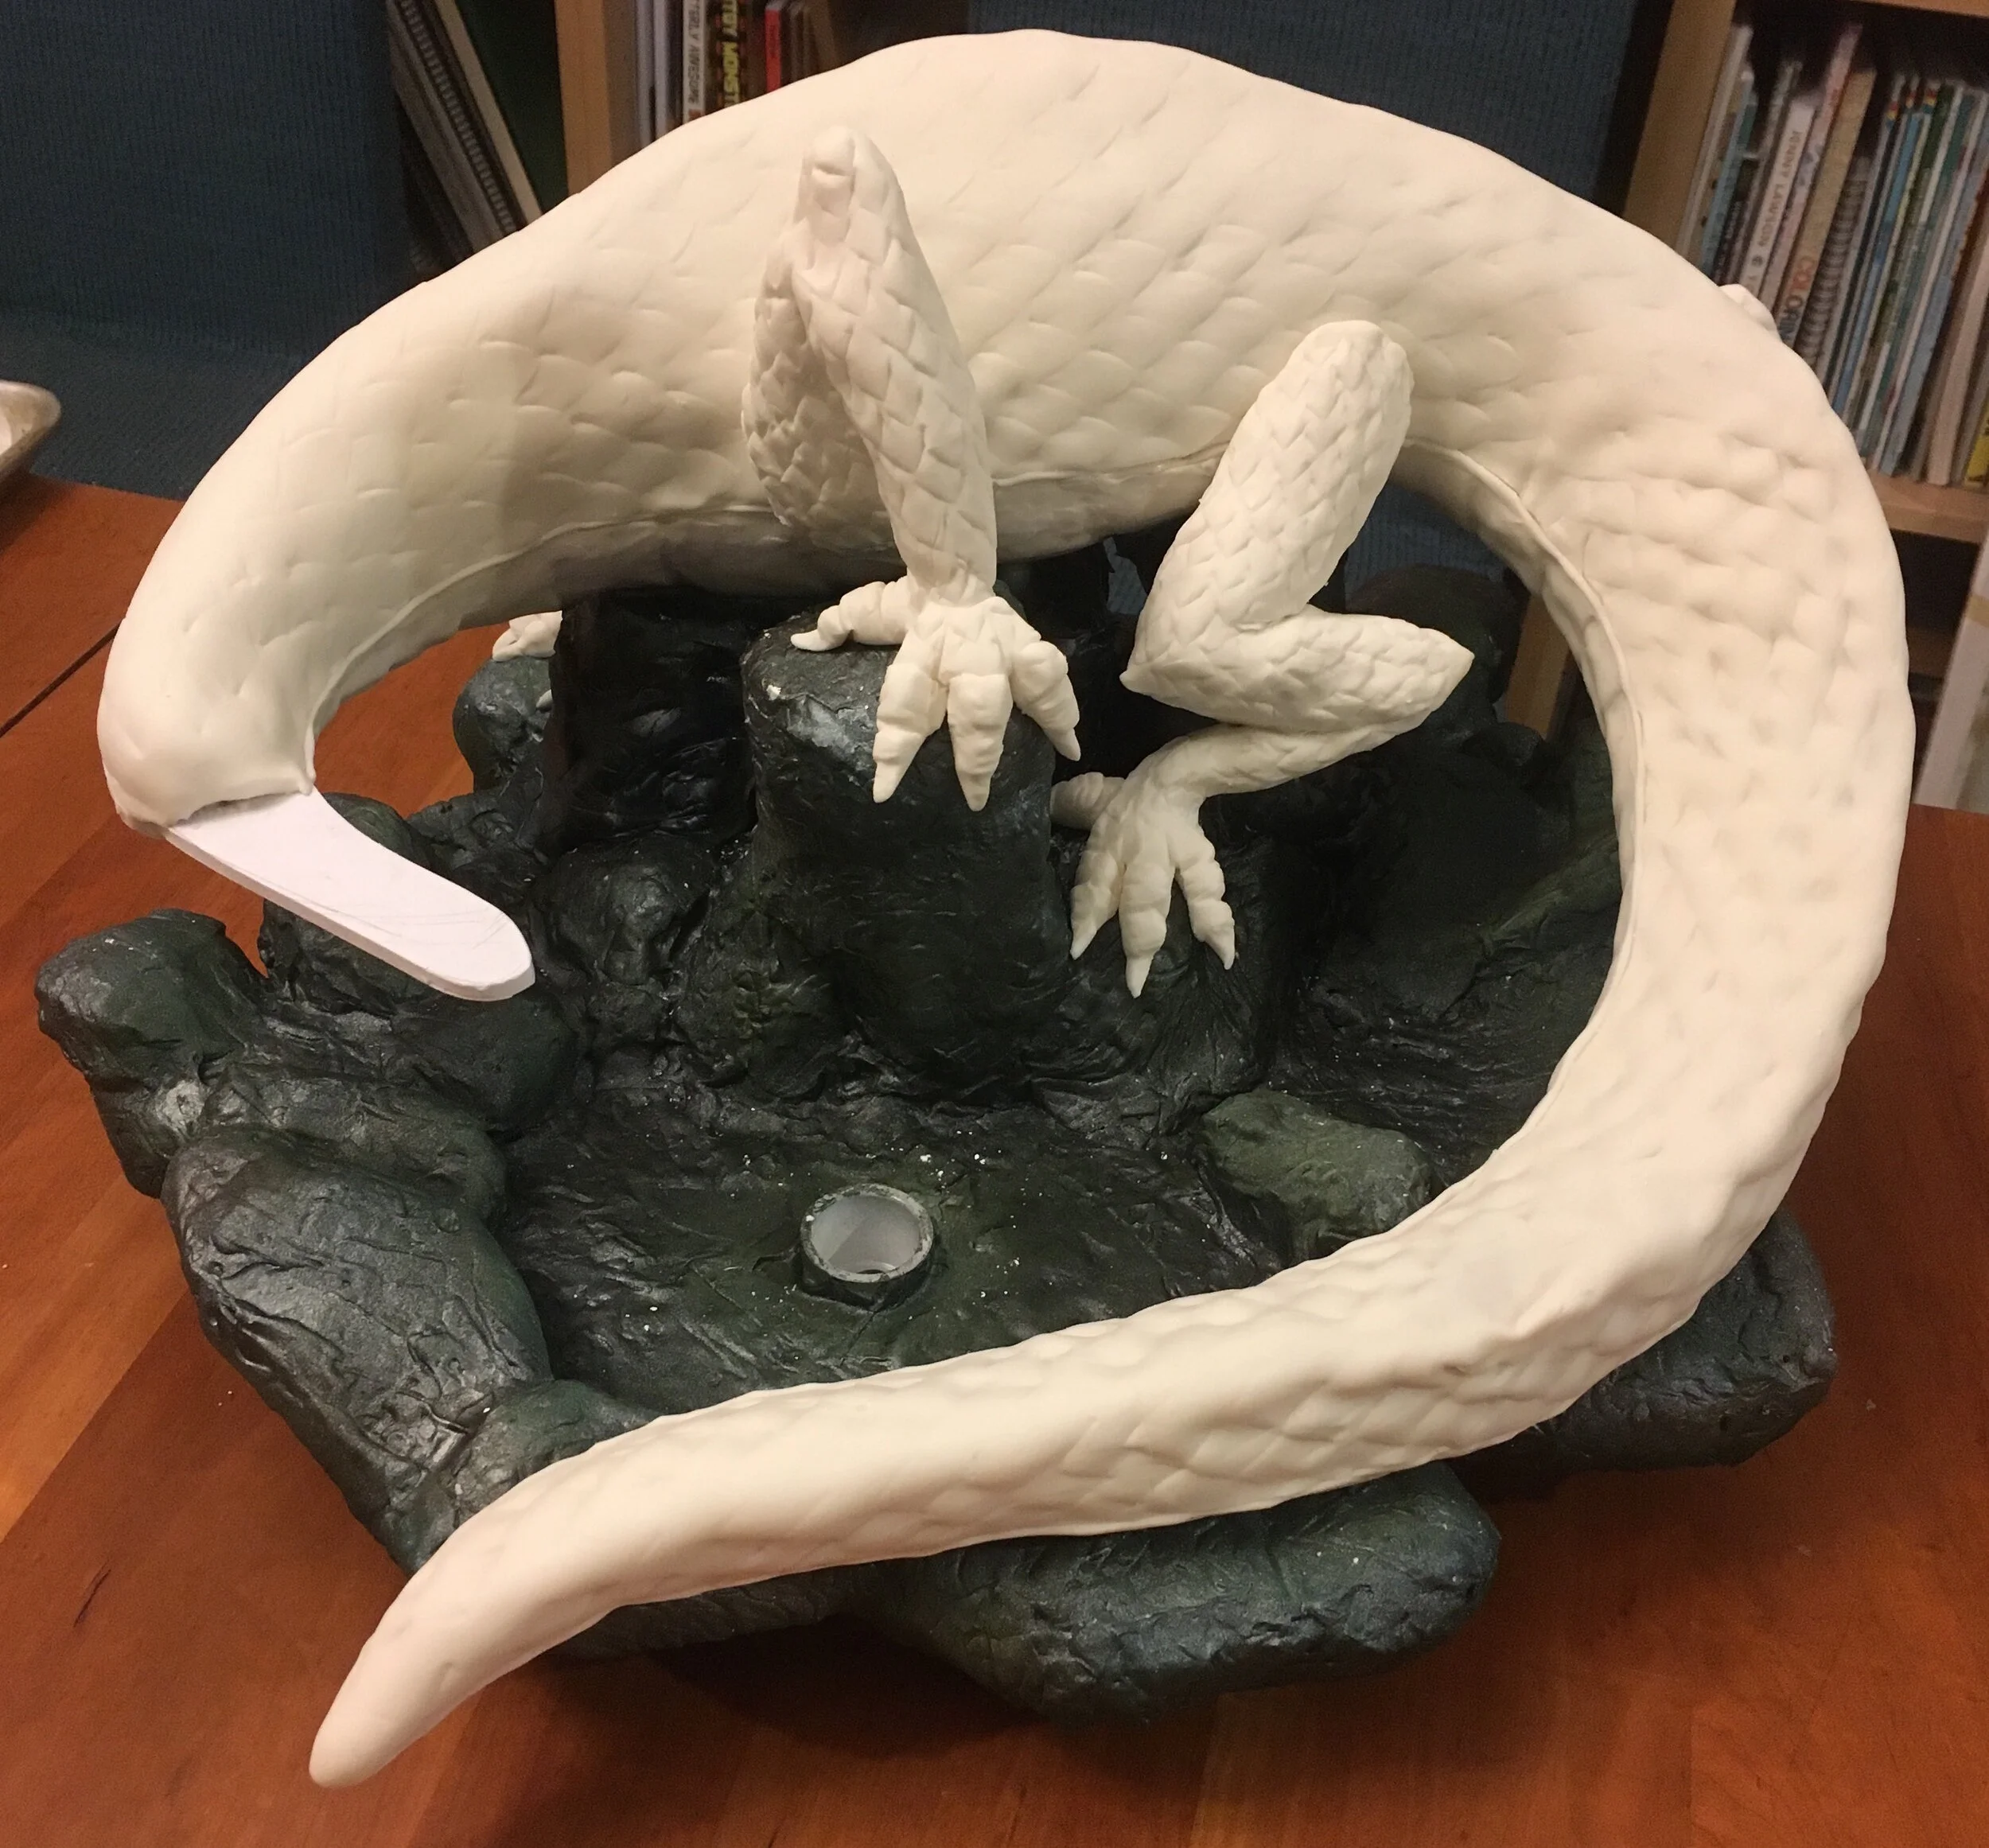
Before I attached the head, a 2-year-old friend who was hanging around our house told me that it looked like a dolphin. She’s not entirely wrong. With the head connected, though, it began to look like a dragon. The head is made of gum paste formed over a mold I made out of foam core.

The wings are also gum paste, over top of a structure made of wire. The wings were the part I was most nervous about attaching, but they turned out to not be a problem at all. The treasure chest and the coins are also made of gum paste, with royal icing accents on the chest.
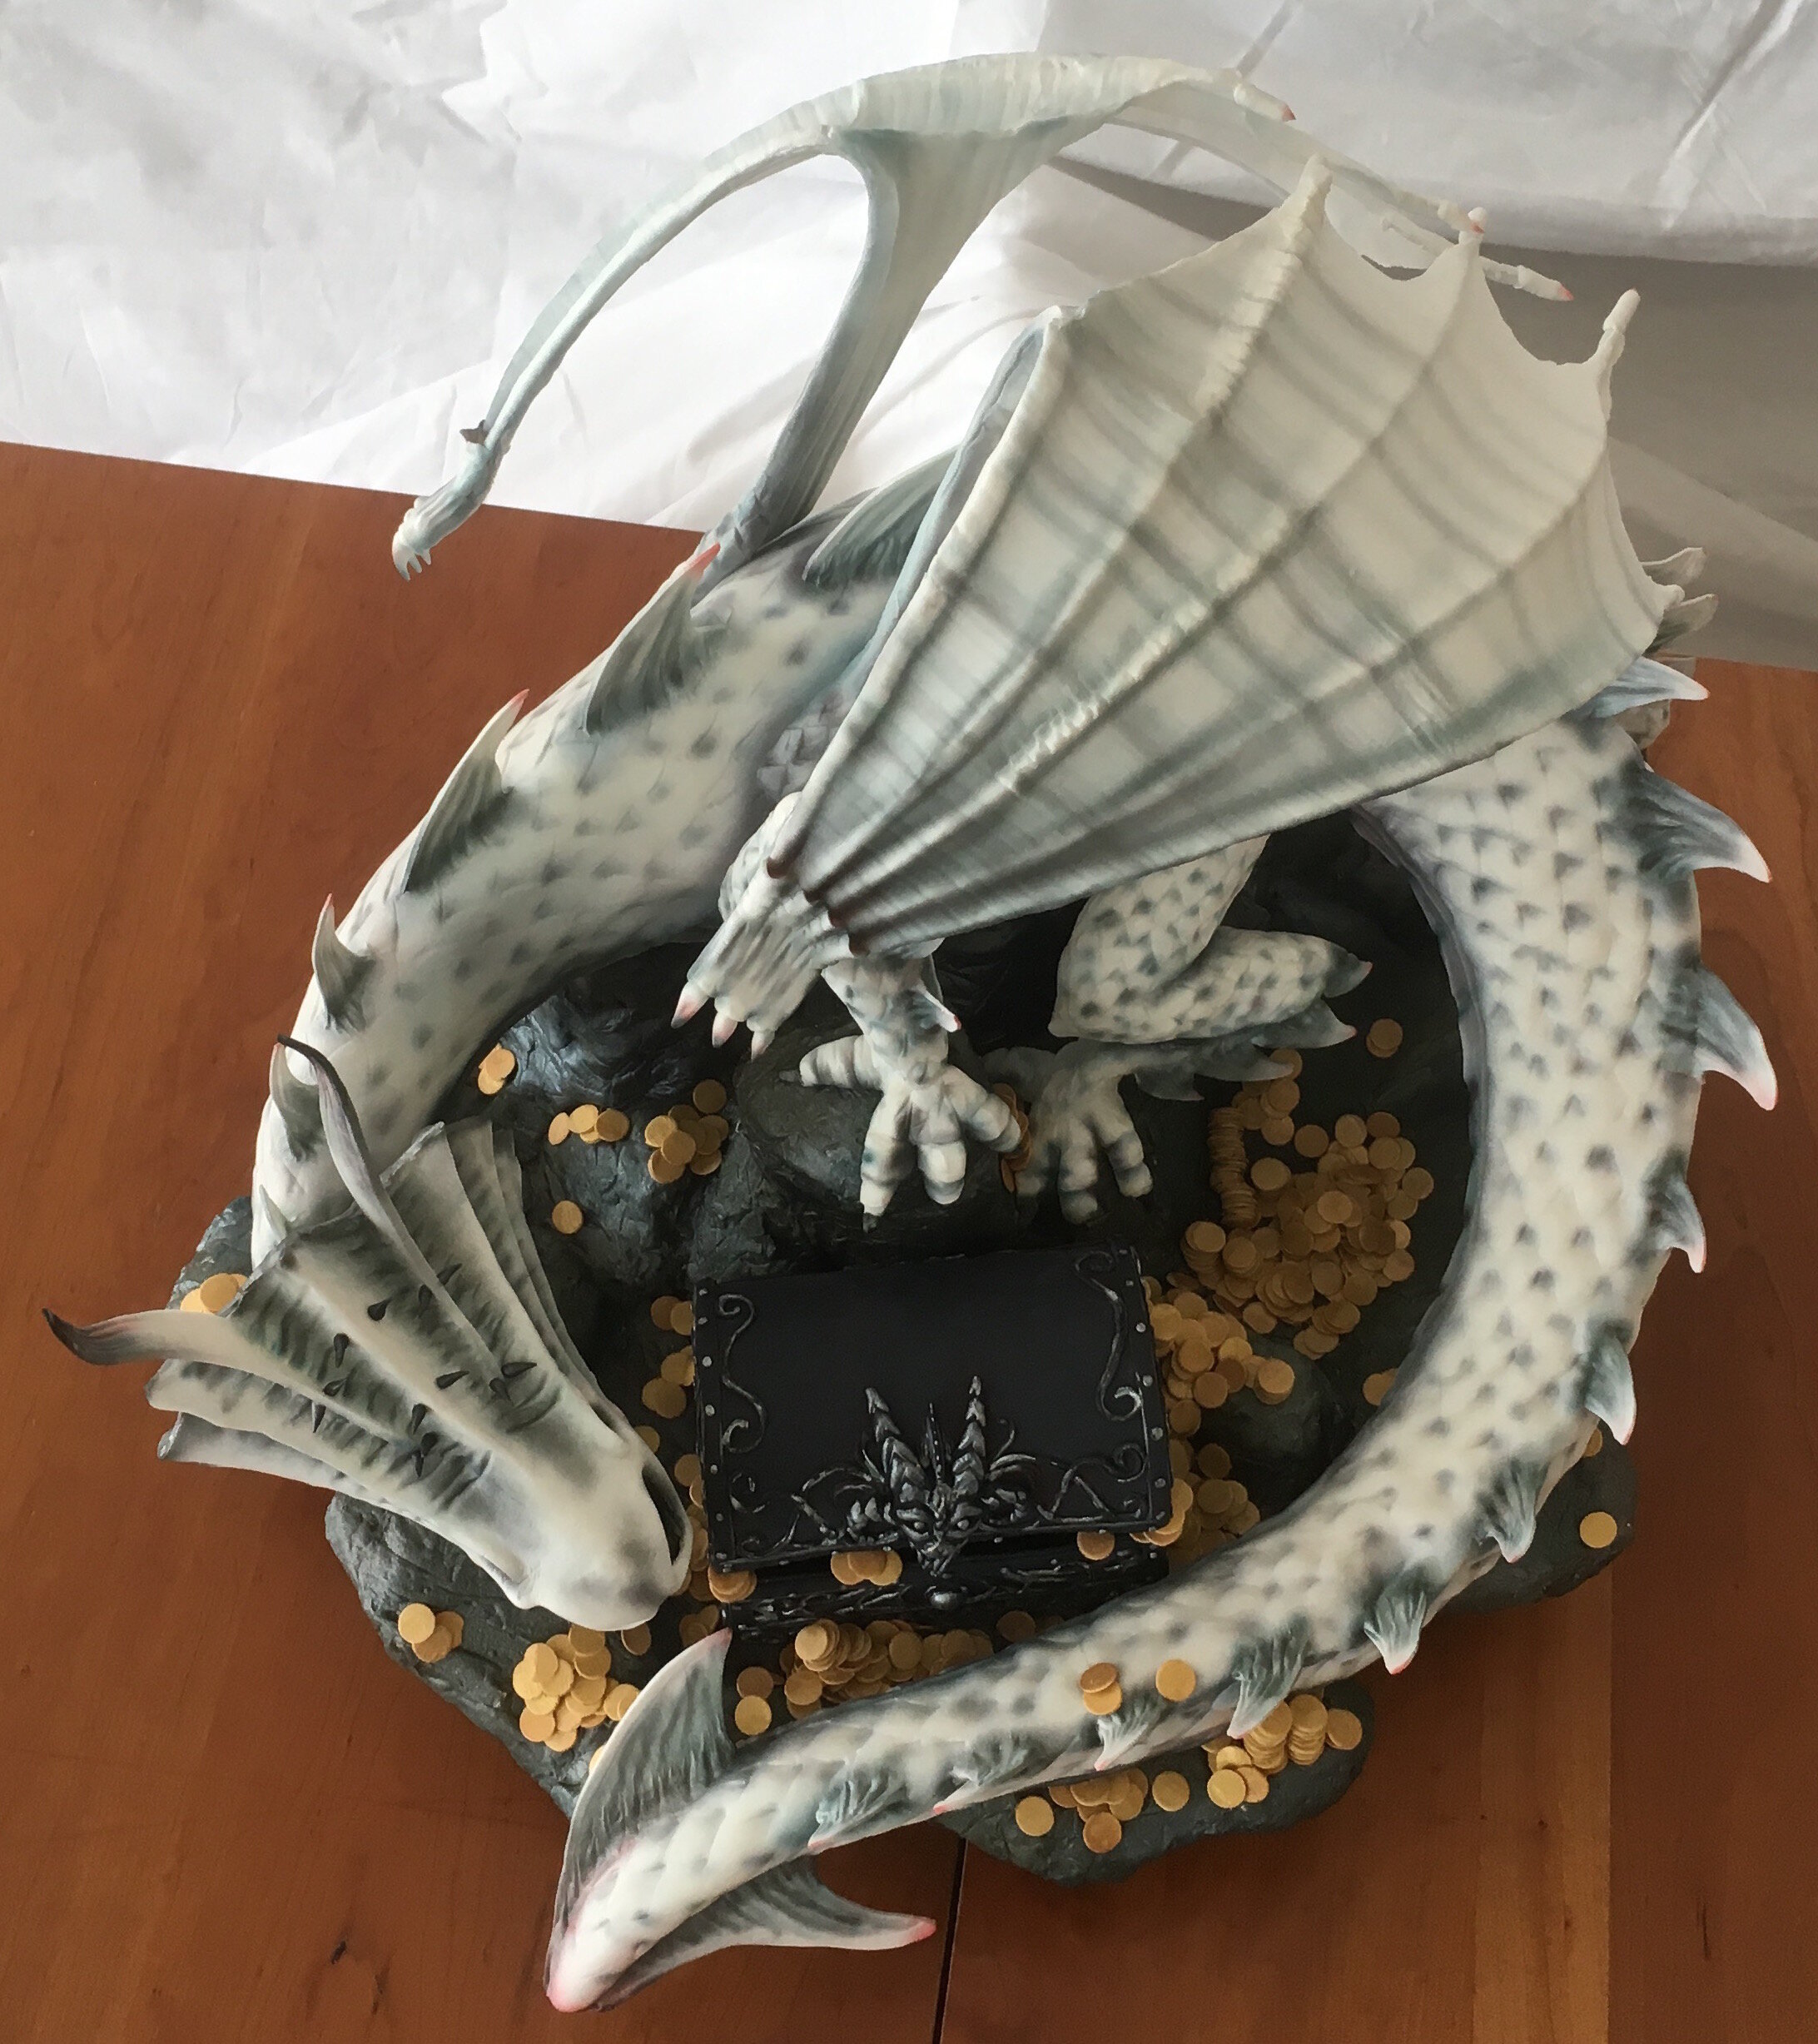
Because no dragon is complete without a miasma of ominous fog, I ran a PVC tube under the cake board and up into the treasure chest. I hooked this up to a home-made dry ice fogger, which consisted of a 5-gallon bucket with 3 little fans I had lying around glued into a hole I cut in the side of the bucket and – voila! The fog didn’t last too long, because there was no heating element in the fogger, but it was cool while it lasted.
Norbert(a) Cake
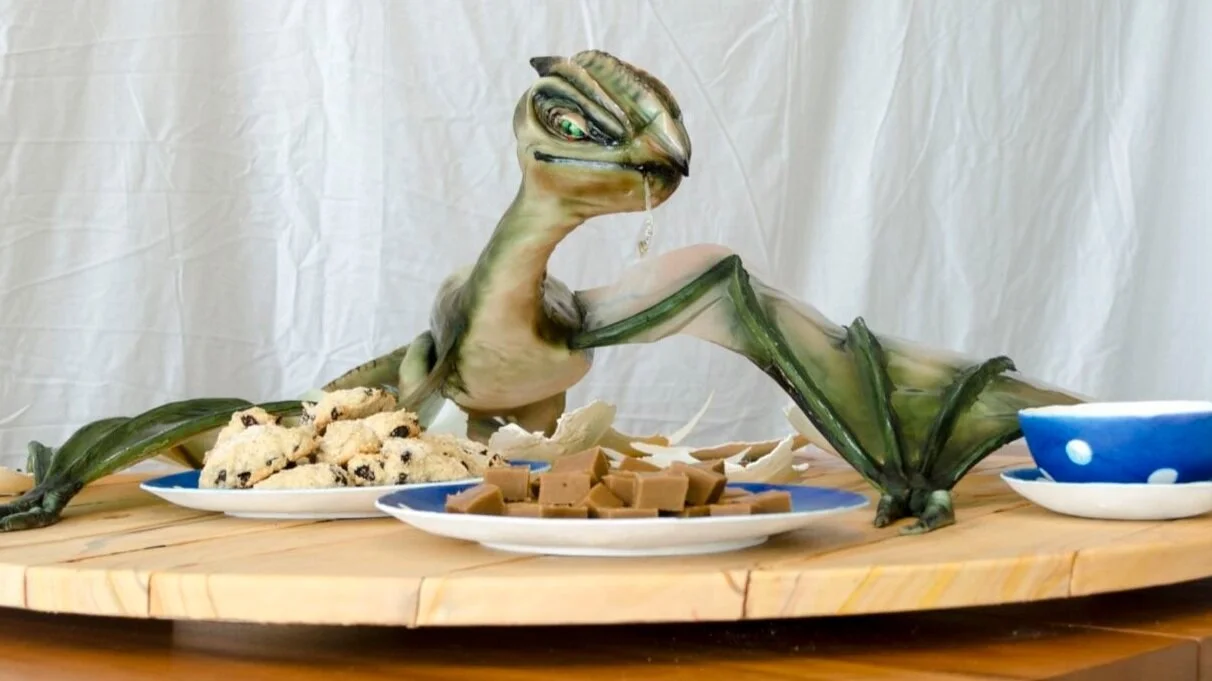
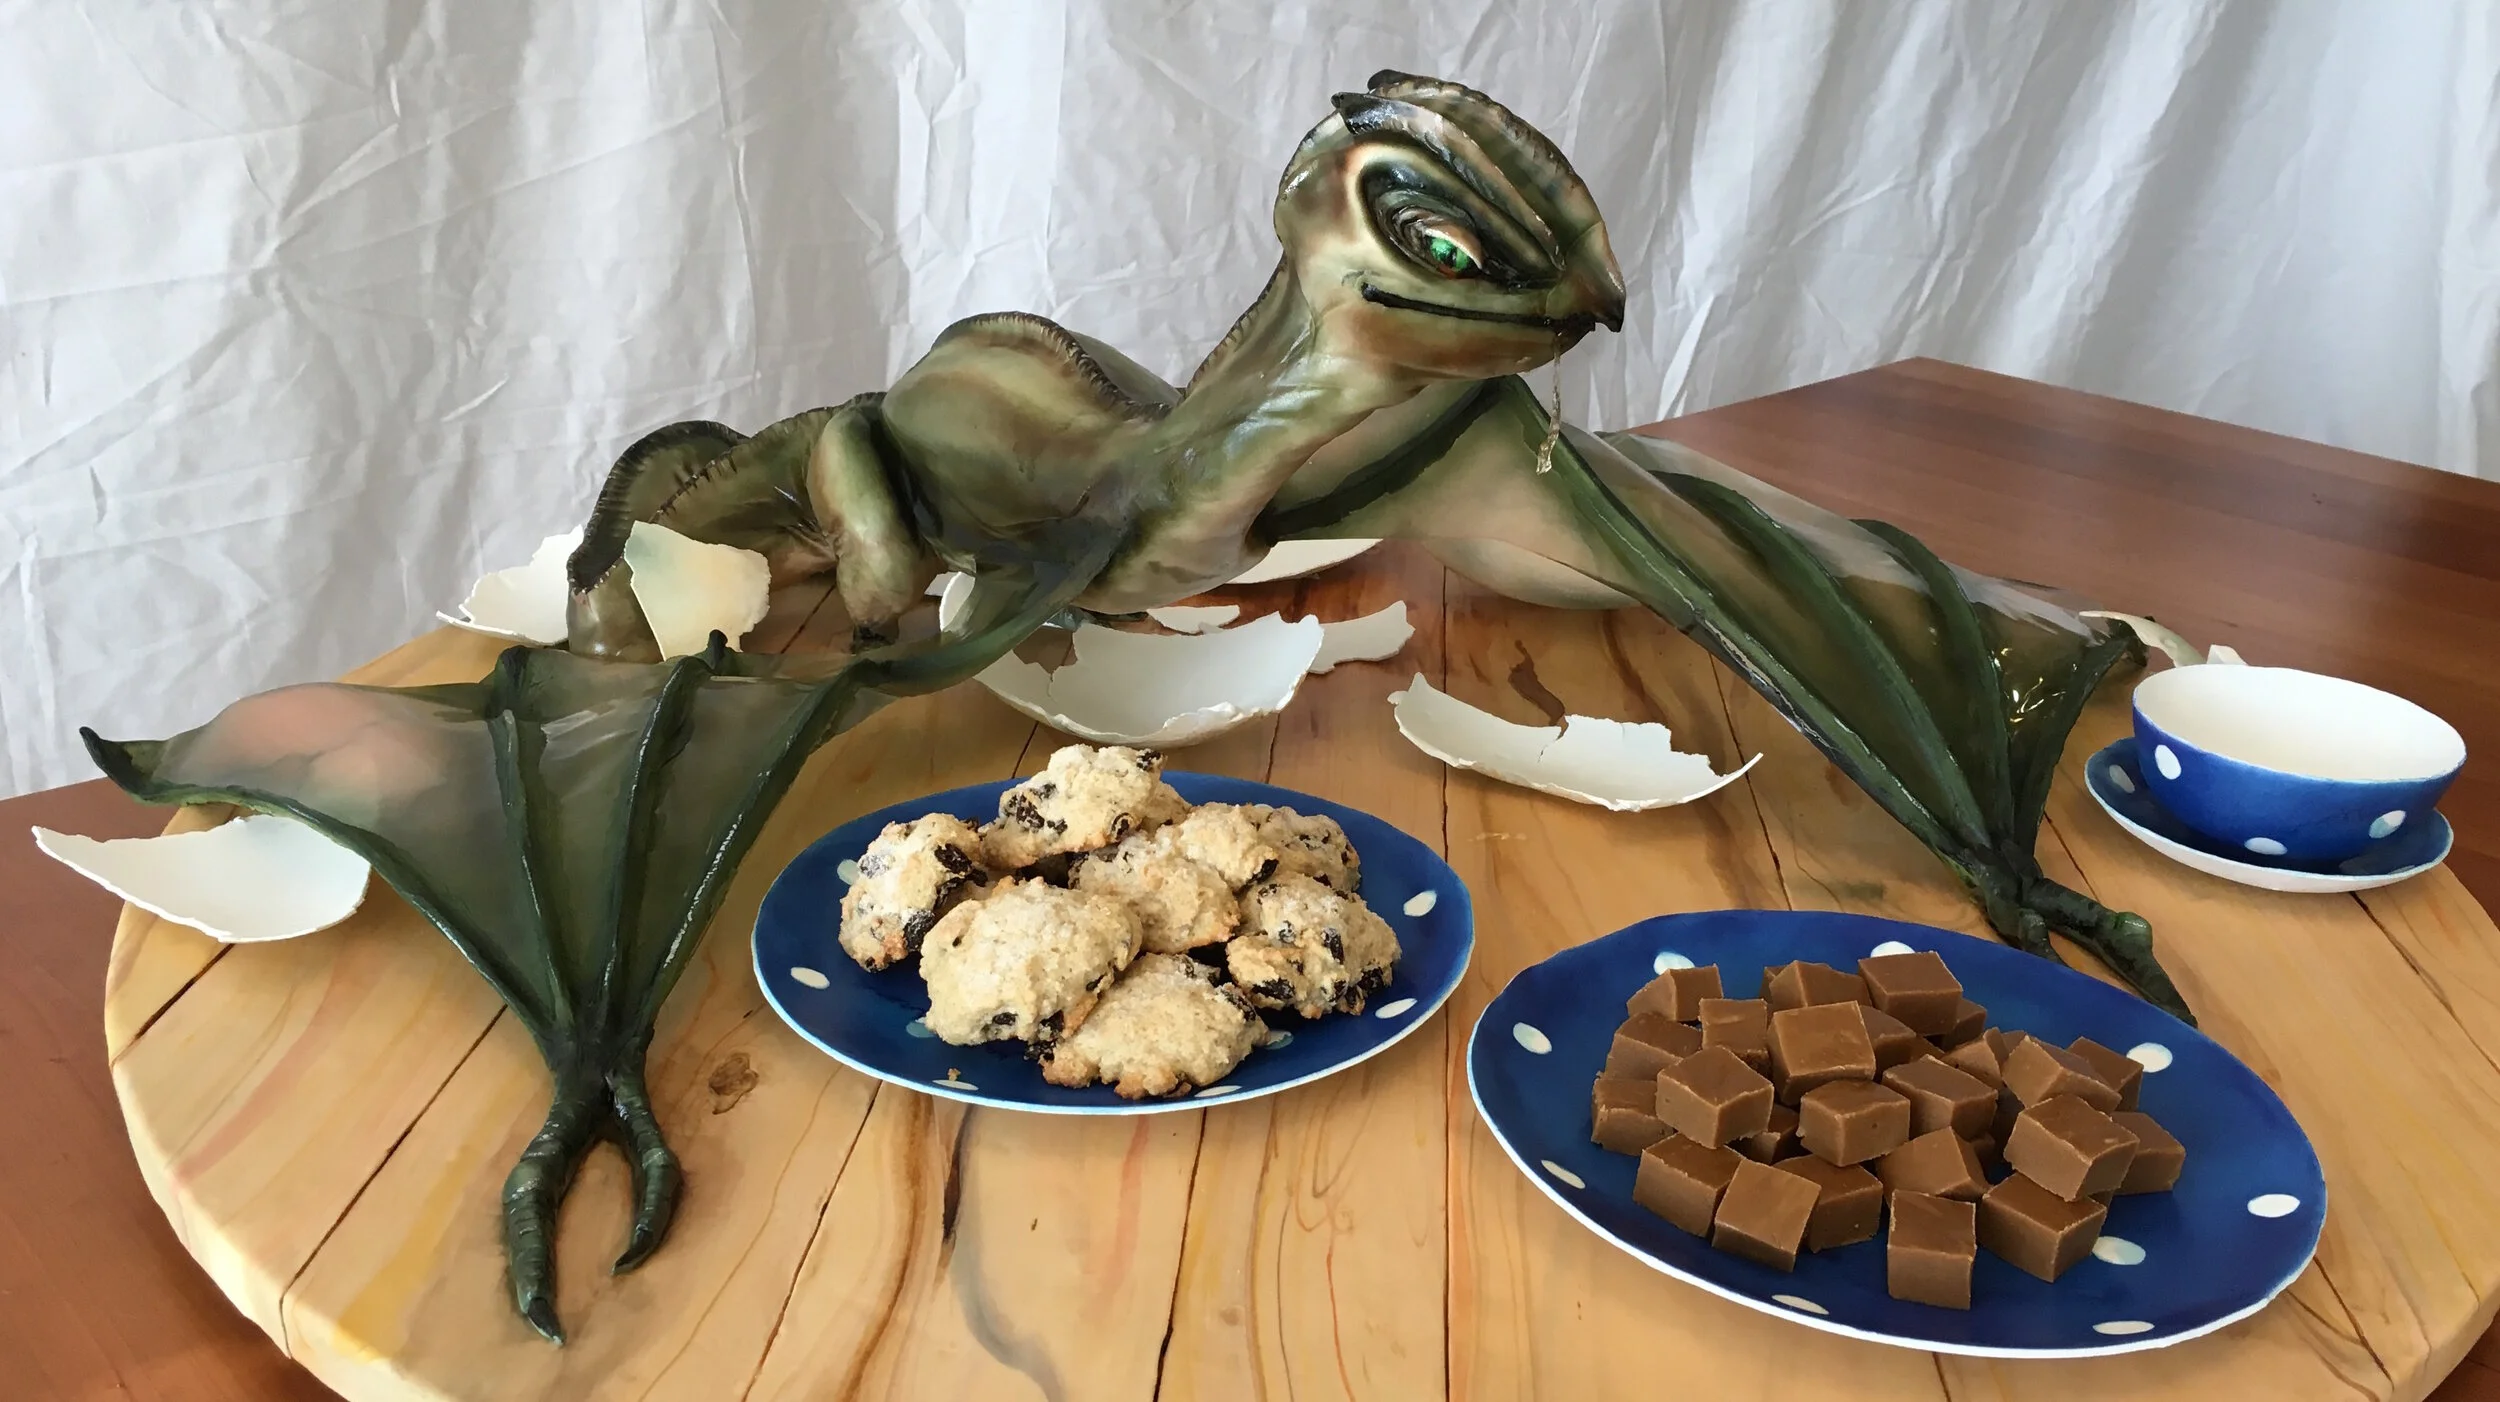
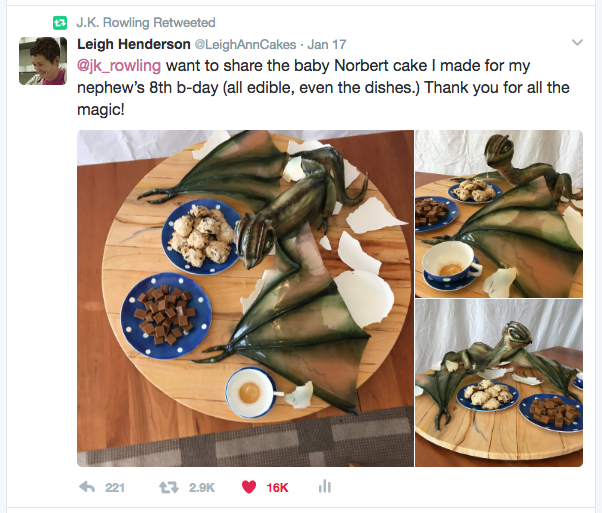
We’re all Harry Potter all the time at our house these days. So for his 8th birthday Sam wanted a cake of Norbert hatching out of an egg on Hagrid’s table.

We’re all Harry Potter all the time at our house these days. So for his 8th birthday Sam wanted a cake of Norbert hatching out of an egg on Hagrid’s table. Here is what the scene looked like in the movie.
The thing about baby dragons is that they’re mostly wings. So in order to have enough actual cake in the body to serve the guests, I had to make the cake pretty huge. That base is a 3-foot diameter plywood circle, covered with wood-grained fondant.
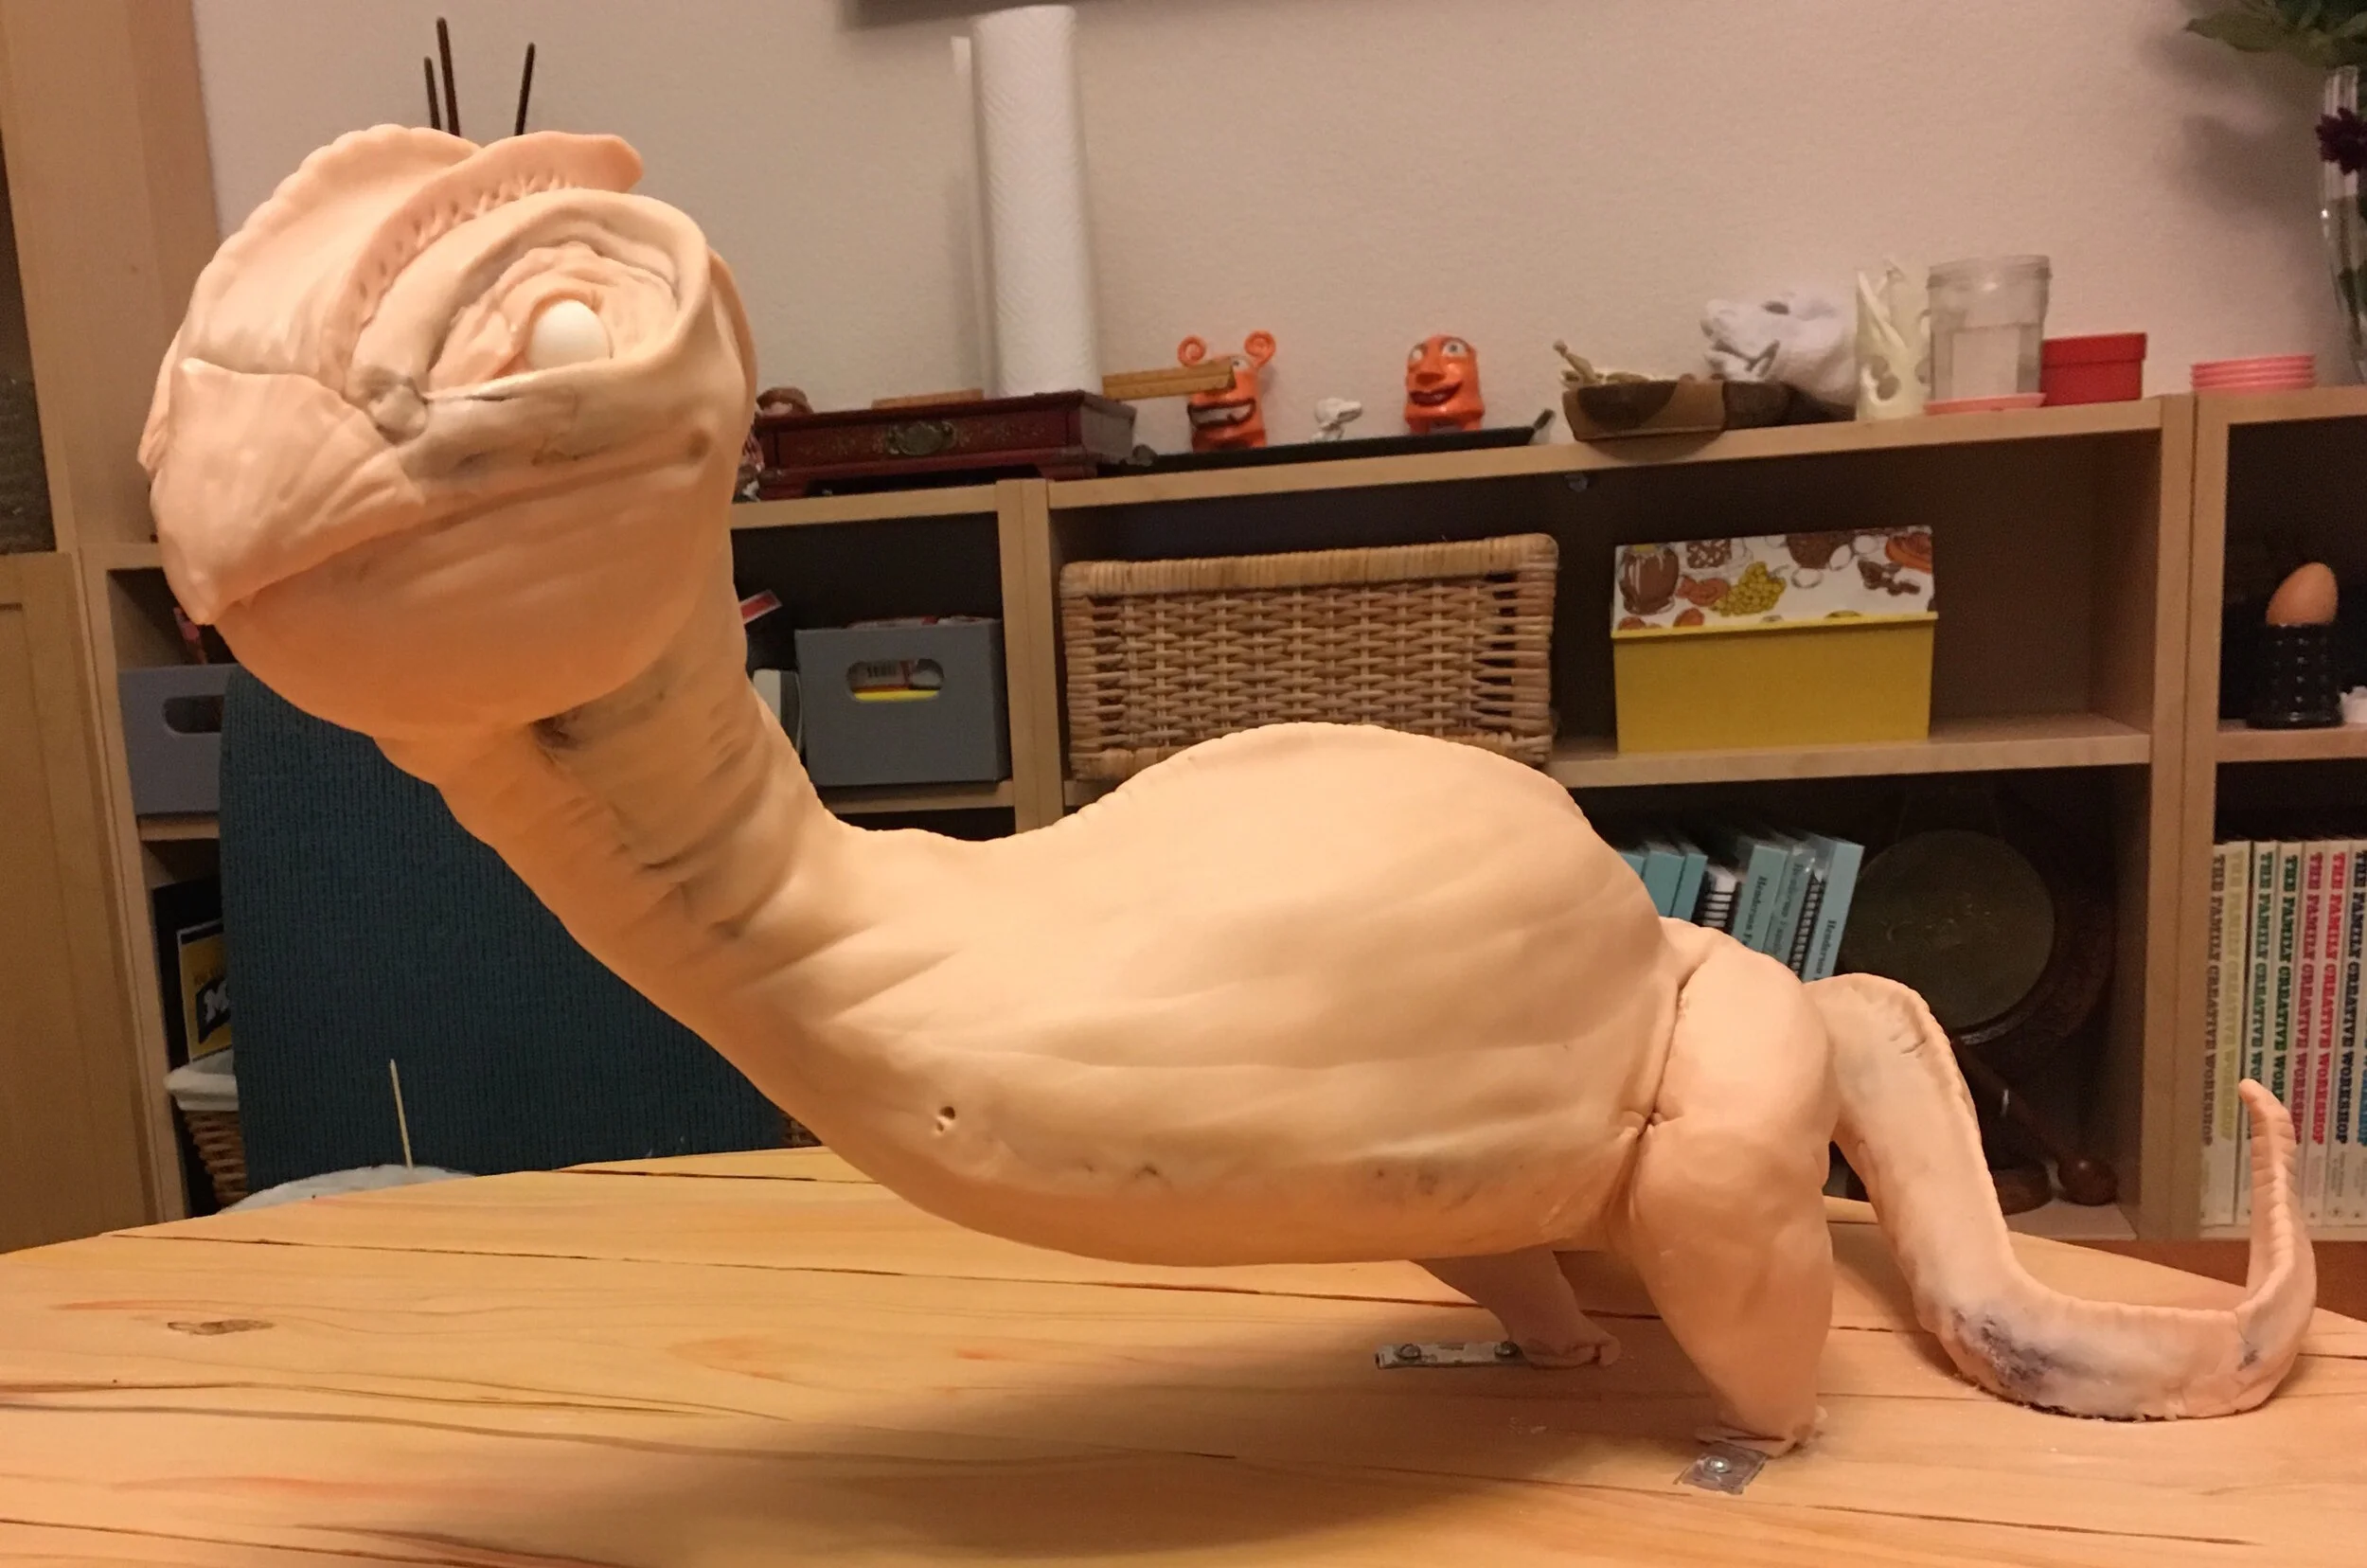
The cake is stacked and sculpted onto a foam core base, supported underneath with aluminum straps, then covered with a mix of fondant and modeling chocolate. I started with a light skin-toned base and airbrushed the colors on top. Sam even helped me sculpt some of the details.

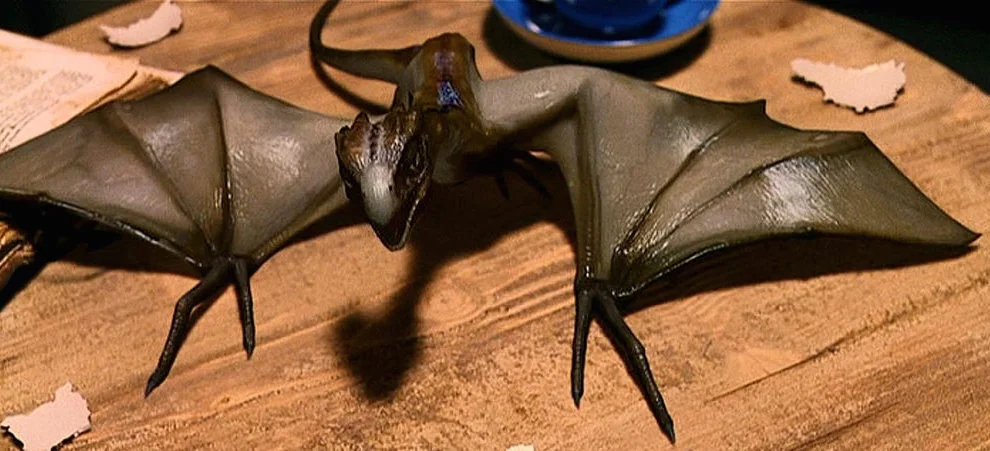
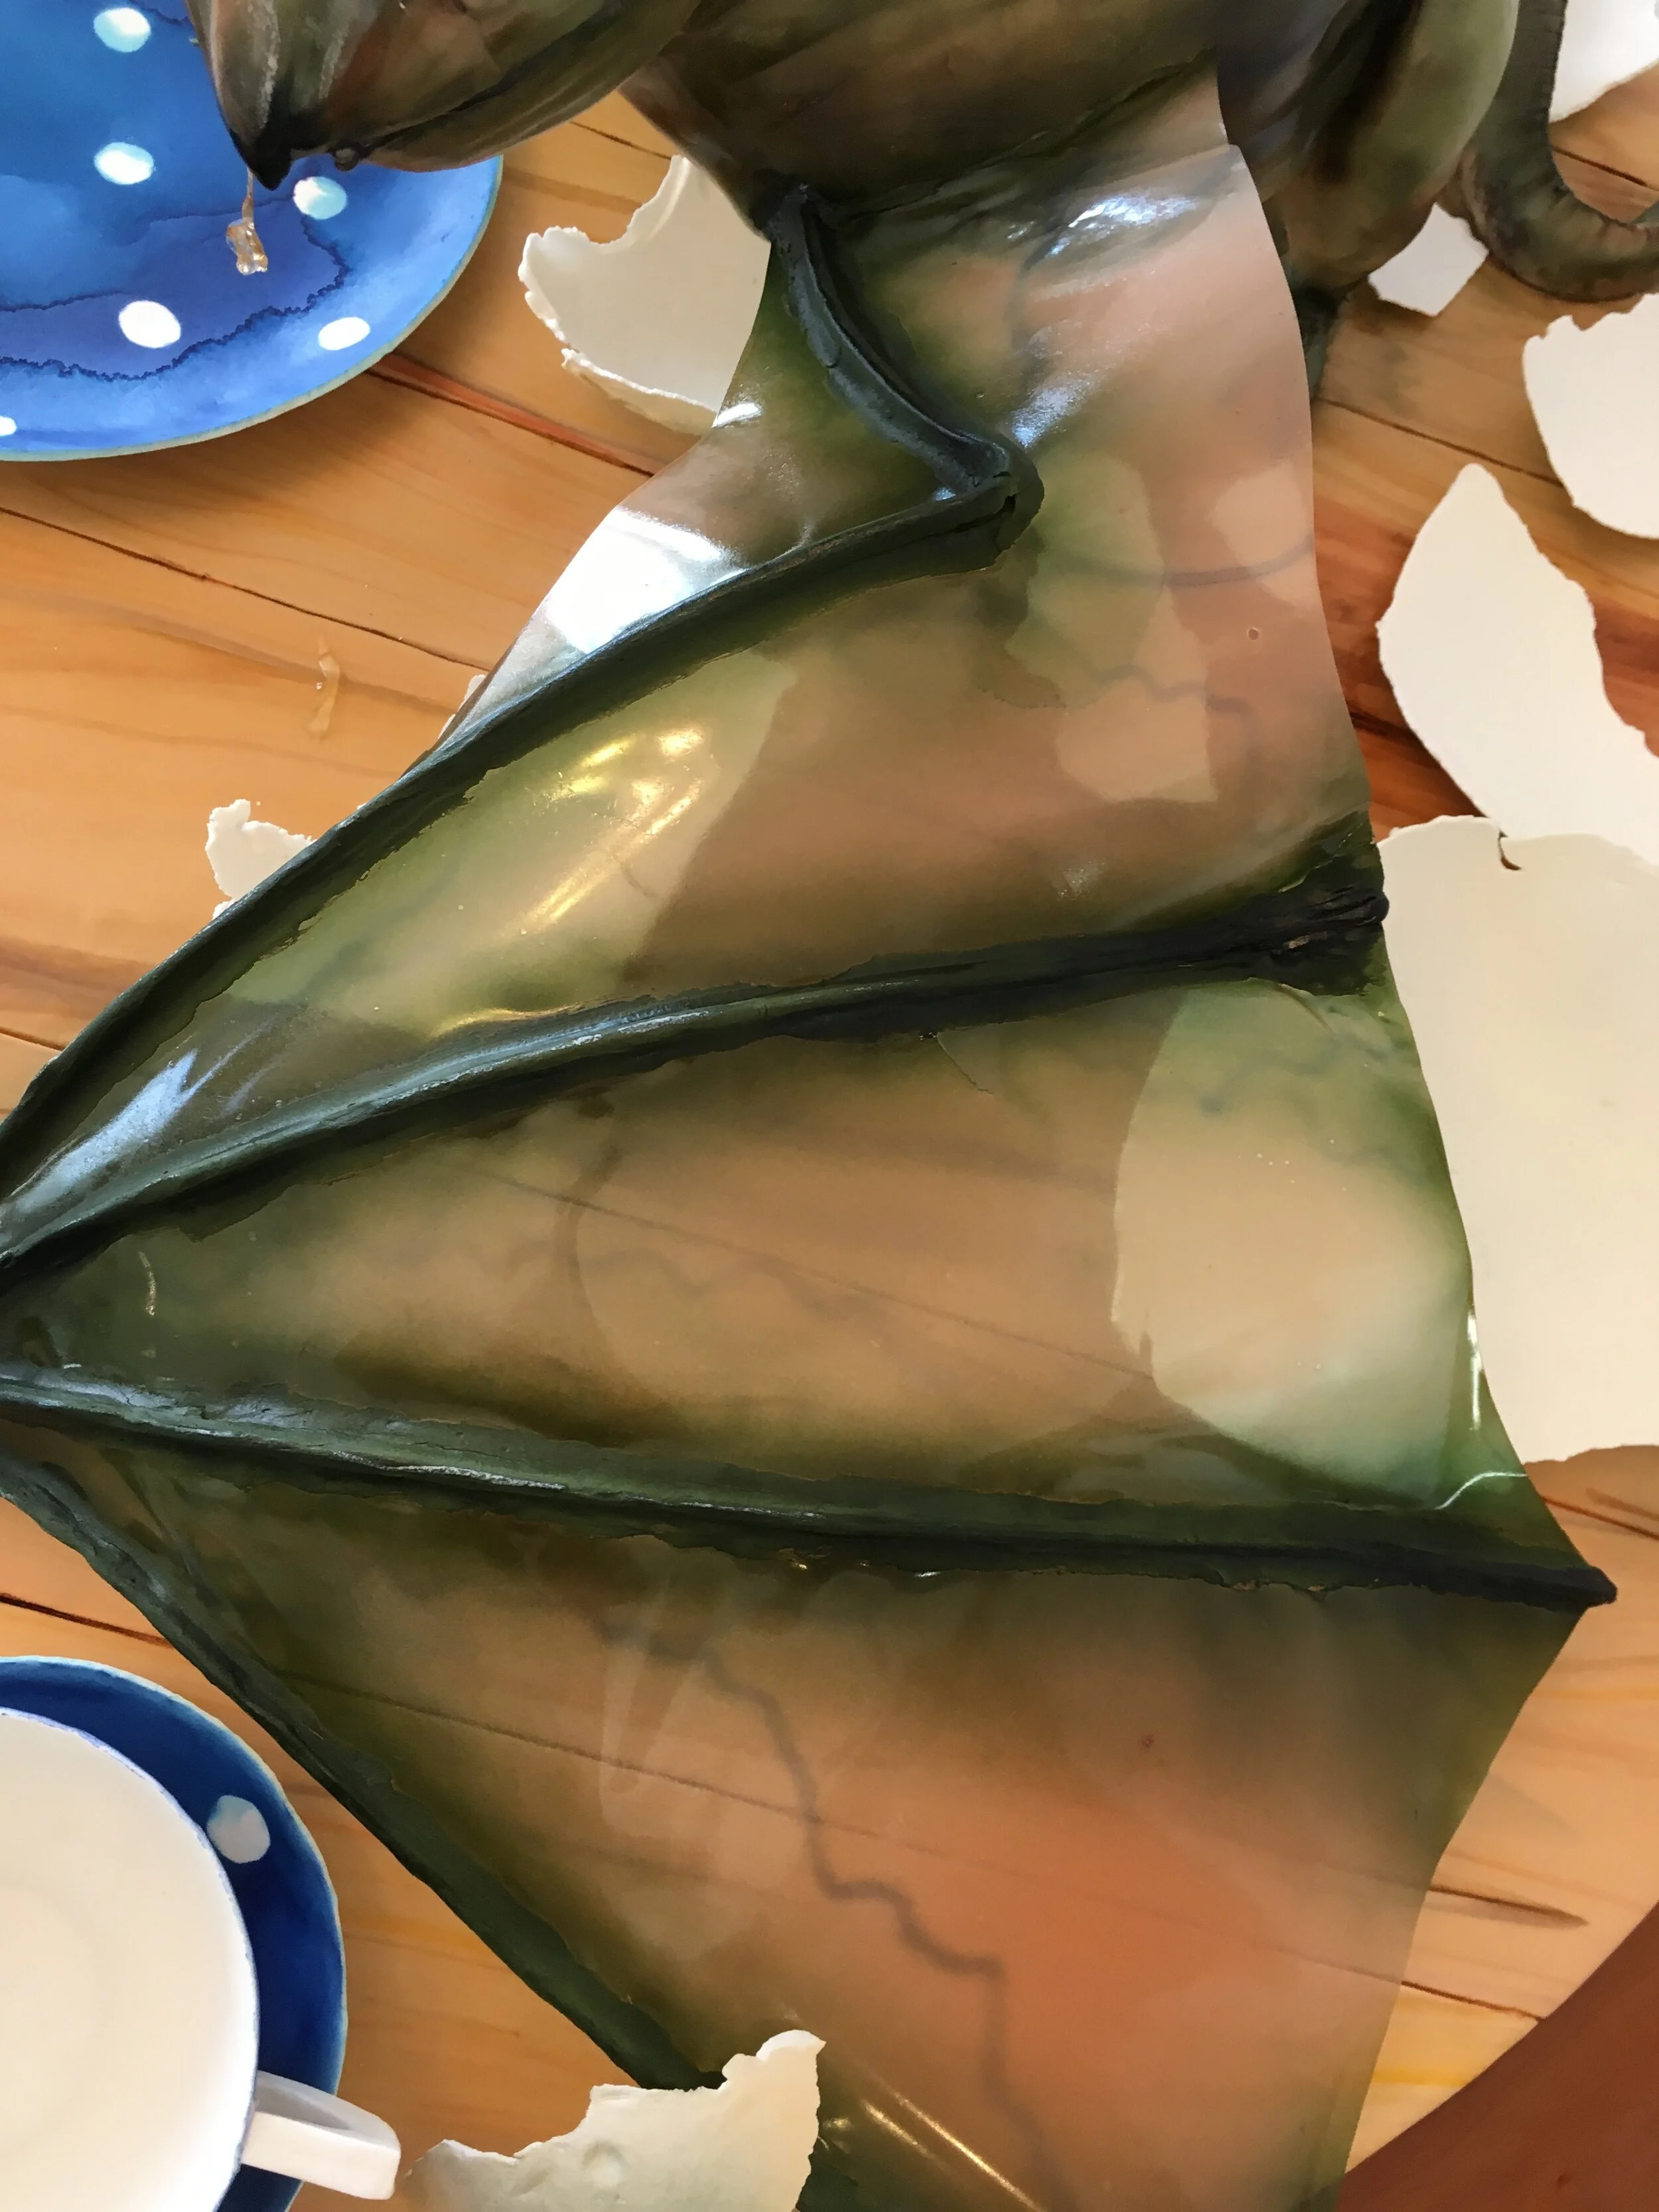
The wings began with a wire armature, covered with gum paste. The membrane is made of gelatin. I’m particularly pleased with the airbrushed veins.
My absolute favorite part about the whole cake, though, is the string of drool hanging from her mouth. It’s piping gel with a strand of sheet gelatin in the middle for structure.
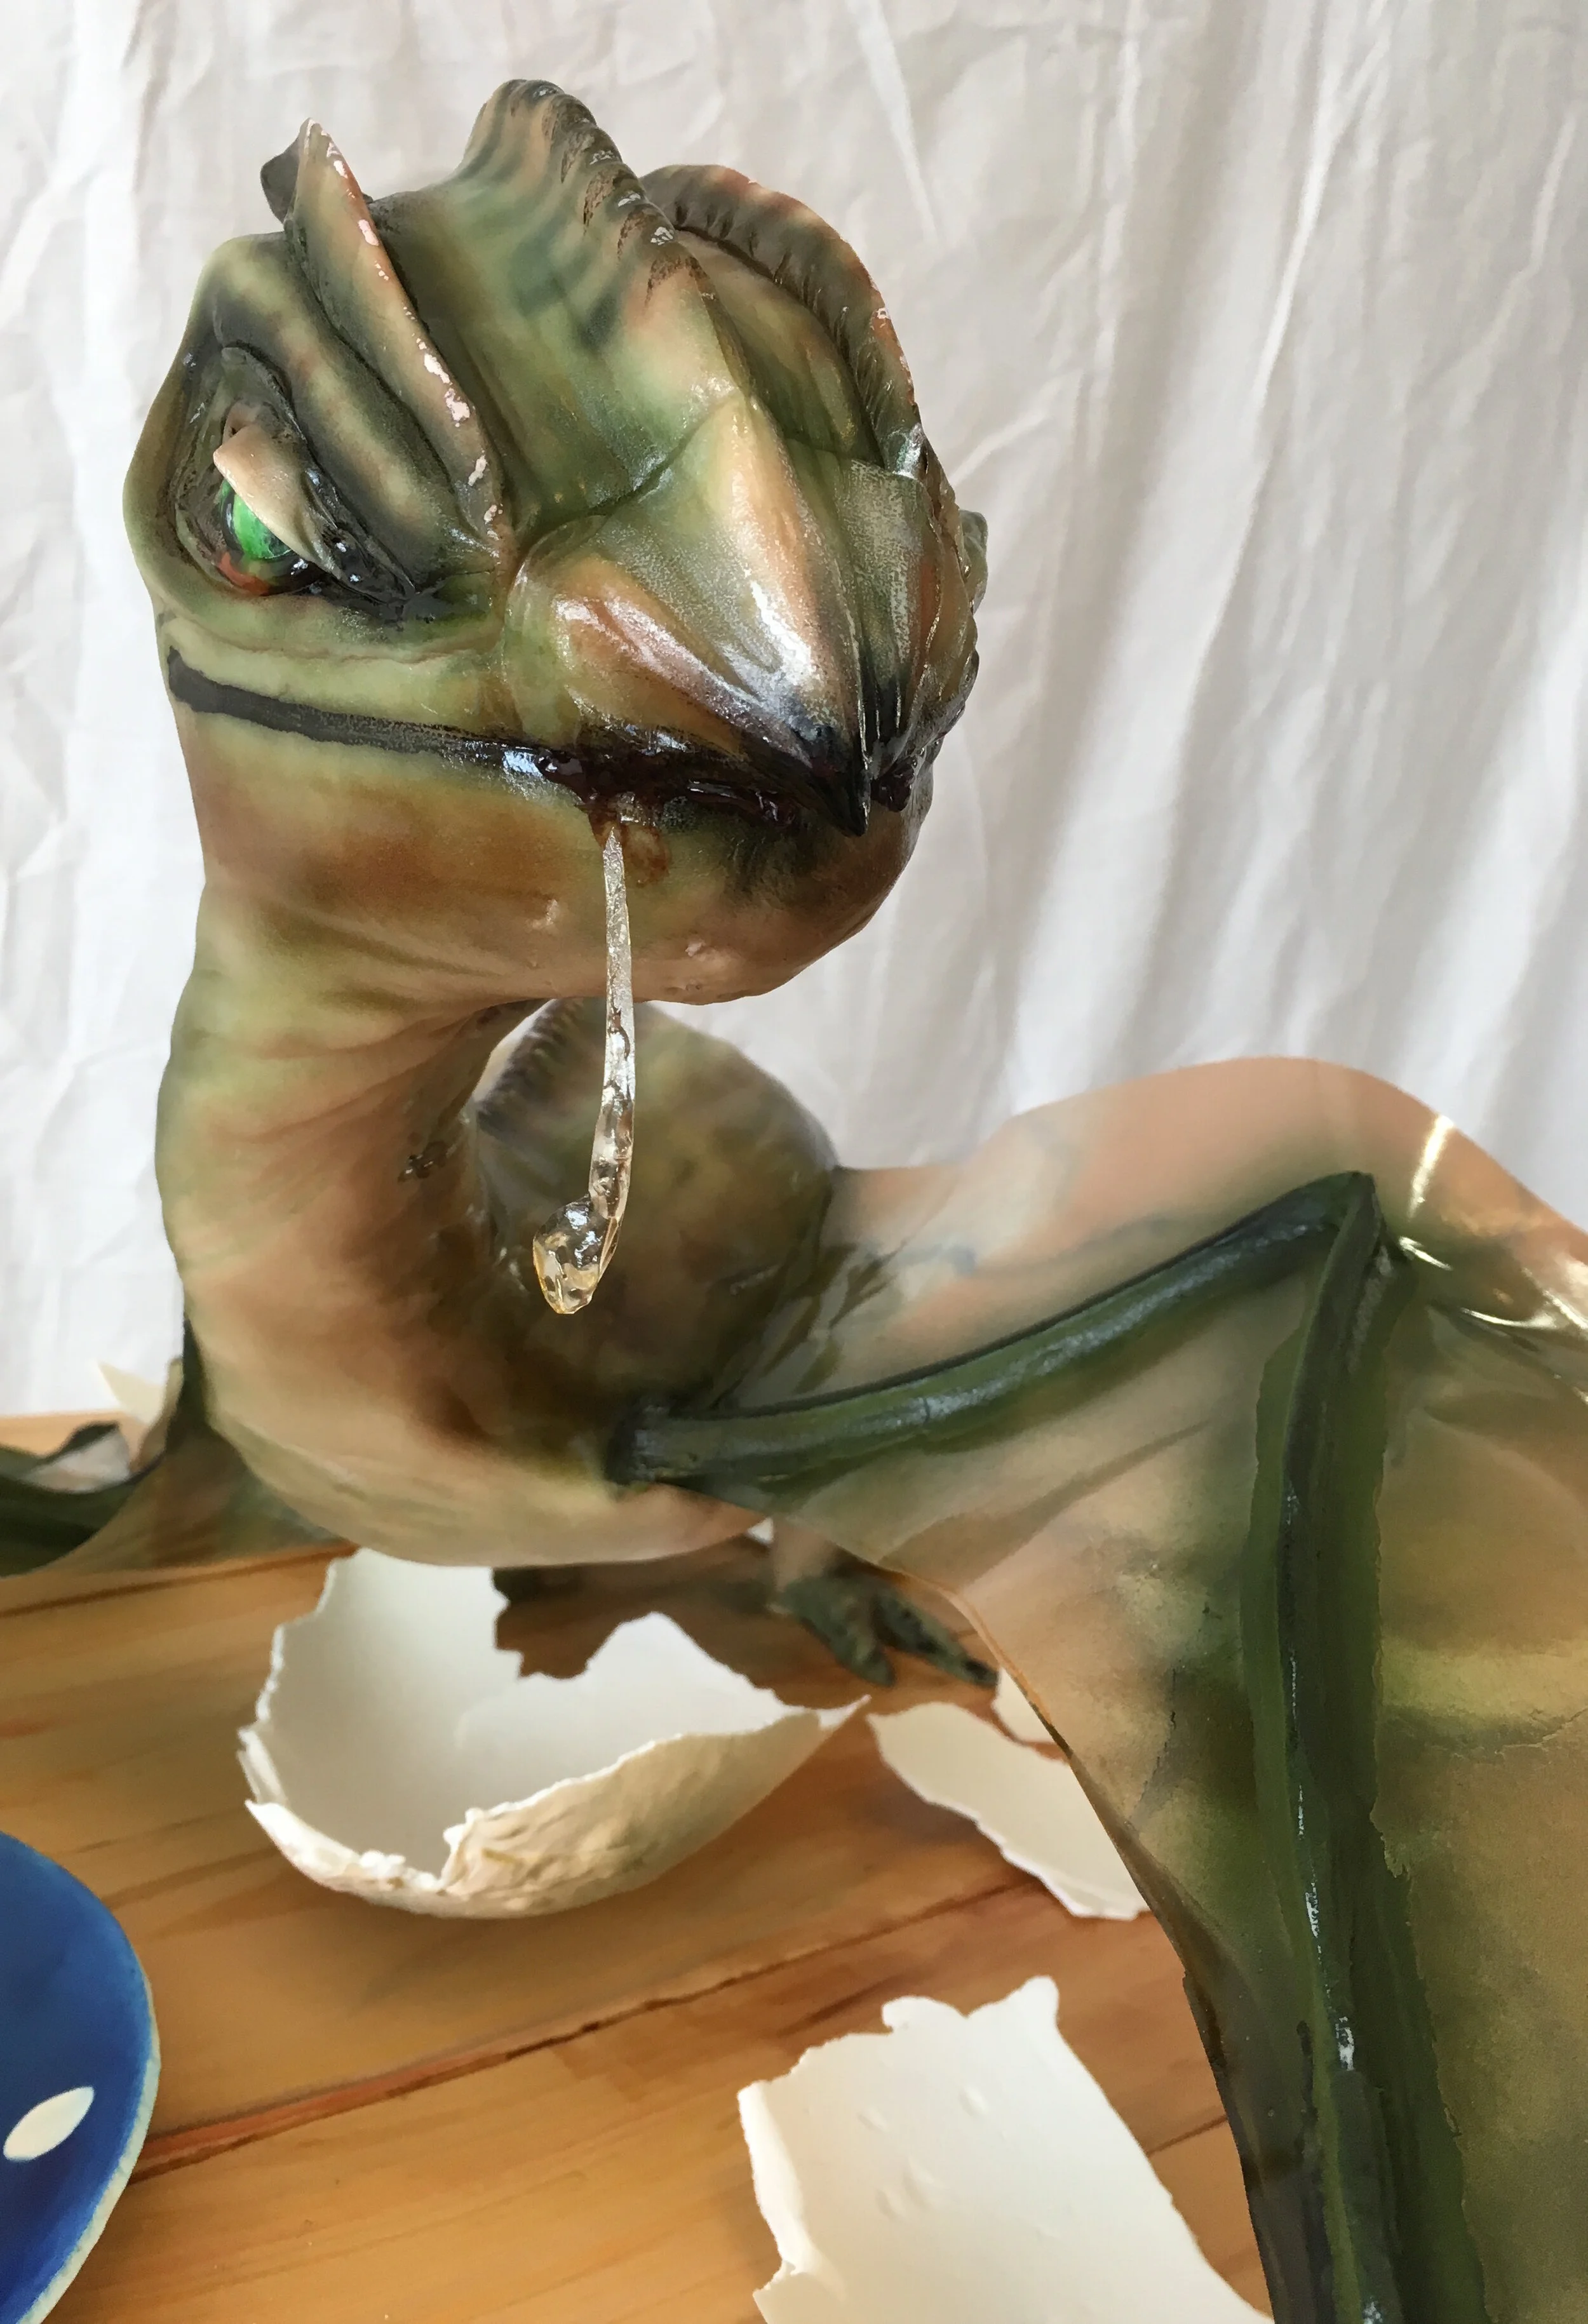
To make the egg shell, I draped gum paste over an oversized plastic Easter egg, then Sam helped me to break into pieces and place it around Norbert like he had just hatched out of it.

The dishes are also made of gum paste. I formed them over a lovely set of china that my sister’s mother-in-law gave her. Obviously, it needed the finishing touch of a little piping gel tea residue in the teacup.
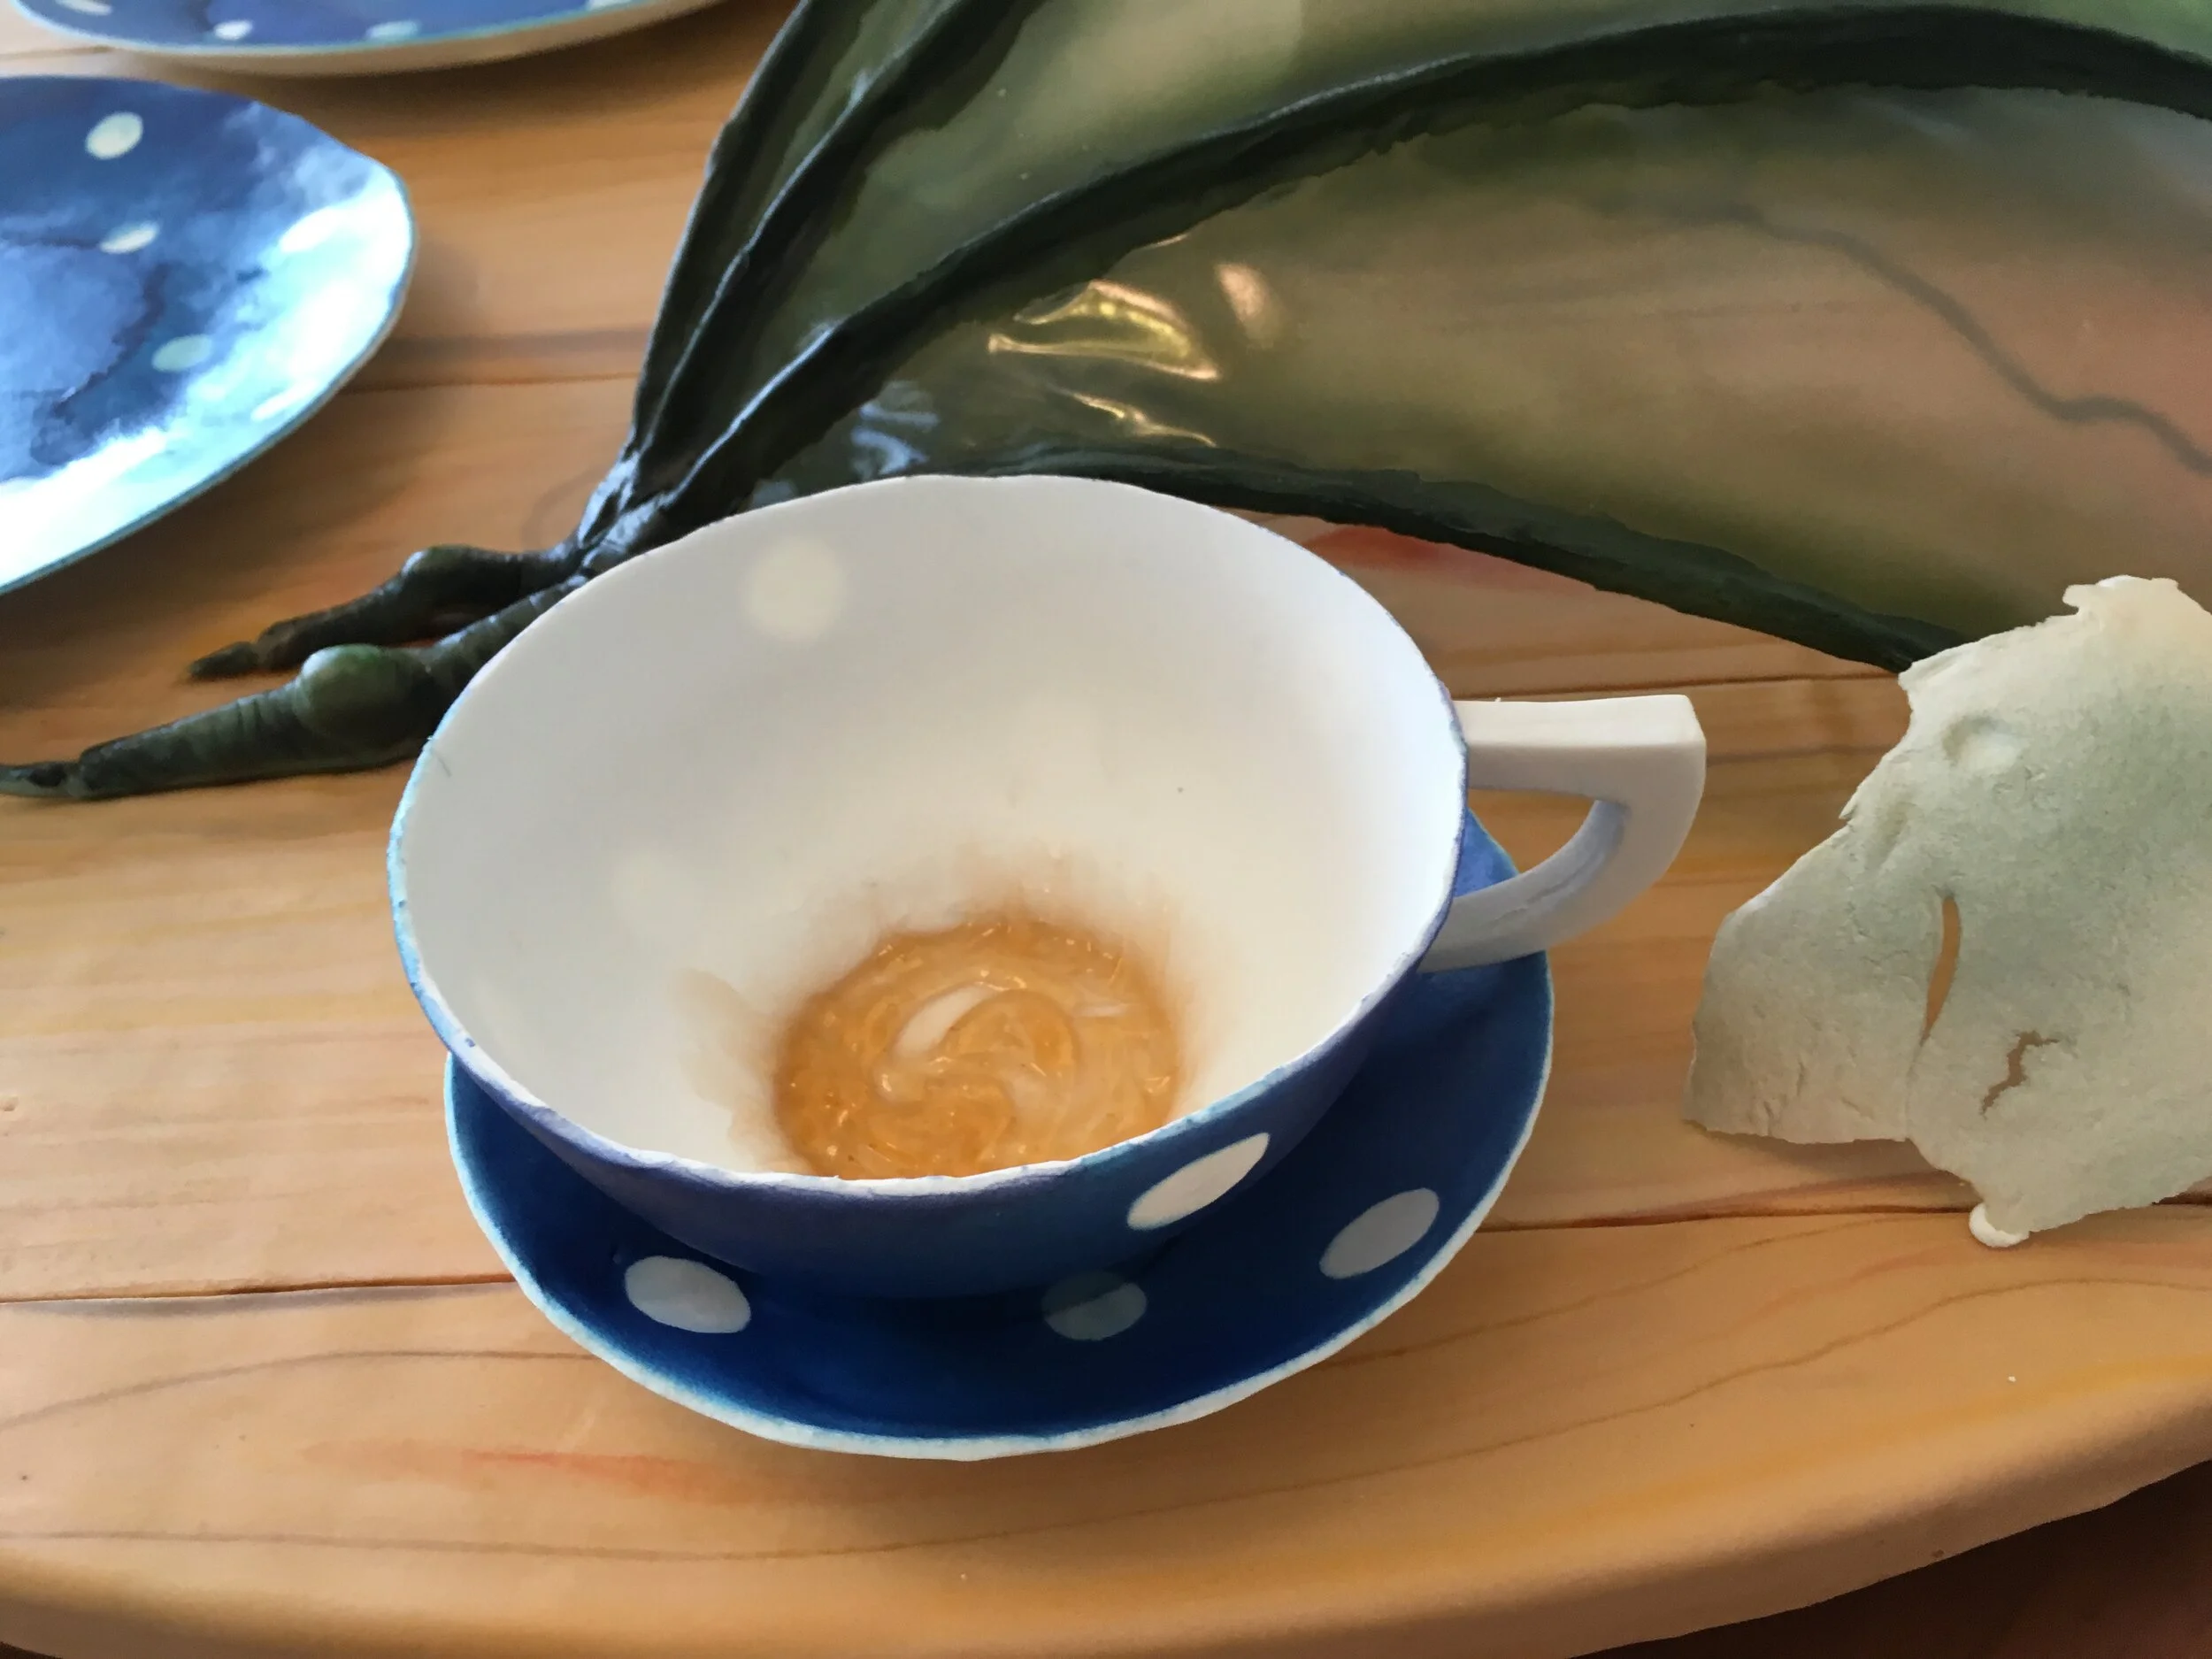
The treats on the dishes are rock cakes and treacle fudge that Sam and his mom made from recipes in The Unofficial Harry Potter Cookbook. We have also made the pumpkin pasties recipe from this book and all the recipes have turned out great. Highly recommended.
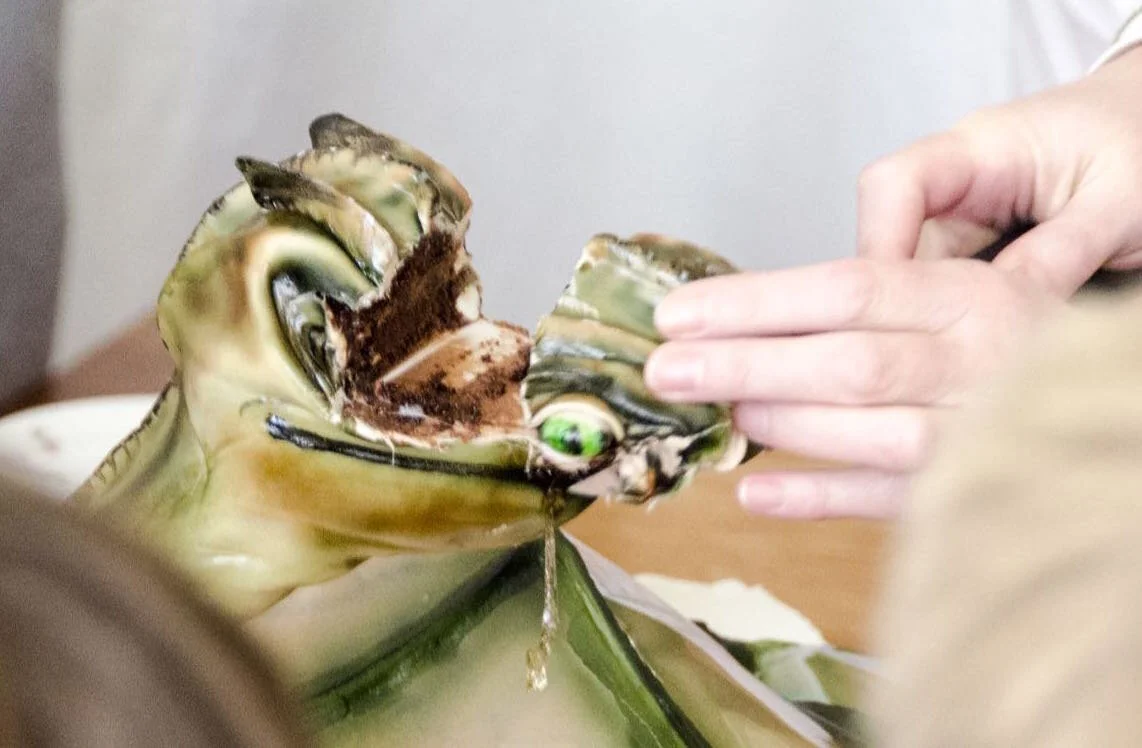
Inside, the cake is chocolate with chocolate buttercream icing. Sam helped me make that, too. For once, the amount of cake that I made was appropriate to the size of the party.
After the party, I tweeted photos of the cake to J.K. Rowling and she not only liked it, she retweeted it! As a result, my tweet is currently at over 965,000 impressions and 15,500 likes. Based on the replies, Harry Potter fans are some of the nicest people in the world.
Update: It's now at over 1,000,000 impressions!

Note:
Unfortunately, J.K. Rowling has disappointed me and many other people. By publicly opposing trans rights and misrepresenting trans people, she has fallen far short of the standard of loving acceptance set by the heroic characters in her books. To learn more, I recommend this open letter to J.K. Rowling from Mermaids, a group in the UK that advocates for trans and gender-diverse children. If you want to help, you can donate to Mermaids, Gender Spectrum, and many other groups working to support trans and gender-diverse people.
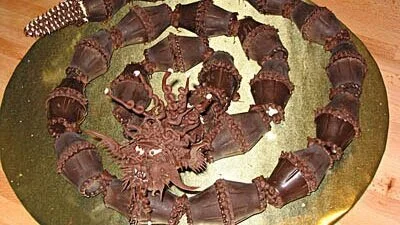
Chocolate Rattlesnake Dragon
This was made as a Christmas present for my sister and her husband. The body is made of forty-seven chocolate cups with eleven different fillings, arranged randomly, so biting into each segment is an adventure, since there's no way of knowing what flavor it will be.

This was made as a Christmas present for my sister and her husband. The body is made of forty-seven chocolate cups with eleven different fillings, arranged randomly, so biting into each segment is an adventure, since there's no way of knowing what flavor it will be. Maybe there's some sort of gambling to be done here. Someone call Vegas. Speaking of which, I have a great idea for a restaurant in Vegas in which, for a fixed price, you get a pull on a slot machine to determine what you're going to get for dinner. The first reel could be the drink, then the appetizer, the side dish, the main course, and dessert. You might end up with lobster; you might end up with a BLT. Wouldn't that be fun?
Getting back to the dragon, the eleven filling flavors were golden sesame, ginger, citrus zest, green tea, red wine, wasabi, peanut butter, peppermint, coffee, orange, and cherry.
Why a dragon, you ask? Well, I reply, because that's what occurred to me. I had another idea first, involving a demonic Santa Claus playing God, holding up a DNA strand covered with the screaming heads of tormented elves, but I didn't think I'd have the time to do it right. It's too bad, because that would have been more Christmas themed. Maybe next year.
Initially, I was planning to make the body out of candies made in several sizes of peanut butter cup molds. This fell through because the peanut butter cup molds I ordered over the internet didn't arrive at my apartment in New York until after I left to spend Christmas at my sister's house in California. I therefore had to run around to candy supply stores looking for usable molds. What I found (at Michael's) were molds for those little chocolate cups that you're supposed to fill with mousse or raspberries. It was actually a blessing in disguise, as these worked better than the peanut butter cup molds ever would have. They're big enough to fit a good amount of filling and they're proportioned really well for snake segments. Peanut butter cup molds would have resulted in much squatter, less graceful snake. Of course, I now have a bunch of peanut butter cup molds and nothing to do with them.

The first step was to make all the fillings, except peanut butter, which comes ready made in a convenient jar. I recommend using some kind of natural peanut butter. I used Trader Joe's.
The peppermint, coffee, orange and cherry centers were made of center fondant, which I've made many times before. My recipe comes from The Practical Candymaking Cookbook, which I highly recommend, though I believe it is now out of print. The fondant is basically sugar, milk, and butter, cooked, then worked on a marble slab to get the right texture. I then flavored it with candy oils (except for the coffee, for which I used instant coffee as flavoring) and colored it with paste food colors.
The golden sesame, ginger, red wine, wasabi, citrus zest, and green tea were much more of an adventure, because instead of a recipe, all I had was a brochure from a high end New York candy store, which I got at the New York Chocolate Show. It had descriptions of the candies, but it wasn't like a real recipe. For instance, all the instruction I had for the ginger candy was, "Milk chocolate blended with gin-flavored ganache and ginger."
The golden sesame and ginger have a milk chocolate ganache base, which is made by boiling cream, pouring it over chopped milk chocolate, and whisking them together. For the golden sesame I added finely ground golden sesame seeds and a splash of brandy and for the ginger, finely chopped ginger root and a little gin. I determined the proportions by taste and then wasn't smart enough to write them down, so I won't know any more the next time I make them than I did this time.
The red wine and wasabi start with a dark chocolate ganache base, made the same way as the ganache with milk chocolate. I then added red wine and wasabi powder (because I couldn't find fresh wasabi root) to taste. Finally, the citrus zest and green tea are based on white chocolate ganache, flavored with orange zest (from my sister's own orange tree) and gin and with ground up green tea.
They all wound up tasting very good. I was particularly pleased with the ginger, red wine, and citrus zest. The only major problem I had was that the white chocolate-based flavors and, to a lesser extent, the milk chocolate-based flavors, were more liquid than is ideal for rolling truffle centers. This actually was no problem at all for this project, as I could just pour the liquid into the mold, but I was also using these ganaches to make rolled truffle centers, both for standard truffles and for the shrunken head truffles that I made Mom and Dad for Christmas. I think I could solve this problem next time by using less cream to make the initial ganache out of milk chocolate and white chocolate. See, I did learn something by making these, even if I didn't have the sense to write down my recipes.
With the fillings done, I was ready to make the chocolate cups themselves.The first step was to fill the mold with dark chocolate, and then set it in the fridge for one minute, so a thin, hard shell formed. Then I poured out the excess chocolate and set the molds back in the fridge to harden.
Once the chocolate shells had solidified, it was a simple matter to pour the fillings in and then pour another thin layer of chocolate on to seal off the top of the cup. Shaking the mold a bit helps to settle the chocolate on top into a flat surface. Then, back in the fridge they went to harden.
Now the fun part begins! It was time to begin adding the artistic details. For this, I found it best to use melted dark chocolate mixed with just a smidge of corn syrup. This gives the chocolate just a little more solidity so it holds its shape better. It also imparts to the chocolate a lovely dark sheen. The only drawback is that too much corn syrup will cause the whole batch of chocolate to seize up and become totally useless. I'll only admit to that happing to me twice

.I put a batch of this dark chocolate / corn syrup combo into a pastry bag with a #4 round tip and piped little dots of chocolate around the top and bottom of each cup. These made a nice visual division between the segments of the snake and also kept the cups from touching each other except around the perimeter, making it possible to break off a cup to eat without extensive damage to the neighboring cup.
Once those dots were dry (Another advantage to the corn syrup addition is that it makes the chocolate set up much more quickly.) I joined forty-six of the cups into twenty-three pairs, by sticking the wide ends of the two cups together. The remaining single cup was for the back of the head.
I was finally ready to arrange the snake on the gold foil covered cardboard cake circle I had designated as the snake's home. I chose to arrange the snake in a spiral, with the tail to be placed on the outside of the spiral and the head rising up from the center. This part went quickly, as it was a simple matter to stick the segments to each other and to the base with a little chocolate. I had to prop the head up on a few containers of luster dust until the chocolate that was holding it in place dried.
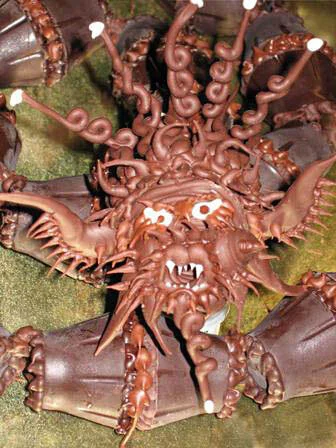
Next, the hard parts - the face and the tail. Actually, the tail wasn't all that hard. I made all of components of the head and tail on a piece of parchment paper, and then stuck them to the snake with a little more chocolate / corn syrup. The tail consisted simply of a series of rings of decreasing size. I believe I piped them with a #6 round tip. Once these dried, I stuck them together to form the rattle, and then stuck the whole thing onto the last segment of the body.
The head was more complicated. The basis was the same as the tail - a series of consecutively smaller rings, though these shrank in diameter more rapidly than those that formed the tail, resulting in a squat, roundhead. The holes in the center of the rings formed a mouth. I also made many whiskers of various sizes and shapes - some s-shapes, some curlicues, some simple swooshes.
Once all the components dried, I was ready to decorate the head. I started with the larger whiskers and worked my way down to the smaller details, basically making it up as I went. I was very happy with the result. While I was at it, I also reinforced many of the connections between the segments to make sure nothing came apart.
I applied the finishing touches with white chocolate - teeth, eyeballs, accents on the tips of the hair and beard, and little spikes on the rattle.
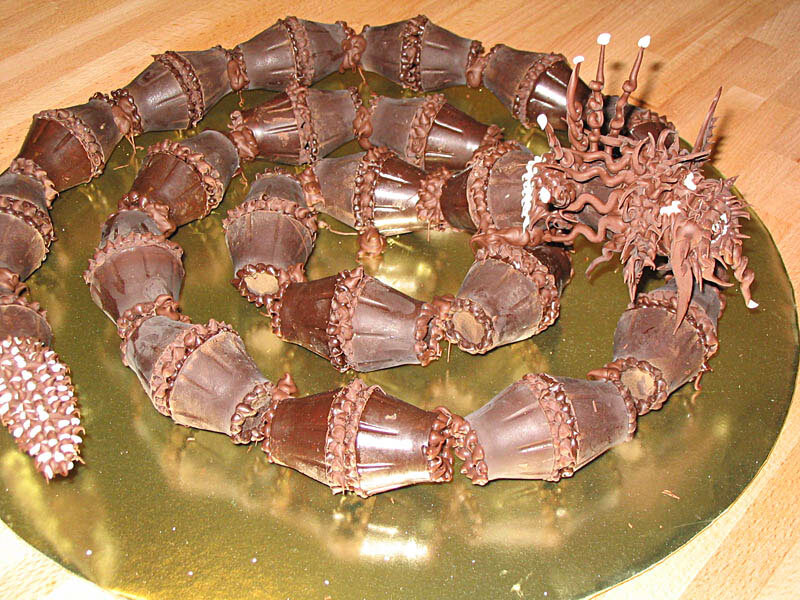
Once it was wrapped I was a little nervous about the head collapsing, but there was nothing I could do at that point (except unwrap it to double check, then rewrap it, which I only did once) but I was worried for nothing. In fact, it was quite sturdy. Unfortunately, my sister and her husband were leaving for Hawaii in two days, so they couldn't eat the dragon right away. We stuck him in fridge to await their return.