Heart Cupcakes
In the past, my heart-shaped cakes have tended to get bigger and bigger, resulting in things like a heart the size of a small dog and the infamous Thoracic Cavity Cake. This year I decided to buck the curve and make very small, individual-portion-sized heart-shaped cakes.

In the past, my heart-shaped cakes have tended to get bigger and bigger, resulting in things like a heart the size of a small dog and the infamous Thoracic Cavity Cake. This year I decided to buck the curve and make very small, individual-portion-sized heart-shaped cakes.
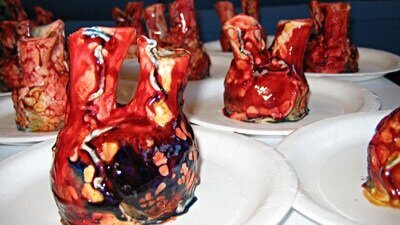
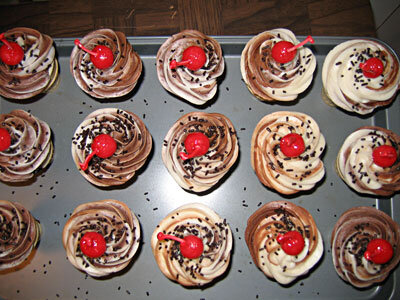
There were 18 people coming to Pumpkinfest, so I needed to make 18 little, cupcake-sized hearts. I also wanted them to bleed because what would be the point of making heart-shaped cupcakes that didn't bleed? I thought it would be a nice touch to have both red blood (arterial) and blue blood (venous), so I made a batch of fresh raspberry sauce and a batch of fresh blueberry sauce. Both of these sauces are very delicious and very easy to make. The only ingredients are berries, sugar, and lemon juice, mixed up in a blender and strained through a sieve to remove the seeds. The blueberry sauce was perhaps less blue than it might optimally have been, but I think we all know how hard it is to find appetizing blue food.
To contain the sauces, I made two gum paste cylinders per cupcake, for a total of 36. The idea was that one of them would be the aorta (full of red blood) and the other the superior vena cava (full of blue blood). Mounted vertically on the top of each cupcake, they would hold the fruit sauces until the cupcakes were cut into, at which point they would spill their gory contents over the plate.
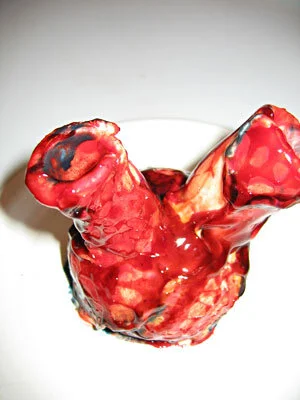
For the cake itself, I started with cupcakes, which are relatively heart-shaped to begin with. I removed the paper from each one and set them in the middle of white paper plates, the better to emphasize the soon-to-be-spilt fruit sauces, and covered them with a thick later of chocolate buttercream frosting.
I didn't want to use fondant to cover and sculpt these hearts because I thought that the proportion of fondant to cake would be overpowering at cupcake scale (not that it probably makes that much difference anyway since most people peel the fondant off before they eat the cake.) For some reason, I also decided not to use buttercream frosting. I don't recall why I made that decision because in retrospect, buttercream would clearly have been the way to go. Instead, I decided to use white modeling chocolate. I didn't do a very good job of making the modeling chocolate, so it came out very hard and a little grainy. I used it anyway. I rolled out circles of the modeling chocolate to drape over the whole cupcake and then shaped it a bit with some gum paste sculpting tools. Then I used royal icing to pipe on detail veins and attach the cylinders sticking off the top.
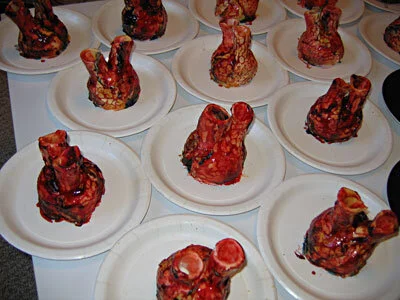
Because I had used modeling chocolate I needed to color the hearts with powdered food coloring mixed into cocoa butter. Water-based colors don't stick to chocolate. To get the hearts nice and shiny, I then painted on a layer of red- or blue-tinted piping gel. Because the piping gel is water-based, it didn't spread smoothly, but rather beaded in rills and pockets, which I thought was actually kind of a nice effect.

Right before serving, I filled the tubes with my two fruit sauces.
Reactions were mixed. Adults more or less agreed that the cake was tasty, but that the modeling chocolate was too thick, hard, and grainy to eat. I really should have used buttercream. One little boy, who had been promised a cupcake adamantly refused to accept that these were, in fact, cupcakes in a slightly different configuration and had to be supplied with a normal-looking cupcake that we fortunately had in reserve. His little brother, on the other hand, took to the little hearts immediately, breaking off the aorta and jugular vein and gleefully drinking the contents like a proper little cannibal.

Poo-Flinging Monkey Cake
I made this creepy poo-flinging monkey cake for our little friend Isaac's first birthday party. This was a special request by Isaac's mother, who was also the recipient of the dancing yeti wedding cake.

I made this creepy poo-flinging monkey cake for our little friend Isaac's first birthday party. This was a special request by Isaac's mother, who was also the recipient of the dancing yeti wedding cake.
What does every little boy want for his first birthday? That's right - a cake shaped like a creepy-looking monkey! And what's even better than a creepy-looking monkey cake? That's right - a creepy-looking monkey cake that flings poo, just like a real monkey.
OK, maybe that's not exactly what my little friend Isaac would have requested for his first birthday cake, but he can't talk, and that is exactly what his mom requested.

The first step, of course, was to figure out exactly how the poo mechanism should work. My first thought was to make it a sort of catapult, but thenI realized that it would be more fun if it could fling poo repeatedly without a complicated reset of the mechanism. So I decided to go with a spring-loaded hinge. I made an armature for the arm and hand out of wood and brass tubing - I felt that it was necessary to have a metal structure within each individual finger so they wouldn't break off when I pulled the arm back to release the poo. The arm was connected via the spring hinge to a post, which was in turn secured to the heavy wooden base of the cake.

Before I made the cake, I sculpted the arm out of gum paste and fondant around the wooden armature, which meant that I had a sort of ghostly white monkey arm on a stick. I did load it up with some raisinettes (aka cake monkey poo), which it flung quite effectively, so I was ready to move onto the cake.
My sister was kind enough to actually bake the cakes for me. Fortunately she baked more than I asked her to, because the amount that I asked her to make would not have been enough. I had to cut notches in each tier and slide them into place around the arm support post. When I was done, I had what appeared to be a squat, one-armed robot, at least until I carved it into a more monkey-like shape.

This cake marked my first experiment with using rice krispie treats to sculpt additively onto my cakes. It's a technique that I learned, like so many others, from reading Colette Peters' books. My plan was to sculpt the tail, haunches, and second arm out of rice krispie treats. Not having ever made rice krispie treats myself, for some reason I thought they solidified really quickly. "I'll have to work fast," I thought, "but once I get them into shape they'll hold really well." Yeah, it didn't work out that way atall.

I'm not sure whether it was because it was really wet out or just because that's the way rice krispie treats are, but they didn't behave at all the way I expected them to. As I started sculpting them, they were just gooey and collapsing everywhere. I hollered for my sister to bring me skewers! Hurry! Hurry! Yikes! I stuck in skewers, here, there, everywhere! Anything to hold those rice krispie treats together and to hold them in place. Pretty soon I had a proto-monkey which appeared to be undergoing a truly ghastly acupuncture session. But at least it had arms and legs. I added some detail to the hand and feet with fondant.
I made the facial features by piping buttercream and sculpting it with a paintbrush. It was kind of hard to make it look like a monkey rather than like a sort of withered old man, but I think I did OK. I was using one of my baby niece’s animal picture books as a reference. It was very nice of her to share it with me.
The ears I had made a few days in advance out of gum paste with skewers embedded in them so I could just stab them into place in the cake.
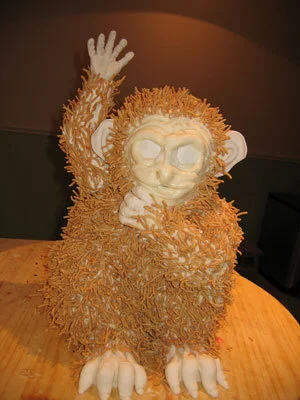
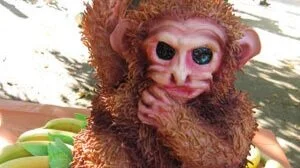
What's the point of a poo-flinging monkey without gross, matted fur? It would have been easy to make the fur out of frosting, but that tends to be too cartoonish for my taste. So I came up with a different plan - those little crunchy chow mein noodles. I know, I know it sounds a little weird. But potato chips and chocolate can be good. Those little shoestring potato snacks and chocolate can be good. I though it was workable. And they looked GREAT! It took me quite a while to cover the entire monkey and I seriously underestimated the amount of noodles it would take. Fortunately, there was some confusion as to who was buying how many packages of noodles, and we wound up buying approximately twice as many as I thought I would need. Which turned out to be just barely enough.

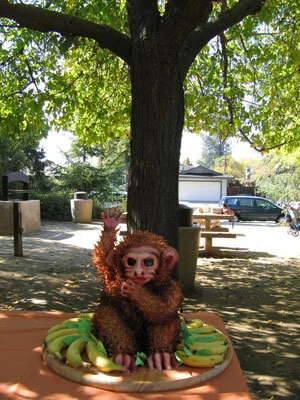
The noodles were already a pretty good base monkey color, so I just airbrushed in some mottling and some shadows. I painted the eyes with black food coloring and then went over that with clear piping gel to get the necessary depth and sheen. With that, the monkey itself was done. Left to my own devices I probably would have left it at that, but fortunately my sister gave me the kick in the ass that I needed to make it a better presentation. She came up with the idea of surrounding the monkey with bananas. So we bought about sixteen bananas and I made some gum paste leaves to fill in the gaps. It looked quite regal really, like he was a monkey king sitting on his banana throne.
The party was in an outdoor park, which was a great setting. We arranged the monkey on a picnic table underneath a big tree, with a convenient bowl of raisinettes to use as poo. The green leaves of the tree complimented the green leaves on the cake perfectly and I got to bask in the compliments of the guests at the party in the next picnic area as well as those of the guests at our party. I actually went to the party thinking that the cake was entirely innocuous and mainstream, at least compared to all my other cakes. But the unanimous verdict was that it was actually quite creepy, primarily due to the huge, hypnotic, glassy eyes.

The weight of all the gum paste and frosting and chow mein noodles on the arm made the poo flinging a little more sluggish than it was in my initial tests, so the monkey only threw his poo about two feet in front of him. Oh well, next time maybe I can get a better angle of release.
Cutting the cake was very funny because I had to cut it away around the arm mechanism. We ended up with a monkey arm hovering above a field of cake and banana carnage. The verdict on the chow mein noodles with the cake was mixed. Some people thought it worked quite well - a bit of crunch, a bit of salt - while others just found it weird and incongruous and ate around it. The birthday boy himself didn't weigh in on that particular issue, as he doesn't have enough teeth to get any of the chow mein noodles, but he certainly seemed to enjoy the cake. No one's quite sure how he got some on the back of his head, though.

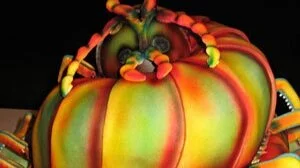
Centipede Cake
When I was in MBA school I had to take a class called Venture Creation, for which the final project was to write a business plan. Mine was for a cake business. We also had to do a presentation for people pretending to be potential investors, so, as part of that presentation, I naturally needed to make a cake. The Centipede Cake is what I came up with.
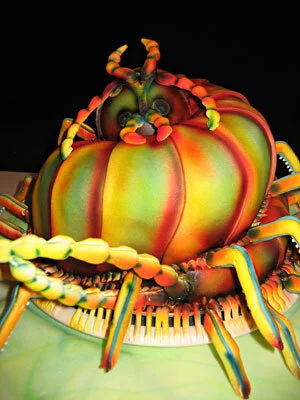
When I was in MBA school I had to take a class called Venture Creation, for which the final project was to write a business plan. Mine was for a cake business. We also had to do a presentation for people pretending to be potential investors, so, as part of that presentation, I naturally needed to make a cake. The Centipede Cake is what I came up with.
Since the name of my imaginary cake business was Kinetic Cakes, it was obvious that my cake had to do something. Since I didn't have all that much time blocked out in my schedule to make the cake, it was obvious that it wouldn't do anything too complicated. Since there would only be a few people at the presentation, it was obvious that it shouldn't be very big. Since moderation in cakes is not one of my strong suits, it was obvious that I was going to make way too much cake.
I had some trouble coming up with a concept because I had a bit too much creative freedom - it can be hard to design anything when there are so few parameters. I have no idea why I ultimately settled on the centipede, unless perhaps it was because the apartment I was living in at the time was occasionally invaded by house centipedes, which are completely harmless but quite large and shocking to meet in the bathroom in the middle of the night. And I like arthropods. I once had to walk five blocks in my pajamas to my friend's apartment because she had a house centipede in her sink and couldn't get rid of it herself.
The legs are, of course, the most pivotal part of the centipede, plus it is their disturbingly inhuman rippling motion that makes the centipede seem so alien to us. It was this motion that I was trying to convey through my cake.
My plan was to mount the cake on a turntable that was, in turn, sitting on a bumpy base so that, when the turntable was spun, the legs, which would hang off the sides of the turntable, would ripple up and down as they passed over the bumps.
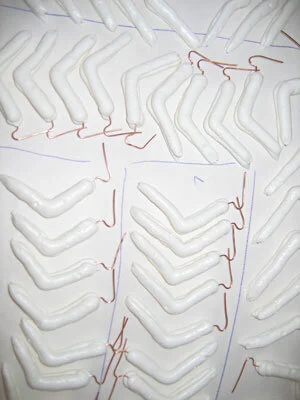
First I needed a turntable. I was fortunate enough to find one with a wire around the perimeter so that I could easily attach my legs to it. In order to do that, I built the legs around lengths of copper wire by piping royal icing onto each side of the wire with a large round tip. I airbrushed one side of each leg yellow and the other side orange because I though that having a variance in color between the two sides would help to emphasize the rotational motion of the turntable. To hide the seams running up each side of the legs, I piped on a thin line of turquoise royal icing. (If this sounds like an unusually colorful centipede, you're right. I don't really recall why I chose this color scheme, but it was quite festive.) Then I positioned the legs all the way around the perimeter of the turntable, wrapping the copper wire in the legs around the wire at the circumference of the turntable.
For the base that the turntable would rest on I used a big piece of foamcore, with smaller segments of foamcore arranged around it to create the bumps. Then I covered the whole thing with a layer of green marbled fondant, to suggest grass and because I like marbled fondant.
To make the cake, I started with two tiers of chocolate cake, one 10" in diameter, the other 8" in diameter, torted and filled with buttercream frosting. Then I carved that into a spiral, as if the centipede was curled into a loop, and coated it with buttercream.

Because centipedes have segmented bodies, it was easy to cover the cake with small fondant sections, each overlapping the one before. With the fondant in place, I built up the airbrush color in layers. First a yellow base, then orange and red shadows around the perimeter of each segment, then blue shading in the center of the segments. Once the color was on, I moved the whole cake onto the base, which already had the legs attached. I stuck some additional legs directly into the cake, following the curve of the centipede's body. In an attempt to conceal the edge of the turntable that wasn't already obscured by the legs, I piped on some sort of mini-legs between the big legs. I also piped some details onto the face. I had made some royal icing antennae and mandibles in advance, as well as some wicked-looking pincers for the back, and I stuck those on at this point as well. Then I airbrushed my new royal icing details with the same yellow, orange, red, and blue and a bit of black for good measure.
The cake went over well at the presentation, though I think if I were talking to real potential investors for a real project it would behoove me to make a cake that did something more impressive, though the rippling of the legs was nice in a restrained kind of way. And of course I had about five times as much cake as I needed, so I gave the rest to my friends in the Entrepreneurship Center. And I got an A in the class (which no one but my parents cares about because it's grad school.)

Fish Fountain Cake
The second in my series of disintegrating cake (the first being the Melting Head Cake), the Fish Fountain was made for the Second Annual MBA Art Show at my business school.

The second in my series of disintegrating cake (the first being the Melting Head Cake), the Fish Fountain was made for the Second Annual MBA Art Show at my business school.
My goals in creating the Fish Fountain were:
To explore the impermanence of human achievement by creating a cake - a work of art that by its very nature must be destroyed to be appreciated - that preemptively destroys itself.
To show off for my classmates.
I think the main mistake that I made in designing this cake was that I was much more concerned with the functionality - the simple fact that it was a self-devouring fountain - than I was with the aesthetics, which, to be honest, were a bit of an afterthought and I was sort of making things up as I went along. I wish that I had put more thought into integrating the appearance of the cake with its actions. I also think that I could have made the melting more impactful had I made the exterior of the cake darker, because then when the color melted away to reveal the white fondant beneath it would have created a sharper contrast.
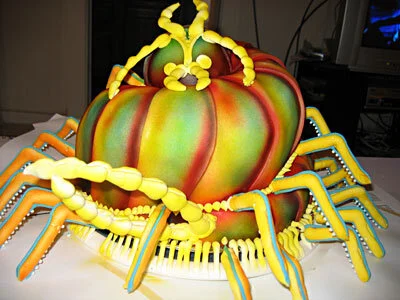
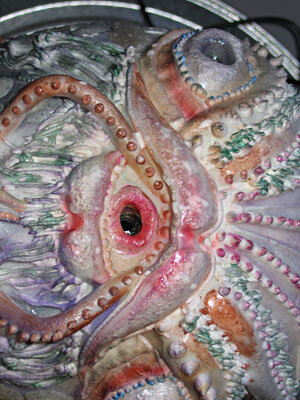
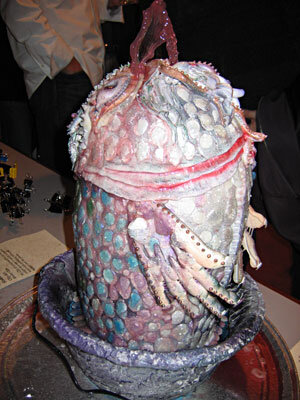
Instead, a fish was the first shape I thought of when I thought of a fountain, so I made a fish. Well, not just a fish, of course. In keeping with my usual style, I wanted to make it a bit monstrous and grotesque, so I decided to give it fins that were morphing into human hands and feet.

The first thing I did was make the hands and feet out of royal icing so they would have lots of time to dry. I piped the royal icing onto parchment paper, then set them over some curved cardboard pieces to give them a nice shape. In hopes that it would help the cake melt in an interesting fashion, I gave the fins some very thin sections and some very thick sections so they would dissolve at different rates.

Next I ran some tests on various form factors of sugar, to see how quickly they melted when left under a stream of water. I wanted the cake to melt quickly enough to be easily observable, but not so quickly that the cake would melt into a soggy inedible mess before everyone had a chance to appreciate the complexities of my concept. I experimented with pressed sugar, royal icing, isomalt sheets, hard candy sheets, and fondant. I also wanted to use multiple materials that would melt at different rates and create interesting textures. Everything worked pretty well, except for the pressed sugar, which dissolved too quickly to really be of any use to me.

Now I needed a fountain. I picked up two different little pumps at Home Depot as well as some tubing. After a fair amount of trial and error, I wound up with a plastic cake plate sitting in an ugly blue plastic bowl with a paper towel tube sticking up through the middle. Underneath the cake plate was my little pump, with a tube running up through the center of the paper towel tube. I wanted to make the water come out as close to vertically as possible, so that it would dissolve the cake all the way around and not just on one side. I knew I wouldn't be able to test it anymore once I had the cake in place, so I just had to set it up as best I could initially and hope.
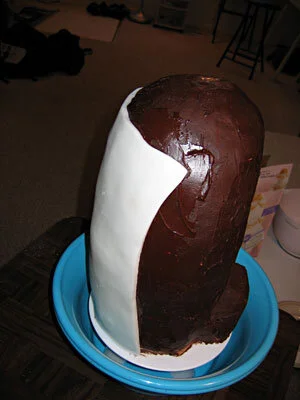
For the cake, I made my usual chocolate recipe, baked a whole mess of rounds, torted and filled them with chocolate ganache, and stacked them around the paper towel tube. Because it was so tall, I used dowels and foamcore circles every four inches or so. Then I carved it into basically a big oblong blob and crumb coated it with more chocolate ganache. In retrospect I should have given it a more contrapposto shape. It would have been more dynamic.

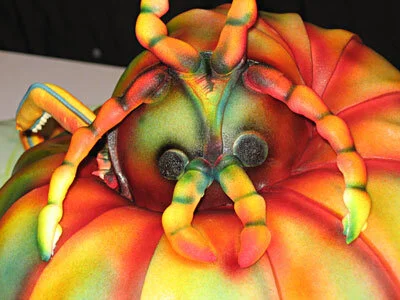
Rather than try to cover such a tall shape with just one piece of fondant, I used three. I also made them extra thick because I didn't to risk the cake itself getting soggy. First I covered the side with two rectangles, so that the seam would run right up the back and the belly of the fish. Then I put one more piece over the top that would serve as the fish head up to the gills. This had the highly unfortunate effect of making it look like a penis.

Next I added the larger fondant decorations to the face. Again, my propensity for making monsters came to the fore and the fish came out very dragon-y. I also ran textured fondant lines up the front and back to hide the seams in my initial fondant layer. Then I put my royal icing fins and tail in place, using big skewers to hold them until the royal icing dried.

At this point, because I hadn't planned the visuals well enough, my decorations got a bit out of hand. It was like the royal icing had a mind of its own. I piped fringe, dots, whiskers, stripes ... in an attempt to conceal the fact that I had made the fountain inside a cheap plastic bowl from Walmart, I covered the bowl with royal icing as well and tried to texture it like stone with a sponge. It wasn't the prettiest thing in the world, but it was probably marginally less ugly than the bowl. I also sponged some royal icing onto the cake itself, as I was vaguely planning to give that a bit of a stone appearance as well.

Once my royal icing dried I put a base coat of airbrushing on. To emphasize the fact that my fish-dragon was also part human, I put flesh tone on the fins/hands and tail/feet. Because I was going for a stone feel overall, I put a grey base coat on the rest of the cake and on the bowl.
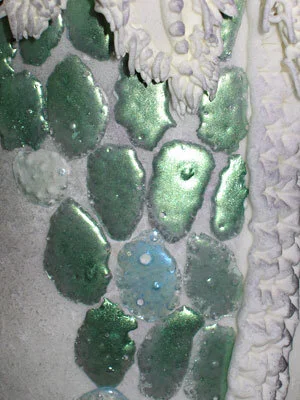
Now my fish needed scales. Of course, if I had really been committed to my stone texture idea, I would have sculpted the scales into the fondant before I applied my stone texture. But, as I said before, cohesive aesthetics was not my top priority. I thought by having several different media on the cake - royal icing, fondant, isomalt - I would get a more interesting melt. So I made some multicolored, iridescent scales by mixing isomalt powder with silver, purple, green, and blue luster dust, then melting little piles of the mixture in a 400 degree oven on a silpat mat. They came out nice and bubbly and organic-looking, but of course they did absolutely nothing to make the cake look like a stone fountain.
I stuck the scales to the cake using royal icing, gradating from green around the back ridge through blue and purple to the silver at the stomach ridge. Then these got out of control, too, and I started sticking scales on the face, the fingers, the toes, everywhere ... I just couldn't stop myself. Improv has never been a strong suit of mine - I really need a firm plan to work from, or I won't be happy with the results.
To try to better integrate the multitude of scales with the rest of the cake, I painted luster dust all over the rest of the cake, too. When I was done, my cake looked more like a disco ball than a fountain. And not a tasteful, restrained, silver disco ball. A ridiculous, garish, rainbow-colored disco ball.

On the bright side, the fountain-ness of it functioned quite well. I realized at the last minute that the bowl the cake was in would be nowhere near big enough to contain all the drips and splashes from the fountain, so I had a friend of mine bring a big silver tray to the art show to put the cake on. I had bought several gallons of cranberry juice to use instead of water, so I poured that in and plugged in the pump. I hadn’t gotten the angle on the tubing just right, so at first the juice all sprayed down one side of the fish. I had to prop one side up a bit with a stack of napkins to get it to flow evenly. I was glad that I had decided to use different types of sugar, because that really did enhance the texture of the melting.

I don’t recall exactly why I decided that the fountain should spray something red. Perhaps I didn’t exactly decide; perhaps after so many gory cakes blood red is just my default setting. My finance professor told me that I should have used Cabernet. He was right, it would have been classier to use wine, but I was too cheap to spend much money on a drink that was obviously going to be useless once it was all gummed up with melted sugar. And it did get gross – you have no idea how bubbly and sticky and gooey cranberry juice full of sugar and fondant can be.


Hobby Eagle
As soon as my niece Alex learned how to walk I decided that she was ready to fly. So for her first birthday I made her a hobby eagle. (It's like a hobby horse, but much more cumbersome.) Being the giant Tolkien nerd that I am, I called it Gwaihir the Windlord.
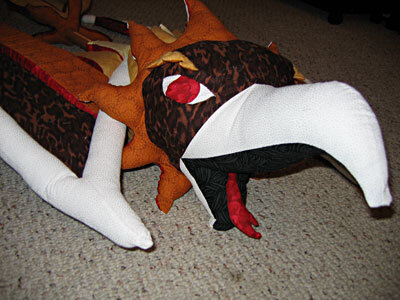
As soon as my niece Alex learned how to walk I decided that she was ready to fly. So for her first birthday I made her a hobby eagle. (It's like a hobby horse, but much more cumbersome.) Being the giant Tolkien nerd that I am, I called it Gwaihir the Windlord.
In making the pattern, I tried to size it appropriately for a taller-than-average one-year-old child. Time has proven that I, in fact, sized it appropriately for a taller-than-average three-year-old child, which is just as well, since time has also proven that Alex had virtually no interest in the eagle until she turned three.
For the structure I used a wooden spindle with a dowel stuck through it at a right angle for the handle. I had already decided to go with a muted palette of natural eagle-toned browns (because everyone knows that one-year-olds love subdued, tasteful colors), so I simply used a basic oak stain. I put a caster on the bottom as well because I figured that would make it easier to use for a child too small to actually pick the whole thing up.

I then made a complete mockup of the entire fabric section out of paper. I of course made it unnecessarily complicated with layers of feathers in gradated colors and lots of alternating curves and a big gaping maw with a twisted tongue. So when it came time to sew the real thing out of fabric, I had to do a lot of hand sewing on the little fiddly bits. Then I used foam rubber to stuff the wing feathers and batting to stuff the rest of it and glued the fabric pieces onto the wooden structure.
Since I was making this in Wisconsin and my niece lives in California, I then had to make a giant, custom-made foam core box to ship the huge thing to Alex. I think that she found the box at least as interesting as she found the eagle.
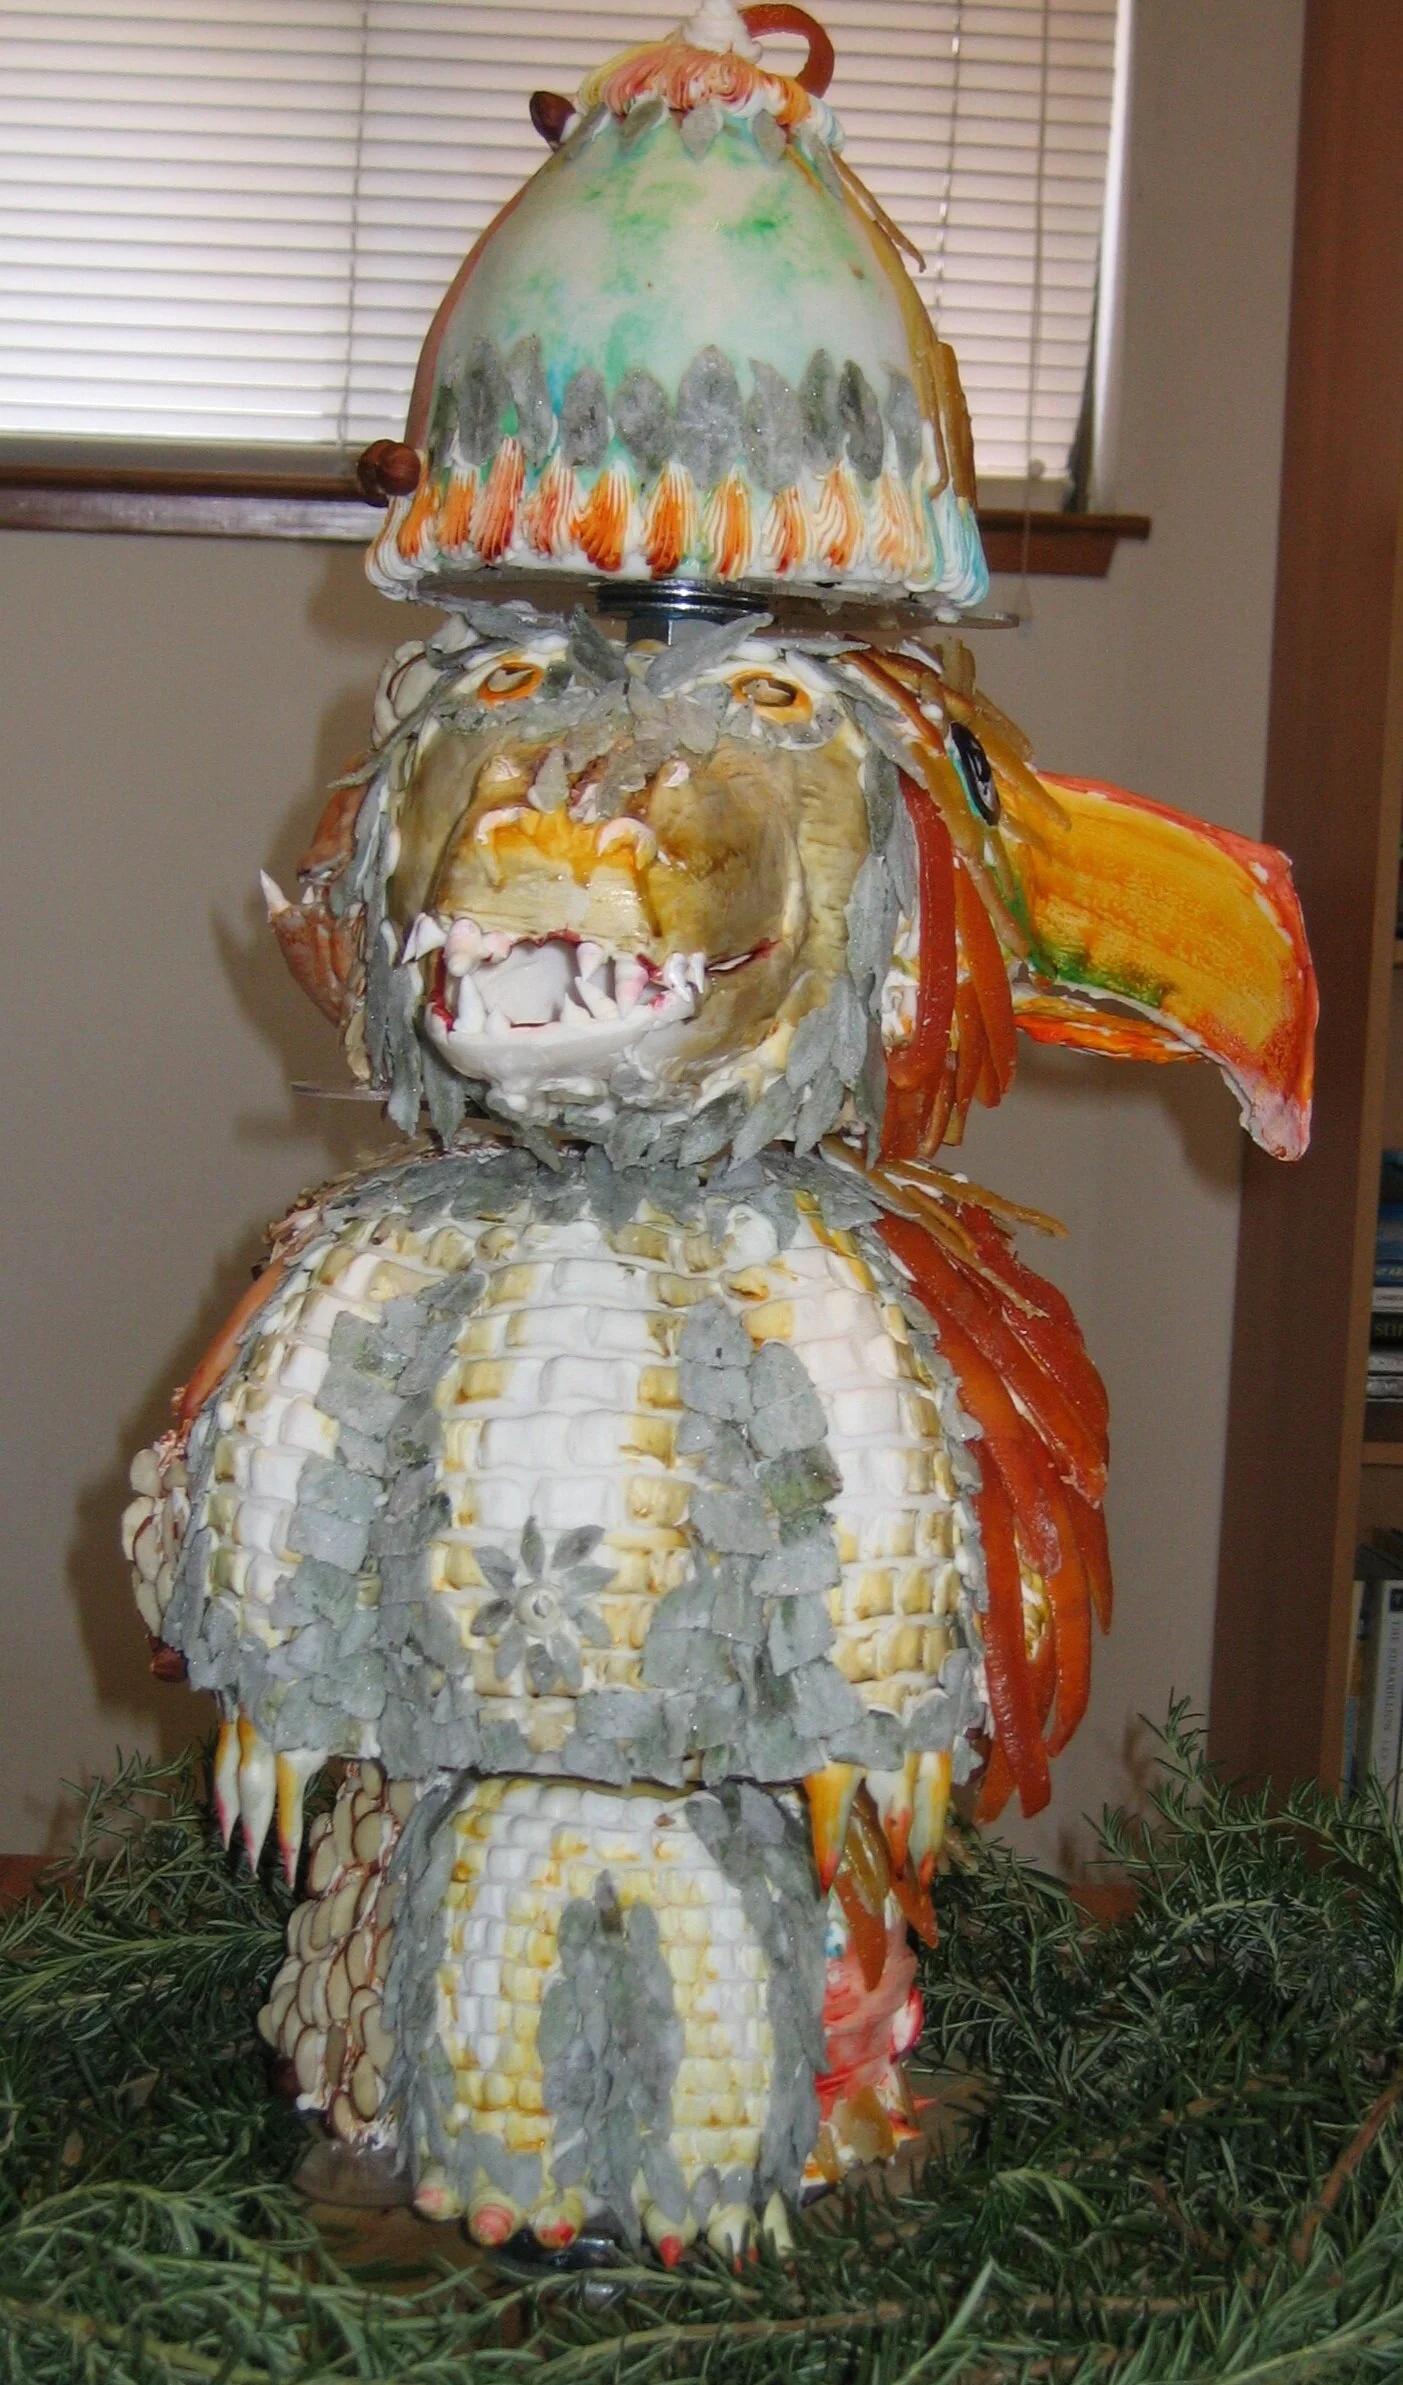
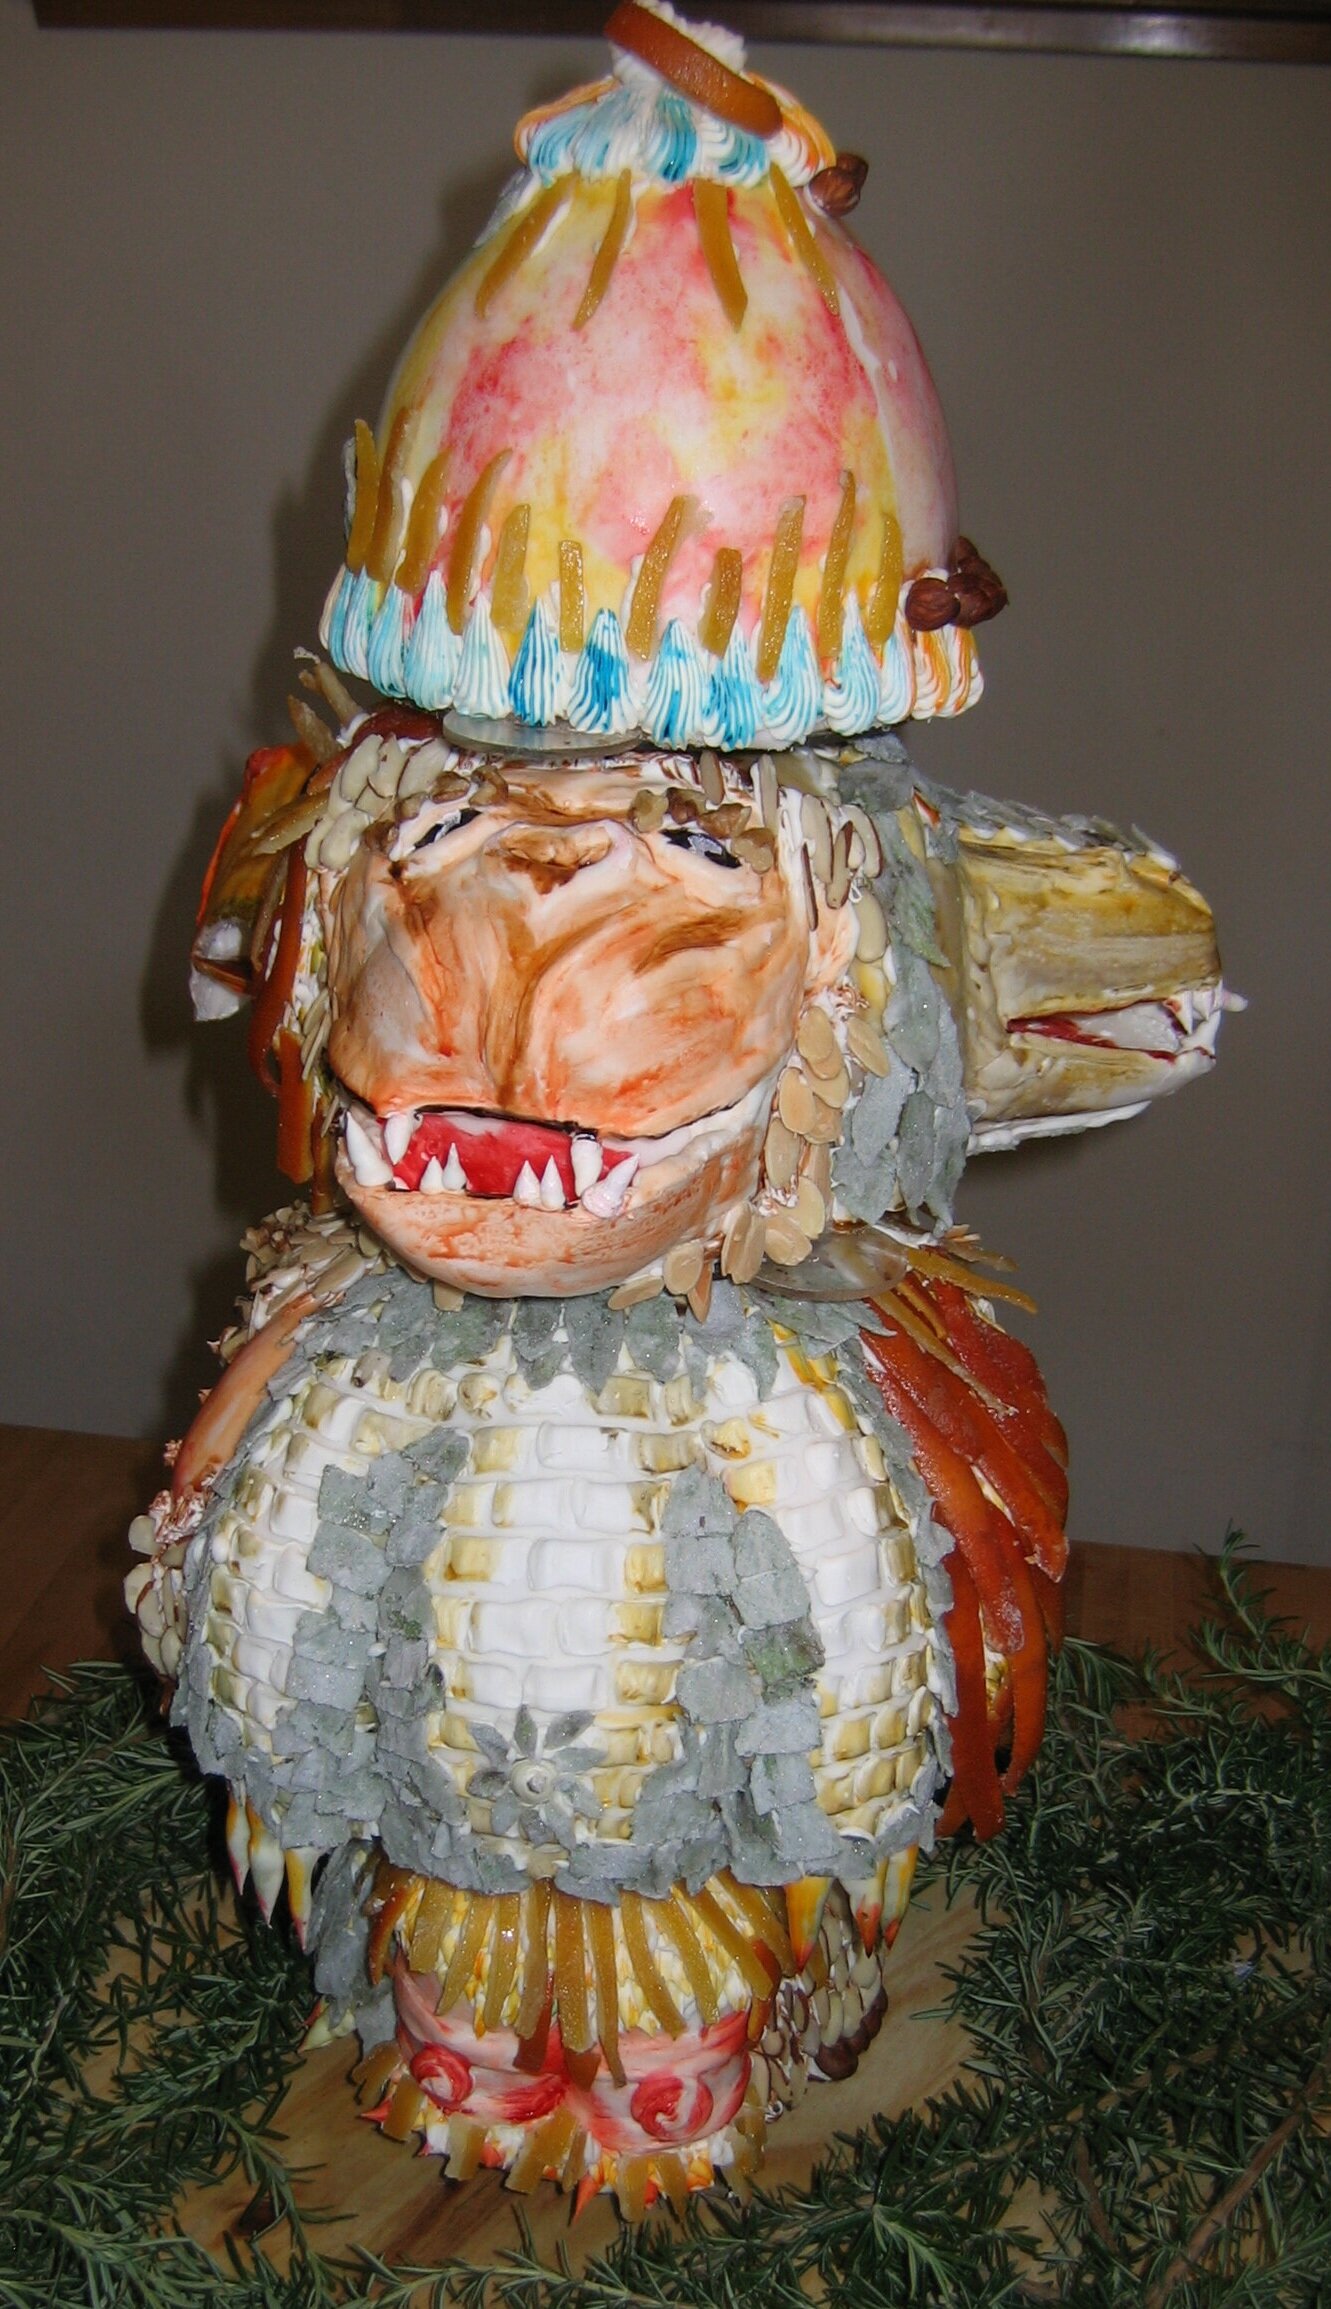
Triple Animal Cake
This cake was made for my niece's first birthday. I was trying to make a 3-dimensional version of those children's picture books where each page is split into three parts so that you can mix and match the heads, bodies, and feet of the animals.
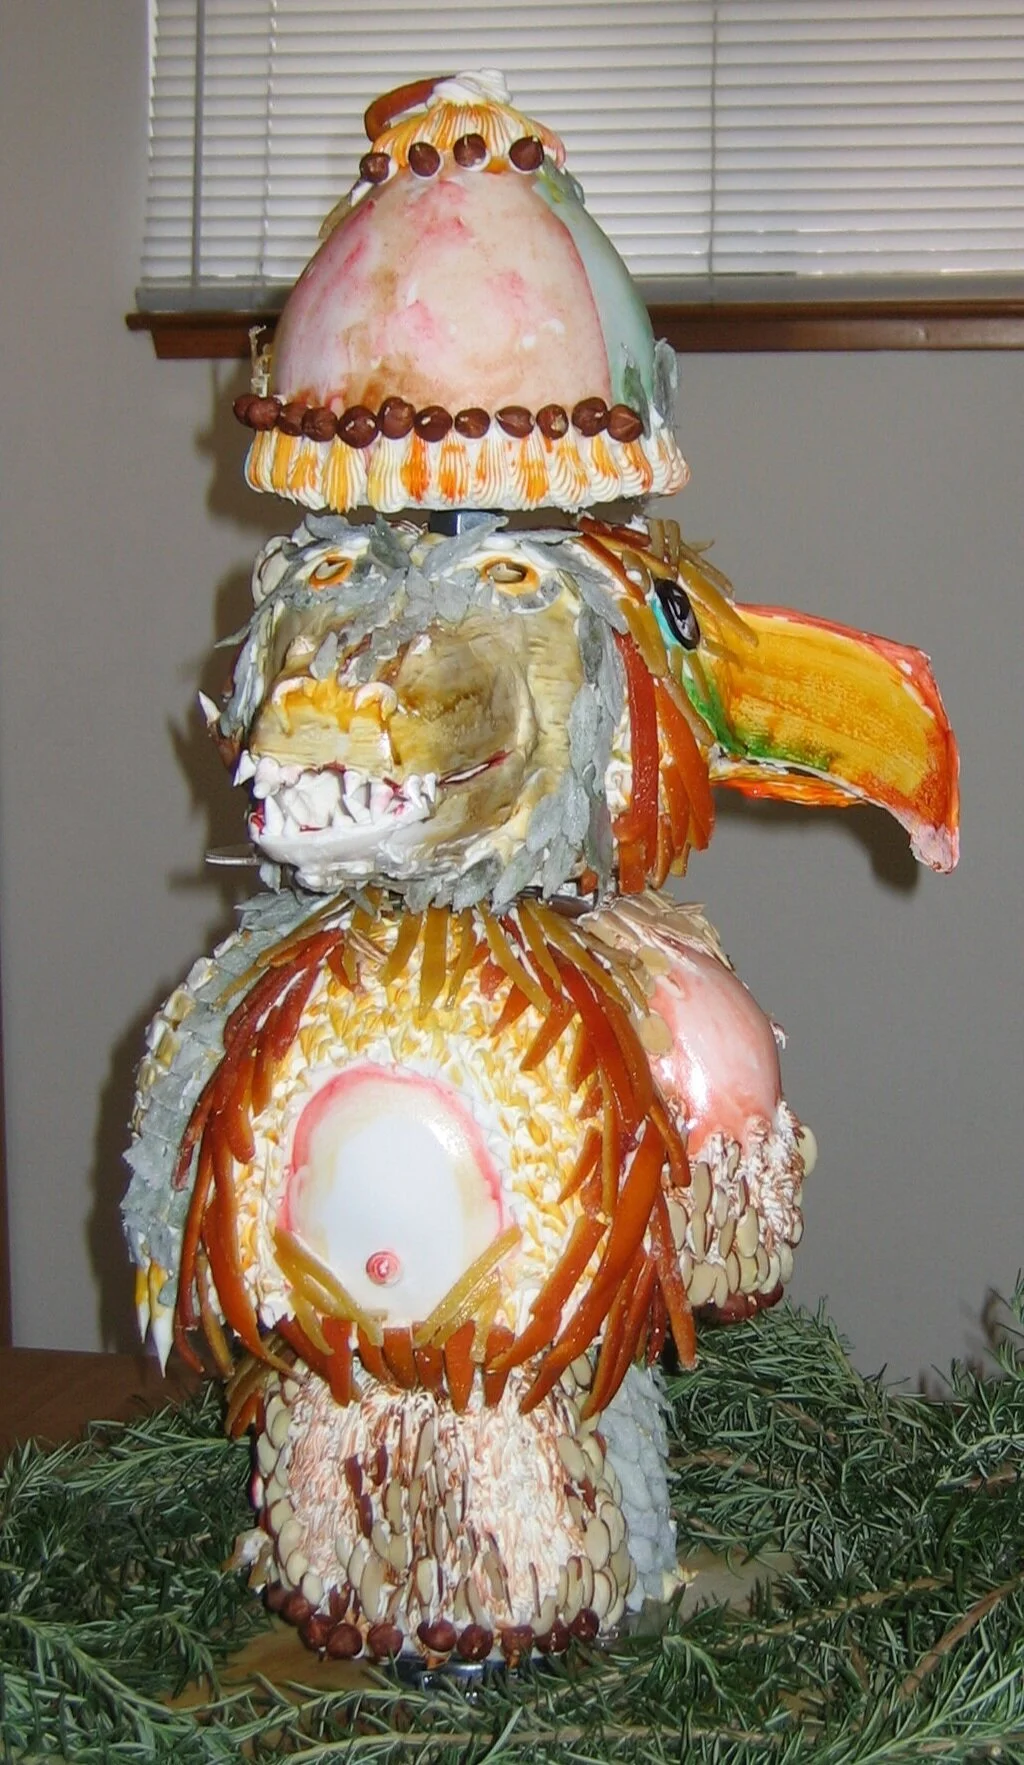
This cake was made for my niece's first birthday. I was trying to make a 3-dimensional version of those children's picture books where each page is split into three parts so that you can mix and match the heads, bodies, and feet of the animals.
My plan to adapt the concept of the mix-and-match animal parts book into a 3-dimensional cake was to build the cake around a central pole, so that each tier would be able to rotate independently of the others. The first tier was the feet, the second tier the body, and the third tier the head. Because I was planning to put all kinds of decorative schmutz onto and into these cakes and because I wanted to have just a basic chocolate cake section for the one-year-old birthday girl to smush, I also made a hat for the fourth tier, which frankly didn't really add a whole lot, visually or conceptually speaking.
Each tier was divided into three sections, each decorated like a different animal. That way, you could line all the sides up so that the three animals appeared in their entirety on the three sides of the cake, or you could rotate the sections relative to one another so that, for, instance, each side of the cake would show the feet of one animal, the body of another, and the head of the third. I also wanted to experiment with different decorating and texturing techniques, so rather than decorating in the usual way with only fondant and frosting and food coloring, I decided to enhance the primary texture of each animal with a different food product and then also coordinate the flavor of the cake within to the decor on the facade of the cake. My animal / decoration / flavor combinations were:
Side #1: Monkey / Nuts / Hazelnut Chocolate Cake
The monkey side of the cake was made of chocolate cake with hazelnut paste added to the batter, with nuts of various types and textures applied to the outside to create the appearance of matted monkey fur.
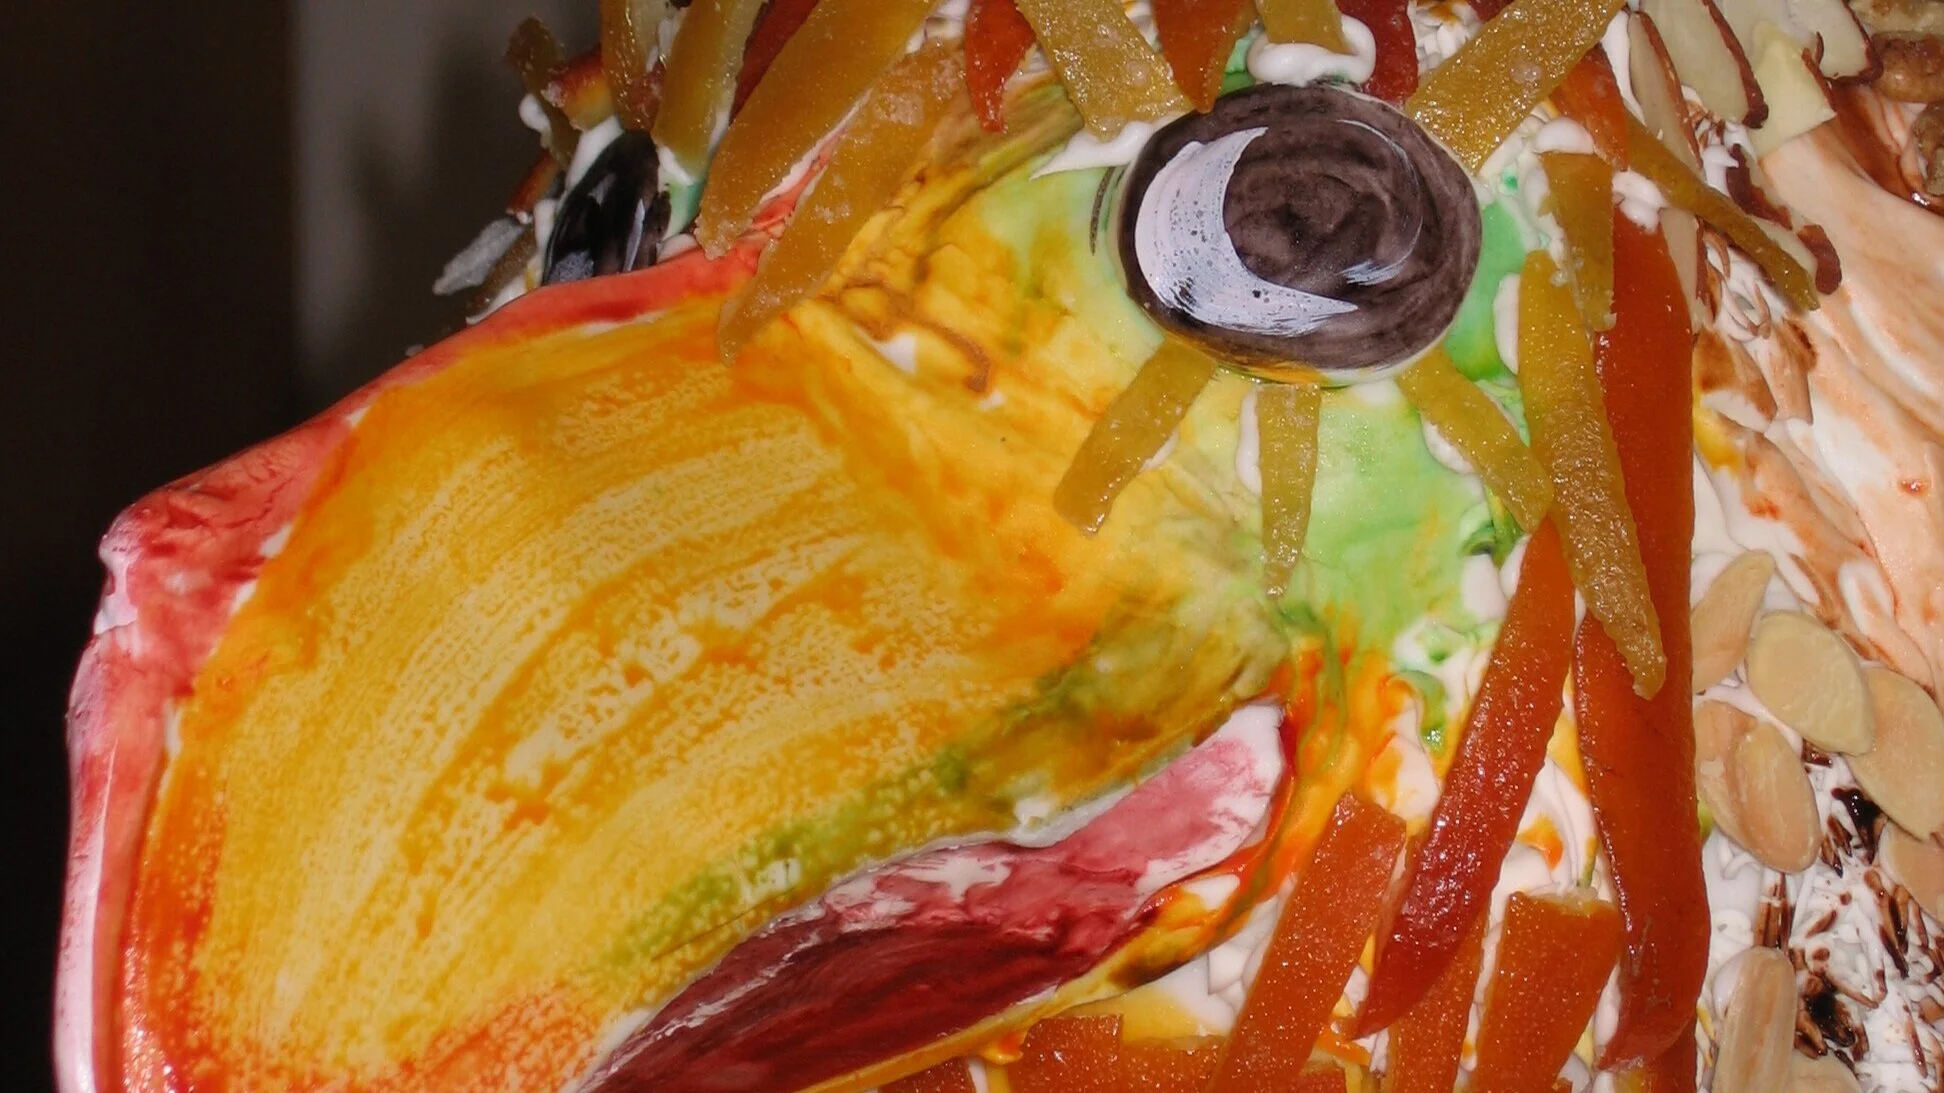
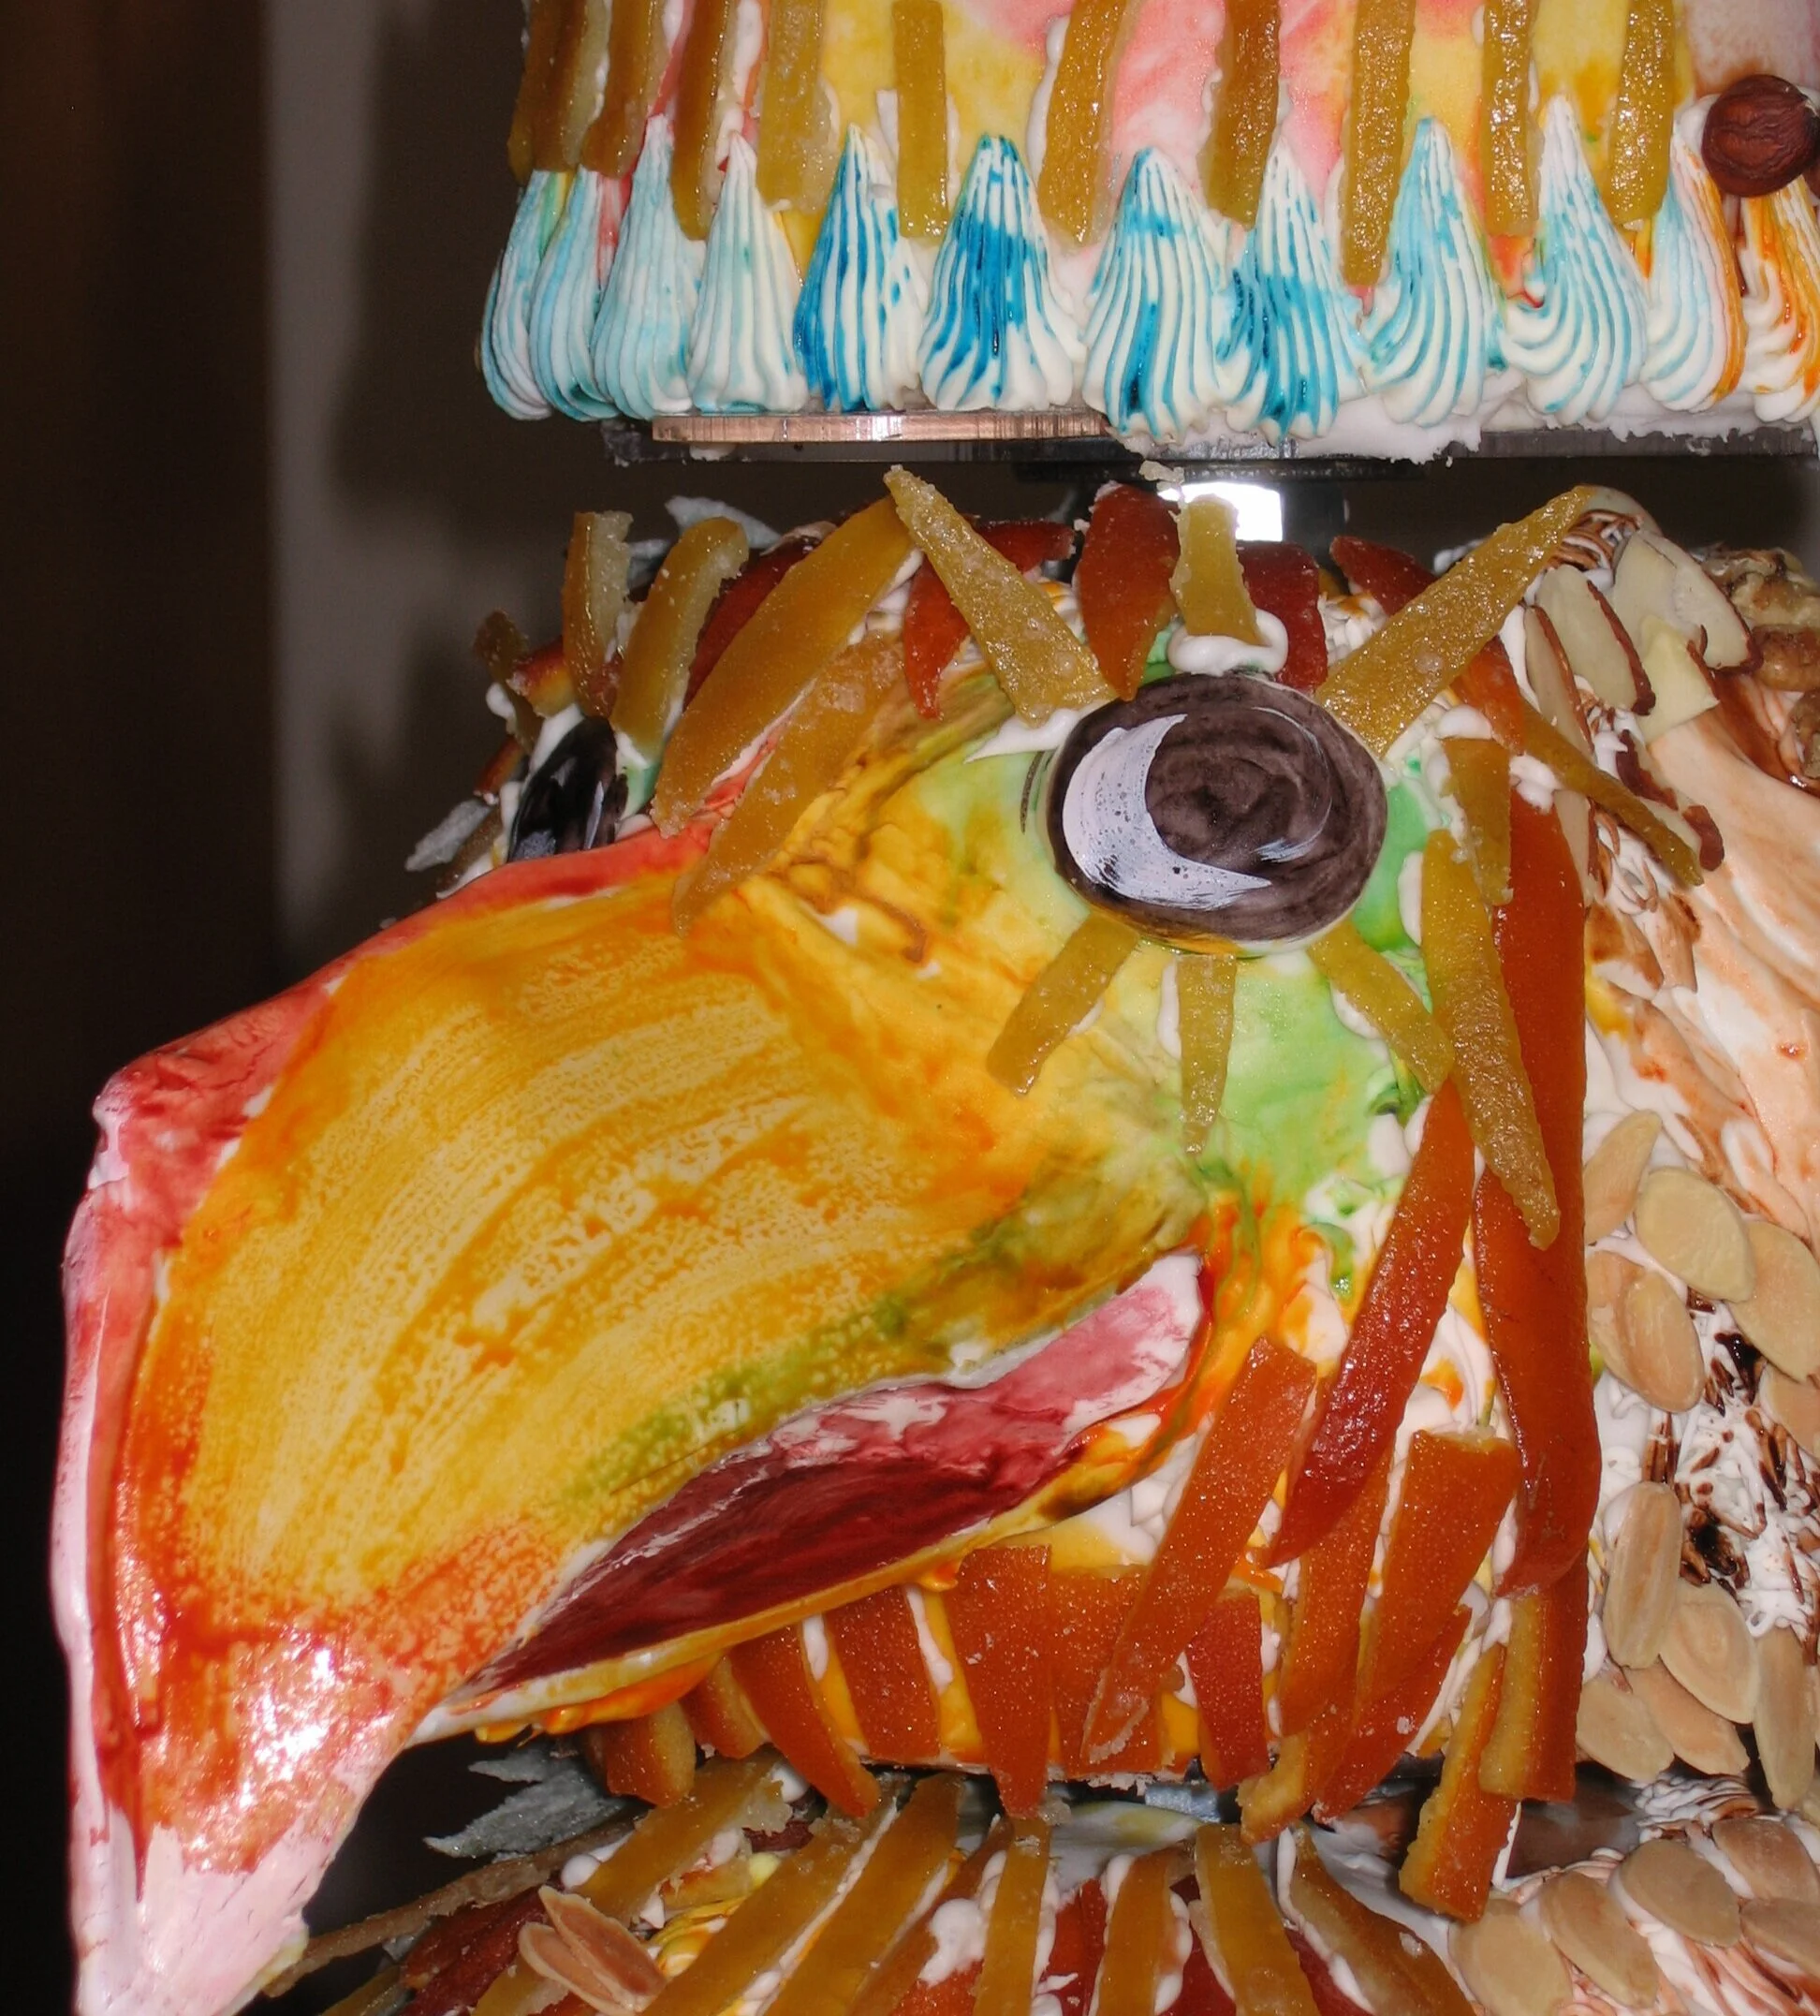
Side #2: Bird / Candied Citrus Peel / Chocolate Orange Zest Cake
The bird was chocolate cake with orange zest added to the batter, with candied lemon, orange, and grapefruit peel feathers.
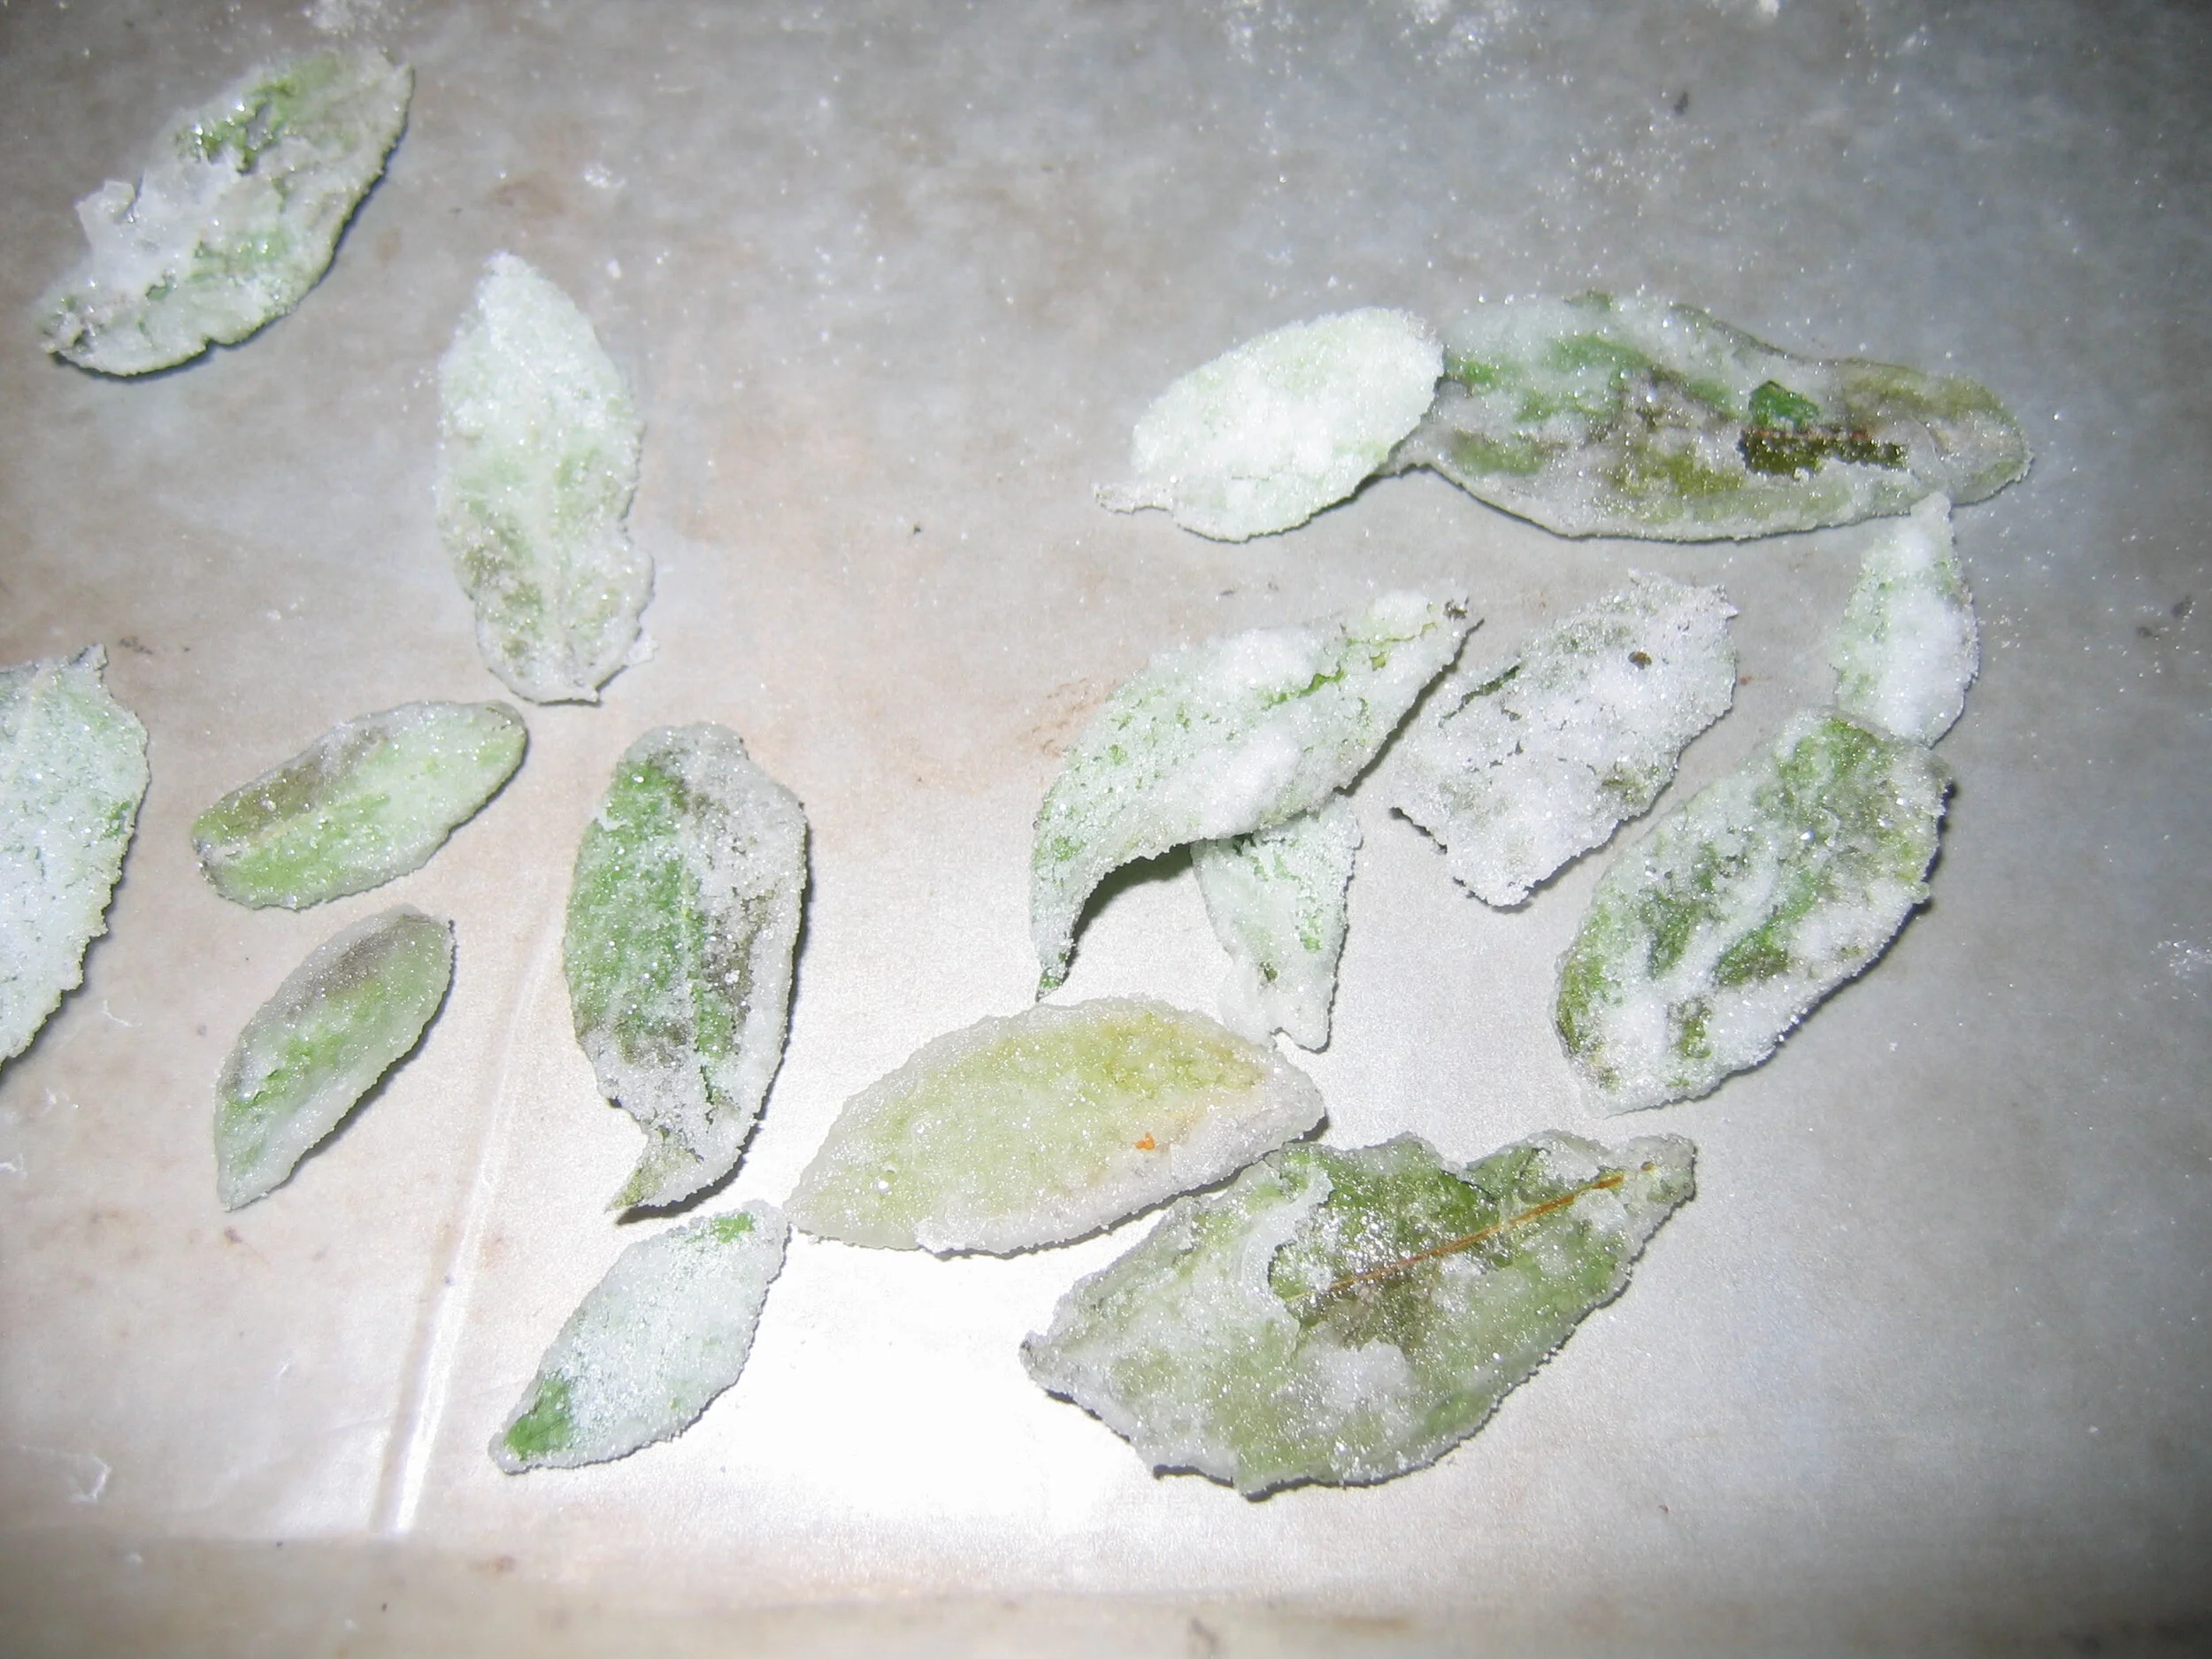
Side #3: Alligator / Sugared Mint Leaves / Mint Chocolate Chip Cake
The alligator was chocolate cake with mint chocolate chips mixed in, with sugar-coated mint leaves for the textured skin.
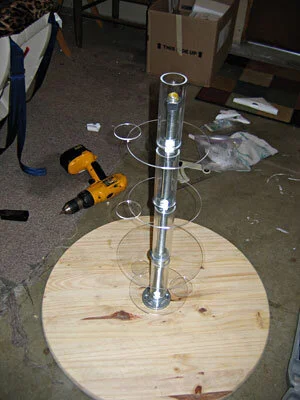
The first thing I needed was a central pole for my cakes to rotate around. I started with a heavy circular wooden base with a 3/4" threaded rod screwed into a phalange in the center. To support the cakes, I got four plexiglass circles with holes drilled in the middle with acrylic tubes the height of the tiers glued around the holes. So that we would be able to turn the tiers without touching the cakes, I glued little plexiglass circles onto the edges of the bigger circles to use as handles. To support these plexi cake bases, I used big nuts and fender washers, screwed onto the central threaded rod. Each tier required three nuts and a fender washer. The nuts were just the right size to fit inside the acrylic tube while the fender washers were big enough for the plexi bases to rest on. To assemble, I started with one nut, then a fender washer, then another nut pinching the fender washer in between. Then one more nut, positioned so that the distance from the top of the fender washer to the top of the nut was the same as the height of the tier. That way, when I slipped the plexi plate and acrylic tube over the nuts, the plate rested on the fender washer and the nuts at the top and bottom kept the whole piece stable. Then repeat the whole operation for each successive tier. I did a dry run putting this whole assembly together without cake to make sure it would work the way it did in my head before I started working on any of the edible cake components. When I reassembled it later with the cakes in place, I also sprayed the washers with cooking spray as lubricant to counteract the weight of the cakes, which I was afraid would hinder the rotation.
Before I started on the cakes themselves, there was lot of advance work to do:
Sugared mint leaves:
These were easy to make, if a bit gooey and tedious. Fortunately, my sister had a big mint plant in her back yard, so I had ready access to a virtually infinite supply of mint leaves. To sugar them, I dipped each leaf one at a time in egg white, then in granulated sugar and put them on wax paper to dry. I have since realized that I could probably have gotten a nicer result had I rubbed on the egg white with my fingers in a thinner layer and then sifted the sugar overtop. As it was, some of my leaves got too much egg white or too much sugar on them and wound up being unusable or just a little lumpy and weird.
Candied citrus peels:
I started with lemon peels, orange peels, and grapefruit peels, so that I would have a variety of sizes and colors to use for my feathers, using a recipe from Jacques Torres. First I cut the fruit into fourths and removed the peels. My mom was in town (she and Dad were both a big help on this cake) so she took the leftover fruit and carefully separated the fruit from the inner membranes to feed to my niece. I tried to eat some of the grapefruit but Mom shooed me away. Apparently I don't rate as highly as she does. The pieces of peel went into a pot of boiling water three times to blanch some of the bitterness out of them. Then they went into a pot of sugary water to simmer for a couple of hours. Then I pulled them out of the syrup and left them on a wire rack to drain and dry. I had been lead to believe, by Jacques Torres' recipe, that they would dry out in a few hours. As usual, Jacques' recipe didn't work out the way I expected. None of Jacques' recipes that I have ever tried have worked out the way I expected. I left the peels out on the rack overnight, and they were still nowhere near dry. At that point, I became pressed for time, so I had to put them into a warm oven to dry before I could put them on the cake.

Gum paste faces:
To make the snouts of the alligator and the monkey and the beak of the bird protrude appropriately from the cake surface, I made them in advance out of gum paste. As it turned out, I didn't make them quite enough in advance, as the beak wasn't quite fully hard when I went to attach it, but I'll get to that in a little bit. In order to get the shapes I needed, I draped rolled-out sheets of gum paste over forms. In the case of the monkey nose and the alligator snout I was able to find cups lying around the kitchen that were basically the right size and shape. To get the more distinctive shape of the bird's beak, I made my own form out of cardboard. All the forms had to be liberally coated with corn starch before applying the gum paste to insure that the finished pieces would release easily.

When it came time to make the cakes and the frostings, Mom and Dad were invaluable, with Mom doing most of the baking work and Dad doing most of the cleanup. For each tier, we made three two-inch tall cakes - one of each of the three flavors described above. I torted each of the cakes and filled them with chocolate buttercream frosting. Then I cut each of the cakes into thirds and stacked the thirds on top of each other, so that I wound up with three pie wedges per tier, one in each flavor, each about six inches tall. I had to cut a little divot out of the corner of each pie wedge so I could fit them around the central tubes, assembling the pie wedges back into circles. As it turns out, cakes are much flimsier when they're built this way and until I finished carving them and covering them with fondant I was very worried that the three sections of the cakes would flop outwards like the petals of a flower. As I said before, I had conceived of the hat as the smash cake for the birthday girl, so for that one I simply made a basic chocolate cake and didn't have to worry about cutting it into thirds.

Carving was pretty easy, actually, since I was going for sort of puffy cartoony animal shapes. Once I had them covered with fondant, I was able to stick my gum paste beaks and snouts on with royal icing, holding them in place with skewers until the icing dried. Unfortunately the beak wasn't quite dry enough and it sort of sunk over the skewer, so I had to leave the skewer embedded in it and pipe royal icing on top to hide the end of the skewer sticking out.
I added a base layer of royal icing details - feathers and fur and scales - because I didn't trust my textural appliques to provide the level of detail that I was looking for. I also added facial features to the heads, and nipples and belly buttons to the torsos. I wasn't quite sure what to do with the hat, so I just gave it a poorly executed inverted shell border.

Because I was visiting my sister when I made this cake, I didn't have my airbrush with me, so I had to paint the colors on the old fashioned way - with a soft brush and some paste food coloring. I didn't do a very good job - so I wound up with a lot of drips and messy brush marks. I also think I either went too muted with the alligator colors or too bright with the bird colors because they sort of didn't belong in the same world.
I was pleased with the effect of my appliques, though. I did get a little carried away with the alligator. I'm not sure why I put a little flower of mint petals around its belly button (which reptile don't even have, by the way!) My bird wound up looking a bit like it was on drugs, because I gave it big blank staring eyes surrounded by dramatic lemon peel lashes. The monkey was apparently a bit diseased, since its shoulders were bald and red and splotchy. You didn't really expect me to successfully make cute little children's book animals, did you?

The board had to be pretty big relative to the cake in order to make sure that it was stable, but I hadn't given any thought whatsoever to decorating it, so it looked very bare. Mom suggested that we get some rosemary sprigs from the garden to gussy it up a little. I think it helped.
Whatever aesthetic faults the cake may have had, my rotation mechanism worked flawlessly. With that aspect, I really couldn't have been happier. Each tier spun easily and smoothly and yet the cake as a whole still felt rock solid.
Hobbit Hole
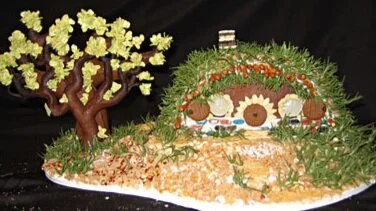
This year I was looking to make a relatively simple gingerbread house because my time was limited, so I took it as an opportunity to experiment with some new textures. I decided to make a hobbit hole, both because I love hobbits and because it only takes 2 pieces of gingerbread to make a hobbit hole.
This year I was looking to make a relatively simple gingerbread house because my time was limited, so I took it as an opportunity to experiment with some new textures. I decided to make a hobbit hole, both because I love hobbits and because it only takes 2 pieces of gingerbread to make a hobbit hole.
While it's true that a hobbit hole can be made with only two pieces of gingerbread (one flat with round doors and windows for the front, one draped over a bowl for the hill) I actually made several more pieces of gingerbread. In order to create a smoother transition from the base to the hole I made a few irregularly shaped blobbies to build up a slight mound underneath the hole proper. I also made a few small gingerbread circles for the shutters and the door, scoring them before baking to give them a weathered woodgrain texture. Finally, I shaped two pieces of gingerbread to make a tree for the yard. I won't say that it was meant to be the Party Tree, since we all know the Party Tree was cut down, but I imagine any self-respecting hobbit would want a nice tree in the yard.

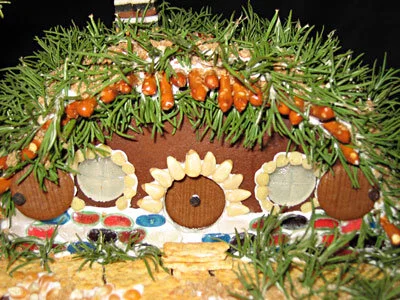
I tried a new technique for the windows - cutting a thin slice of white gum drop and carving some little mullions into it. I think it worked pretty well, though of course it's more opaque than ideal.
After assembling the hill on the base with royal icing, I kept the decor on the facade to a minimum - a few thin slices of jelly bellies for rocks plus pine nut trim around the door and windows. The finishing touch was black peppercorn knobs on the shutters, and in the exact middle of the door.

For the groundcover I really gave myself free rein to experiment with various foods for texture. Though why I didn't bother to tint my royal icing brown before I used it to stick the ground cover on I'll never know. The dirt is composed of peanuts, grape nuts, red pepper flakes, tapioca, and brown sugar. The grass is dried rosemary, which I think looks pretty awesome. I added some broken off pretzel ends to suggest some sort of log support system for the roof. The path to the front door is made of wheat thins. The chimney is made of some sort of ugly gummy candy. I probably shouldn't have used such obviously commercially manufactured candy. It didn't really go with the more organic textures of the rest of the house.
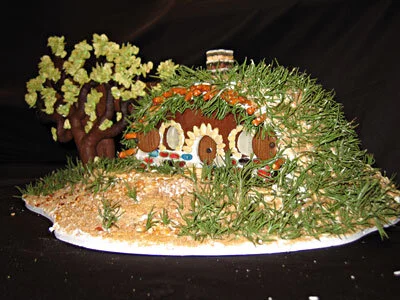
The leaves on the tree are made of raw oatmeal, tossed in a bag with some powdered green food coloring and individually applied. For whatever reason, I did bother to tint the royal icing used to apply these green, although I had failed to tint the royal icing for the ground brown.


Ice Cream Cone Cupcakes
When my sister and I were kids our mom used to make us ice cream cone cupcakes. These are my grown-up version.
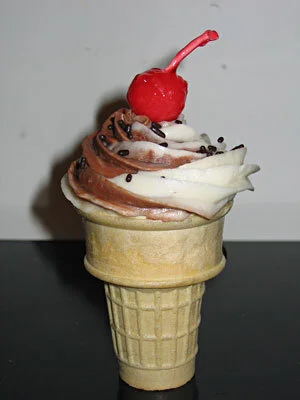
When my sister and I were kids our mom used to make us ice cream cone cupcakes. These are my grown-up version.
The basic technique of the ice cream cone cupcake hasn't changed since Mom made them for us thirty years ago. Any cake recipe works fine. I used my favorite chocolate recipe. Set up the cake cones (the kind with the flat bottom) on a baking sheet and carefully spoon in the batter, filling each one about three quarters full. I was not as careful as I should have been and wound up with some drips down the sides. On the plus side, the drips get dark when the cupcakes bake and make it look like the ice cream is melting and dripping down the side of the cone.
Ideally, once baked, the cupcakes will wind up with the cake doming up nicely above the lip of the cone. Once they're cool, they're ready to frost. Of course, they're fun and delicious any way you decorate them. I wanted to try to make mine look like real ice cream cones.

I mixed up a batch of buttercream frosting, half vanilla and half chocolate. Then I got a big piping bag with an extra large star decorating tip in it, to imitate the shape of ice cream that comes out of a soft serve dispenser. To mimic the pattern of vanilla and chocolate that you get on a soft serve swirl cone, I filled one side of the piping bag with the vanilla frosting and the other side with the chocolate. When I piped the frosting onto the cupcakes in a spiral, starting at the outside edge of the cone and moving inwards and upwards, it created something pretty similar to the classic swirl cone design.
To make them look even more like real ice cream cones (and because jimmies are good in that take-you-back-to-childhood kind of way) I added some chocolate jimmies on top. I also made maraschino cherries for the top by rolling out balls of pink marzipan, sticking in a premade royal icing stem and coating the whole thing with bright red piping gel. I suppose that I could have used real maraschino cherries, but I was concerned that they would be wet enough to dissolve the frosting. Plus I think marzipan tastes better than real maraschino cherries.
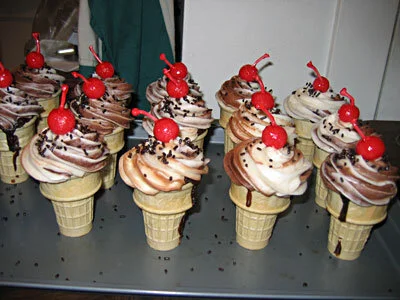
I was very pleased with how my ice cream cone cupcakes looked, but they did suffer from the classic flaw of all ice cream cone cupcakes - you have to eat the top first, so by the time you get to the bottom of the cone, there's no frosting left. I recall having this issue in my childhood as well. In this case, the contrast was exacerbated by the fact that the tops of the cupcakes had almost too much frosting because I had piped it on quite thickly in order to get the swirl cone aesthetic.
If I were to create these again, I would therefore make sure to fill the cupcakes inside the cone either with some kind of frosting or with some other custard or cream filling. I would think I could accomplish this just by jamming a decorating bag with a nice big round tip deep into the cones once they're cool, and squeezing. At least that looked like what they did when they filled their cupcakes on the Food Network Cupcake Challenge.

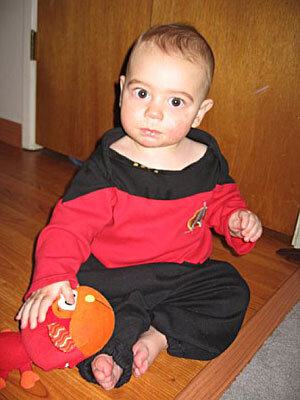
Star Trek Uniform
We all know that all babies look like Winston Churchill. But making a Winston Churchill costume seemed too complicated, so I decided to dress my new baby niece, Alex, as another bald icon - Captain Picard.

We all know that all babies look like Winston Churchill. But making a Winston Churchill costume seemed too complicated, so I decided to dress my new baby niece, Alex, as another bald icon - Captain Picard.
Just to be clear, I didn't deliberated make this as a Halloween costume. I made it because I thought it would be funny to dress a baby as a Starfleet Captain. It was pure coincidence that it was about the right size for Alex to wear on her first Halloween.

I started with a pattern for pants and a long-sleeved one-sy. In the interests of comfort and ease of diapering, I went with elastic waist and ankle on the pants, rather than the slim leg with the boot slit that adult Captain Picard wears. It's not as if Alex was going to be wearing low-healed ankle boots with her pants. I made a mock-up of the one-sy on muslin first so that I could draw in the appropriate pattern of red and black sections, which I then cut apart and used as a pattern for cutting the real pieces. The communicator and the pips on the collar are hand-sewn.
I have a friend who was appalled that I deliberately branded my niece as a Star Trek nerd at such a tender age. Of course, my friend is an alumna of Cal Tech, so I don't think that she has any right to talk about anyone else's nerdy-ness.
Musical Pumpkin
Every now and then I try to go in an uncharacteristic direction with a simple, yet compelling design. Simple isn't really my strong suit, so they're generally not all that good. This one is no exception.

Every now and then I try to go in an uncharacteristic direction with a simple, yet compelling design. Simple isn't really my strong suit, so they're generally not all that good. This one is no exception. I would characterize it as mediocre at best. Even the progression of notes is dull, both visually and aurally.
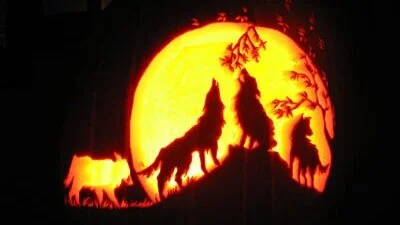
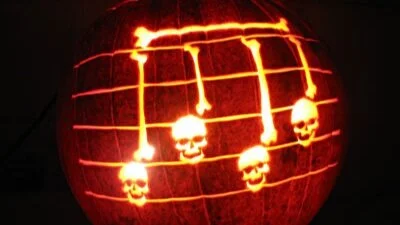
Howling Wolves Pumpkin
Generally, I'm not a big fan of the pumpkins that define an object by silhouetting it against the moon. I think it's overdone and simplistic enough that it usually indicates a poor command of the medium. But I did it anyway.
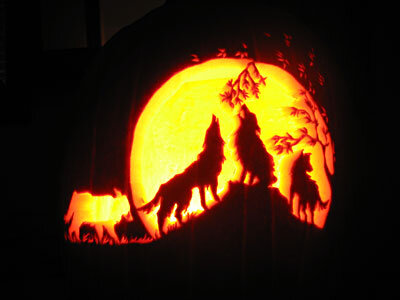
Generally, I'm not a big fan of the pumpkins that define an object by silhouetting it against the moon. I think it's overdone and simplistic enough that it usually indicates a poor command of the medium. But I did it anyway. And apparently it was good enough to win first prize in the Pumpkinmasters "Animals" category.
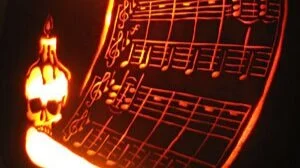
Danse Macabre Pumpkin
I actually bought the sheet music to Dance Macabre in the interests of verisimilitude. Unfortunately, the first several measures (which is about all I could fit on a pumpkin) are really quite boring.
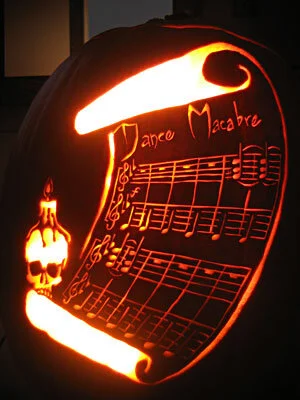
I actually bought the sheet music to Dance Macabre in the interests of verisimilitude. Unfortunately, the first several measures (which is about all I could fit on a pumpkin) are really quite boring.

Carnival of Horrors Pumpkin
This is my second attempt to create a circus-based pumpkin. I was trying to create a dynamic composition, juxtaposing the undulating curve of the roller coaster with the self-contained unity of the circular, be-skulled ferris wheel. It didn't really work, though.

This is my second attempt to create a circus-based pumpkin. I was trying to create a dynamic composition, juxtaposing the undulating curve of the roller coaster with the self-contained unity of the circular, be-skulled ferris wheel. It didn't really work, though. Especially with the big flag, it wound up looking very static and uninteresting. I guess I'll have to try again.

Stuffed Spider
When I found out that my dear friend had given birth to her son Isaac prematurely, the only thing that I could think to do with my worry for them was to make Isaac an enormous stuffed spider.

When I found out that my dear friend had given birth to her son Isaac prematurely, the only thing that I could think to do with my worry for them was to make Isaac an enormous stuffed spider.
At some point I read or heard something about black and white patterns stimulating babies' developing brains. In retrospect, I imagine that is a drastic oversimplification of someone's preliminary research that got completely distorted in its portrayal in the popular media, much like the Mozart effect. Either that, or I just imagined that I had heard that somewhere, when, in fact, I made it up altogether.
Be that as it may, I used black and white patterns as a jumping off point. I chose to make a spider both because spiders have a lot of legs and eyes and such that I figured would be good for a baby to grab onto and because I really like spiders. I chose to make it two feet long because I always overdo these things. I chose to use various fabric textures, under the theory that someone exploring the world with his hands and his mouth would appreciate some textural options.
I decided on a black velour and two different black and white patterned cottons for the abdomen and cephalothorax. For the legs and eyes I chose eight different colorful patterned cottons plus a white vinyl.
Each of the eight eyeballs is made of pentagons assembled into a sphere, using both the colored patterned fabrics and the black and white fabric. Because the pieces were so little, it proved to be easier to hand sew them then to sew them on a machine. I think I made a blessing out of a necessity by using a thick thread so as to create textured ridges on all the seams, again, under the theory that it might be a nice touch for someone prone to chewing on things. I attached each eyeball to the cephalothorax with a length of elastic wrapped in black and white fabric, giving them some movement and bounce.
I also made big vinyl pedipalps for the front and a crazy big stinger of some kind for the back.
I believe that initially little Isaac greeted the gargantuan spider with equanimity, but I am told that it has recently been banished from his bedroom because it was inducing nightmares.

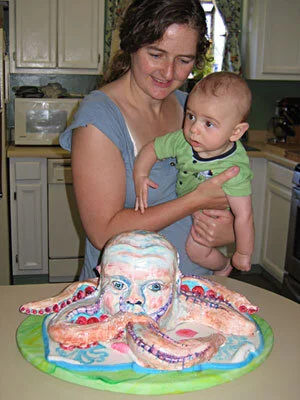
Melting Head Cake
Bride of Zombiefest was the perfect opportunity for me to make a cake that has been percolating in my head for a while now. The idea was a severed head cake, served up on a silver platter with an attractive array of garnishes, with flesh that would melt off over the course of the party, revealing the grinning skull underneath.

I made this delightful severed head presentation for a party celebrating our 400th review on theyrecoming.com.
I admit that we celebrated Bride of Zombiefest before we had actually posted our 400th review on theyrecoming.com (which the party was ostensibly in honor of), but we were close and we needed to schedule it while I was still visiting my sister for the summer.
Bride of Zombiefest was also the perfect opportunity for me to make a cake that has been percolating in my head for a while now. The idea was a severed head cake, served up on a silver platter with an attractive array of garnishes, with flesh that would melt off over the course of the party, revealing the grinning skull underneath.
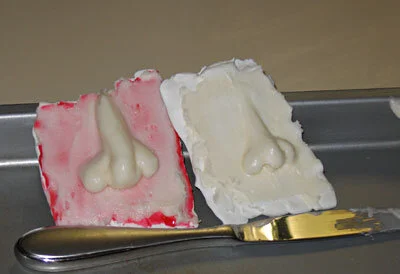
It was obvious that the skull should be made of royal icing, but the question of what to make the flesh out of proved to be a thornier problem. My initial plan was to use buttercream icing and put the cake on a hotplate. I'm glad that I decided to test this plan prior to implementation because the experimental buttercream nose, piped onto the experimental royal icing skull fragments, did not melt at all. Not even a little bit. My sister and I thought that the nose got a little shinier with the heat, but even that may have been wishful thinking.
This preliminary test did teach me a few important things, in addition to the big lesson that buttercream icing does not melt, at least not when I want it to. For instance, I learned that it is, in fact, safe to put buttercream icing onto royal icing, provided that the royal icing is dry first and it's the quick and easy buttercream, not the fancy cooked buttercream. I tried to put royal icing onto cake filled with the fancy buttercream for my sister's baby shower and the royal icing just dissolved into oily goo. I also learned that both red piping gel and seedless raspberry jam are fully compatible with royal icing. This was important because I needed something red to put on top of the skull and underneath the flesh so that the melting would also be bloody. I settled on the raspberry jam because it tastes better, but I actually think in retrospect that the red piping gel might have worked a little better.
At this point, though, I was far more concerned about the flesh's failure to melt. Clearly buttercream icing was not the answer, so I tried boiled icing. Boiled icing really doesn't taste very good at all, but I had high hopes for its melting properties as I confidently made another test nose and set it on the hot plate. And . . . nothing. No melting. Nothing even close to melting. Not so much as a little bit of softening or a sheen of moisture.
At this point I nearly gave up on the melting aspect of the cake. Bear in mind that while I was carrying out these tests the day of the party was fast approaching and I was already well into the creation of the advance elements of the cake - the bloody eyeballs, the skull, and the garnishes, which I will discuss in more detail later in this narrative. But I decided to persevere and test one final type of icing - whipped cream icing. I have never used whipped cream icing before because it is notoriously unstable and the cake, once frosted, has to be frozen or refrigerated. Surely this intimidating, unreliable icing would be fragile enough to melt off my cake!
I made a few test noses this time, so I could test the icing in the fridge and the freezer as well as on the hot plate. I also made test noses of a 50-50 mix of boiled icing and whipped cream icing, because I was afraid that the whipped cream icing, by itself, would be too unstable.(I also tried mixing the whipped cream icing with the buttercream icing, but this instantaneous collapsed into a lumpy mess.) It turned out, however, that the whipped cream icing is actually sturdier and more structural by itself than in conjunction with the boiled icing. And, to my lasting delight, it turns out that whipped cream icing does, in fact, melt when placed on a hotplate!
With rekindled hope for the melting face, I performed a few additional tests on the whipped cream icing to determine if it can be painted with an airbrush (It can.) and to determine if it can be painted with a paintbrush (It can, but only if it's thoroughly frozen.). At this point I also hit on the idea of using a heat lamp to melt the cake from above in conjunction with the hotplate melting it from below. Of course, I didn't have a heat lamp, but I tried a 60 watt bulb and even that melted the test nose, so I went out and bought a heat lamp from the hardware store across the street, as well as a 200 watt bulb. I would have bought two heat lamps, but they only had one, which, as you'll see later, was very fortuitous.
And thus ends the saga of my icing experiments, leaving me ready to move on the saga of the actual cake. So if you thought the icing story was long-winded and melodramatic, you ain't seen nothin' yet.

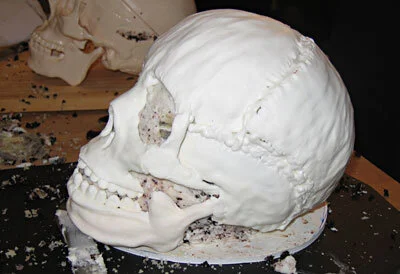
The first step of the cake construction was to make the royal icing skull. For maximum accuracy, I purchased a plastic skull to use as a mold. I used tin foil to cover the skull because it holds the shape really well, but it does have some disadvantages. Because tin foil is opaque it was hard to see the breaks between the skull segments and tin foil also seems to lengthen the dry time of the royal icing. This wouldn't be a problem except that I'm impatient and wasn't willing to wait more than a day to try to unmold the pieces, at which point they were not completely dry. Thus, it took me three tries to make a solid jawbone. I actually managed to wait three days before unmolding the last one, so it was completely dry and came off perfectly.
Unmolding aside, actually making the icing skull was really quite easy. I piped the icing on with a wide, flat tip, then smoothed it with a slightly damp paintbrush.

While I was making things out of royal icing, I also made fifty-odd little tiaras. Why, you ask? Well, we were afraid that a cake the size of a human head wouldn't serve the twenty-five to thirty guests we were expecting at our party, so we decided to make supplemental cupcakes. If the party was Bride of Zombiefest, and the cake was the Bride, then clearly the cupcakes should be the Bridesmaids of the Monster - little fuzzy monster cupcakes (with cotton candy fur; more on that later.) So they needed tiaras, which I piped flat, then draped over a roll of wrapping paper so they would dry with a nice curve. I also made little royal icing eyes for the cupcakes, with painted irises and tiny red veins.

The next pre-baking project was the eyeballs. I have made cordial cherry eyeballs several times before and they're also summarized in the description of the cake from our first Zombiefest. Basically, maraschino cherries are soaked in brandy for a few days then drained and dipped, first in a melted coating fondant, then in white chocolate. The nice thing about the eyeballs is that they actually look better when I don't dip the cherries neatly because weird drips and blobs look like veins and pools of blood. Once the chocolate is set, the eyeballs are painted with powdered food coloring dissolved in melted cocoa butter. Some of the eyeballs were served on their own; others were used as garnishes on the head's serving tray; still others served as the eyes of the head itself.
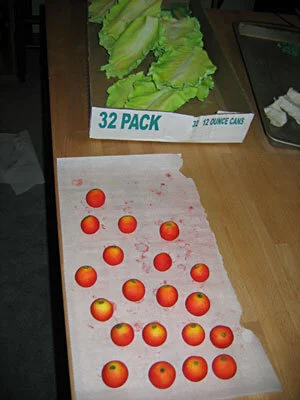
Next came the other garnishes for the head platter - lettuce, tomatoes, and parsley. My sister came up with the idea of how to make the lettuce. I bought actual lettuce (Romaine), dusted the back with corn starch, then pressed a very thin sheet of gum paste onto it so that the gum paste picked up all the lettuce veins. I then ripped the edge a little to get it rough, rolled the edge with a ball tool to ruffle and thin it, and draped the gum paste lettuce over a bed of wax paper so it would dry with nice shape. The parsley was even easier. I just used a very small gum paste flower cutter, then cupped it with a ball tool.
For the tomatoes, I used a 50-50 gum paste-fondant mix, mostly because I didn't have enough gum paste so I had to use the fondant to stretch it. I colored this mixture bright yellow and rolled it into cherry tomato-sized balls. I used an umbrella tool to make the little divot in the top and then rolled the tomato in my hand once more to get it nice and round.
I colored all of these garnishes with ground up chalk pastels and then steamed them in front of a kettle of boiling water to set the color and give it a little sheen.
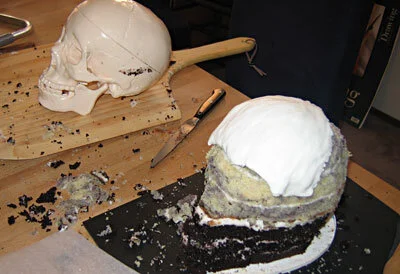
Finally, we're at the baking stage! I made a chocolate cake for the bottom of the head, then a lemon butter cake, swirled with black food coloring to give it a nice brain color, for the top of the head. I also made about fifty lemon butter cupcakes.
Once cool, I torted and filled the cakes with buttercream icing and, using my plastic skull as a model, carved the cake into the proper shape. My royal icing skull fit together remarkably well over top of the cake. At this point, it would actually have been a pretty cool looking cake in and of itself, but I was nowhere near done.

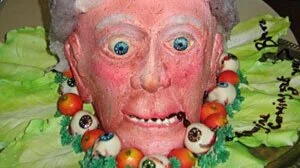
A coating of raspberry jam made the skull look delightfully freshly skinned, especially once I had popped the cordial cherry eyeballs into place.
At this point I transferred the cake onto its silver serving tray (borrowed from a church where a friend of mine works) and I could no longer avoid the part of the operation of which I was most terrified - the icing. I put the head in the freezer for a little while first so it would be nice and cold when the icing hit it.

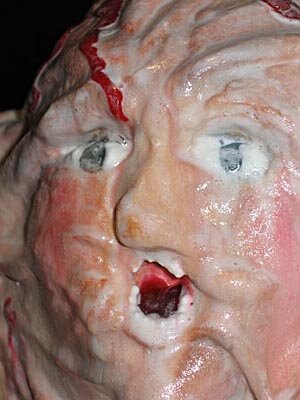
Actually icing the cake went more smoothly than I had feared. It took me three batches of whipped cream icing and between each batch I put the cake in the freezer. Piping the whipped cream icing for details like the nose, lips, ears, and eyelids was a little challenging because if I held the piping bag for too long the icing got too soft, but all in all I was happy with the face creation process. I was trying for a woman's face because she was supposed to be a bride, but it turned out looking androgynous, possibly skewed a little towards the masculine. I hoped that a little airbrushed makeup would tip it into womanhood. Into the freezer it went!

Airbrushing the cake was a little nerve-wracking because the room where I was working was really hot so I had to work fast. I also had to mask off the eyeballs and teeth with parchment paper which was very difficult to do without messing up the icing, but it all went pretty well in the end. The blue eyeshadow (I grew up in the 80's so it somehow got into my head that eyeshadow is always blue. Since I don't wear makeup myself, I've never really been disabused of this notion.), blush, and lipstick did make her look a little more feminine, but she still had a bit of an old man in drag vibe about her.

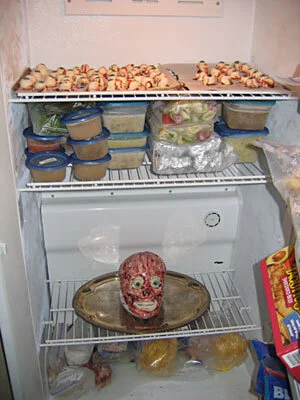
The garnishes went into place quickly and easily with a few dabs of royal icing and that was all I could do until right before the party. At this point, she was still bald, but my plan was to use cotton candy for the hair and cotton candy doesn't have a great deal of longevity. So the cake went into the freezer and I went to bed.
The party was scheduled for 12:30 in the afternoon, evening parties being inadvisable now that my sister has a five-month-old daughter. At about 9:00a.m. we started making cotton candy. First we made some colored cotton candy for the cupcake fur, using sugar mixed with powdered food coloring. A little ball of cotton candy went on top of each cupcake, followed by a tiara and a pair of eyes.
Our cotton candy machine is actually a children's toy that we purchased at a garage sale for three dollars, so it is perhaps not surprising that it overheated after about half of the cupcakes. I had a few moments of panic when I thought that it would not be in service to make hair for the cake itself, but my sister suggested putting it in the freezer to cool it off quickly, which worked like a charm.

Afraid that the machine would crap out altogether next time, I made the hair for the cake next - a tower of white hair with black Bride-of-Frankenstein-style streaks on the side. I assembled the hair on the tin-foil-covered plastic skull first, then plopped it readymade onto the cake. It looked like a wig and only exacerbated the resemblance to a drag queen - a very old one, given the gaunt cheeks, the white hair, and, due to the icing texture, the pockmarked skin. But I considered that a minor problem. My sister said she looked like Mrs. Haversham. Dad thought she looked like a French aristocrat, which also might have been pretty appropriate, given that whole guillotine escapade.
I added a little red piping gel blood to the mouth so she would look more dead and a little red piping gel blood writing on the lettuce stating, of course, that, "They're coming to get you, Barbara". Then I took a whole lot of photos and popped her back in the freezer to await the party.
By this time the cotton candy machine had overheated again so I had to put it back in the freezer for a while before we could finish the cupcakes. But finish them we did, just before the party. By this time, the cotton candy on the first cupcakes was already wilting and we were afraid that the cotton candy hair on the cake herself would fare even worse, due to condensation from the freezer, so we decided that the cake would remain in the freezer until most of our guests had arrived, at which point we would dramatically reveal her, then turn on the heat lamps and hope for the best.
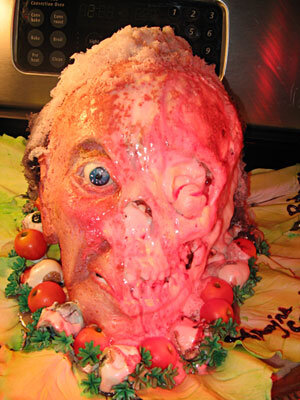
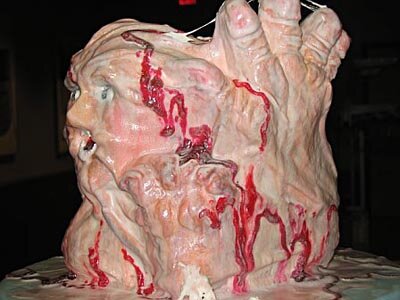
And . . . amazing enough . . . the best actually happened! Even better than I had hoped! I brought her out and set her on the hotplate, turned on the heat lamp on one side and the 200 watt bulb on the other and . . . her flesh started to melt! And, because I only had one heat lamp, at first only the left side of her face melted. Which was incredibly cool looking! She ended up with one side of her face still solid and the other melted all the way to the skull. The heat lamp even toasted the melted icing a bit at the closest point, so it looked like the skull had been cooked.
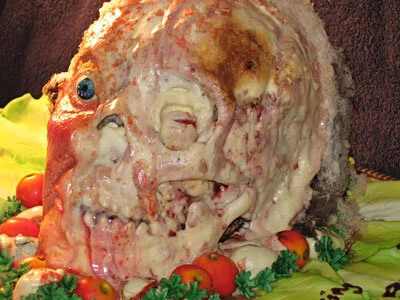
First, the hair melted, then the flesh on top of the skull. The eye socket started to appear, followed by the cheekbone, and the lower jaw. The nose was sloughed off, revealing the nasal cavity and the teeth appeared with a horrifying smile. The eyeball melted away, first crying tears of melted colored cocoa butter, then bursting open to reveal the shiny red cherry within. Red piping gel blood ran out of the mouth, mingling with the gooey white melted flesh.

Once the first side was thoroughly melted away, I switched the heat lamp to the other side until I was left with nothing but a gooey skull sitting in a pool of its own liquefied flesh. Even the garnish cordial cherry eyeballs melted away, leaving only bright cherries amidst the little red tomatoes.

In my darker moments I doubted the melting head cake. I'm ashamed to say that I even seriously considered throwing in the towel and just making a non-melting severed head cake. But that would have been unworthy. That would have been cowardly. I'm proud of myself that I didn't surrender to the temptation of taking the easy way out. I persevered and, in spite of the combined efforts of many different kinds of icing and a finicky cotton candy machine, I succeeded! It was a beautiful moment.

Little Monster Cake
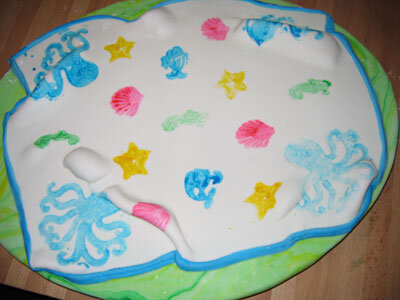
We often refer to my niece as "Little Monster" so naturally when I set about designing a cake for her four-month birthday party (OK, I admit it, I designed the cake first and then made up an occasion to make it for.) what I came up with was essentially a 3-dimensional bust of my niece as a slimy octopus monster.

We often refer to my niece as "Little Monster" so naturally when I set about designing a cake for her four-month birthday party (OK, I admit it, I designed the cake first and then made up an occasion to make it for.) what I came up with was essentially a 3-dimensional bust of my niece as a slimy octopus monster. When I described this concept to my sister, she pointed out that she had been envisioning her as a cute, fuzzy, Sesame Street-type monster, not as an oozing, ugly, Cthulhu-type monster. I pointed out that, unlike Cthulhu, my design had no wings and so was merely an octopus or squid monster, not a Cthulhu monster.
Initially I was hoping to cover the entire cake with a very thin layer of Jell-o Jiggler for a truly slimy, gooey texture. Unfortunately, while preliminary tests were encouraging in terms of the feasibility of creating a very thin, firm Jiggler and draping it effectively over the cake, these same tests also revealed that Jell-o is fundamentally incompatible with all forms of icing. A couple years back I tried to incorporate a Jell-o swamp into my New Orleans Gingerbread house. This proved to be impossible because the liquid Jell-o would have dissolved the house's royal icing wrought iron railings so I used piping gel instead. I was hoping that this time the Jell-o would work because my plan was to use Jell-o which had already set up. But my hope proved to be in vain. Even solidified Jiggler dissolved sample royal icing bits away into nothing within a few hours. I think it's time that I face the fact that the marriage of Jell-o and my cake / gingerbread projects is not meant to be.
I planned the flavor combinations while still envisioning the Jell-o coating. Coordinating an entire set of cake and icing flavors to go with cherry Jell-o is quite a challenge and I suspect that, had the Jell-o actually happened, it would ultimately have been rather gross with any flavors of cake and icing. I settled on a white butter cake with raspberry buttercream icing filling. In and of itself, this might have been OK with cherry Jell-o, but I also planned hazelnut flavored tentacles, a chocolate ganache crumb coat, followed by a layer of marzipan and a royal icing finish. Like I said, it probably would have been gross with cherry Jell-o.
The first step was to make the base for the cake to sit on. My plan was to make a cute fondant baby blanket to contrast with the yucky monster. First I covered an elliptical piece of 3/8" foam core with marbled green fondant, suggesting grass. Then I rolled out another sheet of white fondant for the blanket and stamped little sea creatures on it with food coloring. I tried to drape the blanket onto the base in such a way that it would look like the monster's tentacles were squinching it up, but it didn't work that well and I probably would have been better off with a flat blanket. I also put a little blue border around the edge to make it look more like a blanket. In the end, the blanket wasn't that good and didn't really make sense with the rest of the cake, which I think proves that I'm not meant to make those sickeningly adorable baby shower cakes shaped like diaper bags. But I think we all knew that already, didn't we?
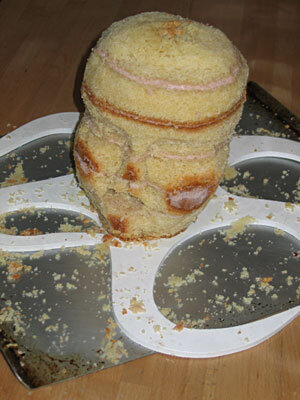
Next, the cake itself. As I already mentioned, I used a butter cake recipe. I had never before tried this recipe, mostly because I'm a much bigger fan of chocolate cake than white cake, but it turned out to be a great recipe - really buttery and one of the best cakes for carving that I've ever tried. So once it was torted and filled with the raspberry buttercream icing (made by mixing some seedless raspberry jam into vanilla buttercream icing) carving it into the shape of a baby / octopus head went very smoothly.
For the tentacles I made some praline feullitine candy that learned how to make at a candy class that Mom and I took recently. Essentially, it's hazelnut butter (made by grinding up toasted hazelnuts and confectioners sugar in a food processor) mixed with milk chocolate and feullitine, which is a lot like ground up flakes of cake ice cream cones. In this case, in fact, it was exactly like ground up flakes of cake ice cream cone because it's not like one can buy real feullitine at the local grocery store. In fact, it's hard to find even on the internet, but that may be because I'm not really sure how to spell it. The praline feullitine worked remarkably well as a sculpting material, and I soon had some lovely tentacles.
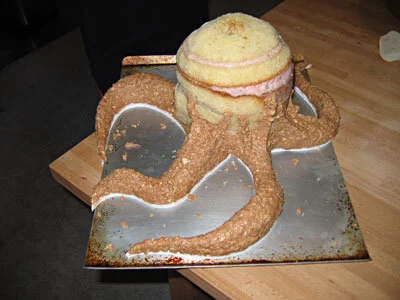
Next, I coated the cake with a smooth layer of chocolate ganache and started rolling out the marzipan. It's a good thing that I was planning to coat the entire cake with royal icing, because the marzipan did not go on neatly at all. I rolled it too thin because I didn't have enough and then it dried out, both because I put too much confectioners sugar down to roll it in and because I covered the cake too slowly. So the marzipan covering ended up extremely messy with seams all over the place and smudges of chocolate ganache everywhere.
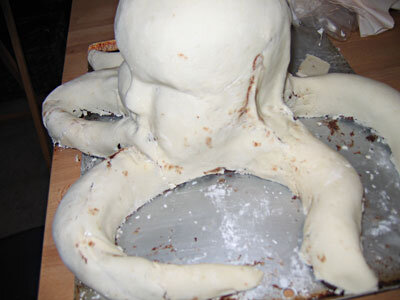
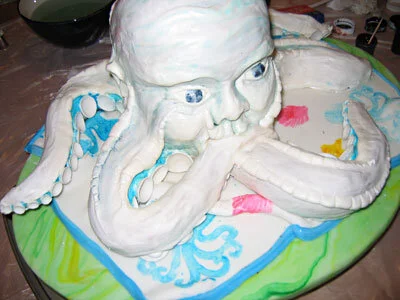
Fortunately, none of that mattered, because the next step was to cover the entire cake with royal icing. The first layer of royal icing obscured all the imperfections. The second layer filled in all the facial details. I even put in the little dent in the top of her little baby skull. At this point I decided that it looked too much like an octopus and not enough like a monster, so I added some little ridges running up the sides of the tentacles and extending onto the face. As my sister pointed out later, it made her look sort of Cardasian.

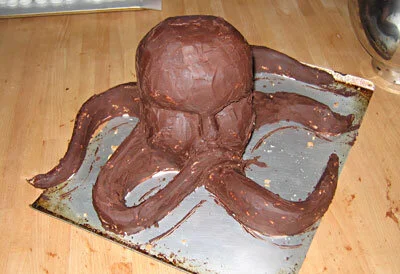
No octopus monster is complete without suckers on its tentacles. I made these out of gum paste, cutting them out with a circle cutter, then cupping them with a ball tool. I stuck them to the tentacles with royal icing.
At this point I transferred the octopus monster onto the previously prepared base and discovered that the 3/16" foam core under the octopus monster wasn't sturdy enough to support the tentacles without bending and the royal icing coating cracked in several places and had to be repaired.
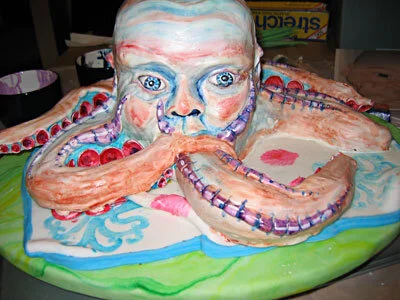
Next step - color! An airbrush probably would have been a very effective tool, but mine was 2,000 miles away, so I did it the old fashioned way - paste food colors and a soft paint brush. In the interests of maximum ickyness, I went with a base coat of flesh tone interspersed with icy blues. I painted the Cardasian ridges purple and added deeper blue shadows. Red suckers and white highlights finished off the paint job.
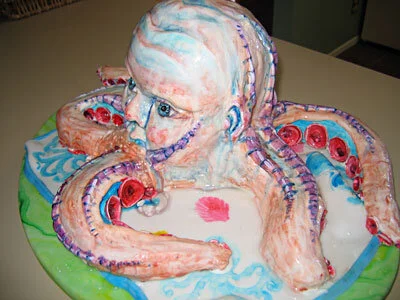
Now the cake looked pretty good, but it just wasn't wet enough. An octopus monster presumably lives in water and my niece drools a lot so I had a couple of reasons for wanting the cake to look moist. I put a big pile of piping gel drool in front of the monster's mouth (which was chewing on a tentacle in homage to my niece's habit of constantly chewing on her hand - and her toys, and her clothes, and our fingers, and basically anything else that comes within arm's reach of her). Then I sprayed the entire cake with some watery corn syrup for that all over, just-emerged-from-the-briny-deeps shine. This had the added advantage of making the colors run and blend a little bit which gave the cake more of a natural look.

Most everybody at the party thought the cake was sort of gross (looking, not tasting) and didn't really look anything like my niece, who is the world's cutest baby. My sister, on the other hand, thought that it did look like her and she therefore declared the monster cake absolutely adorable.

Gelatinous Man Cake
The Gelatinous Man was created for a small art show that some friends and I were hosting at my business school.
The Gelatinous Man was created for a small art show that some friends and I were hosting at my business school. Very few people at the show actually believed that he was cake until I cut into him, but then everyone agreed that he was delicious. One boy even expressed delight at the way the eyeball squished when he bit into it.
The concept for the Gelatinous Man developed out of a cake that I made when I was taking a Master Class from Colette Peters at the Wilton School for Cake Decorating and Confectionary Art. I referred to it as a Sea God cake. It was essentially a standard 3-tiered cake with a raised face on top spitting out a fountain of gum paste water. This got Colette and I talking about making a cake that had an entire man trapped inside, trying to get out. Naturally, when I finally got around to making the cake, it came out all oozy and bloody and moist. And so the Gelatinous Man was born. Or at least he's on the verge of being born. Or possibly he's just been absorbed into his odd, oozing sack. I can't say for sure. You'd have to ask him.
The first step was to make the base, which is simply two circles of 3/8" foam core glued together, one larger than the other. The smaller circle is only there to make it easier to pick up the cake by leaving a space under the upper plate to get your fingers into. It's a little trick I learned from watching cake competitions on the Food Network. The larger circle is covered with fondant, marbled with some royal blue food coloring. Just knead some of the color into the fondant until you come up with a cool marble texture, and then roll it out to about 1/8" thickness. It's very easy to stick the fondant to the foam core by brushing it with water.
I started in on the cake itself by baking four 10" round cakes, using a really great chocolate cake recipe I got from one of Colette's books. I then torted and filled these with a plain chocolate ganache. Because the cake was so tall I had to put a layer of 3/16" foam core, supported by 1/4" dowels, in the middle. I also put a 3/16" foam core circle on the bottom of the cake to make it moveable before it was mounted on the final base. Both pieces of foam core were only 9" in diameter, instead of the 10" diameter of the cake so I would be free to carve into the cake without worrying about running into the foamcore.

Now for the fun part - carving the cake into the shape of a man trapped in some sort of membranous sack. I had a little sketch, which I had made in the margins of my Operations notebook during class. So I was sculpting a cake while consulting my Operations notes. I found this juxtaposition perhaps unduly amusing, because, as anyone else out there who has gone to business school doubtless already knows, Operations is about the most tedious class in existence (Sorry, Professor Rappold.) and I'm not just saying that because, as I write this, my final Operations project is due in eight hours. Using a paring knife, I started by cutting away the area around the face, the hands, one foot, and one knee. I carved the back into a slope with a ridge of spine running down the middle, then added a little butt crack at the bottom. I had to add some extra pieces to the top of the cake to get the requisite height on the fingers of Gelatinous Man's right hand.

Once I had the basic shape, I sealed the entire cake with a crumb coat of royal icing. Royal icing isn't the greatest tasting icing, of course, but I needed the stability of it to hold up to all the brushing and sculpting that would be required in subsequent steps. I had to wait for that crumb coat to dry before I could proceed to the next step.
My plan was to sculpt the details of the features by piping them on in essentially the right place, then smoothing and making fine detail with a damp paint brush. My first attempt at this failed because the water on the brush diluted the icing so much that it couldn't maintain its shape. So I scraped it off and started over again with much thicker icing, to the point where I could barely squeeze it out of the bag, and a slightly drier brush. This worked much better.
It took me two passes through using this technique to get the finished shape. The first pass created all the major shapes - toes and palms and cheeks, even details like the creases in the finger joints. The second pass added more fine details and built up heavily frosted areas like the heel, but mostly focused on stretching out the icing between elevated area - between the finger and the spine, for instance, and between the toes and the chin - to make it seem like Gelatinous Man was writhing inside and struggling against a contiguous membranous sack.
I ran into some difficulty with the nose. I couldn't make it as prominent as I wanted to because the icing wasn't sturdy enough and kept slumping into his open mouth. Clearly I needed something structural to stick into the cake to build the nose around. It needed to be edible, so I ran around my apartment for a while like a chicken with my head cut off, looking for a pretzel, which I already knew I didn't have. Then I stumbled across a packet of Lik-M-Aid that a friend gave me for Valentines Day. The little candy stick, which was already broken in half, was perfect. I stuck the broken end into the cake and built up a frosting nose around the protruding rounded end.

Now for color. My plan was to just add color to the regions that protruded, as if the sack was white but thin, so the flesh color underneath only showed through where Gelatinous Man was exerting pressure on his membranous prison. That plan didn't really pan out because I got carried away with the airbrush, and the whole thing ended up fleshier than I had anticipated. So I made the protrusive parts even darker and redder. Then I sprayed some dark blue and purple vein-ish lines along the stretched membrane areas. I believe that while, obviously, red is important for blood, in order to really evoke gore, you need blues as well. I also added some blue in the as-yet-empty eye sockets and red inside the mouth.
To complete the eyes, I piped in big blobs of clear piping gel for the irises then added royal icing whites over top of the piping gel. A bright red piping gel tongue enhanced the mouth.

With that I was ready to transfer Gelatinous Man onto his blue fondant-covered base. Considering that I was by myself, this went remarkably smoothly and I even got him relatively centered. To clean things up I piped a bead of royal icing around the seam between the cake and the base, and then smoothed it with a damp paintbrush. While I had the icing out, I put some little teeth in Gelatinous Man's mouth.
Now I had a good shape and some decent colors, but the cake still didn't sing. For one thing, it was too neat - no damp oozing, no blood - and for another thing, Gelatinous Man wasn't integrated with his base to create a unified piece.
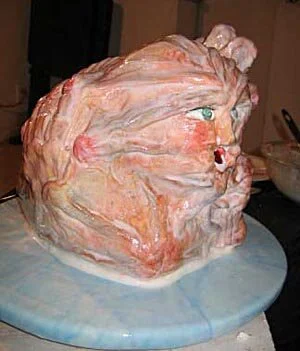
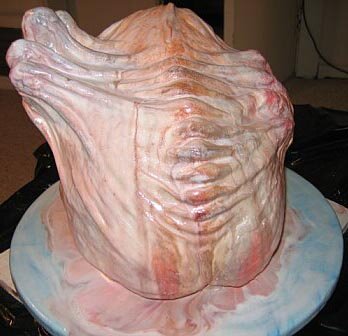
To create the oozing, damp look I was going for, I made some very, very thin royal icing and used a paintbrush to apply it to the cake. Naturally, such watery icing pooled in the crevices and around the bottom of the cake, giving more of an illusion of depth and an indication of moist membrane. A somewhat unforeseen but beneficial effect of the dripping icing was that it made the airbrushed colors run and bleed. I think it made it look much more natural and frankly, I should have known that was going to happen, since I know that airbrush colors don't really set. It took three coats of this watery icing to really get the depth I was looking for, and by that time a whole bunch of icing had pooled on the base, so that Gelatinous Man appeared to be sitting in a puddle of his own melting flesh. It was a nice look, and effectively joined Gelatinous Man visually with his base.

I almost called it quits at this point, but I still thought it needed a little more, and I had a bunch of piping gel lying around. So I whipped up two different colors of red piping gel - a deep burgundy and a bright red. I painted a stripe of blue food coloring on the inside of a piping bag (I told you I'm a big fan of judicious use of blue in my gore effects.) fitted with a #8 round tip and filled it with the darker red piping gel. It was a little hard to control the piping gel on the vertical surfaces, but I ended up pretty happy with my big veins, so I then used the bright red piping gel in a bag with a #6 tip to make the smaller veins.
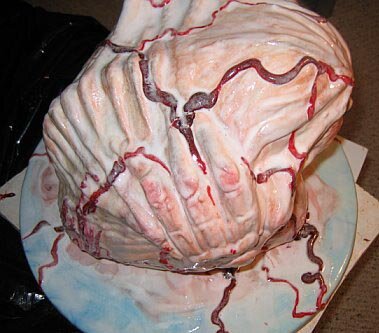
Now I had blood, but was once again faced with a piece that seemed unfinished. One more coat of watery icing did the trick, blending the veins into the cake, melting them just enough to make them seem integrated into the membrane rather than disconnected and sitting on top.

Once again I almost called it done. Then I remembered that I had bought a bag of marshmallows in the hopes of melting them into some sort of fibrous tendrils. This worked really well when I tried it on a practice bowl, but less well when I tried it on the cake because it was still a little wet so the marshmallow wouldn't stick easily. So I only used a little bit, but I still think it added a nice touch and it'll probably be a good technique to have in my arsenal in the future. Easy, too - I just popped the marshmallow in the microwave for fifteen seconds, and then stuck it wherever I wanted it with the tip of a knife. I only used three of the marshmallows, but I have since eaten the entire rest of the bag.
I could probably have gone on poking and prodding at this cake forever until it was just an indistinguishable blob of yuckiness, but fortunately, I ran out of time at this point and had to decide that I was done. I think it has firmly established me as the weirdest member of my MBA class.
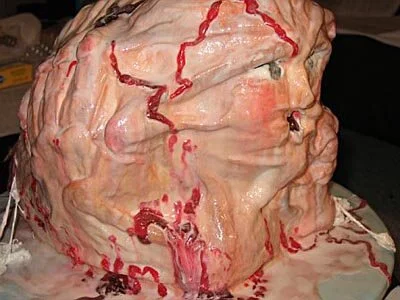
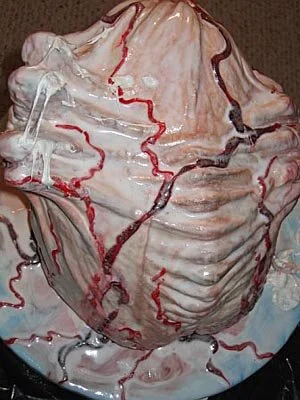

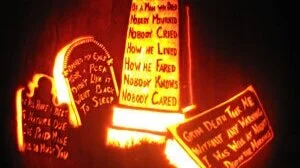
Epitaphs Pumpkin
I didn't come up with the epitaphs. I copied them off the internet. I think I expended too much effort of the legibility of the text and not enough on the atmosphere of the graveyard.
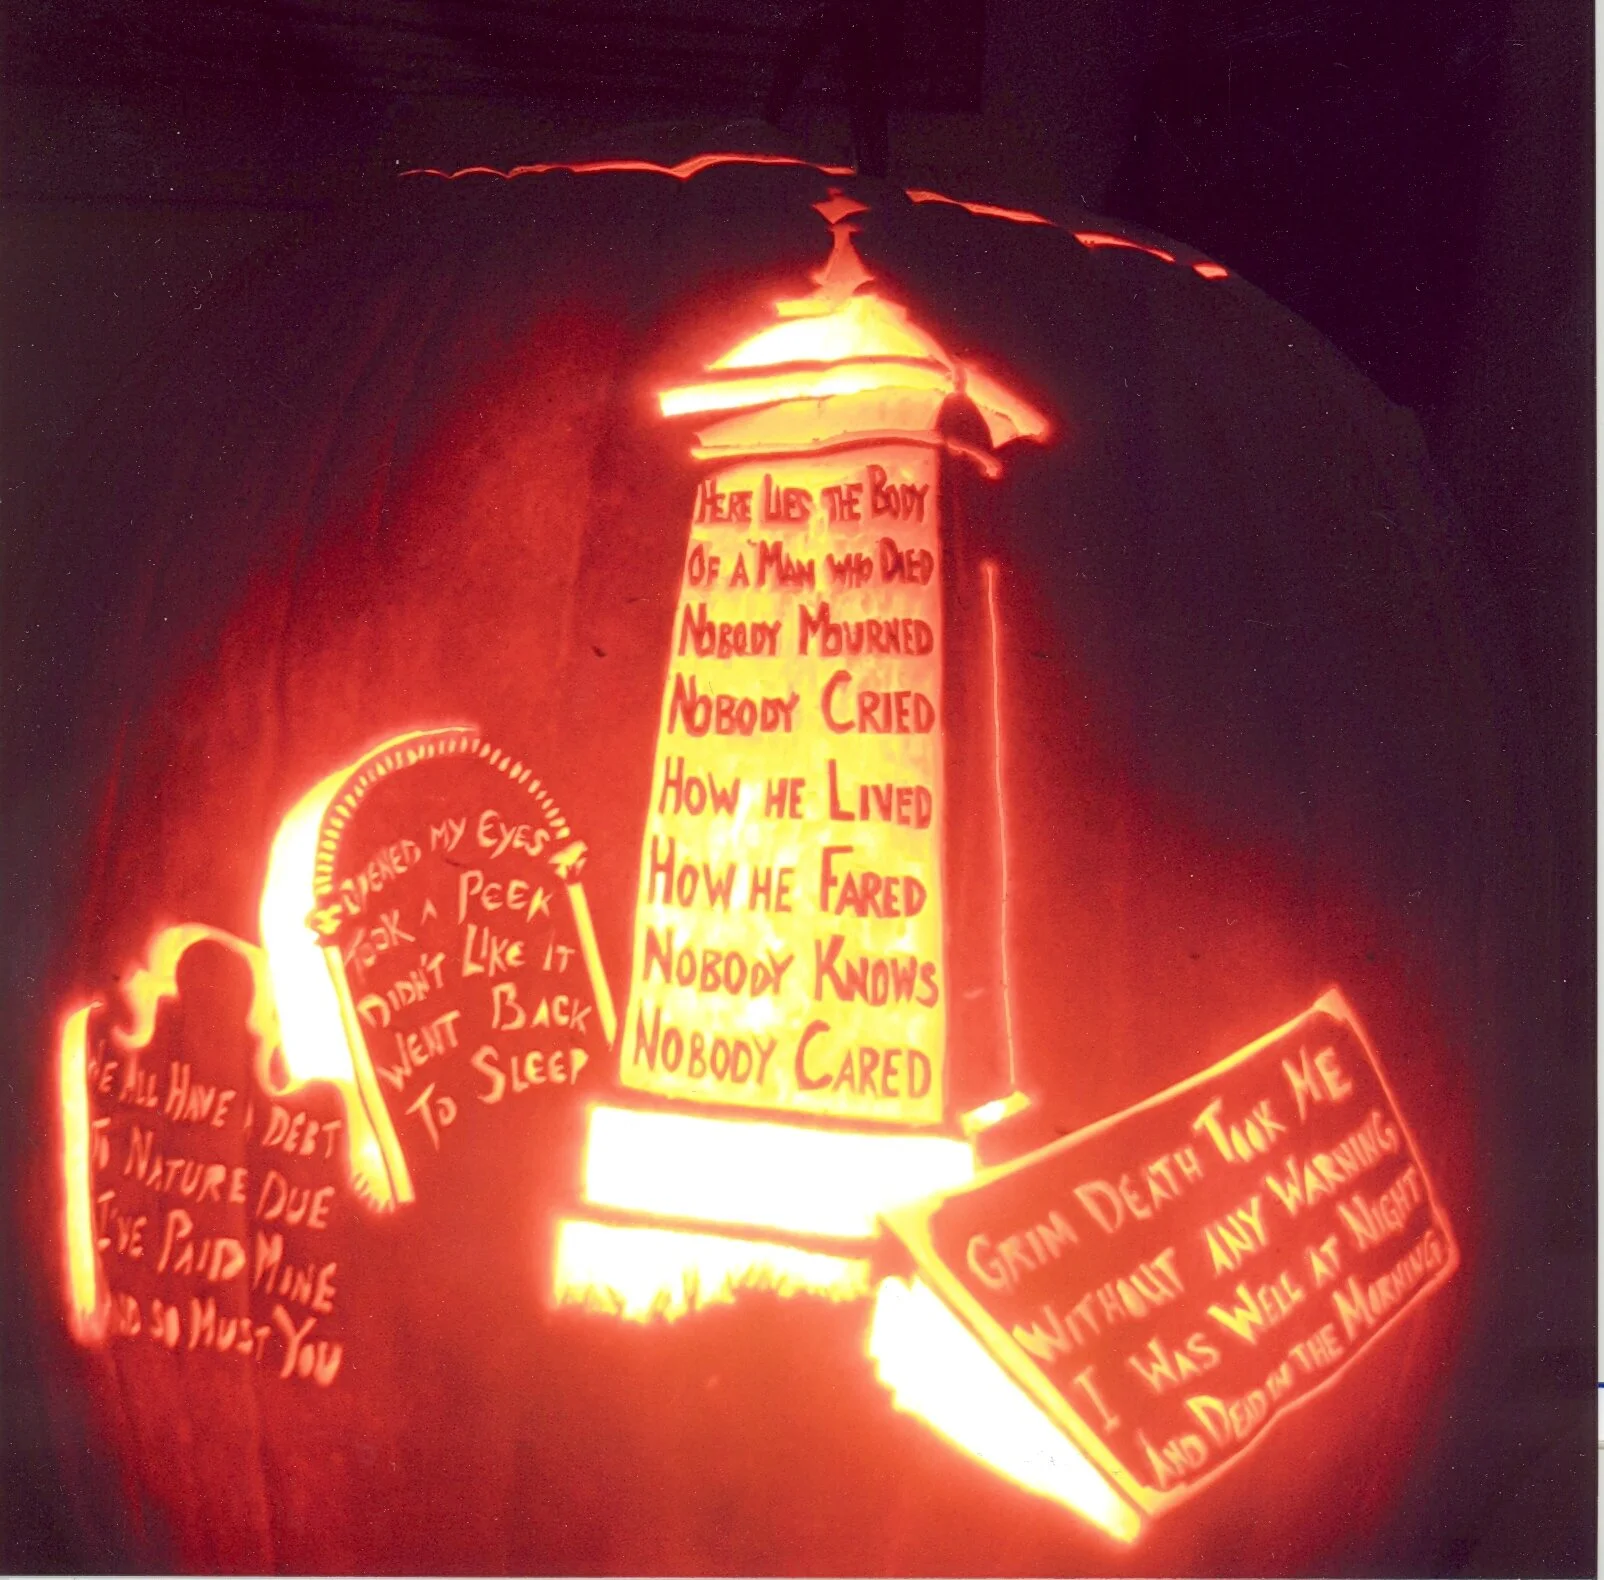
I didn't come up with the epitaphs. I copied them off the internet. I think I expended too much effort of the legibility of the text and not enough on the atmosphere of the graveyard.
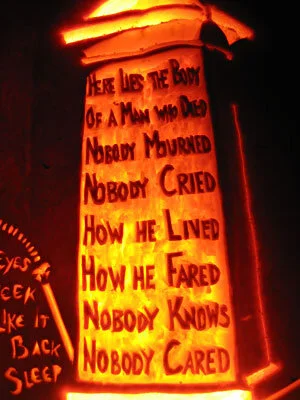

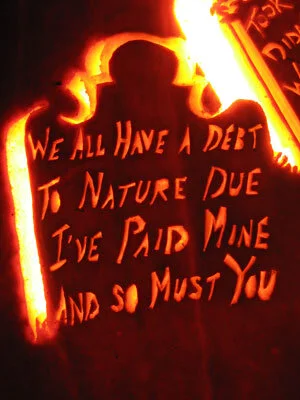


Tombstone Pumpkin
I'm not sure why I even bothered to carve this pumpkin, considering that I had just carved a much better one with four tombstone inscriptions. It might have made sense if I had taken advantage of the more focused subject matter to include more of the detail and texture of the tombstone, but I didn't. Even the font is boring.
I'm not sure why I even bothered to carve this pumpkin, considering that I had just carved a much better one with four tombstone inscriptions. It might have made sense if I had taken advantage of the more focused subject matter to include more of the detail and texture of the tombstone, but I didn't. Even the font is boring.

Sewer Rats Pumpkin
I think I did pretty well with the dramatic perspective on this one, but I wish I had put more effort into creating more realistic rats.
I think I did pretty well with the dramatic perspective on this one, but I wish I had put more effort into creating more realistic rats.